© 2007 cisco systems, inc. all rights reserved.iscw-mod9_l8 1 network security 2 module 7 –...
TRANSCRIPT

© 2007 Cisco Systems, Inc. All rights reserved.ISCW-Mod9_L8 1
Network Security 2
Module 7 – Secure Network Architecture and Management

© 2007 Cisco Systems, Inc. All rights reserved.ISCW-Mod9_L8 2
Lesson 7.1 - Layer 2 Security Best Practices
Module 7 – Secure Network Architecture and Management

© 2007 Cisco Systems, Inc. All rights reserved.ISCW-Mod3_L9 3

© 2007 Cisco Systems, Inc. All rights reserved.ISCW-Mod3_L9 4

© 2007 Cisco Systems, Inc. All rights reserved.ISCW-Mod3_L9 5

© 2007 Cisco Systems, Inc. All rights reserved.ISCW-Mod3_L9 6

© 2007 Cisco Systems, Inc. All rights reserved.ISCW-Mod3_L9 7

© 2007 Cisco Systems, Inc. All rights reserved.ISCW-Mod3_L9 8

© 2007 Cisco Systems, Inc. All rights reserved.ISCW-Mod3_L9 9

© 2007 Cisco Systems, Inc. All rights reserved.ISCW-Mod3_L9 10

© 2007 Cisco Systems, Inc. All rights reserved.ISCW-Mod3_L9 11

© 2007 Cisco Systems, Inc. All rights reserved.ISCW-Mod3_L9 12

© 2007 Cisco Systems, Inc. All rights reserved.ISCW-Mod3_L9 13

© 2007 Cisco Systems, Inc. All rights reserved.ISCW-Mod3_L9 14

© 2007 Cisco Systems, Inc. All rights reserved.ISCW-Mod3_L9 15

© 2007 Cisco Systems, Inc. All rights reserved.ISCW-Mod3_L9 16

© 2007 Cisco Systems, Inc. All rights reserved.ISCW-Mod3_L9 17

© 2007 Cisco Systems, Inc. All rights reserved.ISCW-Mod3_L9 18

© 2007 Cisco Systems, Inc. All rights reserved.ISCW-Mod3_L9 19

© 2007 Cisco Systems, Inc. All rights reserved.ISCW-Mod3_L9 20

© 2007 Cisco Systems, Inc. All rights reserved.ISCW-Mod3_L9 21

© 2007 Cisco Systems, Inc. All rights reserved.ISCW-Mod3_L9 22

© 2007 Cisco Systems, Inc. All rights reserved.ISCW-Mod3_L9 23
Typical Cases
Case # Security Zones Number of User Groups
Number of Switch Devices
1 Single Single Single
2 Single Single Multiple
3 Single Multiple Single
4 Single Multiple Multiple
5 Multiple Single Single
6 Multiple Single Multiple
7 Multiple Multiple Single
8 Multiple Multiple Multiple

© 2007 Cisco Systems, Inc. All rights reserved.ISCW-Mod3_L9 24
Single Security Zone, One User Group, One Physical Switch
or
DMZ
Internet
Vulnerabilities
•MAC spoofing•CAM table overflow

© 2007 Cisco Systems, Inc. All rights reserved.ISCW-Mod3_L9 25
Single Security Zone, One User Group, Multiple Physical Switches
or
DMZ
Internet
Vulnerabilities
•MAC spoofing•CAM table overflow•VLAN hopping•Spanning tree attacks

© 2007 Cisco Systems, Inc. All rights reserved.ISCW-Mod3_L9 34
L2 Security Best Practices
Manage switches as securely as possible.
Use IP-permit lists to restrict access to management ports.
Selectively use SNMPv3 and treat community strings like root passwords.
Always use a dedicated VLAN ID for all trunk ports.
Avoid using VLAN 1.
Set all user ports to non-trunking mode.
Deploy port security where possible for user ports. Alternatively, deploy dynamic port security using DHCP snooping along with Dynamic ARP Inspection (DAI).
Have a plan for the ARP security issues in the network. Consider using DHCP Snooping along with Dynamic ARP Inspection and IP source guard to protect against MAC spoofing and IP spoofing on the network.

© 2007 Cisco Systems, Inc. All rights reserved.ISCW-Mod3_L9 35
L2 Security Best Practices
Enable STP attack mitigation with BPDU Guard and Root Guard.
Use private VLANs where appropriate to further divide Layer 2 networks.
Use Cisco Discovery Protocol (CDP) only where appropriate.
Disable all unused ports and put them in an unused VLAN.
Use Cisco IOS Software ACLs on IP-forwarding devices to protect Layer 2 proxy on private VLANs.
Eliminate native VLANs from 802.1q trunks.
Use VTP passwords to authenticate VTP advertisements.
Consider using Layer 2 port authentication, such as 802.1x, to authenticate clients attempting connectivity to a network.
Procedures for change control and configuration analysis must be in place to ensure that changes result in a secure configuration.

© 2007 Cisco Systems, Inc. All rights reserved.ISCW-Mod3_L9 36
Lesson 7.2 - SDM Security Audit
Module 7 – Secure Network Architecture and Management

© 2007 Cisco Systems, Inc. All rights reserved.ISCW-Mod3_L9 37
Security Audit Overview
Compares router configuration against a predefined checklist of ICSA and TAC approved best practices.
Examples of the audit include, but are not limited to, the following:– Shut down unneeded servers on the router, such as BOOTP, finger,
and tcp/udp small-servers.
– Shut down unneeded services on the router, such as CDP, ip source-route, and ip classless.
– Apply firewall to outside interfaces.
– Disable SNMP or enable with hard-to-guess community strings.
– Shut down unused interfaces, no ip proxy-arp.
– Force passwords for console and vty lines.
– Force an enable secret password.
– Enforce the use of access lists.

© 2007 Cisco Systems, Inc. All rights reserved.ISCW-Mod3_L9 38
Security Audit Main Window

© 2007 Cisco Systems, Inc. All rights reserved.ISCW-Mod3_L9 39
Monitor Mode
Overview
InterfaceStats
FirewallStats
VPNStats

© 2007 Cisco Systems, Inc. All rights reserved.ISCW-Mod3_L9 40
Lesson 7.3 – Router Management Center
Module 7 – Secure Network Architecture and Management

© 2007 Cisco Systems, Inc. All rights reserved.ISCW-Mod3_L9 41
The Router Management Center (MC)

© 2007 Cisco Systems, Inc. All rights reserved.ISCW-Mod3_L9 42
What is the Router MC?

© 2007 Cisco Systems, Inc. All rights reserved.ISCW-Mod3_L9 43
Router MC Components

© 2007 Cisco Systems, Inc. All rights reserved.ISCW-Mod3_L9 44
Configure Routers for SSH

© 2007 Cisco Systems, Inc. All rights reserved.ISCW-Mod3_L9 45
Using the Router MC

© 2007 Cisco Systems, Inc. All rights reserved.ISCW-Mod3_L9 46
The Router MC User Interface

© 2007 Cisco Systems, Inc. All rights reserved.ISCW-Mod3_L9 47
Router MC WorkFlow

© 2007 Cisco Systems, Inc. All rights reserved.ISCW-Mod3_L9 48
Cisco Security Manager

© 2007 Cisco Systems, Inc. All rights reserved.ISCW-Mod3_L9 49
Lesson 7.4 – Simple Network Management Protocol (SNMP)
Module 7 – Secure Network Architecture and Management

© 2007 Cisco Systems, Inc. All rights reserved.ISCW-Mod3_L9 50
SNMP Introduction
Application-layer protocol that facilitates the exchange of management information between network devices
An SNMP managed network consists of three key components:
• Managed Devices
• Agents
• Network management systems (NMSs)

© 2007 Cisco Systems, Inc. All rights reserved.ISCW-Mod3_L9 51
SNMP Agent

© 2007 Cisco Systems, Inc. All rights reserved.ISCW-Mod3_L9 52
SNMP Management Entity

© 2007 Cisco Systems, Inc. All rights reserved.ISCW-Mod3_L9 53
SNMP Device Management

© 2007 Cisco Systems, Inc. All rights reserved.ISCW-Mod3_L9 54
SNMP Versions
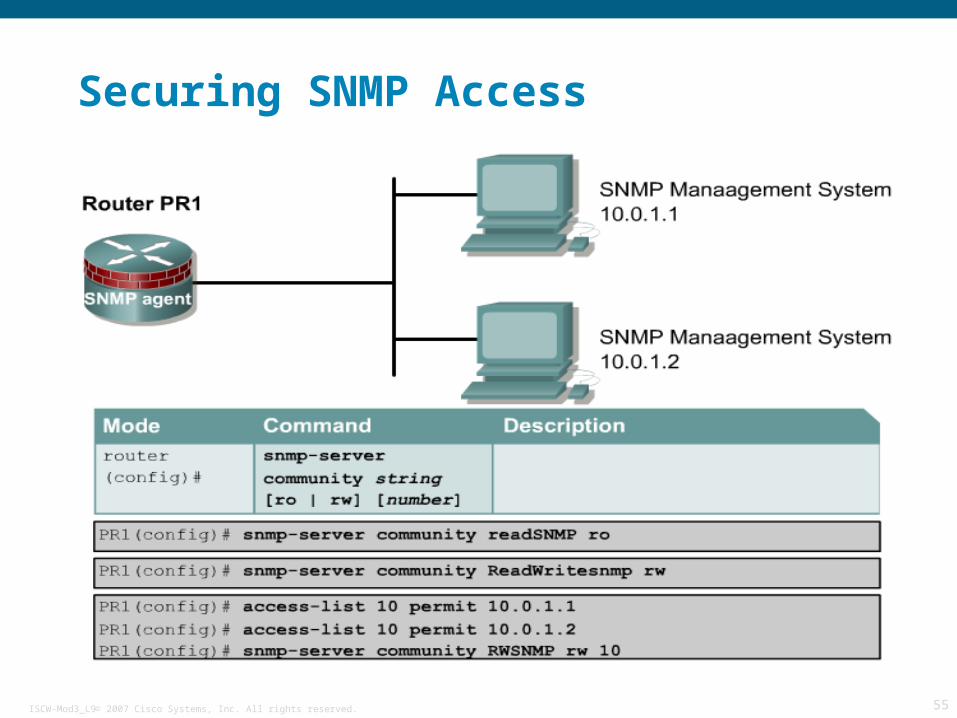
© 2007 Cisco Systems, Inc. All rights reserved.ISCW-Mod3_L9 55
Securing SNMP Access

© 2007 Cisco Systems, Inc. All rights reserved.ISCW-Mod3_L9 56
SNMPv3 Message Format

© 2007 Cisco Systems, Inc. All rights reserved.ISCW-Mod3_L9 57
SNMPv3
SNMPv3 provides secure access to devices by a combination of authenticating and encrypting packets over the network.
The security features provided in SNMPv3 are:
–Message integrity
–Authentication
–Encryption
SNMPv3 provides for both security models and security levels.
–A security model is an authentication strategy that is set up for a user and the group in which the user resides.
–A security level is the permitted level of security within a security model.

© 2007 Cisco Systems, Inc. All rights reserved.ISCW-Mod3_L9 58
SNMP Security Models

© 2007 Cisco Systems, Inc. All rights reserved.ISCW-Mod3_L9 59
SNMP NMS

© 2007 Cisco Systems, Inc. All rights reserved.ISCW-Mod3_L9 60
SNMP Trap Watcher

© 2007 Cisco Systems, Inc. All rights reserved.ISCW-Mod3_L9 61
Configure SNMP Engine
The first task in configuring SNMPv3 is to configure the SNMP engine ID (a character string of up to 24 characters).
Unambiguous identifier of an SNMP engine in the administrative domain.
snmp-server engineID local engineID-string
If not specifically configured with this command, the SNMP entity automatically allocates a value.
After the SNMP engineID is configured, the order of an SNMPv3 configuration task list is groups, users, optional view(s), and optionally the host(s) where the notifications will be sent

© 2007 Cisco Systems, Inc. All rights reserved.ISCW-Mod3_L9 62
SNMP Groups
snmp-server group group-name {v1 | v2c | v3 {auth | noauth | priv}} [readread-view] [write write-view] [notify notify-view] [access access-list]
Configures an SNMP group that maps SNMP users to three SNMP views—read access, write access, and notifications.

© 2007 Cisco Systems, Inc. All rights reserved.ISCW-Mod3_L9 63
SNMP User
snmp-server user username group-name [remote host [udp-port port]] {v1 |v2c | v3 [encrypted] [auth {md5 | sha} auth-password]} [access access-list] [priv {des | 3des | aes {128 | 192 | 256}} privpassword]
Configures a new user to an SNMP group.
This user can use SNMPv1, SNMPv2c, or SNMPv3.
If SNMPv3 is selected, the password, which can optionally be encrypted, has to be specified for the MD5 or SHA authentication.
Furthermore, SNMPv3 requires that you specify the privacy algorithm to be used (DES, 3-DES, AES, AES-192, or AES-256) and the password to be associated with this privacy protocol.

© 2007 Cisco Systems, Inc. All rights reserved.ISCW-Mod3_L9 64
SNMP Host

© 2007 Cisco Systems, Inc. All rights reserved.ISCW-Mod3_L9 65
AuthNoPriv SNMP Example
The SNMP IOS configuration with user authentication and no encryption is straightforward:
router(config)# snmp-server engineID local 1234567890 router(config)# snmp-server group benoitgroup v3 auth router(config)# snmp-server user benoit benoitgroup v3 auth md5 benoitpassword router(config)# exit
In this example, the user benoit belongs to benoitgroup, which is defined with SNMPv3 authentication.
The user benoit is specified with the password benoitpassword, using the MD5 authentication algorithm.

© 2007 Cisco Systems, Inc. All rights reserved.ISCW-Mod3_L9 66
Displaying information for SNMP
The running configuration does not show the SNMP user-related command:
This behavior is explained in RFC 3414, which describes SNMPv3: "A user's password or non-localized key MUST NOT be stored on a managed device/node.“
To display info about SNMP in config:
–show snmp user
–show snmp group

© 2007 Cisco Systems, Inc. All rights reserved.ISCW-Mod3_L9 67
SNMP and the PIX Security Appliance

© 2007 Cisco Systems, Inc. All rights reserved.ISCW-Mod3_L9 68
SNMP and the PIX Security Appliance
Step 1 - Identify the IP address of the NMS that can connect to the PIX
–snmp-server host interface_name ip_address [trap | poll] [community text] [version 1 | 2c] [udp-port port]
Step 2 - Specify the community string –snmp-server community key
Step 3 - (Optional) Set the SNMP server location or contact information
–snmp-server {contact | location} text
Step 4 - Enable the PIX Security Appliance to send traps to the NMS
–snmp-server enable [traps [all | feature [trap1] [trap2]] [...]]

© 2007 Cisco Systems, Inc. All rights reserved.ISCW-Mod3_L9 69
SNMP and the PIX Security Appliance
Step 5 - Enable system messages to be sent as traps to the NMS
–logging history level
–snmp-server enable traps
Step 6 - Enable logging, so system messages are generated and can then be sent to an NMS
–logging on

© 2007 Cisco Systems, Inc. All rights reserved.ISCW-Mod3_L9 70