- · pdf file advanced java (web application development) j2ee specifically given for...
TRANSCRIPT


www.JavaEra.com
Advanced Java (Web Application Development) J2EE specifically given for Business Applications, J2EE is a Collection of technologies used to build enterprise applications. Enterprise Application: Any computer application that is used to automate the business process is known as enterprise application. Application: is a collection of programs to automate the business
� Business Applications are of two types 1. Desktop Applications: Desktop Applications are stand alone (or)
non internet based applications. These applications are used only by the employees of that business organization (Enterprise).
2. Web based applications: Web based Applications are internet based
applications, server side programming. Any Business Application that can be accessible from web is known as a web application.
It offers the following benefits.
1. 24 * 7 business enabling. 2. Optimized automation (more turn over, more business).
ARCHITECTURE OF ENTERPRISE APPLICATION IMPLEMENTED IN JAVA Every enterprise application comprises of 4 types.
1. Client Tier. 2. Presentation Tier. 3. Business Tier. 4. Data Tier.
Tier: A logical partition of the related components of an application (System) is known as tier. Or a deletion of an application is called tier.

www.JavaEra.com
Here we can develop each tier separately without having any
communication between them. For example we can develop business tier without having the support
of presentation tier. Tiers may be in one computer or a tier may separately contain in each
machine. Client Tier (Layer): End user interacts with the application through the client interface (Client Tier/Browser soft ware / cell phone).
� This tier offers user interface to the end users i.e. any internet based web application is used by the end user with the help of client-tier. Here browser is nothing but an application running in the client-tier.
� In the client tier HTML and java script are executed. But in the
client machine no code is stored.
� Client tier is the mediator between the end user and presentation
tier. It takes the user requests and submits them to the presentation tier. It also receives the output from the presentation tier and gives to the end user.
Presentation Tier: presenting the output to the user (client) in presentation tier you need to write java programs (JSP, SERVLETS) to execute it and present the output to the end user. In Enterprise Application (web enabled enterprise application) this tier presents the results (required information) to the client-tier. JSPS and SERVLETS are the technologies used in this tier. These technologies are used to write server side programs that contact the data tier or business tier to produce / get dynamic data. Business Tier: In this tier enterprise application’s business rules are implemented EJB Technology is used here (for complex applications). Data Tier: It is the data base server process any company’s data is stored mostly in the RDBMS.

www.JavaEra.com
EX:
� Oracle � Sybase server � SQL server
Note: SERVLETS, EJB’S, JSP’S make use of JDBC Technology to interact with the data tier. There fore JDBC is known as the service technology. 1.1Architecture of Enterprise Application
Architectural Styles of Distributed Applications
1. 2_tier Architecture 2. 3_tier Architecture 3. n_tier Architecture
1.1.1Two_Tier Architecture: - In traditional 2_tier architecture the processing load is given to the client PC While the server simply acts as a traffic controller between the application and the data.
Client Tier
Presentation Tier Servlets,jsp
Business Tier EJB
Data Tier Oracle,sqlservr,Sybase server

www.JavaEra.com
Here a system (application) is divided in to two tiers.
1. Client Tier: - It is responsible for maintaining the business logic (BL), Persistent Logic, Presentation Logic.
2. Server Tier: - It is responsible for maintaining data. Presentation Logic: set of operations which are used to set our requirement. (Code which is used to presenting the view) Presentation Logic is used to prepare a frame used to take input from the clients present the output. View: it is responsible to take the requests from the client. and presenting the response to the clients. Business Logic: set of operations to meet functional requirements of a business system (application). Persistent Logic: set of operations are used to persist the data. (Using JDBC we can persist the data). Example of two tiered application
Draw backs:
• client tier complexity is high • No proper division of work
AWT RDBMS
client DBserver
PL/per L/B L Data
client server

www.JavaEra.com
• Heavy weight application (memory , processing time, and
resource requirement increases) to execute Presentation Logic, Persistent Logic ,Business Logic
Ex: But Mobile System doesn’t contain persistence logic and Business Logic at client side. • Makes the client application a heavy weight application • We need additional resources since the resources required for
presentation, business, and persistence logic has to be accommodated in to the client side.
• We use AWT, SWINGS concepts to develop an application we can use it in any O.S (sun salaries, UNIX, Linux, window). Here if each client is in a separate (different) O.S we need separate JVM for every O.S so it is costlier.
• Type-2 drivers:- these drivers translates the JDBC API calls to vender specific API’S the Data Base will process the requests and send results back through the API which will in turn forward them back to the JDBC Driver. Nearly we have 300 drivers provided by different venders. This translation from one API to another API will be held in client side (in JVM) burden will become high.
• Increase the cost of the application when we target application to be used with the different JVM for each O.S)]
• The Business Logic can’t be reused means B.L can’t be reused by different types of clients.
Note: Go for Two-Tier Architecture if the systems are fixed. Root cause:- Business Logic and Persistent Logic is embedded with presentation Logic. To solve the above problems we want to separate B.L and persistence logic from the presentation logic and as a result of the requirement 3-tier Architecture is designed.
Presentation Logic
RDBMS
client DBserver
Business Logic Persistence Logic
Middle server

www.JavaEra.com
1.1.2.Three Tier Architecture Is Divided In To Two Types
• Traditional Three Tier Architecture • Web Based Architecture
Traditional Three Tier Architecture:
If we take employee Management system as an example input the
total emp details through the client side when we do this the middle ware is (ready) intelligent to take the request and if required it connects to the D.B get the data required. And process the request and sends a flag (it may be a Boolean or an int) to the client side.
Here the client (developer) has to implement the partial business logic to prepare the presentation content. Draw Backs:
• Complexity is increased compared with 2-tired architecture because in 2-tier architecture there is no network communication so there is no need for the network logic in 2-tier architecture.
• It is mostly costlier than 2-tier architecture • In traditional architecture partial Business Logic will be
implemented in client side.
AWT D.B
client DBserver
RMI/Socket
Middle server
Takes the request from remote clients connects to DB if necessary and process the request and then sends a flag to the client

www.JavaEra.com
• Separate client s/w we need to install compared with web based
Architecture(there the client is browser no need to install any s/w)
Network Logic: it is a logic which is used to communicate with middle ware server to understand the client requests. Web Based Architecture: To reach out the services to number of clients we need web based Architecture.
In this case middle ware server takes additional responsibilities compare to traditional 3-tier architecture. Middle Tier (Middle Ware Server): Middle Tier has the additional responsibility to prepare presentation content that can explain generic web client about what to present and how to present
Browser RDBMS
client DBserver
Business Logic Persistence Logic
Middle server
It contains business logic and presentation logic (used to prepare the presentation content) ready made

www.JavaEra.com
Here one client (browser) is able to communicate with more than one server there is no need to install separate soft ware for separate servers. It is a generic client it can communicate with any other app server. In general Two possible out comes can occur from server to clients
• Correct • Wrong (Exception)
But it is not in all the cases What we can do
• if the number of outcomes increases • if the same application(server) has to connect to the different
databases • if different type of requests are sent to communicate with
different Data Base servers The middle ware must be intelligent to handle above three problems We can do it by separating persistent logic, Business Logic, Presentation Logic etc… in server (middle ware server). 1.1.3.N-Tier Architecture: Here in N-tier architecture the middle ware server is divided into multiple divisions (tiers). In this case as the number of types of clients and the back-end data store types increases complexity of middle ware application also increases. And to simplify this we are recommended to divide this middle ware into multiple tiers which provides the following benefits
• Reusability: reusability of Persistent Logic, Presentation Logic, Business Logic and the cost of development will be reduced.
• Proper Responsibility division that can improve the productivity of the application.
Browser
Yahoo
Sun
IBM
Rediff

www.JavaEra.com
• Future extension to the system can be easily added.
In the given above example we divide our middle tier into 3 divisions (components) Http � to receive http request Presentation Logic �to present the content to the web clients Business Logic � to implement the business Logic Persistent Logic �to persist the data When we develop a system following n-tier architecture model then first of all we need to decide how many number of tiers our system should be divided into and what should be the responsibility of each of these tiers.
2.RMI (Remote Method Invocation)
The Java Remote Method Invocation (RMI) system allows an object running in one Java Virtual Machine (VM) to invoke methods on an object
Browser
Mobile
Awt/vb
Http Per Logic
B.L
Pre Logic
client Middle server Data base
1
2
3

www.JavaEra.com
running in another Java VM. RMI provides for remote communication between programs written in the Java programming language. An Overview of RMI Applications
RMI applications are often comprised of two separate programs: a server and a client. A typical server application creates some remote objects, makes references to them accessible, and waits for clients to invoke methods on these remote objects. A typical client application gets a remote reference to one or more remote objects in the server and then invokes methods on them. RMI provides the mechanism by which the server and the client communicate and pass information back and forth. Such an application is sometimes referred to as a distributed object application.
Distributed object applications need to
• Locate remote objects: Applications can use one of two mechanisms to obtain references to remote objects. An application can register its remote objects with Rim’s simple naming facility, the rmiregistry, or the application can pass and return remote object references as part of its normal operation.
• Communicate with remote objects: Details of communication between remote objects are handled by RMI; to the programmer, remote communication looks like a standard Java method invocation.
• Load class byte codes for objects that are passed around: Because RMI allows a caller to pass objects to remote objects, RMI provides the necessary mechanisms for loading an object's code, as well as for transmitting its data.
Advantages of Dynamic Code Loading
One of the central and unique features of RMI is its ability to download the bytecodes (or simply code) of an object's class if the class is not defined in the receiver's virtual machine. The types and the behavior of an object, previously available only in a single virtual machine, can be transmitted to another, possibly remote, virtual machine. RMI passes objects by their true type, so the behavior of those objects is not changed when they are sent to another virtual machine. This allows new types to be introduced into a

www.JavaEra.com
remote virtual machine, thus extending the behavior of an application dynamically. The compute engine example in this chapter uses RMI's capability to introduce new behavior to a distributed program.
Remote Interfaces, Objects, and Methods
Like any other application, a distributed application built using Java RMI is made up of interfaces and classes. The interfaces define methods, and the classes implement the methods defined in the interfaces and, perhaps, define additional methods as well. In a distributed application some of the implementations are assumed to reside in different virtual machines. Objects that have methods that can be called across virtual machines are remote objects.
An object becomes remote by implementing a remote interface, which has the following characteristics.
• A remote interface extends the interface java.rmi.Remote. • Each method of the interface declares java.rmi.RemoteException in its
throws clause, in addition to any application-specific exceptions.
RMI treats a remote object differently from a non remote object when the object is passed from one virtual machine to another. Rather than making a copy of the implementation object in the receiving virtual machine, RMI passes a remote stub for a remote object. The stub acts as the local representative, or proxy, for the remote object and basically is, to the caller, the remote reference. The caller invokes a method on the local stub, which is responsible for carrying out the method call on the remote object.
A stub for a remote object implements the same set of remote interfaces that the remote object implements. This allows a stub to be cast to any of the interfaces that the remote object implements. However, this also means that only those methods defined in a remote interface are available to be called in the receiving virtual machine.
Creating Distributed Applications Using RMI
When you use RMI to develop a distributed application, you follow these general steps.

www.JavaEra.com
1. Design and implement the components of your distributed application. 2. Compile sources and generate stubs. 3. Make classes network accessible. 4. Start the application.
Design and Implement the Application Components
First, decide on your application architecture and determine which components are local objects and which ones should be remotely accessible. This step includes:
• Defining the remote interfaces: A remote interface specifies the methods that can be invoked remotely by a client. Clients program to remote interfaces, not to the implementation classes of those interfaces. Part of the design of such interfaces is the determination of any local objects that will be used as parameters and return values for these methods; if any of these interfaces or classes do not yet exist, you need to define them as well.
import java.rmi.*; public interface RemoteInf extends Remote { String getMessage () throwsRemoteException; }
By extending the interface java.rmi.Remote, this interface marks itself as one whose methods can be called from any virtual machine. Any object that implements this interface becomes a remote object.
As a member of a remote interface, the getMessage () method is a remote method. Therefore the method must be defined as being capable of throwing a java.rmi.RemoteException. This exception is thrown by the RMI system during a remote method call to indicate that either a communication failure or a protocol error has occurred. A Remote Exception is a checked exception, so any code making a call to a remote method needs to handle this exception by either catching it or declaring it in its throws clause
• Implementing the remote objects: Remote objects must implement one or more remote interfaces. The remote object class may include implementations of other interfaces (either local or remote) and other

www.JavaEra.com
methods (which are available only locally). If any local classes are to be used as parameters or return values to any of these methods, they must be implemented as well.
In general the implementation class of a remote interface should at least
• Declare the remote interfaces being implemented • Define the constructor for the remote object • Provide an implementation for each remote method in the remote
interfaces
The server needs to create and to install the remote objects. This setup procedure can be encapsulated in a main method in the remote object implementation class itself, or it can be included in another class entirely. The setup procedure should
• Create and install a security manager • Create one or more instances of a remote object • Register at least one of the remote objects with the RMI remote object
registry
The RemoteObj class implements the remote interface RemoteInf and also includes the main method to bind the remote objects.
import java.rmi.*; import java.rmi.server.*; public class RemoteObj extends UnicastRemoteObject implements RemoteInf {
public RemoteObj()throws RemoteException { }
public String getMessage()throwsRemoteException {
Return "Hello "+new java.util.Date(); } public static void main(String args[])throws Exception { if (System.getSecurityManager() == null)

www.JavaEra.com
{System.setSecurityManager(newRMISecurityManager()); } RemoteInf ro=null; ro=new RemoteObj();
String name = "msg"; Naming. rebind (name, ro); System.out.println ("Object is ready......."+new java.util.Date ()); }
}
Declare the Remote Interfaces Being Implemented
The implementation class for the compute engine is declared as Public class RemoteObj extends UnicastRemoteObject Implements RemoteInf This declaration states that the class implements the RemoteInf remote interface (and therefore defines a remote object)and extends the class java.rmi.server.UnicastRemoteObject.
UnicastRemoteObject is a convenience class, defined in the RMI public API that can be used as a super class for remote object implementations. The super class UnicastRemoteObject supplies implementations for a number of java.lang.Object methods (equals, hashCode, toString) so that they are defined appropriately for remote objects. UnicastRemoteObject also includes constructors and static methods used to export a remote object, that is, make the remote object available to receive incoming calls from clients.
By extending UnicastRemoteObject, the RemoteObj class can be used to create a simple remote object that supports unicast (point-to-point) remote communication and that uses RMI's default sockets-based transport for communication.
Define the Constructor

www.JavaEra.com
The RemoteObj class has a single constructor that takes no arguments. The code for the constructor is public RemoteObj() throws RemoteException { super(); } This constructor simply calls the super class constructor, which is the no-argument constructor of the UnicastRemoteObject class. Although the super class constructor gets called even if omitted from the RemoteObj constructor, we include it for clarity.
During construction, a UnicastRemoteObject is exported, meaning that it is available to accept incoming requests by listening for incoming calls from clients.
The no-argument constructor for the super class, UnicastRemoteObject, declares the exception RemoteException in its throws clause, so the RemoteObj constructor must also declare that it can throw RemoteException. A RemoteException can occur during construction if the attempt to export the object fails--due to, for example, communication resources being unavailable or the appropriate stub class not being found.
Provide Implementations for Each Remote Method
The class for a remote object provides implementations for each of the remote methods specified in the remote interfaces. The Compute interface contains a single remote method, getMessage (), which is implemented as follows: public String getMessage() { Return "Hello "+new java.util.Date (); }
This method implements the protocol between the RemoteObj and its clients. Clients can call the RemoteObj’s getMessage (). The RemoteObj executes the getMessage() and returns the result to the caller.
Implement the Server's main Method
The most involved method of the RemoteObj implementation is the main method. The main method is used to start the RemoteObj and therefore needs to do the necessary initialization and housekeeping to prepare the

www.JavaEra.com
server for accepting calls from clients. This method is not a remote method, which means that it cannot be called from a different virtual machine. Since the main method is declared static, the method is not associated with an object at all but rather with the class RemoteObj.
Create and Install a Security Manager
The first thing that the main method does is to create and to install a security manager, which protects access to system resources from untrusted downloaded code running within the virtual machine. The security manager determines whether downloaded code has access to the local file system or can perform any other privileged operations.
All programs using RMI must install a security manager, or RMI will not download classes (other than from the local class path) for objects received as parameters, return values, or exceptions in remote method calls. This restriction ensures that the operations performed by downloaded code go through a set of security checks.
The ComputeEngine uses a security manager supplied as part of the RMI system, the RMISecurityManager. This security manager enforces a similar security policy as the typical security manager for applets; that is to say, it is very conservative as to what access it allows. An RMI application could define and use another SecurityManager class that gave more liberal access to system resources or, in JDK 1.2, use a policy file that grants more permissions.
Here's the code that creates and installs the security manager:
if (System.getSecurityManager() == null) { System.setSecurityManager (new RMISecurityManager ()); }
Make the Remote Object Available to Clients

www.JavaEra.com
Next, the main method creates an instance of the RemoteObj. This is done with the statement RemoteInf ro = new RemoteObj();
As mentioned, this constructor calls the UnicastRemoteObject super class constructor, which in turn exports the newly created object to the RMI runtime. Once the export step is complete, the RemoteObj remote object is ready to accept incoming calls from clients on an anonymous port, one chosen by RMI or the underlying operating system. Note that the type of the variable ro is RemoteInf, not RemoteObj. This declaration emphasizes that the interface available to clients is the RemoteInf interface and its methods, not the RemoteObj class and its methods.
Before a caller can invoke a method on a remote object, that caller must first obtain a reference to the remote object. This can be done in the same way that any other object reference is obtained in a program, such as getting it as part of the return value of a method or as part of a data structure that contains such a reference.
The system provides a particular remote object, the RMI registry, for finding references to remote objects. The RMI registry is a simple remote object name service that allows remote clients to get a reference to a remote object by name. The registry is typically used only to locate the first remote object an RMI client needs to use. That first remote object then provides support for finding other objects.
The java.rmi.Naming interface is used as a front-end API for binding, or registering, and looking up remote objects in the registry. Once a remote object is registered with the RMI registry on the local host, callers on any host can look up the remote object by name, obtain its reference, and then invoke remote methods on the object..
The RemoteObj class creates a name for the object with the statement
String name = "msg";
name, that identifies the remote object in the registry. The code then needs to add the name to the RMI registry running on the server. This is done later (within the try block) with the statement
Naming. rebind(name, ro);

www.JavaEra.com
Calling the rebind method makes a remote call to the RMI registry on the local host. This call can result in a RemoteException being generated, so the exception needs to be handled. The RemoteObj class handles the exception within the try/catch block. If the exception is not handled in this way, RemoteException would have to be added to the throws clause (currently nonexistent) of the main method.
Note the following about the arguments to the call to Naming.rebind.
• The first parameter is a URL-formatted java.lang.String representing the name of the remote object.
• The RMI runtime substitutes a reference to the stub for the remote object reference specified by the argument. Remote implementation objects, such as instances of RemoteObj, never leave the VM where they are created, so when a client performs a lookup in a server's remote object registry, a reference to the stub is returned. As discussed earlier, remote objects in such cases are passed by reference rather than by value.
• Note that for security reasons, an application can bind, unbind, or rebind remote object references only with a registry running on the same host. This restriction prevents a remote client from removing or overwriting any of the entries in a server's registry. A lookup, however, can be requested from any host, local or remote.
Once the server has registered with the local RMI registry, it prints out a message indicating that it's ready to start handling calls and then the main method exits. It is not necessary to have a thread wait to keep the server alive. As long as there is a reference to the RemoteObj object in another virtual machine, local or remote, the RemoteObj object will not be shut down, or garbage collected. Because the program binds a reference to the RemoteObj in the registry, it is reachable from a remote client, the registry itself! The RMI system takes care of keeping the RemoteObj's process up. The RemoteObj is available to accept calls and won't be reclaimed until its binding is removed from the registry,
The final piece of code in the RemoteObj.main method deals with handling any exception that might arise. The only exception that could be thrown in the code is a RemoteException, thrown either by the constructor of the RemoteObj class or by the call to the RMI registry to bind the object to the name msg

www.JavaEra.com
• Implementing the clients: Clients that use remote objects can be implemented at any time after the remote interfaces are defined, including after the remote objects has been deployed.
RemoteClient.java
import java.rmi.*;
import java.net.*;
public class RemoteClient
{
public static void main(String args[])throws Exception
{
if (System.getSecurityManager() == null)
{
System.setSecurityManager(new RMISecurityManager());
}
RemoteInf ri=null;
ri=(RemoteInf)Naming.lookup("rmi://localhost:1099/msg");
System.out.println(ri.getMessage());
}
}

www.JavaEra.com
Here we are obtaining the RemoteObj reference by calling lookup method of the Naming class
• Ex: RemoteInf ri=null; • ri=(RemoteInf)Naming.lookup("rmi://localhost:1099/msg");
lookup method takes a String argument i.e.. rmi means rmi protocol to connect to the rmiregistry localhost means system where the rmiregistry existed 1099 is the default port number of the rmiregistry and msg is the binded object name
Compile Sources and Generate Stubs
This is a two-step process. In the first step you use the javac compiler to compile the source files, which contain the implementation of the remote interfaces and implementations, the server classes, and the client classes. In the second step you use the rmic compiler to create stubs for the remote objects. RMI uses a remote object's stub class as a proxy in clients so that clients can communicate with a particular remote object. Compile the source by giving below statement Javac *.java And generate stub class by compiling the class which implements UnicastRemoteObject Rmic RemoteObj The above statement creates a .class file called RemoteObj_Stub.class Now we can run the program steps to run the java application: Note: Before going to run RMI application you need to create .java.policy file and give all permission Creation of .java.policy file needs to follow the below steps
• Type policy tool command in command prompt It will displays a policy tool dialog box.

www.JavaEra.com
• Then click AddPolicyEntry button it will displays a Policy Entry
dialog Box • Then click the Add Permission button it will displays a permission
dialog box in that choose all permission and then click OK button then Done button and save it with the name .java.policy.
Then you can run your application by following below steps
1. start the rmiregistry by giving below command
start rmiregistry 2. run the RemoteObj class by giving below command
start java RemoteObj 3. run the client program by giving below command
java RemoteClient.
3. Working with Databases (JDBC)
Java has an API for working with databases, and this technology is known as JDBC. JDBC provides the developer with tools that allow clients to connect to databases, and send commands to the database. These commands are written in the Structured Query Language. However, JDBC can be used with any kind of data base. That is because JDBC abstracts common database functions into a set of common classes and methods. Database-specific code is contained in a code library, commonly called a driver library. If there is a driver library for a database, you can use the JDBC API to send commands to the database and extract data from the database.
Connect to Database:
The first step in being able to work with a database is to connect to that database. It’s a process that’s analogous to a web browser making a connection to a web server. The browser makes a connection to a server, sends a specially formatted message to the server, and receives a response

www.JavaEra.com
back from the server. When working with a database, your code will use the JDBC API to get a connection to a database server, send a specially formatted message to the server, and receive a response back from the server. The JDBC API is an abstraction, and it uses a database-specific code library to communicate with a particular database. When making a database connection, your code does not need to open any sockets, or use any classes of the java.net package to make a connection to the database. All the connection details are handled primarily by a class in the database-specific library. This class is known as driver. Your code simply tells a class known as the DriverManager that it needs a connection, and the DriverManager works with the driver to create a connection to the database that your code can use.
3.1Drivers:
JDBC provides a database-neutral set of classes and interfaces that can be used by your Java class. The database-specific code is included in a driver library that is developed by the database vendor or third parties. The primary advantage of using a driver library is that your code can use the same JDBC API to talk to many different databases simply by changing the library used by your code. Also, by using a driver library, your code is simpler to develop, debug, and maintain, since the lower-level networking details are handled by the driver.
Driver Types:
The JDBC specification identifies four types of drivers that can be used to communicate with data bases.
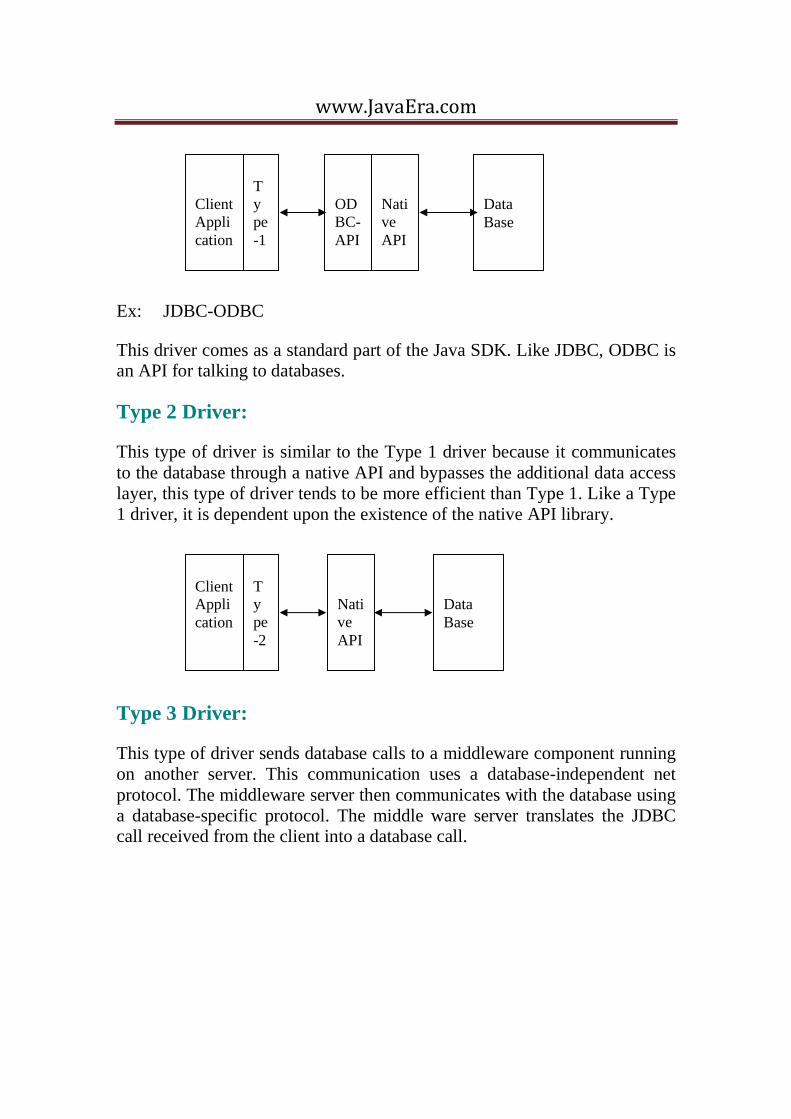
Type 1 Driver:
This driver provides a mapping between JDBC and some other data access API. The other data access API then calls a native API library to complete the communication to the database. Since native APIs are platform specific, this type of driver is generally less portable.
www.JavaEra.com
Ex: JDBC-ODBC
This driver comes as a standard part of the Java SDK. Like JDBC, ODBC is an API for talking to databases.
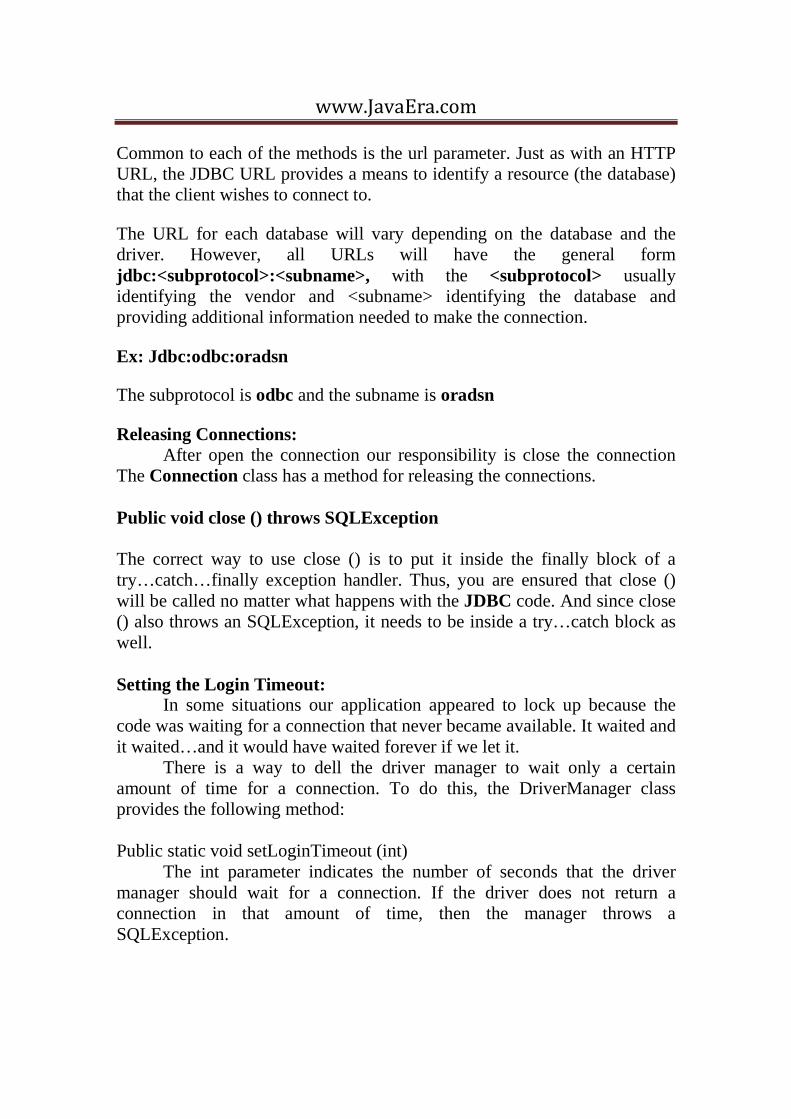
Type 2 Driver:
This type of driver is similar to the Type 1 driver because it communicates to the database through a native API and bypasses the additional data access layer, this type of driver tends to be more efficient than Type 1. Like a Type 1 driver, it is dependent upon the existence of the native API library.
Type 3 Driver:
This type of driver sends database calls to a middleware component running on another server. This communication uses a database-independent net protocol. The middleware server then communicates with the database using a database-specific protocol. The middle ware server translates the JDBC call received from the client into a database call.
Client Application
Type-2
Native API
Data Base
Client Application
Type-1
ODBC-API
Native API
Data Base

www.JavaEra.com
Type 4 driver:
The type 4 driver, also commonly known as a thin driver, is completely written in Java. It communicates directly with a database using the database’s native protocol. Since it is written completely in Java without any platform-specific code, it can be directly used on any platform with a Java virtual machine. The driver translates JDBC directly into the database’s native protocol without the use of ODBC or native C APIs. Thus, the thin driver makes an excellent choice for distributed database applications. If you are developing a client application that must communicate with a database, and the client could be installed on various platforms (Windows, UNIX, Mac), then you would almost certainly use a Type 4 driver. Using a Type 4 driver, you could deploy the same client code (including the driver) to each platform and the client would work without any other modifications.
Choosing a Driver:
In general you will want to choose either a Type 2 or a Type 4 driver for your web application. Type 1 and Type3 drivers add a communication layer between the JDBC driver and the database, so they tend to be less efficient. The difference between a Type 2 and a Type 4 driver depends on whether you need to support a single platform or multiple platforms. If you must support multiple platforms, and native libraries do not exist for all platforms, then you will have to use a Type 4 driver. If a native library exists
Client Application
Type-4
Data Base
Client Application
Type-3
Middle ware-server
Data Base

www.JavaEra.com
for all platforms. Then there is no great difference between a Type 2 and Type 4 driver.
3.2The DriverManager Class:
The DriverManager class is responsible for managing the JDBC drivers available to an application. The other important job of the driver manager is to hand out connections to client code. When you need a connection to a database, you hand the driver Manager a URL, and the driver manager returns a connection to you. To do this, the driver manager maintains a reference to an instance of each driver class that is available. When you ask for a connection, it polls each driver to determine if the driver can handle the URL. As soon as it finds a driver that can handle the URL, it asks the driver for a connection, and returns that connection to you.
For all this to work, two things to need to happen:
• The driver manager needs to know which drivers are available. • You need to provide a valid URL to the DriverManager class.
Loading a Driver:
Before the driver manager can provide connections, a driver class must be loaded by your application and registered with the driver manager. There are various ways to accomplish this:
• You can load and register the class dynamically using Class.forName()
• You can let the system load and register the class automatically using a system property
Using Class.forName ():
This technique uses the method forName (String) from java.lang.Class. Calling forName (String) instructs the JVM to find, load, and link the class file identified by the String parameter. As part of initialization, the driver class will register itself with the driver manager. Thus your code does not need to create an instance of the class, nor does it need to call the

www.JavaEra.com
registerDriver (Driver) method. The JVM creates the instance for you, and the driver itself does the registration.
Using System Property:
The other way to load the driver is to put the driver name into the jdbc.drivers system property. When any code calls one of the methods of the driver manager, the driver manager looks for the jdbc.drivers property. If it finds this property, it attempts to load each driver listed in the property. You can specify multiple drivers in the jdbc.drivers property.
Ex:
System.setProperty (“jdbc.drivers”,”sun.jdbc.odbc.JdbcOdbcDriver”);
Or
System.setProperty (“jdbc.drivers”,”oracle.jdbc.driver.OracleDriver”);
3.3Connections:
Once we have loaded our driver, the next step is to create a connection to the database.
Getting a Connection:
To get a connection you need to interact with the driver manager. The driver manager acts as a factory for Connection objects. The method used to get a Connection object is getConnection () and there are three overloaded forms of this method:
• getConnection (String url) • getConnection (String url, String username, String password) • getConnection (String url, Properties prop)
www.JavaEra.com
Common to each of the methods is the url parameter. Just as with an HTTP URL, the JDBC URL provides a means to identify a resource (the database) that the client wishes to connect to.
The URL for each database will vary depending on the database and the driver. However, all URLs will have the general form jdbc:<subprotocol>:<subname>, with the <subprotocol> usually identifying the vendor and <subname> identifying the database and providing additional information needed to make the connection.
Ex: Jdbc:odbc:oradsn
The subprotocol is odbc and the subname is oradsn
Releasing Connections: After open the connection our responsibility is close the connection The Connection class has a method for releasing the connections. Public void close () throws SQLException The correct way to use close () is to put it inside the finally block of a try…catch…finally exception handler. Thus, you are ensured that close () will be called no matter what happens with the JDBC code. And since close () also throws an SQLException, it needs to be inside a try…catch block as well. Setting the Login Timeout: In some situations our application appeared to lock up because the code was waiting for a connection that never became available. It waited and it waited…and it would have waited forever if we let it. There is a way to dell the driver manager to wait only a certain amount of time for a connection. To do this, the DriverManager class provides the following method: Public static void setLoginTimeout (int) The int parameter indicates the number of seconds that the driver manager should wait for a connection. If the driver does not return a connection in that amount of time, then the manager throws a SQLException.

www.JavaEra.com
3.4 SQLException: Almost all JDBC methods declare that they throw SQLExceptions. In most respects, SQLExceptions are the same as the other exception objects that you encounter in your Java code. Your methods that use JDBC code will either need to handle these exceptions in try…catch…finally blocks, or declare that they throw SQLExceptions. However, SQLExceptions are different from other exceptions in that they can be chained. What this means is that the SQLException you catch in your code, may contain a reference to another SQLException, which in turn may contain a reference to another SQLException, and son on, and son on. It’s a linked list of exceptions. The SQLException class adds a method for dealing with chained exceptions: public SQLException getNextException() Another difference is that the SQLException can contain additional information about the error that occurred inside the database. Databases have their own error codes that identify the problem that occurred. These error codes are returned inside the SQLException Object, and you can get the error code with a call to this method public int getErrorCode() Here is a small snippet of code showing these two methods: try { //Some JDBC CODE } catch (SQLException e) { While (e!=null) { System.out.println(“The Error code is ”+e.getErrorCode()); e=e.getNextException(); } }
3.5 DataBaseMetaData:

www.JavaEra.com
Below statement returns an object that contains data about the database. This object is an instance of DatabaseMetaData. From the DatabaseMetaData object, we were able to get the name and version of both the database and the driver: DatabaseMetaData dbmd=conn.getMetaData(); System.out.println (“dbnamd is: \t”+dbmd.getDatabaseProductName ()); System.out.println (“db `version is: \t”+dbmd.getDatabaseProductVersion ()); System.out.println (“db driver name: \t”+dbmd.getDriverName ()); System.out.println (“db DriverVersion: \t”+dbmd.getDriverVersion); The DatabaseMetaData object contains many other methods that return information about the database.
3.6 Statements already we saw how to get a connection to a database. However, the connection does not provide any methods that allow us to do anything to the database. To actually create, retrieve, update, or delete data from the database, we need the Statement class. Statement objects are your primary interface to the tables in a database. We will look at using statements to insert new rows into a table, update a row in a table, and delete a row from a table. To create Statement objects we have to use the following methods existed in the Connection Interface: Connection Method Description Public Statement createStatement () Creates a Statement object. If the
statement is used for a query, the result set returned by the executeQuery () method is a non-updateable, non-scrollable resultset.
Public Statement createStatement(int, int)
The two parameters determine whether the resultset returned by the excuteQuery () method is updatable

www.JavaEra.com
or scrollable.
Public Statement createStatement(int, int, int)
The two parameters determine whether the resultset returned by the excuteQuery () method is updatable or scrollable. And The third parameter determines holdability
Once you have a statement object, you use it to send SQL to the database with one of three four methods. Statement methods Description Public int executeUpdate(String) Used to any execute SQL that is not
a query. Those will primarily be create, insert, update, and delete SQL operations.
Public ResultSet executeQuery(String)
Used for querying (get details of) database tables
Public int[] executeBatch() Used for sending multiple SQL commands in a single operation.
Public boolean execute(String) Used for executing unknown SQL or SQL that could return either ints or resultsets.
executeUpdate (String): It is used to execute a single SQL command. The String parameter is the SQL that you want to execute in the database. It can be any SQL except for a query. The return value of the method is the number of rows affected by the SQL. This value can range from 0 to the number of rows in the database table. The number of rows returned by various types of SQL commands is shown below: SQL type Number of rows affected CREATE, ALTER, and DROP 0 INSERT 1….n where n is any number DELETE 0….n where n is the no of rows in
the table UPDATE o….n where n is the no of rows in
the table

www.JavaEra.com
Batch Updates: One way to improve the performance of your JDBC application is to execute a number of SQL commands in a batch. With batch execution, you add any number of SQL commands to the statement. The statement holds these SQL commands in memory until you tell it that you are ready for the database to execute the SQL. When you call executeBatch (), the statement sends the entire batch o SQL in one network communication. In addition to the executeBatch () method listed above, two other methods are needed for batch execution. Statement method Description Public void addBatch(String) Adds a SQL command to the current
batch of commands for the Statement object.
Public void clearBatch () Makes the set of commands in the current batch empty
Releasing Statements: Just as with Connection objects, it is equally important to release Statement objects when you are finished with them. This does not mean that you must immediately release the statement after executing an SQL command – you can use the same Statement object to execute multiple SQL commands. However, when you no longer need the statement to execute SQL, you should release it. This mean s that when the Statement object goes out of scope or is otherwise no longer reachable, it is eligible for garbage collection; when the object is garbage collected, its resources will be released.
3.7 ResultSets: When you perform a query of a table in a database, the results of the query are returned in a ResultSet object. The ResultSet object allows you to scroll through each row of the results, and read the data from each column in the row.

www.JavaEra.com
Moving Through the Results The ResultSet interface defines a number of methods that can be used for moving through the results returned. Here again are the three methods that create Statement objects:
public Statement createStatement() public Statement createStatement(int,int) public Statement createStatement(int,int,int)
When you use the first method to create a Statement object, the ResultSet object that is returned by executeQuery () is a no Scrollable ResultSet, or one that is of type forward only. This means that you can only move from the first row to the last row, and cannot scroll backwards through the results. The only methods for moving through the ResultSet object that can be used is Public Boolean next () Assuming no problems with the SQL commands, the executeQuery () method will always return a non-null ResultSet. When the executeQuery () method returns the ResultSet, the cursor is positioned prior to the first row of data. To get to the first row of data, you must call the next () method. Each time you need to get the following row of data, you call next () again. The next () method returns a Boolean value. If there is another row of data, the cursor is positioned after the last row and the next () method returns false. If there are no more rows of data, the cursor is positioned after the last row and the next () method returns false. If there are no results at all in the resultset, then next () will return false the first time it is called. Now, let’s take a look at the other two forms of createStatement (). These two forms have method parameters, and the first parameter sets the type. The type refers to whether you can move backwards through the resultset. The second parameter defines whether you can update the table through the resultset. For the first parameter, you can pass one of these three arguments:
ResultSet.TYPE_SCROLL_SENSITIVE

www.JavaEra.com
ResultSet.TYPE_SCROLL_INSENSITIVE ResultSet.TYPE_FORWARD_ONLY
The first two values create a scrollable resultset, a resultset through which you can move forwards or backwards. If changes occur to the database while you are going through a ResultSet, TYPE_SCROLL_SENSITIVE means you will see those changes; TYPE_SCROLL_INSENSITIVE means you will not see the changes. The third value creates a non-scrollable resultset. With a scrollable resultset, you can use these methods for moving the cursor. Boolean next () boolean previous () boolean first () Boolean last () void afterLast () void beforeFirst () Boolean absolute (int) boolean relative (int) boolean isFirst () Boolean isBeforeFirst () boolean isLast() boolean isAfterLast() Int getRow () void moveToInsertRow () void moveToCurrentRow () Reading Data from the ResultSet: The resultset also contains a number of methods for reading the data in a query result. These methods allow you to reference the column by number or by name, and to retrieve just about any data type. Here are two of the methods: Double getDouble(int) Double getDouble(String) These methods allow you to read a double from the ResultSet. The first method gets a double from the column with the index given by the int parameter. The second method gets the double from the column with the name given by the String parameter. There are getXXX () methods for every Java primitive, and for several objects. Some of the methods are: Float getFloat(int index) int getInt(int index) long getLong(int index) short getShort(int index)

www.JavaEra.com
String getString(int index) Time getTime(int index) Date getDate(int index) double getDouble(int index) Boolean getBoolean(int index) byte getByte(int index) Like the above we have many methods…….. Note: in ResultSet column numbering and row numbering begins at 1 not 0 Working with Null Values: For primitives and for Booleans, the JDBC driver cannot return a null. When the column data for the return type,. For all the methods that return an object, getDate () for example, the methods return a Java null for SQL NULL. All of the getXXX() numeric methods, getFloat () for example return the value 0 for SQL NULL. The getBoolean () method return false for SQL NULL. If you call getFloat (), and the return value is 0, how do you know if the column value is really 0 or NULL? The ResultSet instance provides a method that can give you this information. Here is its signature: Public Boolean wasNull() It does not take a column number or a column name. it provides its answer based on the most recently read column. Note: when you want to pass arguments to a createStatement () method you will need to consult your database and driver documentation to see if the driver supports scrollable resultsets. In some cases, some dabases does support a scrollable resultset, but only if the resultset is not updateable, in such cases we have to send argument to the createStatement method is ResultSet.CONCUR_READ_ONLY. Updateable ResultSets: The second parameter in the createStatement (int, int) and createStatement (int, int, int) methods determines whether you can update the database through the resultset. Prior o JDBC2.0, resultsets could only be used to select data move forward through the data, and read the data in each column. To update the data, you needed to execute another SQL command through a statement object. JDBC2.0 intorduced the ability to update the data in the table directly through the resultset, so as you move through the data, you can call methods

www.JavaEra.com
that insert, update, or delete the data. Here are some methods you would use: Void updateRow Void cancelRowUpdates() Void moveToInsertRow() Void moveToCurrentRow() Void insertRow () Void deleteRow () Void updateBoolean (int, Boolean) Void updateBoolean(String,Boolean) Void updateByte(int, byte) Void updateByte(String, byte) Void updateDate(int,Date) Void updateDate(String, Date) Void updateDouble(int, double) Void updateDouble(String, double) Void updateFloat(int,float) Void updateFloat(String , float) Void updateInt(int, itn) Void updateInt(String, int) Void updateLong(int,long) Void updateLong(String,long) Void updateNull(int) Void updateNull(String) Void updateString(int,String) Void updateString(String,String) If, before you call updateRow(), you may decide that you don’t want to update the row, you can call cancelRowUpdates(). You can also insert a new row of data through the resultset. This is accomplished by moving to a special row in the resultset; this row is known as the insert row. You can move to the insert row by calling rs.moveToInsertRow () here rs is the ResultSet. When you move to the insert row, the resultset remembers the position you were at; this remembered position is know as the current row. Then, you update each column with the appropriate value using the updateXXX() methods. When you are finished entering data for the new row, you can call rs.insertRow(); you can cancel an insert by calling moveToCurrentRow () before you call insertRow(). Finally, you can delete a row from the table and the result set by calling rs.deleteRow();
Holdable ResultSets: When you execute another SQL command with a statement, any open resultsets are closed. Also, when commit () is called with a JDBC2.0 or 1.0 driver, the resultset is closed. JDBC 3.0 adds a new ResultSet object feature

www.JavaEra.com
called holdability, which refers to whether or not a resultset is closed when a new SQL command is executed by a statement or when commit () called. JDBC 3.0 gives you the capability to keep the resultset open. Two class constants were added to the ResultSet interface to provide parameters for the createStatement () method:
� ResultSet.HOLD_CURSORS_OVER_COMMIT:- This specifies that the ResultSet object should not be closed when changes are committed.
� ResultSet.CLOSE_CURSORS_AT_COMMIT:- The driver can close resultset object when changes are committed.
A new createStatement () method was added to the Connection class to support this feature: createStatement (int resultSetType,int, int resutlSetConcurrency, int resultSetHoldability)
3.8 Prepared Statements: Creating PreparedStatement object is similar to creating a Statement object. One difference is that with a prepared statement, you need to tell the database what SQL you intend to execute. You pass the SQL in the creation, rather than in the execute method. The methods to create a PreparedStatement object are as follows. Method Description PreparedStatement(String sql) Creates a prepared statement object
for the given SQL. If the it returns a resultset, the resultset has a type forward only, is not updateable, and is not Holdable.
PreparedStatement(String sql,int resultSetType,int resultSetConcurrency)
If it returns a resultset, the resultset has the given resultset type and concurrency, and is not Holdable.
prepareStatement (String sql, int resultSetType,int resultSetConcurrency,int resultSetHoldability)
JDBC 3.0 create a prepared statement for the given SQL. If the prepared statement returns a resultset, the resultset has the given
www.JavaEra.com
resultset type, concurrency, and holdability
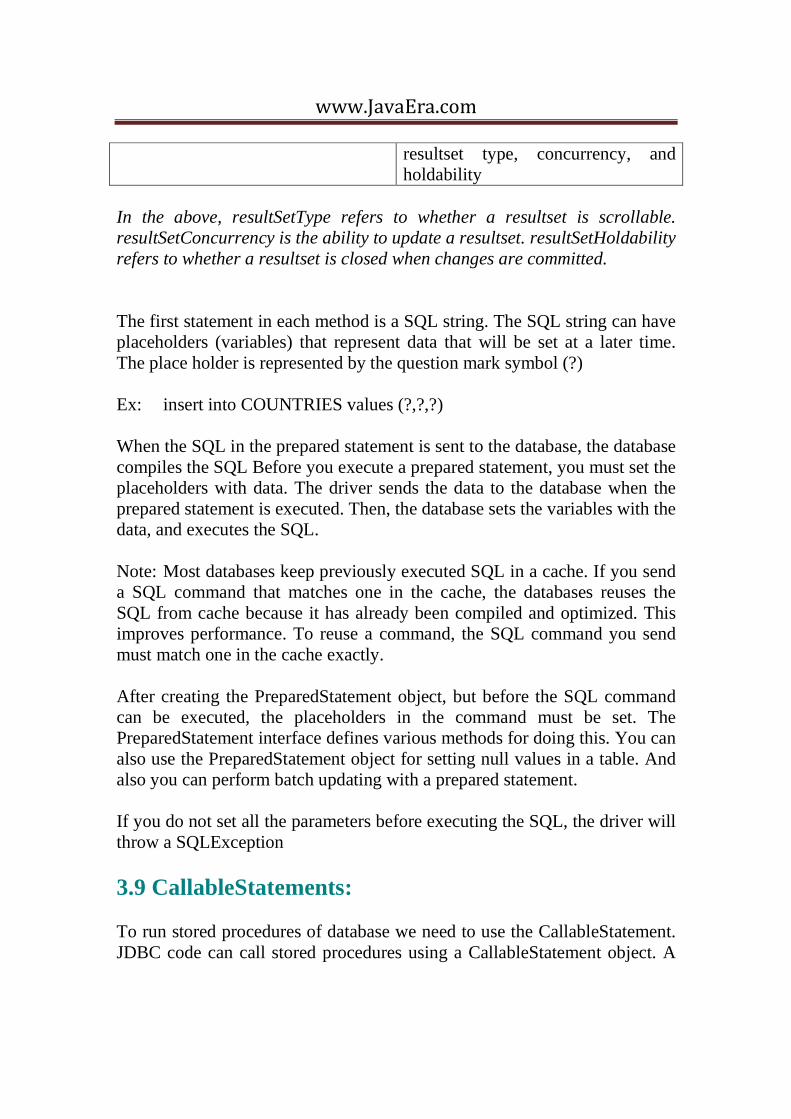
In the above, resultSetType refers to whether a resultset is scrollable. resultSetConcurrency is the ability to update a resultset. resultSetHoldability refers to whether a resultset is closed when changes are committed. The first statement in each method is a SQL string. The SQL string can have placeholders (variables) that represent data that will be set at a later time. The place holder is represented by the question mark symbol (?) Ex: insert into COUNTRIES values (?,?,?) When the SQL in the prepared statement is sent to the database, the database compiles the SQL Before you execute a prepared statement, you must set the placeholders with data. The driver sends the data to the database when the prepared statement is executed. Then, the database sets the variables with the data, and executes the SQL. Note: Most databases keep previously executed SQL in a cache. If you send a SQL command that matches one in the cache, the databases reuses the SQL from cache because it has already been compiled and optimized. This improves performance. To reuse a command, the SQL command you send must match one in the cache exactly. After creating the PreparedStatement object, but before the SQL command can be executed, the placeholders in the command must be set. The PreparedStatement interface defines various methods for doing this. You can also use the PreparedStatement object for setting null values in a table. And also you can perform batch updating with a prepared statement. If you do not set all the parameters before executing the SQL, the driver will throw a SQLException
3.9 CallableStatements: To run stored procedures of database we need to use the CallableStatement. JDBC code can call stored procedures using a CallableStatement object. A

www.JavaEra.com
CallableStatement object is created in much the same way as the PreparedStatement object, by calling a method of the Connection object. Connection interface methods for creating a CallableStatement object: Methods Description prepareCall(String sql) the ResultSet has a type of forward-
only, is not updateable, and is not Holdable
prepareCall(String sql,int resultSetType,int resutlSetConcurrencyu)
The ResultSet has the given ResultSet type and concurrency and is not Holdable
prepareCall(String sql,int resultSetType,int resultSetConcurrency,int resultSetHoldability)
The ResultSet has the given ResultSet type and concurrency and Holdable
Common between all the forms is the SQL keyword call that appears before the procedure name, and the curly braces that surround the SQL. This signals the driver that the SQL is not an ordinary SQL statement and that the SQL must be converted into thee correct form for calling a procedure in the target database. The SQL string look like this
� {call procedure_name} � {call procedure_name(?,?)} � {?=call function_name(?)}
Ex:
//String sql={call procedure_name}; //String sql={call procedure_name(?,?)}; String sql={?=call function_name(?)}; CallableStatement cs=conn.prepareCall (sql);

www.JavaEra.com
4. Java Servlets After JDBC, Servlets were the second J2EE technology invented. Servlet is a j2ee component. Used to Create Server-side Web applications. It has the ability to take the request from client process it and sends the response to the clients. They run inside a Servlet container that communicates with the user's Web browser by exchanging HTTP request and response objects. Servlet container can run stand alone or a s a component of a web server or a j2ee server. Servlet are designed to be extensions to servers, and to extend the capabilities of servers. Servlets were originally intended to be able to extend any servers such as FTP server, or an SMTP (e-mail) server. However in practice, only servlets that respond to HTTP requests have been widely implemented. The Servlet Container Process each Servlets request in a separate thread , maintains user sessions, creates response objects and sends them back to the client. Servlets are easily portable to any application server or Servlet engine- it comes down to copying a web-application archive to the right disk directory 4.1Servlet Structure and life cycle methods: To create a Servlet for a web application we'll have to derive our class from the javax.servlet.http.HttpServlet class, which in turn is derived from the javax.servlet.GenericServlet class. Generic Servlet Service () Init () Destroy () Http Servlet doGet () DoPost () MyServlet doPost() (or)

www.JavaEra.com
doGet() The servlet engine invokes methods such as init, service, and destroy. Application programmers can also create so-called listener objects, which are objects that are notified when some important events occur.
init (): The servlet container calls the init() method exactly ones after instantiating the servlet. this method is called when the servlet is initially loaded by the container. or It may happen during the application server's startup, or when the servlet is being requested for the first time. This method is a good place to write code that creates non-user-specific resources, namely the creation of object pools. This method init() is overloaded and one of its versions receives the object ServletConfig as an argument. This object provides the method get InitParameter() to find the values of the configuration parameters, if any. service(): The service() method is called on the Servlets ancestor every time the servlet receives a user's request. at this point the servlet container passes an instance of the class SerrvletRequest, which contains the client's data, to the servlet. The service() method creates the object HttpServletRequest and HttpServletResponse and passes them as parameters to the doGet() or doPost() of the descendent class. destroy(): The method destroy() is called by the servlet container to notify that it's about to be removed form service. This method will be called only once, and developers should use it to program clean up of any resources. Explanation with an Example: When you use an online store or bank or when you search form some information on the internet, your request is usually processed on the server side. Only limited no of operations, such as simple calculations and input validation, are performed on the client's machine using java applets and JavaScript.

www.JavaEra.com
However Java applets have security restrictions and depend on the version of the web browser's JVM(for example, some of the Java classes or methods may no be available in older versions of JVM). Also if a web browser has to download large java programs, the site's response time will substantially increase. That's why the better choice is to keep only light weight HTML pages(a thin client) on the client's machine, While the major processing should be done by the programs running on the server. The server computers could be more powerful than the client computers. The server software supporting the HTTP protocol has to run on the server side. This web server will listen for the user's requests, usually on default port. If the web server receives a simple request for a static HTML page, it can handle this request without any additional software. The server also needs to run a servlet engine(or an application server that has a servlet container that is a component that supports the lifecycle of servlet). If a user requests some information that should be retrieved programmatically from a database or any other resource. We'll use java Servlets that will accommodate the request, build an output HTML page dynamically, and pass that page over to the user with the help of the web server. When the user's Web browser displays the received page it does not know if that page was a static HTML page or a fresh one right from the oven (servlet engine). Even thought HTML is just a markup language, it has some basic elements and GUI components, such as buttons, text fields, check boxes, and drop down lists that allow users to enter data, make some selections, and submit requests to a remote server. For Ex: the HTML <FORM> tag enables users to enter and submit data from a web page. Note: all GUI controls should be placed between the <FORM> and </FORM> tags. A <FORM> tag has important attributes such as action and method.

www.JavaEra.com
The action attribute contains the uniform resource locator(URL) of the server program to which the browser should send the user's input. The method attribute tells the browser how to send the data; this attribute is usually either Get or Post, as shown in the following ex. <form action="http://localhost:8080/servlets-examples/MyServlet" method=Get> You can create a text field as follows: Login.html <html> <body bgcolor=black > <form action="http://localhost:8888/servlets-examples/MyServlet" method=get> <CENTER> <font color=green SIZE=5>Login_Id Form</font> <table border=2> <tr> <td><font color=red SIZE=5>Enter Login_Id</td><td><input type=text name="id"></td> </tr> <tr> <td><font color=red SIZE=5>PassWord:</td><td><input type=password name="pwd"></td> </tr> </table> <input type=submit value="ClickMe"> </body> </form> <html> Writing the Servlet: Let's write the login servlet shown below that will be invoked by login.html. This servlet checks the user's ID and, if it is correct, greets the user otherwise it displays an error message. To stay focus on servlet coding techniques we'll just compare the id and pwd with "padma" and "gsjm". MyServlet.java

www.JavaEra.com
import javax.servlet.*; import javax.servlet.http.*; import java.io.*; public class MyServlet extends HttpServlet { public void doGet(HttpServletRequest req, HttpServletResponse res)throws ServletException, IOException { res. setContentType("text/html"); PrintWriter out=res. getWriter(); String id=req. getParameter("id"); String pwd=req.getParameter("pwd"); if(id.equalsIgnoreCase("padma")&&pwd.equalsIgnoreCase("gsjm")) { out.println("<html>"); out.println("<body bgcolor=lightpink><h2><center><br><br><br><br><br><br><br>Hellow "+id+" Welcome to our organization"); } else { out.println("<body bgcolor=lightpink><h2><center><br><br><br><br><br><br><br>Hellow "+id+" You are Not Valid User......"); out.println("</html>"); } out.close(); } } When the doGet () method of MyServlet is being called by the container, it receives references to the HttpServletRequest and HttpServletResponse objects. First the code calls the method setContentType () of the HttpServletResponse object to specify the output type text/html. Then it gets the reference to the Servlets output stream of type PrintWriter. The method of the Print Writer’s sends the text output to the user.

www.JavaEra.com
The servlet gets the parameters supplied by the user's browser fro the request object. It can do this with the help of such methods as getParameter (), getParameterValues () and getParameterNames (). After applying some business rules, the servlet forms the content of the output page and sends it to the output stream PrintWriter. At this point the servlet has to be compiled as any other java class and deployed. Deploying Servlets: A web application is a collection of Servlets, HTML pages, classes and other resources that make up a complete application on a web server. J2EE defines a standard way to deploy web application. It suggests that all components of a web application should be packaged in the web application archive (WAR) the file with the extension .war, which has the same format as .jar files. A web application could be deployed either independently in the .war file, or it could be included in the Enterprise Application Archive(.ear file) along with other application components, such as Enterprise JavaBeans etc.. Servlet is the interface belongs to javax.servlet.*; package Public interface Servlet
This interface defines methods that all Servlets must implement
A servlet is a small Java program that runs within a Web server. Servlets receive and respond to requests from Web clients, usually across HTTP, the Hyper Text Transfer Protocol.
To implement this interface, you can write a generic servlet that extends javax.servlet.GenericServlet or an HTTP Servlet that extends javax.servlet.http.HttpServlet.

www.JavaEra.com
This interface defines methods to initialize a servlet, to service requests, and to remove a servlet from the server. - These are known as life cycle methods and are called in the following sequence:
1. The servlet is constructed, and then initialized with the init method. 2. Any calls from clients to the service method are handled. 3. The servlet is taken out of service, then destroyed with the destroy
method, then garbage collected and finalized.
In addition to the life-cycle methods, this interface provides the getServletConfig method, which the servlet can use to get any startup information, and the getServletInfo method, which allows the servlet to return basic information about itself, such as author, version, and copyright.
Destroy(): Called by the servlet container to indicate to a servlet that the servlet is being taken out of service.
GetServletConfig() Returns a ServletConfig object, which contains initialization and startup parameters for this servlet.
GetServletInfo() Returns information about the servlet, such as author, version, and copyright.
Init (ServletConfig config) Called by the servlet container to indicate to a servlet that the servlet is being placed into service. GenericServlet:
Defines a generic, protocol-independent servlet. To write an HTTP servlet for use on the Web, extend HttpServlet instead.
GenericServlet makes writing Servlets easier. It provides simple versions of the lifecycle methods init and destroys and of the methods in the ServletConfig interface. GenericServlet also implements the log method, declared in the ServletContext interface.

www.JavaEra.com
To write a generic servlet, you need only override the abstract service method.
Deployment Descriptors:
We’ve seen several examples of deployment descriptors for our web applications contained in a file called web.xml. However, we’ve postponed a full coverage of deployment descriptors until now. Now we can take a deeper look at the deployment descriptor.
Because the deployment descriptor is contained in an XML file, it must conform to the XML standard. This means it should start with the XML declaration (<?xml version=”1.0”>) and a DOCTYPE declaration, as shown here:
<?xml version="1.0" encoding="ISO-8859-1"?>
<! DOCTYPE web-app
PUBLIC "-//Sun Microsystems, Inc.//DTD Web Application 2.3//EN"
"http://java.sun.com/dtd/web-app_2_3.dtd">
<web-app>
</web-app>
The root element of deployment descriptor is the <web-app> element. The servlet 2.3 specification defines these sub elements that can be used within the <web-app> element.
The <context-param> Element the <context-param> element allows you to define context parameters. These parameters specify values that are available to the entire web application context. The element is used like this.
<web-app>
<context-param>

www.JavaEra.com
<param-name>debug</param-name>
<param-value>true</param-value>
</context-param>
</web-app>
The deployment descriptor can contain zero or more of these elements. Each web component that has access to the servlet context can access these parameters by name.
Note: because the web.xml file is in text format, you can only pass parameters to the application as strings.
The <servlet> Element the <servlet> element is the primary element for describing the Servlets in your web application. The <servlet> element can have the following sub-elements:
1. <servlet-name> 2. <display-name> 3. <description> 4. <servlet-class> 5. <jsp-file> 6. <init-param> 7. <load-on-startup>
Only required sub-elements are <servlet-name> and one of the sub-elements called <servlet-class> or <jsp-file>. The <servlet-name> sub-element defines a user friendly name that can be used for the resource. The <servlet-class> or <jsp-file> sub-elements define the fully qualified name of the servlet class or JSP file.
Ex:
<servlet>
<servlet-name>Login</servlet-name>

www.JavaEra.com
<servlet-class>login.Login</servlet-class>
</servlet>
The <servlet-name> sub-element used to create name for the servlet and we can use this name to invoke Login servlet in the descriptor (web.xml file)
The <servlet-class> sub-element told the servlet container that all requests for Login should be handled by the login.Login class.
The other elements of servlet that you will often used are <load-on-startup> and <init-param>
<load-on-startup>5</load-on-startup>
The <load-on-startup> element, if used, contains a positive integer value that specifies that the servlet should be loaded when the server is started. The relative order of servlet loading is determined by the value; servlets with lower values are loaded before servlets with higher values; servlets with the same value are loaded in an arbitrary order. If the element is not present, the servlet is loaded when the first request for the servlet is made.
The <init-param> element is similar to the <context-param> element. The deference is that <init-param> defines parameters that are only to the given servlet.
<Init-param>
<param-name>jdbc.name</param-name>
<param-value>jdbc:odbc:oradsn</param-value>
</init-param>
The <servlet-mapping> Element

www.JavaEra.com
This element is used to define mappings from a particular request URI to a given servlet name.
<Servlet-mapping>
<servlet-name>Login</servlet-name>
<url-pattern>/Login</url-pattern>
</servlet-mapping>
This told tomcat that if it received any URI that matched the pattern /Login, it should pass the request to the servlet with the name Login
Loading and Instantiation:
In this stage of the life cycle, the servlet class is loaded from the class path and instantiated. The method that realizes this stage is the servlet constructor. However, unlike the other stages, you do not need to explicitly provide the method for this stage.
How does the servlet container know which servlets to load? it knows by reading the deployment descriptors from a well-known location. For example, for tomcat, that location is the webapps directory. Each subdirectory under webapps is a web application. Within each subdirectory that uses servlets will be a WEB-INF directory that contains a web.xml file. The servlet container reads each web.xml file, and loads the servlet classes identified in the deployment descriptor. Then it instantiates each servlet by calling its no-argument constructor
Since the servlet container dynamically loads and instantiates servlets, it does not know about any constructors you create that might take parameters. Thus, it can only call the no-argument constructor and it is useless for you to specify any constructor other than one that takes no arguments. Since the java compiler provides this constructor automatically when you do not supply a constructor, there is no need for you to write any constructor at all in your servlet. This is why your servlet class does not need to define an explicit constructor.

www.JavaEra.com
If you do not provide a constructor, how does your servlet initialize
itself? This is handled in the next phase of the lifecycle, servlet initialization.
Initialization :
After the servlet is loaded and instantiated, the servlet must be initialized. This occurs when the container calls the init (ServletConfig). If your servlet does not need to perform any initialization, the servlet does not need to implement this method. The method is provided for you by the Generic Servlet class. The init () method allows the servlet to read initialization parameters or configuration data, initialize external resources such as database connections, and perform other one-time activities. Generic Servlet provides two overloaded forms of the method.
Public void init () throws ServletException
Public void init (ServletConfig) throws ServletException
As I mentioned above, the deployment descriptor can define parameters that apply to the servlet through the <init-param> element. The servlet container reads these parameters from the web.xml file and stores them as name-value pairs in a ServletConfig object. Because the Servlet interface only defines init (ServletConfig), this is the method the container must call. Generic Servlet implements this method to store the ServletConfig reference, and then call the parameter less init (() method that it defines. Therefore, to perform initialization, your servlet only needs to implement the parameter less init () method. If you implement init (), your init () will be called by GenericServlet; and because the ServletConfig reference is already stored, your init () method will have access to all the initialization parameters stored in it.
If you do decide to implement init(ServletConfig) in your servlet, the method in your servlet must call the super class init(ServletConfig)
Public void init (ServletConfig config) throws ServletException
{
Super. init (config);

www.JavaEra.com
Filter-1 Filter-2 Filter-3
Web resource [Static: html, images etc...] [Dynamic: Servlets/jsp]
//remainder of init () method
}
Note: if you implement init (ServletConfig) without calling suerp.init (ServletConfig), the ServletConfig object won’t be saved, and neither your servlet nor its parent classes will be able to access the ServletConfig object during the remainder of the servlet lifecycle.
Note: if your code encounters a problem during init (), you should throw a ServletExcception, or its subclass UnavailableException. This tells the container that there was a problem with initialization and that it should not use the servlet for any requests.
Note: Tomcat, for example, will return an HTTP 500 error to the client if init () throws a ServletException when it is called as a result of a client request. Subsequent client requests will receive an HTTP 404 (resource unavailable) error.
4.2What is a Filter? Like a servlet, a filter object is instantiated and managed by the container and follows a lifecycle that is similar to that of a servlet. As we shall see later in this chapter, a filter has four stages: instantiate, initialize, filter, and destroy. These stages are similar to a servlet’s instantiate, initialize, service, and destroy. Filters also follow a deployment process close to that of servlet’s. In fact the API of a filter is very similar to that of the servlet interface a filter also operates on HTTP requests to produce and manipulate further HTTP requests and responses. So, how is a filter different from a servlet? In order to see the difference, let us consider how filters participate in the HTTP request-response process:

www.JavaEra.com
In this figure, there is a chain of three filters participating in the request-response process. Each filter (from left to right in this figure) can manipulate the request and response or implement some logic (including updating the HTTP session or the servlet context), and request the container to invoke the next filter (if any) in the filter chain. Ultimately, after invoking the last filter, the container processes the actual web resource. Alternatively, any filter in this chain can choose to abort the processing, and report an error in the HTTP response. The arrows between the filters and between the third filter and the web resource are the javax.servlet.ServletRequest and javax.servlet.ServletResponse objects. In this process, after each filter is processed, the control is transferred to the following filter in the chain. Similarly, after the web resource has been processed, the container returns the thread of execution back to the last filter. This step continues till the control is handed back to the first filter. In this manner, each filter gets an opportunity to participate both before and after invoking the web resource. Let’s now to take a look at some of the possibilities that filter offer:
• Validate HTTP requests Each filter has access to the HTTP request object and therefore can validate the contents of HTTP requests. IF A REQUEST IS INVALID (that is, it contains invalid parameters, required parameters are missing, or values of the supplied parameters are invalid), the filter can abort processing and report HTTP errors to the container. In this way, we can avoid implementing any validation logic within servlets or JSP pages; we can also extend this idea to preprocess HTTP request parameters.
• Authorize HTTP requests • Provide custom HTTP environment for servlets and JSP pages.
(Provide additional behavior). A servlet is equivalent to a web resource except that it is dynamic. A filter, on the other hand, is not a resource that the container serves. Instead, the container invokes a filter while processing a request to “serve” a resource. In this way, filters give us an opportunity to participate in the process of

www.JavaEra.com
serving any web resource. Not e that in the previous figure, the web resource could be any standard resource a static resource such as an HTML file, an image, a class file for an applet, and so on, or a dynamic resource such as a servlet or a JSP page. Filters can be used in any web application, including those containing completely static content. Comparing the filter with request Dispatcher:
The request dispatcher API is mean for servlets and JSP pages to forward the processing to another web resource, or include the contents of another web resource. However, forward and include can only happen from servlets or JSPs which themselves are first classed as web resources. We can’t use this API to control what happens before the request reaches a servlet or JSP. On the other hand, a filter is invoked before the request reaches a servlet, a JSP or in fact, any other resource. We cannot use the request dispatcher API to intervene in the invocation of non-servlet or JSP resources, such as a static file. A filter, however, can be used to do so.
4.3SessionTracking The Need for Session Tracking: HTTP is a “stateless” protocol: each time a client retrieves a Web page, it opens a separate connection to the Web server, and the server does not automatically maintain contextual information about a client. Even with servers that support persistent (keep-alive) HTTP connections and keep a socket open for multiple client requests that occur close together in time, there is no built-in support for maintaining contextual information. This lack of context causes a number of difficulties. For example, when clients at an on-line store add an item to their shopping carts, how does the server know what’s already in them? Similarly, when clients decide to proceed

www.JavaEra.com
to checkout, how can the server determine which previously created shopping carts are theirs? HTTP is a stateless protocol. A client opens a connection and requests some resource or information The server responds with the requested resource (if available), or sends an HTTP error status. After closing the connection, the server does not remember any information about the client. So, the server considers the next request form the same client as a fresh request, with no relation to the previous request, This is what makes HTTP a stateless protocol A protocol is state full if the response to a given request may depend not only on the current request, but also on the outcome of previous requests. Session: The server should be able to identify that a series of requests from a single client form a single session. State: The server should be able to remember information related to previous requests and other business decisions that are made for requests. Approches To SessionTracking: There are essentially four approaches to session tracking: 1. URL rewriting : 2. Hidden form fields 3. Cookies 4. Session tracking support of cookies Although the above four approaches differ in implementation details, all these are based on one simple trick- that is to exchange some form of token between the client and the server URL Rewriting: In this approach, the token is embedded in each URL. In each dynamically generated page the server embeds an extra query parameter, or extra path information. in each URL IN THE page. When the client submits requests using such URLs, the token is retransmitted to the servlet. This approach is called URL rewriting. Hidden Form Fields: This approach is similar to URL rewriting> instead of rewriting each URL, the server embeds hidden fields in each form. When

www.JavaEra.com
the client submits a form, the additional fields will also be sent in the request. The server can use these parameters to establish and maintain a session. Cookies: Cookies were invented by Netscape, and are one of the most refined forms of token that clients and servers can exchange. Unlike URL rewriting or using hidden form fields, cookies Can be exchanged in request and response headers, and therefore do not involve manipulating the generated response to contain a token. STEPS TO EXECUTE SERVLET PROGRAM:
1. C:\Program Files\Apache SoftwareFoundation\Tomcat 5.0\webapps\servlets-examples\WEB-INF\classes\notepad MyServlet.java
2. Set classpath=%classpath%;C:\Program Files\Apache Software
Foundation\Tomcat 5.0\common\lib\servlt-api.jar;
3. C:\Program Files\Apache SoftwareFoundation\Tomcat 5.0\webapps\servlets-examples\WEB-INF\classes\javac MyServlet.java
4. open web.xml file in WEB-INF folder
5. update web.xml file by adding below code
<web-app>
<servlet> <servlet-name>FirstServlet</servlet-name> <servlet-class>MyServlet</servlet-class> </servlet>
<servlet> <servlet-name>FirstServlet1</servlet-name> <servlet-class>MyServlet</servlet-class> </servlet> <servlet-mapping>

www.JavaEra.com
<servlet-name>FirstServlet</servlet-name>
<url-pattern>/MyServlet</url-pattern> </servlet-mapping> </web-app>
6 start the tomcat web server. 7 Open the web browser 8 Check whether server is started or not by giving url as
a. http://localhost:8080
9 invoke the servlet by giving url as 10 http://localhost:8080/servlets-examples/MyServlet
PROGRAMS GenServlet.java import javax.servlet.*; import java.io.*; public class GenServlet extends GenericServlet { String inf; public void init(ServletConfig config)throws ServletException { inf="init"; } public void service(ServletRequest req,ServletResponse res)throws ServletException,IOException { res.setContentType("text/html"); PrintWriter out=res.getWriter(); out.println("<html>"); out.println("<body bgcolor=black text=red>"); out.println("Gen Servlet "+new java.util.Date()); out.println("</body>"); out.println("</html>"); out.close(); } public void destroy() {

www.JavaEra.com
} }
Web.xml <servlet> <servlet-name>GenServlet</sertlet-name> <servlet-class>InitParam</servlet-class> </servlet> <servlet-mapping> <servlet-name>GenServlet</sertlet-name> <url-pattern>/GenServlet</url-pattern> </servlet-mapping>
5. JSP (JAVA SERVER PAGES) Jsp (Java Server Pages) makes you to separate the dynamic part of your pages from the static HTML pages. I.e. we can write dynamic parts (in jsp code ) in HTML page using special tags most which starts with “<%” and end with “%>” . Jsp pages are components in a web, or J2EE, application that consists of HTML with java code added to the HTML. You might ask, “What’s so different about that? I’ve been putting JavaScript into my HTML for years.” The difference is that JavaScript runs on the client, whereas the code in a JSP runs on the server. JavaScript can only affect the particular page in which it is embedded; code in a JSP can access data across the entire web application. Introduction to Jsp As components in a j2ee application, JSP pages run on a server and respond to requests from clients. These clients are usually users accessing the web application through a web browser. The protocol used by clients to

www.JavaEra.com
call the HTML and JSP pages in our j2ee application is HTTP, the same protocol used by browsers to get HTML pages from a web server. Developing JSP Pages: In order to create a JSP PAGE THAT CAN RESPOND TO CLIENT REQUESTS, THERE ARE A NUMBER OF THINGS WE NEED TO DO firstly of course, we need to write the JSP page. At some point, this page is translated and compiled into a java class. This can happen before the page is loaded to a server, or it can happen at the time the client makes a request. The page executes inside a jsp container. A container is a piece of software that loads and manages j2ee components, in this case JSP pages. We can divide this process into three steps: � Creation: The developer creates a JSP source file that contains HTML and embedded java code.
� Deployment: The JSP IS INSTALLED INTO a server. This can be a full J2EE server or a standalone JSP server.
� Translation and Compilation: The JSP container translates the HTML and Java code into a java code source file. This file is then compiled into a java class that is executed by the server. The class file created from the JSP is known as the JSP page implementation class.
Note: Note that this last step can actually occur at various times. Even though it is listed last here you can translate and compile the JSP prior to deployment, and deploy the class file directly. Compiling first allows us to catch and fix syntax errors in our code prior to deployment. Alternatively, the JSP container can compile the JSP when it is deployed to the server. Finally, the usual process is that when the first request is made for the JSP, the server translates and compiles the JSP. This is known as translation at request time. Basic JSP Lifecycle Once compilation is complete, the JSP lifecycle has these phases:
1. Loading and instantiation: The server finds the java class for the JSP page and loads it into the Virtual Machine. After the class is loaded, the JVM creates one or more instances of the page. This can

www.JavaEra.com
occur right after loading, or it can occur when the first request is made.
2. Initialization: The JSP page is initialized. If you need to execute code during initialization, you can add a method to the page that will be called during initialization.
3. Request Processing: The page responds to a request. After performing its processing a response is returned to the client. The response consists solely of HTML tags or other data; none of the java code is sent to the client.
4. End of Life: The server stops sending requests to the JSP. After all current requests are finished processing, any instances of the class are released. If you need to execute and perform any cleanup actions, you can implement a method that will be called before the class instance is released.
PROCESS OF REQUEST RESPONSE
When a client sends a request for a JSP, the web server gives the request to the JSP container, and the JSP container determines which JSP page implementation class should handle the request. The JSP container then calls a method of the JSP page implementation class that processes the request and returns a response through the container and web server to the client. The first time a JSP is loaded by the JSP container (also called the JSP engine), the servlet code necessary to implement the JSP tags is automatically generated, compiled, and loaded into the servlet container.
Request Response
Client
Web Server Request Response
JSP Container Translated INTO Request into Response
JSP page implementation class
JSP

www.JavaEra.com
This occurs at translation time. It is important to note that this occurs only the first time a JSP page is requested. There will be a slow response the first time a JSP page is accessed, but subsequent requests the previously compiled servlet simply processes the requests. This occurs at run time. If we modify the source code for the JSP, it is automatically recompiled and reloaded the next time that page is requested. A lot of work is happening behind the scenes, and you, the developer, are receiving the payoff, in the form of authoring convenience. (The servlet engine will usually manage this by making the generated servlet class expose a timestamp. Before each request, this timestamp can be compared with the file system’s modification timestamp on the JSP file. Recompilation will be necessary only if the JSP file’s timestamp is later than the class’s timestamp.) Translation unit: the JSP page and dependent files are together known as a translation unit. Ex:1
<%@ import=”java.util.Date” %> <html>
<body> Ther current time is <%= new Date() %> </body>
</html> The Nuts and Bolts: There are three categories of JSP tags:
• Directives : these affect the overall structure of the servlet that results from translation, but produce no output themselves
• Scripting Elements: these let us insert Java code into the JSP page(and hence into the resulting servlet).
• Actions : These are special tags available to affect the runtime behavior of the JSP page. JSP supplies some standard actions, such as <jsp:useBean>, which we’ll cover later and we can write our own tags, these custom actions are usually referred to as tag extensions or custom tags.
JSP Directives:
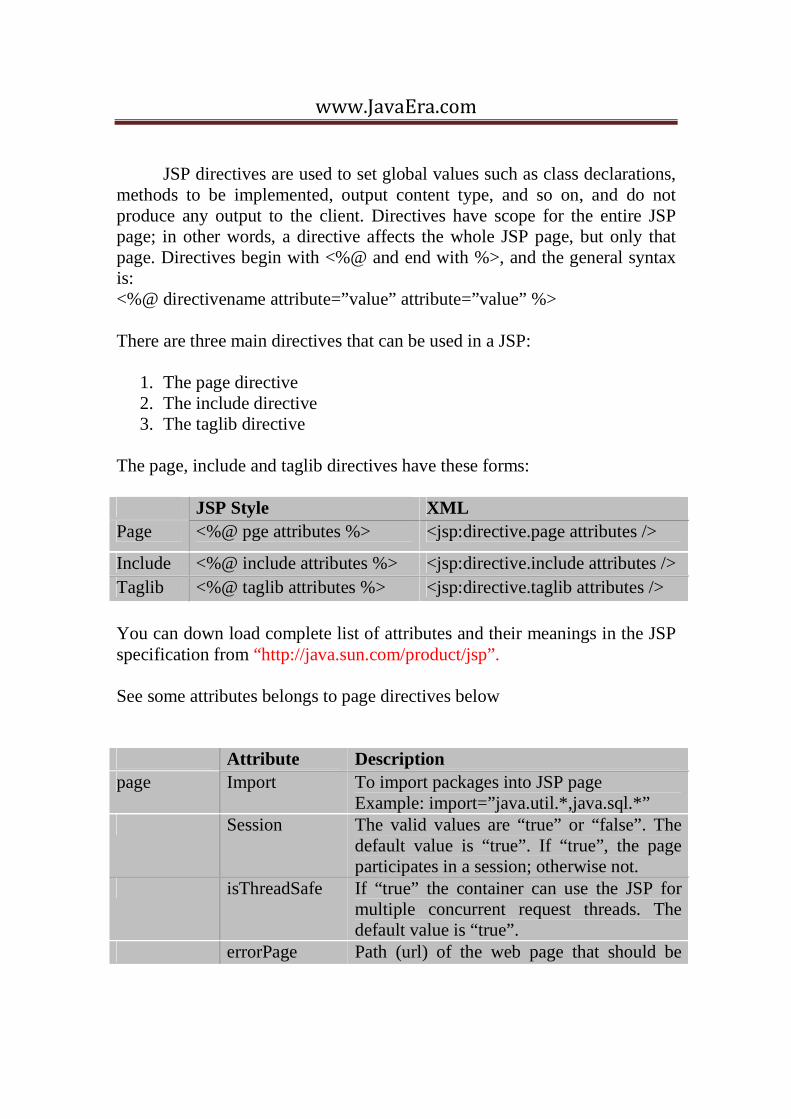
www.JavaEra.com
JSP directives are used to set global values such as class declarations, methods to be implemented, output content type, and so on, and do not produce any output to the client. Directives have scope for the entire JSP page; in other words, a directive affects the whole JSP page, but only that page. Directives begin with <%@ and end with %>, and the general syntax is: <%@ directivename attribute=”value” attribute=”value” %> There are three main directives that can be used in a JSP:
1. The page directive 2. The include directive 3. The taglib directive
The page, include and taglib directives have these forms: JSP Style XML Page <%@ pge attributes %> <jsp:directive.page attributes />
Include <%@ include attributes %> <jsp:directive.include attributes /> Taglib <%@ taglib attributes %> <jsp:directive.taglib attributes />
You can down load complete list of attributes and their meanings in the JSP specification from “http://java.sun.com/product/jsp”. See some attributes belongs to page directives below Attribute Description page Import To import packages into JSP page
Example: import=”java.util.*,java.sql.*” Session The valid values are “true” or “false”. The
default value is “true”. If “true”, the page participates in a session; otherwise not.
isThreadSafe If “true” the container can use the JSP for multiple concurrent request threads. The default value is “true”.
errorPage Path (url) of the web page that should be

www.JavaEra.com
sent to the clinet if an error occurred.
isErrorPage Whether the current page is an error page. The default value is “false”.
cntentType Used to set the mime type the default value is “text/html” for JSP-style JSP tags and “text/xml” for XML –style JSP tags.
include file Value is file name to be included at the current position in the file. File can be any HTML or JSP page
taglib uri Uri of the tag library directive (TLD) prefix The prefix identifies a tag library When u use include directive in JSP page the file is included when the page is translated into its Java form. Scripting elements: JSP Style XML Declaration <%!
Declaration %>
<jsp:declaration>declaration</jsp:declaration>
Scriptlet <% Scriptlet code %>
<jsp:scriptlet>Scriptlet code</jsp:scriptlet>
Expression <%= expression %>
<jsp:expression>expression</jsp:expression>
Declarations: A declaration is used to declare, and optionally define, a Java vaiable or a method. For example to declare a Vector in your JSP, you would use one of these forms: <%! Vector v=new Vector(); %> <jsp:declaration>Vector v=new Vector()</jsp:declaration>

www.JavaEra.com
Any variable you declare within a declaration element becomes an instance variable of the JSP page implementation class, and thus is global to the entire page. You can also declare and define methods within a declaration element: <%! public int countTokens(String s) { StringTokenizer st=new StringTokenizer(s); return st.countTokens(); } %> <jsp:declaration> public int countTokens(String s) { StringTokenizer st=new StringTokenizer(s); return st.countTokens(); } </jsp:declaration> Variables or methods in a declaration element can be called by any other code in the page. Scriptlets: Scriptlets contain Java code statements. The code in the scriptlet appears in the translated JSP, but not in the output to the client. For example , to repeat the phrase “Hello, World! “ ten times in the output page, you could use this scriptlet. <% for(int i=0;i<10;i++) { %> Hellow, Wold! <% } %>

www.JavaEra.com
Everything between scriptlet markers (<% and %>) is script code; everything outside the markers is template data, which is sent to the client as written. Notice that in the above example the Java code block does not need to begin and end within the same scriptlet element. This allows you complete freedom to mix Java code and HTML elements as needed within the page.
Since scriptlets can contain Java statements, the following is a legal
scriptlet: <% Vector v=new Vector(); _ _ _ _ _ _ _ _ _ _ _ _ _ _ %>
Note: Scriptlets cannot be used to diine a method; only declarations can be used for that. Variables declared in a declaration are instance variables of the JSP page implemented class. But variables declared in a scriptlet are local to a method in the JSP page implementation class. Expressions: Expressions are used to output the value of a Java expression to the client. For example The number of tokens in this statement is <%= countTokens(“The numbe4r of tokens in this statement is n”) %> Would result in the text “The number of tokens in this statement is 9.” Being displatyed in the browser Here is the same expression using XML style: <jsp:expression> countTokens(“The number of tokens in this statement is n”) </jsp:expression>

www.JavaEra.com
Comments: You can use standard HTML comments within the JSP and those comments will appear in the page received by the client browser. HTML comments: <!-- this comment will appear in the client’s browser --> You also include JSP-specific comments that use this syntax: <%-- this comment will not appear in the client’s browser --%> JSP comment will not appear in th page output to the client. Template data: Everything that is not a directive, declaration, scriptlet, expression, or JSP comment (usually all the HTML and text in the page) is termed template data. Implicit objects: • request : HTTP request • response: HTTP request • out :Output Stream • session :HTTP session • config : to obtain JSP specific init parameters. • exception: exception object it only available with in error pages. It is the
reference to the java.lang.Throwable object that caused the server to call the erro page.
• application: this object represents the web application environment. Used to get context parameters (application level configuration parameters).
Scope: Objects that are created as part of a JSP have a certain scope,a or lifetime. That scope varies with the object. In some cases, such as the implicit objects, the scope is set and cannot be changed. With other object (JavaBeans for example), you can set the scope of the object. Valid scopes are page, request, session, and application.

www.JavaEra.com
• page: With page scope, the object is only accessible within the page
in which it is defined. (Objects with page scope are thread-safe) • request: With request scope, Object is available within the page in
which it is created, and within pages to which the request is forwarded or included. (Objects with request scope are thread-safe)
• session: Objects with session scope are available to all application components that participate in the client’s session. (Objects with session scope are not thread-safe)
• application: Objects that are created with application scope are available to the entire application for the life of the application. (Objects with application scope are not thread-safe)
JSP PROGRAMS One.jsp <%@ page import="java.util.*" %> <%= new Date() %> Two.jsp <%-- This is my first JSP page --%> <%@ page language="Java" import="java.math.*,java.util.*" session="false" buffer="12kb" autoFlush="true" info="my page directive jsp" errorPage="error.jsp" isErrorPage="false" isThreadSafe="true" contentType="text/html" %> <center><h3>Arithmetic Operations</h3> <%! int a=10,b=20,sum; %> <% out.println("a="+a+"<br>"); out.println("b="+b+"<br>"); sum=a+b; out.println("sum="+sum+"<br>"); %> <hr> <br><br> a=<%=a%><br>

www.JavaEra.com
b=<%=b%><br> sum=<%=a+b%><br> </center> Web.xml <welcome-file-list> <welcome-file> first.jsp </welcome-file> </welcome-file-list> First.jsp <%@ page import="java.util.*" %> <html> <head> <title>First Jsp Page</title> </head> <body background="back.gif" text=red> <%-- out.prinln(new Date()); --%> Todays date is<%= new Date() %> </body> </html> Second.jsp <%@ page language="Java" import="java.math.*,java.util.*" session="false" buffer="12kb" autoFlush="true" info="my page directive jsp" errorPage="error.jsp" isErrorPage="false" isThreadSafe="true" contentType="text/html" %> <body background="back.gif" text=red> <%! int a[]=new int[5];int a1,b,sum; %> <center>Start Of The JSP page<hr> <%! int sum(int a,int b) { return a+b; } %> <center>Todays date is<%= new Date() %><br> sum of 10,20= <%= sum(10,20) %><br>

www.JavaEra.com
<% for(int i=0;i<a.length;i++) a[i]=i+1; out.println("Element in the Array<br>"); for(int i=0;i<a.length;i++) out.print(a[i]); %><br> End Of The JSP Page<hr> </body> Third Web.xml <welcome-file-list> <welcome-file> login.html </welcome-file> </welcome-file-list> Login.html <html> <body background="back.gif" text=red> <center><b><font size=5> <marquee behavior=alternate>Login Page </marquee></font> <form action="http://localhost:8888/login/login.jsp"> <hr> User Name:<input type=text name="uname"><br> Password:<input type=password name="pwd"><br> <hr> <input type=submit value="Login"> <input type=reset> </form> </body> </html> Login.jsp <%@ page import="java.util.*" %>

www.JavaEra.com
<body background="back.gif" text=blue> <center> <%! String name,value; %> <% Enumeration names=request.getParameterNames(); while(names.hasMoreElements()) { name=(String)names.nextElement(); value=request.getParameter(name); out.println(name+"  :"+value+"<br>"); } out.close(); %> Fourth Web.xml <welcome-file-list> <welcome-file> emp.html </welcome-file> </welcome-file-list> Emp.html <html> <body background="back.gif" text=red> <center><b><font size=5> <marquee behavior=alternate>Enter Emp Details </marquee></font> <form action="http://localhost:8888/emp/emp.jsp"> <hr> <table bordercolor=green> <tr> <td>Eno:</td><td><input type=text name="eno"></td> </tr> <tr>

www.JavaEra.com
<td>Ename:</td><td><input type=text name="ename"></td> </tr> <tr> <td>Desig:</td><td><input type=text name="desig"></td> </tr> <tr> <td>Sal:</td><td><input type=text name="sal"></td> </tr> <tr> <td><input type=submit value="insert"></td><td><input type=reset></td> </tr></table> </form> <hr> </body> </html> Error.jsp <%@ page isErrorPage="true" %> <body background="back.gif" text=maroon> <center> <h2>Error Page</h2><hr></center> Errors:<br><br><br><br> <center> <%= exception %> </body> Conn.jsp <%@ page import="java.sql.*" errorPage="error.jsp" %> <%! Connection con; Statement stmt; ResultSet rs; ResultSetMetaData rsmd; PreparedStatement pstmt; int count; void close(Connection con)throws Exception {

www.JavaEra.com
con.close(); } Connection open(String uname,String pwd)throws Exception { Class.forName("sun.jdbc.odbc.JdbcOdbcDriver"); con=DriverManager.getConnection("jdbc:odbc:oradsn",uname,pwd); return con; } %> Emp.jsp <%@ page import="java.util.*" %> <body background="back.gif" text=blue> <center> <%@ include file="conn.jsp" %> <%! String eno,ename,desig,sal; %> <% con=open("scott","tiger"); if(con!=null) out.println("Connected......"); else out.println("Not Connected......"); eno=request.getParameter("eno"); ename=request.getParameter("ename"); sal=request.getParameter("sal"); desig=request.getParameter("desig"); pstmt=con.prepareStatement("insert into empDet values(?,?,?,?)"); pstmt.setString(1,eno); pstmt.setString(2,ename); pstmt.setString(3,desig); pstmt.setString(4,sal); int i=pstmt.executeUpdate(); out.println(i+" Row Inserted......"); close(con); %> Fifth
www.JavaEra.com
Math.jsp <html> <body> <%! int a=10,b=20; %> <%! int getSum() { return a+b; } int getDifference() { return a-b; } int getProduct() { return a*b; } int getDivision() { return a/b; } %> <font face="Georgia" color= "blue" size=4> <center> A is<%=a%><br> B is<%=b%><br> <font color= "green" size=4> <%="Arithmetic Operations"%><br> <font color= "maroon" size=4> sum is <%=getSum() %><br> Difference is <%=getDifference() %><br> Product is <%getProduct() %><br> Division is <%getDivision() %><br> </center> </body> </html> Sixtth (INCLUDE AND FORWARD)

www.JavaEra.com
One.jsp <html> <b><center>This is First Page</b> </html> Two.jsp <html> <h2><center>This is Second Page</center></h2> </html> Three.jsp <html> <h2><center>This is Third Page</center></h2> </html> Error.jsp <html> <h2>Error................</h2> </html> Main.jsp <%@ page language="Java" %> <%! int count=0; %> <% count=++count; out.println(count); if(count==1){%> <jsp:forward page="/one.jsp"/> <%}else if(count==2){%> <jsp:forward page="/second.jsp"/> <%}else if(count==3){%> <jsp:forward page="/third.jsp"/> <%}else{ %>

www.JavaEra.com
<jsp:forward page="error.jsp"/> <%}%> JSP Tag Extensions
Let’s consider the <jsp:forward> standard action that is provided by the JSP specification. This tag dispatches the current request to another JSP page within the current web application. It can be invoked with the following syntax: <jsp:forward page=”next.jsp”> We can also add additional parameters to the request before forwarding it, by using a version of <jsp:forward> that has one or more <jsp:param> tags nested within it: <jsp:forward page=”next.jsp”> <jsp:param name=”image” value=”house.gif” > </jsp:forward> Tag extensions allow a vast range of new functionality to be added to JSP pages and they can be invoked in an intuitive way, similar to the standard actions. For example, we could create a tag named <wrox:forward>, specify what attributes and sub-tags (if any) it requires, and implement it so that it performs a custom action before forwarding the current request to a new JSP page. Not only can such tags be added simply be added into a JSP page, they encourage the separation of code and presentation, because the call is decoupled from the class that implements the functionality associated with the tag. The key concept of tag extensions are:
• Tag Name A JSP tag is uniquely identified in a page by a combination of a prefix (in this case jsp), and suffix(in this case forward), separated by a

www.JavaEra.com
colon. The prefix identifies a tag library (analogous to an XML namespace) and the suffix identifies a particular tag in that library.
• Attributes Tags may have attributes (which use XML attribute syntax). Our <jsp:forward> tag has one attribute (page), while the <jsp:param> tag has two (name and value). Attributes can be required or optional.
• Nesting: Tag extensions can detect nesting at run time and cooperate. A tag directly enclosing another tag is the parent of the tag it encloses. In our example, the <jsp:forward> tag is the parent of the <jsp:param> tag. Any tag enclosing another tag, directly or more distantly, is an ancestor of the enclosed tag.
• Body Content: The body content is anything between the start and end elements in a JSP tag, excluding sub tags. A tag extension can access and manipulate its body content.
• Scripting Variables: Tags can define variables that can be used within the JSP page in tag body content or (depending on the scope of the variables) after the tag has been closed. The <jsp: useBean> standard action is an example of a tag that defines a scripting variable available throughout the remainder of the JSP. A Simple Tag: Before we look at the tag extension API and the supporting infrastructure in detail, let’s implement a simple tag. The simplest case is a tag without attributes or body content, which outputs some HTML. And we will also add some dynamic content to prove that the tag is working and doing something. We’ll call our simple tag hello, and here’s how we might use it in a JSP page. The first line is a declaration used to import the tag library, which we will discuss in detail later: <%@ taglib uri=”/hello” prefix=”examples” %>

www.JavaEra.com
To implement the tag we need to define a tag handler (a Java class implementing the tag’s functionality), and provide a tag library descriptor. We can then import the tag library into any JSP page that requires it. The tag handler class must react to callbacks from the JSP engine when it encounters tags in JSP pages at run time. The most important of these callbacks are doStartTag (), which is called when the opening of the tag is encountered, and doEndTag (), which is called when the closing tag is encountered. The implementation of HelloTag is very simple, as most of the work of implementing the custom tag is done by the TagSupport superclass provided by the JSP API. The TagSupport superclass is a convenience class provided in the tag extension API. It already implements the javax.servlet.jsp.tagext.Tag interface. The doStartTag () method returns a value indicating whether or not to evaluate any body content this tag may have. The legal return vales are EVAL_BODY_INCLUDE (meaning to evaluate the tag’s body content and any sub-tags) and SKIP_BODY (meaning tag contents will be ignored): The doEndTag () method will be called when the JSP engine encounters the end of a tag implemented by this class. It returns a value indication whether or not the engine should evaluate the remainder of the JSP page. The legal turn values are EVAL_PAGE (the usual case), and SKIP_PAGE. The tag library descriptor, which we’ll name hello.tld, maps the tag to the tag handler class and defines the way JSP pages may interact with the HelloTag class: The tag’s suffix when used in any JSP must be hello, and its prefix is example when imported into this JSP page. So to use the tag in a JSP we should use <examples: hello> Anatomy of a Tag Extension:

www.JavaEra.com
The minimal requirement to implement a tag extension is a tag handler class and a tag library descriptor.
• A tag handler is a JavaBean that implements one of three interfaces defined in the javax.servlet.jsp.tagext package: Tag, IterationTag, and BodyTag. These interfaces define the lifecycle events relevant to a tag and most importantly, the calls that the class implementing the tag will receive when the JSP engine encounters the opening and closing tags.
• A tag library descriptor of TLD, which is an XML document that
contains information about one or more tag extensions.
• An additional class may also be specified in the TLD that performs
custom validations of tag attributes. Of course, the classes implementing a tag may use any number of helper classes, which will also need to be packaged with the tag so that it is a complete deployable unit.
• Before tags can be used in a JSP, the taglib directive must be used to
import a tag library and associate the tags it contains with a prefix. Tag Handlers: When the JSP engine encounters a tag extension in a JSP page at translation time, it parses the tag library descriptor to find the required tag handler class, and generates code to obtain, and interact with, the tag handler. The interface implemented by the tag handler defines callbacks that the servlet (created from the JSP page) will make to the tag handler instance at run time.
For performance reasons, JSP engines will not necessarily instantiate a new tag handler every time a tag is encountered in a JSP page. Instead, they may maintain a pool of tag instances, which can be reused where possible. When a tag is encountered in a JSP page, the JSP engine will try to find a Tag instance that is not being used, initialize it, use it, and finally free it (but not destroy it), leaving it

www.JavaEra.com
available for further use. The programmer has no control over any pooling that may occur.
Note: the JSP engine will not use an instance of a tag handler to handle a tag unless it is free. After all invocations of the tag handler are completed, the container will invoke the tag handler’s release () method. This will free any remaining resources and prepare the tag handler for garbage collection. Many tags do not need to implement the release () method and can simply rely on the empty default implementation inherited from the abstract super classes provided by the tag extension API. The javax.servlet.jsp.tagext.Tag interface The Tag interface defines a simple interaction between the JSP engine and the tag handler, which is sufficient for tags that don’t need to manipulate their body content or evaluate it repeatedly. Its core methods are the calls received when the JSP engine encounters the tag’s opening and closing tags: doStartTag () and doEndTag(). Before we look at the method contracts in more detail, a sequence diagram helps to visualize the calls made to the tag handler by the compiled servlet. Assume that the container already has a tag handler instances available, and is in the default state: Let’s look at the messages in more detail:
• The container initializes the tag handler by setting the tag handler’s pageContext property, which the tag handler can use to access information available to the JSP page using it.
• The container sets the tag handler’s parent property. (The parent will be set to null if the tag is not enclosed in another tag.)
• Any tag attributes defined by the developer will be set. This is a mapping from the XML attributes of the tag to the corresponding properties of the tag handler bean. For example, in the case of a tag invoked like this : <mytags:test name=”john” age=”43” />, the container will attempt to call the setName() and setAge() methods on the tag handler. The container will attempt to convert each attribute to the type of the corresponding bean property: for example, the string “43” would be converted to an int in this case. If the type conversion fails, and exception will be thrown and must be handled by the calling JSP page.
• The container calls the tag handler’s doStartTag() method and then the doEndTag() method.

www.JavaEra.com
• This message may not occur after all tag invocations. The container
calls the release () method. Tag handlers differ from page beans in that their lifecycle is entirely independent of that of the JSP pages that use them. Tag handlers must support repeated use before destruction, possibly in a number of JSP pages. The implementation of the release () method must ensure that any resources required during the tag’s execution are freed. The JSP specification states that release () is guaranteed to be called before the tag handler is eligible for garbage collection.
int StartTag() throws JspException
This is called after the tag has been initialized, when the JSP engine encounters the opening of a tag at run time. Its return value should be one of two constants defined in the Tag interface: EVAL_BODY_INCLUDE, which instructs thee JSP engine to evaluate both the tag’s body and any child tags it has, or SKIP_BODY, which instructs the JSP engine to ignore the body. This method can throw a JspException, (as will most of the methods in the tag handler API WHEN AN ERROR CONDITION IS ENCOUNTERED) BUT HOW IT WILL BE HANDLED WILL DEPEND ON THE jsp page using the tag. Most JSP pages will use an error page, so an exception thrown in a tag will typically abort the rendering of the page.
int doEndTag()throws JspException There are also a number of methods that relate to tag nesting, initialization and reuse: Tag getParent() void setParent()
void setPageContext (PageContext pc) : setPageContext () is an initialization method that makes the PageContext of the JSP available to the tag
void release() release () is a call to the tag handler to release any resources, perhaps to close a JSBC connection. The javax.servlet.jsp.tagext.IterationTag Interface: the IterationTag interface has been added in JSP 1.2, and extends that Tag interface. It provides a single new method that allows the tag to repeat the evaluation of the tag body content:

www.JavaEra.com
int doAfterBody() throws JspException
doAfterBody () is called each time the tag’s body has been processed (where doEndTag (() would have been cvalled in the case of an implementation of the Tag interface). The valid return values of doAfterBody () are EVAL_BODY_AGAIN and SKIP_BODY. A return value of EVAL_BODY_AGAIN directs the JSP engine to evaluate the tag’s body and any child tags again, resulting in at lease one more call to this method. A return value of SKIP_BODY causes the processing ofbody content to terminate, which can be used to conditionally loop through the tag content.
In JSP 1.1, it was necessary to use the BodyTag interface to perform iteration. The introduction of the much simpler IterationTag interface is good news, as the BodyTag interface introduces unnecessary complexity i9nt the case of simple looping constructs.
Steps to create and use custom tags
• C:\Program Files\Apache Software Foundation\Tomcat
5.0\webapps\jsp-examples\WEB-INF\classes\HelloTag • • • • .java • set the class path before compile the HelloTag.java • C:\Program Files\Apache Software Foundation\Tomcat
5.0\webapps\jsp-examples\WEB-INF\jsp\example-taglib.tld <tag>
<name>hello</name> <tag-class>tagext.HelloTag</tag-class> <body-content>JSP</body-content> <description>
Perform a server side action; uses 3 mandatory attributes </description> </tag>
• C:\Program Files\Apache Software Foundation\Tomcat 5.0\webapps\jsp-examples\WEB-INF\web.xml

www.JavaEra.com
<taglib>
<taglib-uri>/hello</taglib-uri> <taglib-location> /WEB-INF/jsp/example-taglib.tld </taglib-location> </taglib>
• write a file that uses this custom tag In jsp-examples folder u write hello.jsp
Advanced JSP Topics:
1. Expression Language 2. Custom action 3. JSTL (Java Standard Tag Library)
Expression Language is developed to simplify expressions in a JSP. It
provides a way to use run-time expressions outside JSP scripting elements. We can use EL expressions in scriptless JSP pages. Scriptless JSP pages are those pages that, for whatever reason, are not allowed to use JSP declarations, scriptlets, or scripting expressions. Operators: Most of the usual operators available in Java are available in Expression Language: Arithmetic +,-,*,/,div,%,mod Relational == and eq
!= and ne < and lt >and gt <= and le >=and ge
Logical && and and || and or ! and not
Other (),empty,[],.

www.JavaEra.com
Implicit objects: EL expressions also have implicit objects available to them. Many of these implicit objects are the same implicit objects that are available in JSP scriptlets and expressions. PageContext: The javax.servlet.jsp.PageContext object for the page. Can be used to accesss the JSP implicit objects such as request, reaponse, session,out,etc. for example, ${pageContext.request} evaluates to the request object for the page. pageScope:
<jsp:useBean id=”questions” scope=”page” class=”ch04.Questions”> <jsp:setProperty name=”questions” property=”topic” /> </jsp:useBean> ${pageScope.questions.topic}
requestScope: sessionScope: applicationScope: param: paramValues cookie initParam ExpressioLangaugeEx.jsp <%@ page import="java.util.*,java.io.*;" session="true" %> ${1}+${2}=${1+2}<br> ${ 2*(4+3) }<br> ${(2*4)+2}<br> <jsp:useBean id="sm" class="smarket.SuperMarket"scope="page"> <jsp:setProperty name="sm" property="item" value="Rice" /> <jsp:setProperty name="sm" property="qty" value="50" /> <jsp:setProperty name="sm" property="price" value="1500" /> </jsp:useBean> <h2> values of the bean </h2> Item:${pageScope.sm.item}<br> Quantity:${pageScope.sm.qty}<br>

www.JavaEra.com
price:${pageScope.sm.price}<br> <%-- ${empty name} it checks whether name is empty or not --%> <%! int a=20; %> <% Vector vec=new Vector(); vec.add("bindu"); pageContext.setAttribute("someName",vec); pageContext.setAttribute("value",vec.get(0)); %> ${empty someName} <% session.setAttribute("address","vij"); %><br> ${sessionScope.address} ${pageScope.value} ${a} JavaStandardTagLibrary.jsp <%@ taglib uri="http://java.sun.com/jstl/core_rt" prefix="c_rt" %> <%@ taglib uri="http://java.sun.com/jstl/format" prefix="fmt" %> <html> <head><title>JSTL EXAMPLE</title></head> <body bgcolor=#716302 text=black> <jsp:useBean id="sm" class="smarket.SuperMarket"scope="request"> <jsp:setProperty name="sm" property="item" value="Rice" /> <jsp:setProperty name="sm" property="qty" value="50" /> <jsp:setProperty name="sm" property="price" value="1500" /> </jsp:useBean> <!-- get the properties of the bean --> <h2>get the properties of the bean </h2> <font face="Georgia" color="#wertty" size=3> Item:<c_rt:out value="${sm.item}" /><br> Quantity:<c_rt:out value="${sm.qty}" /><br> price:<c_rt:out value="${sm.price}" /><br> <!-- set the properties of the bean --> <h2>set the properties of the bean </h2>

www.JavaEra.com
<c_rt:set target="${sm}" property="item" value="britania" /> <c_rt:set target="${sm}" property="qty" value="1" /> <c_rt:set target="${sm}" property="price" value="25" /> Item:<c_rt:out value="${sm.item}" /><br> Quantity:<c_rt:out value="${sm.qty}" /><br> Price:<c_rt:out value="${sm.price}" /><br> <h2>if test</h2> <c_rt:if test="${sm.item=='britania'}"> Yes it is Britania </c_rt:if><br> <!-- for loop example --> <h2>for loop example</h2> <c_rt:forEach var="i" begin="1" end="10" step="2"> <c_rt:out value="${i}" /> </c_rt:forEach> <h2>Formating numbers</h2> result in<fmt:formatNumber value="23.456" type="number"/><br> result in<fmt:formatNumber value="23.456" type="currency"/><br> result in<fmt:formatNumber value=".23456" type="percent"/><br> result in<fmt:formatNumber value="23.456" type="currency" minFractionDigits="1"/><br> </body> </html> Note: PLACE THE c.tld AND fmt.tld FILES in TLDS directory AND PLACE THE TLDS DIRECTORY IN WEB-INF FOLDER. Web.xml <taglib> <taglib-uri>http://java.sun.com/jstl/core</taglib-uri> <taglib-location> /WEB-INF/tlds/c.tld </taglib-location> </taglib> <taglib> <taglib-uri>http://java.sun.com/jstl/format</taglib-uri>

www.JavaEra.com
<taglib-location> /WEB-INF/tlds/fmt.tld </taglib-location> </taglib>