文 bitnami tomcat for huawei enterprise cloud · bitnami tomcat for huawei enterprise cloud ......
TRANSCRIPT
文档名称 文档密级
2017-4-12 华为保密信息,未经授权禁止扩散 第 1页, 共 17页
Bitnami Tomcat for Huawei
Enterprise Cloud
Description
Apache Tomcat implements the Servlet and JavaServer Pages specifications
from the Java Community Process. It includes many additional features that
make it a useful platform for developing and deploying web applications and
web services.
How can I get started with Tomcat?
To get started, we suggest the following steps:
Step 1. Publish Web pages.
To serve Web pages with Apache Tomcat, simply copy your files to the
default document root directory at /opt/bitnami/apache-
tomcat/webapps/ROOT. To deploy a WAR file, simply copy the WAR file to
the /opt/bitnami/apache-tomcat/webapps folder.
Step 2. Access the management console.
Use the Tomcat management console to manage the Tomcat server and
deploy applications. To access it, refer to these instructions.
Step 3. Use Apache with Tomcat.
You can connect the Apache Web server with Tomcat through the AJP
protocol. To make them work together, enable the mod_proxy.so and
mod_proxy_ajp.so modules in /opt/bitnami/apache2/conf/httpd.conf and then
configure the ProxyPass directive .
For more information, refer to these instructions.
How to start or stop the services?
Each Bitnami stack includes a control script that lets you easily stop, start and
restart services. The script is located at /opt/bitnami/ctlscript.sh. Call it without
any service name arguments to start all services:
sudo /opt/bitnami/ctlscript.sh start
文档名称 文档密级
2017-4-12 华为保密信息,未经授权禁止扩散 第 2页, 共 17页
Or use it to restart a single service, such as Apache only, by passing the
service name as argument:
sudo /opt/bitnami/ctlscript.sh restart apache
Use this script to stop all services:
sudo /opt/bitnami/ctlscript.sh stop
Restart the services by running the script without any arguments:
sudo /opt/bitnami/ctlscript.sh restart
Obtain a list of available services and operations by running the script without
any arguments:
sudo /opt/bitnami/ctlscript.sh
How to access the Tomcat server console?
Access the Tomcat console by browsing to http://SERVER-IP/.
How to upload files to the server with SFTP?
NOTE: Bitnami applications can be found in /opt/bitnami/apps.
When uploading files via SFTP, you must have the server's IP address,
username and password or, if you chose to deploy the server with an SSH
key instead of a password, you must have the server username and
corresponding SSH private key in .ppk format (for Windows) or in .pem format
(for Linux and Mac OS X).
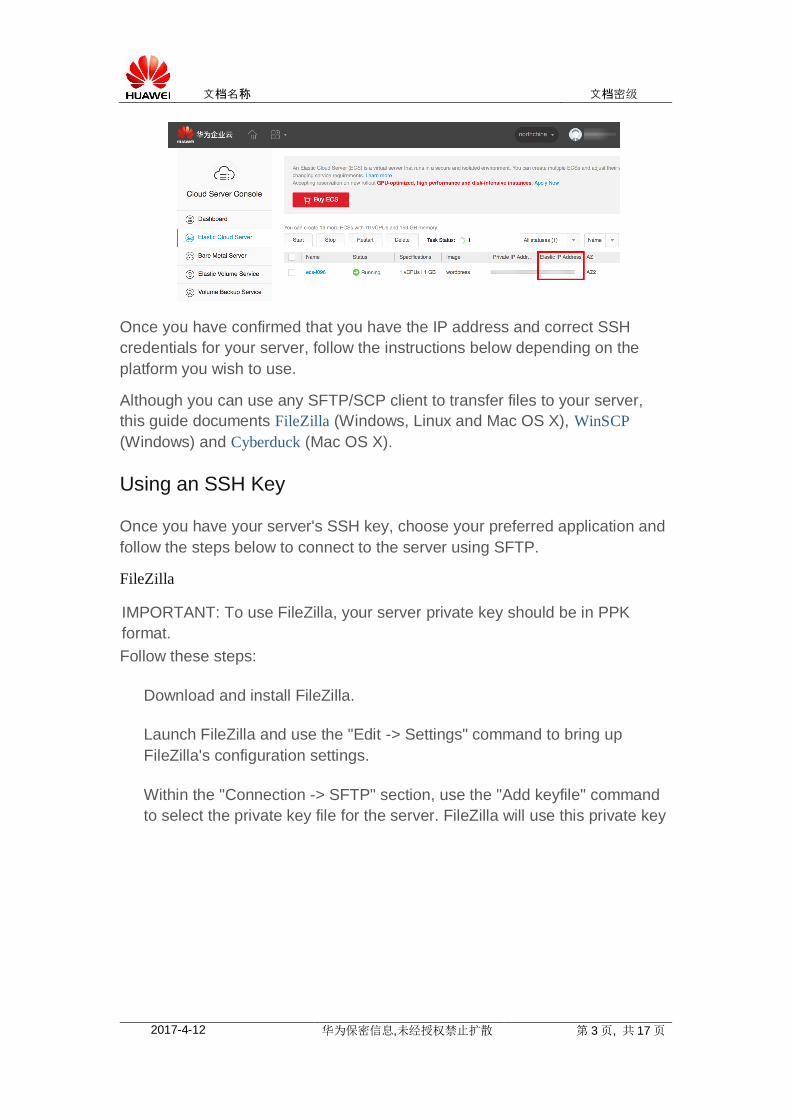
To obtain the IP address for your server, follow these steps:
Log in to the Huawei Cloud Server Console.
Navigate to the "Computing -> Elastic Cloud Server" section.
Note the public IP address for the server you wish to connect to.
文档名称 文档密级
2017-4-12 华为保密信息,未经授权禁止扩散 第 3页, 共 17页
Once you have confirmed that you have the IP address and correct SSH
credentials for your server, follow the instructions below depending on the
platform you wish to use.
Although you can use any SFTP/SCP client to transfer files to your server,
this guide documents FileZilla (Windows, Linux and Mac OS X), WinSCP
(Windows) and Cyberduck (Mac OS X).
Using an SSH Key
Once you have your server's SSH key, choose your preferred application and
follow the steps below to connect to the server using SFTP.
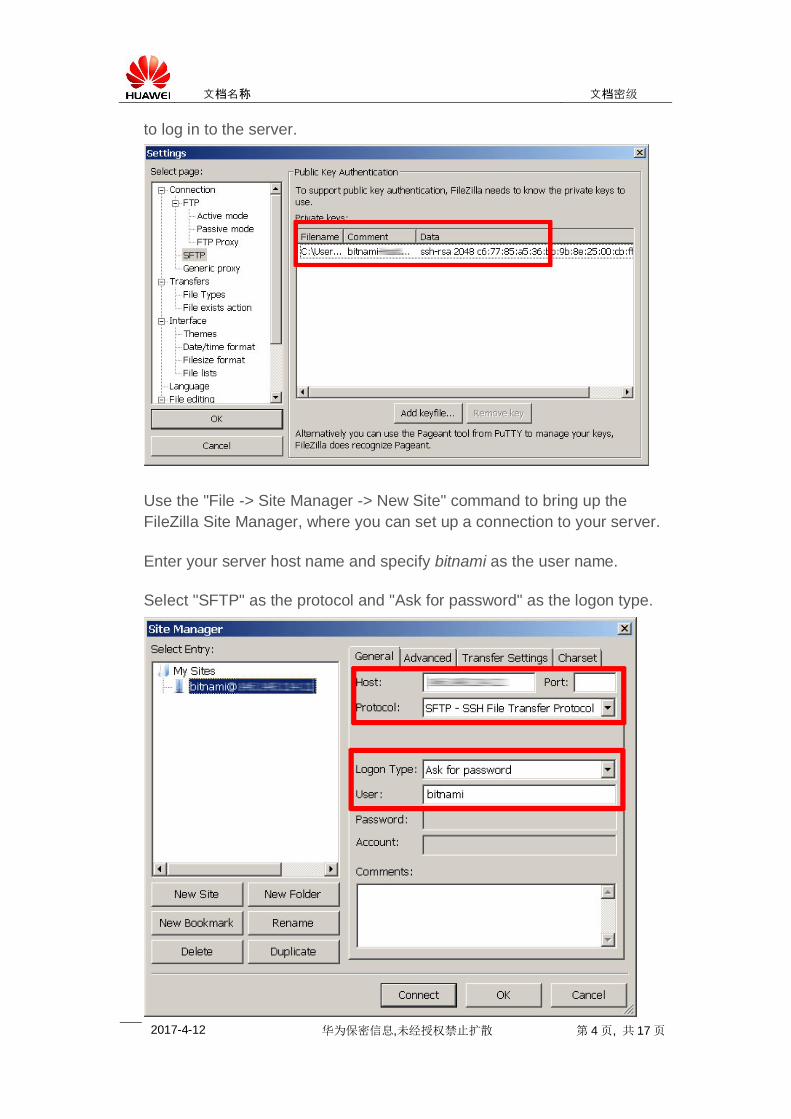
FileZilla
IMPORTANT: To use FileZilla, your server private key should be in PPK
format.
Follow these steps:
Download and install FileZilla.
Launch FileZilla and use the "Edit -> Settings" command to bring up
FileZilla's configuration settings.
Within the "Connection -> SFTP" section, use the "Add keyfile" command
to select the private key file for the server. FileZilla will use this private key
文档名称 文档密级
2017-4-12 华为保密信息,未经授权禁止扩散 第 4页, 共 17页
to log in to the server.
Use the "File -> Site Manager -> New Site" command to bring up the
FileZilla Site Manager, where you can set up a connection to your server.
Enter your server host name and specify bitnami as the user name.
Select "SFTP" as the protocol and "Ask for password" as the logon type.
文档名称 文档密级
2017-4-12 华为保密信息,未经授权禁止扩散 第 5页, 共 17页
Use the "Connect" button to connect to the server and begin an SFTP
session. You might need to accept the server key, by clicking "Yes" or
"OK" to proceed.
You should now be logged into the /home/bitnami directory on the server. You
can now transfer files by dragging and dropping them from the local server
window to the remote server window.
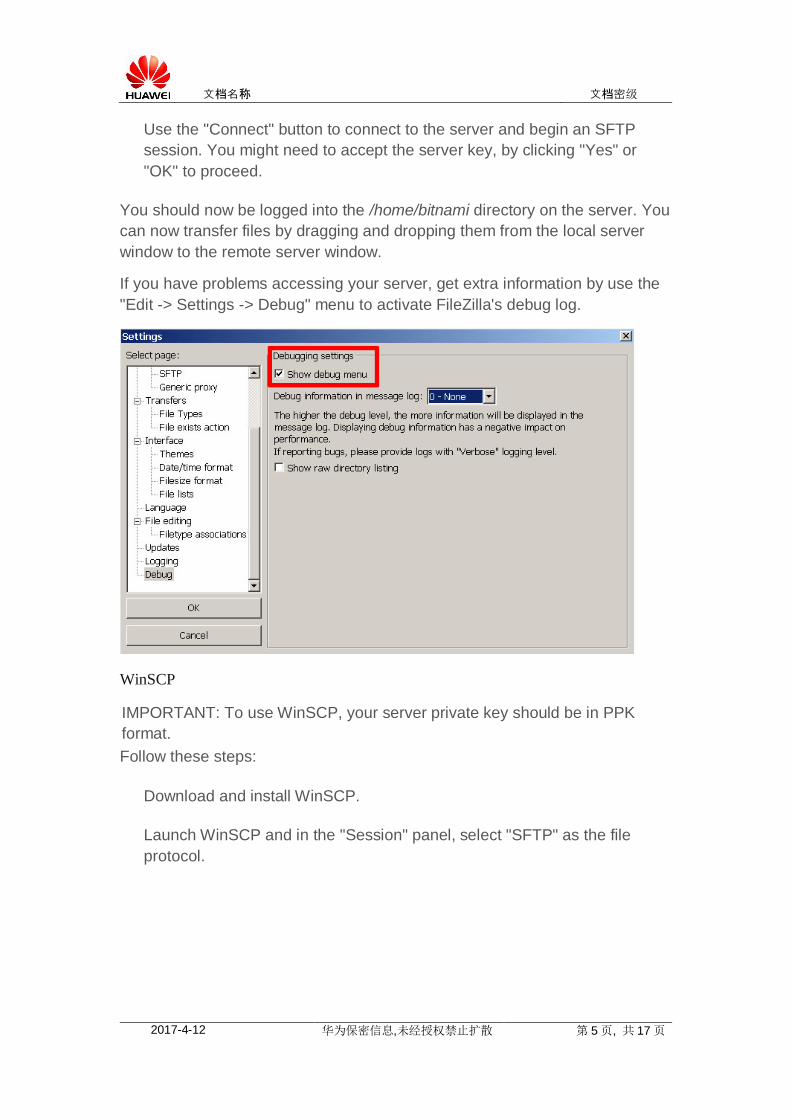
If you have problems accessing your server, get extra information by use the
"Edit -> Settings -> Debug" menu to activate FileZilla's debug log.
WinSCP
IMPORTANT: To use WinSCP, your server private key should be in PPK
format.
Follow these steps:
Download and install WinSCP.
Launch WinSCP and in the "Session" panel, select "SFTP" as the file
protocol.
文档名称 文档密级
2017-4-12 华为保密信息,未经授权禁止扩散 第 6页, 共 17页
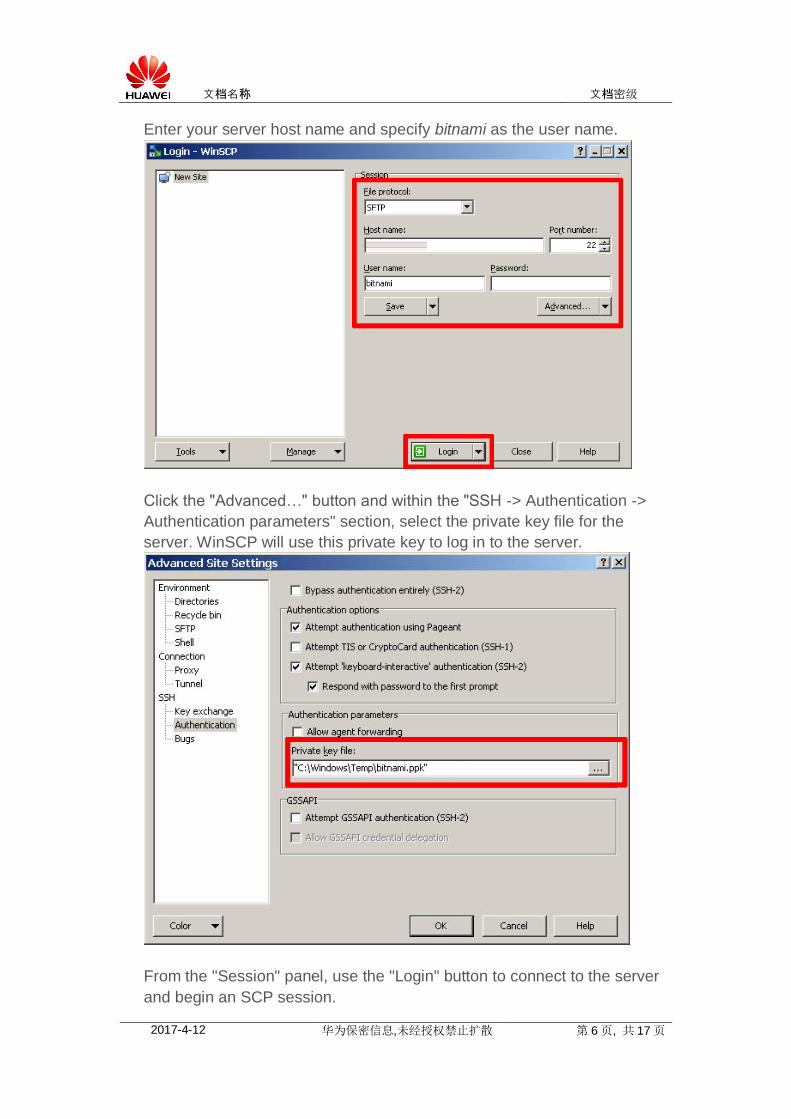
Enter your server host name and specify bitnami as the user name.
Click the "Advanced…" button and within the "SSH -> Authentication ->
Authentication parameters" section, select the private key file for the
server. WinSCP will use this private key to log in to the server.
From the "Session" panel, use the "Login" button to connect to the server
and begin an SCP session.
文档名称 文档密级
2017-4-12 华为保密信息,未经授权禁止扩散 第 7页, 共 17页
You should now be logged into the /home/bitnami directory on the server. You
can now transfer files by dragging and dropping them from the local server
window to the remote server window.
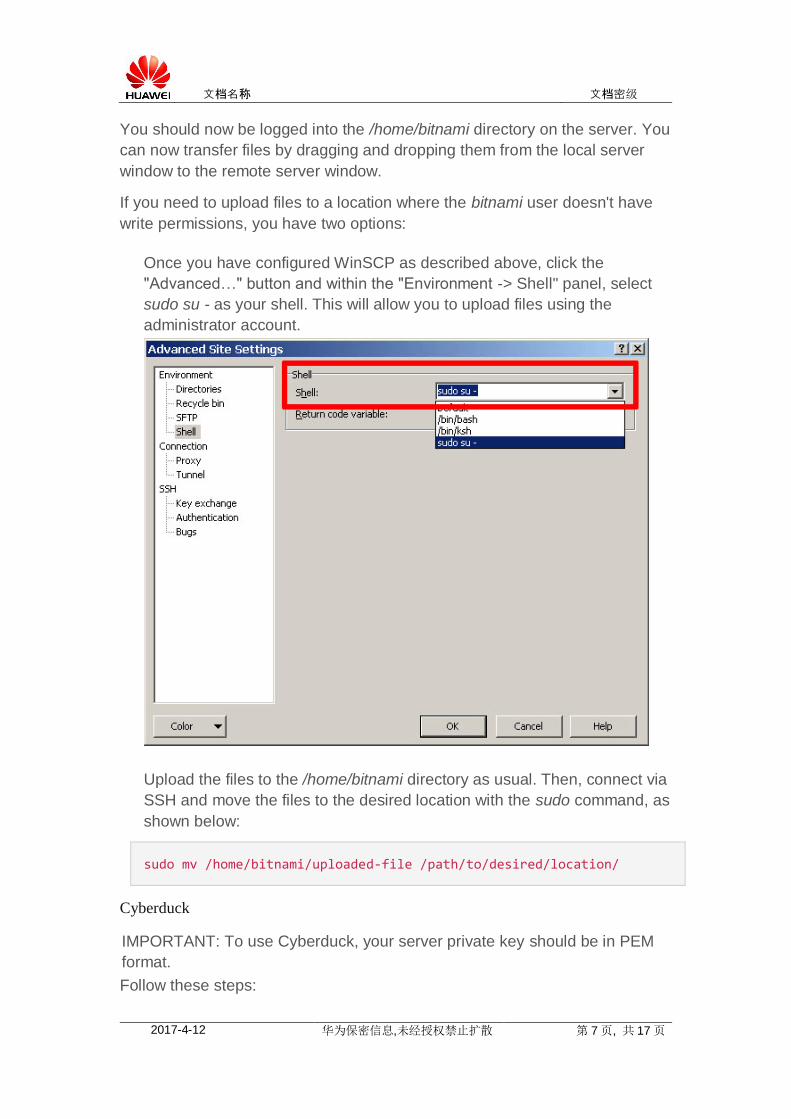
If you need to upload files to a location where the bitnami user doesn't have
write permissions, you have two options:
Once you have configured WinSCP as described above, click the
"Advanced…" button and within the "Environment -> Shell" panel, select
sudo su - as your shell. This will allow you to upload files using the
administrator account.
Upload the files to the /home/bitnami directory as usual. Then, connect via
SSH and move the files to the desired location with the sudo command, as
shown below:
sudo mv /home/bitnami/uploaded-file /path/to/desired/location/
Cyberduck
IMPORTANT: To use Cyberduck, your server private key should be in PEM
format.
Follow these steps:
文档名称 文档密级
2017-4-12 华为保密信息,未经授权禁止扩散 第 8页, 共 17页
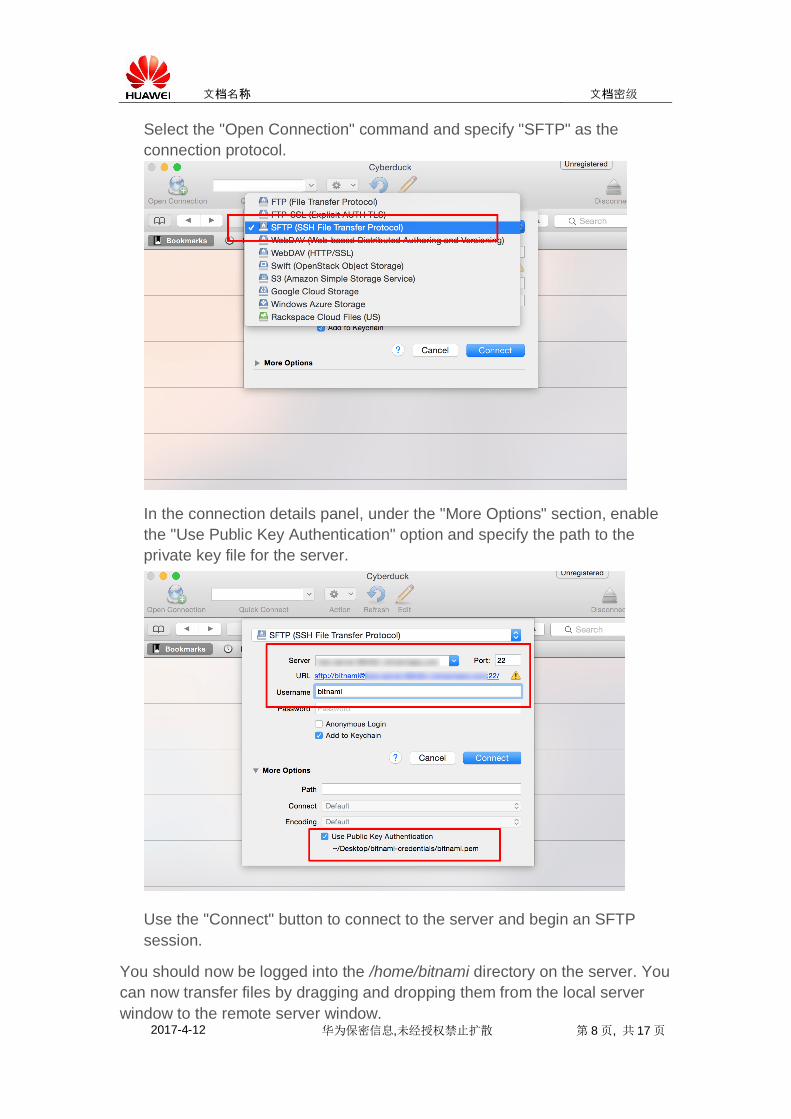
Select the "Open Connection" command and specify "SFTP" as the
connection protocol.
In the connection details panel, under the "More Options" section, enable
the "Use Public Key Authentication" option and specify the path to the
private key file for the server.
Use the "Connect" button to connect to the server and begin an SFTP
session.
You should now be logged into the /home/bitnami directory on the server. You
can now transfer files by dragging and dropping them from the local server
window to the remote server window.
文档名称 文档密级
2017-4-12 华为保密信息,未经授权禁止扩散 第 9页, 共 17页
Using a Password
Once you have your server's SSH credentials, choose your preferred
application and follow the steps below to connect to the server using SFTP.
FileZilla
Follow these steps:
Download and install FileZilla.
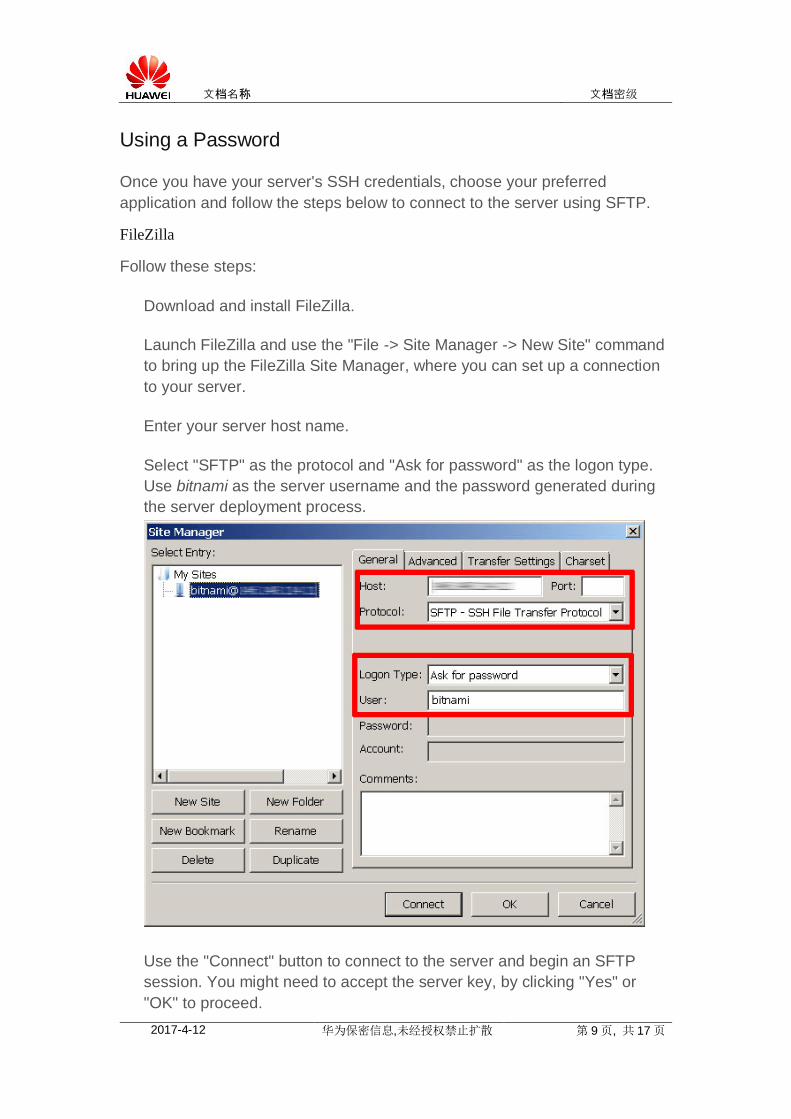
Launch FileZilla and use the "File -> Site Manager -> New Site" command
to bring up the FileZilla Site Manager, where you can set up a connection
to your server.
Enter your server host name.
Select "SFTP" as the protocol and "Ask for password" as the logon type.
Use bitnami as the server username and the password generated during
the server deployment process.
Use the "Connect" button to connect to the server and begin an SFTP
session. You might need to accept the server key, by clicking "Yes" or
"OK" to proceed.
文档名称 文档密级
2017-4-12 华为保密信息,未经授权禁止扩散 第 10页, 共 17页
You should now be logged into the /home/bitnami directory on the server. You
can now transfer files by dragging and dropping them from the local server
window to the remote server window.
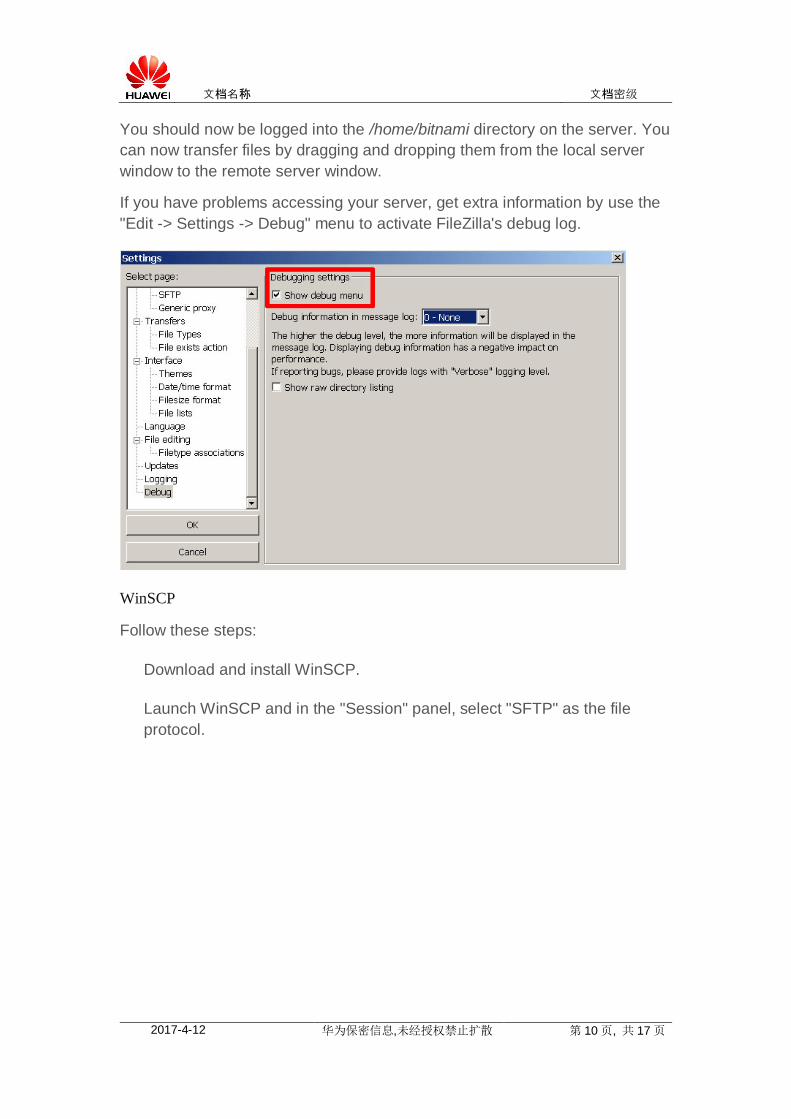
If you have problems accessing your server, get extra information by use the
"Edit -> Settings -> Debug" menu to activate FileZilla's debug log.
WinSCP
Follow these steps:
Download and install WinSCP.
Launch WinSCP and in the "Session" panel, select "SFTP" as the file
protocol.
文档名称 文档密级
2017-4-12 华为保密信息,未经授权禁止扩散 第 11页, 共 17页
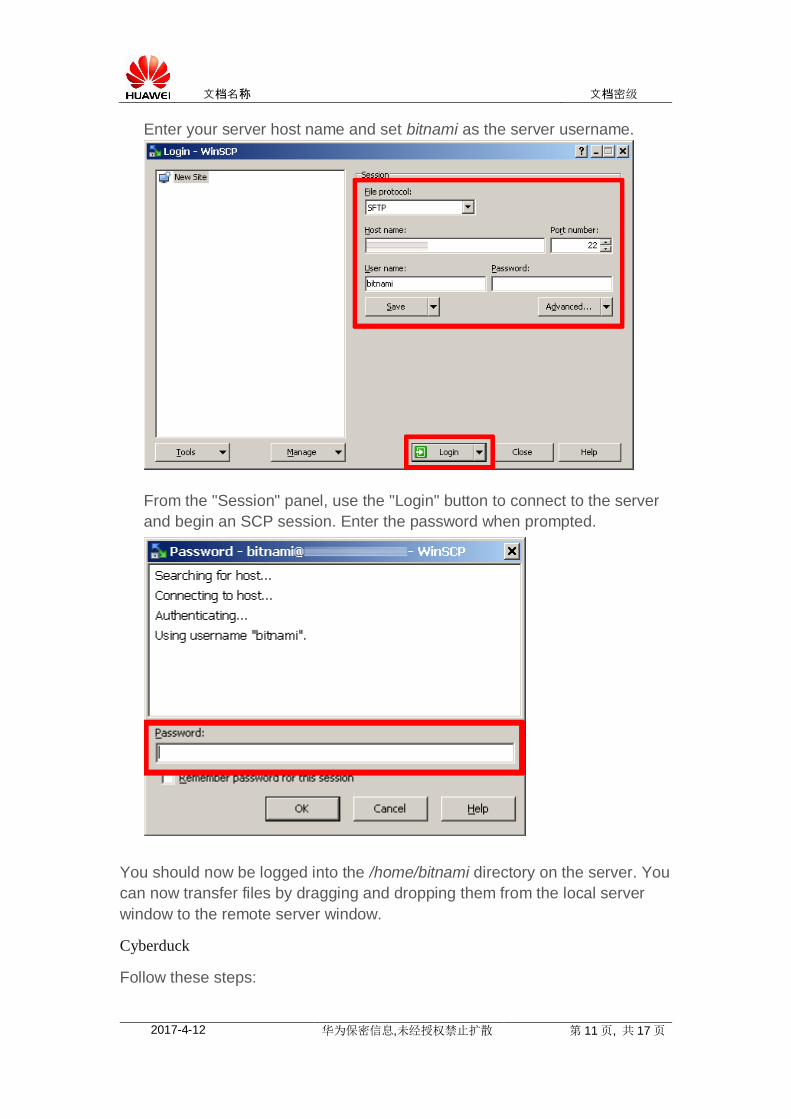
Enter your server host name and set bitnami as the server username.
From the "Session" panel, use the "Login" button to connect to the server
and begin an SCP session. Enter the password when prompted.
You should now be logged into the /home/bitnami directory on the server. You
can now transfer files by dragging and dropping them from the local server
window to the remote server window.
Cyberduck
Follow these steps:
文档名称 文档密级
2017-4-12 华为保密信息,未经授权禁止扩散 第 12页, 共 17页
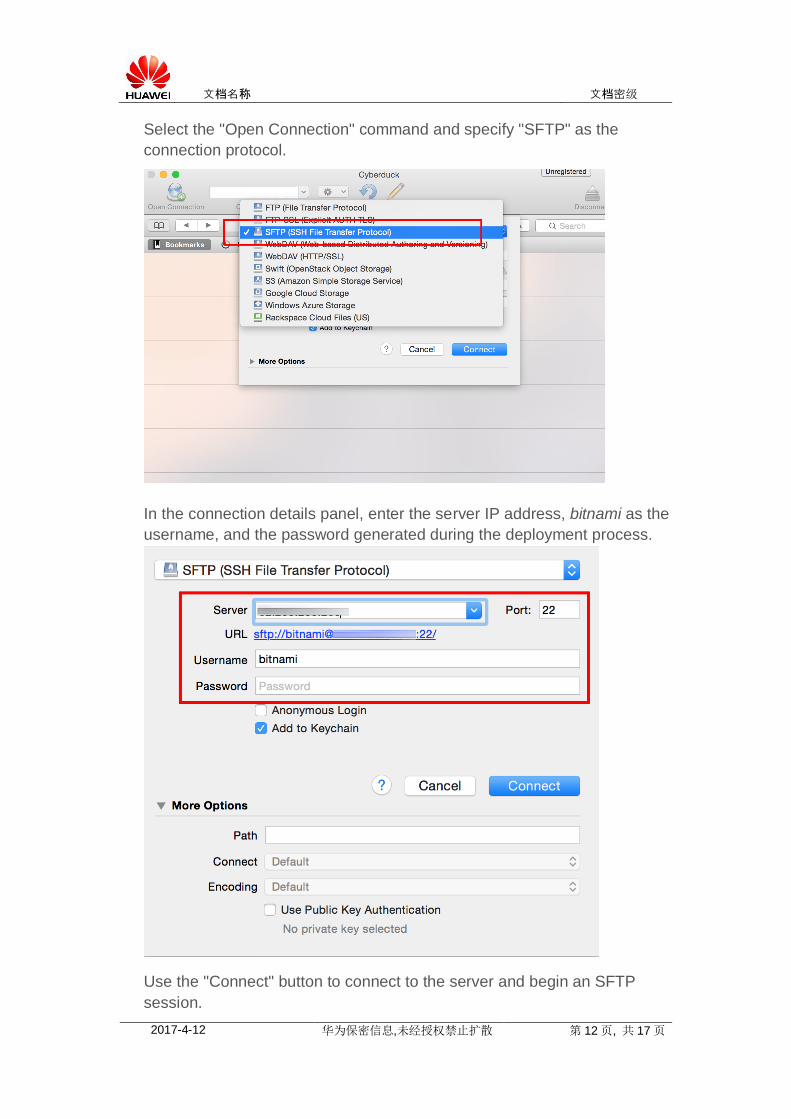
Select the "Open Connection" command and specify "SFTP" as the
connection protocol.
In the connection details panel, enter the server IP address, bitnami as the
username, and the password generated during the deployment process.
Use the "Connect" button to connect to the server and begin an SFTP
session.
文档名称 文档密级
2017-4-12 华为保密信息,未经授权禁止扩散 第 13页, 共 17页
You should now be logged into the /home/bitnami directory on the server. You
can now transfer files by dragging and dropping them from the local server
window to the remote server window.
How to configure the Apache Tomcat
server?
The main Apache Tomcat configuration file is at /opt/bitnami/apache-
tomcat/conf/server.xml.
Once Apache Tomcat starts, it will create several log files in the
/opt/bitnami/apache-tomcat/logs directory. The main log file is the catalina.out
file where you can find error messages.
How to change the Java memory settings?
The Java Virtual Machine (JVM) determines the default settings for your Java
application:
JAVA_OPTS="-Xms256m -Xmx512m"
You can increase these Java settings for your application if necessary. The
settings are in the /opt/bitnami/java/bitnami/setenv.sh file. Here is an example
of how to change the memory settings:
export JAVA_OPTS="$JAVA_OPTS -Xms256M -Xmx768M"
IMPORTANT: This file is a symlink to a configuration file that changes
depending on the instance type that you are currently using. The symlink will
be automatically changed when you resize your server.
How to change the Apache Tomcat port?
With the default configuration, Apache Tomcat will listen for requests on port
8080. To use a different port, edit the server.xml file and modify the value
specified in the Port directive.
<Connector port="8080" URIEncoding="UTF-8" protocol="HTTP/1.1"
connectionTimeout="20000" redirectPort="8443" />
文档名称 文档密级
2017-4-12 华为保密信息,未经授权禁止扩散 第 14页, 共 17页
Restart the Apache Tomcat server for the changes to take effect.
How to publish a Web page?
To serve Web pages with Apache Tomcat, simply copy your files to the
default document root directory at /opt/bitnami/apache-
tomcat/webapps/ROOT.
How to enable SSL access over HTTPS?
You can configure Apache Tomcat to enable SSL access to applications
using HTTPS. It is necessary to configure Tomcat with the location of the
Apache SSL certificate, as described below.
Check that the certificate file is present at /opt/bitnami/apache-
tomcat/conf/ssl/tomcat.cert.pem and the certificate key file is present at
/opt/bitnami/apache-tomcat/conf/ssl/tomcat.key.pem.
Uncomment the following line in the /opt/bitnami/apache-
tomcat/conf/server.xml file:
<Connector port="8443"
protocol="HTTP/1.1" SSLEnabled="true"
maxThreads="150" minSpareThreads="25" maxSpareThreads=
"75"
enableLookups="false" disableUploadTimeout="true"
acceptCount="100" scheme="https" secure="true"
clientAuth="false" sslProtocol="TLS"
keystoreFile="conf/myKeystore"
keystorePass="your_password"
SSLCertificateFile="/opt/bitnami/apache-tomcat/conf/ss
l/tomcat.cert.pem"
SSLCertificateKeyFile="/opt/bitnami/apache-tomcat/conf
/ssl/tomcat.key.pem"/>
Restart the Apache Tomcat server
文档名称 文档密级
2017-4-12 华为保密信息,未经授权禁止扩散 第 15页, 共 17页
You should now be able to access your Web applications over HTTPS by
browsing to https://SERVER-IP:8443.
How to create an SSL certificate for Apache
Tomcat?
A detailed guide is available in the official Apache Tomcat documentation at
http://tomcat.apache.org/tomcat-6.0-doc/ssl-howto.html.
How is Apache server connected with
Tomcat?
Bitnami stacks include the Apache Web server. There are different ways to
connect these two servers. One of them is connecting through the AJP
protocol.
The AJP Connector element represents a Connector component that
communicates with a web connector via the AJP protocol. This is used to
invisibly integrate Tomcat into an Apache installation and have Apache handle
the static content of the web application and/or to utilize Apache's SSL
processing.
To make them work together, enable the mod_proxy.so and
mod_proxy_ajp.so modules in /opt/bitnami/apache2/conf/httpd.conf. Then,
add the following lines to the file:
<Location /APPURL>
ProxyPass ajp://localhost:8009/APPURL
</Location>
If you connect your application through AJP, you will probably want to disable
the Tomcat HTTP port. The Bitnami Tomcat Stack has the HTTP server
disabled by default. To modify this configuration, uncomment the HTTP
section in the /opt/bitnami/apache-tomcat/conf/server.xml file.
How to increase the upload size limit in
Tomcat?
文档名称 文档密级
2017-4-12 华为保密信息,未经授权禁止扩散 第 16页, 共 17页
Modify the max-file-size and max-request-size values in the application's
web.xml configuration file (for example, in the webapps/manager/WEB-
INF/web.xml file).
<max-file-size>83886080</max-file-size>
<max-request-size>83886080</max-request-size>
Remember to restart your Tomcat server for the changes to take effect.
How to use an independent Java installation
instead of the bundled one?
Change the JAVA_HOME variable in the /opt/bitnami/apache-
tomcat/bin/setenv.sh file and the JRE_HOME variable in the
/opt/bitnami/apache-tomcat/scripts/ctl.sh to point to your custom Java
installation. Then, restart the Tomcat server:
sudo /opt/bitnami/ctlscript.sh restart tomcat
How to debug errors in Tomcat?
The main Apache Tomcat configuration file is at /opt/bitnami/apache-
tomcat/conf/server.xml.
Once Apache Tomcat starts, it will create several log files in the
/opt/bitnami/apache-tomcat/logs directory. The main log file is the catalina.out
file where you can find error messages. On some platforms, you may need
root account privileges to view these files.
How to create a custom Java application?
Many users run a Bitnami stack as a development environment for their own
projects (as opposed to running third-party applications). To create a custom
Java application from scratch, follow the steps below. These steps assume
that your application will live in the /opt/bitnami/apps/myapp/ directory:
Run the following commands to create the directories:
sudo mkdir /opt/bitnami/apps/myapp
文档名称 文档密级
2017-4-12 华为保密信息,未经授权禁止扩散 第 17页, 共 17页
sudo mkdir /opt/bitnami/apps/myapp/conf
Create and edit the /opt/bitnami/apps/myapp/conf/httpd-prefix.conf file and
add the line below to it:
Include "/opt/bitnami/apps/myapp/conf/httpd-app.conf"
Create and edit the /opt/bitnami/apps/myapp/conf/httpd-app.conf file and
add the content below to it. This is the main configuration file for your
application, so modify it further depending on your application's
requirements.
<Location /myapp>
ProxyPass ajp://localhost:8009/myapp
</Location>
NOTE: 8009 is the default port for the AJP connector. If you have
customized the stack to use a different port, change it here as well.
Once you have created the files and directories above, add the following
line to the end of the main Apache configuration file at
/opt/bitnami/apache2/conf/bitnami/bitnami-apps-prefix.conf, as shown
below:
Include "/opt/bitnami/apps/myapp/conf/httpd-prefix.conf"
Restart the Apache server.
You should now be able to access the application at http://SERVER-
IP/myapp.