· chapter 3: bodyweight training for the win! 9 the nf beginner bodyweight workout push ups (and...
TRANSCRIPT
WWW.NERDFITNESS.COM
i
CHAPTER 1: INTRODUCTION 1 1WHY STRENGTH TRAINING?PRIMARY OBJECTIONS TO STRENGTH TRAININGMUSCLES AND STRENGTH TRAININGWHAT HAPPENS TO MY MUSCLES WHEN I STRENGTH TRAIN?RECOVERYOK, I GET IT. CAN I START STRENGTH TRAINING NOW?
CHAPTER 2: HOW WILL YOU BE TRAINING? 6OPTION 1: BODYWEIGHT TRAININGOPTION 2: TRAINING IN A (HOME) GYM WITH EQUIPMENTWHICH PATH SHOULD I PICK?WHAT PROGRAM SHOULD I FOLLOW?
CHAPTER 3: BODYWEIGHT TRAINING FOR THE WIN! 9THE NF BEGINNER BODYWEIGHT WORKOUTPUSH UPS (AND 5 MISTAKES TO AVOID)BODYWEIGHT SQUATS (AND 5 MISTAKES TO AVOID)PULL UPS AND WHAT TO DO IF YOU CAN’T DO ONE YET (AND 5 MISTAKES TO AVOID)
CHAPTER 4: THE SQUAT: WHAT YOU NEED TO KNOW 14THE BARBELL SQUATLOW BAR BACK SQUATTHE HIGH BAR BACK SQUATWHICH SHOULD I DO?COMMON BARBELL SQUAT FAULTS
CHAPTER 5: THE DEADLIFT: WHAT YOU NEED TO KNOW 18THE CONVENTIONAL SETUPTHE DEADLIFTSETTING THE BAR DOWNHOW TO GRIP THE BAR, STRAPS, AND OTHER EQUIPMENTCOMMON FAULTSFREQUENTLY ASKED QUESTIONS
CHAPTER 6: THE PRESS - WHAT YOU NEED TO KNOW 23THE SETUPTHE PRESSCOMMON FAULTSPRESS VARIATIONS
CHAPTER 7: JOINING THE RIGHT GYM 27#1 FIGURE OUT EXACTLY WHAT YOU WANT#2 DETERMINE THE TYPE OF GYM YOU WANT!#3 FOUND A POTENTIAL GYM? TEST DRIVE IT.#4 WHAT TO KNOW ABOUT GYM CONTRACTS
CHAPTER 8: TRAINING IN A GYM, PLUS A WEIGHT TRAINING WORKOUT 29STAGE 1: GET THE LAY OF THE LAND, STRETCH AND USE THE TREADMILLSTAGE 2: JOIN THE BODYWEIGHT BRIGADESTAGE 3: JOIN THE DUMBBELL DIVISIONSTAGE 4: ENLIST IN THE BARBELL BATTALIONSTAGE 5: MIXING BARBELLS AND BODYWEIGHT
CHAPTER 9: HOW MUCH WEIGHT SHOULD I BE LIFTING? 35STARTING TO ADD WEIGHTWHAT ABOUT AFTER THE FIRST FEW WORKOUTS?WHAT ABOUT FINDING MY 1 REP MAXES?WHAT IS A RESPECTABLE AMOUNT TO BE LIFTING?
CHAPTER 10: HELP I WORKED OUT AND NOW I’M SORE 38MEET DOMSIS DOMS GOOD FOR ME OR BAD FOR ME?WHAT DO I DO TODAY THOUGH?
CHAPTER 11: MORE RESOURCES 40
Table of Contents
Author: Steve Kamb | NerdFitness.com
COPYRIGHT © 2017 by NerdFitness.com
All rights reserved. No part of this document may be reproduced or transmmitted in any form or by any means electronic, mechanical, or other without prior written permission of Steve Kamb.
DISCLAIMER The information presented herein is in no way intended as medical advice or to serve as a substitute for medical counseling. The information should be used in conjunction with the guidance and care of your physician.
Consult your physician before beginning this program as you would with any exercise and nutrition program. If you choose not to obtain the consent of your physician and/or work with your physician while following the forthcoming advice in Strength Training 101, you are agreeing to accept full responsibility for your actions.
By beginning Strength Training 101 you recognize that despite all precautions on the part of Steve Kamb dba NerdFitness.com, there are risks of injury or illness that can occur because of your use of the aforementioned information, and you expressly assume such risks and waive, relinquish and release any claim that you may have against Steve Kamb dba NerdFitness, or its respective affiliates as a result of any future physical injury or illness incurred in con-nection with, or as a result of, the use or misuse of this product.
WWW.NERDFITNESS.COM
1
CHAPTER 1: INTRODUCTION
“Eat right and get strong.”
If there’s a constant motto we abide by in the Nerd Fitness Rebellion, it’s that if you want to lose weight, gain muscle, or just look better than ever for an upcoming event, the two things you must do is eat right and get strong.
But what exactly does that mean?
How does one get started?
And what is the airspeed velocity of an unladen swallow?
These are all great questions. You’ve downloaded this ebook because you have at least a tiny bit of inter-est (but hopefully a lot more) in getting started with strength training. All of the resources available on
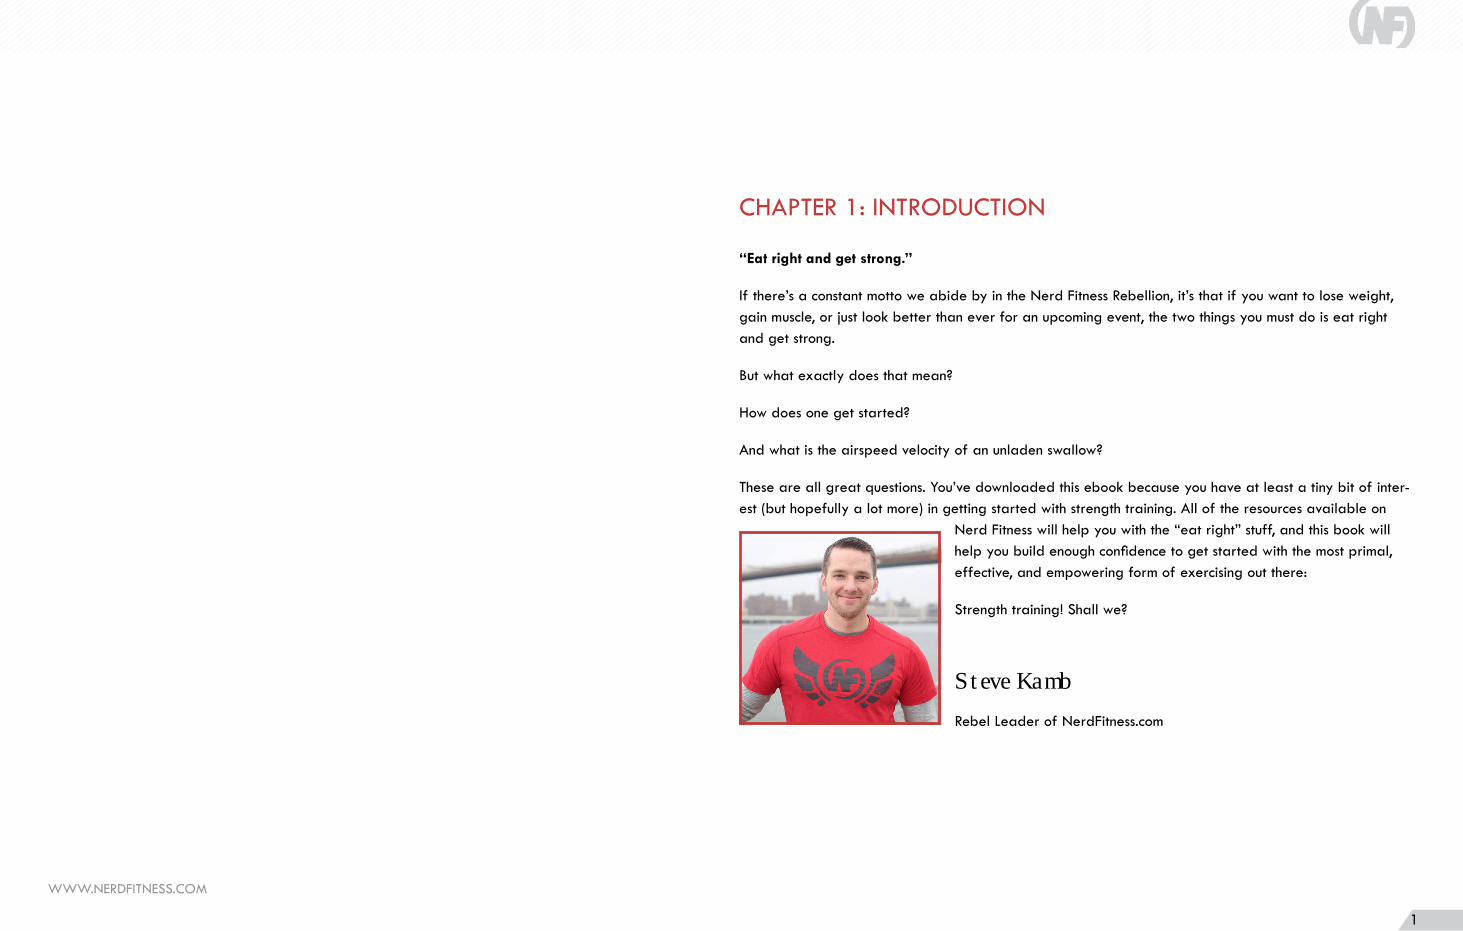
Nerd Fitness will help you with the “eat right” stuff, and this book will help you build enough confidence to get started with the most primal, effective, and empowering form of exercising out there:
Strength training! Shall we?
Steve KambRebel Leader of NerdFitness.com

WWW.NERDFITNESS.COM
2
Why strength training?
Simply put, life is EASIER when you’re strong.
Carrying groceries? One trip. Children to pick up? No problem. Car stuck in the snow? Push it out with ease. Need to fight off a horde of zombies or aliens (or alien zombies?!)? Strength training can help you save the day.
Whether you’re 100+ lbs overweight or just need to lose that last 15, strength training is one of the most effective ways to burn fat and build muscle. If you have a limited amount of time to work out, strength training is the fastest and most efficient path to success, and helps you build the physique you’re looking for.
And that will be applicable for the rest of your life. Strength training has been shown to halt and even reverse sarcopenia – the reduction of skeletal muscle that occurs as we get older – which helps us stay independent (out of a nursing home) and live longer.
In addition to making life easier, strength training has a lot of great benefits right now:
Look good naked: Strength training helps you lose weight (and body fat) in a few different ways. It helps you retain the muscle you have when eating at a caloric deficit and losing weight. Keep the muscle you have + remove the fat on top of your muscle = confidence in your physique. Let’s be honest, this is probably why you’re here - it’s why I started strength training!
Boost your metabolism: When you finish a workout, your body needs to replenish itself in order to return to a normal state (the way it was before you worked out). This can boost your metabo-lism for up to 38 hours after you finish your workout.
Strength training can help speed up your Resting Metabolic Rate (RMR). This is because it takes your body more calories to maintain muscle than it does to maintain fat. Estimates are that for every 1 lb of muscle you gain, your RMR goes up 30-50 calories!
Get healthier: If you’re looking for a workout in which you get the biggest bang for your buck, strength training is it. Strength training increases bone density, builds a stronger heart, reduces your resting blood pressure, improves blood flow, halts muscle loss, helps control blood sugar, improves cholesterol levels, and improves your balance and coordination.
Feel better: Not only will you find yourself with more energy and confidence, less stress and anxiety, and a better overall mood, but you’ll actually begin to think better (resistance training has been proven to help increase cognitive function). And while training too close to bedtime can be a bad idea, exercising earlier in the day has been proven to help prevent sleep apnea and insomnia. Strength training can even improve your posture and thus make you, technically, taller!
Fight off disease and degenerative conditions: Heart disease is the leading cause of death for both men and women; strength training helps correct issues relating to cholesterol, high blood pressure, obesity, diabetes, and inactivity – all factors for heart disease. Cardiologists are even starting to recommend strength training for people who have suffered a heart attack as little as three weeks after the attack. Who knows, maybe one day your cardiologist will tell you to do some “cardio” and he’ll be referring to strength training!
Strength training has also been proven to help manage and improve the quality of life for peo-ple who have arthritis, osteoporosis, Parkinson’s Disease, Down Syndrome, Lymphedema, fibromy-algia, and clinical depression, as well as those who have recently had a stroke, have had a spinal cord injury, or survived cancer.
Strength training can be fun: Whether you are looking for the most effective 20-30 minute workout (to stay fit and feel confident in your “birthday suit”), or are looking for a competitive sport that you can really get into, strength training can help you meet your goals. It’s easy and motivating to see progress as you strength train, like leveling up in a video game. And if you’re looking to improve in other areas (a sport, traditional cardio, or an activity like rock climbing), strength training will make you better at those things.
Okay, okay. Enough already. You can find sources for all of the above studies on NerdFitness.com, but you’re not here to be convinced you need to strength train. You’re here because you want to learn more about it!
Is there any good reason NOT to strength train?
I wanted to find a single group of people who should not strength train, but really struggled with my research. It turns out strength training is helpful for pretty much everybody! It appears that with few rare medical exceptions (or people recovering from certain injuries), everybody can benefit from even basic strength training. I even found studies on how strength training can be beneficial for paraplegics. Not to mention it can be safe for children, adolescents, and pregnant women. Obviously, you should
WWW.NERDFITNESS.COM
3
check with your doctor before you start any sort of strength training program, but it’s natural for us, as humans, to move around and carry things.
Primary objections to strength training
“But I’m so old! This can’t be safe!”
Age is only a number, and you’re only as old as you feel. Funnily enough, we hear this from 30 year olds and 60 year olds alike…and, like “I don’t have time,” it is a big fat lie! Even for the elderly, stud-ies have shown that drastic results are possible in just 10 weeks of weightlifting (for both men and women in their 70s through their 90s).
In fact, weight training has also been shown to delay Alzheimer’s and stave off dementia. So, if you think you might be “too old,” you’re probably the exact type of person that SHOULD be strength train-ing! Yup, your recovery might be slower. Yes, you might need to focus more on form and effort and mobility. But strength training works whether you’re 20 or 80.
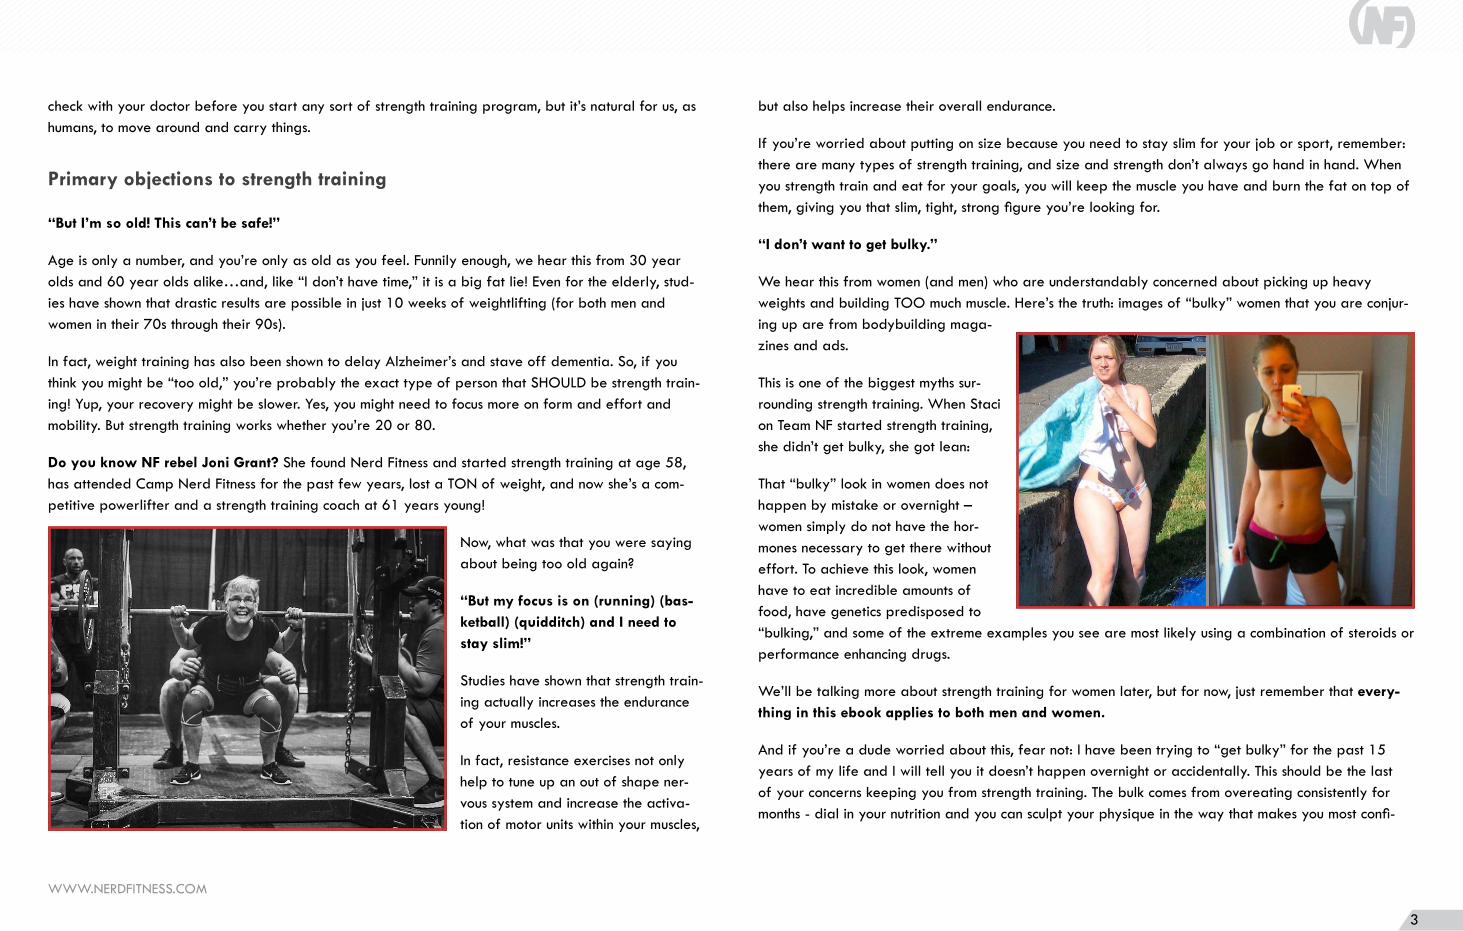
Do you know NF rebel Joni Grant? She found Nerd Fitness and started strength training at age 58, has attended Camp Nerd Fitness for the past few years, lost a TON of weight, and now she’s a com-petitive powerlifter and a strength training coach at 61 years young!
Now, what was that you were saying about being too old again?
“But my focus is on (running) (bas-ketball) (quidditch) and I need to stay slim!”
Studies have shown that strength train-ing actually increases the endurance of your muscles.
In fact, resistance exercises not only help to tune up an out of shape ner-vous system and increase the activa-tion of motor units within your muscles,
but also helps increase their overall endurance.
If you’re worried about putting on size because you need to stay slim for your job or sport, remember: there are many types of strength training, and size and strength don’t always go hand in hand. When you strength train and eat for your goals, you will keep the muscle you have and burn the fat on top of them, giving you that slim, tight, strong figure you’re looking for.
“I don’t want to get bulky.”
We hear this from women (and men) who are understandably concerned about picking up heavy weights and building TOO much muscle. Here’s the truth: images of “bulky” women that you are conjur-ing up are from bodybuilding maga-zines and ads.
This is one of the biggest myths sur-rounding strength training. When Staci on Team NF started strength training, she didn’t get bulky, she got lean:
That “bulky” look in women does not happen by mistake or overnight – women simply do not have the hor-mones necessary to get there without effort. To achieve this look, women have to eat incredible amounts of food, have genetics predisposed to “bulking,” and some of the extreme examples you see are most likely using a combination of steroids or performance enhancing drugs.
We’ll be talking more about strength training for women later, but for now, just remember that every-thing in this ebook applies to both men and women.
And if you’re a dude worried about this, fear not: I have been trying to “get bulky” for the past 15 years of my life and I will tell you it doesn’t happen overnight or accidentally. This should be the last of your concerns keeping you from strength training. The bulk comes from overeating consistently for months - dial in your nutrition and you can sculpt your physique in the way that makes you most confi-

WWW.NERDFITNESS.COM
4
dent.
“But I’m fat. I need to lose weight FIRST, then I can strength train.”
Great, but you can actually start with strength training too. Remember, strength training boosts your me-tabolism and helps you burn fat and preserve the muscle you have. Start strength training and go for long walks, and fix your nutrition. You’ll turbocharge your fat loss and physique transformation - making Optimus Prime proud!
“It’s boring! I don’t want to go to a gym!”
Fair enough! Strength training doesn’t have to mean “go to a gym and pick up weights,” as strength training can also include bodyweight training or gymnastics you can do at home!
I want you to change your mentality about gyms too. You don’t “have to go to the gym,” you GET to go to the gym and find out what you’re capable of. Strength training rocks because you can get instant gratification every time you train. You get to see your progress clearly (“Hey, there’s more weight on the bar! I’m stronger!”), and you’ll also be rewarded by seeing your strength progress from level 1 to level 50!
If you lifted 100 pounds this week compared to 95 pounds last week, congrats, you are stronger! If you did 20 push ups in a row compared to 19 last month, congrats, you are stronger!
If you are eating right and getting stronger, your physique will take care of itself. Focus your energy on getting stronger, and you will win.
Is that enough for us to convince you? Awesome. Let’s get started.
Muscles and strength training
Before we start actually lifting anything, the first thing we need to do is have a basic understanding of how our muscles work.
By the way, if you just want to start training, skip all of this jazz and move right on to the next chapter - I won’t be offended.
(Okay, maybe a little offended.)
Nerd hats on: let’s get into the science.
We have about 642 skeletal muscles in our bodies, and they all work together to help our bodies move. For example, when you bend your arm, your bicep contracts and your tricep does the opposite (elongates) in order to let your elbow bend. Every muscle in your body works alongside others. Without muscles, we’d just be a bag of bones unable to move.
Our muscles are made up of many smaller muscle cells, more commonly known as muscle fibers. They’re long and cylindrical, about the size of a single strand of hair, and come in fast twitch and slow twitch varieties.
Every person has a different percentage of fast twitch and slow twitch muscle fibers, which is why some people tend to be naturally better at running distances than sprinting, or better at longer sets than short ones.
Regardless of your muscle fiber “genetics,” you can strength train and it will make anything else you do better. Screw genetics anyway - starting today you’re not going to use those as an excuse, and instead say “This is the hand I’ve been dealt; time to get strong.”
Cool? Cool.
What happens to my muscles when I strength train?
When you strength train, you’re basically doing two things to your muscles:
1. Breaking down the muscle tissue. After training, your body must heal and rebuild the muscle stron-ger to prepare for future challenges. Our body hates being told it can’t do something, so when you break down your muscle fiber, it works hard to come back stronger. When you try to do that thing again, you are making your muscles more “antifragile” - like giving them tiny doses of chaos to build up their resistance to be better prepared to handle the chaos next time. In other words, strength.
2. As you start to train and specifically focus on following a routine designed to increase size of your muscles, you’re increasing either the amount of sarcoplasmic fluid in your muscles (to make your muscles bigger) or the number of proteins in your muscles (to make them stronger). This is
WWW.NERDFITNESS.COM
5
where you can get your increased size and/or strength from. Don’t concern yourself too much with this - we’ll get into it later.
This is generally referred to as hypertrophy. I won’t bore you with the science behind the different types of hypertrophy, as we’ll cover this in future chapters. Just know that when you strength train, you break down your muscles and they recover and rebuild themselves stronger. If you ALSO eat enough and train the right way, and you can get them to rebuild themselves bigger too!
Recovery
Muscles aren’t built in the gym, they’re built in the kitchen.
When you’re in the gym, you’re breaking apart your muscle fibers. When you’re out of the gym, you’re healing and getting stronger. This means a big part of strength training is proper nutrition and recov-ery!
Which means you should aim to wait 48 hours before breaking down the same muscle group again with training.
One thing to remember with this is that our muscles work together – when you’re working on your “chest” you’re probably also working all of the muscles in your shoulders, along with your upper arms. Because we’re going to focus on compound movements, which recruit ALL of your muscles, recovery is going to be super important.
Recovery is also different for everyone, and dependent on many different factors: how intense was the workout, your age, quality of sleep, quality of nutrition, etc. All of this to say: listen to your body - push it outside of its comfort zone to force adaptation, but give yourself plenty of time to recover, too.
For a basic strength program, working out 3-4 days a week, every other day, is more than enough to get started. This is one of those situations where more is not necessarily better, especially if you want to get bigger.
If you are looking for things to do on your off-days, we’re big fans of long walks, sprints, ultimate fris-bee, hiking, or yoga. Fun exercise that doesn’t feel like exercise!
OK, I get it. Can I start strength training now?
Yes, you can.
For starters, if you’re somebody that just wants to be told EXACTLY what to do so you can get out of your own way and start seeing results, check out our comprehensive strength training course, The Nerd Fitness Academy.
I know how intimidating this strength training stuff can be, and it can help having a very specific work-out plan to follow, along with nutritional strategies, a supportive community, and video demonstrations and explanations of every exercise so you can make sure you’re doing each movement correctly.
The self-paced Academy covers:
• Improving mindset and nutrition (both essential to success for ANY program)
• A physical assessment quiz (know exactly where to start!)
• Multiple progressive workouts you can do at the gym or at home (workout anywhere!)
• Multiple difficulty levels (good for experienced rebels or complete newbies!)
WWW.NERDFITNESS.COM
6
Obviously I’m slightly biased when I say that I truly believe the NF Academy can give you the best chance to transform yourself, but I also want to get you healthy, be it through the Academy or this eb-ook - either way, I want to help.
Let’s dig into the nitty-gritty and give you a plan to get started and get strong as hell.
CHAPTER 2: HOW WILL YOU BE TRAINING?
There are two main paths you can choose when it comes to getting stronger:
• Training at home with just bodyweight.
• Training in a gym with equipment (barbells and dumbbells).
Which one you pick will primarily depend on what equipment you have available, if you have access to a gym, and what your overall goals and aspirations are.
Regardless of which path you choose, the reality is that any gym program with barbells should ALSO include bodyweight exercises, and when training just bodyweight exercises you can introduce some vari-ety with weight training to speed up your progress.
My advice: pick the path that makes you the least scared to attempt! We all have to start somewhere, and by getting started we get over the mental hurdles and confusion around beginning a long journey. Put one foot in front of the other, and adjust as you go!
It’s how Frodo got to Mordor, right?
Option 1: Bodyweight Training
The first option is bodyweight training: using your own bodyweight as resistance in your quest to de-velop strength.
With bodyweight training you need minimal equipment (or none at all), and you can train from any-where. It doesn’t matter if you’re at home, in a hotel, at a playground, in your office at work, traveling around the world, or on Elon Musk’s first mission to Mars; as long as you have enough space to move around, you can get your workout done and fit it into a busy schedule.
Bodyweight training is a perfect place to start, as you’re learning to manipulate and move your own body. Even as you get stronger and start to venture into weight training, you’ll always have the basics in your routine, so it’s best to get good at them!
WWW.NERDFITNESS.COM
7
These basics includes staple exercises like:
• Push-ups
• Pull-ups
• Bodyweight squats
The downside to bodyweight exercises is that you will need to consistently modify the difficulty of each exercise as you get stronger in order to ensure you are leveling up and progressing. Without a plan to follow and a strategy for progressive overload here, your progress can stagnate after a while. Don’t let this concern you too much now, though, as I’ll share HOW to avoid this in the future.
Also, some movements like pull ups are really challenging for most people, which makes it tough to get started on those movements until you have a base level of strength, but I got you covered in this ebook!
Because I like you and you’re a good person.
Option 2: Training in a (home) gym with equipment
When it comes to training in a gym, either a commercial gym or your own garage/basement, you’re going to be primarily focusing on two types of equipment:
• Dumbbells
• Barbells
Dumbbells are a great way to start out with weighted strength training for a few reasons. First, most gyms will have a good set of dumbbells, even if it’s a basic gym in your apartment complex. If you want to train at home, you can get a set of adjustable dumbbells that don’t take up a ton of space, but they tend to break easily and are a pain in the butt to change out. Consider checking Craigslist for a set of lightly used (but maintained) dumbbells that somebody is getting rid of, and turn your garage into a training center!
The biggest downside about dumbbells? You may outgrow whatever set you purchase fairly quickly, and heavy dumbbells can get costly. A gym membership with dumbbells that go up to (or over) 100 lbs should help solve this problem.
Barbell workouts are some of the best workouts you can do, and they’re a personal favorite of most members of Team Nerd Fitness. If your goal is strength above all else, this is the option that we rec-ommend. Barbells allow you to progress clearly and quickly, allowing you to add small increments of weight each week.
We love them because they allow you to go heavy (pick up lots of weight), especially for lower body movements like the squat and the deadlift, which means you’re going to get strong quickly if you focus on a few key movements. For exercises like the squat or the press, you can use racks to safely load and deload heavy weights.
The biggest downside to barbell training is that in order to do it at home, you need to have a squat rack, a barbell, a bench, and enough weight in your house or garage (which is not an inexpensive in-vestment when you’re starting out).
If not, you definitely will be needing a gym membership: see the chapter in this guide about joining the right gym!
Which path should I pick?
What is the best form of strength training?
Realistically, it’s the one that you will actually do! And you’ll probably go through phases over the next few years that have you mixing and matching bodyweight training, barbell training, maybe some gym-nastics, and so on. If you’ll have us, Nerd Fitness can be with you through every step of this process.
Pick the path from this guide that you can get most excited about and get started.
Barbell training may be optimal in terms of strength, but if you don’t see yourself actually driving to the gym three days a week, choose a different plan. Likewise, bodyweight training might seem convenient, but if you don’t actually motivate yourself to workout at home, you might have been better off with a different option.
Many times, I will pick the right workout to match my situation. When I’m travelling, I’ll do a ton of bodyweight workouts since I don’t have a gym and a barbell available. When I’m at home with my gym, you better believe every morning the first thing I do is get under a barbell and go heavy with squats or deadlifts!
WWW.NERDFITNESS.COM
8
This is because nothing can replace a heavy barbell squat and deadlift; at the same time, there’s no barbell movement that can match the classic pull up.
That’s why the barbell and dumbbell routines in The Nerd Fitness Academy contain bodyweight move-ments as well – a mix of all three options builds a well-balanced, functional body.
For our purposes here, we’ll stick to the basics - they’ll get you 95% of the way towards your goal, as they provide the perfect building blocks for adding anything after.
What program should I follow?
Whether you’re training at home, or at a gym, you need a game plan to follow so you can track your progress. As they say, “That which gets measured gets improved.”
I firmly believe this, and it’s why I’ve tracked every rep of every set for every workout I’ve done for the past 10 years.
We want to avoid that wandering “sheep without a shepherd” strategy that doesn’t produce results - we don’t want to be that person that wanders around, sits at a machine and does a few repetitions, and then wanders onto the next machine. This is a waste of time and will not get you the results you’re after. You made it all the way to the gym, or you got dressed to train at home; you might as well follow a good plan!
So, let’s get you a program!
When looking for a program, most beginners will be best served by choosing a full-body routine done three times a week (with a day to rest in between each workout). Make sure the program you choose serves your goals: a powerlifter will have a very different routine than a bodybuilder or endurance athlete, but we’re going to start with building basic strength and overall health and then you can further specialize after that.
There are three key terms I want you to know as we move through the rest of this ebook:
• Repetitions (Reps): a certain movement, completed without stopping. 10 reps of push ups means you did 10 push ups in a row.
• Sets: a block of repetitions. If you did 3 sets of 10 reps of pushups, this means you did 10 push
ups in a row, recovered for a few minutes, did another 10 push ups in a row, recovered for a few minutes, and then did another 10 push ups in a row.
• Circuit: doing one set of each exercise back to back. 3 circuits of push ups, pull ups, and squats means you did 1 set of push ups, followed by 1 set of pull ups, followed by one set of squats, rested, and then repeated the whole cycle 2 more times.
So let’s talk about sets and reps. When it comes to strength training, you can adjust how much weight you lift and how many reps per set you should be targeting based on your goals.
• Reps in the 1-5 range build dense muscle and strength - this is called myofibrillar hypertrophy.
• Reps in the 6-12 range build somewhat equal amounts of muscular strength, size, and muscular endurance - called sarcoplasmic hypertrophy.
• Reps in the 12+ range build muscular endurance, less strength, and less size.
For our purposes, we’ll stick with the basics and aim for 5-10 reps per set. If you are just getting start-ed, target lighter weights and higher reps so you can focus on form, build confidence and momentum, and then work towards using a heavier weight.
A caveat on all of the rep ranges listed above: how you eat will account for 80-90% of your success or failure and whether or not you get bigger or smaller. No matter how many sets or reps you do, how you eat will determine how your body responds to your training.
So don’t get caught up in the rep ranges! This is more advanced stuff that is not important right now. I’ve gotten bigger with low reps and bigger with high reps, leaner with low reps and leaner with high reps. It’s all in your nutrition!
The main goal should be to always do better than you did last time; this will ensure you are continu-ously getting stronger, healthier, leaner, etc.
You can always write your own workout plan, but luckily there are lots of beginner programs to get started with, so you don’t need to be programming your own. Let’s take a look at some of your options.
We are obviously partial to the 20+ workout plans laid out in The Nerd Fitness Academy, as we feel they give you the best chance for newbie success, a leveling system telling you when to advance your workouts, along with a support group of people who are a few steps ahead of you on their path that can lend advice or support.
WWW.NERDFITNESS.COM
9
I honestly don’t care WHAT program you start with, though - what’s important is that you start!
If you are looking for our recommended routines, check out the Bodyweight chapter for a routine there, and our “Training in a Gym” chapter has a progression and workout plan for you to follow to build up confidence and getting started with weight training.
If you just want me to tell you what to do: start with the bodyweight training plan for at least a few weeks, THEN move onto the weight training chapter when you feel confident and excited.
The Nerd Fitness Beginner Bodyweight workout (see chapter 3) is a great free place to start if you’re looking for a super basic, easy-to-follow bodyweight routine. Let’s do it!
CHAPTER 3: BODYWEIGHT TRAINING FOR THE WIN!
Before you ever set foot in a gym, our recommendation is that you start with some basic bodyweight movements to build functional strength.
This applies if you are 400 pounds or 100 pounds.
After all, there’s no need for you to use a barbell to squat or bench press if you can’t get yourself to do a proper bodyweight squat or push up.
The NF Beginner Bodyweight Workout
We’ll cover the basic movements and their modifications at the end of this chapter, but if you’re itching to get started, we’d recommend starting here, with our Beginner Bodyweight Workout.
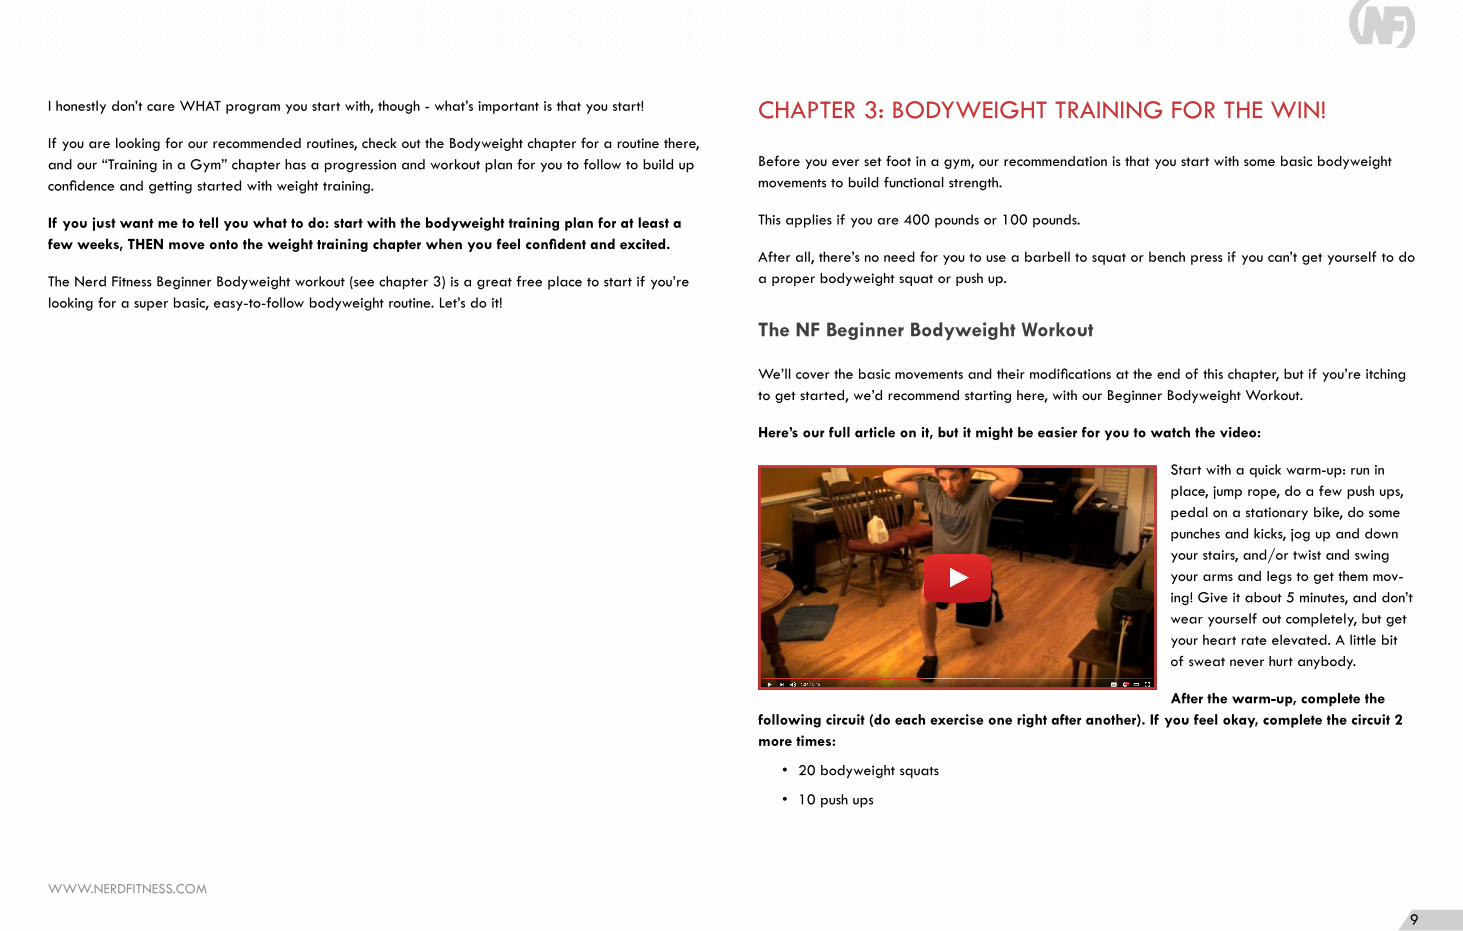
Here’s our full article on it, but it might be easier for you to watch the video:
Start with a quick warm-up: run in place, jump rope, do a few push ups, pedal on a stationary bike, do some punches and kicks, jog up and down your stairs, and/or twist and swing your arms and legs to get them mov-ing! Give it about 5 minutes, and don’t wear yourself out completely, but get your heart rate elevated. A little bit of sweat never hurt anybody.
After the warm-up, complete the following circuit (do each exercise one right after another). If you feel okay, complete the circuit 2 more times:
• 20 bodyweight squats
• 10 push ups
WWW.NERDFITNESS.COM
10
• 20 walking lunges (10 each leg)
• 10 dumbbell rows (using a gallon milk jug, a suitcase, dumbbell, or another weight)
• 15 second plank
• 30 jumping jacks
If you haven’t already done so, you can visit our free resources page to track this exercise by printing out our Beginner Bodyweight Training worksheet.
You can do this routine every other day until you can do all 3 circuits with proper form. Make sure you download that sheet above and track your workouts! The goal is to do better each time. So if you could only do 7 knee push ups, that’s okay! Write it down, and go for 8!
Let’s go into a bit more detail with each of the 3 main movements of bodyweight training. Get strong with these main movements, and eat right, and I guarantee you’ll have a better physique and more strength than 95% of the population!
PUSH UPS (and 5 mistakes to avoid)
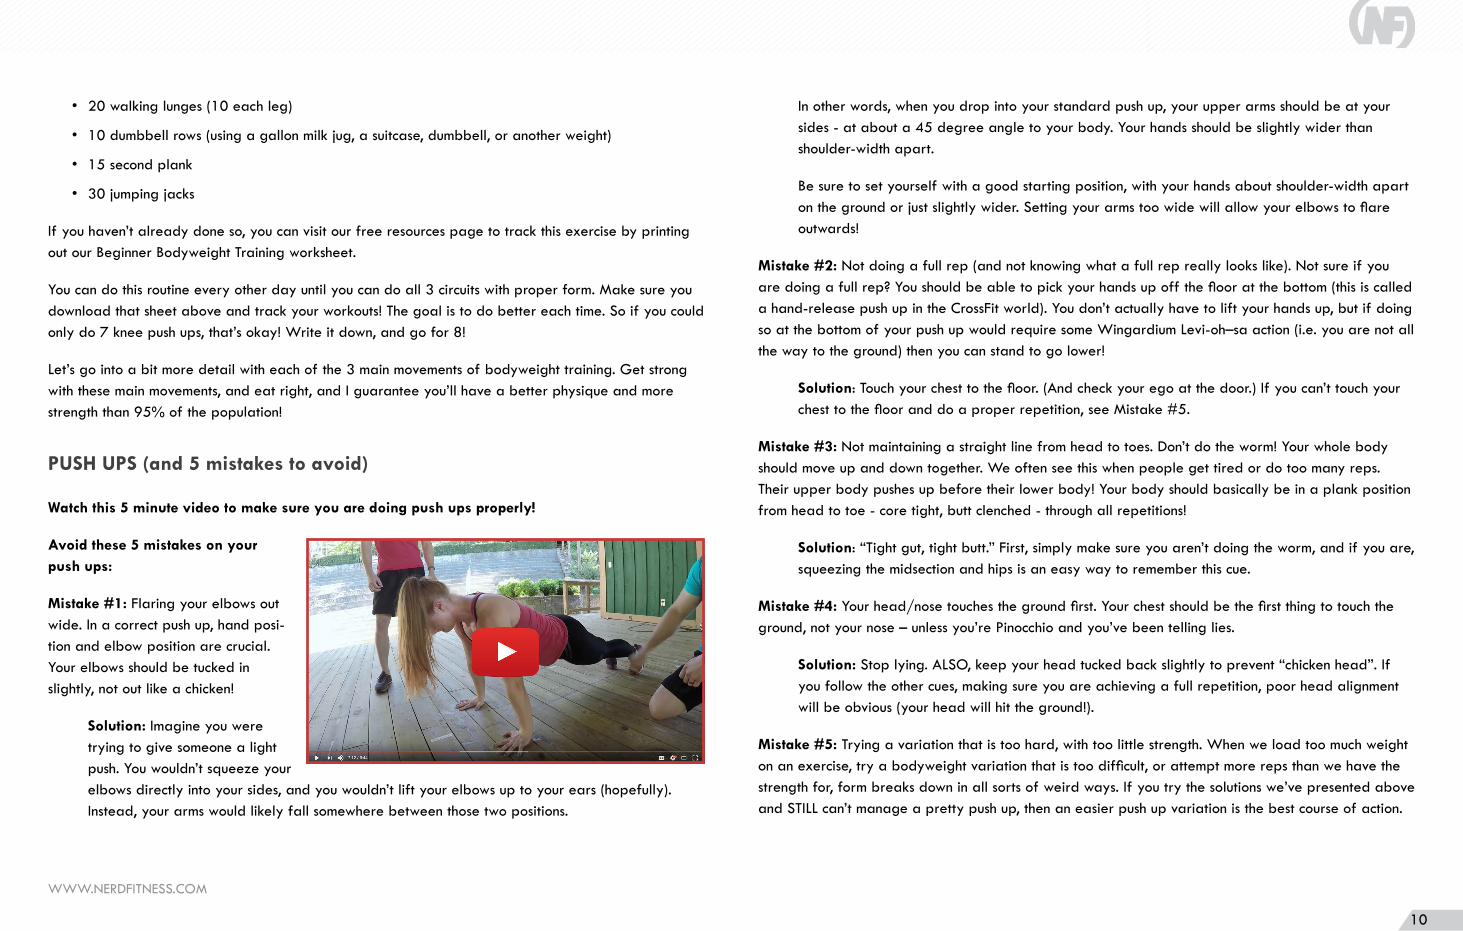
Watch this 5 minute video to make sure you are doing push ups properly!
Avoid these 5 mistakes on your push ups:
Mistake #1: Flaring your elbows out wide. In a correct push up, hand posi-tion and elbow position are crucial. Your elbows should be tucked in slightly, not out like a chicken!
Solution: Imagine you were trying to give someone a light push. You wouldn’t squeeze your elbows directly into your sides, and you wouldn’t lift your elbows up to your ears (hopefully). Instead, your arms would likely fall somewhere between those two positions.
In other words, when you drop into your standard push up, your upper arms should be at your sides - at about a 45 degree angle to your body. Your hands should be slightly wider than shoulder-width apart.
Be sure to set yourself with a good starting position, with your hands about shoulder-width apart on the ground or just slightly wider. Setting your arms too wide will allow your elbows to flare outwards!
Mistake #2: Not doing a full rep (and not knowing what a full rep really looks like). Not sure if you are doing a full rep? You should be able to pick your hands up off the floor at the bottom (this is called a hand-release push up in the CrossFit world). You don’t actually have to lift your hands up, but if doing so at the bottom of your push up would require some Wingardium Levi-oh–sa action (i.e. you are not all the way to the ground) then you can stand to go lower!
Solution: Touch your chest to the floor. (And check your ego at the door.) If you can’t touch your chest to the floor and do a proper repetition, see Mistake #5.
Mistake #3: Not maintaining a straight line from head to toes. Don’t do the worm! Your whole body should move up and down together. We often see this when people get tired or do too many reps. Their upper body pushes up before their lower body! Your body should basically be in a plank position from head to toe - core tight, butt clenched - through all repetitions!
Solution: “Tight gut, tight butt.” First, simply make sure you aren’t doing the worm, and if you are, squeezing the midsection and hips is an easy way to remember this cue.
Mistake #4: Your head/nose touches the ground first. Your chest should be the first thing to touch the ground, not your nose – unless you’re Pinocchio and you’ve been telling lies.
Solution: Stop lying. ALSO, keep your head tucked back slightly to prevent “chicken head”. If you follow the other cues, making sure you are achieving a full repetition, poor head alignment will be obvious (your head will hit the ground!).
Mistake #5: Trying a variation that is too hard, with too little strength. When we load too much weight on an exercise, try a bodyweight variation that is too difficult, or attempt more reps than we have the strength for, form breaks down in all sorts of weird ways. If you try the solutions we’ve presented above and STILL can’t manage a pretty push up, then an easier push up variation is the best course of action.
WWW.NERDFITNESS.COM
11
Solution: Easier push up variations! If you can’t do push ups with proper form, work up to them! If you need to, start with knee push ups. If you need to start with something a little easier, try doing push ups with your hands on a stable elevated surface. You can also combine the two and do knee push ups on an elevated surface. Set good form now, and you will make progress much faster. It is far better to do easier variations with proper form than to do crappy regular push ups.
Start doing better push ups today!
BODYWEIGHT SQUATS (and 5 mistakes to avoid)
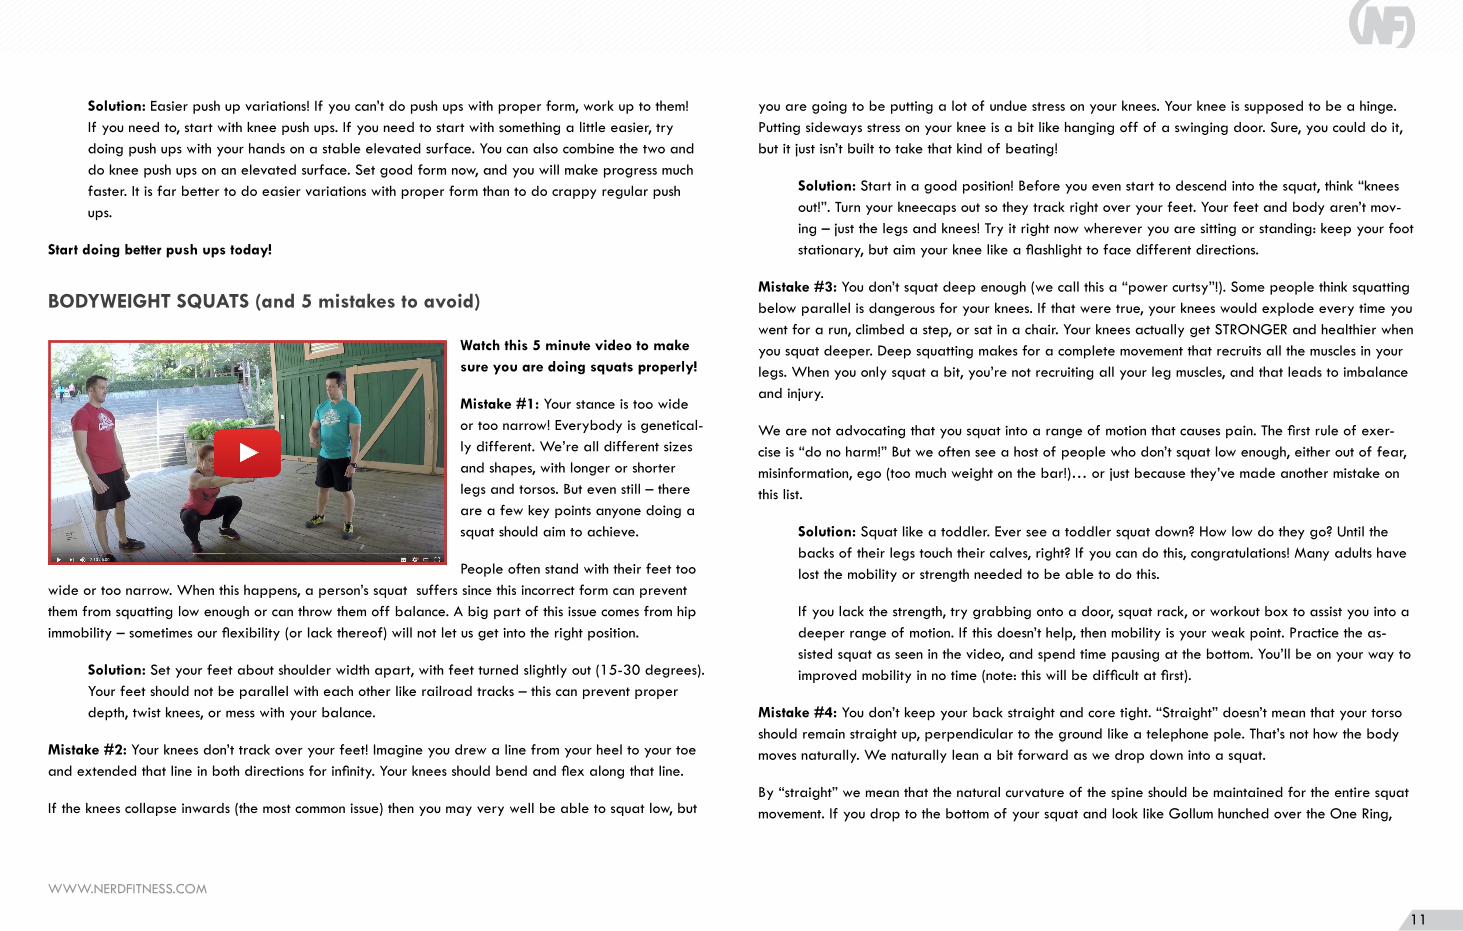
Watch this 5 minute video to make sure you are doing squats properly!
Mistake #1: Your stance is too wide or too narrow! Everybody is genetical-ly different. We’re all different sizes and shapes, with longer or shorter legs and torsos. But even still – there are a few key points anyone doing a squat should aim to achieve.
People often stand with their feet too wide or too narrow. When this happens, a person’s squat suffers since this incorrect form can prevent them from squatting low enough or can throw them off balance. A big part of this issue comes from hip immobility – sometimes our flexibility (or lack thereof) will not let us get into the right position.
Solution: Set your feet about shoulder width apart, with feet turned slightly out (15-30 degrees). Your feet should not be parallel with each other like railroad tracks – this can prevent proper depth, twist knees, or mess with your balance.
Mistake #2: Your knees don’t track over your feet! Imagine you drew a line from your heel to your toe and extended that line in both directions for infinity. Your knees should bend and flex along that line.
If the knees collapse inwards (the most common issue) then you may very well be able to squat low, but
you are going to be putting a lot of undue stress on your knees. Your knee is supposed to be a hinge. Putting sideways stress on your knee is a bit like hanging off of a swinging door. Sure, you could do it, but it just isn’t built to take that kind of beating!
Solution: Start in a good position! Before you even start to descend into the squat, think “knees out!”. Turn your kneecaps out so they track right over your feet. Your feet and body aren’t mov-ing – just the legs and knees! Try it right now wherever you are sitting or standing: keep your foot stationary, but aim your knee like a flashlight to face different directions.
Mistake #3: You don’t squat deep enough (we call this a “power curtsy”!). Some people think squatting below parallel is dangerous for your knees. If that were true, your knees would explode every time you went for a run, climbed a step, or sat in a chair. Your knees actually get STRONGER and healthier when you squat deeper. Deep squatting makes for a complete movement that recruits all the muscles in your legs. When you only squat a bit, you’re not recruiting all your leg muscles, and that leads to imbalance and injury.
We are not advocating that you squat into a range of motion that causes pain. The first rule of exer-cise is “do no harm!” But we often see a host of people who don’t squat low enough, either out of fear, misinformation, ego (too much weight on the bar!)… or just because they’ve made another mistake on this list.
Solution: Squat like a toddler. Ever see a toddler squat down? How low do they go? Until the backs of their legs touch their calves, right? If you can do this, congratulations! Many adults have lost the mobility or strength needed to be able to do this.
If you lack the strength, try grabbing onto a door, squat rack, or workout box to assist you into a deeper range of motion. If this doesn’t help, then mobility is your weak point. Practice the as-sisted squat as seen in the video, and spend time pausing at the bottom. You’ll be on your way to improved mobility in no time (note: this will be difficult at first).
Mistake #4: You don’t keep your back straight and core tight. “Straight” doesn’t mean that your torso should remain straight up, perpendicular to the ground like a telephone pole. That’s not how the body moves naturally. We naturally lean a bit forward as we drop down into a squat.
By “straight” we mean that the natural curvature of the spine should be maintained for the entire squat movement. If you drop to the bottom of your squat and look like Gollum hunched over the One Ring,

WWW.NERDFITNESS.COM
12
then we have a problem if you ever want to squat with added weight.
Solution: Think: “chest up”. This doesn’t mean “head up” – chest means your chest. Don’t let your head fool you. Puff it up a bit while you squat, like Superman. Did you know that the S actually stands for squats? Yeah, true story.
Be sure to keep your midsection tight and engaged. It should feel like all the muscles around your middle are tensing a bit – like when you cough, or if you were Neo bracing from a punch from Mr. Smith.
Mistake #5: You get up on your toes. Keeping your feet on the ground is essential for a strong and balanced squat. It is your foundation! If you are just squatting down to grab something or look under something, then popping up on the toes is of little concern, but if you are training your body to move weights around (whether in the gym or everyday life), keeping your feet firmly grounded is crucial dur-ing your workouts.
Solution: Keep your heels down! Think: “heels down”. Watch a video of yourself doing squats if you’re not sure to double check.
Bonus Mistake #6: You’re overly concerned with your knees going past your toes on your squat. This is an old wives’ tail bro-myth that makes a lot of people freak out over nothing! Depending on your genetic and physiological makeup, your knees may very well go past your toes in a deep squat. This is not the end of the world!
Solution: Let the knees and ankles flex how they were designed! The combined effort of your hips, knees, and ankles will get you into a deep, strong squat!
Any preexisting conditions or knee pain notwithstanding, there is no risk to the knees by allow-ing them to go past your toes. There is not a magical force field that lives in front of your feet that destroys knees that drift too far. If this were the case, we’d see legions of crippled olympic weightlifters – their knees go WAY past their toes – heck, they even wear shoes with elevated heels so that they can get their knees forward more!
PULL UPS And What to Do If You Can’t Do One Yet (and 5 mistakes to avoid)
Watch this 5 minute video to make sure you are doing pull ups properly (and how to scale them if you can’t do them yet!)!
Mistake #1: You don’t extend low enough or pull high enough. Full exten-sion and full range of motion are ma-jor problems for many people training pull ups and chin-ups. Most people I see in a gym are doing half pull ups. They’re either not pulling themselves up high enough, not dropping low enough, or both! This is not a full rep, and it’s robbing your body of effective work.
Solution: Leave your ego at the door! Yes, pull ups are tough, but half effort gives you half re-sults. With each repetition, you want your body to be in a straight line at the bottom – keep your elbows extended and your shoulders relaxed slightly up to your ears. Full range of motion for the win! Better to do a few proper pull ups than more half-rep ones.
Mistake #2: You don’t engage your shoulders at the start. Another problem I see with people is that they’re not setting their shoulders properly when they start their pull ups, which can put unnecessary strain on their joints/tendons/muscles. It can also be the difference between being able to get your first pull up or chin-up and flailing around on the bar!
Solution: Imagine pinching a pen in between your shoulder blades, then do the pull up. In other words, pull your shoulders down and back before you bend your elbows to pull yourself up. This puts you in a far more efficient position. By not using your back and shoulder muscles fully, over the long run you’ll be weaker and at a higher risk for injury.
Mistake #3: You’re doing too hard a variation. Whether it’s lack of strength or too much body mass, choose a variation that allows you to have great form while getting stronger. Use a box, an assisted band, or an assisted pull up machine to start at a low weight and build your strength.
Solution: Always do proper pull ups and chin-ups. Get your chin over the bar from a hang with every rep, and maintain good form. If you find yourself committing the mistakes on this list,
WWW.NERDFITNESS.COM
13
choose an easier variation.
Mistake #4: Not engaging your shoulders at the top. Many people will get a good extension at the bottom of their chin-up and start off with great form. But as they perform the movement, they will find their shoulders in a poor position at the top.
A classic sign of this happening is the chest/neck not touching the bar, or the body curling inward significantly at the top of the movement. Are your shoulders rolled forward? Are you shrugging your shoulders as you’re struggling to get above the bar?
Solution: Choose an easier variation. Work on an assisted chin-up, and maintain a strong shoul-der position at the top. Keep your shoulders down and back and engaged throughout the move-ment.
A chin over the bar is a chin-up – we aren’t trying to take away your chin-up if you aren’t getting your chest to the bar. But consider this a progression to even better form so you can eventually work on harder skills like pull up variations or the legendary muscle-up.
Mistake #5: You use violent kipping motions to do your pull ups or chin-ups. We know CrossFitters use the kip to get more pull ups in a short amount of time. NOW, it is the humble opinion of our team that you should only be kipping AFTER you are capable of doing perfectly functional and safe pull ups and chin-ups (in fact, many CrossFit gyms require qualifying strict pull ups before you can kip).
Solution: Build strength and good position (the foundation!) before you worry about speed. You want to know how to drive a car before you learn how to race it!
“BUT WHAT IF I CAN’T DO A PULL UP YET?”
If you can’t do a pull up yet, that’s okay! We know that’s something you can work towards, but that means you need to WORK TOWARDS IT.
The leveling system of The Nerd Fitness Academy covers how to scale up your exercises specifically to eventually complete a pull up, but go back and watch the video for options on how to scale the move-ment so you can get started training with pull ups right away.
Some quick hits:
• Focus on your nutrition! Every pound you lose means you have one less pound to pull up. As you get stronger AND lose weight, you’re doubling your pace towards getting that first pull up!
• Mix in other exercises. In addition to the progressions in our YouTube video above, you can do things like dumbbell rows and bodyweight rows to help build up your back muscle strength.
• Make getting a pull up a priority for you - promise to work towards your goal by training your pulling muscles with every workout!
WWW.NERDFITNESS.COM
14
CHAPTER 4: THE SQUAT: What You Need to Know
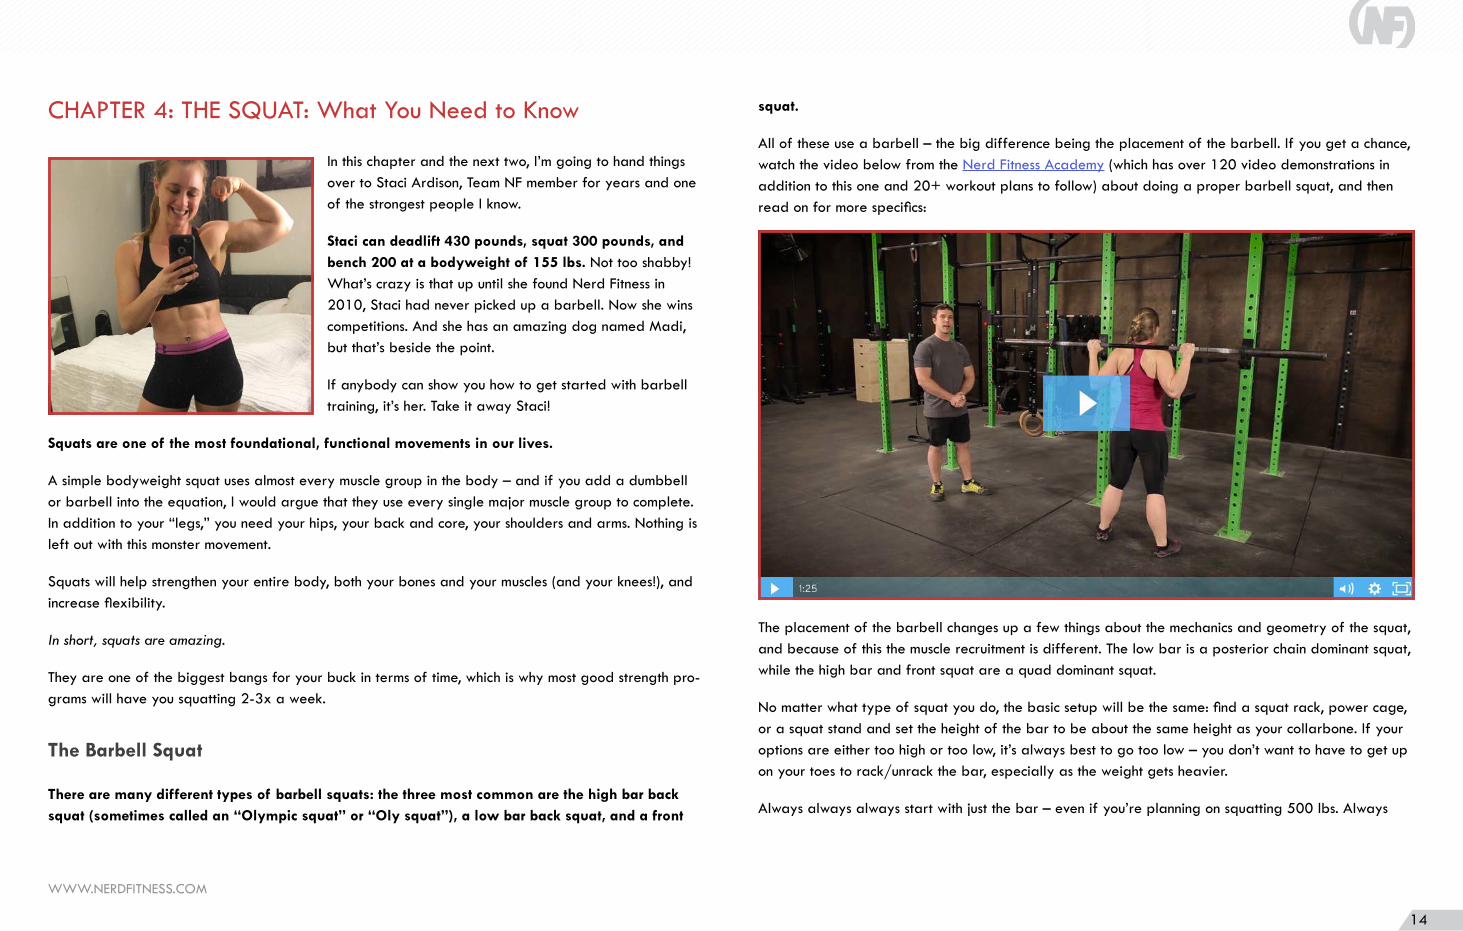
In this chapter and the next two, I’m going to hand things over to Staci Ardison, Team NF member for years and one of the strongest people I know.
Staci can deadlift 430 pounds, squat 300 pounds, and bench 200 at a bodyweight of 155 lbs. Not too shabby! What’s crazy is that up until she found Nerd Fitness in 2010, Staci had never picked up a barbell. Now she wins competitions. And she has an amazing dog named Madi, but that’s beside the point.
If anybody can show you how to get started with barbell training, it’s her. Take it away Staci!
Squats are one of the most foundational, functional movements in our lives.
A simple bodyweight squat uses almost every muscle group in the body – and if you add a dumbbell or barbell into the equation, I would argue that they use every single major muscle group to complete. In addition to your “legs,” you need your hips, your back and core, your shoulders and arms. Nothing is left out with this monster movement.
Squats will help strengthen your entire body, both your bones and your muscles (and your knees!), and increase flexibility.
In short, squats are amazing.
They are one of the biggest bangs for your buck in terms of time, which is why most good strength pro-grams will have you squatting 2-3x a week.
The Barbell Squat
There are many different types of barbell squats: the three most common are the high bar back squat (sometimes called an “Olympic squat” or “Oly squat”), a low bar back squat, and a front
squat.
All of these use a barbell – the big difference being the placement of the barbell. If you get a chance, watch the video below from the Nerd Fitness Academy (which has over 120 video demonstrations in addition to this one and 20+ workout plans to follow) about doing a proper barbell squat, and then read on for more specifics:
The placement of the barbell changes up a few things about the mechanics and geometry of the squat, and because of this the muscle recruitment is different. The low bar is a posterior chain dominant squat, while the high bar and front squat are a quad dominant squat.
No matter what type of squat you do, the basic setup will be the same: find a squat rack, power cage, or a squat stand and set the height of the bar to be about the same height as your collarbone. If your options are either too high or too low, it’s always best to go too low – you don’t want to have to get up on your toes to rack/unrack the bar, especially as the weight gets heavier.
Always always always start with just the bar – even if you’re planning on squatting 500 lbs. Always
WWW.NERDFITNESS.COM
15
warm up with a few sets with just the bar - it lets you safely determine if your body is prepared to start going heavy!
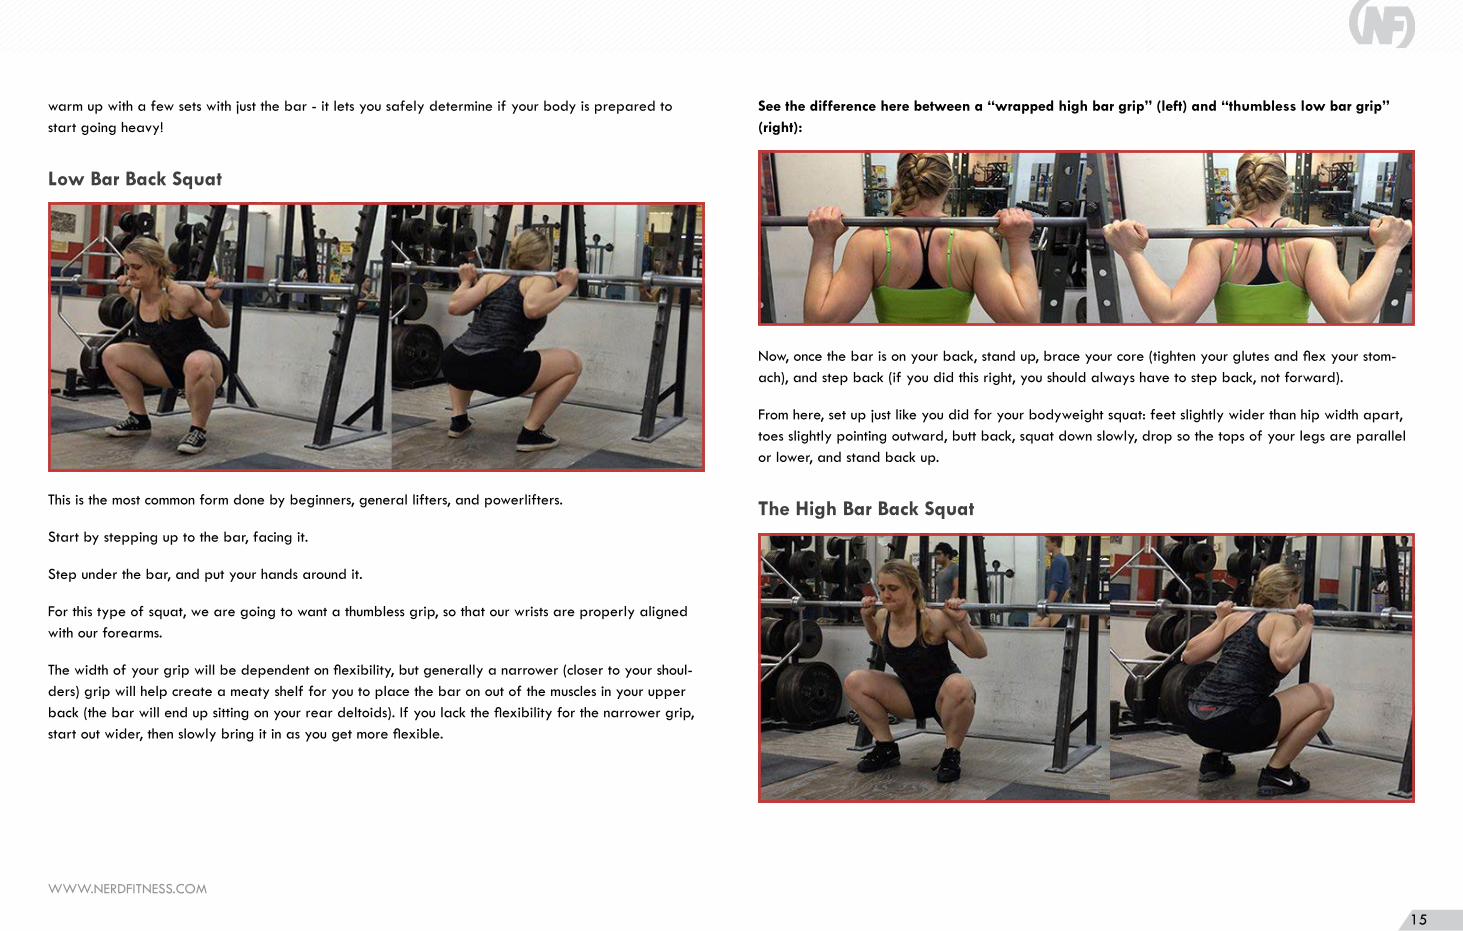
Low Bar Back Squat
This is the most common form done by beginners, general lifters, and powerlifters.
Start by stepping up to the bar, facing it.
Step under the bar, and put your hands around it.
For this type of squat, we are going to want a thumbless grip, so that our wrists are properly aligned with our forearms.
The width of your grip will be dependent on flexibility, but generally a narrower (closer to your shoul-ders) grip will help create a meaty shelf for you to place the bar on out of the muscles in your upper back (the bar will end up sitting on your rear deltoids). If you lack the flexibility for the narrower grip, start out wider, then slowly bring it in as you get more flexible.
See the difference here between a “wrapped high bar grip” (left) and “thumbless low bar grip” (right):
Now, once the bar is on your back, stand up, brace your core (tighten your glutes and flex your stom-ach), and step back (if you did this right, you should always have to step back, not forward).
From here, set up just like you did for your bodyweight squat: feet slightly wider than hip width apart, toes slightly pointing outward, butt back, squat down slowly, drop so the tops of your legs are parallel or lower, and stand back up.
The High Bar Back Squat
WWW.NERDFITNESS.COM
16
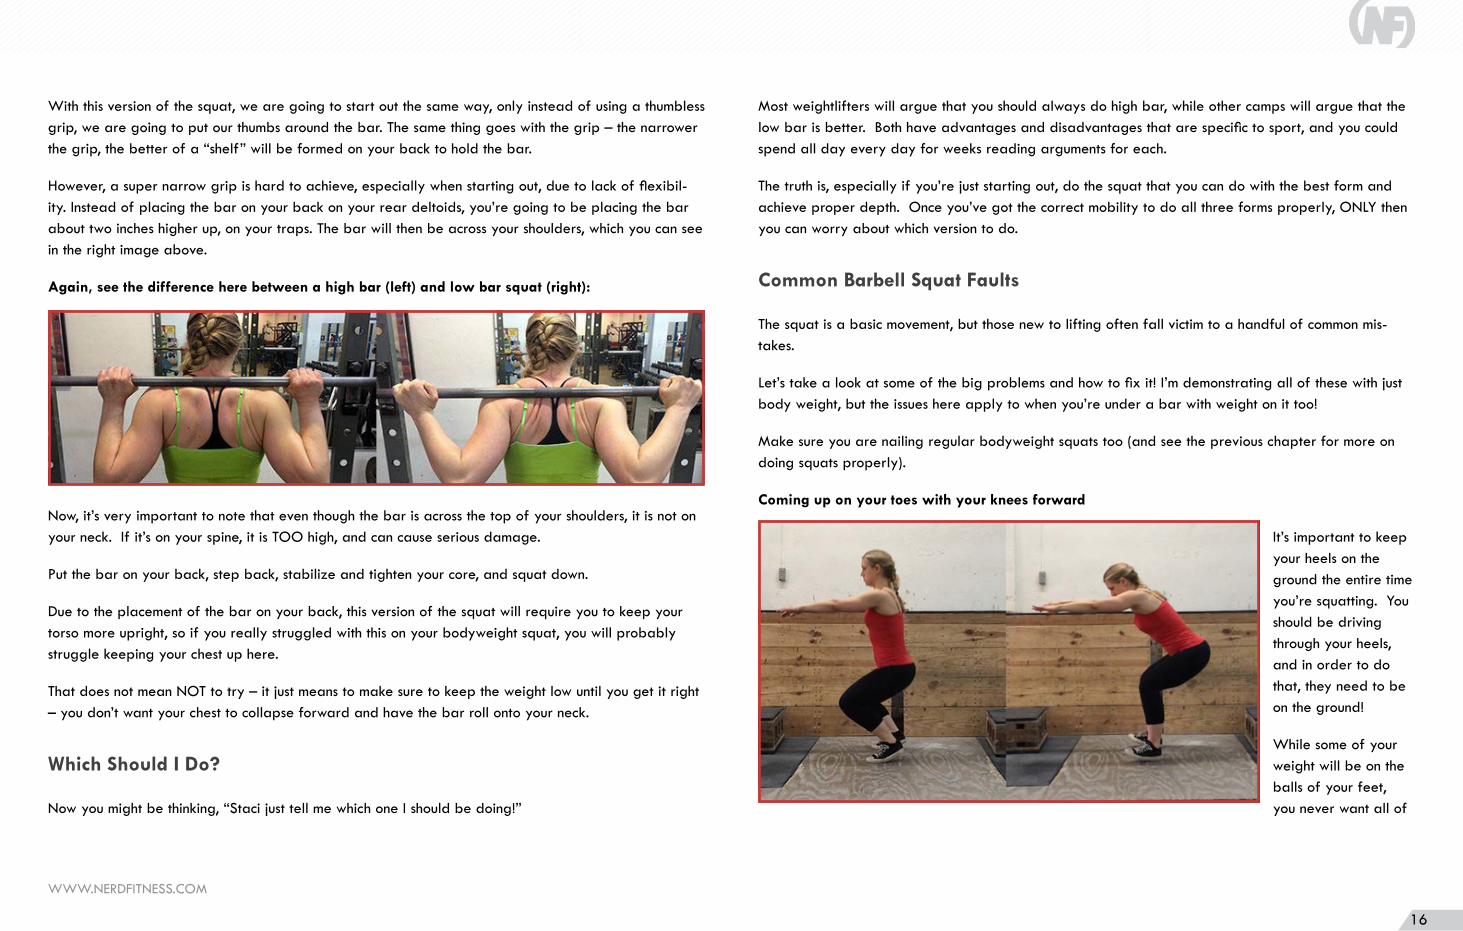
With this version of the squat, we are going to start out the same way, only instead of using a thumbless grip, we are going to put our thumbs around the bar. The same thing goes with the grip – the narrower the grip, the better of a “shelf” will be formed on your back to hold the bar.
However, a super narrow grip is hard to achieve, especially when starting out, due to lack of flexibil-ity. Instead of placing the bar on your back on your rear deltoids, you’re going to be placing the bar about two inches higher up, on your traps. The bar will then be across your shoulders, which you can see in the right image above.
Again, see the difference here between a high bar (left) and low bar squat (right):
Now, it’s very important to note that even though the bar is across the top of your shoulders, it is not on your neck. If it’s on your spine, it is TOO high, and can cause serious damage.
Put the bar on your back, step back, stabilize and tighten your core, and squat down.
Due to the placement of the bar on your back, this version of the squat will require you to keep your torso more upright, so if you really struggled with this on your bodyweight squat, you will probably struggle keeping your chest up here.
That does not mean NOT to try – it just means to make sure to keep the weight low until you get it right – you don’t want your chest to collapse forward and have the bar roll onto your neck.
Which Should I Do?
Now you might be thinking, “Staci just tell me which one I should be doing!”
Most weightlifters will argue that you should always do high bar, while other camps will argue that the low bar is better. Both have advantages and disadvantages that are specific to sport, and you could spend all day every day for weeks reading arguments for each.
The truth is, especially if you’re just starting out, do the squat that you can do with the best form and achieve proper depth. Once you’ve got the correct mobility to do all three forms properly, ONLY then you can worry about which version to do.
Common Barbell Squat Faults
The squat is a basic movement, but those new to lifting often fall victim to a handful of common mis-takes.
Let’s take a look at some of the big problems and how to fix it! I’m demonstrating all of these with just body weight, but the issues here apply to when you’re under a bar with weight on it too!
Make sure you are nailing regular bodyweight squats too (and see the previous chapter for more on doing squats properly).
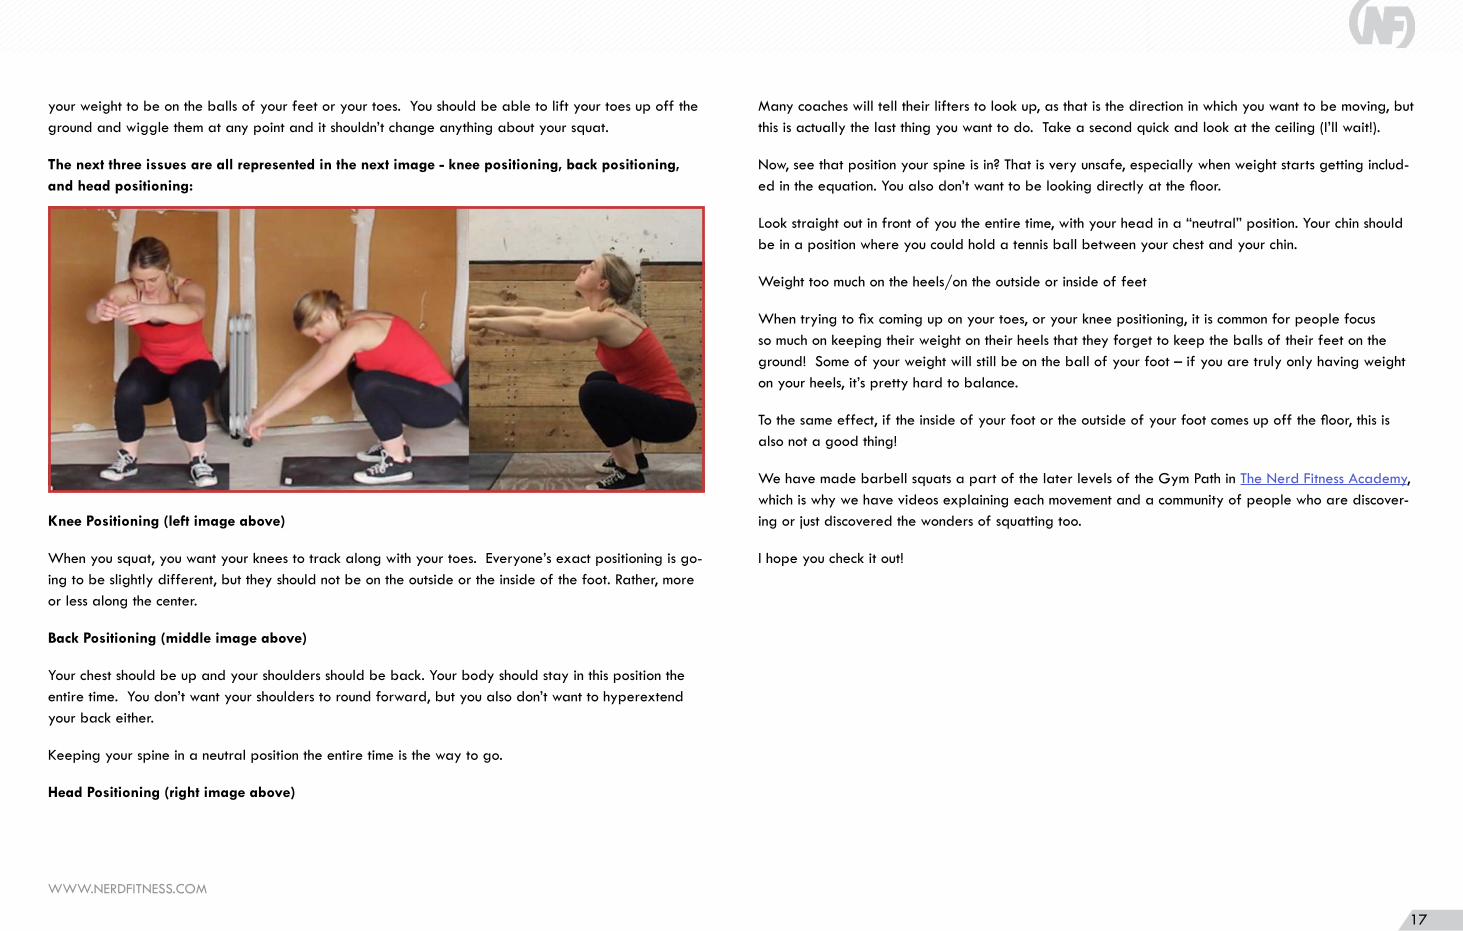
Coming up on your toes with your knees forward
It’s important to keep your heels on the ground the entire time you’re squatting. You should be driving through your heels, and in order to do that, they need to be on the ground!
While some of your weight will be on the balls of your feet, you never want all of
WWW.NERDFITNESS.COM
17
your weight to be on the balls of your feet or your toes. You should be able to lift your toes up off the ground and wiggle them at any point and it shouldn’t change anything about your squat.
The next three issues are all represented in the next image - knee positioning, back positioning, and head positioning:
Knee Positioning (left image above)
When you squat, you want your knees to track along with your toes. Everyone’s exact positioning is go-ing to be slightly different, but they should not be on the outside or the inside of the foot. Rather, more or less along the center.
Back Positioning (middle image above)
Your chest should be up and your shoulders should be back. Your body should stay in this position the entire time. You don’t want your shoulders to round forward, but you also don’t want to hyperextend your back either.
Keeping your spine in a neutral position the entire time is the way to go.
Head Positioning (right image above)
Many coaches will tell their lifters to look up, as that is the direction in which you want to be moving, but this is actually the last thing you want to do. Take a second quick and look at the ceiling (I’ll wait!).
Now, see that position your spine is in? That is very unsafe, especially when weight starts getting includ-ed in the equation. You also don’t want to be looking directly at the floor.
Look straight out in front of you the entire time, with your head in a “neutral” position. Your chin should be in a position where you could hold a tennis ball between your chest and your chin.
Weight too much on the heels/on the outside or inside of feet
When trying to fix coming up on your toes, or your knee positioning, it is common for people focus so much on keeping their weight on their heels that they forget to keep the balls of their feet on the ground! Some of your weight will still be on the ball of your foot – if you are truly only having weight on your heels, it’s pretty hard to balance.
To the same effect, if the inside of your foot or the outside of your foot comes up off the floor, this is also not a good thing!
We have made barbell squats a part of the later levels of the Gym Path in The Nerd Fitness Academy, which is why we have videos explaining each movement and a community of people who are discover-ing or just discovered the wonders of squatting too.
I hope you check it out!
WWW.NERDFITNESS.COM
18
CHAPTER 5: THE DEADLIFT: What You Need to Know
When you deadlift, you use every single muscle in your body, just like with the squat:
• Your arms, forearms, and hands hold onto the barbell and make sure the bar stays in the right position and stays stable throughout the lift.
• Your shoulders and traps hold the weight and hold it stable.
• Your back and core help keep your entire body tight and stable to help keep your spine secure.
• Your posterior chain and legs to act as a lever and lift the weight.
Whenever anyone asks me where I got my shoulders/abs/etc, my answer is the same: deadlifts. Why do a million crunches when I can just do deadlifts instead? Way more fun! Plus, deadlifting is actually more effective.
On top of that, the deadlift is a basic human movement. Other than the squat, there might not be another movement that is more “functional.” From the grocery store, to moving a piece of furniture, to picking your child up off the floor – you are deadlifting (and probably with poor form!).
As you build solid form deadlifting in the gym, using better form when picking things up in real life will become second nature. This means you’ll be less likely to injure yourself now - and later down the line (not only because you are stronger, but because your body knows how to properly handle weight).
And this goes further than just picking up objects – how you move while shoveling snow, doing yard work, and doing other basic, everyday life tasks will all dramatically improve from deadlifting. Don’t be that guy/gal with back problems from lifting that random object years from now!
The deadlift is awesome – perhaps the purest measure of strength: either you can pick the weight off of the ground, or you can’t.
Let’s take a look at how to do them right.
Other than a barbell and weights, there are two optional equipment items you should consider:
• Flat shoes, if your gym requires shoes. Chuck Taylors work great. I personally prefer to dead-lift in either socks, Vibram 5 Fingers, or zero drop shoes like Merrell Vapor Gloves. Many power-lifters wear deadlift slippers, which are basically just a fancy sock that’s approved footwear for
competition.
• Chalk is optional and initially won’t be incredibly useful. However, after you start to put some weight on the bar, chalk will be enormously helpful for hanging onto the bar.
The deadlift can actually be taught in one sentence (pick up that weight and put it down); however, each piece of the deadlift has little intricacies that need to be done right, or you will hurt yourself.
The Conventional Setup
While your choice of deadlift may vary depending on your body type or training goals, the conven-tional deadlift is a great starting point for just about any situation.
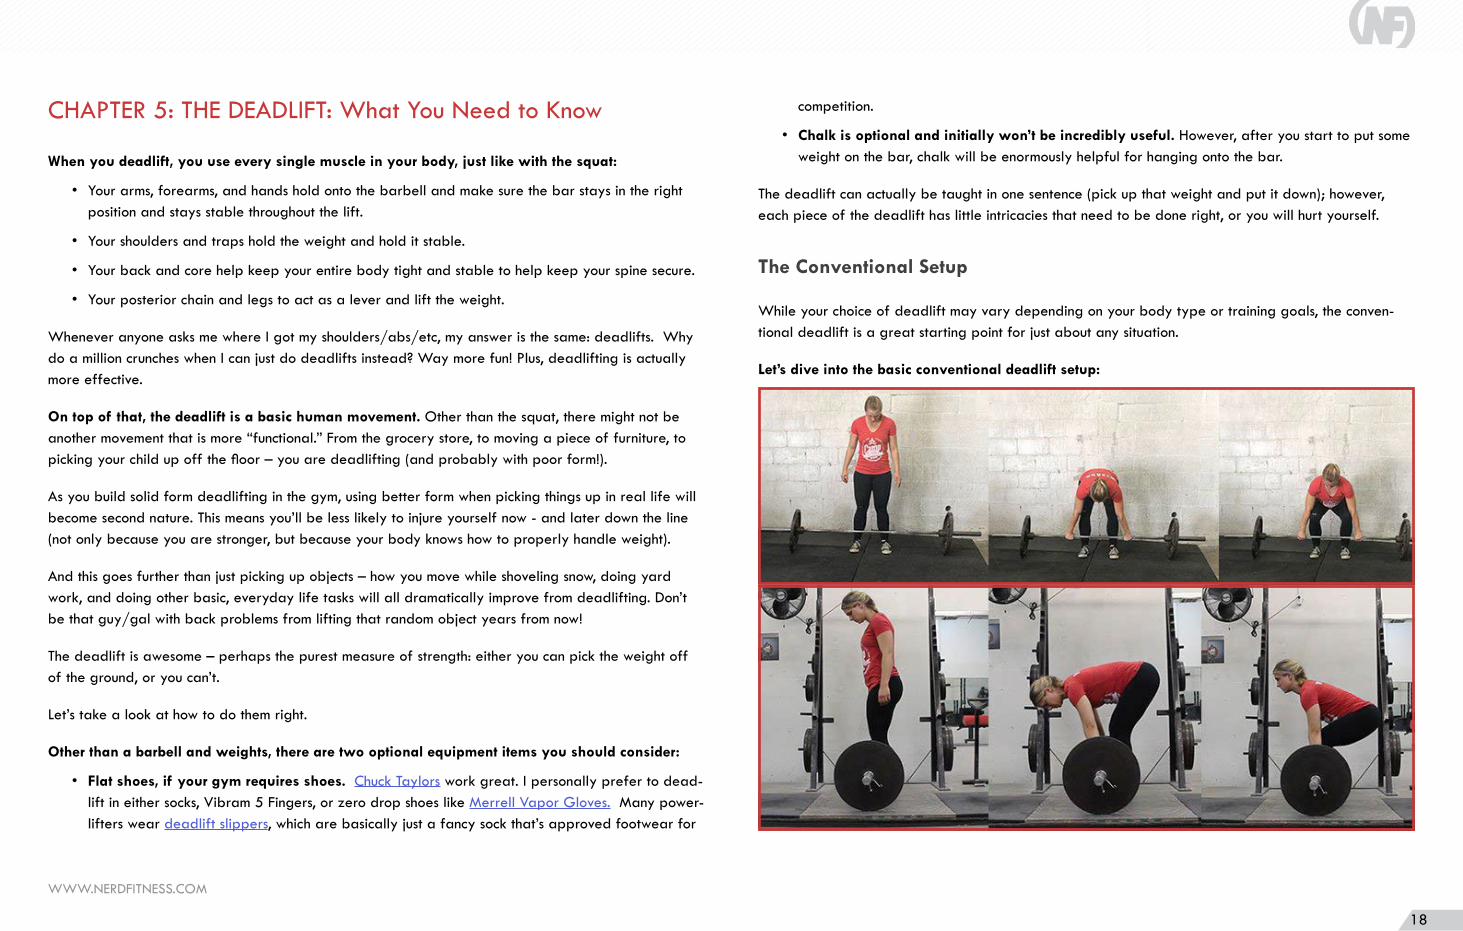
Let’s dive into the basic conventional deadlift setup:
WWW.NERDFITNESS.COM
19
*NOTE: Always warm up properly, and start with just the bar, even for deadlifts!
• Load the bar and secure the plates with collars. If you are just starting out with the movement, begin with 5-10 lb plates, using boxes or blocks to elevate the bar to about where it would be with 45 lb plates attached (if your gym has training plates that are the right diameter, even bet-ter!). You may also be able to use your gym’s power rack for this. Don’t do the deadlift from the ground with just the bar (see note after these bullets).
• Stand with your feet about hip’s width distance (8-12 inches) apart, and angle your feet slightly outwards (5-10 degrees).
• Look down. The bar should be over the middle of your feet. If you’re wearing laced shoes, the bar should be approximately over the tied part of your shoelaces.
NOTE: If you are using just the bar to start, then DON’T pick the bar up from the ground. The bar will be too low to the ground and mess up proper technique. If you don’t have the ability to set the starting height of the bar at the right height (see above), you can start with a Romanian deadlift in-stead!
Here’s Staci demonstrating a barbell Romanian deadlift if you’re not sure how to perform this exercise.
If ARE able to do a regular deadlift from the proper height, you are ready to go!
From here, until you are actually lifting, don’t move the bar!
• Next, lean over and grab the bar without moving the bar or your hips. Your legs should still be straight at this point. Your grip width will be slightly outside of your legs, but your legs and hands should not touch. For now, a simple double overhand grip will work. We will discuss grip options in more detail later!
• Now that you’re holding onto the bar (and not moving it), move your hips down. While you do this, your shins will come forward until they touch the bar (stop moving your hips down when your shins touch the bar). Squeeze your chest up. As you do this, your back should flatten and move into a neutral spine position.
This is the final starting position of the deadlift.
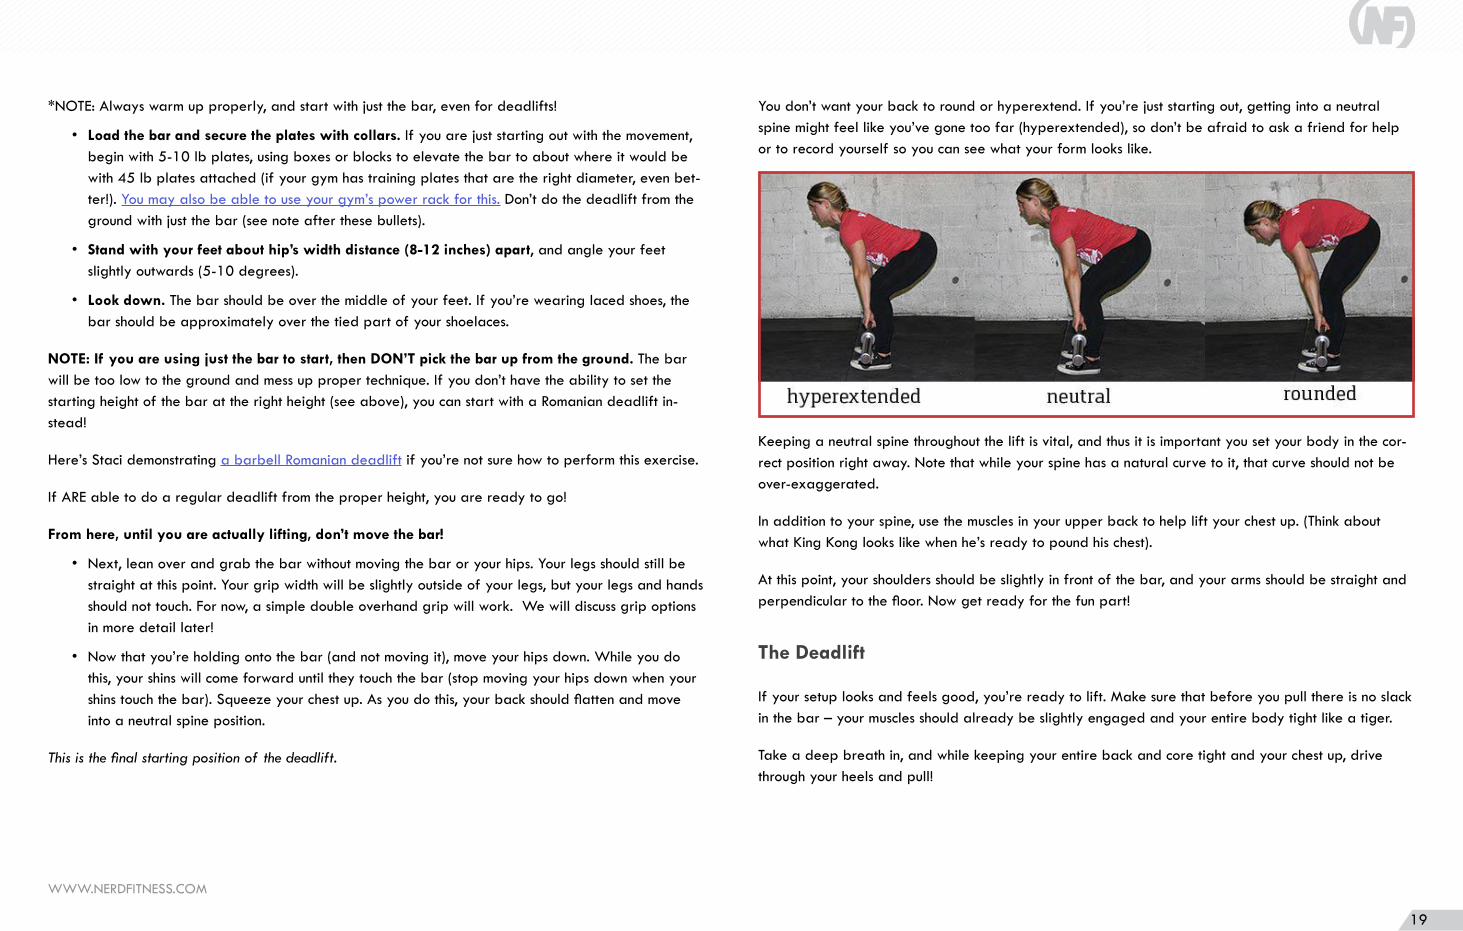
You don’t want your back to round or hyperextend. If you’re just starting out, getting into a neutral spine might feel like you’ve gone too far (hyperextended), so don’t be afraid to ask a friend for help or to record yourself so you can see what your form looks like.
Keeping a neutral spine throughout the lift is vital, and thus it is important you set your body in the cor-rect position right away. Note that while your spine has a natural curve to it, that curve should not be over-exaggerated.
In addition to your spine, use the muscles in your upper back to help lift your chest up. (Think about what King Kong looks like when he’s ready to pound his chest).
At this point, your shoulders should be slightly in front of the bar, and your arms should be straight and perpendicular to the floor. Now get ready for the fun part!
The Deadlift
If your setup looks and feels good, you’re ready to lift. Make sure that before you pull there is no slack in the bar – your muscles should already be slightly engaged and your entire body tight like a tiger.
Take a deep breath in, and while keeping your entire back and core tight and your chest up, drive through your heels and pull!
WWW.NERDFITNESS.COM
20
A popular cue that helps many lifters execute the right form is to visualize the deadlift not as a pull, but rather a push. Imagine you are pushing the world away from the bar with your legs, rather than pulling the bar up - like you’re holding onto the bar and driving your feet down through the earth.
As you pull, remember:
• All of your weight should be on your heels and mid-foot. You should be able to wiggle your toes the entire time (though that is not a part of deadlifting!).
• During the movement, your entire body should move upwards at the same speed. This means that your butt should not rise faster than your chest, or vice versa. You may have heard of the term “stripper deadlift” – this is when your butt rises first before your chest.
• Think about leading with your chest as you drive through your heels, and make sure you keep
your chest upright and tight.
• Your arms should stay straight the entire time. They are literally just there to hold onto the bar – they are not bending or pulling at all.
• The bar should stay in contact with your body the entire time – you will literally be dragging it up your thighs. This is why you see many powerlifters with chalk or baby powder covering their legs (and why they typically wear socks that cover their shins to prevent cuts and scrapes). Do not let the bar come forward. If you were to draw a line that follows the bar’s path from the floor to lockout, it would be a straight, vertical line.
• As you are pulling, you should be squeezing your glutes. Once the bar passes your knees, think of getting your hips under the bar by squeezing your glutes. So while you’re pulling with your arms, you’re pushing through the floor with your feet, and pushing your butt under the bar.
• At the top of the movement, you should be standing tall and proud with your chest open, as if you were King Kong, getting ready to pound his chest.
• At the top, do not hyperextend and lean back. You want to keep your spine neutral and every-thing tight.
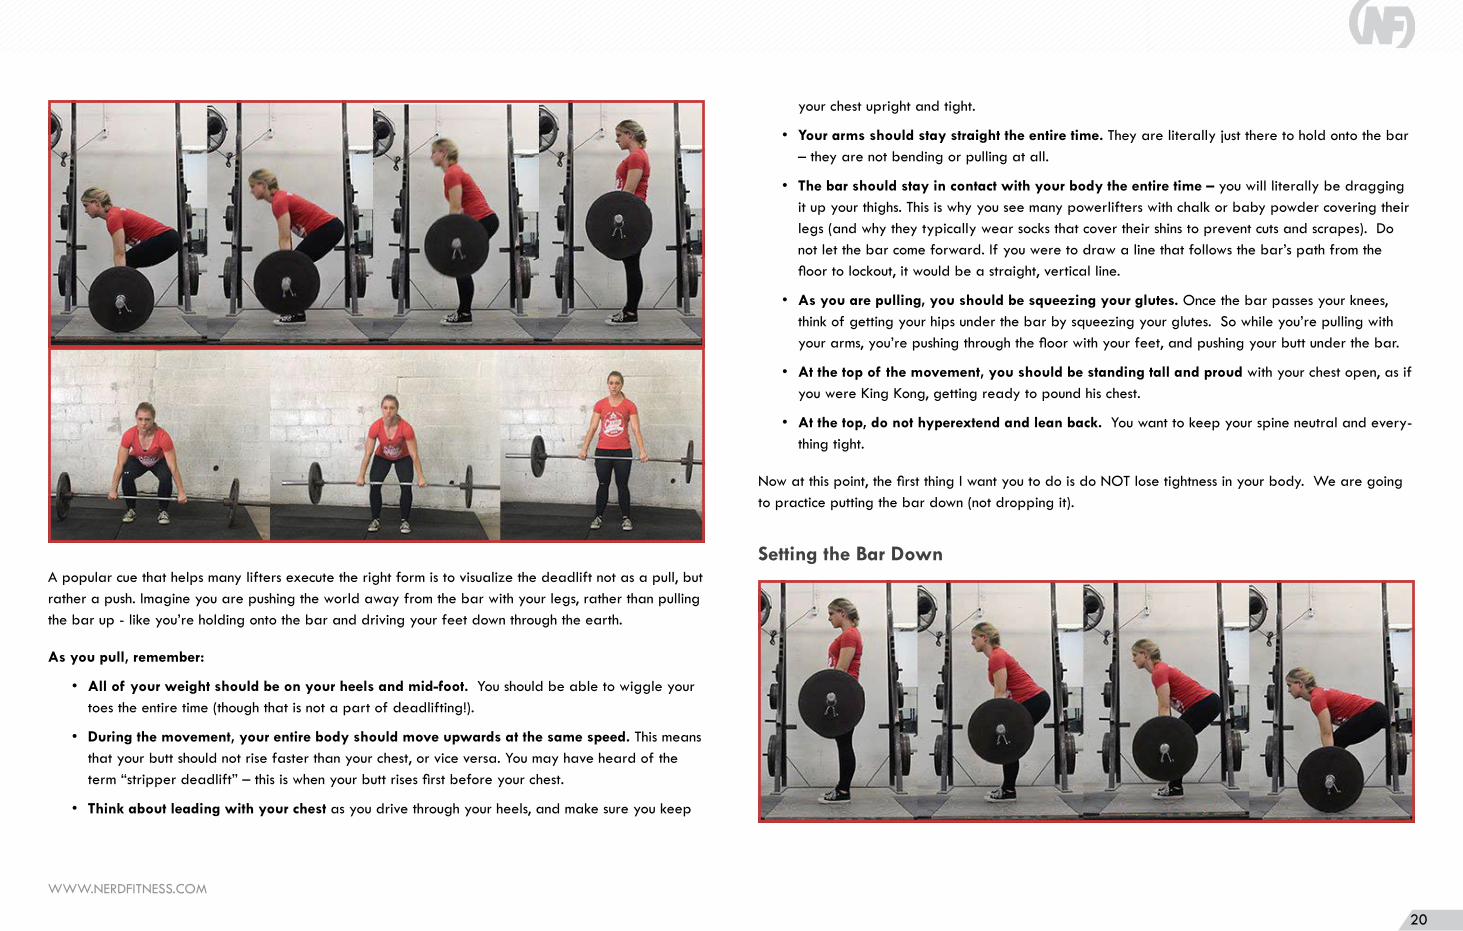
Now at this point, the first thing I want you to do is do NOT lose tightness in your body. We are going to practice putting the bar down (not dropping it).
Setting the Bar Down
WWW.NERDFITNESS.COM
21
Your body should descend all at the same time, just as it ascended, only backwards.
Unlock your hips and knees and slowly lower the bar to set it down (make sure you unlock them at the same time. Unlocking your knees first will cause a lot of awkward movement, and may cause your lower back to round).
Don’t relax until you let go of the bar. This is extremely important; a large amount of deadlift injuries come from people getting super excited about making a lift, losing tightness, and then putting the bar down wrong. You want this to be a quick movement too – lowering the deadlift slowly will take a lot out of you and leave you sore for days.
Notes on dropping the deadlift:
The eccentric part of the deadlift (lowering it) is actually riskier than the concentric (picking it up) part of the deadlift, and it is the part of the deadlift that will give you the most DOMS (Delayed Onset Muscle Soreness). Because of this, many coaches will advocate dropping your deadlift (especially advanced athletes who can’t afford to sacrifice performance later in the week).
I would still recommend putting the bar down (especially if you want to powerlift – the lift does not count if you drop it). So practice putting the bar down properly. It’s just as (if not more) important as picking the bar up. Not only that, but most gyms will NOT let you drop the weight anyways.
How to Grip the Bar, Straps, and Other Equipment
Grip strength is a huge part of the deadlift, because if you can’t hold onto the bar, you can’t lift it!
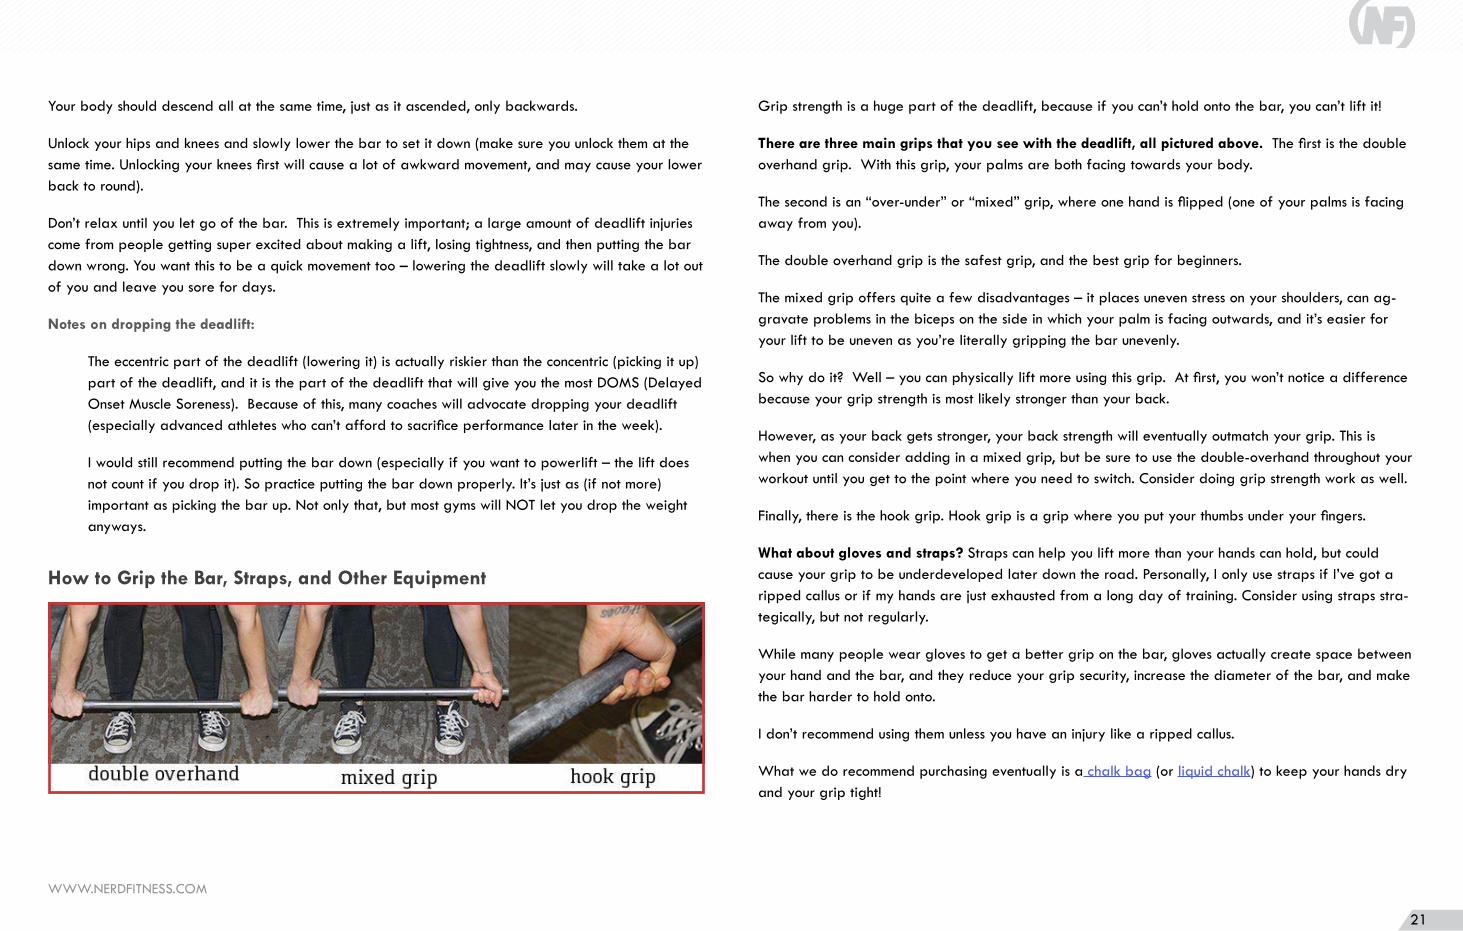
There are three main grips that you see with the deadlift, all pictured above. The first is the double overhand grip. With this grip, your palms are both facing towards your body.
The second is an “over-under” or “mixed” grip, where one hand is flipped (one of your palms is facing away from you).
The double overhand grip is the safest grip, and the best grip for beginners.
The mixed grip offers quite a few disadvantages – it places uneven stress on your shoulders, can ag-gravate problems in the biceps on the side in which your palm is facing outwards, and it’s easier for your lift to be uneven as you’re literally gripping the bar unevenly.
So why do it? Well – you can physically lift more using this grip. At first, you won’t notice a difference because your grip strength is most likely stronger than your back.
However, as your back gets stronger, your back strength will eventually outmatch your grip. This is when you can consider adding in a mixed grip, but be sure to use the double-overhand throughout your workout until you get to the point where you need to switch. Consider doing grip strength work as well.
Finally, there is the hook grip. Hook grip is a grip where you put your thumbs under your fingers.
What about gloves and straps? Straps can help you lift more than your hands can hold, but could cause your grip to be underdeveloped later down the road. Personally, I only use straps if I’ve got a ripped callus or if my hands are just exhausted from a long day of training. Consider using straps stra-tegically, but not regularly.
While many people wear gloves to get a better grip on the bar, gloves actually create space between your hand and the bar, and they reduce your grip security, increase the diameter of the bar, and make the bar harder to hold onto.
I don’t recommend using them unless you have an injury like a ripped callus.
What we do recommend purchasing eventually is a chalk bag (or liquid chalk) to keep your hands dry and your grip tight!
WWW.NERDFITNESS.COM
22
Speaking of ripped calluses, take care of your hands, and ripped calluses are less likely to happen!
“Do I need to use a belt?” When starting out, don’t worry about a belt. However, as you get into heavy weight, it may be something to look into. Belts need to be worn correctly in order to be effective.
Common Faults
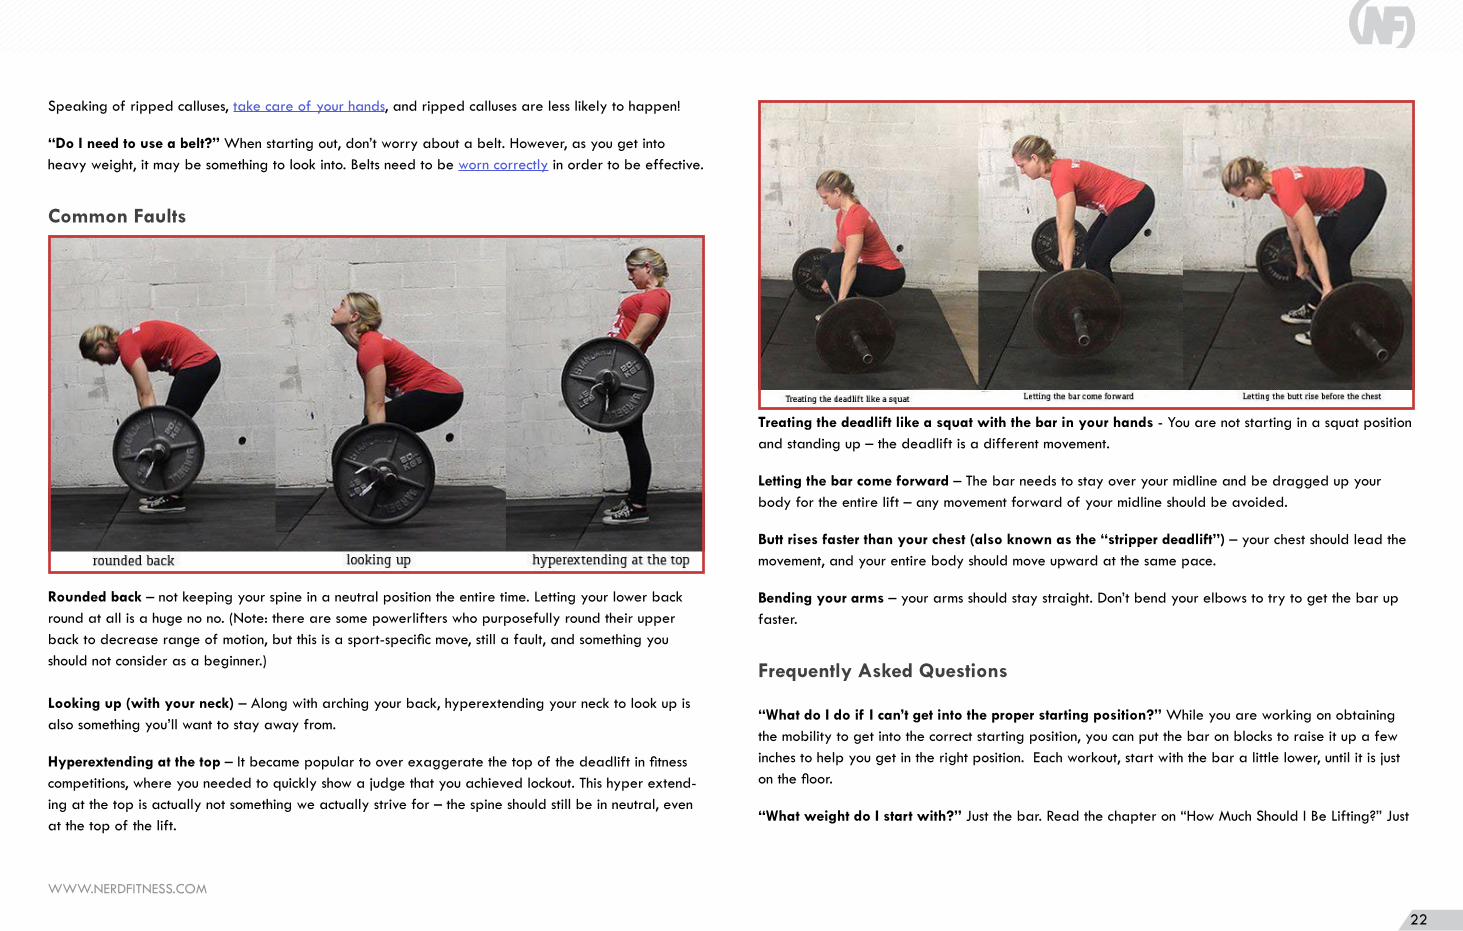
Rounded back – not keeping your spine in a neutral position the entire time. Letting your lower back round at all is a huge no no. (Note: there are some powerlifters who purposefully round their upper back to decrease range of motion, but this is a sport-specific move, still a fault, and something you should not consider as a beginner.)
Looking up (with your neck) – Along with arching your back, hyperextending your neck to look up is also something you’ll want to stay away from.
Hyperextending at the top – It became popular to over exaggerate the top of the deadlift in fitness competitions, where you needed to quickly show a judge that you achieved lockout. This hyper extend-ing at the top is actually not something we actually strive for – the spine should still be in neutral, even at the top of the lift.
Treating the deadlift like a squat with the bar in your hands - You are not starting in a squat position and standing up – the deadlift is a different movement.
Letting the bar come forward – The bar needs to stay over your midline and be dragged up your body for the entire lift – any movement forward of your midline should be avoided.
Butt rises faster than your chest (also known as the “stripper deadlift”) – your chest should lead the movement, and your entire body should move upward at the same pace.
Bending your arms – your arms should stay straight. Don’t bend your elbows to try to get the bar up faster.
Frequently Asked Questions
“What do I do if I can’t get into the proper starting position?” While you are working on obtaining the mobility to get into the correct starting position, you can put the bar on blocks to raise it up a few inches to help you get in the right position. Each workout, start with the bar a little lower, until it is just on the floor.
“What weight do I start with?” Just the bar. Read the chapter on “How Much Should I Be Lifting?” Just
WWW.NERDFITNESS.COM
23
don’t start with the bar on the ground - either do Romanian deadlifts, or put the bar up on blocks or on safety bars in a squat rack so that you are starting with the bar at the proper height.
“Okay, I get it. Deadlifts are great! I should do them ALL THE TIME, right?!?” I appreciate your en-thusiasm, but there are some things you need to take into consideration when adding deadlifts to your program.
Heavy deadlifts are extremely taxing on the central nervous system. This means your body needs more time to recover. In fact, it’s so taxing that some coaches recommend taking the deadlift out completely for their more advanced, sport-specific athletes.
Most good strength programs only include the deadlift once per week, and it’s a lighter volume than squats. Both Starting Strength and StrongLifts only include ONE set of 5 deadlifts. Meanwhile, they program 5 sets of 5 squats.
CHAPTER 6: THE PRESS - What You Need to Know
There are many different variations of the press, but the overhead press, “THE PRESS,” is the origi-nal.
Get started with our video from The Nerd Fitness Academy:
Start with a squat rack and a bar. (Don’t be afraid to start with a lighter bar, for many, the 45 lb bar is too heavy – it was for me for my first few months of lifting!)
The rack should be set at the same height as if you were going to squat – so that the bar is at the same height as your collarbone. When in doubt, go lower versus higher; you don’t want to have to get on your toes to get the bar into the right position.
Now, when we set up, the goal will be to create the most efficient path for the bar as possible. This will allow us to apply the most force as possible, and lift the most amount of weight.
WWW.NERDFITNESS.COM
24
The Setup
In order to create a position that gives you the most leverage, we are going from our shoulders STRAIGHT overhead – the most efficient path is straight up in a vertical line.
Walk up to the bar so that you are right up against it, placing your hands just outside your shoulders.
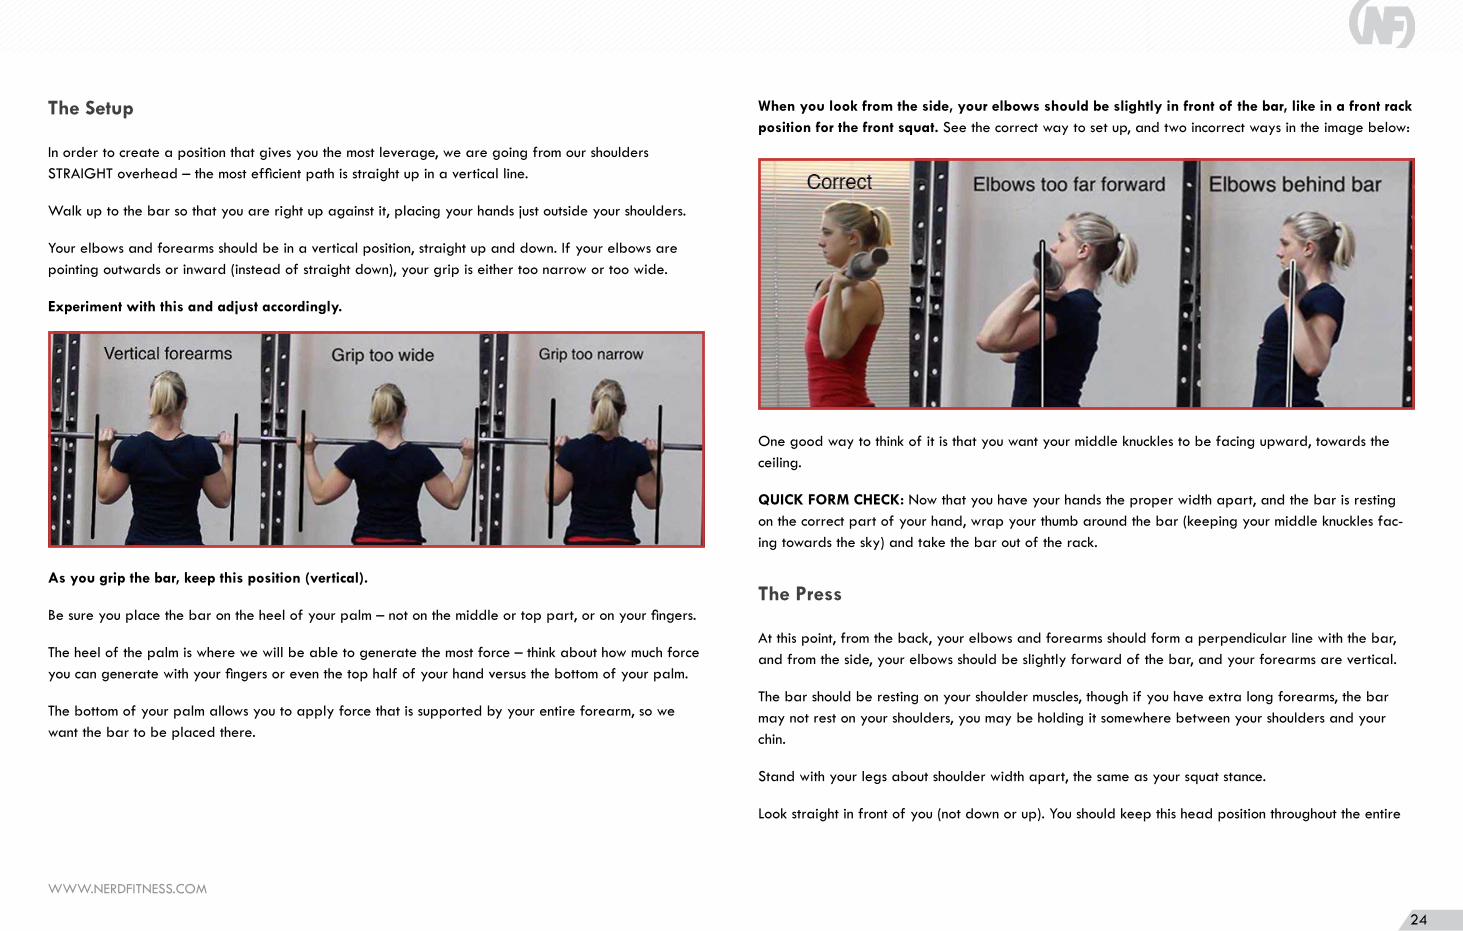
Your elbows and forearms should be in a vertical position, straight up and down. If your elbows are pointing outwards or inward (instead of straight down), your grip is either too narrow or too wide.
Experiment with this and adjust accordingly.
As you grip the bar, keep this position (vertical).
Be sure you place the bar on the heel of your palm – not on the middle or top part, or on your fingers.
The heel of the palm is where we will be able to generate the most force – think about how much force you can generate with your fingers or even the top half of your hand versus the bottom of your palm.
The bottom of your palm allows you to apply force that is supported by your entire forearm, so we want the bar to be placed there.
When you look from the side, your elbows should be slightly in front of the bar, like in a front rack position for the front squat. See the correct way to set up, and two incorrect ways in the image below:
One good way to think of it is that you want your middle knuckles to be facing upward, towards the ceiling.
QUICK FORM CHECK: Now that you have your hands the proper width apart, and the bar is resting on the correct part of your hand, wrap your thumb around the bar (keeping your middle knuckles fac-ing towards the sky) and take the bar out of the rack.
The Press
At this point, from the back, your elbows and forearms should form a perpendicular line with the bar, and from the side, your elbows should be slightly forward of the bar, and your forearms are vertical.
The bar should be resting on your shoulder muscles, though if you have extra long forearms, the bar may not rest on your shoulders, you may be holding it somewhere between your shoulders and your chin.
Stand with your legs about shoulder width apart, the same as your squat stance.
Look straight in front of you (not down or up). You should keep this head position throughout the entire
WWW.NERDFITNESS.COM
25
lift; it’s good to pick a spot in front of you and stare at that one spot the entire time.
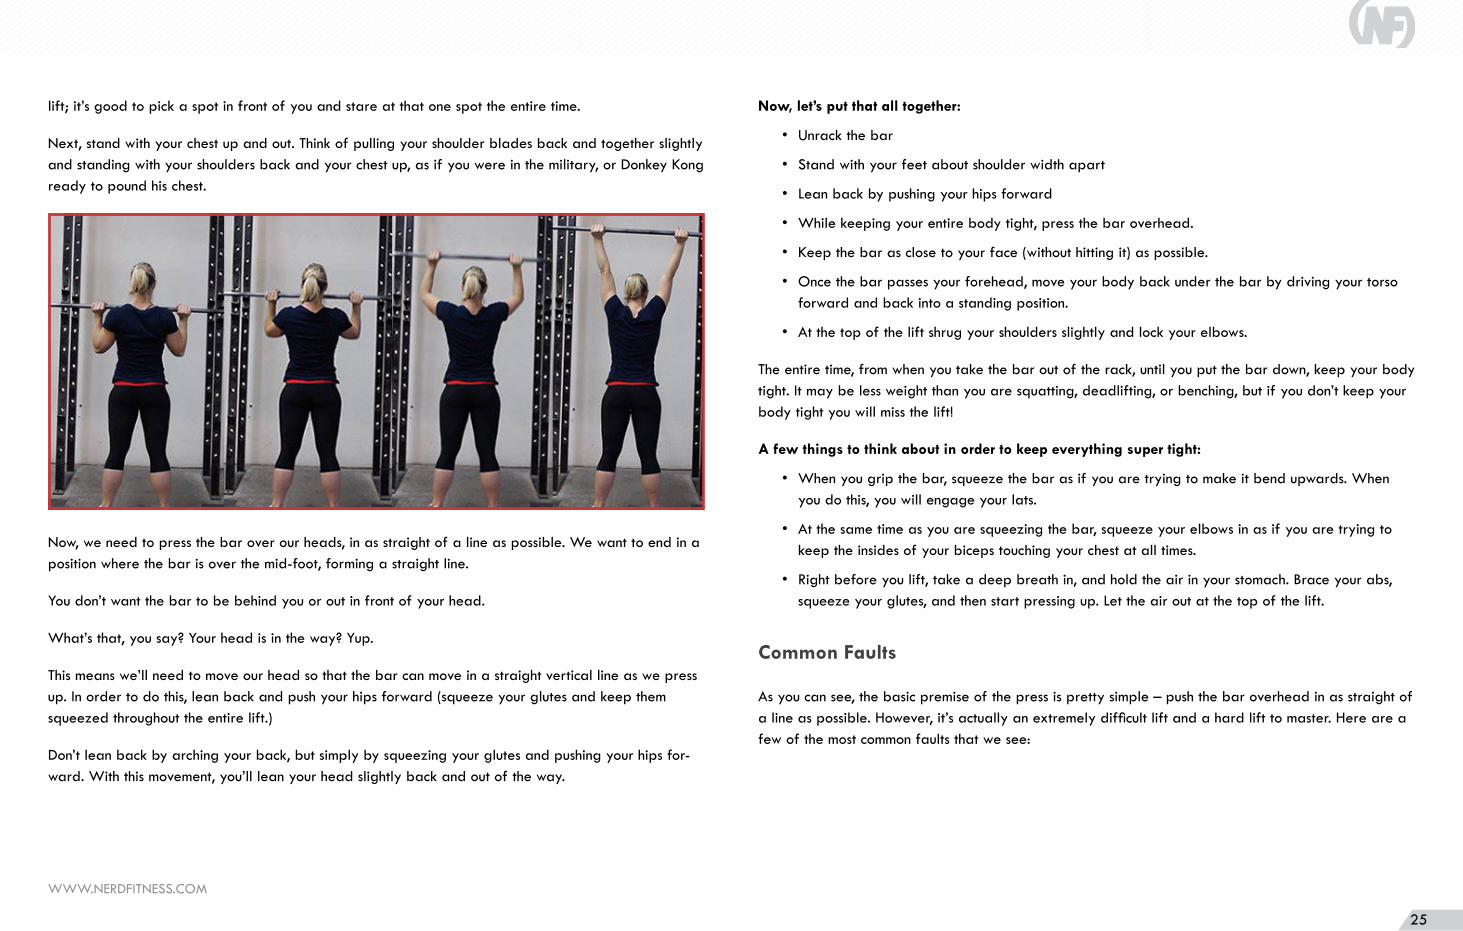
Next, stand with your chest up and out. Think of pulling your shoulder blades back and together slightly and standing with your shoulders back and your chest up, as if you were in the military, or Donkey Kong ready to pound his chest.
Now, we need to press the bar over our heads, in as straight of a line as possible. We want to end in a position where the bar is over the mid-foot, forming a straight line.
You don’t want the bar to be behind you or out in front of your head.
What’s that, you say? Your head is in the way? Yup.
This means we’ll need to move our head so that the bar can move in a straight vertical line as we press up. In order to do this, lean back and push your hips forward (squeeze your glutes and keep them squeezed throughout the entire lift.)
Don’t lean back by arching your back, but simply by squeezing your glutes and pushing your hips for-ward. With this movement, you’ll lean your head slightly back and out of the way.
Now, let’s put that all together:
• Unrack the bar
• Stand with your feet about shoulder width apart
• Lean back by pushing your hips forward
• While keeping your entire body tight, press the bar overhead.
• Keep the bar as close to your face (without hitting it) as possible.
• Once the bar passes your forehead, move your body back under the bar by driving your torso forward and back into a standing position.
• At the top of the lift shrug your shoulders slightly and lock your elbows.
The entire time, from when you take the bar out of the rack, until you put the bar down, keep your body tight. It may be less weight than you are squatting, deadlifting, or benching, but if you don’t keep your body tight you will miss the lift!
A few things to think about in order to keep everything super tight:
• When you grip the bar, squeeze the bar as if you are trying to make it bend upwards. When you do this, you will engage your lats.
• At the same time as you are squeezing the bar, squeeze your elbows in as if you are trying to keep the insides of your biceps touching your chest at all times.
• Right before you lift, take a deep breath in, and hold the air in your stomach. Brace your abs, squeeze your glutes, and then start pressing up. Let the air out at the top of the lift.
Common Faults
As you can see, the basic premise of the press is pretty simple – push the bar overhead in as straight of a line as possible. However, it’s actually an extremely difficult lift and a hard lift to master. Here are a few of the most common faults that we see:
WWW.NERDFITNESS.COM
26
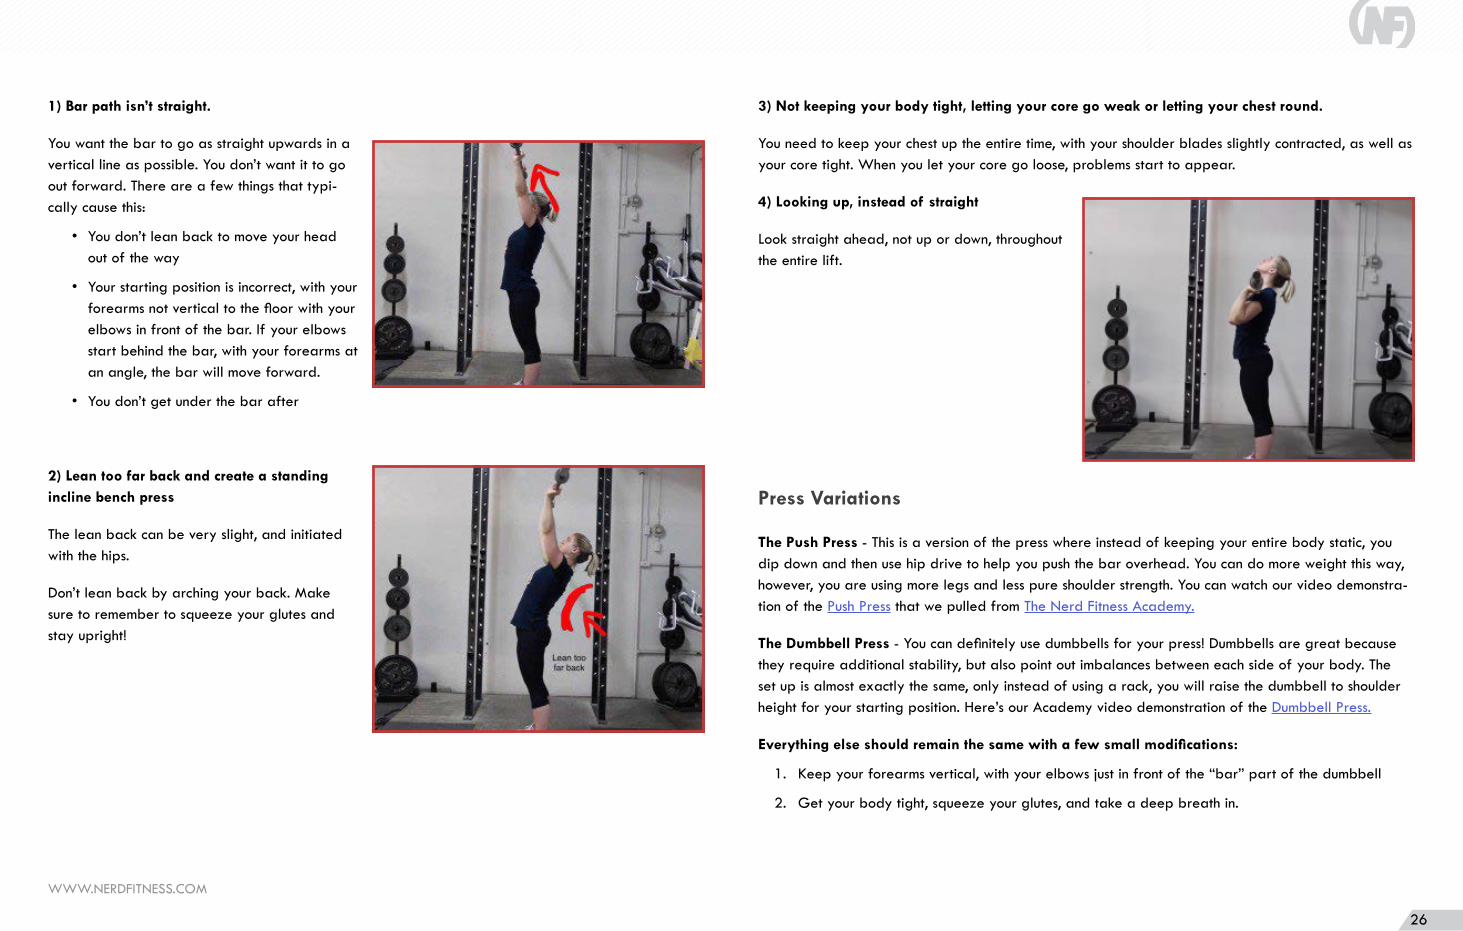
1) Bar path isn’t straight.
You want the bar to go as straight upwards in a vertical line as possible. You don’t want it to go out forward. There are a few things that typi-cally cause this:
• You don’t lean back to move your head out of the way
• Your starting position is incorrect, with your forearms not vertical to the floor with your elbows in front of the bar. If your elbows start behind the bar, with your forearms at an angle, the bar will move forward.
• You don’t get under the bar after
2) Lean too far back and create a standing incline bench press
The lean back can be very slight, and initiated with the hips.
Don’t lean back by arching your back. Make sure to remember to squeeze your glutes and stay upright!
3) Not keeping your body tight, letting your core go weak or letting your chest round.
You need to keep your chest up the entire time, with your shoulder blades slightly contracted, as well as your core tight. When you let your core go loose, problems start to appear.
4) Looking up, instead of straight
Look straight ahead, not up or down, throughout the entire lift.
Press Variations
The Push Press - This is a version of the press where instead of keeping your entire body static, you dip down and then use hip drive to help you push the bar overhead. You can do more weight this way, however, you are using more legs and less pure shoulder strength. You can watch our video demonstra-tion of the Push Press that we pulled from The Nerd Fitness Academy.
The Dumbbell Press - You can definitely use dumbbells for your press! Dumbbells are great because they require additional stability, but also point out imbalances between each side of your body. The set up is almost exactly the same, only instead of using a rack, you will raise the dumbbell to shoulder height for your starting position. Here’s our Academy video demonstration of the Dumbbell Press.
Everything else should remain the same with a few small modifications:
1. Keep your forearms vertical, with your elbows just in front of the “bar” part of the dumbbell
2. Get your body tight, squeeze your glutes, and take a deep breath in.
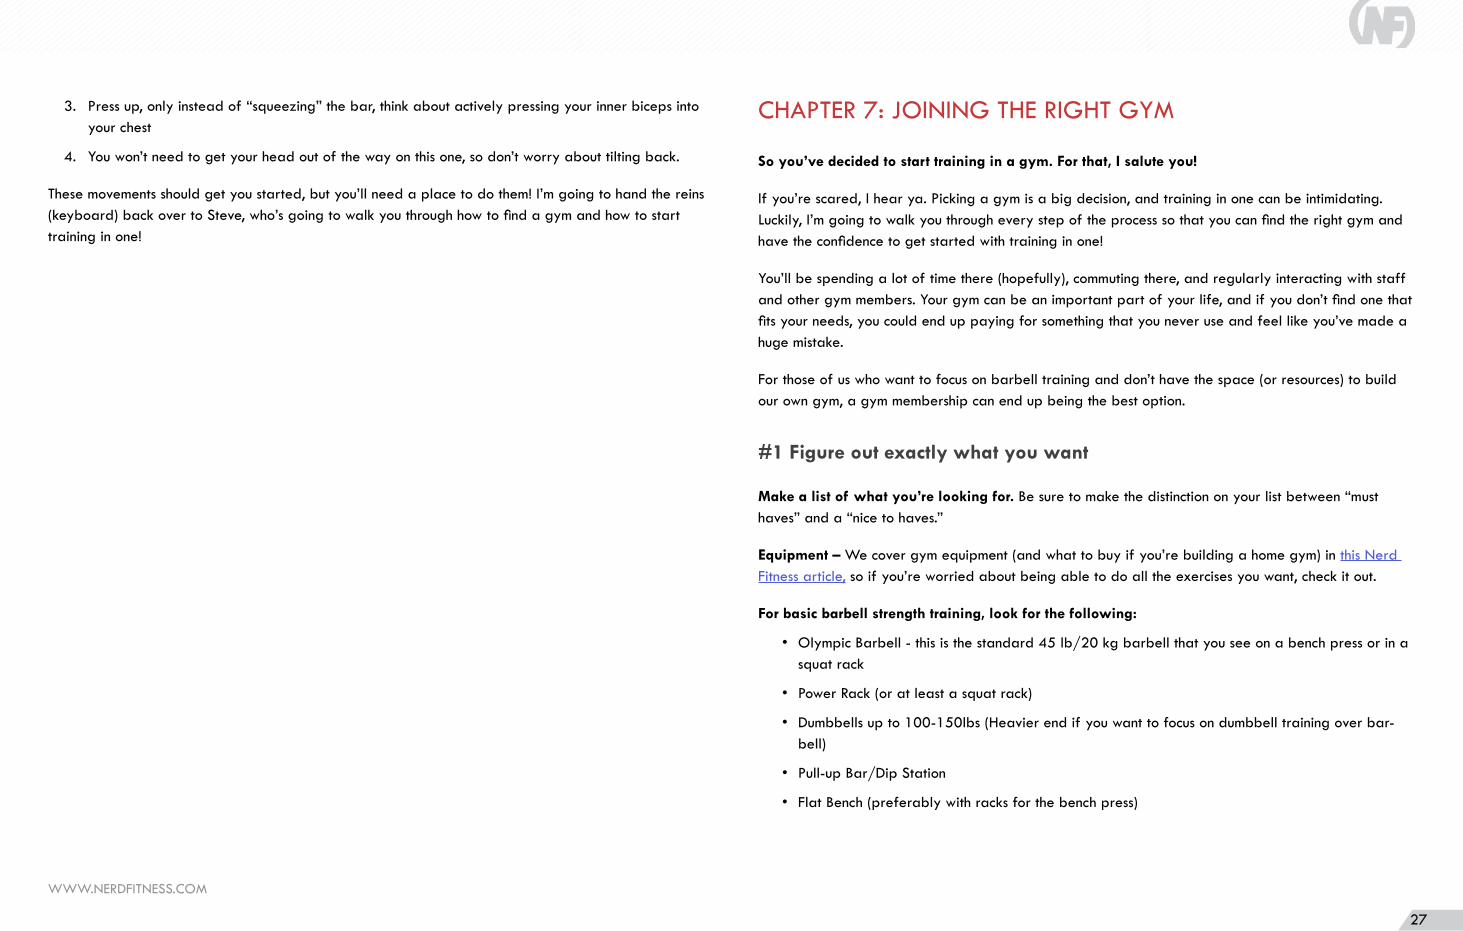
WWW.NERDFITNESS.COM
27
3. Press up, only instead of “squeezing” the bar, think about actively pressing your inner biceps into your chest
4. You won’t need to get your head out of the way on this one, so don’t worry about tilting back.
These movements should get you started, but you’ll need a place to do them! I’m going to hand the reins (keyboard) back over to Steve, who’s going to walk you through how to find a gym and how to start training in one!
CHAPTER 7: JOINING THE RIGHT GYM
So you’ve decided to start training in a gym. For that, I salute you!
If you’re scared, I hear ya. Picking a gym is a big decision, and training in one can be intimidating. Luckily, I’m going to walk you through every step of the process so that you can find the right gym and have the confidence to get started with training in one!
You’ll be spending a lot of time there (hopefully), commuting there, and regularly interacting with staff and other gym members. Your gym can be an important part of your life, and if you don’t find one that fits your needs, you could end up paying for something that you never use and feel like you’ve made a huge mistake.
For those of us who want to focus on barbell training and don’t have the space (or resources) to build our own gym, a gym membership can end up being the best option.
#1 Figure out exactly what you want
Make a list of what you’re looking for. Be sure to make the distinction on your list between “must haves” and a “nice to haves.”
Equipment – We cover gym equipment (and what to buy if you’re building a home gym) in this Nerd Fitness article, so if you’re worried about being able to do all the exercises you want, check it out.
For basic barbell strength training, look for the following:
• Olympic Barbell - this is the standard 45 lb/20 kg barbell that you see on a bench press or in a squat rack
• Power Rack (or at least a squat rack)
• Dumbbells up to 100-150lbs (Heavier end if you want to focus on dumbbell training over bar-bell)
• Pull-up Bar/Dip Station
• Flat Bench (preferably with racks for the bench press)
WWW.NERDFITNESS.COM
28
Classes – If classes are something you’ll be interested in, check out which classes are available for free, and be sure to factor this into your price considerations later.
Amenities – Some gyms offer awesome amenities which you can’t get by working out at home. Have kids? Some offer childcare so you can get a distraction free workout. Female and nervous about work-ing out around guys? Some offer women’s only areas. Short on time? Some gyms even let you drop off your dry cleaning.
Distance and feel – Is this gym’s distance from your work/home about right? Is this a place you can feel comfortable working out? It’s better to pay a little extra to pick a gym that you’ll actually use instead of paying a smaller price to on an unused gym membership that’s too far away.
Training/Coaching – A lot of gyms have training packages or coaches available to help you out with form and help you develop a workout plan. If you’re looking for personalized attention when getting started, be sure to check out what coaches are available.
#2 Determine the type of gym you want!
Be sure to consider the many types of gyms, picking one that actually suits your needs.
Globo Gyms – Often big name franchises, these are typically where you’ll find $10 a month deals. For many, the only “perk” is tanning (which we don’t really consider a “perk”). While often super inexpen-sive with good guest pass policies (generally), globo gyms often offer fewer amenities, certain training is often banned, and they can suffer from a limited free weight section and inexperienced staff.
Health Clubs/Sports Clubs/YMCAs – These can be similar to globo gyms, but are franchises offer-ing a higher level of service. You’ll find there are more amenities offered, such as towel service, child care, and TVs on some of the cardio machines. However, these gyms can be upwards of $100-200+ a month, occasionally disallow types of training, and may have a limited free weights section. However, if you’re looking for a pool or tennis courts, these may be your only option.
Weightlifting Club/Barbell Club/CrossFit gyms – These are typically one room gyms with pull up bars, barbells, dumbbells, and bumper plates. The membership fees usually include coaching and classes, however, they’re usually more expensive (due to a coach being included) and only open a few very specific hours during the day. In these gyms, you’re also usually expected to follow the club’s program-
ming and not your own.
College/University Gyms – A favorite of mine, these gyms typically include access to their full facility – pools, racquetball courts, classes, etc. If you live near the college or university that you attended, you can often get a discount “alumni” membership. Don’t live near where you went to school? Many gyms will offer memberships to family members of alumni or staff, local “senior” memberships, or even just local resident memberships. These are also usually very inexpensive, but have to be paid upfront in full.
#3 Found a potential gym? Test drive it.
So now you’ve figured out what type of gym you want to join, made your list of everything you need, and found gyms in the right location.
Before you sign up for a gym, ask for a guest pass. Some gyms give out free passes for a week or two, some you have to pay for (e.g. $20 for 20 days). Even if you have to pay for it, it’s totally worth it.
Make sure you go at the time of day that you’re planning on going regularly. There’s nothing worse than finding a perfect gym, signing a big contract, and then discovering that the gym is so swamped with people after your work day that you can’t even get to the equipment you’d like to use.
During your guest visits there are lots of things to look for:
• Is the equipment in good working order?
• Is there enough equipment for everyone or are you fighting for a bench?
• What’s the general vibe of the gym?
• Does it seem clean?
• If you’re going before work, are there enough showers available?
• Did you have to wait to use something?
• What is that smell?
It’s also never a bad idea to talk to the other members and ask them what they like and dislike about the gym. You can also read reviews online on sites like Yelp or Google, but remember that people are more likely to complain than compliment, so take all online reviews with a grain of salt.
WWW.NERDFITNESS.COM
29
#4 What to know about gym contracts
One of the big reasons many people don’t want to sign up for a gym is because they don’t want to sign up for a contract! However, if you read everything and know exactly what you’re signing, a contract isn’t all that bad.
Specific Items to look for in a contract:
• An out clause, in case you move, lose your job, etc.
• Can you freeze your contract if you go out of town or are on vacation?
• What happens if the club goes out of business?
• Does the membership renew automatically?
Now, for costs, gym contracts often include a few different things:
• Activation Fee – This is a one time fee required to join the gym
• Monthly Cost – A fee that you will be charged monthly
• Maintenance Fee – Usually a yearly fee. Some gyms have a clause that says: “We don’t have one now, but we could at any point, without telling you, add one.” Make sure to read this clause carefully if it is in there.
Don’t be afraid to negotiate, they’re often given a range of prices that they can sell a membership at, with a higher commission rate at the most expensive one. The worst thing they can do is say no.
Some gyms will offer a better rate if you pay for a year up front, so consider it if that’s an option financially.
Most employers and health insurances offer discounts with specific gyms or rebates for joining a gym, so make sure to check with them as well.
This should help you decide which gym is the one you want to start calling home! Welcome to the world of weight training!
CHAPTER 8: TRAINING IN A GYM, PLUS A WEIGHT TRAIN-ING WORKOUT
For this chapter, I’m going to hand the reins over to Jim Bathurst, “Master of the Fitness Universe” at Nerd Fitness, self-taught gymnast, program designer of all workouts in the Academy and at Nerd Fitness, and a bigger nerd than all of us combined. He’s also the guy you’ve seen in each of the Academy video demonstrations with Staci. Go Jim!
You’ve picked your gym, now it’s time to train there.
If you struggle with self-confidence, or you don’t love how you look in the mirror yet, you might assume that everybody around you will be judging you the whole time and don’t want to subject yourself to this torture – that you need to somehow get in shape FIRST before going to the gym!
Wrong!
If you are going to start using a gym, it’s time to mentally get your head in the right place! Here are some truths you need to know:
1. Everybody around you is just as self-conscious as you are.
2. Everybody starts somewhere. You don’t look good so that you can then go to the gym. You go to the gym to get stronger, more confident, and then look good.
3. MOST will applaud you for trying.
4. MANY will be too self-focused to even notice you.
5. A RARE few will judge. Though, they’re not just judging you, I promise. They’re judging EVERY-BODY around you, because they can’t help but compare themselves to others. This is no different than in real life. Screw these people.
Sure, you can say “people are mean, the gym is scary, I just won’t show up.” But then, the terrorists win. And so do those people. And nobody likes those people anyway.

WWW.NERDFITNESS.COM
30
Stage 1: Get the lay of the land, stretch and use the treadmill
So on your first day in the gym, just GOING to the gym is a big step in the right direction.
Note: you might need to also change into gym clothes if you’re coming from work. I know walking out onto the floor in gym clothes might be intimidating too.
When you’re ready, walk over towards the treadmills or stretching area and do a few basic stretches while continuing to get the lay of the land and see what people are doing (don’t stare excessively). Not sure what to do for stretches? That’s okay!
Start here:
• Roll your head in half circles slowly, from shoulder to shoulder
• Slowly roll your shoulders forwards and back-wards
• Keep your legs stationary and twist your torso, left then right
• Quad stretch
• Cross one arm in front your chest, then the other, as demonstrated here by yours truly
These stretches have the awesome side-effect of being able to look around the gym and get the “flow”
of things, while still looking busy. I STILL use this “trick” when checking out new gyms.
Really just get your body moving. If you walked out right now, it’s still a win for Day 1 in a gym.
If you’re up for MORE, consider the next step:
Get on the treadmill and start it up, based on the staff’s instructions. If you weren’t able to get instruc-tions, many have a “quick start” button that will start things up. Too much? Scares you already? Okay, just stick with the stretching and get out of there. When you’re ready, come back and try the treadmill.
Yes, that’s right, I’m telling you to do “cardio” on a machine! (maybe the first time ever on Nerd Fitness!).
Why? It gets you moving and out of your head! I know you’re smart – you’re reading NERD fitness. But you also probably deal with paralysis by analysis a lot and can overanalyze everything!
So, for your first 10-15 minutes, just walk. Set it at 3mph or 3.5 or whatever speed is comfortable but not too strenuous. Something that gets you moving, gives you a chance to decide what you’ll do next while you look around the gym. (Gives you a chance to get out of your head and stop thinking every-one is looking at you.)
If this is ALL you do, spend 15 minutes walking, and then go home, it’s still a victory. Repeat this as many days in a row that you need to until this starts to feel comfortable and you stop feeling self-conscious.
Scientists, benedictine monks, and german scholars refer to such a thing as a “routine.”
As you get more comfortable, you can can increase your walking speed or length of walking (20 min-utes, 60 minutes, etc).
If I’m gonna walk, I like to crush podcasts while doing so (My favorites: Tim Ferriss Show, Pardon My Take, and Bill Burr). Maybe you do books on tape.
TO RECAP STAGE ONE:
• Walking through the door makes you a winner
• Change into workout clothes
• Ask for a tour if you need to know where things are!
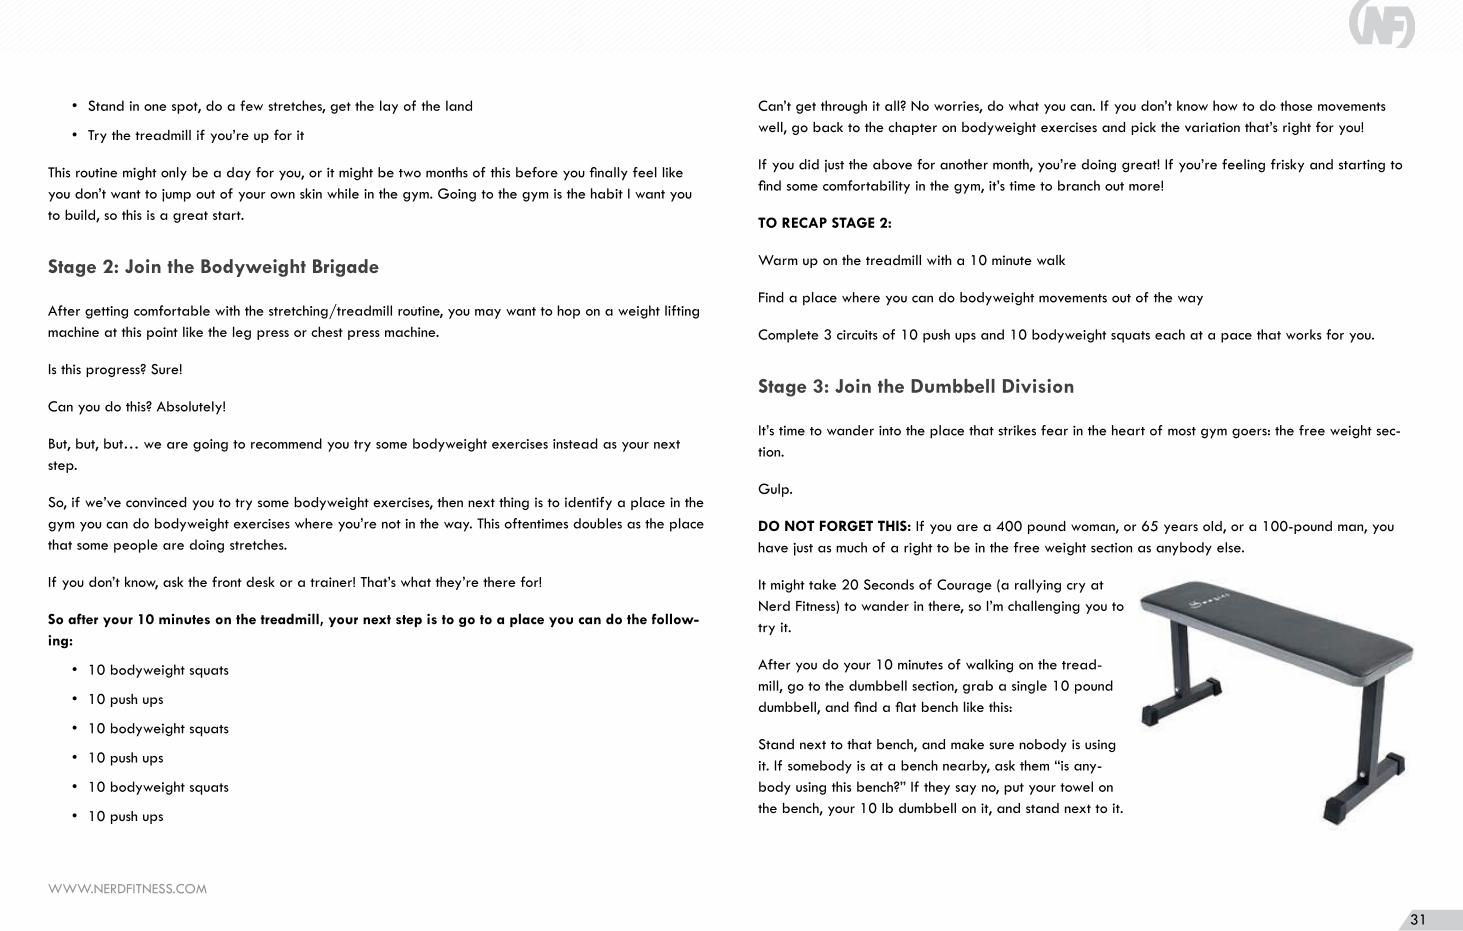
WWW.NERDFITNESS.COM
31
• Stand in one spot, do a few stretches, get the lay of the land
• Try the treadmill if you’re up for it
This routine might only be a day for you, or it might be two months of this before you finally feel like you don’t want to jump out of your own skin while in the gym. Going to the gym is the habit I want you to build, so this is a great start.
Stage 2: Join the Bodyweight Brigade
After getting comfortable with the stretching/treadmill routine, you may want to hop on a weight lifting machine at this point like the leg press or chest press machine.
Is this progress? Sure!
Can you do this? Absolutely!
But, but, but… we are going to recommend you try some bodyweight exercises instead as your next step.
So, if we’ve convinced you to try some bodyweight exercises, then next thing is to identify a place in the gym you can do bodyweight exercises where you’re not in the way. This oftentimes doubles as the place that some people are doing stretches.
If you don’t know, ask the front desk or a trainer! That’s what they’re there for!
So after your 10 minutes on the treadmill, your next step is to go to a place you can do the follow-ing:
• 10 bodyweight squats
• 10 push ups
• 10 bodyweight squats
• 10 push ups
• 10 bodyweight squats
• 10 push ups
Can’t get through it all? No worries, do what you can. If you don’t know how to do those movements well, go back to the chapter on bodyweight exercises and pick the variation that’s right for you!
If you did just the above for another month, you’re doing great! If you’re feeling frisky and starting to find some comfortability in the gym, it’s time to branch out more!
TO RECAP STAGE 2:
Warm up on the treadmill with a 10 minute walk
Find a place where you can do bodyweight movements out of the way
Complete 3 circuits of 10 push ups and 10 bodyweight squats each at a pace that works for you.
Stage 3: Join the Dumbbell Division
It’s time to wander into the place that strikes fear in the heart of most gym goers: the free weight sec-tion.
Gulp.
DO NOT FORGET THIS: If you are a 400 pound woman, or 65 years old, or a 100-pound man, you have just as much of a right to be in the free weight section as anybody else.
It might take 20 Seconds of Courage (a rallying cry at Nerd Fitness) to wander in there, so I’m challenging you to try it.
After you do your 10 minutes of walking on the tread-mill, go to the dumbbell section, grab a single 10 pound dumbbell, and find a flat bench like this:
Stand next to that bench, and make sure nobody is using it. If somebody is at a bench nearby, ask them “is any-body using this bench?” If they say no, put your towel on the bench, your 10 lb dumbbell on it, and stand next to it.

WWW.NERDFITNESS.COM
32
We’re going to add a one arm dumb-bell row to our circuit above. You can see skinny Steve demo it here:
That’s it! Just one dumbbell exercise! Here’s your new circuit:
• 10 bodyweight squats
• 10 push ups
• 10 one arm dumbbell rows (10 per arm)
Do this circuit once, and then repeat two more times if you’re feeling good.
Congrats! You’ve used dumbbells!
Remember, everybody started somewhere, and we’re just working on getting you comfortable being in the free weight section.
Want to continue adding in dumbbells? Let’s add them to the squats. If you’re feeling strong, you can use the same dumbbell to do goblet squats. They’re named as such because it looks like you’re holding a goblet that you don’t want to spill.
Here’s a screencap of Staci and me demonstrating the Goblet Squat pulled from our premium course, The Nerd Fitness Academy. Hold it like a goblet with your arms firm, and drop down into a deep squat.
So your routine is now 3 circuits of the following:
• 10 goblet squats
• 10 push ups
• 10 dumbbell rows/side
If you go to the gym 3x a week work your way up to the following
routine:
• Light stretch and walk on treadmill for 10 minutes
• Work up to 3 complete circuits of this beginner circuit
• Go home and eat good food and play video games like a boss
This will put you ahead of 95% of the planet and gym going population as far as on a great path to building a healthy, antifragile, resilient body. Add a little more weight here and there, making the mini-mal possible jumps each time. Make your push up variation a little harder over time.
You can stick with the above routine for MONTHS.
The last dumbbell exercise to learn is the dumbbell Romanian deadlift (RDL). This is like a cousin of the bodyweight squat where we move through the hips more than the knees. Grab a pair of dumbbells now, push your hips back and bow forward like you’re being polite. Bring the dumbbells to about your knees, not to the ground, then stand back up.
You can see the exercise right here:
Every other workout, swap out the goblet squat for the dumbbell Roma-nian deadlift.
So our circuit is now alternating with each gym day. Do 3 circuits of each if you can! If the weight is too light, use heavier dumbbells the next time you train.
• 10 goblet squats OR 10 dumb-bell Romanian deadlifts
• 10 push ups
• 10 dumbbell rows per arm
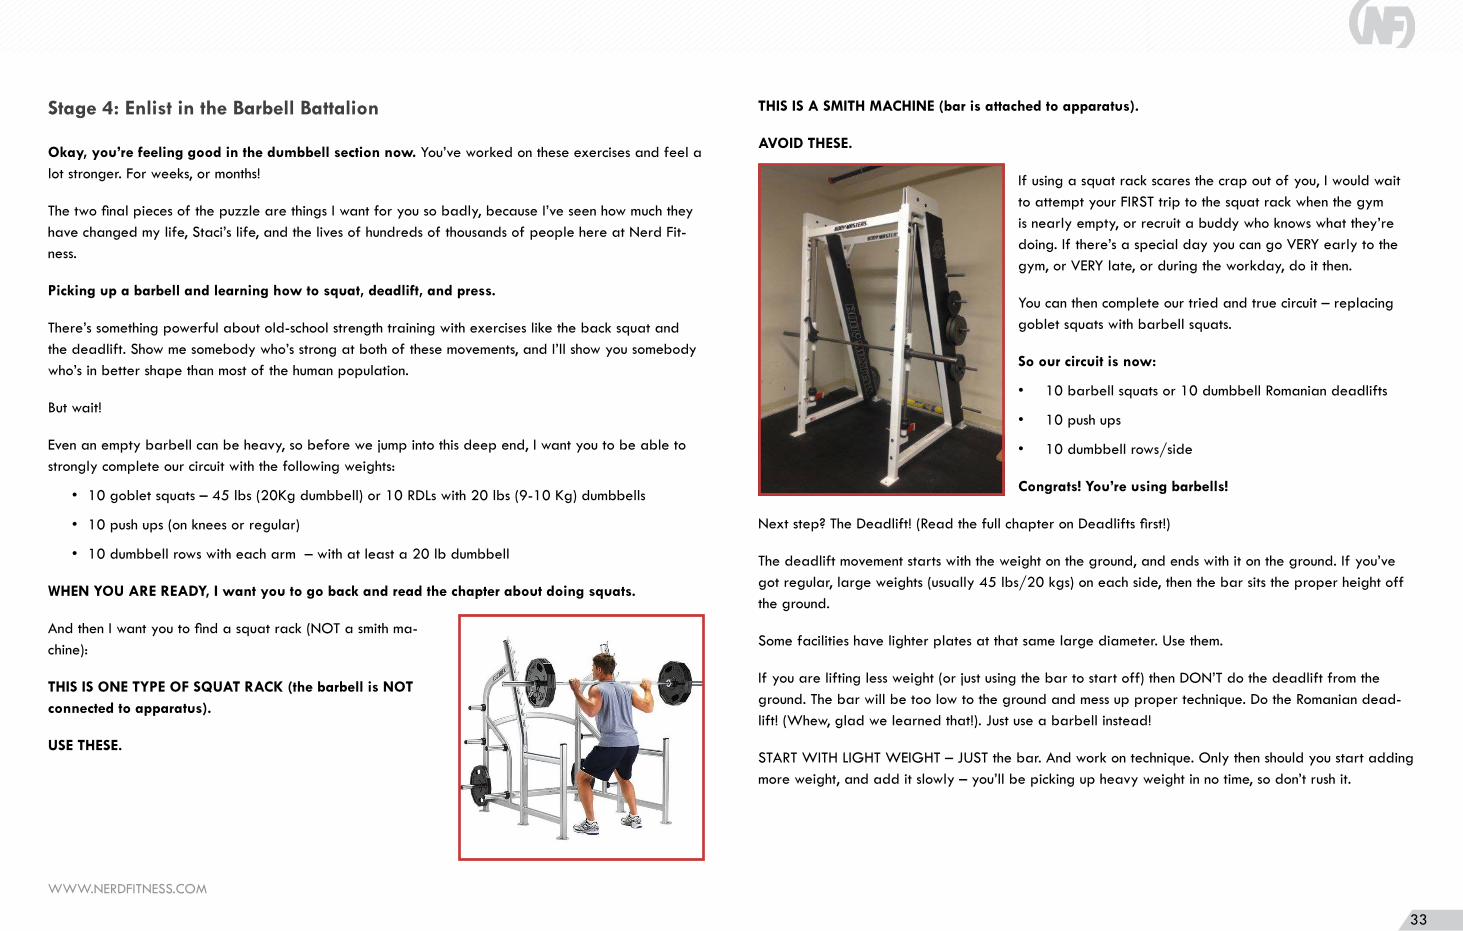
WWW.NERDFITNESS.COM
33
Stage 4: Enlist in the Barbell Battalion
Okay, you’re feeling good in the dumbbell section now. You’ve worked on these exercises and feel a lot stronger. For weeks, or months!
The two final pieces of the puzzle are things I want for you so badly, because I’ve seen how much they have changed my life, Staci’s life, and the lives of hundreds of thousands of people here at Nerd Fit-ness.
Picking up a barbell and learning how to squat, deadlift, and press.
There’s something powerful about old-school strength training with exercises like the back squat and the deadlift. Show me somebody who’s strong at both of these movements, and I’ll show you somebody who’s in better shape than most of the human population.
But wait!
Even an empty barbell can be heavy, so before we jump into this deep end, I want you to be able to strongly complete our circuit with the following weights:
• 10 goblet squats – 45 lbs (20Kg dumbbell) or 10 RDLs with 20 lbs (9-10 Kg) dumbbells
• 10 push ups (on knees or regular)
• 10 dumbbell rows with each arm – with at least a 20 lb dumbbell
WHEN YOU ARE READY, I want you to go back and read the chapter about doing squats.
And then I want you to find a squat rack (NOT a smith ma-chine):
THIS IS ONE TYPE OF SQUAT RACK (the barbell is NOT connected to apparatus).
USE THESE.
THIS IS A SMITH MACHINE (bar is attached to apparatus).
AVOID THESE.
If using a squat rack scares the crap out of you, I would wait to attempt your FIRST trip to the squat rack when the gym is nearly empty, or recruit a buddy who knows what they’re doing. If there’s a special day you can go VERY early to the gym, or VERY late, or during the workday, do it then.
You can then complete our tried and true circuit – replacing goblet squats with barbell squats.
So our circuit is now:
• 10 barbell squats or 10 dumbbell Romanian deadlifts
• 10 push ups
• 10 dumbbell rows/side
Congrats! You’re using barbells!
Next step? The Deadlift! (Read the full chapter on Deadlifts first!)
The deadlift movement starts with the weight on the ground, and ends with it on the ground. If you’ve got regular, large weights (usually 45 lbs/20 kgs) on each side, then the bar sits the proper height off the ground.
Some facilities have lighter plates at that same large diameter. Use them.
If you are lifting less weight (or just using the bar to start off) then DON’T do the deadlift from the ground. The bar will be too low to the ground and mess up proper technique. Do the Romanian dead-lift! (Whew, glad we learned that!). Just use a barbell instead!
START WITH LIGHT WEIGHT – JUST the bar. And work on technique. Only then should you start adding more weight, and add it slowly – you’ll be picking up heavy weight in no time, so don’t rush it.
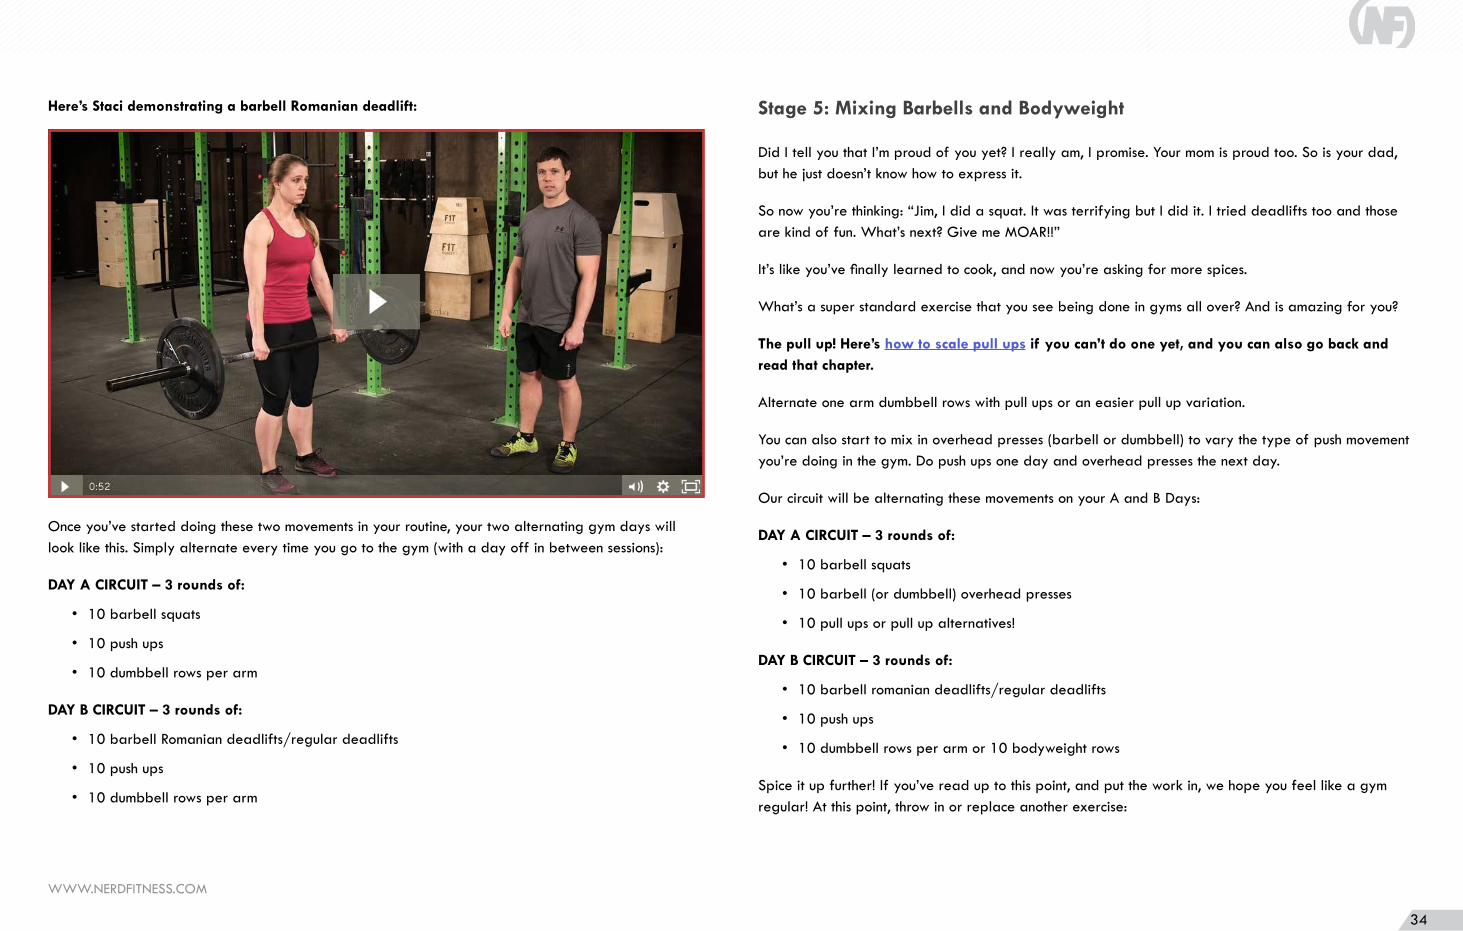
WWW.NERDFITNESS.COM
34
Here’s Staci demonstrating a barbell Romanian deadlift:
Once you’ve started doing these two movements in your routine, your two alternating gym days will look like this. Simply alternate every time you go to the gym (with a day off in between sessions):
DAY A CIRCUIT – 3 rounds of:
• 10 barbell squats
• 10 push ups
• 10 dumbbell rows per arm
DAY B CIRCUIT – 3 rounds of:
• 10 barbell Romanian deadlifts/regular deadlifts
• 10 push ups
• 10 dumbbell rows per arm
Stage 5: Mixing Barbells and Bodyweight
Did I tell you that I’m proud of you yet? I really am, I promise. Your mom is proud too. So is your dad, but he just doesn’t know how to express it.
So now you’re thinking: “Jim, I did a squat. It was terrifying but I did it. I tried deadlifts too and those are kind of fun. What’s next? Give me MOAR!!”
It’s like you’ve finally learned to cook, and now you’re asking for more spices.
What’s a super standard exercise that you see being done in gyms all over? And is amazing for you?
The pull up! Here’s how to scale pull ups if you can’t do one yet, and you can also go back and read that chapter.
Alternate one arm dumbbell rows with pull ups or an easier pull up variation.
You can also start to mix in overhead presses (barbell or dumbbell) to vary the type of push movement you’re doing in the gym. Do push ups one day and overhead presses the next day.
Our circuit will be alternating these movements on your A and B Days:
DAY A CIRCUIT – 3 rounds of:
• 10 barbell squats
• 10 barbell (or dumbbell) overhead presses
• 10 pull ups or pull up alternatives!
DAY B CIRCUIT – 3 rounds of:
• 10 barbell romanian deadlifts/regular deadlifts
• 10 push ups
• 10 dumbbell rows per arm or 10 bodyweight rows
Spice it up further! If you’ve read up to this point, and put the work in, we hope you feel like a gym regular! At this point, throw in or replace another exercise:
WWW.NERDFITNESS.COM
35
Want to do some planks? Put them in the circuit!
Lunges to replace the squats or deadlifts one day? Sounds good!
There are a ton of different options for what to do and where to go. If we’ve gotten you more comfort-able in the gym, we’ve done our job!
Here’s quick public service announcement: be cool in the gym. There are normal rules and unwritten rules, and we want you to treat the equipment and your fellow gym goers with respect.
Read our article on Avoiding Accidental Assery in the Gym: Don’t Make these Newbie Mistakes.
CHAPTER 9: HOW MUCH WEIGHT SHOULD I BE LIFTING?
Before ever trying to figure out how much weight you can lift for any of the big movements like squats, deadlifts, bench press or overhead press, make sure you know how to do the movement, as flawlessly as possible, without any weight at all.
Why?
Because if you can’t do a movement correctly without weight, how can you expect to do it right WITH weight? Think about it this way: If you can’t walk up a flight of stairs normally, would you expect to be able to walk up a flight of stairs carrying bags of groceries? Of course not, that’s a recipe for disaster.
So our first step is to learn each movement without any bars, dumbbells, or added weight.
Grab either a broomstick (be careful for splinters!), mop handle, or PVC pipe (I use a 1.25” PVC cut in half), and pretend it’s a bar.
One great reason to start here is that you can do this in your own home, without other people around you (so you’ll be less nervous). Also, you can record video of yourself pretty easily (I use my computer’s web cam or my phone camera and a little tripod).
Once you feel good about your form, you can see if you can “pass the bar”. (That’s guaranteed to be the nicest lawyer joke you’ll ever read, by the way.)
Now, the bar!
Once you’re comfortable with each movement with a broomstick or PVC pipe, you can move to the barbell.
Your first workout shouldn’t go any heavier than “just” the bar, which means the bar without any added weight. A standard barbell weighs 45 lbs (20.4 kg). Now, don’t be discouraged if this seems really heavy – especially for upper body movements. When I started out, I couldn’t bench press or overhead press an empty barbell!

WWW.NERDFITNESS.COM
36
If the bar is too heavy to start, you have a few options:
1. Look to see if the gym has a lighter barbell – some have a “women’s bar” or a “training bar”. These usually weigh 30-35 lbs and 15 lbs, respectively. These bars are usually shorter than a standard barbell, but that’s okay (just make sure it’s a straight bar).
2. Start out with dumbbells – while the movement will not be exactly the same, this allows you to build up the strength to be able to correctly handle the bar.
3. Focus on bodyweight training (push ups, pull ups, lunges, squats) until you build the strength to be able to lift the bar.
Now, on opposite ends of the spectrum, if the bar seems really light, I would STILL encourage you to complete your workout with “just” the bar on your first day of barbell training. Focus on completing each rep with correct form, having enough mobility, and worry about adding weight next time.
Check your ego at the door. I would rather see somebody in the gym lifting the bar with proper form than watch somebody with awful form lift 400 lbs.
Note: If you finish your first workout with the bar and still aren’t comfortable with the movements, it’s never a bad thing to do your next workout with just the bar again. If you’re not comfortable with the movement and you start adding weight, not only will you be more likely to injure yourself because your body isn’t ready, but you’ll be more likely to hurt yourself because you won’t be confident under the bar. Confidence is something that is very important as you start lifting heavier and heavier.
This isn’t a sprint, it’s a marathon, and people don’t usually get hurt because they didn’t lift heavy enough. They get hurt because they tried to do too much too soon. That’s what we want to avoid.
If you’re planning on using dumbbells as your main lift (and not a barbell), I’d start out with the 5-10 lb dumbbells to get a feel for things.
Starting to Add Weight
If you’re looking to start on a beginner program, such as the workouts in The Nerd Fitness Acad-emy, the first step is to look at the instructed number of reps in each set.
A few common rep ranges for beginner programs are 5 sets of 5 reps, 3 sets of 8 reps, or 3 sets of 10
reps.
For this example, your program has you doing 5 sets of 5 reps for a particular lift. After a proper warm-up routine, start with the empty bar again, and complete the prescribed number of reps (for this, it would be 5).
“But I thought you said we could add weight this time?” you might be thinking.
You can – but no matter how heavy you are going, always start with just the bar to warm up for EACH exercise. If you watch the best lifters in your gym, you will notice they all warm up with “just the bar” to start, often for multiple sets! This helps get your body warm and primes your nervous system and all of your muscles for that movement. This gets you ready to lift heavier weight.
As a beginner, this is especially important to ingrain proper technique.
Next, add some weight to the bar. Depending on how heavy the bar felt, start by adding anywhere from 2.5lbs to 10lbs to each side. Do another set of 5 reps at this weight.
(Note: If you’re doing dumbbell training, instead of adding weight to the bar, increase the weight of the dumbbell: Start with 5lb dumbbells, then move to 10lb dumbbells, for example.)
If you were able to complete those reps - both without losing form and at a consistent speed for all 5 reps - add more weight to the bar. Base the amount of new weight off how it felt – if the last set felt really light, add 10’s, if it felt heavy, add 2.5’s or 5’s.
Continue to do this until your form starts to break down or the speed of the lift gets slower on any of your reps. The weight you used right before your form started to break down is your starting weight on which you will base all future workouts!
If it is a lower number than you expect, it’s the right number! Don’t try to be a hero during your first workout. It is better to start out too light than too heavy. Remember: You’re trying to get solid, produc-tive sets in - not find your max, so you want all of the reps to be consistent and with as perfect form as your body allows.
And since during this process you’re testing out heavier weights for the first time, never be afraid to have a spotter or use pins to ensure your safety!
WWW.NERDFITNESS.COM
37
What about after the first few workouts?
Once you find your starting weight, you’ll want to start using something called “progressive overload”.
Simply put, progressive overload means gradually increasing the stress put on your body during train-ing.
In other words, we need to increase something regularly. Usually this means the amount of weight we lift. And for beginners, that can often happen in every workout. After every workout, your body heals, and if you’re getting proper sleep and nutrition, it heals back stronger than it was before.
If you do 5 sets of 5 at 100 lbs every single workout for months, are you getting stronger? Most likely not – your body is becoming more efficient at lifting 5×5 at 100 lbs. It’s burning less calories and using less processes to make that movement happen.
So how much weight do you add when you’re ready to increase your workouts?
That depends on how difficult your sets were last time. This is where great note-taking (workout track-ing) comes in. I’m a huge fan of a simple notebook or Evernote docs on my phone. Be sure to document not only how much you lifted and for how many reps, but also how your lifts went. So next time you know what you need to be doing. Did you go to failure on your last set? Did your form break down on any of the reps? Make a note to refer to next time!
If you failed to complete any of your reps or your form started to break down, do the same weight again, and focus on boosting your form and technique for each rep.
Remember, if you are doing the same workout as last time, but each rep is more solid and with better form than before, you’re still doing better than you were last workout. You’re still leveling up. You don’t necessarily have to go up in weight every workout to see gains. Less rest between sets, more control and better form, and more repetitions all mean you are getting stronger.
If you were able to get through all of your sets with great form, and without the bar slowing down, consider adding more weight. It’s not unheard of for beginners to add 10-20lbs a week to some lifts (especially squats and deadlifts), though don’t get discouraged if you’re only adding 2.5 or 5! This is still progress!
The BEST THING YOU CAN DO is slowly add weight and progress consistently rather than progress very quickly then hit a plateau. Each week, as you add a little bit of weight, you are building strength, confidence, and momentum.
What about finding my 1 rep maxes?
It’s really fun to find the maximum amount of weight you can do for one repetition (one rep max) every once in a while.
However, as a beginner who is just starting out, it’s better that you start with getting the movement right and adding weight slowly before trying to find a one rep max. I would suggest you follow a program for at least six weeks before even attempting “a heavy single”.
Why?
Even if your form is as good as you can get it now, you will get far better by learning how to make tweaks and corrections as you go. When you first start out, you’re still getting everything down, so your one rep max won’t be a “true” one rep max.
Plus, when you train, you’re training everything in your body. Some things, like muscles and bones, get stronger, while others, like your nervous system, get more efficient. The more you do something, the bet-ter you get at it. And in the beginning you’ll get better very quickly.
As a beginner, it just isn’t safe to attempt a 1 repetition maximum when you’re learning the movement. Even if you can do it with proper form with lighter weights, as soon as the weight gets close to your 1 rep max, your form will start to break down, and you are more likely to hurt yourself.
What is a respectable amount to be lifting?
The simple answer? The weight that’s right for you. You are not competing against the guy next to you; you’re competing against the YOU from last week (like racing your ghost in Mario Kart).
As far as what you can strive for, there’s no easy calculation or formula. It’s truly up to your body, your body type, your background as an athlete, your genetics, and many other factors.

WWW.NERDFITNESS.COM
38
You should be lifting the amount that’s right for you today. In your next workout, you should be trying to lift more (even if you can’t do more weight, try doing one more rep, or take less rest between sets) than you did last time.
That’s it. As a part of this journey, forget about strength standards and forget about everyone around you. I don’t care if the guy or girl next to you is squatting 500 lbs for sets of 10. If you’re squatting 50 lbs, and that’s the weight that is challenging for you, then that’s the weight you should be lifting.
To recap:
• The strongest lifters I know warm up with “just” the bar.
• The strongest lifters I know focus on getting their reps in and aren’t ashamed that they’re lifting less than the guy next to them.
• The strongest lifters I know take time to get things right, even if that means lifting less weight than they know they “can” do.
• The strongest lifters I know started off doing a beginners program just like you.
So remember – start slow, add weight slowly, and stay conservative.
It’s amazing how much adding just 5 lbs (2kg) a week adds up! It’s far better to play it safe in the be-ginning than to find yourself injured and frustrated before you have a chance to progress.
CHAPTER 10: HELP I WORKED OUT AND NOW I’M SORE
“Dear Steve, I think my legs are dying, and I can’t walk. HALP!”
Yesterday, or two days ago, you did a strenuous workout for the first time in your life (or for the first time in a while). You dutifully did your squats, push ups, and rows (if you followed the Beginner Body-weight Workout), or you did some squats or deadlifts or pull ups.
And during the workout, you may have felt pretty good!
That was two days ago, though. When you woke up yesterday, every muscle in your body felt like it was hit by a mac-truck. “Welp, this sucks, but at least tomorrow things should be better,” you tell your brain.
And holy crap, it’s like your body forgot how to function.
Maybe your arms are stuck in the permanent t-rex position. Perhaps your groin is tight in places you didn’t even realize you could be sore. Walking down stairs or doing anything active may feel like try-ing to play the QWOP game (please take 2 seconds to play this – it will be the hardest you’ve ever laughed).
So, what are you supposed to do?
If it’s been only a day, should you be worried?
Maybe it’s been two days and you are supposed to work out again today. Do you skip it?
You’re torn between sitting in an ice bath to numb the soreness or climbing into a hot tub until you re-semble a prune.
Let me first introduce you to my obnoxious friend, DOMS.
Meet DOMS
Although you’re probably already familiar, you’ve never been formally introduced to DOMS (Delayed Onset Muscle Soreness).
WWW.NERDFITNESS.COM
39
First of all, don’t panic. DOMS is totally natural, and you’re going to be fine. Great, even!
In short, DOMS is a result of teeny tiny tears in your muscles from really strenuous activity, meaning you did things that your body is not normally used to.
If you’re brand new to working out, or have taken a few weeks off only to jump back in at a high level of stress (heavy squats after a few weeks off), think of DOMS like your muscles saying: in exchange for the recovery I have to do, I’m going make YOU feel it. And actually, although it may not feel like it, this process is TOTALLY normal.
It tends to peak around 48 hours after training, but can occur any time after your training day (hence the “Delayed” part of DOMS).
Note: This should definitely feel like a soreness (even a painful or deep soreness is okay), but a sharp or severe pain is something you should speak to your doctor about.
So, think of our friend DOMS like an obnoxious friend complaining:
“Whoa whoa whoa, I didn’t sign up for this much activity. You just did a lot of things I’m not used to. So I’m going to piss you off tomorrow and make you super sore. And the day after that? It’s going to be WORSE.”
What an ass! Like most bros, our boy DOMS hates Leg Day and wants you to skip it (like he and all the other bros do). So you may notice that DOMS tends to punish you more for big compound lifts like squats, deadlifts, lunges, etc.
Is Doms Good for Me Or Bad For Me?
Now you’re thinking, “I read on a motivational poster once, “No Pain, No Gain!” … is that true?”
What you’re really asking is: “Is this muscle soreness good for me? Does that mean it’s working? What about TOO much soreness?”
When you exercise (especially strength train), you’re breaking down your muscles, and over the next few days they are rebuilding themselves up stronger.
But if you are SUPPOSED to break down your muscles, then soreness is good. And if SOME soreness is good, then DOMS should be your new best friend because it means it’s REALLY working, right? Maybe.
THE TRUTH: Yes, being sore after a workout can be a sign that you adequately pushed your muscles hard to elicit a response from them – especially if you haven’t worked out that hard in a while. So, DOMS is that friend you want to see occasionally, but not a friend you want to hang out with every day.
This means that once you get used to this level of training, DOMS will go away, and you can make huge progress in your training without this soreness.
This means:
Don’t think that you need to be sore in order to get a good workout. DOMS goes away quickly, and most of your progress will come without DOMS.
DOMS isn’t a total friend though. You might feel so sore and stiff and tight that you don’t think you could possibly work out today (even though it’s a scheduled workout day).
So, some soreness is good, but don’t go searching to destroy yourself in a single session. We’re after real, long term progress, remember?
That’s why we subscribe to the eight-time Mr. Olympia Lee Haney’s motto: “stimulate, not annihilate” method of training at Nerd Fitness. I don’t want you puking. I don’t want you so sore you can’t move. I don’t want you so tired at the end of a workout that you just want to lay down on a mat and die.
Yup, it’s tough to find that balance, especially if you’re brand new to training and have no idea what level of soreness you should feel. Most people first feel DOMS and think something is wrong, when in fact that level of soreness is totally normal.
Don’t be afraid to take a trial and error, self-experimentation mindset!
What Do I Do Today Though?
So you’ve met DOMS, and whether it’s been 24 or 48 or 72 hours, he’s pretty much immobilized you. I realize the following is going to sound counterintuitive, but trust me:
WWW.NERDFITNESS.COM
40
You’re going to do your workout today.
If it’s the day after the workout, you’re going to do some light activity.
Is it two days after (aka time for your next workout)? Yup, you’re going to go through a solid warm-up, and no matter how sore you are, you’re going to do your next workout. You see, when you exercise, you’re increasing blood flow to your muscles. By putting your body through the motions, you’re actually speeding up your recovery.
No, this will not cause further damage to your muscles. In fact, this is the best possible way to improve the soreness you’re currently feeling. Yes, it’s going to suck for the first few repetitions, but each repeti-tion is exercising those sore muscles, stretching them back out, and making them less sore. Think of it like you’re showing your muscles there’s really nothing to be afraid of.
Movement is the best cure for soreness.
That’s why if you’re feeling sore the day immediately after your workout, you can stretch, take a walk, and perform light versions of your movements in order to expedite the healing process!
So when in doubt, move and stretch. This can be done throughout the day, when you wake up, before, during, and after your workout. Just MOVE MORE!
Just remember that because you’re so sore and tight, your range of motion initially will be much smaller than a few days prior.
If you want to help fighting off DOMS, consider mixing in some Nerd Fitness Yoga on your off days to speed up recovery and elongate those muscles!
• Don’t fear DOMS.
• Keep to your workout schedule.
• Use light activity and stretching to recover more quickly and feel better.
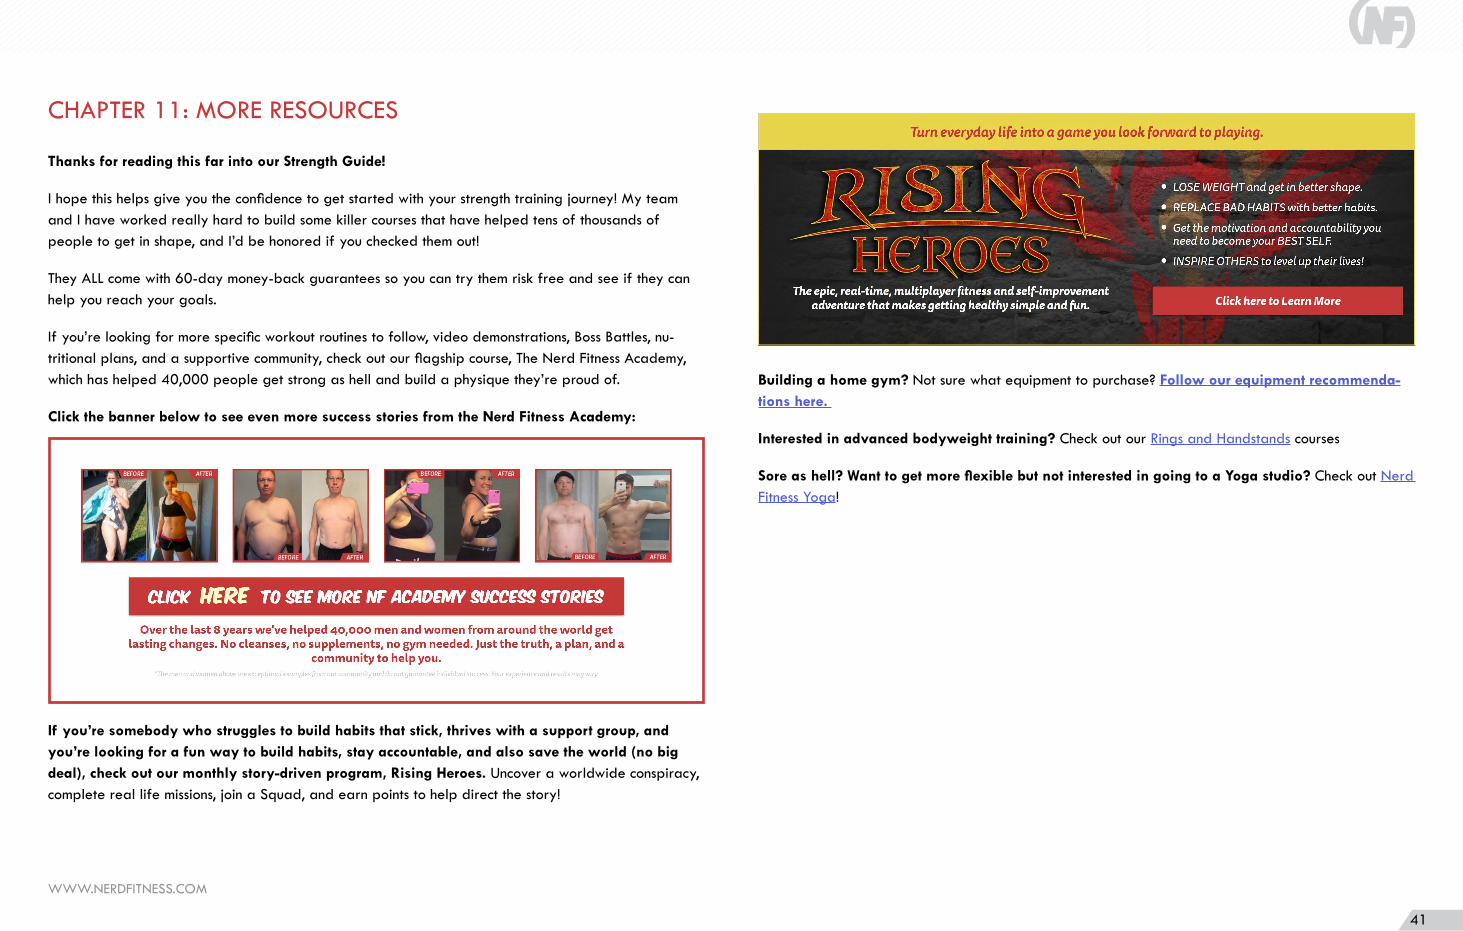
WWW.NERDFITNESS.COM
41
CHAPTER 11: MORE RESOURCES
Thanks for reading this far into our Strength Guide!
I hope this helps give you the confidence to get started with your strength training journey! My team and I have worked really hard to build some killer courses that have helped tens of thousands of people to get in shape, and I’d be honored if you checked them out!
They ALL come with 60-day money-back guarantees so you can try them risk free and see if they can help you reach your goals.
If you’re looking for more specific workout routines to follow, video demonstrations, Boss Battles, nu-tritional plans, and a supportive community, check out our flagship course, The Nerd Fitness Academy, which has helped 40,000 people get strong as hell and build a physique they’re proud of.
Click the banner below to see even more success stories from the Nerd Fitness Academy:
If you’re somebody who struggles to build habits that stick, thrives with a support group, and you’re looking for a fun way to build habits, stay accountable, and also save the world (no big deal), check out our monthly story-driven program, Rising Heroes. Uncover a worldwide conspiracy, complete real life missions, join a Squad, and earn points to help direct the story!
Building a home gym? Not sure what equipment to purchase? Follow our equipment recommenda-tions here.
Interested in advanced bodyweight training? Check out our Rings and Handstands courses
Sore as hell? Want to get more flexible but not interested in going to a Yoga studio? Check out Nerd Fitness Yoga!
WWW.NERDFITNESS.COM
42