-moore eh [email protected] www ... - the crochet crowd...the number of stitches around at rnd 9...
TRANSCRIPT

Page 1 of 11
Designed by Michelle Moore © 2015
www.facebook.com/AMooreEhCanada
www.pinterest.com/amooreehcanada
The S’Naughty or Nice Elf Sniffle Station
This pattern creates a fun and festive tissue cover that will hold hand sanitizer or cough drops! Put it on your desk
at work or on your counter at home and you no longer have to worry about pesky germs or coughs
If you have any questions about this pattern, please feel free to contact me at any of the sites listed below.

Page 2 of 11
**The pattern and photographs contained in this document are property of Michelle Moore. This pattern is available for personal use only. No unauthorized reproduction, in whole or in part, or distribution of this pattern or content is allowed. Finished products created with this pattern may be sold. It is appreciated if you give design credit to Michelle Moore. **
Difficulty: Intermediate/ US Standard Terms
Abbreviations & Stitches
**Please read through the pattern instructions before you
begin. This pattern requires some hand stitching. You will
be making all of the pieces first, and then assembling.
Photos are included to assist you. You should crochet in the
round without joining, unless joining is indicated in the pattern
instructions. CH1 DOES NOT COUNT AS A ST throughout.
Gauge: For H/5mm hook pieces: 7HDC & 6 rows in 2” (5cm)
Materials needed:
Hook H (5mm) (Cover, Hat, Hair, Sanitizer Sack, Brows) Hook G (4mm) (All remaining pieces) Red Heart Super Saver (or similar med. WW yarn): 100g (or less) of Red, Green, White, Black, Eye Color, Hair Color, Mitten Color, Skin Color Bernat Pipsqueak or any Fuzzy or Fun Fur in White Tissue Box Option A: Scotties Tissue Box (23 cm x 11cm x 7cm) (9” x 4.25” x 2.75”) OR Tissue Box Option B: TWO (2) Kleenex Boxes stacked/taped together (23cm x 12cm x 6cm) (9” x 4.75” x 2.25”) = (23 cm x 12cm x 12cm) (9” x 4.75” x 4.5”) OR Other box for which you can adjust your hook size to meet the stitch counts of either Option A or B. Hand Sanitizer - I used Purell Advanced 236 ml Sewing needle/ Large eyed Darning needle Scissors Polyfill Stuffing Stitch Marker Pins
(SC) Single Crochet (HDC) Half Double Crochet (DC) Double Crochet (inc) Increase (dec) Decrease (MC) Magic Circle (Ch) Chain (st) Stitch (sl st) Slip Stitch (tog) Together (rep) Repeat (sk st) Skip Stitch (BL) Back Loops (FL) Front Loops (#) Stitch Count (WS)Wrong side
(RS) Right Side
(FO) Fasten off

Page 3 of 11
PIECES FOR ASSEMBLY
TISSUE COVER (5mm hook)
[Turn tissue box(es) upright as shown]
Important NOTE:
** I have provided you with two options for your tissue boxes below.
The number of stitches around at Rnd 9 (Rnd 15 of Option B)
will be the number of stitches you work for the rest of the cover. Try
adjusting your hook size FIRST to meet the stitch count of Option A
or B. If you have a different stitch count for proper fit, you will have
to adjust the hat and hair pieces as well, because they wrap around
the cover and the number of sts need to match up. Please feel free to
contact me if you require assistance adjusting the pattern for your
box. I will be happy to help with the math!! But before you do,
please read through the pattern so you have a general
understanding of the construction.
OPTION A:
With Red:
Row 1: Ch17, HDC in 2nd ch from hook and next 15 chs, ch1, turn.
(16)
Rows 2-8: HDC across, ch1, turn. (16)
Rnd 9: SC around entire piece. Approx. 16 sts across, 8 sts down, 16
sts across and 8 sts down. Sl st to first SC to join. (48)
OPTION B
With Red:
Row 1: Ch17, HDC in 2nd ch from hook and next 15 chs, ch1, turn. (16)
Rows 2-14: HDC across, ch1, turn. (16)
Rnd 15: SC around entire piece. Approx. 16 sts across, 14 sts down, 16
sts across and 14 sts down. Sl st to first SC to join. (60)
Continue cover for BOTH OPTIONS:
If you are using Option B, Rnd 10 is actually Rnd 16. Simply
continue, bearing in mind that the Rnd #s are different.
Rnd 10: In BL, Ch1, HDC around, join with a sl st. (48) (60)
TEST THE PIECE ON YOUR TISSUE BOX FOR FIT, and continue to
do so as you work the cover.
Rnds 11-12: Ch1, HDC around, join with a sl st. (48) (60) FO.

Page 4 of 11
With White:
Rnd 13: Turn the piece with the WS facing. You will now be working
the piece from the inside. Holding one strand of Bernat Pipsqueak
and one strand of RHSS, join yarn (as shown).
Ch2 (Does not count as st), and working in BL, DC around. Join with
a sl st to top of first DC. FO. (48) (60)
Working the BL will create a row of FL to attach the beige yarn.
With Beige (or Skin Color of Choice):
Rnd 14: With WS facing, join yarn in FL of Rnd 12 (red). Ch1, HDC
around, join with a sl st, and TURN. (48) (60)
You will now be working the RS again.
(Be sure that you do NOT work the forward leaning loops of the
stitches in the next row, but rather the back leaning loops. There
should be a line of loops for attaching the hair later (as shown).
Rnds 15-21: Ch1, HDC around. (48) (60)
At the end of Rnd 21, your cover should be approx. 50% of the
length of your tissue box. This is where the tissue will poke out of
the nose at the front of the box. If not, add or remove a row.
With the seam at the back (or side), mark the FRONT center 8 sts (as
shown).
Rnd 22: Ch1, HDC to just before first marker, ch8, Sk 8, HDC in next
st (after second marker) and each HDC around (as shown).
Join with a sl st. (48)(60)
Rnd 23: Ch1, HDC around, working the 8 skipped chs as you go. Join
with a sl st. (48)(60)
Rnds 24-26: Ch1, HDC around. Join with a sl st. (48) (60) FO.
With White:
Rnd 27: Rep Rnd 13. (48) (60) FO.
With Green:
Rnd 28: With WS facing, join yarn in FL of Rnd 27, ch1, HDC
around. Join with a sl st, ch1, and TURN. (48) (60)
You will now be working the RS again.
Rnds 29-35: Ch1, HDC around.
Join with a sl st. (48) (60) FO.
You may have to add or subtract a row,
depending on the length of your tissue box.
The bottom of the tissue cover should not
show any of the box, but should also not
bunch (as shown). Pull all tails to the inside
of the tissue cover and weave in all ends.
Page 5 of 11
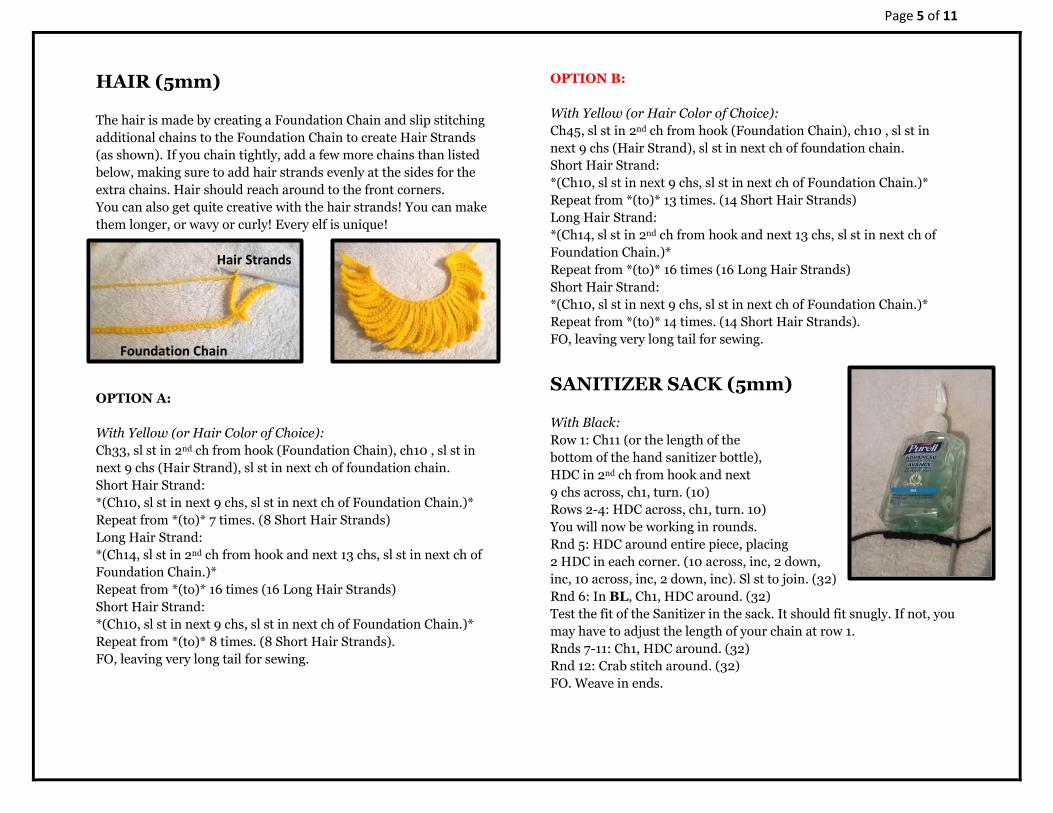
HAIR (5mm)
The hair is made by creating a Foundation Chain and slip stitching
additional chains to the Foundation Chain to create Hair Strands
(as shown). If you chain tightly, add a few more chains than listed
below, making sure to add hair strands evenly at the sides for the
extra chains. Hair should reach around to the front corners.
You can also get quite creative with the hair strands! You can make
them longer, or wavy or curly! Every elf is unique!
OPTION A:
With Yellow (or Hair Color of Choice):
Ch33, sl st in 2nd ch from hook (Foundation Chain), ch10 , sl st in
next 9 chs (Hair Strand), sl st in next ch of foundation chain.
Short Hair Strand:
*(Ch10, sl st in next 9 chs, sl st in next ch of Foundation Chain.)*
Repeat from *(to)* 7 times. (8 Short Hair Strands)
Long Hair Strand:
*(Ch14, sl st in 2nd ch from hook and next 13 chs, sl st in next ch of
Foundation Chain.)*
Repeat from *(to)* 16 times (16 Long Hair Strands)
Short Hair Strand:
*(Ch10, sl st in next 9 chs, sl st in next ch of Foundation Chain.)*
Repeat from *(to)* 8 times. (8 Short Hair Strands).
FO, leaving very long tail for sewing.
OPTION B:
With Yellow (or Hair Color of Choice):
Ch45, sl st in 2nd ch from hook (Foundation Chain), ch10 , sl st in
next 9 chs (Hair Strand), sl st in next ch of foundation chain.
Short Hair Strand:
*(Ch10, sl st in next 9 chs, sl st in next ch of Foundation Chain.)*
Repeat from *(to)* 13 times. (14 Short Hair Strands)
Long Hair Strand:
*(Ch14, sl st in 2nd ch from hook and next 13 chs, sl st in next ch of
Foundation Chain.)*
Repeat from *(to)* 16 times (16 Long Hair Strands)
Short Hair Strand:
*(Ch10, sl st in next 9 chs, sl st in next ch of Foundation Chain.)*
Repeat from *(to)* 14 times. (14 Short Hair Strands).
FO, leaving very long tail for sewing.
SANITIZER SACK (5mm)
With Black:
Row 1: Ch11 (or the length of the
bottom of the hand sanitizer bottle),
HDC in 2nd ch from hook and next
9 chs across, ch1, turn. (10)
Rows 2-4: HDC across, ch1, turn. 10)
You will now be working in rounds.
Rnd 5: HDC around entire piece, placing
2 HDC in each corner. (10 across, inc, 2 down,
inc, 10 across, inc, 2 down, inc). Sl st to join. (32)
Rnd 6: In BL, Ch1, HDC around. (32)
Test the fit of the Sanitizer in the sack. It should fit snugly. If not, you
may have to adjust the length of your chain at row 1.
Rnds 7-11: Ch1, HDC around. (32)
Rnd 12: Crab stitch around. (32)
FO. Weave in ends.
Foundation Chain
Hair Strands

Page 6 of 11
HAT (5mm)
OPTION A:
With Red:
Rnd 1: 8HDC in MC, sl st to join. (8)
Rnd 2: Ch1, HDC around, sl st to join. (8)
Rnd 3: Ch1, (HDC, inc) around, sl st to join. (12)
With Green:
Rnds 4-5: Ch1, HDC around, sl st to join. (12)
Rnd 6: Ch1, (HDC2, inc) around, sl st to join. (16)
With Red:
Rnds 7-8: Ch1, HDC around, sl st to join. (16)
Rnd 9: Ch1, (HDC3, inc) around, sl st to join. (20)
With Green:
Rnds 10-11: Ch1, HDC around, sl st to join. (20)
Rnd 12: Ch1, (HDC4, inc) around, sl st to join. (24)
With Red:
Rnds 13-14: Ch1, HDC around, sl st to join. (24)
Rnd 15: Ch1, (HDC5, inc) around, sl st to join. (28)
With Green:
Rnds 16-17: Ch1, HDC around, sl st to join. (28)
Rnd 18: Ch1, (HDC6, inc) around, sl st to join. (32)
With Red:
Rnds 19-20: Ch1, HDC around, sl st to join. (32)
Rnd 21: Ch1, (HDC7, inc) around, sl st to join. (36)
With Green:
Rnds 22-23: Ch1, HDC around, sl st to join. (36)
Rnd 24: Ch1, (HDC8, inc) around, sl st to join. (40)
With Red:
Rnds 25-26: Ch1, HDC around, sl st to join. (40)
Rnd 27: Ch1, (HDC9, inc) around, sl st to join. (44)
With Green:
Rnds 28-29: Ch1, HDC around, sl st to join. (44)
Rnd 30: Ch1, (HDC10, inc) around, sl st to join. (48)
With Red:
Rnds 31-33: Ch1, HDC around, sl st to join. (48).
FO, leaving very long tail for sewing.
OPTION B:
With Green:
Rnd 1: 6HDC in MC, sl st to join. (6)
Rnd 2: Ch1, Inc around, sl st to join. (12)
Rnd 3: Ch1, HDC around, sl st to join. (12)
Rnd 4: Ch1, (HDC, inc) around, sl st to join. (18)
With Red:
Rnds 5-6: Ch1, HDC around, sl st to join. (18)
Rnd 7: Ch1, (HDC2, inc) around, sl st to join. (24)
With Green:
Rnds 8-9: Ch1, HDC around, sl st to join. (24)
Rnd 10: Ch1, (HDC3, inc) around, sl st to join. (30)
With Red:
Rnds 11-12: Ch1, HDC around, sl st to join. (30)
Rnd 13: Ch1, (HDC4, inc) around, sl st to join. (36)
With Green:
Rnds 14-15: Ch1, HDC around, sl st to join. (36)
Rnd 16: Ch1, (HDC5, inc) around, sl st to join. (42)
With Red:
Rnds 17-18: Ch1, HDC around, sl st to join. (42)
Rnd 19: Ch1, (HDC6, inc) around, sl st to join. (48)
With Green:
Rnds 20-21: Ch1, HDC around, sl st to join. (48)
Rnd 22: Ch1, (HDC7, inc) around, sl st to join. (54)
With Red:
Rnds 23-24: Ch1, HDC around, sl st to join. (54)
Rnd 25: Ch1, (HDC8, inc) around, sl st to join. (60)
With Green:
Rnds 26-28: Ch1, HDC around, sl st to join. (60)
With Red:
Rnds 29-31: Ch1, HDC around, sl st to join. (60)
FO, leaving very long tail for sewing.

Page 7 of 11
BROWS (5mm) (Make 2)
With Yellow (or Brow Color of Choice):
Ch6, SC in 2nd ch from hook and next 4 chs. Sl st to FO, leaving long
tail for sewing.
**SWITCH TO 4MM**
NOSE (4mm hook)
With Beige (or Skin Color of Choice):
Part A:
Rnd 1: 6SC in MC. (6) Place st marker.
Rnd 2: Inc around. (12)
Rnd 3: (SC, inc) around. (18)
Rnd 4: (SC2, inc) around. (24)
Rnds 5-9: SC around. (24)
Rnd 10: (SC2, dec) around. (18)
FO, leaving long tail for sewing.
Part B:
Rnd 1: 6SC in MC. (6) Place st marker.
Rnd 2: Inc around. (12)
Rnd 3: (SC, inc) around. (18)
FO, leaving long tail for sewing.
EYES (4mm) (Make 2)
With White:
Rnd 1: 6SC in MC. (6) Place st marker.
Rnd 2: Inc around. (12)
Rnd 3: (SC, inc) around. (18)
Rnd 4: (SC2, inc) around. (24)
FO, leaving long tail for sewing.
IRISES (4mm) (Make 2)
With Blue (or Eye Color of Choice):
Rnd 1: 6SC in MC. (6) Place st marker.
Rnd 2: Inc around. (12)
FO, leaving long tail for sewing.
PUPILS (4mm) (Make 2)
With Black:
Rnd 1: 5SC in MC. Sl st to join.
FO, leaving long tail for sewing.
EARS (4mm) (Make 4)
With Beige (or Skin Color of Choice):
Rnd 1: 8SC in MC. (8) Place st marker.
Rnd 2: Inc around. (16)
Rnd 3: (SC, inc) around. (24)
Rnd 4: (SC2, inc) around. (32)
Rnd 5: SC around. (32)
Rnd 6: SC8, ch1, TURN. (8)
You will now be crocheting in rows.
Row 7: Dec, SC4, dec, Ch1, TURN. (6)
Row 8: SC6, ch1, TURN. (6)
Row 9: Dec, SC2, dec, Ch1, TURN. (4)
Row 10: SC4, ch1, TURN. (4)
Row 11: Dec, dec, Ch1, TURN. (2)
Row 12: Dec, ch1, DO NOT TURN. (1)
With RS facing, SC around entire piece. (40)
FO, leaving long tail for sewing.
You may not get the exact number of sts as above. That is okay, but
be sure that each of the 4 ear pieces have the same number of sts
around, as they will be sewn together later.

Page 8 of 11
ARMS (4mm) (Make 2)
With Light Green (or Mitten Color of Choice):
Rnd 1: 6SC in MC. (6) Place st marker.
Rnd 2: Inc, SC, inc, inc, SC, inc. (10)
Rnd 3: Inc, SC3, inc, inc, SC3, inc. (14)
Rnd 4: Inc, SC5, inc, inc, SC5, inc. (18)
Rnd 5: Inc, SC7, inc, inc, SC7, inc. (22)
Rnds 6-9: SC around. (22)
Rnd 10: (SC9, dec) around. (20)
Rnd 11: (SC8, dec) around. (18)
Rnd 12: (SC, dec) around. (12) Sl st to join. FO.
With White:
Rnd 13: Turn the piece with the WS facing. You will now be working
the piece from the inside. Holding one strand of Bernat Pipsqueak
and one strand of RHSS. in white, join yarn.
Ch2 (Does not count as st), and working in BL, DC around. Join with
a sl st to top of first DC. FO. (12)
Working the BL will create a row of FL to attach the red yarn.
With Red:
Rnd 14: With WS facing, join yarn in FL of Rnd 12 (green). Ch1, SC
around, join with a sl st, and TURN. (12)
You will now be working the RS again.
Rnd 15: Ch1, SC around, sl st to join. (12)
Rnds 16-17: Ch1, SC around, sl st to join. (12)
Stuff mitten lightly.
With Green:
Rnds 18-21: Ch1, SC around, sl st to join. (12)
With Red:
Rnds 22-25: Ch1, SC around, sl st to join. (12)
Stuff arm lightly as you go.
With Green:
Rnds 26-29: Ch1, SC around, sl st to join. (12)
With Red:
Rnds 30-33: Ch1, SC around, sl st to join. (12)
With Green:
Rnds 34-37: Ch1, SC around, sl st to join. (12)
With Red:
Rnds 38-41: Ch1, SC around, sl st to join. (12)
With Green:
Rnds 42-45: Ch1, SC around, sl st to join. (12)
FO, leaving long tail for sewing.
Weave in all ends.
THUMBS (4mm) (Make 2)
With Light Green (Or Mitten Color of choice):
Rnd 1: 8SC in MC. (8) Place st marker.
Rnds 2-5: SC around. (8)
FO, leaving long tail for sewing.
MOUTH (4mm)
With Black:
Rnd 1: 6SC in MC. (6) Place st marker.
Rnd 2: Inc around. (12)
FO, leaving long tail for sewing.

Page 9 of 11
ASSEMBLY
NOSE
Stuff Part A and line up Part B. Using the long tail of Part B, whip
stitch the nose together through the BL of each piece (as shown).
This will create FL for sewing the nose to the cover. Weave the tail
into the nose.
Be sure that the cover is on the tissue box and lined up correctly.
Using the long tail from Part A, and the loops on the nose, sew the
top of the nose to the opening of the tissue cover, one st at each
corner and across the top 8 sts of the opening (as shown). Before
securing the nose, test that the tissues can be pulled out with ease.
Sew back across the opening from underneath the top of the nose (as
shown). Secure the nose and weave tail into nose.
EYES, MOUTH & BROWS
Sew the pupil to the corner of the iris (as shown). Sew the iris to the
eye, at the corner, and create a highlight using white (as shown)
Place the eyes and mouth where you want them (as shown) and pin
them in place. Remove the tissue box from the cover and sew the eyes
and mouth in place. Weave in ends. Line up the brows, slightly
overlapping the eyes at a “sneezy” angle and sew in place (as shown).
Weave in ends. Place tissue box back into cover.
Page 10 of 11
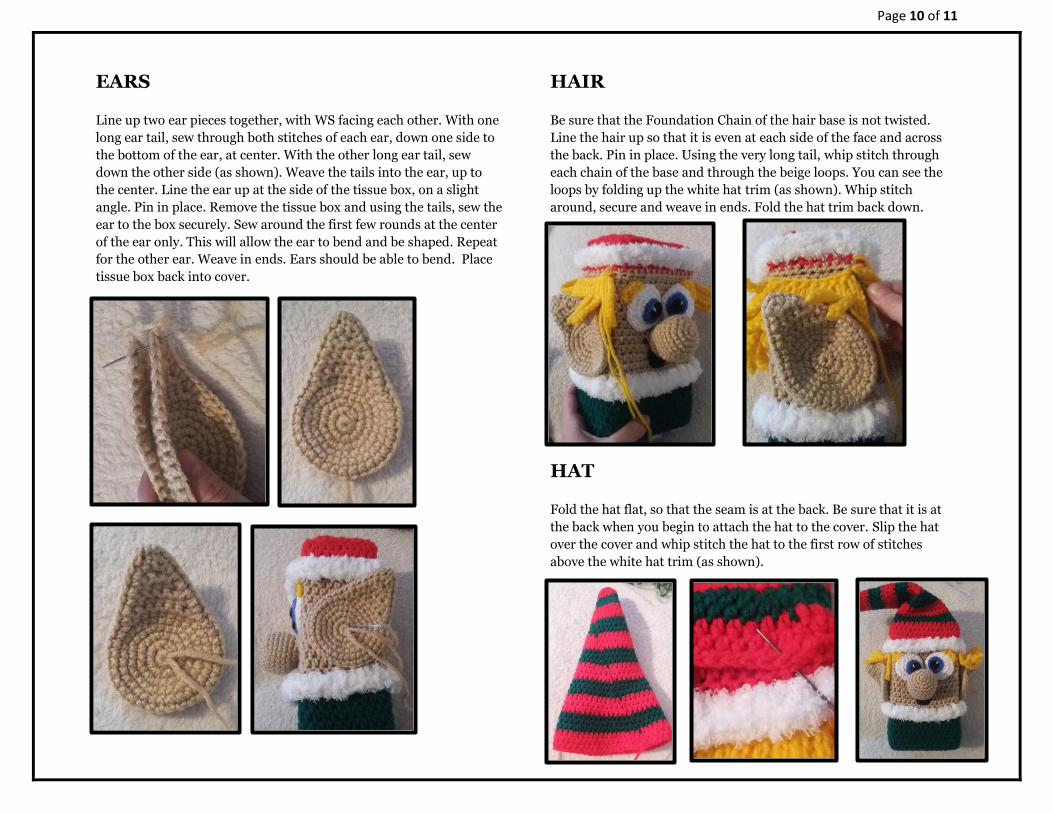
EARS
Line up two ear pieces together, with WS facing each other. With one
long ear tail, sew through both stitches of each ear, down one side to
the bottom of the ear, at center. With the other long ear tail, sew
down the other side (as shown). Weave the tails into the ear, up to
the center. Line the ear up at the side of the tissue box, on a slight
angle. Pin in place. Remove the tissue box and using the tails, sew the
ear to the box securely. Sew around the first few rounds at the center
of the ear only. This will allow the ear to bend and be shaped. Repeat
for the other ear. Weave in ends. Ears should be able to bend. Place
tissue box back into cover.
HAIR
Be sure that the Foundation Chain of the hair base is not twisted.
Line the hair up so that it is even at each side of the face and across
the back. Pin in place. Using the very long tail, whip stitch through
each chain of the base and through the beige loops. You can see the
loops by folding up the white hat trim (as shown). Whip stitch
around, secure and weave in ends. Fold the hat trim back down.
HAT
Fold the hat flat, so that the seam is at the back. Be sure that it is at
the back when you begin to attach the hat to the cover. Slip the hat
over the cover and whip stitch the hat to the first row of stitches
above the white hat trim (as shown).

Page 11 of 11
ARMS & THUMBS
Line up the arms at the sides of the cover, closer to the front than the
back, ensuring that the flat thin side of the mitten is facing out (as
shown). Fold the neck trim up, and whip stitch the arms in place
through the loops beneath the trim (as shown). Secure and weave in
ends.
Stuff thumbs and sew to the mittens (as shown). Weave in ends.
SANITIZER SACK
Place the sanitizer in the sack and line the mittens up at each side.
Pin in place, remove the sanitizer and sew the mittens to the sack.
Secure and weave in ends.
Your sniffle station is complete! Season’s Greetings!
From Michelle Moore