: ruhr-sieg nord driver’s manual
TRANSCRIPT
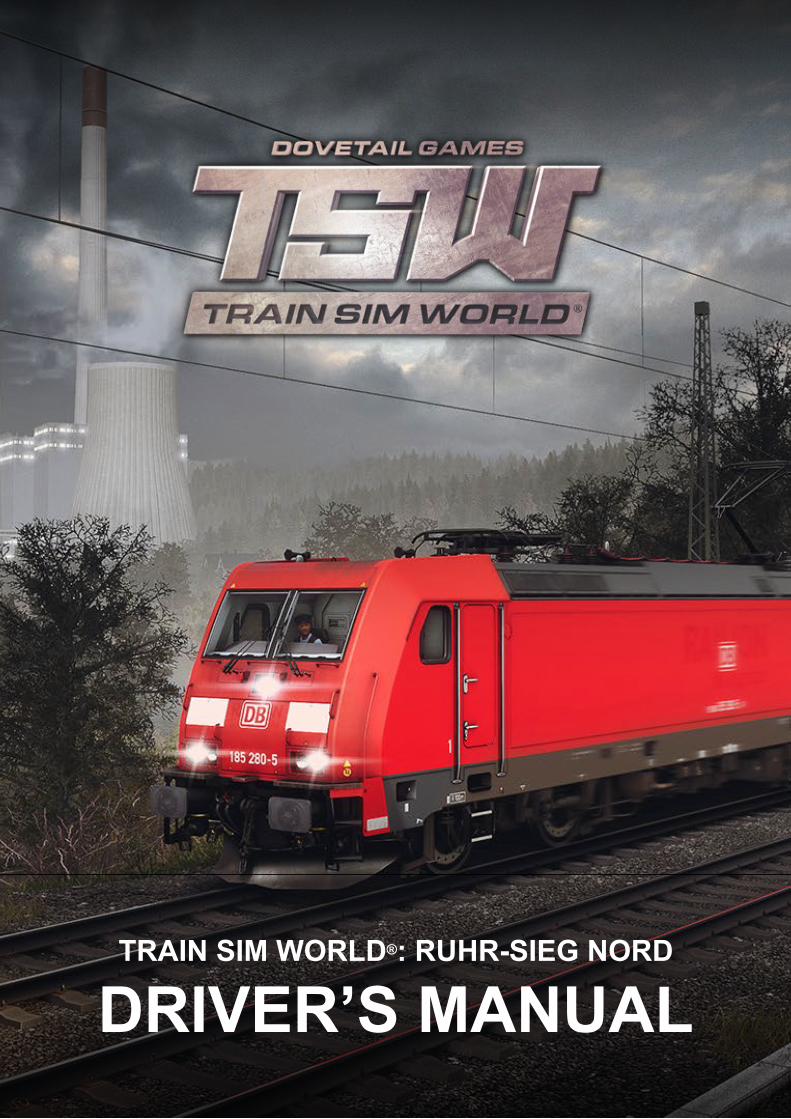
TRAIN SIM WORLD®: RUHR-SIEG NORD
DRIVER’S MANUAL
2
© 2018 Dovetail Games, a trading name of RailSimulator.com Limited (“DTG”). All rights reserved. "Dovetail Games" is a trademark or registered trademark of Dovetail Games Limited. “Train Sim World” and “SimuGraph” are trademarks or registered trademarks of DTG. Unreal® Engine, © 1998-2018, Epic Games, Inc. All rights reserved. Unreal® is a registered trademark of Epic Games. Portions of this software utilise SpeedTree® technology (© 2014 Interactive Data Visualization, Inc.). SpeedTree® is a registered trademark of Interactive Data Visualization, Inc. All rights reserved. The DB logo is a registered trademark of Deutsche Bahn AG. All other copyrights or trademarks are the property of their respective owners. Unauthorised copying, adaptation, rental, re-sale, arcade use, charging for use, broadcast, cable transmission, public performance, distribution or extraction of the product or any trademark or copyright work that forms part of this product is prohibited. Developed and published by DTG.
The full credit list can be accessed from the TSW “Options” menu.

3
Contents
Topic Page
1. An Introduction to the Ruhr-Sieg Railway ................................................................4
2. Ruhr-Sieg Nord Route Map & Key Locations...........................................................5
3. The Game Modes: Tutorials, Scenarios & Services ...............................................6
4. An Introduction to the DB BR 185.2 Electric Locomotive.........................................7
5. Quick Start Guide: DB BR 185.2..............................................................................7
6. An Introduction to the DB BR 143 Electric Locomotive ............................................8
7. Quick Start Guide: DB BR 143.................................................................................9
8. Quick Start Guide: DB BR 767.2 DABpbzfa Control Car .......................................10
9. Reference Section..................................................................................................12
10. Safety Systems – SIFA ..........................................................................................13
11. Signal Post Plates ..................................................................................................14
12. Hv Signalling Quick Reference ..............................................................................14
13. Hv Signalling Overview ..........................................................................................15
14. More about Distant Signals ....................................................................................16
15. Ks Signalling Quick Reference...............................................................................18
16. Ks Signalling ..........................................................................................................19
17. Safety Systems – PZB Quick Reference ...............................................................21
18. Safety Systems – PZB Overview ...........................................................................23
19. Passenger Door Controls .......................................................................................28
20. Keyboard & Other Controls .................................................................................. 29
21. Controlling the Camera & Camera Modes ........................................................... 30
22. Customising the HUD.............................................................................................31
23. Dovetail Live Account ........................................................................................... 32
24. Troubleshooting Guide & How to Get Support ..................................................... 33
4
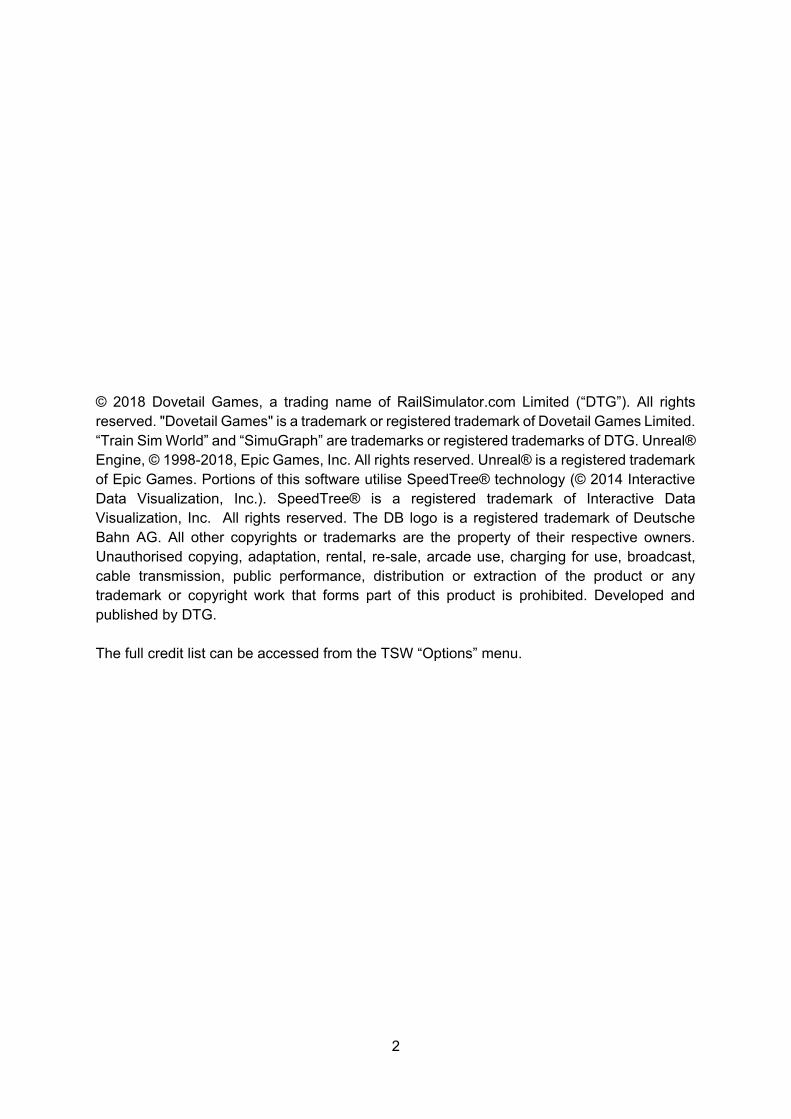
An Introduction to the Ruhr-Sieg Railway
The Ruhr-Sieg Railway is one of the oldest railway lines in Germany, and being nestled within valleys, offers spectacular views and services as a key freight route for multiple industries. Word of a horse-drawn railway to better transport coal for Siegen’s iron and steel industries was first heard in the 1830s, however, many disputes would take place regarding the route itself, and where it would go via. With the project now pushed back to the 1850s, horse-drawn proposals were replaced with steam traction, and a path through the Lenne and Hundem valleys was selected.
Construction finally started in 1858, lasting until 1861, during which time the line was opened in phases as a single-track railway. To navigate through the valleys, many tunnels were bored out of the landscape, and by none other than the engineer who helped out on the Semmeringbahn, Franz von Rziha.
While primarily for freight traffic, the Ruhr-Sieg Railway has stations built at major towns to take advantage of transporting passengers, and this would ultimately prove popular to the point where the line was doubled and later electrified, and as a result regional and regional-express services still operate to this day.
5
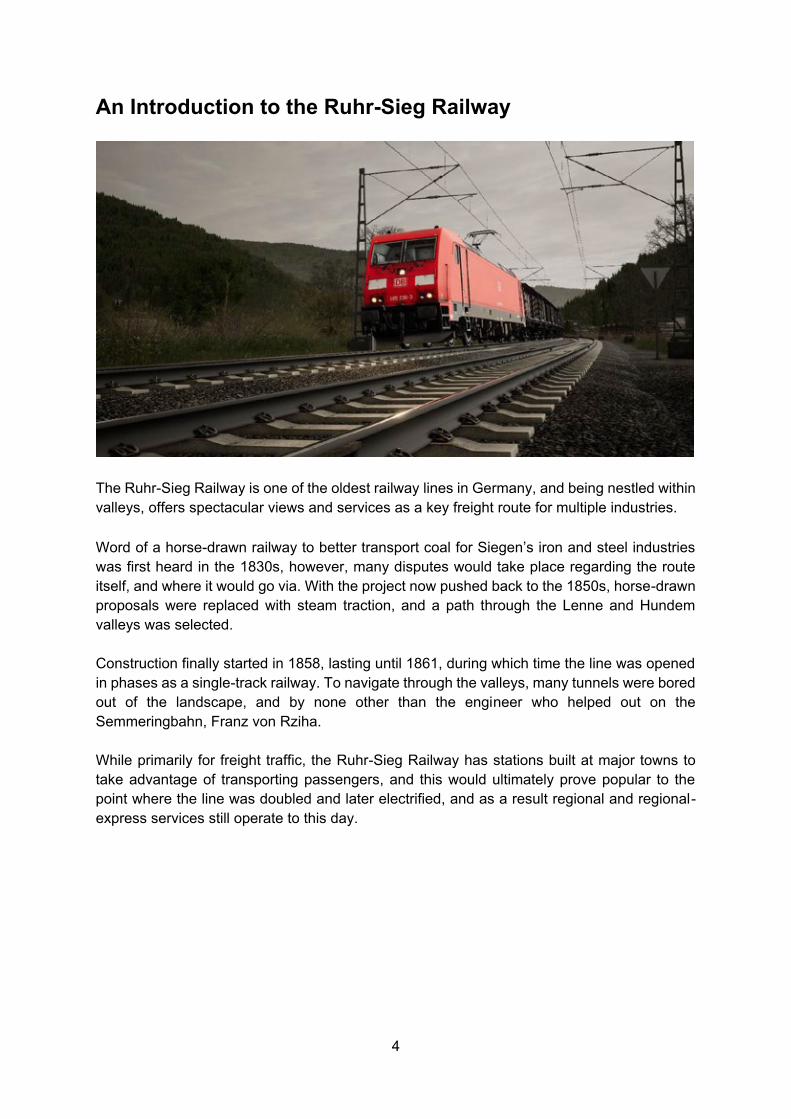
Ruhr-Sieg Nord Route Map & Key Locations
KeyStationsFreight yards or sidings
Hagen Hbf
Hohenlimburg
Iserlohn-Letmathe
Altena (Westfalen)
Werdohl
Plettenberg
Finnentrop
6
The Game Modes
Tutorials
Tutorials give you the knowledge you need to get the most from your locomotives and trains via interactive lessons that teach you key concepts. If you’re new to Train Sim World, we recommend you start here to learn the fundamentals.
Scenarios
These provide a selection of operations over the Ruhr-Sieg Nord route, Scenarios are objective-based activities which provide unique experiences. Move coaches around, drive passenger and freight services and experience some of the operations that occur on this railway.
Services
These provide a host of activities throughout an entire 24-hour time period, Service Mode is a new way to play. There’s always something to do with a large variety of services to take control of or ride along with. Sit back and enjoy the action and capture amazing screenshots, hop on or off and ride along with the various services as they go about their duties or take control and carry out the duties yourself. Featuring many individual services, you’ll always find something going on.
7
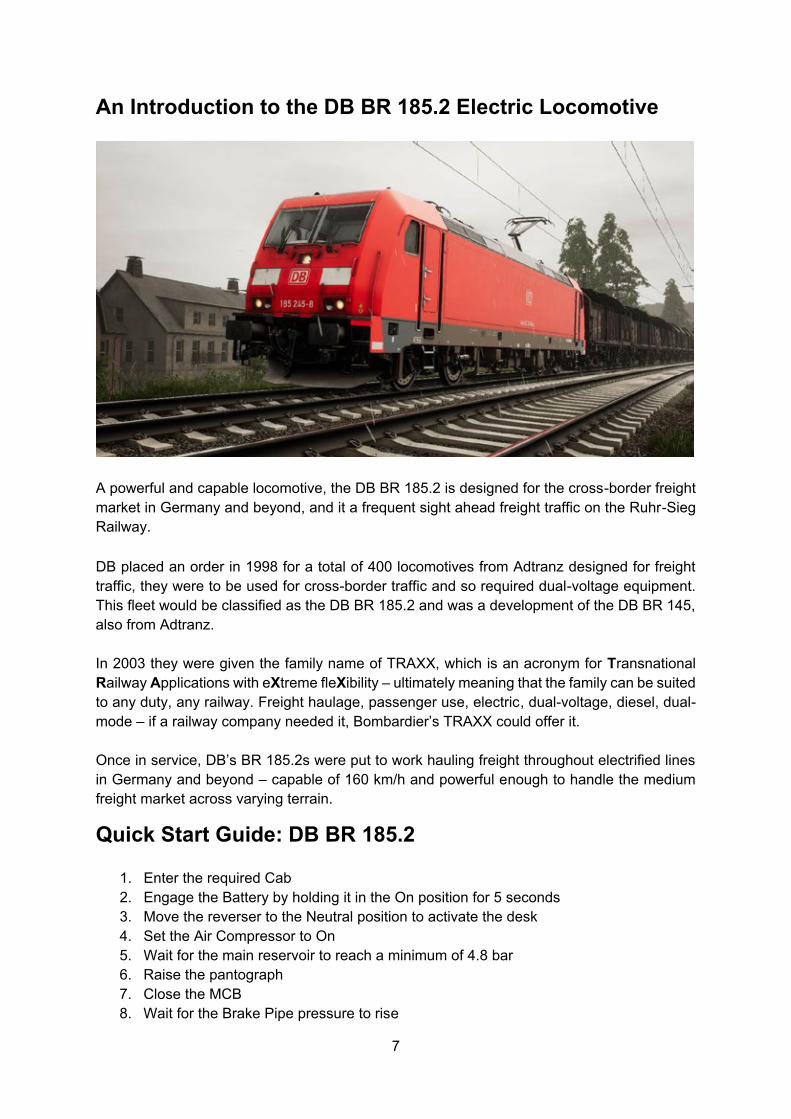
An Introduction to the DB BR 185.2 Electric Locomotive
A powerful and capable locomotive, the DB BR 185.2 is designed for the cross-border freight market in Germany and beyond, and it a frequent sight ahead freight traffic on the Ruhr-Sieg Railway. DB placed an order in 1998 for a total of 400 locomotives from Adtranz designed for freight traffic, they were to be used for cross-border traffic and so required dual-voltage equipment. This fleet would be classified as the DB BR 185.2 and was a development of the DB BR 145, also from Adtranz.
In 2003 they were given the family name of TRAXX, which is an acronym for Transnational Railway Applications with eXtreme fleXibility – ultimately meaning that the family can be suited to any duty, any railway. Freight haulage, passenger use, electric, dual-voltage, diesel, dual-mode – if a railway company needed it, Bombardier’s TRAXX could offer it.
Once in service, DB’s BR 185.2s were put to work hauling freight throughout electrified lines in Germany and beyond – capable of 160 km/h and powerful enough to handle the medium freight market across varying terrain.
Quick Start Guide: DB BR 185.2
1. Enter the required Cab2. Engage the Battery by holding it in the On position for 5 seconds3. Move the reverser to the Neutral position to activate the desk4. Set the Air Compressor to On5. Wait for the main reservoir to reach a minimum of 4.8 bar6. Raise the pantograph7. Close the MCB8. Wait for the Brake Pipe pressure to rise
8
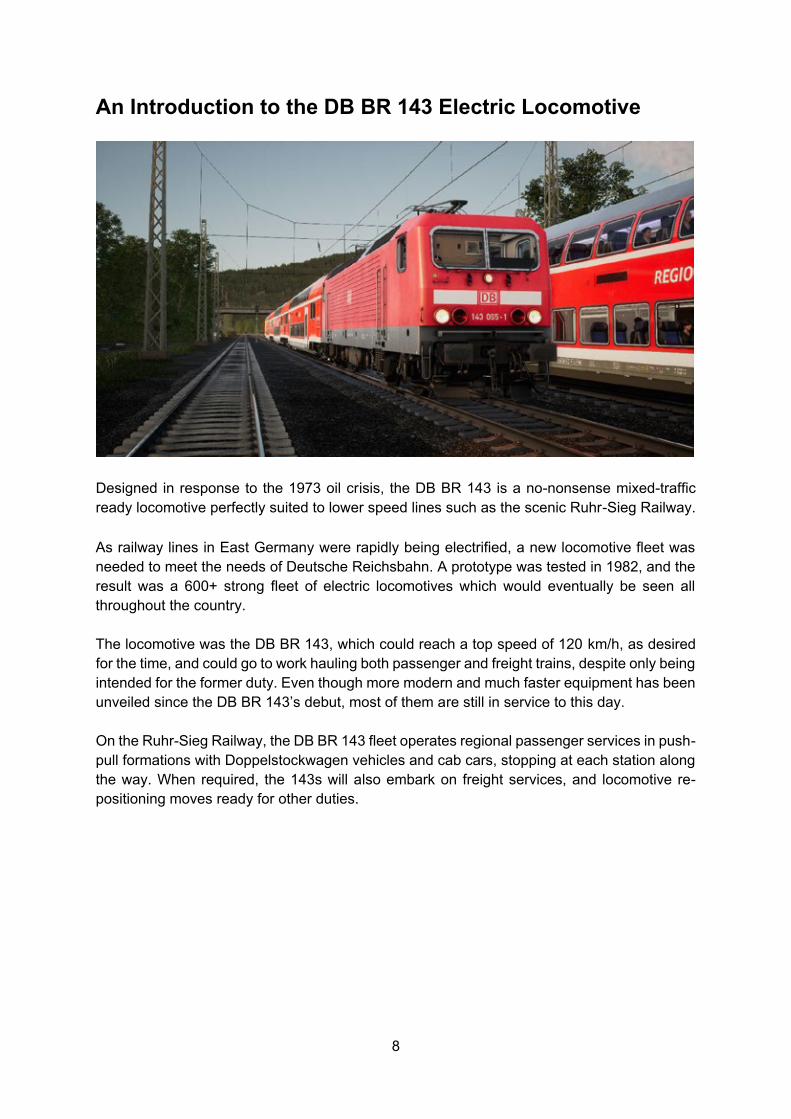
An Introduction to the DB BR 143 Electric Locomotive
Designed in response to the 1973 oil crisis, the DB BR 143 is a no-nonsense mixed-traffic ready locomotive perfectly suited to lower speed lines such as the scenic Ruhr-Sieg Railway. As railway lines in East Germany were rapidly being electrified, a new locomotive fleet was needed to meet the needs of Deutsche Reichsbahn. A prototype was tested in 1982, and the result was a 600+ strong fleet of electric locomotives which would eventually be seen all throughout the country.
The locomotive was the DB BR 143, which could reach a top speed of 120 km/h, as desired for the time, and could go to work hauling both passenger and freight trains, despite only being intended for the former duty. Even though more modern and much faster equipment has been unveiled since the DB BR 143’s debut, most of them are still in service to this day.
On the Ruhr-Sieg Railway, the DB BR 143 fleet operates regional passenger services in push-pull formations with Doppelstockwagen vehicles and cab cars, stopping at each station along the way. When required, the 143s will also embark on freight services, and locomotive re-positioning moves ready for other duties.
9
Quick Start Guide: DB BR 143
1. Enter the required cab.a. Ensure the Handbrake is appliedb. Move the Reverser to the Forward positionc. Set the Drivers Brake to Released. Ensure both Auxiliary Drive Control are Offe. Turn the Headlights to On and Whitef. Reverser to Off
2. Enter the engine rooma. Locate the Engine Room Control Panelb. Switch the Battery to the Start state and allow it to spring to the On statec. Switch the pantograph to the required state
3. Move to the Non-Driving Caba. Ensure both Auxiliary Drive Control are Offb. Handbrake must be releasedc. Turn the Headlights on to Redd. Drivers Brake to Closede. Direct Brake Valve to Release
4. Enter the Driving Caba. Move the reverser to the Forward driving positionb. Raise the pantographc. Close the MCB

10
Quick Start Guide: DB BR 767.2 DABpbzfa Control Car
The DABpbzfa control car is an unusual driving position in that the driver is in the end of a passenger coach that as no actual capability to move on its own. Instead, this control car will remotely control the locomotive situated at the other end of the consist.
Before beginning setup procedure for the control car, you should ensure that you have set up the locomotive ready to run and then deactivated its cab (which usually requires simply setting the reverser to Off).
Once the other loco is operational, return to the control car cab:
Turn on the battery.Set tail lights/headlights (switch above the battery).Set 'Headlights and Instruments Light' switch to On.Set reverser to anything but 'Neutral'.Set 'Pantograph' lever to 'Raise'.Set 'Circuit Breaker' lever to 'Close'.Set 'TrainLinePower' lever to 'Start'.Set 'Coach Lights' to On/Off.Set 'Brake Key' to On.
As you now operate the throttle control, remember that the signals are being sent to the locomotive at the other end and it is responding to them so the way you will feel the reaction to your inputs will be slightly different and a little delayed.
When you set off from stationary, begin with a small amount of power applied and let it get you moving – once the control car is moving you can then start applying some more power. As you gain more confidence with the control car you will be more confident in when to apply power.
11
Brakes are applied from the control car itself, so they will react as you would expect if you were driving a locomotive.
12
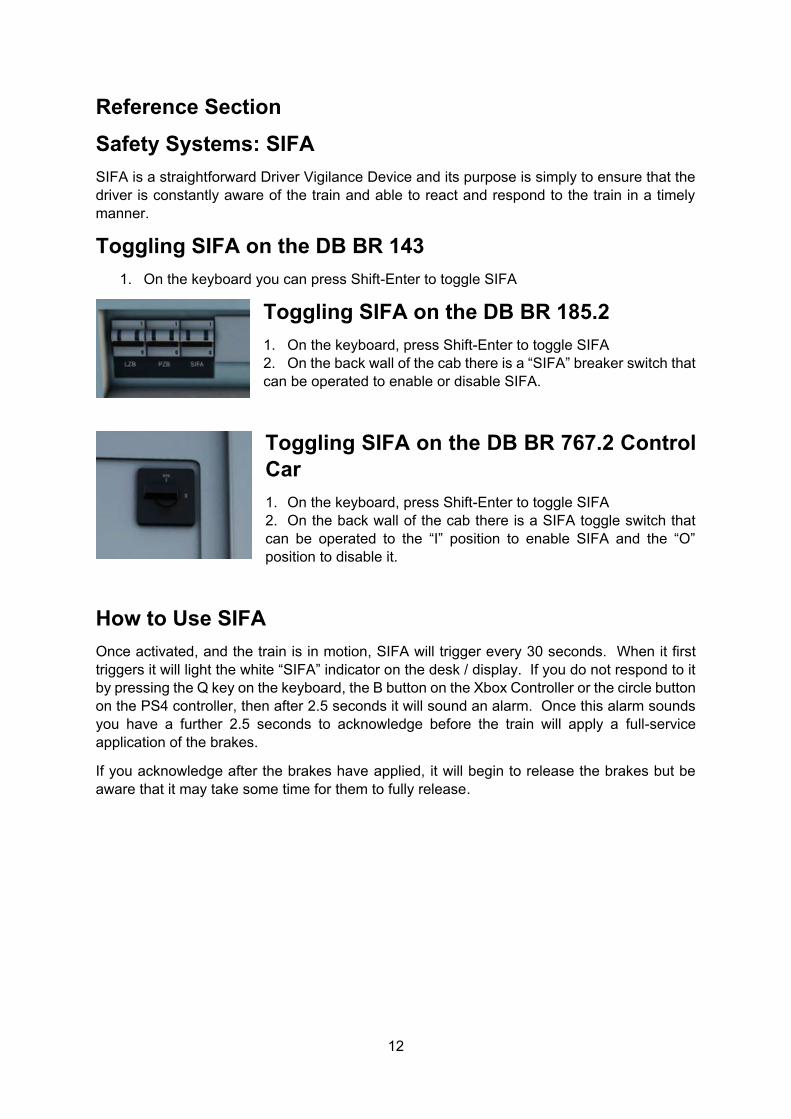
Reference SectionSafety Systems: SIFASIFA is a straightforward Driver Vigilance Device and its purpose is simply to ensure that the driver is constantly aware of the train and able to react and respond to the train in a timely manner.
Toggling SIFA on the DB BR 1431. On the keyboard you can press Shift-Enter to toggle SIFA
Toggling SIFA on the DB BR 185.21. On the keyboard, press Shift-Enter to toggle SIFA2. On the back wall of the cab there is a “SIFA” breaker switch that can be operated to enable or disable SIFA.
Toggling SIFA on the DB BR 767.2 Control Car1. On the keyboard, press Shift-Enter to toggle SIFA2. On the back wall of the cab there is a SIFA toggle switch that can be operated to the “I” position to enable SIFA and the “O” position to disable it.
How to Use SIFAOnce activated, and the train is in motion, SIFA will trigger every 30 seconds. When it first triggers it will light the white “SIFA” indicator on the desk / display. If you do not respond to it by pressing the Q key on the keyboard, the B button on the Xbox Controller or the circle button on the PS4 controller, then after 2.5 seconds it will sound an alarm. Once this alarm sounds you have a further 2.5 seconds to acknowledge before the train will apply a full-serviceapplication of the brakes.
If you acknowledge after the brakes have applied, it will begin to release the brakes but be aware that it may take some time for them to fully release.
13
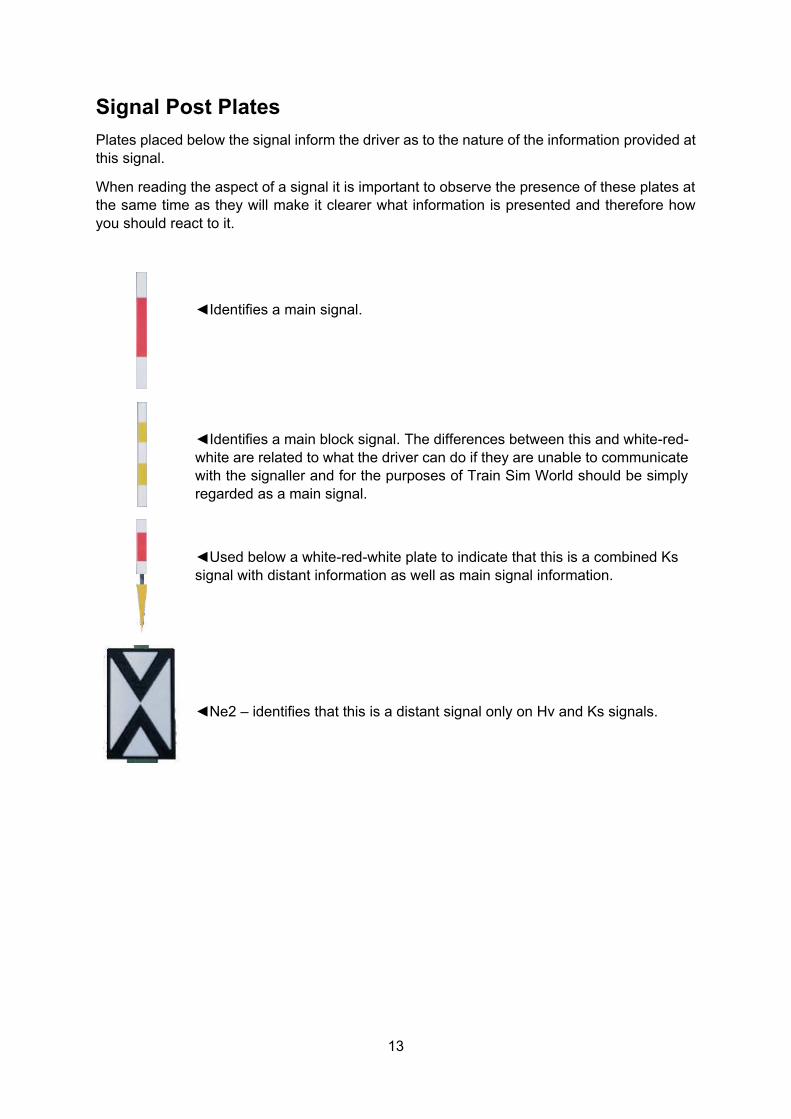
Signal Post PlatesPlates placed below the signal inform the driver as to the nature of the information provided at this signal.
When reading the aspect of a signal it is important to observe the presence of these plates at the same time as they will make it clearer what information is presented and therefore how you should react to it.
Identifies a main signal.
Identifies a main block signal. The differences between this and white-red-white are related to what the driver can do if they are unable to communicate with the signaller and for the purposes of Train Sim World should be simply regarded as a main signal.
Used below a white-red-white plate to indicate that this is a combined Ks signal with distant information as well as main signal information.
Ne2 – identifies that this is a distant signal only on Hv and Ks signals.
14
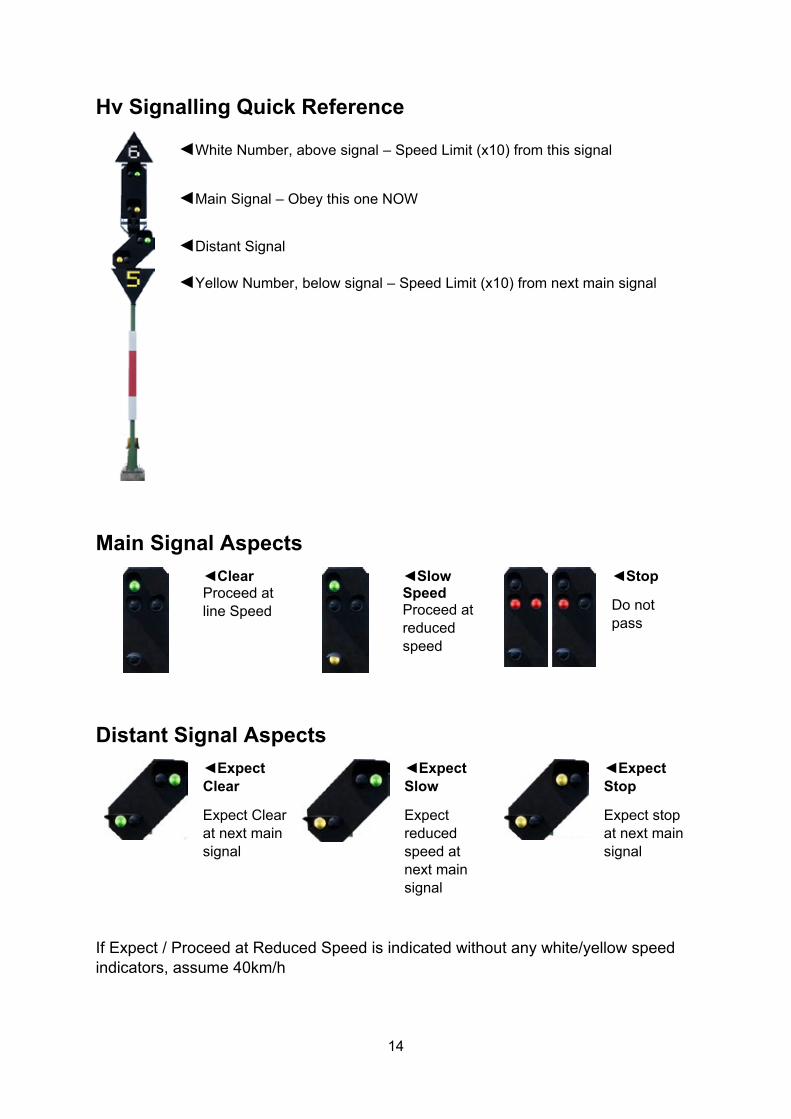
Hv Signalling Quick Reference
White Number, above signal – Speed Limit (x10) from this signal
Main Signal – Obey this one NOW
Distant Signal
Yellow Number, below signal – Speed Limit (x10) from next main signal
Main Signal AspectsClear
Proceed atline Speed
Slow SpeedProceed atreduced speed
Stop
Do not pass
Distant Signal AspectsExpect
Clear
Expect Clear at next main signal
Expect Slow
Expect reduced speed at next main signal
Expect Stop
Expect stop at next main signal
If Expect / Proceed at Reduced Speed is indicated without any white/yellow speed indicators, assume 40km/h
15
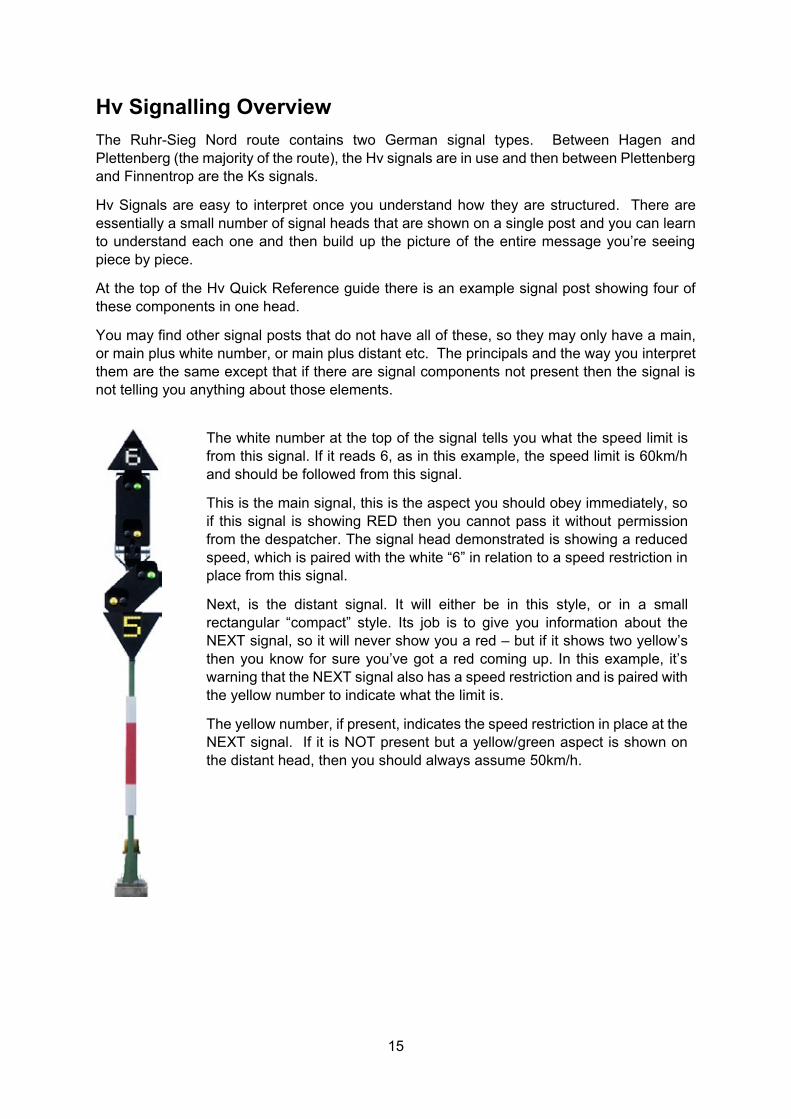
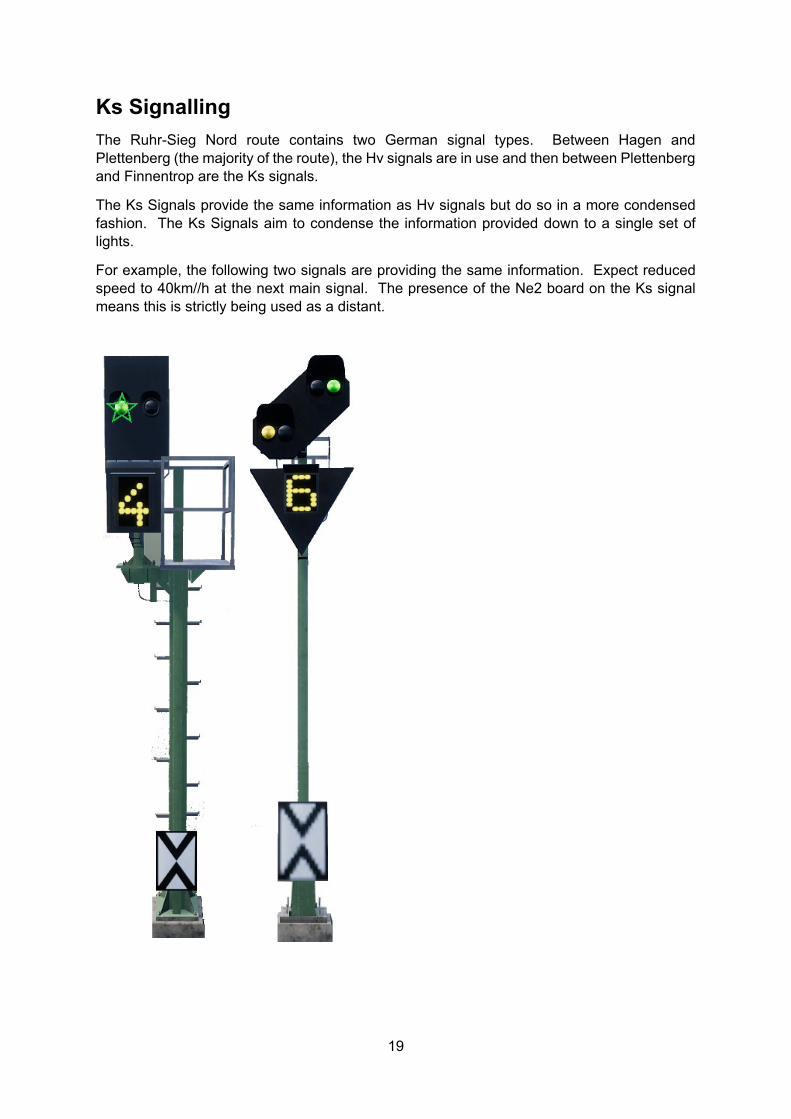
Hv Signalling OverviewThe Ruhr-Sieg Nord route contains two German signal types. Between Hagen and Plettenberg (the majority of the route), the Hv signals are in use and then between Plettenberg and Finnentrop are the Ks signals.
Hv Signals are easy to interpret once you understand how they are structured. There are essentially a small number of signal heads that are shown on a single post and you can learn to understand each one and then build up the picture of the entire message you’re seeing piece by piece.
At the top of the Hv Quick Reference guide there is an example signal post showing four of these components in one head.
You may find other signal posts that do not have all of these, so they may only have a main, or main plus white number, or main plus distant etc. The principals and the way you interpret them are the same except that if there are signal components not present then the signal is not telling you anything about those elements.
The white number at the top of the signal tells you what the speed limit is from this signal. If it reads 6, as in this example, the speed limit is 60km/h and should be followed from this signal.
This is the main signal, this is the aspect you should obey immediately, so if this signal is showing RED then you cannot pass it without permission from the despatcher. The signal head demonstrated is showing a reduced speed, which is paired with the white “6” in relation to a speed restriction in place from this signal.
Next, is the distant signal. It will either be in this style, or in a small rectangular “compact” style. Its job is to give you information about the NEXT signal, so it will never show you a red – but if it shows two yellow’s then you know for sure you’ve got a red coming up. In this example, it’s warning that the NEXT signal also has a speed restriction and is paired with the yellow number to indicate what the limit is.
The yellow number, if present, indicates the speed restriction in place at the NEXT signal. If it is NOT present but a yellow/green aspect is shown on the distant head, then you should always assume 50km/h.
16
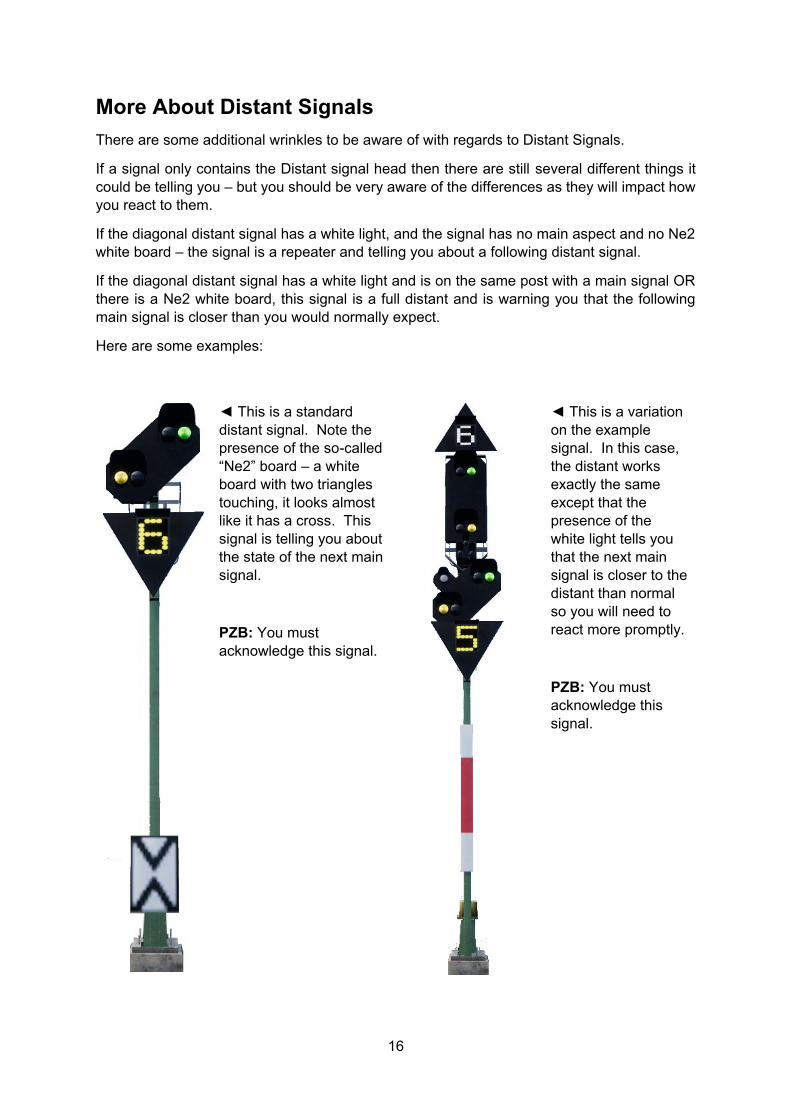
More About Distant SignalsThere are some additional wrinkles to be aware of with regards to Distant Signals.
If a signal only contains the Distant signal head then there are still several different things it could be telling you – but you should be very aware of the differences as they will impact how you react to them.
If the diagonal distant signal has a white light, and the signal has no main aspect and no Ne2 white board – the signal is a repeater and telling you about a following distant signal.
If the diagonal distant signal has a white light and is on the same post with a main signal OR there is a Ne2 white board, this signal is a full distant and is warning you that the following main signal is closer than you would normally expect.
Here are some examples:
This is a standard distant signal. Note the presence of the so-called “Ne2” board – a white board with two triangles touching, it looks almost like it has a cross. This signal is telling you about the state of the next main signal.
PZB: You must acknowledge this signal.
This is a variation on the example signal. In this case, the distant works exactly the same except that the presence of the white light tells you that the next main signal is closer to the distant than normal so you will need to react more promptly.
PZB: You must acknowledge this signal.
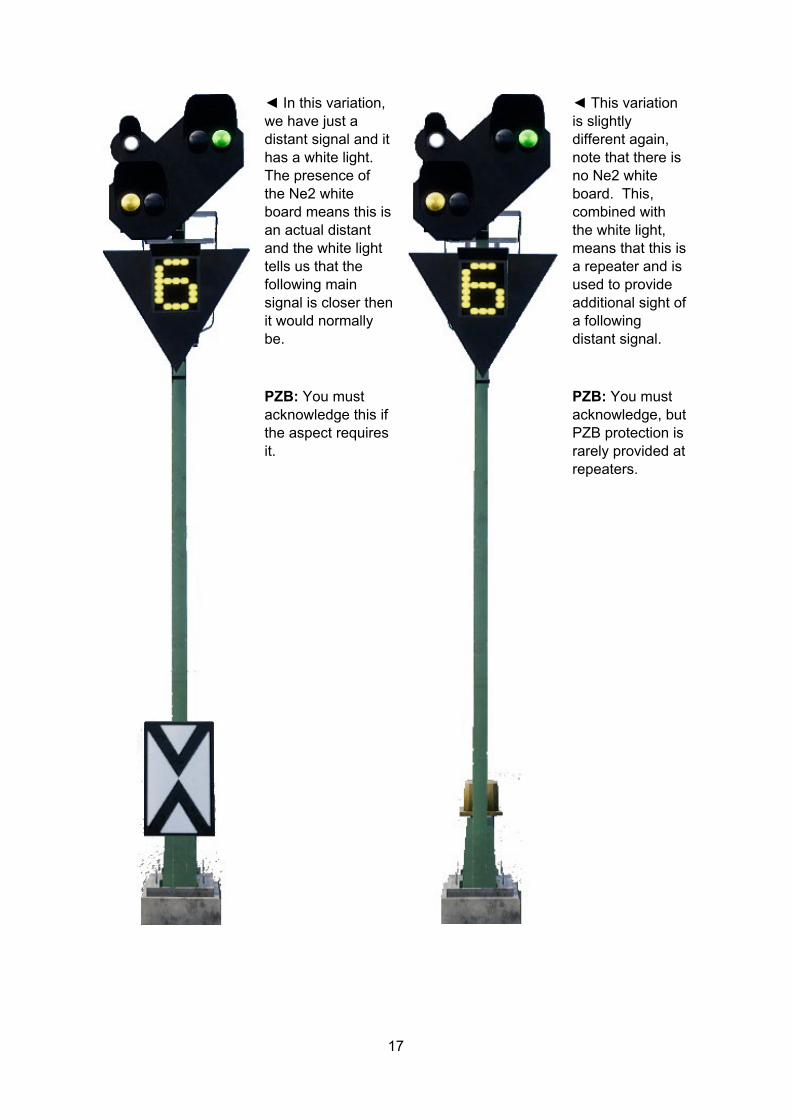
17
In this variation, we have just a distant signal and it has a white light. The presence of the Ne2 white board means this is an actual distant and the white light tells us that the following main signal is closer thenit would normally be.
PZB: You must acknowledge this if the aspect requires it.
This variation is slightly different again, note that there is no Ne2 white board. This,combined with the white light, means that this is a repeater and is used to provide additional sight of a following distant signal.
PZB: You must acknowledge, but PZB protection is rarely provided at repeaters.
18
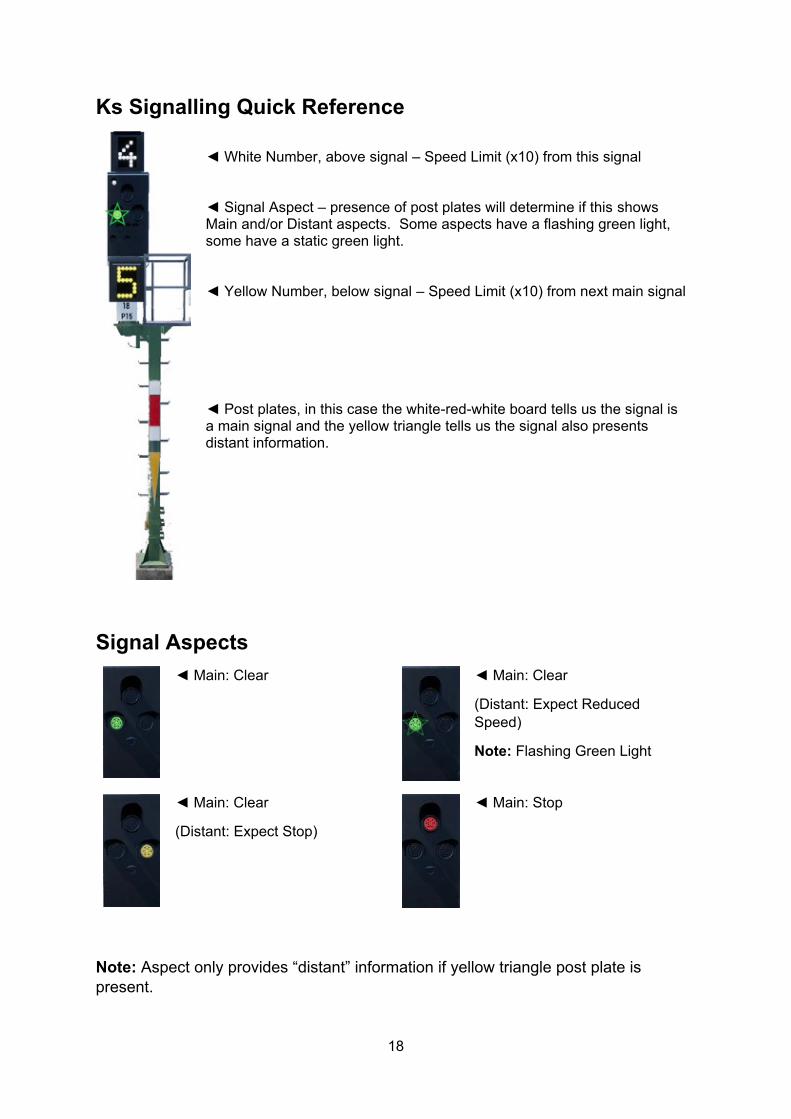
Ks Signalling Quick Reference
White Number, above signal – Speed Limit (x10) from this signal
Signal Aspect – presence of post plates will determine if this showsMain and/or Distant aspects. Some aspects have a flashing green light, some have a static green light.
Yellow Number, below signal – Speed Limit (x10) from next main signal
Post plates, in this case the white-red-white board tells us the signal is a main signal and the yellow triangle tells us the signal also presents distant information.
Signal AspectsMain: Clear Main: Clear
(Distant: Expect Reduced Speed)
Note: Flashing Green Light
Main: Clear
(Distant: Expect Stop)
Main: Stop
Note: Aspect only provides “distant” information if yellow triangle post plate is present.
19
Ks SignallingThe Ruhr-Sieg Nord route contains two German signal types. Between Hagen and Plettenberg (the majority of the route), the Hv signals are in use and then between Plettenberg and Finnentrop are the Ks signals.
The Ks Signals provide the same information as Hv signals but do so in a more condensed fashion. The Ks Signals aim to condense the information provided down to a single set of lights.
For example, the following two signals are providing the same information. Expect reduced speed to 40km//h at the next main signal. The presence of the Ne2 board on the Ks signal means this is strictly being used as a distant.
20
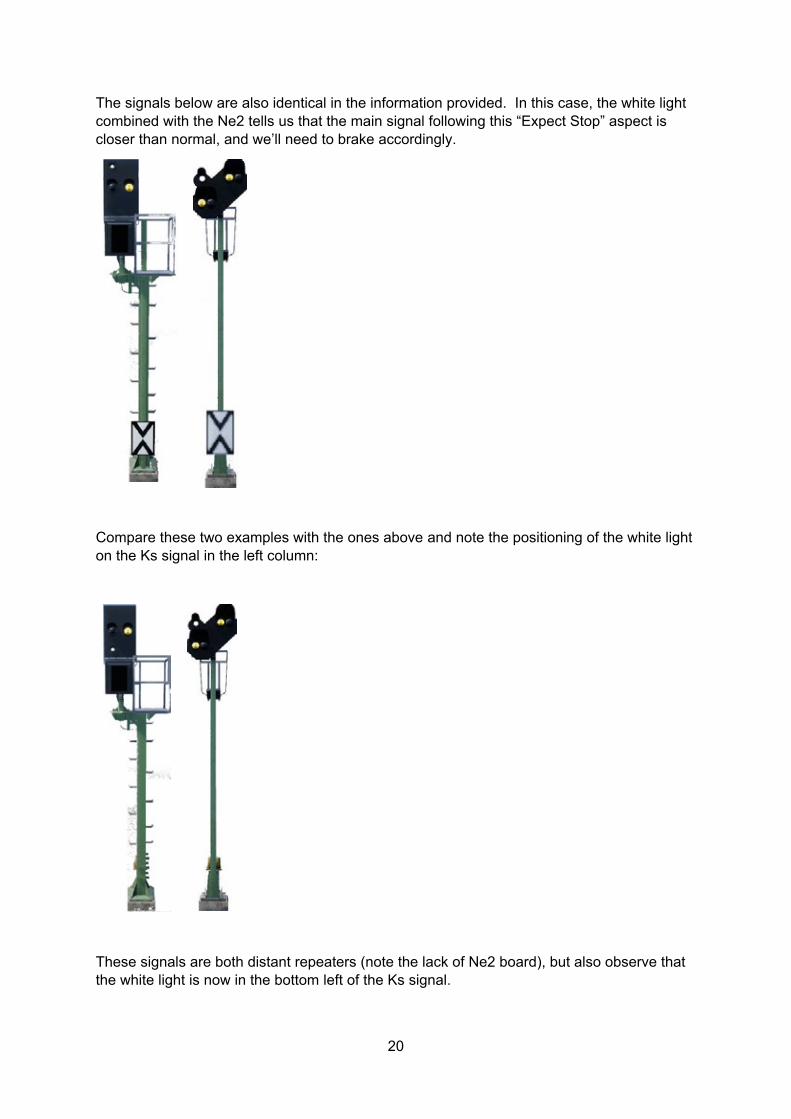
The signals below are also identical in the information provided. In this case, the white light combined with the Ne2 tells us that the main signal following this “Expect Stop” aspect is closer than normal, and we’ll need to brake accordingly.
Compare these two examples with the ones above and note the positioning of the white light on the Ks signal in the left column:
These signals are both distant repeaters (note the lack of Ne2 board), but also observe that the white light is now in the bottom left of the Ks signal.
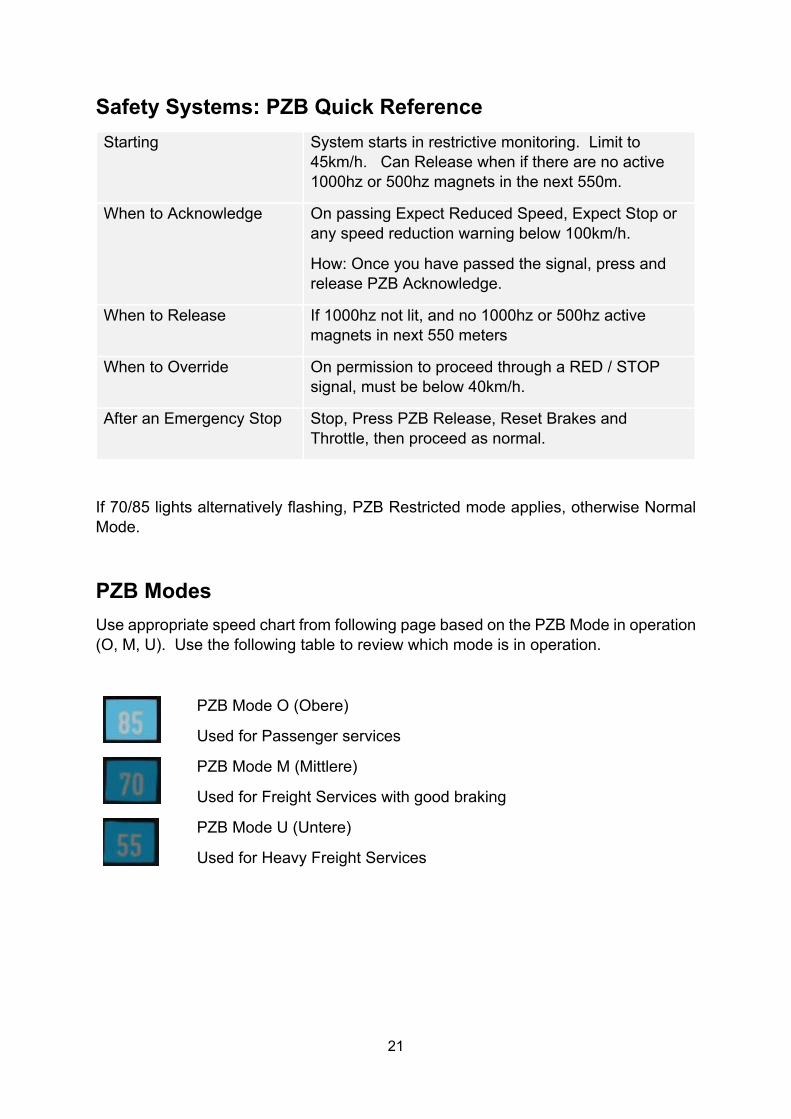
21
Safety Systems: PZB Quick ReferenceStarting System starts in restrictive monitoring. Limit to
45km/h. Can Release when if there are no active 1000hz or 500hz magnets in the next 550m.
When to Acknowledge On passing Expect Reduced Speed, Expect Stop or any speed reduction warning below 100km/h.
How: Once you have passed the signal, press and release PZB Acknowledge.
When to Release If 1000hz not lit, and no 1000hz or 500hz active magnets in next 550 meters
When to Override On permission to proceed through a RED / STOP signal, must be below 40km/h.
After an Emergency Stop Stop, Press PZB Release, Reset Brakes and Throttle, then proceed as normal.
If 70/85 lights alternatively flashing, PZB Restricted mode applies, otherwise NormalMode.
PZB ModesUse appropriate speed chart from following page based on the PZB Mode in operation (O, M, U). Use the following table to review which mode is in operation.
PZB Mode O (Obere)
Used for Passenger services
PZB Mode M (Mittlere)
Used for Freight Services with good braking
PZB Mode U (Untere)
Used for Heavy Freight Services
22
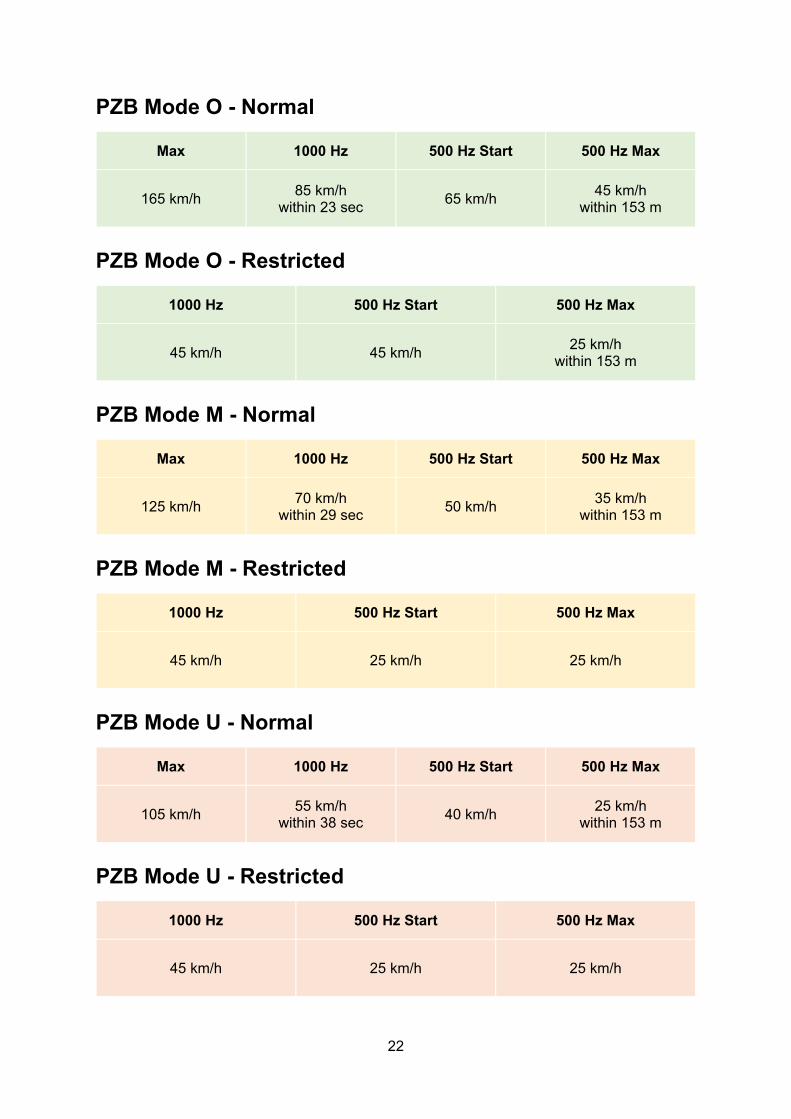
PZB Mode O - Normal
Max 1000 Hz 500 Hz Start 500 Hz Max
165 km/h 85 km/hwithin 23 sec 65 km/h 45 km/h
within 153 m
PZB Mode O - Restricted
1000 Hz 500 Hz Start 500 Hz Max
45 km/h 45 km/h 25 km/hwithin 153 m
PZB Mode M - Normal
Max 1000 Hz 500 Hz Start 500 Hz Max
125 km/h 70 km/hwithin 29 sec 50 km/h 35 km/h
within 153 m
PZB Mode M - Restricted
1000 Hz 500 Hz Start 500 Hz Max
45 km/h 25 km/h 25 km/h
PZB Mode U - Normal
Max 1000 Hz 500 Hz Start 500 Hz Max
105 km/h 55 km/hwithin 38 sec 40 km/h 25 km/h
within 153 m
PZB Mode U - Restricted
1000 Hz 500 Hz Start 500 Hz Max
45 km/h 25 km/h 25 km/h
23
Safety Systems – PZB OverviewThe PZB system is an advanced on-board cab signalling system used to enforce reductions of speed on approach to various situations on the track, whether that is adverse signals, speed reductions or something else. It works via three buttons on the cab desk (Acknowledge, Free and Override) and some visual displays on the desk or the display panels, depending on the locomotive / unit.
Toggling PZB on the DB BR 1431. Select the correct PZB mode via the selector in the engine room2. Either – Press Ctrl-Enter to toggle PZB via the keyboard3. Or – operate the PZB toggle switch in the Engine Room
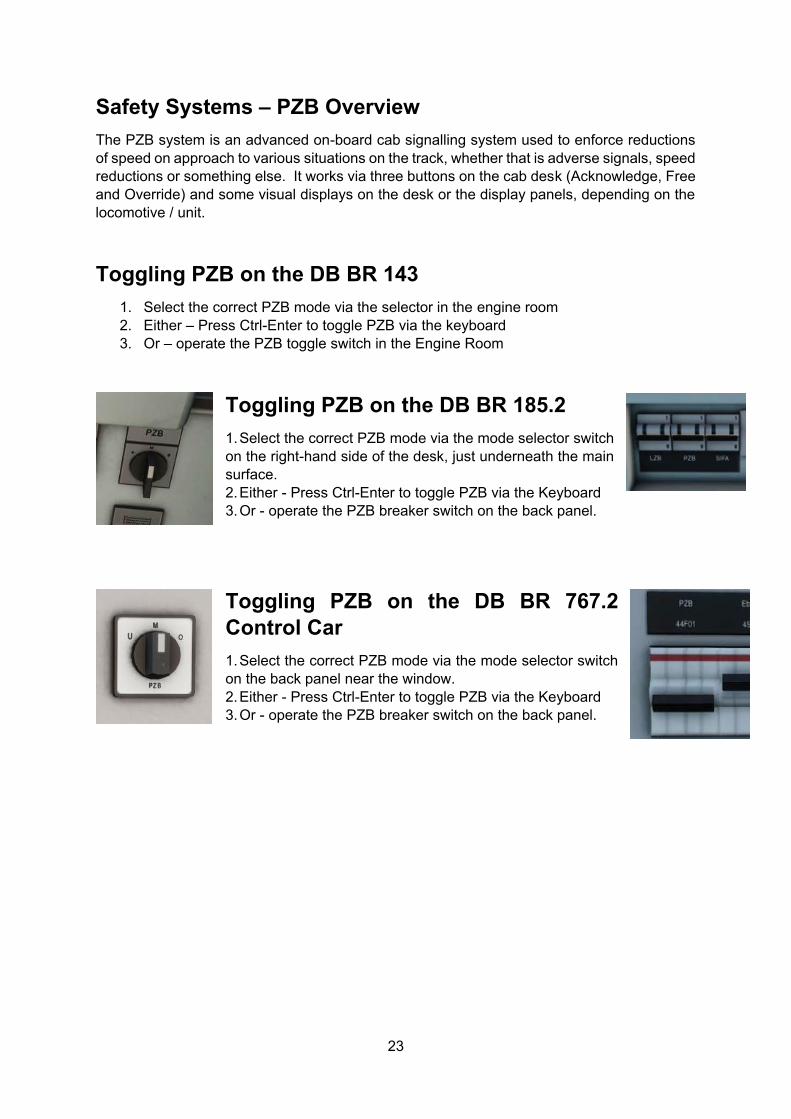
Toggling PZB on the DB BR 185.21.Select the correct PZB mode via the mode selector switchon the right-hand side of the desk, just underneath the main surface.2.Either - Press Ctrl-Enter to toggle PZB via the Keyboard3.Or - operate the PZB breaker switch on the back panel.
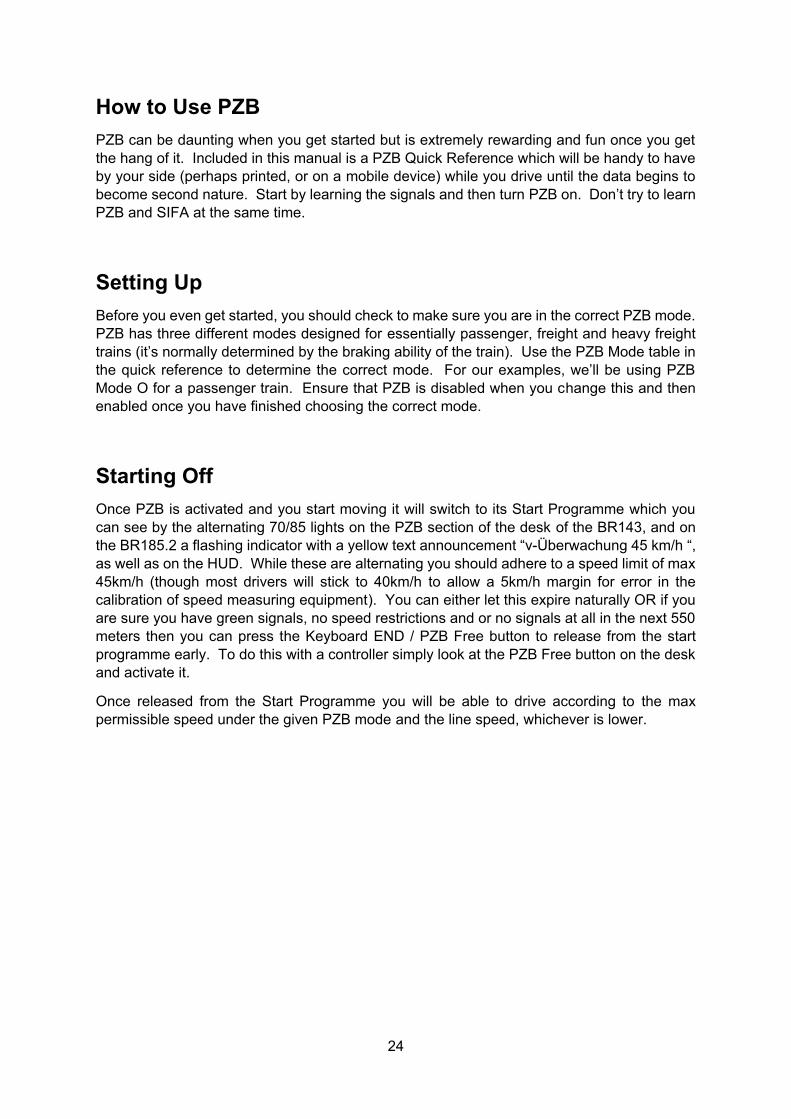
Toggling PZB on the DB BR 767.2 Control Car1.Select the correct PZB mode via the mode selector switch on the back panel near the window.2.Either - Press Ctrl-Enter to toggle PZB via the Keyboard3.Or - operate the PZB breaker switch on the back panel.
24
How to Use PZBPZB can be daunting when you get started but is extremely rewarding and fun once you get the hang of it. Included in this manual is a PZB Quick Reference which will be handy to have by your side (perhaps printed, or on a mobile device) while you drive until the data begins to become second nature. Start by learning the signals and then turn PZB on. Don’t try to learn PZB and SIFA at the same time.
Setting UpBefore you even get started, you should check to make sure you are in the correct PZB mode. PZB has three different modes designed for essentially passenger, freight and heavy freight trains (it’s normally determined by the braking ability of the train). Use the PZB Mode table in the quick reference to determine the correct mode. For our examples, we’ll be using PZB Mode O for a passenger train. Ensure that PZB is disabled when you change this and then enabled once you have finished choosing the correct mode.
Starting OffOnce PZB is activated and you start moving it will switch to its Start Programme which you can see by the alternating 70/85 lights on the PZB section of the desk of the BR143, and on the BR185.2 a flashing indicator with a yellow text announcement “v-Überwachung 45 km/h “, as well as on the HUD. While these are alternating you should adhere to a speed limit of max 45km/h (though most drivers will stick to 40km/h to allow a 5km/h margin for error in the calibration of speed measuring equipment). You can either let this expire naturally OR if you are sure you have green signals, no speed restrictions and or no signals at all in the next 550 meters then you can press the Keyboard END / PZB Free button to release from the start programme early. To do this with a controller simply look at the PZB Free button on the desk and activate it.
Once released from the Start Programme you will be able to drive according to the maxpermissible speed under the given PZB mode and the line speed, whichever is lower.
25
Reacting to the RouteAs you drive you will be faced with signals and speed restrictions, and it is important that you understand how you must react to these. As you get to (or near) these, devices next to the rails will send a pulse to the train and it’s your job to predict this and react accordingly.
It is good practice not to run right up to your speed restrictions when PZB is monitoring, drivers will generally run around 5km/h under the PZB monitored limit to allow for any calibration or calculation errors in any of the equipment.
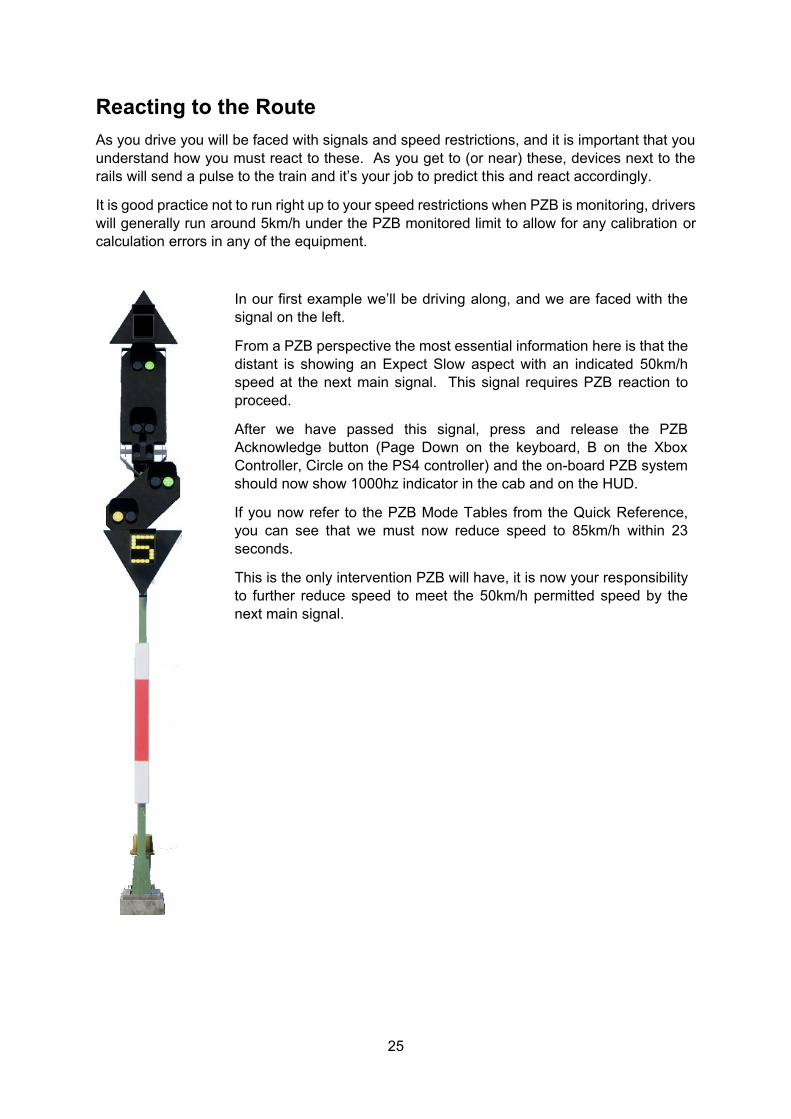
In our first example we’ll be driving along, and we are faced with the signal on the left.
From a PZB perspective the most essential information here is that the distant is showing an Expect Slow aspect with an indicated 50km/h speed at the next main signal. This signal requires PZB reaction toproceed.
After we have passed this signal, press and release the PZB Acknowledge button (Page Down on the keyboard, B on the Xbox Controller, Circle on the PS4 controller) and the on-board PZB system should now show 1000hz indicator in the cab and on the HUD.
If you now refer to the PZB Mode Tables from the Quick Reference,you can see that we must now reduce speed to 85km/h within 23 seconds.
This is the only intervention PZB will have, it is now your responsibility to further reduce speed to meet the 50km/h permitted speed by the next main signal.
26
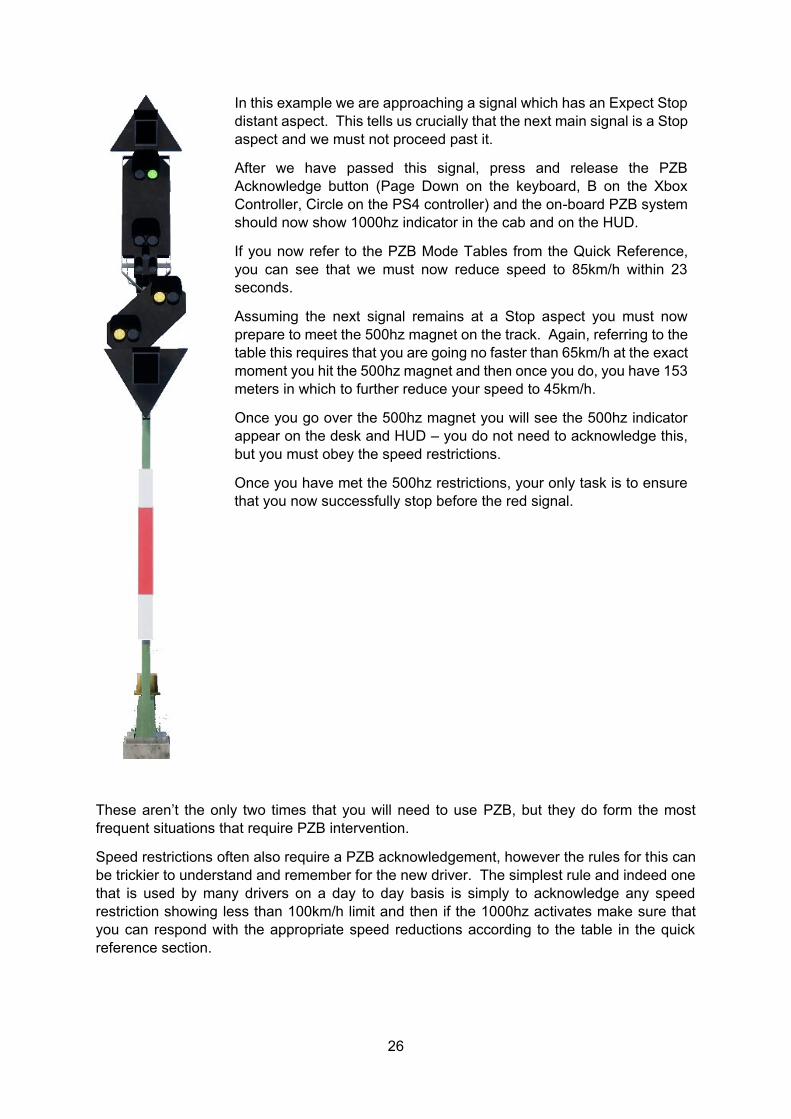
In this example we are approaching a signal which has an Expect Stop distant aspect. This tells us crucially that the next main signal is a Stop aspect and we must not proceed past it.
After we have passed this signal, press and release the PZB Acknowledge button (Page Down on the keyboard, B on the Xbox Controller, Circle on the PS4 controller) and the on-board PZB system should now show 1000hz indicator in the cab and on the HUD.
If you now refer to the PZB Mode Tables from the Quick Reference,you can see that we must now reduce speed to 85km/h within 23 seconds.
Assuming the next signal remains at a Stop aspect you must now prepare to meet the 500hz magnet on the track. Again, referring to the table this requires that you are going no faster than 65km/h at the exactmoment you hit the 500hz magnet and then once you do, you have 153 meters in which to further reduce your speed to 45km/h.
Once you go over the 500hz magnet you will see the 500hz indicator appear on the desk and HUD – you do not need to acknowledge this, but you must obey the speed restrictions.
Once you have met the 500hz restrictions, your only task is to ensure that you now successfully stop before the red signal.
These aren’t the only two times that you will need to use PZB, but they do form the most frequent situations that require PZB intervention.
Speed restrictions often also require a PZB acknowledgement, however the rules for this can be trickier to understand and remember for the new driver. The simplest rule and indeed one that is used by many drivers on a day to day basis is simply to acknowledge any speed restriction showing less than 100km/h limit and then if the 1000hz activates make sure that you can respond with the appropriate speed reductions according to the table in the quick reference section.
27
Restricted MonitoringWhile under 1000hz or 500hz, if you travel below 10km/h for 15 seconds or more or come to a complete stop then the PZB system will switch in to Restrictive Monitoring. At this point thespeed limits enforced change and you should use the Restrictive Monitoring speed tables from the quick reference sheet.
It is possible to release from Restricted Monitoring if neither of the 1000hz or 500hz indicators are lit and you are confident that there are no active 1000hz or 500hz active magnets ahead within 550m, you can do this with the PZB Free or END key on the keyboard. On the controller you will need to access the button on the desk directly.
OverspeedIf in the normal course of driving you exceed the main PZB speed limit for the mode you are operating under (i.e. when not under any restrictions), the PZB system will apply a full-serviceapplication to bring you back within the speed limit.
This brake application will begin releasing as soon as the train is below the correct speed limit however as it is full service, it’s likely the train will slow considerably before the brakes are fullyreleased.
For example, if you are in PZB Mode O and exceed 165km/h you will get a warning indicator showing a “G” indicating you are exceeding the maximum allowed speed, after a few seconds the brakes will apply and slow the train. Once the train is below 165km/h the brakes will begin releasing but you may be as low as 60 or 70km/h before they have fully released.
Handling an Emergency Brake ApplicationShould you make an error while interacting with PZB it may result in the train sounding alarms and applying emergency brakes. If this happens:
Wait for the train to come to a complete stopPress END on the keyboard or activate the PZB Free button to cancel the alarmsApply the brake handle and move the throttle handle to zero if it isn’t alreadyRelease the brakes and continue as normal.
Note that you will likely now be in Restricted Monitoring with an appropriate speed restriction and will need to observe that and decide whether you are able to release safely, if not, continue under the restriction until it releases naturally.
Also, be aware of the cause of the braking, for example, if you are approaching a red light or a speed reduction you should act accordingly.

28
Passenger Door Controls
In Train Sim World: Ruhr-Sieg Nord, you can control the passenger entry and exit doors on each side independently i.e. either left side or right side. A simple method of control has been implemented for the included trains. Simply press the TAB key to call up the menu and select on which side of the train you wish to lock/unlock the doors.
You can also operate the doors from within the various cab desks. You should first operate the door side selector to ensure the correct side is selected (Left, Right or Both) and then use the white switch to Open or Close the doors on that side as required. There is a white switch on either side of the cab however that is for convenience, they will open the doors on the side indicated on the selector switch.
29
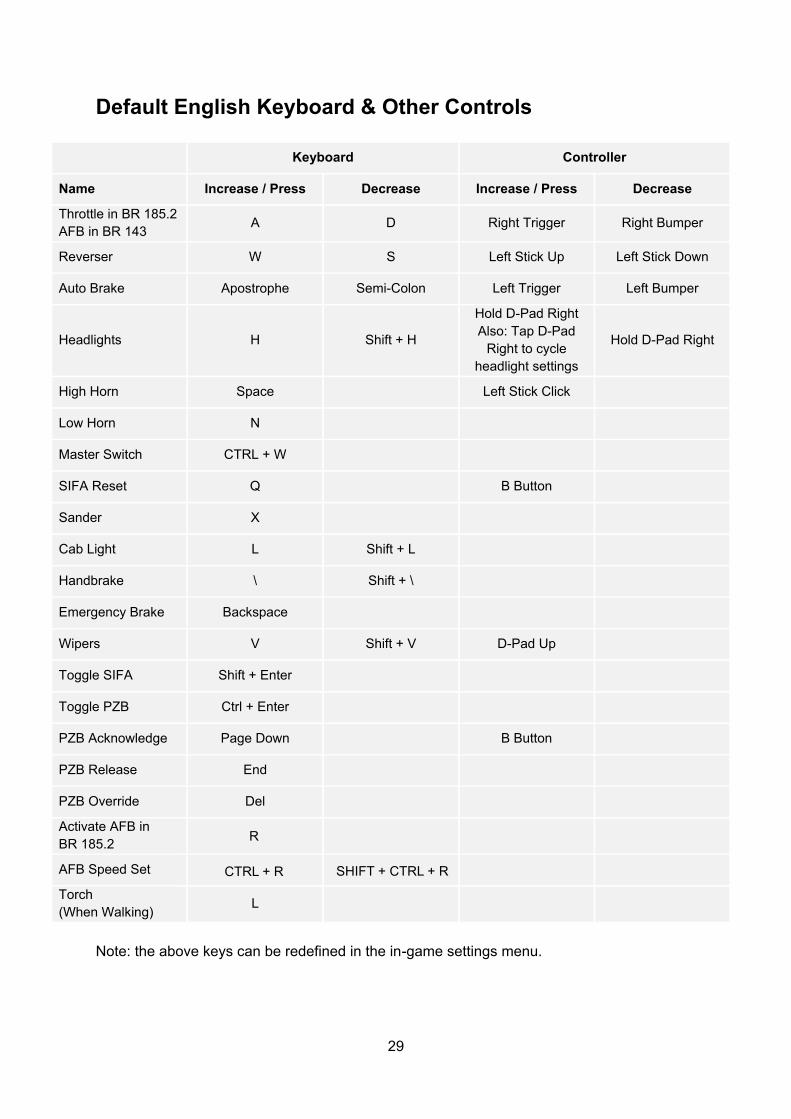
Default English Keyboard & Other Controls
Keyboard Controller
Name Increase / Press Decrease Increase / Press Decrease
Throttle in BR 185.2 AFB in BR 143 A D Right Trigger Right Bumper
Reverser W S Left Stick Up Left Stick Down
Auto Brake Apostrophe Semi-Colon Left Trigger Left Bumper
Headlights H Shift + H
Hold D-Pad Right Also: Tap D-Pad
Right to cycle headlight settings
Hold D-Pad Right
High Horn Space Left Stick Click
Low Horn N
Master Switch CTRL + W
SIFA Reset Q B Button
Sander X
Cab Light L Shift + L
Handbrake \ Shift + \
Emergency Brake Backspace
Wipers V Shift + V D-Pad Up
Toggle SIFA Shift + Enter
Toggle PZB Ctrl + Enter
PZB Acknowledge Page Down B Button
PZB Release End
PZB Override Del
Activate AFB in BR 185.2
AFB Speed Set
Torch (When Walking) L
Note: the above keys can be redefined in the in-game settings menu.
R
CTRL + R SHIFT + CTRL + R
30
Controlling the Camera & Camera Modes
Train Sim World: Ruhr-Sieg Nord includes several cameras for you to control, here’s an outline of those cameras and some examples of use:
1 Key - First Person Camera or Cab CameraUse this camera to operate your locomotive, flip switches and handle all your cab controls.
2 Key - Boom CameraJust like the camera from Train Simulator, your camera extends outward on an invisible pole, you can rotate it around your focussed vehicle. Use Ctrl and the left & right cursor keys to switch between vehicles or press the 2 key again to switch between the front and rear of your consist.
3 Key - Floating CameraA new camera that allows you to freely look in all directions, useful for coupling and changing switches. Press it once to view the front of your consist and again to view the rear. Freely move your view using the cursor keys.
8 Key - Free CameraFreely move around without limits using this camera. Use this camera to navigate your way around a busy yard, change switches or position it to get the perfect screenshot.
31
Customising the HUD
Train Sim World: Ruhr-Sieg Nord includes many options for you to customise the Head Up Display (HUD):
CTRL+1 Toggles the in-world objective marker. CTRL+2 Toggles the in-world next speed limit marker.
CTRL+3 Toggles the in-world next signal marker.
CTRL+4 Cycles the next speed limit / signal information panel in top right.
CTRL+5 Toggles the speedometer panel (or clock/compass while walking).
CTRL+6 Toggles the score display.
CTRL+7 Toggles the passenger stop marker on the track.
CTRL+8 Cycles the centre dot transparency (off, 50/50, white).
32
Dovetail Live Account
The Dovetail Forums are your one-stop destination for everything Train Simulator and Train Sim World related. We have an ever-growing and vibrant community of train enthusiasts from all over the world, ranging from experienced railroad veterans to new players getting into the world of train simulation. So, if you haven’t already, why not sign up for an account today and join our community – we’d love to have you on board!
See more at: https://forums.dovetailgames.com Dovetail Live is an online destination which enables players to interact with Dovetail’s products and each other in an environment tailored specifically to fans of simulation entertainment. Dovetail Live will evolve to become central to Train Sim World®, enriching the player experience in every way from offering rewards, building a community of like-minded players and helping every player find the right content to create their own perfect personal experience. Signing up for Dovetail Live is completely voluntary. However, users that do sign up for it will receive exclusive benefits in the future. See more at: https://live.dovetailgames.com
33
Troubleshooting Guide & How to Get Support
I have a problem downloading the Steam client, how do I contact them? You can contact Steam Support by opening a customer service ticket at support.steampowered.com/newticket.php. You will need to create a unique support account to submit a ticket (your Steam account will not work on this page) and this will enable you to track and respond to any tickets you open with Steam.
How do I install any secondary programs that the game may need?Train Simulator World: Ruhr-Sieg Nord requires certain secondary programs to operate properly. These are standard programs that most up-to-date computers already have installed on them, such as DirectX. These programs can be found at the following location: Local Disk (C:) > Program Files (x86) > Steam > SteamApps > common > TSW > CommonRedist
How do I change the language of TSW: Ruhr Sieg Nord?This is an easy process and will allow you to play Train Sim World: Ruhr-Sieg Nord in English, French, Italian, German, Spanish, Russian and Polish. To change the language of Train SimWorld: Ruhr Sieg Nord, right-click on the Steam icon on your PC desktop, left click on ‘Library’,right click on ‘Train Sim World’, left click on ‘Properties’, and finally left click on the Language tab and select your preferred language.
How do I reset my display screen size settings? It is possible to change the display screen size settings for Train Sim World: Ruhr-Sieg Nordfrom within the game. Changing display screen size settings is done from the Settings menu in the Display tab.
For any questions not covered here, visit our knowledgebase at https://dovetailgames.kayako.com