- saison 3 - alma · imprimez les pages en français de ce document en format ... facebook en...
TRANSCRIPT
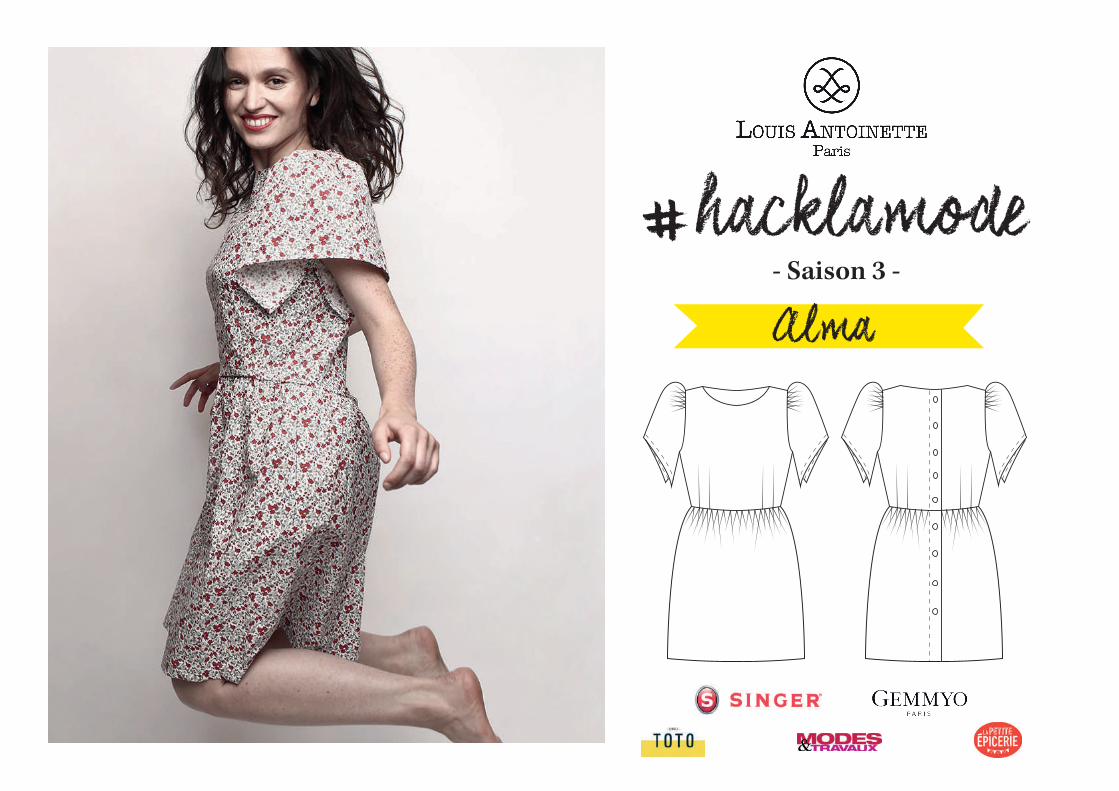
hacklamode- Saison 3 -
#Alma

Sommaire
Table of content
19Carnet d’accompagnement pour réaliser la robe
Le patron !
4
Le point sur le tissu & la mercerie 3
#hacklamode S3, Nov. 2017
Impression du patron & participation au concours 3
19Instruction booklet to make your dress
The pattern
12
Let’s talk about fabrics & haberdashery 11
Printing the pattern & and participating to our contest 11
Mercerie nécessaire
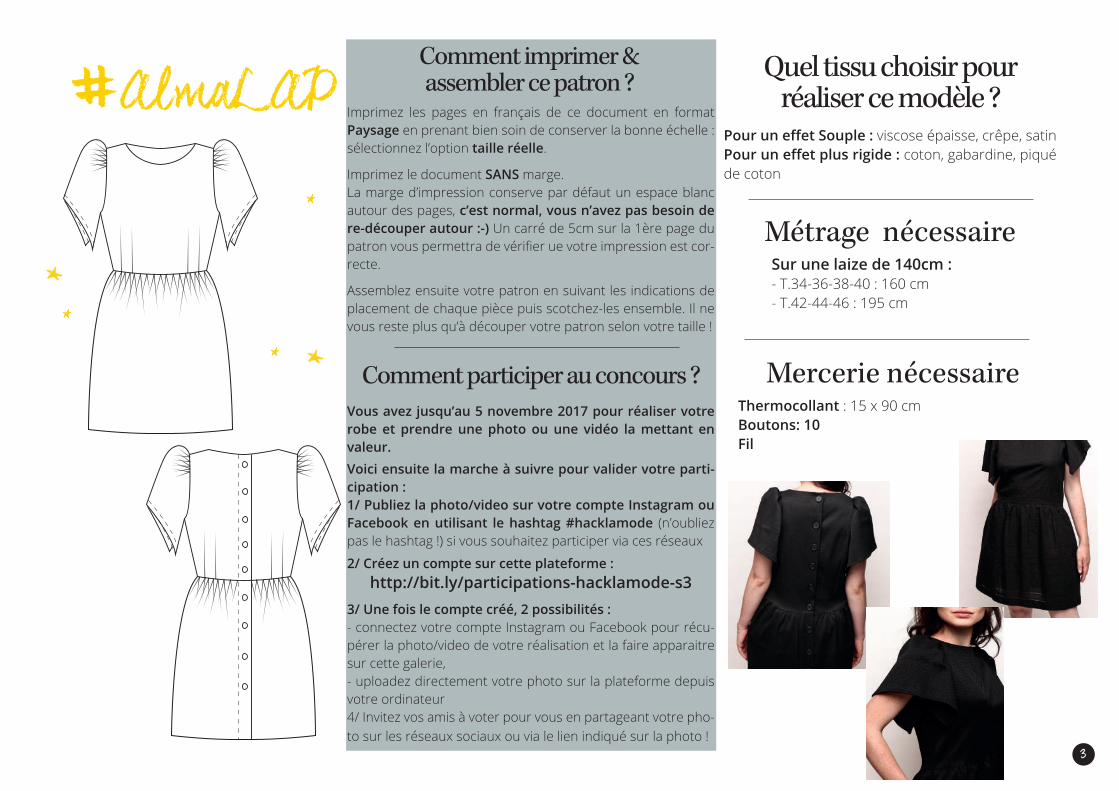
Quel tissu choisir pour réaliser ce modèle ?
Pour un effet Souple : viscose épaisse, crêpe, satinPour un effet plus rigide : coton, gabardine, piqué de coton
Métrage nécessaire Sur une laize de 140cm : - T.34-36-38-40 : 160 cm - T.42-44-46 : 195 cm
Thermocollant : 15 x 90 cmBoutons: 10Fil
Comment imprimer & assembler ce patron ?
Imprimez les pages en français de ce document en format Paysage en prenant bien soin de conserver la bonne échelle : sélectionnez l’option taille réelle.
Imprimez le document SANS marge. La marge d’impression conserve par défaut un espace blanc autour des pages, c’est normal, vous n’avez pas besoin de re-découper autour :-) Un carré de 5cm sur la 1ère page du patron vous permettra de vérifier ue votre impression est cor-recte.
Assemblez ensuite votre patron en suivant les indications de placement de chaque pièce puis scotchez-les ensemble. Il ne vous reste plus qu’à découper votre patron selon votre taille !
AlmaLAP
3
Comment participer au concours ?Vous avez jusqu’au 5 novembre 2017 pour réaliser votre robe et prendre une photo ou une vidéo la mettant en valeur. Voici ensuite la marche à suivre pour valider votre parti-cipation : 1/ Publiez la photo/video sur votre compte Instagram ou Facebook en utilisant le hashtag #hacklamode (n’oubliez pas le hashtag !) si vous souhaitez participer via ces réseaux
2/ Créez un compte sur cette plateforme : http://bit.ly/participations-hacklamode-s3
3/ Une fois le compte créé, 2 possibilités : - connectez votre compte Instagram ou Facebook pour récu-pérer la photo/video de votre réalisation et la faire apparaitre sur cette galerie,- uploadez directement votre photo sur la plateforme depuis votre ordinateur4/ Invitez vos amis à voter pour vous en partageant votre pho-to sur les réseaux sociaux ou via le lien indiqué sur la photo !
#

AuCommencementLes termes barbares employés
La technique, la technique !
Boutons & boutonnières Piqûre de bascule Enforme Cranter Thermocoller Surfiler en simple ou en double
4
Phases de réalisation Temps
6
C’est qui le patron !
On prépare le haut
41h
2h
Les manches 1h 7
Tous ces termes sont dans ce carnet & ici :http://blog.louisantoinette.com/glossaire-couture/
Et si ce n’est toujours pas clair... On ne s’énerve pas, On respire un grand coup, Et on nous écrit ici :
[email protected] bas 1h 8
Alma, c’est notre robe boutonnée dans le dos, resserrée à la taille, avec ses jolies manches froncées ouvertes sous les bras qui vous donnera ce « je ne sais quoi » en plus :-)
Les finitions 1h 10

Phase 1. C’est qui le patron !La robe Alma a été conçue pour une longueur de XX cm à partir de la pointe d’épaule. N’hésitez pas si vous avez la moindre hésitation avant de choisir votre taille !
Découpez le patron selon la couleur Pratique : Les valeurs de couture (1 cm) sont comprises dans le patron. N’oubliez pas les crans !
1.
Chaque pièce du patron représente un morceau du vêtement à couper en tissu 1 ou 2 fois si certains morceaux sont identiques. S’il faut couper le tissu 1 fois : le patron sera positionné sur une 1 seule épaisseur de tissu.
S’il faut le couper 2 fois : il faut plier le tissu endroit contre endroit, lisière contre lisière, pour obtenir 2 épaisseurs, puis positionner le patron.
Chaque morceau du patron comporte une flèche pour repérer le sens dans lequel il faut positionner le mor-ceau sur le tissu (droit fil) : cette flèche doit toujours être parallèle à la lisière et/ou à la pliure du tissu.
Positionnez les formes du patron 2.
Epinglez le patron sur le tissu & découpez3. Pour bien épingler les pièces de patron sur le tissu, positionnez les épingles perpendiculairement aux pièces, tous les 5 cm, sans oublier les angles.
Coupez toutes les pièces au ras du papier.
N’oubliez pas de faire les crans d’assemblage, en les marquant à 5 mm !
Poitrine
Taille
Hanches
34 36 38 40 42 44 46
79/82 cm 83/86 cm 87/90 cm 91/94 cm 95/98 cm 99/102 cm 103/106 cm32 in 331/8 in 347/8 in 361/2 in 377/8 in 391/2 in 411/8 in
59/62 cm 63/66 cm 67/70 cm 71/74 cm 75/78 cm 79/82 cm 83/86 cm237/8 in 251/4 in 263/4 in 283/4 in 301/4 in 321/8 in 331/4 in
85/88 cm 89/92 cm 93/96 cm 97/100 cm 101/104 cm 105/108 cm 109/112 cm341/4 in 353/4 in 371/4 in 387/8 in 401/4 in 417/8 in 431/2 in
Droit fil
Le placement que nous vous proposons est réalisé sur une laize de 140cm, pour la taille 46. Pour les tailles inférieures, les pièces peuvent être davantage imbriquées tant que le sens du droit fil est respecté.
Pliez votre tissu en 2 lisière contre lisière, et positionnez les morceaux comme indiqué ci-contre. Les morceaux 1, 2 et 7 sont au pli.
Pour cette robe :
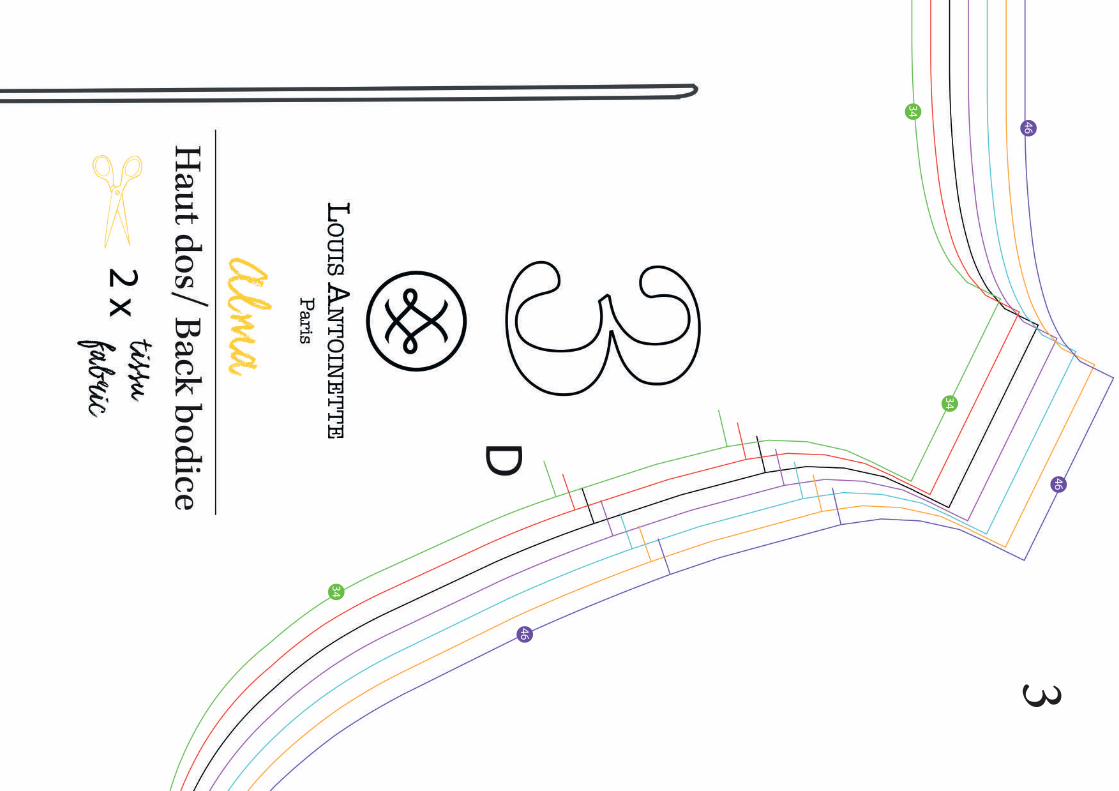
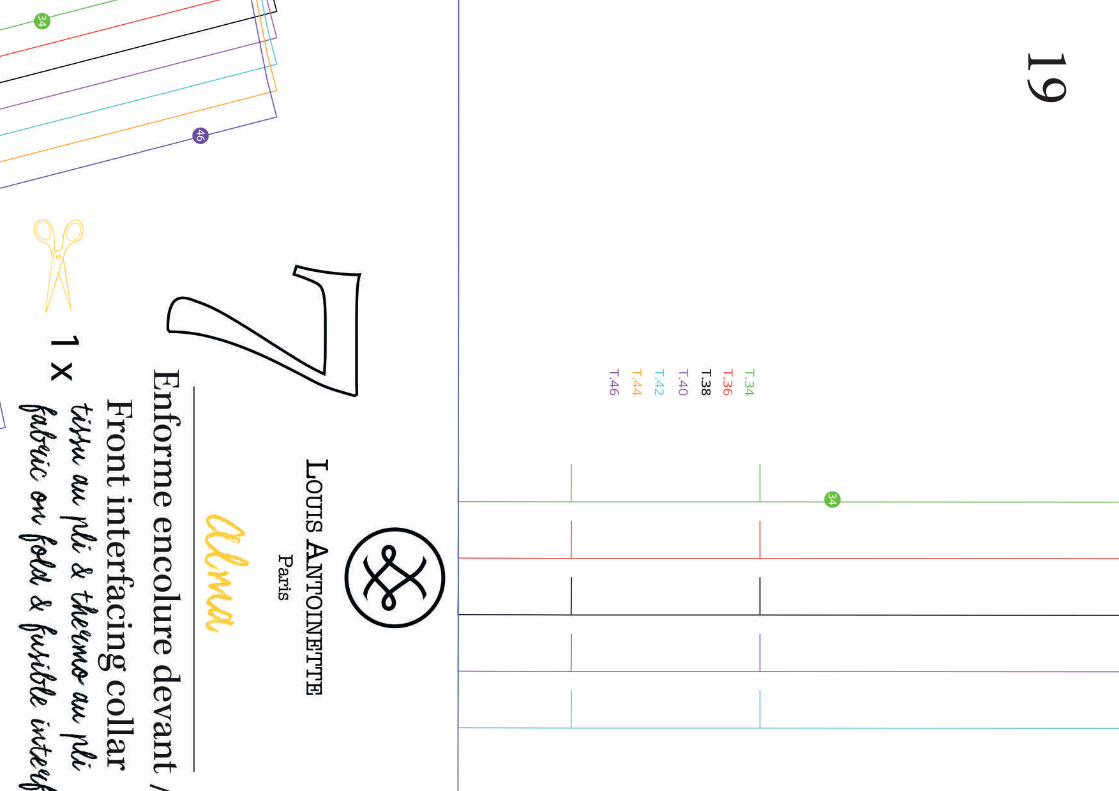
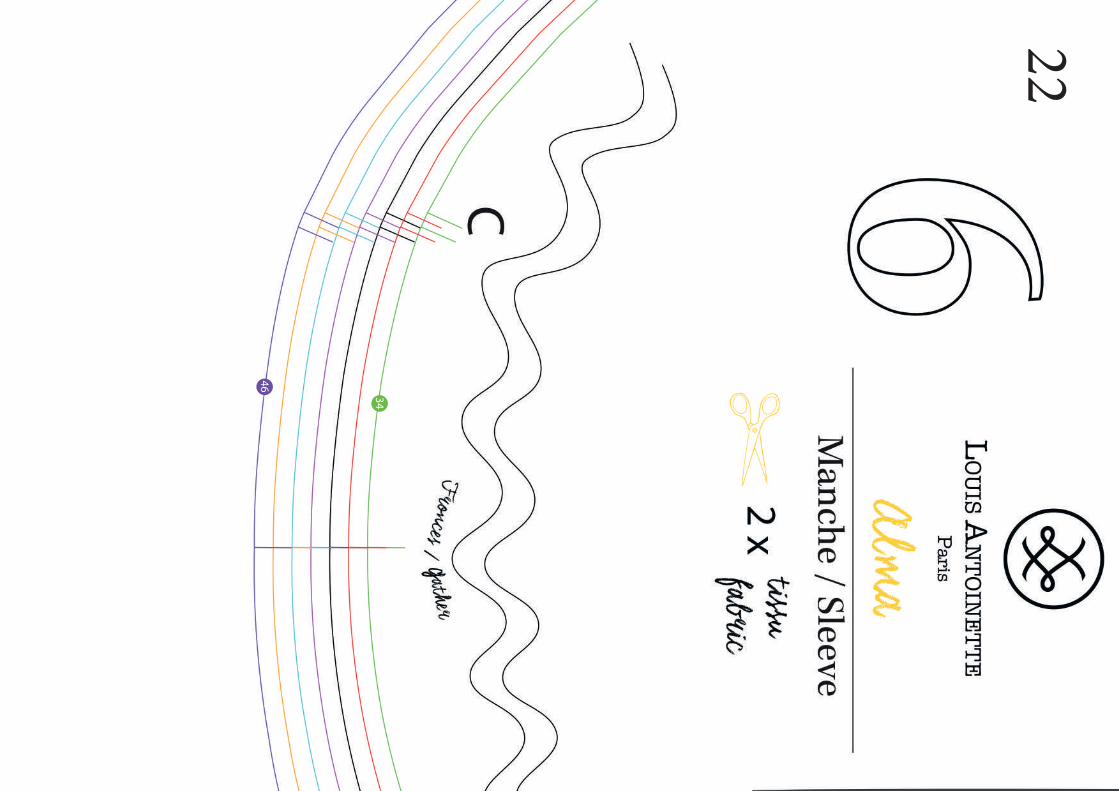
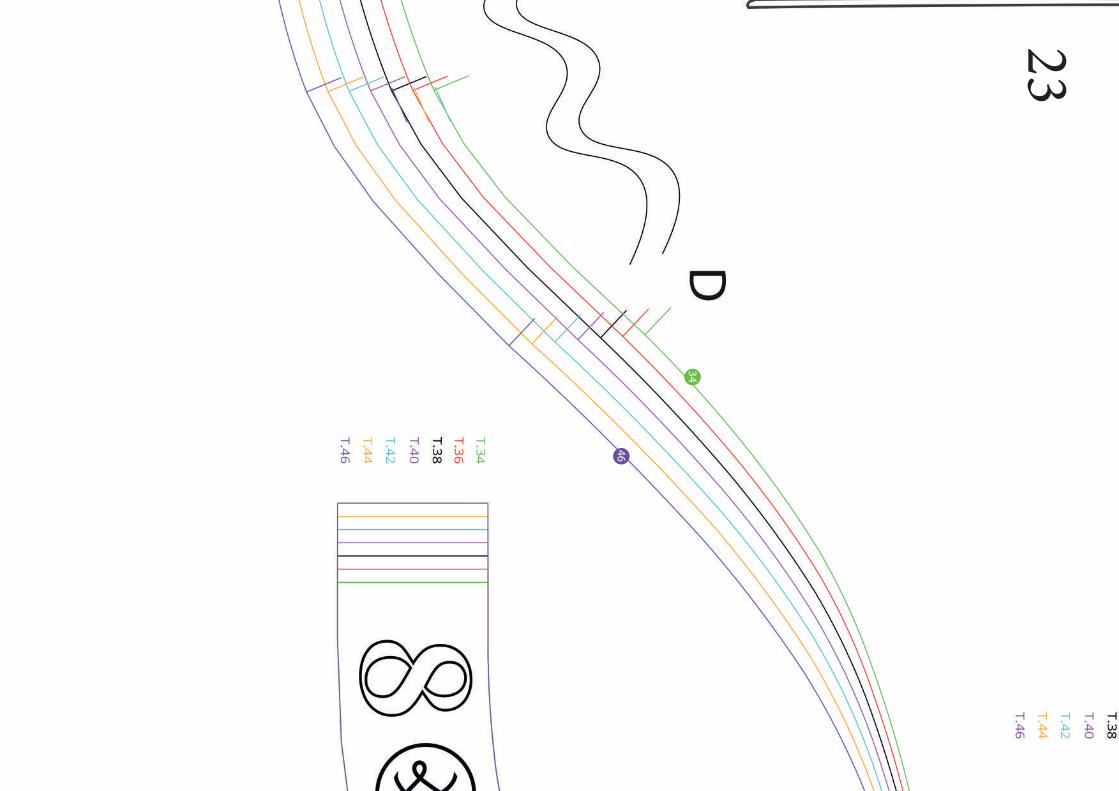
Découpez ! Vous devez avoir devant vous les pièces suivantes : 1 : un haut devant en tissu au pli I 2 : un bas devant en tissu au pli 3 : deux hauts dos en tissu I 4 : deux bas dos en tissu I 5 : quatre poches en tissu I 6 : deux manches en tissu I 7 : une enforme encolure devant en tissu au pli et une enforme encolure devant en thermo au pli 8 : deux enformes encolure dos en tissu et deux enformes encolure dos en thermo.
Pensez bien à marquer le numéro de chacune des pièces à la craie sur l’envers du tissu.
Tour de poitrine : à l’endroit le plus fort de la poitrine. Tour de taille : à l’endroit le plus étroit. Tour de hanches : sur le point le plus fort du bassin
5
Phase 2. On prépare le haut
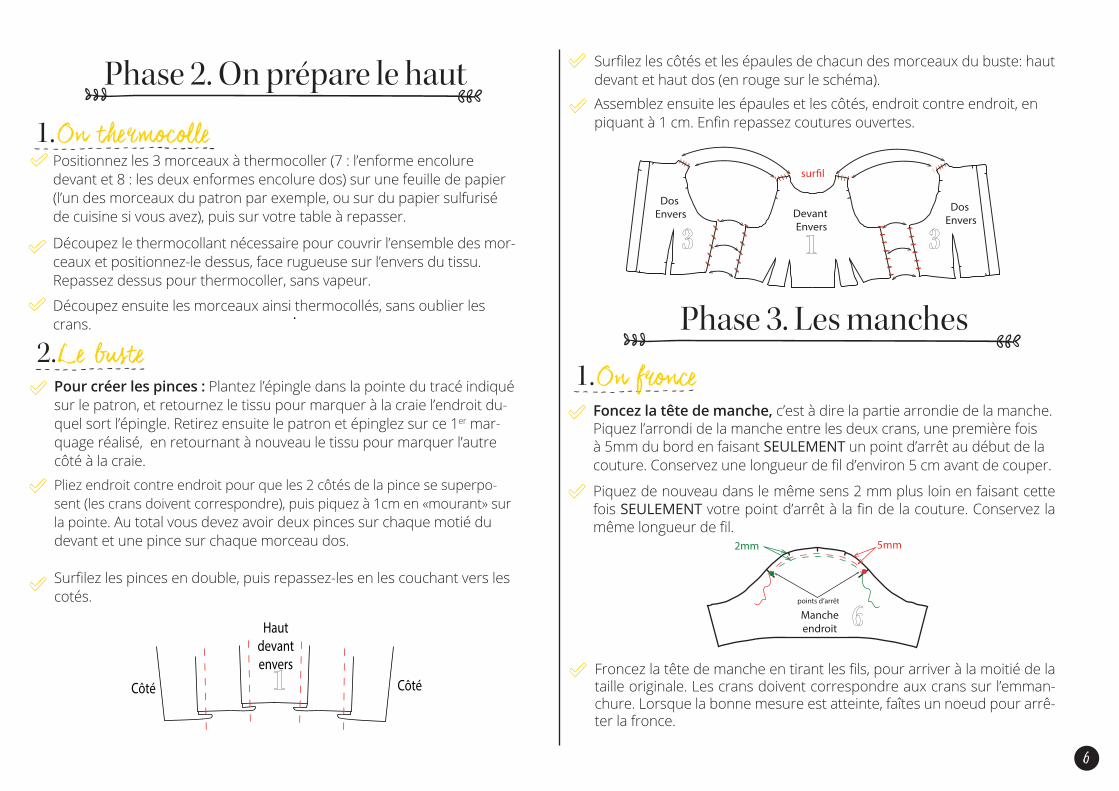
Positionnez les 3 morceaux à thermocoller (7 : l’enforme encolure devant et 8 : les deux enformes encolure dos) sur une feuille de papier (l’un des morceaux du patron par exemple, ou sur du papier sulfurisé de cuisine si vous avez), puis sur votre table à repasser.
Découpez le thermocollant nécessaire pour couvrir l’ensemble des mor-ceaux et positionnez-le dessus, face rugueuse sur l’envers du tissu.Repassez dessus pour thermocoller, sans vapeur.
Découpez ensuite les morceaux ainsi thermocollés, sans oublier les crans.
2.Le bustePour créer les pinces : Plantez l’épingle dans la pointe du tracé indiqué sur le patron, et retournez le tissu pour marquer à la craie l’endroit du-quel sort l’épingle. Retirez ensuite le patron et épinglez sur ce 1er mar-quage réalisé, en retournant à nouveau le tissu pour marquer l’autre côté à la craie. Pliez endroit contre endroit pour que les 2 côtés de la pince se superpo-sent (les crans doivent correspondre), puis piquez à 1cm en «mourant» sur la pointe. Au total vous devez avoir deux pinces sur chaque motié du devant et une pince sur chaque morceau dos.
Surfilez les pinces en double, puis repassez-les en les couchant vers les cotés.
1.On thermocolle
Surfilez les côtés et les épaules de chacun des morceaux du buste: haut devant et haut dos (en rouge sur le schéma). Assemblez ensuite les épaules et les côtés, endroit contre endroit, en piquant à 1 cm. Enfin repassez coutures ouvertes.
Phase 3. Les manches
Foncez la tête de manche, c’est à dire la partie arrondie de la manche.Piquez l’arrondi de la manche entre les deux crans, une première fois à 5mm du bord en faisant SEULEMENT un point d’arrêt au début de la couture. Conservez une longueur de fil d’environ 5 cm avant de couper.
Piquez de nouveau dans le même sens 2 mm plus loin en faisant cette fois SEULEMENT votre point d’arrêt à la fin de la couture. Conservez la même longueur de fil.
1.On fronce
Devant Envers
Dos Envers
Dos Envers
sur�l
Froncez la tête de manche en tirant les fils, pour arriver à la moitié de la taille originale. Les crans doivent correspondre aux crans sur l’emman-chure. Lorsque la bonne mesure est atteinte, faîtes un noeud pour arrê-ter la fronce.
5mm2mm
points d’arrêt
Mancheendroit
Côté Côté
Hautdevantenvers
6
Phase 4. Le bas
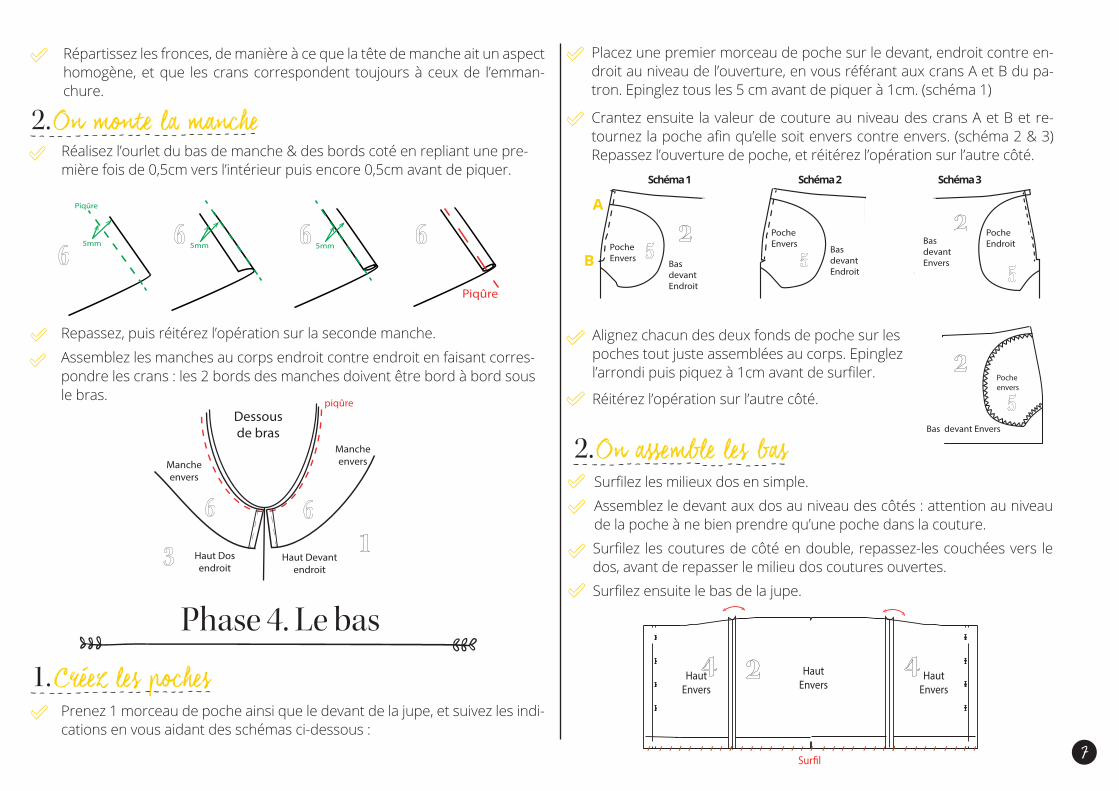
Placez une premier morceau de poche sur le devant, endroit contre en-droit au niveau de l’ouverture, en vous référant aux crans A et B du pa-tron. Epinglez tous les 5 cm avant de piquer à 1cm. (schéma 1)
Crantez ensuite la valeur de couture au niveau des crans A et B et re-tournez la poche afin qu’elle soit envers contre envers. (schéma 2 & 3) Repassez l’ouverture de poche, et réitérez l’opération sur l’autre côté.
1.Créez les poches
envers
endroit
envers
endroit
envers
endroit
PocheEnvers
Bas devantEndroit
A
B
Alignez chacun des deux fonds de poche sur les poches tout juste assemblées au corps. Epinglez l’arrondi puis piquez à 1cm avant de surfiler.
Réitérez l’opération sur l’autre côté.
2.On assemble les basSurfilez les milieux dos en simple.Assemblez le devant aux dos au niveau des côtés : attention au niveau de la poche à ne bien prendre qu’une poche dans la couture.Surfilez les coutures de côté en double, repassez-les couchées vers le dos, avant de repasser le milieu dos coutures ouvertes. Surfilez ensuite le bas de la jupe.
Repassez, puis réitérez l’opération sur la seconde manche.
Assemblez les manches au corps endroit contre endroit en faisant corres-pondre les crans : les 2 bords des manches doivent être bord à bord sous le bras.
Dessous de bras
Haut Dosendroit
Haut Devantendroit
piqûre
Mancheenvers
Mancheenvers
PocheEnvers
Bas devantEndroit
PocheEndroitBas
devantEnvers
2.On monte la mancheRéalisez l’ourlet du bas de manche & des bords coté en repliant une pre-mière fois de 0,5cm vers l’intérieur puis encore 0,5cm avant de piquer.
Piqûre
5mm 5mm 5mm
Piqûre
Répartissez les fronces, de manière à ce que la tête de manche ait un aspect homogène, et que les crans correspondent toujours à ceux de l’emman-chure.
HautEnvers
HautEnvers
HautEnvers
Sur�l
Prenez 1 morceau de poche ainsi que le devant de la jupe, et suivez les indi-cations en vous aidant des schémas ci-dessous :
envers
devant droit
Pocheenvers
Bas devant Envers
Schéma 1 Schéma 2 Schéma 3
7
Revenez ensuite à l’encolure, en positionnant l’enforme sur l’encolure, endroit contre endroit sur tout le tour. Dans le dos, c’est en pliant la patte de boutonnage sur la ligne de pliure que l’enforme se pose correctement. Prenez votre temps pour bien la positionner, puis piquez à 1cm.
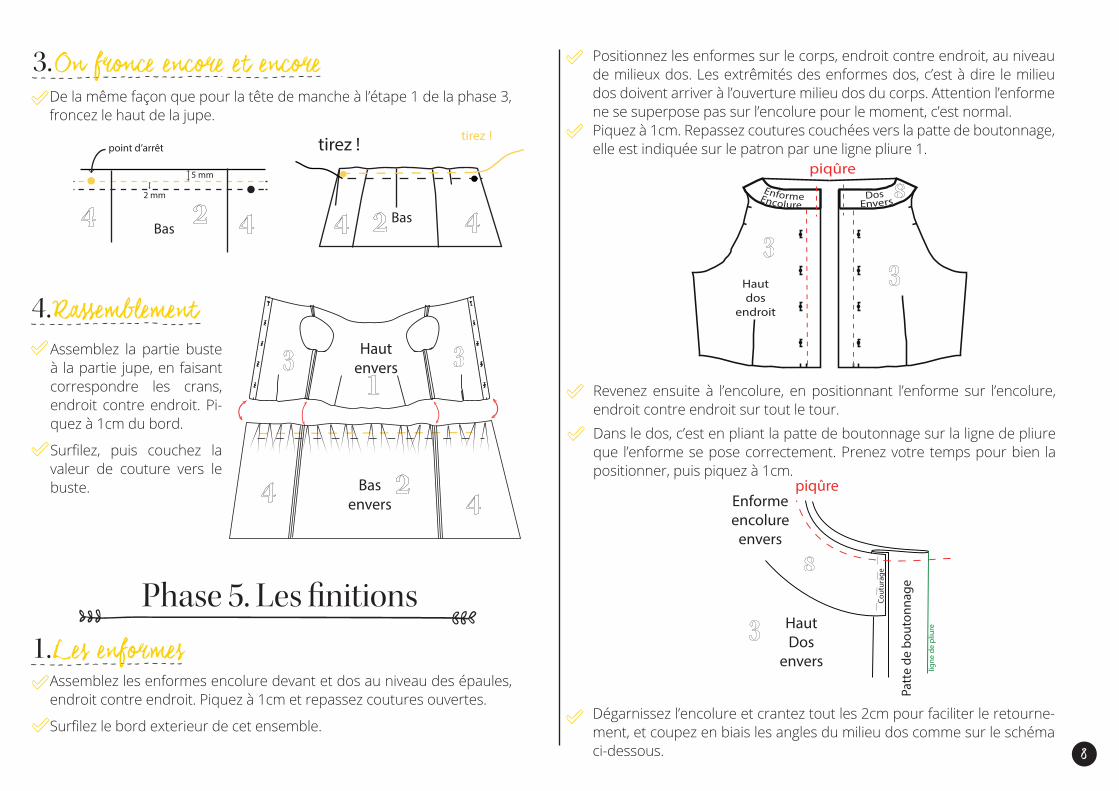
Positionnez les enformes sur le corps, endroit contre endroit, au niveau de milieux dos. Les extrêmités des enformes dos, c’est à dire le milieu dos doivent arriver à l’ouverture milieu dos du corps. Attention l’enforme ne se superpose pas sur l’encolure pour le moment, c’est normal.Piquez à 1cm. Repassez coutures couchées vers la patte de boutonnage, elle est indiquée sur le patron par une ligne pliure 1.
Assemblez les enformes encolure devant et dos au niveau des épaules, endroit contre endroit. Piquez à 1cm et repassez coutures ouvertes.
Surfilez le bord exterieur de cet ensemble.
piqûre
Hautdos
endroit
Enforme DosEncolure Envers
Enformeencolure
envers
HautDos
envers
piqûre
ligne
de
pliu
re
Cout
urag
e
Patt
e de
bou
tonn
agePhase 5. Les finitions
1.Les enformes
3.On fronce encore et encoreDe la même façon que pour la tête de manche à l’étape 1 de la phase 3, froncez le haut de la jupe.
tirez !point d’arrêttirez !
2 mm
5 mm
Assemblez la partie buste à la partie jupe, en faisant correspondre les crans, endroit contre endroit. Pi-quez à 1cm du bord.
Surfilez, puis couchez la valeur de couture vers le buste.
4.Rassemblement
BasBas
Dégarnissez l’encolure et crantez tout les 2cm pour faciliter le retourne-ment, et coupez en biais les angles du milieu dos comme sur le schéma ci-dessous.
Bas envers
Hautenvers
8
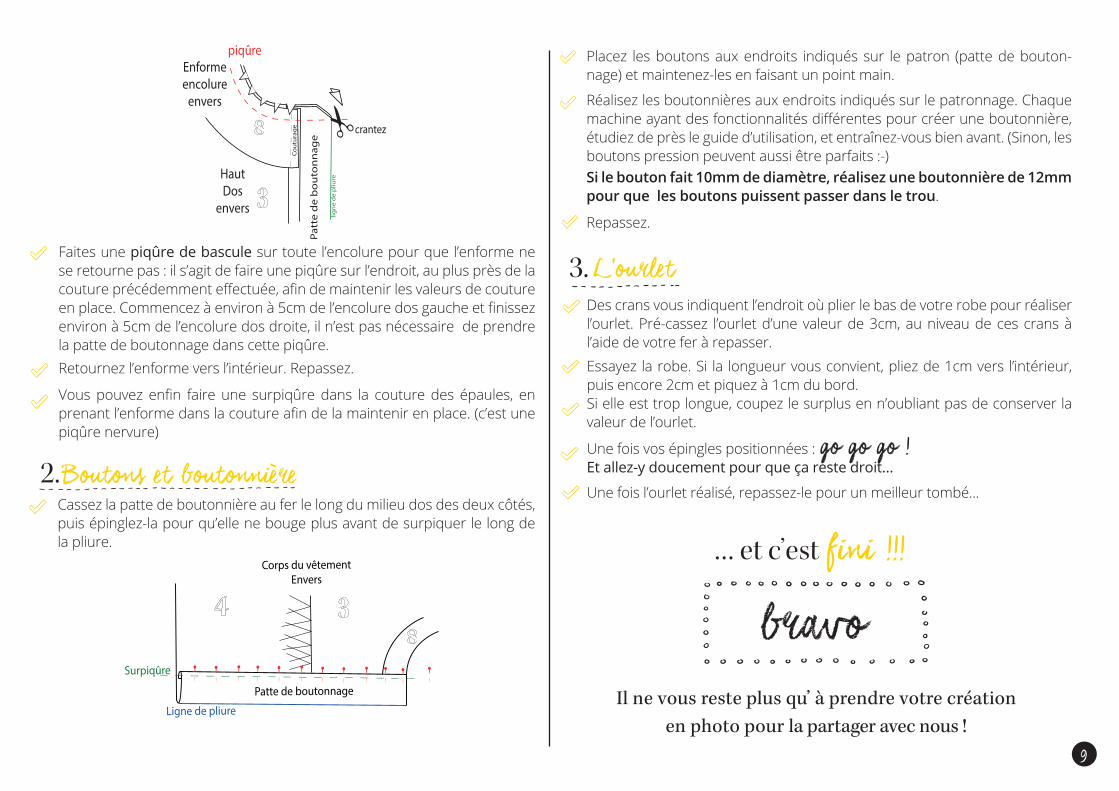
Des crans vous indiquent l’endroit où plier le bas de votre robe pour réaliser l’ourlet. Pré-cassez l’ourlet d’une valeur de 3cm, au niveau de ces crans à l’aide de votre fer à repasser. Essayez la robe. Si la longueur vous convient, pliez de 1cm vers l’intérieur, puis encore 2cm et piquez à 1cm du bord.Si elle est trop longue, coupez le surplus en n’oubliant pas de conserver la valeur de l’ourlet.
Une fois vos épingles positionnées : go go go !Et allez-y doucement pour que ça reste droit…
Une fois l’ourlet réalisé, repassez-le pour un meilleur tombé...
3. L’ourlet
2.Boutons et boutonnière Cassez la patte de boutonnière au fer le long du milieu dos des deux côtés, puis épinglez-la pour qu’elle ne bouge plus avant de surpiquer le long de la pliure.
Placez les boutons aux endroits indiqués sur le patron (patte de bouton-nage) et maintenez-les en faisant un point main.
Réalisez les boutonnières aux endroits indiqués sur le patronnage. Chaque machine ayant des fonctionnalités différentes pour créer une boutonnière, étudiez de près le guide d’utilisation, et entraînez-vous bien avant. (Sinon, les boutons pression peuvent aussi être parfaits :-)Si le bouton fait 10mm de diamètre, réalisez une boutonnière de 12mm pour que les boutons puissent passer dans le trou.
Repassez.
Surpiqûre
Patte de boutonnage
Ligne de pliure
Corps du vêtementEnvers
Retournez l’enforme vers l’intérieur. Repassez.
Vous pouvez enfin faire une surpiqûre dans la couture des épaules, en prenant l’enforme dans la couture afin de la maintenir en place. (c’est une piqûre nervure)
Faites une piqûre de bascule sur toute l’encolure pour que l’enforme ne se retourne pas : il s’agit de faire une piqûre sur l’endroit, au plus près de la couture précédemment effectuée, afin de maintenir les valeurs de couture en place. Commencez à environ à 5cm de l’encolure dos gauche et finissez environ à 5cm de l’encolure dos droite, il n’est pas nécessaire de prendre la patte de boutonnage dans cette piqûre.
Enformeencolure
envers
HautDos
envers
piqûre
lign
e d
e p
liure
crantez
Co
utu
rag
e
Patt
e d
e b
ou
ton
nag
e
9
… et c’est fini !!!
Il ne vous reste plus qu’ à prendre votre création en photo pour la partager avec nous !

Retrouvez l’ensemble de nos patrons & kits Couture sur
www.louisantoinette.com
Et avant de vous laisser en tête-à-tête avec votre machine, une dernière petite chose....
Découvrez CAPSUL studio, notre nouveau concept pour acheter les vêtements finis de vos marques de patrons préférées, directement au-près de couturiers/ières certifié(e)s par nos soins.
10 €offerts
avec le code HACKLAMODE
*
ASTUCE DU JOUR
N’hésitez pas à partager ce code auprès de vos amies non couturières qui vous harcèlent pour que vous leur cousiez de jolis vêtements. Elles devraient trouver leur bonheur sur CAPSUL studio désormais.
*Code valable jusqu’au 31 décembre 2017, pour une commande minimum de 100€.
www.capsul-studio.co

11
Recommended fabrics
Printing & assembling this pattern
Print english pages of this document in landscape for-mat, using the correct scale: Select the full size op-tion.
Print the document WITHOUT marginYou might have a white space around each page, it’s ok, you do not need to re-cut around :-)To make sure your printing is done correctly, you can check the size of the square on the first page of the pattern. If it’s 5cm length when you print the pattern, you’re correct!
Once printed, assemble your pattern following the our in-dications, & tape the pages together, before cutting the line of your size.
How to participate to the contestYou have until November 5th, 2017 to finish your dress, and post a photo or video showcasing your version.
Here’s how to validate your participation:1 / Publish the photo/video on your Instagram or Facebook account using the hashtag #hacklamode (do not forget the hashtag!) If you want to participate via these networks;2 / Create an account on this platform: http://bit.ly/participations-hacklamode-s3
3 / Once the account has been created, 2 possibili-ties:- connect your Instagram or Facebook account to re-trieve the photo / video of your realization and make it appear on the gallery,- upload your photo directly to the platform from your computer4 / Finally, invite your friends to vote for you by sharing your photo on social networks or via the link indicated on the photo!
AlmaLAP
Fusible interfacing: 57/8 ‘’ (353/8 ‘’wide)Butons: 10Thread
Haberdashery
- Soft effect: thick viscose, crepe, satin- Rigid effect: cotton, gabardine, cotton piqué
Fabric length Length (551/8 ‘’ wide) :FR.34-36-38 : 1.8 ydsFR.40-42-44-46 : 2,2 yds
#
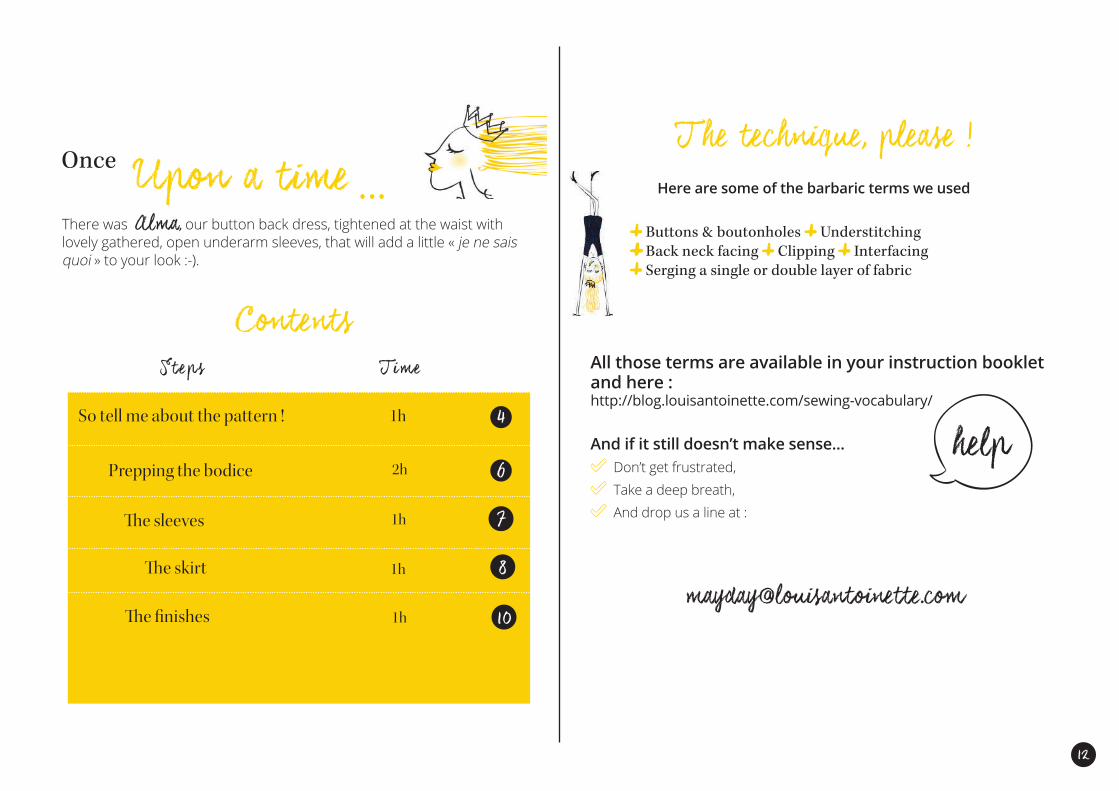
Once Upon a time Here are some of the barbaric terms we used
The technique, please !
Buttons & boutonholes Understitching Back neck facing Clipping Interfacing Serging a single or double layer of fabric
12
Steps Time
6
So tell me about the pattern !
Prepping the bodice
41h
2h
The sleeves 1h 7
ContentsAll those terms are available in your instruction booklet and here :http://blog.louisantoinette.com/sewing-vocabulary/
And if it still doesn’t make sense... Don’t get frustrated, Take a deep breath, And drop us a line at :
[email protected] skirt 1h 8
There was Alma, our button back dress, tightened at the waist with lovely gathered, open underarm sleeves, that will add a little « je ne sais quoi » to your look :-).
The finishes 1h 10
13
Step 1. So tell me about the pattern !The Alma dress has been designed to be 91 cm (3513/16 in) long (Size UK 10/US 6) from the tip of the shoulder. In any doubt, please do not hesitate to contact us before choosing your size !
Cut the pattern according to your size Note : 1cm (3/8in) seam allowance is included in this pattern. Do not forget the notches !
1.
Lay out your pattern pieces on your fabric2.
Pin the pattern onto the fabric & cut3. When pinning the pattern pieces to the fabric, orient the pins so they
are perpendicular to the pattern pieces, placing them 5 cm (2 in) apart, and don’t forget to pin the corners.
Cut all the pattern pieces as close to the edge of the paper as possible.
Don’t forget to mark notches, 0.5 mm (1/4 in) from the edge!
Poitrine
Taille
Hanches
US 2-UK 6 US4 -UK 8 US 6 - UK 10 US 8-UK12 US 10-UK 14 US 12 - UK16 US 14-UK18
79/82 cm 83/86 cm 87/90 cm 91/94 cm 95/98 cm 99/102 cm 103/106 cm32 in 331/8 in 347/8 in 361/2 in 377/8 in 391/2 in 411/8 in
59/62 cm 63/66 cm 67/70 cm 71/74 cm 75/78 cm 79/82 cm 83/86 cm237/8 in 251/4 in 263/4 in 283/4 in 301/4 in 321/8 in 331/4 in
85/88 cm 89/92 cm 93/96 cm 97/100 cm 101/104 cm 105/108 cm 109/112 cm341/4 in 353/4 in 371/4 in 387/8 in 401/4 in 417/8 in 431/2 in
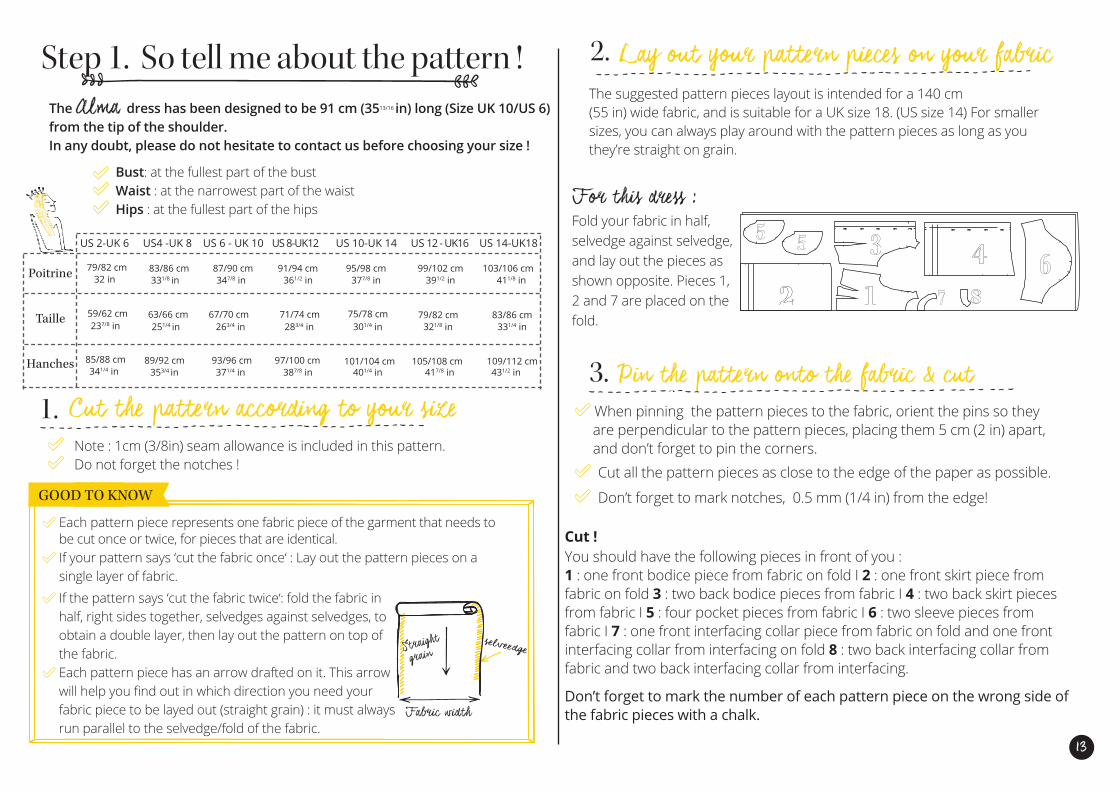
The suggested pattern pieces layout is intended for a 140 cm(55 in) wide fabric, and is suitable for a UK size 18. (US size 14) For smaller sizes, you can always play around with the pattern pieces as long as you they’re straight on grain.
Fold your fabric in half, selvedge against selvedge, and lay out the pieces as shown opposite. Pieces 1, 2 and 7 are placed on the fold.
For this dress :
Cut ! You should have the following pieces in front of you : 1 : one front bodice piece from fabric on fold I 2 : one front skirt piece from fabric on fold 3 : two back bodice pieces from fabric I 4 : two back skirt pieces from fabric I 5 : four pocket pieces from fabric I 6 : two sleeve pieces from fabric I 7 : one front interfacing collar piece from fabric on fold and one front interfacing collar from interfacing on fold 8 : two back interfacing collar from fabric and two back interfacing collar from interfacing.
Don’t forget to mark the number of each pattern piece on the wrong side of the fabric pieces with a chalk.
Bust: at the fullest part of the bust Waist : at the narrowest part of the waist Hips : at the fullest part of the hips
fdfd
Each pattern piece represents one fabric piece of the garment that needs to be cut once or twice, for pieces that are identical. If your pattern says ‘cut the fabric once‘ : Lay out the pattern pieces on a
single layer of fabric. If the pattern says ‘cut the fabric twice‘: fold the fabric in half, right sides together, selvedges against selvedges, to obtain a double layer, then lay out the pattern on top of the fabric. Each pattern piece has an arrow drafted on it. This arrow
will help you find out in which direction you need your fabric piece to be layed out (straight grain) : it must always run parallel to the selvedge/fold of the fabric.
Straight
grain

Step 2. Prepping the bodice
14
Lay all 3 pattern pieces that need to be interfaced (pieces 7 & 8) on a piece of paper (one of the pattern pieces or baking paper will do), be-fore placing it on your ironing table.
Cut the amount of interfacing you need for all the pattern pieces to fit in and place it on top of them, rough face against the wrong side of the fabric. Hold your iron on it so it fuses onto the fabric. Do not use steam.
Then cut your interfaced pieces, and don’t forget to make notches.
2.The Bust Creating the darts : Put your pin through the tip of the marking indi-cated on your pattern, then fold your fabric piece over and, using a tai-lor’s chalk, mark your fabric at the exact point where the pin is inserted into the fabric. Then, pull back the pattern piece, and place your pin at the exact point where the marking is. Then, using your tailor’s chalk, turn your fabric again to mark the other side of the fabric. Fold the dart legs, right sides together, so both dart legs overlap (ma-king sure notches match), then using a 1 cm (3/8 in) seam allowance, sew along the dart legs towards the dart tip, making sure you sew off at the end of the dart. In total, you should have two darts on each front bodice pieces and one dart on each back piece.Serge the darts, and press them towards the side seam.
1.Let’s interface
Serge both side and shoulder seams of each bodice pieces: front bodice and back bodice (see figure below, red marking). Then, using a 1 cm (3/8in) seam allowance, attach the bodice pieces at side and shoulder seams, right sides facing. And press the seams open.
Step 3. The sleeves
Gather the sleeve cap, i.e., the curved part of the sleeve.Sew the curved part of the sleeve, from one notch to another, 5 mm (3/16 in) from the raw edge, backtacking at the start ONLY. Before cut-ting your thread, make sure it is about 5cm long before cutting.
Then sew two other rows in the same direction 2 mm (1/16 in) away from the first raw, making sure you ONLY backtack at the end of your seam. Make sure you keep the same thread length as before.
1.Gathering time
Frontws
Backws
backws
topstitch
Pull the threads up to gather the fabric, making sure you reach half the size of the real sleeve cap size. Make sure the notches match the ar-mhole notches. When you’ve reached your desired sleeve width, tie a knot with the thread in order to end your gathering.
5mm2mm
backstack
SleeveRS
Side Side
Front bodice(wrong side)

15
Step 4. The skirt
Place a pocket piece on top of the front skirt piece, right sides facing, along the skirt side seam, matching up notches A and B (see pattern). Pin it in place, 5 (2in) cm apart, then sew using a 1 cm (3/8in) seam allowance (Figure 1).
Clip the seam allowance at notches A and B, then turn the pocket right side out so they’re wrong sides facing (figure 2 & 3). Press the pocket mouth, then repeat this process on the other side.
1.Making the side seams pockets
envers
endroit
envers
endroit
envers
endroit
Pocket WS
Front Skirt RS
A
B
Align each pocket bag with the pockets that you attached to the skirt.
Pin the curved part of the pocket 1 cm (3/8in) from the edge, then serge. Repeat the same process on the other pocket.
2.Assembling the skirtSerge the centre back pieces separately.Attach the front skirt piece to the back skirt pieces at side seams : Make sure only one part of the pocket is sandwitched between the two layers. Finish side seams together., using a zig zag stich or an overlocker. Press seams towards the back then press the centre back seams open. Them finish the bottom part of the skirt, using a zig zag stitch or an overloc-ker.
Press. Then, repeat this process for the second sleeve.
Attach the sleeves to the bodice, right sides together, matching up notches : make sure both the sleeve and the armhole are aligned.
Under armstitch
SleeveWS
SleeveWS
PocketWS
Front skirtRS
PocketRSFront
skirt RS
2.Setting in sleevesHem the bottom edge of the sleeve and the side seams. Turn the sleeve hem under 0,5cm (3/16 in), and turn it under another 0,5cm (3/16 in), then sew.
stitch
5mm
stitch
Spread the gathers out evenly so the outside of the sleeve cap looks even, and making sure notches still match the armhole notches.
Topstitch
Take one pocket piece and one front skirt piece, and follow the instructions on the figure below :
envers
devant droit
Pocket WS
Front skirt RS
Figure1 Figure 2 Figure 3
16
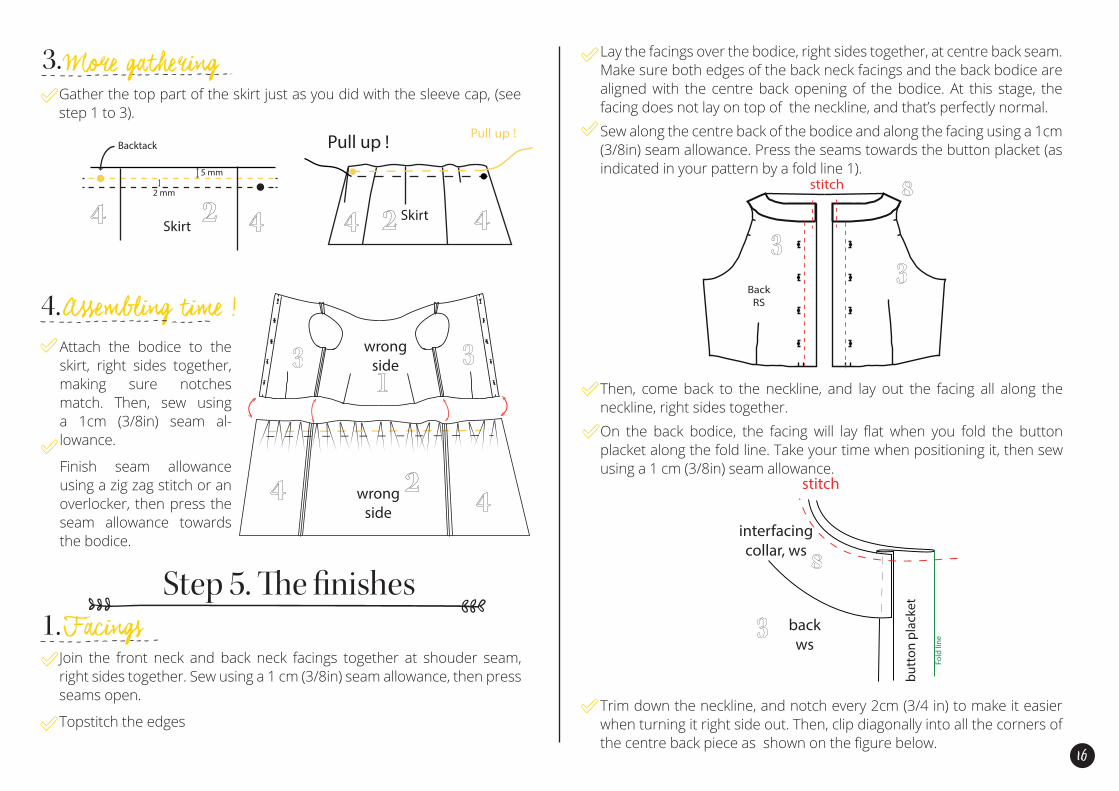
Then, come back to the neckline, and lay out the facing all along the neckline, right sides together. On the back bodice, the facing will lay flat when you fold the button placket along the fold line. Take your time when positioning it, then sew using a 1 cm (3/8in) seam allowance.
Lay the facings over the bodice, right sides together, at centre back seam. Make sure both edges of the back neck facings and the back bodice are aligned with the centre back opening of the bodice. At this stage, the facing does not lay on top of the neckline, and that’s perfectly normal. Sew along the centre back of the bodice and along the facing using a 1cm (3/8in) seam allowance. Press the seams towards the button placket (as indicated in your pattern by a fold line 1).
Join the front neck and back neck facings together at shouder seam, right sides together. Sew using a 1 cm (3/8in) seam allowance, then press seams open.
Topstitch the edges
stitch
BackRS
interfacing collar, ws
backws
stitch
Fold
line
butt
on p
lack
et
Step 5. The finishes1.Facings
3.More gatheringGather the top part of the skirt just as you did with the sleeve cap, (see step 1 to 3).
Pull up !BacktackPull up !
2 mm
5 mm
Attach the bodice to the skirt, right sides together, making sure notches match. Then, sew using a 1cm (3/8in) seam al-lowance.
Finish seam allowance using a zig zag stitch or an overlocker, then press the seam allowance towards the bodice.
4.Assembling time !
SkirtSkirt
Trim down the neckline, and notch every 2cm (3/4 in) to make it easier when turning it right side out. Then, clip diagonally into all the corners of the centre back piece as shown on the figure below.
wrong side
wrong side

17
Notches will show you where to fold the bottom edge of your skirt to hem it. Press under hem allowance by 3 cm (1 3/16), at the exact same point where your notches are. Try your dress on. If you’ve reached your desired length, fold by 1 cm (3/8in) to the inside of the garment, then fold another 2 cm (3/4 in), and sew using a 1 cm (3/8in) seam allowance. If it is still too long, trim off the excess but don’t forget the hem allowance.
Once you pinned it in place : go go go !Take your time so your hem stays straight…
Once you’ve finished hemming your garment, give it a good press so it hangs perfectly.
3. Hemming
2.Buttons and buttonholePress the button placket open along the centre back of both side pieces, then pin it in place. Topstich along the fold line.
Place the buttons as shown in your pattern (see button placket), then handstitch them in place. Make the buttonholes as shown on your pattern. As every sewing ma-chine has different buttonholes functionalities, study the user guide carefully, and make sure you train properly before you make them. (Otherwise, snap fasterners will do the job perfectly :-)If the button is 10mm (3/8 in) wide, make a 12 mm (1/2 in) wide buttonhole so the buttons go through the hole.
Press.
Topstitch
Button placket
Foldline
Garment WS
Turn the facing inwards. Press.Now you may topstitch the shoulder seams, sandwitching the facing in-side the seam to hold it in place (This is what we call topstitiching).You can also topstitch the facing on the neckline about 3cm (1 3/16 in) down from the edge.
Understich the neckline to hold the facing in place : this consists in sti-ching as close as possible to the preceeding stitching line, on the right side of the garment, so the seam allowance stays in place. Start sewing about 5 cm (2 in) from the the left part of the back neckline and end your stiching about 5 cm (2 in) away from the right part of the back neck fa-cing. At this stage, the button placket does not need to be sandwiched in the seam.
interfacing collar
ws
BackWS
stitch
Fold
lin
e
notch
Bu
tto
n p
lack
et

… and you’re done !!!
All you need to do now is take a picture of your creation and share it with us !
LouisAntoinette#AlmaLAP#
Discover our new collection of sewing kits & patterns on:www.louisantoinette.com
New collection !
LuteceLAP#

5 cm
5 cm
1
34
34
46
46

2
34
34
34
46
46
46
3
34
34
34
46
46
46

4
3446

5

6
34
34
34
46
46
46

7
34
46
8
34
34
46
46

9
34
34
34
4646

10
46

11
34
46

12

13

14
34

15
46

16
34
3446
46

17
18
34
19
34
34
46

20
46
2134
46
22
34
46
23
34
46

2434
34
46
46

25