- wd961… · your black & decker dustbuster® handheld vacuum cleaner ... in case of eye...
TRANSCRIPT

Australia
New ZealandWD4810-XEWD9610-XE
www.blackanddecker.com
.au
2
D
F
BA
E
G

3
H J

4
ENGLISH (Original instructions)
Intended useYour Black & Decker Dustbuster® handheld vacuum cleaner has been designed for light wet and dry vacuum cleaning purposes (WD4810 and WD9610). This appliance is intended for household use only.
Safety instructions
@ Warning! Read all safety warnings and all instructions. Failure to follow the warnings and instructions listed below may result in electric shock,
@ Warning! When using battery-powered appliances, basic safety precautions, including the following,
leaking batteries, personal injury and material dam-age.
Read all of this manual carefully before using the appli-ance.
The intended use is described in this manual. The use of any accessory or attachment or the performance of any operation with this appliance other than those recom-mended in this instruction manual may present a risk of personal injury.
Retain this manual for future reference.
Using your appliance Do not use the appliance to pick up liquids or any materi-
Do not use the appliance near water. Do not immerse the appliance in water. Never pull the charger lead to disconnect the charger
from the socket. Keep the charger lead away from heat, oil and sharp edges.
persons without supervision. Children must be supervised to ensure they do not play with the appliance.
After use Unplug the charger before cleaning the charger or
charging base. When not in use, the appliance should be stored in a dry
place. Children should not have access to stored appliances.
and any other conditions that may affect its operation.
Inspection and repairs Before use, check the appliance for damaged or defective
parts. Check for breakage of parts, damage to switches
Do not use the appliance if any part is damaged or defec-tive.
Have any damaged or defective parts repaired or replaced by an authorized repair agent.
Regularly check the charger lead for damage. Replace the charger if the lead is damaged or defective.
Never attempt to remove or replace any parts other than
Additional safety instructions - batteries and charg-ers
Batteries Never attempt to open for any reason. Do not expose the battery to water. Do not expose the battery to heat. Do not store in locations where the temperature may
exceed 40°C. Charge only at ambient temperatures between 10°C and
40°C. Charge only using the charger provided with the appli-
ance/tool. Using the wrong charger could result in an electric shock or overheating of the battery.
When disposing of batteries, follow the instructions given in the section "Protecting the environment".
Do not damage/deform the battery pack either by puncture
Do not charge damaged batteries. Under extreme conditions, battery leakage may occur.
When you notice liquid on the batteries carefully wipe the liquid off using a cloth. Avoid skin contact.
In case of skin or eye contact, follow the instructions below.
Warning!damage to property. In case of skin contact, immediately rinse with water. If redness, pain or irritation occurs seek medical attention. In case of eye contact, rinse immediately with clean water and seek medical attention.
Chargers
check that the mains voltage corresponds to the voltage on the rating plate.Warning! Never attempt to replace the charger unit with a regular mains plug. Use your Black & Decker charger only to charge the bat-
tery in the appliance/tool with which it was supplied. Other batteries could burst, causing personal injury and damage.
The appliance should be supplied via a residual current device (RCD) with a tripping current of not more than 30mA.
Never attempt to charge nonrechargeable batteries.

5
ENGLISH(Original instructions)
If the supply cord is damaged, it must be replaced by the manufacturer or an authorised Black & Decker Service Centre in order to avoid a hazard.
Do not expose the charger to water. Do not open the charger. Do not probe the charger. The appliance/tool/battery must be placed in a well venti-
lated area when charging.
Safety of others This appliance is not intended for use by persons (includ-
ing children) with reduced physical, sensory or mental capabilities, or lack of experience and knowledge, unless they have been given supervision or instruction concern-ing the use of the appliance by a person responsible for their safety.
Children should be supervised to ensure that they do not play with the appliance.
Residual risks.Additional residual risks may arise when using the tool which may not be included in the enclosed safety warnings. These risks can arise from misuse, prolonged use etc.Even with the application of the relevant safety regulations and the implementation of safety devices, certain residual risks can not be avoided. These include: Injuries caused by touching any rotating/moving
parts. Injuries caused when changing any parts, blades or
accessories. Injuries caused by prolonged use of a tool. When
using any tool for prolonged periods ensure you take regular breaks.
Impairment of hearing. Health hazards caused by breathing dust developed
when using your tool (example:- working with wood, especially oak, beech and MDF.)
Electrical safety
check that the mains voltage corresponds to the voltage on the rating plate. Never attempt to replace the charger unit with a regular mains plug.
Symbols on the charger
Read all of this manual carefully before using the appliance.
# This tool is double insulated; therefore no earth wire is required. Always check that the power supply corresponds to the voltage on the rating plate.
w Fail-safe isolating transformer. The mains supply is electrically separated from the transformer output.
x The charger automatically shuts off if the ambient temperature becomes too high. As a consequence the charger will be inoperable. The charging base must be disconnected from the mains supply and taken to an authorised service centre for repair.
$ The charging base is intended for indoor use only.
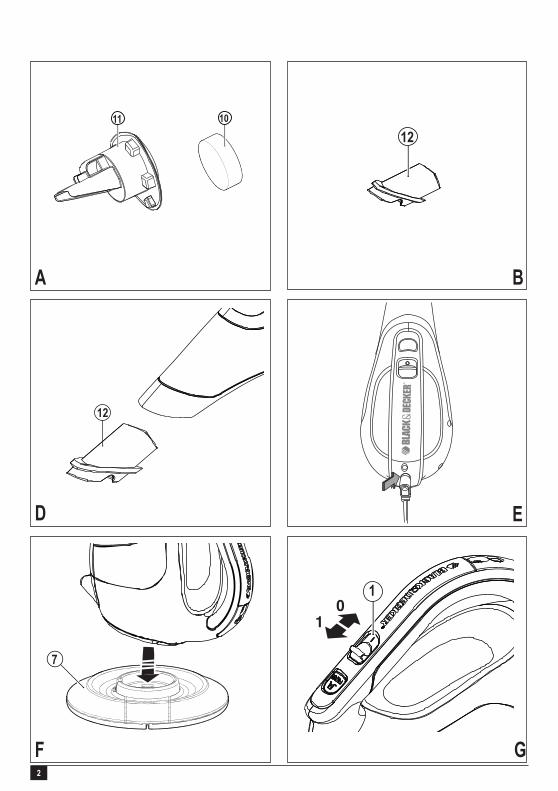
FeaturesThis tool includes some or all of the following features. 1. On/off switch
2. Bowl release button 3. Charging indicator
4. Charging socket (WD4810 Only)5. Dust bowl6. Charger7. Charging base (WD9610 Only)
Fig. A 10. Wet/Dry foam insert (WD4810 and WD9610 Only)
(WD4810 and WD9610 Only) 11.
Fig. B 12. Squeegee (WD4810 and WD9610 Only)
Assembly
These models may be supplied with some of the following accessories: A squeege tool (12) for wet use on hard surfaces.
(WD4810 and WD9610 Only)
Fitting (Fig. D) Insert the appropriate accessory into the front of the appli-
ance. Make sure that the accessory is pushed fully in.

6
ENGLISH (Original instructions)
Use
24 hours. Place the appliance on the charging base whenever it is
not in use. (WD9610 Only)Warning! Before charging, be sure to empty all liquid contents and dry thoroughly, to avoid damage to your appliance.
Charging the battery (Fig. E & F) Make sure that the appliance is switched off. The battery
will not be charged with the on/off switch in the on posi-tion.
Plug the jack plug of the charger (6) into the charging socket (4) of the appliance (Fig. E). (WD4810 Only)
Place the appliance on the charging base (7) (Fig. F). (WD9610 Only)
Plug in the charger. Switch on at the mains. The charging indicator (3) will be lit.
Leave the appliance to charge for at least 16 hours.While charging, the charger may become warm. This is normal and does not indicate a problem. The appliance can
indicator (3) will be lit as long as the appliance is connected to the plugged-in charger.Warning! Do not charge the battery at ambient temperatures below 4 °C or above 40 °C.
To switch the appliance on, slide the on/off switch (1) forward to position 1.
To switch the appliance off, slide the on/off switch (1) back to position 0.
Wet and dry pick up (WD4810 and WD9610 Only) For everyday spills of dry material, use your appliance
without the squeegee accessory.Warning! Your product is designed for light spills only. This appliance can also be used to pick up everyday liquid
spills. Use the squeegee accessory on non-absorbent, hard surfaces. On absorbent surfaces, such as carpet, your appliance will pick up wet spills better without the accessory.
For best performance on hard surface wet pickups, insert squeegee into the bowl nozzle opening.
For best results when using this accessory, hold the appli-ance at an angle of 45° and pull it slowly towards you.
there is any liquid in the bowl, do not turn the unit upside down, sideways, point the nozzle upward, or shake the vac excessively.
After picking up liquid substances clean the appliance and
not properly cleaned after wet pickups. Before charging, be sure to empty all liquid contents and
dry thoroughly, to avoid damage to your appliance.
Optimising the suction force
cleared regularly during use.
Emptying and cleaning the product.
Warning!regularly. Press the release latch (2) and pull the dust bowl (5)
straight off. While holding the dust bowl over a bin or sink, pull out the
To replace the dust bowl, place it back onto the handle
Warning! -
WD9610) Place the foam insert (10) into the centre of the wet/dry
Warning! Never use the appliance for wet applications without
water.
-ever worn or damaged.
dealer.

7
ENGLISH(Original instructions)
-
MaintenanceYour Black & Decker corded/cordless appliance/tool has been designed to operate over a long period of time with a minimum of maintenance. Continuous satisfactory operation depends upon proper tool care and regular cleaning.Warning! Before performing any maintenance on corded/ cordless power tools:u Switch off and unplug the appliance/tool.u Or switch off and remove the battery from the appliance/
tool if the appliance/tool has a separate battery pack.u Or run the battery down completely if it is integral and then
switch off.u Unplug the charger before cleaning it. Your charger does
not require any maintenance apart from regular cleaning.u Regularly clean the ventilation slots in your appliance/tool/
charger using a soft brush or dry cloth.u Regularly clean the motor housing using a damp cloth. Do
not use any abrasive or solvent-based cleaner.
Protecting the environment
Z Separate collection. This product must not be disposed of with normal household waste.
needs replacement, or if it is of no further use to you, do not dispose of it with household waste. Make this product avail-able for separate collection.
z Separate collection of used products and packaging allows materials to be recycled and used again. Re-use of recycled materials helps prevent environmental pollution and reduces the demand for raw materials.
Local regulations may provide for separate collection of electrical products from the household, at municipal waste sites or by the retailer when you purchase a new product.
Black & Decker provides a facility for the collection and recycling of Black & Decker products once they have reached the end of their working life. To take advantage of this service please return your product to any authorised repair agent who will collect them on our behalf.
You can check the location of your nearest authorised repair
the address indicated in this manual. Alternatively, a list of authorised Black & Decker repair agents and full details of our after-sales service and contacts are available on the Internet at: www.2helpU.com
Battery
Z If you want to dispose of the product yourself, the battery must be removed as described below and disposed of in accordance with local regulations.
u Preferably discharge the battery by operating the appli-ance until the motor stops.
u Press the release button (2) and remove the dust bowl (5).u Remove the seven screws holding the body of the appli-
ance together.u Lift the housing cover away from the assembly.u Detach all lead connections from the battery pack.u Remove battery pack.u Place the battery in a suitable packaging to ensure that
the terminals cannot be short-circuited.u Take the battery to your service agent or to a local recy-
cling station.
8
ENGLISH (Original instructions)
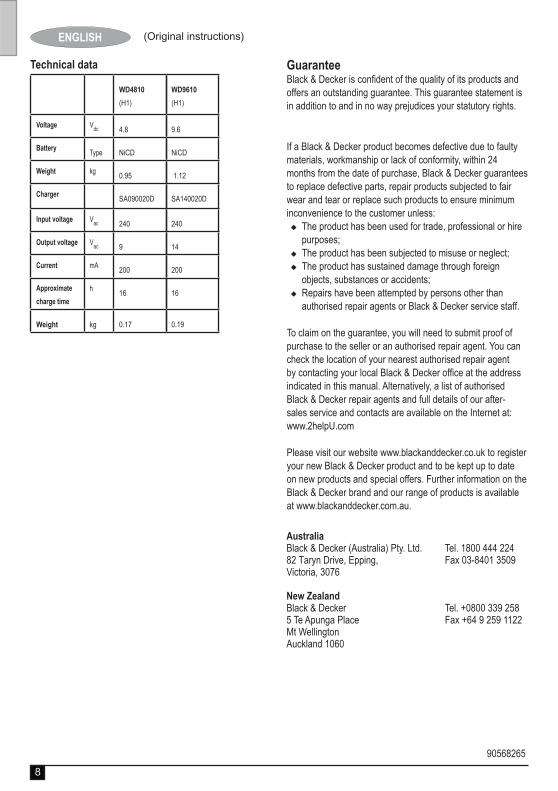
Technical data
WD4810
(H1)
WD9610
(H1)
Voltage Vdc 4.8 9.6
BatteryType NiCD NiCD
Weight kg0.95 1.12
ChargerSA090020D SA140020D
Input voltage Vac 240 240
Output voltage Vac 9 14
Current mA200 200
Approximate
charge time
h16 16
Weight kg 0.17 0.19
Guarantee
offers an outstanding guarantee. This guarantee statement is in addition to and in no way prejudices your statutory rights.
If a Black & Decker product becomes defective due to faulty materials, workmanship or lack of conformity, within 24 months from the date of purchase, Black & Decker guarantees to replace defective parts, repair products subjected to fair wear and tear or replace such products to ensure minimum inconvenience to the customer unless: The product has been used for trade, professional or hire
purposes; The product has been subjected to misuse or neglect; The product has sustained damage through foreign
objects, substances or accidents; Repairs have been attempted by persons other than
authorised repair agents or Black & Decker service staff.
To claim on the guarantee, you will need to submit proof of purchase to the seller or an authorised repair agent. You can check the location of your nearest authorised repair agent
indicated in this manual. Alternatively, a list of authorised Black & Decker repair agents and full details of our after-sales service and contacts are available on the Internet at: www.2helpU.com
Please visit our website www.blackanddecker.co.uk to register your new Black & Decker product and to be kept up to date on new products and special offers. Further information on the Black & Decker brand and our range of products is available at www.blackanddecker.com.au.
90568265
AustraliaBlack & Decker (Australia) Pty. Ltd. Tel. 1800 444 22482 Taryn Drive, Epping, Fax 03-8401 3509Victoria, 3076
New ZealandBlack & Decker Tel. +0800 339 2585 Te Apunga Place Fax +64 9 259 1122Mt WellingtonAuckland 1060