0 emceepro documentation - official site for testify · pdf filemenu bar – access...
TRANSCRIPT

- 1 -
Emcee Pro
Revision B - 10/12/09

- 2 -
EmceePro License Agreement
From the EmceePro EULA
“This EULA grants you the right to install and use one copy of EmceePro on a single computer. One additional copy of EmceePro may be installed on another computer to be used for emergencies or as an archive/back-up. When used in this manner, the second computer must belong to and be under the control of the registered EmceePro user. EmceePro is licensed for use by a single user and is licensed to individuals – not groups. An additional copy of EmceePro may be installed on a ‘back-up’ computer. The purpose of this second ‘back-up’ installation must be emergency operation – not concurrent use. EmceePro 5.0 (EmceePro Suite) now comes with a unique Back-Up Utility which will allow owners to carry a full back-up of their tracks, settings, and the program its self on a USB drive. In case of an emergency, a complete restore can be done, to any Windows computer (XP or later) in a matter of minutes. While EmceePro will operate in DEMO mode following such a restore, its 20 uses will allow users ample time to recover from any equipment emergency.
h t t p : / / w w w . t e s t i f y s o f t w a r e . c o m t e d @ t e s t i f y s o f t w a r e . c o m
k a t h l e e n @ t e s t I f y s o f t w a r e . c o m
Emcee Pro software and all associated documentation is copyrighted by
Ted Watson Testify Music
All Rights Reserved

- 3 -
EmceePro is one of the most versatile yet easy to use programs you’ll ever see. It was designed, from the beginning, to be exactly what the artist/performer needs
to manage performance sound tracks.
PAGE TOPIC 4 Screen Layout
5 Menu Options
7 Enter a Program
7 Enter Tracks
8 Re-order Tracks (Drag/Drop)
8 Moving/Copying a Program
9 Enter Encore Points
10 Encore Fade-in
11 Playing an Track
11 Grouping Tracks
12 “Juke Box” Track Selection
13 Using The Prompter
14 Prompter/Video Options
15 Extended Desktop
16 Font and Font Color
16 Background Image
17 Trimming Lead Time
18 Trimming End Time
19 Setting Sound Level
20 Prompter Information
21 Program Information Tab
22 Using A Remote Control
23 Copying Tracks from a CD (ripping)
24 Backup
25 Pre-Event Timer
26 Appendix A – Using Windows Media Player
29 Appendix B – Back-up Recovery
30 Appendix C – Computer Audio Performance

- 4 -
5.0 Main Screen Layout
Info Tabs – access either the directory, information about your program/tracks, or clock/timer and program notes Menu Bar – access EmceePro tools, options, etc Program Tabs – There are a total of 260 separate ‘program tabs’, each with 26 track buttons Master Tabs – Each of the 26 Master Tabs contain their own set of 10 Program Tabs Track Buttons – Once tracks are on a Track Button, you can drag/drop to rearrange them within the program Encore – Each track can have a ‘encore point’ set Font Size Control – You can increase and decrease the font size of your track buttons by adjusting this Status Bar – View options you have chosen Groups – Setting tracks in a group (color) will play them back to back then stop after finishing the last one
- 5 -
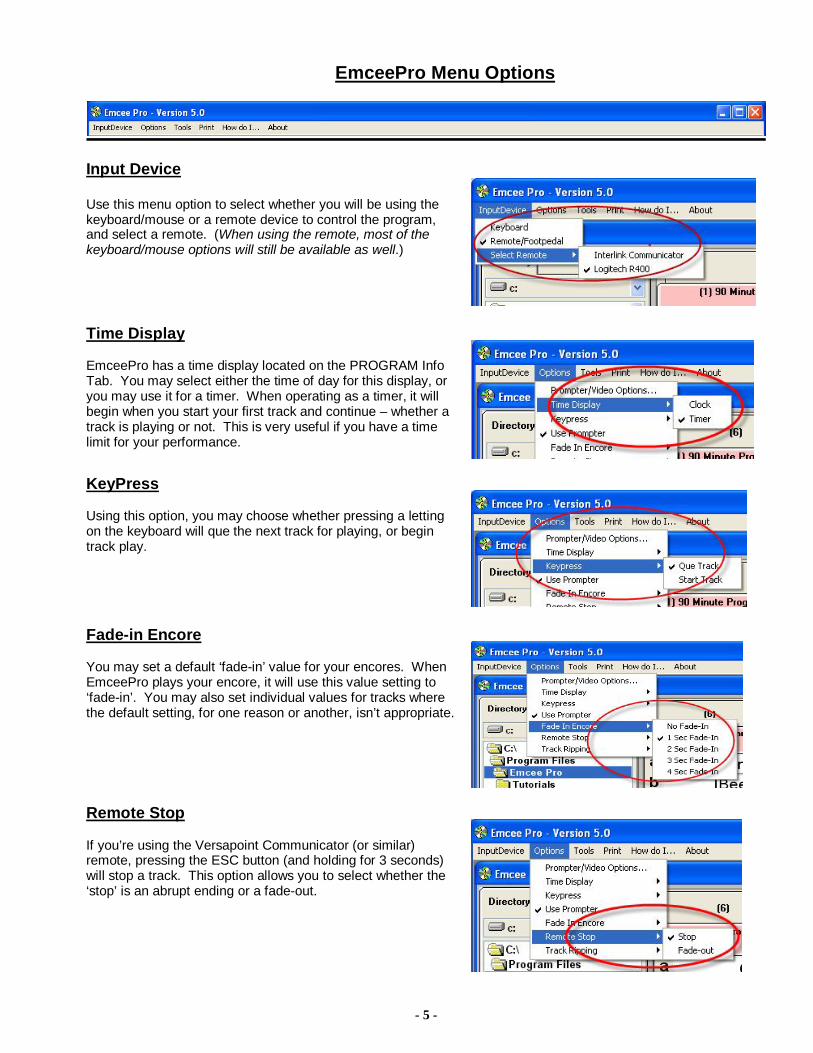
EmceePro Menu Options
Input Device Use this menu option to select whether you will be using the keyboard/mouse or a remote device to control the program, and select a remote. (When using the remote, most of the keyboard/mouse options will still be available as well.)
Time Display EmceePro has a time display located on the PROGRAM Info Tab. You may select either the time of day for this display, or you may use it for a timer. When operating as a timer, it will begin when you start your first track and continue – whether a track is playing or not. This is very useful if you have a time limit for your performance.
KeyPress Using this option, you may choose whether pressing a letting on the keyboard will que the next track for playing, or begin track play.
Fade-in Encore You may set a default ‘fade-in’ value for your encores. When EmceePro plays your encore, it will use this value setting to ‘fade-in’. You may also set individual values for tracks where the default setting, for one reason or another, isn’t appropriate.
Remote Stop If you’re using the Versapoint Communicator (or similar) remote, pressing the ESC button (and holding for 3 seconds) will stop a track. This option allows you to select whether the ‘stop’ is an abrupt ending or a fade-out.

- 6 -
EmceePro Menu Options - continued
Track Ripping When tracks are ‘ripped’ (copied) from a CD, you can choose to supply the track name, replacing Track01, Track02, etc. Selecting ‘Rename Before Rip’ allows you to supply names for all your tracks then allow the rip process to proceed uninterrupted. If ‘Rename During Rip’ is selected, EmceePro will pause before ripping each track and ask for a file name before proceeding.
Print Selecting Print doesn’t actually print your titles but copies them to the Windows Clipboard. Once this is done, simply open a word processing program (Notepad, Wordpad, MS Word, etc) and you can paste them into a document. This can then be printed or archived as you wish.
How Do I… Making a selection in this menu will bring up a video file containing instruction and/or information about the chosen feature. (If you receive a ‘file not found…’ message, make sure you have installed the Tutorials from the EmceePro installation disk.)

- 7 -
Enter Program In EmceePro
Select tracks available on computer/laptop drive for each “Program Tab”
To Enter Tracks into a Program
Use Drive/Folder/File on directory tab selection to locate track file. Select a Program Tab to use. Double-Click on file to transfer to next available button Move to next tab by clicking on TAB number. Repeat process to add tracks Right-Clicking on a track/button will allow add/remove buttons Once a track is on a button, you may use drag/drop to rearrange your program
If you move, rename or delete these files in your computer, EmceePro will draw a line through the title of the track on the Track Button. (See button “P” and “Q” above). If this happens, right-click on the button with the ‘strike-through’. You can select either ‘delete track’ which removes the track from your ‘program’ – not from your computer, or ‘locate file’ to navigate to a file you’ve renamed or moved. Emcee will retain track/button selections until the entries are changed or erased.
Hint: If your filesnames are too large to view in the file selection box, look for a small red ‘resize’ dot at the top right corner of the directory selection boxes.
You may click and drag this dot to resize the width of the boxes.

- 8 -
Re-ordering (drag/drop) Tracks
Once tracks have been placed on a program tab, individual track may be repositioned by ‘dragging’ and ‘dropping’ them to a different track button. When drag/drop is used, the buttons below the drag/drop point are moved down to allow a place for the track being moved. If a track is being moved to the last position, it will be placed in the next-to-last spot. Once this is done, move the button in last position up one spot and the recently moved track will then be on the bottom.
Moving (copying) Complete Programs Once you have a program put together, you may copy all the tracks and settings to a new program number by right clicking on the program tab and choosing COPY. Locate the tab you want to copy the program to, right click again and select PASTE. This is especially useful if you use other Master Tab’s to archive or store programs.

- 9 -
Enter EmceePro “Encore” points
An “encore point” is a point in a track to return to for a “one-more-time” reprise. It can be defined at any point in the track. (While a track is playing…..)
You may advance to your encore point in two ways:
Allow the track to play normally – or – Click and Drag the ‘slider indicator’ to advance the track
Once the point in the track is reached that will be used as the ‘encore point’, click “Set” in the Encore Control Group. The exact position of the track will be recorded and a small ‘encore’ icon will appear next to the corresponding track button. Emcee will retain this information unless changed/deleted. To change or adjust the encore point for a track simply repeat these steps, or use the “<<” and “>>” buttons to make small adjustments. After making adjustments, press “Set” to save your changes.
Encores can be deleted by right-clicking the associated track button, and using the pop-up menu.

- 10 -
Encore Fade-in
To make a smooth transition into your encore, you’ll probably want to ‘fade-in’ to it. EmceePro gives you two ways.
Default “Fade-in” settings
This allows you to establish one setting that will be used by all your Encore Points. Using the menu selection “Options/Fade In Encore”, Make a selection from the options shown. This will be the ‘global’ setting that all encore points will use.
Individual “Fade-in” settings
This will allow you to set individual “fade-in” rates for selected encore without changing or loosing your global ‘fade-in’ setting.
Once your Encore Point is established, right click on the encore button. You will see the Encore Fade-in menu. Make you selection and it will be saved for this encore.
Playing An Encore Playing an “encore” may be done in two ways
Click on the encore icon using the mouse
If the current track (highlighted) has an encore icon, press the CTRL key on the keyboard to play.
Once an ‘encore’ has been played, pressing ENTER or SPACE BAR will advance to the next track.

- 11 -
PLAYING A TRACK Once track buttons are entered for a program tab, the program may be started in two ways. Click on the program you wish to start with. This will turn the button red (to show selection) but will not start the
track. This may be useful when setting up the program in a “ready-to-go” mode. Once a button is red (pending), pressing ENTER or SPACE BAR will begin the program (starting with the ‘red’ track).
If you wish to begin with the first track and there is no button showing red (pending) or green (playing), simply
pressing ENTER or SPACE BAR will play the first track. ENDING A TRACK Unless ‘auto-play’ has been selected Emcee Pro will automatically stop at the end of each track. If you wish to end a track before it is finished, click the “Fade Out” button or press F8 for a 5 second ‘fade-out’ ending. The track may also be stopped by pressing the “ESC” button. ADVANCE TO THE NEXT TRACK Once the program is underway, there are two ways to advance to the next track. (The program automatically stops at the end of each track!)
Manual Advancement If you wish to advance from track to track manually (most common method), simply press ENTER or SPACE BAR to move from track to track. This will cycle through all tracks on a given program tab. When the last track is reached, the program will return to the beginning track button. Automatic Advancement (Auto-Play) If you wish to advance from track to track automatically, use AutoPlay. This will play each track in turn with a delay between tracks of 1 to 60 seconds. To turn on auto-play Click AutoPlay button. To set delay Click Set Delay button and enter a number from 1-60 for the number of seconds to pause
between tracks. Begin playing tracks as usual.
Grouping A mix of ‘auto-play’ and ‘manual play’ is available using the “Grouping” function. When one or more adjacent tracks are ‘grouped’ these tracks will be played as a continuous set, using the delay between tracks defined for the ‘auto-play function. (Example: Tracks 1, 2, and 3 could be played manually; tracks 4, 5, and 6 could be played back to back (grouped); the program would then return to manual play). Grouping of two ‘sets’ back to back is done by designating groups as RED or BLUE. Emcee Pro will stop when all tracks playing in a group of one color before beginning the next group.
To group tracks: Groups are designated by clicking on the letter label next to the track being ‘grouped’. Clicking on the
letter will ‘toggle’ through RED, BLUE, and DEFAULT colors. Setting colors next to each other will establish a ‘group’.

- 12 -
Keyboard “Juke-Box” Selection
A keyboard method is also available to select tracks. Moving from one Master Tab to another can be done by pressing the upper case (capital) letter for the Master Tab you want. Moving from one Program Tab to another can be done by pressing the numbers 0 - 9 (the ‘0’ zero key brings up tab #10) on your keyboard. This will bring up the tab of the corresponding number. Moving from one track button to another can be done by pressing the letter key (lower case) corresponding to the track being selected. Doing this will not interrupt a track currently being played and may be used to place a track in “next-up” mode. If you know the tab and track button of a track and wish to call it quickly (jukebox fashion), simply press the corresponding Master Tab letter (if needed), Program Tab number (if needed), and Track letter to bring it up. Pressing ENTER or SPACE BAR will begin the track. This can be done quickly to bring up a track and begin playing instantly.
OTHER KEYBOARD OPTIONS
Critical functionality may be accessed using keyboard shortcuts:
FUNCTION KEYBOARD SHORTCUT Play SPACE BAR – or – ENTER Stop ESCAPE Key Pause F1 Close Prompter F2 Fade-out ending F8 Toggle Remote/Keyboard F12 Play Encore CRTL Key
- 13 -
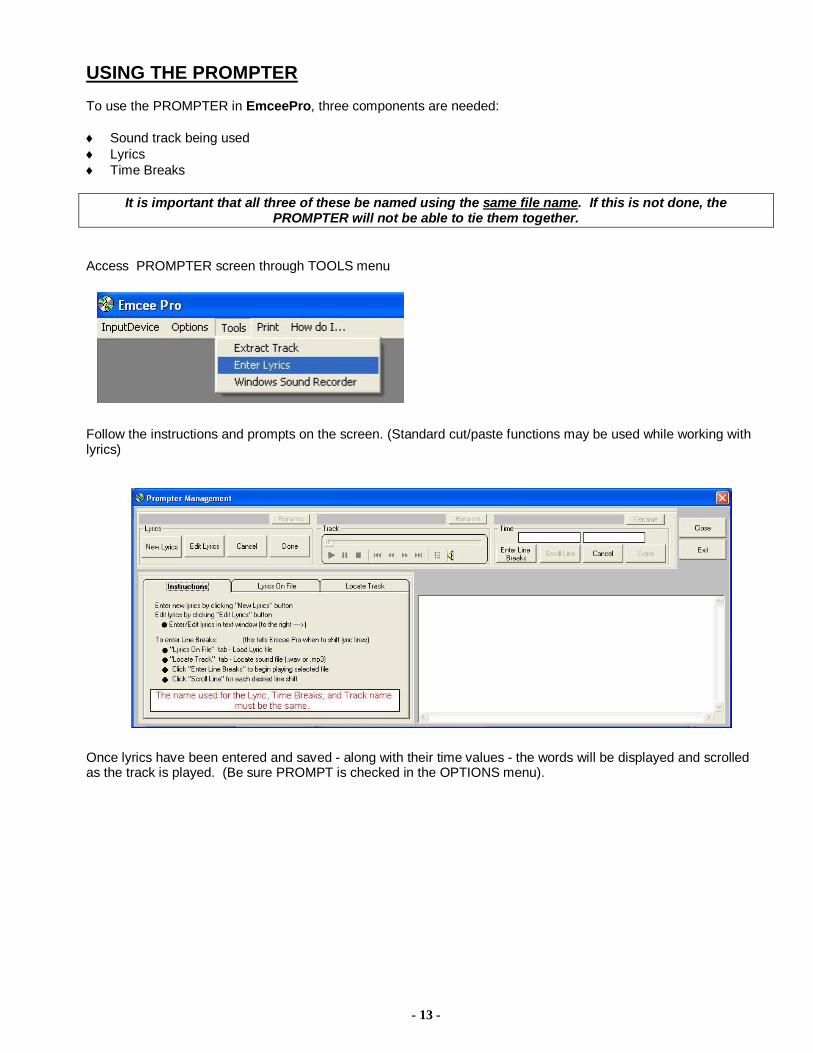
USING THE PROMPTER To use the PROMPTER in EmceePro, three components are needed: Sound track being used Lyrics Time Breaks
It is important that all three of these be named using the same file name. If this is not done, the PROMPTER will not be able to tie them together.
Access PROMPTER screen through TOOLS menu
Follow the instructions and prompts on the screen. (Standard cut/paste functions may be used while working with lyrics)
Once lyrics have been entered and saved - along with their time values - the words will be displayed and scrolled as the track is played. (Be sure PROMPT is checked in the OPTIONS menu).

- 14 -
Prompter/Video Options Main Prompter Options
Line Count Select the number of prompter lines to display in the main EmceePro window. The more line you display, the more ‘screen real estate’ will be needed. In general, two lines seems to work well. With two lines, the current and upcoming lines will be displayed at all times. Font Size The default font size is 30 point, but by selecting ‘Manual’ will allow you to choose the font size that fits your needs. The display box on the right will show you how your chosen font size will display.

- 15 -
Extended Desktop
These settings are important for use of the auxiliary prompter/video display. Just as with your Windows Display Settings, position your second monitor/display to the left or right of your main monitor. These setting must match your Windows settings. If you’re using an auxiliary monitor, check the ‘Use Aux Prompter’ box.
With the release of version 5.0, EmceePro is now fully functional for audio AND video files. Video files, however, requires a little more than just software. Here’s what you’ll need…
Make sure your operating system (Windows) supports the Extended Desktop function (operating more than one monitor at once). You’ll need to be familiar with this.
Each video ‘file type’ requires a separate ‘codex’. Think of these as ‘drivers’ for your software. Just
like you need a driver for your printer, you’ll need a ‘driver’ (codex) for each type of video file you want to use. There are free libraries of these DirectX files available online as well as retail versions. A quick Google search will locate what you need.
You’ll also need hardware to display your videos. This could be anything from a second monitor to a
video projector. Whatever you use, you’ll need to be familiar with its setup and requirements. If you’re going to use the video system at a church, there may be other logistical concerns such as distance, availability, etc.

- 16 -
Aux Font and Color
These settings give additional versatility for display using the ‘aux monitor/display’. You may select, Font, Font Size, Font Color, and Background Color. Your selections will display in the box on the right. You may also choose how many lines to display on the aux monitor. Aux Background Image
If you’re using the aux monitor/display with a video projector, if a video is not playing, you may choose to have either a blank (black) display or you may select any .jpg or .bmp file you have on your computer. Click the BROWSE button to locate the file you wish to use. Click CLEAR to return to a black screen.

- 17 -
TRIMMING LEAD TIME Trimming the ‘empty space’ from the beginning of .wav files can be helpful at times. Once blank space is removed, pressing PLAY gives truly instant playback.
Select a track to work with by clicking on it’s button on a program tab
Using your mouse, click and hold the PLAY button in
the Trim Lead Control Group As soon as you hear the track begin to play, release
the mouse button
You will see a time displayed in the label below the play button. This is the time to trim from the lead of the track
To adjust the lead time (in .1 second steps) use the
“<<” and “>>” buttons
Click SET to record the lead time If at some point you decide not to use the ‘trim lead’ feature, just de-select the check box in this control group.

- 18 -
TRIMMING END TIME Trimming the ‘empty space’ from the end of .wav files can be helpful at times. This is especially true if using the grouping functions. Having several seconds of dead air before the next track begins can ruin the timing of a program.
Select a track to work with by clicking on it’s button on a program tab
Begin playing the track (dragging the slider on the player
will advance the track quickly) When you reach the end of the track, click the SET
button
You will see a time displayed in the label below the play button. This is the time to trim from the lead of the track
To adjust the lead time (in .1 second steps) use the “<<”
and “>>” buttons
If at some point you decide not to use the ‘trim end time’ feature, just de-select the check box in this control group.

- 19 -
Setting Sound Level
When you’re using tracks from different sources or projects, there can be a difference in sound levels. While the track is playing…
Use the slider in the Sound Level control group to adjust volume. The sound level will be displayed. (Zero “0” is full volume.)
Once your sound level has been selected, click SET to record
your setting.
Checking or un-checking the Sound Level check box will determine whether your custom sound level will be used or not.

- 20 -
Prompter Information Small changes or edits can be made to your lyric and time break information. To edit a lyric
Select line to edit using the “<<” or “>>” buttons
Double click on the displayed lyric
Edit information for this line
Click SAVE To change break points
Select line to edit using the “<<” or “>>” buttons
Use the “<” or “>” buttons to adjust the timing of the break point
Click SAVE

- 21 -
Program Information Tab While you may not need the information on the Directory Tab or Info Tab during a performance, the Program Tab is designed with thing you DO want to have. AUTO PLAY Setting AutoPlay and beginning a program tab will allow you to play the tracks on the selected program without stopping or the need to set a ‘mega-group’. If this is used, be sure to turn AutoPlay OFF before your performance begins! NOTES This gives you a place to store notes, settings, or reminders of information you need for specific tracks. CLOCK/TIMER Emcee Pro has a timer display which automatically integrates into your programs. You may select between CLOCK and TIMER modes. To set a preference for clock or timer, RIGHT CLICK on the Timer START button and choose CLOCK or TIMER. CLOCK - This mode will display the time of day. If your program can only run to a certain time, then select this mode. TIMER – This mode will display a running timer. The timer will start automatically when the first track begins. If you have a defined period for your program (15 min, 30 min, etc), then select this mode. When using a mouse, START, STOP, and RESET buttons may be used to operate the Timer. Keyboard commands will also access these functions.
ALT + SHIFT : toggles between Start and Stop BACKSPACE : Reset

- 22 -
USING A REMOTE CONTROL
If a remote is being used, press F12 or click on Keyboard/Remote to switch (toggle) between these input devices. Emcee Pro has been designed and tested to use a remote control to access it’s major functions. Typically, a remote designed to be used with Microsoft PowerPoint will work with Emcee Pro. Manufacturers and models of remotes can vary, though. Before using a remote other than models specified by Testify Software, check with our support staff ([email protected]). The Versapoint Communicator Remote is no longer available, but may users already have this device – and it can continue to be used. When used with Emcee Pro it allows:
(Center Button) - PLAY (Top Button) - Stop Track (Down Button) - Scroll through Track Buttons (Right Button) - Scroll through Program Tabs (Left Button) - Play Encore (Left Button – DOUBLE CLICK) - STOP Track
The Logitech R400 can also be used with Emcee Pro version 5.0.4 or above.
(Left Arrow) – Play Encore (double-click to STOP) (Right Arrow) – Scroll Program Tabs (Start Program) – PLAY (Blank Screen) – Scroll Track Buttons
Using a remote during a concert can give a seamless feel to the performance. Since these are RF (radio) remotes, they do not need to be pointed at the device but can be held easily in the hand – or even hidden in a pocket. Pressing the PLAY starts the ‘next track’ and can be done with complete transparency to the audience. For more information or specific requirements for other remote controls, contact the support staff ([email protected]).

- 23 -
Copying tracks from CD to computer/laptop drive (ripping)
EmceePro will copy files from CD in .wav or .mp3 format.
CD Drive Selector: This dropdown box will show all CD drives available. Select the drive you wish to use.
Files from the drive will be shown in the box on the right Select MP3 or WAV format for saving copied files. Quality Selection: If saving as MP3, select a file quality. Higher quality will mean larger file size. For most
purposes (including performance), NORMAL quality is suggested. Output Path: This is the file location which copied files will be saved to. This can be changed using the Browse
button. Browse Button: Use this to select/change the folder used for saving copied files. Extract Tracks: Once files are selected for copying, clicking Extract Tracks begins the operation File listbox. This will display files when a CD is in the selected drive. Tracks may be renamed all at once before the ‘rip’ process or individually during the ‘rip’ process. Use Options – Track Ripping to make this choice.
If your CD drive does not appear in the dropdown box in the top left corner, you may have a driver issue. The main function of a ‘driver’ is to let the computer know what hardware it has. Some CD/DVD Combo drives no longer identify themselves internally as CD drives. If this is the case, EmceePro can’t access them. If this situation occurs, we recommend using Windows Media Player for track ripping. (See appendix) ExpressRip or AudioGrabber are among many free software products that can be used as well.

- 24 -
Back-up A brief explanation of the back-up utility is on the screen. Using this utility will back-up the audio track that are in the EmceePro default directory, your EmceeFiles settings, and a temp copy of EmceePro to use in emergency back-up situations. This screen will display the file size being included in this back-up. Make sure your back-up media has sufficient free space. IMPORTANT NOTE: If you have audio files in location other than C:\Program Files\Emcee Pro, you’ll need to manually add these to your back-up location after you have completed this process.
Locate your back-up media and click Begin Backup. When the back-up is concluded, it will also include a Read Me file with detailed steps for restoring your EmceePro tracks, settings, and files.

- 25 -
Pre-Event Timer EmceePro allows you to designate a set of “grouped” tracks to use for pre-event music. Using this function, if the time of your grouped set (for example) is 37 minutes, and your program is scheduled to begin at 7pm, with the pre-event timer turned on, EmceePro will automatically start your music at 6:23pm. If you’re at your table or greeting folks as they arrive, just listen for the music. When you hear the last song in your set begin, you’ll know it’s time to move towards the stage. If you were to use a pre-recorded introduction as the last ‘song’ in the set, you’d have pre-event music and an introduction all done automatically. EmceePro can truly be your Emcee!
RIGHT-CLICK on any Track Button letter in your selected group of songs to display the Pre-Event Timer.
The length of the ‘group’ will be displayed.
Enter the beginning time for the event and click “Begin Event Countdown”. EmceePro will subtract the length of
the program from the start time and begin counting.
Make sure there’s enough time before your “Begin” time for your “group” to run.
The button on the screen will begin blinking to show the countdown is active. To end the countdown, just close
the Pre-Event Timer window.

- 26 -
Appendix A – Using Windows Media Player for Ripping Windows Media Player, is included in all version of Microsoft Windows, has the ability to ‘rip’ tracks from CD’s. These instructions were made using Version 10, but other versions will have similar options and settings. If you would like to customize the Media Player settings to match those in Emcee Pro, follow these steps.
From the main Windows Media Player screen, we need to set the options for the
folder the tracks will be ‘ripped’ to and the file type.
Access these options by opening the menu drop-down box. Select TOOLS, then
OPTIONS
From the OPTIONS screen, click on the RIP MUSIC tab. From this screen we can change the location that ‘ripped’ tracks will be sent as
well as the file format (type).
Click on the CHANGE button to bring up the BROWSE FOR FOLDER dialog box

- 27 -
We’ll be navigating to the home directory for Emcee Pro. Double-click on “My Computer”
Double-click your C drive
Scroll down and double-click “Program Files”
Single click on “Emcee Pro” then click the OK button
If you want to reset the ‘save to’ directory at
any time, just repeat these steps
Next, we’ll select the file type for the track(s) we’re ‘ripping’
Click on the drop-down arrow

- 28 -
Make a selection from the options provided. We suggest selecting mp3
Once these settings have been made, click
APPLY and OK.
Returning to the Media Player window, you can supply real track names instead of the
defaults (Track 1, Track 2, etc)
This can be done from other places as well. The instructions will be the same.
Click on the track you want to name (single click).
Click on the track title again (this is a second
single-click – not a double-click). You will see that the track name is highlighted.
Type in the correct name for this track and press the ENTER or RETURN key on your
keyboard.
After you have renamed the tracks you’ll be ripping, click on the RIP tab.
Click on the check box next to each track you
want to ‘rip’
Click the RIP MUSIC button to begin the track extraction process

- 29 -
Appendix B – Back-up Recovery A copy of these instructions is included in the back-up process and can be found (following back-up) on your media
RESTORING EMCEEPRO FROM BACK-UP UTILITY FILES The 'back-up' utility used by EmceePro creates copies of three important groups of files: 1) EmceePro installation files; 2) EmceePro settings; and 3) all audio track located in the EmceePro root directory (default directory). To perform a re-installation using these files, follow the following steps: 1) INSTALL EMCEEPRO - This will be a 'demo' installation of EmceePro which will allow 20 uses. If this installation is to continue beyond 20 uses, registration (with current activation code) will be needed. 1a) locate and open back-up folder: "MCProBackup" 1b) locate and open installation folder: "EmceeInstallationFiles" 1c) locate zipped installation file: "MCBackupInstall.zip" 1d) right-click on "MCBackupInstall.zip" and select EXTRACT ALL 1e) proceed through the extraction wizard 1f) double-click on SETUP.EXE (Application File) to install EmceePro 2) INSTALL EMCEEPRO SETTINGS - This will install the 'EmceeFiles' folder which contains your track settings and programs 2a) locate and open back-up folder: "MCProBackup" 2b) locate folder called "EmceeFiles" 2c) right click on "EmceeFiles" folder and select COPY 2d) navigate to the "C Drive" directory on the host computer 2e) right click on the "C Drive" and select PASTE 3) INSTALL AUDIO TRACKS - This will copy all audio tracks which have been backed-up from the EmceePro root directory 3a) locate and open back-up folder: "MCProBackup" 3b) locate and open (double-click) on the folder: "Tracks" 3c) Press and hold down CTRL key and hit the "A" key to 'Select All' files contained in the "Tracks" folder 3d) Right-Click within the area of the blue highlighted tracks and select COPY 3e) Navigate to and open the "C Drive" on the host computer (double-click) 3f) Navigate to and open the "Program Files" folder 3g) Locate and right-click on the folder "Emcee Pro". Select PASTE These steps will create a back-up (demo) copy of EmceePro, your settings, and your tracks, on a host computer. If you have audio tracks in directories other than <C:\Program Files\Emcee Pro>, or if you have created sub-directories for your tracks within the EmceePro root directory, these will need to be backed-up and restored manually. If you have video tracks, these will need to be backed-up and restored manually as well. We suggest using the folders and directories created by this utility when saving and restoring these files.

- 30 -
Appendix C – Computer Audio Performance ISSUE: Static/Popping/Crackling noises are usually the result of system resource conflicts or excessive activity along the PCI bus. It could also result from System overheating, failing fans or even an inadequate System Power Supply. Often times this is caused by a Video Card, which are known to deplete system resources in order to achieve better performance at the expense of other applications. EXPLANATION: When another device illegally locks up the bus for more than 1/88200th of a second, there's a good chance you will lose audio samples resulting in a glitch in the recording or playback. RESOLUTION: 1) Update your built-in sound system drivers. 2) Try to lower your Video Card's Hardware Acceleration and see if this makes any difference. We have seen this work time and again, not only for static but also for Latency and Syncing issues. 3) Look at your Power settings in the Windows Control Panel. It is probably set to a "Power Efficiency" mode. Set it to "Best Performance" "High Performance" (or similar) and you should hear an improvement in audio performance. ***************************** Windows XP: - Right-click on your Desktop - Properties - Settings - Advanced - Troubleshooting - Next to: Hardware Acceleration - Move slider to the Left* towards "None" Windows Vista: - Right-click on your Desktop - Display Settings - Advanced - Troubleshooting - Change Settings - Continue - Next to: Hardware Acceleration - Move slider to the Left* towards "None" *If you’re using EmceePro to display video files, hardware acceleration may be important. Decrease this incrementally, testing at each setting level to find your optimal settings. For a full guide to optimizing your laptop for audio: www.musicxp.net