00 experiment: basic lab techniques, compliance of glp and
TRANSCRIPT

Experiment: Basic Lab Techniques in Analytical Chemistry Chem251 modified 08/2019
1
00 Experiment: Basic Lab Techniques, Compliance of GLP and Calibration of Glassware
OBJECTIVE: In this experiment you will learn the basic techniques when carrying out chemical analysis. You will learn how to use the analytical balance, calibrate Eppendorf pipettes, read volumetric glassware and calibration of glassware. Finally, you will practice taking meticulous notes on your procedure and observation throughout this exercise.
Equipment Chemicals
Analytical Balance Burets (2) Thermometer KMnO4 solid
100 ml Vol Flask 50-ml Beaker Stirring rod Deionized water 10-mL Vol pipet Slop bucket (400 ml beaker) 10-mL grad cylinder Aluminum slug 250 ml Vol Flask 125-mL Erlenmeyer flask (2) Pipet bulb 5 – pennies in container Rubber stopper or cork- 400-mL beaker
SAFETY AND DISPOSAL INFORMATION
Dispose of ALL solid permanganate, permanganate solutions, and washes containing permanganate into the proper, labeled Hazardous Waste Container in the hoods. If you are unsure about the location of the Haz-Waste container, ASK! Never pour any reagents or chemical down the sink.
Please complete the prelab for the second day which is to generate the tables in your notebook. This lab starts on day2 of the term!!!
Those without a hard copy of this procedure and without a lab notebook will not be allowed to begin the calibration procedures.
Please use care when using the analytical balance. Wipe all moisture left on balance. Before the end of the day, be sure the balance room is clean and all trash and waste have been disposed. Close the chamber window of your balance before excusing yourself from the balance room. It is everyone’s responsibility to keep the balance room clean at all times.
You may dispose of water down the drain.
RECORDING DATA: Use only the lab notebook designated for this course otherwise you will lose 10 pts. Use a fresh lab notebook for this course. Start on page 4 or 5 in your lab notebook, saving the first few pages for table of content and miscellaneous information.
If directed by your instructor, you will need to reproduce the data table in the next few pages in your lab notebook. Record all data in your lab notebook, and DO NOT use pieces of scrap paper while recording your work. If I observed you doing this, you will lose points in your technique grade. Record your procedure and observations in your notebook (see grading evaluation for this experiment). Remember for all experiments in this course, you absolutely need to use your Laboratory Notebook. Your instructor will confiscate pieces of scrap papers, on which you have written data or information, upon discovery. In other words, DO NOT EVER COME UP TO YOUR INSTRUCTOR WITHOUT YOUR LAB NOTEBOOK TO SHOW DATA OR TO ASK QUESTIONS, you will be marked down for not keeping with the protocol or for noncompliance of GOOD LAB PRACTICE.
UNKNOWNS: The instructor will provide you the unknowns for this laboratory. If the instructor forgets, ask the instructor for the assigned unknown number. A numbered aluminum slug in a glass vial will be your designated unknown. You will weigh the aluminum slug to the precision of the scale. Upon completion of the procedure, place the slug back in the vial and return the unknown back to where you found it. If you have to repeat the weighing procedure, you will be issued a new unknown number to carry out your analysis.
DISCUSSION: The purpose of this experiment is to introduce you to the tools and techniques necessary for success when carrying out chemical quantitative analysis. The techniques are considered one at a time, as though they were unit operations. You may well have performed each of these techniques in previous chemistry labs, or even in undergraduate research, and you may be absolutely certain you know how to perform these techniques well. This is immaterial, and you’re probably wrong anyway. There’s a wise, old adage: “It isn’t the things you don’t know that get you into trouble. It’s the things you know for certain that just aren’t true.”
All volumetric ware should be painstakingly free of water breaks before being calibrated. Burets and pipets need not be dry; volumetric flasks should be thoroughly drained and dried at room temperature. The water used for calibration should be in thermal equilibrium with its surroundings. This condition is best established by drawing the water well in advance, noting its temperature at frequent intervals, and waiting until no further changes occur. It is very important that you never assume that your glassware is clean. Furthermore, do not ask another classmate or instructor if the glassware is clean, you are responsible for your own work not your classmate or instructor.
The Analytical Chemistry laboratory requires a substantially higher level of precision, accuracy, laboratory technique, and cleanliness than any other laboratory you have taken. You have to be both meticulous and patient in this course. If you are careless in your work, analytical chemistry is not for you. Drop this course now.
Much as a golfer studies, practices, and improves individual discrete skills of the game (the grip, the stance, the swing, driving, putting, etc.) and puts these all together when playing a round of golf, the chemist must study, practice, and improve individual laboratory techniques such as pipetting, weighing, transferring solids and solutions, and reading a buret to do a complete analysis properly. Do not be lazy and cut corners. This course is to help you hone your skills when working in a laboratory so take advantage of the experience.
The whole point of this experiment is to learn proper technique for individual skills first, before attempting additional labs. If you can’t read a buret properly or pipet accurately or reproduce the technique reliably, it is foolish to attempt a complete volumetric analysis.

Experiment: Basic Lab Techniques in Analytical Chemistry Chem251 modified 08/2019
2
Therefore, if any parts of this experiment need to be redone to satisfy the various tolerance levels, redo them as soon as possible, and document the new data set in your lab notebook. If you do not meet tolerance limits after two or three tries, you are obviously doing something wrong. Ask for assistance from your instructor.
GRADING OF EXPERIMENT #1
This experiment is graded differently from the other labs. Each part in the procedure must be passed within the acceptable tolerance. Each part is independent of the other. Once one part (parts A, B, C, D and E) is successfully completed, points will be earned for successful completion. An additional 15 pts will depend on your record keeping techniques and how well you compile your results. To ensure that these important skills have been mastered in a timely fashion, this experiment MUST be successfully completed and turned in by deadline as outline in the lab schedule. If not, zero points (0 pts) will be awarded.
There is no “partial credit” on the procedural part of the experiment. You will earn 5pts or 0pts for each technique. After completion & turning in the write-up for the lab, additional points will be added to the overall score depending on unknown scores & the write-up.
PART A: USE OF THE ANALYTICAL BALANCE TO CALIBRATE EPPENDOEF PIPPETTES (5 + 5-pts Unknown Aluminum Slug) Read section 2.6 of the Harris Text (8th edition) Automatic adjustable micron pipettes have become an indispensable tool in today's biochemistry laboratory. They are highly advantageous due to their accuracy, ease of use, and wide range of volume deliveries available. You will be using the Eppendorf line of pipettes in this lab. The identification numbers found on the side, as well as the color on the top button, give the pipette size. The pipettes provided allow for delivery of 1 - 1000 microliters in the following volume ranges:
Micro Pipette Volume Range VWR 20 – 200 uL Fingerpipette II 100 – 1000 uL
Each micro pipette is to be used with a specific disposable tip provided in the plastic racks. These pipettes must never be used without a tip! The small clear tips are used with the Eppendorf VWR, 20-200 , and the large blue tips with the Eppendorf 1000. Tips may be used more than once when delivering the same solution, but always replace the tip when changing solutions, when using sterile solutions, or if it becomes dirty, contaminated, or if liquid droplets seem to be retained along the pipette walls. Tips are not stable for chloroform or concentrated nitric or sulfuric acid. In most cases tips are best used for aqueous solutions. Calibrating pipettes frequently is necessary to identify pipettes that are not delivering accurately. Before calibrating the pipettes, practice using the pipettes and get a feel of the button.
Go the following Youtube video to review the pipetting technique as found in the Canvas page. The following is a specific sequence of steps that are followed each time a transfer is desired. This is the “forward mode”.
1. Set appropriate volume on pipet to be used. 2. Carefully attach appropriate tip to model. Do not press down on
tip too hard, but do insure that tip is firmly attached. 3. Press the large button until the first stop. 4. Place the tip in the solution to be transferred. 5. Slowly and smoothly release the large button.
6. Inspect solution in tip to confirm that no air bubbles are present. 7. Place tip gently against the side of destination container. 8. Push large button to first stop. 9. Push large button to second stop. 10. If necessary, dispose of tip by pushing smaller button on the
back of pipette grip.
These pipettes are very fragile and expensive. You are the primary users of these fine instruments and therefore, it is your responsibility to maintain the pipettes in fine working condition. You will be held responsible for any damage to your pipettes due to neglect. In addition to the guidelines already provided, the pipettes should never lay in a horizontal position with a full tip. If you draw too much liquid then the pipettes become flooded in the inside with the liquid. Make sure you use the correct tips to prevent this.
Calibration is carried out at ambient temperature. In addition, obtain an unknown number from your instructor for an aluminum slug. Do not use the same unknown as a classmate otherwise you will split the points. Write your unknown number and the mass data in an organize table in your lab.
You will be given a pipette and also be assigned a balance, be sure to use this same balance for the duration of the course. Write in your notebook the ID of the balance you are assigned. It is up to you to keep your balance clean at all times. If your balance has been un-kept, you will be penalized in your lab technique score. It is also important to write notes to yourself on the proper operation of the scale. Write these notes in your lab notebook
All adjustable pipettes should have their calibration checked periodically. The easiest way to accomplish this task is to pipette an indicated volume of a solution of known density, weigh the amount transferred, and determine if the measured volume corresponds to the indicated volume. The density of distilled water at 25°C is 0.997075 g/ml; an Eppendorf 100 pipette set to 055 should deliver 55 µL, which will weigh 0.0548 g based on the formula: Weight = Density / volume.
In order to establish the accuracy of your pipettes and to test the reproducibility of your pipetting technique, you will pipette ten aliquots of distilled water from one of your pipettes, carefully recording the cumulative weight after each addition. Calibrate the 100-1000uL and 10 – 100uL pipets. Calibrate each pipette using 2 trials at 1 settings (80%). So, if you are calibrating a 100-1000uL pipette, set the volume to 800uL (.8 mL). Later, you will copy your data into the excel spreadsheet and tabulate your results.
Experiment: Basic Lab Techniques in Analytical Chemistry Chem251 modified 08/2019
3
Procedure, PART A
Part A1: After your instructor has instructed you on the proper use of the electronic balance and you have become familiar with its use, decide which pipette to calibrate first. Since there is no time to calibrate all your pipette, it is recommended that you calibrate the pipette that is used most often, the 100 – 1000uL pipette, P1000 and the 10 – 100 uL, P100 pipettes.
Part A2: For this part choose an aluminum slug unknown that is the same as your Eppendorf / Buret number. That is if you have Eppendorf/Buret #4, your unknown number in the course will also be #4.
Part A1. Pour at least 100mL of deionize water into a 250mL clean beaker. Allow the water to equilibrate for 15 minutes. Go to the analytical balance that has been assigned to you.3 Make sure the balance is level and had been warmed up for at least 30 min. Place a weighing boat on the analytical balance and accurately weigh the empty boat to the full resolution of the balance (0.1mg). You may tare the weighing boat or you can move on to the next step. Using the 100 – 1000uL pipet at a setting of 80% of the maximum capacity, carefully pipette an aliquot of distilled water into the boat and record the weight. Repeat this process recording the cumulative weights of ten aliquots. Remove and dry the weighing boat with a Kim-wipe. Repeat the entire procedure for the 10 – 100P pipette and record the data.
NOTE: NEVER transfer chemicals inside an analytical balance. In this experiment, however, it is okay to pipette water to a weighing boat. If you spill any liquid on the balance, soak up the residual liquid immediately with Kim-wipes and contact your instructor.
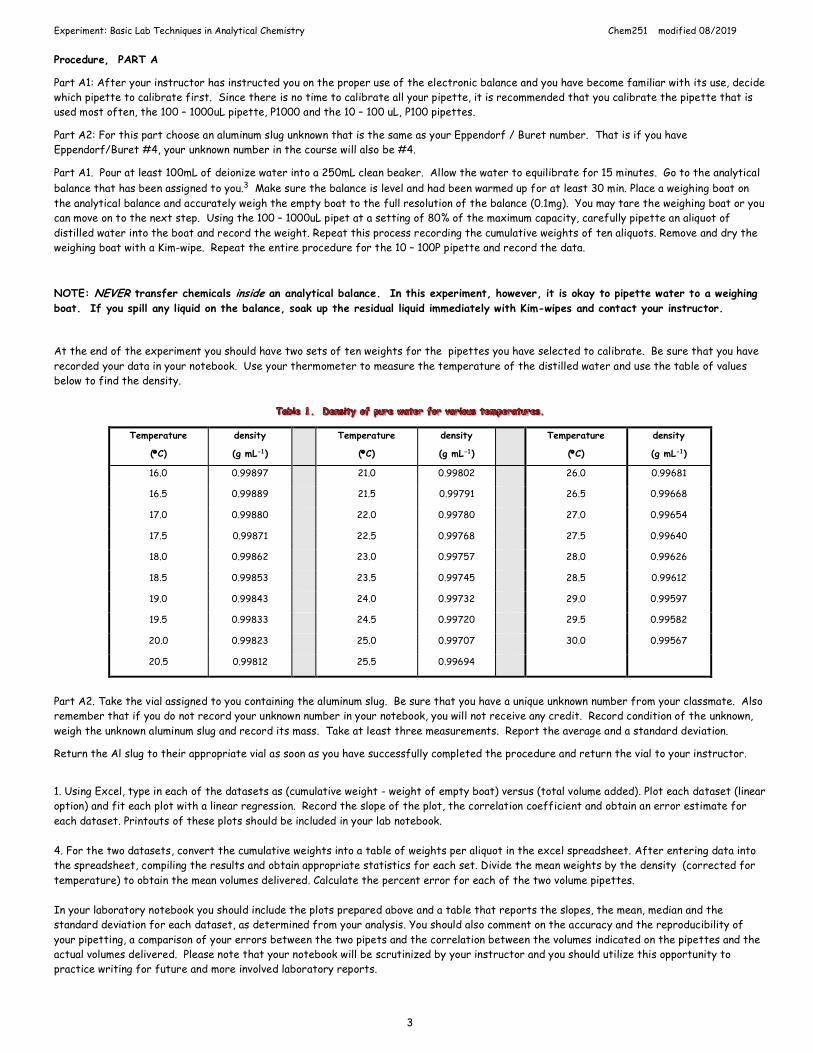
At the end of the experiment you should have two sets of ten weights for the pipettes you have selected to calibrate. Be sure that you have recorded your data in your notebook. Use your thermometer to measure the temperature of the distilled water and use the table of values below to find the density.
Temperature
(°C)
density
(g mL-1)
Temperature
(°C)
density
(g mL-1)
Temperature
(°C)
density
(g mL-1)
16.0 0.99897 21.0 0.99802 26.0 0.99681
16.5 0.99889 21.5 0.99791 26.5 0.99668
17.0 0.99880 22.0 0.99780 27.0 0.99654
17.5 0.99871 22.5 0.99768 27.5 0.99640
18.0 0.99862 23.0 0.99757 28.0 0.99626
18.5 0.99853 23.5 0.99745 28.5 0.99612
19.0 0.99843 24.0 0.99732 29.0 0.99597
19.5 0.99833 24.5 0.99720 29.5 0.99582
20.0 0.99823 25.0 0.99707 30.0 0.99567
20.5 0.99812 25.5 0.99694
Part A2. Take the vial assigned to you containing the aluminum slug. Be sure that you have a unique unknown number from your classmate. Also remember that if you do not record your unknown number in your notebook, you will not receive any credit. Record condition of the unknown, weigh the unknown aluminum slug and record its mass. Take at least three measurements. Report the average and a standard deviation.
Return the Al slug to their appropriate vial as soon as you have successfully completed the procedure and return the vial to your instructor.
1. Using Excel, type in each of the datasets as (cumulative weight - weight of empty boat) versus (total volume added). Plot each dataset (linear option) and fit each plot with a linear regression. Record the slope of the plot, the correlation coefficient and obtain an error estimate for each dataset. Printouts of these plots should be included in your lab notebook. 4. For the two datasets, convert the cumulative weights into a table of weights per aliquot in the excel spreadsheet. After entering data into the spreadsheet, compiling the results and obtain appropriate statistics for each set. Divide the mean weights by the density (corrected for temperature) to obtain the mean volumes delivered. Calculate the percent error for each of the two volume pipettes. In your laboratory notebook you should include the plots prepared above and a table that reports the slopes, the mean, median and the standard deviation for each dataset, as determined from your analysis. You should also comment on the accuracy and the reproducibility of your pipetting, a comparison of your errors between the two pipets and the correlation between the volumes indicated on the pipettes and the actual volumes delivered. Please note that your notebook will be scrutinized by your instructor and you should utilize this opportunity to practice writing for future and more involved laboratory reports.

Experiment: Basic Lab Techniques in Analytical Chemistry Chem251 modified 08/2019
4
PART B: QUANTITATIVE TRANSFERS (5-pts) practice with volumetric flask.
This procedure is designed to provide experience for the correct use of the volumetric flask. Record your observations in your lab notebook.
1. Tap a very small amount of potassium permanganate, KMnO4, from the stock bottle onto a piece of folded glassine paper or into a small clean
beaker or a plastic weighing boat. (Note: Returning chemicals back into stock bottles should never occur as this may contaminate the entire bottle. Avoid putting a spatula into a stock bottle. Tap out a small amount if at all possible.)
2. Tare a clean, dry 50-mL beaker on an electric top-loading balance that is found at the front of each lab counter. Use this scale and not the analytical balance for this procedure. (Note, for weighing that do not require precision to the tenth of milligram, use this top-loading balance.) Add about ~0.2 g of KMnO4 to the beaker, this will be used to prepare a 100-mL stock solution.
3. Dissolve the potassium permanganate in about 20 mL of distilled water, stirring gently to avoid loss. This is nearly a saturated solution, and some care is required to dissolve the crystals completely.
4. Quantitatively transfer the solution into a 100-mL volumetric flask using a small funnel. To prevent the solution from running down the outside of the beaker, pour the solution down the stirring rod, and then touch the rod to the spout of the beaker to remove the last drop. If needed, ask your instructor to show you how to do this. Add more water to the beaker, stir, and repeat the procedure.
Record the amount of washing and the number of times required to quantitatively transfer the permanganate from the beaker to the flask. Finally, rinse the last portions of solution from the stirring rod into the volumetric flask with a stream of water from the wash bottle. Rinse the funnel and remove it. Carefully dilute the solution in the flask until the bottom of the meniscus is even with the graduation mark.
5. Stopper, invert, and shake the flask. Return it to the upright position, and allow the air bubble to return all the way to the top of the neck. Repeat until the solution is completely homogeneous; a minimum of 10 inversions and shakings will be required. Save this solution for Part C. Be sure to record the procedure and the data in your lab notebook.
PART C: TAKING AN ALIQUOT (5-pts)
Whenever a buret or pipet is used to deliver a measured volume of solution, the liquid it contains before a measurement must have the same composition as the solution to be dispensed. The procedure referred to in this section is called “conditioning” your glassware. The following operations are designed to illustrate the minimum effort needed to ensure this.
NOTE: During this part, collect all the permanganate solutions and rinse waste in a large beaker (“slop bucket”, found under the hood to the left of the front board). At the end, all the permanganate is to be disposed of in the proper, labeled waste container. No permanganate should go down the drains.
1. Before beginning this section, make sure you know how to use the Brinkman pipet bulb mechanism in your lab drawer. Your instructor will illustrate how to use this or show you a video on the proper use. [Never draw so much solution that it fills the suction mechanism. If you do this you will ruin the suction mechanism and this will reflect in your lab technique score.] Fill a 10 ml pipet with the solution of potassium permanganate and let it drain completely into a waste beaker. Wait 20-30 seconds, then touch the tip of the pipet to the side of the beaker. Draw a small amount of distilled water from a 50-mL beaker into the pipet, rinse, and discard the rinse solution. Do not fill the pipet completely; this is wasteful, time-consuming, and inefficient. Just draw in a small amount, tilt the pipet horizontally, and turn it to rinse the sides. Determine the minimum number of such rinsing required to completely remove the permanganate color from the pipet. [Hint: Look at the liquid that collects in the tip of the pipet against a white background to see if there is any coloration.] If your technique is efficient, three rinsing should suffice. (Note, if you are not comfortable with the Brinkman pipet bulb, ask for an alternate.)
2. Fill the pipet again with permanganate and proceed as before. This time determine the minimum volume of rinse water required to remove the color by collecting the rinsing in a small graduated cylinder (less than 5 mL of rinse water is enough with efficient technique). Again, check the pipet tip as before for any coloration.
3. Condition a 25-mL pipet three times with the solution of potassium permanganate you prepared (above). Pipet 25 mL of the permanganate solution (see section B, step 2) into a 250-mL volumetric flask. Carefully dilute the solution to volume, try to minimize the mixing of the 25-mL KMnO4 solution with water in the dilution process. Now, mix the solution by
repeatedly inverting and shaking the flask. (Note the effort required to disperse the permanganate color uniformly through the solution.) Rinse the pipet with the solution in the volumetric flask. Pipet a 5-mL aliquot of the solution into a 125mL Erlenmeyer flask. Remember to condition the pipet before drawing the 5-mL aliquot. Record your data.
Dispose of the KMnO4 solid and solution in the proper waste container.
To use the Brinkman Pipet Bulb.
1. Squeeze air out of bulb to create a partial vacuum. 2. Insert a pipet into the pipet receptacle. 3. Place tip of pipet well into the liquid. 4. Push lever up to draw fluid above desired calibration line. DO NOT DRAW FLUID INTO BULB!. 5. Press level down to deliver fluid to new container. 6. Press bulb to blow out last of the liquid from the pipet. For more details go to: http://abacus.bates.edu/~ganderso/biology/resources/serological_pipet.html

Experiment: Basic Lab Techniques in Analytical Chemistry Chem251 modified 08/2019
5
PART D: CALIBRATION OF A GRADUATED PIPET (5-pts)
Read section 2.6 of the Harris Text (8th edition) The calibration of an analytical transfer pipet is a relatively straightforward procedure. The proper technique is readily learned with practice, care, and attention to detail. Note that this is a manual technique. It must be learned; it does not magically appear on the first try, not unlike learning to hit a golf ball. With some practice, however, you ought to be able to handle a pipet about as well as those who routinely works in an analytical lab. With the exception of a simple weighing, this experiment is capable of being the most accurate and precise set of measurements you’re likely to ever perform in a lab course.
1. Obtain the following equipment: Pipet bulb (Brinkman pipet bulb); 125-mL Erlenmeyer flask with a dry cork or rubber stopper; 400-mL beaker of distilled water equilibrated to room temperature; and a thermometer.
2. Clean a 10-mL pipet, and be sure that your pipet is ultra clean. Cleaning is usually accomplished by drawing some warm soapy water into the pipet bulb, wetting the sides, and “shaking the soap” inside the pipet. If that doesn’t work, soak the entire pipet in soapy water overnight or longer. You must clean pipets, burets, and other pieces of volumetric glassware, so that no droplets of reagent remain on the internal surfaces when they are drained; there should be no water break. This is very important for accurate and reproducible results. If reagent gets “hung up” inside a pipet, the nominally stated volume will not be delivered. You should have already cleaned your pipet properly during the check-in period.
3. Using the analytical balance, weigh the flask and stopper and record the mass to the nearest 0.1 mg. Do not touch the flask with your fingers after this weighing. Use tongs, Kim-wipes or wear gloves.
4. Read and record the temperature of the water.
5. Pipet 10.00 mL of the distilled water into the flask using the technique described above. Re-stopper the flask, weigh it, and record the mass of the stoppered flask plus the water.
6. Add a second pipet of water to the flask, without pouring out the 1st aliquot, removing the stopper just before the addition. Re-stopper, weigh, and record the weight. Repeat the entire procedure for a minimum of four readings that agree to within a total range of less than 0.02 g for all the readings. [If you have what you consider 3 “good” replicates and one that seems “bad”, try the Q-test to see if the outlier value can be rejected.] If your values seem very non-reproducible, throw out all your data and do another full set of 4 minimum, paying closer attention to what you’re doing. If these still do not reproduce well, there is something clearly wrong with your technique. Seek assistance from your instructor. Have your instructor look over your measurements in the data sheet if necessary.
7. Correct the apparent masses of the aliquots for the buoyancy effect of atmospheric air to get the true masses as described below. Then calculate the true volume of the pipet using the density of water at the temperature(s) of each aliquot.
8. Report the average “true volume” of your pipet and the associated standard deviation of your values.
Correction for Buoyancy3
A buoyancy error will affect data if the density of the object being weighed differs significantly from that of the standard weights (inside the balance for an electric balance). This error is due to the difference in the buoyant force exerted by the medium (air) on the object weighed and on the weights themselves. The correction is made using:
mcorrected = mobserved + mobserved [(dair/dobject) – (dair/dweights)]
where m is the mass in grams of the corrected and initially observed values of the object weighed (in this case, distilled water, see table below), and d is the density in g/cm3 of air, the object, and the weights. For all but the most exacting work, this correction is negligible for
solids and liquids having a density of 2 g/ cm3 or greater. Correction for buoyancy is required only for measurements that require the highest accuracy, for gases, or for low-density solids and liquids. The density of the weights used in electronic single-pan balances ranges from 7.8 to 8.4 g/cm3, depending on the composition of the weights. Using dweights = 8 g/cm3 is adequate for most purposes. The dair = 0.0012 g/ cm3 at room temperature and pressure.
Experiment: Basic Lab Techniques in Analytical Chemistry Chem251 modified 08/2019
6
PART E: BURET ASSIGNMENT: READING OF BURET (5-pts)
Read section 2.4 of the Harris Text (8th edition) 1. You will be issue 2 burets for this course. Be sure to label your burets because these will be stored under hoods since burets cannot fit in your drawer. You can use a wax pencil or a label tapes to do this. Burets are normally stored upside down so that the inside surface of the part of the section where you will take your reading will remain wetted and drain well. It is also recommended that upon storing the buret, you place parafilm on the tips of the buret so that you minimize contamination to the interior of the buret. Use the buret stand to keep the buret vertical. Puncture a pin size hole at the ends so as to have any residual water drain out of the buret.
2. Invert the buret and tap the section lightly to remove any solvent that might remain in the sealed tip and let it drain for at least 20-30 sec. Use a buret reading card to estimate the readings to the nearest 0.01 mL. A buret card is easily made by making a very heavy, black horizontal rectangle in the center of a 3 x 5” file card.
3. Over-fill the buret with distilled water. You can over-fill the buret by adding distilled water past the 0.0-mL mark. Make sure that there are no air bubbles trapped in the tip. If so, rapidly open valve, “full throttle” until the bubbles are flushed out. If this does not work, sometimes a quick vertical jerk will loosen any residue lodged at the tip of the buret. Refill the buret if the water level falls below the 0.0-mL mark.
4. Drain the buret down to someplace between 0 and 1 mL. Do not try to bring the buret to exactly 0.00 mL, as this is a waste of time. The “zero” reading on all but an automatic buret is always some finite non-zero reading.
5. Wait at least 20-30 seconds before taking the initial or “zero” reading. Why? Take the initial or “zero” reading and the other buret reading using a buret reading card.
6. Now let about 5 mL run into a 125-mL Erlenmeyer flask. Wait at least 30 seconds and take the “final reading”. (The amount of solution in the Erlenmeyer flask is equal to the final reading minus the “zero” reading.) Write down the final reading on the data sheet provided, the time you waited before reading the buret, and then ask your instructor to take the final reading. Compare the two readings. They should agree within 0.01 mL. Do they? Notice that the final digit in the buret reading is the estimation of the distance between two marks on the buret. The instructor will initial your datasheet upon satisfactory completion of this part.
7. Refill the buret, and take a new zero reading. Now add 30 drops to the Erlenmeyer flask, and take the final reading. Calculate the average volume of one drop, then repeat this except with 40 drops and calculate the average volume of a drop. Record these results and compare them. Now, practice adding “half-drops” to the flask. Calculate the average volume of your “half-drops”. In several titration experiments, you will want to try to get half-drop end points for good precision.
PART F: CALIBRATION OF BURET (10-pts) (Taken from C. Harrison, SDSU and Harris chp 2 )
You may calibrate just one or both of your buret. If you decide to do only one, then remember that when doing your titrations, you want to use the calibrated buret for precise measurements.
There are inherent errors in the volumes indicated in the barrel of a buret, which will cause your results to deviate. For this reason, you will need to calibrate your burets. Because the burets do not drain in its entirety during a single titration, calibration must be done in 10 ML increments.
1. For this calibration you will need a stopper flask of 50 mL or greater (but not to exceed the balance weight limits), DI water, a thermometer and your burets. Before you begin, be sure your burets are clean and the stopcocks are functioning properly.
2. Fill a clean, large (~400 mL), beaker with DI water, insert a thermometer and give the water time to come to equilibrium with the room temperature.
3. Prepare a table in your lab notebook, similar to the ones on the following page. You will need to perform the calibration process at least twice to obtain matched, replicate data for the calibration.
4. Record the temperature of the DI water. Record the mass of the flask and stopper.
5. Fill the buret with enough of the DI water so that the meniscus is between the 0.01 and 0.30 mL lines; ensure that there are no air bubbles in the tip of the buret. Do not attempt to fill the buret to 0.00 mL, this is pointless, time consuming and does not provide any benefit to an analysis.
6. Record the initial volume of the buret. Next titrate water into the flask until approximately 10 mL have been delivered.
7. Stopper the flask as soon as you are done delivering the water. Record the new volume on the buret and the new mass for the stoppered flask.
8. Repeat the process for each 10 mL increment of the buret - do not bring the level of the water below the 50.00 mL line as you cannot measure the volume beyond that point. The whole process will need to be repeated a second time in order to confirm the results of the first calibration. In some cases, multiple calibration attempts will be needed to ensure that the calibration is accurate.
Experiment: Basic Lab Techniques in Analytical Chemistry Chem251 modified 08/2019
7
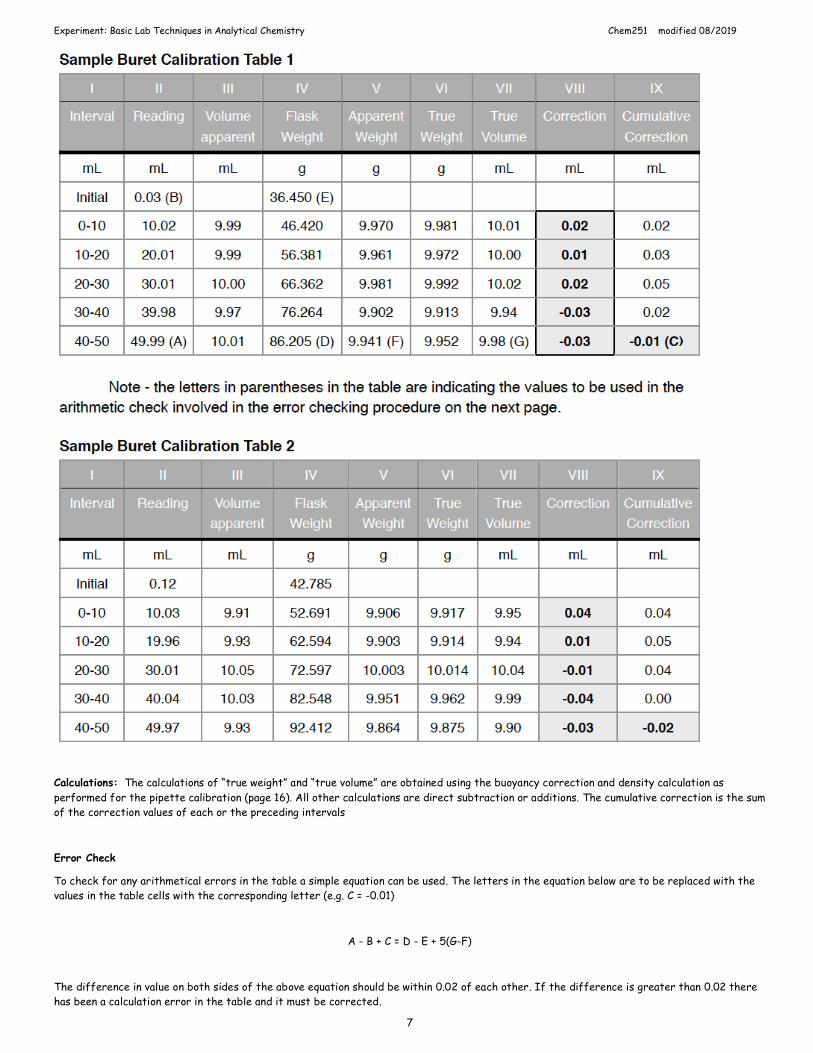
Calculations: The calculations of “true weight” and “true volume” are obtained using the buoyancy correction and density calculation as performed for the pipette calibration (page 16). All other calculations are direct subtraction or additions. The cumulative correction is the sum of the correction values of each or the preceding intervals
Error Check
To check for any arithmetical errors in the table a simple equation can be used. The letters in the equation below are to be replaced with the values in the table cells with the corresponding letter (e.g. C = -0.01)
A - B + C = D - E + 5(G-F)
The difference in value on both sides of the above equation should be within 0.02 of each other. If the difference is greater than 0.02 there has been a calculation error in the table and it must be corrected.
Experiment: Basic Lab Techniques in Analytical Chemistry Chem251 modified 08/2019
8
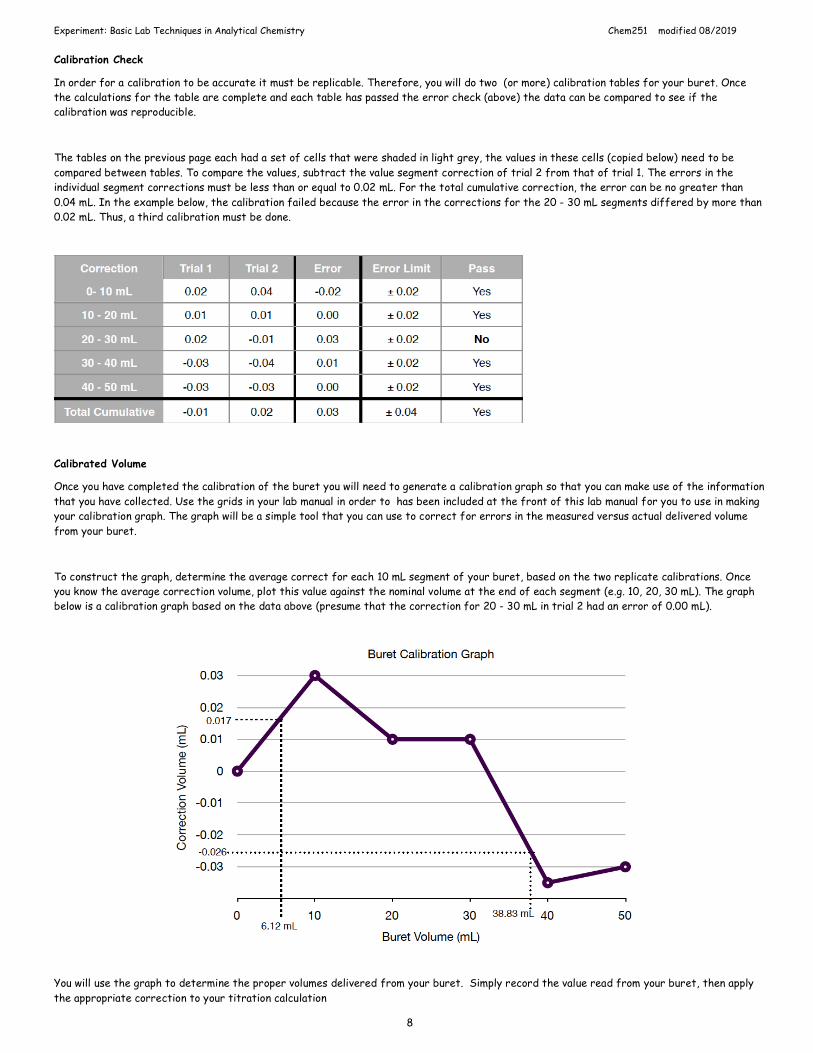
Calibration Check
In order for a calibration to be accurate it must be replicable. Therefore, you will do two (or more) calibration tables for your buret. Once the calculations for the table are complete and each table has passed the error check (above) the data can be compared to see if the calibration was reproducible.
The tables on the previous page each had a set of cells that were shaded in light grey, the values in these cells (copied below) need to be compared between tables. To compare the values, subtract the value segment correction of trial 2 from that of trial 1. The errors in the individual segment corrections must be less than or equal to 0.02 mL. For the total cumulative correction, the error can be no greater than 0.04 mL. In the example below, the calibration failed because the error in the corrections for the 20 - 30 mL segments differed by more than 0.02 mL. Thus, a third calibration must be done.
Calibrated Volume
Once you have completed the calibration of the buret you will need to generate a calibration graph so that you can make use of the information that you have collected. Use the grids in your lab manual in order to has been included at the front of this lab manual for you to use in making your calibration graph. The graph will be a simple tool that you can use to correct for errors in the measured versus actual delivered volume from your buret.
To construct the graph, determine the average correct for each 10 mL segment of your buret, based on the two replicate calibrations. Once you know the average correction volume, plot this value against the nominal volume at the end of each segment (e.g. 10, 20, 30 mL). The graph below is a calibration graph based on the data above (presume that the correction for 20 - 30 mL in trial 2 had an error of 0.00 mL).
You will use the graph to determine the proper volumes delivered from your buret. Simply record the value read from your buret, then apply the appropriate correction to your titration calculation

Experiment: Basic Lab Techniques in Analytical Chemistry Chem251 modified 08/2019
9
Example:
Calculations and Post-Lab Write-up (10 pts)
An excel spreadsheet may be available to you so that you can take the measurements from this lab and automatically perform needed calculations. If one is available, use excel to perform all pertinent calculations. If an excel template is not available, you should generate one. You can use the structure of the datasheet here to give you a sense of how to organize your data in the excel spreadsheet. You will be asked to generate spreadsheets throughout this course so you will develop skills on producing data sheet that can be easily analyzed. While using excel to present your data and to perform repetitive calculations is convenient, you must however show a sample manually calculation in your lab notebook and especially when the procedure instructs you to do so. You need not worry about a sample calculations for some statistical calculations however like the standard deviation, simply state that the results was determined by an excel function. If your class is using a virtual “cloud” drive to store data, i.e., Google Drive or DropBox, you should store the result in this experiment in the appropriate folder in the virtual drive. If you don’t know how to do this, ask your instructor for help.
Summarize each of the part of this experiment and discussed how each of these parts are important in Analytical Chemistry and what you learned in the procedural process. Keep your total summary to one type written page.
REFERENCE
1. D. A. Skoog, D. M. West, F. J. Holler, and S. R. Crouch, Analytical Chemistry: An Introduction, 7th ed. Chapter 2, pp. 21-59.
2. Mark J. Rudin, William H. Hohnson, UNLV, Dept of Health and Physics
3. Topic on Analytical Balance and Buoyancy correction, Section 2.3 of the Harris Text (8th edition)
4. Topic on Burets, Section 2.4 of the Harris Text (8th edition)
5. Topic on Pipets an Syringe, Section 2.6 of the Harris Text (8th edition)

Experiment: Basic Lab Techniques in Analytical Chemistry Chem251 modified 08/2019
10
00 Basic Lab Techniques in Analytical Chemistry; Calibration of Glassware
Reproduce this table in your lab notebook
____ / ___ Score Last Name ________________________First____________________ Date _____
Datasheet.
Part A(i) Use of Analytical Balance and Pipette Calibration
Part A (i) Adding water from pipette in Analytical Balance
Pipette ID
_________
Trial 1
-Total Running Mass
Mass of each drop
Trial 2
-Total Running Mass
Mass of each drop
Pipette ID
_________
Trial 1
-Total Running Mass
Mass of each drop
Trial 2
-Total Running Mass
Mass of each drop
Readings of Balance after tare Reading of Balance after tare
# 1 # 1
# 2 # 2
#3 #3
#4 #4
#5 # 5
#6 # 6
#7 #7
#8 #8
#9 #9
#10 #10
Total mass for drops 1 - 10
Total mass for drops 1 - 10
Statistical Analysis: Pipette #1 Pipette #2
Average Mass of drops (g)
Standard deviation (s)
Relative standard deviation or coefficient of variation (CV)
.
A(iii): Weighing unknown mass of Aluminum
Al Slug Unknown # Condition Mass (g) 1, 2, & 3
1 _____________
2 _____________
3 _____________
Average ________
std dev _________
.
Instructor's initial: Optional Initials _______

Experiment: Basic Lab Techniques in Analytical Chemistry Chem251 modified 08/2019
11
Part B Qualitative Transfer
Part B (i) Preparing 100-mL KMnO4 solution
Observation Data
Step 2 Mass KMnO4
Step 4 Amount of washing to transfer KMnO4 from beaker to flask (mL)
Part C Taking an Aliquot
Part C (i) Using a pipet and suction mechanism to prepare a solution.
Observations Data
Step 1 Minimum number of rinse to completely remove KMnO4 color from pipet
Step 2 Minimum volume of rinse water required to remove KMnO4 color from pipet
Step 3a: Preparing 250 mL stock solution,
Step 3b: Aliquot transfer of 10-mL pipet to 125mL Erlenmeyer flask,
Instructor's initial Initials ___________
Part D Calibration of a Pipet
Part D Weighing volumes of water
Data
Step 2, clean pipet
Step 3: Mass of 125mL Erlenmeyer flask and stopper
Step 4: Temperature of water
Mass (g) Apparent
Mass Corrected
Mass
Step 5: Mass of flask after transfer 10mL DI water (g)
Step 6a: Mass of flask after 2nd transfer 10mL DI water (g)
Step 6b: Mass of flask after 3rd transfer 10mL DI water (g)
Step 6c: Mass of flask after 4th transfer 10mL DI water (g)
Average True Volume and standard deviation
Instructor's initial Initials ___________
Experiment: Basic Lab Techniques in Analytical Chemistry Chem251 modified 08/2019
12
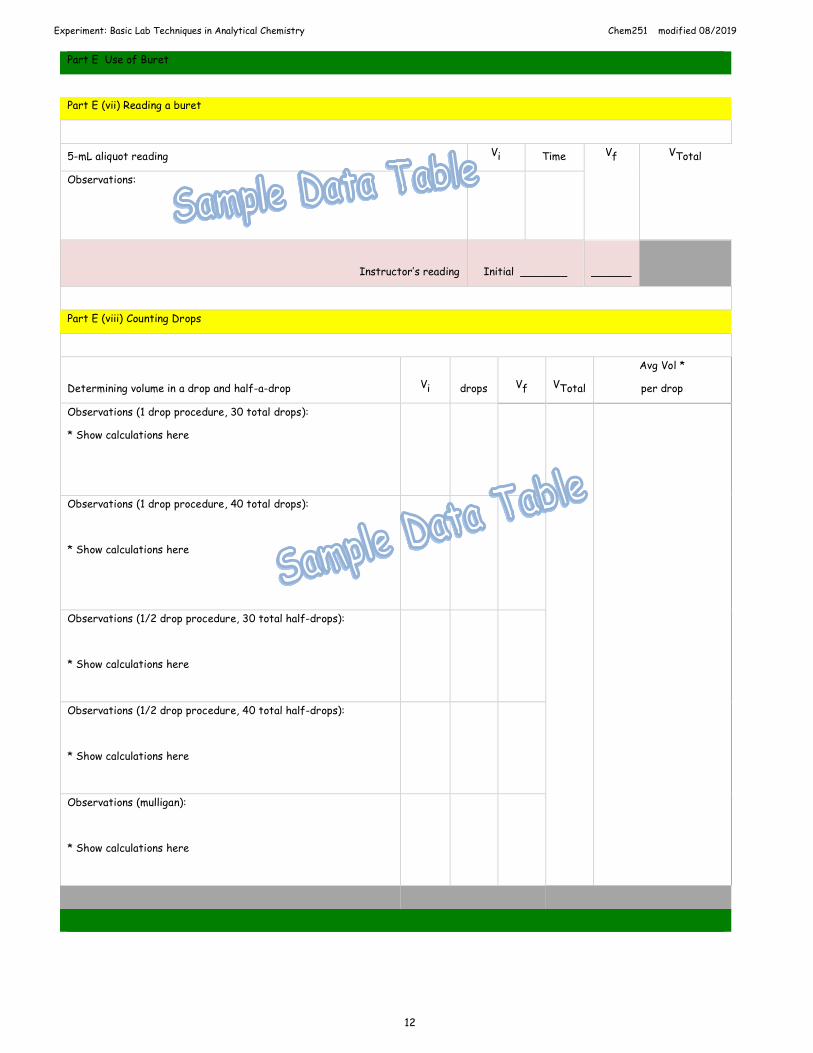
Part E Use of Buret
Part E (vii) Reading a buret
5-mL aliquot reading Vi Time Vf VTotal
Observations:
Instructor’s reading Initial _______ ______
Part E (viii) Counting Drops
Determining volume in a drop and half-a-drop Vi drops Vf VTotal
Avg Vol *
per drop
Observations (1 drop procedure, 30 total drops):
* Show calculations here
Observations (1 drop procedure, 40 total drops):
* Show calculations here
Observations (1/2 drop procedure, 30 total half-drops):
* Show calculations here
Observations (1/2 drop procedure, 40 total half-drops):
* Show calculations here
Observations (mulligan):
* Show calculations here
Experiment: Basic Lab Techniques in Analytical Chemistry Chem251 modified 08/2019
13

Experiment: Basic Lab Techniques in Analytical Chemistry Chem251 modified 08/2019
14
00 Experiment: Basic Lab Techniques and Compliance of GLP Analytical Chemistry 251
# CRITERIA (Tentative point distribution) pts
A Use of the Analytical Balance (5 + 5)
i. Record Keeping of Pipet Calibrations:
• Notes on using a balance.
• Record keeping for pipet calibration. Observation in complete sentences
• Precision in measuring mass
ii. Mass of Unknown, Aluminum Slug
• Unknown number data
• Unknown mass __________ (True) / ____________ (Recorded) • Notebook initial by instructor.
5
5
B Quantitative Transfer (5) i. Recording data and technique in quantitative transfer
• Notes on preparing KMnO4 solution.
• Notes on number of washing to quantitatively transfer from beaker to flask
5
C Taking an Aliquot (5 + 5)
i. Using the Brinkman pipet
• Notes on using the Brinkman pipet and making the transfer
• Technique on using the Brinkman pipet (instructor's notes)
• Notes on number of rinse required to remove permanganate purple color
ii. Demonstration to instructor
• Grade on technique for conditioning and preparing KMnO4 solution demo to instructor.
• Notebook initial by instructor.
5
5
D Calibration of Pipet (5 + 5)
i. Preparing pipet
• Notes preparing pipet • Mass of flask, stopper and water. Precision and accuracy
ii. Buoyancy correction procedure and calculations
• Analysis of 3 good weighing.
• Buoyancy correction calculation.
• Average "True volume" of pipet.
5
5
E Buret Assignment and Proper Reading of your Buret (5 + 5)
i. Caring and labeling buret
• Notes on caring and storing buret
ii. Conditioning and preparing buret
• Notes on preparing and conditioning buret
• Notes on using the buret card to read meniscus of buret.
iii Reading buret to correct precision
• Instructor reading confirmation. Reading should be within +/- 0.02 mL and correct precision
iv. Practice half drop technique
• Notes on technique of half-drop techniques.
5
5
Lab Techniques / Record keeping / Excel Workup (5)
• Following directions of lab and course.
• Precision of work, sound statistical analysis, conclusion of results
• Upkeep of notebook, notebook preparation and using proper notebook as instructed by syllabus
• Working diligently and independently without excessive guidance by others.
5
50/2 pts
Instructor's Comment