016. ct operating manual.pdf
TRANSCRIPT

20 A25000-A1400-D000-01-76P1Issue: 1 Issue date: February 2012
FlexiPacket Commissioning Tool, Rel. 1.3SU2, Operat-ing Documentation, Issue 1
Overview
2 Overview
2.1 Scope of applicationThe basic concept behind the unique value proposition of FlexiPacket Microwave is the implementation of a complete microwave terminal in an Outdoor Unit. This concept has been implemented in the FlexiPacket Radio.
Traditional MW equipment has a functional split between an Indoor (IDU) and an Outdoor (ODU) unit. FlexiPacket Radio includes all the functionalities: modem and baseband processing that are embedded in the ODU.
A standard Ethernet interface is used to interconnect with the network. FlexiPacket Microwave is the means of deploying a cost-effective microwave infrastructure for 3G, WiMAX and LTE backhaul, high speed wireless Internet networks, fixed broadband access backhaul and private wireless networks.
FlexiPacket Microwave is the right solution to design advanced mobile backhaul networks based on Ethernet transport. The solution is conceived both for pure packet and hybrid (TDM+packet) networks. FlexiPacket Microwave includes:
• FlexiPacket Radio, a fully outdoor microwave radio. • FlexiPacket Hub A1200/A2200, FlexiPacket FirstMile 200, FlexiPacket Hub
800/800H.
Scope of the FlexiPacket Commissioning Tool is to support the first installation and upgrade of the FlexiPacket system (IDU, ODUs). More in details:
• to configure the E-LAN reachability for all ODUs and IDU with their public IP addresses, after this operation, it will be possible to address all the management SNMP Agents on the whole system with their public IP addresses and through their relevant plug-in.
• to configure 1+1 protection relationship between two ODUs (system type, alignment of Gbe/Radio parameters)
• to configure and align the ODUs parameters inside the Link Protection Group (LPG) • to change topology of an already working system, thus adding/removing an ODU
with its own public IP address, this means to build up a communication tunnel to reach each ODU, to configure the DCN data set and to provide the IDU with the relevant data.
2.2 PC requirement • Laptop running Windows XP, Windows Vista and Windows 7 operating system with:
• Java (JRE) version 1.6 or higher installed on the laptop • Active serial port (COM port) , it’s only needed for solutions with Hub
A1200/A2200
g Starting from A1200 R5.0 drop 2, running FTI is no more needed and connection to console port can be avoided, so serial port related item and settings are not neces-sary.

A25000-A1400-D000-01-76P1Issue: 1 Issue date: February 2012
21
FlexiPacket Commissioning Tool, Rel. 1.3SU2, Operat-ing Documentation, Issue 1
Overview
g For the non-administrator user in Window 7 environment, please open Control Panel > User Accounts > Change User Account Control Settings, and change the setting to Never Notify, then reboot the laptop.
• 1 x Ethernet cable (copper) • RJ-45 Serial console cable (provided with the FlexiPacket Hub), it’s only needed for
solutions with Hub A1200/A2200 • USB-serial adapter, if the laptop has no COM port. • Identify your Serial Port connection and define the following values for the serial con-
nection, it’s only needed for solutions with Hub A1200/A2200: • Bits per second = 9600 (For A1200, it is 115200) • Data bits = 8 (default) • Parity = None (default) • Stop bits = 1 (default) • Flow control = None
• Remove old CT version from Start > Programs > Nokia Siemens Networks > Commissioning Tool > Uninstall Commissioning Tool, if any, and install on the laptop CT 1.3 following the steps below:1 Double click the installation application provided. Setup wizard window pops up:
Figure 1 Setup wizard2 Click on Next to select installation folder, here use default setting.

22 A25000-A1400-D000-01-76P1Issue: 1 Issue date: February 2012
FlexiPacket Commissioning Tool, Rel. 1.3SU2, Operat-ing Documentation, Issue 1
Overview
Figure 2 Select installation folder3 Leave the settings unchanged in the next steps, until the installation is finished,
then setup complete window appears:
Figure 3 Setup complete

A25000-A1400-D000-01-76P1Issue: 1 Issue date: February 2012
23
FlexiPacket Commissioning Tool, Rel. 1.3SU2, Operat-ing Documentation, Issue 1
Overview
4 Click Finish to exit setup application.
g The installation program of Commissioning Tool 1.3 already includes Java installer, Ax200 First Time Installer, License Management Tool, FTP server and FTP client. By default, the FTP server provided here is used instead of the one already existed in the laptop if any.
• Manually assign to your laptop the IP address 192.168.255.101 with subnet mask 255.255.255.0. gateway: 192.168.255.100
Figure 4 IP connectivity setting 1/31 Select from Start > Settings > Network Connections. (For Window 7 user,
select from Start > Control Panel > Network and Sharing Center > Change Adapter Settings
2 Select Local Area Connection for the appropriate ethernet card, then double click.
Figure 5 IP connectivity setting 2/3
3 Select Properties > Internet Protocol (TCP/IP).4 Then select Use following IP address and type in IP address, subnet mask and
default gateway, as shown in Figure 5.
g If personal firewall is installed on the laptop, administrator rights is required to set IP address of system in friend list of the firewall or disable firewall.

24 A25000-A1400-D000-01-76P1Issue: 1 Issue date: February 2012
FlexiPacket Commissioning Tool, Rel. 1.3SU2, Operat-ing Documentation, Issue 1
Overview
5 Click OK on all windows.
• Manually assign to your laptop a second IP Address in the same sub-net, that will be assigned to the FlexiPacket Hub and FlexiPacket Radios (example 192.168.12.120).
Figure 6 IP connectivity setting 3/31 From “General” IP config window, select Advanced.2 On the group “IP address” select Add and set a second IP address, as shown
in Figure 6.3 On the group “Default gateways” select Add and set a second gateway.4 Click OK on all windows.
2.3 Graphical User InterfaceFlexiPacket Commissioning tool supports easy and guided first installation and upgrade procedures of the FlexiPacket system (IDU & ODU). It enables the user to perform a wide variety of operation, configuration, and maintenance tasks with the IDUs and ODUs. It can also be used without any IDU support and directly connected to the Flex-iPacket Radio via laptop.
2.3.1 Login wizard viewThe login window. See Figure 7.

A25000-A1400-D000-01-76P1Issue: 1 Issue date: February 2012
25
FlexiPacket Commissioning Tool, Rel. 1.3SU2, Operat-ing Documentation, Issue 1
Overview
Figure 7 Login Window
There are two operation modes available for different IDUs depend on the specific IDU equipment: Assisted mode and Advanced mode. And standalone radio only support advanced mode.
• Assisted Mode is mainly intended for non-advanced user and for site first installation phase. In this mode, user is forced to follow a predefined sequence, answering precise questions and filling required fields. Assisted Mode runs also as offline con-figurator. Thus it is not required to directly connect to the devices. At the end of the configuration steps, the user can decide to perform all the configurations to the devices (connection required) or to save all the settings into a CT configuration file. This CT configuration file can be loaded in a second time to resume all the configu-rations into the Commissioning Tool. The format of this file is .txt and could be modified offline with text editor before uploading to the target device. At last, a vali-dation process is performed to validate the parameters set in assisted mode. if error occurs, relevant step will be shown in red, and commission is not available unless the error is fixed. The parameters can only be applied after commissioning.
g Recommend to modify the CT configuration in assisted mode of CT.
• Advanced Mode is intended for an advanced user or for site maintenance/trouble-shooting, testing and reporting. In this mode, user can jump from one view to another without any constraint, even if the actions/views are presented in an ordered sequence to be performed from the first to the last. In this mode, there is no valida-
tion step, the button is pressed to validate the parameters. If error occurs, a error message will appear. The parameters will take effect only when the error is fixed.

26 A25000-A1400-D000-01-76P1Issue: 1 Issue date: February 2012
FlexiPacket Commissioning Tool, Rel. 1.3SU2, Operat-ing Documentation, Issue 1
Overview
g Demonstration check box is only used in assisted mode to simulate the last steps of commissioning when there is no equipment connected.
2.3.2 Main windowAfter login successfully, the main window is displayed as the root screen to access all other windows. Figure 8, Figure 9, Figure 10 and Figure 11 provides an overview of the main window for assist mode, advanced mode, and standalone FlexiPacket Radio respectively.
g These pictures are just the overview of each mode, may be different depending on the equipment.
Assisted mode wizard view
• IDU Base Setting • IDU Port Setting • LPG Setting (Depends on the IDU type) • ODU Setting • Setting finished • Commissioning • Validation Views
Figure 8 Assisted mode wizard view (Part 1) example from FPFM200

A25000-A1400-D000-01-76P1Issue: 1 Issue date: February 2012
27
FlexiPacket Commissioning Tool, Rel. 1.3SU2, Operat-ing Documentation, Issue 1
Overview
Figure 9 Assisted mode wizard view (Part 2) example from FPH800
Advanced mode view
• IDU view • Port View • Device View • ODU Software • ODU License • Alarm View • Test View • Report View

28 A25000-A1400-D000-01-76P1Issue: 1 Issue date: February 2012
FlexiPacket Commissioning Tool, Rel. 1.3SU2, Operat-ing Documentation, Issue 1
Overview
Figure 10 Advanced mode view example from FPFM200
Advanced mode view for FlexiPacket Radio
• FPR view • Software view • License view • Alarm View • Test View
Figure 11 FlexiPacket Radio overview example from FPR

A25000-A1400-D000-01-76P1Issue: 1 Issue date: February 2012
29
FlexiPacket Commissioning Tool, Rel. 1.3SU2, Operat-ing Documentation, Issue 1
Overview
2.3.3 Main window menuFigure 12 displays the CT main window menu. By clicking one of these menu items, the corresponding drop-down menu opens.
Figure 12 Main window menu
2.3.4 View barThe view bar on the left side of the CT main window is used to navigate between differ-ent views and elements. This is only available in advanced mode and standalone device.
Menu Item Description
File
Exit Exits the CT application.
Help
About Display the CT application information, e.g., version number.
Table 4 Main window menu items
Icon Description
• IP settings • Management VID • Time and date • System command • Configuration backup and restore • Software and license management
• Display port-related information • Add, delete and configure ODU • Set, reset and disable management port
• Display ODU-related information • Add, delete and configure LPG • Configure ODU • ODU configuration restore and align
Table 5 View bar in advanced mode

30 A25000-A1400-D000-01-76P1Issue: 1 Issue date: February 2012
FlexiPacket Commissioning Tool, Rel. 1.3SU2, Operat-ing Documentation, Issue 1
Overview
• ODU software information • Software upgrade and switch
• ODU license information • License upgrade
• Alarm information of the equipment.
• Test IDU port and ODU parameters, link and end to end connection, etc.
• Generate a commissioning report.
Icon Description
• Overview and status of ODU • Wizard creation of LPG, service and ODUs parame-
ter.
• Upload software of ODU • Restore configuration of ODU • Switch software bank on ODU
• View ODU license data • Update license of ODU
Table 6 View bar in Standalone device
Icon Description
Table 5 View bar in advanced mode (Cont.)

A25000-A1400-D000-01-76P1Issue: 1 Issue date: February 2012
31
FlexiPacket Commissioning Tool, Rel. 1.3SU2, Operat-ing Documentation, Issue 1
Overview
2.3.5 General function buttonsBy clicking one of the function buttons in the window, a specific operation can be done.
2.4 Supported ProductsThe complete products supported by Commissioning Tool 1.3 are listed in Table 8 and Table 9:
• Alarm information of the equipment.
• Test ODU parameters, link and end to end connec-tion, etc.
Icon Description
Table 6 View bar in Standalone device (Cont.)
Function button Description
To add new settings.
To confirm all the configuration changes.
To close the window without saving any configuration changes.
To confirm all the configuration changes and close the window.
Go to the next step.
Go back to previous step.
To modify the settings of a specific component.
To delete the current settings.
To exit the application immediately
Table 7 General function buttons

32 A25000-A1400-D000-01-76P1Issue: 1 Issue date: February 2012
FlexiPacket Commissioning Tool, Rel. 1.3SU2, Operat-ing Documentation, Issue 1
Overview
For the IDUs, the laptop which runs the commissioning tool software needs to connect to the management port of the IDU. ODU configuration is done via the IDU connection.
While for the Standalone FlexiPacket Radio and Standalone FlexiPacket MultiRadio, the laptop which runs the commissioning tool software directly connects to the ODU and configures the ODU directly.
The configuration of the IDU and ODUs through the commissioning tool is a must and precondition for the later configuration via network management tools either locally or remotely.
Supported IDUs Abbreviations
FlexiPacket Hub A1200 R5.0 (drop1, 2, 3) A1200 or FPH1200
FlexiPacket Hub A2200 R4.5, R4.5 EP1,R5.0
A2200 or FPH2200
FlexiPacket FirstMile 200 R1.0 EP1 FirstMile 200 or FPFM200
FlexiPacket FirstMile 200 R2.0 FirstMile 200 or FPFM200
FlexiPacket Hub 800 R2.0 Hub 800 or FPH800
FlexiPacket Hub 800 H1.0 Hub 800H or FPH800H
Table 8 Supported IDUs
Supported ODUs Abbreviations
FlexiPacket Radio R1.2 SU1 FPR
FlexiPacket Radio R1.3 FPR
FlexiPacket Radio R1.3 EP1 FPR
FlexiPacket MultiRadio R2.1 FPMR(P)
FlexiPacket MultiRadio R2.4 FPMR(P)
FlexiPacket MultiRadio H2.1 FPMR(H)
FlexiPacket Radio HC R1.4.6 FPR HC
Table 9 Supported ODUs

A25000-A1400-D000-01-76P1Issue: 1 Issue date: February 2012
99
FlexiPacket Commissioning Tool, Rel. 1.3SU2, Operat-ing Documentation, Issue 1
FlexiPacket FirstMile 200 setting
4 FlexiPacket FirstMile 200 settingIn this chapter, the operation in both assisted mode and advanced mode of FlexiPacket FirstMile 200 will be described.
4.1 Hardware ConnectionFirst time installation is not needed for FlexiPacket FirstMile 200. PC is connected to FirstMile 200 directly through OOB port. ODUs are connected to the IU/OU port of First-Mile 200.
4.2 Assisted modeFor assisted mode, the ODU settings can be predefined before the IDU and ODU are physically connected. The physical connection is not necessary until the validation pro-cedure. This offline procedure is only for the first-time installation but not for the mainte-nance.
4.2.1 Log-in1. Run the FlexiPacket Commissioning Tool application from Start > Programs >
Nokia Siemens Networks > Commissioning Tool > Run CT.
2. Select FPFM200 from Equipment drop-down list and Assisted from operation mode drop-down list in the Equipment Selection box, and then click Next button.
Figure 109 Login Window
3. Choose Import from file to use predefined offline configuration file, or select Start from scratch to configure manually.

100 A25000-A1400-D000-01-76P1Issue: 1 Issue date: February 2012
FlexiPacket Commissioning Tool, Rel. 1.3SU2, Operat-ing Documentation, Issue 1
FlexiPacket FirstMile 200 setting
Figure 110 Select Configuration File
g The file imported must be generated by Commissioning Tool.
4. Click on Next button in Figure 110, the following interface appears.
Figure 111 Application is loading
4.2.2 IDU base setting1. Configure IDU System Type window opens. Select FPFM200 R2.0 as shown in
Figure 112.

A25000-A1400-D000-01-76P1Issue: 1 Issue date: February 2012
101
FlexiPacket Commissioning Tool, Rel. 1.3SU2, Operat-ing Documentation, Issue 1
FlexiPacket FirstMile 200 setting
Figure 112 Configuration Overview_2.0Or select FPFM200 R1.0 EP1 as shown in Figure 113.
Figure 113 Configuration Overview_EP1

102 A25000-A1400-D000-01-76P1Issue: 1 Issue date: February 2012
FlexiPacket Commissioning Tool, Rel. 1.3SU2, Operat-ing Documentation, Issue 1
FlexiPacket FirstMile 200 setting
In equipment FM200 R2.0, the system type is fixed to Single IDU. So there is no option to select system type.In equipment FM200 R1.0EP1, the system type can be selected in 5 types from the drop-down list and click on Next, as shown in Figure 113.
g There are 5 types in the list. • Nx(1+0) N=1...4: Allow to connect at most 4 ODUs. LPG setup is not allowed. • 1x(1+1) Hot Stand-By with Single IDU: Allow to connect at most 2 ODUs and
setup at most 1 LPG. • 2x(1+1) Hot Stand-By with Single IDU: Allow to connect at most 4 ODUs and
setup at most 2 LPGs. • 1x(1+0)+(1+1) Hot-Stand-By: Allow to connect at most 3 ODUs and setup at
most 1 LPG. • 2x(1+0)+(1+1) Hot-Stand-By: Allow to connect at most 4 ODUs and setup at
most 2 LPGs.
g The license is needed to be updated to support FirstMile 200 1+1 Hot -Stand_By.
2. Upgrade IDU Software.
Figure 114 Upgrade IDU SoftwareClick on Browse button to locate the upgrade software file provided and click on Open.

A25000-A1400-D000-01-76P1Issue: 1 Issue date: February 2012
103
FlexiPacket Commissioning Tool, Rel. 1.3SU2, Operat-ing Documentation, Issue 1
FlexiPacket FirstMile 200 setting
Figure 115 Choose software upgrade file
g The software file name must end with ".bin".The SW upgrade setting is executed in offline condition, so it needs to be verified in Validate Setting execution.In particular, the setting needs to be resetted when executed on field, because the location of upload file may not be the same as in offline mode.
If there is no need to upgrade the software, please keep it blank.
3. Upgrade IDU License.Obtain license for FirstMile 200 R1.0 EP1:

104 A25000-A1400-D000-01-76P1Issue: 1 Issue date: February 2012
FlexiPacket Commissioning Tool, Rel. 1.3SU2, Operat-ing Documentation, Issue 1
FlexiPacket FirstMile 200 setting
Figure 116 Upgrade IDU LicenseFor the detailed information to get new license, please refer to Upgrade ODU license.
Obtain license for FirstMile 200 R2.0:Type the new license key in the License key field.

A25000-A1400-D000-01-76P1Issue: 1 Issue date: February 2012
105
FlexiPacket Commissioning Tool, Rel. 1.3SU2, Operat-ing Documentation, Issue 1
FlexiPacket FirstMile 200 setting
Figure 117 Upgrade IDU licenseFor the detailed information to get new license, please refer to CLicS license key generation procedure.
4. Configure IDU Properties. This window provides the parameters of M-VID, PC Syn-chronization, IP address and so on. Fill in the required fields and click on Next.

106 A25000-A1400-D000-01-76P1Issue: 1 Issue date: February 2012
FlexiPacket Commissioning Tool, Rel. 1.3SU2, Operat-ing Documentation, Issue 1
FlexiPacket FirstMile 200 setting
Figure 118 Configure IDU Properties
g The IP address here is used as the public IP of IDU, and please fill in this IP address when login to the commissioning tool for the next time.Please make sure the SNTP server is available. If the server is not available, IDU is unable to synchronize time from SNTP server, and use current system time instead.
4.2.3 IDU port setting1. Configure Port to ODU. Select the port which is connected to ODU and fill in the
required fields, click on Add button to add entries then click on Next button.

A25000-A1400-D000-01-76P1Issue: 1 Issue date: February 2012
107
FlexiPacket Commissioning Tool, Rel. 1.3SU2, Operat-ing Documentation, Issue 1
FlexiPacket FirstMile 200 setting
Figure 119 Configure ODU Port (FPR)
g The IDU system type selected before decides how many ports can be connected to ODUs.The ODU subnet mask and default gateway are copied from those of IDU IP Setting before.The port selected here can not be used as the management port any more.Port GE3 and GE4 is set as power supply for ODU by default.The ODU subnet mask and default gateway are copied from those of IDU IP Setting before.
Fill in the fields as shown in Figure 119 and click on Add button to add an entry. The ODU type can be selected from FPR, FPMR(P), FPR HC and 2*FPMR(P).
g The 2*FPMR(P) ODU is the same ODU as FPMR, but it just has one cable. FPMR has two cables.
For 2*FPRM(P), see the configuration in Figure 120:

108 A25000-A1400-D000-01-76P1Issue: 1 Issue date: February 2012
FlexiPacket Commissioning Tool, Rel. 1.3SU2, Operat-ing Documentation, Issue 1
FlexiPacket FirstMile 200 setting
Figure 120 Configure ODU Port (2*FPMR)Click to select an existing entry row to modify the corresponding fields directly on the window. Then click on Modify button to commit the changes.
Click to select an existing entry row and click on Delete button to delete the entry row.
2. Configure Management Port.

A25000-A1400-D000-01-76P1Issue: 1 Issue date: February 2012
109
FlexiPacket Commissioning Tool, Rel. 1.3SU2, Operat-ing Documentation, Issue 1
FlexiPacket FirstMile 200 setting
Figure 121 Configure Management Port
g The port selected here can not be used to connect to ODU any more.The port connected with ODU can not be modified or deleted.
Select the management port and its parameters as shown in Figure 121 and click on Add button to add an entry row.
Click to select an existing entry row and modify the corresponding fields directly on the window. Then click on Modify button to commit the changes.
Click to select an existing entry row and click on Delete button to delete the entry row.
3. Configuration for IDU is complete. Press Next button to continue with LPG setting.
4.2.4 ODU System Type SettingFigure 122 shows various parameters required to configure the ODU system type.

110 A25000-A1400-D000-01-76P1Issue: 1 Issue date: February 2012
FlexiPacket Commissioning Tool, Rel. 1.3SU2, Operat-ing Documentation, Issue 1
FlexiPacket FirstMile 200 setting
Figure 122 Configure ODU system type
Fill in the fields as shown in Figure 122 and click on Add button to add an entry row.
When Odu type is FPR, the Odu system type can only be 1+1 HSBY.
When Odu type is FPMR(P) and the software version is 2.1, the Odu system type can be selected from 1+1 HSBY, 1+1 Frequency Diversity, 2+0 Frequency Diversity, 1+1 Space Diversity and 2+0 XPIC.
When Odu type is FPMR(P) and the software version is 2.4, the Odu system type can be selected from 1+0 Ring, 1+1 HSBY CCM Based, 1+1 HSBY Standalone, 1+1 Fre-quency Diversity, 2+0 Frequency Diversity, 1+1 Space Diversity and 2+0 XPIC.
g For odu system type 1+1 HSBY Standalone, it can work with or without LPG setting.
When Odu type is 2xFPMR(P), the Odu system type can only be 1+1 HSBY 1 Cable and 2+0 XPIC 1 Cable.
When Odu type is FPR HC, the Odu system type can be selected from hsb_1wire, hsb_2wire and x2.
For 2*FPMR(P) with ODU system type 1+1 HSBY 1 Cable, see the ODU system type configuration in Figure 123:

A25000-A1400-D000-01-76P1Issue: 1 Issue date: February 2012
111
FlexiPacket Commissioning Tool, Rel. 1.3SU2, Operat-ing Documentation, Issue 1
FlexiPacket FirstMile 200 setting
Figure 123 ODU system type configuration (1+1 HSBY 1 Cable)
In this case, the direct connected ODU is protection ODU, and the co-located ODU is main ODU. It is not possible to change the role of main ODU and protection ODU (ie, the IP address of these two ODUs are not exchangable).
For 2*FPMR(P) with ODU system type 2+0 XPIC 1 Cable, the ODU system type config-uration is:

112 A25000-A1400-D000-01-76P1Issue: 1 Issue date: February 2012
FlexiPacket Commissioning Tool, Rel. 1.3SU2, Operat-ing Documentation, Issue 1
FlexiPacket FirstMile 200 setting
Figure 124 ODU system type configuration (2+0 XPIC 1 Cable)
In this case, the direct connected ODU is master ODU, the co-located ODU is slave ODU. It is not possible to change the role of master ODU and slave ODU. But horizonal ODU and vertical ODU can exchange.
g Only NNI ports can be used to setup LPG!
Click on an existing entry row and click on Delete button to delete the entry row.
g The LPG1 is binding to GE1 port and GE2 port. The LPG2 is binding to GE3 port and GE4 port. The IDU system type selected before decides how many LPG can be created.
4.2.5 ODU settingFor all the following ODU Settings, multiple ODUs can be selected to set the parameters at a time with the use of Ctrl .
1. Upgrade ODU Software interface shows as Figure 125 for FPR, FPMR(P) and 2*FPMR(P) ODU type.

A25000-A1400-D000-01-76P1Issue: 1 Issue date: February 2012
113
FlexiPacket Commissioning Tool, Rel. 1.3SU2, Operat-ing Documentation, Issue 1
FlexiPacket FirstMile 200 setting
Figure 125 Upgrade ODU Software interfaceSelect the ODU or multiple ODUs, click on Browse button to locate the upgrade software file provided, see Figure 126, and click on Open button to select the file, then click Modify to upgrade the software.
Figure 126 Upgrade ODU Software

114 A25000-A1400-D000-01-76P1Issue: 1 Issue date: February 2012
FlexiPacket Commissioning Tool, Rel. 1.3SU2, Operat-ing Documentation, Issue 1
FlexiPacket FirstMile 200 setting
g The software file name must end with ".pec". If there is no need to upgrade the soft-ware, please keep it blank.
Upgrade ODU Software interface shows as Figure 127 for FPR HC ODU type.
Figure 127 Upgrade ODU Software interface-FPR HCSelect the ODU, click on Browse button to locate the Application OMNI file, Modem OMNI file and Frequency file. Click on Open button to select the file, then click Modify to upgrade the software. All these three files have to be correctly located to proceed the software upgrade.
g The Application OMNI file and Modem OMNI file name must end with ".hex". The Frequency file name must end with “.txt”. If there is no need to upgrade the software, please keep them blank.
2. Upgrade ODU license. Select a port on which the connected ODU needs license upgrade. For ODU type - FPR, FPMR(P) and 2*FPMR(P):
g For FPMR(P), only CLICS License Key is used.

A25000-A1400-D000-01-76P1Issue: 1 Issue date: February 2012
115
FlexiPacket Commissioning Tool, Rel. 1.3SU2, Operat-ing Documentation, Issue 1
FlexiPacket FirstMile 200 setting
Figure 128 Upgrade ODU License (version 1.3.8 and before)
For the detailed information to get new license, please refer to Upgrade ODU license.
Then type the license key created in the “License Key Generation” window into the “License Key from Management Tool” field, and click on Modify to upgrade the key.
In software version 1.3.9 and afterwards, select License Key from CLicS.

116 A25000-A1400-D000-01-76P1Issue: 1 Issue date: February 2012
FlexiPacket Commissioning Tool, Rel. 1.3SU2, Operat-ing Documentation, Issue 1
FlexiPacket FirstMile 200 setting
Figure 129 Upgrade ODU License (version 1.3.9 and afterwards)
The new CLicS License Key can be either retrieved via web interface or generated via SMS, refer to CLicS license key generation procedure for detailed information.
Type in the license key generated in CLicS, then click on Add button to upgrade.
g If there is no need to upgrade the license key, please keep it blank or zero.
3. Configure ODU ACM. For ODU type - FPR, set the following parameters for selected IDU Port. • ACM TX enable (enable/disable) • Static TX profile (4 QAM/16 QAM/64 QAM/128 QAM/256 QAM)
ACM: Adaptive Code Modulation, belongs to the radio link algorithms. When enabled, it allows automatic modulation code selection in accordance with S/MSE value received by the remote ODU.It is recommended to make sure you have enough license to set ACM.
For ODU type - FPMR(P) with software version 2.1, set the following parameters for selected IDU Port. • Profile criteria (high performance/custom profile) • ACM TX enable (enable/disable) • Static TX profile (QPSK/16 QAM/32 QAM/64 QAM/128 QAM/256 QAM)
For ODU type - FPMR(P) with software version 2.4 and 2xFPMR(P), set the follow-ing parameters for selected IDU Port. • Standard mode (etsi/ansi)

A25000-A1400-D000-01-76P1Issue: 1 Issue date: February 2012
117
FlexiPacket Commissioning Tool, Rel. 1.3SU2, Operat-ing Documentation, Issue 1
FlexiPacket FirstMile 200 setting
• Channel bandwidth (3.5 MHz/7 MHz/14 MHz/28 MHz/40 MHz/56 MHz) • Profile criteria (standard profiles/high throughput) • ACM TX enable (enable/disable) • TX static profile (QPSK/16 QAM/32 QAM/64 QAM/128 QAM/256 QAM)
g ODU license upgrade is needed to support more modulation type.In case of the first link setup (before antenna alignment), the ACM must be disabled. It can be enabled at the end of antennas alignment.
Figure 130 Configure ODU ACM
For ODU type - FPR HC, set the parameter HAAM status (on/off) for selected IDU Port, see Figure 131.HAAM - Hitless Automated Adaptive Modulation.

118 A25000-A1400-D000-01-76P1Issue: 1 Issue date: February 2012
FlexiPacket Commissioning Tool, Rel. 1.3SU2, Operat-ing Documentation, Issue 1
FlexiPacket FirstMile 200 setting
Figure 131 Configure ODU ACM-FPR HCClick on Modify to update the changes.
4. Configure ODU ATPC. For ODU type - FPR, FPMR(P) and 2*FPMR(P), set the following parameters for selected IDU Port, see Figure 132. • ATPC enable (enable/disable) • MAX TX power (dbm)
ATPC: Automatic Transmit Power Control. The ATPC defines the optimum TX power level basing on one of the quality and the power level of the received signal (MSE and RSL respectively).The approximative range of "Max TX Power" is 3-17. The accurate range of "Max TX Power" can not be determined in a offline state, it depends on the modulation mode and bandwidth.For FPMR(P) with software version 2.4, if the value set for MAX TX power in CT is bigger than the value in ODU, ODU will automatically adopt a proper value.

A25000-A1400-D000-01-76P1Issue: 1 Issue date: February 2012
119
FlexiPacket Commissioning Tool, Rel. 1.3SU2, Operat-ing Documentation, Issue 1
FlexiPacket FirstMile 200 setting
Figure 132 Configure ODU ATPC
g The Max TX Power range is automatically detected by the system and may vary depending on the setting in ATM view (Static TX profile, Max RX profile, etc).In case of the first link setup (before antenna alignment), the ATPC must be dis-abled. It can be enabled at the end of antennas alignment.
For ODU type - FPR HC, set the following parameters for selected IDU Port, see Figure 133. • ATPC status (on/off) • ATPC coordinated power status (on/off) • Coordinated power offset(dbm)(1.0--10.0)

120 A25000-A1400-D000-01-76P1Issue: 1 Issue date: February 2012
FlexiPacket Commissioning Tool, Rel. 1.3SU2, Operat-ing Documentation, Issue 1
FlexiPacket FirstMile 200 setting
Figure 133 Configure ODU ATPC-FPR HCClick on Modify to update the changes.
5. Configure ODU SyncE. For ODU type - FPR, set the following parameters for selected IDU Ports. • Source syncE setting (freerun/ethernet/radio), default is freerun. • ODU master/slave value (automatic/slave/master), default is automatic. • IDU port master/slave value (slave/master).
If ethernet is selected, ODU will be set to slave and IDU will be set to master.If radio is selected, ODU will be set to master and IDU will be set to slave.If freerun is selected, ODU will be set to automatic and IDU will do nothing.
For ODU type - FPMR(P) and 2*FPMR(P), set the following parameters for selected IDU Ports. • Source syncE transfer (NCT/Fixed/Priority). • Source syncE setting (ethernet/radio). • Master/slave value (slave/master). • IDU port master/slave value (slave/master).
If ethernet is selected, ODU will be set to slave and IDU will be set to master.If radio is selected, ODU will be set to master and IDU will be set to slave.

A25000-A1400-D000-01-76P1Issue: 1 Issue date: February 2012
121
FlexiPacket Commissioning Tool, Rel. 1.3SU2, Operat-ing Documentation, Issue 1
FlexiPacket FirstMile 200 setting
Figure 134 Configure ODU SyncEFPR HC does not support SyncE.
6. Configure ODU Network. Multiple ODUs can be selected to set the Default Gateway and Secondary Gateway at a time and click on Modify to update the changes, see Figure 135.FPR HC does not support secondary default gateway. Keep it empty is preferred. If in chain sites, is suggested to set as Secondary Gateway the IP address associated to the Transport Card of the local BTS. This allows to have the reachability of the ODU via LMP port of this BTS if the radio link is down and this affects the path toward the Primary Gateway.

122 A25000-A1400-D000-01-76P1Issue: 1 Issue date: February 2012
FlexiPacket Commissioning Tool, Rel. 1.3SU2, Operat-ing Documentation, Issue 1
FlexiPacket FirstMile 200 setting
Figure 135 Configure ODU Network
7. Configure ODU RF. For ODU type - FPR, FPMR(P) with software version 2.1, set the following parame-ters for selected IDU Ports, see Figure 136. • Tx frequency (KHz) / Rx frequency (KHz) • Channel bandwidth (3.5MHz/ 7MHz/ 14MHz/ 28MHz/ 40MHz/ 56MHz) • Radio port admin status (up/down) • ODU system type

A25000-A1400-D000-01-76P1Issue: 1 Issue date: February 2012
123
FlexiPacket Commissioning Tool, Rel. 1.3SU2, Operat-ing Documentation, Issue 1
FlexiPacket FirstMile 200 setting
Figure 136 Configure ODU RF
g Either the TX frequency or the RX frequency is needed to input and can not be zero. Here use 18900000 KHz as example. There is a formula between TX frequency and RX frequency. This tool will automatically calculate the TX frequency according to the RX frequency, and vise versa.
The frequency range can not be determined in the offline state. It can be confirmed in the validation step before commissioning. If you are not sure about the accurate frequency, just set it to “1” temporarily and go back to correct it after the validation.
For ODU type - FPMR(P) with software version 2.4 and 2xFPMR(P), set the follow-ing parameters for selected IDU Ports. • Tx frequency (KHz) / Rx frequency (KHz) • Radio port admin status (up/down) • ODU system type
For ODU type - FPR HC, set the following parameters for selected IDU Ports, see Figure 137. • Radio band • Programmed frequency • System mode • Transmitter state • Programmed transmitter power (in dbm)

124 A25000-A1400-D000-01-76P1Issue: 1 Issue date: February 2012
FlexiPacket Commissioning Tool, Rel. 1.3SU2, Operat-ing Documentation, Issue 1
FlexiPacket FirstMile 200 setting
Figure 137 Configure ODU RF - FPR HC
8. Configure ODU Time Server. For ODU type - FPR, FPMR(P) and 2*FPMR(P), set the following parameters for selected IDU Port, see Figure 138. • Synchronize time from PC to ODU • SNTP server IP • Time zone • Daylight saving enable (Enabled / Disabled)

A25000-A1400-D000-01-76P1Issue: 1 Issue date: February 2012
125
FlexiPacket Commissioning Tool, Rel. 1.3SU2, Operat-ing Documentation, Issue 1
FlexiPacket FirstMile 200 setting
Figure 138 Configure ODU Time Server
g Please make sure the SNTP server is available. If the server is not available, IDU is unable to synchronize time from SNTP server, and use current system time instead.
For ODU type - FPR HC, set the following parameters for selected IDU Port, see Figure 139. • SNTP enable (Disable / Enable) • SNTP offset (time offset from GMT) • SNTP server

126 A25000-A1400-D000-01-76P1Issue: 1 Issue date: February 2012
FlexiPacket Commissioning Tool, Rel. 1.3SU2, Operat-ing Documentation, Issue 1
FlexiPacket FirstMile 200 setting
Figure 139 Configure ODU Time Server - FPR HC
After ODU Settings are completed, there are four steps in Setting Validation described below. In order to validate setting, IDUs and ODUs need to be connected.
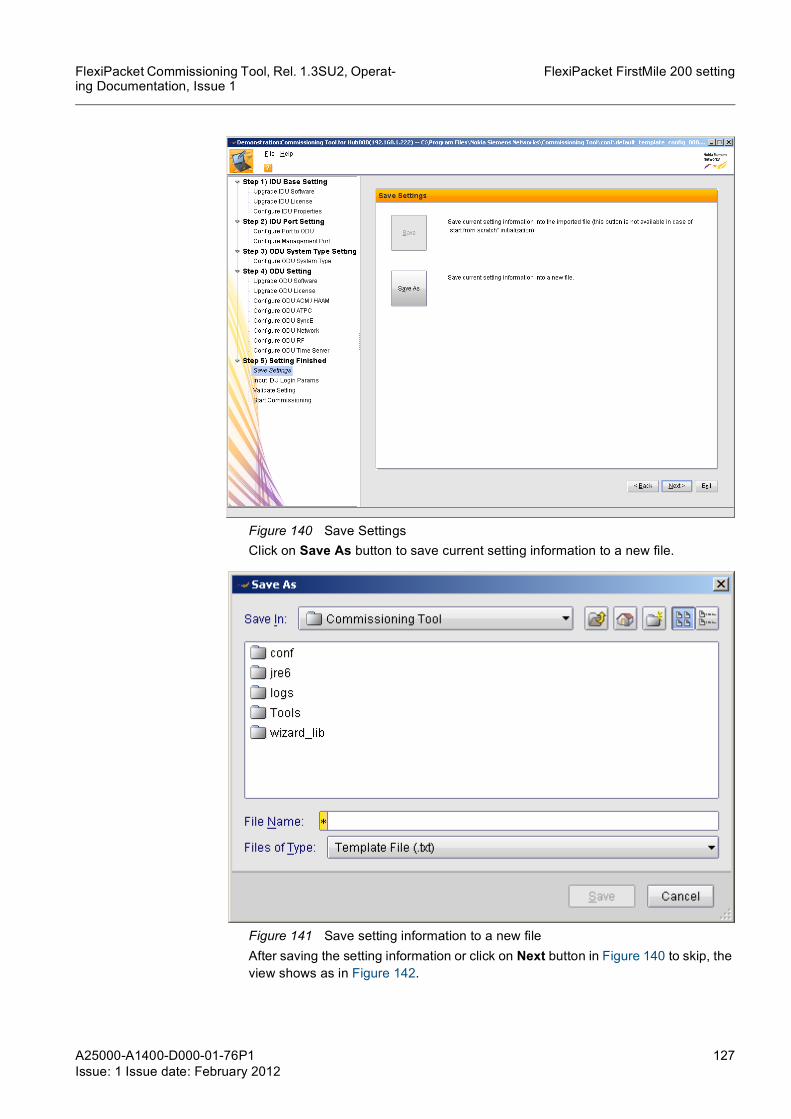
4.2.6 Setting finished1. Save Settings. Click on Save button to save current setting information to the
opening file. But if you are using the default template file, this button would be dis-abled. This step can be skipped without saving the settings.
A25000-A1400-D000-01-76P1Issue: 1 Issue date: February 2012
127
FlexiPacket Commissioning Tool, Rel. 1.3SU2, Operat-ing Documentation, Issue 1
FlexiPacket FirstMile 200 setting
Figure 140 Save SettingsClick on Save As button to save current setting information to a new file.
Figure 141 Save setting information to a new fileAfter saving the setting information or click on Next button in Figure 140 to skip, the view shows as in Figure 142.

128 A25000-A1400-D000-01-76P1Issue: 1 Issue date: February 2012
FlexiPacket Commissioning Tool, Rel. 1.3SU2, Operat-ing Documentation, Issue 1
FlexiPacket FirstMile 200 setting
2. Input IDU Login Parameters. Input the IDU IP and IDU Admin Community, then select PC interface name from the drop-down list, so that Commissioning Tool can connect to IDU.
g In this step, IDU and ODU need to be lined up to get connected.
The community here must be an admin user, the view shows as in Figure 143.
Figure 142 Input IDU Login ParametersThen click on Next button to connect, a warning message will appear to confirm the IDU IP address is correct or not: “Commissioning Tool will try to connect IDU in next steps. Are you sure the IDU IP is correct?”
3. Validate Setting. Click on Validate button to validate current setting in a real envi-ronment. This requires all cables have been exactly connected. A message “No setting error found” will appear and then click on Next button.
g Please validate your settings before commissioning. During validation, all existing LPG will be removed and all ports will be reset to NNI.If there is anything wrong occurred during the validation, the error message will be listed in the blank area below. And the corresponding error steps will be shown in red color in the left tree panel.

A25000-A1400-D000-01-76P1Issue: 1 Issue date: February 2012
129
FlexiPacket Commissioning Tool, Rel. 1.3SU2, Operat-ing Documentation, Issue 1
FlexiPacket FirstMile 200 setting
Figure 143 Validate Setting
4. Start Commissioning. Click on Run button to do commissioning now with current setting information.
g Commissioning will start right after clicking on Run button.

130 A25000-A1400-D000-01-76P1Issue: 1 Issue date: February 2012
FlexiPacket Commissioning Tool, Rel. 1.3SU2, Operat-ing Documentation, Issue 1
FlexiPacket FirstMile 200 setting
Figure 144 Start Commissioning
5. Do Commissioning. Commission is in progress. Wait for the progress bar to com-plete. If there is error during commission, an error message will appear above each progress bar.

A25000-A1400-D000-01-76P1Issue: 1 Issue date: February 2012
131
FlexiPacket Commissioning Tool, Rel. 1.3SU2, Operat-ing Documentation, Issue 1
FlexiPacket FirstMile 200 setting
Figure 145 Commission progress
6. Information View. Figure 146 shows the overview information of IDU base and IDU license.

132 A25000-A1400-D000-01-76P1Issue: 1 Issue date: February 2012
FlexiPacket Commissioning Tool, Rel. 1.3SU2, Operat-ing Documentation, Issue 1
FlexiPacket FirstMile 200 setting
Figure 146 Information View of IDUFigure 147 shows the overview information of ODU.
Figure 147 Information View of ODU

A25000-A1400-D000-01-76P1Issue: 1 Issue date: February 2012
133
FlexiPacket Commissioning Tool, Rel. 1.3SU2, Operat-ing Documentation, Issue 1
FlexiPacket FirstMile 200 setting
4.3 Advanced mode
4.3.1 Application launching processThis chapter describes the configuration process of how to launch the FlexiPacket Com-missioning Tool for FM200 advanced mode. For both the FM200 R1.0EP1 and FM200 R2.0, the major procedure is the same, so the configuration process for FM200 R2.0 is displayed as example, the differences of the procedure for FM200 R1.0EP1 are high-lighted in the corresponding places.
g The parameter values in the following figures are only for demonstration, may not be consistent in the context.
The configuration process follows the steps in this section.
1. Run the FlexiPacket Commissioning Tool application.
g For physical connection procedures, please refer to Hardware Connection.
Figure 148 FPFM200 advanced mode login windowSelect FPFM200 from Equipment drop down list and Advanced from Operation Mode drop down list in the Equipment Selection box, and then click on Next button.
2. The Fill login parameters window opens as Figure 149.

134 A25000-A1400-D000-01-76P1Issue: 1 Issue date: February 2012
FlexiPacket Commissioning Tool, Rel. 1.3SU2, Operat-ing Documentation, Issue 1
FlexiPacket FirstMile 200 setting
Figure 149 Fill login parameters windowLocal management connection means connecting to the IDU which is connected to the local PC; and remote management connection means connecting to the IDU on which the peer ODU is connected after the line-up, in this case only the configura-tions that have no impact on the flowing traffic can be set from remote connection. For example, changing radio parameters like ATPC, ACM and so on.
Enter the values for parameter FPFM200 IP address, FPFM200 Password and ODU Password, then click on Next button.
3. The Configure PC IP address window opens as Figure 150.

A25000-A1400-D000-01-76P1Issue: 1 Issue date: February 2012
135
FlexiPacket Commissioning Tool, Rel. 1.3SU2, Operat-ing Documentation, Issue 1
FlexiPacket FirstMile 200 setting
Figure 150 Configure PC IP address windowConfigure the IP address for PC and click on Next button.
4. The loading interface appears as Figure 151.
Figure 151 Application is loading
4.3.2 IDU ViewThis section describes the operating procedures of the Commissioning tool.
The commissioning tool for FPFM200 advanced mode appears as Figure 152.

136 A25000-A1400-D000-01-76P1Issue: 1 Issue date: February 2012
FlexiPacket Commissioning Tool, Rel. 1.3SU2, Operat-ing Documentation, Issue 1
FlexiPacket FirstMile 200 setting
Figure 152 Commissioning tool for FPFM200 advanced mode overview
In IDU View tab (see Figure 152), there are eight groups of parameters can be config-ured.
• IP SettingsIn IP Settings view (see Figure 153), configure the DNC IP address, Subnet mask and Default gateway, then click on Apply button.
Figure 153 IP settings view
• System TypeIn System Type view (see Figure 155), configure IDU System type. Select system type in the drop-down list and click on Apply button.

A25000-A1400-D000-01-76P1Issue: 1 Issue date: February 2012
137
FlexiPacket Commissioning Tool, Rel. 1.3SU2, Operat-ing Documentation, Issue 1
FlexiPacket FirstMile 200 setting
Figure 154 System type view-FM200 R2.0In equipment FM200 R2.0, the system type is fixed to Single IDU. So there is no option to select system type.
g In equipment FM200 R1.0EP1, the system type can be selected in 5 types (see Figure 155): • Nx(1+0) N=1...4: Allow to connect at most 4 ODUs. LPG setup is not allowed. • 1x(1+1) Hot Stand-By with Single IDU: Allow to connect at most 2 ODUs and
setup at most 1 LPG. • 2x(1+1) Hot Stand-By with Single IDU: Allow to connect at most 4 ODUs and
setup at most 2 LPGs. • 1x(1+0)+(1+1) Hot-Stand-By: Allow to connect at most 3 ODUs and setup at
most 1 LPG. • 2x(1+0)+(1+1) Hot-Stand-By: Allow to connect at most 4 ODUs and setup at
most 2 LPGs.
Figure 155 System type view-FM200 R1.0EP1
• Management VIDIn Management VID view (see Figure 156), set value of Management VLAN ID and click on Apply button.

138 A25000-A1400-D000-01-76P1Issue: 1 Issue date: February 2012
FlexiPacket Commissioning Tool, Rel. 1.3SU2, Operat-ing Documentation, Issue 1
FlexiPacket FirstMile 200 setting
Figure 156 Management VLAN ID view
• Time and DateIn Time and Date view (see Figure 157), following parameters can be configured: Time server IP, Current PC time, Current GMT time, Time zone and Daylight saving enable. Then click on Apply button.
Figure 157 Time and date view
• System CommandsIn System Commands view (see Figure 158), click on Restore to Factory Default button to restore IDU settings to the factory default.
Figure 158 System commands view
• Backup/RestoreIn Backup/Restore view (see Figure 159), the IDU configuration backup file from IDU can be saved on PC, and the stored configuration backup file on PC can be restored to IDU.

A25000-A1400-D000-01-76P1Issue: 1 Issue date: February 2012
139
FlexiPacket Commissioning Tool, Rel. 1.3SU2, Operat-ing Documentation, Issue 1
FlexiPacket FirstMile 200 setting
Figure 159 Backup/Restore viewClick on Browse button in Configuration Backup section, the Choose Configura-tion Backup File window opens as Figure 160. Locate a path for saving the config-uration backup file and enter a file name.
Figure 160 Choose configuration backup file windowClick on Get config file from NE button to store the configuration backup file, the Operation Status field shows the progress of the operation. See in Figure 161.

140 A25000-A1400-D000-01-76P1Issue: 1 Issue date: February 2012
FlexiPacket Commissioning Tool, Rel. 1.3SU2, Operat-ing Documentation, Issue 1
FlexiPacket FirstMile 200 setting
Figure 161 Waiting for NE to prepare the config backup file windowWhen the progress is finished, the Operation Status shows ‘Configuration backup finished!’.
Click on Browse button in Configuration Restore section, the Choose Configu-ration Restore File window opens as Figure 162.
Figure 162 Choose configuration restore file windowLocate a IDU configuration restore file saved before and click on Put config file on NE button to restore. The Operation Status field shows the configuration restoring progress (see Figure 163). When the progress is finished, the Operation Status shows ‘Configuration restore finished!’.

A25000-A1400-D000-01-76P1Issue: 1 Issue date: February 2012
141
FlexiPacket Commissioning Tool, Rel. 1.3SU2, Operat-ing Documentation, Issue 1
FlexiPacket FirstMile 200 setting
Figure 163 Configuration restoring window
g The configuration file can be stored in any location according to user’s convenience and should be with the extension ‘.fm’.
• SoftwareIn Software view (see Figure 164), the Software Information and Software Oper-ation Status are showing.
Figure 164 Software viewClick on Refresh button to get the latest updated information.
Click on SW Upload button to open the Choose the Software File to Download window as in Figure 165. Locate the upgrade software file and click on Open button.
g The software file can be stored in any location according to user’s convenience and should be with the extension ‘.bin’.

142 A25000-A1400-D000-01-76P1Issue: 1 Issue date: February 2012
FlexiPacket Commissioning Tool, Rel. 1.3SU2, Operat-ing Documentation, Issue 1
FlexiPacket FirstMile 200 setting
Figure 165 Choose the software file to download windowThe parameter Download status shows ‘Downloading’ during the download process.When the download is finished, click on Switch button, software for IDU will be switched between the active software version and the standby software version. Wait for the success message to proceed.
• LicenseIn the License view (see Figure 166), the information of license is showing.
Figure 166 License view

A25000-A1400-D000-01-76P1Issue: 1 Issue date: February 2012
143
FlexiPacket Commissioning Tool, Rel. 1.3SU2, Operat-ing Documentation, Issue 1
FlexiPacket FirstMile 200 setting
Click on Refresh button to get the latest updated information.Enter the new license key in the CLicS license key field.
The new CLicS License Key can be either retrieved via web interface or generated via SMS, refer to CLicS license key generation procedure for detailed information.
Then fill in the new license and click on Update License Key button to update license key.
4.3.3 Port ViewIn Port View tab, two tabs Ethernet Port and E1/T1 Port are shown (see Figure 167).
1. Ethernet PortConnectivity Status, IP Address and other related parameters can be seen for each port.
Figure 167 Port viewIn the L2 Trace-rt column, click on discover button to open the L2 Discovered Path window as in Figure 168. This window shows the discovered network associ-ated with the name of the NE and related IP address. For each NE, there is a button Launch to open the WebLCT for the NE.

144 A25000-A1400-D000-01-76P1Issue: 1 Issue date: February 2012
FlexiPacket Commissioning Tool, Rel. 1.3SU2, Operat-ing Documentation, Issue 1
FlexiPacket FirstMile 200 setting
Figure 168 L2 discovered path window
In the Renew IP column, click on renew IP button to open the Renew Public IP window as in Figure 169. This button provides the possibility to change the IP settings for the selected NE connected to the IDU being managed by the CT.
Figure 169 Renew public IP windowSelect the port which is physically connected to the ODU and click on Add Device button to configure one ODU unit.
g Use DCN port as Management port connecting PC with IDU to add ODU, ODU is connected to IDU via Ethernet port 1-4. When adding ODU , CT will check Ethernet

A25000-A1400-D000-01-76P1Issue: 1 Issue date: February 2012
145
FlexiPacket Commissioning Tool, Rel. 1.3SU2, Operat-ing Documentation, Issue 1
FlexiPacket FirstMile 200 setting
port 1-4 whether they work properly. If one port mode is not NNI, CT will remove this port from Mng Vlan List. The purpose is to ensure PC and the ODU are in the same E-LAN.If two ODUs need to be created as LPG, then all the parameters for the two ODUs should be exactly the same except the IP address which is unique.
The Device can be selected from FPR, FPMR(P) and FPR HC.If the ODU is FPR1.3, see in Figure 170, choose FPR for Device parameter.
Figure 170 Add FlexiPacket Radio-FPRIf the ODU is FPR2.1, see in Figure 171, choose FPMR(P) for Device parameter.

146 A25000-A1400-D000-01-76P1Issue: 1 Issue date: February 2012
FlexiPacket Commissioning Tool, Rel. 1.3SU2, Operat-ing Documentation, Issue 1
FlexiPacket FirstMile 200 setting
Figure 171 Add FlexiPacket Radio-FPMRIf the ODU is FPR HC, see in Figure 172, choose FPR HC for Device parameter.

A25000-A1400-D000-01-76P1Issue: 1 Issue date: February 2012
147
FlexiPacket Commissioning Tool, Rel. 1.3SU2, Operat-ing Documentation, Issue 1
FlexiPacket FirstMile 200 setting
Figure 172 Add FlexiPacket Radio-FPR HCOnce all the parameters are set up, click on Apply button to add the ODU.
Select one ODU added before and click on Remove Device button to remove attached FlexiPacket Radio. After confirming the warning message “Are you sure to delete?”, the FPR will be removed. Once it is successful, a message pops up: “Remove the FlexiPacket Radio successfully!”.
It is possible to have additional management ports connecting to DCN network. Connect PC to one Ethernet port (except the ports that have been already con-nected to the ODUs) which to be set as the management port and click on Set Mng Port button to configure the management port. Click on OK button to apply the setting.

148 A25000-A1400-D000-01-76P1Issue: 1 Issue date: February 2012
FlexiPacket Commissioning Tool, Rel. 1.3SU2, Operat-ing Documentation, Issue 1
FlexiPacket FirstMile 200 setting
Figure 173 Set management port
g If port connected to ODUs is selected by mistake a warning pops up with the message “Please select a port NOT connecting to FlexiPacket Radio!”.
Select one management port set before and click on Reset Mng Port button to reset the management port. A message pops up: “Reset management port successfully”. Resetting a management port puts the port in its default configuration (no IP address and gateway settings) and no data loss shall occur.
Select one management port set before and click on Disable Mng Port to disable a management port. A message pops up: “Disable the management function success-fully”.
2. E1/T1 PortThe view is shown in Figure 174, click on Refresh button to see the latest updated information.
Figure 174 E1/T1 port
4.3.4 Device ViewIn Device View tab (see Figure 175), System Type, LPG Member and other related information is shown.

A25000-A1400-D000-01-76P1Issue: 1 Issue date: February 2012
149
FlexiPacket Commissioning Tool, Rel. 1.3SU2, Operat-ing Documentation, Issue 1
FlexiPacket FirstMile 200 setting
Figure 175 Device View
g If the ODU is in LPG, a warning message pops up: “The ODU is in LPG! Please delete LPG first!”. Click on Remove LPG button to open the Remove LPG window as in Figure 176, select the LPG group to be removed, click on Apply button to delete the LPG.
Figure 176 Remove LPG
g If selected ODU is offline, then Configure System Type operation cannot be executed.
Make sure the two ODUs have exactly the same configurations in order to put them in a LPG group. Otherwise, the LPG cannot be created successfully.
Select one FPR, click on Configure System Type button to open Configure System Type window as Figure 177. Select one FPR can set the system type to 1+0.
Select two FPRs, click on Configure System Type button to open Configure System Type window as Figure 178. Select two FPRs can set the system type to 1+0 or 1+1 HSBY.
Select two FPMRs, click on Configure System Type button to open Configure System Type window as Figure 179. Select two FPMRs can set the system type to 1+1 HSBY, 1+1 Frequency Diversity, 2+0 Frequency Diversity, 1+1 Space Diversity or 2+0 XPIC.
Select two FPR HCs, click on Configure System Type button to open Configure System Type window as Figure 180. Select two FPR HCs can set the system type to hsb_1wire, hsb_2wire or x2. In this step, ODU has to be defined whether it is primary ODU or Secondary ODU, this setting will be active in LPG configuration.
Choose the System type and click on Apply button to update the system type.

150 A25000-A1400-D000-01-76P1Issue: 1 Issue date: February 2012
FlexiPacket Commissioning Tool, Rel. 1.3SU2, Operat-ing Documentation, Issue 1
FlexiPacket FirstMile 200 setting
Figure 177 Configure system type window-single FPR
Figure 178 Configure system type window-two FPRs
Figure 179 Configure system type window-two FPMRs

A25000-A1400-D000-01-76P1Issue: 1 Issue date: February 2012
151
FlexiPacket Commissioning Tool, Rel. 1.3SU2, Operat-ing Documentation, Issue 1
FlexiPacket FirstMile 200 setting
Figure 180 Configure system type window-two FPR HCs
Select two LPG ODUs, click on Add LPG button to open the LPG window.
• For FPR and FPMR, shown in Figure 181, nominate the Main ODU and the other one is automatically nominated to be the Protection ODU. The switch mode can be selected in revertive or unrevertive. Then click on Apply button. Wait for the success message to proceed.
Figure 181 LPG configuration window
g Under system type 1+1 Frequency Diversity and 1+1 Space Diversity, the LPG configuration window is as Figure 182.

152 A25000-A1400-D000-01-76P1Issue: 1 Issue date: February 2012
FlexiPacket Commissioning Tool, Rel. 1.3SU2, Operat-ing Documentation, Issue 1
FlexiPacket FirstMile 200 setting
Figure 182 LPG configuration window-FPMR
• For FPR HC, shown in Figure 183. The Standby enet state can be selected in on or off. Then click on Apply button. Wait for the success message to proceed.
Figure 183 LPG configuration window-FPR HC
Select two LPG ODUs, click on Remove LPG button to remove the LPG (see in Figure 184). A confirmation message “Remove LPG will remove current services configured on this port, are you sure to continue?” pops up, click on Yes button to proceed.

A25000-A1400-D000-01-76P1Issue: 1 Issue date: February 2012
153
FlexiPacket Commissioning Tool, Rel. 1.3SU2, Operat-ing Documentation, Issue 1
FlexiPacket FirstMile 200 setting
Figure 184 Remove LPG
Select only one FlexiPacket Radio and click on Configuration to configure one Flexi-Packet Radio (1+0 Configuration). Select two FlexiPacket Radios and click on Config-uration to configure the FlexiPacket Radios in 1+1 Configuration.
• For FPR and FPMR, for example, when select two ODUs at the same time, and click on Configuration, a Configuration window opens for configuration setup and mod-ification, as shown in Figure 185. Enter the value of Secondary gateway, and click on Apply button. Wait for the success message to proceed to the SyncE view.
Figure 185 Network view
In SyncE view (see Figure 186), select Source SyncE Setting (freerun/ether-net/radio) and click on Apply button. Wait for the success message to proceed to ACM view.

154 A25000-A1400-D000-01-76P1Issue: 1 Issue date: February 2012
FlexiPacket Commissioning Tool, Rel. 1.3SU2, Operat-ing Documentation, Issue 1
FlexiPacket FirstMile 200 setting
Figure 186 SyncE window
In ACM view (see Figure 187), set the following parameters: • ACM TX enabling (enable/disable) • Static TX profile (4 QAM/16 QAM/64 QAM/128 QAM/256 QAM)Then click on Apply button. Wait for the success message to proceed to ATPC view.
Figure 187 ACM window
In ATPC view (see Figure 188). Set the ATPC enable (enabled or disabled) and key in the number for (Max) TX power. Then click on Apply button. Wait for the success message to proceed to RF view.
g The (Max) TX Power range is automatically detected by the system and may vary depending on the setting in the ACM configuration window (Static TX profile, Max RX profile, etc).

A25000-A1400-D000-01-76P1Issue: 1 Issue date: February 2012
155
FlexiPacket Commissioning Tool, Rel. 1.3SU2, Operat-ing Documentation, Issue 1
FlexiPacket FirstMile 200 setting
Figure 188 ATPC window
In RF view (see Figure 189), set the parameters as below: • Tx frequency (KHz) • Rx frequency (KHz)
g For Rx frequency and Tx frequency, the effective frequency range should be automatically detected by the system according to the actual connecting ODU type. And the input values should be multiple of 250Khz within the range.
• Channel bandwidth (3.5MHz/ 7MHz/ 14MHz/ 28MHz/ 56MHz) • Radio port service state (up/down)Then click on Apply button. Wait for the success message to proceed to Time Server view.
Figure 189 RF window

156 A25000-A1400-D000-01-76P1Issue: 1 Issue date: February 2012
FlexiPacket Commissioning Tool, Rel. 1.3SU2, Operat-ing Documentation, Issue 1
FlexiPacket FirstMile 200 setting
In Time Server view (see Figure 190), tick to select the PC Synchronization checkbox to synchronize clock with PC. Otherwise key in the Time server IP address in the text field. Time zone and Daylight saving flag (Enabled/Disabled) can be selected to set. Then click on Apply button. Wait for the success message.
Figure 190 Time server configuration window
• For FPR HC, for example, when select two FPR HCs at the same time, and click on Configuration, a Configuration window opens for configuration setup and modifi-cation, as shown in Figure 191.
Figure 191 ATPC viewClick on Apply button to apply the change, or click on RF_1 on the left side bar to show the RF_1 view as in Figure 192.

A25000-A1400-D000-01-76P1Issue: 1 Issue date: February 2012
157
FlexiPacket Commissioning Tool, Rel. 1.3SU2, Operat-ing Documentation, Issue 1
FlexiPacket FirstMile 200 setting
Figure 192 RF_1 viewSelect value for Radio band and click on Apply button to apply the change. Click on RF_2 on the left side bar to show the RF_2 view as in Figure 193.
Figure 193 RF_2 viewSelect the values for the parameters System mode, Programmed frequency, Pro-grammed transmitter power and Transmitter state, click on Apply button to apply the change. Click on HAAM on the left side bar to show the HAAM view as in Figure 194.

158 A25000-A1400-D000-01-76P1Issue: 1 Issue date: February 2012
FlexiPacket Commissioning Tool, Rel. 1.3SU2, Operat-ing Documentation, Issue 1
FlexiPacket FirstMile 200 setting
Figure 194 HAAM viewClick on Apply button to apply the change. Click on Time Server on the left side bar to show the Time Server view as in Figure 195.
Figure 195 Time Server viewClick on Apply button to apply the change.
Select one ODU, click on Alignment button, a warning message: “Are you sure to do alignment from ODU(192.168.xx.xxx) to ODU(192.168.xx.xxx)? Please make sure the configuration of the ODU (192.168.xx.xxx) is factory default.” pops up, click on Yes to proceed the alignment.
g The alignment function is only available to the ODU in LPG mode, if the selected ODU is not in LPG mode, a warning message: “The selected ODU is not in LPG mode!” pops up.
The alignment function is not available for FPR HC.
4.3.5 ODU SoftwareIn ODU Software view, two tabs are displaying FPR/FPMR and FPR HC software infor-mation (see Figure 196 / Figure 201).
• FPR/FPMR

A25000-A1400-D000-01-76P1Issue: 1 Issue date: February 2012
159
FlexiPacket Commissioning Tool, Rel. 1.3SU2, Operat-ing Documentation, Issue 1
FlexiPacket FirstMile 200 setting
Figure 196 ODU software view-FPR/FPMRThere are three operations: SW Upload, Switch Software and Restore Config_file, which are described below. • SW Upload. Select one FlexiPacket Radio, click on SW Upload button to open
the FlexiPacket Radio Software Download window (see Figure 197).
Figure 197 FlexiPacket Radio software upgrade windowClick on Browse button to open the Choose Software File window as in Figure 198. And select the software with the extension “.pec” stored in the location according to user’s convenience.

160 A25000-A1400-D000-01-76P1Issue: 1 Issue date: February 2012
FlexiPacket Commissioning Tool, Rel. 1.3SU2, Operat-ing Documentation, Issue 1
FlexiPacket FirstMile 200 setting
Figure 198 Choose software file window
• Switch Software. Click on Switch Software button in Figure 196 to switch the software version from Standby to Active or from Active to Standby. A warning message will pop up: ‘Are you sure to switch the software version?’. Click on Yes button to proceed or click on No button to withdraw the setting.
• Restore Config_file. Select one ODU, click on Restore Config_file button, the FlexiPacket Radio Configuration Restore window opens as Figure 199.
Figure 199 FlexiPacket Radio configuration restore windowClick on Browse button to open the Choose Configuration File window as Figure 200. Locate the configuration file and click on Open button.

A25000-A1400-D000-01-76P1Issue: 1 Issue date: February 2012
161
FlexiPacket Commissioning Tool, Rel. 1.3SU2, Operat-ing Documentation, Issue 1
FlexiPacket FirstMile 200 setting
Figure 200 Choose configuration file window
• FPR HC
Figure 201 ODU software view-FPR HCSelect one ODU, click on Upgrade button to open the Device Software Upgrade window as Figure 202.

162 A25000-A1400-D000-01-76P1Issue: 1 Issue date: February 2012
FlexiPacket Commissioning Tool, Rel. 1.3SU2, Operat-ing Documentation, Issue 1
FlexiPacket FirstMile 200 setting
Figure 202 Device software upgrade-FPR HCClick on Browse button to locate Application OMNI file, Modem OMNI file and Fre-quency file for the FPR HC software upgrade. All these three files have to be cor-rectly located to proceed the software upgrade. Then click on Apply button to proceed.
4.3.6 ODU LicenseIn ODU License view, two tabs are displaying FPR/FPMR license information (see Figure 203).
• FPR/FPMRLicenseMask[HEX], Connectivity Status (green indicates connected and red indi-cates disconnected) and other related information is shown for ODU connected.
Figure 203 ODU license view-FPR/FPMRSelect one FPR, click on Detail button to view the ODU license detail as seen in Figure 204.

A25000-A1400-D000-01-76P1Issue: 1 Issue date: February 2012
163
FlexiPacket Commissioning Tool, Rel. 1.3SU2, Operat-ing Documentation, Issue 1
FlexiPacket FirstMile 200 setting
Figure 204 ODU license detail-FPRClick on License Upgrade button to open Upgrade License window as seen in Figure 205.
g To upgrade license, the ODU must be restarted after clearing license.
Figure 205 License upgrade window-FPRThere are two types of license available: CLicS License Key and License Key [SNMP Coding].
For the detailed information to get new license, please refer to Upgrade ODU license.
4.3.7 AlarmIn Alarm view, the interface displays the alarm status.
For FPR/FPMR, see in Figure 206.
Figure 206 Alarm view-FPR/FPMR
For FPR HC, see in Figure 207.

164 A25000-A1400-D000-01-76P1Issue: 1 Issue date: February 2012
FlexiPacket Commissioning Tool, Rel. 1.3SU2, Operat-ing Documentation, Issue 1
FlexiPacket FirstMile 200 setting
Figure 207 Alarm view-FPR HC
Click button to show / hide alarm history of current manager session.
Click button to refresh the alarm list.
Click button to show Raised Time Stamp and Cleared Time Stamp in GMT.
Click button to show Raised Time Stamp and Cleared Time Stamp in PC Time Zone.
Click button to show Raised Time Stamp and Cleared Time Stamp in NE Time Zone.
4.3.8 Test View
g For the test purpose and troubleshooting, please refer to Test View.
In Test View tab (see Figure 208), Connected NE Type, IP Address and related infor-mation is displayed.
Figure 208 Test View
Click on Refresh button to get the latest updated information.
Figure 209 FPFM200 front view
In Figure 209 shows the Ethernet ports and E1 ports on FPFM200 front panel.
Click on Eth Port button in Test View to open the Ethernet Port HW Validation window as in Figure 210.

A25000-A1400-D000-01-76P1Issue: 1 Issue date: February 2012
165
FlexiPacket Commissioning Tool, Rel. 1.3SU2, Operat-ing Documentation, Issue 1
FlexiPacket FirstMile 200 setting
Figure 210 Eth Port HW Validation window
Operate as indicated in the window: “Please connect the cable to Ethernet port SFP1(1105). Wait until the test result is displayed!”. After SFP1(1105) is tested, the test result displays and the indication in the window changes to: “Please move the cable to Ethernet port SFP2(1106). Wait until the test result is displayed!”, as in Figure 211.

166 A25000-A1400-D000-01-76P1Issue: 1 Issue date: February 2012
FlexiPacket Commissioning Tool, Rel. 1.3SU2, Operat-ing Documentation, Issue 1
FlexiPacket FirstMile 200 setting
Figure 211 Eth Port HW Validation window-2
When all the ports have been tested, the message shows: “All Ethernet ports have been tested, please connect the Ethernet cable to the “reserved” management port and then press “Exit”.” as in Figure 212.

A25000-A1400-D000-01-76P1Issue: 1 Issue date: February 2012
167
FlexiPacket Commissioning Tool, Rel. 1.3SU2, Operat-ing Documentation, Issue 1
FlexiPacket FirstMile 200 setting
Figure 212 Eth Port HW Validation window-3
Click on E1 Port button in Test View, the Message window pops up as in Figure 213.
Figure 213 Message window
Move the cable to E1-1(1401) and press the OK button. Then the E1 Port HW Valida-tion window (see Figure 214) opens.

168 A25000-A1400-D000-01-76P1Issue: 1 Issue date: February 2012
FlexiPacket Commissioning Tool, Rel. 1.3SU2, Operat-ing Documentation, Issue 1
FlexiPacket FirstMile 200 setting
Figure 214 E1 Port HW Validation window
Follow the instruction in the windows and click on Next button to test the E1 ports one by one. When all the E1 ports have been tested, the window is as in Figure 215.

A25000-A1400-D000-01-76P1Issue: 1 Issue date: February 2012
169
FlexiPacket Commissioning Tool, Rel. 1.3SU2, Operat-ing Documentation, Issue 1
FlexiPacket FirstMile 200 setting
Figure 215 E1 Port HW Validation window-2
Click on Interf button in Test View, the Interference Test window opens as in Figure 216.
Figure 216 Interference Test window
Enter the Interference Threshold number in the text field and click on Run button to start test, the progress is showing as in Figure 217.

170 A25000-A1400-D000-01-76P1Issue: 1 Issue date: February 2012
FlexiPacket Commissioning Tool, Rel. 1.3SU2, Operat-ing Documentation, Issue 1
FlexiPacket FirstMile 200 setting
Figure 217 Interfering Test Progress window
Click on Line up button in Test View, the Test Line-up Progress window pops up as in Figure 218.
Figure 218 Test Line-up Progress window
Click on Link Validation button in Test View, the Test Link Validation Progress window pops up as in Figure 219.

A25000-A1400-D000-01-76P1Issue: 1 Issue date: February 2012
171
FlexiPacket Commissioning Tool, Rel. 1.3SU2, Operat-ing Documentation, Issue 1
FlexiPacket FirstMile 200 setting
Figure 219 Test Link Validation Progress window
Click on Hop Validation button in Test View, the Hop Validation Test window opens as in Figure 220.
Hop Validation Test: This test can be used to display radio parameters (when Tracking is checked) or for Antenna Alignment purpose (when Tracking is not checked).
The operation steps are as below: Click the Hop Validation button, a box Test Hop Val-idation Progress is open, as shown in picture below. Check the Tracking checkbox, this will disable the ATPC and ACM function in both local and remote ODU, then input suitable values, the test will verify whether the Antenna Alignment is correct.
Enable Local Force Down button can be used to switch the Active and Standby ODU, and Disable Local Force Down button can restore the operation performed by Enable Local Force Down button.

172 A25000-A1400-D000-01-76P1Issue: 1 Issue date: February 2012
FlexiPacket Commissioning Tool, Rel. 1.3SU2, Operat-ing Documentation, Issue 1
FlexiPacket FirstMile 200 setting
Figure 220 Hop Validation Test window
Click on E2E Validation button in Test View, the Test E2E Connectivity Progress window opens as in Figure 221.
Figure 221 Test E2E connectivity Progress window
4.3.9 ReportFor the detailed description of Report tab, please refer to Report of FlexiPacket Hub 800 setting.

A25000-A1400-D000-01-76P1Issue: 1 Issue date: February 2012
173
FlexiPacket Commissioning Tool, Rel. 1.3SU2, Operat-ing Documentation, Issue 1
FlexiPacket Hub 800/800H setting
5 FlexiPacket Hub 800/800H settingIn this chapter,both assisted and advanced mode of operation for FlexiPacket Hub 800/800H will be described. IDU, LPG and ODU settings for FlexiPacket Hub 800/800H will be described.
For both the FPH800 and FPH800H, the major configuration procedures are the same, so the procedures for FPH800 will be displayed as example, the differences of the pro-cedure for FPH800H will be highlighted in the corresponding places.
g • Commissioning Tool just support SNMPv2 now. • FlexiPacket Hub 800H can only support cooperating with FlexiPacket MultiRadio.
Hub 800 can work with both FlexiPacket Radio and FlexiPacket MultiRadio.
5.1 Hardware ConnectionFirst time installation is not needed for FlexiPacket Hub 800/800H. Laptop is connected to Hub 800/800H directly through port DCN. ODUs are connected to the IU/OU port of Hub 800/800H.
5.2 Assisted modeFor assisted mode, the ODU settings can be predefined before the IDU and ODU are physically connected. The physical connection is not necessary until the validation pro-cedure. But this offline procedure is only for the first-time installation and not for the maintenance.
5.2.1 Log-in1. Run the FlexiPacket Commissioning Tool application from Start > Programs >
Nokia Siemens Networks > Commissioning Tool > Run CT.
2. Select FPH800/800H from Equipment drop-down list and Assisted from operation mode drop-down list in the Equipment Selection box, and then click Next button.

174 A25000-A1400-D000-01-76P1Issue: 1 Issue date: February 2012
FlexiPacket Commissioning Tool, Rel. 1.3SU2, Operat-ing Documentation, Issue 1
FlexiPacket Hub 800/800H setting
Figure 222 Login Window
3. Choose Import from file to use predefined offline configuration file, or select Start from scratch to use the default one.

A25000-A1400-D000-01-76P1Issue: 1 Issue date: February 2012
175
FlexiPacket Commissioning Tool, Rel. 1.3SU2, Operat-ing Documentation, Issue 1
FlexiPacket Hub 800/800H setting
Figure 223 Select Configuration File
g The file imported must be generated by Commissioning Tool.
4. Click on Next button in Figure 223, the following interface appears.
Figure 224 Application is loading
5.2.2 IDU Base Setting1. Upgrade IDU Software.

176 A25000-A1400-D000-01-76P1Issue: 1 Issue date: February 2012
FlexiPacket Commissioning Tool, Rel. 1.3SU2, Operat-ing Documentation, Issue 1
FlexiPacket Hub 800/800H setting
Figure 225 Upgrade IDU Software (FPH 800)Click on Browse button to locate the upgrade software file provided and click on Open.
Figure 226 Choose software upgrade file
A25000-A1400-D000-01-76P1Issue: 1 Issue date: February 2012
177
FlexiPacket Commissioning Tool, Rel. 1.3SU2, Operat-ing Documentation, Issue 1
FlexiPacket Hub 800/800H setting
g The software file name must end with ".bin". If there is no need to upgrade the soft-ware, please keep it blank.
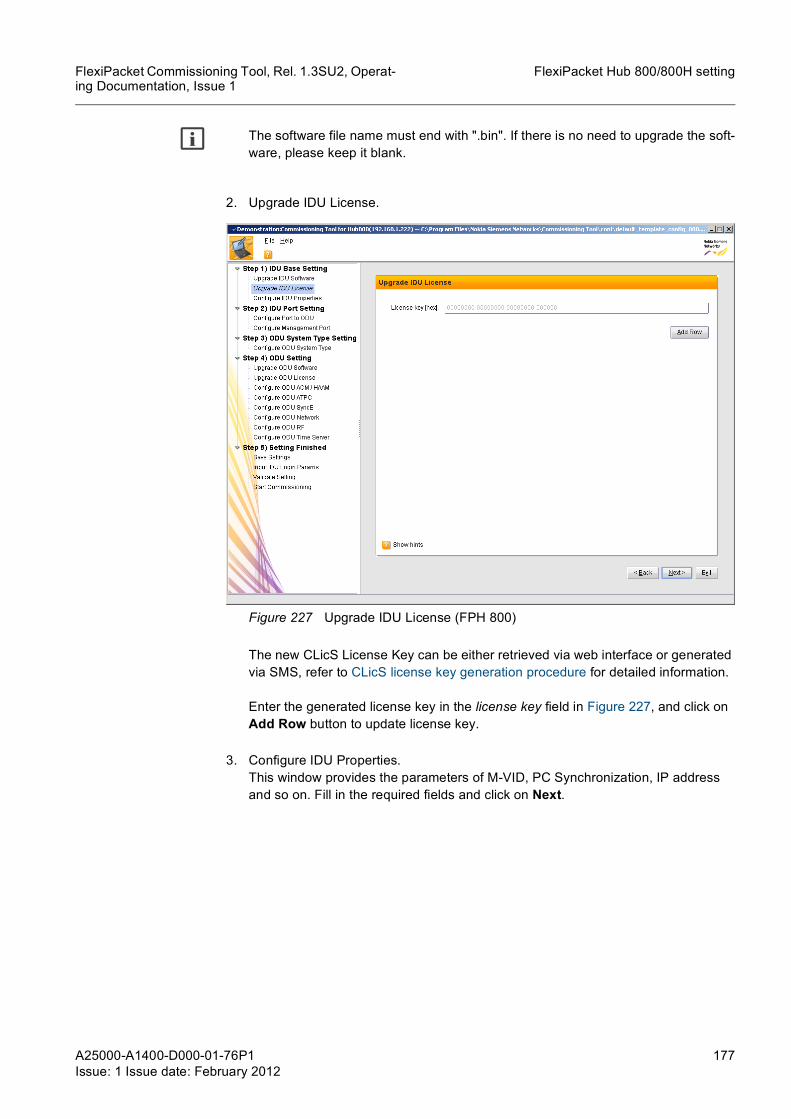
2. Upgrade IDU License.
Figure 227 Upgrade IDU License (FPH 800)
The new CLicS License Key can be either retrieved via web interface or generated via SMS, refer to CLicS license key generation procedure for detailed information.
Enter the generated license key in the license key field in Figure 227, and click on Add Row button to update license key.
3. Configure IDU Properties. This window provides the parameters of M-VID, PC Synchronization, IP address and so on. Fill in the required fields and click on Next.

178 A25000-A1400-D000-01-76P1Issue: 1 Issue date: February 2012
FlexiPacket Commissioning Tool, Rel. 1.3SU2, Operat-ing Documentation, Issue 1
FlexiPacket Hub 800/800H setting
Figure 228 Configure IDU Properties (FPH 800)
g The IP address here is used as the public IP of IDU, and please fill in this IP address when login to the commissioning tool for the next time.Please make sure the SNTP server is available. If the server is not available, IDU is unable to synchronize time from SNTP server, and use current system time instead.
5.2.3 IDU Port Setting1. Configure Port to ODU. Select the port which is connected to ODU and fill in the
required fields, click on Add button to add entries then click on Next button.

A25000-A1400-D000-01-76P1Issue: 1 Issue date: February 2012
179
FlexiPacket Commissioning Tool, Rel. 1.3SU2, Operat-ing Documentation, Issue 1
FlexiPacket Hub 800/800H setting
Figure 229 Configure ODU Port (FPH 800)
g The IDU system type selected before decides how many ports can be connected to ODUs.The port selected here can not be used as management port anymore.In Commission Tool release 1.3SU2, there is only one type of ODU can be selected for FPH800H:FPMR(H). For FPH800, there are four types of ODUs can be selected: FPR, FPMR(P), 2*FPMR(P) and FPR HC.
g The 2*FPMR(P) ODU is the same ODU as FPMR, but it just has one cable. FPMR has two cables.
For 2*FPRM(P), see the configuration in Figure 230:

180 A25000-A1400-D000-01-76P1Issue: 1 Issue date: February 2012
FlexiPacket Commissioning Tool, Rel. 1.3SU2, Operat-ing Documentation, Issue 1
FlexiPacket Hub 800/800H setting
Figure 230 Configure ODU Port (2*FPMR)Select ODU type from the ODU type drop-down list. Fill in the fields as shown in Figure 229 and click on Add button to add an entry.Click an existing entry and modify the corresponding fields directly on the window. Then click on Modify button to commit the changes.Click an existing entry and click on Delete button to delete the entry.
2. Configure Management Port. Select the management port and its parameters, click on Add button to add entries then click on Next button.

A25000-A1400-D000-01-76P1Issue: 1 Issue date: February 2012
181
FlexiPacket Commissioning Tool, Rel. 1.3SU2, Operat-ing Documentation, Issue 1
FlexiPacket Hub 800/800H setting
Figure 231 Configure Management Port (FPH 800)
g The port selected here can not be used to connect to ODU any more.
Fill in the fields as shown in Figure 231 and click on Add button to add an entry.Click on an existing entry and modify the corresponding fields directly on the window. Then click on Modify button to commit the changes.Click an existing entry and click on Delete button to delete the entry.
3. Configuration for IDU is complete. Please continue with LPG setting.
5.2.4 ODU System Type SettingFigure 232 shows various parameters required to configure the ODU system type.

182 A25000-A1400-D000-01-76P1Issue: 1 Issue date: February 2012
FlexiPacket Commissioning Tool, Rel. 1.3SU2, Operat-ing Documentation, Issue 1
FlexiPacket Hub 800/800H setting
Figure 232 Configure ODU system type (FPH 800)
Fill in the fields as shown in Figure 232 and click on Add button to add an entry. In 800H, this part is called Create LPG, see
Figure 233 Create LPG (FPH 800H)

A25000-A1400-D000-01-76P1Issue: 1 Issue date: February 2012
183
FlexiPacket Commissioning Tool, Rel. 1.3SU2, Operat-ing Documentation, Issue 1
FlexiPacket Hub 800/800H setting
g • For FPH800, there are 4 ODU types, and the system modes that can be configured are different for each ODU type: • For FPR, only the 1+1 HSBY mode can be configured when in LPG mode. • For FPMR(P) with software version 2.1, there are 5 system types can be config-
ured when setting LPG, as shown below: • 1+1 HSBY • 1+1 Space Diversity • 1+1 Frequency Diversity • 2+0 Frequency Diversity • 2+0 XPIC
• For FPMR(P) with software version 2.4, there are 7 system types can be config-ured when setting LPG, as shown below: • 1+0 Ring • 1+1 HSBY CCM Based • 1+1 HSBY Standalone
g For odu system type 1+1 HSBY Standalone, it can work with or without LPG setting.
• 1+1 Space Diversity • 1+1 Frequency Diversity • 2+0 Frequency Diversity • 2+0 XPIC
• For 2*FPMR(P), there are 2 system types can be configured when setting LPG, as shown below: • 1+1 HSBY 1 Cable • 2+0 XPIC 1 Cable
• For FPR HC, there are 3 types can be configured: • hsb_1wire • hsb_2wire • x2
• For FPH800H, only the 1+1 Frequency Diversity and 1+1 Space Diversity can be configured when connected with FPMR(H), and FPH800H can only work with FPMR(H).
For 2*FPMR(P) with ODU system type 1+1 HSBY 1 Cable, see the LPG configuration in Figure 234:

184 A25000-A1400-D000-01-76P1Issue: 1 Issue date: February 2012
FlexiPacket Commissioning Tool, Rel. 1.3SU2, Operat-ing Documentation, Issue 1
FlexiPacket Hub 800/800H setting
Figure 234 LPG configuration (1+1 HSBY 1 Cable)
In this case, the direct connected ODU is protection ODU, and the co-located ODU is main ODU. It is not possible to change the role of main ODU and protection ODU (ie, the IP address of these two ODUs are not exchangable).
For 2*FPMR(P) with ODU system type 2+0 XPIC 1 Cable, the LPG configuration is

A25000-A1400-D000-01-76P1Issue: 1 Issue date: February 2012
185
FlexiPacket Commissioning Tool, Rel. 1.3SU2, Operat-ing Documentation, Issue 1
FlexiPacket Hub 800/800H setting
Figure 235 LPG configuration (2+0 XPIC 1 Cable)
In this case, the direct connected ODU is master ODU, the co-located ODU is slave ODU. It is not possible to change the role of master ODU and slave ODU. But horizonal ODU and vertical ODU can exchange.
Click on an existing entry and click on Delete button to delete the entry.
g The LPG1 is binding to GE1 port and GE2 port. The LPG2 is binding to GE3 port and GE4 port. The IDU system type selected before decides how many LPG can be created.
5.2.5 ODU settingFor all the following ODU Settings, multiple ODUs can be selected to set the parameters at a time with the use of Ctrl .
1. Upgrade ODU Software interface shows as Figure 236 for FPR, FPMR(P) and 2*FPMR(P) ODU type.

186 A25000-A1400-D000-01-76P1Issue: 1 Issue date: February 2012
FlexiPacket Commissioning Tool, Rel. 1.3SU2, Operat-ing Documentation, Issue 1
FlexiPacket Hub 800/800H setting
Figure 236 Upgrade ODU Software InterfaceSelect the ODU or multiple ODUs, click on Browse button to locate the upgrade software file see Figure 237, then click on Open button to select the file, finally click Modify to upgrade the software.
Figure 237 Upgrade ODU Software

A25000-A1400-D000-01-76P1Issue: 1 Issue date: February 2012
187
FlexiPacket Commissioning Tool, Rel. 1.3SU2, Operat-ing Documentation, Issue 1
FlexiPacket Hub 800/800H setting
g The software file name must end with ".pec". If there is no need to upgrade the soft-ware, please keep it blank.
Upgrade ODU Software interface shows as Figure 238 for FPR HC ODU type.
Figure 238 Upgrade ODU Software interface - FPR HCSelect the ODU, click on Browse button to locate the Application OMNI file, Modem OMNI file and Frequency file. Click on Open button to select the file, then click Modify to upgrade the software. All these three files have to be correctly located to proceed the software upgrade.
g The Application OMNI file and Modem OMNI file name must end with ".hex". The Frequency file name must end with “.txt”. If there is no need to upgrade the software, please keep them blank.
2. Upgrade ODU license. Please refer to Upgrade ODU license.

188 A25000-A1400-D000-01-76P1Issue: 1 Issue date: February 2012
FlexiPacket Commissioning Tool, Rel. 1.3SU2, Operat-ing Documentation, Issue 1
FlexiPacket Hub 800/800H setting
Figure 239 Upgrade ODU License
3. Configure ODU ACM/HAAM.For ODU type - FPR, set the following parameters for selected IDU Port. • ACM TX enable (enable/disable) • Static TX profile (4 QAM/16 QAM/64 QAM/128 QAM/256 QAM)
ACM: Adaptive Code Modulation, belongs to the radio link algorithms. When enabled, it allows automatic modulation code selection in accordance with S/MSE value received by the remote ODU.It is recommended to make sure you have enough license to set ACM.
For ODU type - FPMR(P) with software version 2.1, set the following parameters for selected IDU Port. • Profile criteria (high performance/custom profile) • ACM TX enable (enable/disable) • Min/Max TX profile (QPSK/16 QAM/32 QAM/64 QAM/128 QAM/256 QAM)
For ODU type - FPMR(P) with software version 2.4 and 2xFPMR(P), set the follow-ing parameters for selected IDU Port. • Standard mode (etsi/ansi) • Channel bandwidth (3.5 MHz/7 MHz/14 MHz/28 MHz/40 MHz/56 MHz) • Profile criteria (standard profiles/high throughput) • ACM TX enable (enable/disable) • TX static profile (QPSK/16 QAM/32 QAM/64 QAM/128 QAM/256 QAM)

A25000-A1400-D000-01-76P1Issue: 1 Issue date: February 2012
189
FlexiPacket Commissioning Tool, Rel. 1.3SU2, Operat-ing Documentation, Issue 1
FlexiPacket Hub 800/800H setting
g ODU license upgrade is needed to support more modulation type.In case of the first link setup (before antenna alignment), the ACM must be disabled. It can be enabled at the end of antennas alignment.
Figure 240 Configure ODU ACM
For ODU type - FPR HC, set the parameter HAAM status (on/off) for selected IDU Port.HAAM - Hitless Automated Adaptive Modulation.
Click on Modify to update the changes.
4. Configure ODU ATPC.For ODU type - FPR, FPMR(P) and 2*FPMR(P), set the following parameters for selected IDU Port, see Figure 241. • ATPC enable (enable/disable) • MAX TX power (dbm)
ATPC: Automatic Transmit Power Control. The ATPC defines the optimum TX power level basing on one of the quality and the power level of the received signal (MSE and RSL respectively).The approximative range of "Max TX Power" is 3-17. The accurate range of "Max TX Power" can not be determined in a offline state. It can be confirmed in the vali-dation step before commissioning.

190 A25000-A1400-D000-01-76P1Issue: 1 Issue date: February 2012
FlexiPacket Commissioning Tool, Rel. 1.3SU2, Operat-ing Documentation, Issue 1
FlexiPacket Hub 800/800H setting
Figure 241 Configure ODU ATPC
g The approximative range of "Max TX Power" is 3-17. The accurate range of "Max TX Power" can not be determined in a offline state, it depends on the modulation mode and bandwidth.For FPMR(P) with software version 2.4, if the value set for MAX TX power in CT is bigger than the value in ODU, ODU will automatically adopt a proper value.In case of the first link setup (before antenna alignment), the ATPC must be dis-abled. It can be enabled at the end of antennas alignment.
For ODU type - FPR HC, set the following parameters for selected IDU Port, see Figure 242. • ATPC status (on/off) • ATPC coordinated power status (on/off) • Coordinated power offset(dbm)(1.0--10.0)

A25000-A1400-D000-01-76P1Issue: 1 Issue date: February 2012
191
FlexiPacket Commissioning Tool, Rel. 1.3SU2, Operat-ing Documentation, Issue 1
FlexiPacket Hub 800/800H setting
Figure 242 Configure ODU ATPC-FPR HCClick on Modify to update the changes.
5. Configure ODU SyncE.
g Only FPH800 support the ODU SyncE function in CT Assisted mode. FPH800H does not support SyncE function in CT Assisted mode.
For ODU type - FPR, set the following parameters for selected IDU Ports. • Source syncE setting (freerun/ethernet/radio), default is freerun. • ODU master/slave value (automatic/slave/master), default is automatic. • IDU port master/slave value (slave/master).
If ethernet is selected, ODU will be set to slave and IDU will be set to master.If radio is selected, ODU will be set to master and IDU will be set to slave.If freerun is selected, ODU will be set to automatic and IDU will do nothing.
For ODU type - FPMR(P) and 2*FPMR(P), set the following parameters for selected IDU Ports. • Source syncE transfer (NCT/Fixed/Priority). • Source syncE setting (ethernet/radio). • Master/slave value (slave/master). • IDU port master/slave value (slave/master).
If ethernet is selected, ODU will be set to slave and IDU will be set to master.If radio is selected, ODU will be set to master and IDU will be set to slave.

192 A25000-A1400-D000-01-76P1Issue: 1 Issue date: February 2012
FlexiPacket Commissioning Tool, Rel. 1.3SU2, Operat-ing Documentation, Issue 1
FlexiPacket Hub 800/800H setting
Figure 243 Configure ODU SyncE FPR HC does not support SyncE.
6. Configure ODU Network. Multiple ODUs can be selected to set the Default Gateway and Secondary Gateway at a time and click on Modify to update the changes.FPR HC does not support secondary default gateway. Keep it empty is preferred. If in chain sites, is suggested to set as Secondary Gateway the IP address associated to the Transport Card of the local BTS. This allows to have the reachability of the ODU via LMP port of this BTS if the radio link is down and this affects the path toward the Primary Gateway.

A25000-A1400-D000-01-76P1Issue: 1 Issue date: February 2012
193
FlexiPacket Commissioning Tool, Rel. 1.3SU2, Operat-ing Documentation, Issue 1
FlexiPacket Hub 800/800H setting
Figure 244 Configure ODU Network7. Configure ODU RF.
For ODU type - FPR, FPMR(P) and 2*FPMR(P), set the following parameters for selected IDU Ports, see Figure 245. • Tx frequency (KHz) / Rx frequency (KHz) • Channel bandwidth (3.5MHz/ 7MHz/ 14MHz/ 28MHz/ 40MHz/ 56MHz) • Radio port admin status (up/down)

194 A25000-A1400-D000-01-76P1Issue: 1 Issue date: February 2012
FlexiPacket Commissioning Tool, Rel. 1.3SU2, Operat-ing Documentation, Issue 1
FlexiPacket Hub 800/800H setting
Figure 245 Configure ODU RF
g Either the TX frequency or the RX frequency is needed to input and can not be zero. Here use 18900000 KHz as example. There is a formula between TX frequency and RX frequency. This tool will automatically calculate the TX frequency according to the RX frequency, and vise versa.
The frequency range can not be determined in the offline state. It can be confirmed in the validation step before commissioning. If you are not sure about the accurate frequency, just set it to “1” temporarily and go back to correct it after the validation.
For ODU type - FPR HC, set the following parameters for selected IDU Ports, see Figure 246. • Radio band • Programmed frequency • Programmed transmitter power (in dbm) • Radio port service status • System mode (not applicable if HAAM is on)

A25000-A1400-D000-01-76P1Issue: 1 Issue date: February 2012
195
FlexiPacket Commissioning Tool, Rel. 1.3SU2, Operat-ing Documentation, Issue 1
FlexiPacket Hub 800/800H setting
Figure 246 Configure ODU RF - FPR HC8. Configure ODU Time Server.
For ODU type - FPR, FPMR(P) and 2*FPMR(P), set the following parameters for selected IDU Port, see Figure 247. • Synchronize time from PC to ODU • SNTP server IP • Time zone • Daylight saving enable (Enabled / Disabled)

196 A25000-A1400-D000-01-76P1Issue: 1 Issue date: February 2012
FlexiPacket Commissioning Tool, Rel. 1.3SU2, Operat-ing Documentation, Issue 1
FlexiPacket Hub 800/800H setting
Figure 247 Configure ODU Time Server
g Please make sure the SNTP server is available. If the server is not available, IDU is unable to synchronize time from SNTP server, and use current system time instead.
For ODU type - FPR HC, set the following parameters for selected IDU Port, see Figure 248. • SNTP enable (Disable / Enable) • SNTP offset (time offset from GMT) • SNTP server

A25000-A1400-D000-01-76P1Issue: 1 Issue date: February 2012
197
FlexiPacket Commissioning Tool, Rel. 1.3SU2, Operat-ing Documentation, Issue 1
FlexiPacket Hub 800/800H setting
Figure 248 Configure ODU Time Server - FPR HCAfter ODU Settings are completed, there are four steps in Setting Validation described below. In order to validate setting, IDUs and ODUs need to be connected.
5.2.6 Setting FinishedFor all the following ODU Settings, multiple ODUs can be selected to set the parameters at a time with the use of Ctrl .
1. Save Settings. Click on Save button to save current setting information to the opening file. But if you are using the default template file, this button would be dis-abled. This step can be skipped without saving the settings.

198 A25000-A1400-D000-01-76P1Issue: 1 Issue date: February 2012
FlexiPacket Commissioning Tool, Rel. 1.3SU2, Operat-ing Documentation, Issue 1
FlexiPacket Hub 800/800H setting
Figure 249 Save Settings
Click on Save As button to save current setting information to a new file.
Figure 250 Save setting information to a new file
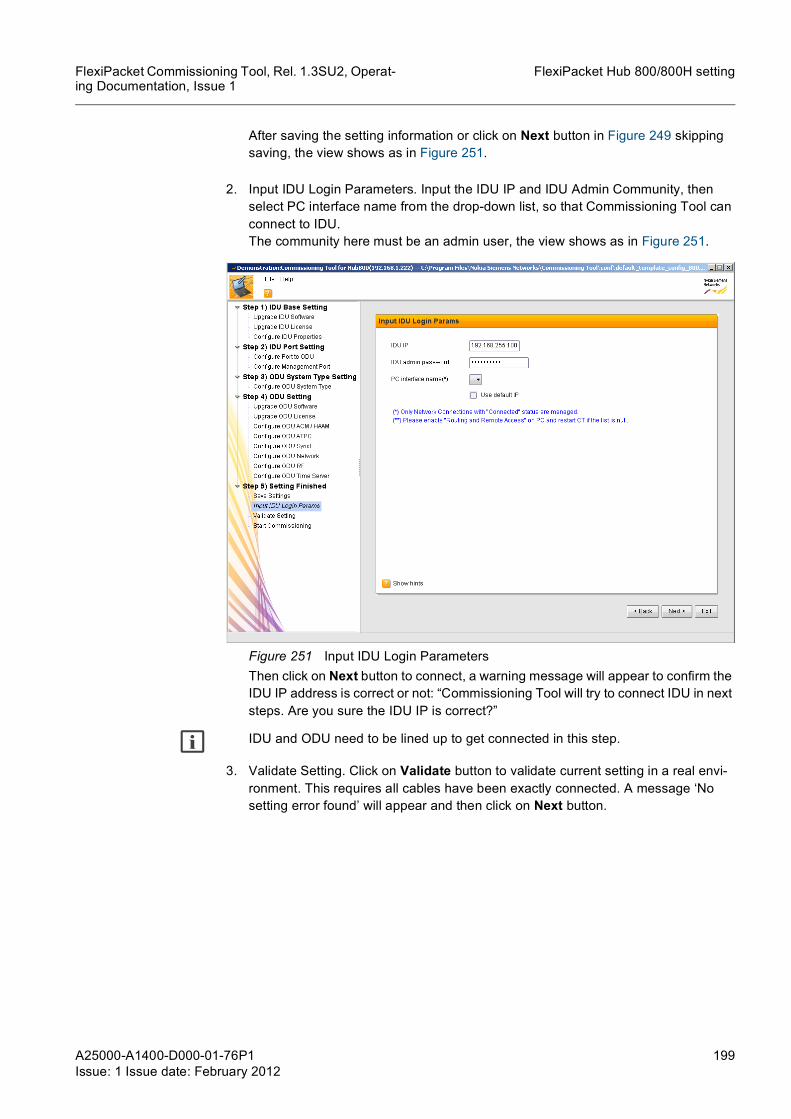
A25000-A1400-D000-01-76P1Issue: 1 Issue date: February 2012
199
FlexiPacket Commissioning Tool, Rel. 1.3SU2, Operat-ing Documentation, Issue 1
FlexiPacket Hub 800/800H setting
After saving the setting information or click on Next button in Figure 249 skipping saving, the view shows as in Figure 251.
2. Input IDU Login Parameters. Input the IDU IP and IDU Admin Community, then select PC interface name from the drop-down list, so that Commissioning Tool can connect to IDU.The community here must be an admin user, the view shows as in Figure 251.
Figure 251 Input IDU Login ParametersThen click on Next button to connect, a warning message will appear to confirm the IDU IP address is correct or not: “Commissioning Tool will try to connect IDU in next steps. Are you sure the IDU IP is correct?”
g IDU and ODU need to be lined up to get connected in this step.
3. Validate Setting. Click on Validate button to validate current setting in a real envi-ronment. This requires all cables have been exactly connected. A message ‘No setting error found’ will appear and then click on Next button.

200 A25000-A1400-D000-01-76P1Issue: 1 Issue date: February 2012
FlexiPacket Commissioning Tool, Rel. 1.3SU2, Operat-ing Documentation, Issue 1
FlexiPacket Hub 800/800H setting
Figure 252 Validate Setting
g Please validate your settings before commissioning. During validation, all existing LPG will be removed and all ports will be reset to NNI.If there is anything wrong occurred during the validation, the error message will be listed in the blank area below. And the corresponding error steps will be shown in red color in the left tree panel.
4. Start Commissioning. Click on Run button to do commissioning now with current setting information.
g Commissioning will start right after clicking on Run button.

A25000-A1400-D000-01-76P1Issue: 1 Issue date: February 2012
201
FlexiPacket Commissioning Tool, Rel. 1.3SU2, Operat-ing Documentation, Issue 1
FlexiPacket Hub 800/800H setting
Figure 253 Start Commissioning5. Do Commissioning. Commission is in progress. Wait for the progress bar to com-
plete. If there is error during commission, an error message will appear above each progress bar.

202 A25000-A1400-D000-01-76P1Issue: 1 Issue date: February 2012
FlexiPacket Commissioning Tool, Rel. 1.3SU2, Operat-ing Documentation, Issue 1
FlexiPacket Hub 800/800H setting
Figure 254 Commission progress6. Information View. Figure 255 shows the overview information of IDU base and IDU
license.
Figure 255 Information View of IDU

A25000-A1400-D000-01-76P1Issue: 1 Issue date: February 2012
203
FlexiPacket Commissioning Tool, Rel. 1.3SU2, Operat-ing Documentation, Issue 1
FlexiPacket Hub 800/800H setting
Figure 256 shows the overview information of ODU.
Figure 256 Information View of ODU
7. Test & Report. After finishing the Information View, click on Next button, the Test & Report screen will be showed as Figure 257.
g Only the Advanced Mode provide test and report function. Please click left button if you need. After clicking, CT will close this Assisted mode and open Advanced mode automatically.

204 A25000-A1400-D000-01-76P1Issue: 1 Issue date: February 2012
FlexiPacket Commissioning Tool, Rel. 1.3SU2, Operat-ing Documentation, Issue 1
FlexiPacket Hub 800/800H setting
Figure 257 Test & Report
5.3 Advanced ModeThis chapter describes the configuration process of FPH800/FPH800H with FlexiPacket Commissioning Tool in advanced mode.
5.3.1 Log-in1. Run the FlexiPacket Commissioning Tool application from Start > Programs >
Nokia Siemens Networks > Commissioning Tool > Run CT.
2. The login screen appears. Select FPH 800/800H in the Equipment drop down list, then click on Next:

A25000-A1400-D000-01-76P1Issue: 1 Issue date: February 2012
205
FlexiPacket Commissioning Tool, Rel. 1.3SU2, Operat-ing Documentation, Issue 1
FlexiPacket Hub 800/800H setting
Figure 258 Login Window
3. Fill in the IP, user name and password of Hub 800/800H, ODU password, select local or remote connection, then click on Next:
Figure 259 Hub 800/800H connection parameter
g Local management connection means connecting to the IDU which is connected to the local laptop; and remote management connection means connecting to the IDU on which the peer ODU is connected after the line-up, in this case only the configu-

206 A25000-A1400-D000-01-76P1Issue: 1 Issue date: February 2012
FlexiPacket Commissioning Tool, Rel. 1.3SU2, Operat-ing Documentation, Issue 1
FlexiPacket Hub 800/800H setting
rations that have no impact on the flowing traffic can be set from remote connection. For example, changing radio parameters like ATPC, ACM and so on.
4. Tick the Add Laptop IP entry if laptop IP needs to be changed, then fill in the Laptop IP, Laptop Subnet Mask and Laptop Default Gateway. Or keep the Add Laptop IP entry blank.
Figure 260 Configure laptop IP address
5. Click on Connect button in Figure 261, the following interface appears:
Figure 261 Application is loading

A25000-A1400-D000-01-76P1Issue: 1 Issue date: February 2012
207
FlexiPacket Commissioning Tool, Rel. 1.3SU2, Operat-ing Documentation, Issue 1
FlexiPacket Hub 800/800H setting
5.3.2 IDU ViewIn IDU view, IDU related information can be set, such as IDU IP, management VID, time and date, license and software.
Figure 262 IDU view
Configurations of IDU are listed as below:
5.3.2.1 IP Settings
Figure 263 IP Settings
IDU IP address, subnet mask and default gateway can be modified here.

208 A25000-A1400-D000-01-76P1Issue: 1 Issue date: February 2012
FlexiPacket Commissioning Tool, Rel. 1.3SU2, Operat-ing Documentation, Issue 1
FlexiPacket Hub 800/800H setting
Click to get the latest updated information. After modification, click
button to commit the changes.
5.3.2.2 Management VID
Figure 264 Management VID
Management VID can be modified here.
Click to get the latest updated information. After modification, click
button to commit the changes.
g Management VID should be in the range of 51 - 4090.
5.3.2.3 Time and Date
Figure 265 Time and date
Time and date of the IDU can be set by using time server and current laptop time. Also other parameters related to time can be set here.

A25000-A1400-D000-01-76P1Issue: 1 Issue date: February 2012
209
FlexiPacket Commissioning Tool, Rel. 1.3SU2, Operat-ing Documentation, Issue 1
FlexiPacket Hub 800/800H setting
Click to get the latest updated information. After modification, click
button to commit the changes.
5.3.2.4 System command
Click to restore the IDU to factory default configuration.
5.3.2.5 Backup/Restore
Figure 266 Backup/restore configuration
The Operation Status shows the current operation performed and the status of the operation.
To backup the configuration, follow the steps below:
1 Click the button to select the location where the backup file to be saved.
2 Click the button to start backup. The progress is showing at the Operation Status.
3 Wait until the backup completion message shows up. The configuration backup is completed successfully.
To restore a configuration, follow the steps below:
1 Click the button to select the location where the restore file saved before.
2 Click the button to start restore. The progress is showing at the Operation Status.
3 Wait until the restore completion message shows up. The configuration restore is completed successfully.

210 A25000-A1400-D000-01-76P1Issue: 1 Issue date: February 2012
FlexiPacket Commissioning Tool, Rel. 1.3SU2, Operat-ing Documentation, Issue 1
FlexiPacket Hub 800/800H setting
5.3.2.6 IDU Software Management
Figure 267 IDU software management
Click to get the latest updated information.
Click the button, a box Choose the Software File to Download is open:
Figure 268 Choose the software file to download
After selecting the directory where the software is stored, then click the button to begin the downloading process. When finished, the software is downloaded to the standby software bank of the Network Elements.

A25000-A1400-D000-01-76P1Issue: 1 Issue date: February 2012
211
FlexiPacket Commissioning Tool, Rel. 1.3SU2, Operat-ing Documentation, Issue 1
FlexiPacket Hub 800/800H setting
g Normally, before the download process, the software should be downloaded to the PC which is running the CT.
After finishing the download process, there will be two software versions stored. If you
want to replace the old software version with the new one, just click the button to begin the switch and reset process.
5.3.2.7 IDU License Management
Figure 269 IDU license management
Click to get the latest updated information.
The new CLicS License Key can be either retrieved via web interface or generated via SMS, refer to CLicS license key generation procedure for detailed information.
Then fill in the new license and click on button to update license key.
5.3.3 Port ViewFor all the following ODU Settings, multiple ODUs can be selected to set the parameters at a time with the use of Ctrl .
Ethernet Port Tab:

212 A25000-A1400-D000-01-76P1Issue: 1 Issue date: February 2012
FlexiPacket Commissioning Tool, Rel. 1.3SU2, Operat-ing Documentation, Issue 1
FlexiPacket Hub 800/800H setting
Figure 270 Ethernet Port Tab
Click to show topological structure of the network:
Figure 271 L2 Discovered Path

A25000-A1400-D000-01-76P1Issue: 1 Issue date: February 2012
213
FlexiPacket Commissioning Tool, Rel. 1.3SU2, Operat-ing Documentation, Issue 1
FlexiPacket Hub 800/800H setting
The table in Figure 271 lists IP address, device name and current highest system alarm severity of the corresponding equipment. Click the Launch button to open WebLCT for the device.
g Please note that FPR HC does not support the discover path function.
Click Renew IP button in Figure 270 to renew IP address, IP mask and IP gateway of the device:
Figure 272 Renew Public IP
Click in Figure 270 to get the latest updated information.
Select one entry without ODU connected, then click button to add ODU on relevant port:

214 A25000-A1400-D000-01-76P1Issue: 1 Issue date: February 2012
FlexiPacket Commissioning Tool, Rel. 1.3SU2, Operat-ing Documentation, Issue 1
FlexiPacket Hub 800/800H setting
Figure 273 Add ODU
Fill in the required parameters, then click the button to confirm adding ODU,
or click the button to withdraw the adding.
g • Only use DCN as management port to add ODU. • For FPH800H,there are 2 types of ODU can be selected: FPR and FPMR.For
FPH800, an additional ODU type - FPR HC has been added for choosing.
Select one entry with ODU connected, then click button to remove the ODU connected to this port, a confirmation box appears with the question “Are you
sure to delete them(it)?”. Click button to proceed.
Select one entry without ODU connected, then click button:

A25000-A1400-D000-01-76P1Issue: 1 Issue date: February 2012
215
FlexiPacket Commissioning Tool, Rel. 1.3SU2, Operat-ing Documentation, Issue 1
FlexiPacket Hub 800/800H setting
Figure 274 Set management port
Choose the required parameters, then click the button to confirm.
Click button to reset the management port to the default setting.
Select one entry in which the port is set as a management port, then click
button to disable the management port setting on that port.
E1/T1 Port Tab:
Figure 275 E1/T1 Port Tab
This tab shows admin status and operational status of E1/T1 port.
Click to get the latest updated information.

216 A25000-A1400-D000-01-76P1Issue: 1 Issue date: February 2012
FlexiPacket Commissioning Tool, Rel. 1.3SU2, Operat-ing Documentation, Issue 1
FlexiPacket Hub 800/800H setting
STM1 Port Tab:
Figure 276 STM1 Port Tab
This tab shows admin status and operational status of STM1 port.
Click to get the latest updated information.
5.3.4 Device View
Figure 277 Device view
Click to get the latest updated information.

A25000-A1400-D000-01-76P1Issue: 1 Issue date: February 2012
217
FlexiPacket Commissioning Tool, Rel. 1.3SU2, Operat-ing Documentation, Issue 1
FlexiPacket Hub 800/800H setting
Select one ODU, then click to configure the system type of the ODU.
g • If you select only one ODU(FPR,FPMR or FPR HC), only 1+0 can be selected. • When two FPRs are selected at the same time, there are 4 system types can be
selected for FPH800: 1. 1+02. 1+1 HSBY3. 1+1 Frequency Diversity4. 1+1 Space Diversity
• When two FPMRs are selected at the same time, there are two system mode types can be selected for FPH800H, and 6 system mode types for FPH800, shown as below.
Figure 278 Configure system type (FPH800H)
Figure 279 Configure system type (FPH800)
• When two FPR HCs are selected at the same time, there are 7system types can be selected for FPH800: 1. off2. primary-hsb-1wire3. secondary-hsb-1wire4. primary-hsb-2wire

218 A25000-A1400-D000-01-76P1Issue: 1 Issue date: February 2012
FlexiPacket Commissioning Tool, Rel. 1.3SU2, Operat-ing Documentation, Issue 1
FlexiPacket Hub 800/800H setting
5. secondary-hsb-2wire6. primary-x27. secondary-x2
g Please note that FPH800H can not support FPMR.FPH800 can support the 3 types of ODU.
Choose the desired system type, then click the button to confirm.
Select two ODUs not in a LPG, then click to create LPG:
Figure 280 Add LPG
Select desired parameters, then click the button to confirm, or click the
button to withdraw.
Or select two ODUs in a LPG, then click the button to remove the LPG:
Figure 281 Remove LPG
Select the ODU(s) for which the configuration needs to be modified, then click the
button to open ODU configuration window, here select two ODUs as example:
1. Select Network from left tab, the interface is only for FPMR:

A25000-A1400-D000-01-76P1Issue: 1 Issue date: February 2012
219
FlexiPacket Commissioning Tool, Rel. 1.3SU2, Operat-ing Documentation, Issue 1
FlexiPacket Hub 800/800H setting
Figure 282 Network (FPMR)Fill in the secondary gateway if needed (For FPMR also the peer ODU IP), then click
the button to confirm.
2. Select SyncE from left tab, the interface is different for FPR and FPMR:
g The cofiguration of SyncE is only for FPH800 with FPR and FPMR, and FPH800 does not have this function when working with FPR HC. FPH800H does not have this function.

220 A25000-A1400-D000-01-76P1Issue: 1 Issue date: February 2012
FlexiPacket Commissioning Tool, Rel. 1.3SU2, Operat-ing Documentation, Issue 1
FlexiPacket Hub 800/800H setting
Figure 283 SyncE (FPR)The default value for Source SyncE Setting is freerun.

A25000-A1400-D000-01-76P1Issue: 1 Issue date: February 2012
221
FlexiPacket Commissioning Tool, Rel. 1.3SU2, Operat-ing Documentation, Issue 1
FlexiPacket Hub 800/800H setting
Figure 284 SyncE (FPMR)
Select synchronization parameters, then click the button to confirm.
3. Select ACM from left tab, the interfaces are different for FPR, FPMR and FPR HC (For FPR HC it is HAAM):

222 A25000-A1400-D000-01-76P1Issue: 1 Issue date: February 2012
FlexiPacket Commissioning Tool, Rel. 1.3SU2, Operat-ing Documentation, Issue 1
FlexiPacket Hub 800/800H setting
Figure 285 ACM (FPR)

A25000-A1400-D000-01-76P1Issue: 1 Issue date: February 2012
223
FlexiPacket Commissioning Tool, Rel. 1.3SU2, Operat-ing Documentation, Issue 1
FlexiPacket Hub 800/800H setting
Figure 286 ACM (FPMR)

224 A25000-A1400-D000-01-76P1Issue: 1 Issue date: February 2012
FlexiPacket Commissioning Tool, Rel. 1.3SU2, Operat-ing Documentation, Issue 1
FlexiPacket Hub 800/800H setting
Figure 287 HAAM (FPR HC)
Select desired transmit profile, enable or disable ACM, then click the button to confirm. For FPR HC choose “on” or “off” button to enable or disable the HAAM function.
g Adaptive Code Modulation belongs to the radio link algorithms. When enabled, auto-matic modulation code selection can be done in accordance with S/MSE value received by the remote ODU.
4. Select ATPC from left tab, the interfaces are different for FPR,FPMR and FPR H.

A25000-A1400-D000-01-76P1Issue: 1 Issue date: February 2012
225
FlexiPacket Commissioning Tool, Rel. 1.3SU2, Operat-ing Documentation, Issue 1
FlexiPacket Hub 800/800H setting
Figure 288 ATPC (FPR)

226 A25000-A1400-D000-01-76P1Issue: 1 Issue date: February 2012
FlexiPacket Commissioning Tool, Rel. 1.3SU2, Operat-ing Documentation, Issue 1
FlexiPacket Hub 800/800H setting
Figure 289 ATPC (FPMR)

A25000-A1400-D000-01-76P1Issue: 1 Issue date: February 2012
227
FlexiPacket Commissioning Tool, Rel. 1.3SU2, Operat-ing Documentation, Issue 1
FlexiPacket Hub 800/800H setting
Figure 290 ATPC (FPR HC)
Fill in the max transmit power, enable or disable ATPC, then click the button to confirm.
g Automatic Transmit Power Control defines the optimum Tx power level based on one of the quality and power level of the received signal (MSE and RSL respectively)
5. Select RF from left tab: • For FPR, FPMR:

228 A25000-A1400-D000-01-76P1Issue: 1 Issue date: February 2012
FlexiPacket Commissioning Tool, Rel. 1.3SU2, Operat-ing Documentation, Issue 1
FlexiPacket Hub 800/800H setting
Figure 291 RF(FPR / FPMR)Fill in the Tx and Rx frequency, channel bandwidth, select radio port administra-
tive status, then click the button to confirm.
• For FPR HC, there are two steps to configure the RF:1. Step 1: Configure the Radio band:

A25000-A1400-D000-01-76P1Issue: 1 Issue date: February 2012
229
FlexiPacket Commissioning Tool, Rel. 1.3SU2, Operat-ing Documentation, Issue 1
FlexiPacket Hub 800/800H setting
Figure 292 RF_1
Fill in the Radio band, then click the button to confirm.2. Step 2: Configure the system mode, programmed frequency, programmed
transmitter power, transmitter state:

230 A25000-A1400-D000-01-76P1Issue: 1 Issue date: February 2012
FlexiPacket Commissioning Tool, Rel. 1.3SU2, Operat-ing Documentation, Issue 1
FlexiPacket Hub 800/800H setting
Figure 293 RF_2 Fill in the System mode, Programmed frequency, Programmed transmitter
power, Transmitter state, then click the button to confirm.
6. Select Time Server from left tab:

A25000-A1400-D000-01-76P1Issue: 1 Issue date: February 2012
231
FlexiPacket Commissioning Tool, Rel. 1.3SU2, Operat-ing Documentation, Issue 1
FlexiPacket Hub 800/800H setting
Figure 294 Time serverFill in the time server IP, select time zone and other parameters, then click the
button to confirm.
When the ODU system type is 1+1 hot stand-by, one of the two ODUs is replaced by another ODU with different settings, then select the entry represent the new ODU, click
button in Figure 277 to synchronize the settings, that is, copy the settings on the existing old ODU to the new ODU.
For example, select the ODU with IP 192.168.240.105 in Figure 270, and click
button, a warning message appears: ”Are you sure to do alignment from ODU (192.168.240.106) to ODU (192.168.240.105)”. Click Yes to confirm:

232 A25000-A1400-D000-01-76P1Issue: 1 Issue date: February 2012
FlexiPacket Commissioning Tool, Rel. 1.3SU2, Operat-ing Documentation, Issue 1
FlexiPacket Hub 800/800H setting
Figure 295 Alignment
Fill in the ODU new IP, then click the button to confirm, or click the button to withdraw.
5.3.5 ODU SoftwareThe interface is different for FPR/FPMR and FPR HC.
• For FPR/FPMR
Figure 296 ODU Software
Click to get the latest updated information.Select the ODU (s) for which the software needs to be upgrade, then click the
button, a box Device Software Upload is open:

A25000-A1400-D000-01-76P1Issue: 1 Issue date: February 2012
233
FlexiPacket Commissioning Tool, Rel. 1.3SU2, Operat-ing Documentation, Issue 1
FlexiPacket Hub 800/800H setting
Figure 297 Device software upload
Then click the button, a window is open:
Figure 298 Choose software file
After selecting the directory where the software is stored, click the
button then the button to begin the downloading process. When finished, the software is downloaded to the standby software bank of the ODU.

234 A25000-A1400-D000-01-76P1Issue: 1 Issue date: February 2012
FlexiPacket Commissioning Tool, Rel. 1.3SU2, Operat-ing Documentation, Issue 1
FlexiPacket Hub 800/800H setting
g Normally, before the download process, the software should be downloaded to the PC which is running the CT.
After finishing the download process, there will be two software versions stored. If you want to replace the old software version with the new one, just click the
button to begin the switch and reset process.
Click the button to restore ODU configuration from configu-ration backup file:
Figure 299 ODU configuration file restore
1 Click the button to select the location where the restore file saved before.
2 Click the button to confirm, or click the button to withdraw.
• For FPR HC

A25000-A1400-D000-01-76P1Issue: 1 Issue date: February 2012
235
FlexiPacket Commissioning Tool, Rel. 1.3SU2, Operat-ing Documentation, Issue 1
FlexiPacket Hub 800/800H setting
Figure 300 ODU Software
Click to get the latest updated information.Select the ODU (s) for which the software needs to be upgrade, then click the Upgrade button, a box Device Software Upgrade is open:
Figure 301 Device software upgrade (FPR HC)

236 A25000-A1400-D000-01-76P1Issue: 1 Issue date: February 2012
FlexiPacket Commissioning Tool, Rel. 1.3SU2, Operat-ing Documentation, Issue 1
FlexiPacket Hub 800/800H setting
g The FPR HC contains three different files that all together are needed for the normal functioning of the device. They are an application omni, a modem file and a fre-quency file. In order to be sure about compatibilities between this different files, please refer to the Release Note of the software version you want install on the FPR HC.
g The software file name must be ‘standby.pec’.
5.3.6 ODU License
Figure 302 ODU License
Click to get the latest updated information.
Click to view the detailed license information.
Select the ODU (s) for which the license needs to be upgrade, then click the
button, a box Upgrade License is open, this box is different for FPR and FPMR:
Figure 303 Upgrade license (FPR)

A25000-A1400-D000-01-76P1Issue: 1 Issue date: February 2012
237
FlexiPacket Commissioning Tool, Rel. 1.3SU2, Operat-ing Documentation, Issue 1
FlexiPacket Hub 800/800H setting
There are two types of license available: CLicS License Key and License Key [SNMP Coding]. For the detailed steps, please refer to Upgrade ODU license.
Figure 304 Upgrade license (FPMR)
For the CLicS license key creation process, please refer to CLicS license key generation procedure.
5.3.7 Alarm View
Figure 305 Alarm View
In this view, all the active alarms of connected IDU and ODU are collected and listed.

238 A25000-A1400-D000-01-76P1Issue: 1 Issue date: February 2012
FlexiPacket Commissioning Tool, Rel. 1.3SU2, Operat-ing Documentation, Issue 1
FlexiPacket Hub 800/800H setting
5.3.8 Test View
Figure 306 Test View
The Ethernet ports, E1/T1 ports, SFP ports are listed as below, which can be refered when test.
Figure 307 Port Locations
Click to get the latest updated information.
Select the ethernet ports configured as GE port, then test the state of the ports selected.
Here configure IDU-A 0/2 port as GE port as example, to test it’s state.
1. Ethernet Port HW Validation: Test the hardware connection state of the Ethernet ports. The operation steps are as below:
Make sure the cable to port IDU-A 0/2 has been connected. Click the button, a box Ethernet Port HW Validation is open.

A25000-A1400-D000-01-76P1Issue: 1 Issue date: February 2012
239
FlexiPacket Commissioning Tool, Rel. 1.3SU2, Operat-ing Documentation, Issue 1
FlexiPacket Hub 800/800H setting
Figure 308 Ethernet Port HW ValidationWait until the test result is displayed. Then the screen below will be displayed:

240 A25000-A1400-D000-01-76P1Issue: 1 Issue date: February 2012
FlexiPacket Commissioning Tool, Rel. 1.3SU2, Operat-ing Documentation, Issue 1
FlexiPacket Hub 800/800H setting
Figure 309 Ethernet Port HW Validation ResultIt means the test result has been recorded.Then connect the Ethernet cable to the “reserved” management port and then press “Exit”.If the test failed, please check the IDU connection and configuration.
g Usually in practical site, there may have several ports to be set as Ethernet port, then they will be tested one by one.
2. E1 Port HW Validation: Test the hardware connection state of the E1 ports. The operation steps are as below:
Click the button, a box E1 Port HW Validation is open as below. You need to test the E1 ports manually. Check the E1 ports state and make record of each port state one by one then press “Exit”.

A25000-A1400-D000-01-76P1Issue: 1 Issue date: February 2012
241
FlexiPacket Commissioning Tool, Rel. 1.3SU2, Operat-ing Documentation, Issue 1
FlexiPacket Hub 800/800H setting
Figure 310 E1 Port HW ValidationIf the test failed, please check the IDU connection and configuration.
3. Interference Test: CT first switch off the peer ODU (if present), then get a received power value on the local ODU, if the received power is less than the preset interfer-ence threshold, the test is pass.
Click the button, a box Interference Test is open:
Figure 311 Interference Test
Then click “Run”. The test progress will be displayed as below:

242 A25000-A1400-D000-01-76P1Issue: 1 Issue date: February 2012
FlexiPacket Commissioning Tool, Rel. 1.3SU2, Operat-ing Documentation, Issue 1
FlexiPacket Hub 800/800H setting
Figure 312 Interference Test Progress
After test completed, the result will be showed like below.
Figure 313 Interference Test ResultIf the test failed, please check the ODU connection and configuration.
g Please note that the Interference Test function is not complied with FPR HC.
4. Line-up Test: Test the connection state of the two local ODUs(If only there are two ODUs connected to IDU). The operation steps are as below:
Click the button, a box Test Line-up Progress is open. After the test completed, the result will be showed as below:

A25000-A1400-D000-01-76P1Issue: 1 Issue date: February 2012
243
FlexiPacket Commissioning Tool, Rel. 1.3SU2, Operat-ing Documentation, Issue 1
FlexiPacket Hub 800/800H setting
Figure 314 Line-up Test ResultIf the test failed, please check the local ODU connection and configuration.
5. Link Validation Test: Test the connection state between local IDU and peer ODU. The operation steps are as below:
Click the button, a box Test Link Validation Progress is open. After the test completed, the result will be showed as below:
Figure 315 Link Validation Test ResultIf the test failed, please check the local IDU and ODU connection and configuration.
6. Hop Validation Test: This test can be used to display radio parameters (when Tracking is checked) or for Antenna Alignment purpose (when Tracking is not checked). The operation steps are as below: Check the Tracking checkbox, this will disable the ATPC and ACM function in both local and remote ODU, then input suitable values, the test will verify whether the Antenna Alignment is correct.

244 A25000-A1400-D000-01-76P1Issue: 1 Issue date: February 2012
FlexiPacket Commissioning Tool, Rel. 1.3SU2, Operat-ing Documentation, Issue 1
FlexiPacket Hub 800/800H setting
Figure 316 Hop Validation Test ProcessEnable Local Force Down button can be used to switch the Active and Standby ODU, and Disable Local Force Down button can restore the operation performed by Enable Local Force Down button.
In this step, you can click to save the test result for report directly then click “Exit”.If the test failed, please check the local and remote ODU connection and configura-tion.
7. E2E Connectivity Test: Test the connection state between local IDU and peer IDU. The operation steps are as below:
Click the button, a box Test E2E connectivity Progress is open. After the test completed, the result will be showed as below:

A25000-A1400-D000-01-76P1Issue: 1 Issue date: February 2012
245
FlexiPacket Commissioning Tool, Rel. 1.3SU2, Operat-ing Documentation, Issue 1
FlexiPacket Hub 800/800H setting
Figure 317 E2E connectivity Test ResultIf the test failed, please check the local and remote IDU connection and configura-tion.
g Please not that the E2E validation function is not complied with FPR HC.
5.3.9 Report
5.3.9.1 Overview
Figure 318 Report view
When you choose the Report, a box Generate Report is open as showed below.

246 A25000-A1400-D000-01-76P1Issue: 1 Issue date: February 2012
FlexiPacket Commissioning Tool, Rel. 1.3SU2, Operat-ing Documentation, Issue 1
FlexiPacket Hub 800/800H setting
Figure 319 Generate Report
Input the information listed in the window, then click ,the report will be generated automatically. And there are four types of report available:
• Full report: Generated at the end of a complete phase of site installation procedure that includes an installation, a commissioning and a testing phase of the system.
• Swap report: generated when, following a fault in a Unit (can be either IDU or ODU), and not all phases are performed in the involved site. That is, just the directly involved NE are subject to commissioning and testing.
• Commission report: related to the whole set of configuration performed in the system (also HW/SW inventory are reported) but at the end of this phase, no tests on the built links have been done.
• Test report: This last phase of test can be instead performed stand-alone, and this brings in the generation of this last TEST REPORT.

A25000-A1400-D000-01-76P1Issue: 1 Issue date: February 2012
247
FlexiPacket Commissioning Tool, Rel. 1.3SU2, Operat-ing Documentation, Issue 1
FlexiPacket Hub 800/800H setting
Figure 320 Report generation flow chart
5.3.9.2 Report TemplateHere we use an empty full report to explain each section of the final report. For the example full report generated by commissioning tool, please refer to Appendix: Report example.
g The section with yellow background means it is related to IDU. The section with tan background mean it is related to ODU. The grey part means it is the field filled by user or generated by Commissioning Tool. Red text means comment, not present in the final report.
General information
• General information
Figure 321 General Information

248 A25000-A1400-D000-01-76P1Issue: 1 Issue date: February 2012
FlexiPacket Commissioning Tool, Rel. 1.3SU2, Operat-ing Documentation, Issue 1
FlexiPacket Hub 800/800H setting
All fields are filled by the user in ‘Generator Dialog’, see Figure 319.
• Relevant remark
Figure 322 Relevant remarkIf there is no remark, leave them empty.
• Test instrument

A25000-A1400-D000-01-76P1Issue: 1 Issue date: February 2012
249
FlexiPacket Commissioning Tool, Rel. 1.3SU2, Operat-ing Documentation, Issue 1
FlexiPacket Hub 800/800H setting

250 A25000-A1400-D000-01-76P1Issue: 1 Issue date: February 2012
FlexiPacket Commissioning Tool, Rel. 1.3SU2, Operat-ing Documentation, Issue 1
FlexiPacket Hub 800/800H setting
Figure 323 Test instrumentBasic Test Instruments suggested for Line-up and commissioning
IDU part
• IDU installation check list summary
Figure 324 IDU installation check list summaryLeave empty all tables in this page.
• Connected network elements summary

A25000-A1400-D000-01-76P1Issue: 1 Issue date: February 2012
251
FlexiPacket Commissioning Tool, Rel. 1.3SU2, Operat-ing Documentation, Issue 1
FlexiPacket Hub 800/800H setting
Figure 325 Connected network elements summaryFor the ‘Connected network element type’, leave it empty if the type is unknown. For the ‘New Installation’ field, set ‘Yes’ if the related NE is added to the IDU during this session of Commissioning Tool.
• Equipment configuration parameters

252 A25000-A1400-D000-01-76P1Issue: 1 Issue date: February 2012
FlexiPacket Commissioning Tool, Rel. 1.3SU2, Operat-ing Documentation, Issue 1
FlexiPacket Hub 800/800H setting
Figure 326 Equipment configuration parameters
• Equipment Synchronization parameters

A25000-A1400-D000-01-76P1Issue: 1 Issue date: February 2012
253
FlexiPacket Commissioning Tool, Rel. 1.3SU2, Operat-ing Documentation, Issue 1
FlexiPacket Hub 800/800H setting
Figure 327 Equipment Synchronization parameters
• IDU system check and measure

254 A25000-A1400-D000-01-76P1Issue: 1 Issue date: February 2012
FlexiPacket Commissioning Tool, Rel. 1.3SU2, Operat-ing Documentation, Issue 1
FlexiPacket Hub 800/800H setting
Figure 328 IDU system check and measure
• Test result

A25000-A1400-D000-01-76P1Issue: 1 Issue date: February 2012
255
FlexiPacket Commissioning Tool, Rel. 1.3SU2, Operat-ing Documentation, Issue 1
FlexiPacket Hub 800/800H setting

256 A25000-A1400-D000-01-76P1Issue: 1 Issue date: February 2012
FlexiPacket Commissioning Tool, Rel. 1.3SU2, Operat-ing Documentation, Issue 1
FlexiPacket Hub 800/800H setting

A25000-A1400-D000-01-76P1Issue: 1 Issue date: February 2012
257
FlexiPacket Commissioning Tool, Rel. 1.3SU2, Operat-ing Documentation, Issue 1
FlexiPacket Hub 800/800H setting
Figure 329 Test resultThe row of the table depends on the number of devices connected to the IDU.
ODU part
• ODU installation check list summary
Figure 330 ODU installation check list summaryLeave empty all tables in this page.This is a set of tables for each ODU connected to IDU A. IDU Bx is the peer IDU belonging to each radio link. In case of protect system, both ODUs have the same system type.
• System configuration type
Figure 331 System configuration type

258 A25000-A1400-D000-01-76P1Issue: 1 Issue date: February 2012
FlexiPacket Commissioning Tool, Rel. 1.3SU2, Operat-ing Documentation, Issue 1
FlexiPacket Hub 800/800H setting
• Composition, Serial numbers and active Product Software on IDU
Figure 332 Composition, Serial numbers and active Product Software on IDU
• Composition and Serial number on ODU

A25000-A1400-D000-01-76P1Issue: 1 Issue date: February 2012
259
FlexiPacket Commissioning Tool, Rel. 1.3SU2, Operat-ing Documentation, Issue 1
FlexiPacket Hub 800/800H setting
Figure 333 Composition and Serial number on ODU
• Product Inventory Data (HW PID) from LCT on ODU
Figure 334 Product Inventory Data (HW PID) from LCT on ODU(**) This is the SN of the RF part, the SN in the Figure 333 is the one related to the whole ODU.
• NE Info from LCT on ODU
Figure 335 NE Info from LCT on ODU(**) Take into account the possibility to extend the User data up to its biggest value (xxx bytes).
• Networking Configurations on IDU

260 A25000-A1400-D000-01-76P1Issue: 1 Issue date: February 2012
FlexiPacket Commissioning Tool, Rel. 1.3SU2, Operat-ing Documentation, Issue 1
FlexiPacket Hub 800/800H setting
Figure 336 Networking Configurations on IDU
• Networking Configurations on ODU

A25000-A1400-D000-01-76P1Issue: 1 Issue date: February 2012
261
FlexiPacket Commissioning Tool, Rel. 1.3SU2, Operat-ing Documentation, Issue 1
FlexiPacket Hub 800/800H setting
Figure 337 Networking Configurations on ODU
• Product and SW Data on ODU

262 A25000-A1400-D000-01-76P1Issue: 1 Issue date: February 2012
FlexiPacket Commissioning Tool, Rel. 1.3SU2, Operat-ing Documentation, Issue 1
FlexiPacket Hub 800/800H setting
Figure 338 Product and SW Data on ODU
• License Data on IDU
Figure 339 License Data on IDU
• License Data on ODU
Figure 340 License Data on ODU
• ODU Equipment configuration parameters

A25000-A1400-D000-01-76P1Issue: 1 Issue date: February 2012
263
FlexiPacket Commissioning Tool, Rel. 1.3SU2, Operat-ing Documentation, Issue 1
FlexiPacket Hub 800/800H setting
Figure 341 ODU Equipment configuration parameters
• RF measurements
Figure 342 RF measurements
• Outdoors ODU’s Cables status
Figure 343 Outdoors ODU’s Cables status
• Antenna’s system

264 A25000-A1400-D000-01-76P1Issue: 1 Issue date: February 2012
FlexiPacket Commissioning Tool, Rel. 1.3SU2, Operat-ing Documentation, Issue 1
FlexiPacket Hub 800/800H setting
Figure 344 Antenna’s system
• ODU system check and measure

A25000-A1400-D000-01-76P1Issue: 1 Issue date: February 2012
265
FlexiPacket Commissioning Tool, Rel. 1.3SU2, Operat-ing Documentation, Issue 1
FlexiPacket Hub 800/800H setting
Figure 345 ODU system check and measure
• ODU test result

266 A25000-A1400-D000-01-76P1Issue: 1 Issue date: February 2012
FlexiPacket Commissioning Tool, Rel. 1.3SU2, Operat-ing Documentation, Issue 1
FlexiPacket Hub 800/800H setting
Figure 346 ODU test result

A25000-A1400-D000-01-76P1Issue: 1 Issue date: February 2012
267
FlexiPacket Commissioning Tool, Rel. 1.3SU2, Operat-ing Documentation, Issue 1
Standalone ODU setting
6 Standalone ODU settingThis chapter describes how to use the Commissioning Tool 1.3 SU2 to configure ODU settings directly. The local IP address for FPR is fixed to 192.168.20.231. And once the connection is established, user can set up public IP address according to their require-ment.
Most of the operations in Commissioning Tool 1.3 SU2 assisted mode are nearly the same for FPR1.3, FPMR R2.1, FPMR R2.4 and FPR HC, they will be described in FPR/FPMR/FPR HC Assisted Mode.
Most of the operations in Commissioning Tool 1.3 SU2 advanced mode are the same for FPR1.3 and FPMR, so this chapter FPR Advanced Mode will describe the operations for FPR advanced mode as example. The different parts between FPR and FPMR(P) advanced mode are also described in FPMR(P) Advanced Mode. The operations for FPR HC advanced mode are totally different from FPR and FPMR, and this part will be described separately in FPR HC Advanced Mode.
6.1 FPR/FPMR/FPR HC Assisted ModeThe Assisted Mode of FPR/FPMR and FPR HC are nearly the same.
For assisted mode, the ODU settings can be predefined before the ODU is physically connected. The physical connection is not necessary until the validation procedure. But this offline procedure is only for the first-time installation and not for the maintenance.
6.1.1 ODU settingFor all the following ODU Settings, multiple ODUs can be selected to set the parameters at a time with the use of Ctrl .
1. Configure ODU System Type. Operations of this part are different for FPR/FPMR and FPR HC. • For FPR and FPMR:
Select the ODU System type, Pccm Vid, Role, Switch Mode as in Figure 349, then click on Next button to continue next step.

268 A25000-A1400-D000-01-76P1Issue: 1 Issue date: February 2012
FlexiPacket Commissioning Tool, Rel. 1.3SU2, Operat-ing Documentation, Issue 1
Standalone ODU setting
Figure 347 Configure ODU System Type (FPR/FPMR) • For FPR HC:
Set the redundancy mode to “off” by select it with a tick at the front, as shown in the picture below.
g When set the redundancy mode to “off”, the system type will be set to off mode (Similar with the 1+0 mode of FPR/FPMR). If the tick removed it means the system type will keep the original one.

A25000-A1400-D000-01-76P1Issue: 1 Issue date: February 2012
269
FlexiPacket Commissioning Tool, Rel. 1.3SU2, Operat-ing Documentation, Issue 1
Standalone ODU setting
Figure 348 Configure ODU System Type (FPR HC)2. Upgrade ODU Software. Operations of this part are different for FPR/FPMR and
FPR HC. • For FPR/FPMR:
Select the ODU or multiple ODUs, click on Browse button to locate the upgrade software file provided, see Figure 349, and click on Open button to select the file, then click Modify to upgrade the software.

270 A25000-A1400-D000-01-76P1Issue: 1 Issue date: February 2012
FlexiPacket Commissioning Tool, Rel. 1.3SU2, Operat-ing Documentation, Issue 1
Standalone ODU setting
Figure 349 Upgrade ODU Software (FPR/FPMR)
g The software file name must end with ".pec". If there is no need to upgrade the software, please keep it blank.
• For FPR HC: Select the ODU or multiple ODUs, click on Browse button to locate the upgrade software file provided, see Figure 349, and click on Open button to select the files, then click Modify to upgrade the software.
g The FPR HC contains three different files that all together are needed for the normal functioning of the device. They are an application omni, a modem file and a frequency file. In order to be sure about compatibilities between this different files, please refer to the Release Note of the software version you want install on the FPR HC.

A25000-A1400-D000-01-76P1Issue: 1 Issue date: February 2012
271
FlexiPacket Commissioning Tool, Rel. 1.3SU2, Operat-ing Documentation, Issue 1
Standalone ODU setting
Figure 350 Upgrade ODU Software (FPR HC)3. Upgrade ODU license. Select a port on which the connected ODU needs license
upgrade.
Figure 351 Upgrade ODU License (version 1.3.8 and before)

272 A25000-A1400-D000-01-76P1Issue: 1 Issue date: February 2012
FlexiPacket Commissioning Tool, Rel. 1.3SU2, Operat-ing Documentation, Issue 1
Standalone ODU setting
For the detailed information to get new license, please refer to Upgrade ODU license.
Type in the license key generated in CLicS, then click on Modify button to upgrade.
g If there is no need to upgrade the license key, please keep it blank or zero.
For FPMR(P), only CLICS License Key is used.The new CLicS License Key can be either retrieved via web interface or generated via SMS, refer to CLicS license key generation procedure for detailed information.
Figure 352 Configure ODU ACM4. Configure ODU Network. Fill in the following parameters of ODU:
• ODU IP Configuration: • IP Address • IP Mask • Default Gateway • Secondary Gateway
• Management VLAN Configuration • DHCP Configuration (Only for FPR and FPMR)

A25000-A1400-D000-01-76P1Issue: 1 Issue date: February 2012
273
FlexiPacket Commissioning Tool, Rel. 1.3SU2, Operat-ing Documentation, Issue 1
Standalone ODU setting
Figure 353 Configure ODU Network
5. Configure ODU ACM (For FPR HC it is HAAM). • For ODU type - FPR, set the following parameters for selected IDU Port.
• ACM TX enable (enable/disable) • Static TX profile (4 QAM/16 QAM/64 QAM/128 QAM/256 QAM)
ACM: Adaptive Code Modulation, belongs to the radio link algorithms. When enabled, it allows automatic modulation code selection in accordance with S/MSE value received by the remote ODU.It is recommended to make sure you have enough license to set ACM.
For ODU type - FPMR(P) with software version 2.1, set the following parameters for selected IDU Port. • Profile criteria (high performance/custom profile) • ACM TX enable (enable/disable) • Static TX profile (QPSK/16 QAM/32 QAM/64 QAM/128 QAM/256 QAM)
For ODU type - FPMR(P) with software version 2.4 and 2xFPMR(P), set the fol-lowing parameters for selected IDU Port. • Standard mode (etsi/ansi) • Channel bandwidth (3.5 MHz/7 MHz/14 MHz/28 MHz/40 MHz/56 MHz) • Profile criteria (standard profiles/high throughput) • ACM TX enable (enable/disable) • TX static profile (QPSK/16 QAM/32 QAM/64 QAM/128 QAM/256 QAM)

274 A25000-A1400-D000-01-76P1Issue: 1 Issue date: February 2012
FlexiPacket Commissioning Tool, Rel. 1.3SU2, Operat-ing Documentation, Issue 1
Standalone ODU setting
g ODU license upgrade is needed to support more modulation type.
Figure 354 Configure ODU ACM
g In case of the first link setup (before antenna alignment), the ACM must be dis-abled. It can be enabled at the end of antennas alignment.
• For FPR HC:Configure ODU HAAM.Set the HAAM enable to on or off state.

A25000-A1400-D000-01-76P1Issue: 1 Issue date: February 2012
275
FlexiPacket Commissioning Tool, Rel. 1.3SU2, Operat-ing Documentation, Issue 1
Standalone ODU setting
Figure 355 Configure ODU HAAM (FPR HC)
g The function HAAM (Hitless Automated Adaptive Modulation) of FPR HC is similar with the ACM function of FPR/FPMR.
6. Configure ODU ATPC. Operations of this part are different for FPR/FPMR and FPR HC. • For FPR and FPMR:
Set the following parameters for selected IP addresses. • ATPC Enable (enable/disable) • MAX TX Power

276 A25000-A1400-D000-01-76P1Issue: 1 Issue date: February 2012
FlexiPacket Commissioning Tool, Rel. 1.3SU2, Operat-ing Documentation, Issue 1
Standalone ODU setting
Figure 356 Configure ODU ATPC (FPR and FPMR)
g The ATPC defines the opitmum Tx power level basing on one of the quality and the power level of the received signal (MSE and RSL respectively).The approximative range of "Max TX Power" is 3-17. The accurate range of "Max TX Power" can not be determined in a offline state, it depends on the mod-ulation mode and bandwidth.For FPMR(P) with software version 2.4, if the value set for MAX TX power in CT is bigger than the value in ODU, ODU will automatically adopt a proper value.In case of the first link setup (before antenna alignment), the ATPC must be dis-abled. It can be enabled at the end of antennas alignment.
• For FPR HC: Set the following parameters for selected IP addresses: • ATPC Enable (enable/disable). • ATPC Coordinated power (on/off), which is the transmit power of the FPR
HC, usually will be set “on”. • Coordinated power offset (range 1-10).

A25000-A1400-D000-01-76P1Issue: 1 Issue date: February 2012
277
FlexiPacket Commissioning Tool, Rel. 1.3SU2, Operat-ing Documentation, Issue 1
Standalone ODU setting
Figure 357 Configure ODU ATPC (FPR and FPMR)
g The Max TX Power range is automatically detected by the system and may vary depending on the setting in ATM view (Static TX profile, Max RX profile, etc).The range of ‘Max TX Power’ can not be determined in the offline state. It can be confirmed in the validation step before commissioning.In case of the first link setup (before antenna alignment), the ATPC must be dis-abled. It can be enabled at the end of antennas alignment.
7. Configure ODU SyncE (Only for FPR/FPMR). For ODU type - FPR, set the following parameters for selected IDU Ports. • Source syncE setting (freerun/ethernet/radio), default is freerun. • ODU master/slave value (automatic/slave/master), default is automatic. • IDU port master/slave value (slave/master).
If ethernet is selected, ODU will be set to slave and IDU will be set to master.If radio is selected, ODU will be set to master and IDU will be set to slave.If freerun is selected, ODU will be set to automatic and IDU will do nothing.
For ODU type - FPMR(P) and 2*FPMR(P), set the following parameters for selected IDU Ports. • Source syncE transfer (NCT/Fixed/Priority). • Source syncE setting (ethernet/radio). • Master/slave value (slave/master). • IDU port master/slave value (slave/master).
If ethernet is selected, ODU will be set to slave and IDU will be set to master.If radio is selected, ODU will be set to master and IDU will be set to slave.

278 A25000-A1400-D000-01-76P1Issue: 1 Issue date: February 2012
FlexiPacket Commissioning Tool, Rel. 1.3SU2, Operat-ing Documentation, Issue 1
Standalone ODU setting
Figure 358 Configure ODU SyncE (FPR/FPMR)
8. Configure ODU RF. Operations of this part are different for FPR/FPMR and FPR HC. • For FPR/FPMR:
Set the following parameters for selected IP addresses. • Tx frequency (KHz) / Rx frequency (KHz) • Channel Bandwidth (3.5MHz/ 7MHz/ 14MHz/ 28MHz/ 56MHz) • Radio PortAdmin Status (up/down)

A25000-A1400-D000-01-76P1Issue: 1 Issue date: February 2012
279
FlexiPacket Commissioning Tool, Rel. 1.3SU2, Operat-ing Documentation, Issue 1
Standalone ODU setting
Figure 359 Configure ODU RF (FPR/FPMR)
g Either the TX frequency or the RX frequency is needed to input and can not be zero. Here use 18900000 KHz as example. There is a formula between TX fre-quency and RX frequency. This tool will automatically calculate the TX fre-quency according to the RX frequency, and vise versa.The frequency range can not be determined in the offline state. It can be con-firmed in the validation step before commissioning. If you are not sure about the accurate frequency, just set it to “1” temporarily and go back to correct it after the validation.
• For FPR HC:There are two steps for the FPR HC to configure the ODU RF function.1. Set the Radio band and Transmitter state, click Next button.

280 A25000-A1400-D000-01-76P1Issue: 1 Issue date: February 2012
FlexiPacket Commissioning Tool, Rel. 1.3SU2, Operat-ing Documentation, Issue 1
Standalone ODU setting
Figure 360 Configure ODU RF STEP 1 (FPR HC)2. Set the Frequency and System mode, click Next button.
Figure 361 Configure ODU RF STEP 2 (FPR HC)9. Configure ODU Time Server. Set following parameters for selected IP addresses.

A25000-A1400-D000-01-76P1Issue: 1 Issue date: February 2012
281
FlexiPacket Commissioning Tool, Rel. 1.3SU2, Operat-ing Documentation, Issue 1
Standalone ODU setting
• PC Synchronization • Time Server IP Address • Time Zone • Daylight Saving Flag (Enabled / Disabled)
Figure 362 Configure ODU Time Server
g Please make sure the SNTP server is available. If the server is not available, IDU is unable to synchronize time from SNTP server, and use current system time instead.
After ODU Settings are completed, there are four steps in Setting Validation described below. In order to validate setting, IDUs and ODUs need to be connected.
6.1.2 Setting FinishedFor all the following ODU Settings, multiple ODUs can be selected to set the parameters at a time with the use of Ctrl .
1. Save Settings. Click on Save button to save current setting information to the opening file. But if you are using the default template file, this button would be dis-abled. This step can be skipped without saving the settings.

282 A25000-A1400-D000-01-76P1Issue: 1 Issue date: February 2012
FlexiPacket Commissioning Tool, Rel. 1.3SU2, Operat-ing Documentation, Issue 1
Standalone ODU setting
Figure 363 Save Settings
Click on Save As button to save current setting information to a new file.
Figure 364 Save setting information to a new file

A25000-A1400-D000-01-76P1Issue: 1 Issue date: February 2012
283
FlexiPacket Commissioning Tool, Rel. 1.3SU2, Operat-ing Documentation, Issue 1
Standalone ODU setting
After saving the setting information or click on Next button in Figure 363 skipping saving, the view shows as in Figure 364.
2. Input ODU Login Parameters. Input the ODU IP and ODU Admin Community, then select PC interface name from the drop-down list, so that Commissioning Tool can connect to ODU.The community here must be an admin user, the view shows as in Figure 365.
Figure 365 Input ODU Login Parameters
Then click on Next button to connect, a warning message will appear to confirm the ODU IP address is correct or not: “Commissioning Tool will try to connect ODU in next steps. Are you sure the ODU IP is correct?”
3. Validate Setting. Click on Validate button to validate current setting in a real envi-ronment. This requires all cables have been exactly connected. A message ‘No setting error found’ will appear and then click on Next button.

284 A25000-A1400-D000-01-76P1Issue: 1 Issue date: February 2012
FlexiPacket Commissioning Tool, Rel. 1.3SU2, Operat-ing Documentation, Issue 1
Standalone ODU setting
Figure 366 Validate Setting
g Please validate your settings before commissioning. During validation, all existing LPG will be removed and all ports will be reset to NNI.If there is anything wrong occurred during the validation, the error message will be listed in the blank area below. And the corresponding error steps will be shown in red color in the left tree panel.
4. Start Commissioning. Click on Run button to do commissioning now with current setting information.

A25000-A1400-D000-01-76P1Issue: 1 Issue date: February 2012
285
FlexiPacket Commissioning Tool, Rel. 1.3SU2, Operat-ing Documentation, Issue 1
Standalone ODU setting
Figure 367 Start Commissioning
g Commissioning will start right after clicking on Run button.
5. Do Commissioning. Commission is in progress. Wait for the progress bar to com-plete. If there is error during commission, an error message will appear above each progress bar.

286 A25000-A1400-D000-01-76P1Issue: 1 Issue date: February 2012
FlexiPacket Commissioning Tool, Rel. 1.3SU2, Operat-ing Documentation, Issue 1
Standalone ODU setting
Figure 368 Commission progress
6. Information View. Figure 369 shows the overview information of ODU base and ODU license.

A25000-A1400-D000-01-76P1Issue: 1 Issue date: February 2012
287
FlexiPacket Commissioning Tool, Rel. 1.3SU2, Operat-ing Documentation, Issue 1
Standalone ODU setting
Figure 369 Information View of ODU7. Test & Report. After finishing the Information View, click on Next button, the Test &
Report screen will be showed as Figure 370.
g Only the Advanced Mode provide testing and report function.Please click left button if you need. After click, CT will close this Assisted mode and open Advanced mode automatically as showed in Figure 371.

288 A25000-A1400-D000-01-76P1Issue: 1 Issue date: February 2012
FlexiPacket Commissioning Tool, Rel. 1.3SU2, Operat-ing Documentation, Issue 1
Standalone ODU setting
Figure 370 Test & Report
Figure 371 Test & Report in Advanced modeCommissioning finished.
6.2 FPR Advanced ModeFPR can be configured directly by the Commissioning Tool 1.3 EP1. There are two ways to get connected with the FPR, one way is connecting it directly with the PC, another way is connecting the FlexiPacket Radio with PC via IDU.

A25000-A1400-D000-01-76P1Issue: 1 Issue date: February 2012
289
FlexiPacket Commissioning Tool, Rel. 1.3SU2, Operat-ing Documentation, Issue 1
Standalone ODU setting
When FPR is connected directly with PC, the configuration steps are described as fol-lowings.
6.2.1 Log-in1. Run the FlexiPacket Commissioning Tool application.
2. In the Equipment Selection window (see Figure 372), select FPR for Equipment, and click on Next.
Figure 372 Standalone FlexiPacket Radio login
g For Standalone FlexiPacket Radio, the Operation Mode is fixed to Advanced mode.
3. In the Configure FlexiPacket Radio IP window (see Figure 373), enter the local IP address of the FlexiPacket Radio and the password, and click on Next.

290 A25000-A1400-D000-01-76P1Issue: 1 Issue date: February 2012
FlexiPacket Commissioning Tool, Rel. 1.3SU2, Operat-ing Documentation, Issue 1
Standalone ODU setting
Figure 373 Configure FlexiPacket Radio IP
g When the FlexiPacket Radio is connected directly with PC, the login IP address is fixed to its local IP address (192.168.20.231). And once the connection is estab-lished, user can set up public IP address according to their requirement. Then the Standalone FlexiPacket Radio can be connected via IDU by its public IP address.
The FlexiPacket Radio Password is fixed to ‘sysmanager’.
4. In the Configure PC IP Address window (see Figure 374), tick to select Add PC IP checkbox if necessary. Then click on Connect to connect the FlexiPacket Radio with PC.

A25000-A1400-D000-01-76P1Issue: 1 Issue date: February 2012
291
FlexiPacket Commissioning Tool, Rel. 1.3SU2, Operat-ing Documentation, Issue 1
Standalone ODU setting
Figure 374 Configure PC IP address
g If the PC has such an IP address in the same subnet as the FlexiPacket Radio, it will display the PC IP address. Otherwise, it will display a suggested IP address (192.168.255.4). And this IP address will be added to local PC if the Add PC IP checkbox is selected.
5. The application will be launched as in Figure 375 with software information.
Figure 375 Application is loading

292 A25000-A1400-D000-01-76P1Issue: 1 Issue date: February 2012
FlexiPacket Commissioning Tool, Rel. 1.3SU2, Operat-ing Documentation, Issue 1
Standalone ODU setting
6.2.2 FPR ViewThe FlexiPacket Radio configuration interface opens as shown in Figure 376:
Figure 376 The FlexiPacket Radio configuration interface
There are four tabs FPR View, Software, License and Alarm which are four parts to be configured.
In FPR View tab (see Figure 377), IP Address, System Type, Odu Role and other related parameters of the FlexiPacket Radio are displayed.
Figure 377 FPR view
Click on Configure System Type button, the FPR System Type Configuration Wizard opens as Figure 54. In this wizard, select the system type, and click on OK button to proceed.

A25000-A1400-D000-01-76P1Issue: 1 Issue date: February 2012
293
FlexiPacket Commissioning Tool, Rel. 1.3SU2, Operat-ing Documentation, Issue 1
Standalone ODU setting
Figure 378 Configure System Type
If some of the parameters need to be modified, click on Open Configuration Wizard to open the Device Configuration Wizard as in Figure 379.

294 A25000-A1400-D000-01-76P1Issue: 1 Issue date: February 2012
FlexiPacket Commissioning Tool, Rel. 1.3SU2, Operat-ing Documentation, Issue 1
Standalone ODU setting
Figure 379 Device configuration wizard
In the Device Configuration Wizard, parameters of Network, SyncE, ACM (HAAM), ATPC, RF, Time Server can be modified.
g In the Device Configuration Wizard, it is allowed to exit anytime by clicking on Exit button.
User can go back to previous steps by clicking on Back button.
• NetworkInformation of network related parameters can be seen in this view (see Figure 379). Click on Refresh to get the latest updated information. The parameters can be

A25000-A1400-D000-01-76P1Issue: 1 Issue date: February 2012
295
FlexiPacket Commissioning Tool, Rel. 1.3SU2, Operat-ing Documentation, Issue 1
Standalone ODU setting
updated by selecting the corresponding checkbox, only one checkbox can be selected at a time. If there is no need to update, click on Next to the SyncE tab.
Select Enable IP Configuration and Management VLAN checkbox in the Network tab, IP Address, IP Mask, Default Gateway and Management VLAN can be modified in corresponding text field. Then click on Apply to apply the configura-tion. A message “Apply successfully!” will pop up.
Select Enable DHCP Configuration checkbox in the Network tab, the parameter Activate DHCP can be set as start or stop, and click on Apply to apply the config-uration. A message “Apply successfully!” will pop up.
The parameter Secondary GateWay can be updated.Then click on Next to open the SyncE tab.
• SyncEAs seen in Figure 380, IP Address, Source SyncE Setting, Master/Slave Value are showing in SyncE view. Click on Refresh to get the latest updated information. The IP address displaying is the FlexiPacket Radio IP address (read value only). The parameters Source SyncE Setting (freerun/ethernet/radio) can be modified, and the value of Master/Slave Value (automatic/slave/master) is read only and depends on the parameter Source SyncE Setting. Then click on Apply to apply the configuration. A message ‘Set GBE successfully!’ will pop up. Then click on Next.
Figure 380 Device configuration wizard SyncE view
• ACMAs seen in Figure 381, the following parameters are shown in ACM view.

296 A25000-A1400-D000-01-76P1Issue: 1 Issue date: February 2012
FlexiPacket Commissioning Tool, Rel. 1.3SU2, Operat-ing Documentation, Issue 1
Standalone ODU setting
Figure 381 Device configuration wizard ACM view
• IP Address
g The IP address displaying is the FlexiPacket Radio IP address (read value only).
• ACM TX enabling (enable/disable)
g In case of the first link setup (before antenna alignment), the ACM must be dis-abled. It can be enabled at the end of antennas alignment.
• Min RX profile (4 QAM/16 QAM/64 QAM/128 QAM/256 QAM) • Max RX profile (4 QAM/16 QAM/64 QAM/128 QAM/256 QAM)
Click on Refresh to get the latest updated information. The parameters can be mod-ified, and click on Apply to apply the configuration. A message ‘Apply successfully!’ will pop up. Then click on Next.
• ATPCAs seen in Figure 382, IP Address, ATPC Enable, (Max) TX Power values are showing in ATPC view. Click on Refresh to get the latest updated information. The IP address displaying is the FlexiPacket Radio IP address (read value only). The values of ATPC Enable (enable/disable) and (Max) TX Power can be modified.

A25000-A1400-D000-01-76P1Issue: 1 Issue date: February 2012
297
FlexiPacket Commissioning Tool, Rel. 1.3SU2, Operat-ing Documentation, Issue 1
Standalone ODU setting
Figure 382 Device configuration wizard ATPC view
g The (Max) TX Power range is automatically detected by the system and may vary depending on the setting in ACM view (ACM TX enabling, Static TX profile, etc). For this setting, the rang is -4~21dBm.
g In case of the first link setup (before antenna alignment), the ATPC must be dis-abled. It can be enabled at the end of antennas alignment.
And click on Apply to apply the configuration. A message ‘Apply successfully!’ will pop up. Then click on Next.
• RFAs seen in Figure 383, the following parameters are showing in RF view.

298 A25000-A1400-D000-01-76P1Issue: 1 Issue date: February 2012
FlexiPacket Commissioning Tool, Rel. 1.3SU2, Operat-ing Documentation, Issue 1
Standalone ODU setting
Figure 383 Device configuration wizard RF view
• IP Address
g The IP address displaying is the FlexiPacket Radio IP address (read value only).
• TX Frequency [KHz] / RX Frequency [KHz]
g The effective frequency range should be automatically detected by the system according to the actual connecting FlexiPacket Radio type. And the input values should be multiple of 250Khz within the range.
• Channel Bandwidth (3.5MHz / 7MHz / 14MHz / 28MHz / 56MHz / 28 MHz HP / 56 MHz HP)
• Radio Port Administrative Status (up / down)
Click on Refresh to get the latest updated information. The value of the parameters can be modified and click on Apply to apply the configuration. A message ‘Apply successfully!’ will pop up. Then click on Next.
If the input value of TX Frequency [KHz] / RX Frequency [KHz] is out of the RF band-width limits, a message ‘TX Frequency must be between 17714000KHz and

A25000-A1400-D000-01-76P1Issue: 1 Issue date: February 2012
299
FlexiPacket Commissioning Tool, Rel. 1.3SU2, Operat-ing Documentation, Issue 1
Standalone ODU setting
18211000KHz and multiple of 250’ will pop up. Then click on OK to go back to the previous RF view, input a frequency value within the RF bandwidth limits.
• Time ServerAs seen in Figure 384, the following parameters are showing in Time Server view.
Figure 384 Device configuration wizard Time Server view
• IP Address
g The IP address displaying is the FlexiPacket Radio IP address (read value only).
• PC Synchronization • Time Server IP Address • Time Zone • Daylight Saving Flag (Enabled / Disabled)Click on Refresh to get the latest updated information. Select PC Synchronization checkbox to synchronize clock with PC, otherwise key in the Time Server IP Address in the text field. The value of Time Zone and Daylight Saving Flag (Enabled/Disabled) can be modified. Click on Apply to apply the configuration. A message ‘Apply successfully!’ will pop up. Then click on Exit.
6.2.3 SoftwareIn Software tab (see Figure 385), IP Address, Odu Role, Software Version (Active) and other related parameters are displayed. Software operations are only for ODUs.

300 A25000-A1400-D000-01-76P1Issue: 1 Issue date: February 2012
FlexiPacket Commissioning Tool, Rel. 1.3SU2, Operat-ing Documentation, Issue 1
Standalone ODU setting
Figure 385 FPR software view
There are two operations for software, upgrade and switch software, which are described below.
• UpgradeTo upgrade software, click on Upgrade to open FlexiPacket Radio Software Upgrade Wizard as in Figure 386.
Figure 386 FPR software upgrade wizardSelect Do upgrade checkbox, the interface will change to as in Figure 387.

A25000-A1400-D000-01-76P1Issue: 1 Issue date: February 2012
301
FlexiPacket Commissioning Tool, Rel. 1.3SU2, Operat-ing Documentation, Issue 1
Standalone ODU setting
Figure 387 FPR software upgrade view
Click on Browse to open the Choose Software File window as in Figure 388. Then click on Next to the ‘Restore Configuration’ view.
g The software file name must be ‘standby.pec’.
Figure 388 Choose software file
As seen in Figure 389, select Do restore checkbox, the interface will change to as in Figure 390.

302 A25000-A1400-D000-01-76P1Issue: 1 Issue date: February 2012
FlexiPacket Commissioning Tool, Rel. 1.3SU2, Operat-ing Documentation, Issue 1
Standalone ODU setting
Figure 389 FPR restore configuration view
Figure 390 FPR restore configuration file
Click on Browse to open the Choose Configuration File window as in Figure 391, and click on Apply to activate the restore.

A25000-A1400-D000-01-76P1Issue: 1 Issue date: February 2012
303
FlexiPacket Commissioning Tool, Rel. 1.3SU2, Operat-ing Documentation, Issue 1
Standalone ODU setting
Figure 391 Choose configuration file window
g The configuration file name must have the extension ‘.gz’.
• Switch softwareClick on Switch Software button in Software view to switch the software version from StandBy to Active or from Active to StandBy. A warning message “Are you sure to switch the software version?” will pop up, click on OK button to proceed the switch.
6.2.4 LicenseIn License tab (see Figure 392), IP Address, LicenseMask [HEX], Serial Number, License Name, and Connectivity Status (green indicates connected and red indicates disconnected) are shown.
Figure 392 FPR license view

304 A25000-A1400-D000-01-76P1Issue: 1 Issue date: February 2012
FlexiPacket Commissioning Tool, Rel. 1.3SU2, Operat-ing Documentation, Issue 1
Standalone ODU setting
g To upgrade license, the ODU must be restarted after clearing license.
In software version 1.3.8 and before, click on Upgrade License, a License Upgrade view is seen as in Figure 393.
Figure 393 FPR license upgrade (version 1.3.8 and before)
For the detailed information to get new license, please refer to the content correspond-ing to the ODU software version 1.3.8 and before in the Upgrade ODU license.
If keying in the license key, click on Modify License button, the ‘New License Key’ window will be seen as in Figure 394. Input the SNMP coding format license key in the text field. Then click on OK button to upgrade the license key.
Figure 394 FPR input license key (version 1.3.8 and before)
g The SNMP code format is the format aligned with Simple Network Management Protocol (SNMP).

A25000-A1400-D000-01-76P1Issue: 1 Issue date: February 2012
305
FlexiPacket Commissioning Tool, Rel. 1.3SU2, Operat-ing Documentation, Issue 1
Standalone ODU setting
In software version 1.3.9 and afterwards, click on Upgrade License button to open a ‘License Upgrade’ window as seen in Figure 395.
Figure 395 FPR license upgrade (version 1.3.9 and afterwards)
The new CLicS License Key can be either retrieved via web interface or generated via SMS, refer to CLicS license key generation procedure for detailed information.
Then fill in the new license and click on Upgrade License button to update license key.
6.2.5 AlarmIn Alarm tab (see Figure 396), parameters of ODU View and Alarm View are shown.

306 A25000-A1400-D000-01-76P1Issue: 1 Issue date: February 2012
FlexiPacket Commissioning Tool, Rel. 1.3SU2, Operat-ing Documentation, Issue 1
Standalone ODU setting
Figure 396 Alarm view
Click button to show / hide alarm history of current manager session.
6.2.6 Connecting ODU via IDUWhen configuring FlexiPacket Radio by connecting ODU via IDU, the configuration interfaces will have some differences from the ones by connecting directly with ODU. The different parts are described below.
1 In the Configure FlexiPacket Radio IP window (see Figure 397), the public IP address of the FlexiPacket Radio is used here.
Figure 397 Configure FlexiPacket Radio IP window

A25000-A1400-D000-01-76P1Issue: 1 Issue date: February 2012
307
FlexiPacket Commissioning Tool, Rel. 1.3SU2, Operat-ing Documentation, Issue 1
Standalone ODU setting
2 The FlexiPacket Radio configuration interface. This interface contains five tabs: FPR View, Software, License, LineUp View and Alarm.
Figure 398 FlexiPacket Radio configuration interface
3 LineUp View. This view is visible only when the ODU is connected via IDU. As in Figure 399, IP Address and Connectivity Status are shown.
Figure 399 FPR LineUp view
Click on View LineUp info to open the LineUp Status View window, as seen in Figure 400. Click on Close LineUp info to close the LineUp Status View window.

308 A25000-A1400-D000-01-76P1Issue: 1 Issue date: February 2012
FlexiPacket Commissioning Tool, Rel. 1.3SU2, Operat-ing Documentation, Issue 1
Standalone ODU setting
Figure 400 FPR LineUp Status view
6.3 FPMR(P) Advanced ModeIn this chapter, only the different parts in FPMR(P) comparing to FPR are discussed. Please refer to FPR Advanced Mode for all the other parts which are not included in this chapter.
In the Login window (see Figure 401), select FPMR(P) as Equipment.
Figure 401 FPMR(P) login window
The FPMR(P) configuration interface (see Figure 402) is shown as example.

A25000-A1400-D000-01-76P1Issue: 1 Issue date: February 2012
309
FlexiPacket Commissioning Tool, Rel. 1.3SU2, Operat-ing Documentation, Issue 1
Standalone ODU setting
Figure 402 FPMR(P) configuration interface overview
Compared to FPR View (see Figure 377), there is one more Configure System Type button in the FPMR(P) View (see Figure 402). And in the FPMR(P) view, one more parameter Odu Prio is displaying.
Click on Configure System Type button, the FPMR(P) Configuration Wizard opens as Figure 403. In this wizard, select the Systemtype, and click on OK button to proceed.
Figure 403 FPMR(P) configuration wizard
The list of licenses supported by FPMR(P) is seen in Table 10.
License Mask (hex)
NSN Sales Item License Name Notes
0x00000001 T555KEYL.00 License 16QAM 40Mbit/s
0x00020001 T555KEYL.02 License 16QAM and 28MHz
100Mbit/s Low Density
Table 10 FPMR(P) license list

310 A25000-A1400-D000-01-76P1Issue: 1 Issue date: February 2012
FlexiPacket Commissioning Tool, Rel. 1.3SU2, Operat-ing Documentation, Issue 1
Standalone ODU setting
0x0000000F T555KEYL.01 License from 16QAM up to 256QAM
100Mbit/s High Density
0x0002000F T555KEYL.03 License 16QAM up to 256QAM and 28MHz
200Mbit/s
0x0006000F T555KEYL.04 License 16QAM up to 256QAM, 28MHz and 56MHz
400Mbit/s
0x00000010 T555KEYL.05 License Upgrade ACM ACM
0x00000011 T555KEYL.06 License 16QAM and ACM 40Mbit/s and ACM
0x00020011 T555KEYL.08 License 16QAM, 28MHz and ACM
100LD and ACM
0x0000001F T555KEYL.07 License from 16QAM up to 256QAM and ACM
100HD and ACM
0x0002001F T555KEYL.09 License 16QAM up to 256QAM, 28MHz and ACM
200Mbit/s and ACM
0x0006001F T555KEYL.10 License 16QAM up to 256QAM, 28MHz, 56MHz and ACM
400Mbit/s and ACM
0x00020000 T555KEYL.12 License Upgrade 28MHz from 40 to 100LD
0x0000000E T555KEYL.11 License Upgrade 64QAM, 128QAM and 256QAM
from 40 to 100HD
0x00040000 T555KEYL.19 License Upgrade 56MHz from 200 to 400Mbit/s
0x0002000E T555KEYL.13 License Upgrade 64QAM, 128QAM, 256QAM and 28MHz
From 40 to 200Mbit/s
0x0006000E T555KEYL.14 License Upgrade 64QAM, 128QAM, 256QAM, 28MHz and 56MHz
From 40 to 400Mbit/s
0x00060000 T555KEYL.16 License Upgrade 28MHz and 56MHz
From 100HD to 400Mbit/s
0x0004000E T555KEYL.18 License Upgrade 64QAM, 128QAM, 256QAM and 56MHz
From 100LD to 400Mbit/s
0x0000001E T555KEYL.20 License Upgrade 64QAM, 128QAM, 256QAM and ACM
from 40 to 100HD & ACM
0x00020010 T555KEYL.21 License Upgrade 28MHz and ACM
from 40 to 100LD & ACM
License Mask (hex)
NSN Sales Item License Name Notes
Table 10 FPMR(P) license list (Cont.)

A25000-A1400-D000-01-76P1Issue: 1 Issue date: February 2012
311
FlexiPacket Commissioning Tool, Rel. 1.3SU2, Operat-ing Documentation, Issue 1
Standalone ODU setting
6.4 FPR HC Advanced ModeThe FPR HC configuration interface (see Figure 402) is shown as example.
0x0002001E T555KEYL.22 License Upgrade 64QAM, 128QAM, 256QAM, 28MHz and ACM
From 40 to 200Mbit/s &ACM
0x0006001E T555KEYL.23 License Upgrade 64QAM, 128QAM, 256QAM, 28MHz, 56MHz and ACM
From 40 to 400Mbit/s &ACM
0x00060010 T555KEYL.25 License Upgrade 28MHz, 56MHz and ACM
From 100HD to 400Mbit/s &ACM
0x0004001E T555KEYL.27 License Upgrade 64QAM, 128QAM, 256QAM, 56MHz and ACM
From 100LD to 400Mbit/s &ACM
0x00040010 T555KEYL.28 License Upgrade 56MHz and ACM
from 200 to 400Mbit/s &ACM
0x00020003 T555KEYL.29 License 16QAM and 64QAM and 28Mhz
150Mbit/s
0x00020013 T555KEYL.30 License 16QAM and 64QAM and 28Mhz and ACM
150Mbit/s and ACM
0x0000000C T555KEYL.31 License Upgrade 128QAM and 256QAM
From 150 to 200Mbit/s
0x0000001C T555KEYL.32 License Upgrade 128QAM, 256QAM and ACM
From 150 to 200Mbit/s and ACM
0x0006001F T555HWSCL.01 Spare license for replace-ment
Full License
0x00000003 T555KEYL.33 License 16QAM and 64QAM
70Mbit/s
0x00000013 T555KEYL.34 License 16QAM, 64QAM and ACM
70Mbit/s & ACM
License Mask (hex)
NSN Sales Item License Name Notes
Table 10 FPMR(P) license list (Cont.)

312 A25000-A1400-D000-01-76P1Issue: 1 Issue date: February 2012
FlexiPacket Commissioning Tool, Rel. 1.3SU2, Operat-ing Documentation, Issue 1
Standalone ODU setting
Figure 404 FPR HC configuration interface overview
6.4.1 Log-inIn the Login window (see Figure 401), select FPR HC as Equipment.
Figure 405 FPR HC login window
6.4.2 FPR HC ViewIn the FPR HC view, one more function Test is displaying.

A25000-A1400-D000-01-76P1Issue: 1 Issue date: February 2012
313
FlexiPacket Commissioning Tool, Rel. 1.3SU2, Operat-ing Documentation, Issue 1
Standalone ODU setting
Click on Configure System Type button, the FPR HC System Type Configuration Wizard opens as Figure 403. In this wizard, select the system type, and click on OK button to proceed.
Figure 406 FPR HC system type configuration wizard
g • If you select only one FPR HC, only off can be selected. • When two FPR HCs are selected at the same time, there are 7system types can be
selected for Standalone Mode: 1. off2. primary-hsb-1wire3. secondary-hsb-1wire4. primary-hsb-2wire5. secondary-hsb-2wire6. primary-x27. secondary-x2
Click on Open Configuration Wizard button, the FPR HC Configuration Wizard opens as Figure 403. In this wizard, FPR HC Configuration is totally different with FPR and FPMR, as showed in below:
g In the Device Configuration Wizard, it is allowed to exit anytime by clicking on Exit button.
User can go back to previous steps by clicking on Back button.
• NetworkInformation of network related parameters can be seen in this view (see Figure 379). Click on Refresh to get the latest updated information. If there is no need to update, click on Next to the ATPC tab.In the Network tab, IP Address, IP Mask, Default Gateway and Management VLAN can be modified in corresponding text field. As showed in pic below. Then click on Apply to apply the configuration. A message “Apply successfully!” will pop up.

314 A25000-A1400-D000-01-76P1Issue: 1 Issue date: February 2012
FlexiPacket Commissioning Tool, Rel. 1.3SU2, Operat-ing Documentation, Issue 1
Standalone ODU setting
Figure 407 Device configuration wizard Network view • ATPC
As seen in Figure 382, IP Address, ATPC Enable, (Max) TX Power values are showing in ATPC view. Click on Refresh to get the latest updated information. The IP address displaying is the FlexiPacket Radio IP address (read value only). The values of ATPC Enable (enable/disable) and (Max) TX Power can be modified.

A25000-A1400-D000-01-76P1Issue: 1 Issue date: February 2012
315
FlexiPacket Commissioning Tool, Rel. 1.3SU2, Operat-ing Documentation, Issue 1
Standalone ODU setting
Figure 408 Device configuration wizard ATPC view
g The (Max) TX Power range is automatically detected by the system and may vary depending on the setting in ACM view (ACM TX enabling, Static TX profile, etc). For this setting, the rang is -4~21dBm.
g In case of the first link setup (before antenna alignment), the ATPC must be dis-abled. It can be enabled at the end of antennas alignment.
And click on Apply to apply the configuration. A message ‘Apply successfully!’ will pop up. Then click on Next.
• RF_STEP1As seen in Figure 383, the following parameters are showing in RF_STEP1 view.

316 A25000-A1400-D000-01-76P1Issue: 1 Issue date: February 2012
FlexiPacket Commissioning Tool, Rel. 1.3SU2, Operat-ing Documentation, Issue 1
Standalone ODU setting
Figure 409 Device configuration wizard RF_STEP1 view • IP Address
The IP address displaying is the FlexiPacket Radio IP address (read value only). • Radio BandClick on Refresh to get the latest updated information. The value of the parameters can be modified and click on Apply to apply the configuration. A message ‘Apply successfully!’ will pop up. Then click on Next.
• RF_STEP2As seen in Figure 383, the following parameters are showing in RF_STEP2 view.

A25000-A1400-D000-01-76P1Issue: 1 Issue date: February 2012
317
FlexiPacket Commissioning Tool, Rel. 1.3SU2, Operat-ing Documentation, Issue 1
Standalone ODU setting
Figure 410 Device configuration wizard RF_STEP2 view
• IP Address
g The IP address displaying is the FlexiPacket Radio IP address (read value only).
• Programmed Frequency [KHz] / RX Frequency [KHz]
g The effective frequency range should be automatically detected by the system according to the actual connecting FlexiPacket Radio type. And the input values should be multiple of 250Khz within the range.
• System Mode • Transmitter Power (in dbm) • Transmitter Status (off / on)Click on Refresh to get the latest updated information. The value of the parameters can be modified and click on Apply to apply the configuration. A message ‘Apply successfully!’ will pop up. Then click on Next.
• HAAMAs seen in Figure 384, the following parameters are showing in HAAM view.

318 A25000-A1400-D000-01-76P1Issue: 1 Issue date: February 2012
FlexiPacket Commissioning Tool, Rel. 1.3SU2, Operat-ing Documentation, Issue 1
Standalone ODU setting
Figure 411 Device configuration wizard HAAM view
• IP Address
g The IP address displaying is the FlexiPacket Radio IP address (read value only).
• HAAM StatusClick on Refresh to get the latest updated information. Click on Apply to apply the configuration. A message ‘Apply successfully!’ will pop up. Then click on Exit.
• Time ServerAs seen in Figure 384, the following parameters are showing in Time Server view.

A25000-A1400-D000-01-76P1Issue: 1 Issue date: February 2012
319
FlexiPacket Commissioning Tool, Rel. 1.3SU2, Operat-ing Documentation, Issue 1
Standalone ODU setting
Figure 412 Device configuration wizard Time Server view • IP Address
g The IP address displaying is the FlexiPacket Radio IP address (read value only).
• PC Synchronization • Time Server IP Address • Time Zone • Daylight Saving Flag (Enabled / Disabled)Click on Refresh to get the latest updated information. Select PC Synchronization checkbox to synchronize clock with PC, otherwise key in the Time Server IP Address in the text field. The value of Time Zone and Daylight Saving Flag (Enabled/Disabled) can be modified. Click on Apply to apply the configuration. A message ‘Apply successfully!’ will pop up. Then click on Exit.
6.4.3 SoftwareIn Software tab (see Figure 385), IP Address, Odu Role, Software Version (Active) and other related parameters are displayed. Software operations are only for ODUs.

320 A25000-A1400-D000-01-76P1Issue: 1 Issue date: February 2012
FlexiPacket Commissioning Tool, Rel. 1.3SU2, Operat-ing Documentation, Issue 1
Standalone ODU setting
Figure 413 FPR software view
To upgrade software, click on Upgrade to open Software Upgrade Wizard as in Figure 386.
Figure 414 FPR HC software upgrade wizard
g The FPR HC contains three different files that all together are needed for the normal functioning of the device. They are an application omni, a modem file and a frequency file. In order to be sure about compatibilities between this different files, please refer to the Release Note of the software version you want install on the FPR HC.

A25000-A1400-D000-01-76P1Issue: 1 Issue date: February 2012
321
FlexiPacket Commissioning Tool, Rel. 1.3SU2, Operat-ing Documentation, Issue 1
Standalone ODU setting
g The software file name must be ‘standby.pec’.
6.4.4 TestIn Test tab (see Figure 392), IP Address and Connectivity Status (green indicates connected and red indicates disconnected) are shown in below.
Figure 415 FPR HC Test view
Click MWR Hop Verification button, the Hop Verification interface will be shown as in Figure 393.
Figure 416 FPR HC Hop Verification

322 A25000-A1400-D000-01-76P1Issue: 1 Issue date: February 2012
FlexiPacket Commissioning Tool, Rel. 1.3SU2, Operat-ing Documentation, Issue 1
Standalone ODU setting
This test can be used to display radio parameters (when Tracking is checked) or for Antenna Alignment purpose (when Tracking is not checked)..
The operation steps are as below:
Check the Tracking checkbox, this will disable the ATPC and ACM function in both local and remote ODU, then input suitable values, the test will verify whether the Antenna Alignment is correct.
Enable Local Force Down button and Disable Local Force Down button can be used to shift and shift back the state of the master ODU.
You can click Save for Report to save the test report automatically.
6.4.5 AlarmPlease refer to chapter 6.2.5 Alarm.
6.4.6 ReportFor the detailed description of Report tab, please refer to Report of FlexiPacket Hub 800 setting.
g In case of standalone ODU connection or 0 footprint solution, the IDU part of the report is meaningless and empty(filled with NA).

A25000-A1400-D000-01-76P1Issue: 1 Issue date: February 2012
323
FlexiPacket Commissioning Tool, Rel. 1.3SU2, Operat-ing Documentation, Issue 1
FPR/FPMR via BTS
7 FPR/FPMR via BTSIf the commissioning is to be done on FlexiPacket Radio (including FPR and FPMR) which is connected to some kind of BTS, such as Flexi WCDMA 3G BTS, Flexi Edge 2G BTS and LTE 4G BTS (ie. Zero Footprint), some connection parameters will be set before the connection to FlexiPacket Radio via BTS can be done.
g For detailed information about the FlexiPacket Zero Footprint Solution, please refer to FlexiPacket Zero Footprint Solution Overview and Procedures in FlexiPacket Radio, Rel. 1.3 EP1, Operating Documentation (or FlexiPacket MultiRadio, Rel, 2.1, Operating Documentation). This document applies to both the FPR and FPMR(P), and also works with Commissioning Tool R1.3 SU2.
g User needs NOLS access to get this document.
1. Run the FlexiPacket Commissioning Tool application from Start > Programs > Nokia Siemens Networks > Commissioning Tool > Run CT.
2. The login screen appears. Select FPR via BTS LMP/FPMR via BTS LMP in the Equipment drop down list, then select Advanced Mode and click on Next:
Figure 417 Login Window
3. Fill in the IP and password of FlexiPacket Radio, FPR DCN mask and gateway, select local or remote connection, then click on Next:

324 A25000-A1400-D000-01-76P1Issue: 1 Issue date: February 2012
FlexiPacket Commissioning Tool, Rel. 1.3SU2, Operat-ing Documentation, Issue 1
FPR/FPMR via BTS
Figure 418 Connection parameter
g Local management connection means connecting to the BTS which is connected to the local laptop; and remote management connection means connecting to the BTS on which the peer ODU is connected after the line-up, in this case only the configu-rations that have no impact on the flowing traffic can be set from remote connection. For example, changing radio parameters like ATPC, ACM and so on.
Proper FPR DCN gateway and mask needs to be provided, then Commissioning Tool will automatically add a route according to these parameters to reach the selected ODU connected to the transport module of the BTS.
4. Tick the Add PC IP address box if PC IP needs to be changed, then fill in the PC IP, PC Subnet Mask and PC Default Gateway. Or keep the Add PC IP box blank.

A25000-A1400-D000-01-76P1Issue: 1 Issue date: February 2012
325
FlexiPacket Commissioning Tool, Rel. 1.3SU2, Operat-ing Documentation, Issue 1
FPR/FPMR via BTS
Figure 419 Configure IP address5. Then the FPR/FPMR(P) configuration interface appears, please refer to FlexiPacket
Zero Footprint Solution Overview and Procedures (start from step 6 in page 21) to configure the FPR/FPMR(P) connected to the BTS.

326 A25000-A1400-D000-01-76P1Issue: 1 Issue date: February 2012
FlexiPacket Commissioning Tool, Rel. 1.3SU2, Operat-ing Documentation, Issue 1
Appendix: Report example
8 Appendix: Report exampleThis chapter contains an example of full report generated by commissioning tool.

A25000-A1400-D000-01-76P1Issue: 1 Issue date: February 2012
327
FlexiPacket Commissioning Tool, Rel. 1.3SU2, Operat-ing Documentation, Issue 1
Appendix: Report example

328 A25000-A1400-D000-01-76P1Issue: 1 Issue date: February 2012
FlexiPacket Commissioning Tool, Rel. 1.3SU2, Operat-ing Documentation, Issue 1
Appendix: Report example

A25000-A1400-D000-01-76P1Issue: 1 Issue date: February 2012
329
FlexiPacket Commissioning Tool, Rel. 1.3SU2, Operat-ing Documentation, Issue 1
Appendix: Report example

330 A25000-A1400-D000-01-76P1Issue: 1 Issue date: February 2012
FlexiPacket Commissioning Tool, Rel. 1.3SU2, Operat-ing Documentation, Issue 1
Appendix: Report example

A25000-A1400-D000-01-76P1Issue: 1 Issue date: February 2012
331
FlexiPacket Commissioning Tool, Rel. 1.3SU2, Operat-ing Documentation, Issue 1
Appendix: Report example

332 A25000-A1400-D000-01-76P1Issue: 1 Issue date: February 2012
FlexiPacket Commissioning Tool, Rel. 1.3SU2, Operat-ing Documentation, Issue 1
Appendix: Report example

A25000-A1400-D000-01-76P1Issue: 1 Issue date: February 2012
333
FlexiPacket Commissioning Tool, Rel. 1.3SU2, Operat-ing Documentation, Issue 1
Appendix: Report example

334 A25000-A1400-D000-01-76P1Issue: 1 Issue date: February 2012
FlexiPacket Commissioning Tool, Rel. 1.3SU2, Operat-ing Documentation, Issue 1
Appendix: Report example

A25000-A1400-D000-01-76P1Issue: 1 Issue date: February 2012
335
FlexiPacket Commissioning Tool, Rel. 1.3SU2, Operat-ing Documentation, Issue 1
Appendix: Report example

336 A25000-A1400-D000-01-76P1Issue: 1 Issue date: February 2012
FlexiPacket Commissioning Tool, Rel. 1.3SU2, Operat-ing Documentation, Issue 1
Appendix: Report example

A25000-A1400-D000-01-76P1Issue: 1 Issue date: February 2012
337
FlexiPacket Commissioning Tool, Rel. 1.3SU2, Operat-ing Documentation, Issue 1
Appendix: Report example

338 A25000-A1400-D000-01-76P1Issue: 1 Issue date: February 2012
FlexiPacket Commissioning Tool, Rel. 1.3SU2, Operat-ing Documentation, Issue 1
Appendix: Report example

A25000-A1400-D000-01-76P1Issue: 1 Issue date: February 2012
339
FlexiPacket Commissioning Tool, Rel. 1.3SU2, Operat-ing Documentation, Issue 1
Appendix: Report example

340 A25000-A1400-D000-01-76P1Issue: 1 Issue date: February 2012
FlexiPacket Commissioning Tool, Rel. 1.3SU2, Operat-ing Documentation, Issue 1
Appendix: Report example

A25000-A1400-D000-01-76P1Issue: 1 Issue date: February 2012
341
FlexiPacket Commissioning Tool, Rel. 1.3SU2, Operat-ing Documentation, Issue 1
Appendix: Report example

342 A25000-A1400-D000-01-76P1Issue: 1 Issue date: February 2012
FlexiPacket Commissioning Tool, Rel. 1.3SU2, Operat-ing Documentation, Issue 1
Appendix: Report example

A25000-A1400-D000-01-76P1Issue: 1 Issue date: February 2012
343
FlexiPacket Commissioning Tool, Rel. 1.3SU2, Operat-ing Documentation, Issue 1
Appendix: Report example

344 A25000-A1400-D000-01-76P1Issue: 1 Issue date: February 2012
FlexiPacket Commissioning Tool, Rel. 1.3SU2, Operat-ing Documentation, Issue 1
Appendix: Report example

A25000-A1400-D000-01-76P1Issue: 1 Issue date: February 2012
345
FlexiPacket Commissioning Tool, Rel. 1.3SU2, Operat-ing Documentation, Issue 1
Appendix: Report example

346 A25000-A1400-D000-01-76P1Issue: 1 Issue date: February 2012
FlexiPacket Commissioning Tool, Rel. 1.3SU2, Operat-ing Documentation, Issue 1
Appendix: Report example

A25000-A1400-D000-01-76P1Issue: 1 Issue date: February 2012
347
FlexiPacket Commissioning Tool, Rel. 1.3SU2, Operat-ing Documentation, Issue 1
Appendix: Report example

348 A25000-A1400-D000-01-76P1Issue: 1 Issue date: February 2012
FlexiPacket Commissioning Tool, Rel. 1.3SU2, Operat-ing Documentation, Issue 1
Appendix: Report example

A25000-A1400-D000-01-76P1Issue: 1 Issue date: February 2012
349
FlexiPacket Commissioning Tool, Rel. 1.3SU2, Operat-ing Documentation, Issue 1
Appendix: Report example

350 A25000-A1400-D000-01-76P1Issue: 1 Issue date: February 2012
FlexiPacket Commissioning Tool, Rel. 1.3SU2, Operat-ing Documentation, Issue 1
Appendix: Report example

A25000-A1400-D000-01-76P1Issue: 1 Issue date: February 2012
351
FlexiPacket Commissioning Tool, Rel. 1.3SU2, Operat-ing Documentation, Issue 1
Appendix: Report example

352 A25000-A1400-D000-01-76P1Issue: 1 Issue date: February 2012
FlexiPacket Commissioning Tool, Rel. 1.3SU2, Operat-ing Documentation, Issue 1
Appendix: Report example

A25000-A1400-D000-01-76P1Issue: 1 Issue date: February 2012
353
FlexiPacket Commissioning Tool, Rel. 1.3SU2, Operat-ing Documentation, Issue 1
Appendix: Report example
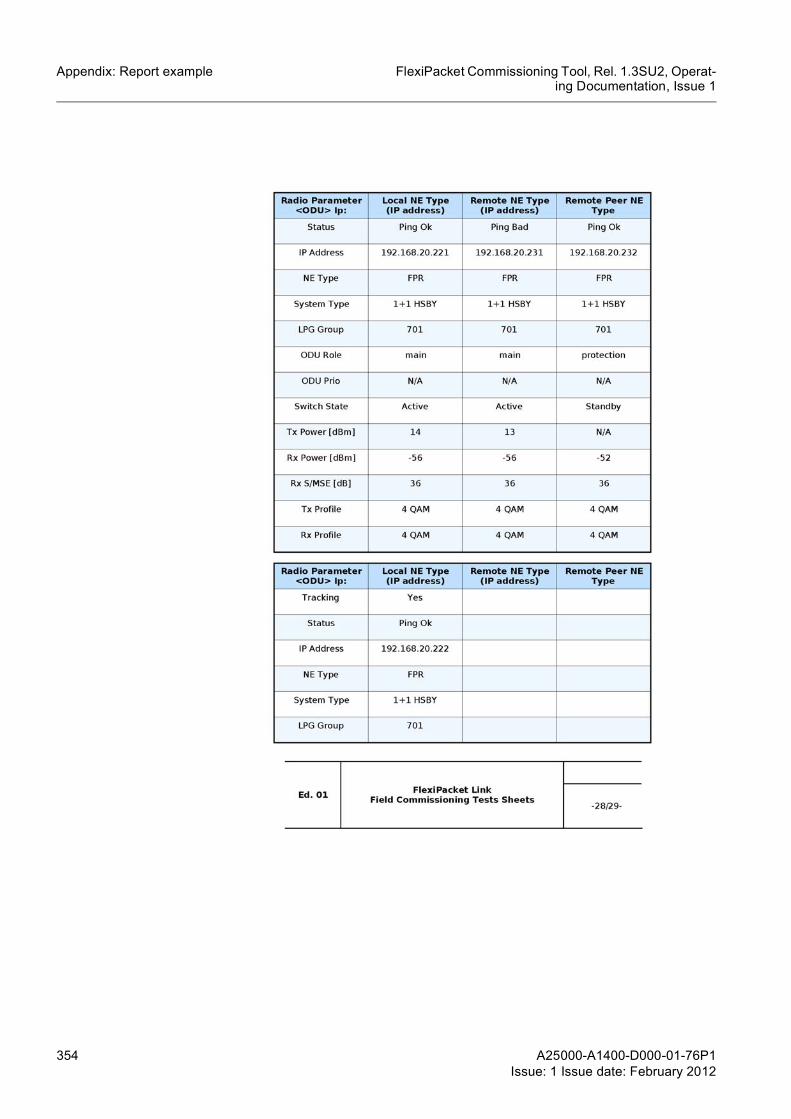
354 A25000-A1400-D000-01-76P1Issue: 1 Issue date: February 2012
FlexiPacket Commissioning Tool, Rel. 1.3SU2, Operat-ing Documentation, Issue 1
Appendix: Report example

A25000-A1400-D000-01-76P1Issue: 1 Issue date: February 2012
355
FlexiPacket Commissioning Tool, Rel. 1.3SU2, Operat-ing Documentation, Issue 1
Appendix: Report example