04-handling client inquiries - nevada department … client inquiries digit number assigned by nwds...
TRANSCRIPT

Handling Client Inquiries
CHAPTER 4 HANDLING CLIENT INQUIRIES Introduction One of the biggest advantages of the Application Hunt System relational database is that all the client information is virtually at your fingertips. In this chapter, we will explore how to handle client and staff inquiries using the Client Function and the Hunter Browse forms.
Logging In to the Application Hunt System Start the Application Hunt System from the Desktop and enter your User ID and Password on the Logon Screen shown in Figure 4-1.
Figure 4-1 Application Hunt System Login

Handling Client Inquiries
The Application Hunt System executes automatically. The Hunter Browse Form displays, as shown in Figure 4-2. Note: If you are a WASO Manager or Supervisor, the Draw Number Selection Form also displays (it does not display for NDOW users). Managers and Supervisors then select the draw they are working on to enable draw-related activities or click Cancel to perform data non-draw-related inquiry activities in the database. The Database Manager controls which draws are displayed.
Figure 4-2 Hunter Browse Form
If you select a Draw, the Draw Number Confirmation dialog box shown on the left in Figure 4-3 appears. Check your selection and click Yes.

Handling Client Inquiries
If you click Cancel, the Confirm Cancel Dialog Box shown on the right in Figure 4-3 appears. Click Yes to continue with Inquiry only. Remember – NDOW users do not see the Draw Selection or the table view at all. You must be an SCI Supervisor or Manager to see the Draw Selection Box and Confirmation windows.
Figure 4-3 Draw Selection Dialog Boxes
The Hunter Browse Form is displayed on screen as shown in Figure 4-4. Users employ the Hunter Browse for quick access to a Hunter’s record to answer inquiries.

Handling Client Inquiries
Figure 4-4 Hunter Browse Form
To see the detailed information for a specific hunter, click on the button in the left column to place a ►next to the hunter, then click the Hunter button to display the hunter’s demographic and hunting history information. In the Hunter Browse, you could scroll through the summary hunter information, but there are several hundred thousand records. It is much more likely that you will search for a specific hunter. FINDING A HUNTER RECORD Using the View menu, you can display the information sorted by Client Number (SSN), Sportsman’s ID Number, or Client Name, and you can search for a specific hunter by Client Number (SSN), Sportsman’s ID

Handling Client Inquiries
Number, or Client Name. The View pull down menu is shown in Figure 4-5.
Figure 4-5 Hunter Browse View Menu Options
Here are the options: Selection Description Alpha Sort Sorts Client database alphabetically by last name Sportsman Sort Sorts Client database by Sportsman’s ID ID Sort Sorts the Client database by numerically by SSN Forward Sort Sorts the Client database by SSN from lowest Reverse Sort Sorts the Client database by SSN from highest Name Locate Locates the client record by name Sportsman ID Locate
Locates the client record by Sportsman’s ID
Client Locate Locates the client record by SSN Detail Displays the Hunter Detail Form NDOW requires that a US citizen provide his/her SSN when applying for a recreational license; this is done to assist the state in identifying parents who are not making court-ordered child-support payments, as required by the Federal Bradley Amendment legislation. The SSN is never shown on NDOW documents; the Nevada Sportsman’s ID, a 7-

Handling Client Inquiries
digit number assigned by NWDS when the hunter account is established, is now used in lieu of the SSN. As a practical matter, many sportsmen do not know their Sportsman’s ID number, so the system retains the capability to search the data on SSN. Selecting Name Locate, displays the Hunter Search Form shown in Figure 4-6. Enter the name and click Find. Alternatively, use the Sportsman’s ID Locate, or Client Locate selections to display the Hunter Search Forms in Figure 4-7 to search by client number.
Figure 4-6 Hunter Name Find Form
Tip: You will get the quickest results using the Sportsman’s ID Locate or Client Locate selection and social security number, if you have it.
Figure 4-7 Hunter Sportsman’s ID and SSN Find Form

Handling Client Inquiries
The selection arrow () shows the record selected in the Hunter Browse Form. Click Detail in the menu or Hunter on the form to view the complete record. VIEWING THE HUNTER’S DETAIL RECORD The see the hunter detail information, click on the button in the left column to select the hunter, then click the Hunter button to display the hunter’s demographics and hunting history as shown in Figure 4-8.
Figure 4-8 Hunter Detail Record The hunter detail record contains the following fields:

Handling Client Inquiries
Field Field Description Client ID SSN with 9 digits (shown here as nnn-nn-nnnn) Sports ID Nevada Sportsman’s ID Number with 7 digits Client Name First Name, MI, Last Name Address Street or mailing address City/Cnty/ST/ZIP City/county (Nevada Only)/state/ZIP Code Day Phone Area Code and telephone number –no dashes Home Phone Area Code and 7 digit telephone number Lifetime License Not Used in Nevada Driver’s License State and driver’s license number DOB Date of birth in dd/mm/yyyy format License # Nevada Hunting License number Gender M(ale) or F(emale) Height Height in feet and inches, n’nn” format, e.g. 5’08” Weight Weight in pounds, nnn format, e.g. 172 Hair Hair color, AAA format, e.g. BRN for brown Eyes Eye color, AAA format, e.g. BLU for blue Res Resident, Y(es) or N(o) Years/ Months Years and months of continuous residency Hunter Ed Year of Hunter Education class in yyyy format Hunter Education Certificate Number/State Deceased Deceased, Y(es) or N(o) No Mail Customer opted out of mailing lists, Y(es) or N(o) Mail Returned Mailings returned by USPS, Y(es) or N(o) Permit Hold Checked or not checked Email Address Customer email address Note the Report menu selection on the Hunter Detail Record. You can print out the Hunter’s Client Profile, the Client Profile Redacted (shows last 4 of SSN only), or the current Bonus Point Calculation. These reports preview on screen as shown in Figure 4-9.

Handling Client Inquiries
Figure 4-9 Hunter Detail Profile Report
The icon is available to Managers and Supervisors working outside the runtime environment to export the report to Word as an

Handling Client Inquiries
RTF file. Clicking the allows you to export to MS Excel or MS Publisher. Word or Excel will open automatically. When you are finished, click Close on the menu bar. The Hunter Detail Form displays a complete record of previous hunter participation. The information in this form cannot be edited. The display consists of 6 windows. Applications Applications, shown in Figure 4-10, depicts the year of the application(s), the Draw, the Application Number, the Man Number, the Hunt Number, the Status (outcome), G (number of hunters in the group), and the number of bonus points at the time of the application for the Hunt Number and Draw selected.
Figure 4-10 Hunter Browse Applications Window
Eligibility Eligibility in Figure 4-11 displays the hunter’s eligibility including Hunt (Description and Number), Bonus Points, Last Points (year last bonus points were earned or lost), Last Tag (year hunter last received a tag), H(arvest) Y(es) or N(o), Year eligible to apply again, Return Card submitted Y(es) or N(o), Penalty Fine Paid, and Date Paid.

Handling Client Inquiries
Figure 4-11 Hunter Browse Eligibility Window
Letters Letters shown in Figure 4-12 refers to system generated letters and applications sent to the hunter. The tab displays the Year, the Draw Name, the Application Number, the Man Number, the Hunt Number (If not for multiple hunts as in 2008 in the example), the Letter Code (description of the letter), the Status, and the Date of the letter. Refund letters are shown in the Refunds window.
Figure 4-12 Hunter Browse Letters Window

Handling Client Inquiries
Refunds Refunds is shown in Figure 4-13. It displays the Year, the Draw Number, T(ype) of Document (T=Tag – No Refund, C=Check, S=Stale Check), the Document Number (Check Number), the Date of the Refund, the Refund Amount, and the S(tatus) (Blank=No Refund, “I” = issued but not cleared, “C” =cleared, and “V” = voided.)
Figure 4-13 Refunds Window
NDOW makes all refunds for paper applicants. SCI will forward the refund file to the State Treasurer who will cut and mail out the checks. WASO does not receive confirmation so the Status is not updated. All refund questions after the file is sent to NDOW are referred to NDOW. Documents Documents displays the Tag and License History. Shown are the Year (Hunt or calendar year for tags/License Year of 1 Mar – 28/29 Feb for licenses), the Draw Number, the T(ype) (T=Tag, L=License), the S(tatus) (C=Claimed on hunt application, S=Sold through the draw, P=Printed*), the Sub-status V (D=Duplicate, V=Void the reprinted document, A=Alignment for test printing, R=Replacement, S=Void or Surrendered Tag), the Document Number (tag or license number), and the Date of the transaction. The Amount, the Form issued, and the Agent ID Number are reported as applicable.

Handling Client Inquiries
Figure 4-14 Hunter Browse Documents Window
Return Cards Return Cards is shown in Figure 4-15. It gives the status of all required return cards.
Figure 4-15 Hunter Browse Return Cards Window
The data includes the Year, the Draw Name, the Application Number, the Man Number, the Hunt Number, the S(tatus) of the return card, Hunted Y(es) or N(o) and Harvested Y(es) or N(o). The Date Returned and Date Due are also reported.

Handling Client Inquiries
PHONE LOGS When AHS was introduced, records of phone calls were handled manually in hardcopy. Phone call records are now entered in the AHS database as received, making the information instantly available to the operators and managers from the Hunter Detail Record screen. Click Phone Logs on the Menu Bar to display the choices in Figure 4-16.
Figure 4-16 Hunter Detail Phone Log Menu Phone Log Select Phone Log to view a list of the calls received from this hunter, as seen in Figure 4-17.
Figure 4-17 Hunter Detail Phone Log List
You can view the call Detail, Add a call record, or Delete a record from this screen. A detail record is shown in Figure 4-18.
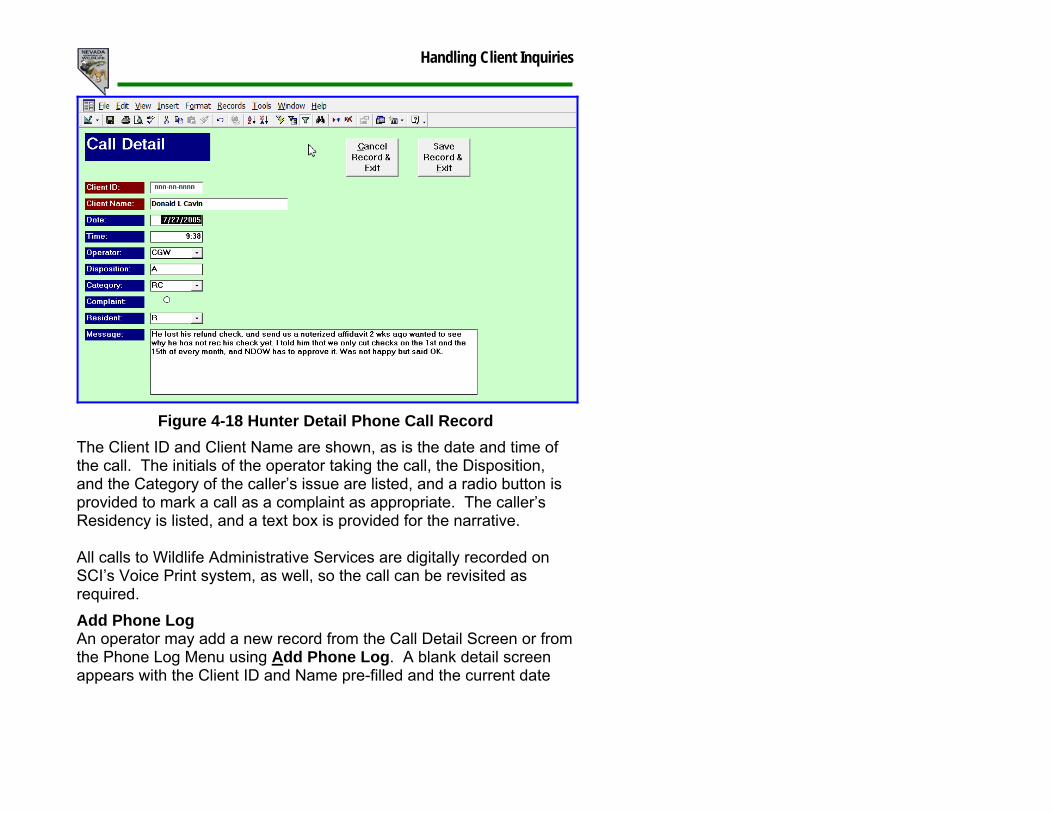
Handling Client Inquiries
Figure 4-18 Hunter Detail Phone Call Record
The Client ID and Client Name are shown, as is the date and time of the call. The initials of the operator taking the call, the Disposition, and the Category of the caller’s issue are listed, and a radio button is provided to mark a call as a complaint as appropriate. The caller’s Residency is listed, and a text box is provided for the narrative. All calls to Wildlife Administrative Services are digitally recorded on SCI’s Voice Print system, as well, so the call can be revisited as required. Add Phone Log An operator may add a new record from the Call Detail Screen or from the Phone Log Menu using Add Phone Log. A blank detail screen appears with the Client ID and Name pre-filled and the current date

Handling Client Inquiries
and time. If you are entering a previous call that occurred earlier, be sure to correct the date and time accordingly.
Figure 4-19 Hunter Detail Add New Phone Log Enter the required information using the pulldowns where required and click Save Record and Exit when complete. Category Browse Categories of calls enable managers to track the issues that are giving the hunters problems. A list of codes is available by clicking the pulldown in the Detail Screen while completing the Phone Log entry. The list can also be viewed and edited by selecting Category Browse from the Phone Log menu. The list is shown in Figure 4-20.

Handling Client Inquiries
Figure 4-20 Phone Log Call Categories
Reports Several summary reports for calls received over a range of dates for all clients are available from the Phone Log menu, as seen in Figure 4-21.

Handling Client Inquiries
Figure 4-21 Hunter Detail Phone Log Reports The date ranges for Phone Log reports are established in the dialog boxes shown in Figure 4-22 when each report is selected.
Figure 4-22 Phone Log Report Date Specifications
The Call Detail Log is shown in Figure 4-23.

Handling Client Inquiries
Figure 4-23 Phone Log Report – Call Detail Log
The Miscellaneous Calls Report is no longer used in Nevada. The Summary Calls by Category Report is shown in Figure 4-24.

Handling Client Inquiries
Figure 4-24 Phone Log Call Summary by Category
The Call Summary by Days Report is shown in Figure 4-25.

Handling Client Inquiries
Figure 4-25 Phone Log Call Summary by Day Report
An additional Phone Log report is available for selection from the Hunter Browse View menu – The Call Log Summary Report. Like the reports described above, it uses a date range to filter the call information. A partial example is shown in Figure 4-26.

Handling Client Inquiries
Figure 4-26 Phone Log Call Summary Report
UPDATING HUNTER INFORMATION The Hunter Browse menu bar Processes are shown in Figure 4-27. We will discuss Insert Client and Update Client Info here, as they are part of the Inquiries area.
Figure 4-27 Hunter Browse Processes

Handling Client Inquiries
Selection Function Insert Client Displays Hunter Add for data entry of hunter
information not related to the current tag application (See Data Fields Table)
Change Client ID Displays the Hunter ID Change Form for change entry. This process is discussed in Chapter 10, Maintaining the System.
Merge Clients Displays Hunter Accounts Merge Form for data entry. This process is discussed in Chapter 10.
Update Client Info Displays Hunter Edit Form for data entry
Insert Client Clients can be inserted into the database independent of applications for tags. One common example is a hunter who wishes to be placed on the mailing list. Click Processes>Insert Client to display the Hunter Addition Form shown in Figure 4-28. Fill in the fields as shown. The data fields follow the same format as the Hunter Detail Form on page 4-6. A complete name and address is the minimum requirement, but other fields should be completed if the information is available to avoid having to key it in later when an application is received.

Handling Client Inquiries
Figure 4-28 Hunter Browse Hunter Addition Form
When the full name is entered, AHS will attempt a lookup to determine if the new client is already in the database. The screen in Figure 4-29 appears with the closest match on name.
Figure 4-29 Hunter Browse Insert New Client Lookup

Handling Client Inquiries
Use Detail to check for a match, and click Exit to continue. When the entry is complete, click Save to save the record. Update Client Info When information such as a change of address is received, you can update the hunter’s record by clicking Process>Update Client Info. The Hunter Edit Form shown in Figure 4-30 displays.
Figure 4-30 Hunter Edit Form
Update the information as required and click Exit. A dialog box appears confirming that you wish to save the changes. UTILITY MENU The Utility pull down menu contains three options:

Handling Client Inquiries
Selection Function Change Draw Displays the same Draw Number Selection Form
that displays on system entry. If you are a Supervisor or Manager and desire to change the operative draw, select the appropriate draw.
Convert to Post Draw
Changes the draw number for the selected client from numeric to the equivalent letter of the alphabet for printing of licenses and tags outside the workflow of the draw. This must be done by a Supervisor or Manager and is discussed in the Draw Section.
Change Password Displays the Change Password Dialog Box. Enter your old password, enter your new password, enter your new password again in the Verify line, then click OK.
The Change Draw selection box is shown in Figure 4-31.
Figure 4-31 Hunter Browse – Change Draw

Handling Client Inquiries
The Change Password dialog box is shown in Figure 4-32.
Figure 4-32 Hunter Browse – Change Password
Summary Handling inquiries can be quite challenging. You are representing NDOW when you answer the call, and the client will expect you to be familiar with the hunt rules and the application process. Knowing the Application Hunt System well will go a long way towards making your life easier and providing the level of service that our clients expect. Lastly, if you do not know the answer or cannot find it in the records, call on your Supervisor or Manager for assistance.

Handling Client Inquiries
