062-2013: popular tips and tricks to help you use sas®...
TRANSCRIPT

1
Paper 062-2013
Popular Tips and Tricks to Help You Use SAS® Web Report Studio More Efficiently
Keith Myers, SAS Institute, Inc.; Madelyn Bythell, SAS Institute, Inc.
ABSTRACT For more than six years, SAS® Web Report Studio has enabled users at all skill levels to create, view, and explore centrally stored reports. This paper discusses tips and tricks for reporting techniques that have been most popular with customers over the years. The paper also explains new features that shipped with the second maintenance release of SAS Web Report Studio 4.31. As with the tips and tricks, these new features offer more efficient methods for tasks related to conditional highlighting and to content enhancement in reports that are sent via e-mail. The techniques and features that are discussed cover tasks in the following key areas: performance, filtering, scheduling, and distribution, report design, and sending reports via e-mail.
INTRODUCTION If you have ever found a SAS usage note or sample that exactly met your need, there is an easy explanation. The note or sample was likely inspired by a customer just like you who contacted one of the global SAS Technical Support offices for more information about how a particular feature works, how to perform a specific task, or how to more easily achieve a goal.
This paper is a collection of the most popular tips and tricks that SAS Technical Support has documented over the years. The paper also points out some of the new features that were delivered with the second maintenance release of SAS Web Report Studio 4.31 (M2). These tips and tricks, along with the new features, illustrate ways to make your reporting more effective and efficient.
TIPS AND TRICKS FOR REPORTING TECHNIQUES This section includes tips and tricks about the following topics:
designing filters (including creating a prompted general prefilter, creating a case-insensitive prompt, and subsetting a dynamically populated prompt)
distributing reports based on group breaks
creating data items that are hyperlinked
DESIGNING FILTERS Filters restrict the data that is returned from a query to a data source, which helps you work more efficiently by focusing your attention on the most relevant results. Filters also improve performance because they reduce the amount of data that is returned and displayed in a report. For these reasons, most SAS Web Report Studio reports use some type of filter. You can create filters either in the information map or in SAS Web Report Studio. Most of the following popular tips are about creating filters in information maps because those filters are easily accessible for use in multiple reports.
Creating Prompted General Prefilters
You can use general prefilters in information maps to prescreen and subset relational data before any other filters are applied. However, by design, a general prefilter cannot be a prompted filter. This restriction also means that you might have to maintain multiple information maps in order to use different filtering criteria.
This tip shows you how you can create a prompted general prefilter, and it explains how you can add flexibility to your required filter by allowing users to choose their own value on which to subset. For example, you might want to enable users to subset based on an individual's name. Instead of creating one information map for each possible name, you can have one information map with a prompted general prefilter that enables users to enter their own value for name.
Business Intelligence ApplicationsSAS Global Forum 2013

2
Follow these steps to implement this tip:
1. In SAS® Information Map Studio, select Insert ► New Filter to open the New Filter dialog box. Enter a name and select a data item. Then, beneath Value(s), click New to add a prompt to the filter.
2. On the General tab in the New Prompt dialog box, enter values for the prompt in the Name and the Displayed text boxes. Remember the name of the prompt. You will use it later.
3. On the Prompt Type and Values tab, specify the prompt type, the method for populating the prompt, and the data source that you want to use to supply the values. If you create a dynamic prompt, then you must select the option Specify a data source and click Browse to select the data table that you want to use.
Display 1. Specifying a Data Source for Your Prompt
4. For each of the open dialog boxes, click OK to close them.
5. Test the prompt to make sure that it returns the results that you expect.
Before you can add the filter as a general prefilter, you must remove the prompt temporarily. This interim action is required because you cannot add prompted filters as general prefilters. The following steps first explain how to remove the prompt temporarily. Then they continue with the steps for creating the prompted filter:
1. In the Information Map Contents pane, double-click the filter to open the Edit Filter dialog box.
2. Under Value(s), change Prompt user for value(s) to Use an expression, and then click Create Expression.
3. In the expression text box, enter a simple quoted string such as 'Jane', and then click OK.
Display 2. A Simple String Expression Temporarily Replaces the Prompt
An expression-text warning message appears, but you can ignore it. Click OK to close the message dialog box.
4. In the Edit Filter dialog box, click Update to modify the expression that is shown in the Filter combinations box.
5. Click OK, and then save the information map.
6. Select Edit ► Properties ► Information Map. Then click the General Prefilters tab, and move the filter that you just created to the Selected filters box. Click OK.
7. In the Information Map Contents pane, double-click the filter to open the Edit Filter dialog box.
8. In the Edit Filter dialog box, click Edit Expression.
Business Intelligence ApplicationsSAS Global Forum 2013

3
9. In the Expression Text box, enter a reference to the filter using the syntax <<root.prompt-name>>, as shown below.
Display 3. The Expression References the Previously Created Prompt
Again, a warning message appears, but you can ignore it. Click OK to close the message dialog box.
10. In the Edit Filter dialog box, click Update to modify the expression shown in the Filter combinations box.
11. Click OK.
12. Save the information map.
You now have a prompted filter that is applied automatically by every SAS Web Report Studio report that uses the information map.
Creating a Case-Insensitive, Single-Selection Prompt
By default, prompts that enable you to enter values are case sensitive, which means that you must always know the exact casing of the value on which you want to filter. However, this information might not be available readily. Therefore, this tip explains how to create a case-insensitive, single-selection prompt so that the prompt works regardless of what casing you use when entering the value. Case insensitivity is particularly useful for manual data-entry prompts and for prompts that enable you to specify additional unformatted values.
Follow these steps to implement this tip:
1. In SAS Information Map Studio, select Insert ► New Filter to open the New Filter dialog box.
2. Enter a name for the filter, select the data item for the filter, and then click Edit Data Item.
3. In the Expression Text box, add the UPCASE function around the data-item expression in order to make the values case insensitive, as shown in Display 4. Notice the parentheses around the name of the data item.
Display 4. The Modified Data-Item Expression Uses the UPCASE Function
Business Intelligence ApplicationsSAS Global Forum 2013

4
4. Click OK to return to the New Filter dialog box.
5. From the Value list, select Prompt user for value. Then click New to open the New Prompt dialog box.
6. On the General tab in the New Prompt dialog box, enter values for the prompt in the Name box and the Displayed textbox. On the Prompt Type and Values tab, specify the prompt type as Text. Then choose a method for populating the prompt. For example, you might select User enters values. Click OK to return to the New Filter dialog box.
7. Change the Value(s) selection from Prompt user for values to Use an expression. Then click Create Expression.
8. In the Expression Text box, reference the prompt using the following syntax:
UPCASE(prompt::<<prompt-name>>)
Display 5 shows how the filter expression looks after you modify it to reference the prompt.
Display 5. A Filter Expression That References a Prompt
9. Click OK to return to the New Filter dialog box. In the warning message that appears, click OK. The New Filter dialog box should look similar to Display 6.
Display 6. An Example of a Case-Insensitive Filter
10. Click OK to close the dialog box and save the filter.
You now have a prompted filter that can return results regardless of the letter casing that is used when the value is entered.
Business Intelligence ApplicationsSAS Global Forum 2013

5
Subsetting the List of Values for a Dynamically Populated Prompt
By design, prompted filters that are dynamically populated show all of the values that are available for the data item that is used in the filter. However, sometimes you might find it more efficient to present a targeted list of values. For example, suppose that your data contains ten international regions, but you want the prompt to display regions that are only in North and South America. This tip explains how to use a hidden prompt to accomplish this task. Essentially, you make your dynamic prompt dependent on the default values that are specified for a hidden prompt. As an added benefit, if your default list of values is very large (in the thousands), then subsetting the list can improve performance.
Follow these steps to implement this tip:
1. In SAS Information Map Studio, select Tools ► Manage Prompts to open the Manage Prompts dialog box.
2. Click New to open the New Prompt dialog box. Enter values for the hidden prompt in the Name and Displayed text boxes.
3. Select the Hide from user option.
4. On the Prompt Type and Values tab, select User selects values from a static list from the Method for populating prompt list.
5. Under List of values, click Get Values, which opens the Get Values dialog box.
6. In the Get Values dialog box, select the data item that you want to use for the filter. Then select the values that you want use to subset the visible prompt.
7. Click OK to return to the New Prompt dialog box.
8. Select the Default radio button to make each value that you select a default value. Then click OK to return to the Manage Prompts dialog box.
9. Click New and complete the New Prompt dialog box to define a visible prompt that is dynamically populated. Click OK when you finish creating the visible prompt.
10. Now select Insert ► New Filter to open the New Filter dialog box. This action begins the process of creating the filter that uses both prompts.
11. Select Prompt user for value(s), and then select the hidden prompt that you created.
12. Click Combinations. Then click Add.
13. Select Prompt user for value(s)again. However, this time, select the visible prompt that you created. Then click Add.
14. Beneath the Filter combinations box, select Establish dependencies between prompts. Your filter should look similar to Display 7 at this point.
Display 7. A Combination Filter That Establishes a Dependency between the Two Referenced Filters
15. Click OK to close the dialog box and save the filter.
You now have a visible prompted filter that is restricted by the default values that you selected for the hidden prompt.
Business Intelligence ApplicationsSAS Global Forum 2013

6
DISTRIBUTING REPORTS BASED ON GROUP BREAKS SAS Web Report Studio enables you to distribute reports via e-mail either as embedded HTML or as a PDF attachment. If a report has group breaks, you can distribute the report to specific recipients based on group break values. This targeted distribution is more efficient than sending a comprehensive report because users see only the information that is relevant to them. For example, your company might sell 100 different types of shoes, but each sales representative needs to see sales for only one or two of those products.
Follow these steps to implement this tip:
1. In SAS Web Report Studio, open a report that has group breaks enabled.
2. Select File ► Distribute to launch the Distribute Report wizard.
3. Specify a time to run the report, and click Next to move to the next wizard page.
4. Choose a delivery method and specify the subject, the sender, and the message. You also have the option to include your selected group-break value in the subject line, which is a new feature in SAS Web Report Studio 4.31 (M2).
5. Click the Recipients and Rules button to open the Recipients and Distribution Rules dialog box. To the
right of the Recipient Lists box, click the icon to open the New Recipient List dialog box.
6. Enter a name for the list and then select the Create recipient list based on group break option. From the drop-down list, select the data item (for example, Product) that you are using for the group break.
Display 8. The Group Break Data Item
Then, click OK to return to the Recipients and Distribution Rules dialog box.
As shown below in Display 7, the Content box contains the name of the data item (Product) that is used for the group break along with the value (Boot) that you selected for that item.
7. To assign an e-mail address or addresses to each data item in the list, select a value (in this example,
Boot) for the data item in the Content box. Then click the icon to open the Edit Recipient dialog box.
Business Intelligence ApplicationsSAS Global Forum 2013

7
8. In the E-mail text box, enter the e-mail addresses, separated by the delimiter that is recognized by your e-mail server. In Display 9, two addresses are entered for Boot.
Display 9. Two Addresses Are Set to Receive a Report for Boot Sales
9. Repeat steps 7 and 8 for each data-item value to which you want to associate e-mail addresses.
10. Click OK to return to the Recipients and Rules dialog box, and then select the Group break option at the bottom of the dialog box.
11. Click OK to return to the Distribute Report wizard, and then click Finish to immediately distribute the report to the specified e-mail addresses.
CREATING DATA ITEMS THAT ARE HYPERLINKED SAS Information Map Studio has a Display as a hyperlink feature that enables you to create a data item that is an active link in your reports. For example, the link might direct users to an external website that contains more information about the results that they are viewing. By including the link in the report, users do not have to open a new browser window and manually type in a URL.
Follow these steps to implement this tip. In this example, you create a data item that links to the SAS website.
1. In SAS Information Map Studio, create a new data item (SAS) of that has a Type value of Character.
2. In the Expression Editor dialog box for the data item, enter the link element that is shown in the Expression Text box below. Make sure that you use single quotation marks around the expression and double quotation marks around the URL, as shown here:
Display 10. A Data-Item Expression That Includes an HTML Anchor Tag
Business Intelligence ApplicationsSAS Global Forum 2013

8
The TARGET= option for the HTML anchor tag determines how the target of the link is displayed. The following two options are the most popular.
Value Description _blank Open in a new window (tab) _self Open in the same window (default)
3. In the Properties pane for the data item, set the Display as a hyperlink property to Yes.
Display 11. The Display as a hyperlink Property Set to a Value of Yes
Display 12 shows how the data item (SAS) appears in the report. When you click the link, the SAS website opens in a new browser tab.
Display 12. The Data Item Named SAS with an Active Link
Business Intelligence ApplicationsSAS Global Forum 2013
9
NEW FEATURES IN SAS® WEB REPORT STUDIO 4.31 (M2) As is the case with tips and tricks discussed in the previous sections, some new features in SAS Web Report Studio 4.31 (M2) also provide better, more efficient methods for accomplishing certain tasks. This section discusses three new features:
adding custom text in the body of an e-mail message
sending a link to a customized view of a report via e-mail
defining conditional highlighting to draw attention to specific results in a report
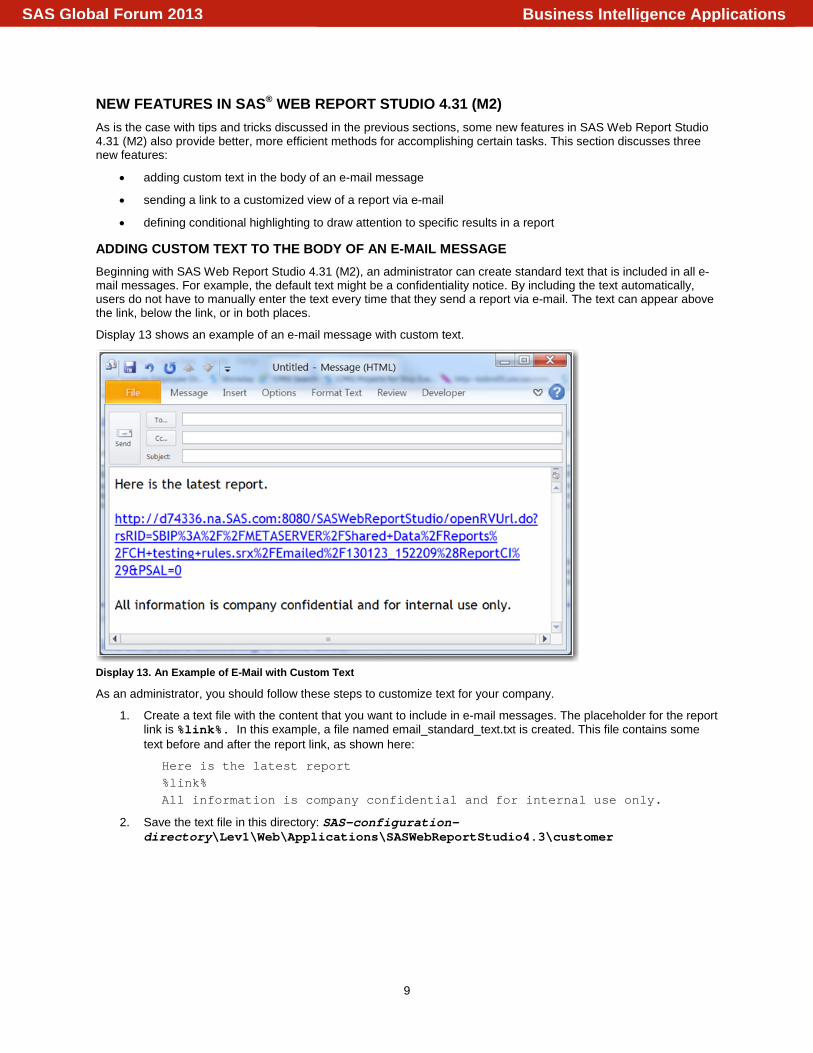
ADDING CUSTOM TEXT TO THE BODY OF AN E-MAIL MESSAGE Beginning with SAS Web Report Studio 4.31 (M2), an administrator can create standard text that is included in all e-mail messages. For example, the default text might be a confidentiality notice. By including the text automatically, users do not have to manually enter the text every time that they send a report via e-mail. The text can appear above the link, below the link, or in both places.
Display 13 shows an example of an e-mail message with custom text.
Display 13. An Example of E-Mail with Custom Text
As an administrator, you should follow these steps to customize text for your company.
1. Create a text file with the content that you want to include in e-mail messages. The placeholder for the report link is %link%. In this example, a file named email_standard_text.txt is created. This file contains some text before and after the report link, as shown here:
Here is the latest report %link% All information is company confidential and for internal use only.
2. Save the text file in this directory: SAS-configuration-directory\Lev1\Web\Applications\SASWebReportStudio4.3\customer
Business Intelligence ApplicationsSAS Global Forum 2013

10
In SAS® Management Console, add the wrs.email.report.standard.text.file.name property to SAS Web Report Studio (Display 14). The value of the property is the name of the file that you created. In this case, the filename is email_standard_text.txt.
Display 14. The Standard Text Property Configured with Customized Text
3. After you add the property, restart your web application server.
SENDING A LINK TO A SNAPSHOT OF A REPORT IN AN E-MAIL MESSAGE When you view a report, you might decide to navigate to a specific group break and apply some filters. You want to share this view with other users, but you do not want to save your changes or maintain multiple copies of the report. In SAS Web Report Studio 4.31 (M2), you can send a link in to your customized view in an e-mail message without the need to save the modifications. The customized view is called a report definition snapshot.
This feature is active by default. When you select File ► E-mail to send a report, SAS Web Report Studio automatically constructs a special URL that enables the recipients to see the customized view of your report. The e-mail message also contains any standard text that is configured for your environment. By default, you can create a maximum of 50 snapshots. When the limit is reached, older snapshots are deleted and replaced by newer snapshots.
Note: To send a link to the saved copy of the report:
1. Select File ► Manage Files.
2. Navigate to the report and open the Actions menu.
3. Select E-mail.
DEFINING CONDITIONAL HIGHLIGHTING FOR CHARACTER CATEGORIES You can use conditional highlighting to direct a user’s attention to specific report results. For example, you might design a report about suppliers where table cells that contain delivery times that are greater than 14 days are automatically highlighted with a red background. Without the use of highlighting, users might need more time to find the information that they need to make an informed decision.
Business Intelligence ApplicationsSAS Global Forum 2013

11
You can apply conditional highlighting by performing the following steps:
1. In SAS Web Report Studio, open a report in Edit mode.
2. Right-click the table for which you want to add some conditional highlighting rules and select Conditional Highlighting.
Display 15. The Conditional Highlighting Option Available from the Table’s Pop-Up Menu
Selecting this item opens the Conditional Highlighting dialog box.
3. In the Conditional Highlighting dialog box, click New. This action displays three tabs, as shown below.
Display 16. The Tabs That Provide Options for Defining a Rule
Business Intelligence ApplicationsSAS Global Forum 2013

12
4. On the Rules tab, select the data item, condition, and rule assignment that you want to use.
5. On the Color and Font tab and the Image and Text tab, choose how you want to highlight values that match your rule.
The following examples illustrate several ways of applying multiple rules to a crosstabulation table.
Table 1 shows a table with no conditional highlighting applied.
Table 1. No Conditional Highlighting Rules Are Applied
In Table 2, the rule is written so that Participant values are red when the Type category has a value of indoor.
Table 2. A Rule Is Applied to the Type Category for the Row
In Table 3, the rule is written so that Participant values are green when the Sport category has a value of hockey.
Table 3. A Rule Is Applied to the Sport Category for the Row
In Table 4, the rule is written so that Sex values are blue if the value is equal to M. Notice that the column rule does not overwrite the previously defined row rules.
Table 4. A Rule Is Applied to the Sex Category for Individual Cells
Business Intelligence ApplicationsSAS Global Forum 2013

13
CONCLUSION Thanks to queries from customers, SAS Technical Support has accumulated a wealth of information about how to more efficiently use SAS Web Report Studio. Many of the most popular tips have been documented in the form of SAS Samples and SAS Notes. This paper reviewed a selection of those tips in areas such as filtering and distribution. To find more tips online, use keywords to search "Samples & SAS Notes" on the SAS Customer Support website. (support.sas.com/notes/index.html) This paper also discussed some new features that are available with the second maintenance release of SAS Web Report Studio 4.31 (M2). These new features are also designed to help you accomplish your reporting tasks more easily and efficiently.
RECOMMENDED READING SAS Institute Inc. 2007. Sample 40250: "Distributing SAS® Web Report Studio reports based on group break values." Cary, NC: SAS Institute Inc. Available at support.sas.com/kb/40/250.html.
SAS Institute Inc. 2011. Sample 45088: "Using SAS® Information Map Studio to create an information map that includes a prompted general prefilter." Cary, NC: SAS Institute Inc. Available at support.sas.com/kb/45/088.html.
SAS Institute Inc. 2011. Sample 45185: "Subsetting the list of values for a dynamically populated prompt in SAS® Information Map Studio." Cary, NC: SAS Institute Inc. Available at support.sas.com/kb/45/185.html.
SAS Institute Inc. 2012. Sample 46715: "Creating a case-insensitive, single-selection prompt in SAS® Information Map Studio." Cary, NC: SAS Institute Inc. Available at support.sas.com/kb/46/715.html.
SAS Institute Inc. 2012. SAS® 9.3 Intelligence Platform: Web Application Administration Guide, Third Edition. Cary, NC: SAS Institute Inc. Available at support.sas.com/documentation/cdl/en/biwaag/65230/PDF/default/biwaag.pdf.
SAS Institute Inc. 2012. SAS® Web Report Studio 4.31: User's Guide. Cary, NC: SAS Institute Inc. Available at support.sas.com/documentation/cdl/en/citug/65339/PDF/default/citug.pdf.
CONTACT INFORMATION Your comments and questions are valued and encouraged. Contact the authors at:
Keith Myers SAS Institute Inc. SAS Campus Drive Cary, NC 27513 E-mail: [email protected] Web: support.sas.com Madelyn Bythell SAS Institute Inc. SAS Campus Drive Cary, NC 27513 E-mail: [email protected] Web: support.sas.com
SAS and all other SAS Institute Inc. product or service names are registered trademarks or trademarks of SAS Institute Inc. in the USA and other countries. ® indicates USA registration.
Other brand and product names are trademarks of their respective companies.
Business Intelligence ApplicationsSAS Global Forum 2013