1 (1b) emmc card - allo.com · these pads for connecting serial console. baud rate 115200, n, 8, 1....
TRANSCRIPT

1
2
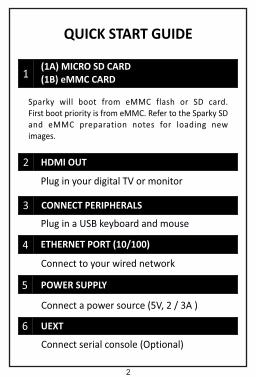
Connect serial console (Optional)
UEXT6
Connect a power source (5V, 2 / 3A )
POWER SUPPLY 5
Connect to your wired network
ETHERNET PORT (10/100)4
Plug in a USB keyboard and mouse
CONNECT PERIPHERALS3
Plug in your digital TV or monitor
HDMI OUT2
Sparky will boot from eMMC flash or SD card. First boot priority is from eMMC. Refer to the Sparky SD and eMMC preparation notes for loading new images.
(1A) MICRO SD CARD(1B) eMMC CARD1
QUICK START GUIDE

3

4
Optional UEXT header has to be fixed onthese pads for connecting serial console.Baud rate 115200, N, 8, 1.
UEXT6
A good quality micro USB power supply that can provide at least 2A at 5V is essential. *For best results, use poweradap te r supp l i ed w i th Sparky. Sparky with add on, use 5V 3A adaptor.
Power Adapter
5
To update and download software, we recommend connecting to the Internetvia an Ethernet cable.
Ethernet 4
Any standard keyboard and mouse should work. Keyboards or mouse that take a lot of power from the USB ports however, may need a powered USB hub. This may include some wireless devices.
Keyboard and Mouse
3
HD TVs and monitors with HDMI input or use HDMI to VGA converter for using with VGA monitor.
HDMI2
Minimum size 8GB, Class 4 or above.Supports up to 64GB.*We recommend using branded SD cards as they are more reliable.
Micro SD Card or eMMC
1
SPECIFICATIONS & NOTESITEMSl. NO

5
LOGGING INTO YOUR SPARKY SBCOnce your Sparky SBC has completed the boot process, a loginprompt will appear. The default login for Ubuntu is usernameroot with no password (user can set password).
After you have successfully logged in, you will see the commandline prompt root@sparky
WHAT CAN YOU DO NEXT?Refer to other guides for Sparky Shields and prepare SD / eMMC.
STEP 1:Insert your Micro SD card into the Micro SD Card slot on theSparky SBC, or plug the eMMC Card to the eMMC connector.
STEP 2:Plug in USB Keyboard and Mouse into USB slots on Sparky SBC.
STEP 3:Make sure monitor or TV is turned on, and select the right input(ie: HDMI1, HDMI2, DVI etc.).
STEP 4:Connect HDMI Cable from Sparky SBC to monitor or TV.
STEP 5:If you intend to connect your Sparky SBC to the Internet, plugin an Ethernet Cable to the Ethernet port next to the USB ports.
STEP 6:When you are finished plugging in all the cables and Micro SD / eMMC Card as required, plug in the Micro USB Power Supply.This action will turn on and boot your Sparky SBC.
Before you plug anything into your Sparky SBC, make sure thatyou have all the equipment listed on previous page. Then followthese instructions:
SPARKY SBC POWER-ON STEPS

6
·The cable or connector used must offer adequate insulation and operation in order that the requirements of the relevant performance and safety requirements are met.
·
All peripherals used with the Sparky SBC should comply with relevant standards for the country of use and be marketed accordingly to ensure that safety and performance requirements are met. These articles include but are not limited to keyboards, monitors and mouse used in conjunction with the Sparky SBC.
·The connection of incompatible devices to the GPIO connector may affect compliance or result in damage to invalidate the warranty..
·This product should be placed on a stable flat non conductive surface in use and should not be contacted by conductive items.
This product should be operated in a well ventilatedenvironment
·
·This product shall only be connected to an external power supply rated at 5V 2/3A DC or any external DC power supply.
WARNINGS
SPARKY SBC REGULATORYCOMPLIANCE AND SAFETY INFORMATION
SAFETY INSTRUCTIONS

7
WEEE DIRECTIVE STATEMENT FOR THE EUROPEANUNION In common with all electronic and electrical products theSparky SBC should not be disposed of in household waste.Alternative arrangements may apply in other jurisdictions.
COMPLIANCE INFORMATIONThe Sparky SBC complies with the relevant provisions ofthe RoHS Directive for the European Union.
·Avoid handling the printed circuit board while it is powered. Only handle by the edges to minimize the risk of electrostatic discharge damage.
·Take care whilst handling to avoid mechanical or electrical damage to the printed circuit board and connectors.
·The Sparky SBC is not designed to be powered from a USB port on other connected equipment (such as PC/LAPTOPs), if this is attempted it may malfunction.
·Do not expose it to heat from any source; the Sparky SBC is designed for reliable operation at normal ambient room temperatures.
·Do not expose it to water, moisture or place on a conductive surface whilst in operation.
To avoid malfunction or damage to your Sparky SBC please observe the following:
INSTRUCTIONS FOR SAFE USE

8
·
This equipment has been tested and found to comply with the limits for a Class B digital device, pursuant to part 15 of the FCC rules. These limits designed to provide reasonable protections against harmful interference in a residential / commercial environment. This equipment complies withpart 15 of FCC rules. Operation is subject to the following two conditions: 1) this equipment might not cause harmful interference. 2) this equipment must accept any interference received, including interference that might cause un desired operation.
This product has been tested and found to comply with the limits for Class B information Technology Equipment according to the European Standard.
·
·This product is in conformity with the protection requirement of EU council Directive 2004/108/EC on the approximation of the laws of the member states relating to electromagnetic compatibility.
ELECTROMAGNETIC COMPATIBILITYCOMPLIANCE STATEMENT
COMPLIANCE STATEMENTS

9
Power Adaptor 5V 2 / 3A
Micro SD 8GB or 16GB
OPTIONAL ACCESSORIES

10
Battery Pack
eMMC Card Reader

11
eMMC
Spacers & Screw

12
www.allo.com
www.shield.com
DISTRIBUTED BY:
SPARKY SBC IS A TRADEMARK OF