$1 fighter kite
TRANSCRIPT

6-2007 www.fighterkitecentral.com Manny Alves’ $1 Fighter Kite
$1 Fighter Kite Manny Alves is one of the few ‘masters’ of figher kite design and construction. Manny has a keen eye for fighter kites; and as it turns out for other kites as well. He saw a kite at Wal-Mart for $1. The kite is a simple diamond Eddy style single line plastic child’s kite with the images of Spiderman and the like on the skin. The kite is manufactured by ‘Kite Factory’ and sells for $1. After getting the kite home, Manny realized that the parts of this Eddy kite could be used to make a good flying fighter kite....so, of course that’s what Manny did; he made a great flying fighter kite from the parts. And the results are quite remarkable! Manny was pleasantly surprised and excited about the good flight characteristics his $1 fighter had, even in winds as high as 11mph! The performance of this fighter is every bit as good as any fighter except it is slightly slower than some. And, this kite is extremely durable...always a good feature! At the recent Brigantine, NJ fighter kite event a couple of competitors flew these $1 fighter kites with great success in scoring points during the precision or skills competition! Here’s how Manny made the conversion from an Eddy kite to a fighter kite.
1. The parts included in the original eddy kite include a fiberglass bow & spine, wingtip connectors plus nose and tail spine connectors and of course the plastic skin.
2. Manny used the bow as it came in the original kite. 3. The spine was shortened a little....review the template following this article. 4. The skin was re-cut to a template Manny created. The template is included, full sized,
following this article. 5. Install the bow. Using the wingtip connectors from the original kite makes it easy to install the
bow in your $1 fighter kite. 6. You’ll probably want to reinforce the nose leading edges with tape, just for added durability. 7. Install the spine. 8. Make either a 2 or a 3-point bridle based on your personal preferences. Manny made a 3-point
bridle. 9. Make a spine tension line as shown in the following photos. 10. Create a slight spine bend, position the bridle’s tow connection loop and enjoy flying your new
fighter kite. This is a relatively easy project. It involves removing all the parts from the original $1 kite, re-cutting the kite skin to a new shape, re-attaching the spine, tail and wingtip connectors, installing the bow and spine, creating a spine tension line, install a bridle and fly. The hard part, figuring out what shape and size of fighter kite will perform well with the given components, Manny has done for us. The full sized template is at the end of this article for you to print. Actually there are 2 templates, one with a hem for bow and nose and one without....a R and L template. Use both, or, the one best suited to how you’ll make your kite.

6-2007 www.fighterkitecentral.com Manny Alves’ $1 Fighter Kite
The components; the fiberglass bow and spine, plus the 4 connectors of this kite, can be used to make any fighter kite that uses a bow no longer than the one from the Eddy kite, such as my ‘small sly dog’.
The photos on the left are of the original Eddy 1$ Wal-Mart kite, back and front.
6-2007 www.fighterkitecentral.com Manny Alves’ $1 Fighter Kite
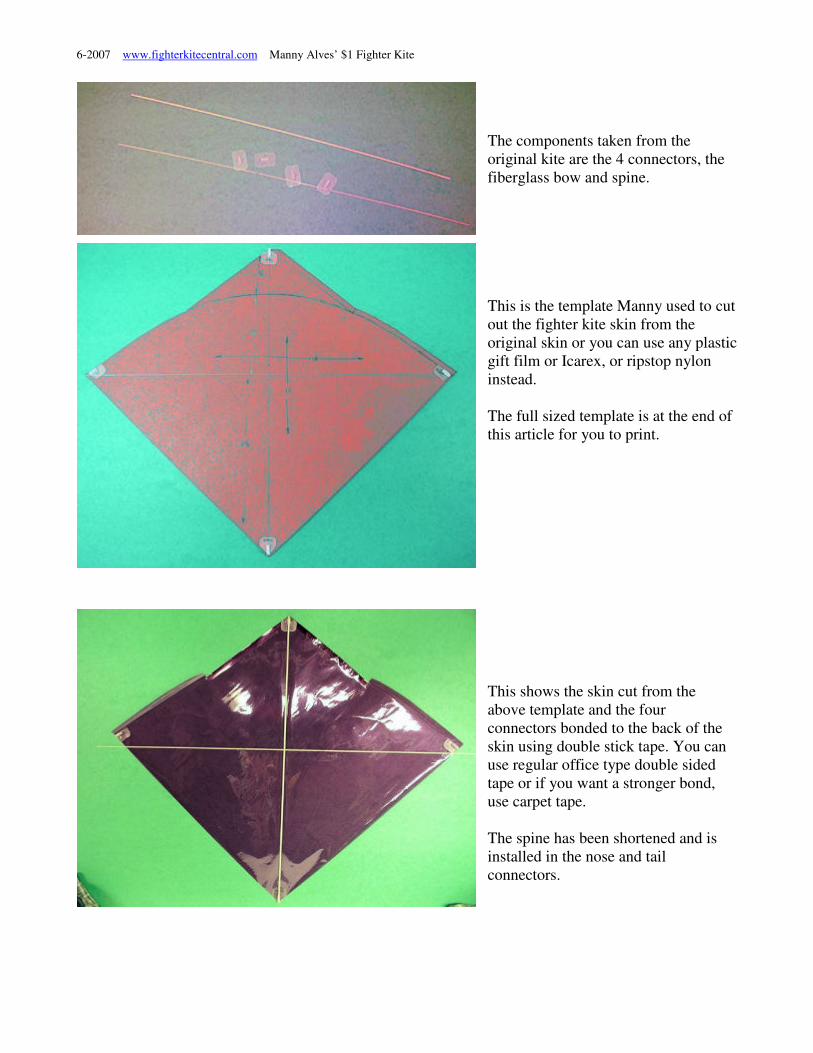
The components taken from the original kite are the 4 connectors, the fiberglass bow and spine.
This is the template Manny used to cut out the fighter kite skin from the original skin or you can use any plastic gift film or Icarex, or ripstop nylon instead. The full sized template is at the end of this article for you to print.
This shows the skin cut from the above template and the four connectors bonded to the back of the skin using double stick tape. You can use regular office type double sided tape or if you want a stronger bond, use carpet tape. The spine has been shortened and is installed in the nose and tail connectors.

6-2007 www.fighterkitecentral.com Manny Alves’ $1 Fighter Kite
For this kite Manny used a black plastic film to make it easier to see the construction in the photos. This is a close up of one wingtip connector and the bow hem line drawn on the kite skin.
A key to successfully flying a kite when using a fiberglass or carbon fiber rod for a spine is to mark the inside of the curve when the spine is bent in its natural bend. The ‘natural’ bend is the bend created by tensioning the spine and allowing it to rotate or find its ‘natural’ position for the bend you want to create in it. This mark along the inside of the bend should be facing you when the spine is installed in the kite. You should be looking at the mark you made along the bend when the spine is installed. In order to control the amount of bend in the spine and the location of where the bend is along the spine, a tensioning line must be created. The following photos show how Manny makes a simple and very effective spine
tensioning line.

6-2007 www.fighterkitecentral.com Manny Alves’ $1 Fighter Kite
Start by making two loops of 15# to 20# test dacron fishing line. The loops are about 3” long when finished.
Larkshead one of the loops around the spine near the nose, the other is located 7-1/4” from the nose, measured toward the tail. After attaching the loops, make sure they are pointing upward from the ‘bend mark’ you put on the spine, then put a drop of CA glue on the loops to secure them to the spine. Tie an overhand knot only in the nose loop about in the middle. This creates a second or ‘extra’ loop that will be used to secure the tension line to the nose of the spine.

6-2007 www.fighterkitecentral.com Manny Alves’ $1 Fighter Kite
To make the tension line you’ll need a glass bead and some 15-20# test dacron line. The photo shows how to thread the line. The tension line is threaded through the loop nearest to the tail of the spine and through the center hole in the bead. The end of the tension line at the nose of the spine is left for the moment. Next, loop the line through both the bead and the lower loop on the spine a second time. After completing this part, snug the loose ends of the tension line so it will just reach the nose loop and tie the ends together with an overhand or figure 8 knot.
Using the nose loop’s upper ‘extra’ loop, larkshead the knotted ends of the tension line to secure it and complete the tension line.

6-2007 www.fighterkitecentral.com Manny Alves’ $1 Fighter Kite
This is the finished tension line attached to the spine
To adjust the tension line, firmly hold one loop and slide the bead to either lengthen the tension line which will lessen the bend, or move it the other direction to shorten the tension line which will increase the amount of bend in the spine.
Here are two finished kites after the bow hems have been taped or glued around the bow and holes cut in the skin for the bridle connections. Manny used contact cement to bond the bow hem to the bow on the white kite.

6-2007 www.fighterkitecentral.com Manny Alves’ $1 Fighter Kite
Manny used regular double stick tape and plain scotch type tape to make the black kite bow hems.
This is the finished black kite showing the front and the bridle. This is the finished kite using the original skin re-cut. Manny used a standard 3-point bridle with the upper bridle connections about 1.25” either side of the spine.


