1 gtx portable radio - the repeater builder's … radio features welcome to the motorola gtx...
TRANSCRIPT

1 GTX Portable Radio
© 1997 by Motorola, Inc., 1301 E. Algonquin Road, Schaumburg, IL. 60196
Printed 1/97. All Rights Reserved.
ContentsIntroduction
Basic Radio Features ......................................................................................................3Inspection and Unpacking ..............................................................................................3Warnings, Cautions, and Notes ......................................................................................3
Getting Started
Battery Installation.........................................................................................................4Battery Removal..............................................................................................................4Controls, Switches, Indicators, and Connectors ............................................................5Keypad .............................................................................................................................6Display .............................................................................................................................7Status Indicators and LEDs ...........................................................................................7Alert Tone Indications.....................................................................................................8Time-Out Timer...............................................................................................................9Trunked or Conventional Radio Operation....................................................................9Basic Radio Operation
Radio On/Off; Power-Up................................................................................................10Selecting a Menu Mode .................................................................................................11Muting and Unmuting the Keypad Tones ...................................................................11Monitor On/Off ..............................................................................................................12Failsoft Operation (Trunked Systems Only)................................................................13Selecting a Mode............................................................................................................14Receiving a Call .............................................................................................................14Transmitting .................................................................................................................15Scan Operation
Introduction ...................................................................................................................16Turning Scan On/Off .....................................................................................................16Deleting Nuisance Modes .............................................................................................16Talkback Delay ..............................................................................................................17Scan List Programming/Viewing..................................................................................17
Trunked Telephone OperationGeneral Information......................................................................................................18Receiving a Telephone Call (Land to Mobile) ..............................................................18Calling the Last Number Dialed ..................................................................................19Calling a Stored Number using Direct Access.............................................................21Storing a New Phone Number......................................................................................23
Trunked Private ConversationTM Call Operation (800 MHz Only)Introduction ...................................................................................................................25Answering a Private Conversation Call.......................................................................25Calling the Last ID Number Transmitted or Received ...............................................26Direct Entry of the ID Number to be Called................................................................27
, Motorola, GTX, SMARTNET, Private-Line, Digital Private-Line
Private Conversation, Call Alert , and SmartZone are trademarks of Motorola. Inc

2 GTX Portable Radio
Contents (cont.)Scrolling to an ID Number in the Call List .................................................................29Calling an ID Number at a Known Location in the Call List.....................................31
Call AlertTM Page OperationIntroduction ...................................................................................................................33Answering a Call Alert Page ........................................................................................33Sending a Call Alert to the Last ID Number Transmitted or Received .....................34Direct Entry of the ID Number to be Call Alert Paged...............................................35Scrolling to an ID Number in the Call List .................................................................37Paging an ID Number at a Known Location in the Call List .....................................38
Trunked Enhanced Private ConversationTM Call Operation(900 MHz Only)Introduction ...................................................................................................................41Answering an Enhanced Private Conversation
TMCall.................................................41
Enhanced Calling the Last ID Number Transmitted or Received .............................43Direct Entry of the ID Number to be Called ...............................................................44Scrolling to an ID Number in the Call List .................................................................46Calling an ID Number at a Location in the Call List..................................................48Leaving a Call Alert Page when Called Party Does not Answer................................50
Roaming CapabilitySmartZone Operation....................................................................................................51Locking and Unlocking a Site.......................................................................................52Forcing a Site Change...................................................................................................52AMSS Feature ...............................................................................................................52
Conventional Phone OperationConventional Phone Operation Procedure...................................................................53
Batteries and AccessoriesBattery Information ......................................................................................................54List of Accessories .........................................................................................................57General InformationTransmitting Distance ..................................................................................................59Radio Care .....................................................................................................................59Safety Standards .......................................................................................................... 60Important Safety Information ......................................................................................61Air Bag Warning Statement .........................................................................................63Read this Information Before Using Your Radio .........................................................64Service........................................................................................................................... 66Express Service Plus .....................................................................................................67Parts Information..........................................................................................................68Computer Software Copyrights ....................................................................................68Patent Disclosure ..........................................................................................................68

Basic Radio Features
Welcome to the Motorola GTX portable radio. GTXPortable radios are sophisticated, state-of-the-artcommunication units, with 90-modes available in the 800MHz and 900 MHz frequency ranges. Pioneering thelatest technology in radio electronics, Motorola GTXPortable radios provide features that were once onlyavailable in more expensive radios. Intelligent andflexible software increases the radio’s capability,decreases the radio's physical size, and permits many ofthe radio's features to be customized for you.
Inspection and Unpacking
Inspect the shipping carton for any signs of damage.Remove and check the contents to be sure that all ordereditems have been shipped. Inspect all items thoroughly. Ifany items have been damaged during transit, report thedamage to the shipping company immediately.
Radio Packing Box Contents
• Radio• Antenna• Nickel-Cadmium Battery • User’s Guide
• Quick Start (Part of User’s Manual)
Warnings, Cautions, and NotesThroughout the text in this publication, you will
notice the use of WARNINGS, CAUTIONS, and Notes.These notations are used to emphasize that safetyhazards exist, and care must be taken or observed.
WARNING: An operational procedure, practice,or condition, etc., which may result in injury ordeath if not carefully observed.
CAUTION: An operational procedure, practice, orcondition, etc., which may result in damage to theequipment if not carefully observed.
Note: An operational procedure, practice, orcondition, etc., which is essential to emphasize.
3 Introduction
Whi

4 Getting Started
Battery Installation
1. Hold the radio with its back facingyou (knobs turned upwards).
2. Hold the battery with its nameplate facing you.
3. Insert the projected upper end ofthe battery into the cut openingslocated at the lower end of theradio, and slide the battery to thetop of the radio until the batteryclicks into place.
Note:
The battery is shipped uncharged.Batteries must be charged beforeuse (See Battery Informationsection).
Battery Removal
1. Turn off the radio and hold it sothat the battery side of the radio istilted down.
2. Press the battery release lever.
3. With the release lever pressed,gently slide out the battery.
5 Getting Started(cont.)
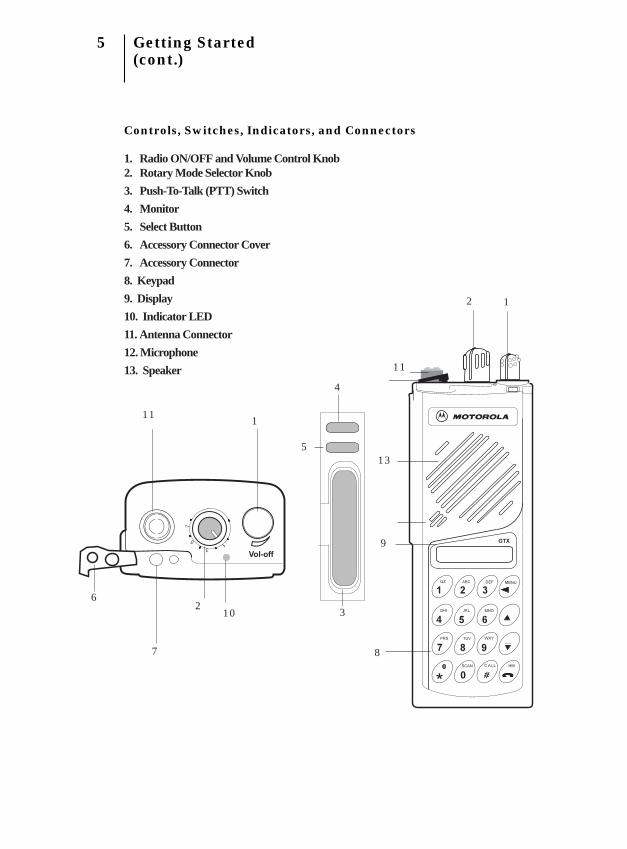
Controls, Switches, Indicators, and Connectors
1. Radio ON/OFF and Volume Control Knob2. Rotary Mode Selector Knob
3. Push-To-Talk (PTT) Switch
4. Monitor
5. Select Button
6. Accessory Connector Cover
7. Accessory Connector
8. Keypad
9. Display
10. Indicator LED
11. Antenna Connector
12. Microphone
13. Speaker
12
3
4
5
8
9
10
111
7
13
2
11
6

6 Getting Started(cont.)
Menu and Backspace Button
System Up/Scroll Up
System Down/Scroll Down
Home and Phone Button
Private Call (PC) and Call Alert (CA) ButtonScan and ZeroButton
Backlight andAsterisk Button
Keypad

7 Getting Started(cont.)
Display
The GTX radio has a one-line liquid-crystal display (LCD) which displayseither numeric messages or feature information. Seven status annunciators locatedabove the character display, indicate some of the radio’s operating conditions.
Status Indicators and LEDs
The status annunciators indicate the status of certain radio functions:
• LEDs
RED when the radio istransmitting
Green when radio is receiving
OFF when radio is not transmitting.
• Status Indicators
Battery Status ( ) – Solid when the battery is low.
Carrier Squelch ( ) – Indicates when the active conventional mode isbeing monitored; ON = BEING MONITORED/OFF = NOT BEING MONITORED.
Scan ( ) – Indicates when the radio is scanning.
Programming Mode ( ) – Indicates when the radio is in theprogramming mode; ON = IN PROGRAMMING MODE/OFF = NOT INPROGRAMMING MODE.
Direct ( ) – Indicates whether you are talking directly to another radio(talkaround), or through a repeater in Conventional mode; ON =DIRECT/OFF = REPEATER.
( ) – Not in use.
(LO) – Not in use.
LED

8 Getting Started(cont.)
Alert Tone Indications
The GTX radio generates a number of audible tones to indicate radio operatingconditions:
• Low Battery – A low-battery condition is indicated by a high-pitched, cricket-like “chirp-chirp”. There are two low battery conditions. The low battery alertwill be heard if the battery voltage falls below the low voltage level. The tonewill be emitted when the PTT is released in the transmit mode, and when thelow battery condition is detected in the receive mode.
• Successful Power-Up – When the radio is first turned on, a short high-pitchedtone indicates that the radio has passed its power-up self test and is ready foruse.
• Unsuccessful Power-Up – When the radio is first turned on, a short low-pitched tone indicates that the radio has failed to pass its power-up self test andis not ready for use. Contact your nearest Motorola Service Shop.
• Invalid Mode – A continuous, low-pitched tone is heard when an invalid orunprogrammed operation is performed on the radio.
• Valid (Good) Key Press – A short, medium-pitched tone when a key is pressedindicates that the key instruction has been accepted.
• Invalid (Bad) Key Press – A short, low-pitched tone when a key is pressedindicates that the key instruction has been rejected.
• Time-Out Timer Warning – Your radio’s time-out timer limits the duration ofyour transmission time. When you are pressing the PTT switch (transmitting),a short, low-pitched warning tone will sound four seconds before the allottedtime will expire.
• Time-Out Timer Timed-Out – If your phone conversation is longer than thetime allotted to the time-out timer, a continuous, low-pitched tone will sound,indicating that your transmission has been cut off. This tone will continue untilyou depress the PHON button.
• Failsoft (Trunked Systems Only) – A faint “beeping” tone every ten secondsindicates that the radio is operating in the failsoft mode.
• Phone Busy – A “bah-bah-bah-bah” tone when telephone interconnect isaccessed, indicates that all available channels are busy and the radio is in queuefor the next available phone channel.
• DTMF Tones (During Dialing) – When a digit (0 to 9, * and #) is dialed, aDTMF tone will be heard.
• Out of Range Tone – When the radio is Out of Range from the selectedTrunking site, a continues, low pitched tone is heard while the PTT is pressed.
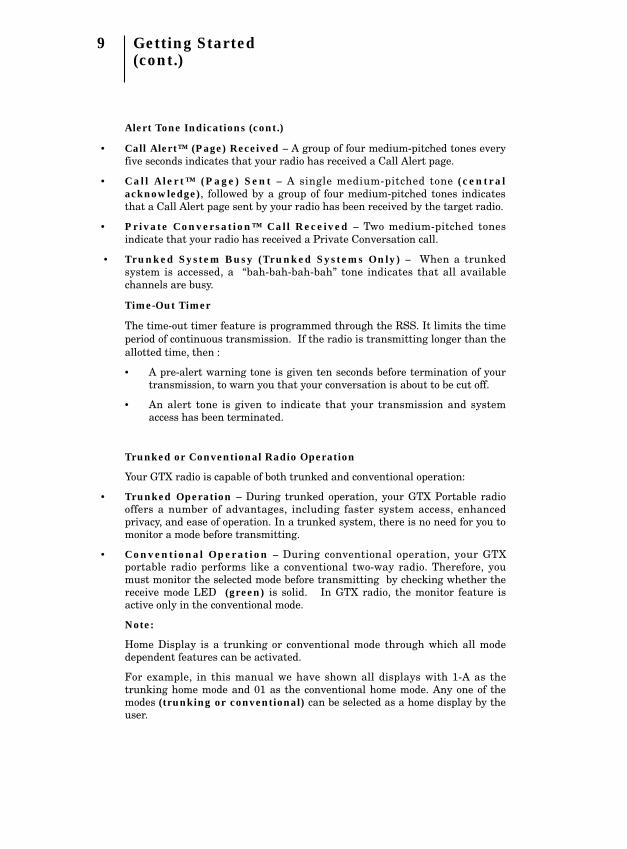
9 Getting Started(cont.)
Alert Tone Indications (cont.)
• Call Alert™ (Page) Received – A group of four medium-pitched tones everyfive seconds indicates that your radio has received a Call Alert page.
• Call Alert™ (Page) Sent – A single medium-pitched tone (centralacknowledge), followed by a group of four medium-pitched tones indicatesthat a Call Alert page sent by your radio has been received by the target radio.
• Private Conversation™ Call Received – Two medium-pitched tonesindicate that your radio has received a Private Conversation call.
• Trunked System Busy (Trunked Systems Only) – When a trunkedsystem is accessed, a “bah-bah-bah-bah” tone indicates that all availablechannels are busy.
Time-Out Timer
The time-out timer feature is programmed through the RSS. It limits the timeperiod of continuous transmission. If the radio is transmitting longer than theallotted time, then :
• A pre-alert warning tone is given ten seconds before termination of yourtransmission, to warn you that your conversation is about to be cut off.
• An alert tone is given to indicate that your transmission and systemaccess has been terminated.
Trunked or Conventional Radio Operation
Your GTX radio is capable of both trunked and conventional operation:
• Trunked Operation – During trunked operation, your GTX Portable radiooffers a number of advantages, including faster system access, enhancedprivacy, and ease of operation. In a trunked system, there is no need for you tomonitor a mode before transmitting.
• Conventional Operation – During conventional operation, your GTXportable radio performs like a conventional two-way radio. Therefore, youmust monitor the selected mode before transmitting by checking whether thereceive mode LED (green) is solid. In GTX radio, the monitor feature isactive only in the conventional mode.
Note:
Home Display is a trunking or conventional mode through which all modedependent features can be activated.
For example, in this manual we have shown all displays with 1-A as thetrunking home mode and 01 as the conventional home mode. Any one of themodes (trunking or conventional) can be selected as a home display by theuser.

10 Basic Radio Operation
Radio On/Off; Power-Up
1. Turn the radio on by turning the Volume Controlknob clockwise. The radio goes through a power-up self test and, if it passes the check, the displaymomentarily shows “SLF tSt” for about twoseconds. A good-power-up, high-pitched tonesounds to indicate that the radio has passed theself check. The radio goes to personality # 1 andthe display shows“1-A” or to that “personality”system the radio operated at before power down.
In case of self test failure, the display shows“FAtAL 05” or “Error 06” and the illegalcontinuous tone is sounded. Turn off the radioand remove the battery. Check the battery,reinsert it and turn the radio on again. If theradio still does not pass the self check, a problemexists in the radio. Contact the nearest MotorolaService Shop.
Note:• The power-up self check verifies that the radio’s
microprocessor-based systems are working, but itdoes not check all the RF components, nor does itcheck the operation of all customer-specificfeatures. Motorola recommends that thefunctioning of the radio be checked periodicallyby an authorized Motorola service shop.
2. Turn the radio off by turning the volume knobcounter -clockwise.
or
In case of test failure
11 Basic Radio Operation (cont.)
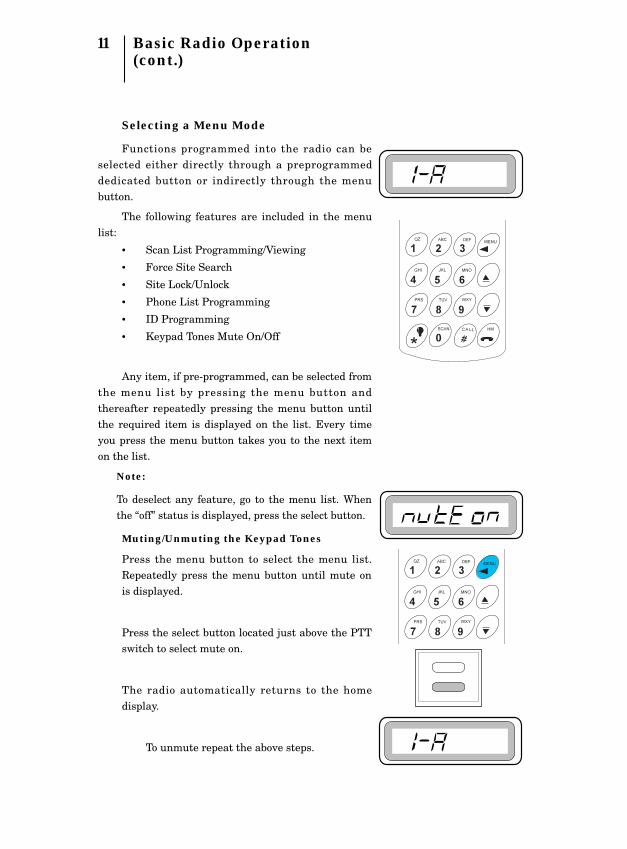
Selecting a Menu Mode
Functions programmed into the radio can beselected either directly through a preprogrammeddedicated button or indirectly through the menubutton.
The following features are included in the menulist:
• Scan List Programming/Viewing
• Force Site Search
• Site Lock/Unlock
• Phone List Programming
• ID Programming
• Keypad Tones Mute On/Off
Any item, if pre-programmed, can be selected fromthe menu list by pressing the menu button andthereafter repeatedly pressing the menu button untilthe required item is displayed on the list. Every timeyou press the menu button takes you to the next itemon the list.
Note:
To deselect any feature, go to the menu list. Whenthe “off” status is displayed, press the select button.
Muting/Unmuting the Keypad Tones
Press the menu button to select the menu list.Repeatedly press the menu button until mute onis displayed.
Press the select button located just above the PTTswitch to select mute on.
The radio automatically returns to the homedisplay.
To unmute repeat the above steps.

12 Basic Radio Operation (cont.)
Monitor On/Off
Note:The monitoring feature is available when theradio is in conventional mode and CodedSquelch PL or DPL is preprogrammed for thereceiver frequency.
Press the monitor button located on the side (firstbutton from the top) to turn monitoring on.
The speaker is enabled when the monitor icon isdisplayed.
To turn monitoring OFF, again press the monitorbutton.
Monitor Button
Select Button

13 Basic Radio Operation (cont.)
Failsoft Operation (Trunked SystemsOnly)
Note:
Failsoft capability can be programmed in thecodeplug.
The failsoft system ensures that you will continue tohave radio communications capability in case of trunkedsystem failure. During trunked operation, if the centraltrunking controller fails, the radio automaticallyswitches to "failsoft" operation according to predefinedcodeplug programming. Thus, your radio display showsFailsoft Mode or Failsoft Personality Mode (seedisplay). In "failsoft" operation your radio can transmitand receive on a conventional predetermined frequency,as opposed to trunked mode. When you are in failsoftoperation, you hear a faint beeping sound every tenseconds, your display shows the failsoft group and FS ifthe radio has been programmed for failsoft.
If the radio has been programmed for systemFailsoft (i.e one failsoft frequency for all talkgoupsin the system), then the display shows the system andFS.
Failsoft per Mode
Failsoft per Personality Mode

14 Basic Radio Operation (cont.)
Tx/Rx LED
Selecting a Mode
A mode is a trunking system or a conventional channelwith features slaved or programmed to it. Before you send orreceive calls, set the radio to the desired mode.
To select trunking system or conventional channels,press the or buttons. To select trunking talkgroup usethe channel selector group located on the top panel of theradio and rotate the knob to the desired location.
Receiving a Call
Conventional Modes
1. Turn the radio on and select the desired mode.
2. Listen until you hear activity, then adjust the volumecontrol for a comfortable listening level.
Note:
The squelch opening level setting may bereprogrammed at an authorized service facility.
3. Your radio is now set to receive calls on the selectedmode.
Trunked Systems
1. Turn the radio on and select the desired mode
2. Listen until you hear activity, then adjust the volumecontrol for a comfortable listening level.
3. Your radio is now set to receive calls on the selectedmode.

15 Basic Radio Operation (cont.)
Transmitting
Conventional Modes
1. Turn the radio on and select the desired mode.
2. Do not interrupt another user. If the mode on whichyou are transmitting is programmed to receive PL(Private Line) or DPL (Digital Private Line),ensure that the channel is not in use by listening toactivity. If the green LED is solid while receiving(PTT released), this will indicate that the channel iscurrently busy and you should not transmit.
3. When the channel is available, press and hold thePTT switch and speak slowly and clearly into themicrophone. The red Tx LED will light continuouslywhile the radio is transmitting. When you havefinished talking (transmitting), release the PTT tolisten (receive).
Note:
• If a mode is programmed for receive only, anyattempt to transmit on that mode will cause aninvalid-mode tone to sound until the PTT switchis released.
Trunked Systems
1. Turn the radio on and select the desired trunkedmode.
2. Press the PTT switch. Speak slowly and clearly intothe microphone area. The red Tx LED will lightwhile the radio is transmitting. When yourtransmission is completed, release the PTT to listen.
Notes:
• If you hear a busy tone (a low-frequency “bah-bah-bah-bah”), release the PTT switch andwait for a call-back tone (sounds like“di-di-dit”). When you hear the call-back tone you willhave three seconds to press the PTT switch,allowing you to make your call without gettinganother busy signal.
• If a continuous talk-prohibit tone is heard whenthe PTT switch is pressed, it means that theradio is out of range and you will not be able totransmit.
Rx/Tx
Rx/Tx

16 Scan Operation
Introduction
The scan feature allows you to monitor activity ondifferent conventional and trunked modes by scanninga “scan list” of modes. The radio can have only onescan list; it can contain up to eight different members(trunk and conventional). The modes to be scannedin a scan list can be programmed with the radioservice software (RSS) or by using the scan listprogramming/viewing option. Refer to the RSS manualfor detailed information:
• Talkgroup Scan—Includes conventional modesand trunked modes from more than one trunkingsystem. Priority of operation is not available inthis radio.
Turning Scan On/Off
1. To turn scan on, press the (Scan) button.
2. The scan status icon appears on the display,indicating that scan is active, and the radiobegins scanning. The scan annunciator willremain on until scan is turned off or if the radio isturned off.
3. To turn scanning off, press the (Scan) buttononce again.
4. The scan status annunciator turns off, indicatingthat scan is off, and the radio stops scanning.
Note:
• To initiate a call properly during scan mode,press PTT for a few seconds.
Deleting Nuisance Modes
While scanning, if you find that a certain mode isnoisy and disturbs, you can delete it temporarily fromthe scan list by pressing the select button when thedisplay shows the nuisance channel. As a result, theradio excludes this mode and continues to scan theremaining modes in the list. To include the deletedmode back into the scan list, exit and reenter scan.

17 Scan Operation
Talkback Delay
You may talkback during a detected activity for a pre-programmed (RSS) time period after the activity ends.After this time period, the radio will resume scan.
Scan List Programming/Viewing
If you desire to make changes in the scan list, followthe steps given below:
1. Press the menu button until “SCAn PrG” is displayed.
2. Press Select button located above the PTT switch.
3. Four beeps are sounded and display shows the defaulthome channel and the scan status. The scan iconindicates that the displayed mode is in the scan list.
4. To add a member or delete a member from the list,
press the select button. To scroll through active scan
members list, press (Scan) button; but to scroll
through all modes in the radio (trunk and
conventional) use the scroll or scroll button.
If you want to add a member to the list, and the list is
full, the radio indicates this with a medium beep.
5. When you have finished scan programming/viewing,press the (Home) button to exit.

18 Trunked Telephone Operation
General Information
The trunked telephone feature is similar to that of astandard telephone.
Receiving a Telephone Call - land to Mobile
1. When you receive a telephone call, you hear thetelephone ring and the characters PH will bedisplayed with the talkgroup currently in use.
2. Press the Phone button to answer the call. Thedisplay shows “PHonE”. Press the PTT switch totalk and release to listen.
Note:
• Incoming phone-call numbers are not stored inthe phone list.
3. If during the conversation you need DTMF overdial,
use the keypad. Use the scroll or button to
scroll through the list then press PTT switch to
send the numbers.
4. Press the PTT switch to talk and release to listen.
5 When you have finished your conversation, pressthe (Home) button to hang-up.
6. The radio will return to the Home display.

Calling the Last Number Dialed
1. Press the (Phone) button to make a phone call.
2. If the system access is successful, you will hear a dialtone and the last number dialed will be displayed.
Notes:
• If you are out of the trunked system range or thephone interconnect is out of service, “noPHonE” is displayed for six seconds after tryingto access the system, and a continuous low-pitched tone is emitted.
• If the trunked phone interconnect is in use, abusy tone sounds and “PH buSY” is displayed.If you hang up, you will lose your place in thequeue.
• This is a timed message. If you cannot access thetelephone system (no dial tone heard), you needto press the (Home) button to hang up, andstart again from step 1 of this procedure.
19 Trunked Telephone Operation (cont.)

20 Trunked Telephone Operation(cont.)
Calling the Last Number Dialed (cont.)
3. To redial the last number called, press the PTTswitch.
4. The telephone number will be sent out by pressingthe PTT switch, and you will hear tones as theyare being sent. After the complete number hasbeen dialed, you will hear either a busy tone orring tone. If you hear a busy tone, follow step 5given below.
5. When you have finished your conversation, or ifthe number you are calling is busy or there is noanswer, press the (Home) button to hang-up.
6. The radio will return to the home display.

21 Trunked Telephone Operation (cont.)
Calling a Stored Number using Direct Access
1. To make a phone call, press the (Phone)button.
2. Access will be displayed momentarily and then thelast dialed phone number.
Notes:
• If you are out of the trunked system range or thephone interconnect is out of service, “no PHonE” isdisplayed for six seconds after trying to access thesystem, and a continuous low-pitched tone isemitted.
• If the trunked phone interconnect is in use, a busytone sounds and “PH buSY” is displayed. If youhang up, you will lose your place in the queue.
• This is a timed message. If you cannot access thetelephone system (no dial tone heard), you need topress the to hang up, and start again fromstep 1 of this procedure.
Note:
• The display is able to accommodate eight digits. Ifthe last dialed number is more than eight digitsthen the first eight and the digits after the firsteight digits are displayed alternately.

22 Trunked Telephone Operation
Calling a Stored Number using Direct Access(cont.)
3. To scroll through the phone list, use the scroll orscroll button.
Upon entering the scroll option, use the direct entrywhich will take you to the direct location on the list.
4. When you have selected the member you wish to call,press the PTT switch.
5. When you have finished your conversation, or if thenumber you are calling is busy or there is no answer,press the (Home) button to hang-up.
6. The radio will return to the home display.

Storing A New Phone Number
1. To store a new telephone number, press (Menu)button, until “PHon PrG” appears on the display.
2. Press the Select button.
3. “PH LoC1” will be displayed momentarily, and thenthe phone number to indicate the first storednumber is selected.
4. Use the scroll up and scroll down buttons toscroll through the list or directly press your allotteddigit (0 through 9) for your required locationnumber.
5. After you have reached the memory location whereyou would like to store the number, press theSELECT button.
Note:
The factory default number or last stored numberwill be displayed
23 Trunked Telephone Operation(cont.)

24 Trunked Telephone Operation(cont.)
Storing A New Phone Number (cont.)
6. The new telephone number can now be enteredfrom the keypad, using any of the numeric (0 – 9)keys, as well as the “*” and “#” button. You canalso enter a pause in the telephone number byusing the button bearing the asterisk sign and
then the button bearing the pound sign.
7. The display changes to show the numbers as theyare being entered. 16 digits can be entered butonly 8 can be displayed.
Note:
• Once you have started entering numbers, the
(Menu) button will function as a delete key.
• When the last digit on the display has beenerased, an additional press of this key willcause a bad key chirp.
8. After dialing the desired number, press the selectbutton to store the new number. The display willfirst show the location number momentarily, andthen the new stored number.
Note:
• At this point another location/s can be changed byrepeating the steps 4 through 8.
9. When you have finished phone programming/viewing, press the (Home) button to exit.
10. The radio will return to the home display.

25 Trunked Private Conversation™Call Operation (800 MHz Only)
Introduction
The Private Conversation feature allows you to carryon a conversation that is heard only by two parties. Inthis feature, if you want to view the calling radio’s IDnumber before answering, press the (Call) button.
Answering a Private Conversation Call
1. When your radio receives a Private Conversationcall, you will hear two alert tones, the display willshow “1-A PC” and you will hear the caller.
2. Press the (Call) button. The display will showPC momentarily and then the incoming caller’s IDnumber.
CAUTION: If you press the PTT button beforeyou press the CALL button, the response willbe transmitted to everyone in the talkgroup(see dispatch mode operation).
Note:
When in home display mode, if the PTT is pressedbefore the repeater hang-up time, then the callremains a private call.
3. Press the PTT switch to carry on a PrivateConversation with the caller. The caller’s ID numberwill remain on the display for the duration of thecall.
Notes:
• If there is a delay in answering your incoming calland the system happens to be busy, then a busy tonewill be heard. When a channel becomes available,you will receive a call back tone, and your radioautomatically keys up for three seconds so that youcan start your conversation. Press PTT to talk.
• When the radio is Out of Range from the selectedTrunking site, a continuous low pitched tone is heard.
4. When you have finished your conversation, press the
(Home) button to return to the home display.

26 Trunked Private Conversation™Call Operation 800 MHz Only (cont.)
Calling the Last ID NumberTransmitted or Received
1. To call the last ID number transmitted or received,
press the (Call) button.
2. The display shows PC momentarily and then the lastcalled ID.
3. Press and hold the PTT switch to carry on a PrivateConversation.
Notes:
• If there is a delay in answering your incoming calland the system happens to be busy, then a busy tonewill be heard. When a channel becomes available,you will receive a call back tone, and your radioautomatically keys up for three seconds so that youcan start your conversation. Press PTT to talk.
• When the radio is Out of Range from the selectedTrunking site, a continuous low pitched tone is heard.
4. Pause for a second to allow the alert tone to sound inthe receiving radio, then begin talking. Speak slowlyand clearly into the microphone.
5. If the party you are calling does not respond, thenpress the (Home) button to exit the PrivateConversation feature and return to the home display.

27 Trunked Private Conversation™Call Operation 800 MHz only (cont.)
Direct Entry of the ID Number to be Called
1. Press the (Call) button to call the ID numberdirectly.
2. The display shows “PC” momentarily and thenchanges to show the last ID number transmitted orreceived or blank display with six dashes if last IDwas not stored. You can now enter the ID number tobe called.
3. Enter the new six-digit ID number using the keypad.
4. On the display, the old ID number disappears. Thenew digits appear as they are being entered. Thecursor shifts to the right to indicate the location ofthe next number to be entered.
Note:
• If you press PTT after entering an illegal IDnumber, then illegal tone is heard and thedisplay shows “iLLEG Id” . A few momentsafter the PTT is released, the illegal numberyou have entered will be displayed.
• Use (Backspace) button to delete thedisplayed digits. Use the keypad to enter thedesired number.

28 Trunked Private Conversation™Call Operation 800 MHz only (cont.)
Direct Entry of the ID Number to be Called(cont.)
5. Press the PTT switch. Wait for a second to allow thealert tone to sound in the receiving radio, then begintalking.
Notes:
• If there is a delay in answering your incoming calland the system happens to be busy, then a busy tonewill be heard. When a channel becomes available,you will receive a call back tone, and your radioautomatically keys up for three seconds so that youcan start your conversation. Press PTT to talk.
• When the radio is Out of Range from the selectedTrunking site, a continuous low pitched tone is heard.
6a. If the party you are calling does not respond, thenpress the (Home) button to exit the PrivateConversation feature.
or
6b. If the party you are calling does answer the call, youwill hear his/her voice.
7. Press the PTT switch to carry on a PrivateConversation with the called party.
8. When you have finished your conversation, or if the
radio you are calling does not answer or is not inservice, press the (Home) button; the radio willreturn to the home display.

29 Trunked Private Conversation™Call Operation 800 MHz only (cont.)
Scrolling to an ID Number in the Call List
1. To scroll to a certain ID number on thepreprogrammed call list, press the (Call) button toinitiate the Private Call feature.
Note:
• Each trunking system has its unique PC/Call Alertlist. The same list is shared by both PrivateConversation and Call Alert features.
2. The display shows “PC” momentarily and thenchanges to show the last ID number that wastransmitted or received, or blank display with sixdashes if the last ID was not stored. You can now enterthe ID number to be called.
3. To scroll through the call list, use the scroll orscroll button.
4. When scrolling through the list, first Id LoCx” (x canbe any location number from 1 to 8) is displayedmomentarily with the location number, and then theID number.
Note:
• The last location in the list bears the radio ID number.

Scrolling to an ID Number in the Call List (Cont.)
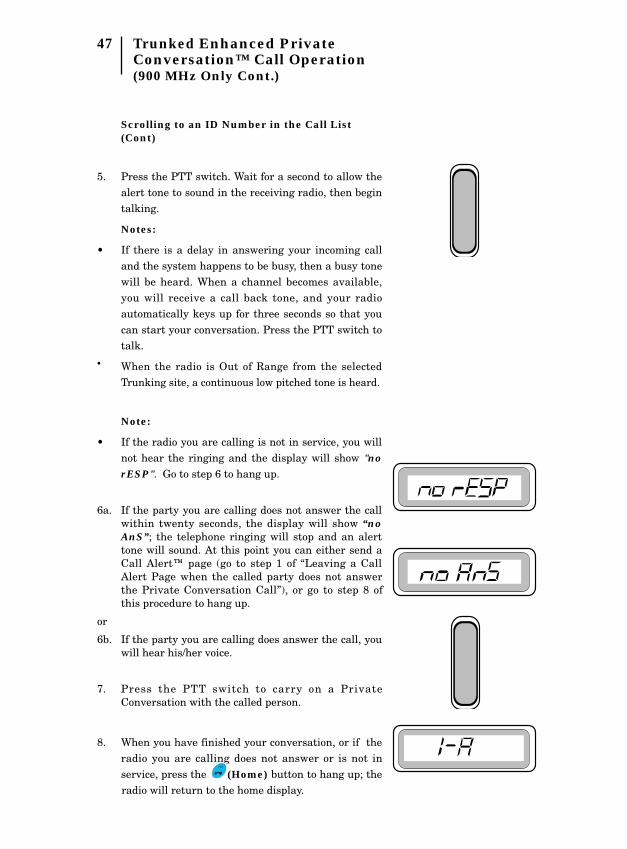
5. Press the PTT switch. Wait for a second to allow thealert tone to sound in the receiving radio, then begintalking.
Notes:
• If there is a delay in answering your incoming calland the system happens to be busy, then a busy tonewill be heard. When a channel becomes available,you will receive a call back tone, and your radioautomatically keys up for three seconds so that youcan start your conversation. Press the PTT switch totalk.
• When the radio is Out of Range from the selectedTrunking site, a continuous low pitched tone is heard.
6a. If the party you are calling does not respond, thenpress the (Home) button to exit the PrivateConversation feature.
or
6b. If the party you are calling does answer the call, youwill hear his/her voice.
7. Press the PTT switch to carry on a PrivateConversation with the called party.
8. Press the (Home) button after completing yourcall; the radio will return to the home display.
30 Trunked Private Conversation™Call Operation 800 MHz only (cont.)

Calling an ID Number at a Location in the Call List
1. You can also call an ID number at a particularlocation in the preprogrammed call list. To scroll to acertain ID number on the preprogrammed call list,press (Call) button to initiate the Private Callfeature.
2. The display shows “PC” momentarily and thenchanges to show the last ID number that wastransmitted or received, or blank display with sixdashes if the last ID was not stored. You can nowenter the ID number to be called.
3. To reach the required known location, enter the list,
and press scroll or scroll button. The scroll
button will take you forward to the first or next
member on the list; the scroll button will take you
backward to the last or previous member on the list.
Note:
• When scrolling through the list, first “Id LoCx” (xcan be any location number from 1 to 8) isdisplayed momentarily with the location number, andthen the ID number.
4. When “Id LoCx” is displayed, use keypad digits 1through 8 for the stored ID members location. Digit 9displays the owner’s ID and 0 the last ID.
31 Trunked Private Conversation™Call Operation 800 MHz only (cont.)

32 Trunked Private Conversation™Call Operation 800 MHz only (cont.)
Calling an ID Number at a Location in the Call List(Cont)
5. Press the PTT switch. Wait for a second to allow thealert tone to sound in the receiving radio, then begintalking.
Notes:
• If there is a delay in answering your incoming calland the system happens to be busy, then a busy tonewill be heard. When a channel becomes available,you will receive a call back tone, and your radioautomatically keys up for three seconds so that youcan start your conversation. Press PTT to talk.
• When the radio is Out of Range from the selectedTrunking site, a continuous low pitched tone is heard.
6a. If the party you are calling does not respond, thenpress the (Home) button to exit the PrivateConversation feature.
or
6b. If the party you are calling does answer the call, youwill hear his/her voice.
7. Press the PTT switch to carry on a PrivateConversation with the called party.
8. Press the (Home) button after completing yourcall; the radio will return to the home display.

33 Call Alert™ Page Operation
Introduction
The Call Alert page feature enables your radio tofunction like a pager (beeper) . Your radio (asprogrammed by the RSS) can receive and respond topages from other radios, and send pages to them.
Answering a Call Alert Page
1. When a Call Alert page is being received, you willhear a recurring four-beep tone until you answer thecall or reset the radio. The display will show “1-ACA”.
2. To terminate the call alert page, press the PTTswitch or any button from the keypad. The displaywill show the current talkgroup and the audible alertwill turn off. The ID number of the radio that pagedyou is stored as “the last ID number received”.

Sending a Call Alert to the Last IDNumber Transmitted or Received
1. To send a Call Alert to the last ID number
transmitted or received, press the (Call) button.
Note:
• If the radio is programmed with both Private Call(PC) or Call Alert (CA) features, then press the callbutton twice to enter the CA mode.
2. The display shows “CA” momentarily and then thelast ID number.
3. Press the PTT switch to send the ID number.
3a. If you hear one beep, it indicates that the ID numberhas been received by the system, the radio you arepaging is not on the air, and your radio remains inthe Call Alert mode. You can either go back to step 3and press the PTT switch to send the ID numberagain, or press the (Home) button to return tothe home display.
Note:
• If after six seconds the called radio fails toacknowledge the alert, a low-pitch alert tone soundsand the display changes to “no rESP”. You may trythis sequence again.
or
3b. If you hear five beeps, it indicates that the IDnumber has been received by the system, the radioyou are paging is on the air and has received yourpage. The display shows “SCC” momentarily andthe radio automatically returns to the home display.
34 Call Alert™ Page Operation(cont.)

Direct Entry of the ID Number to be C all AlertPaged
1. Press the (Call) button to directly enter the IDnumber to be called.
Note:
• If the radio is programmed with both Private Call(PC) or Call Alert (CA) features, then press the callbutton twice to enter the CA mode.
2. The display shows “CA” momentarily and then thelast ID number transmitted or received, or blankdisplay with six dashes if the last display was notstored. You can now enter the ID number to bepaged.
3. Enter the new six-digit ID number from the keypad.On the display, the old ID number disappears, andthe new digits appear as they are being entered. Thecursor flashes to indicate the location of the nextnumber to be entered.
Notes:
• If you press PTT after entering an illegal ID number,then illegal tone is heard and the display shows“iLLEG Id”. A few moments after the PTT isreleased, the illegal number you have entered will bedisplayed.
• Once you have started entering numbers, the(Backspace Delete) button will function as a
backspace key. Pressing this key will cause the lastdigit entered to be erased, and the cursor to move tothe left. When the last digit has been erased, anillegal tone will sound,
35 Call Alert™ Page Operation(cont.)

Direct Entry of the ID Number to be C all AlertPaged (Cont.)
4. Press the PTT switch to send the ID number.
5a. If you hear one beep, it indicates that the ID numberhas been received by the system, the radio you arepaging is not on the air, and your radio remains inthe Call Alert mode. You can either go back to step 3and press the PTT switch to send the ID numberagain, or press the (Home) button to return tothe home display.
Note:
• If after six seconds the called radio fails toacknowledge the alert, a low-pitch alert tone soundsand the display changes to “no rESP”. You may trythis sequence again.
or
5b. If you hear five beeps, it indicates that the IDnumber has been received by the system, the radioyou are paging is on the air and has received yourpage. The display shows “SCC” momentarily andthe radio automatically returns to the home display.
36 Call Alert™ Page Operation(cont.)

Scrolling to an ID Number in the Call List
1. To scroll to an ID number to be Call Alert paged from
the preprogrammed call list, press the (Call)
button.
Note:
• If the radio is programmed with both Private Call
(PC) or Call Alert (CA) features, then press the
(Call) button twice to enter the CA mode.
2. The display shows “CA” momentarily and then thelast ID number transmitted or received, or blankdisplay with six dashes if the last display was notstored. You can now scroll to the ID number in thecall list.
3. To enter the list, press scroll or scroll button.
The scroll button will take you forward to the
first or next member on the list; the scroll button
will take you backward to the last or previous
member on the list.
4. When scrolling through the list, first “Id LoCx” (xcan be any location number from 1 to 8) isdisplayed momentarily with the location number,and then the ID number.
Note:
• The last number in the list is the radio ID number.
5. Press the PTT to initiate the page.
6. To exit press the (Home) button.
37 Call Alert™ Page Operation(cont.)

Paging an ID Number at a Location in the CallList
1. You can also Call Alert page an ID number at aparticular location in the preprogrammed call list.
2. To page an ID number from the preprogrammed calllist, press the (Call) button.
Note:
• If the radio is programmed with both Private Call(PC) or Call Alert (CA) features, then press the callbutton twice to enter the CA mode.
3. The display shows “CA” momentarily and then thelast ID number transmitted or received, or blankdisplay with six dashes if the last display was notstored. You can now scroll to the ID number in thecall list.
4. The scroll button will take you forward to the
first or next member of the list; the scroll button
will take you backward to the last or previous
member of the list.
38 Call Alert™ Page Operation(cont.)

Paging an ID Number at a Location in the CallList (Cont.)
5. When scrolling through the list, first “Id LoCx” (xcan be any location number from 1 to 8) isdisplayed momentarily with the location number,and then the ID number.
Note:
• The last number in the list is the radio ID number.
6. When you have selected the member you wish to call,press the PTT switch. The display freezes to showthe selected member’s ID number which is to betransmitted.
or
6b. Press the (Home) button to exit.
39 Call Alert™ Page Operation(cont.)

40 Call Alert™ Page Operation(cont.)
Paging an ID Number at a Location in the CallList (Cont.)
7a. If you hear one beep, it indicates that the ID numberhas been received by the system, the radio you arepaging is not on the air, and your radio remains inthe Call Alert mode. You can either go back to step 3and press PTT switch to send the ID number again,or press the (Home) button to return to thehome display.
Note:
If after six seconds the called radio fails toacknowledge the alert, a low-pitch alert tone soundsand the display changes to “no rESP” You may trythis sequence again.
or
7b. If you hear five beeps, it indicates that the IDnumber has been received by the system, the radioyou are paging is on the air and has received yourpage. The display shows “SCC” momentarily andthe radio automatically returns to the home display.

41 Trunked Enhanced PrivateConversation™ Call Operation(900 MHz Only)
Introduction
As with regular telephone call, conversation in antrunked enhanced private conversation call is heard onlyby the called party. With this feature, you are able todetermine whether the radio you are calling is in service.If the called party does not answer your call, then you canchoose to leave your radio’s ID (via call alert) so that youcan be called back.
Answering a Trunked Enhanced PrivateConversation Call
1. When your radio receives a Trunked EnhancedPrivate Conversation call, your display will show“I-APC” . Your radio will sound two beeps to indicate acall being received. You will have 20 seconds toanswer the call before the radio automaticallyreturns to the home display.
2. Press the (Call) button. The display will showthe incoming caller ’s ID number, and the callreceived annunciator will turn off. After viewing thecaller’s ID number, you can decide to either talkprivately (go to step 3), or not answer the call byletting the remainder of the 20 seconds elapse andreturning to the home display.
Note:
• If you press the PTT switch before you press the
(Call) button, the response will be transmitted
to everyone in the talkgroup.

Answering a Trunked Enhanced PrivateConversation Call (Cont.)
3. If you decide to answer the call, press the PTTswitch to carry on a Private Conversation with thecaller. The caller’s ID number will remain on thedisplay for the duration of the call.
4. When you have finished your conversation, press the(Home) button or the call response button to
hang up; the radio will return to the home display.
42 Trunked Enhanced PrivateConversation™ Call Operation(900 MHz Only Cont.)

Enhanced calling the Last ID NumberTransmitted or Received
1. To call the last ID number transmitted or received,press the (Call) button.
2. The display will show “PC” momentarily and thenthe last ID or “------” if there is no last ID.
3. Press the PTT switch: the ID number is transmitted.If the radio you are calling is on the air, you will heartelephone type ring for 20 seconds, or until the calledradio answers the call.
Note:
If the radio you are calling is not in service, you willnot hear the ringing and the display will show "norESP". Go to step 6 to hang up.
4a. If the party you are calling does not answer the callwithin twenty seconds, the display will show “noAnS”; the telephone ringing will stop and an alerttone will sound. At this point you can either send aCall Alert™ page (go to step 1 of “Leaving a CallAlert Page when the called party does not answerthe Private Conversation Call”), or go to step 6 ofthis procedure to hang up.
or
4b. If the party you are calling does answer the call, youwill hear his/her voice.
5. Press the PTT switch to carry on a PrivateConversation with the called person.
6. When you have finished your conversation, or if the
radio you are calling does not answer or is not in
service, press the (Home) button to hang up; the
radio will return to the home display.
43 Trunked Enhanced PrivateConversation™ Call Operation(900 MHz Only Cont.)

Direct Entry of the ID Number to be Called
1. Press the (Call) button to call the ID numberdirectly.
2. The display shows “PC” momentarily and thenchanges to show the last ID number transmitted orreceived or blank display with six dashes if last IDwas not stored. You can now enter the ID number tobe called.
3. Enter the new six-digit ID number using the keypad.
4. On the display, the old ID number disappears. Thenew digits appear as they are being entered. Thecursor shifts to the right to indicate the location ofthe next number to be entered.
Note:
• If you press PTT after entering an illegal ID numberthen illegal tone is heard and the display shows“iLLEG Id” . A few moments after the PTT isreleased, the illegal number you have entered will bedisplayed.
• Use (Backspace) button to delete thedisplayed digits. Use the keypad to enter thedesired number.
44 Trunked Enhanced PrivateConversation™ Call Operation(900 MHz Only Cont.)

Direct Entry of the ID Number to be Called(Cont.)
5. Press the PTT switch. Wait for a second to allow thealert tone to sound in the receiving radio, then begintalking.
Notes:
• If there is a delay in answering your incoming calland the system happens to be busy, then a busy tonewill be heard. When a channel becomes available,you will receive a call back tone, and your radioautomatically keys up for three seconds so that youcan start your conversation. Press PTT to talk.
• When the radio is Out of Range from the selectedTrunking site, a continuous low pitched tone is heard.
Note:
If the radio you are calling is not in service, you willnot hear the ringing and the display will show "norESP". Go to step 6 to hang up.
6a. If the party you are calling does not answer the callwithin twenty seconds, the display will show “noAnS”; the telephone ringing will stop and an alerttone will sound. At this point you can either send aCall Alert™ page (go to step 1 of “Leaving a CallAlert Page when the called party does not answerthe Private Conversation Call”), or go to step 8 ofthis procedure to hang up.
or
6b. If the party you are calling does answer the call, youwill hear his/her voice.
7. Press the PTT switch to carry on a PrivateConversation with the called person.
8. When you have finished your conversation, or if the
radio you are calling does not answer or is not in
service, press the (Home) button to hang up; the
radio will return to the home display.
45 Trunked Enhanced PrivateConversation™ Call Operation(900 MHz Only Cont.)

Scrolling to an ID Number in the Call List
1. To scroll to a certain ID number on thepreprogrammed call list, press the (Call) buttonto initiate the Enhanced Private Call feature.
Note:
• Each trunking system has its unique EPC/CallAlert list. The same list is shared by both PrivateConversation and Call Alert features.
2. The display shows “PC” momentarily and thenchanges to show the last ID number that wastransmitted or received, or blank display with sixdashes if the last ID was not stored. You can nowenter the ID number to be called.
3. To scroll through the call list, use the scroll orscroll button.
4. When scrolling through the list, first “Id LoCx” (xcan be any location number from 1 to 8)isdisplayed momentarily with the location number,and then the ID number.
Note:
• The last location in the list bears the radio IDnumber.
46 Trunked Enhanced PrivateConversation™ Call Operation(900 MHz Only Cont.)
Scrolling to an ID Number in the Call List(Cont)
5. Press the PTT switch. Wait for a second to allow thealert tone to sound in the receiving radio, then begintalking.
Notes:
• If there is a delay in answering your incoming calland the system happens to be busy, then a busy tonewill be heard. When a channel becomes available,you will receive a call back tone, and your radioautomatically keys up for three seconds so that youcan start your conversation. Press the PTT switch totalk.
• When the radio is Out of Range from the selectedTrunking site, a continuous low pitched tone is heard.
Note:
• If the radio you are calling is not in service, you willnot hear the ringing and the display will show "norESP". Go to step 6 to hang up.
6a. If the party you are calling does not answer the callwithin twenty seconds, the display will show “noAnS”; the telephone ringing will stop and an alerttone will sound. At this point you can either send aCall Alert™ page (go to step 1 of “Leaving a CallAlert Page when the called party does not answerthe Private Conversation Call”), or go to step 8 ofthis procedure to hang up.
or
6b. If the party you are calling does answer the call, youwill hear his/her voice.
7. Press the PTT switch to carry on a PrivateConversation with the called person.
8. When you have finished your conversation, or if theradio you are calling does not answer or is not inservice, press the (Home) button to hang up; theradio will return to the home display.
47 Trunked Enhanced PrivateConversation™ Call Operation(900 MHz Only Cont.)

Calling an ID Number at a Location in the CallList
1. You can also call an ID number at a particularlocation in the preprogrammed call list. To scroll to acertain ID number on the preprogrammed call list,press (Call) button to initiate the EnhancedPrivate Call feature.
2. The display shows “PC” momentarily and thenchanges to show the last ID number that wastransmitted or received, or blank display with sixdashes if the last ID was not stored. You can nowenter the ID number to be called.
3. To reach the required known location, enter the list,
and press scroll or scroll button. The Scroll
button will take you forward to the first or next
member on the list; the scroll button will take
you backward to the last or previous member on the
list.
Note:
• When scrolling through the list, first “Id LoCx” (xcan be any location number from 1 to 8)isdisplayed momentarily with the location number,and then the ID number.
4. When “Id LoC” is displayed, use keypad digits 1through 8 for the stored ID members location. Digit9 displays the owner’s ID and 0 the last ID.
48 Trunked Enhanced PrivateConversation™ Call Operation(900 MHz Only Cont.)

Calling an ID Number at a Location in the CallList (Cont.)
5. Press the PTT switch. Wait for a second to allow thealert tone to sound in the receiving radio, then begintalking.
Notes:
• If there is a delay in answering your incoming calland the system happens to be busy, then a busy tonewill be heard. When a channel becomes available,you will receive a call back tone, and your radioautomatically keys up for three seconds so that youcan start your conversation. Press PTT to talk.
• When the radio is Out of Range from the selectedTrunking site, a continuous low pitched tone is heard.
Note:
• If the radio you are calling is not in service, you willnot hear the ringing and the display will show "norESP". Go to step 6 to hang up.
6a. If the party you are calling does not answer the callwithin twenty seconds, the display will show “noAnS”; the telephone ringing will stop and an alerttone will sound. At this point you can either send aCall Alert™ page (go to step 1 of “Leaving a CallAlert Page when the called party does not answerthe Private Conversation Call”), or go to step 8 ofthis procedure to hang up.
or
6b. If the party you are calling does answer the call, youwill hear his/her voice.
7. Press the PTT switch to carry on a PrivateConversation with the called person.
8. When you have finished your conversation, or if the
radio you are calling does not answer or is not in
service, press the (Home) button to hang up; the
radio will return to the home display.
49 Trunked Enhanced PrivateConversation™ Call Operation(900 MHz Only Cont.)

Leaving Call Alert Page When Called PartyDoes Not Answer
1. If the party you are private calling does not answerthe call within twenty seconds, the display will show“no AnS”; the telephone ringing will stop and analert tone will sound. At this point you can send aCall Alert™ page to the party you are calling. Thiswill leave your radio’s ID number with the calledradio so that you can be called back later.
2. Press the PTT switch to send the Call Alert page.You will hear five beeps to indicate that the numberhas been received by the system, the radio you arepaging is on the air and has received your page. Thedisplay shows “SCC” momentarily and the radioautomatically returns to the home display. For moredetails see the Call Alert Page Operation on page 33.
3. Press the HOME key and the radio will return to thehome display
Note:• Once engaged in a private conversation, if the radio
is left idle for more than one minute, a momentarywarning alert will sound every six seconds to remindyou that dispatch calls are not being heard. Aftertwo minutes, a permanent invalid mode tone will beheard.
50 Trunked Enhanced PrivateConversation™ Call Operation(900 MHz Only Cont.)

SmartZoneTM Operation
GTX portables have the ability to operate onspecially equipped Type II systems for roaming, mostcommonly referred to as SmartzoneTM
.
• SmartZone - provides an efficient use of channelresources. Efficient channel utilization is achievedvia a new capability called Dynamic Site Assignment.This capability provides for the keying of a voicechannel only at the sites necessary to reach thetalkgroup members in a group call or individuals inselective calls.
• SmartZone - supports Private Conversation, CallAlert and Telephone Interconnect. SinceSmartZone
TMsupports 48,000 unique IDs, the normal
type II ID is used to make calls across differentsystems.
• Automatic Site Registration
Smartzone radios have a new feature called SiteRegistration. This feature enables the radio toautomatically send in its talkgroup affiliation andtalkgroup ID whenever it changes sites. The siteregistration information, along with a knowledge ofthe site of its origin, enables the SmartZone systemto know where all active members of a talkgroup arelocated. This feature allows the SmartZone system toassign a channel only at the sites necessary to reachall active talkgroup members.
51 Roaming Capability

Locking and Unlocking a Site
1. If the radio is programmed to include SmartZone orAMSS, it requires to designate the site from which itshould start operating on the system. To do so, choosethe proper mode from the mode list.
2. To verify whether the radio is presently locked onto
the site, press the (Menu) button. “SitE L” or
“Site uL” is displayed.
3. If you wish to lock on a specific site, verify “SitE L”appears on the display.
4. Press the Select button. The display automaticallyreverts to the home display.
5. If you wish to unlock a specific site, verify that " SitEuL" appear on the display. To change the selection,press the Select button. As a result, the radio willunlock the required site.
Forcing a Site Change
1. Repeatedly press the menu button until “ForCd SS “is displayed.
2. Press the select button.
3. The radio starts searching for a new site and thedisplay reverts to the home display.
AMSS Feature
AMSS feature is available either in the automatic(unlocked) or manual (locked) mode. In the automaticmode, the radio switches as it goes out of range of thesystem and another system comes within range. In themanual mode, the site used is the site that is selectedwhen you have entered the manual mode. A forced sitesearch (FSS) can be initiated either in the automatic ormanual mode.
52 Roaming Capability(cont.)

Conventional Phone Operation Feature
The conventional telephone feature allows you to useyour conventional radio similar to a standard telephone.
• To make a call, press the (Phone) button. Thedisplay will show PH with the current conventionalsystem.
• In this mode, for every number entered from thekeypad including * and # buttons, the correspondingDTMF tone will be sent.
• Type the relevant access code to enter the telephonesystem. If the access is successful, you will hear dialtone.
• Dial the required telephone number. Each digit issent on each key press.
• If the calling party answers, carry on with theconversation in the usual way. Press the PTT to talkand release the PTT to listen.
• When you have completed your conversation, or if thenumber you have dialed is busy, or does not answer,press the (Home) button to hang up.
53 Conventional Phone Operation

Battery Information
The GTX portable radio receives its power (7.5Vdc)from a rechargeable nickel-cadmium battery. This batteryis a safe, dependable power source for your radio. Propercare of the battery will ensure its effectiveness and allowfor peak radio performance.
Recharging Nickel-Cadmium Batteries
Recharge the battery before use to ensure optimumcapacity and performance. The battery is designedspecifically to be used with a Motorola charger. Chargingwith non-Motorola equipment may lead to battery damageand void the battery warranty.
Note: When charging with the battery attached to theradio, turn the radio off to ensure a full charge.
WARNING: Do not attempt to change or chargethe battery in a hazardous atmosphere.
Charging Temperature
The battery should be at about 77°F (roomtemperature) whenever possible. Charging a cold battery(below 50° F) may result in leakage of electrolyte, andultimately, in failure of the battery. Charging a hot battery(above 95°F) results in reduced discharge capacity,affecting the performance of the radio.
Short Circuit
Care should be taken to avoid external shortcircuiting of the battery.
WARNING: A sustained high-rate discharge (forexample, a paper clip placed accidentally acrossthe battery contacts) may permanently damagethe battery, void the battery warranty, andcreate a burn or fire hazard.
Memory Effect (Reduced Charge Capacity)
Memory effect is a phenomenon caused by temporaryloss in battery capacity or voltage due to repetitive shallowdischarging or long-term overcharging. This memory effecthas been virtually eliminated from Motorola batteries bythe use of new cell technology.
54 Batteries and Accessories

Rechargeable Battery Care
These battery tips will help assure you the highestperformance and longest cycle life from your Motorolarechargeable battery.
• Charge your new battery overnight (14-16 hours)before using it. This is referred to as "initializing"and will enable you to obtain maximum batterycapacity.
• New batteries can be stored up to two years withoutsignificant cycle loss.
• Store new/unused batteries at room temperature in acool dry area.
• Batteries which have been in storage should becharged overnight.
• When using a Motorola rapid charger, leave battery incharger for an additional 1-2 hours after the greenlight appears.
• Do Not leave your radio & battery in the chargerwhen not charging. Continuous charging will shortenbattery life. (Don't use your charger as a radio stand).
• Only charge batteries when they need it. If it isn'tfully discharged, don't recharge it. (We recommendyou purchase a second battery for multiple/longerduty cycle applications).
• Do not return fully charged batteries to the chargerfor an "extra boost". This action will significantlyreduce cycle life.
• Stabilize battery to room temperature (72 degreesFahrenheit) before charging. Charging below 40degrees Fahrenheit and above 104 degreesFahrenheit will decrease cycle life.
• For optimum battery life and operation use onlyMotorola brand chargers. They were designed tooperate as an integrated energy system.
• These simple instructions protect your rechargeablebatteries from extreme temperatures and enhancetheir performance and life.
55 Batteries and Accessories(cont.)

Battery Disposal
For disposal, nickel-cadmium sealed rechargeablebatteries should be delivered to an authorized metalsreclamation dealer, or returned to Motorola.
Nickel-metal-hydride batteries, although theycontain no designated toxic metals, are recommended tobe disposed of through an authorized metals reclamationdealer.
WARNING: Do not dispose of any batteries in afire, as they may explode!This product is powered by a nickel-cadmium
rechargeable battery. At the end of its useful life, thebattery can be recycled. However, recycling facilities maynot be available in all areas. Under various state or locallaws, the battery must be recycled or disposed of properly,and cannot be disposed of in landfills or incinerators.
In addition, U.S. Environmental Protection Agency(EPA) regulations classify used nickel-cadmium batteriesas hazardous waste, unless certain exemptions apply.
Motorola fully endorses and encourages therecycling of nickel-cadmium batteries. You can ship,postpaid, your used Motorola nickel-cadmium batteries toINMETCO, an EPA-approved recycling facility, at theaddress given on the next page. Should you have anyquestions, contact the facility first.
Consideration should be given to the methods ofcollecting, labeling, and shipping used nickel-cadmiumbatteries. Your federal, state, or local EPA should beconsulted for specific requirements and for recyclingoptions in your area.
Motorola, as a responsible corporate citizen, hasalways been concerned with the protection of theenvironment. For further information, you may call theMotorola America’s Parts Division, Customer ServiceDepartment,toll-free at 1-800-422-4210.
Nickel-Cadmium Battery Recycling Facility
INMETCO, Bin #M1P.O. Box 7202
245 Pottersville RoadEllwood City, PA 16117Phone: (412) 758-2800
Fax: (412) 758-9311For additional information on Motorola’s batteries,
write to:Motorola
Energy Products DivisionCustomer Care Department
1700 Belle Meade CourtLawrenceville, GA 30243-5854
56 Batteries and Accessories (cont.)

List of Accessories
Chargers
HTN9630 Single Unit, Rapid Charger 110 Volts
HTN9802 Single Unit, Rapid Charger, European Plug, 220 Volts
HTN9803 Single Unit, Rapid Charger, UK Plug, 240 Volts
HTN9702 Single Unit, Standard Charger, 110 Volts
HTN9804 Single Unit, Standard Charger, European Plug,220 Volts
HTN9805 Single Unit, Standard Charger, UK Plug, 240 VoltsHLN9719 Vehicular Chargers, Adapter/Bracket 12 Volts for use
with Single Unit Rapid Chargers
HLN9748 Multiple Unit, Rapid Charger 110 Volts.
HLN9811 Multiple Unit, Rapid Charger, European Plug, 220 Volts
HLN9812 Multiple Unit, Rapid Charger, UK Plug, 240 Volts
HLN9944 Wall Mounting Bracket for Multiple Unit Chargers\
Antennas
NAF5042 806-941 MHz 1/4 Wavelength Whip
NAF5037 806-870 MHz 1/2 Wavelength Whip
NAF5038 896-941 MHz 1/2 Wavelength Whip (Flex)
Batteries
HNN9628 1200 mAH Standard Battery
HNN9701 1200 mAH Fully Approved Factory Mutual Battery
HNN8308 600 mAH Slim Battery
HNN9808 600 mAH Fully Approved Factory Mutual Slim Battery
57 Batteries and Accessories (cont.)

58 Batteries and Accessories (cont.)
List of Accessories (Cont.)
Carrying Accessories
HLN9428 DTMF Standard Leather Carry Case w/Belt Loop
HLN9750 Nylon Belt Loop Carry Case for High Capacity Battery
HLN9421 DTMF Standard Leather Carry Case w/Swivel
HLN9076 Standard Molded Carry Holder with Belt Clip
HLN9429 DTMF Leather Carry Case w/Belt Loop for Fully Approved FM1200 mAH Battery
HLN9426 DTMF Leather Carry Case w/Swivel for Fully Approved FM1200 mAH Battery
HLN9149 Swivel Belt Loop Adapter for Use with Carry Cases HLN9750.
HLN9427 DTMF Leather Carry Case w/Swivel for Fully Approved FM 600mAH Battery
HLN9431 DTMF Leather Carry Case w/Belt Loop for Fully Approved FM600 mAH Battery
TDN1002 Swiveller- includes holster, belt and strap
HLN8255 Spring Action 3" Belt Clip
NTN5243AR Shoulder Strap (for use with all Carry Cases)
Audio Accessories
HMN9725DR Remote Speaker Microphone w/Coil Cord and Clip Back
HMN9727BR Earpiece w/out Volume Control
HMN9752BR Earpiece w/Volume Control
HMN9754DR 2-piece Surveillance Microphone, PTT and Microphone arecombined in 1 piece
BDN6720 Ear Receiver w/GP300 style connector
BDN6706 Ear Receiver w/vox
FLN8660 Accessories Clamp Plug

59 General Information
Transmitting Distance
Several conditions determine the distance that your radio will transmit a cleardata/voice communication. The following list describes many conditions and theirtypical affect on your radio's transmitting distance.
radio's power more power longer distanceradio's tuning properly tuned radio (on frequency, more power) longer distancestormy weather adverse atmospheric conditions shorter distanceat sea better ground plane (clearer line-of-sight) longer distancecity large/tall buildings (interference problems) shorter distancein a building structural boundaries (interference problems) shorter distanceon a tall building's roof less interference (clearer line-of-sight) longer distancein a subway below ground level (interference problems) shorter distanceon top of a hill less interference (clear line-of-sight) longer distanceintervening hills more interference (no line-of-sight) shorter distanceinside a vehicle metal structure (interference problems) shorter distance
Radio Care
Cleaning
Clean external surfaces of the radio with a mild detergent and a stiff, non-metallic, short-bristled brush. A suitable detergent solution may be mixed by addingone teaspoon of mild dishwashing detergent to one gallon of water (0.5% solution).Apply the detergent solution sparingly with the brush, being careful not to allowexcess detergent to remain entrapped near connectors and controls or in cracks andcrevices. Do not submerse the radio in the detergent solution. Dry the radiothoroughly with a soft, lint-free cloth.
Clean all battery contacts with a lint-free cloth to remove dirt, grease, or otherforeign material that may prevent good electrical connections.
Handling
• Do not handle the radio roughly; do not pound, drop, or throw the radio.Do not carry the radio by the antenna.
• Avoid subjecting the radio to an excess of liquids. Never allow the radio tobecome submersed.
• Avoid subjecting the radio to corrosives, solvents, or spirits.
CAUTION
Clean the radio with the recommended solution only. Cleaning the radiowith solvents or spirits may be harmful and permanently damage theradio housing.
Do not disassemble the radio in any way. Keep the connector cover in placeuntil ready to use the accessory connector. Replace the cover immediately after theaccessory has been disconnected.

Safety Standards The Federal Communications Commission (FCC),
has adopted a safety standard for human exposure toradio frequency electromagnetic energy emitted by FCCregulated equipment. Motorola subscribes to the samesafety standard for the use of its products. Properoperation of this radio will result in user exposuresubstantially below FCC recommended limits:
• Do not hold the radio with the antenna veryclose to, or touching, exposed parts of the body,especially the face, ears, or eyes, whiletransmitting. Hold the radio in a verticalposition with the microphone two to threeinches away from the lips.
• Do not hold the transmit switch (PTT) on whennot actually desiring to transmit.
• Do not allow children to play with any radioequipment containing a transmitter.
• Do not operate this equipment near electricalblasting caps or in an explosive atmosphere.Under certain conditions, radios can interferewith blasting operations. When you are in thevicinity of construction work, look for, andobserve, signs cautioning against radiotransmission. If radio transmission isprohibited, you must not transmit until out ofthe area. Furthermore, you must turn off yourradio to prevent any accidental transmission.
• Do not replace or charge batteries in ahazardous atmosphere. Contact sparking mayoccur while installing or removing batteries andcause an explosion.
• Turn radio off when removing or installing abattery.
60 General Information (cont.)

61 General Information (cont.)
Important Safety Information: Intrinsically Safe Radios
FMRC Approved Equipment
Anyone intending to use a radio in a location where hazardous concentrationsof flammable material exist (hazardous atmosphere) is advised to become familiarwith the subject of intrinsic safety and with the National Electric Code NFPA 70(National Fire Protection Association) Article 500 (hazardous [classified] locations).
An Approval Guide, issued by Factory Mutual Research Corporation (FMRC),lists manufacturers and the products approved by FMRC for use in such locations.FMRC has also issued a voluntary approval standard for repair service (“ClassNumber 3605").
FMRC Approval labels are attached to the radio to identify the unit as beingFM Approved for specified hazardous atmospheres. This label specifies thehazardous Class/Division/Group along with the part number of the battery thatmust be used. Their Approval mark is shown below.
WARNING
Do not operate radio communications equipment in a hazardousatmosphere unless it is a type especially qualified (e.g. FMRCApproved) for such use. An explosion or fire may result.
Do not operate the FMRC Approved Product in a hazardousatmosphere if it has been physically damaged (e.g. cracked housing).An explosion or fire may result.
Do not replace or charge batteries in a hazardous atmosphere. Contactsparking may occur while installing or removing batteries and causean explosion or fire.
Do not replace or change accessories in a hazardous atmosphere.Contact sparking may occur while installing or removing accessoriesand cause an explosion or fire.
Do not operate the FMRC Approved Product unit in a hazardouslocation with the accessory contacts exposed. Keep the connectorcover in place when accessories are not used.
Turn radio off before removing or installing a battery or accessory.
Do not disassemble the FMRC Approved Product unit in any way thatexposes the internal electrical circuits of the unit.
FM
APPROVED

Important Safety Information: Intrinsically Safe Radios (cont.)
Radios must ship from the Motorola manufacturing facility with the hazardousatmosphere capability and FM Approval labeling. Radios will not be “upgraded” tothis capability and labeled in the field. A modification changes the unit's hardwarefrom its original design configuration. Modifications can only be done by the originalproduct manufacturer at one of its FMRC audited manufacturing facilities.
WARNING:Failure to use an FMRC Approved Product unit with an FMRCApproved battery or FMRC Approved accessories specificallyapproved for that product may result in the dangerously unsafecondition of an unapproved radio combination being used in ahazardous location.
Unauthorized or incorrect modification of an FMRC ApprovedProduct unit will negate the Approval rating of the product.
Repair of FMRC Approved ProductsREPAIRS FOR MOTOROLA FMRC APPROVED PRODUCTS ARE THERESPONSIBILITY OF THE USER. You should not repair or relabel any Motorola manufactured communication
equipment bearing the FMRC Approval label (“FMRC Approved Product”) unlessyou are familiar with the current FMRC Approval Standard for repair service(“Class Number 3605").
You may want to consider using a repair facility that operates under 3605repair service approval.
WARNING:Incorrect repair or relabeling of any FMRC Approved Product unitcould adversely affect the Approval rating of the unit.
Use of a radio that is not intrinsically safe in a hazardous atmospherecould result in serious injury or death.
FMRC's Approval Standard Class Number 3605 is subject to change at anytime without notice to you, so you may want to obtain a current copy of 3605 fromFMRC. Per the December, 1994 publication of 3605, some key definitions andservice requirements are as follows.
Repair A repair constitutes something done internally to the unit that would bring it
back to its original condition Approved by FMRC. A repair should be done in anFMRC Approved facility. Items not considered as repairs are those in which an action is performed on a unitwhich does not require the outer casing of the unit to be opened in a manner whichexposes the internal electrical circuits of the unit. You do not have to be an FMRCApproved Repair Facility to perform these actions.
RelabelingThe repair facility shall have a method by which the replacement of FMRC
Approval labels are controlled to ensure that any relabeling is limited to units thatwere originally shipped from the Manufacturer with an FM Approval label in place.FMRC Approval labels shall not be stocked by the repair facility. An FMRCApproval label shall be ordered from the original manufacturer as needed to
62 General Information(cont.)

Important Safety Information: Intrinsically Safe Radios (cont.)
repair a specific unit. Replacement labels may be obtained and applied by the repairfacility providing satisfactory evidence that the unit being relabeled was originallyan FMRC Approved unit. Verification may include, but is not limited to: a unit witha damaged Approval label, a unit with a defective housing displaying an Approvallabel, or a customer invoice indicating the serial number of the unit and purchase ofan FMRC Approved model.
Do Not Substitute Options or AccessoriesThe communications equipment package that Motorola submits to FMRC for
testing and approval is tested as a system that consists of the communications unititself and the battery, antenna and other options or accessories that make up therest of the package to be approved. This approved package must be strictly observedand there must be no substitution of items, even if the substitute you wanted toconsider appears as an approved accessory elsewhere in the Guide for some othercommunications equipment unit. Approved configurations are listed by FMRCApproved Product in the annual Approval Guide published by FMRC. That guide,and the Approval Standard Class Number 3605 document, can be ordered from thefollowing address.
Training Resource Center, Publications-Order Processing Dept. Factory Mutual Engineering and Research
1151 Boston-Providence TurnpikePO Box 9102
Norwood, MA, 02062telephone (617) 762-4300
RestrictionsBecause this radio contains a transmitter, federal law prohibits unauthorized,
non-licensed personnel from adjusting or maintaining it. If any operationaldifficulties should arise while using this product, report them to authorized servicepersonnel as soon as possible.
WARNING Do not attempt any unauthorized modification to the radioor accessories.
Airbag Warning StatementWARNING: VEHICLES EQUIPPED WITH AIR BAGSAn air bag inflates with great force. DO NOT place objects, includingcommunication equipment, in the area over the air bag or in the airbag deployment area. If the communication equipment is improperlyinstalled and the air bag inflates, this could cause serious injury.
Installation of vehicle communication equipment should be performed by aprofessional installer/technician qualified in the requirements for such installations.An air bag’s size, shape and deployment area can vary by vehicle make, model andfront compartment configuration (e.g., bench seat vs. bucket seats).
Contact the vehicle manufacturer’s corporate headquarters, if necessary, forspecific air bag information for the vehicle make, model and front compartmentconfiguration involved in your communication equipment installation.
63 General Information(cont.)
Read This Information Before Using Your Radio
• Antenna Care and Replacement
Do not use the radio with a damaged antenna. If a damaged antennacomes into contact with the skin, a minor burn may result. Replace adamaged antenna immediately. Use only the supplied or approvedantenna. Unauthorized antennas, modifications, or attachments coulddamage the radio and may violate FCC regulations.
• Driving
Check the laws and regulations on the use of communication devices inthe areas where you drive. Always obey them. Also, when using yourmobile while driving, please:
• give full attention to driving,
• use hands-free operation, if available, and
• pull off the road and park before making or
answering a call if driving conditions so require.
• Electronic Devices
Most modern electronic equipment – for example, equipment inhospitals and cars – is shielded from RF energy. However, RF energyfrom your radio may affect some electronic equipment.
Consult your physician or the manufacturer of any personal medicaldevices (such as pacemakers, hearing aids, etc.) to determine if they areadequately shielded from external RF energy. The operation ofinadequately shielded medical devices may be adversely affected when aradio is ON.
Turn your radio OFF in health care facilities when any regulationsposted in the areas instruct you to do so. Always request permissionbefore using your radio near medical equipment.
RF energy may affect some electronic systems in motor vehicles. Checkwith your vehicle manufacturer’s representative to be sure your radiowill not affect the electronic system of your vehicle.
64 General Information(cont.)

• Aircraft
Turn your radio OFF before boarding any aircraft.
• Use it on the ground only with crew permission.
• Do not use in the air.
To prevent possible interference with aircraft systems, Federal AviationAdministration (FAA) regulations require you to have permission from acrew member to use your radio while the plane is on the ground. Toprevent interference with FCC regulations prohibit using your radio whilethe plane is in the air.
• Children
Do not allow children to play with your radio. It is not a toy. Childrencould hurt themselves or others (by poking themselves or others in the eyewith the antenna, for example). Children also could damage the radio.
• Blasting Areas
To avoid interfering with blasting operations, turn your radio OFF whenin a “blasting area” or in areas posted: “turn off two-way radio.”Construction crews often use remote-control RF devices to set offexplosives.
• Potentially Explosive Atmospheres
Turn your radio OFF when in any area with a potentially explosiveatmosphere. It is rare, but your radio or its accessories could generatesparks. Sparks in such areas could cause an explosion or fire resulting inbodily injury or even death.
Areas with a potentially explosive atmosphere are often, but not always,clearly marked. They include: fueling areas such as gas stations, belowdeck on boats, fuel or chemical transfer or storage facilities, and areaswhere the air contains chemicals or particles, such as grain, dust, or metalpowders.
Do not transport or store flammable gas, liquid, or explosives in thecompartment of your vehicle which contains your radio or accessories.
Vehicles powered by liquefied petroleum gas (such as propane or butane)must comply with the National Fire Protection Standard (NFPA-58). For acopy of this standard, contact the National Fire Protection Association.One Batterymarch Park, Quincy, MA 02269, Attn: Publications SalesDivision.
65 General Information(cont.)

Service
Proper repair and maintenance procedures will assure efficient operation andlong life for this product. A Motorola maintenance agreement will provide expertservice to keep this and all other communication equipment in perfect operatingcondition. A nationwide service organization is provided by Motorola to supportmaintenance services. Through its maintenance and installation program, Motorolamakes available the finest service to those desiring reliable, continuouscommunications on a contract basis.
Motorola's Customer Service Division is the largest service organizationspecializing in mobile communications. It includes over 900 authorized stations. Inaddition, our products are serviced throughout the world by a wide network ofcompany or authorized independent distributor service organizations. For a contractservice agreement, please contact your nearest Motorola service representative,authorized Motorola dealer, or Motorola sales representative. If you suspect a radioproblem, check the following items before requesting service.
1. Radio Checks
• Be sure the radio is turned on and the channel selector is in the properposition.
• Replace or recharge the battery. The first time a new battery is used, itshould charge a minimum of 16 hours.
• Antenna must be screwed on properly, with the base flush against theradio top.
• Be sure that the 3-position toggle switch is in the proper position.
• Check that the radio problem is not caused by accessories improperlyconnected.
2. Operating Instructions
Review your operation instructions to ensure proper radio use.
3. Problem(s) Not Solved
After following steps 1 and 2, if your radio still exhibits a problem, reviewyour service agreement and call the applicable Motorola servicerepresentative.
If you do not have a service agreement on your radio, contact your nearestauthorized Motorola service shop for guidance toward a prompt andexpedient evaluation and/or repair, or call 1-800-247-2346, extension 8615.
66 General Information(cont.)

Express Service Plus (ESP), U.S.A. only
Express Service Plus (ESP) is an optional extended service coverage plan. ESPprovides for the repair of this product, at the Motorola Radio Support Center listed instep 3, below, for a period of three years (one year warranty plus two years of extendedservice) from the date of shipment from the factory, or the date of delivery if purchasedfrom an authorized Motorola two-way radio dealer. If ESP has been purchased, theserial number of this product has been registered for coverage under Express ServicePlus at the depot listed in step 3, below.
To obtain service under Extended Service Plus:
1. Check to make sure the battery or battery charger of the unit is not defective.(Batteries and chargers are excluded from this service plan).
2. Include the following information:
Your name
Company name
Address
Telephone number
A brief description of the nature of the problem or failure (be specific)
3. Pack and ship the unit (prepaid) to:
Motorola Radio Support Center
3761 South Central Avenue
Rockford, IL 61102-4294
Express Service Plus is subject to Motorola standard terms and conditions. ESPdoes not include repairs which will be necessary due to damage caused byaccidents, physical abuse or misuse of the product(s), acts of God, and fires.Batteries, battery chargers, and external accessories are excluded from this plan.Service under ESP is available only at the service center listed herein.
If you are unsure as to whether your radio is covered under ExpressService Plus, call the depot at (800) 227-6772 or (815) 489-1000.
67 General Information(cont.)

Parts Information
7:00 A.M. - 7:00 P.M. (CST) Monday - Friday (Chicago, U.S.A.)Domestic (U.S.A.) 1-800-422-4210 or 847-538-8023
1-800-826-1913 or 410-712-6200(Federal Government) TELEX: 280127
FAX: 1-847-538-8198FAX: 1-410-712-4991 (Federal Government)
Domestic (U.S.A.) after hours or weekends1-800-925-4357
International 1-847-538-8023TELEX: 403305 MOTO PART SHBU UD
FAX: 1-847-576-3023 TWX: 910-693-0869
No International weekend service is available.
Computer Software Copyrights
The Motorola equipment described in this manual may include copyrightedMotorola computer programs stored in semiconductor memories or other media.Laws in the United States and other countries preserve for Motorola certainexclusive rights for copyrighted computer programs, including the exclusive right tocopy or reproduce in any form the copyrighted computer program. Accordingly, anycopyrighted Motorola computer programs contained in the Motorola equipmentdescribed in this manual may not be copied or reproduced in any manner withoutthe express permission of Motorola. Furthermore, the purchase of Motorolaequipment shall not be deemed to grant either directly or by implication, estoppel,or otherwise, any license under the copyrights, patents or patent applications ofMotorola, except for the normal nonexclusive, royalty free license to use that arisesby operation of law in the sales of a product.
Patent Disclosure
This product is covered by one or more of the following United States patents:
4,512,035 4,551,856 4,653,117 4,816,774
4,829,594 4,837,853 4,864,252 4,885,550
4,914,321 4,918,403 4,959,617 4,975,650
4,994,768 5,006,730 5,021,754 5,079,526
68 General Information(cont.)