1 of 6 sharepoint sites share much of the same underlying functionality, and most can be customized...
Post on 21-Dec-2015
214 views
TRANSCRIPT

1 of 6
SharePoint sites share much of the same underlying functionality, and most can be customized using the same techniques. So whether you have a basic site or a highly customized one, you can use the tools and methods described here to create the site you want. This guide assumes you already have a SharePoint site created. (A Team Site is used in this guide for illustration purposes.)
About Customizing a Microsoft® SharePoint® Site
Customize your Quick Launch menu to make navigation clearer and easier to use.
This guide will show you how to:
Create a unique look for your site with the Image Web Part.
Display other content on your site including shared documents, partner names, alerts, RSS feeds, and more to aid collaboration with others.
Display an Office document on your site to immediately share information with users.
Customize Announcements on your site to create a better experience for your readers.
This document is for informational purposes only. MICROSOFT MAKES NO WARRANTIES, EXPRESS OR IMPLIED, IN THIS DOCUMENT.© 2007 Microsoft Corporation. All rights reserved.
2 of 6
Create a Unique Look for Your SiteHelp your site stand out from others by having a strong image on the Home page. For example, see the “Contoso” banner used on page 1 of this guide. A SharePoint Image Web Part was used to apply that image. You can also change the look of your site by using a SharePoint theme. SharePoint themes combine color schemes and design touches to give sites a cohesive look and feel.
Note Though bold colors can be striking, they can also make text hard to read. If you use a SharePoint theme to change the look of your site, always keep your audience in mind.
To Add a Banner or Picture to Your Site
Notes
• You can also use the tool pane to adjust picture alignment, appearance, and layout. To open the tool pane, click Modify Shared Page>Modify Shared Web Parts>Image Web Part.
• Never use a copyrighted image in your SharePoint site without permission from the copyright holder.
From your Home page, click Modify Shared Page, point to Add Web Parts, and then click Browse. (If you do not see the Modify Shared Page link, click Modify My Page, and then click Shared View.)
With the name of your site highlighted, find the Image Web Part in the Web Part List and drag it onto a column of your site.
4
8
3
Go to a Picture Library (click Documents and Lists at the top of your site to see all your Picture Libraries), and then click Add Picture.
Browse to the picture, click Open, and then click Save and Close.
After the picture has been uploaded, right-click the picture icon (view the picture in Details mode), and then click Copy Shortcut. This gives you the image URL.
Click Site Settings.
Under Customization, click Apply theme to site.
1
2
To Change the Look and Feel of Your Site with a Theme
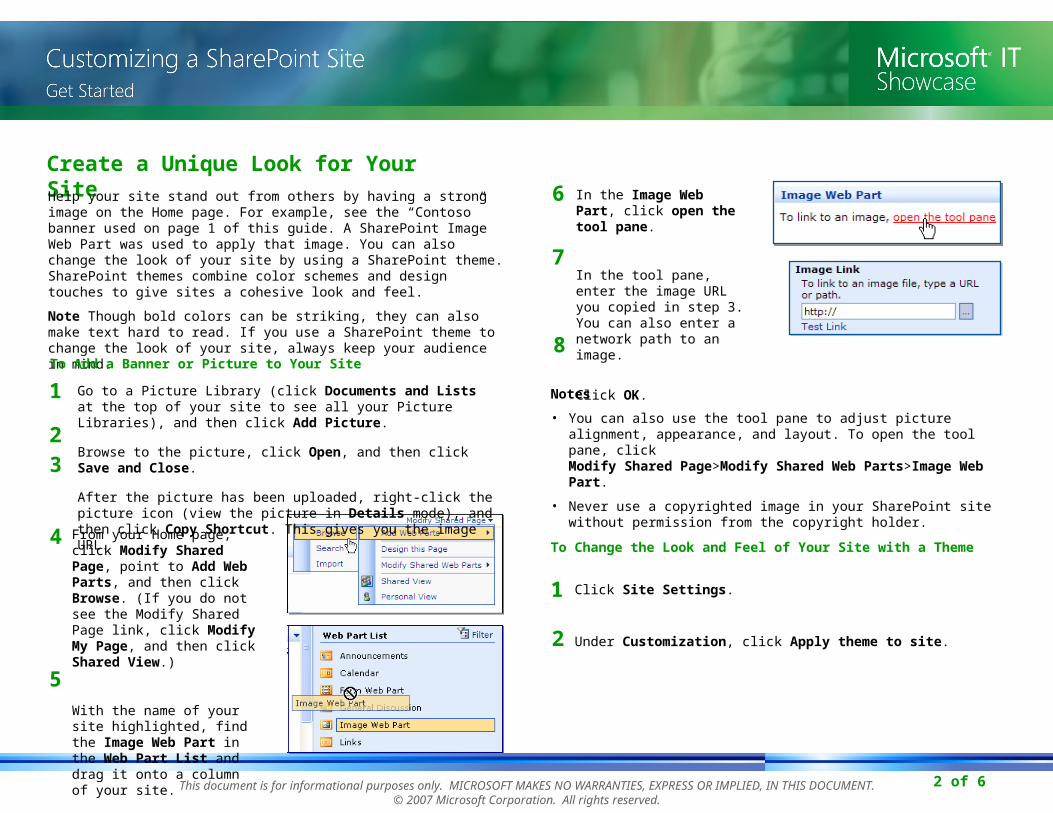
In the Image Web Part, click open the tool pane.
In the tool pane, enter the image URL you copied in step 3. You can also enter a network path to an image.
Click OK.
6
7
1
2
5
This document is for informational purposes only. MICROSOFT MAKES NO WARRANTIES, EXPRESS OR IMPLIED, IN THIS DOCUMENT.© 2007 Microsoft Corporation. All rights reserved.

3 of 6
Display Other Content on Your SiteUse Web Parts to customize your site. Web Parts are pre-built Web modules that add functionality to your SharePoint site.
There are Web Parts for almost every kind of content and with a little creativity, you can use existing Web Parts for almost any new content need. In the table below are some examples of existing Web Parts:
To Display This Content Use This Web Part
Messages to site users Announcements
A list of site users Members
An Office 2003 document or a Web page
Page Viewer Web Part
A list of high priority tasks for site users
Tasks
Self-updating information from an external source, such as a news feed
RSS Viewer Web Part (in the Virtual Server Gallery)
1 From your Home page, click Modified Shared Page, point to Add Web Parts, and then click Browse. (If you do not see the Modify Shared Page link, click Modify My Page, and then click Shared View.)
Go to your site gallery and drag a Web Part onto a column of your page. Note Drag it onto a boxed area, or it won’t be applied.
Do this with as many Web Parts as desired. When you are done, close the Web Parts pane.
Click Modify Shared Page, and then click Design this Page. In this view, you can arrange the Web Parts on your site by dragging them back and forth, and above or below one another.
When you have finished, click Modify Shared Page, and then click Design this Page to exit the design view.
2
4
3
Select a theme from the list, and then click Apply.3
This image shows the Compass theme applied to the demonstration site. Compare this to the default look featured on page 1 of this guide.
Customize Announcements on Your SiteBy default, SharePoint sites include an Announcements Web Part on the Home page. With this Web Part, you can post news and updates to your site. By becoming familiar with this tool, you can customize how news and updates are displayed. Take a look at the News section on page 1 of this guide to see how the Announcements Web Part was customized for the demonstration site.
Click Announcements in the title bar of the Web Part.
Click Modify settings and columns.
Under Views, click All Items (the default view).
1
2
3
This document is for informational purposes only. MICROSOFT MAKES NO WARRANTIES, EXPRESS OR IMPLIED, IN THIS DOCUMENT.© 2007 Microsoft Corporation. All rights reserved.
4 of 6
In the remaining sections of the Edit View page, you can:
4
5• Sort items to appear in a different order.
• Filter content to prevent some items from appearing.
• Group columns.
• Display Totals if you are using columns with numbers.
• Apply a Style to the Announcement content. (See the shaded style—and the changed title—in the picture on the first page of this Guide.)
• Set a limit on how many items will display.
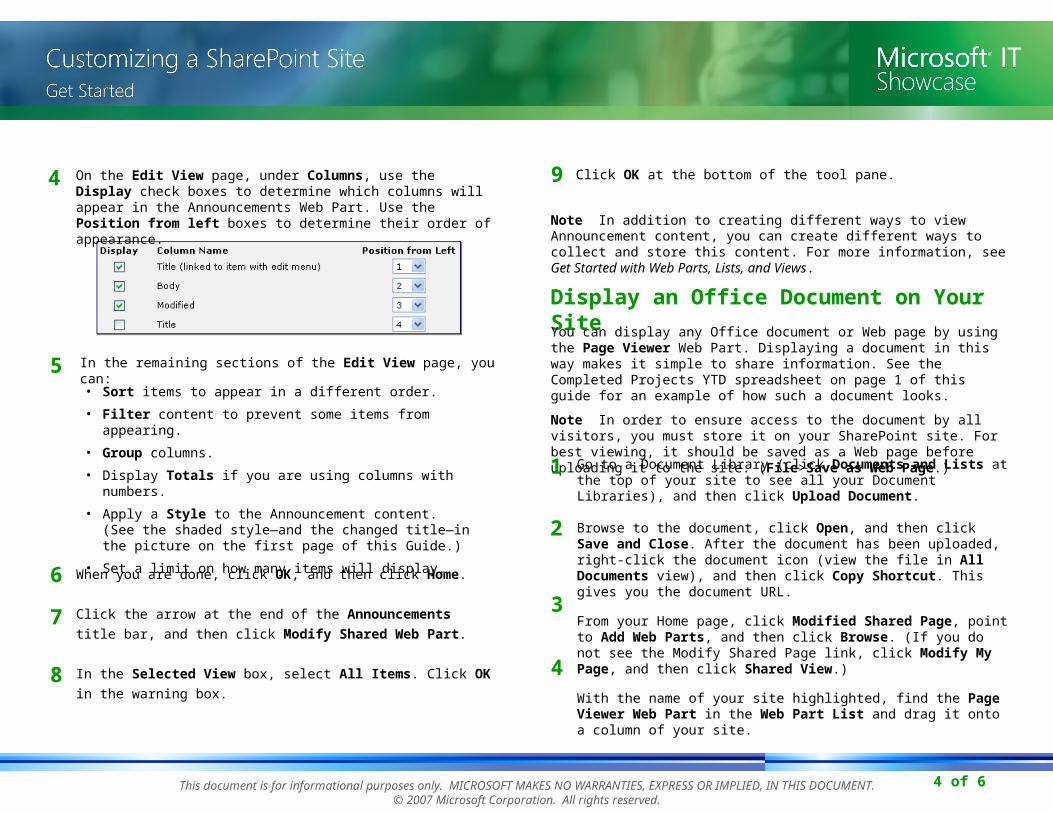
On the Edit View page, under Columns, use the Display check boxes to determine which columns will appear in the Announcements Web Part. Use the Position from left boxes to determine their order of appearance.
6
7
8
When you are done, click OK, and then click Home.
Click the arrow at the end of the Announcements title bar,
and then click Modify Shared Web Part.
In the Selected View box, select All Items. Click OK in the
warning box.
9 Click OK at the bottom of the tool pane.
Note In addition to creating different ways to view Announcement content, you can create different ways to collect and store this content. For more information, see Get Started with Web Parts, Lists, and Views.
Display an Office Document on Your SiteYou can display any Office document or Web page by using the Page Viewer Web Part. Displaying a document in this way makes it simple to share information. See the Completed Projects YTD spreadsheet on page 1 of this guide for an example of how such a document looks.
Note In order to ensure access to the document by all visitors, you must store it on your SharePoint site. For best viewing, it should be saved as a Web page before uploading it to the site. (File>Save as Web Page.)Go to a Document Library (click Documents and Lists at the
top of your site to see all your Document Libraries), and then click Upload Document.
Browse to the document, click Open, and then click Save and Close. After the document has been uploaded, right-click the document icon (view the file in All Documents view), and then click Copy Shortcut. This gives you the document URL.
From your Home page, click Modified Shared Page, point to Add Web Parts, and then click Browse. (If you do not see the Modify Shared Page link, click Modify My Page, and then click Shared View.)
With the name of your site highlighted, find the Page Viewer Web Part in the Web Part List and drag it onto a column of your site.
1
2
3
4
This document is for informational purposes only. MICROSOFT MAKES NO WARRANTIES, EXPRESS OR IMPLIED, IN THIS DOCUMENT.© 2007 Microsoft Corporation. All rights reserved.

5 of 6
In the tool pane, click Web Page.
Under Link, paste the document URL you copied in step 2. To
test the location, click Test Link, and then Click OK.
5
6
7
In the Page Viewer Web Part, click open the tool pane.
Customize Your Quick Launch Menu
1
The Quick Launch menu is the list of site links found on the left side of your Home page. It is created automatically and updates automatically to reflect changes on the site. You can customize this menu in Microsoft FrontPage®. Look at the customized Quick Launch menu in the picture on page 1 of this guide. The following procedure explains how to use FrontPage to change a standard Quick Launch menu into the one on the demo site.Important
• When FrontPage is used to customize the Quick Launch menu, all standard SharePoint connections to the menu are broken. Once you use FrontPage for this, all subsequent changes must be made in FrontPage.
• Only use FrontPage to make these changes. Do NOT use Word as your SharePoint HTML editor. Using Word may cause irreparable damage to the site.
If you do not see this option, go to your Internet Explorer toolbar, click the arrow on the Edit icon, and then click Edit with Microsoft Office FrontPage.
2
3
Select the category name Documents and then type Main Pages in its place.(You can change this later.)
Point to the area beneath the new category name. When the pointer becomes a , double-click to open the Link Bar Properties dialog box. Click Create New. In the Create New Link Bar dialog box, type Main Pages.
You can add, remove, and reposition links within Link Bar Properties.
Open your site. On the Edit menu, click Edit with Microsoft Office FrontPage.
This document is for informational purposes only. MICROSOFT MAKES NO WARRANTIES, EXPRESS OR IMPLIED, IN THIS DOCUMENT.© 2007 Microsoft Corporation. All rights reserved.

6 of 6
4 In the Link Bar Properties dialog box, click Add Link to open the Add to Link Bar dialog box. In the Text to display box, enter the name of your link. In the Address box, type the URL of the link, and then click OK. Repeat this process for each link you want to add to the new category name. When you are done, click OK.
5 Position your pointer over the words Quick Launch. When the pointer changes to crosshairs, click to select the Quick Launch graphic. Press Delete.
With the graphic removed, the menu becomes narrower and more room becomes available in your main window.
To see your changes in FrontPage, click Preview near the bottom of the FrontPage window. When you are satisfied, save your FrontPage work, and then refresh your site page in Internet Explorer.
Tips
• To insert a horizontal line, Insert>Horizontal Line.
• Create special styles for your links by selecting the Style tab in the Link Bar Properties dialog box.
6
This document is for informational purposes only. MICROSOFT MAKES NO WARRANTIES, EXPRESS OR IMPLIED, IN THIS DOCUMENT.© 2007 Microsoft Corporation. All rights reserved.