1 teaching the lesson materials - ellis familyellis2020.org/itlg/itlg grade 4/u1-8.pdfteaching the...
TRANSCRIPT

Technology Assessment Management SystemMath Boxes, Problem 1See the iTLG.
Teaching the Lesson materials
Key ActivitiesStudents continue their work with a compass and straightedge. They copy line segments, construct regular hexagons inscribed in circles, and divide a hexagon into six equilateral triangles.
Key Concepts and Skills• Use a compass as a tool to measure distance. [Measurement and Reference Frames Goal 1]• Copy a line segment with a compass and straightedge. [Geometry Goal 1]• Use a compass to draw circles; construct a regular hexagon inscribed in a circle.
[Geometry Goal 2]• Verify that the sides of regular polygons are the same length. [Geometry Goal 2]
Ongoing Assessment: Informing Instruction See page 59.
Ongoing Learning & Practice materials
Students match descriptions of geometric figures with their names.Students practice and maintain skills through Math Boxes and Study Link activities.
Ongoing Assessment: Recognizing Student Achievement Use journal page 26.[Operations and Computation Goal 1]
Differentiation Options materials
Students identify a regularhexagon in a design.
Students create 6-pointdesigns.
Students inscribe an equilateral triangle inside a circle.
� Teaching Masters (Math Masters,pp. 31–33)
� compass; straightedge; crayons ormarkers; paper
See Advance Preparation
EXTRA PRACTICEENRICHMENTREADINESS
3
� Math Journal 1, pp. 25 and 26� Study Link Master (Math Masters,
p. 30)
2
� Math Journal 1, pp. 21–24� Student Reference Book, pp. 114,
117, and 118 (optional)� Study Link 1�7� +, – Fact Triangles; compass;
straightedge; Geometry Template;tape; scissors
� board compass for demonstrationpurposes
See Advance Preparation
1
Additional InformationAdvance Preparation For Parts 1 and 3, students should have plenty of paper for constructions.
Lesson 1�8 57
Objective To guide students in the construction of figures with a compass and straightedge.
EM07TLG1_G4_U01_LOP08.qxd 1/29/06 11:33 AM Page 57

58 Unit 1 Naming and Constructing Geometric Figures
21
Copying a Line SegmentLESSON
1�8
Date Time
Steps 1–4 below show you how to copy a line segment.
Step 1 You are given line segment ABto copy.
Step 2 Draw a line segment that is longer than line segment AB. Label one of its endpoints C.
Step 3 Open your compass so that the anchor is on one endpoint of line segment AB and the pencil point is on the other endpoint.
Step 4 Without changing the compass opening,place the anchor on point C on your second line segment. Make a mark that crosses this line segment. Label the point where the mark crosses the line segment with the letter D.
Line segment CD should be about the same length as line segment AB. Line segments CD and AB are congruent.
Use a compass and straightedge to copy the line segments shown below. For eachproblem, begin by drawing a line segment that is longer than the one given.
1.
2. M N
E F
A B
C
A B
C D
Math Journal 1, p. 21
Student Page
� Math Message Follow-UpBefore discussing the Math Message problem as a class, have partners discuss how they would copy the line segment. Strategiesmight include the following:
� Use tracing paper and trace the line segment.
� Measure the line segment with a ruler, and then draw anotherline segment that is the same length.
If no student mentions the use of a compass and straightedge, askif anyone can think of a way that these tools could be used to copythe line segment. Allow several minutes for partners to discuss thequestion. Then tell students that in this lesson they will learn howto use a compass and straightedge to copy a line segment.
� Making Constructions with a Compass and Straightedge(Math Journal 1, pp. 21–24)
The constructions in the previous lessons consisted mainly ofdrawing circles with a compass. The compass-and-straightedgeconstructions in this lesson involve marking equal distancesbetween points on a circle.
At first, you probably will need to demonstrate the constructionson the board or overhead projector. The directions also appear inthe journal.
Copying a Line SegmentGo over the steps for copying a line segment shown on journalpage 21. Students should practice this construction several times.Then have students copy line segments EF and MN onto thejournal page. Remind them that their straightedges are fordrawing straight lines, not for measuring.
INDEPENDENTACTIVITY
PARTNER ACTIVITY
1 Teaching the Lesson
Getting Started
Study Link 1�7Follow-Up Ask students to measure the radii of apartner’s circles. They should comparethe measurements and remeasure if they disagree.
Math MessageSuppose your partner drawsa line segment on a piece of paper. Youwant to make an exact copy of the linesegment without using a copyingmachine. How would you do it? Recordyour ideas on a half-sheet of paper.
Mental Math andReflexes Students take out their �, � FactTriangles and practice the facts in their Try Again piles. When time is up, studentstransfer appropriate triangles to the OKpile, fasten their new piles with paperclips, and store them.
NOTE Some students may benefit fromdoing the Readiness activity before you beginPart 1 of the lesson. See the Readinessactivity in Part 3 for details.
EM07TLG1_G4_U01_L08.qxd 1/29/06 11:37 AM Page 58
Adjusting the Activity
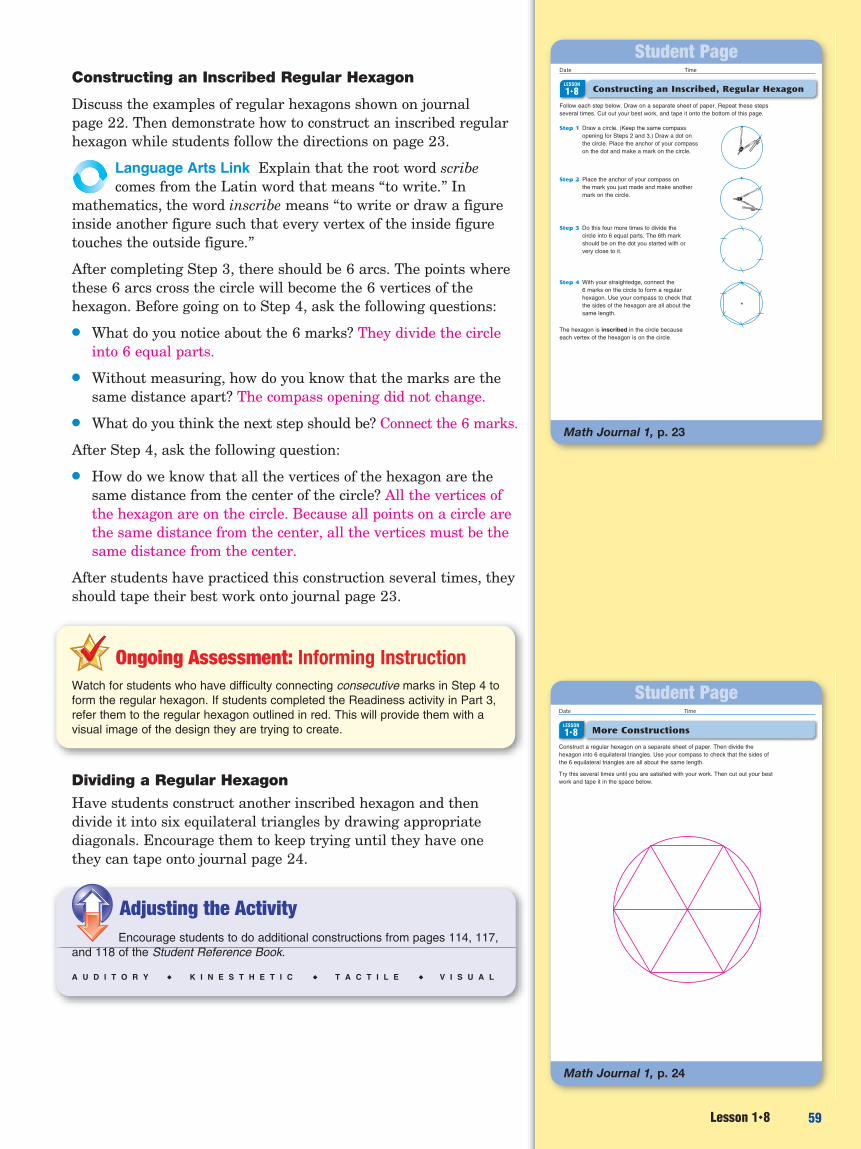
Constructing an Inscribed Regular Hexagon
Discuss the examples of regular hexagons shown on journalpage 22. Then demonstrate how to construct an inscribed regularhexagon while students follow the directions on page 23.
Language Arts Link Explain that the root word scribecomes from the Latin word that means “to write.” In
mathematics, the word inscribe means “to write or draw a figureinside another figure such that every vertex of the inside figuretouches the outside figure.”
After completing Step 3, there should be 6 arcs. The points wherethese 6 arcs cross the circle will become the 6 vertices of thehexagon. Before going on to Step 4, ask the following questions:● What do you notice about the 6 marks? They divide the circle
into 6 equal parts.● Without measuring, how do you know that the marks are the
same distance apart? The compass opening did not change.● What do you think the next step should be? Connect the 6 marks.
After Step 4, ask the following question:● How do we know that all the vertices of the hexagon are the
same distance from the center of the circle? All the vertices ofthe hexagon are on the circle. Because all points on a circle arethe same distance from the center, all the vertices must be thesame distance from the center.
After students have practiced this construction several times, theyshould tape their best work onto journal page 23.
Ongoing Assessment: Informing InstructionWatch for students who have difficulty connecting consecutive marks in Step 4 toform the regular hexagon. If students completed the Readiness activity in Part 3,refer them to the regular hexagon outlined in red. This will provide them with avisual image of the design they are trying to create.
Dividing a Regular HexagonHave students construct another inscribed hexagon and thendivide it into six equilateral triangles by drawing appropriatediagonals. Encourage them to keep trying until they have one they can tape onto journal page 24.
Encourage students to do additional constructions from pages 114, 117,and 118 of the Student Reference Book.
A U D I T O R Y � K I N E S T H E T I C � T A C T I L E � V I S U A L
23
Constructing an Inscribed, Regular HexagonLESSON
1�8
Date Time
Follow each step below. Draw on a separate sheet of paper. Repeat these stepsseveral times. Cut out your best work, and tape it onto the bottom of this page.
Step 1 Draw a circle. (Keep the same compassopening for Steps 2 and 3.) Draw a dot onthe circle. Place the anchor of your compasson the dot and make a mark on the circle.
Step 2 Place the anchor of your compass on the mark you just made and make another mark on the circle.
Step 3 Do this four more times to divide the circle into 6 equal parts. The 6th mark should be on the dot you started with or very close to it.
Step 4 With your straightedge, connect the 6 marks on the circle to form a regular hexagon. Use your compass to check that the sides of the hexagon are all about the same length.
The hexagon is inscribed in the circle because each vertex of the hexagon is on the circle.
Math Journal 1, p. 23
Student Page
Lesson 1�8 59
24
More ConstructionsLESSON
1�8
Date Time
Construct a regular hexagon on a separate sheet of paper. Then divide thehexagon into 6 equilateral triangles. Use your compass to check that the sides ofthe 6 equilateral triangles are all about the same length.
Try this several times until you are satisfied with your work. Then cut out your bestwork and tape it in the space below.
Math Journal 1, p. 24
Student Page
EM07TLG1_G4_U01_L08.qxd 1/29/06 11:37 AM Page 59

60 Unit 1 Naming and Constructing Geometric Figures
26
Date Time
3. Draw a quadrangle that has 2 pairs ofparallel sides and no right angles.
What kind of quadrangle is this?
parallelogram
Sample answer:
4. Circle the concave (nonconvex) polygon(s).
1. Subtract mentally.
a. 14 � 9 �
b. 13 � 8 �
c. � 18 � 9
d. 17 � 8 �
e. � 11 � 7
f. � 15 � 694
99
55
2. Which of the shape(s) below are
polygons? A and C
5. Draw and label ray CA.Draw point R on it.
What is another name for ray CA?
C AR
Sample answer:
6. In the numeral 30,516, what does the 3 stand for? Circle the best answer.
A. 3,000
B. 30
C. 30,000
D. 300,000
96
97
491
99 100
A B C
Math Boxes LESSON
1�8
CR��
�
Math Journal 1, p. 26
Student Page
25
Definition MatchLESSON
1�8
Date Time
Match each description of a geometric figure in Column I with its name in Column II. Some of the items in Column II do not have a match.
I
a. a polygon with 4 right angles and4 sides of the same length
b. a polygon with 4 sides, none ofwhich are the same length
c. a quadrilateral with exactly 1 pairof opposite sides that is parallel
d. lines that never intersect
e. a parallelogram with all sides thesame length, but not a rectangle
f. a polygon with 8 sides
g. a polygon with 5 sides
h. an angle that measures 90°
i. a triangle with all sides the samelength
II
octagon
rhombus
right angle
trapezoid
hexagon
square
equilateral triangle
perpendicular lines
parallel lines
pentagon
isosceles triangle
quadrangleb
g
d
i
a
c
h
e
f
94–100
Math Journal 1, p. 25
Student Page
� Defining Geometric Figures(Math Journal 1, p. 25)
Students match descriptions of geometric figures with names.
� Math Boxes 1� 8(Math Journal 1, p. 26)
Mixed Practice Math Boxes in this lesson are paired with Math Boxes in Lesson 1-6. The skill in Problem 6previews Unit 2 content.
Ongoing Assessment:Recognizing Student Achievement
Use Math Boxes, Problem 1 to assess students’ automaticity with subtractionfacts. Students are making adequate progress if they compute the differences inProblems 1a–1f correctly. Some students may be able to explain how to useaddition to check their answers.
[Operations and Computation Goal 1]
� Study Link 1�8(Math Masters, p. 30)
Home Connection Students inscribe polygons in circles.
INDEPENDENTACTIVITY
Math Boxes Problem 1 �
INDEPENDENTACTIVITY
INDEPENDENTACTIVITY
2 Ongoing Learning & Practice
STUDY LINK
1�8 Inscribed Polygons
96 97115
Name Date Time
1. Use a straightedge to inscribe a differentpolygon in each of the circles below.Write the name of each polygon.
a. b.
c. d.
2. Are any of the polygons that you drew regular polygons? Explain how you know.
and interior angles are all the same measure.Sample answer: Sides are all the same length,
hexagon
square
3. 41 � 27 � 4. � 263 � 59 5. 461 � 398 �
6. � 72 � 36 7. 158 � 71 � 8. 742 � 349 � 393873685932268
Practice
Example:
kite
Equilateral triangle
Rectangle and triangle
Sample answers:
Math Masters, p. 30
Study Link Master
EM07TLG1_G4_U01_L08.qxd 1/29/06 11:37 AM Page 60

� Identifying a Regular Hexagon(Math Masters, p. 31)
To explore the concept of regular polygons, have students identifyand describe a regular hexagon inscribed in a circle. Ask them tooutline the regular hexagon in a design and then color the design in an interesting way. Have students share their definitions of aregular polygon.
� Creating 6-Point Designs(Math Masters, p. 32)
Art Link To apply students’ ability to inscribe hexagons incircles, have them create hexagram designs. Suggestions
are on Math Masters, page 32. Students can work on these designsfirst and then create some of their own as an ongoing project forthe next few weeks. Their finished work could be displayed in aGeometry Art Exhibit.
Sample hexagram design from Math Masters, page 32
� Inscribing an Equilateral Triangle in a Circle(Math Masters, p. 33)
To provide practice inscribing polygons in circles, students use acompass to divide a circle into six equal parts. Then they inscribean equilateral triangle by connecting three alternating points onthe circle.
5–15 Min
INDEPENDENTACTIVITYEXTRA PRACTICE
15–30 Min
INDEPENDENTACTIVITYENRICHMENT
5–15 Min
INDEPENDENTACTIVITYREADINESS
3 Differentiation Options
Name Date Time
LESSON
1� 8 An Inscribed Equilateral Triangle
Step 1 Draw a circle. (Keep the samecompass opening for Steps 2 and 3.)Draw a dot on the circle. Place theanchor of your compass on the dotand draw a mark on the circle.
Step 2 Place the anchor of your compasson the mark you just made and drawanother mark on the circle.
Step 3 Do this 4 more times to divide thecircle into 6 equal parts. The 6thmark should be on the dot youstarted with or very close to it.
Step 4 With your straightedge, connect 3alternating marks (every other mark)on the circle to form an equilateraltriangle. Use your compass to checkthat the sides of the equilateraltriangle are about the same length.
Follow each step below. Draw on a separate sheet of paper. Repeat these steps several times. Then cut out your best work and tape it to the bottom of this page.
Math Masters, p. 33
Teaching Master
Lesson 1�8 61
LESSON
1�8
Name Date Time
A Hexagon Design
1. Outline the regular hexagon in the design to the right using a red crayon or pencil. Use your crayons or pencils to color the design in an interesting way.
2. How do you know the polygon you outlined is a regular hexagon? Sampleanswer: All the sides are the samelength, and all the angles have the same measure.
Math Masters, page 31