11 setting up, configuring, and troubleshooting printers · 11-1 11 setting up, configuring, and...
TRANSCRIPT
11-1
11 Setting Up, Configuring, and Troubleshooting Printers
Exam Objectives in this Chapter:
■ Connect to local and network print devices.
■ Manage printers and print jobs.
■ Connect to an Internet printer.
■ Connect to a local print device.
Why This Chapter MattersThis chapter introduces you to setting up and configuring network printers so thatusers can print over the network. You will also learn how to troubleshoot com-mon printing problems associated with setting up network printers.
Lessons in this Chapter:
■ Lesson 1: Introduction to Windows XP Professional Printing
■ Lesson 2: Setting Up Network Printers
■ Lesson 3: Connecting to Network Printers
■ Lesson 4: Configuring Network Printers
■ Lesson 5: Troubleshooting Setup and Configuration Problems
Before You Begin
To complete this chapter, you must have a computer that meets the minimum hard-ware requirements listed in the preface, “About This Book.” You must also haveMicrosoft Windows XP Professional installed on a computer on which you can makechanges.
Note You do not need a printer to complete the exercises in this chapter.

11-2 Chapter 11 Setting Up, Configuring, and Troubleshooting Printers
Lesson 1: Introduction to Windows XP Professional PrintingWith Windows XP Professional printing, you can easily configure and share printersacross an entire network. After a computer is shared on a computer running WindowsXP Professional, you can then set up client computers running Windows XP, Windows2000 Professional, Windows NT 4.0, Windows Me, Windows 98, and Windows 95 touse that shared printer.
After this lesson, you will be able to
■ Define Windows XP Professional printing terms.
■ Identify the requirements for network printing.
■ Develop a network-wide printing strategy.
Estimated lesson time: 15 minutes
Important Printing Terms
Before you start setting up printers, you should be familiar with some important Win-dows XP Professional printing terms that will help you understand how the differentprinting components work together, as shown in Figure 11-1.
F11us01
Figure 11-1 Several printing components work together to make printing happen.
The following list defines some Windows XP Professional printing terms:
Logical printer The logical printer is the software configuration that is created inWindows XP and is represented by an icon in the Printers And Faxes window. Itcontrols the printer’s configuration and the way in which Windows sends docu-ments to the printer.
Printer The printer is a hardware device that puts text or images on paper or onother print media. You will encounter two types of printers:
❑ A local printer is connected to a physical port on the print server. A logicalprinter created on the print server provides tools for managing and sharingthe printer.
Print server
Local printerPrinter driver
Network interface printer
11-3
❑ A network interface printer is connected directly to the network via aninternal network adapter. You create a logical printer on a print server thatyou can use to manage and share the printer.
Note In previous versions of Windows, Microsoft made an important distinction between the terms “printer” and “print device.” Prior to Windows XP, a “printer” was the software on the computer that controlled printing, and a “print device” was the actual hardware device. The two terms were not used interchangeably. In Windows XP, that terminology has changed. The Windows XP documentation generally defines the “printer” as “a device that puts text or images on paper or other print media,” and the “logical printer” as the “collection of software components that interface between the operating system and the printer.” Thus, the printer is the physical device connected to a computer, and the logical printer is the icon in the Printers And Faxes window that represents the printer.
Printer port The printer port is a software interface through which a computercommunicates with a printer by means of a locally attached interface. For exam-ple, if a computer has a parallel port, the printer port configured in Windowsmight be named LPT 1. Windows XP Professional supports the following inter-faces: line printer (LPT), COM, universal serial bus (USB) 1.1 and 2.0, IEEE 1394(FireWire), and network-attached devices such as HP JetDirect and Intel NetPort.
Print server The print server is the computer that manages a printer on a network.The print server receives and processes documents from client computers. Notethat any computer (a laptop or a desktop) can act as a print server.
Printer driver The printer driver is a file or set of files containing information thatWindows XP Professional requires to convert print commands into a specificprinter language, such as Adobe PostScript. This conversion makes it possible fora printer to print a document. A printer driver is specific to each printer model.
Print job A print job is a document that Windows has prepared for printing. Printjobs wait in a printer’s print queue until it is their turn to be printed. While a printjob is waiting in the queue, users can manage or delete the print job.
Requirements for Network Printing
The requirements for setting up printing on a Windows network include the following:
■ At least one computer to act as the print server. If the print server is to managemany heavily used printers, the task of printing documents can use 100 percent ofthe computer’s processing or network capacity. This will slow down other servicesrunning on the computer. Therefore, Microsoft recommends using a dedicated
Lesson 1 Introduction to Windows XP Professional Printing

11-4 Chapter 11 Setting Up, Configuring, and Troubleshooting Printers
print server if the server will be placed under a heavy load. The computer can runalmost every Windows operating system, including the following:
❑ Windows Server 2003, which can handle a large number of connections, andsupports Apple Macintosh and UNIX computers as well as Novell NetWareclients.
❑ Windows XP Professional, which is limited to 10 concurrent connections fromother computers for file and print services. It does not support Macintoshcomputers or NetWare clients but does support UNIX computers.
■ Sufficient random access memory (RAM) to process documents. If a print servermanages a large number of printers or many large documents, the server mightrequire additional RAM beyond what Windows XP Professional or WindowsServer 2003 requires for other tasks. If a print server does not have sufficient RAMfor its workload, printing performance deteriorates. Given the modern prevalenceof inexpensive memory, RAM is typically not an issue unless you expect a printserver to be heavily utilized. Even having 64 MB of RAM beyond what the com-puter requires for other tasks should be sufficient.
■ Sufficient disk space on the print server to ensure that the print server can storedocuments that are sent to it until it sends the documents to the printer. This is crit-ical when documents are large or likely to accumulate. For example, if 10 userssend large documents to print at the same time, the print server must have enoughdisk space to hold all the documents until it can send them to the print device. Ifthere is not enough space to hold all the documents, users get error messages andcannot print. As with memory, hard disk space really becomes an issue only onheavily used print servers. Having an extra 500 MB to 1 GB of disk space (or, evenbetter, moving the print queue to a spare hard disk) ensures that disk space doesnot become an issue when printing.
Exam Tip Windows XP Professional supports up to 10 simultaneous network connections. Windows XP Professional supports printing from the following clients: MS-DOS, Windows 3.1, Windows 95, Windows 98, Windows Me, Windows NT, Windows 2000, Windows Server 2003, Windows XP, and UNIX. Windows XP Professional does not support printing from NetWare or older Macintosh clients. Clients using newer Macintosh operating systems can communicate directly with Windows clients by using special built-in file and print services named Samba.
Guidelines for Developing a Network-wide Printing Strategy
Before you set up network printing, develop a network-wide printing strategy to meetusers’ printing needs without unnecessary duplication of resources or delays in print-ing. Table 11-1 provides some guidelines for developing such a strategy.
!
11-5
Lesson Review
Use the following questions to help determine whether you have learned enough tomove on to the next lesson. If you are unable to answer a question, review the lessonmaterials and try the question again. You can find answers to the questions in the“Questions and Answers” section at the end of this chapter.
1. ______________________ are connected to a physical port on the print server. Fillin the blank.
2. Do you have to have a computer running one of the Windows Server products tohave a print server on your network? Why or why not?
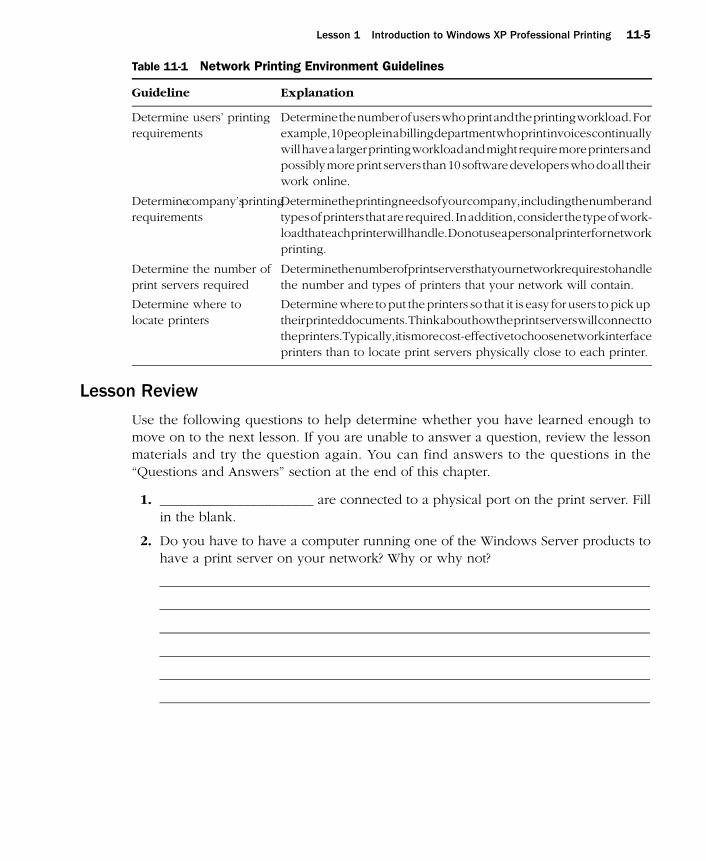
Table 11-1 Network Printing Environment Guidelines
Guideline Explanation
Determine users’ printing requirements
Determine the number of users who print and the printing workload. For example, 10 people in a billing department who print invoices continually will have a larger printing workload and might require more printers and possibly more print servers than 10 software developers who do all their work online.
Determine company’s printing requirements
Determine the printing needs of your company, including the number and types of printers that are required. In addition, consider the type of work-load that each printer will handle. Do not use a personal printer for network printing.
Determine the number of print servers required
Determine the number of print servers that your network requires to handle the number and types of printers that your network will contain.
Determine where to locate printers
Determine where to put the printers so that it is easy for users to pick up their printed documents. Think about how the print servers will connect to the printers. Typically, it is more cost-effective to choose network interface printers than to locate print servers physically close to each printer.
Lesson 1 Introduction to Windows XP Professional Printing

11-6 Chapter 11 Setting Up, Configuring, and Troubleshooting Printers
3. How many concurrent connections from other computers for file and print ser-vices can Windows XP Professional provide? Choose the correct answer.
a. 20
b. 10
c. Unlimited
d. 30
4. A(n) ______________________ is one file or a set of files containing informationthat Windows XP Professional requires to convert print commands into a specificprinter language, such as PostScript. Fill in the blank.
5. Windows XP Professional printing supports which of the following types of com-puters? Choose all that apply.
a. Macintosh computers
b. UNIX computers
c. NetWare clients
d. Windows 98 computers
Lesson Summary
■ To work with printers in Windows XP Professional, you should know the follow-ing terms:
❑ A printer is a hardware device that puts text or images on paper or on otherprint media.
❑ Local printers are connected to a physical port on the print server, and net-work interface printers are connected to a print server through the network.
❑ Network interface printers require their own network interface cards(NICs) and have their own network address, or they are attached to an exter-nal network adapter.
❑ A printer driver is one file or a set of files containing information that Win-dows XP Professional requires to convert print commands into a specificprinter language.
■ The requirements for setting up printing on a network include at least one com-puter to operate as a printer server, sufficient RAM to process documents, and suf-ficient disk space to ensure that the print server can store documents until it sendsthe documents to the printer.
■ Before you set up network printing, you should take the time to determine theusers’ and company’s printing requirements, the number of print servers needed,and where to locate printers.
11-7
Lesson 2: Setting Up Network PrintersSetting up and sharing a network printer makes it possible for multiple users to utilizeit. You can set up a local printer that is connected directly to the print server, or youcan set up a network interface printer that is connected to the print server over the net-work. In larger organizations, most printers are network interface printers.
After this lesson, you will be able to
■ Add and share a local printer.
■ Add and share a network interface printer.
■ Add a Line Printer Remote (LPR) port.
■ Configure client computers to print to a network printer.
Estimated lesson time: 30 minutes
How to Add and Share a Local Printer
The steps for adding a local printer or a network interface printer are similar. You usethe following steps to add a local printer:
1. Log on as Administrator or with a user account that is a member of the Adminis-trators group on the print server.
2. From the Start menu, click Printers And Faxes.
3. In the Printers And Faxes window, in the Printer Tasks section, click Add A Printerto start the Add Printer Wizard.
4. On the Welcome To The Add Printer Wizard page, click Next.
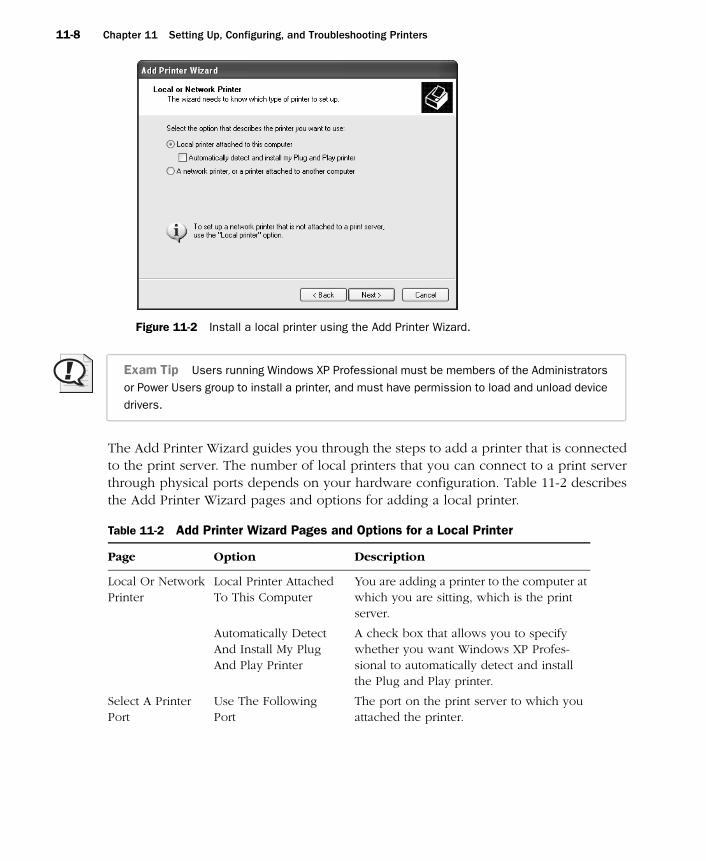
5. On the Local Or Network Printer page, shown in Figure 11-2, select Local PrinterAttached To This Computer, and then click Next.
Lesson 2 Setting Up Network Printers
11-8 Chapter 11 Setting Up, Configuring, and Troubleshooting Printers
F11us02
Figure 11-2 Install a local printer using the Add Printer Wizard.
Exam Tip Users running Windows XP Professional must be members of the Administrators or Power Users group to install a printer, and must have permission to load and unload device drivers.
The Add Printer Wizard guides you through the steps to add a printer that is connectedto the print server. The number of local printers that you can connect to a print serverthrough physical ports depends on your hardware configuration. Table 11-2 describesthe Add Printer Wizard pages and options for adding a local printer.
!
Table 11-2 Add Printer Wizard Pages and Options for a Local Printer
Page Option Description
Local Or Network Printer
Local Printer Attached To This Computer
You are adding a printer to the computer at which you are sitting, which is the print server.
Automatically Detect And Install My Plug And Play Printer
A check box that allows you to specify whether you want Windows XP Profes-sional to automatically detect and install the Plug and Play printer.
Select A Printer Port
Use The Following Port
The port on the print server to which you attached the printer.

11-9
Install Printer Software
Manufacturer And Printers
Select the appropriate manufacturer and printer so that the correct printer driver for the local printer will be installed. If your printer is not on the list, you must provide a printer driver from the manufacturer or select a model that is similar enough so the printer can use it.
Name Your Printer
Printer Name A name that identifies the printer to the users. Some applications might not support more than 31 characters in the server and printer name combinations.
Do You Want To Use This Printer As The Default Printer?
Select Yes to make this printer the default printer for all Windows-based applications and so that users do not have to set a printer for each application. This option does not appear the first time that you add a printer to the print server because the printer is auto-matically set as the default printer.
Printer Sharing Share Name Users (with the appropriate permissions) can use the share name to connect to the printer over the network. This name appears when users browse for a printer or supply a path to a printer. The share name must be com-patible with the naming conventions for all client computers on the network. By default, the share name is the printer name truncated to an 8.3-character file name.
Location And Comment
Location Describe the location of the printer.
Comment Provide information that helps users deter-mine whether the printer meets their needs. If your computer is in a domain, users can search the Active Directory service for the information that you enter here.
Print Test Page Do You Want To Print A Test Page?
Select Yes to print a test page and verify that you have installed the printer correctly.
Completing The Add Printer Wizard
Finish If the information about how you config-ured the printer to be installed is correct, click Finish.
Table 11-2 Add Printer Wizard Pages and Options for a Local Printer
Page Option Description
Lesson 2 Setting Up Network Printers
11-10 Chapter 11 Setting Up, Configuring, and Troubleshooting Printers
Real World Plug and Play PrintersIf you have a Plug and Play printer that connects through a USB port, an IEEE1394 interface, or any other port that allows you to attach or remove devices with-out having to shut down and restart your computer, you probably do not need touse the Add Printer Wizard. If Windows has the drivers for your printer, you canoften connect the printer’s cable to your computer (or point the printer towardyour computer’s infrared port) and turn on the printer. Windows automaticallyinstalls the printer for you.
However, you should always read the installation instructions provided by the man-ufacturer. With some printers, you must install the software provided by the manu-facturer before you connect and turn on the printer. This process helps ensure thatWindows has the proper drivers available when it first detects the printer.
How to Add and Share a Network Interface Printer
In larger companies, most printers are network interface printers. These printers offer adistinct advantage: Because you do not need to connect printers directly to the printserver, you can place printers where you need them instead of where the print server is.
To add a network interface printer, select Local Printer Attached To This Computer on theLocal Or Network Printer page of the Add Printer Wizard. The main difference betweenadding a local printer and adding a network interface printer is that you provide addi-tional port and network protocol information for a typical network interface printer.
The default network protocol for Windows XP Professional is Transmission Control Pro-tocol/Internet Protocol (TCP/IP), which many network interface printers use. For TCP/IP,you provide additional port information in the Add Standard TCP/IP Printer Port Wizard.
Figure 11-3 shows the Select A Printer Port page of the Add Printer Wizard, and Table 11-3describes the options on this page that pertain to adding a network interface printer.
Table 11-3 Options on the Select A Printer Port Page That Affect Adding a Network Interface Printer
Option Description
Create A New Port This selection starts the process of creating a new port for the print server to which the network interface print device is connected. In this case, the new port points to the network connection of the print device.
Type Of Port This selection determines the network protocol to use for the connection. If you select Standard TCP/IP, it starts the Add Standard TCP/IP Printer Port Wizard.
11-11
F11us03
Figure 11-3 Configure the connection to the network printer on the Select A Printer Port page of the Add Printer Wizard.
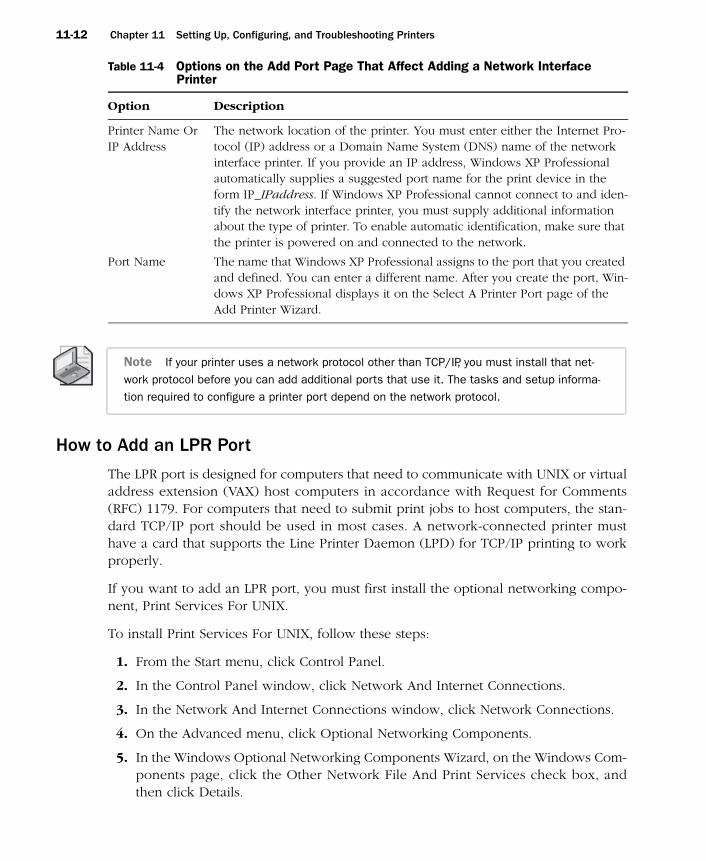
Figure 11-4 shows the Add Port page of the Add Standard TCP/IP Printer Port Wizard,and Table 11-4 describes the options on this page.
F11us04
Figure 11-4 Enter the network printer’s information on the Add Port page of the Add Standard TCP/IP Printer Port Wizard.
Lesson 2 Setting Up Network Printers
11-12 Chapter 11 Setting Up, Configuring, and Troubleshooting Printers
Note If your printer uses a network protocol other than TCP/IP, you must install that net-work protocol before you can add additional ports that use it. The tasks and setup informa-tion required to configure a printer port depend on the network protocol.
How to Add an LPR Port
The LPR port is designed for computers that need to communicate with UNIX or virtualaddress extension (VAX) host computers in accordance with Request for Comments(RFC) 1179. For computers that need to submit print jobs to host computers, the stan-dard TCP/IP port should be used in most cases. A network-connected printer musthave a card that supports the Line Printer Daemon (LPD) for TCP/IP printing to workproperly.
If you want to add an LPR port, you must first install the optional networking compo-nent, Print Services For UNIX.
To install Print Services For UNIX, follow these steps:
1. From the Start menu, click Control Panel.
2. In the Control Panel window, click Network And Internet Connections.
3. In the Network And Internet Connections window, click Network Connections.
4. On the Advanced menu, click Optional Networking Components.
5. In the Windows Optional Networking Components Wizard, on the Windows Com-ponents page, click the Other Network File And Print Services check box, andthen click Details.
Table 11-4 Options on the Add Port Page That Affect Adding a Network Interface Printer
Option Description
Printer Name Or IP Address
The network location of the printer. You must enter either the Internet Pro-tocol (IP) address or a Domain Name System (DNS) name of the network interface printer. If you provide an IP address, Windows XP Professional automatically supplies a suggested port name for the print device in the form IP_IPaddress. If Windows XP Professional cannot connect to and iden-tify the network interface printer, you must supply additional information about the type of printer. To enable automatic identification, make sure that the printer is powered on and connected to the network.
Port Name The name that Windows XP Professional assigns to the port that you created and defined. You can enter a different name. After you create the port, Win-dows XP Professional displays it on the Select A Printer Port page of the Add Printer Wizard.

11-13
6. In the Other Network File And Print Services dialog box, select the Print ServicesFor UNIX check box, and then click OK.
7. In the Windows Optional Networking Components Wizard, click Next.
8. When the installation completes, close the Network Connections window.
To connect to an LPR network printer, follow these steps:
1. From the Start menu, click Printers And Faxes.
2. In the Printers And Faxes window, click Add A Printer.
3. In the Add Printer Wizard, on the Welcome To The Add Printer Wizard page, clickNext.
4. On the Local Or Network Printer page, click Local Printer Attached To This Com-puter, and clear the Automatically Detect And Install My Plug And Play Printercheck box. Click Next.
5. On the Select A Printer Port page, click Create A New Port, and on the Type OfPort drop-down list, select LPR Port. Click Next.
Note If LPR Port is not available, make sure that the optional networking component Print Services For UNIX is installed. Click Cancel to exit the Add Printer Wizard.
6. In the Add LPR Compatible Printer dialog box, in the Name Or Address Of ServerProviding LPD text box, type the DNS name or IP address of the host of the printeryou are adding. In the Name Of Printer Or Print Queue On That Server text box,type the name of the print queue. Click OK.
Note The host can be the direct-connect TCP/IP printing device or the UNIX computer to which the printer is connected. The DNS name can be the name specified for the host in the HOSTS file. LPD is a service on the print server that receives documents (print jobs) from the LPR utilities running on client systems.
7. Follow the directions onscreen to complete the installation of the TCP/IP printer.
How to Configure Client Computers So Users Can Print
After you add and share a printer, you need to set up client computers so that users canprint. Although the tasks to set up client computers vary depending on which operat-ing systems are running on the client computers, all client computers require installa-tion of a printer driver. The following points summarize the installation of printerdrivers according to the computer’s operating system:
Lesson 2 Setting Up Network Printers
11-14 Chapter 11 Setting Up, Configuring, and Troubleshooting Printers
■ Windows XP Professional automatically downloads the printer drivers for clientcomputers running Windows 2000, Windows NT versions 4.0 and earlier, Win-dows ME, Windows 95, or Windows 98.
■ Client computers running other Microsoft operating systems require installation ofprinter drivers.
■ Client computers running non-Microsoft operating systems require installation ofprinter drivers. For clients using LPR, you must install Print Services For UNIX.
To Set Up Client Computers Running Windows 2000, Windows NT, Windows Me, Windows 95, or Windows 98
Users of client computers running Windows XP Professional, Windows XP Home Edi-tion, Windows 2000, Windows NT, Windows Me, Windows 98, and Windows 95 onlyneed to connect to the shared printer. The client computer automatically downloadsthe appropriate printer driver, as long as there is a copy of it on the print server.
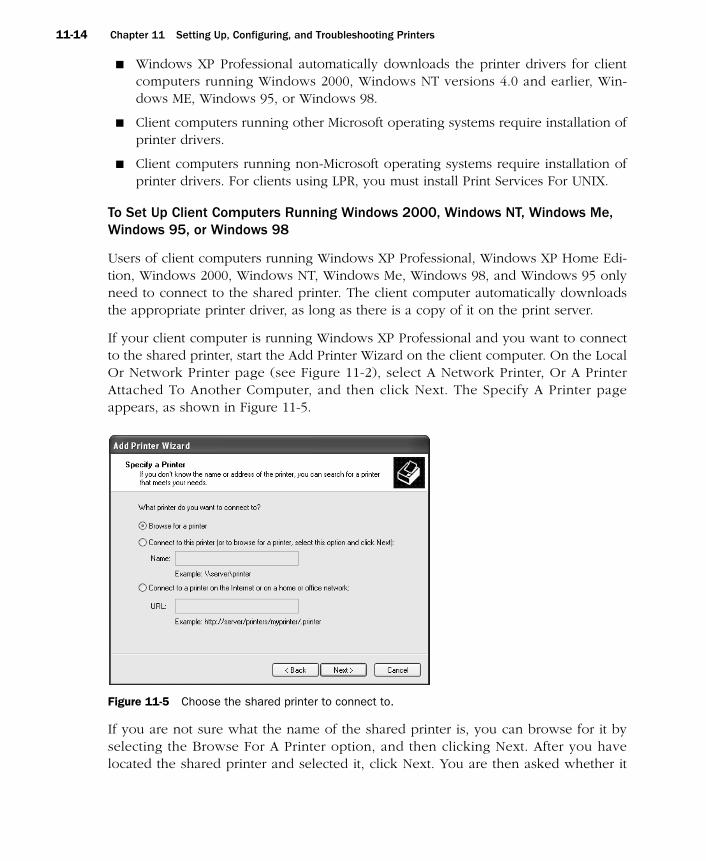
If your client computer is running Windows XP Professional and you want to connectto the shared printer, start the Add Printer Wizard on the client computer. On the LocalOr Network Printer page (see Figure 11-2), select A Network Printer, Or A PrinterAttached To Another Computer, and then click Next. The Specify A Printer pageappears, as shown in Figure 11-5.
F11us05
Figure 11-5 Choose the shared printer to connect to.
If you are not sure what the name of the shared printer is, you can browse for it byselecting the Browse For A Printer option, and then clicking Next. After you havelocated the shared printer and selected it, click Next. You are then asked whether it
11-15
should be the default printer. If you want it to be the default printer, click Yes; other-wise, select No and click Next. The Completing The Add Printer Wizard page appears.Check over the information and then click Finish. You have successfully made a con-nection from your client computer to the shared printer.
What You Must Do to Set Up Client Computers Running Other Microsoft Operating Systems
To enable client computers running other Microsoft operating systems (such as Win-dows 3.1 or MS-DOS) to print to a shared printer on a computer running Windows XPProfessional, you must manually install a printer driver on the client computer. To dothis, you must get the appropriate printer driver for a Windows-based client computerfrom the installation disks for that client computer or from the printer manufacturer.
Practice: Installing a Network Printer
In this practice, you use the Add Printer Wizard to install and share a local printer. Shar-ing the printer makes it available to other users on the network. You also take theprinter offline and then print a document, which loads the document into the printqueue. Complete the five exercises that follow.
Important Before you can share a printer or a folder on a computer running Windows XP Professional in a workgroup environment, you must run the Network Setup Wizard to properly configure the network. You can learn more about setting up a network connection in Chapter 15, “Configuring Network and Internet Connections.”
Exercise 1: Adding a Local Printer
1. Log on as Administrator or with a user account that is a member of the Adminis-trators group on the print server.
2. From the Start menu, click Printers And Faxes.
3. In the Printers And Faxes window, click Add A Printer to launch the Add PrinterWizard.
4. On the Welcome To The Add Printer Wizard page, click Next.
5. On the Local Or Network Printer page, click Local Printer. Make sure that theAutomatically Detect And Install My Plug And Play Printer check box is cleared,and then click Next.
6. On the Select A Printer Port page, in the Use The Following Port drop-down list,select LPT1: (Recommended Printer Port), and then click Next.
Lesson 2 Setting Up Network Printers

11-16 Chapter 11 Setting Up, Configuring, and Troubleshooting Printers
Note If you already have a printer connected to the LPT1 port, select LPT2: (Printer Port) in step 6.
7. On the Install Printer Software page, in the Manufacturer list, select HP. In thePrinters list, select HP Color LaserJet 4550 PS printer. Click Next.
Note The selected driver is digitally signed to ensure reliability and to protect your system. Driver signing is covered in Chapter 6, “Installing, Managing, and Troubleshooting Hardware Devices and Drivers.”
8. On the Name Your Printer page, in the Printer Name list box, the Add Printer Wiz-ard suggests a printer name based on the printer model. For this exercise, do notchange this name.
9. If other printers are already installed, the wizard also asks whether you want tomake this the default printer. If the Add Printer Wizard displays the Do You WantTo Use This Printer As The Default Printer message, click Yes.
10. Click Next to continue.
11. On the Printer Sharing page, click Share Name.
12. In the Share Name box, type Printer1, and then click Next.
Note The Add Printer Wizard suggests a share name that is a shortened version of the printer name. The shared printer name is used to identify a printer on the network. Some operating systems (such as Windows 3.1) recognize share names up to only 12 characters. If such clients will connect to the printer, you should use a name that is 12 characters or fewer; otherwise, you can use a longer name.
13. On the Location And Comment page, type second floor west and in the Com-ment text box type mail room–room 2624. Click Next.
Note If your computer running Windows XP Professional is part of a domain, Windows 2000 displays the values that you enter for Location and Comment when a user searches Active Directory for a printer. Entering this information is optional, but it can help users locate the printer more easily.
14. On the Print Test Page page, you can specify whether to print a test page to con-firm that your printer is set up properly. Because this exercise does not require thatyou have a printer, click No, and then click Next. When you are actually setting upa printer, you should print a test page to confirm that it is working properly.
11-17
15. On the Completing The Add Printer Wizard page, click Finish.
16. In the Printers And Faxes window, notice that there is a new icon for the sharedHP Color LaserJet 4550 PS printer. Windows XP Professional displays an openhand on the printer icon to indicate that the printer is shared. The check mark justabove the printer indicates that printer as the default printer.
Exercise 2: Taking a Printer Offline
In this exercise, you take the printer that you created in Exercise 1 offline.
Note Taking a printer offline causes documents that you send to this printer to be held on the computer while the print device is not available. This process eliminates error messages about unavailable printers in later exercises. Windows XP Professional displays such error messages when it attempts to send documents to a printer that is not connected to the com-puter. When a printer is offline, Windows XP Professional dims the icon and changes the sta-tus of the printer from Ready to Offline to reflect that the printer is not available.
1. From the Start menu, click Printers And Faxes.
2. Right-click the HP Color LaserJet 4550 PS icon.
3. On the shortcut menu, click Use Printer Offline.
Exercise 3: Printing a Test Document
1. In the Printers And Faxes folder, double-click the HP Color LaserJet 4550 PS icon.
2. In the HP Color LaserJet 4550 PS–Use Printer Offline dialog box, notice that thereare no documents waiting to be printed.
3. Click Start, point to All Programs, point to Accessories, and then click Notepad.
4. In Notepad, type any text that you want.
5. Arrange the Notepad window and the HP Color LaserJet 4550 PS–Use PrinterOffline dialog box on the desktop so that you can see the contents of both.
6. In Notepad, on the File menu, click Print.
7. In the Print dialog box, notice that the location and comment information that youentered when you created the printer are shown, and that the Status for the printershows that it is currently offline.
8. Make sure that the HP Color LaserJet 4550 PS is selected as the printer, and thenclick Print.
Lesson 2 Setting Up Network Printers

11-18 Chapter 11 Setting Up, Configuring, and Troubleshooting Printers
9. Notepad briefly displays a message on your computer, stating that the documentis printing. On a fast computer, you might not be able to see this message. CloseNotepad and click No when prompted to save changes to your document.
10. In the HP Color LaserJet 4550 PS–Use Printer Offline dialog box, you will see thedocument waiting to be sent to the printer. Windows XP Professional holds thedocument because you took the printer offline. Otherwise, Windows XP Profes-sional would have sent the document to the printer immediately.
11. Close the HP Color LaserJet 4550 PS–Use Printer Offline dialog box.
12. Close all open windows.
Exercise 4: Installing Print Services For UNIX
1. From the Start menu, click Control Panel.
2. In the Control Panel window, click Network And Internet Connections.
3. In the Network And Internet Connections window, click Network Connections.
4. On the Advanced menu, click Optional Networking Components.
5. In the Windows Optional Networking Components Wizard, on the Windows Com-ponents page, click the Other Network File And Print Services check box, andthen click Details.
6. In the Other Network File And Print Services dialog box, click the Print ServicesFor UNIX check box, and then click OK.
7. In the Windows Optional Networking Components Wizard, click Next.
8. When the installation completes, close the Network Connections window.
Exercise 5: Installing an LPR Port
1. From the Start menu, click Printers And Faxes.
2. In the Printers And Faxes window, click Add A Printer.
3. In the Add Printer Wizard, on the Welcome To The Add Printer Wizard page, clickNext.
4. On the Local or Network Printer page, click Local Printer Attached To This Com-puter and clear the Automatically Detect And Install My Plug And Play Printercheck box. Click Next.
5. On the Select A Printer Port page, click Create A New Port; and on the Type OfPort drop-down list, select LPR Port. Click Next.

11-19
6. In the Add LPR Compatible dialog box, in the Name Or Address Of Server Provid-ing LPD text box, type the DNS name or IP address of the host of the printer youare adding. Click OK.
7. On the Install Printer Software page, in the Manufacturer list, select HP. In thePrinters list, select HP Color LaserJet. Click Next.
8. On the Name Your Printer page, in the Printer Name list box, the Add PrinterWizard suggests a printer name based on the printer model. For this exercise,do not change this name. If other printers are already installed, the wizard alsoasks whether you want to make this the default printer. If the Add Printer Wiz-ard displays the Do You Want To Use This Printer As The Default Printer mes-sage, click Yes.
9. Click Next to continue.
10. On the Printer Sharing page, click Do Not Share This Printer, and then click Next.
11. On the Print Test Page page, click No, and then click Next.
12. On the Completing The Add Printer Wizard page, click Finish.
Lesson Review
Use the following questions to help determine whether you have learned enough tomove on to the next lesson. If you have difficulty answering these questions, reviewthe material in this lesson before beginning the next lesson. You can find answers tothese questions in the “Questions and Answers” section at the end of this chapter.
1. Which of the following tasks can you perform with the Add Printer Wizard?Choose all that apply.
a. Taking a local printer offline
b. Printing multiple copies of a document
c. Adding an LPR port
d. Making a printer that is connected to your computer available to other net-work users
2. What is the default printer in Windows XP Professional?
Lesson 2 Setting Up Network Printers
11-20 Chapter 11 Setting Up, Configuring, and Troubleshooting Printers
3. After you get home from the store, you unpack your new computer and printer.You install Windows XP Professional, and you want to install your printer. Youwant to set up the printer as your default printer. During the installation, you arenot prompted to use the printer as your default printer for all Windows-basedapplications. You know you have seen this option at work when you install localprinters. Why can you not see it on your home computer?
Lesson Summary
■ Local printers are directly connected to a print server. To install and share a localprinter, use the Add Printer Wizard on the print server. Sharing a local printermakes it possible for multiple users on the network to utilize it.
■ In larger companies, most printers are network interface printers. To install a net-work interface printer, use the Add Printer Wizard and specify the port informa-tion for the printer (such as a network address).
■ The LPR port is designed for computers that need to communicate with UNIX orVAX host computers. For computers that need to submit print jobs to host com-puters, the standard TCP/IP port should be used in most cases. To install an LPRport, you must first install Print Services For UNIX.
■ Users of client computers running Windows XP Professional, Windows 2000, Win-dows Me, Windows NT, Windows 98, or Windows 95 only need to connect to theshared printer to be able to print. To enable users of client computers that use theLPR protocol to print, the print server must have Print Services For UNIX installed.

11-21
Lesson 3: Connecting to Network PrintersAfter you have installed and shared a printer on the print server, and installed appro-priate drivers, users on client computers running Windows 95 and later can easily con-nect to the shared printer. For most Windows-based client computers, if theappropriate printer drivers are on the print server, the client computer automaticallydownloads the drivers when the user makes a connection to the printer. For informa-tion on how you can install additional drivers on a print server, see Lesson 4, “Config-uring Network Printers,” later in this chapter.
When you add and share a printer, by default, all users can connect to that printer andprint documents. The method used to connect to a printer depends on the client com-puter. Client computers running Windows 95 and later can use the Add Printer Wizard.Client computers running Windows XP Professional, Windows XP Home Edition, orWindows 2000 can also use a Web browser to connect to the printer.
After this lesson, you will be able to
■ Identify the options available when using the Add Printer Wizard to connect to a network printer.
■ Connect directly to a shared printer.
■ Connect to a network printer by using a Web browser.
■ Find a printer using the Search Assistant.
Estimated lesson time: 15 minutes
Add Printer Wizard Options
The Add Printer Wizard is one method that client computers running Windows XP Pro-fessional, Windows XP Home Edition, Windows 2000, Windows Me, Windows NT,Windows 98, or Windows 95 can use to connect to a printer. This is the same wizardthat you use to add and share a printer. The options that are available in the AddPrinter Wizard that allow you to locate and connect to a printer vary depending on theoperating system that the client computer is running.
Options for Client Computers Running Windows 2000 and Later
By using the Add Printer Wizard on client computers running Windows 2000 and later,you can connect to a printer through the following methods:
Use the Universal Naming Convention (UNC) name You can use the UNC name(\\print_server\printer_name) to make connections by selecting Type The PrinterName Or Click Next To Browse For A Printer on the Locate Your Printer page ofthe Add Printer Wizard. If you know the UNC name, this is a quick method.
Lesson 3 Connecting to Network Printers

11-22 Chapter 11 Setting Up, Configuring, and Troubleshooting Printers
Browse the network You can also browse the network for the printer by selectingType The Printer Name Or Click Next To Browse For A Printer on the Locate YourPrinter page of the Add Printer Wizard, leaving the Name text box blank, andclicking Next.
Use the Uniform Resource Locator (URL) name You can also connect to a printer onthe Internet or your intranet by selecting Connect To A Printer On The Internet Or OnYour Local Intranet on the Locate Your Printer page of the Add Printer Wizard.
Search Active Directory If your computer running Windows 2000 or later is a mem-ber of a domain, you can find the printer by using Microsoft Active Directory ser-vice search capabilities. You can search either the entire Active Directory or just aportion of it. You can also narrow the search by providing features of the printer,such as color printing.
Options for Client Computers Running Windows NT 4.0, Windows 95, or Windows 98
On client computers running Windows NT 4.0, Windows 95, or Windows 98, the AddPrinter Wizard allows you only to enter a UNC name or to browse Network Neighbor-hood to locate the printer.
Options for Client Computers Running Other Microsoft Operating Systems
Users at client computers running early versions of Windows—such as Windows 3.1,Windows 3.5, and Windows for Workgroups—use Print Manager instead of the AddPrinter Wizard to make a connection to a printer.
How to Connect Directly to a Shared Printer
Instead of using the Add Printer Wizard, an often simpler way to connect to a sharedprinter is to connect directly by using any of the following techniques:
Browse My Network Places or Network Neighborhood In Windows 95, Win-dows 98, and Windows NT, Network Neighborhood provides a way to browsecomputers on the local network. In Windows 2000 and Windows XP, My NetworkPlaces provides this same functionality. After browsing to the computer that sharesthe printer, right-click the printer and click Connect to initiate a connection to theprinter. You can also drag the printer icon to the Printers And Faxes folder on theclient computer.
Use the Run dialog box Click Start and then click Run to open the Run dialog box.Type the UNC of any printer (\\print_server\printer_name) into the Open textbox, and then click OK to initiate a connection to the printer. If the print serverdoes not have the appropriate drivers for the operating system running on the cli-ent, Windows asks you to provide the drivers.
Use the command prompt Users of any Windows-based client computer can con-nect to a network printer by typing net use lptx: \\print_server\printer_name,
11-23
where x is the number of the printer port. The Net Use command is also the onlymethod available for making a connection to a network printer from client com-puters running MS-DOS or IBM OS/2 with Microsoft LAN Manager client softwareinstalled.
How to Use a Web Browser
If you are using a client computer running Windows XP Professional, Windows XPHome Edition, or Windows 2000, you can connect to a printer through your corporateintranet. You can type a URL in your Web browser, and you do not have to use the AddPrinter Wizard. In Windows XP Professional, you can use Microsoft Internet Explorer,the Printers And Faxes folder, My Computer, or any other window or folder that has anaddress bar. After you make a connection, Windows XP Professional copies the correctprinter drivers to the client computer automatically.
A Web designer can customize this Web page, for example, to display a floor plan thatshows the location of print devices to which users can connect. There are two ways toconnect to a printer using a Web browser:
■ If you do not know the printer’s name, type http://print_server/printers. TheWeb page lists all the shared printers on the print server that you have permissionto use. The page provides information about the printers, including printer name,status of print jobs, location, model, and any comments that were entered whenthe printer was installed. This information helps you select the correct printer foryour needs. Click the printer that you want to use.
■ If you know the printer’s name, type http://print_server/printer_name. Youprovide the intranet path for a specific printer. You must have permission to usethe printer.
Windows automatically copies the appropriate printer driver to your computer and theicon appears in Printers And Faxes. When you have connected to a shared printer froma Web browser, you can use the printer as if it were attached to your computer.
Note For Internet printing, you must have Internet Information Services (IIS) and the Inter-net Printing Windows component installed on the print server. You must use Internet Explorer version 4.0 or later to connect to a printer.
How to Find a Printer Using the Search Assistant
In the Search Assistant, the Find Printers feature allows you to search for printers inActive Directory when you are logged on to an Active Directory domain. To activatethe Search Assistant, click Start, and then click Search. When the Search Assistant hasstarted, click Find Printers. When you have located a printer using Find Printers, youcan double-click the printer; or you can right-click it, and then click Connect to make
Lesson 3 Connecting to Network Printers
11-24 Chapter 11 Setting Up, Configuring, and Troubleshooting Printers
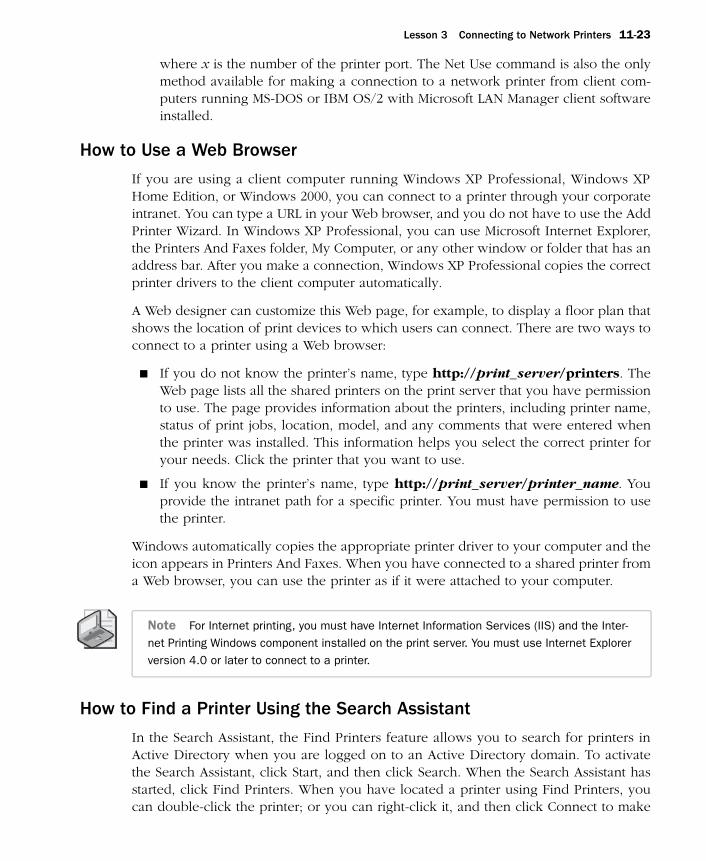
a connection to the printer. The Find Printers dialog box has three tabs to help youlocate a printer (see Figure 11-6).
F11us06
Figure 11-6 Search for printers in Active Directory with the Find Printers dialog box.
The following list describes the three tabs of the Find Printers dialog box:
Printers tab Allows you to enter and search for specific information, such as thename, location, and model of the printer.
Features tab Allows you to select from a prepared list of additional search options,such as whether the printer can print double-sided copies or at a specific resolution.
Advanced tab Allows you to use custom fields and Boolean operators to definecomplex searches, such as whether the printer supports collation and a specificprinter language such as PostScript.
If you want to search for all available printers, you can leave all search criteria blankand click Find Now. All the printers in the domain will be listed.
Note The Find Printers feature is not available in the Search Assistant unless you are logged on to a Windows domain. If you are using a computer that is in a workgroup, the Find Printers feature is not available.
Lesson Review
Use the following questions to help determine whether you have learned enough tomove on to the next lesson. If you have difficulty answering these questions, reviewthe material in this lesson before beginning the next lesson. You can find answers tothese questions in the “Questions and Answers” section at the end of this chapter.
11-25
1. When you add and share a printer, who can connect to that printer by default?
2. Which of the following operating systems running on a client computer allow youto connect to a network printer by using Active Directory search capabilities?Choose all that apply.
a. Windows 2000
b. Windows Me
c. Windows NT 4.0
d. Windows XP Professional
3. You have a small workgroup consisting of five computers running Windows XPProfessional at your house. You are giving your friend, who has never seen Win-dows XP Professional, a tour around the operating system. You are demonstratinghow the Search Assistant works, but the Find Printers feature is missing. Why?
Lesson Summary
■ Client computers running Windows XP Professional, Windows XP Home Edition,Windows 2000, Windows Me, Windows NT, Windows 98, or Windows 95 can usethe Add Printer Wizard to connect to a printer. On client computers running Win-dows NT 4.0, Windows 95, or Windows 98, the Add Printer Wizard only allowsyou to enter a UNC name or to browse Network Neighborhood to locate theprinter. Users on client computers running early versions of Windows (such asWindows 3.1, Windows 3.5, and Windows for Workgroups) use Print Manager toconnect to a printer.
■ You can also install a printer by connecting to it with My Network Places (or Net-work Neighborhood), the Run dialog box, or the command prompt.
■ If you are using a client computer running Windows XP Professional, Windows XPHome Edition, or Windows 2000, you can connect to a printer through your cor-porate intranet by typing a URL in your Web browser.
■ On client computers running Windows XP Professional, Windows XP Home Edi-tion, or Windows 2000 that are part of a Active Directory domain, you can connectto a printer using Active Directory search capabilities.
Lesson 3 Connecting to Network Printers
11-26 Chapter 11 Setting Up, Configuring, and Troubleshooting Printers
Lesson 4: Configuring Network PrintersAfter you have set up and shared network printers, user and company printing needsmight require you to configure printer settings so that your printing resources better fitthese needs.
The five most common configuration changes you can make are as follows:
■ You can share an existing nonshared printer if your printing load increases.
■ You can download additional print drivers so that clients running other versions ofWindows can use the shared printer.
■ You can stop sharing an existing shared printer.
■ You can create a printer pool with multiple printers so that print jobs are automat-ically distributed to the first available printer. In this way, users do not have tosearch for an available printer.
■ You can set priorities among printers so that critical documents always printbefore noncritical documents.
After this lesson, you will be able to
■ Share an existing printer.
■ Install additional printer drivers.
■ Stop sharing a printer.
■ Create a printer pool.
■ Set priorities among printers.
Estimated lesson time: 25 minutes
How to Share an Existing Printer
If the printing demands on your network increase, and if your network has a printerthat is already installed as a local printer but not yet shared, you can share the printerwith the network.
When you share a printer, you need to assign the printer a share name, whichappears in My Network Places. Use an intuitive name to help users when they arebrowsing for a printer. You can also add printer drivers for all versions of WindowsXP Professional, Windows XP Home Edition, Windows 2000, Windows NT, Windows95, and Windows 98.
In the Properties dialog box for the printer, you can use the Sharing tab to share anexisting printer (see Figure 11-7).

11-27
F11us07
Figure 11-7 Use the Sharing tab of a printer’s Properties dialog box to configure sharing.
You use the following steps to share an existing printer using the Sharing tab:
1. From the Start menu, click Printers And Faxes.
2. In the Printers And Faxes window, right-click the icon for the printer that you wantto share and click Sharing.
Note If this is the first time you have shared a printer or a file on the computer, Windows XP Professional prompts you to either run the Network Setup Wizard or just enable sharing. For the purposes of this exercise, you should just enable sharing if Windows presents you with the choice. For more information on using the Network Setup Wizard, see Chapter 15.
3. In the Properties dialog box for the printer, on the Sharing tab, click Share ThisPrinter.
4. In the Share Name text box, type in a share name, and then click OK.
After you have shared the printer, Windows XP Professional puts an open hand underthe printer icon, indicating that the printer is shared.
How to Install Additional Printer Drivers
If you expect network users of a shared printer to have computers that are running dif-ferent versions of Windows, you can install different drivers so that they are automati-cally available to users who connect to the printer. Making drivers available preventsusers from having to find and install the drivers themselves. To verify which printerdrivers are downloaded or to download printer drivers to your print server, use the fol-lowing steps:
Lesson 4 Configuring Network Printers
11-28 Chapter 11 Setting Up, Configuring, and Troubleshooting Printers
1. On the print server, click Start, and then click Printers And Faxes.
2. In the Printers And Faxes window, right-click the shared printer you want to man-age, and then click Sharing.
3. In the Properties dialog box for the printer, on the Sharing tab, click AdditionalDrivers.
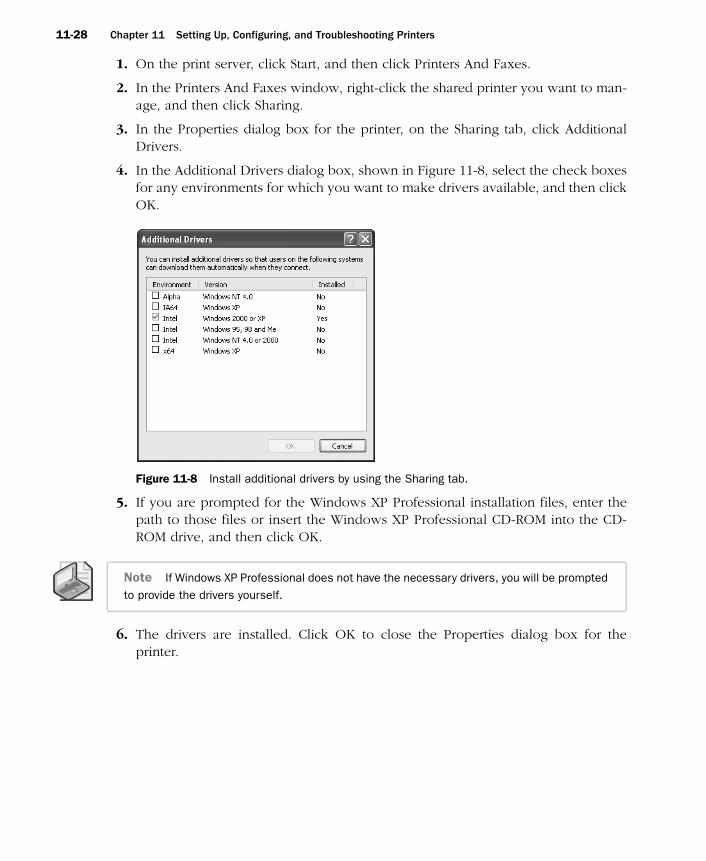
4. In the Additional Drivers dialog box, shown in Figure 11-8, select the check boxesfor any environments for which you want to make drivers available, and then clickOK.
F11us08
Figure 11-8 Install additional drivers by using the Sharing tab.
5. If you are prompted for the Windows XP Professional installation files, enter thepath to those files or insert the Windows XP Professional CD-ROM into the CD-ROM drive, and then click OK.
Note If Windows XP Professional does not have the necessary drivers, you will be prompted to provide the drivers yourself.
6. The drivers are installed. Click OK to close the Properties dialog box for theprinter.

11-29
How to Stop the Sharing of a Printer
If the printing demands on your network change, you can stop sharing an existingshared printer. Use the Sharing tab of the Properties dialog box for that printer to stopsharing it. The steps to stop sharing a printer are similar to those for sharing a printer.However, in the steps to stop sharing a printer, in the Properties dialog box for theprinter, in the Sharing tab, click Do Not Share This Printer (refer to Figure 11-7), andthen click OK.
How to Create a Printer Pool
A printer pool consists of two or more identical printers that are connected to oneprint server and are configured with a single logical printer. The printers can be localor network interface printers. Although the printers should be identical, you can useprinters that are not identical but use the same printer driver. After you install a printer,you can create a printer pool using the Ports tab of the Properties dialog box for thatprinter. In the Ports tab, select the Enable Printer Pooling check box and select addi-tional ports on the printer server (see Figure 11-9).
F11us09
Figure 11-9 Enable printer pooling using the Properties dialog box for the printer.
When you create a printer pool, users can print documents without checking to seewhich printer is available. The document prints on the first available printer in theprinting pool.
Lesson 4 Configuring Network Printers

11-30 Chapter 11 Setting Up, Configuring, and Troubleshooting Printers
Tip When you set up a printer pool, you should place the printers in the same physical area so that users can easily locate their documents.
A printing pool has the following advantages:
■ In a network with a high volume of printing, it decreases the time that documentswait on the print server.
■ It simplifies administration because you can administer multiple printers simulta-neously.
After connecting the printers to the print server, you can create a printing pool by com-pleting the following steps:
1. Click Start, and then click Printers And Faxes.
2. In the Printers And Faxes window, right-click the printer icon and click Properties.
3. In the Properties dialog box for the printer, on the Ports tab, select the EnablePrinter Pooling check box.
4. Select the check box for each port to which a printer that you want to add to thepool is connected, and then click OK.
How to Set Priorities Among Printers
Although creating a printer pool involves creating a single logical printer for multipleprinters, setting priorities involves creating multiple logical printers for a single printer.The printer priority you set on each logical printer governs the order in which printjobs are printed. For example, you could create a high-priority logical printer for someusers and a lower-priority logical printer for other users. All users would print to thesame printer, but some users would get to print first.
There are two things that you must do to set priorities among printers:
■ Add a printer and share it. Then add a second printer and point it to the samephysical printer or port. The port can be either a physical port on the print serveror a port that points to a network interface print device.
■ Set a different priority for each of the printers that is pointing to the physical printeror hardware device. Have different groups of users print to different virtual printers,or have users send different types of documents to different virtual printers.
For an example of printer priority, see Figure 11-10. User1 sends documents to aprinter with the lowest priority of 1, and User2 sends documents to a printer with thehighest priority of 99. In this example, User2’s documents always print before User1’sdocuments.

11-31
F11us10
Figure 11-10 Logical printers with higher priorities print before logical printers with lower priorities.
Use the following steps to set the priority for a printer:
1. Click Start, and then click Printers And Faxes.
2. In the Printers And Faxes window, right-click the icon for the printer, and thenclick Properties.
3. In the Properties dialog box for the printer, on the Advanced tab, adjust the Prior-ity setting for the printer. This value for a printer can be set from 1 through 99—the higher the number, the higher the priority of the printer.
4. Click OK.
Exam Tip You can configure multiple logical printers for a single printer to control how the printer is used in different circumstances or by different users. You can also create a printer pool to configure multiple printers for a single logical printer.
Lesson Review
Use the following questions to help determine whether you have learned enough tomove on to the next lesson. If you have difficulty answering these questions, reviewthe material in this lesson before beginning the next lesson. You can find answers tothese questions in the “Questions and Answers” section at the end of this chapter.
1. What are two advantages of sharing a printer?
Print server
User2
User1
User2 User1 User2
Word.doc
Priority 1
User1
Printer-Gen
Word.doc
Priority 99
User1
Printer-Gen
!
Lesson 4 Configuring Network Printers
11-32 Chapter 11 Setting Up, Configuring, and Troubleshooting Printers
2. How do you share a printer?
3. Which of the following statements about a printing pool in Windows XP Profes-sional are correct? Choose all that apply.
a. All printers in a printing pool must be network interface printers.
b. A printing pool consists of two or more identical printers that are connectedto one print server and act as a single printer.
c. If you use printers that are not identical, they must use the same printerdriver.
d. If you use printers that are not identical, you must install all the requiredprinter drivers on the print server.
4. Why would you create virtual printers and vary the priorities on them?
Lesson Summary
■ To share an existing printer, use the Sharing tab of the Properties dialog box forthe printer and select Share This Printer.
■ If you expect network users of a shared printer to have computers that are runningdifferent versions of Windows, you can install different drivers so that they areautomatically available to users who connect to the printer.
■ To stop sharing a printer, in the Properties dialog box for the printer, on the Shar-ing tab, click Not Shared.
■ A printer pool consists of two or more identical printers that are connected to oneprint server and act as a single printer.
■ Setting priorities on virtual printers makes it possible for users to send critical doc-uments to a high-priority printer and noncritical documents to a lower-priorityprinter, even when there is only one physical printer.

11-33
Lesson 5: Troubleshooting Setup and Configuration Problems
During setup and configuration of a printer, problems can occur. This lesson intro-duces you to a few common problems that you might encounter and provides somesuggested solutions.
After this lesson, you will be able to
■ Troubleshoot a printer setup problem by using the Windows troubleshooters
■ Offer possible solutions to common troubleshooting scenarios
Estimated lesson time: 5 minutes
How to Use Windows Troubleshooters
Windows XP Professional helps you interactively troubleshoot problems you encoun-ter. To troubleshoot problems with a printer, click Start, click Control Panel, and thenclick Printers And Other Hardware. In the Printers And Other Hardware window,under Troubleshooters, click Printing. The Help And Support Center window appearswith the printing troubleshooter displayed, as shown in Figure 11-11.
F11us11
Figure 11-11 Use Windows troubleshooters to troubleshoot printing problems.
Notice the series of questions on the page. As you respond to these questions, the trou-bleshooter asks additional questions and makes suggestions to resolve your problembased on the answers you provide.
Lesson 5 Troubleshooting Setup and Configuration Problems
11-34 Chapter 11 Setting Up, Configuring, and Troubleshooting Printers
Possible Solutions to Common Troubleshooting Scenarios
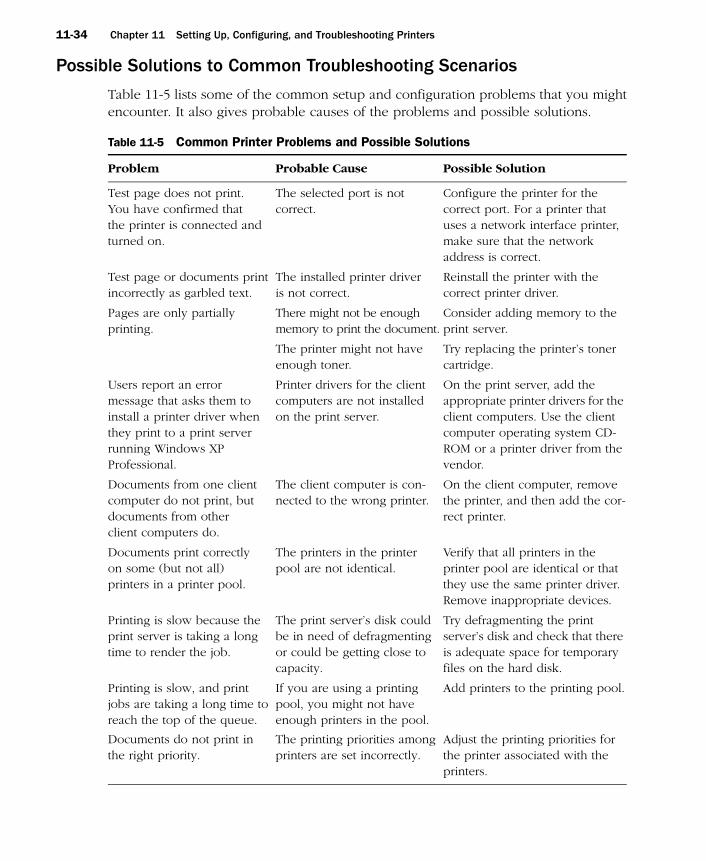
Table 11-5 lists some of the common setup and configuration problems that you mightencounter. It also gives probable causes of the problems and possible solutions.
Table 11-5 Common Printer Problems and Possible Solutions
Problem Probable Cause Possible Solution
Test page does not print. You have confirmed that the printer is connected and turned on.
The selected port is not correct.
Configure the printer for the correct port. For a printer that uses a network interface printer, make sure that the network address is correct.
Test page or documents print incorrectly as garbled text.
The installed printer driver is not correct.
Reinstall the printer with the correct printer driver.
Pages are only partially printing.
There might not be enough memory to print the document.
Consider adding memory to the print server.
The printer might not have enough toner.
Try replacing the printer’s toner cartridge.
Users report an error message that asks them to install a printer driver when they print to a print server running Windows XP Professional.
Printer drivers for the client computers are not installed on the print server.
On the print server, add the appropriate printer drivers for the client computers. Use the client computer operating system CD-ROM or a printer driver from the vendor.
Documents from one client computer do not print, but documents from other client computers do.
The client computer is con-nected to the wrong printer.
On the client computer, remove the printer, and then add the cor-rect printer.
Documents print correctly on some (but not all) printers in a printer pool.
The printers in the printer pool are not identical.
Verify that all printers in the printer pool are identical or that they use the same printer driver. Remove inappropriate devices.
Printing is slow because the print server is taking a long time to render the job.
The print server’s disk could be in need of defragmenting or could be getting close to capacity.
Try defragmenting the print server’s disk and check that there is adequate space for temporary files on the hard disk.
Printing is slow, and print jobs are taking a long time to reach the top of the queue.
If you are using a printing pool, you might not have enough printers in the pool.
Add printers to the printing pool.
Documents do not print in the right priority.
The printing priorities among printers are set incorrectly.
Adjust the printing priorities for the printer associated with the printers.
11-35
Lesson Review
Use the following questions to help determine whether you have learned enough tomove on to the next lesson. If you have difficulty answering these questions, reviewthe material in this lesson before beginning the next lesson. You can find answers tothese questions in the “Questions and Answers” section at the end of this chapter.
1. How do you access and use the printing troubleshooter?
2. What should you check if documents print correctly on some printers in a printingpool, but not on all of them?
3. What should you check if printing is slow because the print server is taking a longtime to render the job?
4. What should you check if pages are only partially printing?
Lesson Summary■ Windows XP Professional helps you interactively troubleshoot problems you
encounter. To troubleshoot printing problems, use the printing troubleshooter.
■ There are a number of common setup and configuration problems that you shouldlearn how to solve. The most common solutions include making sure that
❑ The proper port is selected.
❑ The proper printer driver is installed, as well as drivers for any clients runningother operating systems.
❑ The print server has enough memory.
❑ The printer has enough toner.
❑ The correct printer is being printed to.
Lesson 5 Troubleshooting Setup and Configuration Problems
11-36 Chapter 11 Setting Up, Configuring, and Troubleshooting Printers
Case Scenario ExerciseRead the following scenario and answer the associated questions. You can use thisexercise to help determine whether you have learned enough to move on to the nextchapter. If you have difficulty completing this work, review the material in this chapterbefore beginning the next chapter. You can find answers to these questions in the“Questions and Answers” section at the end of this chapter.
Scenario
You are an administrator for a company named Contoso, Ltd., which provides land-scaping services for government-owned property. You are working with Jeff, a man-ager in the Marketing department who has just purchased 10 identical laser printers atan auction. The printers all have a built-in network interface that uses TCP/IP. Youhave verified that the printers are functional and have already attached each printer tothe network. Jeff wants to configure these printers so that they are all accessible to theusers in the department as a single printer, preventing users from having to install mul-tiple printers.
Questions
1. What feature in Windows XP Professional allows you to configure all these print-ers so that users will have to install only one printer on their local computers.?
2. How will you configure this feature?
3. What steps will users have to take to connect to the printers?

11-37
Troubleshooting LabRead the following troubleshooting scenario and then answer the question that fol-lows. You can use this lab to help determine whether you have learned enough tomove on to the next chapter. If you have difficulty completing this work, review thematerial in this chapter before beginning the next chapter. You can find the answer tothis question in the “Questions and Answers” section at the end of this chapter.
Scenario
You are working as an administrator for a company named Margie’s Travel, one of thelargest travel agents in the southeast United States. Angela, one of your users, has acolor laser printer that is connected to her computer running Windows XP Profes-sional. Angela shares the printer with other users on the network. Sometimes, the otherusers on the network print large documents that take a long time to print. Angela wantsto keep the printer available to other users because it is the only color printer availablein the department, but she often has important documents that need to be printedbefore any long documents that are waiting to be printed.
Question
How would you solve Angela’s problem?
Chapter Summary■ A printer is a hardware device that puts text or images on paper or on other print
media. Local printers are connected to a physical port on the print server, and net-work interface printers are connected to a print server through the network. Net-work interface printers require their own NICs and have their own networkaddress, or they are attached to an external network adapter. Before configuring aprint server, you should make sure that the computer has sufficient RAM to pro-cess documents and sufficient disk space to ensure that the print server can storedocuments until it sends the documents to the printer.
Troubleshooting Lab
11-38 Chapter 11 Setting Up, Configuring, and Troubleshooting Printers
■ To install and share a local printer, use the Add Printer Wizard on the print server.Sharing a local printer makes it possible for multiple users on the network to uti-lize it. In larger companies, most printers are network interface printers. To installa network interface printer, use the Add Printer Wizard and specify the port infor-mation for the printer (such as a network address).
■ Clients can connect to a shared printer by using the Add Printer Wizard, by con-necting directly to the printer (using My Network Places, the Run dialog box, orthe Command Prompt), by using a Web browser, or by searching Active Directory.
■ To share an existing printer, use the Sharing tab of the Properties dialog box forthe printer and select Share This Printer. If you expect network users of a sharedprinter to have computers that are running different versions of Windows, you caninstall different drivers so that they are automatically available to users who con-nect to the printer. You can also create two advanced printer configurations:
❑ A printer pool consists of two or more identical printers that are connected toone print server and act as a single printer.
❑ Setting priorities on virtual printers makes it possible for users to send criticaldocuments to a high-priority printer and noncritical documents to a lower-pri-ority printer, even when there is only one physical printer.
■ Windows XP Professional helps you interactively troubleshoot problems youencounter. To troubleshoot printing problems, you can use the printing trouble-shooter. You should also learn to resolve common problems such as improperprinter drivers, improper ports, and low ink or toner.
Exam HighlightsBefore taking the exam, review the key points and terms that are presented in thischapter. You need to know this information.
Key Points
■ Windows XP Professional supports up to 10 simultaneous network connections.Windows XP Professional supports printing from the following clients: MS-DOS,Windows 3.1, Windows 95, Windows 98, Windows Me, Windows NT, Windows2000, Windows Server 2003, Windows XP, and UNIX. Windows XP Professionaldoes not support printing from NetWare or Macintosh clients.

11-39
■ Users running Windows XP Professional must be members of the Administratorsor Power Users groups to install a printer.
■ You can configure multiple logical printers for a single printer to control how theprinter is used in different circumstances or by different users. You can also createa printer pool to configure multiple printers for a single logical printer.
Key Terms
local printer A printer that is connected to a physical port on the print server.
logical printer The software configuration that is created in Windows and displayedin Printers And Faxes.
network interface printer A printer that is connected directly to the network via aninternal network adapter.
print job A document that Windows has prepared for printing.
print server The computer or other remote device that has a network printer phys-ically connected to it.
printer The physical device used for printing. This device is usually a standardprinter, but it can also be a fax device, a plotter, or a file. It might also refer to thecombination of the physical and logical printer.
printer driver A file or set of files containing information that Windows XP Profes-sional requires to convert print commands into a specific printer language.
printer pool A printing option that permits you to attach two or more printers to asingle printer configuration.
printer port A software interface through which a computer communicates with aprinter by means of a locally attached interface.
printer priority Governs the order in which print jobs are printed relative to otherlogical printers configured for the same printer.
Exam Highlights

11-40 Chapter 11 Setting Up, Configuring, and Troubleshooting Printers
Questions and Answers
Lesson 1 Review
Page 11-5
1. ______________________ are connected to a physical port on the print server. Fillin the blank.
Local printers
2. Do you have to have a computer running one of the Windows Server products tohave a print server on your network? Why or why not?
No. A print server is a computer that manages one or more printers on a network. The printserver receives and processes documents from client computers. If you have a computer run-ning Windows XP Professional and it has a shared printer attached to it, it is by definition a printserver. However, if the print server will manage many heavily used printers, Microsoft recom-mends a dedicated print server, and most dedicated print servers run one of the WindowsServer products.
3. How many concurrent connections from other computers for file and print ser-vices can Windows XP Professional provide? Choose the correct answer.
a. 20
b. 10
c. Unlimited
d. 30
B is the correct answer. Windows XP Professional allows 10 concurrent connections from net-work users.
4. A(n) ______________________ is one file or a set of files containing informationthat Windows XP Professional requires to convert print commands into a specificprinter language, such as PostScript. Fill in the blank.
Printer driver
5. Windows XP Professional printing supports which of the following types of com-puters? Choose all that apply.
a. Macintosh computers
b. UNIX computers
c. NetWare clients
d. Windows 98 computers
The correct answers are B and D. A and C are not correct because Windows XP Professionaldoes not support printing from Macintosh or NetWare clients. Windows Server 2003 does sup-port printing from these clients.

11-41
Lesson 2 Review
Page 11-19
1. Which of the following tasks can you perform with the Add Printer Wizard?Choose all that apply.
a. Taking a local printer offline
b. Printing multiple copies of a document
c. Adding an LPR port
d. Making a printer that is connected to your computer available to other net-work users
The correct answers are C and D. A is not correct because you take a printer offline by right-clickingthe printer in the Printers And Faxes window and clicking Use Printer Offline. B is not correctbecause you print documents from within applications and not during the installation of the printer.
2. What is the default printer in Windows XP Professional?
The default printer is the printer used for all Windows-based applications. You select this optionso that you do not have to set a printer for each application. The first time that you add a printerto the print server, this option does not appear because the printer is automatically selected asthe default printer.
3. After you get home from the store, you unpack your new computer and printer.You install Windows XP Professional, and you want to install your printer. Youwant to set up the printer as your default printer. During the installation, you arenot prompted to use the printer as your default printer for all Windows-basedapplications. You know you have seen this option at work when you install localprinters. Why can you not see it on your home computer?
The first time that you add a printer to a computer, this option does not appear. The printer isautomatically selected as the default printer.
Lesson 3 Review
Page 11-24
1. When you add and share a printer, who can connect to that printer by default?
By default, all users can connect to that printer.
2. Which of the following operating systems running on a client computer allow youto connect to a network printer by using Active Directory search capabilities?Choose all that apply.
a. Windows 2000
b. Windows Me
c. Windows NT 4.0
d. Windows XP Professional
The correct answers are A and D. B and C are not correct because Windows Me and WindowsNT 4.0 do not allow you to search for computers using Active Directory.
Questions and Answers

11-42 Chapter 11 Setting Up, Configuring, and Troubleshooting Printers
3. You have a small workgroup consisting of five computers running Windows XPProfessional at your house. You are giving your friend, who has never seen Win-dows XP Professional, a tour around the operating system. You are demonstratinghow the Search Assistant works, but the Find Printers feature is missing. Why?
The Find Printers feature is not available in the Search Assistant unless you are logged on to anActive Directory domain. If you are using a stand-alone computer or one that is in a workgroup,the Find Printers component is not available.
Lesson 4 Review
Page 11-31
1. What are two advantages of sharing a printer?
Sharing a printer allows other users on the network to use the printer. It also simplifies admin-istration because you can administer printers remotely.
2. How do you share a printer?
In the Properties dialog box for the printer, in the Sharing tab, click Share This Printer and typein a share name.
3. Which of the following statements about a printing pool in Windows XP Profes-sional are correct? Choose all that apply.
a. All printers in a printing pool must be network interface printers.
b. A printing pool consists of two or more identical printers that are connectedto one print server and act as a single printer.
c. If you use printers that are not identical, they must use the same printerdriver.
d. If you use printers that are not identical, you must install all the requiredprinter drivers on the print server.
The correct answers are B and C. A is not correct because you can also include local printersin a printer pool. D is not correct because you should use identical printers, but must at leastuse printers that use the same driver.
4. Why would you create virtual printers and vary the priorities on them?
Creating virtual printers that print to the same physical printer and varying the printer priorityallows you to set priorities among groups of documents that all print on the same physicalprinter. Users can send critical documents to a high-priority virtual printer and noncritical docu-ments to a lower-priority virtual printer. The critical documents always print first, even if there isonly one physical printer.
Lesson 5 Review
Page 11-35
1. How do you access and use the printing troubleshooter?
Click Start, click Control Panel, and click Printers And Other Hardware. In the Printers And OtherHardware window, under Troubleshooters, click Printers. The Help And Support Services win-dow appears with the printing troubleshooter displayed.

11-43
2. What should you check if documents print correctly on some printers in a printingpool, but not on all of them?
Verify that all print devices in the printer pool are identical or that they use the same printerdriver.
3. What should you check if printing is slow because the print server is taking a longtime to render the job?
Try defragmenting the print server’s disk and check that there is adequate space for temporaryfiles on the hard disk.
4. What should you check if pages are only partially printing?
There might not be enough memory to print the document, so consider adding memory to theprint server. The printer might not have enough toner, so try replacing the printer’s toner car-tridge.
Case Scenario Exercise
Page 11-36
1. What feature in Windows XP Professional allows you to configure all these print-ers so that users will have to install only one printer on their local computers.?
Printer pooling
2. How will you configure this feature?
You must designate a computer to act as the print server. On this computer, you should installa logical printer that is configured with the IP address of one of the printers. Once the printeris installed, you should use the Ports tab of the printer’s Properties dialog box to enable printerpooling. You should then add ports for the IP addresses of each of the other printers. Finally,you should share the logical printer with the network and install any additional drivers the clientcomputers might need.
3. What steps will users have to take to connect to the printers?
After a printer pool is configured, users only need to connect to the single logical printer on theprint server to use the printer pool. If drivers are configured appropriately, the printer installa-tion should happen automatically.
Troubleshooting Lab
Page 11-37
How would you solve Angela’s problem?
You should suggest that Angela configure two logical printers for the printer. She should assignone of the logical printers a higher priority than the other printer. She should also name the log-ical printers to indicate their use. (For example, she might name the logical printer with thelower priority “Long Document Printer” and name the printer with the higher priority “NormalUse Printer.”) She should share each of the printers with the network and explain to the otherusers on the network how the printers are configured.
Questions and Answers


12-1
12 Managing Printers and Documents
Exam Objectives in this Chapter:
■ Connect to local and network print devices.
❑ Manage printers and print jobs.
❑ Control access to printers by using permissions.
Why This Chapter MattersIn Chapter 11, “Setting Up, Configuring, and Troubleshooting Printers,” youlearned how to install and configure printers. This chapter focuses on the man-agement of printers and of documents waiting to print. You will learn how tomanage printers and documents, how to restrict access to printers by using per-missions, and how to troubleshoot common printing problems.
Lessons in this Chapter:
■ Lesson 1: Introduction to Printer Administration
■ Lesson 2: Managing Printers
■ Lesson 3: Managing Documents
■ Lesson 4: Administering Printers by Using a Web Browser
■ Lesson 5: Troubleshooting Common Printing Problems
Before You Begin
To complete this chapter, you must have a computer that meets the minimum hard-ware requirements listed in the preface, “About This Book.” You must also haveMicrosoft Windows XP Professional installed on a computer on which you can makechanges. To complete the practices in this chapter, you must have installed the driversfor an HP Color LaserJet 4550 PS printer as directed in Chapter 11.
Note You do not need a printer to complete the exercises in this chapter. You just need to have installed the software for the HP Color LaserJet 4550 PS printer.
12-2 Chapter 12 Managing Printers and Documents
Lesson 1: Introduction to Printer AdministrationAfter your printing network is set up, you will be responsible for administering it. Youcan administer network printers at the print server or remotely over the network. Thislesson introduces you to the concepts involved in administering network printers:managing printers, managing documents, troubleshooting printers, and performingtasks that require the Manage Printers permission. You will also learn how to accessprinters and how to control access by using print permissions.
After this lesson, you will be able to
■ Identify tasks involved in printer management.
■ Identify tasks involved in document management.
■ Identify common troubleshooting tasks.
■ Gain access to printers for administration.
■ Assign print permissions to user accounts and groups.
Estimated lesson time: 30 minutes
Printer Management Tasks
Managing printers, which is one of the most important aspects of printer administra-tion, includes the following tasks:
■ Assigning forms to paper trays
■ Setting a separator page
■ Pausing, resuming, and canceling documents on a printer
■ Redirecting documents
■ Taking ownership of a printer
Document Management Tasks
A second major aspect of printer administration is managing documents, whichincludes the following tasks:
■ Pausing and resuming a document
■ Setting notification, priority, and printing time
■ Restarting and deleting a document

12-3
Common Printer Problems that Require Troubleshooting
Troubleshooting printers, which means identifying and resolving all printer problems,is a third major aspect of printer administration. The types of problems you will com-monly need to troubleshoot include the following:
■ Printers that are off or offline
■ Printers that are out of paper or out of ink
■ Printers that are incorrectly configured
■ Users who cannot print or cannot print correctly
■ Users who cannot access a printer
How to Access Printers
You can perform most administrative tasks for printers by using the Printers And Faxeswindow. When you select a printer icon, Windows XP Professional displays many ofthe common printer management and document management tasks for you in thePrinter Tasks list, as shown in Figure 12-1.
F12us01
Figure 12-1 Manage printers and documents using the Printers And Faxes window.
Note These tasks, as well as some additional printer management and document manage-ment tasks, are covered in later lessons in this chapter.
Lesson 1 Introduction to Printer Administration
12-4 Chapter 12 Managing Printers and Documents
To access printers by using the Printers And Faxes window, complete the followingsteps:
1. From the Start menu, click Printers And Faxes.
2. In the Printers And Faxes window, click the appropriate printer icon to select it.
3. After you have selected a printer icon, you can do the following:
❑ Click any of the tasks in the Printer Tasks list.
❑ Click the File menu and then click Open (or just double-click the printer icon)to open the printer window, which allows you to perform document manage-ment tasks.
❑ Click the File menu (or right-click the printer icon) and then click Propertiesto open the Properties dialog box, which allows you to perform printer-man-agement tasks such as changing print permissions or editing Microsoft ActiveDirectory service information about the printer.
Windows XP Professional Print Permissions
Windows XP Professional allows you to control printer usage and administration byassigning print permissions. With print permissions, you can control who can use aprinter, who can manage the printer, and who can manage documents in the printqueue.
For security reasons, you might need to limit user access to certain printers. You canalso use print permissions to delegate responsibilities for specific printers to users whoare not administrators. Windows XP Professional provides three levels of print permis-sions: Print, Manage Documents, and Manage Printers. Table 12-1 lists the capabilitiesof each level of permission.
Exam Tip The Print permission offers the fewest rights, basically allowing users to print to the printer and manage their own documents. The Manage Documents permission allows all the rights offered by the Print permission and also allows users to manage other users’ docu-ments. The Manage Printers permission includes all the rights offered by the Manage Docu-ments permission and allows users to configure printer settings.
You can allow or deny print permissions. Denied permissions always override allowedpermissions. For example, if you select the Deny check box next to Manage Docu-ments for the Everyone group, no one can manage documents, even if you grant thispermission to another user account or group because all user accounts are members ofthe Everyone group.
!
12-5
See Also For more information about using permissions, read Chapter 8, “Securing Resources with NTFS Permissions.”
To Assign Print Permissions
By default, Windows XP Professional assigns the Print permission for each printer tothe built-in Everyone group, allowing all users to send documents to the printer. Youcan also assign print permissions to users or groups.
Security Alert Because the Everyone group includes all users, you should remove the Everyone group from the list of groups with print permissions for a printer and instead use the Users group to provide general network access to a printer.
To assign print permissions, complete the following steps:
1. Click Start, and then click Printers And Faxes.
2. In the Printers And Faxes window, right-click the appropriate printer icon, andthen click Properties.
3. Click the Security tab.
Table 12-1 Printing Capabilities of Windows XP Professional Print Permissions
CapabilitiesPermissions
Print Manage Documents Manage Printer
Print documents ✔ ✔ ✔Pause, resume, restart, and cancel the user’s own document
✔ ✔ ✔
Connect to a printer ✔ ✔ ✔Control job settings for all documents ✔ ✔Pause, resume, restart, and cancel all other users’ documents
✔ ✔
Cancel all documents ✔Share a printer ✔Change printer properties ✔Delete a printer ✔Change print permissions ✔
Lesson 1 Introduction to Printer Administration

12-6 Chapter 12 Managing Printers and Documents
Note If your computer running Windows XP Professional is in a workgroup environment and you do not have a Security tab in your printer’s Properties dialog box, close the Properties dia-log box. In the Printers And Faxes window or in Explorer on the Tool menu, click Folder Options and click the View tab. Clear the Use Simple File Sharing (Recommended) check box, click OK, and then display your Printer’s Properties dialog box.
4. In the Security tab, click Add.
5. In the Select Users, Groups, Or Computers dialog box, select the appropriate useraccount or group, and then click OK. Repeat this step for all users or groups thatyou are adding.
6. Click OK.
7. In the Security tab, shown in Figure 12-2, select a user account or group, and thendo one of the following:
❑ Select the permissions in the bottom part of the dialog box that you want toassign.
❑ Click Advanced and assign additional print permissions that do not fit into thepredefined permissions in the Security tab, and then click OK.
The bottom part of the dialog box shows the permissions granted to the user orgroup selected in the upper part.
8. Click OK to close the Properties dialog box.
F12us02
Figure 12-2 Assign print permissions on the Security tab of a printer’s Properties dialog box.
To Modify Print Permissions
You can change the default print permissions that Windows XP Professional assignedor that you previously assigned for any user or group.
12-7
To modify print permissions, complete the following steps:
1. In the Printers And Faxes window, right-click the appropriate printer icon, andthen click Properties.
2. In the Properties dialog box for the printer, on the Security tab, select the appro-priate user account or group, and then do one of the following:
❑ Select the permissions that you want to change for the user or group.
❑ Click Advanced to modify additional print permissions that do not fit into thepredefined permissions in the Security tab.
3. Click OK.
Real World Encouraging Expert UsersIn just about any size organization or department, you are likely to find users whoare more interested in computing than others, and you should take advantage ofthese users when you find them. In larger companies in particular, users within adepartment often have a better understanding of how the people in the departmentuse printing resources than the IT support staff. At the least, you should encouragethese people to participate when planning the location and access of printingresources. You might also find that some users are willing to manage documents, oreven manage printers and use IT support as a backup. This practice offloads someof the administrative overhead and can result in more efficient use of resources.
Practice: Changing the Default Permissions on a Printer
In this practice, you will change the default permissions on the HP Color LaserJet 4550 PSprinter that you installed in Chapter 11. If you have not yet installed that printer, followthe instructions in Chapter 11 to install the printer before continuing with this practice.Complete the following steps.
1. Click Start, and then click Printers And Faxes.
2. In the Printer And Faxes window, right-click the HP Color LaserJet 4550 PS printerand click Properties.
3. In the HP Color LaserJet 4550 PS Properties dialog box, on the Security tab, in theGroup Or User Names list, click Everyone, and then click Remove.
4. Click Add.
5. In the Select Users Or Groups dialog box, click Advanced.
6. In the Select Users Or Groups dialog box, click Find Now.
Lesson 1 Introduction to Printer Administration
12-8 Chapter 12 Managing Printers and Documents
7. In the list of Names that appears, click Users and then click OK. Click OK again toclose the Select Users Or Groups dialog box.
8. In the HP Color LaserJet 4550 PS Properties dialog box, in the Group Or UserNames list, click Users. Make sure that the Users group is assigned only the Printpermission.
9. Click OK.
Lesson Review
Use the following questions to help determine whether you have learned enough tomove on to the next lesson. If you have difficulty answering these questions, reviewthe material in this lesson before beginning the next lesson. You can find answers tothese questions in the “Questions and Answers” section at the end of this chapter.
1. What are the four major types of tasks involved with administering network printers?
2. Windows XP Professional allows you to control printer usage and administrationby assigning _________________. Fill in the blank.
3. Which level of print permissions provided by Windows XP Professional grantsusers the ability to perform the most printing tasks? Choose the correct answer.
a. Manage Printers
b. Manage Documents
c. Print
d. Full Control
4. Which Windows XP Professional print permission allows users to pause, resume,restart, and cancel all other users’ documents? Choose all that apply.
a. Print
b. Manage Printers
c. Full Control
d. Manage Documents
12-9
Lesson Summary
■ Printer management involves assigning forms to paper trays, setting separatorpages, redirecting documents, and taking ownership of printers.
■ Document management involves pausing and resuming documents, configuringnotifications, and deleting documents from the print queue.
■ Troubleshooting printers involves identifying and resolving printer problems suchas offline printers, printers that are out of paper or ink, printers that are incorrectlyconfigured, and situations in which users are not using a printer properly.
■ You can gain access to printers for administration by using the Printers And Faxes window accessed through Control Panel.
■ Windows XP Professional allows you to control printer usage and administrationby assigning permissions.
Lesson 1 Introduction to Printer Administration
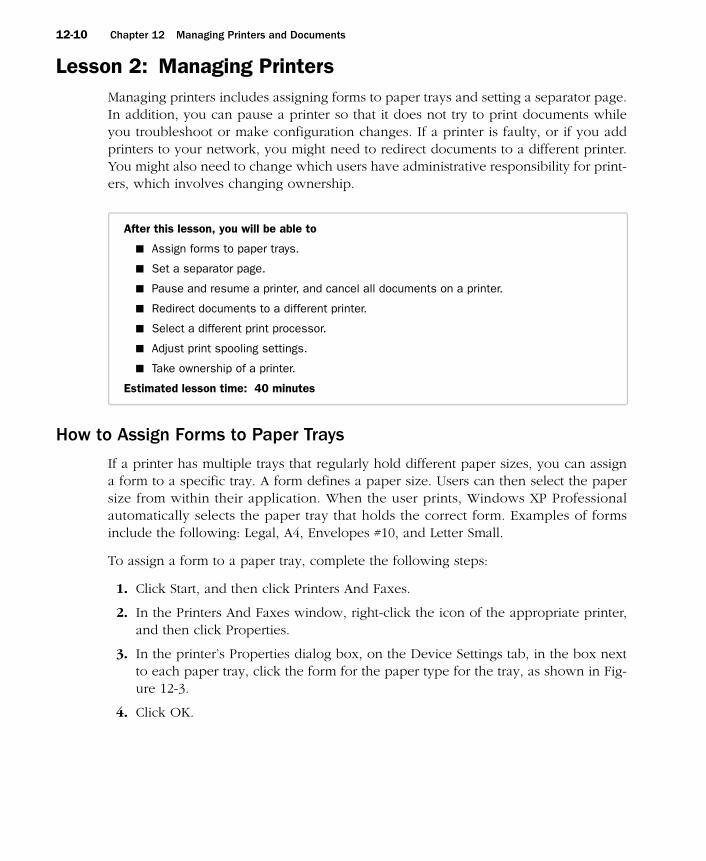
12-10 Chapter 12 Managing Printers and Documents
Lesson 2: Managing PrintersManaging printers includes assigning forms to paper trays and setting a separator page.In addition, you can pause a printer so that it does not try to print documents whileyou troubleshoot or make configuration changes. If a printer is faulty, or if you addprinters to your network, you might need to redirect documents to a different printer.You might also need to change which users have administrative responsibility for print-ers, which involves changing ownership.
After this lesson, you will be able to
■ Assign forms to paper trays.
■ Set a separator page.
■ Pause and resume a printer, and cancel all documents on a printer.
■ Redirect documents to a different printer.
■ Select a different print processor.
■ Adjust print spooling settings.
■ Take ownership of a printer.
Estimated lesson time: 40 minutes
How to Assign Forms to Paper Trays
If a printer has multiple trays that regularly hold different paper sizes, you can assigna form to a specific tray. A form defines a paper size. Users can then select the papersize from within their application. When the user prints, Windows XP Professionalautomatically selects the paper tray that holds the correct form. Examples of formsinclude the following: Legal, A4, Envelopes #10, and Letter Small.
To assign a form to a paper tray, complete the following steps:
1. Click Start, and then click Printers And Faxes.
2. In the Printers And Faxes window, right-click the icon of the appropriate printer,and then click Properties.
3. In the printer’s Properties dialog box, on the Device Settings tab, in the box nextto each paper tray, click the form for the paper type for the tray, as shown in Fig-ure 12-3.
4. Click OK.
12-11
F12us03
Figure 12-3 Set forms for a printer to make paper selection automatic.
After you have set up a paper tray, users specify the paper size from within applica-tions. Windows XP Professional knows in which paper tray the form is located.
How to Set Up a Separator Page
This section explains what a separator page is, describes its functions, lists separatorpage files included in Windows XP Professional, and then describes how to set up aseparator page.
What Is a Separator Page?
A separator page is a file that contains print device commands. Separator pages havetwo functions:
■ To identify and separate printed documents, making it easier for users to find theirdocuments on printers used by more than one person.
■ To switch a printer to a different print mode. Some printers support different printmodes that take advantage of different device features. You can use separatorpages to specify the correct page description language. For example, you canspecify PostScript or Printer Control Language (PCL) for a printer that can switchbetween different print modes but cannot automatically detect which language aprint job uses.
Separator Page Files Included in Windows XP Professional
Windows XP Professional includes four separator page files, which are located in the%systemroot%\System32 folder. Table 12-2 lists the file name and describes the func-tion for each of the included separator page files.
Lesson 2 Managing Printers
12-12 Chapter 12 Managing Printers and Documents
Exam Tip Separator pages identify and separate print jobs, and can also be used to switch a printer to a different print mode. Windows XP includes four separator pages: sysprint.sep, pcl.sep, pscript.sep, and sysprtj.sep. Sysprint.sep is the most commonly used page.
To Set Up a Separator Page
When you have decided to use a separator page and have chosen an appropriate one,use the Advanced tab in the printer’s Properties dialog box to have the separator pageprinted at the beginning of each print job.
To set up a separator page, complete the following steps:
1. In the Properties dialog box for the printer, on the Advanced tab (see Figure 12-4),click Separator Page.
F12us04
Figure 12-4 Configure a separator page by using the Advanced tab of a printer’s Properties dialog box.
2. In the Separator Page dialog box, type the name of or browse for the separatorpage file.
Table 12-2 Separator Page Files
File Name Function
Sysprint.sep Prints a page before each document; compatible with PostScript print devices
Pcl.sep Switches the print mode to PCL for HP-series print devices and prints a page before each document
Pscript.sep Switches the print mode to PostScript for HP-series print devices but does not print a page before each document
Sysprtj.sep A version of SYSPRINT.SEP that uses Japanese characters
!
12-13
3. Click OK to close the Separator Page box, and then click OK again to close theprinter’s Properties dialog box.
How to Pause a Printer and Cancel Documents
Pausing and resuming a printer or canceling all documents on a printer might be nec-essary if there is a printing problem. To pause or cancel all documents, right-click theicon for the printer in the Printers And Faxes window, and then click the appropriatecommand. To resume printing on a printer, right-click the printer and click ResumePrinting.
Table 12-3 describes the tasks that you might perform when you manage printers, listshow to perform the tasks, and gives examples of situations in which you might per-form these tasks.
Tip You can also pause a printer by taking the printer offline. To take a printer offline, open the printer window, and on the Printer menu, click Use Printer Offline.
How to Redirect Documents to a Different Printer
You can redirect documents to a different printer. For example, if a printer is not work-ing, you should redirect the documents so that users do not need to resubmit them.You can redirect all print jobs for a printer, but you cannot redirect specific documents.The new printer must use the same printer driver as the current printer.
To redirect documents to a different printer, complete the following steps:
1. Open the Printers And Faxes window, right-click the printer, and then click Prop-erties.
2. In the Properties dialog box, on the Ports tab, click the Add Port button.
Table 12-3 Managing Printer Tasks
Task Action Example
To pause printing Click Pause Printing. The Pause Printing command changes to Resume Printing.
Pause the printer if there is a problem with the printer until you fix the problem.
To resume printing Click Resume Printing. The Resume Printing command changes to Pause Printing.
Resume printing after you fix a problem with a printer.
To cancel all documents
Click Cancel All Documents. All documents are deleted from the printer.
Cancel all documents when you need to clear a print queue after old documents that no longer need to print have accumulated.
Lesson 2 Managing Printers

12-14 Chapter 12 Managing Printers and Documents
3. In the Available Port Types list, click Local Port, and then click the New Port button.
4. In the Port Name dialog box, in the Enter A Port Name text box, type the UniversalNaming Convention (UNC) name for the printer to which you are redirecting doc-uments (for example, \\prntsrv6\HPCLJ4550), as shown in Figure 12-5.
F12us05
Figure 12-5 Redirect documents to another printer so users do not have to print again.
5. Click OK to accept the change and close the Port Name dialog box.
6. Click Close to close the Printer Ports dialog box.
7. Click OK to close the printer’s Properties dialog box.
If another printer is available for the current print server, you can redirect the docu-ments to that printer. To redirect documents to another local or network printer thatuses the same printer driver, select the appropriate port on the print server and cancelthe selection of the current port.
Exam Tip Remember that you can redirect all documents for a printer, but not individual documents. Also, the new printer must use the same printer driver as the current printer.
Formats Supported by the WinPrint Print Processor
The print processor is software that is responsible for processing print documents intoa format that is suitable to be sent to the printer, and Windows XP contains only the Win-Print processor by default. The default print processor and data types are suitable for thevast majority of printing, and you should not change them unless you have an applica-tion that specifies the need for a different print processor or additional data type.
The WinPrint print processor supports the following formats:
RAW RAW is a common data type for clients other than Windows. When using theRAW format, the spooler does not modify the print data; data is sent directly to theprinter for processing. There are two additional versions of RAW:
❑ RAW [FF appended] is the same as the RAW format, except that a form feedcharacter is appended to the end of each print job, which is necessary for cer-tain types of printers.
❑ RAW [FF auto] works like RAW [FF appended], except that the processorchecks to see if there is a form feed character at the end of a document andif there is not one already, the processor adds one.
!

12-15
EMF Enhanced Metafile (EMF) is the default format used by WinPrint. The instruc-tions for the print job are assembled on the client computer that prints the docu-ment when the spooler processes the print job.
Text Text is a standard ANSI text format that prints using only the printer’s defaultfont.
How to Configure Spooling Options
Spooling is the process of saving a print job to the hard disk before sending it to theprinter. The process increases user productivity because after the job has beenspooled, the application is released, and the user can continue working while theprinting process continues in the background. Print spooling also ensures that printjobs will be saved in the event of a computer, application, or printer failure. In addi-tion, when a client is printing to a printer on the network, print spooling also managesthe routing of the print job from the client to the appropriate print server.
On the Advanced tab of a printer’s Properties dialog box, select the Spool Print Docu-ments So The Program Finishes Printing Faster option to enable printer spooling. Selectthe Print Directly To The Printer option to disable spooling. If spooling is enabled, youneed to decide whether you want the document to be spooled in its entirety before print-ing (the best option for remote printers) or to start printing immediately upon receivingthe first page (the best option for local printers).
How to Move the Print Spool FolderWindows XP uses the spool folder to store print jobs while they are waiting to besent to the printer. By default, Windows stores this file on the same partition as theWindows system files, in %systemroot%\System32\spool\PRINTERS. Moving theprint spool folder to a partition different from the system partition increases freespace on the system partition.
To move the print spool folder, follow these steps:
1. From the Start menu, click Printers And Faxes.
2. In the Printers And Faxes window, click the File menu, and then click ServerProperties.
3. In the Print Server Properties dialog box, on the Advanced tab, in the SpoolFolder text box, type a new location for the print spool folder. This locationshould be on a different partition from the Windows system files.
4. Click OK.
Lesson 2 Managing Printers
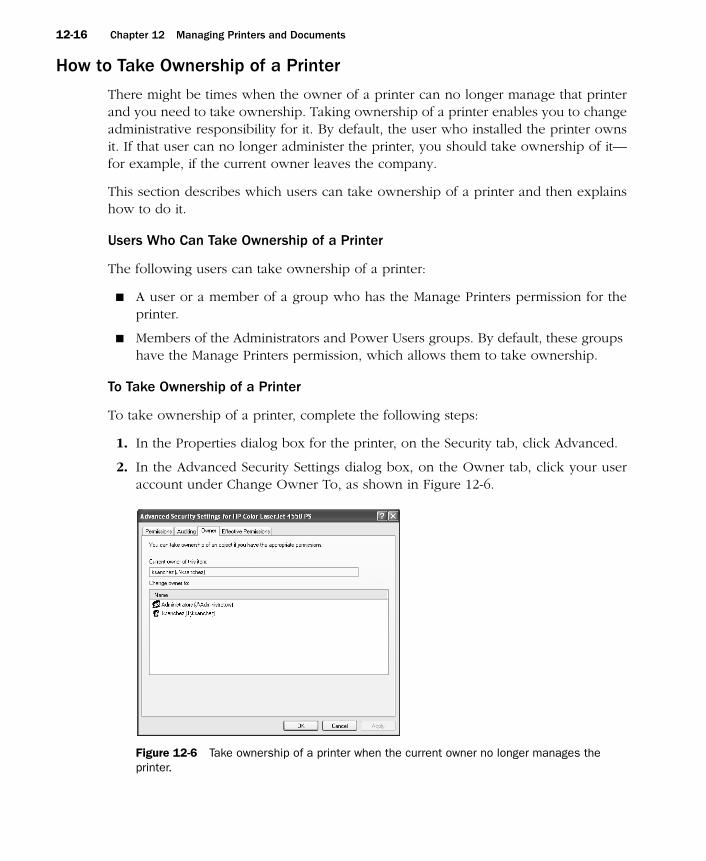
12-16 Chapter 12 Managing Printers and Documents
How to Take Ownership of a Printer
There might be times when the owner of a printer can no longer manage that printerand you need to take ownership. Taking ownership of a printer enables you to changeadministrative responsibility for it. By default, the user who installed the printer ownsit. If that user can no longer administer the printer, you should take ownership of it—for example, if the current owner leaves the company.
This section describes which users can take ownership of a printer and then explainshow to do it.
Users Who Can Take Ownership of a Printer
The following users can take ownership of a printer:
■ A user or a member of a group who has the Manage Printers permission for theprinter.
■ Members of the Administrators and Power Users groups. By default, these groups have the Manage Printers permission, which allows them to take ownership.
To Take Ownership of a Printer
To take ownership of a printer, complete the following steps:
1. In the Properties dialog box for the printer, on the Security tab, click Advanced.
2. In the Advanced Security Settings dialog box, on the Owner tab, click your useraccount under Change Owner To, as shown in Figure 12-6.
F12us06
Figure 12-6 Take ownership of a printer when the current owner no longer manages the printer.

12-17
3. Click OK to change ownership and to close the Advanced Security Settings dialogbox.
4. Click OK to close the Properties dialog box for the printer.
Practice: Managing Printers
In this practice, you perform three tasks that are part of managing printers. In the firstexercise, you assign forms to paper trays. In the second exercise, you set up a separa-tor page. In the third exercise, you learn how to take ownership of a printer. Completethe following exercises.
Exercise 1: Assigning Forms to Paper Trays
In this exercise, you assign a paper type (form) to a paper tray so that when usersprint to a specified form, the print job is automatically routed to and adjusted for thecorrect tray.
1. Log on with the user account you used to create the HP Color LaserJet 4550 PSprinter in Chapter 11 or with any user account that is a member of the Adminis-trators group.
2. Click Start, and then click Printers And Faxes.
3. Right-click the HP Color LaserJet 4550 PS printer, and then click Properties.
4. In the HP Color LaserJet 4550 PS Properties dialog box, on the Device Settings tab,click Tray 2, and then select Legal.
5. Click Apply and leave the HP Color LaserJet 4550 PS Properties dialog box openfor the next exercise.
Exercise 2: Setting Up Separator Pages
In this exercise, you set up a separator page to print between documents. You use theSysprint.sep separator page that ships with Windows XP Professional. This separatorpage includes the user’s name and the date and time the document was printed.
1. On the Advanced tab of the HP Color LaserJet 4550 PS Properties dialog box, clickSeparator Page.
2. In the Separator Page dialog box, click Browse.
3. Windows XP Professional displays a Separator Page dialog box that lists the con-tents of the System32 folder, which contains the separator pages that ship withWindows XP Professional. This dialog box also allows you to search in additionalfolders. Select Sysprint.sep, and then click Open.
4. Click OK. Windows XP Professional is now set to print a separator page betweenprint jobs.
5. Leave the Properties dialog box open for the next exercise.
Lesson 2 Managing Printers

12-18 Chapter 12 Managing Printers and Documents
Exercise 3: Taking Ownership of a Printer
In this exercise, you practice taking ownership of a printer.
1. On the Security tab of the Properties dialog box, click Advanced.
2. In the Advanced Security Settings For HP Color LaserJet 4550 dialog box, on theOwner tab, in the Change Owner To list, click Administrators to become theowner of the printer.
3. If you actually wanted to take ownership, you would click Apply, but for the pur-poses of this exercise, click Cancel and leave the ownership unchanged.
4. Click OK to close the Properties dialog box.
Lesson Review
Use the following questions to help determine whether you have learned enough tomove on to the next lesson. If you have difficulty answering these questions, reviewthe material in this lesson before beginning the next lesson. You can find answers tothese questions in the “Questions and Answers” section at the end of this chapter.
1. If a printer has multiple trays that regularly hold different paper sizes, you canassign a form to a specific tray. How do you assign a form to a paper tray?
2. A(n) _______________________ is a file that contains print device commands thatidentify and separate printed documents. Fill in the blank.
3. Which of the following tabs do you use to redirect documents to a differentprinter? Choose the correct answer.
a. Advanced tab of the Properties dialog box for the printer
b. Security tab of the Properties dialog box for the printer
c. Ports tab of the Properties dialog box for the printer
d. Device Settings tab of the Properties dialog box for the printer
4. Which of the following tabs do you use to take ownership of a printer? Choose thecorrect answer.
a. Advanced tab of the Properties dialog box for the printer
b. Security tab of the Properties dialog box for the printer
c. Ports tab of the Properties dialog box for the printer
d. Permissions tab of the Properties dialog box for the printer

12-19
Lesson Summary
■ If a printer has multiple trays that regularly hold different paper sizes, you canassign a form to a specific tray. A form defines a paper size.
■ A separator page is a file that contains print device commands. Separator pagesidentify and separate printed documents, and they can be used to switch printdevices between print modes.
■ To pause a printer, cancel all documents, or to resume a paused printer, right-clickthe icon for the printer in the Printers And Faxes window and then click theappropriate command.
■ You can redirect all print jobs for a printer to a different printer that uses the sameprinter driver. You cannot redirect specific documents in the print queue.
■ The print processor prepares a document for printing before it sends the docu-ment to the printer. The WinPrint processor is shipped with Windows and sup-ports the following formats: RAW, EMF, and Text.
■ By default, print jobs are spooled to disk before the print processor sends them tothe printer. This allows users to access their applications again more quickly.
■ To take ownership of a printer, a user must have or be a member of a group thathas the Manage Printers permission for the printer. By default, members of theAdministrators and Power Users groups have the Manage Printers permission.
Lesson 2 Managing Printers

12-20 Chapter 12 Managing Printers and Documents
Lesson 3: Managing DocumentsIn addition to managing printers, you can use Windows XP Professional to manage doc-uments that are in a printer’s print queue waiting to be printed. Managing documentsincludes pausing, resuming, restarting, and canceling documents. In addition, you canset users to be notified when a print job is finished, a priority that allows a critical docu-ment to print before other documents, and a specific time for a document to print.
After this lesson, you will be able to
■ Pause, resume, restart, and cancel the printing of a document.■ Set a notification, priority, and printing time.
Estimated lesson time: 20 minutes
How to Pause, Restart, and Cancel a DocumentIf a printer problem occurs during the printing of a document, you can pause that doc-ument while you resolve the problem and then resume printing. If you suspect that theprinting problem is related to the document itself, you can restart or cancel the printingof the document. You must have the Manage Documents permission for the appropri-ate printer to perform these actions. Because the creator of a document has the defaultpermissions to manage that document, users can perform any of these actions on theirown documents.
To manage a document, right-click the icon representing the printer for the documentin the Printers And Faxes window, and then click Open. Select the appropriate docu-ments; click the Document menu; and then click the appropriate command to pause,resume, and restart from the beginning, or cancel a document, as shown in Figure 12-7.
F12us07
Figure 12-7 Manage documents by opening the print queue window.
12-21
Table 12-4 describes the tasks that you might perform when you manage individualdocuments, how to perform the tasks, and examples of situations in which you mightperform them.
How to Set Notification, Priority, and Printing Time
You can control print jobs by setting the notification, priority, and printing time. Toperform these document management tasks, you must have the Manage Documentspermission for the appropriate printer.
You can set the notification, priority, and printing time for a document in the General tabof the Properties dialog box for the document, as shown in Figure 12-8. To open the Prop-erties dialog box for one or more documents, first select the documents in the Printer win-dow, click Document on the Printer window menu bar, and then click Properties.
Table 12-4 Document Management Tasks
Task Action Example
To pause printing of a document
Select the documents for which you want to pause printing, and then click Pause. (The status changes to Paused.)
Pause printing of a document when there is a problem with the document.
To resume printing a document
Select the documents for which you want to resume printing, and then click Resume. (The status changes to Printing.)
Resume printing of the docu-ment after you fix the problem with the paused document.
To restart printing a document
Select the documents for which you want to restart printing, and then click Restart. Restart causes printing to start from the beginning of the document.
Restart printing of a partially printed document after you fix a problem with the document or the print device.
To cancel printing a document
Select the documents for which you want to cancel printing, and then click Cancel. You can also cancel a document by pressing the DELETE key.
When a document has the wrong printer settings or is no longer needed, you can cancel it so it is deleted before it prints.
Lesson 3 Managing Documents

12-22 Chapter 12 Managing Printers and Documents
F12us08
Figure 12-8 Set notification, priority, and printing time for a document.
Table 12-5 describes the tasks that you might perform when you control print jobs,how to perform the tasks, and examples of situations in which you might performthem.
Practice: Managing Documents
In this practice, you manage documents by printing a document, setting a notificationfor a document, changing the priority for a document, and then canceling a document.Complete the following exercises, and answer any questions that are asked. You canfind answers to these questions in the “Questions and Answers” section at the end ofthis chapter. To complete this practice, you must have completed the exercises inChapter 11.
Table 12-5 Setting a Notification, Changing Priority, and Scheduling Print Times
Task Action Example
Set a notification In the Notify text box, type the logon name of the user who should receive the notification. By default, Win-dows XP Professional enters the name of the user who printed the document.
Change the print notification when someone other than the user who printed the document needs to retrieve it.
Change a docu-ment priority
Move the Priority slider to the priority level that you want. The highest pri-ority is 99, and the lowest is 1.
Change a priority so that a critical document prints before other doc-uments.
Schedule print times
To restrict print times, select Only From in the Schedule section, and then set the hours between which you want the document to print.
Set the print time for a large docu-ment so that it prints during off-hours, such as late at night.
12-23
Exercise 1: Verifying that a Printer is Offline
1. Log on with the user account you used to create the HP Color LaserJet 4550 PSprinter in Chapter 11 or with any user account that is a member of the Adminis-trators group.
2. Click Start, and then click Printers And Faxes.
3. In the Printers And Faxes window, click the HP Color LaserJet 4550 PS printericon. Do one of the following to verify that the printer is offline:
❑ On the File menu, verify that the Use Printer Online option is listed becausethat indicates that the printer is currently offline.
❑ Right-click the printer icon and verify that the Use Printer Online command islisted because that indicates that the printer is currently offline.
❑ If the Printers And Faxes window is displayed in Web view, verify that UsePrinter Offline is displayed in the left portion of the window.
4. Verify that a check mark appears above the printer icon indicating that it is thedefault printer.
5. Minimize the Printers And Faxes window.
Note Keep the printer offline so that documents enter the print queue, but are not sent to the printer. This eliminates error messages in later exercises.
Exercise 2: Printing a Document
1. Click Start, point to All Programs, point to Accessories, and then click WordPad.
2. Type How big is big?, and then, on the File menu, click Save.
3. In the File Name text box, type big.rtf, and then click Save.
4. Click File, and then click Print.
5. In the Print dialog box, make sure that the file will be printed on the HP ColorLaserJet 4550 PS printer. Click Print, and then close WordPad.
Exercise 3: Setting a Notification
1. Restore the Printers And Faxes window that you minimized in Exercise 1.
2. Double-click HP Color LaserJet 4550 PS.
3. In the printer window, click the big document. On the Document menu, clickProperties.
Windows XP Professional displays the BIG Document Properties dialog box withthe General tab active.
Lesson 3 Managing Documents
12-24 Chapter 12 Managing Printers and Documents
4. Which user is specified in the Notify text box? Why?
5. In the Notify text box, type Fred, and then click Apply.
Exercise 4: Increasing the Priority of a Document
1. In the big.rtf Document Properties dialog box, on the General tab, notice the defaultpriority.
2. What is the current priority? Is it the lowest or highest priority?
3. Move the Priority slider to the right to increase the priority of the document to 38,and then click OK.
Exercise 5: Canceling a Document
1. In the Printer window, select the big document.
2. On the Document menu, click Cancel.
3. In the Printers dialog box, click Yes to confirm the cancellation.
The big document is removed from the document list.
4. Notice that for larger documents, you might see the document status change toDeleting for a period before the document is removed from the list.
Note You can also cancel a document by selecting the document and pressing the DELETE key.
5. Close the Printer window, and then close the Printers And Faxes window.
Lesson Review
Use the following questions to help determine whether you have learned enough tomove on to the next lesson. If you have difficulty answering these questions, reviewthe material in this lesson before beginning the next lesson. You can find answers tothese questions in the “Questions and Answers” section at the end of this chapter.
1. What is the difference between resuming printing of a document and restartingprinting of a document?
12-25
2. Which of the following statements about the range of priorities for a document tobe printed is correct? Choose the correct answer.
a. Priorities for a document range from 1 to 10, with 1 being the highest priority.
b. Priorities for a document range from 1 to 10, with 10 being the highest priority.
c. Priorities for a document range from 1 to 99, with 1 being the highest priority.
d. Priorities for a document range from 1 to 99, with 99 being the highest priority.
3. You set the notification, priority, and printing time for a document on the______________ tab of the Properties dialog box for the document. Fill in theblank.
4. By default, Windows XP Professional enters which of the following user accountsin the Notify text box of a document?
a. Administrator
b. Owner of the printer
c. All users with the Manage Documents permissions
d. Person who printed the document
Lesson Summary
■ Managing documents includes pausing, resuming, restarting, and canceling docu-ments. You must have the Manage Documents permission for the appropriateprinter to perform these document-management tasks. The creator of a documenthas the default permissions to manage that document, so users can perform any ofthese actions on their own documents.
■ In the Notify text box for a document, you can set who is notified when the print job is finished. Setting the document priority allows a critical document to printbefore other documents. Setting a specific time for a document to print allowslarge documents to print only during off-hours, such as late at night.
Lesson 3 Managing Documents

12-26 Chapter 12 Managing Printers and Documents
Lesson 4: Administering Printers by Using a Web BrowserYou can use Windows XP Professional to manage printers from any computer runninga Web browser, regardless of whether the computer is running Windows XP Profes-sional or has the correct printer driver installed. To access a printer using a Webbrowser, a print server running Windows 2000 Server or Windows XP Professionalmust have Microsoft Internet Information Services (IIS) installed. All management tasksthat you perform with Windows XP Professional management tools are the same whenyou use a Web browser. The only difference in administering with a Web browser isthe interface, which is a Web-based interface.
See Also For information about installing IIS, see Chapter 5, “Configuring Windows XP Pro-fessional.”
After this lesson, you will be able to
■ Describe the advantages of administering printers using a Web browser.
■ Administer printers using a Web browser.
Estimated lesson time: 5 minutes
The Advantages of Using a Web Browser to Manage Printers
The following are the advantages of using a Web browser, such as Microsoft InternetExplorer, to manage printers:
■ You can administer printers from any computer with a Web browser, regardless ofwhether the computer is running Windows XP Professional or has the correctprinter driver installed.
■ You can customize the Web interface. For example, you can create your own Webpage containing a floor plan with the locations of the printers and the links to theprinters.
■ You can view a summary page that lists the status of all printers on a print server.
■ You can view real-time print device data, such as whether the print device is inpower-saving mode, if the printer driver makes such information available. Thisinformation is not available in the Printers And Faxes window.
How to Access Printers Using a Web Browser
You can access all printers on a print server by using a Web browser or you can useany of the windows or folders within the Windows XP Professional interface that hasan address bar, such as the Printers And Faxes window or Internet Explorer. In the
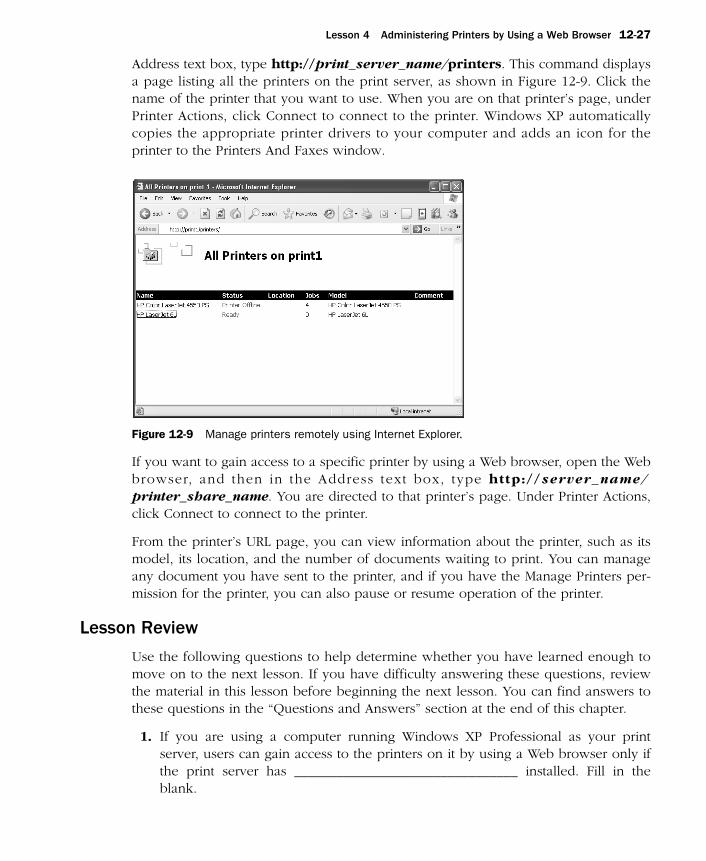
12-27
Address text box, type http://print_server_name/printers. This command displaysa page listing all the printers on the print server, as shown in Figure 12-9. Click thename of the printer that you want to use. When you are on that printer’s page, underPrinter Actions, click Connect to connect to the printer. Windows XP automaticallycopies the appropriate printer drivers to your computer and adds an icon for theprinter to the Printers And Faxes window.
F12us09
Figure 12-9 Manage printers remotely using Internet Explorer.
If you want to gain access to a specific printer by using a Web browser, open the Webbrowser, and then in the Address text box, type http://server_name/printer_share_name. You are directed to that printer’s page. Under Printer Actions,click Connect to connect to the printer.
From the printer’s URL page, you can view information about the printer, such as itsmodel, its location, and the number of documents waiting to print. You can manageany document you have sent to the printer, and if you have the Manage Printers per-mission for the printer, you can also pause or resume operation of the printer.
Lesson Review
Use the following questions to help determine whether you have learned enough tomove on to the next lesson. If you have difficulty answering these questions, reviewthe material in this lesson before beginning the next lesson. You can find answers tothese questions in the “Questions and Answers” section at the end of this chapter.
1. If you are using a computer running Windows XP Professional as your printserver, users can gain access to the printers on it by using a Web browser only ifthe print server has ________________________________ installed. Fill in theblank.
Lesson 4 Administering Printers by Using a Web Browser
12-28 Chapter 12 Managing Printers and Documents
2. How can you gain access to all printers on a print server?
3. Can you pause and resume operation of a printer that you have used InternetExplorer to connect to?
Lesson Summary
■ The advantages of managing printers from a Web browser are:
❑ It does not matter whether the print server is running Windows XP Profes-sional.
❑ All management tasks that you perform with Windows XP Professional man-agement tools are the same when you use a Web browser.
❑ You can customize the Web interface.
❑ You can view a summary page and real-time device information.
■ You can access all printers on a print server running IIS by typing http://print_server_name/printers. You can access a particular printer by typinghttp://print_server_name/printer_share_name.
12-29
Lesson 5: Troubleshooting Common Printing ProblemsIn this lesson, you will learn about some common printing problems and how to trou-bleshoot them. This chapter also shows you to how to troubleshoot printer and docu-ment problems by using the built-in Printing Troubleshooter, which was introduced inChapter 11.
After this lesson, you will be able to
■ Examine a printing problem and know the appropriate troubleshooting questions to ask.
■ Identify and solve common printing problems.
■ Solve printing problems using the Printing Troubleshooter in Windows XP Professional.
Estimated lesson time: 10 minutes
ESTIMATED LESSON TIME: 10 MINUTES
Guidelines for Examining a Printing Problem
When you detect a printing problem, always verify that the printer is plugged in,turned on, and connected to the print server. For a network interface printer, verify thatthere is a network connection between the printer and the print server.
To determine the cause of a problem, first try printing from a different program to ver-ify that the problem is with the printer, not with the program. If the problem is with theprinter, ask the following questions:
■ Can other users print normally? If so, the problem is most likely caused by insuf-ficient permissions, no network connection, or client computer problems.
■ Does the print server use the correct printer driver for the printer? If not, youshould install the appropriate printer driver.
■ Is the print server operational, and is there enough disk space for spooling?
■ Does the client computer have the correct printer driver?
Solutions to Common Printing Problems
There are some printing problems that are common to most network printing environ-ments. Table 12-6 describes some of these common printing problems, as well as somepossible causes and solutions.
Lesson 5 Troubleshooting Common Printing Problems
12-30 Chapter 12 Managing Printers and Documents
Table 12-6 Common Printing Problems, Causes, and Solutions
Problem Possible Cause Solution
A user receives an Access Denied message when trying to configure a printer from an application (for example, from earlier versions of Microsoft Excel).
The user does not have the appropriate permission to change printer configurations.
Change the user’s permission or configure the printer for the user.
The document does not print completely or comes out gar-bled.
The printer driver is incorrect (if it is the first time you have used the printer since installa-tion or updating the driver).
Install the correct printer driver.
A user has changed the printer configuration or placed the printer into a separate mode.
Cancel the print job, reset the printer, and resubmit the print job.
Pages print only partially. The printer is out of ink or toner, or the print server is low on memory. If specific parts of a page do not print and those parts are the same each time you print, the printer may not be able to print a particular font, or the margins of the document may be outside the printable range.
Replace the ink or toner car-tridge. Check the memory on the print server. Change the font in a document or adjust the margins of the document.
The hard disk starts working too hard, the document does not reach the print server, or printing is very slow.
There is insufficient hard disk space for spooling.
Create more free space on the hard disk, or move the print spool folder to a different partition.
There is a problem printing graphics.
EMF format can occasionally cause problems with printing, especially with the printing of graphics.
Consider disabling EMF spooling on the Advanced tab of the printer’s Properties dia-log box by clearing the Enable Advanced Printing Features check box.

12-31
How to Solve Printing Problems Using the Windows XP Professional Printing Troubleshooter
Windows XP Professional has a built-in troubleshooter to help you resolve your print-ing problems. For example, in the Printers And Faxes window, you can click Trouble-shoot Printing.
When you click Troubleshoot Printing, Windows XP Professional presents you with aseries of potential printing problems. After you make a selection from the list of poten-tial problems and click Next, the troubleshooter takes you through a series of sugges-tions and questions to help you resolve the problem. You can also perform a search tohelp resolve your problem or you can select the I Want The Troubleshooter To Inves-tigate Settings On This Computer option.
Lesson Review
Use the following questions to help determine whether you have learned enough tomove on to the next lesson. If you have difficulty answering these questions, reviewthe material in this lesson before beginning the next lesson. You can find answers tothese questions in the “Questions and Answers” section at the end of this chapter.
1. When you detect a printing problem, what three things should you always checkbefore you start troubleshooting the problem?
2. If a user reports to you that he or she cannot print, what are some of the areas youshould check?
Lesson Summary
■ When there is a printing problem, always verify that the printer is plugged in,turned on, and connected to the print server. For a network interface print device,verify that there is a network connection between the printer and the print server.Ask questions to help determine whether the problem is with the application, thedocument, or the printer.
Lesson 5 Troubleshooting Common Printing Problems
12-32 Chapter 12 Managing Printers and Documents
■ There are a number of common printing problems that you should know how to solve, including problems arising from printer configuration, printer drivers, andprint permissions.
■ You can access the Windows XP Professional built-in Printing Troubleshooterfrom the Printers And Faxes window by clicking Troubleshoot Printing.
Case Scenario Exercise
In this exercise, you will read a scenario about a user who is trying to manage docu-ments on a network printer, and then answer the questions that follow. If you have dif-ficulty completing this work, review the material in this chapter before beginning thenext chapter. You can find answers to these questions in the “Questions and Answers”section at the end of this chapter.
Scenario
You are working as an administrator for Fabrikam, Inc., a company that makes prebuiltcabinetry that people can install in their own homes. Erin, a user from the Sales depart-ment, calls at 4:45 p.m. to tell you that one of the other people in her department hasprinted a very long document to the department’s only color laser printer. The printeris a network printer that is used by many people, and Erin does not think the long doc-ument has started printing yet.
Erin tells you that her manager, Jesper, has asked her to print several copies of animportant memo to distribute to other people in her department before 5:00 p.m. Shedoes not want to stop the long document from being printed because the person whoprinted it has already left for the afternoon and will need the printed document in themorning. Erin says that she has accessed the print server using her Web browser in thepast but cannot remember how she did it. You determine that the print server is namedSLS-PR1 and that the printer’s share name is ColorLaser.
Questions
1. What URL should Erin type into her Web browser to access the printer directly?
2. What action should Erin take to ensure that all printing on the printer stops whileshe figures out what to do, but that no documents need to be reprinted?
3. What permission will Erin need to take this action?
12-33
4. What action should Erin take to make sure that her document prints before thelong document?
5. How else could Erin handle this situation?
Troubleshooting Lab
In this lab, you will use the Printing Troubleshooter to simulate troubleshooting a printingproblem.
1. From the Start menu, click Control Panel.
2. In the Control Panel window, click Printers And Other Hardware.
3. In the Printers And Other Hardware window, in the Troubleshooters list, clickPrinting.
4. In the Help And Support Center window, select Printed Text Or Graphics AreIncomplete, and then click Next.
5. On the Are You Having Trouble Printing Text Or Graphics? page, click I Am Hav-ing Trouble With Graphics, and then click Next.
6. On the Are The Page Size And Orientation Settings Correct? page, you are asked,“Does Adjusting Your Page Size And Orientation Settings Solve The Problem?”Click No, My Page Size And Orientation Settings Are Correct, But Part Of My FileStill Does Not Print, and then click Next.
7. On the Are Your Printer Resolution Settings Correct? page, you are asked, “DoesChanging Your Printer Resolution Solve The Problem?” Click No, I Still Have AProblem Printing Graphics, and then click Next.
8. On the Does The File Or Graphic That You Are Trying To Print Require Too MuchMemory? page, you are asked, “Does Freeing Memory On Your Computer SolveThe Problem?” Click No, I Still Have A Problem, and then click Next.
Troubleshooting Lab
12-34 Chapter 12 Managing Printers and Documents
9. On the Does Your Printer Have Enough Memory? page, you are asked, “Do TheseSuggestions Help You To Solve The Problem?” Click No, I Still Have A Problem,and then click Next.
10. On the Is Your Graphic Damaged? page, you are asked, “Can You Print YourGraphic In WordPad?” Click No, I Cannot Print My Graphic In WordPad, and thenclick Next.
11. On the Is There A Problem With Your Printer Driver? page, you are asked, “DoesReinstalling Or Updating Your Printer Driver Solve The Problem?” Click Yes, ThisSolves The Problem, and then click Next.
12. Close Help And Support Center.
Chapter Summary■ Printer management involves assigning forms to paper trays, setting separator
pages, redirecting documents, and taking ownership of printers. Document man-agement involves pausing and resuming documents, configuring notifications, anddeleting documents from the print queue.
■ There are a number of tasks associated with managing printers, including thefollowing:
❑ If a printer has multiple trays that regularly hold different paper sizes, you canassign a form to a specific tray. A form defines a paper size.
❑ A separator page is a file that contains print device commands. Separatorpages identify and separate printed documents, and they can be used toswitch print devices between print modes.
❑ To pause a printer, cancel all documents, or resume printing, right-click theicon for the printer in the Printers And Faxes window, and then click theappropriate command.
❑ You can redirect all print jobs for a printer to a different printer that uses thesame printer driver. You cannot redirect specific documents in the print queue.
❑ The print processor prepares a document for printing before it sends the doc-ument to the printer. The WinPrint processor is shipped with Windows andsupports the following formats: RAW, EMF, and Text.
❑ By default, print jobs are spooled to disk before the print processor sends themto the printer. This allows users to access their applications again more quickly.
❑ To take ownership of a printer, a user must have or be a member of a group thathas the Manage Printers permission for the printer. By default, members of theAdministrators and Power Users groups have the Manage Printers permission.

12-35
■ Managing documents includes pausing, resuming, restarting, and canceling docu-ments. You must have the Manage Documents permission for the appropriateprinter to perform these document management tasks. The creator of a documenthas the default permissions to manage that document, so users can perform any ofthese actions on their own documents.
■ You can also manage printers from a Web browser in Windows XP Professional. The print server must be running IIS for Web management to work. You canaccess al l pr inters on a pr int server running IIS by typing http://print_server_name/printers. You can access a particular printer by typinghttp://print_server_name/printer_share_name.
■ When there is a printing problem, always verify that the printer is plugged in,turned on, and connected to the print server. For a network interface print device,verify that there is a network connection between the printer and the print server.Ask questions that help determine whether the problem is with the application,the document, or the printer.
Exam HighlightsBefore taking the exam, review the key points and terms that are presented in thischapter. You need to know this information.
Key Points
■ The general categories of print permissions are inclusive at progressive levels. ThePrint permission offers the least number of rights, basically allowing users to printto the printer and manage their own documents. The Manage Documents permis-sion allows all the rights offered by the Print permission and also allows users tomanage other users’ documents. The Manage Printers permission includes all therights offered by the Manage Documents permission and allows users to configureprinter settings.
■ Separator pages identify and separate print jobs, and can also be used to switch aprinter to a different print mode. Windows XP includes four separator pages:sysprint.sep, pcl.sep, pscript.sep, and sysprtj.sep. Sysprint.sep is the most com-monly used separator page.
■ You can redirect all documents for a printer, but not individual documents. Also,the new printer must use the same printer driver as the current printer.
Exam Highlights

12-36 Chapter 12 Managing Printers and Documents
Key Terms
print spooling The process of saving a print job to the hard disk before sending itto the printer.
print permissions Permissions that enable you to control which users can access aprinter and which actions they can perform.
print processor Software that is responsible for processing print documents into aformat that is suitable to be sent to the printer. Windows XP contains only the Win-Print processor by default.
redirecting The process of sending a document to another printer. You can redirectonly all documents for a printer, not individual documents. Also, you can redirectdocuments only to printers that use the same printer driver as the original printer.
separator page A file that contains print device commands. Separator pages identifyand separate print jobs and can also be used to switch a printer to a different printmode.

12-37
Questions and Answers
Lesson 1 Review
Page 12-8
1. What are the four major types of tasks involved with administering network printers?
Managing printers, managing documents, troubleshooting printers, and performing tasks thatrequire the Manage Printers permission
2. Windows XP Professional allows you to control printer usage and administrationby assigning _________________. Fill in the blank.
permissions
3. Which level of print permissions provided by Windows XP Professional grantsusers the ability to perform the most printing tasks? Choose the correct answer.
a. Manage Printers
b. Manage Documents
c. Print
d. Full Control
The correct answer is A. Granting the Manage Printers permission also allows users to managedocuments and print to the printer. B and C are not correct because these rights are includedin the Manage Printers permission. D is not correct because Full Control is not a permissionassociated with printers.
4. Which Windows XP Professional print permission allows users to pause, resume,restart, and cancel all other users’ documents? Choose all that apply.
a. Print
b. Manage Printers
c. Full Control
d. Manage Documents
The correct answers are B and D. Both the Manage Printers and Manage Documents permis-sions allow users to manage documents in the print queue. A is not correct because the Printpermission allows users to print to a printer and to manage their own documents, but not tomanage all documents in a printer queue. C is not correct because Full Control is not a permis-sion associated with printers.
Lesson 2 Review
Page 12-18
1. If a printer has multiple trays that regularly hold different paper sizes, you canassign a form to a specific tray. How do you assign a form to a paper tray?
In the Properties dialog box for the printer, click the Device Settings tab. In the box next to eachpaper tray, select the form for the paper type you want to assign to that tray.
Questions and Answers
12-38 Chapter 12 Managing Printers and Documents
2. A(n) _______________________ is a file that contains print device commands thatidentify and separate printed documents. Fill in the blank.
separator page
3. Which of the following tabs do you use to redirect documents to a differentprinter? Choose the correct answer.
a. Advanced tab of the Properties dialog box for the printer
b. Security tab of the Properties dialog box for the printer
c. Ports tab of the Properties dialog box for the printer
d. Device Settings tab of the Properties dialog box for the printer
The correct answer is C. The Ports tab defines the port (or address) that the logical printer usesto direct the document to the printer. A, B, and D are not correct because you do not use thesetabs to redirect documents.
4. Which of the following tabs do you use to take ownership of a printer? Choose thecorrect answer.
a. Advanced tab of the Properties dialog box for the printer
b. Security tab of the Properties dialog box for the printer
c. Ports tab of the Properties dialog box for the printer
d. Permissions tab of the Properties dialog box for the printer
The correct answer is B. The Security tab defines the permissions associated with the printer,so it is a logical place to change the owner of the printer. A, C, and D are not correct becauseyou do not use these tabs to take ownership of a printer.
Lesson 3 Practice: Exercise 3
Page 12-22
1. Which user is specified in the Notify text box? Why?
The user account that you are logged on with is specified because that is who created the print job.
Lesson 3 Practice: Exercise 4
2. What is the current priority? Is it the lowest or highest priority?
The current priority is 1, which is the lowest priority.
Lesson 3 Review
Page 12-24
1. What is the difference between resuming printing of a document and restartingprinting of a document?
When you restart a document, it begins printing again from the beginning of the document.When you resume printing a document, it continues from where it left off printing.
12-39
2. Which of the following statements about the range of priorities for a document tobe printed is correct? Choose the correct answer.
a. Priorities for a document range from 1 to 10, with 1 being the highest priority.
b. Priorities for a document range from 1 to 10, with 10 being the highest priority.
c. Priorities for a document range from 1 to 99, with 1 being the highest priority.
d. Priorities for a document range from 1 to 99, with 99 being the highest priority.
The correct answer is D. You can set a priority from 1 to 99 for any document. 99 is the highestpriority; 1 is the lowest priority.
3. You set the notification, priority, and printing time for a document on the____________ tab of the Properties dialog box for the document. Fill in the blank.
General
4. By default, Windows XP Professional enters which of the following user accountsin the Notify text box of a document?
a. Administrator
b. Owner of the printer
c. All users with the Manage Documents permissions
d. Person who printed the document
The correct answer is D. By default, the person who printed the document is notified when thedocument prints or fails to print.
Lesson 4 Review
Page 12-27
1. If you are using a computer running Windows XP Professional as your printserver, users can gain access to the printers on it by using a Web browser only ifthe print server has ________________________________ installed. Fill in theblank.
Internet Information Services (IIS)
2. How can you gain access to all printers on a print server?
In a Web browser or any of the windows or folders within the Windows XP Professional interfacethat has an address bar, type http://print_server_name/printers.
3. Can you pause and resume operation of a printer that you have used InternetExplorer to connect to?
Yes, if you have the Manage Printers permission for the printer, you can also pause or resumeoperation of a printer that you used Internet Explorer to connect to.
Questions and Answers
12-40 Chapter 12 Managing Printers and Documents
Lesson 5 Review
Page 12-31
1. When you detect a printing problem, what three things should you always checkbefore you start troubleshooting the problem?
Always verify that the printer is plugged in, turned on, and connected to the print server or net-work.
2. If a user reports to you that he or she cannot print, what are some of the areas youshould check?
Answers may vary. Suggested questions to ask include the following: Can other users print nor-mally? Is the print server operational, and is there enough disk space for spooling? Does theclient computer have the correct printer driver?
Case Scenario Exercise
Page 12-32
1. What URL should Erin type into her Web browser to access the printer directly?
http://SLS-PR1/ColorLaser
2. What action should Erin take to ensure that all printing on the printer stops whileshe figures out what to do, but that no documents need to be reprinted?
She should either pause the printer or take it offline.
3. What permission will Erin need to take this action?
She will need the Manage Printer permission (or will need to be in a group that has that permis-sion).
4. What action should Erin take to make sure that her document prints before thelong document?
She should first make sure that the long document has not started printing. She should thenopen the Properties dialog box for her document and assign it a higher priority than the longdocument. She should then resume the printer.
5. How else could Erin handle this situation?
Instead of pausing the printer itself, Erin could also pause the long document, which wouldallow other documents (including hers) to continue printing. After her document printed, shecould resume printing of the long document. However, when talking a user through a situationlike this, it is usually easier to pause the printer while the user gets her bearings.