12th international congress on the deterioration and...
TRANSCRIPT
DRAFT
12th International Congress on the Deterioration and Conservation of Stone Columbia University, New York, 2012
1
THE INCE BLUNDELL COMPOSITE MARBLE STATUE OF A MAN WITH
AN IVY WREATH – ‘MARCUS AURELIUS’: REVISITED/ RESTORED
Nicolas Verhulst1 and Lottie Barnden2
1Conservation Trainee, specialising in stone, University of Amsterdam, Ateliergebouw,
Hobbemastraat 22, 1071 ZC Amsterdam, The Netherlands (contact author:
2Head of Sculpture Conservation, National Museums Liverpool, Conservation Centre,
1 Peter Street, Liverpool L1 6HZ, United Kingdom (supervisor of the project).
Abstract
In the eighteenth century Henry Blundell bought an antique over-life-sized statue
of ‘Marcus Aurelius’ to add to his collection at Ince Blundell Hall, north of Liverpool.
His private collection of antique sculpture became the second largest in the United
Kingdom, after the Townley collection (British Museum). As a ‘composite’ sculpture
‘Marcus Aurelius’ represented the fashion of eighteenth century restoration ethics.
During the condition report the sculpture was divided into three different zones: the
plinth with the feet were separated from the main body and another zone existed of 58 pieces. The treatment proposal focused on a series of complex issues. A range of pins
and clamps needed to be removed from lead and eighteenth century resin. After cleaning
the surface dirt, the disturbing staining of the white Carrara marble by old resin needed
to be tempered or removed. Considering different cleaning methods, a superficial
impregnating gel worked by dissolving 4% agar in deionised water. Grey dirt layers and
sulphation could be removed with a Nd:YAG laser. To reinstate the structural integrity
of the statue a ‘piston fit pin sleeve’ armature was devised, besides the use of common
pins. This will create an easier disassembly in the future, as the stainless steel pin slides
into stainless steel sleeves that are fixed inside the holes with a bulked epoxy. For
choosing the right colour fill seven adhesives with seven fillers were tested. This
‘colourfill chart’ worked as a reference and each recipe could be adjusted by adding more or less fillers when searching for the right properties. Finally a protective coating
of microcrystalline wax was applied to protect the surface from surface dirt ingression in
the future.
Keywords: This paper is about a composite statue and represents ideas for the removal
of pins, cramps and lead; removal of surface dirt and stains with Laser and agar; the
choice of appropriate adhesives according to its function; the development of a ‘piston
fit pin sleeve’ armature system, creating a colour fill to imitate white Carrara marble and
the application of a protective coating.
1. Introduction The Former head of the sculpture studio at the Conservation Centre in Liverpool
(UK): Samantha Sportun examined the white Carrara marble composite statue with an
ivy wreath – ‘Marcus Aurelius’ (210 x 85 x 50 cm) in 1995-1996. She started with the
disassembly and removal of corroded armature. Since fifteen years this project was left
DRAFT
12th International Congress on the Deterioration and Conservation of Stone Columbia University, New York, 2012
2
unfinished in the studio consisting of two main zones and another one about 58
fragments. Over the years surface dirt accumulated on top of the disturbing resin
staining and sulphation. Under supervision of the current head of the sculpture studio:
Lottie Barnden, it became the multifaceted restoration project during my conservation
trainee internship in 2011-2012, as part of the University of Amsterdam. It was
necessary to get familiar with the object’s background and current condition while
writing a treatment proposal. Different options were considered and will be explained in
the following article. An important idea that was kept in mind during the whole interdisciplinary process was that of a MINIMAL INTERVENTION AND EASE OF
DISSASEMBLY.
2. Historic background
2.1 The Ince Blundell collection
The antique over-life-sized statue was given the label: ‘Marcus Aurelius’ (Ince 569)
by the wealthy aristocrat Henry Blundell (1724-1810), who gathered an impressive
collection of antiquities in his garden temples at the Ince Blundell hall in Lancashire,
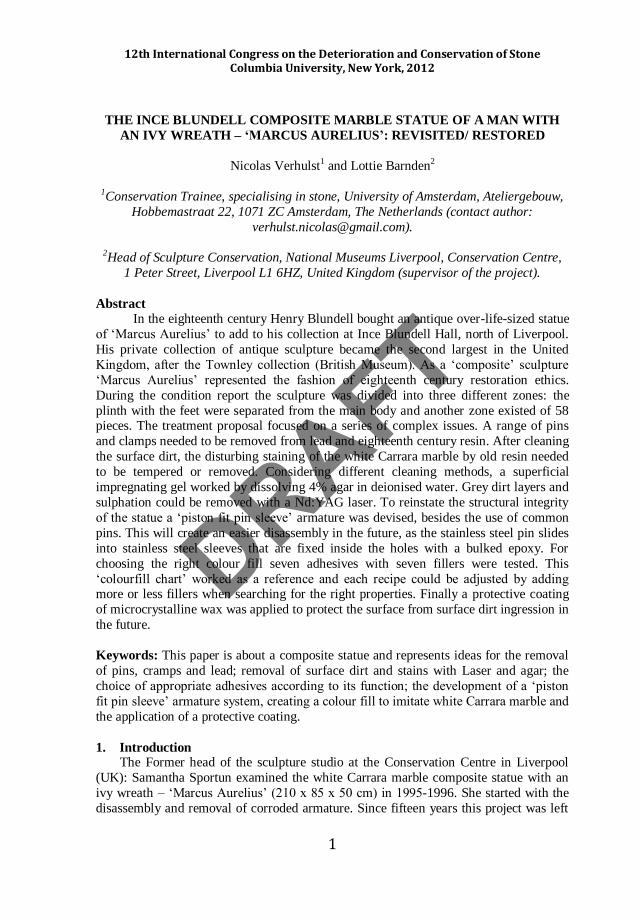
situated north of Liverpool (UK). In one of the greenhouses of his estate he displayed
the statue in a niche (Figure 1). He probably bought the statue at the end of his life in
England after the sculpture supply in Italy dried up, around 1800. Blundell’s catalogue
mentions that the sculpture was found in the yard of a sculptor. Thomas Banks (1772-1779) is suggested, however London based sculptor Joseph Nollekens (1760-1770) also
sold ‘antiques’. Blundell must have been familiar with the contemporary restoration
approaches as he was aware that he had accumulated an eclectic collection of uneven
quality. Most of his collection, including ‘Marcus Aurelius’ became partially alienated
from its eighteenth century setting, because the contemporary owner could not safeguard
his collection. He entrusted the majority of it to the city of Liverpool, where the
National Museums Liverpool became responsible for its conservation and partially
displays it to the public for free.
2.2 The label of ‘Marcus Aurelius’ revised
Two key questions appeared to be crucial to understand the iconography of this statue: What type of statue are we dealing with and how is it possible to typecast a
composite sculpture of ancient and modern pieces, with a distinction in style between
body and head? By scanning through literature one could describe the ‘Ince 569’ as an
over-life-size freestanding statue, with a bare torso and ‘hip mantle’ held together by his
left advancing arm, which recalls the Claudian timeframe. However his stance is already
inspired by the early canon from Polykleitos’ Doryphoros. His physiognomy bears more
similarities with the second type of ‘Marcus Aurelius’ than the first type. But it was still
uncertain whether that this portrait represents ‘Marcus Aurelius’. The scholar Fejfer
considered that the ivy wreath around his head may point into the direction of a
Claudian (Antonine) or Hadrianic type, maybe as part of the Liber Pater cult.
DRAFT
12th International Congress on the Deterioration and Conservation of Stone Columbia University, New York, 2012
3
Figure 1 Figure 2 Figure 3
Figure 1. Bartolomeo Cavaceppi, Raccolta d’Antiche statue busti bassirilievi ed altra sculture Restaurate da Bartolomeo Cavaceppi sculpture Romano, Rome, Vol. 1, 1768, Rome: Augusto, illustration 33.
Figure 2. Photo of the Ince 569 at the Ince Blundell Hall, in a nice of the greenhouse, illustration by Ashmole, John, Catalogue of Ancient Marbles at Ince Blundell Hall, Oxford, 1929: 50. Figure 3. Colour scheme by Sportun, Highlights of different parts. Illustration by Samantha Sportun, History of restoration of Ancient Stone Sculptures - Papers from a symposium, October 2001, Los Angeles, 2003: 128 and 171, plate VIII: Drawing of ‘Marcus Aurelius’ figure, p. 128 based on an engraving by Bernard de Montfaucon (1655-1741), from H. Blundell, Engravings and Etchings, plate 35.
2.3 A restoration history backed up by its condition research
From Antiquity, over the Renaissance to the end of the nineteenth century the
integrity of antique fragments was often compromised drastically as the fashion of the
period was not for broken fragments. As a ‘composite’ sculpture ‘Marcus Aurelius’
represents the ‘enlightened fashion’ of eighteenth century restoration ethics. One of the
best-known workshops during the time was the studio of Bartolomeo Cavaceppi (1717-
1799), who wrote a three-volume work on the principles of restoration. In one of these
volumes he gives an illustration of ‘Augusto’, resembling to the Ince ‘Marcus Aurelius’
(Figure 2). Some authors attributed the ‘Ince 569’ to Cavaceppi, while others think that the piece was assembled in England rather than in Rome. Similarities in some of the
restored parts of drapery to the joint surfaces that were worked relatively smoothly and
then chiselled with quite fine marks to anchor the adhesive may point into the direction
of Cavaceppi. The ‘purist’ approach in the 1960’s and 1970’s was to remove all
previous restorations, which did not happen in this case.
DRAFT
12th International Congress on the Deterioration and Conservation of Stone Columbia University, New York, 2012
4
The early additions to the ‘Ince 569’ represented a valuable insight into the methods
and techniques of the restorers of the period and must be valued and examined as such
wherever possible. Sportun was the first one to highlight the different interventions in a
drawing, while discussing them in detail (Figure 3). The original parts are the face,
except for the nose, the drapery and probably the central part of the torso (separated
from the drapery), as is a part of the tree trunk and the right leg and ankle. The plinth,
with both feet and the left leg, is supposed to be a classical repair. Eighteenth century additions are the right arm, the left arm with overhanging drapery, the left shoulder, part
of the breast, the neck with the back of the head, including the right ear and the rim of
the left one. Some other undated repairs are the small pieces inserted in the back of the
drapery, the back of the left ankle and the front of the left knee, as a larger part of the
drapery, in between the original and later addition. The back of the tree trunk and the
back corner of the plinth underneath can also be attributed to this phase, according to
Sportun.
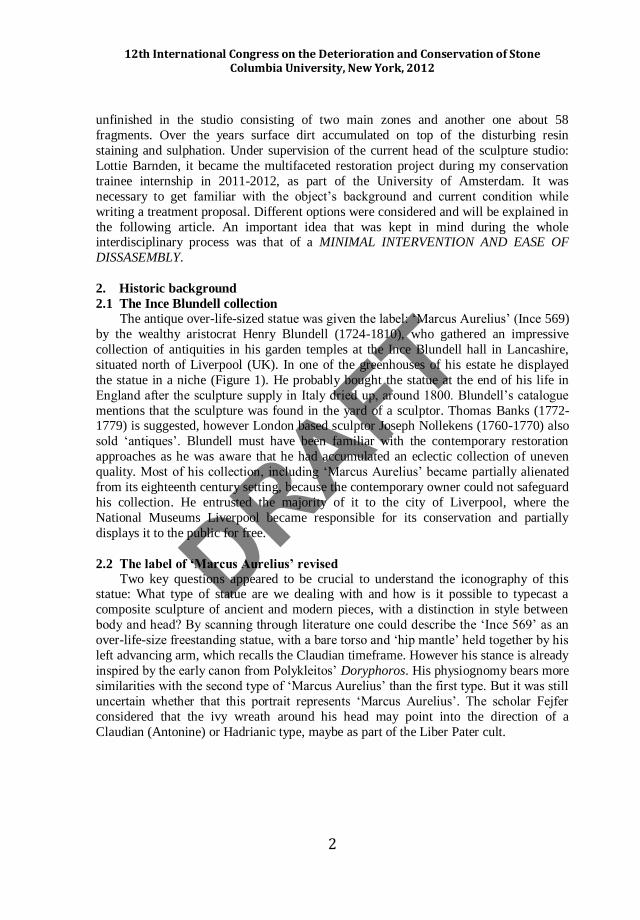
2.4. Condition
Figure 4 Figure 5 Figure 6
Figure 4. Zone I in the studio after 15 years, by author. Figure 5. Zone II in the studio after 15 years, by author. Figure 6. Zone III in the studio after 15 years, by author.
2.5 In general Research about its assembly, ‘patination’ and used resins was executed in the past.
For the current condition research the statue was divided into three different zones: the
plinth with the feet were separate from the main body and another zone existed of 58
pieces, plus some extra pieces that could not be located as part of the statue (Figures 4-
6). They were approached by visual means under daylight, ultra violet light and raking
light. What happened to the statue exactly when it came into the museum was unclear,
except that most of the statues were sprayed for a couple weeks continuously. This has
more than likely accelerated sugaring, forming of corrosion and staining due to the old
resins. After fifteen years lying unfinished in the studio dust accumulated on of the
DRAFT
12th International Congress on the Deterioration and Conservation of Stone Columbia University, New York, 2012
5
surface of the marble fragments, as they were not covered properly. The different
marbles showed different forms of weathering: the plinth and arms had still a smooth
finish, while the head, torso and drapery were rough. The nose, left ear and right eye, to
the right side of the drapery, a piece in the back of the drapery and some edges of the
piece inserted in the back of the left ankle tended to sugar. Some of the disassembled
pieces have smooth joint surfaces, like the ones along the legs and the corner of the
plinth. But the joint surfaces of the tree trunk and top of the left leg bear marks of fine
chisel incisions for better adhesion. The broken edges of the recarved ribbons are smooth. Some of these were removed in the past and some got lost.
2.6 Armature
In total seventeen small corroded pins can be detected visually, some causing iron
staining: in the drapery, nose and left ear and hand. To the back of the right foot and in
the tree trunk a corroded cramp was still in place, which did not cause any structural
damage. The same was true for the slightly corroded square pin, fixed to the back of the
right leg and tree trunk. The corresponding hole in the tree trunk was filled with lead,
surrounded with resin. It looked like the cramp at the bottom of the plinth was the cause
of a hair crack. Next to it was a round pouring hole, filled with lead.
The pin from the corner of the plinth was sawn in two. It was fixed with lead and
resin. The resin around the lead probably sealed the bond in the past, but is crumbling now. The left foot and the hole in the right leg and tree trunk were filled with lead. Both
pins were removed and both rough holes clearly widened when going deeper. In front of
the left ankle an incision was made in the smooth break surface that looked like a
pouring channel for lead. Another half of a big square pin was still imbedded in lead in
the tree trunk, behind the right leg of the main body, and appeared to have flared, barbed
ends, as the pin became wider towards the back in a hole that also became wider
towards the back. The large corroded iron cramp left from the tree trunk at the back was
causing brown-orange iron staining and was removed in 1995. The common rule was to
hide the armature as much as possible. Several hair cracks were visible, of which the
long one that runs over the drapery looked the most unstable. A couple of them were
consolidated with darkened facings of Japanese or fibreglass paper in 1995.
2.7 Staining and residues
It is remarkable that in Ashmole’s publication of 1929 the statue still has all its
fingers, they have since broken off, were lost and the exposed edges became rough. The
repaired middle and index finger of the right hand were broken of together with the
scroll. They were patinated with a yellowish substance. The nose is broken in three
pieces and was patinated. The old residues caused orange-brown staining of the white
marble. They are not supposed to be patination. Sportun explained that two kinds of
resin were used: based on two kinds of binding media, maybe to facilitate pouring: a
dark one with a softwood tar (a distillation product of pine) became sometimes powdery.
The other one was more yellow due to mixing in a wax or oil and was not brittle. Marble powder and gypsum were added to provide bulk and strength. Under ultra-violet light
these resins fluoresced. The resin stains were most persistent along the joints of the
marble. Why the drapery also showed similar staining became clear while removing the
sugaring part from the back and removing the resin underneath. This confirmed that the
DRAFT
12th International Congress on the Deterioration and Conservation of Stone Columbia University, New York, 2012
6
torso and part of the drapery were put into the drapery as a separate piece. The marble
appeared to be only 2-3 mm thick around the hole. The open space was filled completely
with resin to fix the torso. Due to a damp environment or wet cleaning this resin could
migrate to the surface. More greyish stains - entrapped dirt, were also visible and were
slightly soluble in water. Sportun (Laser) cleaned most of zone II, zone III and the front
of zone I.
2.8 Tool marks and mechanical damages By making use of raking light different patterns, in first instance tool marks, on the
surface became more visible. The marks of tooth chisels and flat chisels were visible,
some fine scratches point to the use of rasps, files or fine stone powders to polish the
surface like pumice powder. A tooth chisel was used on the original flat part of the
plinth in between the feet. The rest of the restored plinth has a very smooth, almost
polished surface finish, still baring traces of a very fine rasp or stone powders. The part
of the tree trunk between the feet has been carved with a flat chisel in contrary to the
outer side of the tree trunk where traces of a tooth chisel are visible. Besides the tool
marks several scratches and impact damage could be noted, especially on the back of the
torso and on the sides of the plinth. A strange marking appeared across the two pieces of
marble on the chest.
It is assumed that some kind of clamp aligned the two pieces together during assembly. Raking light also revealed the burial marks on the drapery better, which
weren’t removed in the past. The roughened surface of the face for example was also
clearly visible in this way. The head isn’t fixed completely anymore as it moves a tiny
bit.
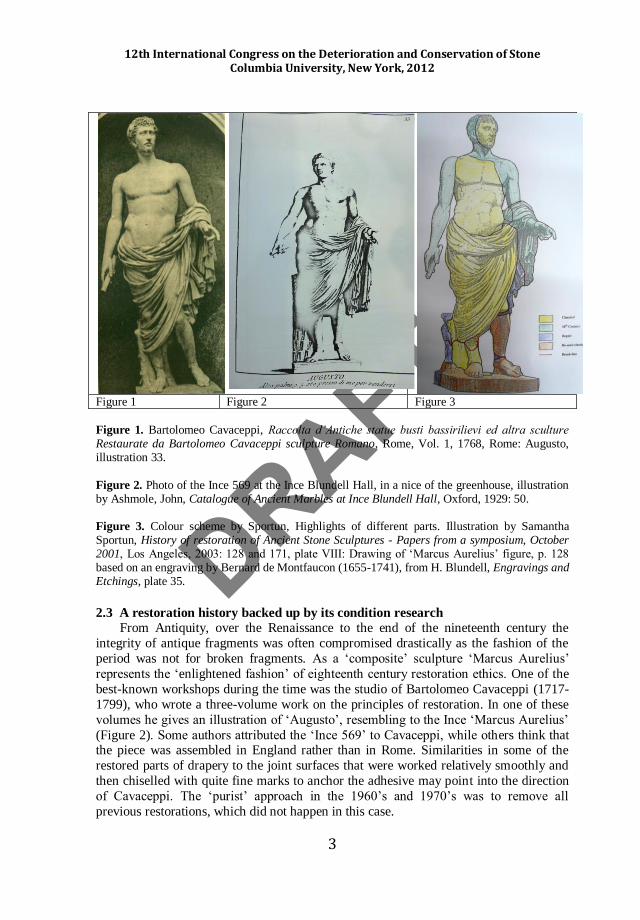
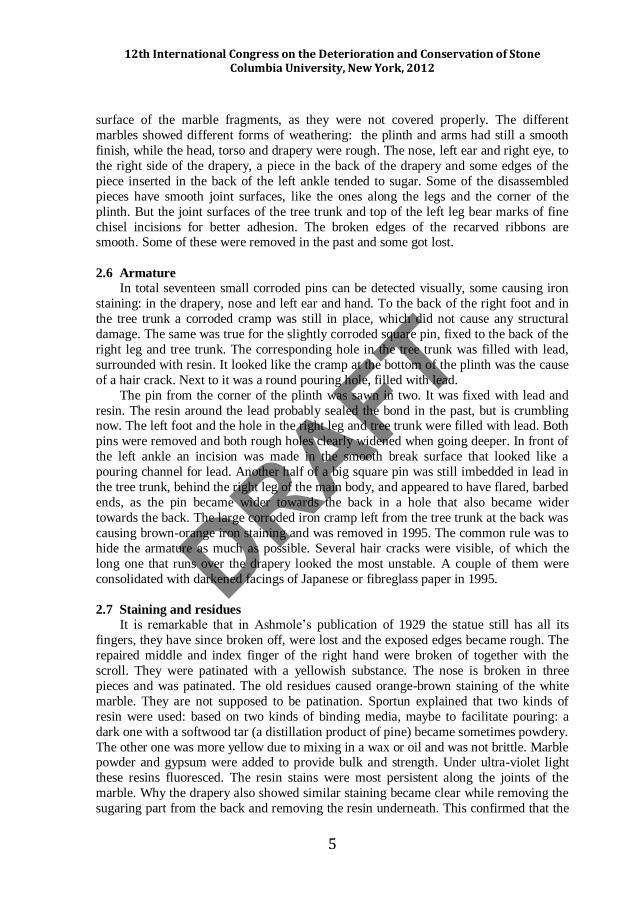
2.9 Cleaning
Figure 7 Figure 8 Figure 9 Figure 10
Figure 7. Dry cleaning with brush - half of the statue, by author. Figure 8. Removed of pin and lead, by author. Figure 9. Drilled out small pins with 3 mm diamond coredrill, by author. Figure 10. Acetone poultice on the surface to soften the adhesive and take it of with cotton swabs, by author.
3. Dry cleaning Working according to a phased approach the process of cleaning would develop
slowly, allowing the conservator to adjust the visual balance of the sculpture as he
worked, as John Larson phrased it in the past. The dust that had gathered over the years
DRAFT
12th International Congress on the Deterioration and Conservation of Stone Columbia University, New York, 2012
7
on the surface of the statue hid the white Carrara marble underneath. In first instance the
removal of this loose surface dirt was achieved mainly with a soft chip brush and a
museum vacuum cleaner (Figure 7). However the ‘Wishab’ sponge was a good cleaning
method for removal of more ingrained surface dirt, it could also damage sugared marble
not visible due to the surface dirt. In the end this technique was used only on the whole
surface of zone II, which was in a good and safe condition.
3. 1 Mechanical removal of cement, lead and armature Some cement residues on the back of the plinth were removed with a flat chisel,
leaving a thin layer that was removed with a scalpel. The use of ultrasound abrading
tools would be nice to test for this last step. But the more invasive question was
developing a technique for the removal of the small pins, cramps and lead. Both the
chisels and drill bits tended to get stuck in the lead and snapped. All in all the high steel
drill bits seemed to work best for drilling out the lead around the pins (Figure 8). While
removing the bottom clamp it could be seen that the perpendicular hair crack was not
caused by the corrosion of the clamp, as the crack did not run through the marble
underneath the clamp. But the clamp was probably put in the marble to preventing it
from cracking further.
If the corrosion had not expanded the pin in the hole so much, the removal of the
small-corroded pins could be achieved in first instance with a needle, loosening the resin around it. At this stage they could be removed with pliers, however some pins snapped.
Then a three-millimetre diamond core drill was applied to drill out the pins with as little
removal of the marble as possible (Figure 9). A couple of pins were left in place at the
drapery as it might have caused more damage putting pressure on them during the
removal of the ribbon. Where a pin or clamp was left in the tree trunk, the corrosion was
first removed mechanically with a scalpel and sanding tool on a ‘Dremel’. Afterwards a
rust inhibitor was applied. During this tannin process the metal turned black. It is
important not to spill any of the inhibitor on the marble as it may cause staining but also
attacks the marble, as its pH is around 3.5. An interesting technique for future reference
would be to test dry ice blasting for the removal of corrosion.
3.2 Mechanical and chemical removal of resins
For the removal of paint and thick resin residues a viscous paint stripper: ‘X-TEX’,
was used after the marble was pre-wetted with deionised water. After a minute the blue
paste was removed with a wooden spatula and a swab. Any residues were removed with
acetone. Next step was to remove all the resin residues on the restored edges of the
marble. All the removed residues were labelled and kept separately in the object’s
conservation file, for any further research. For the removal different steps were
necessary. After the broken edges were cleaned with a chip brush, the residues were
removed mechanically with wooden pickers, glass fibre brush and scalpels. Brushing
this clean was followed with an acetone swab. Then cotton wool was applied over the
surface and dampened with acetone to soften the residues for about an hour, covered with cling film (Figure 10). With cotton wool swabs of acetone most of the traces could
be removed afterwards. Finally the surface was cleaned with bristle brushes and low-
pressure steam. The darkened Japanese tissue facings consolidating the hair cracks or
fractures could not be removed with deionised water, but with acetone. This indicated
DRAFT
12th International Congress on the Deterioration and Conservation of Stone Columbia University, New York, 2012
8
that the facing was not adhered with a water based adhesive such as the ‘Primal WS-24’
emulsion, but with a solvent based ‘Paraloid’ co-acryllic polymer.
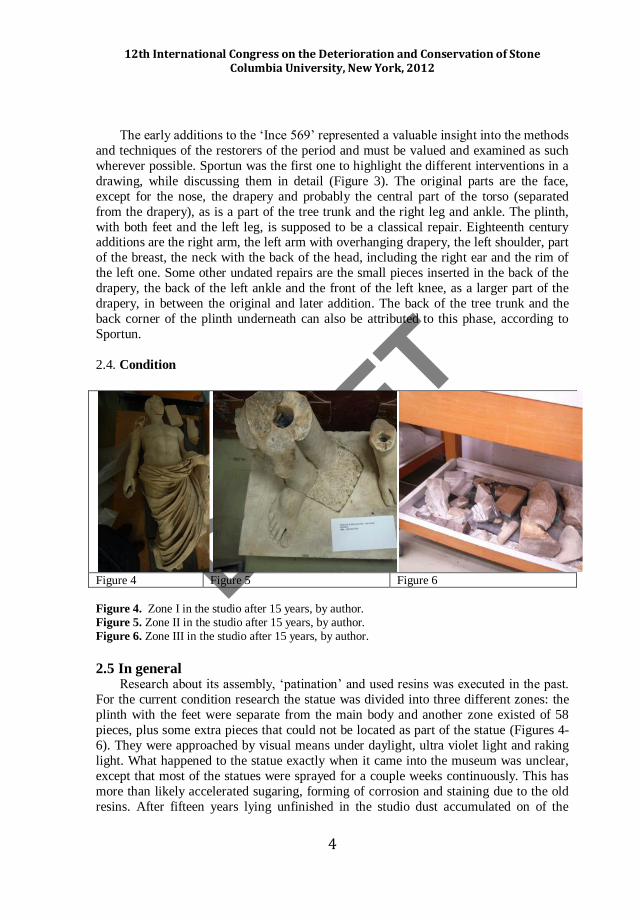
3.3 LASER cleaning
Due to the risks of material loss and creating white hazes when using steam to
remove the grey dirt layer on marble that is not always in a good condition Sportun also preferred to use the Q-switched Nd:YAG (infrared: 1064 nm through a fibre-optic
cable) Laser to clean (Figure 11). With a fluence of around 50 a smooth cleaning was
established, similar to the one of Sportun. Laser cleaning systems can be used on dry
marble or one can pre-wet the marble to achieve a certain kind of micro superficial
steam effect. Cleaning the back with or without a pre-wetted surface did not seem to
produce a different result, however the dirty parts on the fronts that were pre-wetted did
not yellow. Strangely enough the Laser cleaning of the back with the same energy
seemed to look a bit more yellow than the front. The application of agar afterwards did
not seem to reduce this. When Laser cleaning the broken off scroll a part of the surface
turned black. This appeared to be a small fill from a former restoration containing lead
white.
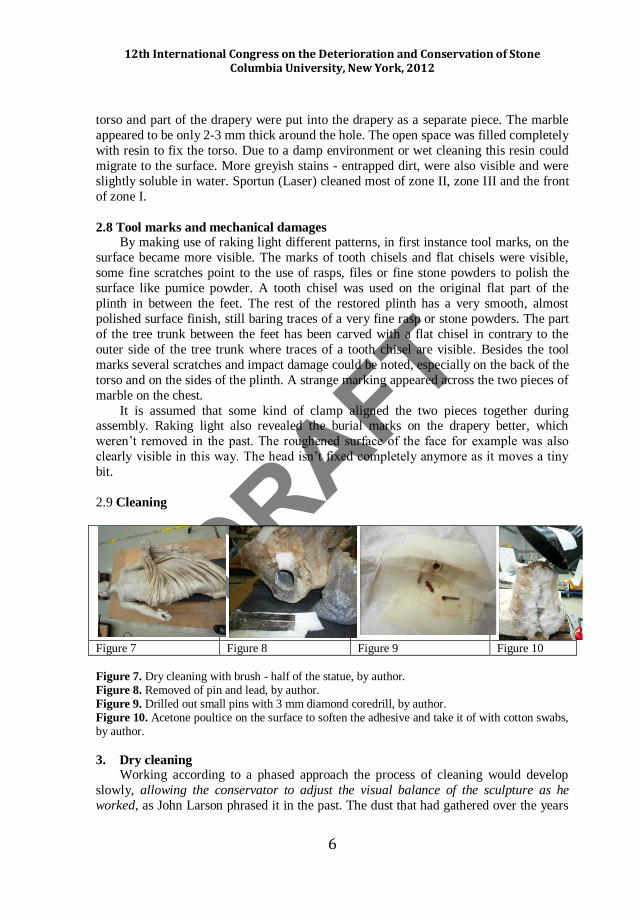
Figure 11 Figure 12 Figure 13
Figure 11. Laser cleaning the back with a fluence around 50, by author. Figure 12. Residues of agar fluorescence under UV-light after complete covering, by author.
Figure 13. Local application of agar - 30 minutes, by author.
3.4 Agar application
Cleaning with water did work for certain kinds of surface dirt. But the risk in applying deionised water, through swabs or moreover steam, is the migration of the
orange-brown resin stains along the broken edges and on the drapery, which are difficult
to control. By applying a superficial impregnating agar(ose) gel, a technique was
established however with a minimum of water contact to the marble surface, but still
enough to dissolve the stain and pull it back into the gel. The results of a 4% Agar
solution in deionised water (w/v) were very satisfying. The pH of the solution was
around 7, like the marble surface. For the removal of iron stains in plaster agar works
very well, but the influence it had on the removal of iron stains from white Carrara
marble was, even after 5 applications, minimal. Its application directly onto the corroded
DRAFT
12th International Congress on the Deterioration and Conservation of Stone Columbia University, New York, 2012
9
metal proved however that it was capable of taking up the corrosion product. The
literature states that agar doesn’t leave any residues. This might be true for a smooth
surface, but on a rough marble surface this appeared not easy to achieve when the gel
was completely dried out (Figure 12). Its application on sugared marble needed to be
avoided as the dried up gel took up loose crystals of marble.
The difficulty in applying agar is to get an even layer of about 1 centimetre (also
along the edges) on a vertical surface without creating drips, so it is easier to remove afterwards. Pouring or brushing did not always work out when the liquid was too warm
and it took too long to form a fixed gel. A thin gel layer tended to form quickly whilst
the bulk of the liquid ran off the vertical surface. A reapplication to created one gel layer
created two or more layers with peeling. When dried out completely the residues can be
clearly seen under UV-light. A full application to the torso did not reduce the possibility
of creating stain tide lines, as could be seen also under UV-light. On smooth surfaces
like the plinth the dried out gel was very easy to remove, as it was lying loose on the
surface. But on the coarser surface it got stuck and light pressure steam seemed to be the
best method to dissolve and remove it with a bristle brush, with migration of the stains
as a consequence. In that sense the decision was made to apply the agar only locally and
tests pointed out that the agar was able to remove the stains after only 10 to 30 minutes.
After searching for the right application methodology quite a quick technique was developed in the end. By working in dammed sections a still flexible gel of about one
centimetre could be removed with wooden spatulas, while trying not to leave any
residues (Figure 13 and Figure 19). Before the back of zone one could be cleaned in the
similar way, and after the Laser cleaning had taken place, the assembly of the statue
needed to be completed.
3.5 Re-assembly of an over-life-size marble statue
3.6 Introduction With the pins removed and the old cavities cleaned the next phase of the project
could start reinstating the structural integrity of the statue. Different stainless steel pins
were used depending on their location and specific purpose, different types of adhesives and armature needed to be selected according to their function (consolidation, structural
or not and time available during application), all the time bearing in mind the leitmotiv
of minimal intervention and ease of disassembly in the future. In that sense the meaning
of reversibility: the complete undoing of an adhesive bond with no or minimal effect on
the substrate is not always easy to achieve; because the resistance of epoxies and
polyesters towards a more common solvent is considered to be one of their best
characteristics. The choice of adhesives was discussed with Norman Tennent and the
internal forces that this kind of armature need to withstand was with Bill Wei (RCE) and
Jerry Podany (Getty); but could not be calculated within the timeframe. Their
knowledge was very helpful during the design of piston fit pin sleeve system.
3.7 Selecting appropriate adhesives
It was necessary to apply barrier coatings on areas where epoxy otherwise would
come into contact with the marble. First, a 4% Paraloid B-72 in acetone was brushed on
the surface, followed by a coating of 10% the next day. Both coatings were left to dry
DRAFT
12th International Congress on the Deterioration and Conservation of Stone Columbia University, New York, 2012
10
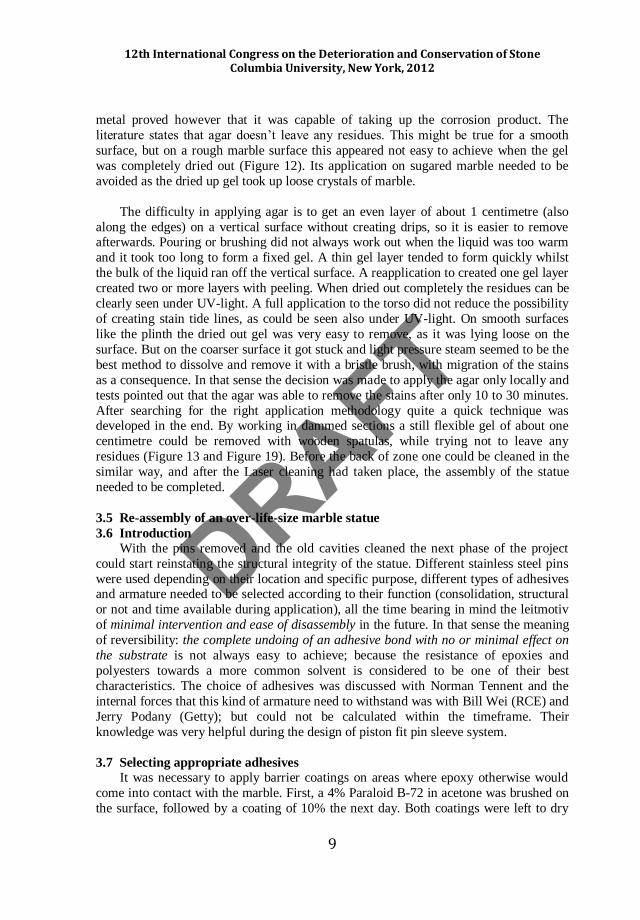
for a couple of days. The 4% solution was also used to consolidate the thin shattered left
knee piece. Caution was taken that the solution did not reach and possibly darken the
surface that would be visible. Pieces (for example the nose - including small stainless
steel pin, left ear, drapery pieces, small pieces near the tree trunk, the odd rectangular
piece at the back of the plinth), which did not have any structural function, were glued
with a 50% solution of Paraloid B-72 in acetone, bulked-out with marble powder (grade
100) (Figure 14). This was done to reduce shrinkage caused by the evaporation of the
solvent and to increase the compressive strength (if necessary). The fingers were fixed with ‘General - Vertical Transparent - Polyester’ after the marble received a barrier
coating.
For the structural adhesions the first choice was the use of a viscous high-grade
epoxy, like ‘Araldite 2011’. However, although this adhesive is already viscous, extra
AEROSIL®Fumed Silica was added to tweak its viscosity (to reduce dripping) before
application, but also to create a more flexible cured adhesive that can withstand greater
tensions during future movements.
Figure 14 Figure 15 Figure 16
Figure 14. Application of 50% Paraloid B-72 in acetone bulked-out with marble powder for non-structural fillings, by author. Figure 15. ‘General - Vertical Transparant Poyester’ for quick fix structural fixings of a solid pin, by author. Figure 16. Bulked-out ‘Araldite 2011’ with Fumed silica for slow setting structural fixing of the
piston fit pin sleeve system, by author.
3.8 Selecting appropriate armatures The broken pieces of the corner of the plinth were glued together with ‘General -
Vertical Transparent - Polyester’. As a whole it was glued with dots of ‘Araldite 2011’
epoxy and a keyed in stainless steel pin, bulked-out with Fumed Silica. Besides the
classical solid pin a ‘piston fit pin sleeve system’ was developed. Inspiration was drawn
from other semi-bonded systems, similar to the ones developed by the J. Paul Getty
Museum. In this system the pin slides into two separate loose sleeves, each closed from
one side, which are fixed with the thixotropic epoxy.
The torso was strapped around the drapery, avoiding any movement of the two
separate pieces. After the first sling was applied and the statue was lifted up diagonally a
second sling was applied. Bearing in mind its centre of gravity the correct position was
reached to lift the statue according the corresponding alignment of zone two. During
DRAFT
12th International Congress on the Deterioration and Conservation of Stone Columbia University, New York, 2012
11
lifting all the hair cracks were monitored. A dry test run was completed to check the
procedure. First the left leg was fixed with a solid pin (keyed in along the surface and
rounded at the edges) with quick curing polyester: ‘General – Vertical Transparent –
Polyester’ (Figure 15). This choice was made, because the leg could be held in place
while zone one was hanging into the correct position over zone 2. After the polyester
cured the statue could be lifted with the left leg. The big sleeves were then placed into
the right leg and the small sleeves were placed into the left ankle. Both of them were
placed into a bed of the bulked-out ‘Araldite 2011’ epoxy with Fumed Silica. Using this slow curing epoxy allowed the time to place everything into its exact position (Figure
16). The pins were first sprayed with a release agent to reduce friction before they were
slid into the sleeves. Now zone one could be lowered in the correct position onto zone
two. The slings were loosened but left in position, because the epoxy needed to cure
over night. As the statue was leaning a bit forward on the plinth (which narrows down to
the front) it was decided to raise the front of the plinth by 12 mm, to correct the centre of
gravity, creating a more stable object. On the back of the statue a new cramp, following
the contours of the surfaces was fixed with the bulked-out epoxy, where the old one next
to the tree trunk had held zone one and two together as an extra support. The two pieces
of the tree trunk were fixed with dots of the bulked-out epoxy to give extra support over
epoxy around the tarnished cramp. The hole in the top fragment of the tree trunk was
filled with this epoxy as it slid over the old tarnished square. The statue was leaning a bit more forward. The chin of the right leg was glued with the bulked-out Paraloid B-72
with marble powder as it almost stayed in position by itself and had very little structural
support.
3.9 Loss compensation for indoor white marble sculpture
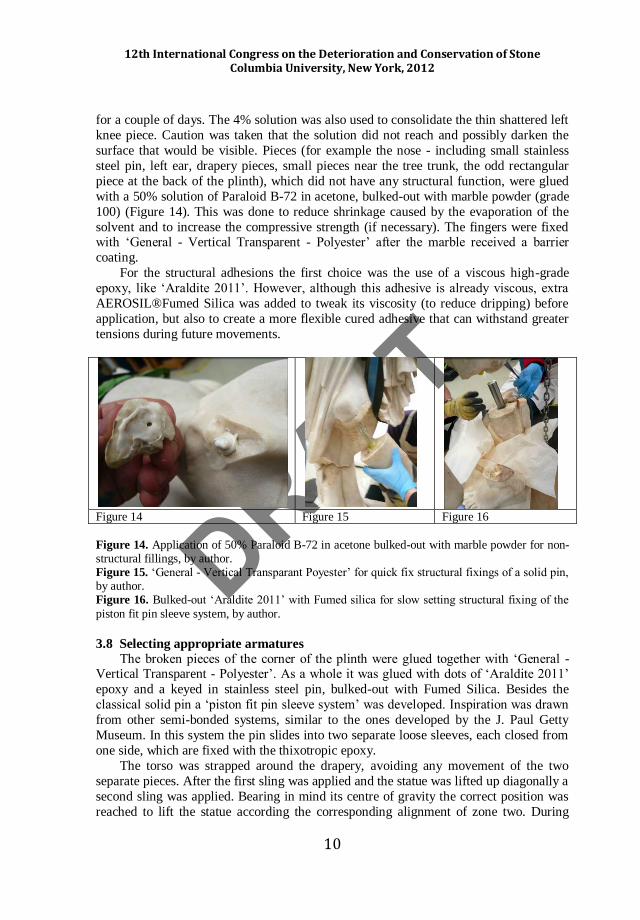
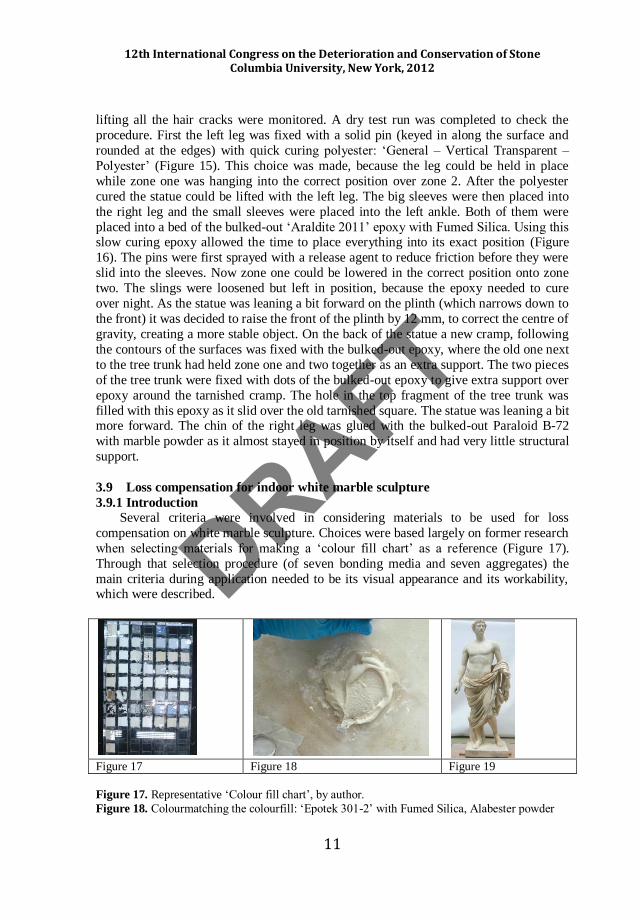
3.9.1 Introduction Several criteria were involved in considering materials to be used for loss
compensation on white marble sculpture. Choices were based largely on former research
when selecting materials for making a ‘colour fill chart’ as a reference (Figure 17).
Through that selection procedure (of seven bonding media and seven aggregates) the
main criteria during application needed to be its visual appearance and its workability, which were described.
Figure 17 Figure 18 Figure 19
Figure 17. Representative ‘Colour fill chart’, by author.
Figure 18. Colourmatching the colourfill: ‘Epotek 301-2’ with Fumed Silica, Alabester powder
DRAFT
12th International Congress on the Deterioration and Conservation of Stone Columbia University, New York, 2012
12
and marble powder, by author. Figure 19. Man with an ivy wreath – ‘Marcus Aurelius’, Ince 569, National Museums Liverpool, after reassembly, by author.
The environment in which the sculpture will be stored or displayed plays a
significant role in the range of materials to be used. Objects on display outdoor have a
more limited range of materials, which are preferably sacrificial lime based mortars.
Interior objects, like this case, have a wider range of possibilities - also making use of
synthetic materials. Each sample recipe in the chart could be adjusted by adding more or
less fillers to a certain binding media when searching for the right properties. It became
clear that not all combinations were a success. Some of them work very pleasantly while
others were more difficult to work with, or don’t give you much working time.
Remarkable was that a couple of the test samples failed completely as they crumbled
while shrinking, produced bubbles or had the wrong colour.
3.9.2 Application procedure On the bottom of the plinth a test was conducted in the gap left by the removed
clamp. After applying barrier coatings (4% and 10% Paraloid B-72 in acetone) and
filling the gap with ‘Polyfilla’ almost completely, the last final layer was applied with
the colour fill. Into a high-grade epoxy of ‘Epotek 301-2’, Fumed Silica was mixed to
create a paste. A combination of alabaster- and marble powder was mixed into this to
obtain a similar colour and translucency as the marble, while no pigments were added
(ill. 18). Pigments can be added according to the surrounding stone. Because the gap
was quite big the fill tended to slump after a while. To avoid this more Fumed Silica
should be added in advance. In this case the filling was kept in place by covering it with
a ‘Melinex’ sheet. If the filling is too high it can be cut back with rifflers, files or
scalpels, without creating any sort of mechanical damage to the marble. For the other fills another high-grade epoxy, ‘Hxtal-NYL 1’, was chosen as it has better light ageing
properties.
4. Protective coating
After treatment the procedure at the Conservation Centre is to apply a protective
coating to prevent any dust, dirt or grease (and any unwanted additions by the public)
getting trapped into the surface or cracks. It both seals the open porous structure and
must be reversible. The natural result of such treatments is to enhance the translucency
of the marble. Some argue that this would soften the effect of the tooling (‘sfumato’)
giving the sculpture a more ‘finished’ appearance than in reality. The ‘Renaissance
micro-crystalline wax polish’ was applied with a soft brush or a cloth onto the surface of the marble and left to dry for at least 30 minutes. When the wax had partly dried, the
excess wax was buffed away with a clean cloth or brush. After this a second layer was
applied to impart sheen to the surface. By this method a uniform finish was achieved
over the whole object that enhances the ‘patina’ without the appearance of an applied
coating.
5. Conclusions
One could describe the composite statue, formerly labelled: ‘Marcus Aurelius’ (Ince
DRAFT
12th International Congress on the Deterioration and Conservation of Stone Columbia University, New York, 2012
13
569), as an over-life size free-standing statue, with a bare torso and a ‘hip mantle’ held
together by his left advancing arm, which recalls the Claudian timeframe. However his
stance was already inspired by the early canon from Polykleitos’ Doryphoros. His
physiognomy beared more similarities with the second type of ‘Marcus Aurelius’ than
the first type. But it was not certain that this portrait really represented ‘Marcus
Aurelius.’ Especially considering the ivy wreath around his head, which may have
pointed into the direction of a Claudian (Antonine) or Hadrianic type, maybe as part of
the Liber Pater cult. Henry Blundell’s private collection of antique sculpture became the second largest
in the United Kingdom, after the Townley collection (British Museum). As a
‘composite’ sculpture ‘Marcus Aurelius’ represented the fashion of the eighteenth
century restoration ethics. However the origin of this statue remained vague, Blundell
acquired it at the end of his life. He displayed it within a niche in the greenhouse of his
Ince Blundell Hall just north of Liverpool. Until 1959 the statue stayed on his estate.
Afterwards the collection was trusted to what became National Museums Liverpool,
who still conserve of a large part of the collection. What happened to the statues, besides
a thorough wet cleaning, remains unknown. It was only until 1995 when Samantha
Sportun undertook research into this statue, started disassembly and laser cleaned
different parts that more information about this sculpture became available.
Sportun did not complete the treatment of the sculpture and it was left to rest within the sculpture studio for at least fifteen years. In the fall of 2011 the author started
writing a treatment proposal during his internship for the University of Amsterdam. The
sculpture was divided into three different zones: the plinth - with the feet (2) was
separated from the main body (1) and another zone consited of 58 loose fragments,
which could be located back on the object (3). A range of pins and clamps needed to be
removed from lead and/or eighteenth century adhesive. After cleaning the surface dirt
with a soft brush, the disturbing brown orange resin stains could be removed or
tempered from the white Carrara marble. A superficial impregnating gel worked by
dissolving 4% agar in deionised water. As the resin stain was soluble in water this gel
was applied in separate zones and could be removed after already fifteen minutes with a
wooden spatula. The rough surface made it not always easy to remove all residues of this gel. Grey dirt layers and sulphation could be removed with a Nd:YAG Laser. The
only downside was a yellow ‘discoloration’ of the back, which was not pre-wetted in
advance, for avoiding migration of resin stains. Small pieces on the front of the drapery
and the leg were pre-wetted and had the same colour as it surrounding marble which
was laser cleaned by Sportun years earlier.
This project also allowed for the development of a technical approach to re-
assembly, addressing issues like stability and reversibility of its adhesives and armature.
Adhesives were being used according to their function: 4% Paraloid B-72 in acetone for
consolidation and as a barrier layer (4% followed by a 10%) before applying a quick
setting polyester of ‘General – Vertical Transparent – Polyester’ or a slow curing epoxy,
‘Araldite 2011’, bulked-out with Fumed Silica to increase viscosity and strength. A 50% mixture of Paraloid B-72 in acetone bulked-out with marble flour to reduce shrinkage
was chosen for non-structural adhesion. Stainless steel pins were used and a ‘piston fit
pin sleeve’-system for the right leg and the left ankle was designed to enable an easier
disassembly, if necessary in the future.
DRAFT
12th International Congress on the Deterioration and Conservation of Stone Columbia University, New York, 2012
14
After testing several materials for loss compensation of white marble, gathered in a
reference ‘colour fill chart’, the choice was made to use the high grade epoxy: ‘Hxtal
Nyl 1’; together with Fumed Silica, marble powder, cooked alabaster powder and if
necessary pigments to imitate the surrounding marble. This ‘colourfill chart’ worked as
a reference and each recipe could be adjusted by adding more or less fillers when
searching for the right properties. After the application of a barrier coating of Paraloid
B-72 in acetone (4% followed by a 10%) and a bulk fill of ‘Polyfilla’ if the gap was
considerable, the epoxy mixture was applied. By closing cracks or missing parts (without remodelling parts) the chances of the accumulation of dust and other surface
dirt was reduced. Applying a protective coating of microcrystalline wax further
enhanced this and its look.
Acknowledgments
Many thanks are due to the numerous people who helped me with the realisation of
this project: Martin Cooper and Annemarie La Pensée from Conservation Technologies
for answering Laser related questions and to be able to be part of the workshop on Laser
cleaning. More over I want to thank my supervisor and head of sculpture conservation,
Lottie Barnden. Her patience, focus and sensitive approach towards our field will be
remembered. Also a big thank you to Bill Sillitoe and especially Dave Whitty from
Technical Services. I don’t want to forget the people from the other disciplines providing me with materials and discussing subjects. I could always approach the
curator of antiquities, Gina Musket, with questions relating to ‘Marcus Aurelius’ his
background. Furthermore I want to thank specialists in the field: Prof. Norman Tennent
(UVA), Deborah Carty (private restorer), Bill Wei (RCE, Amsterdam) and Jerry Podany
(J. Paul Getty Museum) for having e-mail contact about adhesives and armatures. Last
but not least my lecturer Lisya Biçaçi, who insisted on me going to Liverpool - a
decision I will never regret.
References Cooper, Martin, 2005. ‘Laser Cleaning of Sculpture, Monuments and Architectural
Detail’, In Journal of Architectural Conservation, 2005 (November): 201-119. Fejfer, Jane, 1997, ‘The Portraits’, ‘The Roman Male Portraits’, In The Ince Blundell
Collection of Classical Sculpture. Liverpool, Liverpool University Press.
Fotakis, C., 2006. ‘Lasers in the Preservation of Cultural Heritage’, In Principles and
Applications (Series in Optics and Optoelectronics), New York, Taylor & Francis.
Garland, Kathleen M. and Joe Rogers, 1995. ‘The Disassembly and Reassembly of an
Egyptian Limestone Sculpture’, In Studies in Conservation, vol. 40(1): 1-9.
Griswold, John and Sari Uricheck, 1998, ‘Loss compensation Methods for Stone’, In
Journal of the American Institute for Conservation, Volume 37(1): 89-110.
Jorjani, Mersedeh, 2009, ‘An evaluation of potential adhesives for marble repair’, In
Janet Ambers, Holding it all together - Ancient and Modern Approaches to Joining,
repair and Consolidation, London: 143-149. Kleiner, E.E., Diana, Roman Sculpture, New Haven and London, 1992.
Nagy, Eleonore E., 1998. ‘Fills for White Marble: Properties of Seven Fillers and Two
Thermosetting Resins’, In Journal of the American Institute for Conservation, vol. 37
(1): 69-87.
DRAFT
12th International Congress on the Deterioration and Conservation of Stone Columbia University, New York, 2012
15
Podany, Jerry, 1994. ‘Faked, flayed or fractured? Development of loss compensation
approaches for antiquities at the J. Paul Getty Museum’, Abstract of papers at the
Twenty second annual meeting, Nashville, Tennessee, June 6-11, 1994, Washington,
bcin.ca.
Podany, Jerry, 2001. ‘Paraloid B-72 as a structural Adhesive and as a Barrier within
Structural Adhesive Bonds: Evaluations of Strength and Reversibility’, In Journal of
the American Institute for Conservation, vol. 40 (1): 15-33.
Podany, Jerry, Eric Risser, and, Eduardo Sanchez, 2009. ‘Never forever: assembly of sculpture guided by the demands disassembly’, In Holding it all together - Ancient
and Modern Approaches to Joining, repair and Consolidation, London: Archetype
Publications.
Rhabar, Nima 2010. ‘Mixed mode fracture of marble/adhesive interfaces’, In Materials
Science and Engineering A, 527 (2010): 4939-4946.
Rockwell, Peter, Stanley Rosenfeld, and Heather Hanley, 2004. The Complete Marble
Sleuth, Rome: Rockrose Publishing.
Sportun, Samantha, 1996. Case study: An 18th century restored classical male statue,
MA. Conservation of Historic Objects, Durham University, Department of
Archaeology.
Sportun, Samantha, 2003. ‘The Investigation of Two Male Sculptures from the Ince
Blundell Collection’, In History of restoration of Ancient Stone Sculptures - Papers from a symposium, October 2001, Los Angeles: J. Paul Getty Museum.
Wolfe, Julie, ‘Effects of Bulking Paraloid B-72 for Marble Fills’, In Journal of the
American Institute for Conservation, vol. 48 (2009): 121-140.