13 ways to make your photos look professional
DESCRIPTION
φωτογραφιαTRANSCRIPT

13 WAYS TO MAKE YOUR PHOTOS LOOK PROFESSIONAL
There is no silver bullet to making a professional picture. It often takes years of practice; however, as a newer photographer you’ll find that there are some things that will dramatically improve your photography without much effort.
But after you apply the tips on this page and get to the point of being a competent photographer, you’ll find that your progress will be slower and you’ll have to work harder to make your photo just 1 or 2% better.
But here are the simplest things you can do to quickly see an improvement in your photos.
LIGHTING IS THE #1 FASTEST WAY TO MAKE A PHOTO LOOK MORE PROFESSIONAL. THE BIGGEST DIFFERENCE BETWEEN THE PHOTO ON THE LEFT AND THE ONE ON THE RIGHT IS THE LIGHTING, WHICH GIVES CONTRAST, INTEREST, AND POP TO THE PHOTO.
TIP #1: CAPTURE INTERESTING LIGHTING
Lighting is number one on this list for a reason. It’s easily the most overlooked aspect of photography for beginning photographers, but professional photographers obsess about it. Lighting is the most important thing to making a photo look professional.
Now what makes lighting look interesting? First of all, it’s different from what we normally see. Second, it highlights the subject and presents it in a good way.
There are many ways to make a portrait photo have more interesting lighting. You could simply place the person in the shade in order to put even lighting on their face, or you could turn their back to the sun so that hard shadows don’t rake across the face.
With landscape photography, time of day is absolutely imperative. 95% of the landscape photos in my portfolio of the best shots I’ve ever taken were photographed in the very early morning at sunrise or late in the evening at sunset. Beginning photographers often overlook this important tip and try to make a photo in the middle of the day. That’s rarely a recipe for success.

MOST PARENTS PHOTOGRAPHING THEIR DAUGHTER IN A SWIMMING COMPETITION WOULD BE HAPPY TO GET A SHOT LIKE THE ONE ON THE BOTTOM. BUT A PROFESSIONAL PHOTOGRAPHER REMOVES ALL OF THE ABERRATIONS OR CLUTTER OUT OF THE BACKGROUND. I SHOT THIS PICTURE IN A HOTEL POOL, SO I CREATED A BLACK BACKGROUND TO GET RID OF THE UNNECESSARY CLUTTER SO THAT ALL THE VIEWER’S ATTENTION WOULD BE PLACED ON THE ACTION.
NO ABERRATIONS
An aberration in photography is something that is left in the picture that doesn’t belong in the picture. It makes the photo feel cluttered with distractions that keep the viewer from enjoying the subject.
I most commonly see aberrations around the edges of the frame. It can be easy for the photographer to pay close attention to the person they are photographing, and forget about a piece of trash in the background, an ugly telephone pole in the distance, etc.
CHOSE A CLEAR SUBJECT BY ZOOMING IN TIGHT
If you’re having a difficult time getting a composition to make sense, the problem is most likely that you’ve chosen too many subjects at once. Decide on what one subject will be the center of attention, and you’ll have a much more interesting picture.

It’s incredibly rare that I see a photo that is photographed TOO tight. Zooming in on one part of the scene is almost always the right answer for new photographers. It takes most of my students a year of learning photography before they finally dare to zoom in tight. How long will it take you?
ON THE “BEFORE” PHOTO ON THE LEFT, YOU SEE WHAT A PHOTO LOOKS LIKE STRAIGHT OUT OF THE CAMERA. ON THE RIGHT, I SHOW THE SAME PHOTO AFTER APPLYING ONE OF MY ONE CLICK LIGHTROOM PRESETS. YOU’LL GET SOME OF MY FAVORITE PORTRAIT PRESETS ALONG WITH THE LIGHTROOM AND PHOTOGRAPHY VIDEO TRAININGS.
DIGITAL STYLING
Often, I see photos submitted to me in a portfolio review (starting at only $39) that is beautiful, but just hasn’t been styled yet. Digital styling is applied in Photoshop and Lightroom and allows the photographer to creatively change the colors, contrast, and exposure.
While I personally am not much of a fan of the filters on Instagram, we have all seen a photo that looks much more trendy and creative when a filter is applied to it.
If you feel like you’re ready to learn this part of photography, I highly recommend getting Lightroom and taking my Lightroom 101 class to help you get started with the software.
WHILE DOING A SENIOR PICTURE SHOOT LAST MONTH (WHICH WAS FILMED FOR MY “PHOTOGRAPHY START” CLASS), THE MODEL MENTIONED SHE HAD HORSES. OBVIOUSLY THE SHOOT SUDDENLY INCLUDED THE HORSES BECAUSE THEY ARE AN INTERESTING SUBJECT. I WANTED TO TAKE A PHOTO SHOWING HOW MUCH THE GIRL LOVES HER HORSE, SO I FOCUSED IN ON THE FINE DETAIL OF JUST PART OF THE HORSE TO CAPTURE THIS SHOT.
INTERESTING SUBJECT
Capturing an interesting subject is usually the simplest part of photography. Even non-photographers know that some things are more interesting in a photo than others.
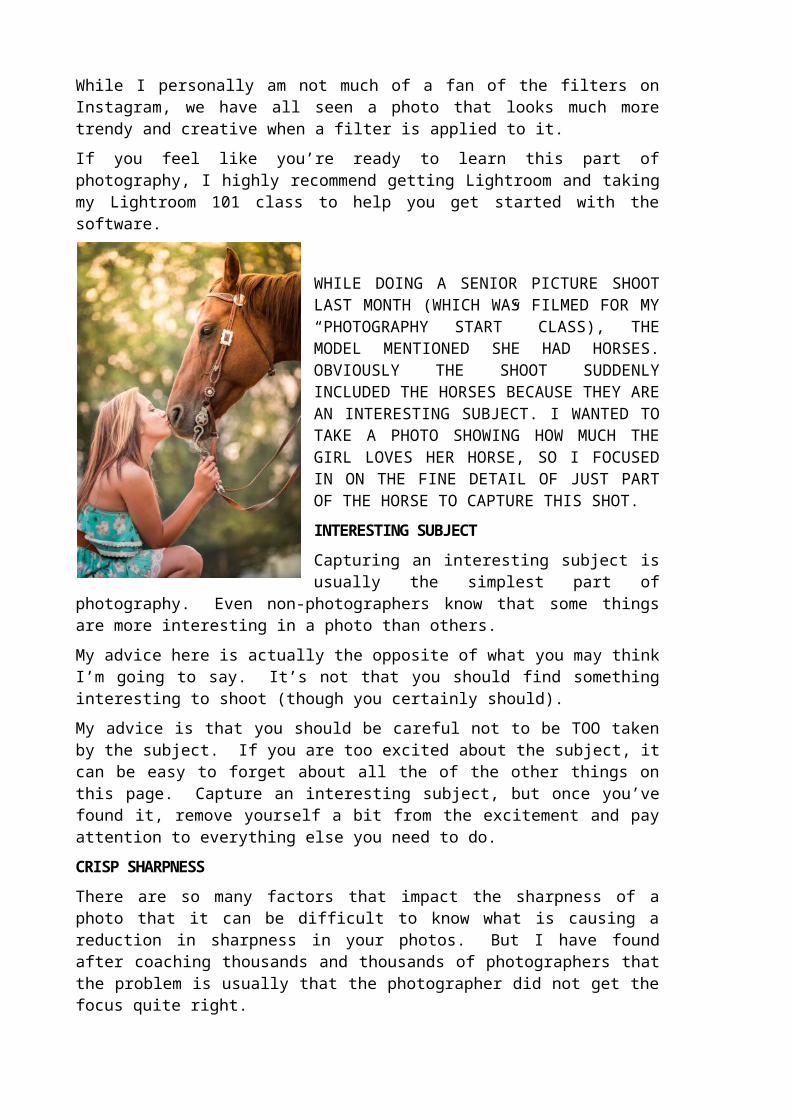
My advice here is actually the opposite of what you may think I’m going to say. It’s not that you should find something interesting to shoot (though you certainly should).
My advice is that you should be careful not to be TOO taken by the subject. If you are too excited about the subject, it can be easy to forget about all the of the other things on this page. Capture an interesting subject, but once you’ve found it, remove yourself a bit from the excitement and pay attention to everything else you need to do.
CRISP SHARPNESS
There are so many factors that impact the sharpness of a photo that it can be difficult to know what is causing a reduction in sharpness in your photos. But I have found after coaching thousands and thousands of photographers that the problem is usually that the photographer did not get the focus quite right.
When taking a picture of a person, it’s essential to put the focus point exactly on the eye of the person you are photographing.
If you want to learn to focus properly, I highly recommend reading my article with 10 tips on getting sharper photos.
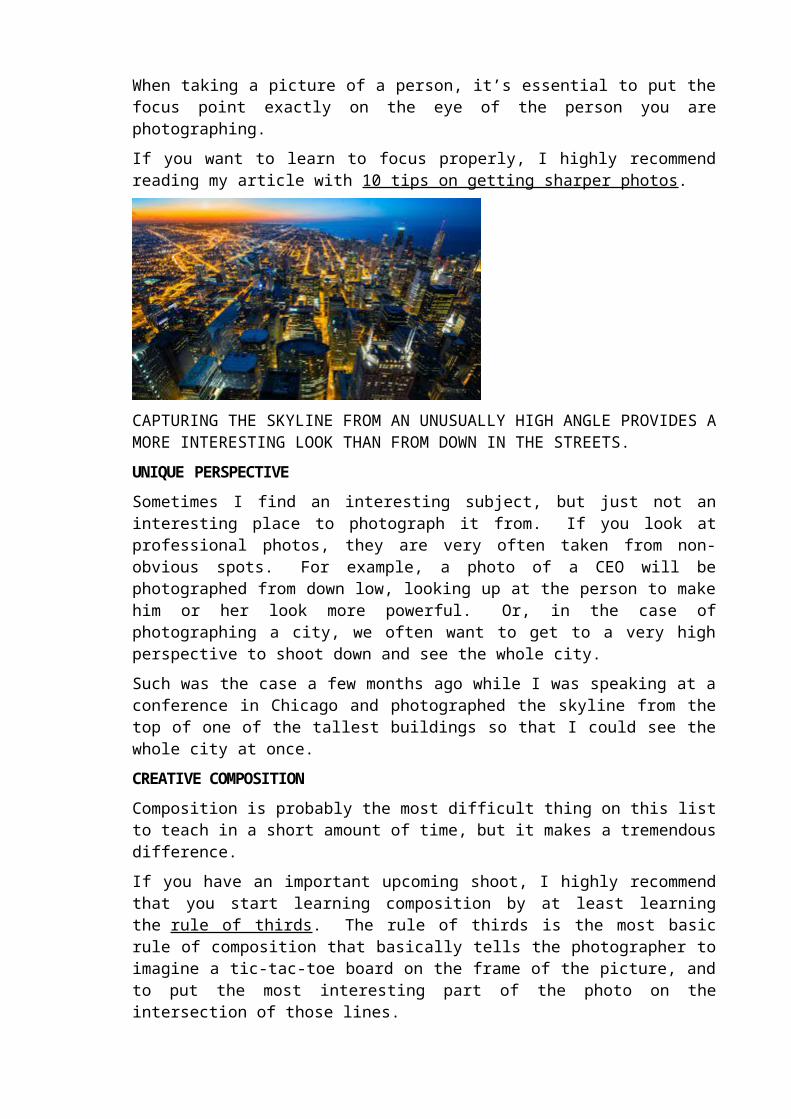
CAPTURING THE SKYLINE FROM AN UNUSUALLY HIGH ANGLE PROVIDES A MORE INTERESTING LOOK THAN FROM DOWN IN THE STREETS.
UNIQUE PERSPECTIVE
Sometimes I find an interesting subject, but just not an interesting place to photograph it from. If you look at professional photos, they are very often taken from non-obvious spots. For example, a photo of a CEO will be photographed from down low, looking up at the person to make him or her look more powerful. Or, in the case of photographing a city, we often want to get to a very high perspective to shoot down and see the whole city.
Such was the case a few months ago while I was speaking at a conference in Chicago and photographed the skyline from the top of one of the tallest buildings so that I could see the whole city at once.
CREATIVE COMPOSITION
Composition is probably the most difficult thing on this list to teach in a short amount of time, but it makes a tremendous difference.
If you have an important upcoming shoot, I highly recommend that you start learning composition by at least learning the rule of thirds. The rule of thirds is the most basic rule of composition that basically tells the photographer to imagine a tic-tac-toe board on the frame of the picture, and to put the most interesting part of the photo on the intersection of those lines.
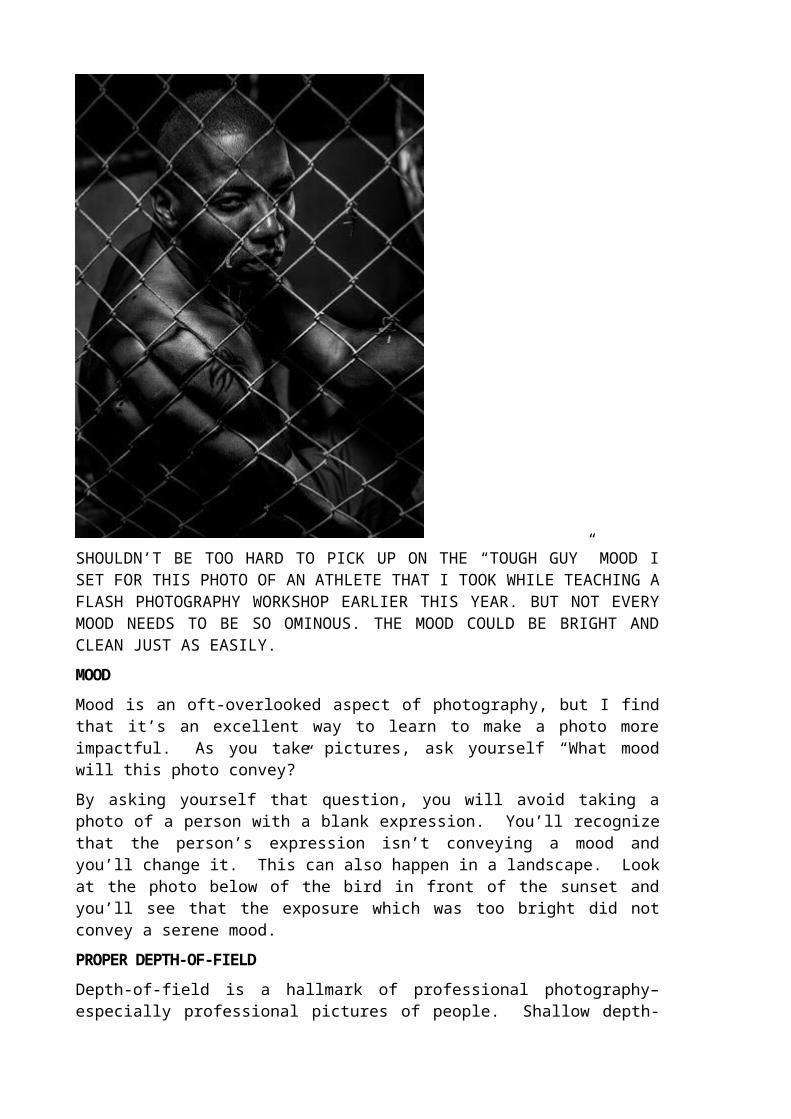
SHOULDN’T BE TOO HARD TO PICK UP ON THE “TOUGH GUY” MOOD I SET FOR THIS PHOTO OF AN ATHLETE THAT I TOOK WHILE TEACHING A FLASH PHOTOGRAPHY WORKSHOP EARLIER THIS YEAR. BUT NOT EVERY MOOD NEEDS TO BE SO OMINOUS. THE MOOD COULD BE BRIGHT AND CLEAN JUST AS EASILY.
MOOD
Mood is an oft-overlooked aspect of photography, but I find that it’s an excellent way to learn to make a photo more impactful. As you take pictures, ask yourself “What mood will this photo convey?”
By asking yourself that question, you will avoid taking a photo of a person with a blank expression. You’ll recognize that the person’s expression isn’t conveying a mood and you’ll change it. This can also happen in a landscape. Look at the photo below of the bird in front of the sunset and you’ll see that the exposure which was too bright did not convey a serene mood.
PROPER DEPTH-OF-FIELD
Depth-of-field is a hallmark of professional photography–especially professional pictures of people. Shallow depth-of-field means that the subject of the photo is sharp, and the background is blurry. Learning this technique can instantly transform your photography to something much more professional looking.
To take a picture with shallow depth of field, follow ALL of the steps in this recipe:
1. Put on your longest lens
2. Set the camera to aperture priority
3. Set the aperture as low as it will go
4. Step as close to the subject as you can while still allowing the lens to focus
5. Place the subject far away from anything in the background.
6. Put the focus point on the subject
7. Take the picture
WITH AUTO SETTINGS, THE CAMERA TOOK THE PICTURE ON THE LEFT. IT’S OKAY, BUT IT ISN’T INTERESTING. THE PHOTO ON THE RIGHT HAS A CREATIVELY DARK EXPOSURE THAT MAKES THE COLOR IN THE SCENE POP. THE PHOTO ON THE RIGHT CONVEYS A MUCH MORE IMPRESSIVE MOOD.
PROPER EXPOSURE
Exposure means the brightness or darkness of a photo. It’s probably the thing that beginning photographers put the most work into learning.
There are three ways to control the exposure of a photo: aperture, ISO, and shutter speed. If you’re not sure how they work together and how to set them, take some time to read my free photography basics series.
Digital cameras are very good at coming to a neutral exposure, but the truth is that the neutral exposure is not always the best exposure. For example, suppose you are taking a picture of a person on a bright sunny day. The camera will likely make the face of the person dark and the background too bright. The “neutral” exposure is mid-way between exposing for the face and the background.
But as the photographer, you know that the face is far more important than the background, so you will brighten the exposure for the face and let the background go bright. Go for the proper exposure, not the neutral one.

BY SHOOTING A PANORAMA IN THIS LOCATION, I WAS ABLE TO CAPTURE THE GENTLE CURVE OF THE RIVER, WHICH MADE A HUGE DIFFERENCE IN THE PHOTO. MY GUIDE, ANDY BEALES, POINTED OUT THIS LOCATION TO ME AND IT WAS A WINNER!
VIEWING THE PHOTO LARGE
After you apply all of the other tips on this page, the way you present the photo will also make a major difference in how it is viewed by those who see it. Don’t you dare put a tremendous amount of work into a photo and then print it out at 8×10. Show your photo large to have a bigger impact!
Have you ever walked through a photography gallery? Notice how HUGE the photos are? It’s because almost any photo looks better and more captivating when it is viewed full screen or on a very large print.
LEARN PHOTOGRAPHY!
If you’re ready to sink your teeth into photography and learn to master it, I highly recommend you read my free photography basics article series. I poured hours into that tutorial to make it the very best way to learn photography, and tens of thousands of people read it every month. I’m sure you’ll love it.
CONCLUSION
If you can only do a few of these things in your photo, make it these: capture interesting lighting, use a creative composition, and remember to digitally style the photo afterward.
But there’s one problem. I only got to 13 tips. Comment below with some of the ideas that you have seen work.