13a portfolio
TRANSCRIPT


NICOLE NUGENT
TABLE OF [email protected]
Magazine Cover
Prezi Presentation
Photodesign
Montage
Business Identity
Infographic
HTML & CSS Coding
Web Page Mockup
Brochure
4
6
8
10
12
16
18
20
22
417.310.0414
www.nicolenugent.com
4444 Kitten LaneRexburg, ID 83440

MAGAZINECOVER
DESCRIPTION
PROCESS
PROGRAMS
COURSE & SECTION
OBJECTIVE
INSTRUCTOR
DATE
Design a magazine cover that showcases a self-portrait as well as articles about yourself.
As I was looking at all the different magazine covers out there, I realized that I didn’t feel I fit with many of them. So I decided to create my own magazine titled “Create”. It’s a magazine for all the visual creatives out there.
The topics I chose for the articles revolved around my interests and hobbies. For example, I love everything to do with creativity. I love taking pictures and designing a variety of things. I have also always loved dance and music and those are a major stress reliever for me in my life. I also really love cats because they are adorable, soft, loyal, and hilarious.
The process of creating my magazine cover went as follows:1. First I sketched out on paper some possible layouts of the magazine cover.2. Next I created a shape map in InDesign of one of my sketches. 3. I then searched out a photo that I wanted to use as my self-portrait.4. I opened the image in Photoshop and cut out the background so that I would be able to have the name of the magazine go behind my head.5. Next I opened up InDesign and created a new 8.5 x 11 inch page.6. I then placed in my PSD document.7. I then duplicated it and put it behind the words “CREATE” so that I could have the background colors (I felt it was too boring with the white background.)8. I then proceeded to add text boxes with all the different articles I wanted to include.9. Once I was finished, I saved the InDesign file and then exported a JPEG at 150 ppi.
Photoshop & InDesign
Comm 130 • Section 01
Jane Doe
April 18, 2016
Use the basic tools of InDesign to create a cover of a real or fictional magazine.

DESCRIPTION
PROCESS
PROGRAMS
COURSE & SECTION
OBJECTIVE
INSTRUCTOR
DATEComm 130 • Section 01
Jane Doe
April 28, 2016
Learn how to use Prezi and use it as a resource for giving visual presentations.
I’m not very familiar with Prezi so I had first look at some example presentations to get an idea of what I could do. The process of creating my Prezi presentation went as follows:
1. After I researched, I chose an idea and then started sketching. I sketched out an idea that I had in my head regarding ways to be more creative. I chose to go with a light bulb as my graphic and then work around that.2. I opened up Photoshop and Illustrator and used both programs to create my background. I used my sketch as my basic foundation. I started creating the light bulb in Photoshop and decided to add some brush strokes to give it more of an artistic feel and add some flare to it. I added the text and other elements so that they would be solidified in their position when I started working in Prezi.3. Next I went into the heart of Prezi, added my background, and started editing. I added more of my content on the sides and then worked on the transitions.4. I added background music to make it more enjoyable to read.
Photoshop, Illustrator, PreziCreate an instructional presentation using the Prezi software to demonstrate it’s features and capabilities.
PRESENTATIONPREZI

DESCRIPTION
PROCESS
PROGRAMS
COURSE & SECTION
OBJECTIVE
INSTRUCTOR
DATEComm 130 • Section 01
Jane Doe
The steps that I followed in my process were:
1. I decided what color scheme I was going to use. I knew that I wanted to take a photo of a beautiful creek and so I used that image for my design.2. I did a lot to the photo to create the look I was going for: I increased the levels and the vibrance. I changed the color of the leaves to be more of an autumn-like feel. I then added some sharpness all over on the foliage.3. I created a new 8.5 x 11 inch document in Photoshop.4. Then I pulled my photo on top of it and started designing.5. I added the bars on the left and then the text. I tried to keep a good flow throughout the design. I also made sure to pay attention to alignment.
May 7, 2016
Photoshop
Learn basic photography skills. Combine photo(s) with design elements using Photoshop.
By using photography and design skills, create a project that encompasses a consistent color scheme from the image.
PHOTODESIGN
DESCRIPTION
PROCESS
PROGRAMS
COURSE & SECTION
OBJECTIVE
INSTRUCTOR
DATEComm 130 • Section 01
Jane Doe
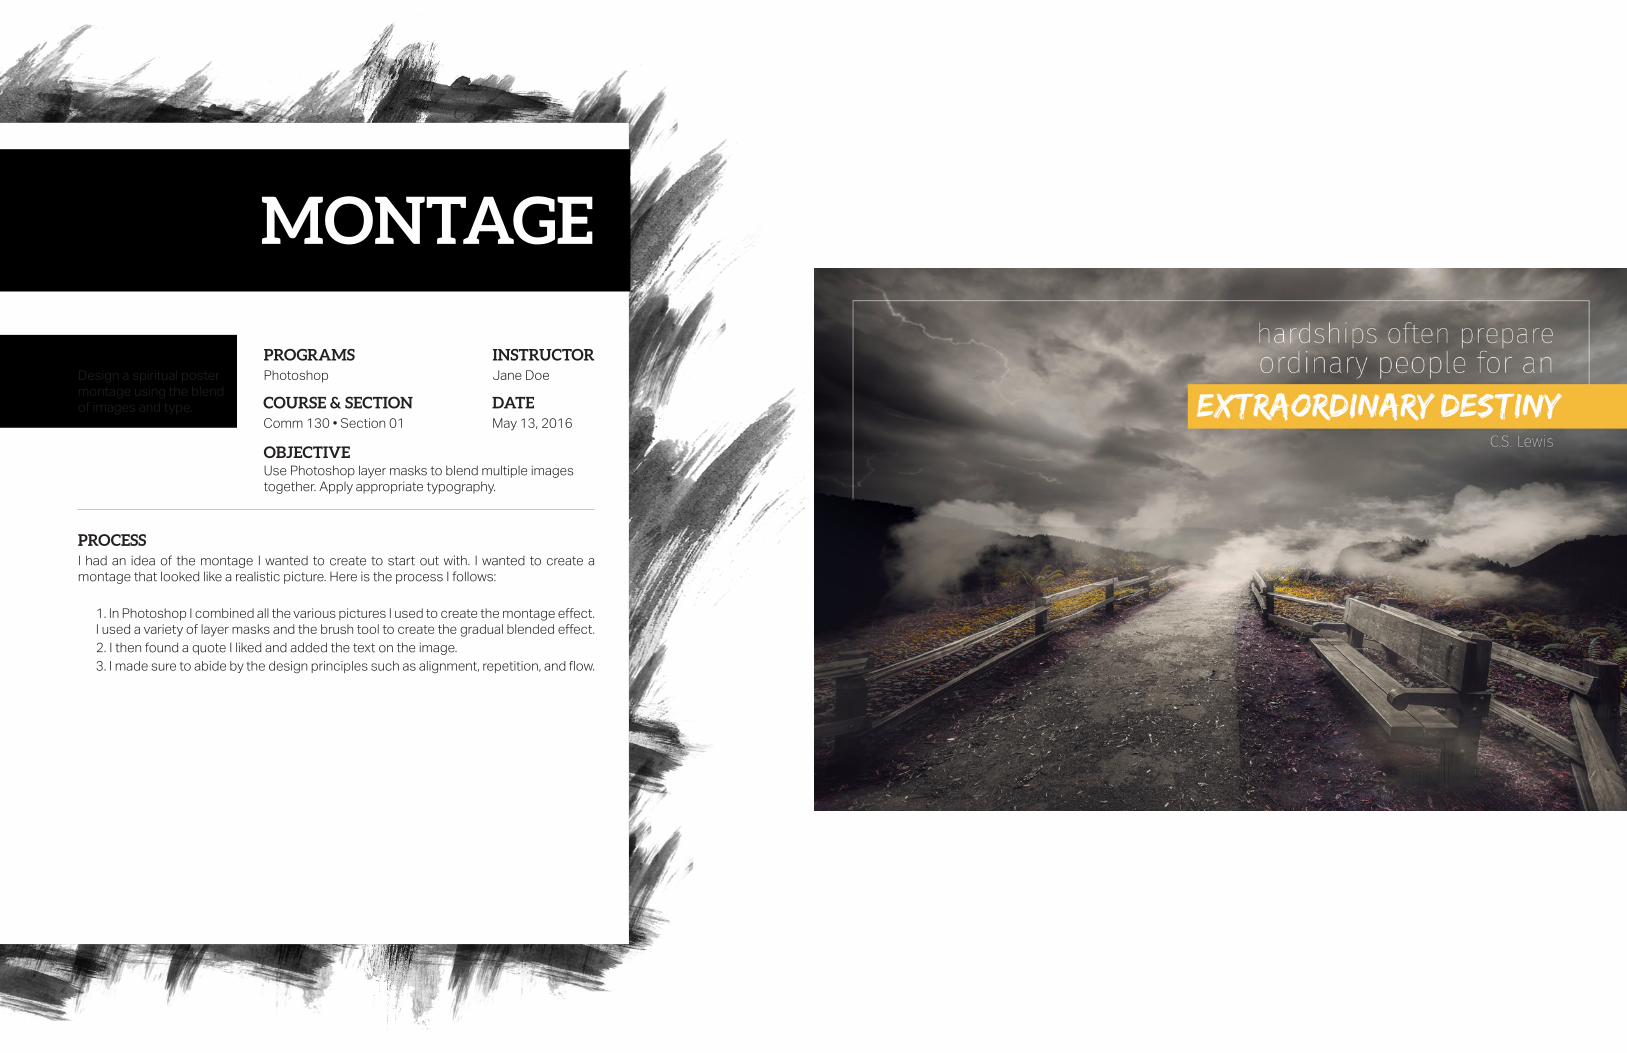
I had an idea of the montage I wanted to create to start out with. I wanted to create a montage that looked like a realistic picture. Here is the process I follows:
1. In Photoshop I combined all the various pictures I used to create the montage effect. I used a variety of layer masks and the brush tool to create the gradual blended effect.2. I then found a quote I liked and added the text on the image.3. I made sure to abide by the design principles such as alignment, repetition, and flow.
Photoshop
May 13, 2016
Use Photoshop layer masks to blend multiple images together. Apply appropriate typography.
Design a spiritual poster montage using the blend of images and type.
MONTAGE

DESCRIPTION
PROCESS
PROGRAMS
COURSE & SECTION
OBJECTIVE
INSTRUCTOR
DATEComm 130 • Section 01
Jane Doe
1. I first sketched out some ideas for the logo on paper. I had a lot of different options.2. After sketching, I opened up Illustrator and started creating some of my sketches digitally.3. I came up with some options, but felt I needed to go back to sketching some more ideas.4. I felt better this time around and was able to create three different options in Illustrator.5. I wanted to have more of a type logo, a symbol logo, and an illustration logo.6. I got votes from various people on which was their favorite. It helped me to narrow it down to the one I would use to move on.7. I chose the illustration logo and then created my letterhead and business card.8. I made sure to follow the rule of alignment and repetition.
Create a new logo to fit a company or personal image. Design consistent layouts for various business documents.
Illustrator & InDesign
May 21, 2016
Create a logo for a company/service/organization and establish a visual identity across documents.
IDENTITYBUSINESS


DESCRIPTION
PROCESS
PROGRAMS
COURSE & SECTION
OBJECTIVE
INSTRUCTOR
DATEComm 130 • Section 01
Jane Doe
1. I started brainstorming some topics and ended up with the idea of the seasons.2. I did some research to find some data and found a study where Americans were asked what their favorite season was.3. I also conducted a research on my Facebook page and asked people what their favorite season was and why. 4. I then sketched out some graphics that I knew I wanted to include in the infographic.5. Next I opened up Illustrator and started on my Infographic.6. I created the pie charts and other graphics to organize the data.
Improve research skills and organize data using graphics and design.
May 28, 2016
IllustratorCreate an infographic that organizes data in a visually pleasing way.
INFOGRAPHIC

DESCRIPTION
PROCESS
PROGRAMS
COURSE & SECTION
OBJECTIVE
INSTRUCTOR
DATEComm 130 • Section 01
Jane Doe
Acquire a working knowledge of HTML and basic understanding of CSS.
June 2, 2016
Text Wrangler
1. First I created my logo in Illustrator. I love cats so I decided to go that route.2. I resized my logo to be no longer than 500 px on the long side.3. I created my HTML file and started adding my content and tags.4. Then I created my CSS file and made sure to link it in the HTML code.5. I made customizations in my CSS to match the colors in my logo and changed the fonts to what I preferred.6. I created the background by creating an image with the yellow gradient and then used that image as my background in my HTML code.7. I then made sure to validate my HTML and CSS.
Code a custom web page with HTML and CSS.
CODINGHTML & CSS

DESCRIPTION
PROCESS
PROGRAMS
COURSE & SECTION
OBJECTIVE
INSTRUCTOR
DATEComm 130 • Section 01
Jane Doe
Use Photoshop to design a mockup of a website homepage with the help of a grid.
1. I first picked an idea of what I was going to use for the basis of my website. I chose the same cat adoption center I used in the previous project.2. I then started sketching an idea of how I wanted to lay it out. I knew I wanted some images of cats at the beginning to grab viewers’ attention and be easy to navigate.3. After I sketched it on paper, I then jumped into Photoshop and opened the 16-column grid. I started to create my wireframe to get me started.4. After my wireframe, I started to add the actual content.5. My final design ended up being a little different from my original sketch and wireframe as I realized the pictures would have been smaller if I did 3 on a line. So I decided to go with 2 and just added another image.
June 11, 2016
InDesign & PhotoshopDesign a website homepage using a grid.
MOCKUPWEB PAGE

DESCRIPTION PROGRAMS
COURSE & SECTION
OBJECTIVE
INSTRUCTOR
DATEComm 130 • Section 01
Jane Doe
1. I first created the logo in Illustrator.2. Then I went into InDesign and started to design my brochure. I wrote my body copy and added the body copy so I knew how I want it to fit.3. I saved the images as Photoshop documents so when I was in InDesign I could edit the original and it would open in Photoshop. Then I could edit the coloring, etc and it would automatically update the link in InDesign.4. I then exported the brochure document as JPEGS.5. Even though it wasn’t required, I placed the brochure in a mockup so it would be easy to see how it would look.
PROCESS
Set up and align a two-sided, folded document. Learn how to wrap text around an image. Use paragraph styles in InDesign.
June 18, 2016
Photoshop, Illustrator, InDesignDesign a logo and brochure for a company.
BROCHURE