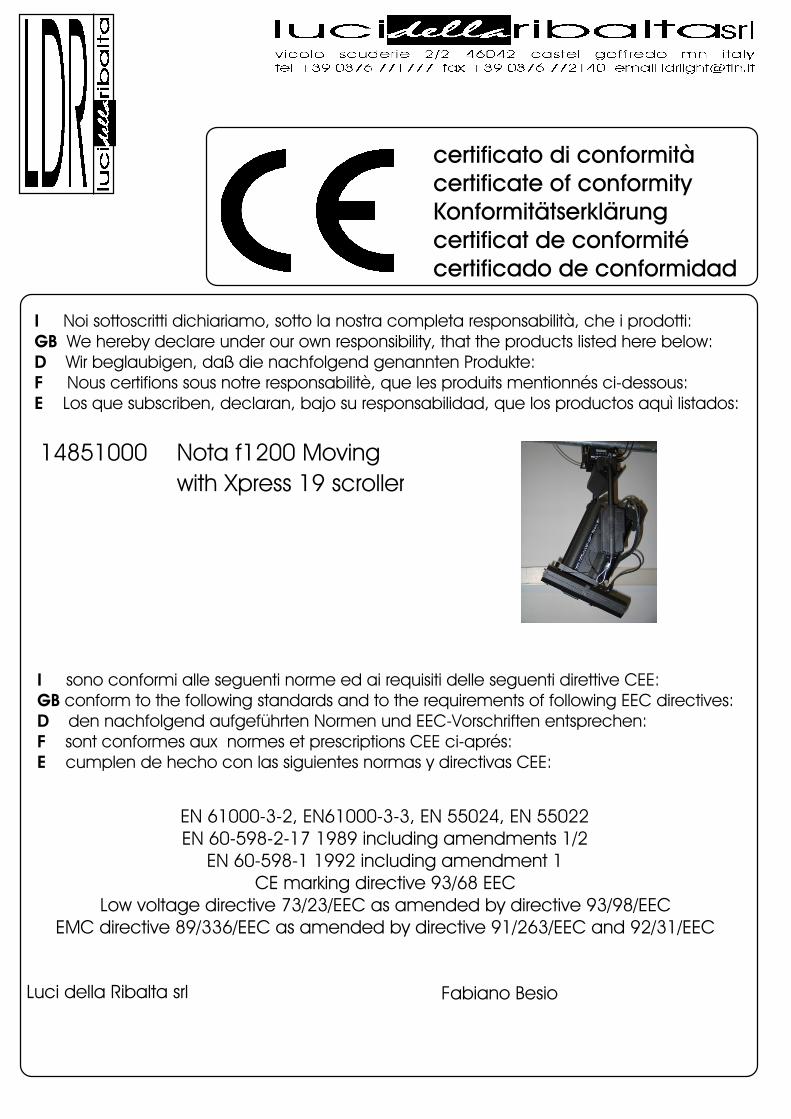
14851000 nota f1200 moving with xpress 19 scroller nota f1200 moving with xpress 19 scroller...
TRANSCRIPT
14851000 Nota f1200 Movingwith Xpress 19 scroller
istruzioni per l'usooperating instructionsBedienungsanleitung
instrucciones de manejomode d'emploi
gebruiksaanwijzing
Luci della Ribalta srl, Via Berna 14, 46042 Castel Goffredo mn Italy. tel +39 0376 771 777 - fax +39 0376 772 140 - email [email protected]

Nota Moving User’s Manual – 1.0
Luci della Ribalta srl, Via Berna 14, 46042 Castel Goffredo (MN) Italy
Tel. +39 0376 771 777 – fax +39 0376 772 140 – email [email protected] – web www.ldr.it
1
ENGLISH – TABLE OF CONTENTS Important safety norms ……………………………………………………………………... page 3
1. Check box content…………………………………………………………………. page 4 2. Weight and dimensions……………………………………………………............ page 4 3. Important notice before installation ……………………………………………… page 4 4. Lamp-holder setting ……………………………………………………………….. page 5 5. Balance setting …………………………………………………………………….. page 5 6. Installation …………………………………………………………………………… page 6 7. Installation example ………………………………………………………………... page 7
OPERATION 8. DMX connection ……………………………………………………………………. page 8 9. Connection to the Nota Moving ………………………………………………….. page 8 10. Power cable …………………………………………………………………………. page 8 11. 7-segment display ………………………………………………………………….. page 8 12. Setting the start address ……………………………………………………………. page 8 13. LED status indicators ………………………………………………………………… page 9 14. The “LEARN” key ……………………………………………………………………… page 9 15. 6-way control/power unit …………………………………………………………… page 10 16. Fuse replacement ………………………………………………………………….. page 10 17. Colour scroller – LDR Xpress 19 ……………………………………………………. page 10 18. Horizontal movement (Pan) ………………………………………………………… page 11 19. Vertical movement (Tilt) …………………………………………………………….. page 11 20. Focus (zoom) control ……………………………………………………………….. page 11 21. Cleaning and maintenance ………………………………………………………. page 11 22. Spare parts …………………………………………………………………………… page 12 23. Warranty ……………………………………………………………………………… page 12
ITALIANO – INDICE Importanti norme di sicurezza………………………..……………………………………... pag. 13
1. Controllo del contenuto dell’imballo ………………………………….…………. pag. 14 2. Peso e dimensioni …………………………………………………….................. pag. 14 3. Prima dell’installazione …………………………………………..………………… pag. 15 4. Regolazione del porta-lampada ………………………………………………… pag. 15 5. Bilanciamento …………………………………………………..………………….. pag. 15 6. Installazione ………………………….……………………………………………… pag. 16 7. Esempio di installazione …………………………………………………………... pag. 17
FUNZIONAMENTO 8. Collegamento DMX ………………………….……………………………………. pag. 18 9. Collegamento al Nota Moving ………………………………………….……….. pag. 18 10. Cavo di alimentazione …………………………………………….………………. pag. 18 11. Display ……………………………………………………………………………….. pag. 18 12. Assegnazione dell’indirizzo DMX di inizio …………………………………………. pag. 18 13. Indicatori di stato - LED ……………………………………………………………… pag. 19 14. Il tasto “LEARN” ……………………………………………………………………… pag. 19 15. Alimentatore PSU-6 .……………………………………………………………….… pag. 20 16. Sostituzione del fusibile …………….……………………………………………….. pag. 20 17. Colour scroller – LDR Xpress 19 ……………………………………………………. pag. 21 18. Movimento orizzontale (Pan) ………………………………………………………. pag. 21 19. Movimento verticale (Tilt) ……………………………………………………….….. pag. 21 20. Messa a fuoco (zoom) ……………………………………………………….…….. pag. 21 21. Pulizia e manutenzione ………………….…………………………………………. pag. 22 22. Parti di ricambio …………….…………………………………………….………… pag. 22 23. Garanzia ………………………………………………………………..…….……… pag. 22

Nota Moving User’s Manual – 1.0
Luci della Ribalta srl, Via Berna 14, 46042 Castel Goffredo (MN) Italy
Tel. +39 0376 771 777 – fax +39 0376 772 140 – email [email protected] – web www.ldr.it
2
DEUTSCH – INHALTSVERZEICHNIS Wichtige Sicherheitshinweise …………………………..…………………………………... Seite 23
1. Inhalt der Verpackung …………….………………………………………………. Seite 24 2. Gewicht und Abmessungen ………….…………………………………............ Seite 24 3. Vorsicht ……………………………………………………………………………… Seite 24 4. Verstellung des Lampensockels ………………………………………………….. Seite 25 5. Schwerpunkteinstellung ..………………………………………………………….. Seite 25 6. Montage ………………………………………………….………………………… Seite 26 7. Installationsbeispiel …………………………………………….…………………... Seite 27
INBETRIEBNAHME 8. DMX Anschluss ………………………………………………………………………. Seite 28 9. Verbindung zum Nota Moving …………………………………………………….. Seite 28 10. Netzkabel …………………………………………………………………………….. Seite 28 11. Die 7-Segment Anzeige …………..……………………………………….……….. Seite 28 12. Einstellen der Startadresse …………………………………………………………. Seite 28 13. Die Leuchtdioden …………………………………………………………………… Seite 29 14. Die “LEARN” Taste …………………………….……………………………………… Seite 29 15. DMX-Adressen am 6-Fach Steuer/Netzgerät ……..……………………………… Seite 30 16. Sicherungswechsel ………………………………………………………………….. Seite 30 17. Farbwechsler – LDR Xpress 19 ……………………………………………..………. Seite 30 18. Horizontalantrieb (Pan) ……………………………………………………………… Seite 31 19. Vertikalantrieb (Tilt) ……………………………………………………….………….. Seite 31 20. Fokusverstellung ………….………………………………………………………….. Seite 31 21. Reinigung und Wartung …………………………………….………………………. Seite 31 22. Ersatzteile ……………………………………………………………………………… Seite 32 23. Garantie ……………….……………………………………………………………… Seite 32
LI Conformity Certificate – Certificato di Conformità – Konformitätserklärung ……….… Page 33 LDR Conformity Certificate – Certificato di Conformità – Konformitätserklärung ……… Page 34 Complaint form – Modulo di reclamo – Reklamationsformular …………………………. Page 35 WEEE Directive – Direttiva RAEE – WEEE Richtlinie …………………………………………… Page 36

Nota Moving User’s Manual – 1.0
Luci della Ribalta srl, Via Berna 14, 46042 Castel Goffredo (MN) Italy
Tel. +39 0376 771 777 – fax +39 0376 772 140 – email [email protected] – web www.ldr.it
3
ENGLISH Thanks for having chosen Luci della Ribalta srl. We hope our products and services meet your requirements, but should this not be the case, we kindly ask you to contact us directly to help us supply you and all our customers with better and better quality. The product you purchased has been manufactured with maximum care and selected components, but should you, for reasons beyond our control, have received it damaged, we kindly ask you to contact the dealer who supplied the product to you. To help you in this casualty, a form is supplied at the end of this manual.
Carefully read user’s instructions before using this lighting unit The instructions given here below ensure a safe and correct usage of this product. User’s failure to comply with the installation, operating, maintenance and safety procedures mentioned in this manual, as well as those generally applicable to this lighting equipment, may cause the luminaire not to perform as expected. Luci della Ribalta accepts no liability for direct, indirect, incidental, special, or consequential damages resulting from the customer’s failure to follow the installation, operating, maintenance and safety procedures in this manual or those generally applicable to lighting equipment. The limitation extends to damages for personal injury, property damage, loss of operations, loss of profits, loss of product or loss of time, whether incurred in by the customer, the customer’s employees or a third part. Apart from the instructions given on this manual, all relevant safety and health standards of the
appropriate EU Directives must be complied with
IMPORTANT SAFETY NORMS * this product is fitted with a remote control yoke for stage lighting fixtures, which can only be operated by experts. * make sure balance is always reset before operation in case one or more accessories have been added or removed (colour scrollers or changer, barndoors, etc.) See specific instructions on page 5 and 6 of this manual * this product reaches high temperatures. Avoid any direct contact with its metallic parts. * this product is rated IP 20 and is therefore designed for interior use and in dry environment only (humidity < 90%). For details on maximum ambient temperature, minimum distance from flammable objects and tilt angle, please refer to what indicated on the product label. * do not install this product on or near flammable surfaces * before installing this product make sure the structure you are fixing the product to can withstand its load. * replace the lamp, the mirror and the lenses if damaged or deformed by heat. Make sure the lamp is cold before attempting to remove it. To perform a correct installation of the lamp, please refer to the lamp manufacturer's instructions included in the lamp box and to the relevant chapter in this manual * make sure the unit is disconnected from the mains before attempting to replace the fuse or any other component * fixing and replacement of any component of this product must be carried out exclusively by professional personnel in conformity with the relevant safety and health standards and only with original manufacturer’s components.
Nota Moving User’s Manual – 1.0
Luci della Ribalta srl, Via Berna 14, 46042 Castel Goffredo (MN) Italy
Tel. +39 0376 771 777 – fax +39 0376 772 140 – email [email protected] – web www.ldr.it
4
* replacement of any part of the wiring system must be carried out exclusively by professional personnel in compliance with the original wiring diagrams and with components identical or compatible with those originally fitted. * installation of this product must be exclusively carried out by professional personnel in compliance with the safety norms in force in the country where the product is used.
1. CHECK BOX CONTENT Upon opening the packaging, please make sure it contains the following: luminaire:
a. lighting unit complete with motor yoke b. colour scroller Xpress 19, fitted c. 2 mega clamps for ø50/60mm pipe d. safety cable
PSU: (if ordered)
a. this product can only be operated through a dedicated PSU. Please make sure the shipment includes the model you have ordered
Should one or more items miss, we kindly ask you to contact your dealer immediately.
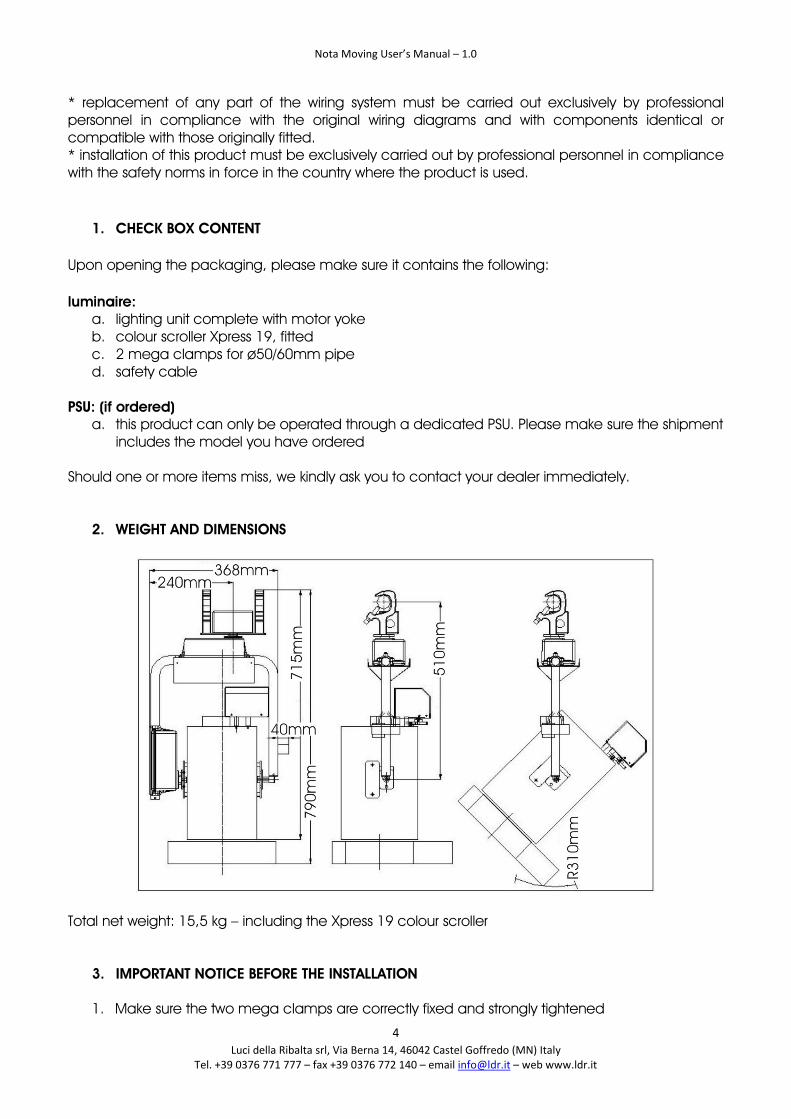
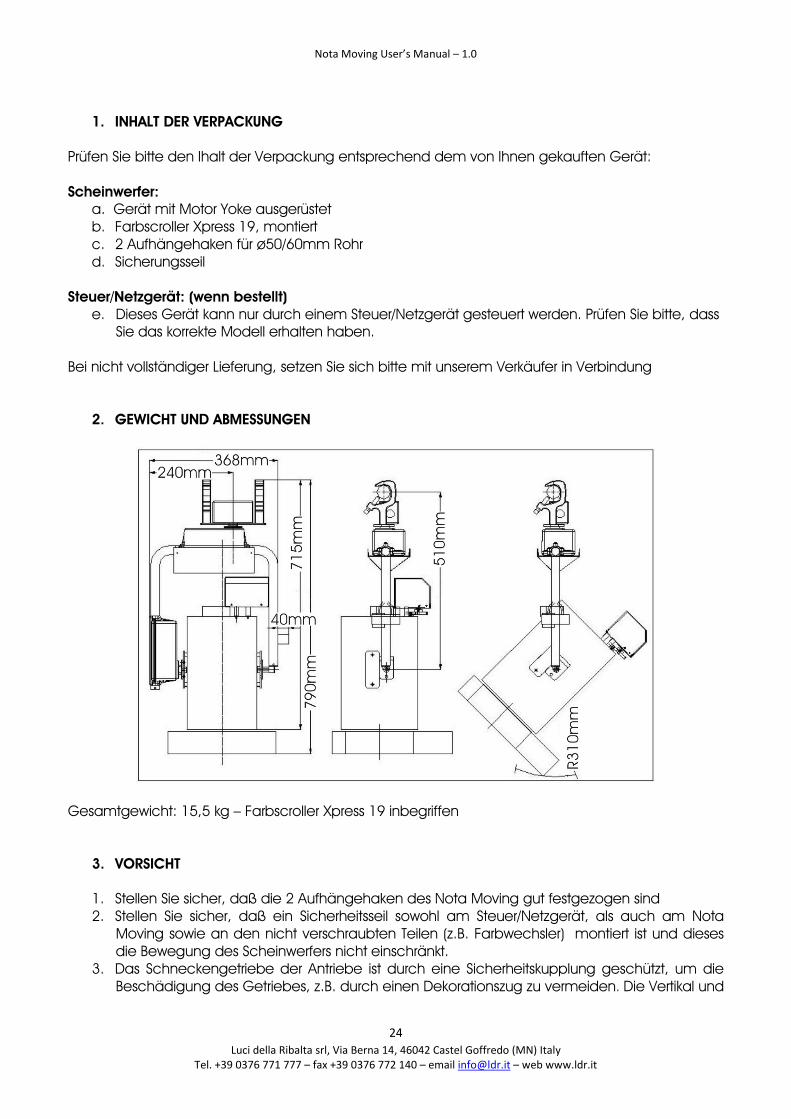
2. WEIGHT AND DIMENSIONS
Total net weight: 15,5 kg – including the Xpress 19 colour scroller
3. IMPORTANT NOTICE BEFORE THE INSTALLATION
1. Make sure the two mega clamps are correctly fixed and strongly tightened
Nota Moving User’s Manual – 1.0
Luci della Ribalta srl, Via Berna 14, 46042 Castel Goffredo (MN) Italy
Tel. +39 0376 771 777 – fax +39 0376 772 140 – email [email protected] – web www.ldr.it
5
2. Make sure each part of this unit (power supply, motor yoke as well as colour scroller and, if installed, a barndoor, are securely fixed to the structure by an individual safety cable
3. Make sure none of the safety cables installed hinders in any way the free movement of the unit
4. The gearbox controlling the drive of the yoke is protected by a friction clutch to avoid possible damages to transmission, for example by decoration items on the wall. In order to avoid malfunctioning of the clutch we strongly recommend that pan and tilt position are NOT MANUALLY SET
4. LAMP-HOLDER SETTING
This unit is fitted with a double-microswitch which disconnects power as soon as the lam-tray is open. The lampholder is factory set for usage with a CP70 GX9.5 1000W lamp. Should you require to set it for usage with CP90 GX9.5 1200W lamp, remove the lampholder support plate from its seat by slackening its fixing screw. Reposition the plate in the lower cut and re-tighten the screw to fix it in place.
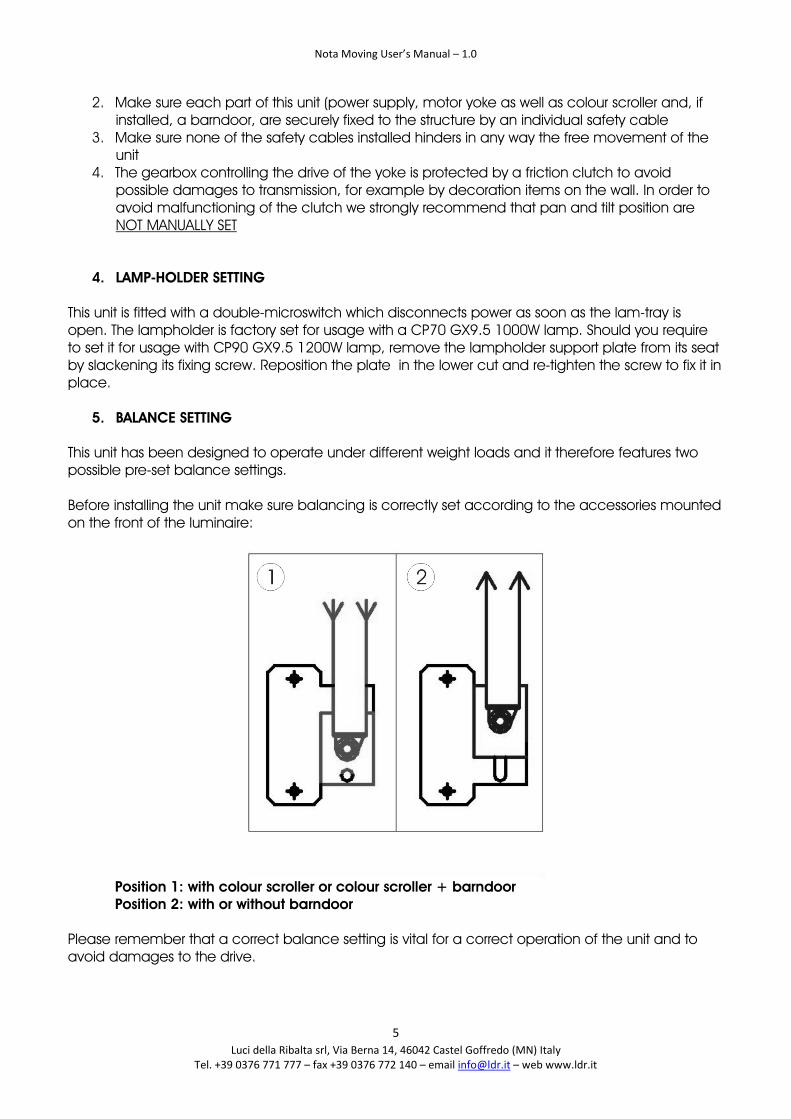
5. BALANCE SETTING
This unit has been designed to operate under different weight loads and it therefore features two possible pre-set balance settings. Before installing the unit make sure balancing is correctly set according to the accessories mounted on the front of the luminaire:
Position 1: with colour scroller or colour scroller + barndoor Position 2: with or without barndoor Please remember that a correct balance setting is vital for a correct operation of the unit and to avoid damages to the drive.
Nota Moving User’s Manual – 1.0
Luci della Ribalta srl, Via Berna 14, 46042 Castel Goffredo (MN) Italy
Tel. +39 0376 771 777 – fax +39 0376 772 140 – email [email protected] – web www.ldr.it
6
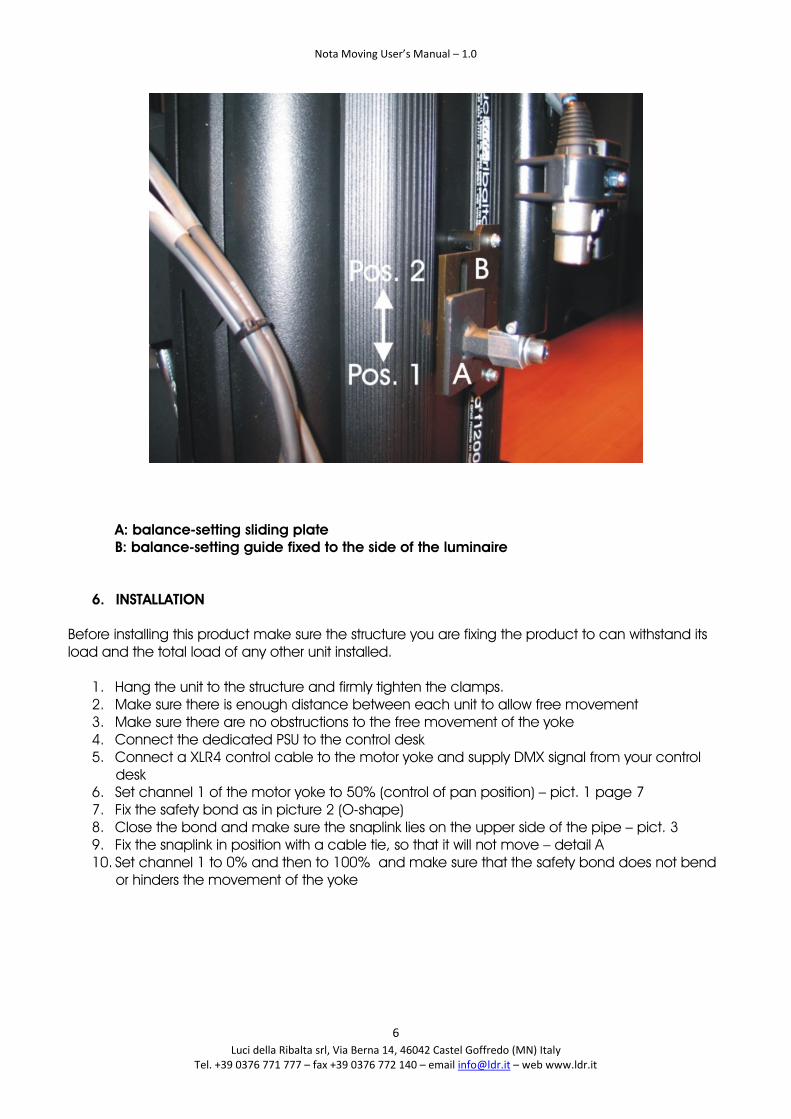
A: balance-setting sliding plate B: balance-setting guide fixed to the side of the luminaire
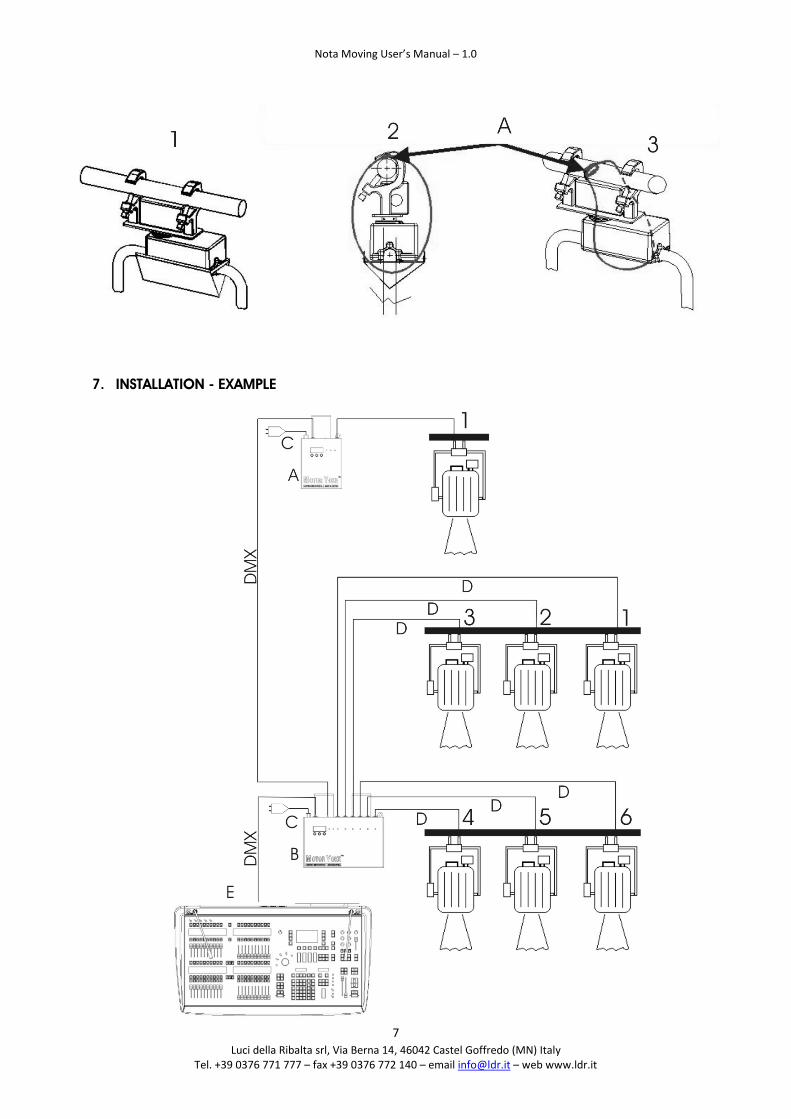
6. INSTALLATION Before installing this product make sure the structure you are fixing the product to can withstand its load and the total load of any other unit installed.
1. Hang the unit to the structure and firmly tighten the clamps. 2. Make sure there is enough distance between each unit to allow free movement 3. Make sure there are no obstructions to the free movement of the yoke 4. Connect the dedicated PSU to the control desk 5. Connect a XLR4 control cable to the motor yoke and supply DMX signal from your control
desk 6. Set channel 1 of the motor yoke to 50% (control of pan position) – pict. 1 page 7 7. Fix the safety bond as in picture 2 (O-shape) 8. Close the bond and make sure the snaplink lies on the upper side of the pipe – pict. 3 9. Fix the snaplink in position with a cable tie, so that it will not move – detail A 10. Set channel 1 to 0% and then to 100% and make sure that the safety bond does not bend
or hinders the movement of the yoke
Nota Moving User’s Manual – 1.0
Luci della Ribalta srl, Via Berna 14, 46042 Castel Goffredo (MN) Italy
Tel. +39 0376 771 777 – fax +39 0376 772 140 – email [email protected] – web www.ldr.it
7
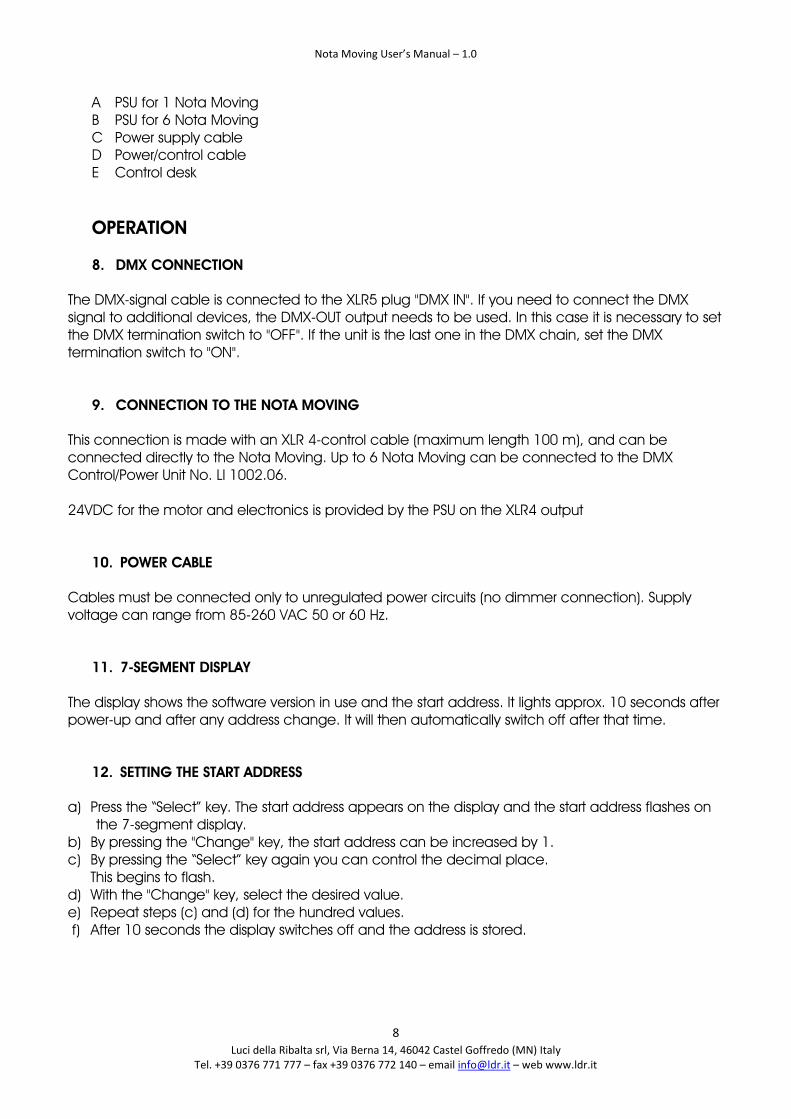
7. INSTALLATION - EXAMPLE
Nota Moving User’s Manual – 1.0
Luci della Ribalta srl, Via Berna 14, 46042 Castel Goffredo (MN) Italy
Tel. +39 0376 771 777 – fax +39 0376 772 140 – email [email protected] – web www.ldr.it
8
A PSU for 1 Nota Moving B PSU for 6 Nota Moving C Power supply cable D Power/control cable E Control desk OPERATION 8. DMX CONNECTION
The DMX-signal cable is connected to the XLR5 plug "DMX IN". If you need to connect the DMX signal to additional devices, the DMX-OUT output needs to be used. In this case it is necessary to set the DMX termination switch to "OFF". If the unit is the last one in the DMX chain, set the DMX termination switch to "ON".
9. CONNECTION TO THE NOTA MOVING This connection is made with an XLR 4-control cable (maximum length 100 m), and can be connected directly to the Nota Moving. Up to 6 Nota Moving can be connected to the DMX Control/Power Unit No. LI 1002.06. 24VDC for the motor and electronics is provided by the PSU on the XLR4 output
10. POWER CABLE
Cables must be connected only to unregulated power circuits (no dimmer connection). Supply voltage can range from 85-260 VAC 50 or 60 Hz.
11. 7-SEGMENT DISPLAY The display shows the software version in use and the start address. It lights approx. 10 seconds after power-up and after any address change. It will then automatically switch off after that time.
12. SETTING THE START ADDRESS
a) Press the “Select” key. The start address appears on the display and the start address flashes on the 7-segment display.
b) By pressing the "Change" key, the start address can be increased by 1. c) By pressing the “Select” key again you can control the decimal place. This begins to flash. d) With the "Change" key, select the desired value. e) Repeat steps (c) and (d) for the hundred values. f) After 10 seconds the display switches off and the address is stored.

Nota Moving User’s Manual – 1.0
Luci della Ribalta srl, Via Berna 14, 46042 Castel Goffredo (MN) Italy
Tel. +39 0376 771 777 – fax +39 0376 772 140 – email [email protected] – web www.ldr.it
9
Note: A DMX line transfers 512 data channels. If you want to use a higher address, (eg.525), follow these steps:
1. Engage the second DMX path (address 513-1024) 2. The selected start address corresponds to the circuit number less 512 (525-512=13) 3. Set the resulting number (in this case 13) as the start address
13. LED STATUS INDICATORS There are 3 LEDs indicating the status of the unit as follows:
Label LED colour Function
Power red Connected to power, fuse ok
DMX control green DMX signal present
Yoke ready yellow Nota Moving is ready to use
14. THE “Learn” KEY If you want to modify the horizontal (pan) or vertical (tilt) operation angle of the Nota Moving, press the “Learn” key. Note: this function only applies to pan and tilt, not to focus and colour changer. Press the “Learn” key: the display shows “Lrn”. Keep the key pressed (approx. 12 secs) until the display shows “run”. You can now set the desired operation angle, i.e. get the unit to learn its movement limits. If the movement of the unit is not stopped, it will store the maximum capability as the default operation angle. You can also manually stop the unit during this process and the unit will store the angle reached when it’s been stopped as the standard operation angle. The “learning process” or set up of the operation angles lasts approx 2min. The advantage of this function is that the lighting control system can exploit the full capability of 0-100%. In case of power cuts or black-outs, the Nota Moving remains in the same position and resumes standard operation after power up, without any need for a reset.
DMX Chan.
Resolution Attribute
1 2
16bit Pan Pan fine
3 4
16bit Tilt Tilt fine
5 8bit Focus
6 8bit Colour (Step mode)
7 8bit Colour motor speed
8 8bit Colour fan speed
Nota Moving User’s Manual – 1.0
Luci della Ribalta srl, Via Berna 14, 46042 Castel Goffredo (MN) Italy
Tel. +39 0376 771 777 – fax +39 0376 772 140 – email [email protected] – web www.ldr.it
10
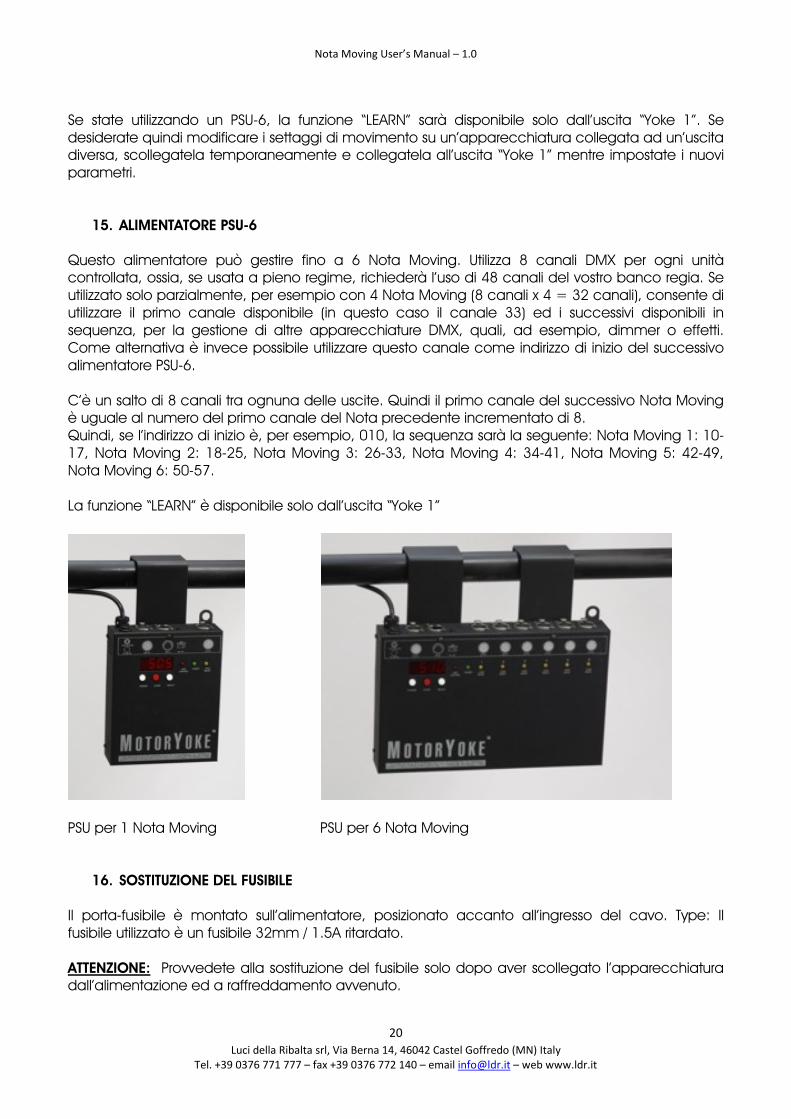
If you are using a 6-way PSU, the “LEARN” function will only be available through output “Yoke 1”. If you need to custom set the operation angle on a unit plugged onto a different output, unplug it and temporarily plug it onto output “Yoke 1” while setting the new parameters.
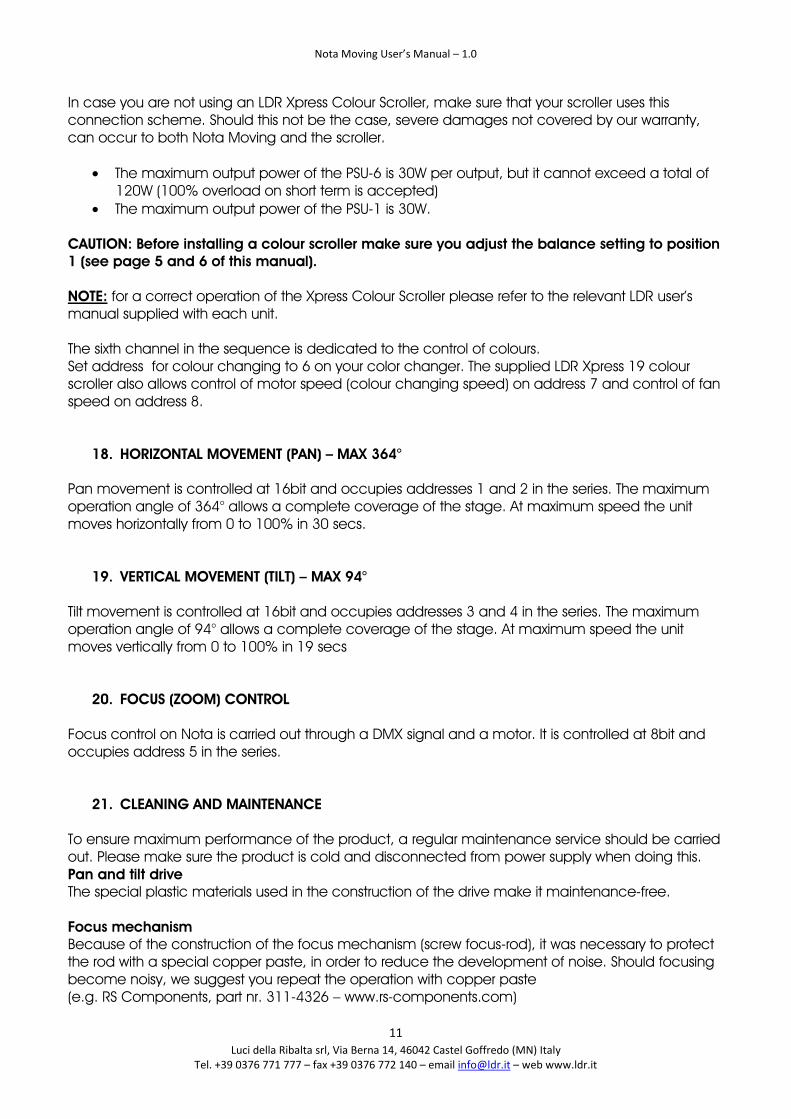
15. 6-WAY CONTROL/POWER UNIT
This unit can control up to 6 Nota Moving. It takes 8 channels per controlled device, i.e. when used at full capacity, it will take 48 channels of your console. When used only partially, for example with 4 units of Nota Moving, (8 channels x 4 = 32 channels), it allows to use, in this case, the 33rd channel in sequence for other DMX devices, such as dimmers, effects, etc. As an alternative option this channel can be set as the start address for the next 6 way PSU. There is a shift of 8 channels in between the outputs. So, the first channel of the next Nota Moving is the first channel of the previous one increased by 8. If the start address is, for example, 010, the sequence would be as follows: Nota Moving 1: 10-17, Nota Moving 2: 18-25, Nota Moving 3: 26-33, Nota Moving 4: 34-41, Nota Moving 5: 42-49, Nota Moving 6: 50-57. The “LEARN” function is only available through output “Yoke 1”
PSU for 1 Nota Moving PSU for 6 Nota Moving
16. FUSE REPLACEMENT The fuse holder is fitted on the Control / Power Unit, located next to the cable entry. Type: 32mm / 1.5A slow blow. CAUTION: Replace the fuse only when power is disconnected!
17. COLOUR SCROLLER – LDR XPRESS 19 – STEP MODE The Nota Moving is fitted with an XLR4 output on the opposite side of the tilt drive. Most manufacturers of colour scrollers, including LDR, adopt the following scheme for the connection of pins: Pin 1 = 0V; Pin 2 = Data -; Pin 3 = Data +; Pin 4 = 24V
Nota Moving User’s Manual – 1.0
Luci della Ribalta srl, Via Berna 14, 46042 Castel Goffredo (MN) Italy
Tel. +39 0376 771 777 – fax +39 0376 772 140 – email [email protected] – web www.ldr.it
11
In case you are not using an LDR Xpress Colour Scroller, make sure that your scroller uses this connection scheme. Should this not be the case, severe damages not covered by our warranty, can occur to both Nota Moving and the scroller.
• The maximum output power of the PSU-6 is 30W per output, but it cannot exceed a total of 120W (100% overload on short term is accepted)
• The maximum output power of the PSU-1 is 30W. CAUTION: Before installing a colour scroller make sure you adjust the balance setting to position 1 (see page 5 and 6 of this manual). NOTE: for a correct operation of the Xpress Colour Scroller please refer to the relevant LDR user’s manual supplied with each unit. The sixth channel in the sequence is dedicated to the control of colours. Set address for colour changing to 6 on your color changer. The supplied LDR Xpress 19 colour scroller also allows control of motor speed (colour changing speed) on address 7 and control of fan speed on address 8.
18. HORIZONTAL MOVEMENT (PAN) – MAX 364° Pan movement is controlled at 16bit and occupies addresses 1 and 2 in the series. The maximum operation angle of 364° allows a complete coverage of the stage. At maximum speed the unit moves horizontally from 0 to 100% in 30 secs.
19. VERTICAL MOVEMENT (TILT) – MAX 94° Tilt movement is controlled at 16bit and occupies addresses 3 and 4 in the series. The maximum operation angle of 94° allows a complete coverage of the stage. At maximum speed the unit moves vertically from 0 to 100% in 19 secs
20. FOCUS (ZOOM) CONTROL Focus control on Nota is carried out through a DMX signal and a motor. It is controlled at 8bit and occupies address 5 in the series.
21. CLEANING AND MAINTENANCE
To ensure maximum performance of the product, a regular maintenance service should be carried out. Please make sure the product is cold and disconnected from power supply when doing this. Pan and tilt drive The special plastic materials used in the construction of the drive make it maintenance-free. Focus mechanism Because of the construction of the focus mechanism (screw focus-rod), it was necessary to protect the rod with a special copper paste, in order to reduce the development of noise. Should focusing become noisy, we suggest you repeat the operation with copper paste (e.g. RS Components, part nr. 311-4326 – www.rs-components.com)
Nota Moving User’s Manual – 1.0
Luci della Ribalta srl, Via Berna 14, 46042 Castel Goffredo (MN) Italy
Tel. +39 0376 771 777 – fax +39 0376 772 140 – email [email protected] – web www.ldr.it
12
General maintenance * clean all reflective parts such as reflector, mirror and lens opening the product, if necessary. * check the lamp and the lenses and replace any visibly damaged component. * clean air ducts and fans in order to allow proper ventilation activity on the product. * check internal and external wiring and replace any cable which should be damaged by heat or mechanical agents.
22. SPARE PARTS
All components are available as spare parts. We strongly recommend you always use original LDR components as spare parts. Please refer to our technical assistance should you need to order and/or replace any part of the unit.
23. WARRANTY Our warranty covers all structural and manufacture defects for one year from the date you purchased this product. In case of complaints we strongly recommend you contact the local dealer who supplied the product to you. In any case please report the serial number of the product. Luci della Ribalta srl reserves the right to modify the present document without prior notice.
Nota Moving User’s Manual – 1.0
Luci della Ribalta srl, Via Berna 14, 46042 Castel Goffredo (MN) Italy
Tel. +39 0376 771 777 – fax +39 0376 772 140 – email [email protected] – web www.ldr.it
13
ITALIANO Grazie per aver scelto Luci della Ribalta srl. Speriamo che i nostri prodotti e servizi soddisfino le vostre esigenze, ma se così non fosse vi preghiamo di contattarci direttamente per aiutarci ad offrire a voi ed a tutti i nostri clienti un servizio sempre migliore. Il prodotto che avete acquistato è stato fabbricato con il massimo della cura e con componenti di elevata qualità. Nel caso in cui, per ragioni indipendenti dalla nostra volontà, l’aveste ricevuto danneggiato, vi preghiamo di contattare il rivenditore che ve l’ha fornito. Per aiutarvi in questa evenienza, abbiamo inserito un modulo di reclamo alla fine di questo manuale.
Leggete attentamente questo manuale prima di utilizzare questa apparecchiatura elettrica
Le istruzioni qui di seguito riportate assicurano un utilizzo corretto e sicuro del prodotto che avete acquistato. La mancata osservanza delle procedure di installazione, funzionamento, manutenzione e sicurezza qui indicate, oltre alle norme generali di utilizzo di questo tipo di prodotti potrebbe essere causa di malfunzionamento dell’apparecchiatura o di rese diverse da quanto specificato dal produttore. Luci della Ribalta srl non si assume alcuna responsabilità in caso di danno diretto, indiretto, accidentale, specifico o conseguente a cose o persone derivante dalla mancata osservanza da parte dell’utilizzatore delle procedure di installazione, funzionamento, manutenzione e sicurezza indicate in questo manuale e di quelle genericamente applicabili a questa categoria di prodotto. La limitazione si estende a danni a persone, cose, proprietà, interruzione o perdita di attività, mancato profitto, o perdita di tempo, causati dal cliente, da un suo dipendente o da terzi. L’utilizzo di questa apparecchiatura è regolato, oltre che dalle prescrizioni qui indicate, anche da tutte le relative norme di sicurezza e protezione della salute riportate nelle specifiche direttive EU relative a questo tipo di apparecchiature.
IMPORTANTI NORME DI SICUREZZA * questa apparecchiatura è dotata di una forcella mobile con controllo a distanza che può essere utilizzata solo da personale esperto * assicuratevi che il punto di bilanciamento sia sempre regolato sulla posizione richiesta dall’assetto dell’apparecchiatura, ossia degli accessori frontali quali scroller e o paraluce che vengano di volta montati o rimossi. Si vedano dettagliate istruzioni a pag. 15 e 16 * questa apparecchiatura raggiunge temperature elevate. Evitate qualsiasi contatto diretto con le parti metalliche. * questo prodotto è classificato IP20 ed è quindi adatto al solo utilizzo in interni ed in ambienti con umidità inferiore al 90%. Per informazioni sulla temperatura ambiente massima consentita, sulla distanza minima del prodotto da oggetti infiammabili e l’angolo massimo di inclinazione utilizzabile, vi preghiamo di far riferimento a quanto riportato sull’etichetta del prodotto. * non installate questo prodotto su – o vicino a superfici infiammabili * prima di installare questo prodotto assicuratevi che la struttura a cui lo state per fissare ne sopporti il peso * sostituite la lampada, lo specchio e le lenti se danneggiate o deformate dal calore. Assicuratevi che la lampada sia fredda prima di iniziarne la sostituzione. Per eseguire una corretta installazione
Nota Moving User’s Manual – 1.0
Luci della Ribalta srl, Via Berna 14, 46042 Castel Goffredo (MN) Italy
Tel. +39 0376 771 777 – fax +39 0376 772 140 – email [email protected] – web www.ldr.it
14
della lampada vi preghiamo di attenervi alle istruzioni del fabbricante riportate all’interno della confezione della lampada stessa ed al relativo capitolo di istruzioni di questo manuale. * assicuratevi che il prodotto sia scollegato dall’alimentazione e che sia freddo prima di effettuare la sostituzione del fusibile o di qualsiasi altro componente. * la riparazione e/o sostituzione di qualsiasi componente di questo prodotto deve essere effettuata esclusivamente da personale qualificato in conformità con le specifiche norme di sicurezza e protezione della persona ed esclusivamente con parti di ricambio originali * la riparazione e/o sostituzione di qualsiasi componente delle parti elettriche deve essere effettuata esclusivamente da personale qualificato in conformità con gli schemi elettrici forniti da Luci della Ribalta e con componenti identici o compatibili con quelli originariamente montati. * l’installazione di questo prodotto deve essere effettuata esclusivamente da personale qualificato in conformità con le specifiche norme di sicurezza e protezione della persona in vigore nel paese in cui il prodotto viene utilizzato.
1. CONTROLLO DEL CONTENUTO DELL’IMBALLO Controllate che l’imballo contenga I seguenti articoli: illuminatore:
a. illuminatore completo di forcella motorizzata b. colour scroller Xpress 19, montato c. 2 mega ganci per tubo ø50/60mm d. cavo di sicurezza alimentatore : (se ordinato) a. questo prodotto può funzionare solo in combinazione con un alimentatore dedicato.
Controllate che l’imballo contenga il modello che avete ordinato. Nel caso in cui mancassero uno o più articoli vi preghiamo di contattare immediatamente il vostro rivenditore.
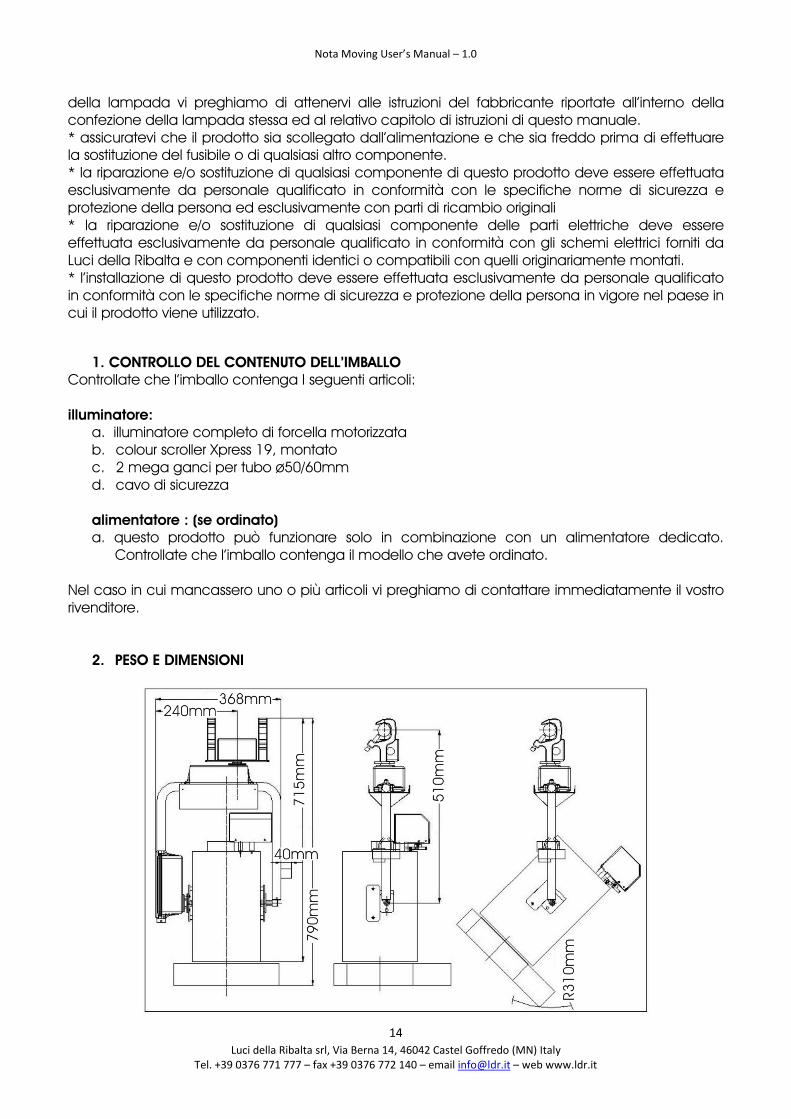
2. PESO E DIMENSIONI
Nota Moving User’s Manual – 1.0
Luci della Ribalta srl, Via Berna 14, 46042 Castel Goffredo (MN) Italy
Tel. +39 0376 771 777 – fax +39 0376 772 140 – email [email protected] – web www.ldr.it
15
Peso netto totale: 15,5kg – compreso lo scroller Xpress 19
3. PRIMA DELL’INSTALLAZIONE
1. Assicuratevi che i due mega ganci siano correttamenti montati e ben fissati. 2. Assicuratevi che ogni componente mobile di questo prodotto (alimentatore, forcella
motorizzata, colour scroller e paraluce) vengano saldamente fissati alla struttura di supporto con un cavo di sicurezza individuale.
3. Assicuratevi che nessuno dei cavi di sicurezza impedisca in ogni modo il libero movimento del prodotto.
4. Il sistema di controllo del movimento della forcella è dotato di un blocco frizione che impedisce possibili danni alla trasmissione, per esempio a causa dell’urto con tendaggi o altri elementi decorativi. Al fine di evitare il malfunzionamento del blocco frizione si raccomanda DI NON SETTARE MAI MANUALMENTE LA POSIZIONE ORIZZONTALE E VERTICALE DELLA FORCELLA.
4. REGOLAZIONE DEL PORTA-LAMPADA
Questo prodotto è dotato di un doppio microinterruttore di sicurezza che scollega l’alimentazione all’apertura del carrello porta-lampada. Il porta-lampada è settato di serie per l'uso con lampada CP70 GX9.5 1000W. Per l'uso con CP90 GX9.5 1200W, togliere dalla propria sede la squadretta di supporto-del porta-lampada svitandone la vite di fissaggio. Riposizionate la squadretta nel taglio inferiore e riavvitate.
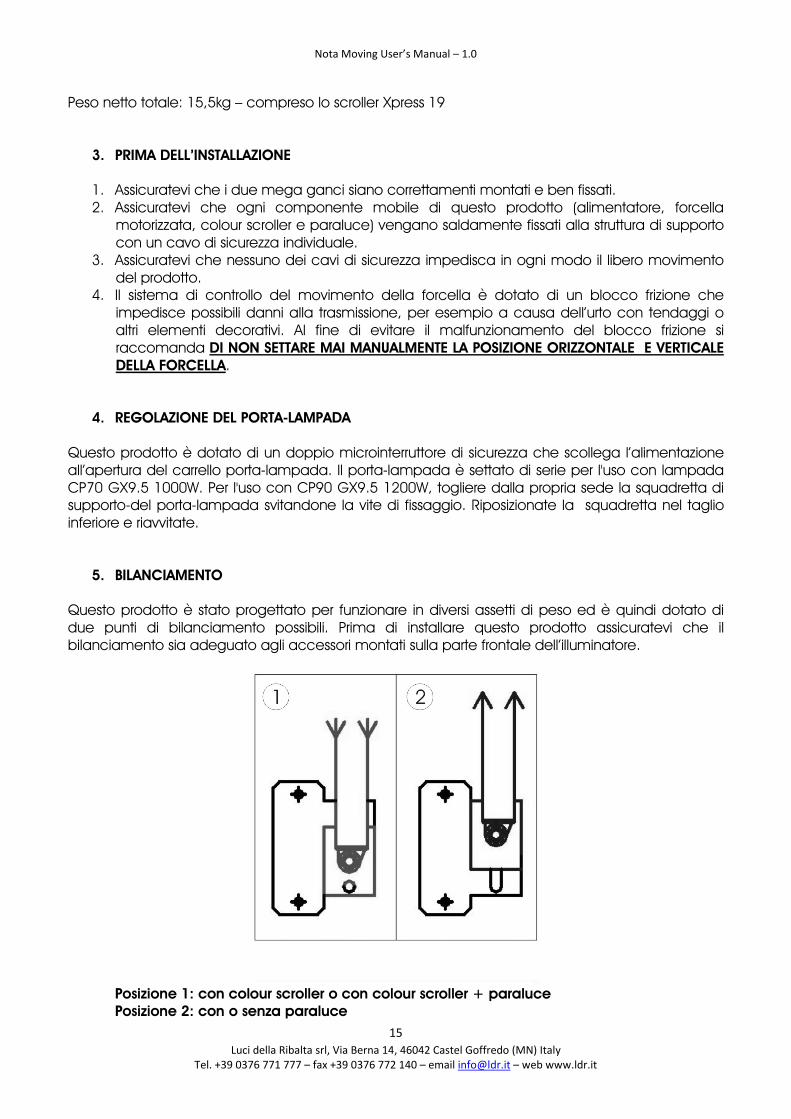
5. BILANCIAMENTO
Questo prodotto è stato progettato per funzionare in diversi assetti di peso ed è quindi dotato di due punti di bilanciamento possibili. Prima di installare questo prodotto assicuratevi che il bilanciamento sia adeguato agli accessori montati sulla parte frontale dell’illuminatore.
Posizione 1: con colour scroller o con colour scroller + paraluce Posizione 2: con o senza paraluce
Nota Moving User’s Manual – 1.0
Luci della Ribalta srl, Via Berna 14, 46042 Castel Goffredo (MN) Italy
Tel. +39 0376 771 777 – fax +39 0376 772 140 – email [email protected] – web www.ldr.it
16
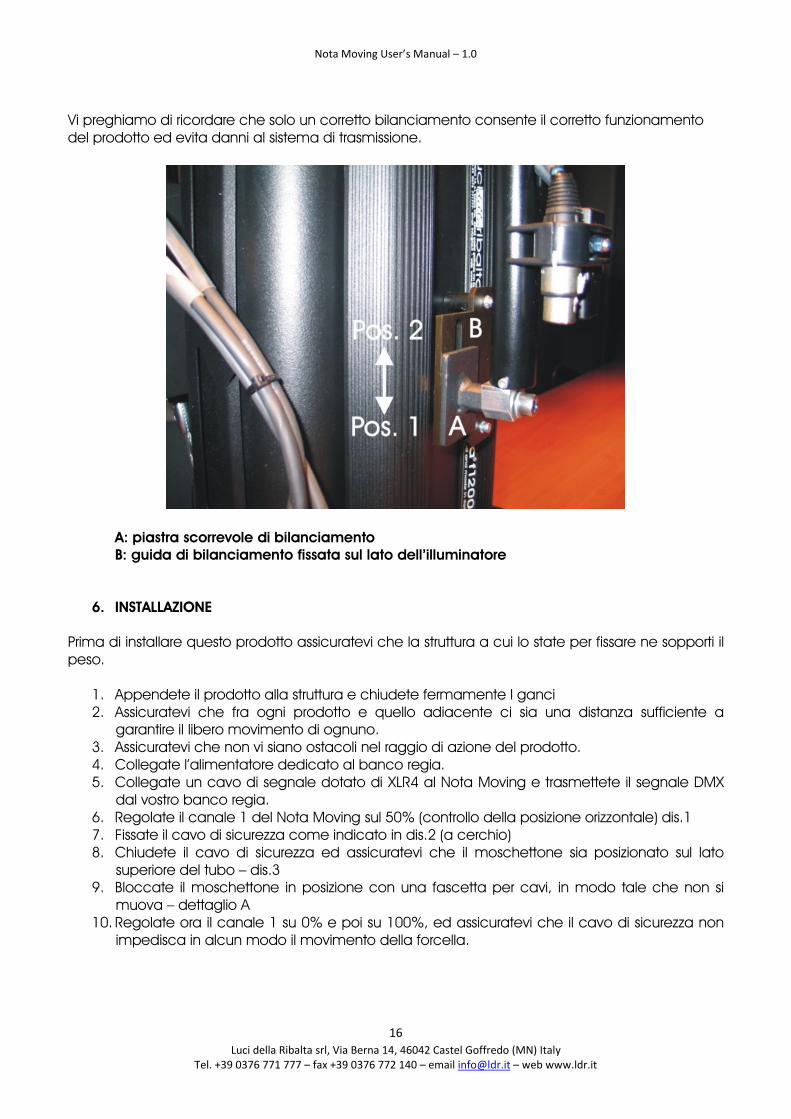
Vi preghiamo di ricordare che solo un corretto bilanciamento consente il corretto funzionamento del prodotto ed evita danni al sistema di trasmissione.
A: piastra scorrevole di bilanciamento B: guida di bilanciamento fissata sul lato dell’illuminatore
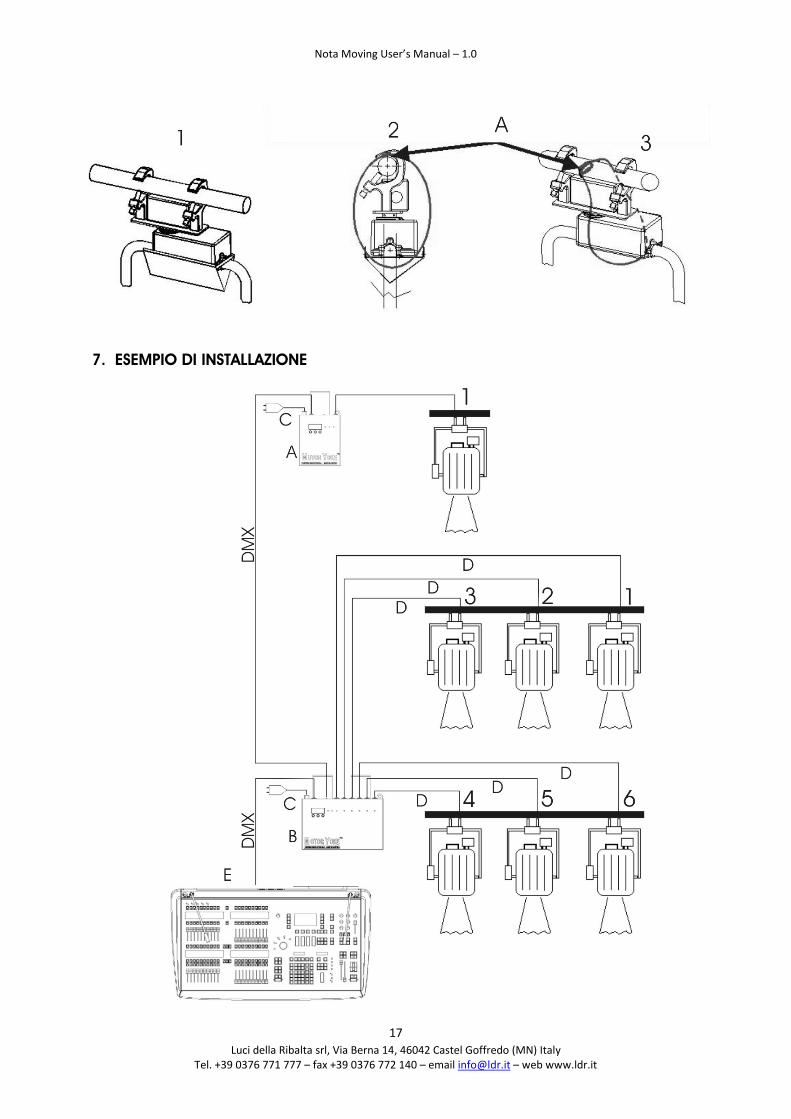
6. INSTALLAZIONE Prima di installare questo prodotto assicuratevi che la struttura a cui lo state per fissare ne sopporti il peso.
1. Appendete il prodotto alla struttura e chiudete fermamente I ganci 2. Assicuratevi che fra ogni prodotto e quello adiacente ci sia una distanza sufficiente a
garantire il libero movimento di ognuno. 3. Assicuratevi che non vi siano ostacoli nel raggio di azione del prodotto. 4. Collegate l’alimentatore dedicato al banco regia. 5. Collegate un cavo di segnale dotato di XLR4 al Nota Moving e trasmettete il segnale DMX
dal vostro banco regia. 6. Regolate il canale 1 del Nota Moving sul 50% (controllo della posizione orizzontale) dis.1 7. Fissate il cavo di sicurezza come indicato in dis.2 (a cerchio) 8. Chiudete il cavo di sicurezza ed assicuratevi che il moschettone sia posizionato sul lato
superiore del tubo – dis.3 9. Bloccate il moschettone in posizione con una fascetta per cavi, in modo tale che non si
muova – dettaglio A 10. Regolate ora il canale 1 su 0% e poi su 100%, ed assicuratevi che il cavo di sicurezza non
impedisca in alcun modo il movimento della forcella.
Nota Moving User’s Manual – 1.0
Luci della Ribalta srl, Via Berna 14, 46042 Castel Goffredo (MN) Italy
Tel. +39 0376 771 777 – fax +39 0376 772 140 – email [email protected] – web www.ldr.it
17
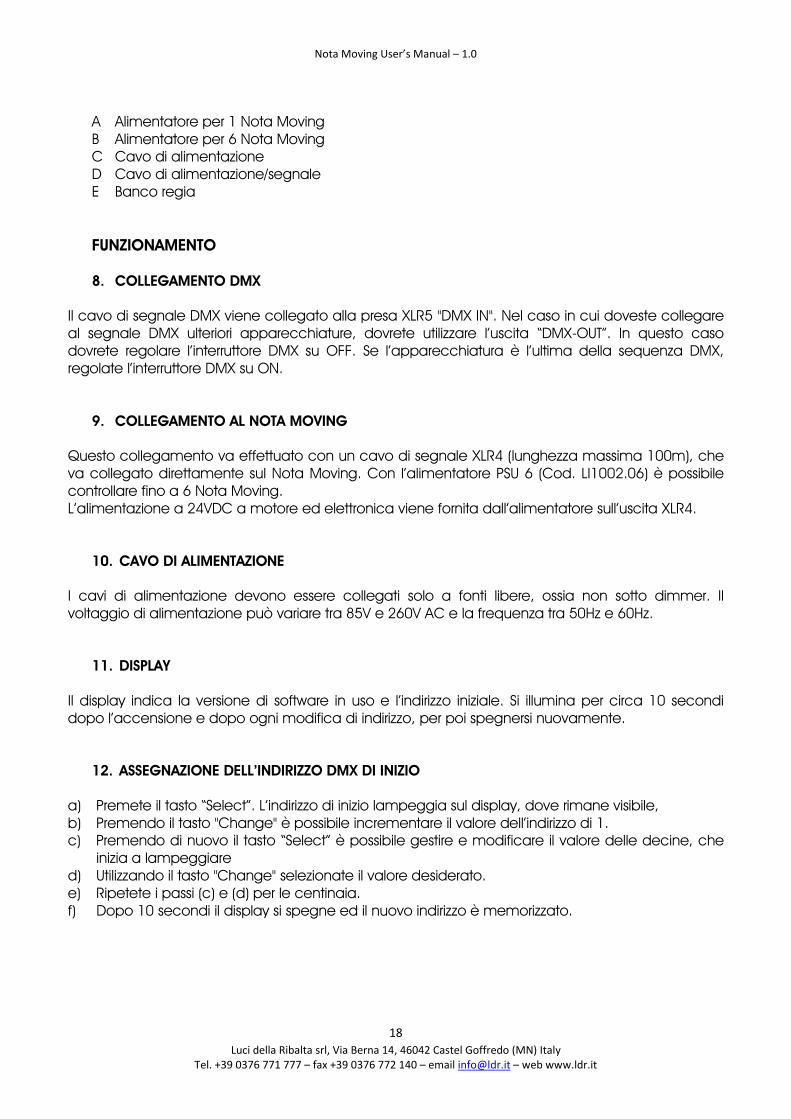
7. ESEMPIO DI INSTALLAZIONE
Nota Moving User’s Manual – 1.0
Luci della Ribalta srl, Via Berna 14, 46042 Castel Goffredo (MN) Italy
Tel. +39 0376 771 777 – fax +39 0376 772 140 – email [email protected] – web www.ldr.it
18
A Alimentatore per 1 Nota Moving B Alimentatore per 6 Nota Moving C Cavo di alimentazione D Cavo di alimentazione/segnale E Banco regia FUNZIONAMENTO 8. COLLEGAMENTO DMX
Il cavo di segnale DMX viene collegato alla presa XLR5 "DMX IN". Nel caso in cui doveste collegare al segnale DMX ulteriori apparecchiature, dovrete utilizzare l’uscita “DMX-OUT”. In questo caso dovrete regolare l’interruttore DMX su OFF. Se l’apparecchiatura è l’ultima della sequenza DMX, regolate l’interruttore DMX su ON.
9. COLLEGAMENTO AL NOTA MOVING Questo collegamento va effettuato con un cavo di segnale XLR4 (lunghezza massima 100m), che va collegato direttamente sul Nota Moving. Con l’alimentatore PSU 6 (Cod. LI1002.06) è possibile controllare fino a 6 Nota Moving. L’alimentazione a 24VDC a motore ed elettronica viene fornita dall’alimentatore sull’uscita XLR4.
10. CAVO DI ALIMENTAZIONE
I cavi di alimentazione devono essere collegati solo a fonti libere, ossia non sotto dimmer. Il voltaggio di alimentazione può variare tra 85V e 260V AC e la frequenza tra 50Hz e 60Hz.
11. DISPLAY Il display indica la versione di software in uso e l’indirizzo iniziale. Si illumina per circa 10 secondi dopo l’accensione e dopo ogni modifica di indirizzo, per poi spegnersi nuovamente.
12. ASSEGNAZIONE DELL’INDIRIZZO DMX DI INIZIO
a) Premete il tasto “Select”. L’indirizzo di inizio lampeggia sul display, dove rimane visibile, b) Premendo il tasto "Change" è possibile incrementare il valore dell’indirizzo di 1. c) Premendo di nuovo il tasto “Select” è possibile gestire e modificare il valore delle decine, che
inizia a lampeggiare d) Utilizzando il tasto "Change" selezionate il valore desiderato. e) Ripetete i passi (c) e (d) per le centinaia. f) Dopo 10 secondi il display si spegne ed il nuovo indirizzo è memorizzato.
Nota Moving User’s Manual – 1.0
Luci della Ribalta srl, Via Berna 14, 46042 Castel Goffredo (MN) Italy
Tel. +39 0376 771 777 – fax +39 0376 772 140 – email [email protected] – web www.ldr.it
19
Nota: una linea DMX trasmette 512 canali di dati. Se volete utilizzare un indirizzo di valore superiore a 512 (es. 525), adottate la seguente procedura:
1. Spostatevi sulla seconda linea DMX (indirizzo 513-1024) 2. L’indirizzo di inizio selezionato corrisponde al numero del circuito meno 512 (es. 525-512=13) 3. Attribuite il numero risultante, in questo caso 13, come indirizzo di inizio.
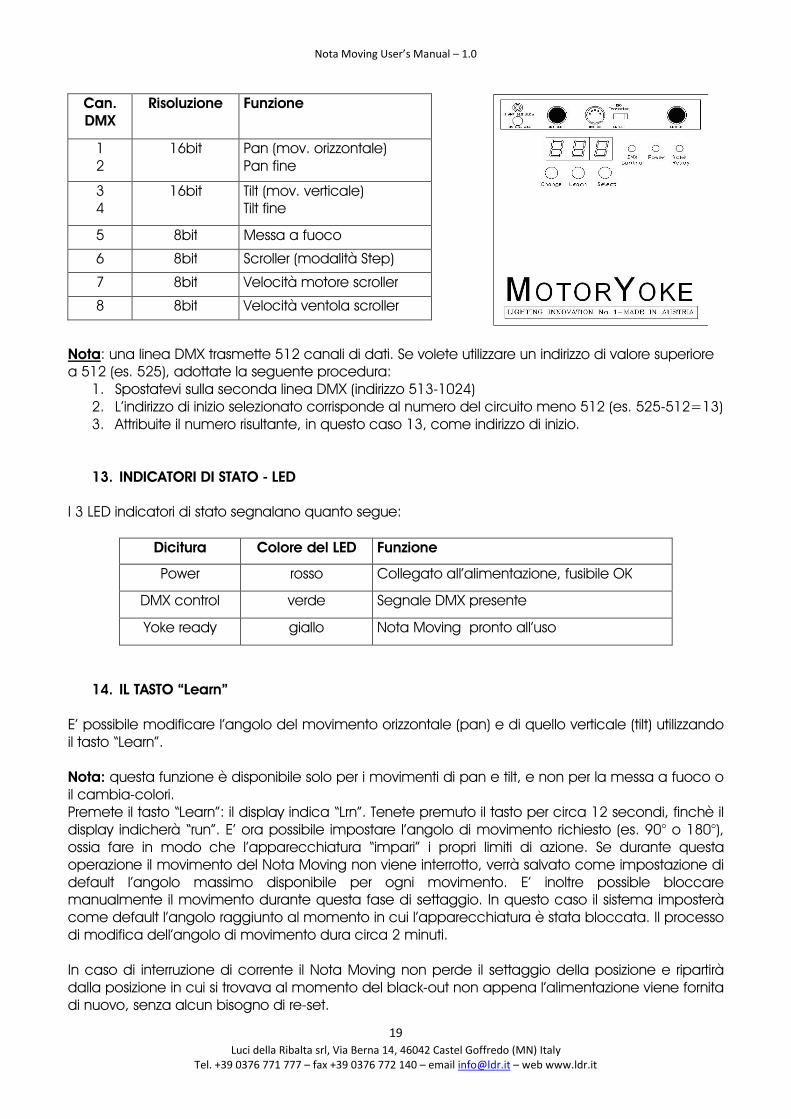
13. INDICATORI DI STATO - LED I 3 LED indicatori di stato segnalano quanto segue:
Dicitura Colore del LED Funzione
Power rosso Collegato all’alimentazione, fusibile OK
DMX control verde Segnale DMX presente
Yoke ready giallo Nota Moving pronto all’uso
14. IL TASTO “Learn” E’ possibile modificare l’angolo del movimento orizzontale (pan) e di quello verticale (tilt) utilizzando il tasto “Learn”. Nota: questa funzione è disponibile solo per i movimenti di pan e tilt, e non per la messa a fuoco o il cambia-colori. Premete il tasto “Learn”: il display indica “Lrn”. Tenete premuto il tasto per circa 12 secondi, finchè il display indicherà “run”. E’ ora possibile impostare l’angolo di movimento richiesto (es. 90° o 180°), ossia fare in modo che l’apparecchiatura “impari” i propri limiti di azione. Se durante questa operazione il movimento del Nota Moving non viene interrotto, verrà salvato come impostazione di default l’angolo massimo disponibile per ogni movimento. E’ inoltre possible bloccare manualmente il movimento durante questa fase di settaggio. In questo caso il sistema imposterà come default l’angolo raggiunto al momento in cui l’apparecchiatura è stata bloccata. Il processo di modifica dell’angolo di movimento dura circa 2 minuti. In caso di interruzione di corrente il Nota Moving non perde il settaggio della posizione e ripartirà dalla posizione in cui si trovava al momento del black-out non appena l’alimentazione viene fornita di nuovo, senza alcun bisogno di re-set.
Can. DMX
Risoluzione Funzione
1 2
16bit Pan (mov. orizzontale)Pan fine
3 4
16bit Tilt (mov. verticale)Tilt fine
5 8bit Messa a fuoco
6 8bit Scroller (modalità Step)
7 8bit Velocità motore scroller
8 8bit Velocità ventola scroller
Nota Moving User’s Manual – 1.0
Luci della Ribalta srl, Via Berna 14, 46042 Castel Goffredo (MN) Italy
Tel. +39 0376 771 777 – fax +39 0376 772 140 – email [email protected] – web www.ldr.it
20
Se state utilizzando un PSU-6, la funzione “LEARN” sarà disponibile solo dall’uscita “Yoke 1”. Se desiderate quindi modificare i settaggi di movimento su un’apparecchiatura collegata ad un’uscita diversa, scollegatela temporaneamente e collegatela all’uscita “Yoke 1” mentre impostate i nuovi parametri.
15. ALIMENTATORE PSU-6
Questo alimentatore può gestire fino a 6 Nota Moving. Utilizza 8 canali DMX per ogni unità controllata, ossia, se usata a pieno regime, richiederà l’uso di 48 canali del vostro banco regia. Se utilizzato solo parzialmente, per esempio con 4 Nota Moving (8 canali x 4 = 32 canali), consente di utilizzare il primo canale disponibile (in questo caso il canale 33) ed i successivi disponibili in sequenza, per la gestione di altre apparecchiature DMX, quali, ad esempio, dimmer o effetti. Come alternativa è invece possibile utilizzare questo canale come indirizzo di inizio del successivo alimentatore PSU-6. C’è un salto di 8 canali tra ognuna delle uscite. Quindi il primo canale del successivo Nota Moving è uguale al numero del primo canale del Nota precedente incrementato di 8. Quindi, se l’indirizzo di inizio è, per esempio, 010, la sequenza sarà la seguente: Nota Moving 1: 10-17, Nota Moving 2: 18-25, Nota Moving 3: 26-33, Nota Moving 4: 34-41, Nota Moving 5: 42-49, Nota Moving 6: 50-57. La funzione “LEARN” è disponibile solo dall’uscita “Yoke 1”
PSU per 1 Nota Moving PSU per 6 Nota Moving
16. SOSTITUZIONE DEL FUSIBILE Il porta-fusibile è montato sull’alimentatore, posizionato accanto all’ingresso del cavo. Type: Il fusibile utilizzato è un fusibile 32mm / 1.5A ritardato. ATTENZIONE: Provvedete alla sostituzione del fusibile solo dopo aver scollegato l’apparecchiatura dall’alimentazione ed a raffreddamento avvenuto.
Nota Moving User’s Manual – 1.0
Luci della Ribalta srl, Via Berna 14, 46042 Castel Goffredo (MN) Italy
Tel. +39 0376 771 777 – fax +39 0376 772 140 – email [email protected] – web www.ldr.it
21
17. COLOUR SCROLLER – LDR XPRESS 19 – MODALITA’ STEP
Il Nota Moving è dotato di un’uscita XLR4 dislocata sul lato opposto della trasmissione verticale. La maggior parte dei produttori di scroller, compreso LDR, adotta il seguente schema per il collegamento dei poli: Pin 1 = 0V; Pin 2 = Data -; Pin 3 = Data +; Pin 4 = 24V Nel caso in cui non stiate utilizzando uno scroller LDR Xpress, assicuratevi che il vostro scroller utilizzi questo schema di collegamento. In caso contrario si potrebbero verificare seri danni, non coperti da garanzia, sia al Nota Moving che allo scroller.
• Il carico massimo di uscita sul PSU-6 è di 30W per canale, ma con un carico massimo complessivo di120W, anche se un sovraccarico del 100% è consentito per tempi brevi.
• Il carico massimo di uscita sul PSU-1 è di 30W per canale ATTENZIONE: Prima di installare uno scroller assicuratevi che il bilanciamento sia settato sulla posizione 1 (cfr. pag. 15 e 16 di questo manuale) NOTA: per un corretto funzionamento del cambia colori Xpress 19, si faccia riferimento al manuale d’uso accluso al prodotto. Il sesto canale della sequenza è dedicato alla gestione dei colori. Assegnate l’indirizzo 6 sullo scroller alla gestione del cambio dei colori. Lo scroller in dotazione, LDR Xpress 19, consente inoltre il controllo via canale DMX della velocità dei motori (velocità di scrolling) sull’indirizzo 7 e quello della velocità della ventola dello scroller sull’indirizzo 8.
18. MOVIMENTO ORIZZONTALE (PAN) – MAX 364° Il movimento orizzontale viene controllato a 16 bit ed occupa gli indirizzi 1 e 2 della serie. L’angolo massimo di movimento di 364° consente una copertura complete della scena. Alla massima velocità, il Nota Moving esegue un movimento orizzontale completo (da 0% a 100%) in 30 secondi.
19. MOVIMENTO VERTICALE (TILT) – MAX 94° Il movimento verticale viene controllato a 16 bit ed occupa gli indirizzi 3 e 4 della serie. L’angolo massimo di movimento di 94° consente una copertura complete della scena. Alla massima velocità, il Nota Moving esegue un movimento verticale completo (da 0% a 100%) in 19 secondi.
20. MESSA A FUOCO (ZOOM) La messa a fuoco sul Nota Moving viene gestita da un segnale DMX ed un motore. Viene controllata ad 8 bit ed occupa il canale 5 della serie.
Nota Moving User’s Manual – 1.0
Luci della Ribalta srl, Via Berna 14, 46042 Castel Goffredo (MN) Italy
Tel. +39 0376 771 777 – fax +39 0376 772 140 – email [email protected] – web www.ldr.it
22
21. PULIZIA E MANUTENZIONE
Par garantire un funzionamento ottimale del prodotto, si consiglia una manutenzione periodica, da effettuarsi ad apparecchiatura fredda e spenta. Forcella motorizzata Gli speciali materiali plastici utilizzati nella costruzione della forcella e dei suoi ingranaggi li rendono esenti da manutenzione. Messa a fuoco A causa del tipo di sistema di messa a fuoco utilizzato (barra con vite senza fine) è stato necessario proteggere la barra stessa con una speciale pasta di rame, per evitare che durante il movimento si generino rumori molesti. Nel caso in cui il livello del rumore aumentasse durante l’operazione di messa a fuoco, vi consigliamo di provvedere ad un nuovo trattamento di protezione con un prodotto analogo. (es. RS Components, part nr. 311-4326 – www.rs-components.com) Manutenzione generale * pulite tutte le parti riflettenti quali parabole, coppe e lenti, aprendo l'apparecchiatura, se necessario. * controllate lo stato di lampada, lenti e schermi protettivi, e sostituite qualsiasi componente presentasse danni visibili. * pulite i dotti di areazione e le ventole (se montate), in modo tale da consentire la normale attività di raffreddamento dell'apparecchiatura. * controllate lo stato dei cablaggi interni ed esterni, e sostituite qualsiasi cavo fosse danneggiato o deformato dal calore o da agenti meccanici.
22. PARTI DI RICAMBIO
Tutti i componenti sono disponibili come parti di ricambio. Raccomandiamo l’uso di componenti originali LDR. Nel caso in cui doveste identificare ed ordinare un componente quale parte di ricambio, vi preghiamo di rivolgervi al nostro servizio di assistenza tecnica.
23. GARANZIA La nostra garanzia copre tutti i difetti strutturali e di assemblaggio per un periodo di 12 mesi dalla data dell’acquisto. In caso di reclami vi preghiamo di contattare il rivenditore che vi ha fornito il prodotto. Luci della Ribalta srl si riserva il diritto di apportare qualsivoglia modifica al presente documento senza previo avviso
Nota Moving User’s Manual – 1.0
Luci della Ribalta srl, Via Berna 14, 46042 Castel Goffredo (MN) Italy
Tel. +39 0376 771 777 – fax +39 0376 772 140 – email [email protected] – web www.ldr.it
23
DEUTSCH Herzlichen Dank, daß Sie sich für Luci della Ribalta entschieden haben. Wir hoffen, daß unser Produkt und unser Service Ihren Ansprüchen gerecht. Sollte dies einmal nicht der Fall sein, so bitten wir Sie, uns direkt anzusprechen, und somit uns zu helfen, Ihnen und unseren weiteren Kunden eine immer bessere Qualität anbieten zu können. Das Gerät, das Sie gekauft haben, wurde mit äußerster Sorgfalt und aus ausgewählten Einzelteilen hergestellt. Sollten Sie es, aus Gründen, die sich unserer Macht entziehen, beschädigt erhalten haben, so bitten wir Sie, sich mit dem Verkäufer in Verbindung zu setzen, der Ihnen das Gerät geliefert hat. Sie können unser vorgefertigtes Formular am Ende dieses Handbuch benutzen. Unsere Garantie auf Struktur- und Konstruktionsmängel besteht ein Jahr ab Kaufsdatum des Produktes. Wir bitten Sie daher, uns bei Beanstandungen einen Kaufnachweis vorzulegen. Die Beachtung der nachfolgend aufgeführten Hinweise garantiert eine korrekte und sichere Benutzung des Geräts. Luci della Ribalta srl lehnt jegliche Verantwortung für Sach- und Personenschäden, die sich wegen unsachgemäßer Benutzung des Gerätes oder Nichtbeachtung der folgenden Sicherheithinweise ergeben, ab. Es sind unter allen Umständen die beiliegenden Betriebsanleitungen und Sicherheitshinweise des Es sind unter allen Umständen die beiliegenden Betriebsanleitungen und Sicherheitshinweise des Es sind unter allen Umständen die beiliegenden Betriebsanleitungen und Sicherheitshinweise des Es sind unter allen Umständen die beiliegenden Betriebsanleitungen und Sicherheitshinweise des
Scheinwerfers und des Farbwechslers zu beachten!Scheinwerfers und des Farbwechslers zu beachten!Scheinwerfers und des Farbwechslers zu beachten!Scheinwerfers und des Farbwechslers zu beachten!
WICHTIGE SICHERHEITSHINWEISE * dieses Gerät ist ein DMX/gesteuerter Bühnenscheinwerfer, der nur durch Fachpersonal bedient werden darf * Es ist unbedingt notwendig den Schwerpunkt des Gerätes entsprechend der Belastung einzustellen. Siehe Anleitungen auf Seiten 25 und 26 dieses Handbuchs * dieses Gerät erhitzt sich auf höhe Temperaturen. Vermeiden Sie jede direkte Berührung der metallischen Teile. * dieses Gerät darf ausschließlich in geschlossenen und trockenen Räumen (Luftfeuchtigkeit >90%) betrieben werden (IP20). Angaben bezüglich der max. zulässigen Umgebungstemperatur, des Mindestabstandes zu entzündenden Materialien und des zulässigen Neigungswinkels finden Sie auf der Etikette des Apparates. * dieses Gerät muß mit einem davorliegenden Splitterschutz (Schutzgitter oder -glas) ausgerüstet sein. Sollte im Lieferumfang kein Splitterschutz enthalten sein, so kaufen Sie einen entsprechenden und setzen diesen vor Inbetriebnahme des Gerätes ein. * sollte keine automatische allpolige Trennung vom Netz eingebaut sein, so trennen Sie es vor dem Auswechseln bzw. Einbau der Lampe unbedingt vom Netz. * ersetzen Sie beschädigte oder von Hitze deformierte Lampen, Splitterschutze oder Linsen (wo vorhanden). Stellen Sie sicher, daß Lampe bzw. Splitterschutz vor dem Ausbau vollständig abgekühlt sind. Zum korrekten Einbau der Lampe beachten Sie bitte die in der Lampenverpackung enthaltenen Hinweise des Lampenherstellers. * das Gerät muß zusätzlich mit einem Sicherungsseil bzw. einer -kette gesichert werden. Sollte keine zusätzliche Sicherung im Lieferumfang enthalten sein, so kaufen Sie eine und bringen sie am Gerät an, bevor Sie es benutzen. * Ersatz und Reparatur von Einzelteilen des Gerätes dürfen nur von Fachpersonen und ausschließlich mit Originalteilen von Luci della Ribalta srl ausgeführt werden. * alle Teile der elektrischen Verkabelung dürfen ausschließlich von Fachpersonen und nur durch originaltreue oder gleichwertige Teile dem Schaltplan entsprechend ersetzen werden. * die Installation des Gerätes unterliegt den jeweils gültigen Sicherheitsbestimmungen des Landes, in dem das Gerät verwendet wird und darf nur von Fachpersonal ausgeführt werden.
Nota Moving User’s Manual – 1.0
Luci della Ribalta srl, Via Berna 14, 46042 Castel Goffredo (MN) Italy
Tel. +39 0376 771 777 – fax +39 0376 772 140 – email [email protected] – web www.ldr.it
24
1. INHALT DER VERPACKUNG
Prüfen Sie bitte den Ihalt der Verpackung entsprechend dem von Ihnen gekauften Gerät: Scheinwerfer:
a. Gerät mit Motor Yoke ausgerüstet b. Farbscroller Xpress 19, montiert c. 2 Aufhängehaken für ø50/60mm Rohr d. Sicherungsseil
Steuer/Netzgerät: (wenn bestellt)
e. Dieses Gerät kann nur durch einem Steuer/Netzgerät gesteuert werden. Prüfen Sie bitte, dass Sie das korrekte Modell erhalten haben.
Bei nicht vollständiger Lieferung, setzen Sie sich bitte mit unserem Verkäufer in Verbindung
2. GEWICHT UND ABMESSUNGEN
Gesamtgewicht: 15,5 kg – Farbscroller Xpress 19 inbegriffen
3. VORSICHT
1. Stellen Sie sicher, daß die 2 Aufhängehaken des Nota Moving gut festgezogen sind 2. Stellen Sie sicher, daß ein Sicherheitsseil sowohl am Steuer/Netzgerät, als auch am Nota
Moving sowie an den nicht verschraubten Teilen (z.B. Farbwechsler) montiert ist und dieses die Bewegung des Scheinwerfers nicht einschränkt.
3. Das Schneckengetriebe der Antriebe ist durch eine Sicherheitskupplung geschützt, um die Beschädigung des Getriebes, z.B. durch einen Dekorationszug zu vermeiden. Die Vertikal und
Nota Moving User’s Manual – 1.0
Luci della Ribalta srl, Via Berna 14, 46042 Castel Goffredo (MN) Italy
Tel. +39 0376 771 777 – fax +39 0376 772 140 – email [email protected] – web www.ldr.it
25
Horizontalverstellung des Scheinwerfers darf nicht manuell verstellt werden da sonst die Sicherheitskupplung unnötig abgenützt wird.
4. VERSTELLUNG DES LAMPENSOCKELS
Dieses Gerät ist mit einer allpoligen Trennung ausgerüstet. Der Lampensockel ist serienmäßig auf die Verwendung von CP70 oder T19 1000W Lampen justiert. Wollen Sie eine CP90 oder T29 1200W Lampen benutzen, so schrauben Sie die Schraube, die den Lampensockel mit der Spiegelhalterung verbindet, los und setzen Sie die Führung des Sockels in die darunterliegende Aufnahme. Setzen Sie Schraube und Unterlegscheibe in das untere Gewindeloch und ziehen Sie die Schraube fest.
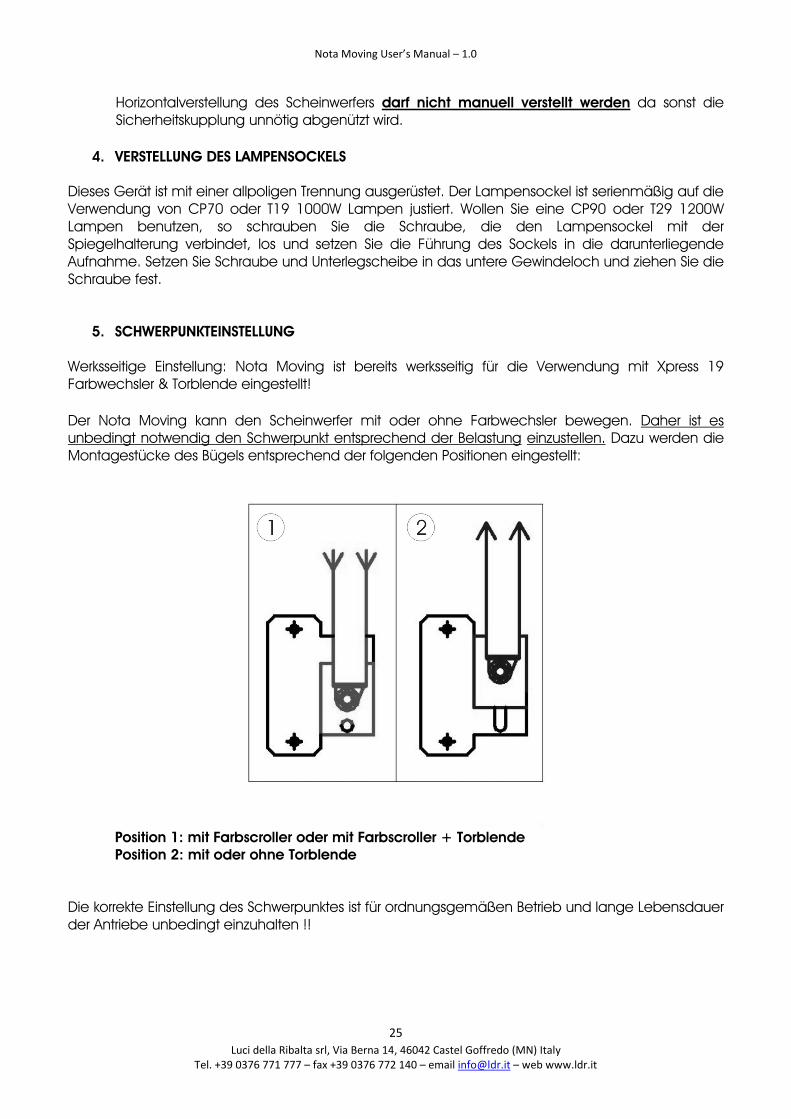
5. SCHWERPUNKTEINSTELLUNG Werksseitige Einstellung: Nota Moving ist bereits werksseitig für die Verwendung mit Xpress 19 Farbwechsler & Torblende eingestellt! Der Nota Moving kann den Scheinwerfer mit oder ohne Farbwechsler bewegen. Daher ist es unbedingt notwendig den Schwerpunkt entsprechend der Belastung einzustellen. Dazu werden die Montagestücke des Bügels entsprechend der folgenden Positionen eingestellt:
Position 1: mit Farbscroller oder mit Farbscroller + Torblende Position 2: mit oder ohne Torblende Die korrekte Einstellung des Schwerpunktes ist für ordnungsgemäßen Betrieb und lange Lebensdauer der Antriebe unbedingt einzuhalten !!
Nota Moving User’s Manual – 1.0
Luci della Ribalta srl, Via Berna 14, 46042 Castel Goffredo (MN) Italy
Tel. +39 0376 771 777 – fax +39 0376 772 140 – email [email protected] – web www.ldr.it
26
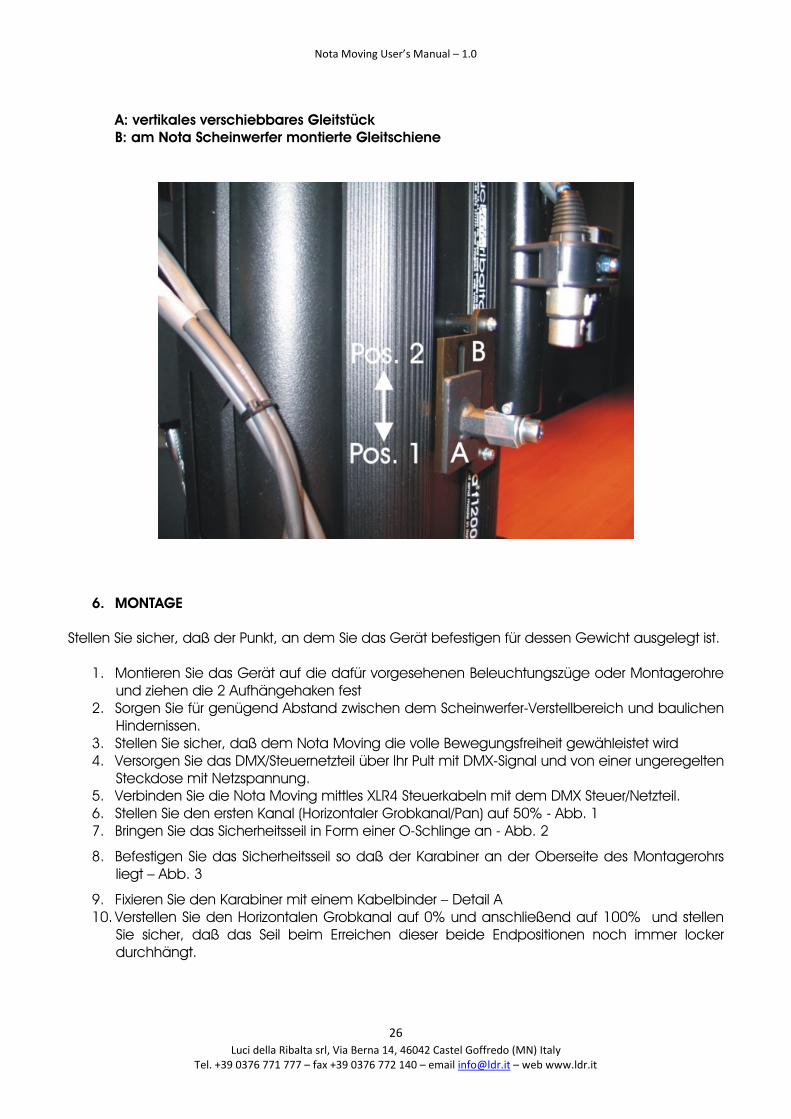
A: vertikales verschiebbares Gleitstück B: am Nota Scheinwerfer montierte Gleitschiene
6. MONTAGE
Stellen Sie sicher, daß der Punkt, an dem Sie das Gerät befestigen für dessen Gewicht ausgelegt ist.
1. Montieren Sie das Gerät auf die dafür vorgesehenen Beleuchtungszüge oder Montagerohre und ziehen die 2 Aufhängehaken fest
2. Sorgen Sie für genügend Abstand zwischen dem Scheinwerfer-Verstellbereich und baulichen Hindernissen.
3. Stellen Sie sicher, daß dem Nota Moving die volle Bewegungsfreiheit gewähleistet wird 4. Versorgen Sie das DMX/Steuernetzteil über Ihr Pult mit DMX-Signal und von einer ungeregelten
Steckdose mit Netzspannung. 5. Verbinden Sie die Nota Moving mittles XLR4 Steuerkabeln mit dem DMX Steuer/Netzteil. 6. Stellen Sie den ersten Kanal (Horizontaler Grobkanal/Pan) auf 50% - Abb. 1 7. Bringen Sie das Sicherheitsseil in Form einer O-Schlinge an - Abb. 2
8. Befestigen Sie das Sicherheitsseil so daß der Karabiner an der Oberseite des Montagerohrs liegt – Abb. 3
9. Fixieren Sie den Karabiner mit einem Kabelbinder – Detail A 10. Verstellen Sie den Horizontalen Grobkanal auf 0% und anschließend auf 100% und stellen
Sie sicher, daß das Seil beim Erreichen dieser beide Endpositionen noch immer locker durchhängt.
Nota Moving User’s Manual – 1.0
Luci della Ribalta srl, Via Berna 14, 46042 Castel Goffredo (MN) Italy
Tel. +39 0376 771 777 – fax +39 0376 772 140 – email [email protected] – web www.ldr.it
27
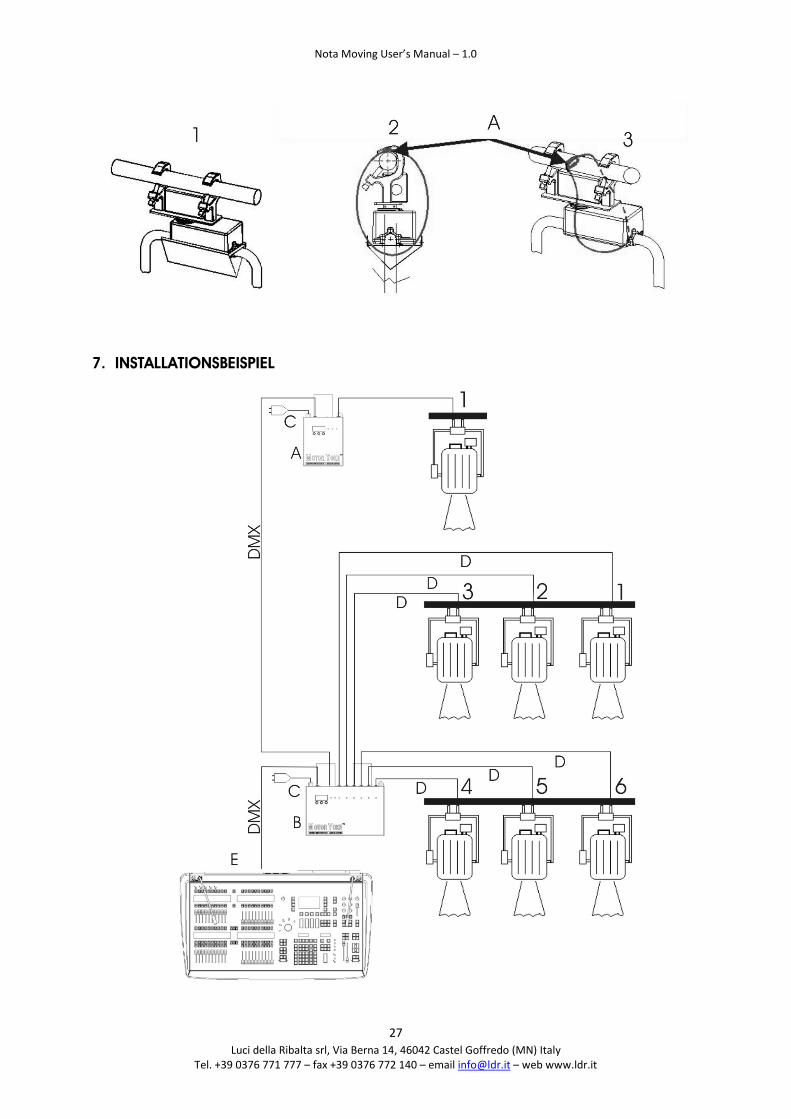
7. INSTALLATIONSBEISPIEL

Nota Moving User’s Manual – 1.0
Luci della Ribalta srl, Via Berna 14, 46042 Castel Goffredo (MN) Italy
Tel. +39 0376 771 777 – fax +39 0376 772 140 – email [email protected] – web www.ldr.it
28
A Steuer/Netzgerät für 1 Nota Moving B Steuer/Netzgerät für 6 Nota Moving C Netzversorgung D Steuer – und Versorgungskabel E DMX Lichtsteuerpult INBETRIEBNAHME 8. DMX ANSCHLUSS
Die DMX- Steuerleitung wird am XLR5 Stecker "DMX IN" angeschlossen. Soll das DMX-Signal auch auf nachfolgenden Geräten verwendet werden, steht dafür der "DMX OUT" Ausgang zur Verfügung. Dabei wird der "DMX Termination"-Schalter auf "OFF" gestellt. Bildet jedoch das Netzgerät den Abschluß der DMX-Kette so ist der Schalter auf "ON" zu stellen.
9. VERBINDUNG ZUM NOTA MOVING
Diese erfolgt mit einem XLR4 Steuerkabel (maximale Länge 100m), es kann ein Nota Moving angeschlossen werden (an DMX Steuer-/Netzgerät LI 1002.01). Am DMX Steuer-/Netzgerät LI 1002.06 können bis zu 6 Nota Moving versorgt werden.
10. NETZKABEL
Es darf nur an ungeregelte Steckdosen angeschlossen werden. Versorgungsspannung kann von 85-260 VAC mit 50 oder 60 Hz variieren. Die für Motor und Elektronik benötigte 24V DC wird vom Netzgerät automatisch eingestellt.
11. DIE 7-SEGMENT ANZEIGE
Die 7-Segment Anzeige zeigt die Startadresse und leuchtet ca. 10 Sek. Unmittelbar nach dem Einschalten und bei der Adresseänderung.
12. EINSTELLEN DER STARTADRESSE
a) Die “Select” Taste drücken. Die Startadresse erscheint am Display und die Einerstellte blinkt b) Mit der “Change” Taste kann die Einerstellte jeweils um 1 erhöht warden. c) Nochmailges Drücken der “Select” Taste schaltet auf die Zehnerstelle um. Die beginnt zu blinken. d) Mit der “Change” Taste den gewünschten Wert einstellen. e) Die Schritte (c) und (d) für die Hunderterstelle wiederholen. f) Nach einigen Sekunden erlischt die Anzeige. Erst dann wird die Eingabe gespeichert.
Nota Moving User’s Manual – 1.0
Luci della Ribalta srl, Via Berna 14, 46042 Castel Goffredo (MN) Italy
Tel. +39 0376 771 777 – fax +39 0376 772 140 – email [email protected] – web www.ldr.it
29
Anmerkung: eine DMX Leitung überträgt Daten für 512 Anschlüsse, soll z.B. der Kreis 525 angesprochen werden, so ist folgendes zu tun:
1. Die zweite DMX Leitung (Adresse 513-1024) verwenden 2. Die eingestellte Startadresse entspricht der Kreiszahl minus 512 (525-512=13) 3. Die entsprechende Nummer (im Beispiel 13) als Startadresse einstellen.
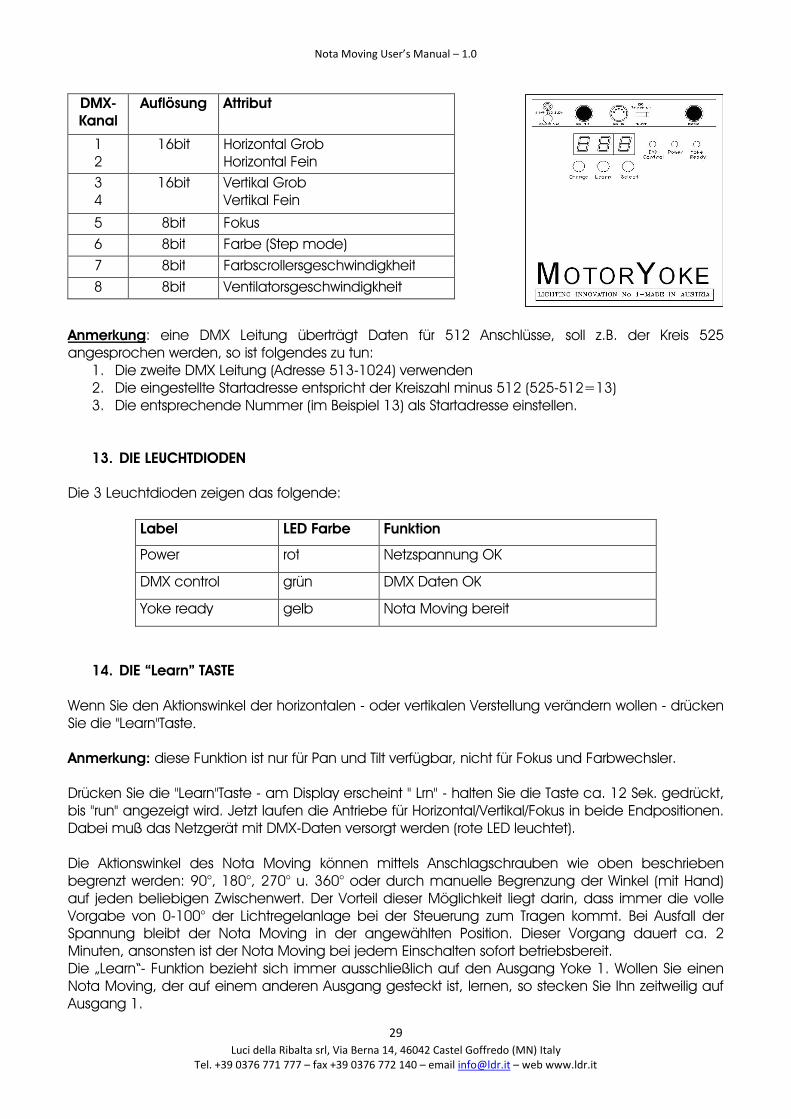
13. DIE LEUCHTDIODEN Die 3 Leuchtdioden zeigen das folgende:
Label LED Farbe Funktion
Power rot Netzspannung OK
DMX control grün DMX Daten OK
Yoke ready gelb Nota Moving bereit
14. DIE “Learn” TASTE Wenn Sie den Aktionswinkel der horizontalen - oder vertikalen Verstellung verändern wollen - drücken Sie die "Learn"Taste. Anmerkung: diese Funktion ist nur für Pan und Tilt verfügbar, nicht für Fokus und Farbwechsler. Drücken Sie die "Learn"Taste - am Display erscheint " Lrn" - halten Sie die Taste ca. 12 Sek. gedrückt, bis "run" angezeigt wird. Jetzt laufen die Antriebe für Horizontal/Vertikal/Fokus in beide Endpositionen. Dabei muß das Netzgerät mit DMX-Daten versorgt werden (rote LED leuchtet). Die Aktionswinkel des Nota Moving können mittels Anschlagschrauben wie oben beschrieben begrenzt werden: 90°, 180°, 270° u. 360° oder durch manuelle Begrenzung der Winkel (mit Hand) auf jeden beliebigen Zwischenwert. Der Vorteil dieser Möglichkeit liegt darin, dass immer die volle Vorgabe von 0-100° der Lichtregelanlage bei der Steuerung zum Tragen kommt. Bei Ausfall der Spannung bleibt der Nota Moving in der angewählten Position. Dieser Vorgang dauert ca. 2 Minuten, ansonsten ist der Nota Moving bei jedem Einschalten sofort betriebsbereit. Die „Learn“- Funktion bezieht sich immer ausschließlich auf den Ausgang Yoke 1. Wollen Sie einen Nota Moving, der auf einem anderen Ausgang gesteckt ist, lernen, so stecken Sie Ihn zeitweilig auf Ausgang 1.
DMX-Kanal
Auflösung Attribut
1 2
16bit Horizontal Grob Horizontal Fein
3 4
16bit Vertikal Grob Vertikal Fein
5 8bit Fokus 6 8bit Farbe (Step mode)7 8bit Farbscrollersgeschwindigkheit8 8bit Ventilatorsgeschwindigkheit

Nota Moving User’s Manual – 1.0
Luci della Ribalta srl, Via Berna 14, 46042 Castel Goffredo (MN) Italy
Tel. +39 0376 771 777 – fax +39 0376 772 140 – email [email protected] – web www.ldr.it
30
15. DMX-ADRESSEN AM 6-FACH STEUER/NETZGERÄT
Dieses Steuer-/Netzgerät kann bis zu 6 Nota Moving steuern. Bei voller Ausnützung werden 48 Kanäle des Steuerpultes belegt. Sollten Sie z.B. nur 4 Nota Moving ansteuern sind nur 32 Kanäle des Pultes belegt. Kanal 33 des Pultes kann für jeden anderen Zweck – Dimmer, Effekt, usw. verwendet werden.
Sollten Sie eine weiteres Steuer-/Netzgerät für Nota Moving einsetzten, kann diese Box mit der Startadresse 33 beginnen. Der erste Kanal des folgenden Nota Moving ist die jeweils um 8 erhöhte Startadresse des vorhergehenden, z.B.:
Eingestellte Startadresse 010: Nota Moving 1: 10-17, Nota Moving 2: 18-25, Nota Moving 3: 26-33, Nota Moving 4: 34-41, Nota Moving 5: 42-49, Nota Moving 6: 50-57.
Die Learn-Funktion ist nur auf Anschluß "Yoke 1" verfügbar.
DMX Steuer/Netzteil für DMX Steuer/Netzteil für 6 Scheinwerfer 1 Scheinwerfer
16. SICHERUNGSWECHSEL Der Sicherungshalter befindet sich am Steuer/Netzgeräte, neben dem Kabeleinlass. Type: 32mm / 1,5A träge VORSICHT: Wechseln Sie die Sicherung nur, wenn das Gerät abgesteckt und abgekühlt ist!
17. FARBWECHSLER – LDR XPRESS 19 – EINGESTEELT AUF STEP MODE (VOLLFARBEN) Der Nota Moving verfügt standardmäßig über einen Farbwechslerausgang. Meisten Hersteller, LDR inbegriffen, verwenden die folgende Pinbelegung: Pin 1 = 0V; Pin 2 = Daten - ; Pin 3 = Daten +; Pin 4 = 24V
Nota Moving User’s Manual – 1.0
Luci della Ribalta srl, Via Berna 14, 46042 Castel Goffredo (MN) Italy
Tel. +39 0376 771 777 – fax +39 0376 772 140 – email [email protected] – web www.ldr.it
31
Stellen Sie sicher, daß Ihr Farbwechsler wie hier beschrieben belegt ist. Anderfalls könnnen Schäden sowohl am Nota Moving, als auch am Farbwechsler entstehen, die nicht durch die Garantie gedeckt sind.
• die maximale Ausgangsleistung der PSU 6 beträgt 30W per Ausgang aber nicht mehr als 120W Gesamtlast (100% kurzzeitige Überlast möglich)
• die maximale Ausgangsleistung der PSU 1 beträgt 30W Achtung: Beim Einsatz eines Farbwechslers muss der Schwerpunkt korrigiert werden. (Seite 25 +26) Für eine korrekte Adressierung des Farbwechslers benutzen Sie bitte das Handbuch für Xpress 19 Der sechste Kanal in der Reihenfolge ist die Steuerung der Farben zuständig. Stellen Sie auf dem Farbwechsler Kanal 6 ein. Beim gelieferten LDR Xpress 19 kann die Geschwindigkeit des Motors (Adresse 7 = Farbwechslersgeschwindigkeit) und die Geschwindigkeit des Ventilators (Adresse 8) auch per DMX gesteuert werden.
18. HORIZONTALANTRIEB (PAN) – MAX 364° Der Horizontalantrieb wird mit 16bit gesteuert und belegt die 1. und 2. Adresse in der Reihenfolge. Der Verstellwinkel beträgt 364° damit kann jeder Punkt der Bühne erreicht werden. Die Bewegung von 0 auf 100% mit Maximalgeschwindigkeit dauert 30 Sekunden.
19. VERTIKALANTRIEB (TILT) – MAX 94° Der Vertikalantrieb wird mit 16bit gesteuert und belegt die 3. und 4. Adresse in der Reihenfolge. Der Verstellwinkel beträgt 94° damit kann jeder Punkt der Bühne erreicht werden . Die Bewegung von 0 auf 100% mit Maximalgeschwindigkeit dauert 19 Sekunden.
20. FOKUSVERSTELLUNG Die Fokusverstellung wird mittels DMX und einer motorischen Verstellmöglichkeit betrieben. Sie wird mit 8bit gesteuert und belegt die 5. Adresse. Mit der Fokusverstellung besteht die Möglichkeit den Lichtkegel zu verändern (Flood und Spot).
21. REINIGUNG UND WARTUNG
Zur optimalen Funktion des Gerätes empfehlen wir eine Periodische Wartung bei kaltem und vom Netz getrennten Gerät. Pan und Tilt Antriebe Aufgrund der verwendeten Spezialkunststoffe sind PAN & Tilt Antriebe wartungsfrei. Fokusantrieb Aufgrund der Konstruktion der Fokusspindel (Spiralfeder) war es notwendig diese Spindel mit „Kupferpaste“ zu schmieren um die Geräuschentwicklung zu verringern. Sollten die Geräusche neuerlich stören empfiehlt es sich die Schmierung mit Kupferpaste zu erneuern. (z.B.: von RS Components (www.rs-components.com) Bestell Nr.: 311-4326.)
Nota Moving User’s Manual – 1.0
Luci della Ribalta srl, Via Berna 14, 46042 Castel Goffredo (MN) Italy
Tel. +39 0376 771 777 – fax +39 0376 772 140 – email [email protected] – web www.ldr.it
32
Allgemeine Wartung * reinigen Sie alle reflektierenden Teile des Geräts wie Spiegel, Reflektoren oder Linsen. Falls nötig, öffnen Sie das Gerät. * kontrollieren Sie Lampe, Splitterschutz und Linse, und ersetzen Sie die beschädigte Teile. * reinigen Sie die Lüftungskanäle des Lampengehäuses bzw. (wo vorhanden) den Lüfter, um eine normale Luftzirkulation zu gewährleisten. * überprüfen Sie die interne und externe Verkabelung und ersetzen Sie jegliches durch Hitze oder mechanische Beanspruchung beschädigte Kabel.
22. ERSATZTEILE
Alle Einzelteile sind als Ersatzteile erhältlich. Im Fall einer Bestellung Setzen Sie sich bitte mit Ihrem LDR Vertreter in Verbindung.
23. GARANTIE Unsere Garantie auf Struktur- und Konstruktionsmängel besteht ein Jahr ab Kaufsdatum des Produktes. Luci della Ribalta srl behält sich das Recht vor, jegliche Veränderung dieser Publikation ohne vorherige Ankündigung vorzunehmen.
Nota Moving User’s Manual – 1.0
Luci della Ribalta srl, Via Berna 14, 46042 Castel Goffredo (MN) Italy
Tel. +39 0376 771 777 – fax +39 0376 772 140 – email [email protected] – web www.ldr.it
33
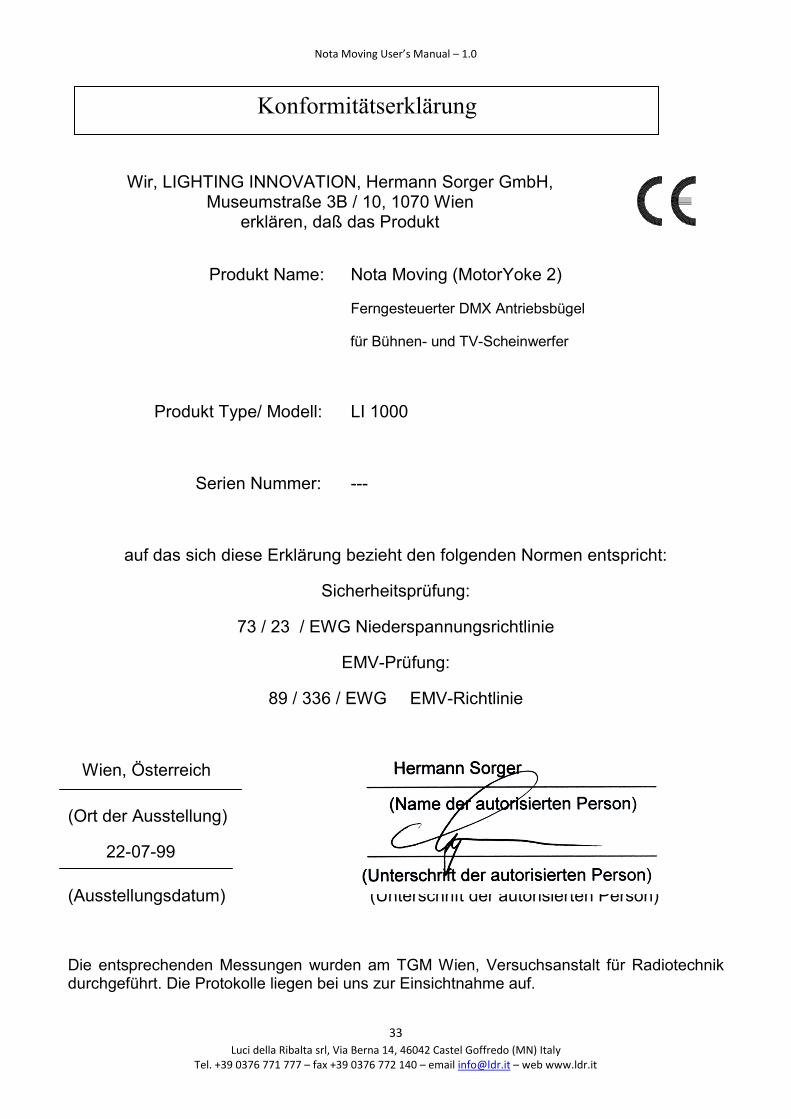
Wir, LIGHTING INNOVATION, Hermann Sorger GmbH, Museumstraße 3B / 10, 1070 Wien
erklären, daß das Produkt
Produkt Name: Nota Moving (MotorYoke 2)
Ferngesteuerter DMX Antriebsbügel
für Bühnen- und TV-Scheinwerfer
Produkt Type/ Modell: LI 1000
Serien Nummer: ---
auf das sich diese Erklärung bezieht den folgenden Normen entspricht:
Sicherheitsprüfung:
73 / 23 / EWG Niederspannungsrichtlinie
EMV-Prüfung:
89 / 336 / EWG EMV-Richtlinie
Wien, Österreich Hermann Sorger
(Ort der Ausstellung) (Name der autorisierten Person)
22-07-99
(Ausstellungsdatum) (Unterschrift der autorisierten Person) Die entsprechenden Messungen wurden am TGM Wien, Versuchsanstalt für Radiotechnik durchgeführt. Die Protokolle liegen bei uns zur Einsichtnahme auf.
Konformitätserklärung
certificato di conformitàcertificate of conformityKonformitätserklärungcertificat de conformitécertificado de conformidad
14851000 Nota f1200 Movingwith Xpress 19 scroller
I Noi sottoscritti dichiariamo, sotto la nostra completa responsabilità, che i prodotti:GB We hereby declare under our own responsibility, that the products listed here below:D Wir beglaubigen, daß die nachfolgend genannten Produkte:F Nous certifions sous notre responsabilitè, que les produits mentionnés ci-dessous:E Los que subscriben, declaran, bajo su responsabilidad, que los productos aquì listados:
I sono conformi alle seguenti norme ed ai requisiti delle seguenti direttive CEE:GB conform to the following standards and to the requirements of following EEC directives:D den nachfolgend aufgeführten Normen und EEC-Vorschriften entsprechen:F sont conformes aux normes et prescriptions CEE ci-aprés:E cumplen de hecho con las siguientes normas y directivas CEE:
EN 61000-3-2, EN61000-3-3, EN 55024, EN 55022EN 60-598-2-17 1989 including amendments 1/2
EN 60-598-1 1992 including amendment 1CE marking directive 93/68 EEC
Low voltage directive 73/23/EEC as amended by directive 93/98/EECEMC directive 89/336/EEC as amended by directive 91/263/EEC and 92/31/EEC
Luci della Ribalta srl Fabiano Besio

modulo di reclamo - complaint formReklamationsformular - formulaire de réclamation -
hoja de reclamaciones
14851000 Nota f1200 Movingwith Xpress 19 scroller
Azienda ed Indirizzo - Company's name and address - Firmenname und Addresse - Nom et adresse -Nombre y direcciòn
_______________________________________________________________________________________________________
_______________________________________________________________________________________________________
Nome del rivenditore da cui il prodotto è stato acquistato - Name of the dealer where you have purchasedthe product - Namen der Firma, die Ihnen das Produkt verkauft hat - Nom de la société qui vous a vendu ceproduit - Nombre de la compañia donde han comprado el producto:
____________________________________________________________________________________________________
Prodotto difettosoFaulty productDefekte s ProduktProduit défectueuxProducto defectuoso
Descrizione del problema /Problem found/Beschreibung des Defekts/Description du défaut/Descripciòn del problema
________________________________________________________________________________________________________
________________________________________________________________________________________________________
________________________________________________________________________________________________________
________________________________________________________________________________________________________
Data d'acquisto - Date of purchase - Kaufdatum - Date de l'achat - Fecha de compra ________________________
Si prega di allegare prova d'acquisto - Please attach copy of purchase invoice - Bitte Kaufnachweis beilegen -Veuillez joindre une quittance d'achat - Les rogamos incluyan lcopia de la factura de compra.
Nome e qualifica - Name and position - Name und Funktion - Nom et fonction - Nombre y cargo
____________________________________________________________________
Data - Date - Datum - Date - Fecha _____________________________
fax: +39 0376 772140

IT Direttiva 2002/96/CE (Rifiuti di Apparecchiature Elettriche ed Elettroniche - RAEE): informazioni agli utenti: ai sensi dell’art. 13 del Decreto Legislativo 25 luglio 2005, n. 151"Attuazione delle Direttive 2002/95/CE, 2002/96/CE e 2003/108/CE, relative alla riduzione dell'uso di sostanze pericolose nelle apparecchiature elettriche ed elettroniche, nonché allo smaltimento dei rifiuti" questo prodotto è conforme. Il simbolo del cassonetto barrato riportato sull’apparecchiatura o sulla sua confezione indica che il prodotto alla fine della propria vita utile deve essere raccolto separatamente dagli altri rifiuti. L’utente dovrà, pertanto, conferire l’Apparecchiatura giunta a fine vita agli idonei centri di raccolta differenziata dei Rifiuti Elettronici ed Elettrotecnici, oppure riconsegnarla al rivenditore al momento dell’acquisto di una nuova apparecchiatura di tipo equivalente, in ragione di uno a uno. L’adeguata raccolta differenziata per l’avvio successivo dell’apparecchiatura dismessa al riciclaggio, al trattamento ed allo smaltimento ambientalmente compatibile contribuisce ad evitare possibili effetti negativi sull’ambiente e sulla salute e favorisce il reimpiego e/o riciclo dei materiali di cui è composta l’apparecchiatura. Lo smaltimento abusivo del prodotto da parte dell’utente comporta l’applicazione delle sanzioni amministrative previste dalla normativa vigente. ES Directiva 2002/96/EC (Residuos de aparatos eléctricos y electrónicos - RAEE): Información para el usuario. Este producto es conforme con la Directiva EU 2002/96/CE. El simbolo de la papelera barrada situado sobre el aparato indica que este producto, al final de su vida útil, debe ser tratado separadamente de los residuos domésticos. El usuario es responsable de la entrega del aparato al final de su vida útil a los centros de recogida autorizados. El adecuado proceso de recogida diferenciada permite dirigir el aparato desechado al reciclaje, a su tratamiento y a su desmantelamiento de una forma compatible con el medio ambiente, contribuyendo a evitar los posibles efectos negativos sobre el ambiente y la salud, favoreciendo el reciclaje de los materiales de los que está compuesto el producto. Para información más detallada inherente a los sistemas de recogida disponibles, dirigirse al servicio local de recogida o al establecimiento donde se adquirió el producto. FR Directive 2002/96/CE (Déchets d’équipements électriques et électroniques - DEEE): informations aux utilisateurs. Ce produit est conforme à la Directive ED 2002/96/CE. Le symbole de la corbeille barrée reporté sur l’appareil indique que ce dernier doit être éliminé à part lorsqu’il n’est plus utilisable et non pas avec les ordures ménagéres. L’utilisateur a la responsabilité de porter l’appareil hors d’usage à un centre de ramassage spécialisé. Le tri approprié des déchets permet d’acheminer l’appareil vers le recyclage, le traitement et l’élimination de façon écologiquement compatible. Il contribute à éviter les effets négatifs possibles sur l’environnement et sur la santé, tout en favorisant le recyclage des matériaux dont est constitué le produit. Pour avoir des informations plus détaillées sur les systèmes de ramassage disponibles, s’adresser au service local d’élimination des déchets ou au revendeur.
DE Richtlinie 2002/96/EU (Elektro- und Elektronik- Altgeräte - WEEE): Benutzerinformationen. Dieses Produkt entspricht der EU Richtlinie 2002/96/EU. Das Symbol des auf dem Gerät dargestellten, durchgestrichenen Korbes gibt an, dass das Produkt am Ende seiner Nutzungsdauer gesondert vom Hausmüll zu behandeln ist. Am Ende der Nutzungsdauer ist der Benutzer für die Überantwortung des Geräts an geeignete Sammelstellen verantwortlich. Die angemessene, getrennte Müllsammlung zwecks umweltkompatibler Behandlung und Entsorgung für den anschließenden Recycling beginn des nicht mehr verwendeten Geräts trägt zur Vermeidung möglicher schädlicher Wirkungen auf Umwelt und Gesundheit bei und begunstigt das Recycling der Materialien, aus denen das Produkt zusammengesetzt ist. Für nähere Informationen bezüglich der zur Verfügung stehenden Sammelsysteme, wenden Sie sich bitte an den örtlichen Müllentsorgungsdienst oder an das Geschäft, in dem der Kauf getäligt worden ist. UK Directive 2002/96/EC (Waste Electrical and Electronic Equipment - WEEE): information for users. This product complies with EU Directive 2002/96/EC. The crossed-out wastebasket symbol on the appliance means that at the end of its useful lifespan, the product must be disposed of separately from ordinary household wastes. The user is responsible for delivering the appliance to an appropriate collection facility at the end of its useful lifespan. Appropriate separate collection to permit recycling, treatment and environmentally compatible disposal helps prevent negative impact on the environment and human health and promotes recycling of the materials making up the product. For more information on available collection facilities, contact your local waste collection service or the shop where you bought this appliance. NL Richtlijn 2002/96/EG (Afgedankte Elektrische en Elektronische Apparaten - AEEA): informatie voor de gebruikers. Dit product voldoet aan de richtlijn EU 2002/96/EG. Het symbool van de vuilnisbak met een streep erdoor, dat op het apparaat staat, geeft aan dat het product, wanneer het wordt afgedankt, niet met het huisvuil kan worden meegegeven. Het is de verantwoordelijkheid van de gebruiker het product, op het moment dat dit wordt afgedankt, in te leveren bij een centrum voor gescheiden afvalverwerking. Een correcte gescheiden afvalverwerking, die gericht is op de recycling van het afgedankte product en die een milieuvriendeiijke behandeling en vernietiging mogelijk maakt, draagt ertoe bij mogelijk negatieve effecten op het milieu en op de gezondheid te voorkomen en bevordert het hergebruik van de materialen waaruit het product bestaat. Voor meer gedetailleerde informatie met betrekking tot de voorhanden zijnde afvalverwerkingsystemen dient u zich te wenden tot de plaatselijke vuilnisdienst of tot de winkelier waar u het product heeft gekocht. PT Directiva 2002/96/CE (Residuos de equipamentos eléctricos e electrónicos REEE): informações para os utilizadores. Este produto é conforme á Directiva EU 2002/96/CE. O simbolo do cesto barrado marcado no aparelho indica que o produto, no fim da própria vida útil, deve ser tratado separadamente do lixo doméstico. O utilizador é responsável pela entrega do aparelho. no fim da vida do mesmo, às apropriadas estruturas de recolha. A adequada recolha diferenciada para o encaminhamento sucessivo do aparelho à reciclagem, ao tratamento e ao escoamento ambientalmente compativel, contribui para evitar possiveis efeitos negativos sobre o ambiente e a saúde e favorece a reciclagem dos materiais que compõem o produto. Para informações mais detalhadas inerentes aos sistemas de recolha disponiveis, dirija-se ao serviço
local de escoamento de residuos, ou a loja na qual efectuou a compra. NO WEEE-symbolet (Waste Electrical and Electronic Equipment). Bruken av WEEE-symbolet indikerer at dette produktet ikke kan behandles som husholdningsavfall. Du vil bidra til å beskytte miljøet ved å sørge for at dette produktet blir avhendet på en forsvarlig måte. Ta kontakt med kommunale myndigheter, renovasjonsselskapet der du bor eller forretningen hvor du kjøpte produktet for å få mer informasjon om resirkulering av dette produktet. S Symbol för avfall från elektrisk och elektronisk utrustning (WEEE). Märkning med WEEE-symbolen visar att produkten inte får behandlas som hushållsavfall. Genom att slänga den här produkten på rätt sätt bidrar du till att skydda miljön. Mer information om återvinning av produkten kan du få av de lokala myndigheterna, din renhållningsservice eller i affären där du köpte produkten. FI WEEE-merkintä (sähkö- ja elektroniikkalaiteromu). WEEE-merkintä osoittaa, että tätä tuotetta ei voi käsitellä kotitalousjätteen tavoin. Kun huolehdit tämän tuotteen asianmukaisesta hävittämisestä, autat suojelemaan ympäristöä. Lisätietoa tämän tuotteen kierrättämisestä saat paikallisviranomaisilta, jätehuoltoyhtiöltäsi tai myymälästä josta ostit tämän tuotteen. DK Symbol for affald af elektrisk og elektronisk udstyr (WEEE) Brugen af WEEE-symbolet betyder, at dette produkt ikke må behandles som husholdningsaffald. Ved at sørge for korrekt bortskaffelse af produktet medvirker du til at beskytte miljøet. Du kan få flere oplysninger om genbrug af dette produkt hos de lokale myndigheder, dit renovationsselskab eller i forretningen, hvor du har købt produktet. HU Hulladék elektromos vagy elektronikus készüléket jelölö szimbòlum. Ez a szimbólum azt jelöli, hogy a terméket nem szabad háztartási hulladékként kezelni. A hulladékká valt termék megfeleló elhelyezésével hozzájárul a környezet védelméhez. A termék újrafelhasználásával kapcsolatban a helyi szerveknél háztartási hulladékokat elszállító vállalatnál vagy a terméket értékesítö üzletben tájékozódhat. CZ Symbol pro odpadní elektrický a elektronický materiál (WEEE). Použití symbolu WEEE označuje, že tento produkt nelze likvidovat jako domovní odpad.Správnou likvidaci tohoto produktu přispějete k ochraně životního prostředí. Podrobnější informace o likvidaci tohoto produktu vám podaji místní úřady, společnost pro likvidaci komunálního odpadu nebo obchod, kde jste zboži zakoupili.
Luci della Ribalta srl, Via Berna 14, 46042 Castel Goffredo mn Italy. tel +39 0376 771 777 - fax +39 0376 772 140 - email [email protected]