15 filleting
TRANSCRIPT

7/28/2019 15 Filleting
http://slidepdf.com/reader/full/15-filleting 1/13
PowerSHAPE 15. Filleting Surfaces
15. Filleting Surfaces
Filleting SurfacesPowerSHAPE allows you to fillet one or a number of surfaces together with a specified
radius. The shape of a fillet surface may be imagined as the path produced by rolling a ball of
the same radius along the surfaces. Where the ball makes contact a fillet is produced and the
original surfaces are trimmed back to the new fillet surfaces.
Before Filleting After Filleting
PowerSHAPE can either create a concave fillet or a convex fillet. A concave fillet is
produced with all of the surfaces to be filleted facing outwards i.e. all shaded in gold. Aconvex fillet is the negative or reverse fillet that is produced on the inside region with the
surfaces to be filleted facing outwards as before.
During the filleting operation it shows the current direction of each surface by arrows. These
arrows always highlight the male or gold side to the surface. These arrows can be clicked on
to reverse the surface for filleting.
Issue PSHAPE 5.5 119

7/28/2019 15 Filleting
http://slidepdf.com/reader/full/15-filleting 2/13
15. Filleting Surfaces PowerSHAPE
Cone ExampleThis example goes through the basic filleting options.
• Create a Plane Primitive of length 100 and width 100 at 0 0 0.
• Create a Cone Primitive of base radius 30, top radius 15 and length 50 at
0 0 0.
• Right click over the cone and select Convert Surface.
A selected Power
Surface shows more
detail.The small brown arrow
points outwards,
indicating that this is the
outside edge of the
surface. The larger
brown arrow indicates
the direction the surface
flows and is not used in
filleting.
Another way to show the inside and outside of the surface is to shade the model.
By default PowerSHAPE displays the outside of surfaces as gold and the inside as red .
• Select the Shaded icon.
Both surfaces should be shaded gold on the outside.
If not then you can right click on any red surfaces
and select Reverse from the available menu.
• Select both surfaces by dragging a
window around them.
• Revert to a normal view by selecting the Wireframe View icon.
• Select the Filleting option from the Surfaces submenu.
120 Issue PSHAPE 5.5
7/28/2019 15 Filleting
http://slidepdf.com/reader/full/15-filleting 3/13
PowerSHAPE 15. Filleting Surfaces
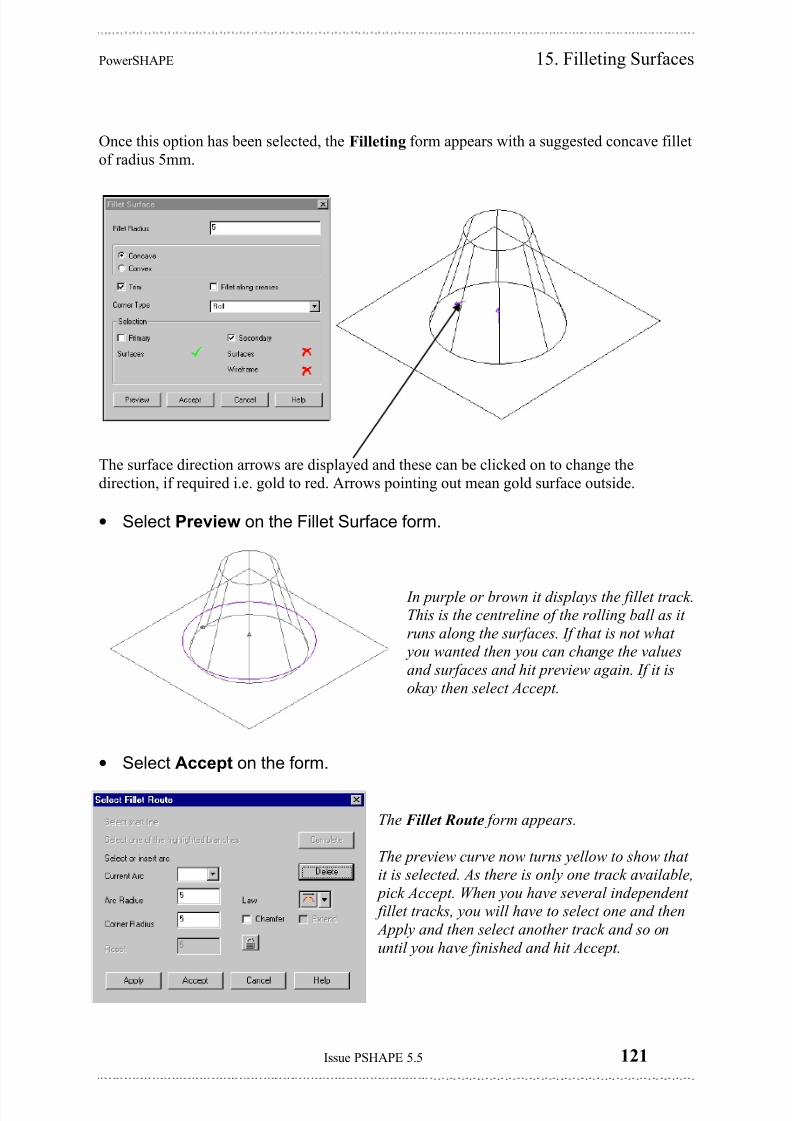
Once this option has been selected, the Filleting form appears with a suggested concave fillet
of radius 5mm.
The surface direction arrows are displayed and these can be clicked on to change the
direction, if required i.e. gold to red. Arrows pointing out mean gold surface outside.
• Select Preview on the Fillet Surface form.
In purple or brown it displays the fillet track.
This is the centreline of the rolling ball as it
runs along the surfaces. If that is not what
you wanted then you can change the values
and surfaces and hit preview again. If it is
okay then select Accept.
• Select Accept on the form.
The Fillet Route form appears.
The preview curve now turns yellow to show that
it is selected. As there is only one track available,
pick Accept. When you have several independent
fillet tracks, you will have to select one and then
Apply and then select another track and so on
until you have finished and hit Accept.
Issue PSHAPE 5.5 121

7/28/2019 15 Filleting
http://slidepdf.com/reader/full/15-filleting 4/13
15. Filleting Surfaces PowerSHAPE
• Select Accept off the form.
The fillet surface is produced and the cone and
plane trimmed back to the fillet.
• Create a Plane Primitive at 0 0 40 with a length and width of 80.
•Double click on the plane and in the plane form select a Y-Twist angle of 10 degrees.
• Convert the plane into a Power Surface.
This top surface will be filleted to the cone, but this
time the fillet will be on the inside of the cone.
• Select the Cone and the angled plane surface.
• Select the Fillet icon.
• Preview a 3mm Convex fillet.
122 Issue PSHAPE 5.5

7/28/2019 15 Filleting
http://slidepdf.com/reader/full/15-filleting 5/13
PowerSHAPE 15. Filleting Surfaces
• Accept the preview and the Select Fillet Route form to produce the new
surface.
The fillet is produced trimming back the top of the
cone and the plane.
Fillets can also be produced with several surfaces.
• Create a Cylinder Primitive at –30 0 20 along the X PRINCIPLE PLANE.
• Change the radius to 6, length to 60 and rotate it with an X-Twist of –15.
• Right click over the Cylinder Primitive and select Reverse.• Select all of the surfaces apart from the lower fillet and plane.
• Select the fillet icon.
• Set a 2mm Convex radius and then Preview.
• Select Accept.
In this case, PowerSHAPE has identifeied two
complete fillet tracks and a few other possibilities. As
PowerSHAPE allows you to specify which track you
want to use you can use as little or as many tracks as
required.
Issue PSHAPE 5.5 123

7/28/2019 15 Filleting
http://slidepdf.com/reader/full/15-filleting 6/13
15. Filleting Surfaces PowerSHAPE
• Select the first fillet track nearest the plane (lowest one), which turns
yellow.
• Select Apply to produce the first fillet.
The first fillet is produced and PowerSHAPE waits for
another fillet track to be selected.
• Select the second track nearest the top.
• Select Apply and Accept to generate the last fillet.
All of the other tracks are ignored.
Do not delete the model.
Filleting using Secondary Surfaces
Normal filleting will check every selected surface against each other to find the fillet path
required. On a large job, this can take some time and it may be awkward to pick the actual
fillet path out.
By using the Secondary surface option, this allows to identify two sets of surfaces that the
fillet will run between. With this option, you select the first set of surfaces as your primary
surfaces, select the fillet icon and then pick your second set of surfaces, which automatically become the Secondary set. PowerSHAPE now knows where to generate the fillet.
124 Issue PSHAPE 5.5

7/28/2019 15 Filleting
http://slidepdf.com/reader/full/15-filleting 7/13
PowerSHAPE 15. Filleting Surfaces
Example
Continue with the filleting example.
• Delete the lower plane and fillet.
• Create a Plane Primitive on the YZ plane (X Principle Plane) at 0 0 20
with a width of 110 and a length of 60.
• Convert the plane to a Power Surface and change the direction if required
so the gold surface is on the X+
direction as shown.
• Drag a box over the surfaces on the left as indicated.
• Select the fillet icon. Set a radius of 2mm and Convex.
• Select the Plane surface.
Issue PSHAPE 5.5 125

7/28/2019 15 Filleting
http://slidepdf.com/reader/full/15-filleting 8/13
15. Filleting Surfaces PowerSHAPE
The selected surface turns pink and the secondary surface option is ticked.
• Select Accept.
• Select the first track and then select the Apply button.
• Select the last track and then select the Apply button.
The fillets are produced and most of the other surfaces
have been trimmed back.
• Delete this remaining surface.
• Limit the bottom of the plane back to
complete the job. Hint: use wireframe toLimit to.
Tap ExampleCreate the following kitchen tap shape.
• Generate the following wireframe.
126 Issue PSHAPE 5.5

7/28/2019 15 Filleting
http://slidepdf.com/reader/full/15-filleting 9/13
PowerSHAPE 15. Filleting Surfaces
• Create a surface of revolution from this shape.
• Create a workplane at 0 0 44
• Generate a Sphere Primitive of radius 7.5 at the new workplane.
• Select the Workplane then select limit under the Edit toolbar and then the
sphere.
The sphere is then limited to the workplane and the top half
should be kept. This will only work if the correct Principle
Plane is set.
• Generate the following geometry for the tap arm shape around the
workplane.
• Create a surface of revolution around X Principle Plane.
• Rotate and copy this surface 3 times by 90 degrees around the Z
Principle Plane to make the four arms.
Issue PSHAPE 5.5 127

7/28/2019 15 Filleting
http://slidepdf.com/reader/full/15-filleting 10/13
15. Filleting Surfaces PowerSHAPE
The four arms need to be filleted to the central section. Make sure that when shaded, all of the
surfaces are gold. We do not want to fillet each arm to each other or waste time generating
the route so we are going to use the Secondary surfaces option.
• Select the central section (the revolved surface and the sphere).• Select the fillet icon. Select the four arms.
On the form the option secondary
surfaces becomes ticked.
• Enter a concave radius of 2
• Accept the form.• Select the fillet tracks in turn and Accept to finish the model.
Variable filleting
Variable fillets are easily created along the fillet track using the mouse to identify KEY
points or using functionality within the form to position the fillet arcs either by Parametric,
Relative or Absolute values.
Example
• Create a new model and a Workplane at 0.
• Create two circles with radius 8.5 at 30 and –30 in X.
• Create a Fitted arc of radius 50 either side of the two circles to form the
following shape.
128 Issue PSHAPE 5.5

7/28/2019 15 Filleting
http://slidepdf.com/reader/full/15-filleting 11/13
PowerSHAPE 15. Filleting Surfaces
• Create a composite curve from the wireframe.
• Generate a Surface Extrusion.
• Double click the extrusion and in the form change the Length to 60 and
select the Keep button.
The composite curve is needed to
enable a Fill in surface to be created atthe end of the extrusion.
• Accept the form.
• Select the composite curve and create a Fill in surface from wireframe
• Delete the composite curve.
• Drag a box around both surfaces and select the Fillet surface icon.
• Input a fillet radius of 3 select Convex and press Accept.
• View the model down in Z.
If you place the mouse pointer at strategic points around the fillet route the word KEY
will appear. Clicking the left mouse button at these KEY points creates an arc of the size
specified in the first fillet form. The value can be modified in the Arc Radius area of the
form.
Issue PSHAPE 5.5 129

7/28/2019 15 Filleting
http://slidepdf.com/reader/full/15-filleting 12/13
15. Filleting Surfaces PowerSHAPE
• Create 6 arcs at the KEY points around the fillet route starting at the top
working your way around clockwise as shown on the next page.
Six KEY points were found but noticeably none were found at the very ends of the surfaces
where they will be required. The fillet size needs to increase at the ends to 5mm. Options in
the form allow fillet arcs to be added accurately between existing arcs using the Parametric
method.
• Change the Current Arc to 1 by selecting it from the pull down menu.
• Change the arc position type from ABS (Absolute) to PAR (Parametric)
and in the Distance for selected arc area type in 1.5 then Return on the
keyboard.
A new arc has been generated accurately between existing arcs allowing the fillet size to
be modified. PowerSHAPE has also automatically renumbered the Current Arc to be 2.
• With Current Arc 2 selected change the Arc Radius to 5.
• Create another arc at PAR 5.5 and change its radius also to 5.
• Change the Arc Radius to 5 for arcs 1, 3, 5 and 7.
• Apply the form.
130 Issue PSHAPE 5.5

7/28/2019 15 Filleting
http://slidepdf.com/reader/full/15-filleting 13/13
PowerSHAPE 15. Filleting Surfaces
The variable fillet is applied successfully.
Issue PSHAPE 5.5 131