15/19/24/26 panel pc ecdis marine quick start guidedc.winmate.com.tw/_downloadcenter/2016/mlcd/ecdis...
TRANSCRIPT
Please read these instructions carefully before using this product, and save this manual for future use.
15/19/24/26” Panel PC ECDIS Marine
Quick Start Guide V1.0
Document Part Number: 91521110100E
Model No.:
R15IH3S-MRA3FP
R19IH3S-MRA1FP
W24IH3S-MRA1FP
W26IH3S-MRA1FP

Copyright © Notice
No part of this document may be reproduced, copied, translated, or transmitted in any form or by any
means, electronic or mechanical, for any purpose, without the prior written permission of the original
manufacturer.
Trademark Acknowledgement
Brand and product names are trademarks or registered trademarks of their respective owners.
Disclaimer
Winmate Inc. reserve the right to make changes, without notice, to any product, including circuits and/or
software described or contained in this manual in order to improve design and/or performance. We
assume no responsibility or liability for the use of the described product(s) conveys no license or title
under any patent, copyright, or masks work rights to these products, and make no representations or
warranties that these products are free from patent, copyright, or mask work right infringement, unless
otherwise specified. Applications that are described in this manual are for illustration purposes only. We
make no representation or guarantee that such application will be suitable for the specified use without
further testing or modification.
Warranty
Winmate Inc. warranty guarantees that each of its products will be free from material and workmanship
defects for a period of one year from the invoice date. If the customer discovers a defect, we will, at
his/her option, repair or replace the defective product at no charge to the customer, provide it is returned
during the warranty period of one year, with transportation charges prepaid. The returned product must be
properly packaged in its original packaging to obtain warranty service. If the serial number and the
product shipping data differ by over 30 days, the in-warranty service will be made according to the
shipping date. In the serial numbers the third and fourth two digits give the year of manufacture, and the
fifth digit means the month (e. g., with A for October, B for November and C for December).
For example, the serial number 1W15Axxxxxxxx means October of year 2015.

Contents
Getting Started 3
Unpacking 4
Accessories 4
Description Of Parts 5
Appearance 15” 5
Appearance 19” 6
Appearance 24” and 26” 7
Capacitive Touch OSD Control Panel 8
Installing 2.5" Removable HDD 9
Mounting 10
Panel Mount 10
VESA Mount 11
Connector Description 12
DC Input Connector 12
Serial Port Connector 12
Two USB 3.0 Connectors 12
USB2.0 Connector 13
LAN (RJ45) Connector 13
HDMI Connector 13
NMEA 0183 Port (optional) 14
Digital Input / Output Connector (optional) 14
Powering On or Off 15
Connecting to AC Power Source (for testing) 15
Connecting to DC Power Source 15
Turning On or Off 16
Turning On 16
Turning Off 16
ECDIS Mode Brightness Adjustment 17
ECDIS Mode Brightness Adjustment 17
Switching to DAY Mode 17
Switching to DUSK Mode 18
Switching to NIGHT Mode 18
Hot Tab Introduction 18
Hot Tab Menu 19
Software Developer Support 21
Winmate Download Center 21
Winmate File Share 21

3
Getting Started Congratulations on purchasing Winmate® ECDIS Marine Series Panel PC. The design meets the
requirements of industrial marine standards, including IEC60945 4th Edition, DNV2.4, IACS E10.
Modern marine sector requires durable devices that can withstand long periods submersed in
water. Winmate ECDIS Marine Series Panel PC is suitable for navigation, ship automation, and
surveillance, rugged industrial and light military applications.. Flat surface is easy-to-clean and
delivers aesthetically pleasing look. Due to dimmable backlight the Panel PC suitable for high
and low ambient light conditions. You can mount the Panel PC on the bridge of a ship.
The device powered by Intel® 5th Generation Core™ i5-5200U 2.2GHz processor and supports
various Windows-based operating systems: Windows 10 IoT Enterprise, Windows Embedded 8.1
Industry PRO, Windows Embedded 8 Std, Windows Embedded Std. 7, and Windows 7 PRO for
Embedded System. The Panel PC features user-friendly and resistant to scratches PCAP touch-
screen. These models sealed with front IP 65 dust and water proof
All Winmate® ECDIS Marine Series Panel PCs meet the requirements of industrial marine
standards, including IEC60945 4th Edition, DNV2.4
Winmate® ECDIS Series Marine Panel PC offers the following features:
Projective capacitive multi-touch screen
Intel 5th ® Generation Core™ i5-5200U 2.2GHz
Edge-to-edge narrow bezel design and fanless cooling system
Color calibrated for ECDIS compliance
Capacitive touch keys for quick function access and display control (Support ECDIS DAY,
DUSK, and NIGHT mode switching)
Optional 4 x COM port (NMEA 0183 protocol) 422/485 switchable by software
Compliant with marine standards (DNV2.4, IEC 60945 4th, IACS-E10)
Support capacitive touch key lock / touchscreen lock function
Model Number Naming Rule
R19IH3S-MRXXFP
Item Description
R Panel Type
19 Panel Size
IH3S CPU Platform
MR Mechanical Type
XX Panel Model
FP Touch Type

4 Please read these instructions carefully before using this product, and save this guide for future use.
Unpacking
Carefully remove the box and unpack your device. Please check if all the items listed below are
inside your package. If any of these items are missing or damaged contact us immediately.
Accessories
The factory shipment list:
Panel PC Driver CD & User Manual Quick Start Guide
(Hardcopy)
AC Adapter (12V/ 80W)
Power Cord (varies in appearance by region
and country)
3-pin Terminal Block (Phoenix type)
M4 x 12 Black Screws
Notice: Only to be used to secure the Panel PC onto a console from the rear side. If you prefer your own bolts, make sure to use M4 x 30mm in length.
*Optional 4 x 5-pin Terminal Block 3.81
(Phoenix Type)
For NMEA port
* 4 x 5-pin Terminal Block 3.81 is an optional accessory and may be included in your package based on your order.
**AC adapter, 3-pin terminal block, and power cord shipped with Panel PC for testing purposes
only.
5
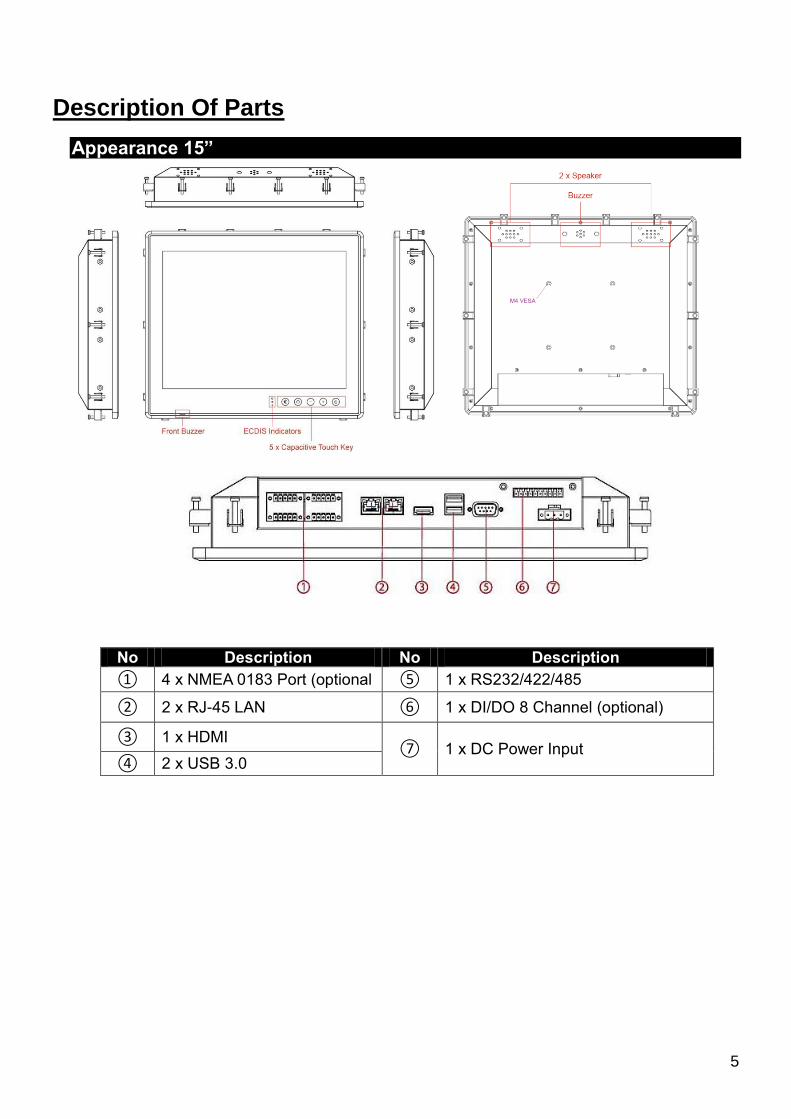
Description Of Parts
Appearance 15”
No Description No Description
① 4 x NMEA 0183 Port (optional ⑤ 1 x RS232/422/485
② 2 x RJ-45 LAN ⑥ 1 x DI/DO 8 Channel (optional)
③ 1 x HDMI ⑦ 1 x DC Power Input
④ 2 x USB 3.0

6 Please read these instructions carefully before using this product, and save this guide for future use.
Appearance 19”
No Description No Description
① 4 x NMEA 0183 Port (Optional) ⑤ 1 x RS232/422/485
② 2 x LAN (RJ-45) ⑥ 1 x USB 2.0
③ 1 x HDMI ⑦ 1 x DI/DO 8 Channel (Optional)
④ 2 x USB 3.0 ⑧ 1 x DC Power Input

7
Appearance 24” and 26”
No Description No Description
① 1 x 2.5" Removable HDD ⑥ 1 x USB 2.0
② 2 x LAN (RJ-45) ⑦ 1 x DI/DO 8 Channel (Optional)
③ 1 x HDMI ⑧ 4 x NMEA 0183 Port (Optional)
④ 2 x USB 3.0 ⑨ 1 x DC Power Input
⑤ 1 x RS232/422/485

8 Please read these instructions carefully before using this product, and save this guide for future use.
Capacitive Touch OSD Control Panel
Capacitive touch OSD control panel is located on the front of your Panel PC.
ECDIS Mode Indicator Capacitive Touch Keys
Icon Function Description Icon Function Description
Day Mode
Lights up when ECDIS
brightness adjusted to
day mode
Function Key
Default setting:
ECDIS Mode
Default: Switching
ECDIS standard range
mode (Day / Dust / Night
mode)
Dusk Mode
Lights up when ECDIS
brightness adjusted to
dusk mode
Menu/ Home Switch to Menu or
Desktop
Night Mode
Lights up when ECDIS
brightness adjusted to
night mode
Brightness/
Volume
To decrease
brightness/volume of
panel
Brightness/
Volume
To increase brightness/
volume of panel
Power Power on/off control

9
Installing 2.5" Removable HDD
The 24” and 26” Marine Panel PC ECDIS series has tray for SATA hard disk. No tools required
to install the hard disk. Follow the instructions below to quickly install/remove the hard disk.
Step 1 Disconnect the device from the power source.
Step 2 Loosen the thumb screw beside the valve of hard drive bay.
Step 3 Open the valve and pull out the bracket with hard disk.
Step 4 Replace the hard disk, be sure to check if the hard disk inserted correctly to the hard disk
bay.
Step 5 Insert the bracket back and carefully tighten the thumb screw.

10 Please read these instructions carefully before using this product, and save this guide for future use.
Mounting There are two most common mounting solutions for Panel PC – Panel Mount from the rear side
and VESA Mount. This section explains how to mount ECDIS Marine Panel PC.
Panel Mount
Winmate provides mounting clips for installation onto a wall or into console by request.
Make sure you console cutout matches the Panel PC cutout dimensions.
Use either short or long screws based on the thickness of the fixture.
Cutout dimension ( W x D in mm)
15” 19” 24” 26”
330 x 280 408 x 359 572 x 363 598 x 408
Mounting Kit Mounting Kit
Mounting Clips: 12pcs
Short screws: 15mm M4
Long screws: 30mm M4
Mounting Clips: 16pcs
Short screws: 15mm M4
Long screws: 30mm M4

11
VESA Mount
Winmate provides VESA and Wall Mount Kits by request.
VESA Plate Dimensions
15” 19” 24” 26”
100 x 100 100 x 100 100 x 100
100 x 200
100 x 100
100 x 200
Screw Hole Diameter
M4 D=3mm M4 D=5mm M4 D=5mm M6 D=5mm
Mounting Steps:
1. Screw VESA bracket to the fixture (ex. wall) with four screws (refer to the table above for
screw hole diameter).
2. Place the device on VESA bracket.
3. Connect all cables and peripheral devices.
4. When the installation is complete, plug the power cord into a grounded AC outlet. Turn on
the power.
NOTE:
Notice that both hooks on bracket should lock the notches on the back cover of the
device.

12 Please read these instructions carefully before using this product, and save this guide for future use.
Connector Description
DC Input Connector
DC terminal block power source input compact design meets the maritime application. The 3-
pin terminal block is to be secured that the cable to screw terminal.
Serial Port Connector
The Marine Panel PCs support COM1 ports to comply with maritime accessories sensor units. Connect Standard D-SUB 9-pin connector to connect on the Marine Panel PC to make it a control center.
Serial COM1 settings can be configured for RS-232, RS-422 or RS-485 by BIOS setting.
Two USB 3.0 Connectors
Use standard USB type A cable to connect any device that use USB interface for expansion functions.
Pin No. Symbol Description
1 VIN+ 9-36V DC Input +
2 VIN- 9-36V DC Input -
3 GND Ground
Pin № RS-232 RS-422 RS-485
1 DCD TxD- D-
2 RXD TxD+ D+
3 TXD RxD+ NC
4 DTR RxD- NC
5 GND GND GND
6 DSR NC NC
7 RTS NC NC
8 CTS NC NC
9 RI NC NC
Pin № Name Pin № Name
1 +5V 2 USB_D-
3 USB_D+ 4 GND
5 STDA_SSRX- 6 STDA_SSRX+
7 GND_DRAIN 8 STDA_SSTX-
9 STDA_SSTX+

13
USB 2.0 Connector
Use standard USB2.0 type A cable to connect any device that use USB2.0 interface for
expansion functions.
LAN (RJ45) Connector
The Marine Panel PC supports one 10/100/1000 Mbps Ethernet interface for connecting to the internet.
HDMI Connector
Connect HDMI A Type19-pin female output connector to the display.
Pin № Name Pin № Name
1 +5V 2 Data-
3 Data+ 4 GND
Pin № Name Pin № Name
1 TX1+ 2 TX1-
3 TX2+ 4 TX2-
5 TX3+ 6 TX3-
7 TX4+ 8 TX4-
Pin № Name Pin № Name
1 TMDS_DATA2+ 2 GND
3 TMDS_DATA2- 4 TMDS_DATA1+
5 GND 6 TMDS_DATA1-
7 TMDS_DATA0+ 8 GND
9 TMDS_DATA0- 10 TMDS_CLOCK+
11 GND 12 TMDS_CLOCK-
13 CEC 14 NC
15 DDC_CLOCK 16 DDC_DATA
17 GND 18 5V
19 Hot Plug Detect

14 Please read these instructions carefully before using this product, and save this guide for future use.
NMEA 0183 Port (optional)
By request the Marine Panel PC comes with NMEA port on the bottom panel. The figure
shows the pin assignments.
NMEA 0183 ports can change serial status for RS-422 or RS-485 in COM Port Mode Switch.
To change serial status go to HotTab Main menu > Other Tools > COM Port Mode Switch
Digital Input / Output Connector (optional)
Four-channel isolated Digital Input and Output. On-board optical isolation protection output up to 1.5KVdc.
PinNo. Symbol PinNo. Symbol
1 TxD1- 6 TxD2-
2 TxD1+ 7 TxD2+
3 GND 8 GND
4 RxD1- 9 RxD2-
5 RxD1+ 10 RxD2+
Pin No. Symbol Description
1 DO_COM DO Port Reference Voltage Level
2 DO_0 Digital Output 0
3 DO_1 Digital Output 1
4 DO_2 Digital Output 2
5 DO_3 Digital Output 3
6 ISOGND Isolated Ground
7 DI0 Digital Input 0
8 DI1 Digital Input 1
9 DI2 Digital Input 2
10 DI3 Digital Input 3

15
Powering On or Off
Connecting to AC Power Source (for testing)
1. Plug one end of the terminal block cable firmly to the DC IN Jack. 2. Plug the other end of the terminal block plug to the AC adapter (12V 80W). 3. Connect the AC adapter to the power cord. 4. Plug the power cord to a working AC outlet.The device will boot automatically.
Connecting to DC Power Source
1. Insert the exposed wires of the DC Power Cable to the appropriate connectors on the terminal block plug.
2. Plug the terminal block plug firmly to the DC IN Jack. 3. Connect the other end of the DC power cable (wires with lug terminals that are
labeled + and – to the terminals of the 9~36V DC Power Source. Ensure that the power connections maintain the proper polarity.
For more detailed instructions refer to the User Manual.

16 Please read these instructions carefully before using this product, and save this guide for future use.
Turning On or Off
Turning On
Press and hold the capacitive power key ( ) for 4 seconds until the blue LED backlight light up.
Turning Off
Perform the following procedure to shut down the Panel PC (for Windows 8):
1. Make sure to close all programs that are open on the Desktop. Start Screen programs don’t need to be closed.
2. Open the Charms Bar by swiping your finger from the far right of the screen towards the middle of the screen.
3. Tap on the Settings charm. 4. Tap on Power. 5. Tap on Shut Down. 6. Wait for Panel PC to power off.
Perform the following procedure to shut down the Panel PC (for Windows 7):
1. Make sure you have closed any programs that are open on the Desktop.
2. Click the Start button , and then, in the lower-right corner of the Start menu, click Shut down.
3. Or click the arrow next to the Shut down button for more options.
NOTE: The computer will forcibly be turned off if the capacitive power key is pressed and held for
8 seconds or longer.
If the capacitive power key is pressed and held between 5 to 8 seconds, the computer will
enter preset custom power button action in OS. (ex: Do nothing, Ask me what to do,
Standby or Shut down)

17
ECDIS Mode Brightness Adjustment Winmate provides quickly adjustable Buttons for the ECDIS mode switch (DAY, DUSK , NIGHT)
ECDIS Mode Brightness Adjustment
Switch the ECDIS mode by tapping capacitive touch key. Tap the "ECDIS Mode Quick
Button", and the level of brightness is automatically adjusted according to ECDIS standard.
ECDIS Mode Indicator shows the mode that has been activated.
The sequence of the switching modes is as follows:
DAY Mode → DUSK Mode → NIGHT Mode → DAY Mode.
ECDIS Mode Indicator Capacitive Touch Key
Icon Function Description Touch
Key Function Description
Day Mode
Lights up green
when ECDIS
brightness adjusted
to day mode
ECDIS
Mode Quick
Button
Switching ECDIS
standard range
mode (Day /Dusk /
Night mode)
Dusk
Mode
Lights up green
when ECDIS
brightness adjusted
to dusk mode
Night
Mode
Lights up green
when ECDIS
brightness adjusted
to night mode
NOTE:
In ECDIS Mode (DAY, DUSK, NIGHT) you can adjust the brightness manually. Notice when the
manually adjusted brightness parameter does not comply with the ECDIS Standard, the LED
indicator light disappears. You should switch the ECDIS mode quick button again to correct the
brightness parameter to ECDIS.
Switching to DAY Mode

18 Please read these instructions carefully before using this product, and save this guide for future use.
Switching to DUSK Mode
Switching to NIGHT Mode
Hot Tab Introduction
DAY Mode
LED Indicator
The brightness was adjusted to DAY Mode
DUSK Mode LED Indicator
The brightness was adjusted to DUSK Mode
NIGHT Mode LED Indicator
The brightness also be adjusted to NIGHT Mode

19
Hot Tab is a tool that is used to control system settings. If your order includes pre-installed OS,
the Hot Tab control utility is also included in to your system.
You can find HotTab Utility Icon in Windows System Tray:
Hot Tab Menu
Icon Sub-menu Description
+/- Key
Volume
Controls Volume. Plus (+) touch key is mapped to raise the volume and
Minus
(-) touch key is mapped to lower the volume.
Brightness
(default)
Controls the screen Brightness. Plus (+) touch key is mapped to raise
screen brightness and Minus (-) touch key is mapped to lower screen
brightness.
Adjustment
Scale
Allows switching between user’s preset Brightness level. Plus (+) touch
key sets the screen brightness to user’s preset maximum level and Minus
(-) touch key sets the screen brightness to user’s preset minimum level.
In other words, user can switch between two different brightness levels
quickly.
Function
Key
Default: ECDIS
mode brightness
adjustment
If you don’t need ECDIS, you can configure function key mapping.

20 Please read these instructions carefully before using this product, and save this guide for future use.
Menu Key
Home Mode
When the user taps the capacitive key while running an application,
the display screen will show the Desktop.
Metro Mode (for
Windows 8)
When the user taps the capacitive key while running an application,
the display screen will show the Metro UI
Touch
Lock
Lock the
touchscreen
Tap on this button to lock the touchscreen.
To unlock the screen, tap anywhere on the touchscreen, and pull the
slide bar to the right.
Key Lock
Key Unlock
White icon means the physical touch keys are currently unlocked. The
text below the icon shows the current status (Unlocked in this case).
Key Lock
Orange icon means the physical touch keys are currently locked. The
text below the icon shows the current status (Locked in this case).
Other
Tools
Buzzer
Tap on this icon to activate built-in buzzer.
COM Port Mode
Switch
Change the status of the NMEA 0183 ports (optional feature) for RS-422
or RS-485.
DI4DO4 In this menu user can configure Digital Input / Digital Output parameters
(COM ports setting at COM23).
For more details about Hot Tab and its functions please refer to User Manual.

21
Software Developer Support Winmate provides the following drivers for ECDIS Marine Panel PC with Intel® Core i5-5200U
Broadwell processor:
Item Driver Windows 7 Windows 8 Windows 10
1 Chipset Driver ☑ ☑ ☑
2 Graphics Driver ☑ ☑ ☑
3 Audio Driver ☑ ☑ ☑
4 Ethernet Driver ☑ ☑ ☑
5 Fintek Com Port Driver ☑ ☑ ☑
6 Intel® Management Engine Software ☑ ☑ ☑
7 USB 3.0 Driver ☑ ☒ ☒
Winmate provides the following development kits (SDK) for ECDIS Marine Panel PC with Intel®
Core i5-5200U Broadwell processor:
Item File Type Description
1 Watchdog Driver, SDK and AP Driver, AP and development kit for Watchdog
2 Digital I/O Driver/ SDK Driver and development Kit for Digital I/O
3 Marine Driver/ AP Capacitive Touch Keys Driver & AP
4 ECDIS Color Table The table of colors used in ECDIS system
You can download SDK and Drivers from Winmate Download Center or Winmate File Share.
Winmate Download Center
http://www.winmate.com.tw/>Support > Download Center > Marine Grade > Marine PPC Core i5
> Development Kit/ Driver
Or follow the link below: http://www.winmate.com/DownCenter/DownLoadCenter.asp?DownType=0617
Winmate File Share
http://www.winmate.com/> File Share > Public Document > Panel PC > Multi-Touch ECDIS
Marine Panel PC> IH32 (Broadwell 5200U)> Development Kit/ Driver
Or follow the link below: https://winmate.box.com/v/ECDIS-Marine-PPC-IH32

Winmate Inc. 9F, No.111-6,Shing-De Rd., San-Chung District, Taipei 241, Taiwan, R.O.C Tel: 886-2-8511-0288 Fax: 886-2-8511-0211 Email: [email protected] Official website: www.winmate.com