16ch mp4 network dvr manual - · pdf file16ch mp4 network dvr mpeg4 www. mouse 2008 set....
TRANSCRIPT
16CH MP4 NETWORK DVR
www.MPEG4
Mouse
2008 SET. V1.1.2
Manual
16CH mpeg4 DVR
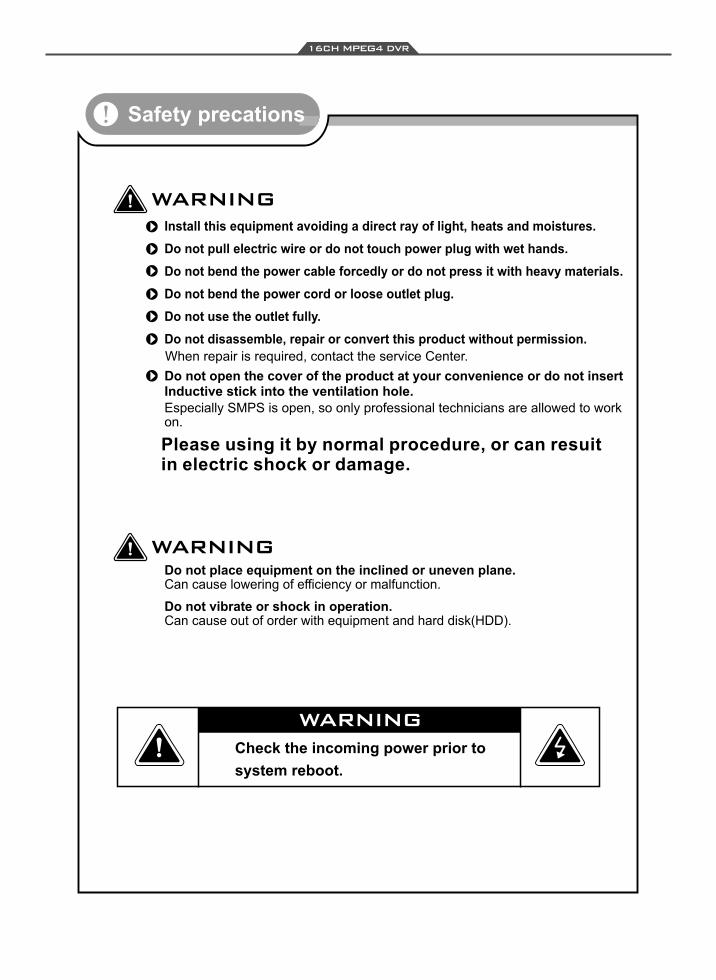
! Check the incoming power prior to
system reboot.
WARNING
! WARNING
! WARNING
Install this equipment avoiding a direct ray of light, heats and moistures.
Do not pull electric wire or do not touch power plug with wet hands.
Do not bend the power cable forcedly or do not press it with heavy materials.
Do not bend the power cord or loose outlet plug.
Do not use the outlet fully.
Do not disassemble, repair or convert this product without permission.
When repair is required, contact the service Center.
Inductive stick into the ventilation hole.Especially SMPS is open, so only professional technicians are allowed to workon.
Do not open the cover of the product at your convenience or do not insert
Do not place equipment on the inclined or uneven plane.
Do not vibrate or shock in operation.
Can cause lowering of efficiency or malfunction.
Can cause out of order with equipment and hard disk(HDD).
Safety precations
Please using it by normal procedure, or can resuit in electric shock or damage.

16CH mpeg4 DVR
1
2
3
4
5
5
5
6
8
8
8
9
9
9
9
9
9
10
10
10
10
11
11
11
11
11
11
11
11
11
11
11
12
12
12
13
13
13
12
13
13
13
13
14
14
14
14
14
14
14
14
15
16
16
16
16
17
17
17
17
18
18
18
18
18
18
19
19
19
19
12 20
20
20
20
20
21
21
21
21
21
22
22
22
22
23
23
23
23
23
25
26
26
27
27
27
28
29
29
1.Specifications
2.Front Panel
3.Rear Panel
4.Initialization
5.System Operation
➣Mouse Operation
➣Remote Control Operation
★ Enter System
6.System
➣Time Setup
➣System Password
➣System Information
➣Video Format
➣Log View
➣Buzzer
➣HDD Format set
➣Firmware upgrade
➣Factory Reset
➣
➣Language
➣Sub Monitor
7.Camera
➣Channel
➣Color
➣Title
➣PTZ Type
➣PTZ Protocol
➣PTZ Address
➣PTZ Baud Rate
➣PTZ Speed
➣PTZ Preset
➣PTZ Tour Time
➣Event Popup
➣Main Rot. Time
Noise Filter
➣Channel
➣Resolution
➣Pre Record➣FPS
➣Quality
➣Record mode
➣Audio
➣Schedule
9.Network
➣IP Mode
➣Port
➣IP
➣Net Mask
➣Gateway
➣Name Sever
➣DDNS
10.Schedule
11.Motion
➣Camera Channel
➣Motion Enable
➣Sensitivity
➣Motion Area
➣Post Record Time
➣Buzzer Time
➣Alarm Time
12.Sensor
➣Sensor Channel
➣Sensor Type
➣Post Record Time
➣Buzzer Time
➣Alarm Time
13.Backup
➣Device
➣Channel
➣End & Start Time
➣AVI
8.Record 14.Search
➣Date Record
➣Time Record
➣Event Record
➣Force Record
15.Display
➣Live Play
➣Zoom
➣Auto Sequence
➣PTZ
16.Other Function
➣Force Recording
➣Sound Effects
➣Rebooting
17.NetViewer Manual
➣Introduction
➣System Requirement
➣Software Retrieving &
Installation
➣User Interface
➣Network Setup
➣Live Play & Setting
➣AVI Backup
➣Save Video Stream to
PC's HDD
➣Play Back
➣Scan Disk
18.Default Setting
19.Record Time
20.HDD Compatibility
CONTENT

1
16CH mpeg4 DVR
1. Specifications
Highest
High
Normal
Highest
High
Normal
720x480
720 x 240
352 x 240
Normal: 13~17KB
Max: 23~ 8KB
Max. fps
Max. 60 fps
Max. 30 fps
2
120
720x576
720 x 288
352 x 288
Normal: 15~19KB
Max: 25~30KB
Max. 100 fps
Max. 50 fps
Max. 25 fps
EIDE- 133 3.5inch * 2pcs (wi thout HDD) ATA * 2pcs (Optional
Format Automat ically
Internal PELCO P、PELCO D、MIKAMI Commun ication Protocol
RS- 485 Interface
)
USB 2.0( Incl udi ng USB1.1) , CD-R/W(DVD Opt ion)
Via USB2. 0 Memory St ick
Engl ish/ Tradi tional Chi nes e/ Simpl ified Chi nes e/Other s(Opt ional
Front Panel / IR Remote Cont rol / USB Mous e/ Network
Net Viewer (PC Sof tware) to LAN downl oad
Live Play Viewer / Network eve nt list Play Back
/ USB flash dr ive Fi le Play / PTZ Cont rol
AC I/P VOL: AC115V/ AC230V 150W MAX. FREQ: 50~60Hz
)
MPEG4 based(none-standarde)
Embe dded Linux
Rec ord / Playback / Net wor k
Time / Man ual / Schedule / Event
Weekly/ Nor mal ity/ Alarm/ No Rec ording
Power / Rec ord/ Playback/ Net wor k/ Backup
Sensor & Mot ion Det ection
Rec ording Dur at ion: OFF、1~60 Sec.
16Sensor / Alarm(N.O. or N.C.,D-Sub connection
Nor mal : x1
Fast Forwar d: x2 / x4 / x6
Fast Backwar d: x2 / x4 / x6
Frame by Frame : Forwar d/ Rev erse
Time Search/ Event Search/ Man ual Search
TCP/ IP/ RJ45(10M/100M)
)
RS- 485
43 (W) x37 (D) x9.6 (H) cm (standard 2U machine)
Unit Weight (8kg) (NO Hard Discs)
-5 ° C ~ 45 ° C
NTSC PAL
16 CH Input / 1V p-p / 75 Ohm / BNC
4 Input / RCA
16CH Looping Output / BNC, 1 CH Monitor Output/BNC,
1 SPOT Output/BNC, 1 VGA Output (800x600 60Hz)
1 Output / RCA
Full Screen, 3(PIP)4/9/16 Division, Sequential Zoom in the image
720x480 720x576
Video
Video Input
Audio Input
Video Output
Audio Output
Display Mode
Display Resolution
Recording Resolution
Compression Rate
Recording Speed
Compression Algorithm
OS
Triplex
Recording Mode
Schedule Recording
Status Indicator (LED)
Event Mode
Alarm Connect
Playback
Network Protocol
Commu nication Protocol
HDD Type
HDD Management
P/T/Z Control
Archiving
Firmwa re Update
Language
Control Mode
Network Control
Network Function
Power Supply
Unit Dimension
Weight
Amb ient Temperature
NTSCPAL
PBPOWER NET REC BACKUP
PTZ CANCEL
CH CH
123 4 5 6 7 8 69 10
611 12 13 14 15
2
16CH mpeg4 DVR
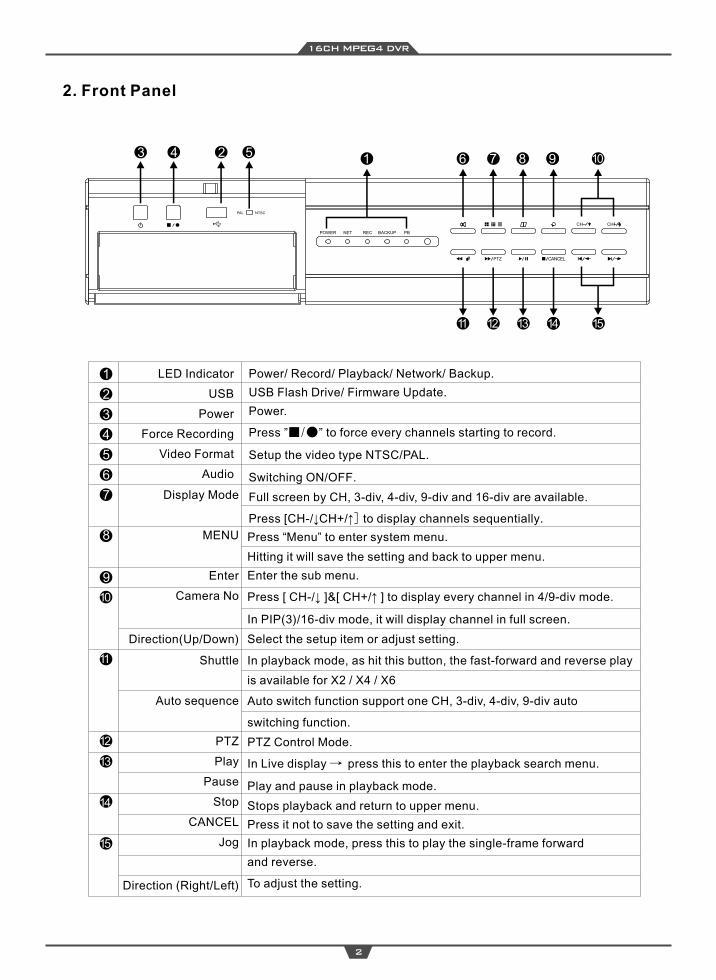
2. Front Panel
1
2
3
4
5
6
7
8
9
10
10
11
12
13
14
15
LED Indicator
USB
Power
Force Recording
Video Format
Audio
Power/ Record/ Playback/ Network/ Backup
USB Flash Drive/ Firmware Update
Power.
Press ”■/●” to force every channels starting to record.
Setup the video type NTSC/PAL.
Switching ON/OFF.
Full screen by CH, 3-div, 4-div, 9-div and 16-div are available.
Press [CH-/↓CH+/↑] to display channels sequentially.
.
.
Press “Menu” to enter system menu.
Hitting it will save the setting and back to upper menu.
Enter the sub menu.
Press [ CH-/↓ ]&[ CH+/↑ ] to display every channel in 4/9-div mode.
In PIP(3)/16-div mode, it will display channel in full screen.
Select the setup item or adjust setting.
In playback mode, as hit this button, the fast-forward and reverse play
is available for X2 / X4 / X6
Auto switch function support one CH, 3-div, 4-div, 9-div auto
switching function.
PTZ Control Mode.
In Live display → press this to enter the playback search menu.
Play and pause in playback mode.
Stops playback and return to upper menu.
Press it not to save the setting and exit.
In playback mode, press this to play the single-frame forward
and reverse.
To adjust the setting.
Display Mode
MENU
Enter
Camera No
Direction(Up/Down)
Shuttle
Auto sequence
PTZ
Play
Pause
Stop
CANCEL
Jog
Direction (Right/Left)
AUDIO
1 2 3 4
IN OUT VGARS-485
D+ D-
ALARMLAN
1 2 3 4 5 6 7 8 9 10 11 12 13 14 15 16
1 2 3 4 5 6 7 8 9 10 11 12 13 14 15 16
VIDEO OUT
SPOTOUT
SATA 1 SATA2
115
230
ALARM 1
25
RS-485
USB Mouse
SATAHDD1
PC MONITOR OUTPUT
SATAHDD2
3
16CH mpeg4 DVR
LOOP OUT
VIDEO IN
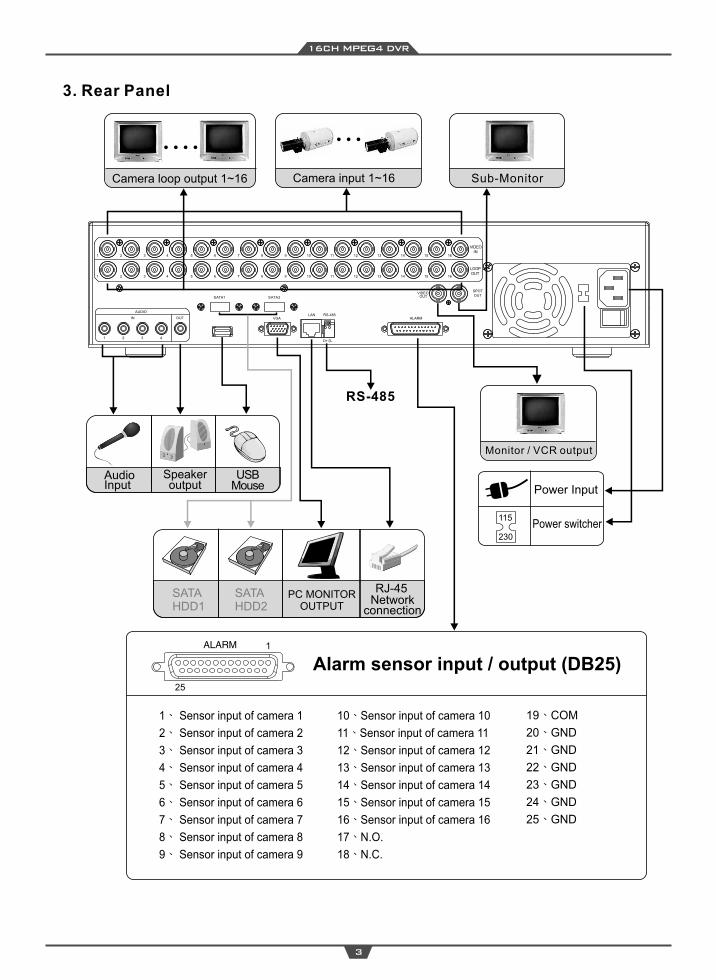
3. Rear Panel
Camera loop output 1~16 Camera input 1~16 Sub-Monitor
RJ-45Network
connection
Audio Input
Speakeroutput Power Input
Power switcher
1、
2、
3、
4、
5、
6、
7、
8、
9、
Sensor input of camera 1
Sensor input of camera 2
Sensor input of camera 3
Sensor input of camera 4
Sensor input of camera 5
Sensor input of camera 6
Sensor input of camera 7
Sensor input of camera 8
Sensor input of camera 9
Alarm sensor input / output (DB25)
10、
11、
12、
13、
14、
15、
16、
17、
18、N.C.
Sensor input of camera 10
Sensor input of camera 11
Sensor input of camera 12
Sensor input of camera 13
Sensor input of camera 14
Sensor input of camera 15
Sensor input of camera 16
N.O.
19、COM
20、GND
21、GND
22、GND
23、GND
24、GND
25、GND
Monitor / VCR output

4
16CH mpeg4 DVR
4. Initialization
➣
Use the power cord provided by the DVR supplier in the package to connect
the power supply (AC100V~AC230V) see Page 1.
➣ Connect BNC of Cameras to BNC of DVR.
Coaxial cable cat6 or above in use.
➣ DVR Network Cabling
Please connect HUB or Router to the LAN port with RJ-45 connector.
This DVR is static IP & DHCP support.
➣ Alarm I/O
Alarm I/O DB25(25PIN) details read Page 3.
Alarm I/O details read Page 18.
➣ Speed Dome Camera
Pelco D, Pelco P & MIKAMI protocol available PTZ setup details read Page 11.
Power Supply

ENTER
POWER REC
CANCEL
Z+
Z-
F+
F-
PTZ
BAKUP
ZOOM
INFO
SEARCH
AUDIO
PIP2X23X34X4
1 2 3 4
5 6 7 8
9 10 11 12
13 14 15 16
AUTO
MENU
➣REC: Post Record
Press “REC” to start record.
Dirction:
Select the setup item or
adjust setting.
ENTER : Enter to sub menu.
5
➣POWER
➣ BACKUP
➣ SEARCH
➣ AUDIO
➣ ZOOM
➣INFO: Display system
information
➣AUTO: Support 1CH, 3-div,
4-div, 9-div auto switching
function.
➣Use ↓/↑/←/→ to setup the direction
➣Use Z+ / Z- to zoom in / out
➣Use F+ / F- to setup the focal length
:Play / Pause playback.
ENTER
MENU : Press it to enter setup
page or save the setting
and exit.
CANCEL: Press it will not to save the
setting and exit.
16CH mpeg4 DVR
5. System Operation
1.Mouse Operation
➣Move the mouse to Menu and click right button will leave.
➣Move the mouse to Menu and click the mouse wheel will open the menu.
➣At【sub-menu】into【Setup】and click left button to setup.
➣Scroll the mouse wheel to setup the rate.
➣Setup PTZ mode please read page 21 for【Display Setup】
2.Remote Control Operation
➣ Mouse & Remote Control
Quick funciton:
:FF & FR
:frame by frame.
:Stop play.
Division: Use ↓/↑/←/→ choose the rest of channel.
to
Playback
PTZ
Channel Setup:
Full screen by choosing the Channel
nunber.
PIP
( )image screen, push the bottom on/offZ- key Auto cruise tour –based on single
Auto cruise: based on single imagescreen, push the button on/off
SETUP >
PLAYBACK >
DISPLAY >
ZOOM >
ROTATION
PTZ
FORCE REC.
AUDIO
REBOOT
2 0 0 7 / 1 0 / 0 3 1 9 : 3 6 : 2 5
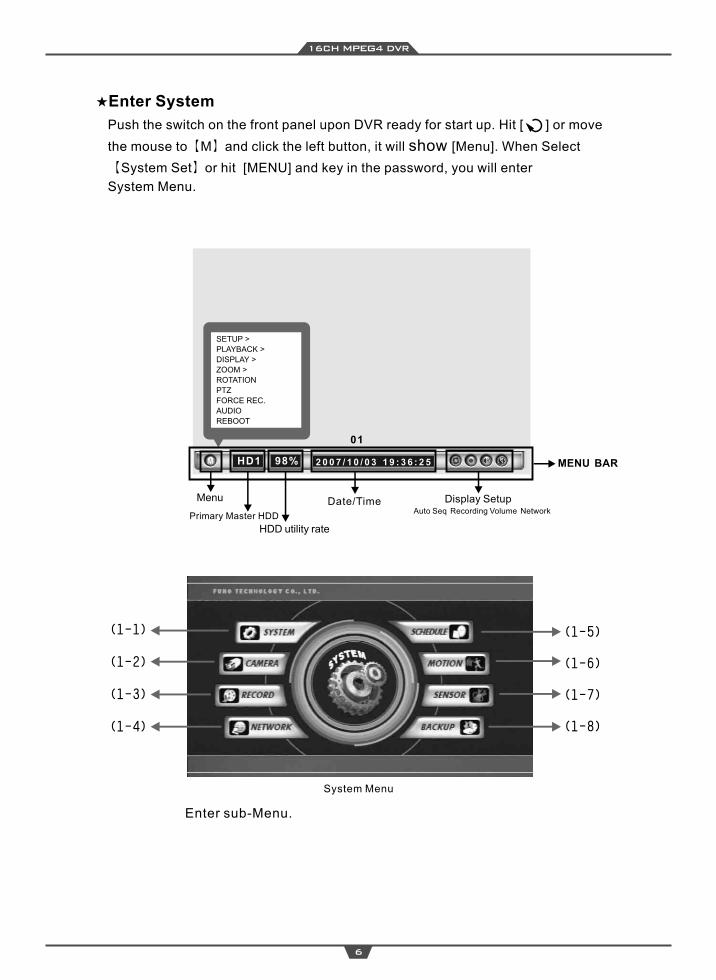
★Enter System
HDD utility rate
6
16CH mpeg4 DVR
MENU BAR
(1-1)
(1-2)
(1-3)
(1-4)
(1-5)
(1-6)
(1-7)
(1-8)
01
M
Date/Time Display SetupAuto Seq Recording Volume Network
System Menu
Enter sub-Menu.
Push the switch on the front panel upon DVR ready for start up. Hit [ ] or move
the mouse to【M】and click the left button, it will show [Menu]. When Select
【System Set】or hit [MENU] and key in the password, you will enter
System Menu.
Menu
98%HD1
Primary Master HDD
NTSC
ENGLISHON
SETTIME SETUPSYSTEM PASSWORDSYSTEM INFOVIDEO FORMATLOG VIEWBUZZER SOUNDDISK FORMATFIRMWARE UPGRADEFACTORY RESETNOISE FILTERLANGUAGESUB MONITOR
7
16CH mpeg4 DVR
CANCEL
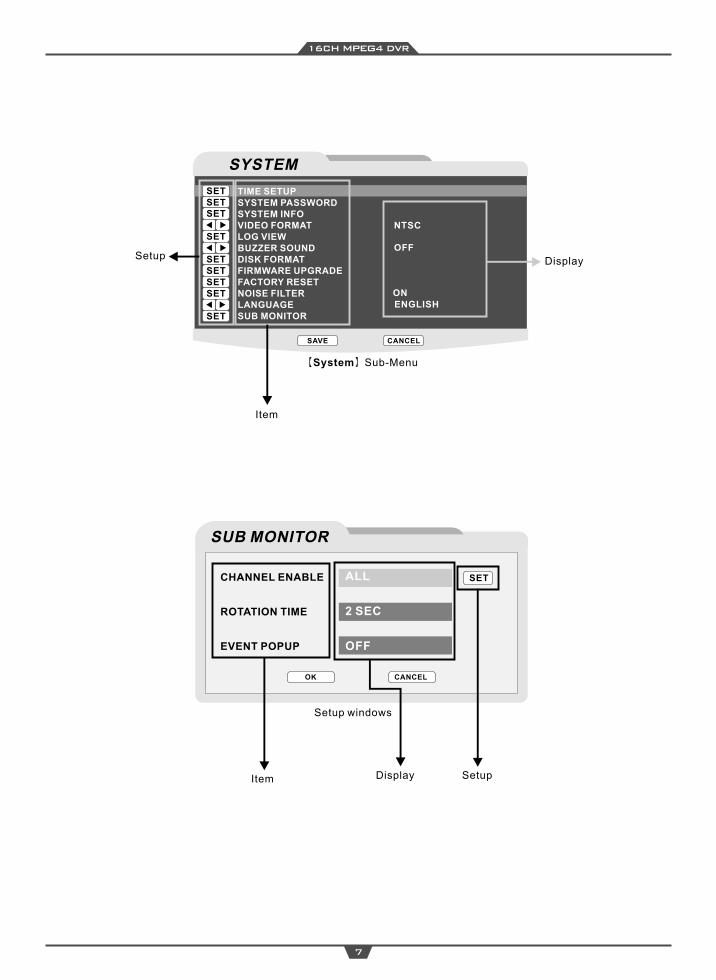
SYSTEM
ALL
2 SEC
OFF
Setup
Item
Display
【System】Sub-Menu
Item Display Setup
Setup windows
SET
SET
SET
SETSETSETSET
SET
SAVE
SET
SUB MONITOR
CHANNEL ENABLE
ROTATION TIME
EVENT POPUP
CANCELOK
OFF

(1-1-1)(1-1-2)(1-1-3)(1-1-4)(1-1-5)(1-1-6)(1-1-7)(1-1-8)(1-1-9)
(1-1-10)(1-1-11)(1-1-12)
8
16CH mpeg4 DVR
6.System
Press [Menu] to enter System Menu, select【system setup(1-1)】to setup.
1.Enter【Time Setup(1-1-1)】,Hit [ ] buttons
to select the option,hit [ ] to change setting.
If time is adjusted ahead, the system will show the
message ”loss the recording data” .
2.Different format as follows:ASIA(yyyy/mm/dd)、
EURO(dd/mm/yyyy)、US(mm/dd/yyyy)。
3.Hit [ MENU ] button is ”exit” or hit [ CANCEL ] button
to exit in condition of setting an option and back to
upper menu.
➣ Time Setup
➣ System Password
CANCELSAVE
SYSTEM
TIME
FORMAT
CANCELOK
TIME SETUP
2 0 0 7 / 11 / 2 3 1 0 : 3 3 : 3 0
A S I A
PASSWORD
CONFIRM
CANCELOK
SYSTEM PASSWORD
。。。。
。。。。
SET
SET
1.Enter【System Password(1-1-2)】,select it
and input password, new password to confirm the change.
2.Use[ ]to setup.
3.Hit [ ] into keyboard to input the password,
”Password” & ”Confirm”.
4.It will ask the password when the auto lock was
marked;when leave the MANU will show up the
question. Select “Yes” will need to key the
password next time, otherwise select “No”.
5.Hit [ MENU ] button is ”exit” or hit [ CANCEL ]
button to exit in condition of setting an option
and back to upper menu.
DO YOU ENABLE PASSWORD
PROTECTION
NOYES
WARNING
AUTO LOCK
NTSC
ENGLISHON
SETTIME SETUPSYSTEM PASSWORDSYSTEM INFOVIDEO FORMATLOG VIEWBUZZER SOUNDDISK FORMATFIRMWARE UPGRADEFACTORY RESETNOISE FILTERLANGUAGESUB MONITOR
SET
SET
SET
SETSETSETSET
SET
OFF

9
16CH mpeg4 DVR
➣ Firmware Upgrade
➣ System Information
➣ Video Format
➣ Log View
1.Select【Video Format(1-1-4)】,Use [ to change NTSC/PAL.
2.It will become effective to move the mouse to [Enter] or [MENU] in【System (1-1)】.
]
1.Enter【LOG View(1-1-5)】,use [ ] & [ ] to surf the information
2.Hit[ MENU ] button is ”exit” or hit [ CANCEL ] button to exit in condition of setting an option
and back to upper menu.
.
➣ HDD Format Set
Select【Disk Format (1-1-7)】. Hit [ ] will show
up a question. Select ”Yes” to clear all data,
otherwise select “No”.
※ It is impossible to undo HDD format.
FIRMWARE VER.
PRO. MASTER
SLAVE
SEC. MASTER
SALVE
HDD OVERWRITE
CANCELOK
SYSTEM INFO
1.0.8
NONE
CD-RW
15(133)GB
NONE
ON
ALL DATA WILL BE REMOVE.
CONTINUE?
NOYES
WARNING
FIRMWARE UPGRADE MAY MA-
KE THE SYSTEM FATAL ERR-
OR. CONTINUE?
NOYES
WARNING
(Please install the HDD, than use memory stick to upgrade the firmware)Put the update firmware in a memory stick, put the memory stick in the USB port and accordingly
enter【System Setup(1-1)】, select【Firmware
Upgrade(1-1-8)】then hit [ ]. Select “Yes” to start
update. “No” to stop proceeding.
※ Please do not remove memory stick while firmware updated. DVR must reboot after firmware update.
USB port is the only way for firmware update.
1.Enter【System Information(1-1-3)】, to display
the firmware and HDD free capacity.
2.Use [ ] to setup the HDD will rewrite the data or not.
3.Hit[ MENU ] button is ”exit” or hit [ CANCEL ] button to exit in condition of setting an option and back to
upper menu.
➣ System Info1.Enter [Log View (1-1-3)] – shows firmware version and free space in hard drives
2.Press [← → to setup overwrite ON/OFF.
3.Press [MENU] to save and exit to the upper menu Press [ CANCEL] to exit without saving changes and return to the upper menu
]
.
BUZZER ON/OFF buzzer. When turning off the system, the warning buzzer of
Video Loss will be turned off automatically. Both warning buzzer of Motion (1-6-6) and
Sensor (1-7-4) remain on ON position.
[ (1-1-6)]➣ BUZZER

16CH mpeg4 DVR
➣ Language
Select【Language(1-1-11)】use[ ]to change language.
➣ SUB Monitor
10
S Y S T E M S E T U P W I L L I N I T I -
A L I Z E . C O N T I N U E ?
NOYES
WARNING
CANCELOK
NOISE FILTER
0 2 4 6 8 10 12 14 16 18 20 22 24■■■■■□□□□□□□□□□□■■■■■■■■
CHANNEL ENABLE
ROTATION TIME
EVENT POPUP
CANCELOK
SUB MONITOR
ALL
2 SEC
OFF
SET
➣ Factory Reset
Select【Factory Reset(1-1-9)】hit[ ]shows up a question. Select ”Yes” to run factory reset, otherwise select “No”. ※Details please read【Default Setting】
➣ Noise Filter
1.Select【Sub-Monitor(1-1-12)】,hit [ ] to
setup channel enable/rotation time/event
popup.
2.Channel: Use[ ]to setup.
●Use[ ]to choose camera channel.
●Use[ ]to setup recording.
3.Seq Time: To setup channel auto sequence, 02 second is the default setting.
4.Time of Alarm Seq : Setup the display time of each
CH when you press “Time of Alarm Seq(1-2-7)”.
1.Select【Noise Filter(1-1-10)】and hit[ ]to set up.
2.Mode set(use numeric key[1/2/3/4]on the remote control):
[1]—All Cancel
[2]—ON
[3]—Move
[4]—Cancel
3.Use [ ] to setup.
4.Hit [ MENU ]to save and back to upper menu.
5.This function is more obvious in dark area,
usually use at night.
16CH mpeg4 DVR
(1-2-1)(1-2-2)(1-2-3)(1-2-4)(1-2-5)(1-2-6)(1-2-7)(1-2-8)(1-2-9)(1-2-10)(1-2-11)(1-2-12)
➣ Color
➣ Title
11
1
01
OFF
OFF
0
9600
5
3 SEC
OFF
2 SEC
SETSET
CHANNELCOLORTITLEPTZ TYPEPTZ PROTOCOLPTZ ADDRESSPTZ BUAD RATEPTZ/TILE SPEEDPTZ PRESETPTZ TOUR TIMEEVENT POPUPMAIN ROT. TIME
CANCELSAVE
CAMERA
CONTRAST
BRIGHTNESS
HUE
SATURATION
SHARPNESS
CANCELOK
COLOR
5.0
5.0
5.0
5.0
ON
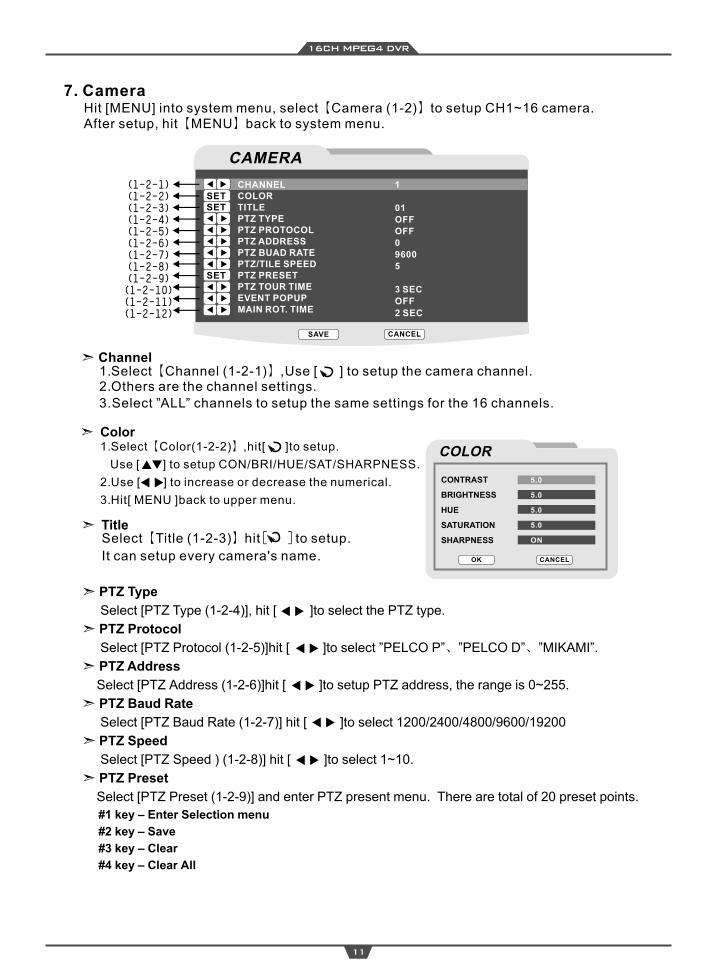
7. CameraHit [MENU] into system menu, select【Camera (1-2)】to setup CH1~16 camera.After setup, hit【MENU】back to system menu.
➣ Channel1.Select【Channel (1-2-1)】,Use [ ] to setup the camera channel.2.Others are the channel settings.
3.Select ”ALL” channels to setup the same settings for the 16 channels.
1.Select【Color(1-2-2)】,hit[ ]to setup.
Use [ ] to setup CON/BRI/HUE/SAT/SHARPNESS.
2.Use [ ] to increase or decrease the numerical.
3.Hit[ MENU ]back to upper menu.
Select【Title (1-2-3)】hit[ ] to setup.
It can setup every camera's name.
SET
➣ PTZ Type
Select [PTZ Type (1-2-4)], hit [ ]to select the PTZ type .
➣ PTZ Protocol
Select [PTZ Protocol (1-2-5)]hit [ ]to select PELCO P 、 PELCO D 、 MIKAMI ” ” ” ” ” ”.
➣ PTZ Address
Select [PTZ Address (1-2-6)]hit [ ]to setup PTZ address, the range is 0~255 .
➣ PTZ Baud Rate
Select [PTZ Baud Rate (1-2-7)] hit [ ]to select 1200/2400/4800/9600/19200
➣ PTZ Speed
Select [PTZ Speed (1-2-8)] hit [ ]to select 1~10. )
➣ PTZ Preset
Select [PTZ Preset (1-2-9)] and enter PTZ present menu. There are total of 20 preset points.
#1 key – Enter Selection menu
#2 key – Save
#3 key – Clear
#4 key – Clear All

16CH mpeg4 DVR
(1-3-1)(1-3-2)(1-3-3)(1-3-4)(1-3-5)(1-3-6)(1-3-7)(1-3-8)
12
1
NORMAL
OFF
8 / 120 FPS
HIGH
ALWAYS
OFF
SCHEDULE 1
SET
CHANNELRESOLUTIONPRE RECORDFPSQUALITYRECORD MODEAUDIOSCHEDULE
RECORD
CANCELSAVE
8. RecordHit [ MENU ] into System Menu,select【Record (1-3)】to setup the camera 1~16.
After setup, hit【MENU】to save and back to system menu.
1.Select【Event Popup (1-2-11)】hit to select duration of the sequence.
2.The range is 1~60 sec or shut.
[ ]
1.Select【Main Rot. Time 】hit to setup the interval of AutoSeq Time.
2.The range is 1~10sec or shut.
(1-2-12) [ ]
Press number 1 key on the remote control and use [↓↑] buttons or mouse to select the
preset point between 1 and 20 Follow by that use [↓↑←→ ]buttons to set the position of PTZ. . ,
Press number 2 key to save the setting. Press [MENU] to save ALL setting and return to the
upper menu. If [PTZ Tour Time (1-2-10)] is on the DVR will automatically start PTZ Tour ,
Time capability
➣ Event Popup
➣ Main Rot. Time
➣ PTZ Tour Time
Select [PTZ Tour Time (1-2-10)], use [←→ ] buttons to set the tour time between 5 and 60 seconds.
[ PTZ Preset (1-2-9) ] must set correctly.
F+
F-
Z+
Z-
PRESET
PRESET 1
SAVE CLEAR CLEAR ALL
OK CANCEL
16CH mpeg4 DVR
13
➣ Quality
1.Select【Quality (1-3-5)】use to setup the recording quality.
2.REC Quality is available AVERAGE/STANDARD/HIGH/HIGHEST.
[ ]
➣ Record Mode
1.Select【REC Mode 】use to setup the recording mode.
2.REC Mode is available ALWAYS MOTION SENSOR SCHEDULE OFF
(1-3-6) [ ]
/ / / / .
➣ Audio
1.Select【Audio Select 】use to select which channel's volume.
2.The range is 1~4 or shut.
(1-3-7) [ ]
➣ Schedule
Select【Schedule (1-3-8)】use to setup the schedule.[ ]
CH1
CH5
CH9
CH13
CANCELOK
FRAME RATE
8
8
8
8
CH2
CH6
CH10
CH14
7
7
7
7
CH3
CH7
CH11
CH15
8
8
8
8
CH4
CH8
CH12
CH16
7
7
7
7
AUTO GROUP TOTAL: 120 / 120
➣ Resolution
1.Select【Resolution(1-3-2)】and use [ ] to setup the recording resolution.
2.Select “ALL” in【Channel(1-3-1)】and must select “ALL” channels to setup.
3.This is available Highest / High / Normal
➣ Pre RecordSelect【Pre Record (1-3-3)】use [ ] to setup ON/OFF.
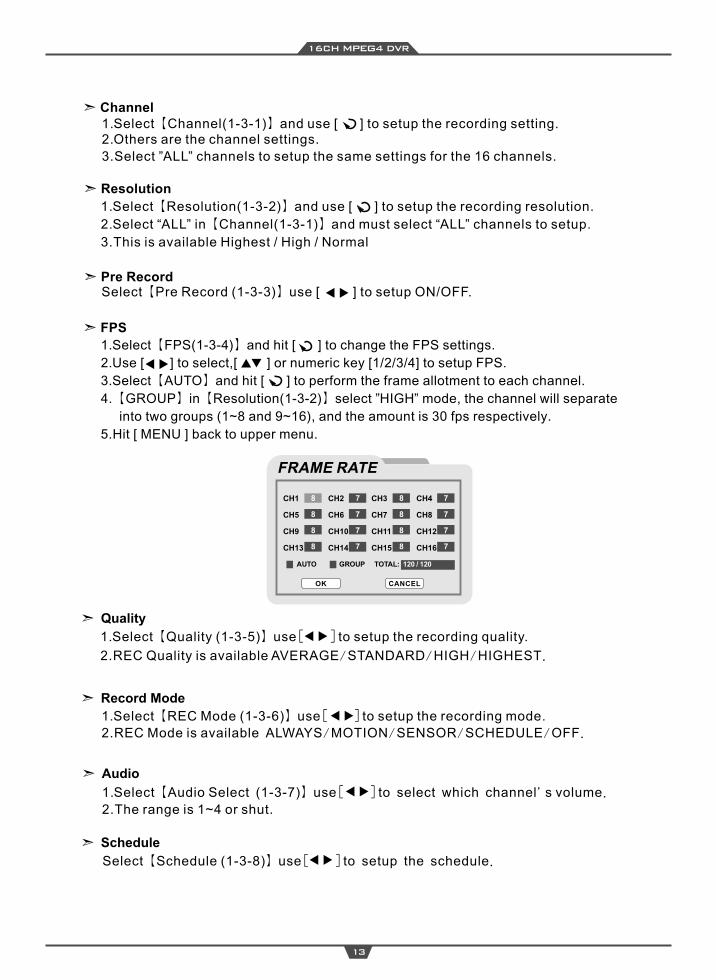
➣ FPS
1.Select【FPS(1-3-4)】and hit [ ] to change the FPS settings.
2.Use [ ] to select,[ ] or numeric key [1/2/3/4] to setup FPS.
3.Select【AUTO】and hit [ ] to perform the frame allotment to each channel.
4.【GROUP】in【Resolution(1-3-2)】select ”HIGH” mode, the channel will separate
into two groups (1~8 and 9~16), and the amount is 30 fps respectively.
5.Hit [ MENU ] back to upper menu.
➣ Channel1.Select【Channel(1-3-1)】and use [ ] to setup the recording setting.2.Others are the channel settings.
3.Select ”ALL” channels to setup the same settings for the 16 channels.

16CH mpeg4 DVR
(1-4-1)(1-4-2)(1-4-3)(1-4-4)(1-4-5)(1-4-6)(1-4-7)
➣ DDNS
14
IP MODEPORTIPNETMASKGATEWAYNAME SERVERDDNS
STATIC3100192.168.66.171255.255.255.0192.168.66.254168.95.1.1
CANCELSAVE
NETWORK
SETSETSETSETSET
SERVER
HOST NAME
USER NAME
PASSWORD
xDSL-ROTUER
CANCELOK
DDNS
OFF
OFF
SET
SET
SET
9. NetworkRemote user can download user manual and NetViewer through IE browser. Also can remote access to DVR via NetViewer.Hit [MENU]into system menu,select【Network (1-4)】to setup the network.After setup, hit【MENU】to save and back to system menu
➣ IP Mode
1.Select【IP Mode (1-4-1)】use to setup the IP mode.
2.This mode is available for『STATIC』、『DHCP』、『Shut』
[ ]
➣ Port
1.Select【Port(1-4-2)】use to setup the network port.
2.The NETVIEWER connect this DVR via the net port.
[ ]
➣ IP1.Select【IP (1-4-3)】hit [ ] to setup the IP address.
Use【 】to choose the number or symbol, and hit [ ] to setup.
➣ Net Mask1.Select【NetMask (1-4-4)】hit [ ] to setup the netmask.
Use【 】to choose the number or symbol, and hit [ ] to setup.
➣ Gateway
1.Select【Gateway (1-4-5)】hit [ ] to setup the default gateway.
Use【 】to choose the number or symbol, and hit [ ] to setup.
➣ Name Server1.Select【Name Server (1-4-6)】hit [ ] to setup the sever.
Use【 】to choose the number or symbol, and hit [ ]to setup.
1.Select【DDNS 】hit to setup DDNS.
2.Use[ ] to select DYNDNS server or shut.
3.When Select DYNDNS sever, use[ ] to
setup the HOST NAME/ ID/Password/
xDSL-ROUTER.
4.Hit [MENU] back to upper menu.
(1-4-7) [ ]

16CH mpeg4 DVR
(1-5-1) (1-5-2) (1-5-3) (1-5-4)
➣ Schedule Setup
15
0 2 4 6 8 10 12 14 16 18 20 22 24
SCHEDULE
MON
TUE
WED
THD
FRI
SAT
SUN
SCHEDULE 1
ALWAYS MOTION SENSOR CANCEL
CANCELOK
10.Schedule
Hit[MENU] into System Menu, select【Schedule (1-5)】to setup weekly schedule
recording.
1.Enter【Schedule (1-5)】use [ ] and [ ] or use remote control to move
and use [menu]to setup the schedule.
2.This DVR is available in recording modes of recording/motion recording/sensor
recording/not recording.
3.Use remote control's [BLUE●](1-5-1)、[RED●](1-5-2)、[YELLOW●](1-5-3)、
[GREEN●](1-5-4) correspond to【Always recording】、【Motion recording】、
【Sensor recording】、【Cancel recording】.
4.Use [ ] moving to up-date(Monday)and hit [ ] again, use [ ]to
select one of schedule.
5.Hit [MENU] will show the question.
Select ”Yes” to save and exit, otherwise select “No”.
SAVE THE CHANGED?
NOYES
WARNING

(1-6-1)(1-6-2)(1-6-3)(1-6-4)(1-6-5)(1-6-6)(1-6-7)
16
1OFF
5 SEC1 SEC1 SEC
SETSET
MOTION
CANCELSAVE
CAMERA CHANNELMOTION ENABLESENSITIVITYMOTION AREAPOST RECORD TIMEBUZZER TIMEALARM TIME
SENSITIVITY
SPATIAL
BLACK LEVEL
WHITE LEVEL
CANCELOK
SENSITIVITY
LEVEL 4
LEVEL 4
LEVEL 4
LEVEL 4
16CH mpeg4 DVR
11.Motion Hit[MENU]enter System Menu, select【Motion(1-6)】to setup CH1~16.
After setup, hit【MENU】to save and back to system menu.
➣ Camera Channel
1.Select【Channel(1-6-1)】and use to setup.
2.Select ”ALL” to setup the same of numerical with all of CH.
[ ]
➣ Motion EnableSelect【Motion Enable(1-6-2)】and use to setup.[ ]
➣ Sensitivity
1.Select【Sensitivity(1-6-3)】to hit to setup.
2.Use[ ]to setup SENSITIVITY / SPATIAL / BLACK LEVEL / WHITE LEVEL.
3.Use[ ]to setup the level 1~8, LEVEL 4 is the default setting.
* SENSITIVITY:The higher rate means the more sensitivity.
*SPATIAL:The rate high means more grid will be detonated.
*BLACK LEVEL & WHITE LEVEL:Become black or white as effective detonate.
4.Hit [MENU] back to upper menu.
[ ]
16CH mpeg4 DVR
17
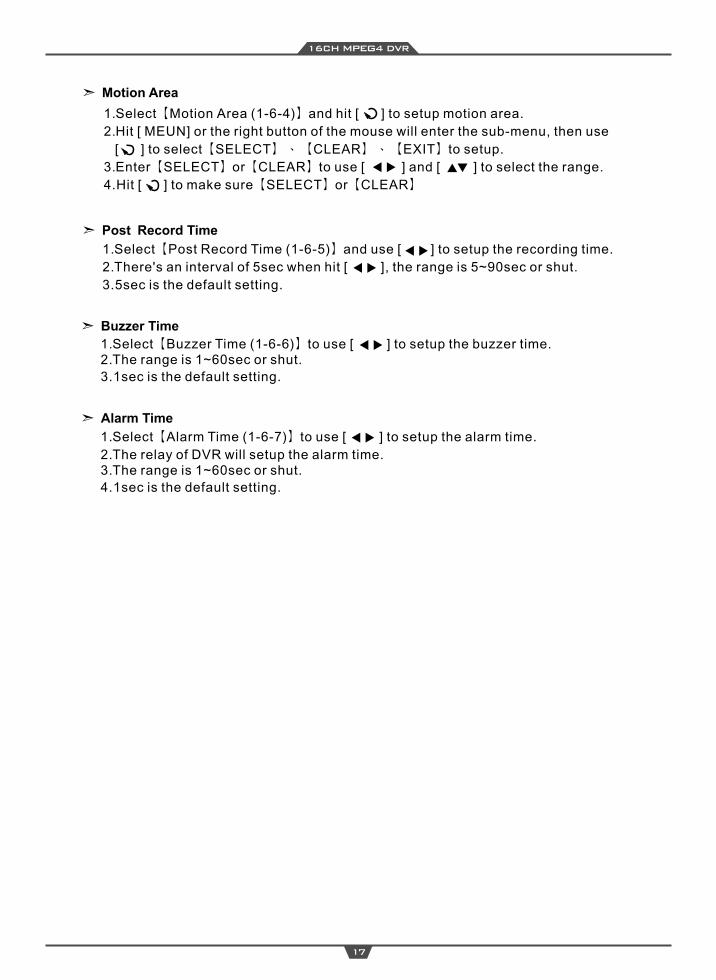
➣ Motion Area
1.Select【Motion Area (1-6-4)】and hit [ ] to setup motion area.
2.Hit [ MEUN] or the right button of the mouse will enter the sub-menu, then use
[ ] to select【SELECT】、【CLEAR】、【EXIT】to setup.
3.Enter【SELECT】or【CLEAR】to use [ ] and [ ] to select the range.
4.Hit [ ] to make sure【SELECT】or【CLEAR】
➣ Post Record Time
1.Select【Post Record Time (1-6-5)】and use [ ] to setup the recording time.
2.There's an interval of 5sec when hit [ ], the range is 5~90sec or shut.
3.5sec is the default setting.
➣ Buzzer Time
1.Select【Buzzer Time (1-6-6)】to use [ ] to setup the buzzer time.2.The range is 1~60sec or shut.
3.1sec is the default setting.
➣ Alarm Time
1.Select【Alarm Time (1-6-7)】to use [ ] to setup the alarm time.
2.The relay of DVR will setup the alarm time.3.The range is 1~60sec or shut.
4.1sec is the default setting.
16CH mpeg4 DVR
(1-7-1)
(1-7-2)
(1-7-3)
(1-7-4)
(1-7-5)
➣ Sensor Channel
18
1
NORMAL OPEN
5 SEC
1 SEC
1 SEC
SENSOR CHANNELSENSOR TYPEPOST RECORD TIMEBUZZER TIMEALARM TIME
SENSOR
CANCELSAVE
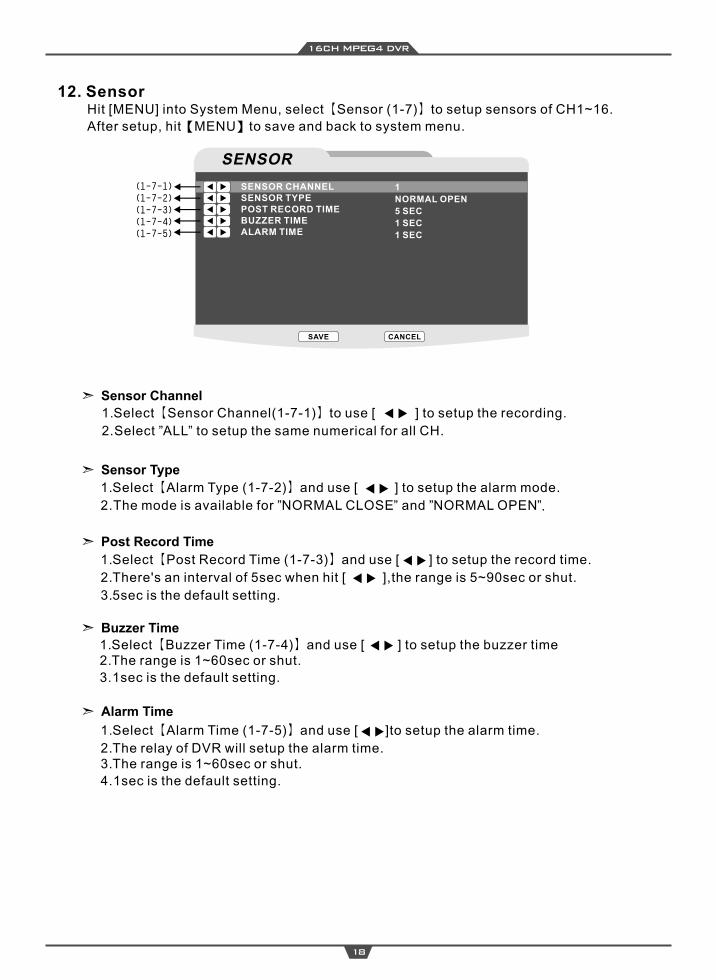
12. SensorHit [MENU] into System Menu, select【Sensor (1-7)】to setup sensors of CH1~16.
After setup, hit【MENU】to save and back to system menu.
1.Select【Sensor Channel(1-7-1)】to use [ ] to setup the recording.
2.Select ”ALL” to setup the same numerical for all CH.
➣ Sensor Type
➣ Post Record Time
➣ Buzzer Time
➣ Alarm Time
1.Select【Alarm Type (1-7-2)】and use [ ] to setup the alarm mode.
2.The mode is available for ”NORMAL CLOSE” and ”NORMAL OPEN”.
1.Select【Post Record Time (1-7-3)】and use [ ] to setup the record time.
2.There's an interval of 5sec when hit [ ],the range is 5~90sec or shut.
3.5sec is the default setting.
1.Select【Buzzer Time (1-7-4)】and use [ ] to setup the buzzer time2.The range is 1~60sec or shut.
3.1sec is the default setting.
1.Select【Alarm Time (1-7-5)】and use [ ]to setup the alarm time.
2.The relay of DVR will setup the alarm time.3.The range is 1~60sec or shut.
4.1sec is the default setting.

16CH mpeg4 DVR
(1-8-1)
(1-8-2)
(1-8-3)
(1-8-4)
(1-8-5)
(1-8-6)
19
AVI
BACKUP
CANCELOK
DISK
DEVICE
CHANNEL
START
END
TOTAL:
SET
SET
13. Backup
Hit[MENU] into System Menu, select【Backup 】to setup.
This DVR is available in backup of USB backup and CD-R/CD-RW backup.
(1-8)
[ ] & [ ]
[MENU] to backup.
[CANCEL] to leave.
to setup.
➣ Device
1.It is unavailable without the CD and the USB memory stick.
2.Use[ ] to setup when enter.
3.Select【Device(1-8-2)】and use[ ] to setup backup
➣ Channel
1.Select【Channel 】and use to setup the channel.
2.Use[ ] to setup the Channel and use[ ] to setup backup or not.
3.Hit[MENU] to save.
(1-8-3) [ ]
➣ End & Start Time
1.Select【Start 】or【End 】, use to setup
year/month/day/hour/minute.
2.Also can hit[ ] to setup the date.
3.Hit[MENU] to save and back to upper menu.
(1-8-4) (1-8-5) [ ]
➣ AVI
1.Select【AVI 】 to save in AVI.2.If not select this function, the system will save in binary file, and the backup data must play via NetViewer.3.This function will take up a lot of space and slower than binary file.*Caution: Please download xvid codec from http://www.xvid.org/Downloads.15.0.html. Please use the Media Play to playback.
(1-8-6)
9
WILL STOP RECORDING CONTINUE?
NOYES
WARNING※
“WILL STOP RECORDING, CONTINUE?” will appear in
the screen. Click YES to continue to backup and stop
recording simultaneously.
Click NO to return to BACKUP menu.
Caution: When backup is in progress, a warning sign,
HDD-D1
USB
ALL CHANNEL
2008 / 09 / 01 19:19
2008 / 090 / 03 19:37
72,988MB
SET
16CH mpeg4 DVR
(2-2)
(2-3)
(2-4)
(2-1)
➣ Date Record【(2-1)】
20
2 0 0 7 / 1 0
日 一 二 三 四 五 六
1 2 3 4 5 6 7 8 9 1 0 1 1 1 2 1 31 4 1 5 1 6 1 7 1 8 1 9 2 02 1 2 2 2 3 2 4 2 5 2 6 2 72 8 2 9 3 0 3 1
(2-1)
SEARCH
CANCEL
TIMERECORD
EVENTRECORD
FORCERECORD
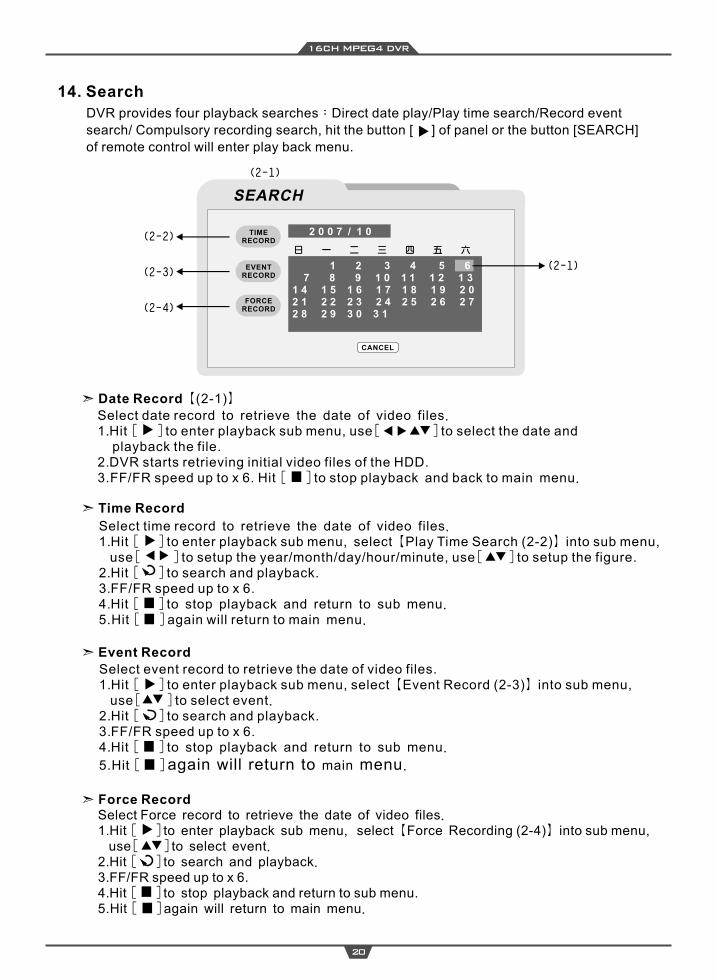
14. Search
DVR provides four playback searches:Direct date play/Play time search/Record event
search/ Compulsory recording search, hit the button [ ] of panel or the button [SEARCH]
of remote control will enter play back menu.
Select date record to retrieve the date of video files.1.Hit [ ] to enter playback sub menu, use to select the date and playback the file.2.DVR starts retrieving initial video files of the HDD.3.FF/FR speed up to x 6. Hit [ ] to stop playback and back to main menu.
[ ]
➣ Time Record
Select time record to retrieve the date of video files.1.Hit to enter playback sub menu, select【Play Time Search (2-2)】into sub menu, use[ ] to setup the year/month/day/hour/minute, use[ ] to setup the figure.2.Hit [ ] to search and playback.3.FF/FR speed up to x 6.4.Hit [ ] to stop playback and return to sub menu.5.Hit [ ]again will return to main menu.
[ ]
➣ Event Record
Select event record to retrieve the date of video files.1.Hit [ ] to enter playback sub menu, select Event Record (2-3) into sub menu, use[ ] to select event.2.Hit [ ] to search and playback.3.FF/FR speed up to x 6.4.Hit [ ] to stop playback and return to sub menu.
5.Hit [ ]again will return to main menu.
【 】
➣ Force Record Select Force record to retrieve the date of video files.1.Hit [ ]to enter playback sub menu, select Force Recording (2-4) into sub menu, use[ ]to select event. 2.Hit [ ]to search and playback.3.FF/FR speed up to x 6.4.Hit [ ]to stop playback and return to sub menu.5.Hit [ ]again will return to main menu.
【 】

16CH mpeg4 DVR
21
15. Display
DVR provides four playback features:Live Play/Zoom/Auto Sequence/PTZ.
➣ Live Play
1.
2. Hit [Display Mode] to display by 16/9/4/3/1.
3.To display the channel in 4/9-div, and display full screen in PIP(3)/16-div with [Channel].
「full screen」、「4-div」、「9-div」、「16-div」、「PIP」
➣ Zoom
1.
2.Hit「Zoom」from[Menu], click the left button of the mouse and drag a rectangle
range.
3.Release the button will zoom in.
4.When click the right button of the mouse, it will exit the zoom mode.
Choose one of camera in full screen when select this function.
➣ Auto Sequence
1.
2.Hit the button [AutoSeq] again will stop.
Full screen by「CH」、「4-div」、「9-div」、「PIP」are available in live display mode.
➣ PTZ
To setup【PTZ Protocol(1-2-4)】and【PTZ Address(1-2-5)】in【 Camera Setup 】.
1.Select a full screen of PTZ in live display.
2.Enter PTZ mode, the screen will show 4 button「ZOOM IN」「ZOOM OUT」
「FOCUS IN」「FOCUS OUT」, and the functions are the same with
[Display Mode][PTZ][Volume][AutoSeq] of the front panel.
3.Use the left/right buttons and roller of mouse to control PTZ.
4.The button [CANCEL]to exit PTZ mode.
5. Read【Remote Control Operation】。
16CH mpeg4 DVR
➣ Force Recording
➣ Sound Effects
➣ Rebooting
22
16. Other Function
1. The channel use schedule recording mode and not record. The channel use motion recording mode and not record. The channel use sensor recording mode and not record. The channel stop to record.2. Use this function will record the daily of system at the same time.
「Force Recording 」as follows.
Open the volume of full screen in live display mode.
Read for【Volume Channel(1-3-7)】in【 Record Setup 】
When download the software must reboot the system.
16CH mpeg4 DVR
➣Introduction
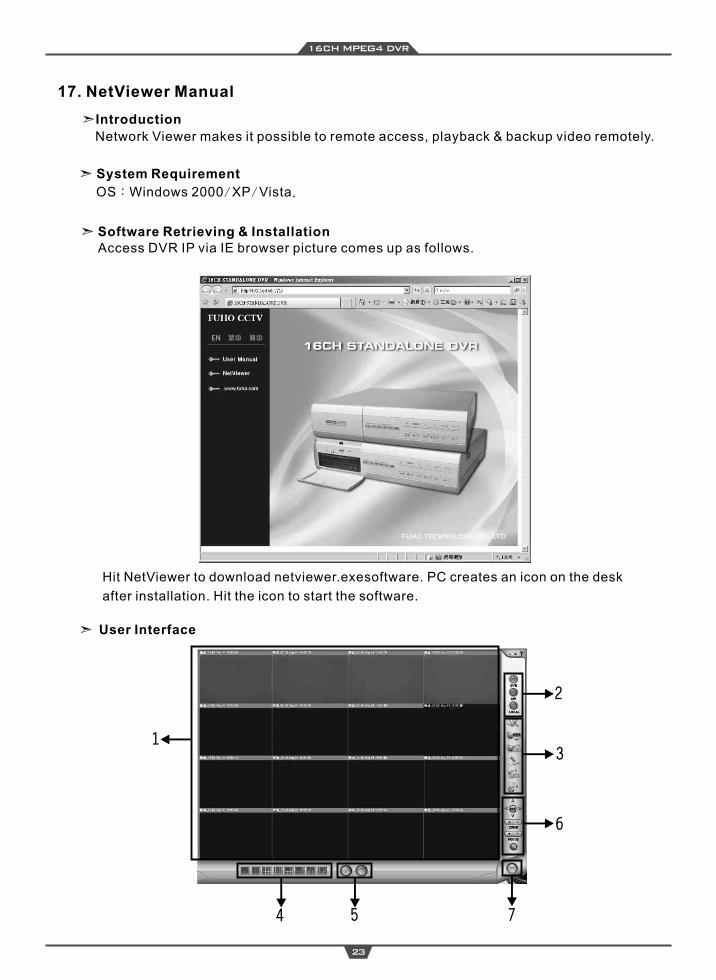
➣ User Interface
1
2
3
4 5
6
23
17. NetViewer Manual
Network Viewer makes it possible to remote access, playback & backup video remotely.
➣ System Requirement
OS:Windows 2000/XP/Vista.
➣ Software Retrieving & InstallationAccess DVR IP via IE browser picture comes up as follows.
Hit NetViewer to download netviewer.exesoftware. PC creates an icon on the desk
after installation. Hit the icon to start the software.
7
16CH mpeg4 DVR
24
: it lights up when recording.
: it lights up while AVI backup.
: it lights up when saving video to PC
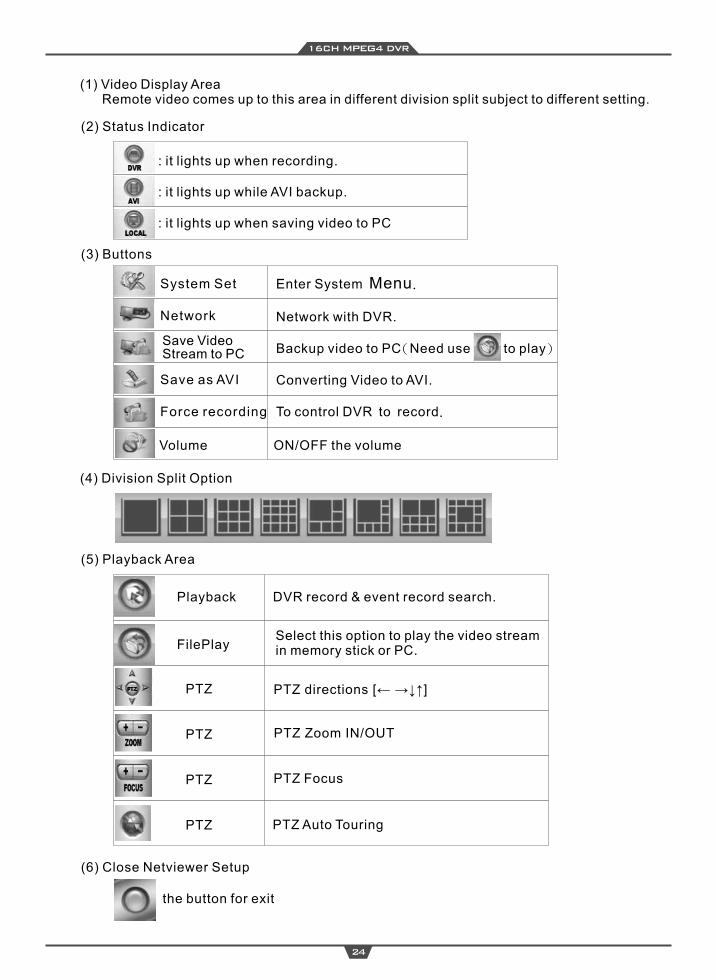
(1) Video Display Area Remote video comes up to this area in different division split subject to different setting.
(2) Status Indicator
(3) Buttons
System Set
Network
Save as AVI
Force recording
Save Video Stream to PC
Enter System Menu.
Network with DVR.
Backup video to PC(Need use to play)
Converting Video to AVI.
To control DVR to record.
(4) Division Split Option
(5) Playback Area
(6) Close Netviewer Setup
the button for exit
Playback
FilePlay
DVR record & event record search.
Select this option to play the video stream in memory stick or PC.
Volume ON/OFF the volume
PTZ
PTZ
PTZ
PTZ
PTZ directions [← →↓↑]
PTZ Zoom IN/OUT
PTZ Focus
PTZ Auto Touring

16CH mpeg4 DVR
25
➣ Network Setup
Hit to enter Netviewer Setup
▲
→Setup 「IP Addr」first and select 「AV Port」and hit connect to start connecting.
※ Attention:DVR port is 3100
▲Common:
→「Network Mode」as follows:Local/LAN/WAN
→「Max Channel」to setup the maximum of the channel.
→「Local rec Path」this makes saving video to PC HDD in the directory.
▲Language:
→「Language」option
▲Video:
→Can setup video size of the AVI files, video format & frame per second.
※ Attention:「Video Size」setting makes AVI images full size of field size.
30 frames per second is the maximum speed.
▲AVI Codec:
→Select Codec for the converted AVI files.
Network:
16CH mpeg4 DVR
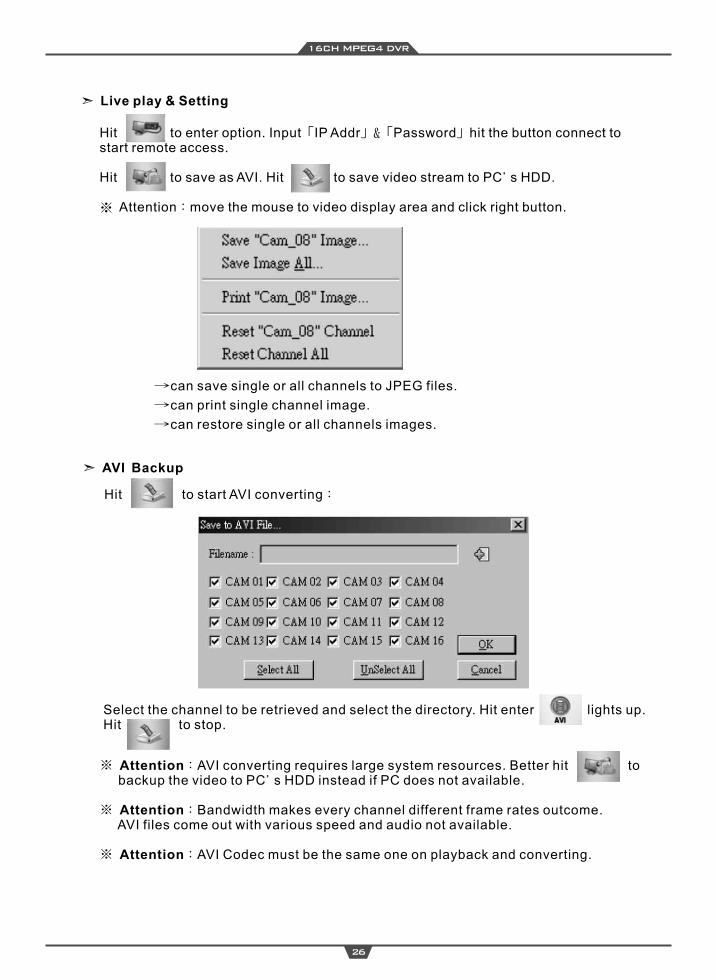
➣ Live play & Setting
➣ AVI Backup
26
Hit to enter option. Input「IP Addr」&「Password」hit the button connect to start remote access.
Hit to save as AVI. Hit to save video stream to PC's HDD.
※ Attention:move the mouse to video display area and click right button.
→can save single or all channels to JPEG files.
→can print single channel image.
→can restore single or all channels images.
Hit to start AVI converting:
Select the channel to be retrieved and select the directory. Hit enter lights up. Hit to stop.
※ Attention:AVI converting requires large system resources. Better hit to backup the video to PC's HDD instead if PC does not available.
※ Attention:Bandwidth makes every channel different frame rates outcome. AVI files come out with various speed and audio not available.
※ Attention:AVI Codec must be the same one on playback and converting.
16CH mpeg4 DVR
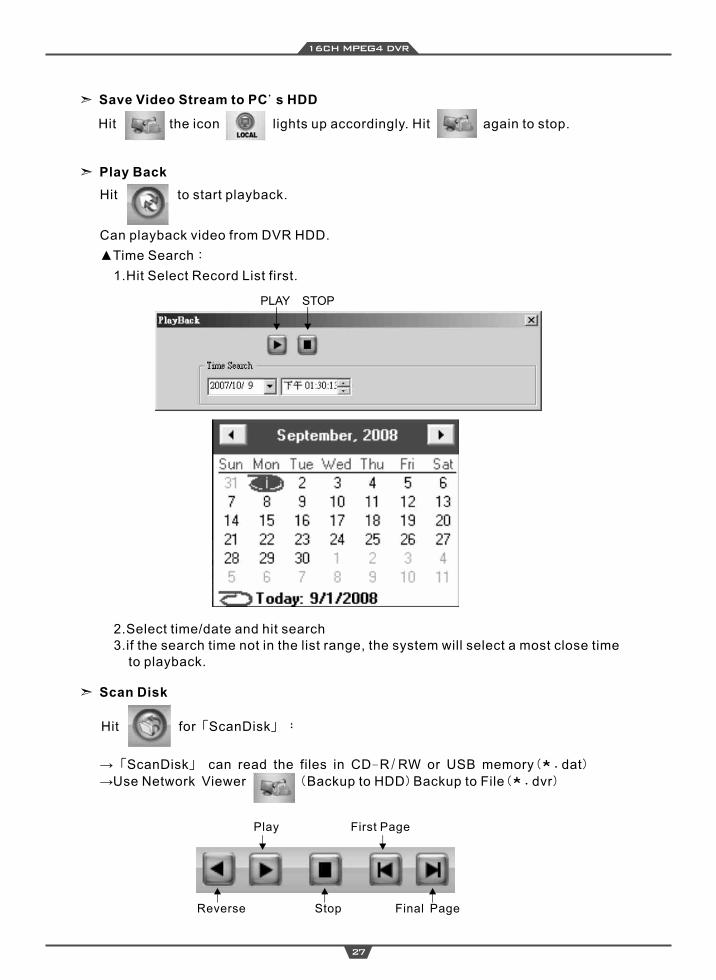
➣ Save Video Stream to PC's HDD
➣ Play Back
PLAY STOP
27
Hit the icon lights up accordingly. Hit again to stop.
Hit to start playback.
Can playback video from DVR HDD.
▲Time Search:
1.Hit Select Record List first.
2.Select time/date and hit search3.if the search time not in the list range, the system will select a most close time to playback.
➣ Scan Disk
→「ScanDisk」 can read the files in CD-R/RW or USB memory dat
→Use Network Viewer (Backup to HDD)Backup to File(*.dvr)
(*. )
Hit for「ScanDisk」:
Play First Page
Reverse Stop Final Page
16CH mpeg4 DVR
28
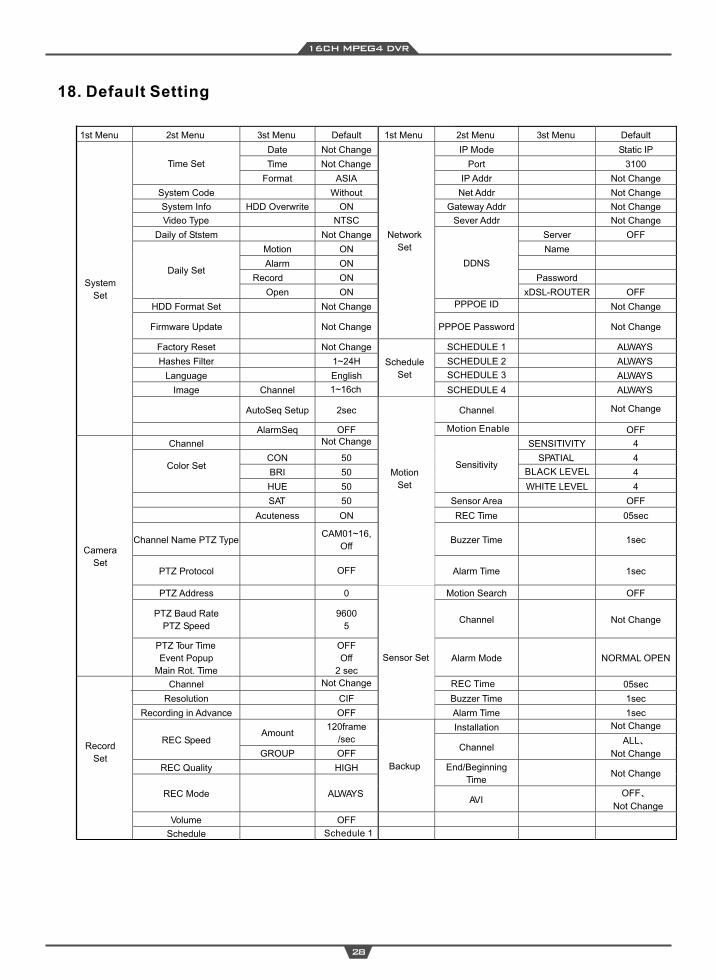
18. Default Setting
SCHEDULE 2
REC Time
Motion Enable
1~16ch
1st Menu 2st Menu 3st Menu Default 1st Menu 2st Menu 3st Menu Default
Date Not Change IP Mode
Static IP
Time Not Change Port
3100 Time Set
Format ASIA IP Addr
Not Change
System Code
Without Net Addr
Not Change
System Info HDD Overwrite ON Gateway Addr
Not Change
Video Type
NTSC Sever Addr
Not Change
Daily of Ststem
Not Change Server OFF
Motion ON Name
Alarm ON
Record ON Password
Daily Set
Open ON
DDNS
xDSL-ROUTER OFF
HDD Format Set
Not Change PPPOE ID Not Change
Firmware Update
Not Change
Network
Set
PPPOE Password
Not Change
Factory Reset
Not Change SCHEDULE 1
ALWAYS
Hashes Filter
1~24H
SCHEDULE 3
ALWAYS
Language English
ALWAYS
Image Channel
Schedule
Set
SCHEDULE 4
ALWAYS
AutoSeq Setup 2sec Channel
System
Set
AlarmSeq OFF
OFF
Channel
SENSITIVITY 4
CON 50
SPATIAL 4
BRI 50
4 Color Set
HUE 50
Sensitivity
WHITE LEVEL 4
SAT 50 Sensor Area
OFF
Acuteness ON
REC Time
05sec
Channel Name PTZ Type
CAM01~16,
Off Buzzer Time
1sec
PTZ Protocol
Alarm Time
1sec
PTZ Address 0 Motion Search OFF
PTZ Baud Rate
PTZ Speed 9600
5 Channel
Camera
Set
PTZ Tour Time
Event Popup
Main Rot. Time
OFF
Off
2 sec
Alarm Mode
NORMAL OPEN
Channel
05sec
Resolution CIF Buzzer Time
1sec
Recording in Advance
OFF Alarm Time
1sec
Installation Amount
120frame
/sec REC Speed
GROUP OFF Channel
ALL、
Not Change
REC Quality
HIGH End/Beginning
Time Not Change
REC Mode
ALWAYS
Backup
AVI OFF、
Not Change
Volume OFF
Record
Set
Schedule
Not Change
Not Change
Not Change
BLACK LEVEL
Not Change
Not Change
Motion
Set
Sensor Set
Schedule 1
OFF

16CH mpeg4 DVR
29
20.HDD Compatibility
Brand NameModel Size
NTSC
PAL
FPS
Western Digital
Western Digital
Western Digital
HITACHI
Seagate
Seagate
Seagate
Maxtor
Maxtor
WD5000AVJB
WD3200AAJB
WD2500AVJB
HDT725050VLAT80
ST3500630AV
ST3250620A
ST3160812AV
STM3320820A
STM3250820A
500G
320G
250G
500G
500G
250G
160G
320G
250G
Resolution
Highest
High
Normal
Highest
High
Normal
30
60
120
25
50
100
2.25GB/hr
1.95GB/hr
1.66GB/hr
3.42GB/hr
2.34GB/hr
1.22GB/hr
3.07GB/hr
2.53GB/hr
2.03GB/hr
3.075GB/hr
2.81GB/hr
1.95GB/hr
3.82GB/hr
3.08GB/hr
2.36GB/hr
4.12GB/hr
3.26GB/hr
2.24GB/hr
5.35GB/hr
4.20GB/hr
2.71GB/hr
4.47GB/hr
3.45GB/hr
2.42GB/hr
Average Standard High Highest
Record Quality
19.Record Time

H12CMP1603