1938123002 - ideal world
TRANSCRIPT

Please read & understand this manual, paying particular attention to the safety instructions, before use.The manufacturer reserves the right to change the product specifi cation and livery according to continues product improvements.
Operator’s Manual
1600W Electric 36cm Lawnmower
WEER361938123002
1800W Electric 40cm Lawnmower
WEER401938124002

CONTENTS SPECIFICATION COMPONENTS SAFETY INSTRUCTIONS ASSEMBLY OPERATION MAINTENANCE STORAGE TROUBLE SHOOTING
DECLARATION OF CONFORMITY
SPECIFICATION
Model WEER36 WEER40
Product No. 1938123002 1938124002
Motor – Rated Power 1600W 1800W
Motor – Rated Voltage 230-240V ~50Hz 230-240V ~50Hz
No Load Speed 3700rpm 3700rpm
Cutting Width 36cm 40cm
Height of Cut 20-70mm 20-70mm
Height Adjustments 5 5
Grassbox Capacity 45L 50L
Sound Pressure Level 80.6dB(A) 84dB(A)
Guaranteed Sound Power Level 96dB(A) 96dB(A)
Vibration 1.47m/s2 2.5m/s2
Insulation Double Insulated IPX4 Double Insulated IPX4
Weight N.W 11.5kg – G.W 13.5kg N.W 12.7kg – G.W 14.5kg

SAFETY INSTRUCTIONS - SAVE THESE INSTRUCTIONS FOR FUTURE USE
WARNING Read this instruction manual carefully before operating this lawn mower. Make sure that you are familiar with the controls and properly operate the machine. Following these instructions can reduce the risk of fire, electric shock and personal injury. IF NOT USED PROPERLY THIS LAWN MOWER CAN BE DANGEROUS! This lawn mower can cause serious injury to the operator and others, the warning and safety instructions must be followed to ensure reasonable safety and efficiency in using this lawn mower. The operator is responsible for following the warning and safety instructions in this manual and on the lawn mower. Never use the lawn mower unless the grass box or guards are correctly positioned. THE LAWN MOWER IS DESIGNED FOR DOMESTIC USE ONLY. Lawn mowers for use in private gardens are mowers whose annual use does not generally exceed 50 hours and that are primarily used for tending GRASS OR LAWN AREAS, but not in public facilities, parks or sports grounds and not for agricultural or forestry use. Compliance with the operating manual supplied by the manufacturer is a prerequisite for the proper usage of the lawn mower. The operating manual contains servicing and maintenance instructions as well as directions for use. IMPORTANT The lawn mower must not be used to trim bushes, hedges and shrubs, to cut or shred climbing plants or lawns on roof gardens or in balcony boxes or to clean footpaths, nor must it be used as a chopper for shredding tree or hedge cuttings. Furthermore, the lawn mower must not be used as a cultivator or to level off uneven areas of ground, e.g. molehills. TRAINING Read the instructions carefully: Be familiar with the controls and the proper use of the equipment. Never allow children or people unfamiliar with these instructions to use the lawnmower. Local regulations can restrict the age of the operator. Never operate the mower while people, especially children, or pets are nearby. Keep in mind that the operator or user is responsible for accidents or hazards involving the lawnmower that occur to other people or their property.
COMPONENTS
1 Handle 7 Rear Wheel 2 OPC Lever 8 Front Wheel 3 Cable Clips 9 Electric Cable Retainer 4 Quick Release Handle 10 Safety Button 5 Grassbox Full Indicator 11 Single Height Adjuster 6 Grassbox 12 Lower Handle Quick Release
Carefully remove the machine from its packaging and check that you have all the components. If parts are missing or damaged, please contact us:
Telephone: 01793 333212
(Mon to Fri 8.00am to 5.30pm excl. Bank Holidays)
Email: [email protected]
INSTRUCTION MANUAL

PREPARATION § Always wear appropriate footwear, such as work boots, and trousers when operating the mower.
Do not operate the equipment when barefoot or wearing open sandals. Always wear safety goggles or safety glasses with side shields when operating the mower.
§ Thoroughly inspect the area where the equipment is to be used and remove all objects which can
be thrown by the machine. § Before using, always visually inspect to see that the blades, blade bolts and cutter assembly are
not worn or damaged. Replace worn or damaged blades and bolts in sets to preserve balance. § Only use accessories approved by the manufacturer. § Do not operate the machine while under the influence of alcohol or drugs. § Never operate the machine in wet grass. This could cause you to slip while mowing. ELECTRICAL SAFETY § Power plugs must match the outlet. Never modify the plug in any way. Do not use any adapter
plugs with earthed (grounded) power tools. Unmodified plugs and matching outlets will reduce risk of electric shock.
§ Avoid unintentional starting. Always check that the switch is in Off position before plugging in the product to the power supply. Do not carry a plugged in product with your finger on the switch.
§ Avoid body contact with earthed or grounded surfaces, such as pipes, radiators, ranges and refrigerators. There is an increased risk of electric shock if your body is earthed or grounded.
§ Do not expose the product to rain or wet conditions. § Water entering an appliance will increase the risk of electric shock. § Electrical power should be supplied via a residual current device (RCD) with a tripping current of
not more than 30 mA. § Before use, check the supply and extension cord for signs of damage or aging. If the cord
becomes damaged during use, disconnect the cord from the supply immediately. Do not touch the cord before disconnecting the supply. Do not use the product if the cord is damaged or worn.
§ If you need to use an extension cable, ensure it is suitable for outdoor use and has a current capacity rating, sufficient to supply your product. Check it before every use for damage, always uncoil it completely, during use because coiled cables can overheat. Damaged extension cables should not be repaired; they should be replaced with an equivalent type.
SYMBOLS
Correct Disposal of this product
This marking indicates that this product should not be disposed with other household wastes throughout the EU. To prevent possible harm to the environment or human health from uncontrolled waste disposal, recycle it responsibly to promote the sustainable reuse of material resources. To return your used device, please use the return and collection systems or contact the retailer where the product was purchased. They can take this product for environmental safe recycling.
Read the instruction handbook
before operating this machine.
Beware of flying objects. Keep all bystanders,
especially children & pets, at least 15m away
from the operating area.
Class II, double insulation Do not expose to rain or damp condition
Keep hands and feet clear of the
cutting deck when the machine is
running.
The cutting blade will continue to rotate after
the motor is switched off
Keep the supply flexible cord away
from the cutting blades
Remove all objects that could be thrown by
the blade in the working area.
Wear Ear & Eye Protection
Before working or undertaking any servicing
or cleaning of the machine, ensure the
electrical cable is removed from the power
source.
Be careful when using on slopes. Do
not operate on inclines greater than
15°.
It is advised to cut across the incline.
Safety alert symbol. Used to alert you to
potential personal injury hazards. Obey all
safety messages that follow this symbol to
avoid possible injury.
DANGER
Indicates an imminently hazardous
situation which, if not avoided, will
result in serious injury.
WARNING
Indicates a potentially hazardous situation
which, if not avoided, could result in serious
injury.
CAUTION
Indicates a potentially hazardous
situation which, if not avoided, may
result in minor or moderate injury. CAUTION
Used without the safety alert symbol,
indicates a potentially hazardous situation
which, if not avoided, may result in property
damage.
INSTRUCTION MANUAL

GENERAL MOWING TIPS § When cutting long grass, reduce walking speed to allow for more effective cutting and a proper
discharge of the clippings. It is recommended that you cut longer grass in stages. Start at a higher cutting height and go over the same area a second time with a lower cutting height.
§ Do not cut wet grass; it will stick to the underside of the deck and prevent proper collection or discharge of grass clippings.
§ New or thick grass may require a higher cutting height. § Empty the grass box regularly, the discharge chute will become blocked with grass cuttings. § The mower is designed to operate and cut most effectively when moving forwards. OVERLOAD PROTECTION § The product has an overload protection device. When overloading is detected, the product will
automatically switch off. If the overload protector is actuated, the motor must be allowed to cool down for 5 to 10 minutes.
§ Turn off the power and remove the plug from the supply. The blades are sharp, wear heavy duty gloves before touching. Make sure the blade can rotate freely and is not jammed or tight.
§ When the motor is cool, connect the plug to the power supply, turn the power on. Press the Safety Button & then the Trigger to start the product. If the product will still not start, return it to an authorised service centre for repair.
MAINTENANCE AND STORAGE § Keep all nuts, bolts and screws tight to be sure the equipment is in safe working condition. § Replace worn or damaged parts for safety. § Keep the machine free of grass, leaves, or other debris build-up. § Allow the machine to cool before storing. § Grass catcher components are subject to wear, damage, & deterioration, which could expose
moving parts or allow objects to be thrown. Frequently check & replace them with the manufacturer’s recommended parts, when necessary.
§ Mower blades are sharp and can be dangerous. Wrap the blade(s) or wear gloves, and use extra caution when servicing them.
§ Make sure the power cable is positioned so that it cannot be damaged by the cutting means and
will not be stepped on, tripped over or otherwise subjected to damage or stress. § Never pick up or carry the product by the electric cable. § Never pull by the power cord to disconnect from the power supply. § Keep the power cord away from heat, oil and sharp edges. § Make sure voltage is correct for your product. A nameplate on the product indicates the product’s
voltage. Never connect the product to an AC voltage that differs from this voltage. § Always ensure the cord from the handlebar to the mower body is never trapped, pinched or
otherwise damaged during assembly or handle folding. Never apply power to the mower if this cable is damaged. Return to authorised service centre for professional repair.
OPERATION § Only operate the mower in daylight or in good artificial light. § Avoid operating the equipment in wet grass. § Always be sure of your footing on slopes. Exercise extreme caution when changing direction on
slopes. Do not mow excessively steep slopes, which exceed 15°. For wheeled rotary machines, mow across the face of slopes, never up and down.
§ Never run while using the mower, always walk. § Do not pull the mower backwards unless absolutely necessary. Use extreme caution when
reversing or pulling the lawnmower towards you. § Stop the blade(s) if the lawnmower has to be tilted for transportation when crossing surfaces
other than grass (such as gravel drives, walks, or roads) & when transporting the lawnmower to & from the area to be mowed. Never pick up or carry a lawnmower while the electric motor is running.
§ Never operate the lawnmower with defective guards, or without safety devices, for example deflectors and/or grass catchers, in place.
§ Do not put hands or feet near or under rotating parts. Keep clear of the discharge opening at all times.
Stop the motor and disconnect the electrical plug from the power source: ü before clearing blockages or unclogging the chute; ü before checking, cleaning or working on the lawnmower; ü after striking a foreign object inspect the lawnmower for damage and make repairs before
restarting and operating the lawnmower, ü if lawnmower starts to vibrate abnormally (check immediately). § Shut the motor off and wait until the motor and the blade come to a complete stop before
removing the grass catcher. § Watch for holes, ruts, or bumps. Tall grass can hide obstacles. § Do not mow near drop-offs, ditches or embankments. The operator could lose footing or
balance. § Be alert and turn the machine off if children enter the area. § Never tamper with safety devices. Check their proper operation regularly. § Never attempt to make wheel height adjustments while the motor is running.
INSTRUCTION MANUAL

HANDLE ASSEMBLY § Rotate the lower handle up away from the lawnmower deck, ensuring the electrical cables are
not trapped or crimped. (See fig. 2) § Ensure the Electric Cables run down the outside of the handle assembly.
§ With the handles in line with the Lower Quick Release Handle, secure, by folding the Quick
Release Handle upwards to secure. Repeat on both sides. (See fig. 3)
§ Secure the Upper & Lower Handle. (See fig. 4 &5) Select the required height for the user and
secure, ensure the handle assembly is straight and in line with each other.
§ Secure the Electric Cable to the handle assembly, using the Cable Clips provided. (See fig. 6). The
2
ASSEMBLY ASSEMBLY/PRE-OPERATION Read these instructions in its entirety before you attempt to assemble and operate your new lawnmower. REMOVE LAWN MOWER FROM CARTON Roll the lawn mower out of the carton and check thoroughly for additional loose parts. Please ensure that you have all the below necessary parts, before commencing with the assembly. In the unlikely event that you are missing a component, please do contact us on 01793 333212, option 2 or email [email protected] for assistance.
x1 x1
x1 x2
INSTRUCTION MANUAL

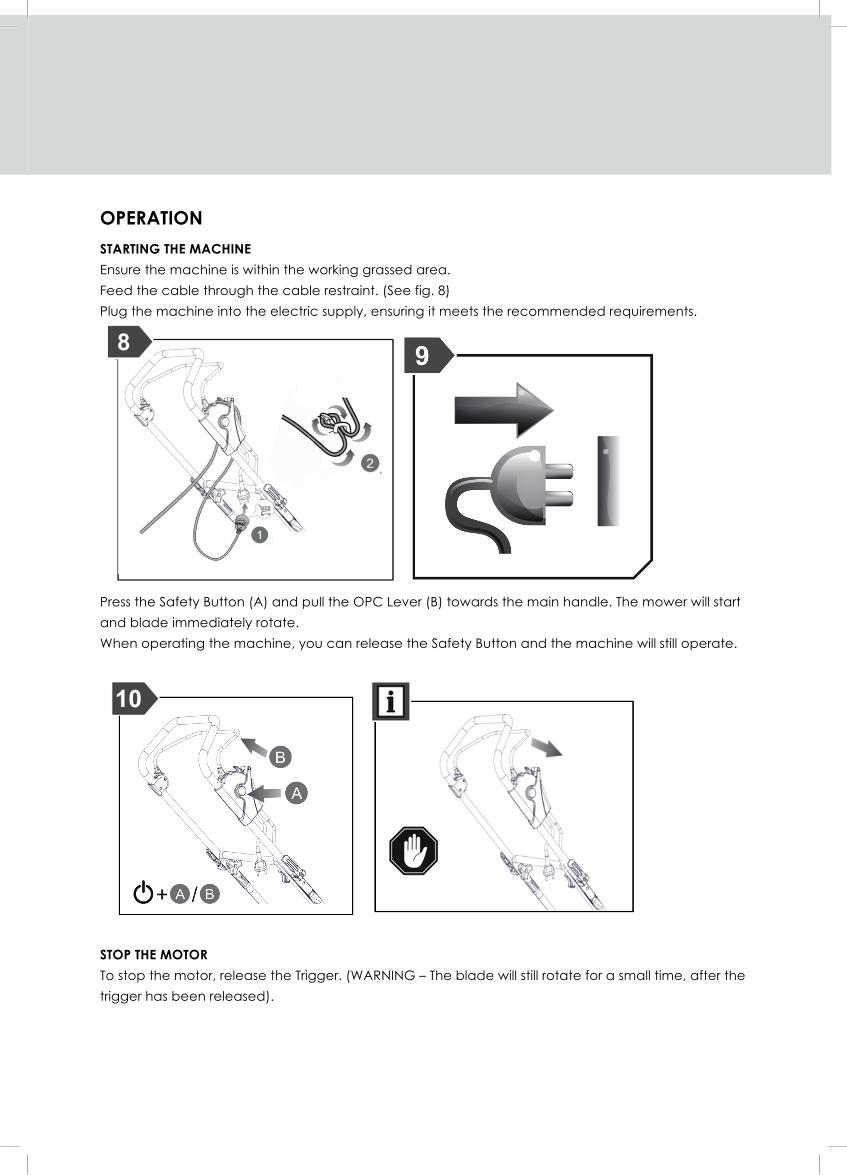
OPERATION STARTING THE MACHINE Ensure the machine is within the working grassed area. Feed the cable through the cable restraint. (See fig. 8) Plug the machine into the electric supply, ensuring it meets the recommended requirements.
Press the Safety Button (A) and pull the OPC Lever (B) towards the main handle. The mower will start and blade immediately rotate. When operating the machine, you can release the Safety Button and the machine will still operate.
STOP THE MOTOR To stop the motor, release the Trigger. (WARNING – The blade will still rotate for a small time, after the trigger has been released).
cables should not be in contact with any moving component on the machine.
GRASSBOX COLLECTOR
§ Ensure the lower mesh collector is fully clear open and away from the collector top. § Lift the Grass Flap. § Secure the Grassbox to the machine, ensuring the hooks are firmly housed onto the machine
deck. (See fig.7)
4
INSTRUCTION MANUAL

MOWING TIPS Under certain conditions, such as very tall grass, it may be necessary to raise the height of cut to reduce pushing effort, prevent overloading of the motor and leaving clumps of grass clippings. It may also be necessary to reduce ground speed and/or push the lawn mower over the area a second time. For extremely heavy cutting, reduce the width of cut by overlapping the previously cut path and mow slowly. The side combs allow the machine to cut up to walls. When cutting on slopes, ensure your footing is secure, the grass is not wet and the machine is used across the slope and not up or down the slope. The slope gradient should not exceed 15°.
ADJUST THE CUTTING HEIGHT Raise the wheels for a low cut and lower the wheels for a high cut, adjust the cutting height to suit your requirements. Medium position is best for most lawns. The single height adjustment lever is located on the left of the machine. Push the lever towards the wheel and rotate up or down the five settings, depending on your needs.
GRASSBOX FULL INDICATOR Your machine grassbox collector is fitted with a full indicator at the rear of the hard top. Whilst air is still rotating around the collector and grass is being collected, the flap will raise and remain open. Once the collector is full, the flap will remain closed and you should empty the grassbox.
INSTRUCTION MANUAL

MAINTENANCE
IMPORTANT - Regular, careful maintenance is essential for keeping the safety level and original performance of the machine unchanged over time. 1. Keep all nuts, bolts and screws tight to be sure the equipment is in safe working condition. Regular
maintenance is essential for safety and performance. 2. Do not use the equipment with worn or damaged parts, this can be dangerous. Parts are to be
replaced and not repaired. Use genuine spare parts. Parts that are not of the same quality can damage the equipment and create safety hazards.
3. Wear strong work gloves when removing and reassembling the blade. 4. Check the blade’s balance after sharpening. 5. Check the grass flap and grassbox collector frequently for wear and deterioration. 6. Whenever the machine is to be handled, transported or tilted you must: ü Wear strong working gloves; ü Grasp the machine at the points that offer a safe grip, taking account of the blades, the mower’s
weight and its distribution. BLADE MAINTENANCE
The cutting blade will continue to rotate after the motor is switched off. Slicing is possible if care is not taken. Wear appropriate hand coverage. Remove the electric plug from the mains supply. Clean the underside of the deck with a stiff brush, before any maintenance is undertaken to the blade.
INSTRUCTION MANUAL
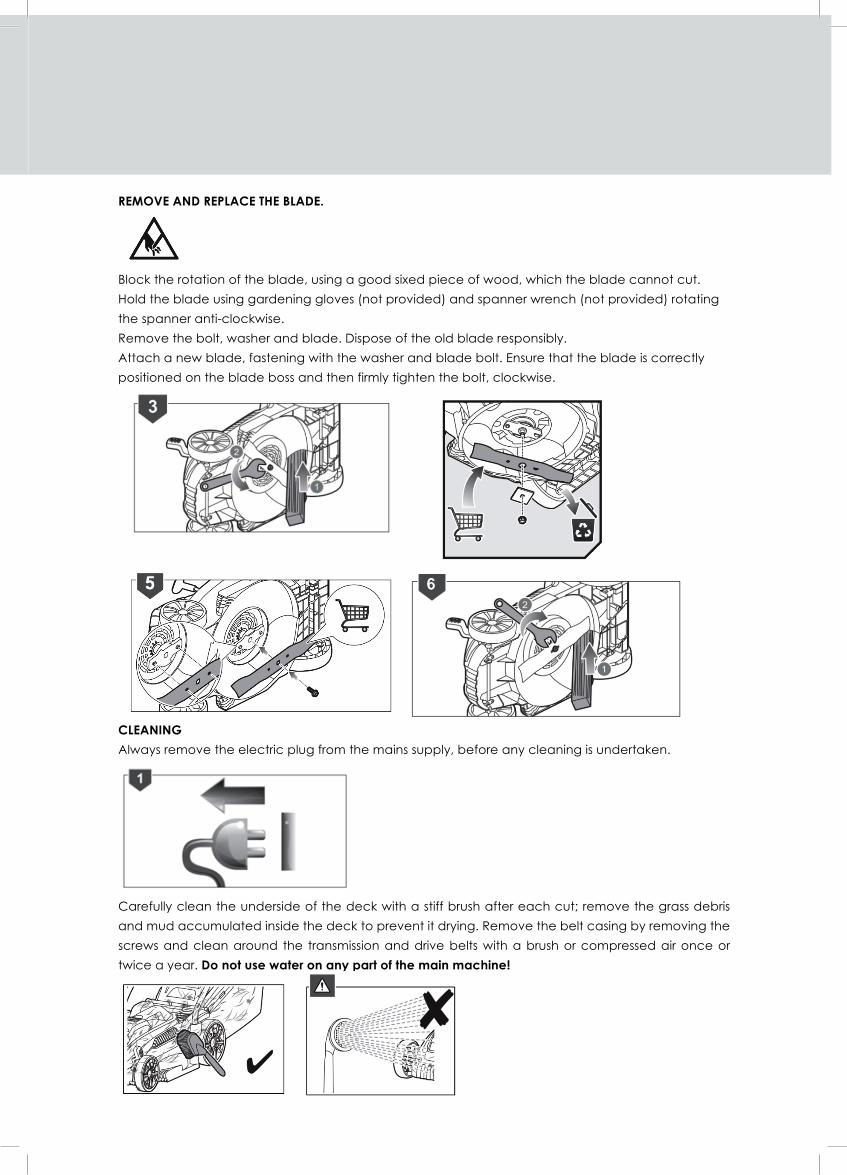
REMOVE AND REPLACE THE BLADE. Block the rotation of the blade, using a good sixed piece of wood, which the blade cannot cut. Hold the blade using gardening gloves (not provided) and spanner wrench (not provided) rotating the spanner anti-clockwise. Remove the bolt, washer and blade. Dispose of the old blade responsibly. Attach a new blade, fastening with the washer and blade bolt. Ensure that the blade is correctly positioned on the blade boss and then firmly tighten the bolt, clockwise.
CLEANING Always remove the electric plug from the mains supply, before any cleaning is undertaken.
Carefully clean the underside of the deck with a stiff brush after each cut; remove the grass debris and mud accumulated inside the deck to prevent it drying. Remove the belt casing by removing the screws and clean around the transmission and drive belts with a brush or compressed air once or twice a year. Do not use water on any part of the main machine!
MAINTENANCE
IMPORTANT - Regular, careful maintenance is essential for keeping the safety level and original performance of the machine unchanged over time. 1. Keep all nuts, bolts and screws tight to be sure the equipment is in safe working condition. Regular
maintenance is essential for safety and performance. 2. Do not use the equipment with worn or damaged parts, this can be dangerous. Parts are to be
replaced and not repaired. Use genuine spare parts. Parts that are not of the same quality can damage the equipment and create safety hazards.
3. Wear strong work gloves when removing and reassembling the blade. 4. Check the blade’s balance after sharpening. 5. Check the grass flap and grassbox collector frequently for wear and deterioration. 6. Whenever the machine is to be handled, transported or tilted you must: ü Wear strong working gloves; ü Grasp the machine at the points that offer a safe grip, taking account of the blades, the mower’s
weight and its distribution. BLADE MAINTENANCE
The cutting blade will continue to rotate after the motor is switched off. Slicing is possible if care is not taken. Wear appropriate hand coverage. Remove the electric plug from the mains supply. Clean the underside of the deck with a stiff brush, before any maintenance is undertaken to the blade.
INSTRUCTION MANUAL
TROUBLE SHOOTING ISSUE CORRECTION
Motor does not run
1. Check the mains connection cable, plug fuse and circuit breaker.
2. Start on short grass or on an area which has already been mown.
3. Unplug the mower. Clean the discharge chute/housing, the blade must rotate freely.
4. Correct the cutting height.
Reduced Motor Power
1. Correct the cutting height. 2. Clean the discharge chute/housing. 3. Have the blade re-sharpened or replaced by an authorised
service dealer.
The grass collector does not fill completely
1. Correct the cutting height. 2. Allow the lawn to dry. 3. Have the blade re-sharpened or replaced by an authorised
service dealer. 4. Clean the grille on the grass catcher. 5. Clean the discharge chute/housing.
GRASSBOX COLLECTOR CLEANING Pores in the grassbox can become filled with dirt and dust, during use and will collect less grass. To prevent this, regularly hose the catcher off with water and let dry before using. Keep the top of the motor housing vents clear and clean of grass clippings & dust. This will assist motor air flow and extend the machine life.
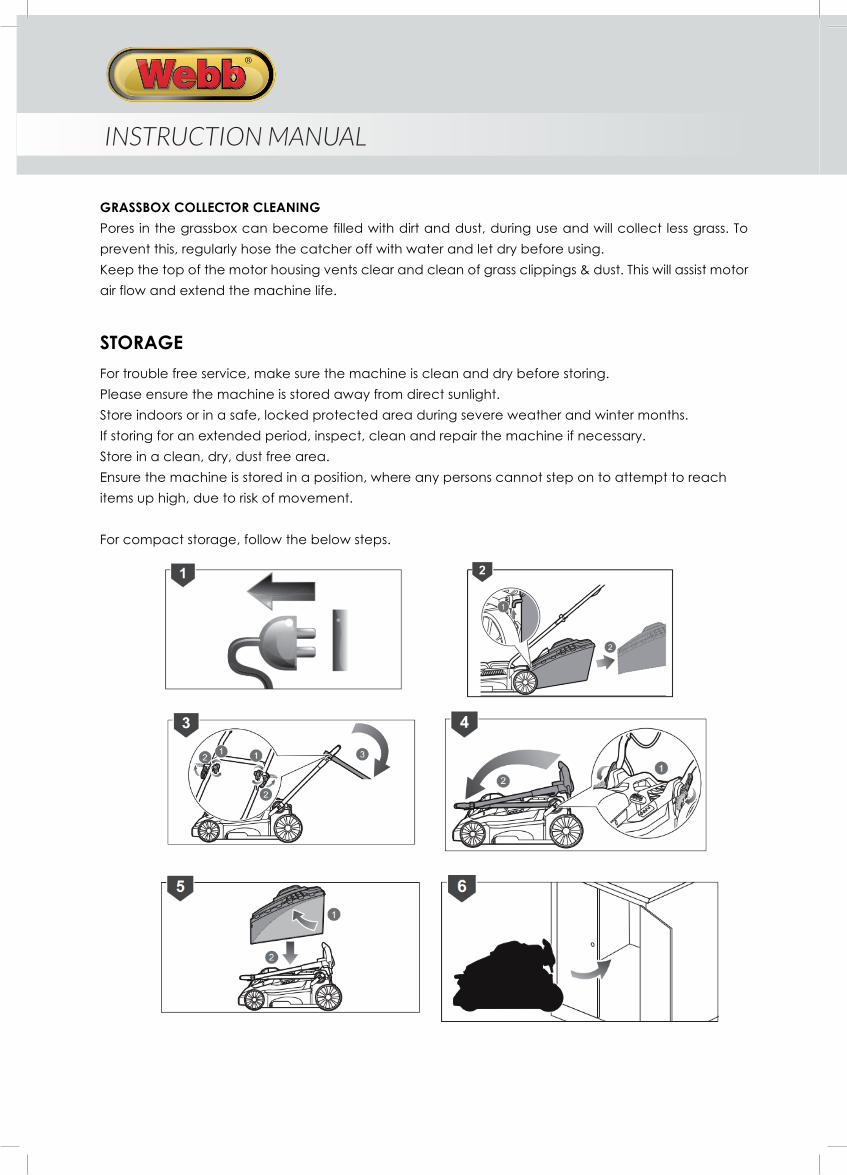
STORAGE For trouble free service, make sure the machine is clean and dry before storing. Please ensure the machine is stored away from direct sunlight. Store indoors or in a safe, locked protected area during severe weather and winter months. If storing for an extended period, inspect, clean and repair the machine if necessary. Store in a clean, dry, dust free area. Ensure the machine is stored in a position, where any persons cannot step on to attempt to reach items up high, due to risk of movement. For compact storage, follow the below steps.
INSTRUCTION MANUAL

TROUBLE SHOOTING ISSUE CORRECTION
Motor does not run
1. Check the mains connection cable, plug fuse and circuit breaker.
2. Start on short grass or on an area which has already been mown.
3. Unplug the mower. Clean the discharge chute/housing, the blade must rotate freely.
4. Correct the cutting height.
Reduced Motor Power
1. Correct the cutting height. 2. Clean the discharge chute/housing. 3. Have the blade re-sharpened or replaced by an authorised
service dealer.
The grass collector does not fill completely
1. Correct the cutting height. 2. Allow the lawn to dry. 3. Have the blade re-sharpened or replaced by an authorised
service dealer. 4. Clean the grille on the grass catcher. 5. Clean the discharge chute/housing.
GRASSBOX COLLECTOR CLEANING Pores in the grassbox can become filled with dirt and dust, during use and will collect less grass. To prevent this, regularly hose the catcher off with water and let dry before using. Keep the top of the motor housing vents clear and clean of grass clippings & dust. This will assist motor air flow and extend the machine life.
STORAGE For trouble free service, make sure the machine is clean and dry before storing. Please ensure the machine is stored away from direct sunlight. Store indoors or in a safe, locked protected area during severe weather and winter months. If storing for an extended period, inspect, clean and repair the machine if necessary. Store in a clean, dry, dust free area. Ensure the machine is stored in a position, where any persons cannot step on to attempt to reach items up high, due to risk of movement. For compact storage, follow the below steps.
INSTRUCTION MANUAL

ECDECLARATIONOFCONFORMITYWeHandyDistributionLtd-SN35HY(Importer)declarethattheproduct:Designation:36cm1600WElectricRotaryLawnmowerModel(s):WEER36ProductNumber:1938123002Type/SerialNo.AsperratinglabelonmachineComplieswiththefollowingdirectives:MachineryDirective2006/42/ECTheconformityassessmentprocedurefollowedwasinaccordancewithEN60335-1:2012+A11:2014,EN60335-2-77:2010,EN62233:2008MeasuredSoundPressureLevel:LPA=80.6dB(A)MeasuredSoundPowerLevel:LWA=96dB(A)VibrationLevel:3.47m/s²NotifiedBody:IntertekTestingServicesShanghaiAddresses:BuildingNo.86,1198QinzhouRoad(North),CaohejingDevelopmentZone,Shanghai200233,P.R.CAuthorisedsignatoryandtechnicalfileholderDate:04/10/2017
Signature: Name:MrSimonBelcherPosition:ManagingDirectorCompany:HandyDistributionLtdAddress:MurdockRd,Swindon,Wiltshire,SN35HY.

ECDECLARATIONOFCONFORMITYWeHandyDistributionLtd-SN35HY(Importer)declarethattheproduct:
Designation:40cm1800WElectricRotaryLawnmowerModel(s):WEER40ProductNumber:1938124002Type/SerialNo.Asperratinglabelonmachine
Complieswiththefollowingdirectives:MachineryDirective2006/42/EC
TheconformityassessmentprocedurefollowedwasinaccordancewithEN60335-1:2012+A11:2014,EN60335-2-77:2010,EN62233:2008MeasuredSoundPressureLevel:LPA=84dB(A)MeasuredSoundPowerLevel:LWA=96dB(A)VibrationLevel:2.5m/s²
NotifiedBody:IntertekTestingServicesShanghaiAddresses:BuildingNo.86,1198QinzhouRoad(North),CaohejingDevelopmentZone,Shanghai200233,P.R.CAuthorisedsignatoryandtechnicalfileholderDate:04/10/2017
Signature: Name:MrSimonBelcherPosition:ManagingDirectorCompany:HandyDistributionLtdAddress:MurdockRd,Swindon,Wiltshire,SN35HY.

This Service Book is provided with your Webb, to help you look after your purchase to our recommendations and enable you to take advantage of the 2 year conditional manufacturer domestic warranty*.
* Commercial/Professional & Hire users receive a 90 day warranty
Present this service book to your authorised Webb repair dealer, whenever a service or a warranty appraisal is required.
The booklet is applicable to the following products, in the UK only:Ride On Lawn TractorsCylinder Lawnmowers
Petrol Rotary LawnmowersPetrol Hand Held Range
Please register your machine using the following pages or at www.webbgardenpower.co.uk. By registering your machine, you agree to maintain the machine in accordance with the service schedules specifi ed in this manual and services duly recorded. You may be asked to produce this booklet as proof of servicing in the event of a claim. Proof of purchase should also be kept
as a reference.
Ensure you have the following information available from your machine product label. The two examples below can be found on your machine:
12
1. Model Number
2. Serial & Product Number
Please complete using BLOCK CAPITALS. Sections marked* must be completed to validate Warranty.
Warranty
1. Users Statement of WarrantyEach new machine is warranted against defective material or assembly of material under normal usage. The warranty applies to the original purchaser, is not transferable and covers faulty parts and the labour involved in replacing and repairing those parts, which are of original manufacture.
2. Period of Warranty2 year conditional warranty from the original date of sale to the fi rst domestic user.90 days from the original date of sale to the professional/commercial or for hire user.Engine warranty as per the engine manufacturer’s warranty, which will be supplied with the machine.90 days from the original date of sale for Replacement Spare Parts All machines’ must be serviced within the fi rst 14 months from the original date of purchase, to qualify for a second year parts & labour warranty, details of the service must be recorded in the service record within this manual.A reduced warranty period of 90 days applies to those items which are subject to normal wear and tear and in normal use, will need replacement or adjustment.These items are chargeable after 90 days of ownership.
Filters Tyres / Wheels
Drive chains and belts Brake & clutch friction components
Control cable & starter cordsFluids & lubricants
Spark plugsBlades (Lawnmowers & Brushcutters)
Cutter bars (Hedgecutters)Drive & clutch cable surfacesNylon Lines (Line Trimmers)
Carburettor cleaningBearingsBushes
Electric cableGrass collectors
3. Not covered by this warranty(a) The warranty policy does not cover any depreciation or damages caused by ordinary wear, rusting or corrosion, lack of correct maintenance or operation, misuse, abuse, lack of transportation or accident.(b) The warranty policy does not cover any costs necessary for the standard periodic maintenance services instructed by the operators manual, or service parts replacement which would include oil, fi lters, tyres, belts, brake linings, fuses, blades, seals and other service parts unless it can be proven that the item has evidence of faulty manufacture.(c) The warranty policy will not cover failure or damage caused as a result of parts or accessories being modifi ed without the written approval of GJ Handy & Co Ltd.(d) The warranty policy will not cover the unit if non-genuine parts have been fi tted and as a result damage has occurred to the unit.(e) The warranty policy is non-transferable and is only applicable to the original purchaser.
4. Disclaimer(a) This warranty is only a remedy for defect of products. GJ Handy & Co Ltd will never warranty in terms of the merchantability or the fi tness for a particular purpose.(b) No person is authorised to make any warranties, representations or promises, expressed or implied, on behalf of GJ Handy & Co Ltd, or to modify the terms conditions or limitation of this warranty policy in any way.(c) Neither GJ Handy & Co Ltd nor any company affi liated with GJ Handy & Co Ltd shall be liable in any event or manner whatsoever for incidental or consequential damages or injuries, including, but not limited to, loss of crops, loss of profi t, out of pocket expenses or profi ts, rental of substitute equipment or other commercial losses.
INSTRUCTION MANUAL

This Service Book is provided with your Webb, to help you look after your purchase to our recommendations and enable you to take advantage of the 2 year conditional manufacturer domestic warranty*.
* Commercial/Professional & Hire users receive a 90 day warranty
Present this service book to your authorised Webb repair dealer, whenever a service or a warranty appraisal is required.
The booklet is applicable to the following products, in the UK only:Ride On Lawn TractorsCylinder Lawnmowers
Petrol Rotary LawnmowersPetrol Hand Held Range
Please register your machine using the following pages or at www.webbgardenpower.co.uk. By registering your machine, you agree to maintain the machine in accordance with the service schedules specifi ed in this manual and services duly recorded. You may be asked to produce this booklet as proof of servicing in the event of a claim. Proof of purchase should also be kept
as a reference.
Ensure you have the following information available from your machine product label. The two examples below can be found on your machine:
12
1. Model Number
2. Serial & Product Number
Please complete using BLOCK CAPITALS. Sections marked* must be completed to validate Warranty.
Warranty
1. Users Statement of WarrantyEach new machine is warranted against defective material or assembly of material under normal usage. The warranty applies to the original purchaser, is not transferable and covers faulty parts and the labour involved in replacing and repairing those parts, which are of original manufacture.
2. Period of Warranty2 year conditional warranty from the original date of sale to the fi rst domestic user.90 days from the original date of sale to the professional/commercial or for hire user.Engine warranty as per the engine manufacturer’s warranty, which will be supplied with the machine.90 days from the original date of sale for Replacement Spare Parts All machines’ must be serviced within the fi rst 14 months from the original date of purchase, to qualify for a second year parts & labour warranty, details of the service must be recorded in the service record within this manual.A reduced warranty period of 90 days applies to those items which are subject to normal wear and tear and in normal use, will need replacement or adjustment.These items are chargeable after 90 days of ownership.
Filters Tyres / Wheels
Drive chains and belts Brake & clutch friction components
Control cable & starter cordsFluids & lubricants
Spark plugsBlades (Lawnmowers & Brushcutters)
Cutter bars (Hedgecutters)Drive & clutch cable surfacesNylon Lines (Line Trimmers)
Carburettor cleaningBearingsBushes
Electric cableGrass collectors
3. Not covered by this warranty(a) The warranty policy does not cover any depreciation or damages caused by ordinary wear, rusting or corrosion, lack of correct maintenance or operation, misuse, abuse, lack of transportation or accident.(b) The warranty policy does not cover any costs necessary for the standard periodic maintenance services instructed by the operators manual, or service parts replacement which would include oil, fi lters, tyres, belts, brake linings, fuses, blades, seals and other service parts unless it can be proven that the item has evidence of faulty manufacture.(c) The warranty policy will not cover failure or damage caused as a result of parts or accessories being modifi ed without the written approval of GJ Handy & Co Ltd.(d) The warranty policy will not cover the unit if non-genuine parts have been fi tted and as a result damage has occurred to the unit.(e) The warranty policy is non-transferable and is only applicable to the original purchaser.
4. Disclaimer(a) This warranty is only a remedy for defect of products. GJ Handy & Co Ltd will never warranty in terms of the merchantability or the fi tness for a particular purpose.(b) No person is authorised to make any warranties, representations or promises, expressed or implied, on behalf of GJ Handy & Co Ltd, or to modify the terms conditions or limitation of this warranty policy in any way.(c) Neither GJ Handy & Co Ltd nor any company affi liated with GJ Handy & Co Ltd shall be liable in any event or manner whatsoever for incidental or consequential damages or injuries, including, but not limited to, loss of crops, loss of profi t, out of pocket expenses or profi ts, rental of substitute equipment or other commercial losses.
INSTRUCTION MANUALSERVICE BOOK

Warranty
5. General(a) Most warrantable failures show up within the fi rst few weeks of use. These failures are usually straightforward and warranty assessment is relatively easy.(b) Failures relating to cutter decks and belts need careful investigation, as the cause may not always be straightforward. Look for damage to blades and pulleys especially when the cutter belt or blade boss have snapped or cracked as this could be due to impact damage.(c) Customers should always refer to the operator/instruction manual when any disputed problem arises, you will fi nd most areas covered within the manual.
Protecting your machine
MaintenanceRegular maintenance of your Webb machine is essential to ensure it operates, safely, effi ciently and therefore reducing the environmental impact.It is the owner’s responsibility to ensure that their Webb machine is maintained at specifi c intervals. Any approved Webb service dealer can undertake a service, which are specialised in our products and will be aware of your particular machine and any technical updates which will save valuable time & money.If you are using your machine in dry, dusty or high temperatures, you will need to service the machine more regularly.
FuelDue to ongoing efforts by fuel companies to reduce emissions, unleaded petrol will oxidize & deteriorate in storage overtime, leaving residue from detergent components.Fuel deterioration problems may occur when petrol is stored for over 30 days. If you are planning to store fuel for over 30 days, we recommend you add Handy Parts Sure-Start fuel stabilizer to fresh fuel after purchasing. Sure-Start cannot reconstitute stale fuel.
StorageWhen storing your machine for an extended period, we do recommend that you follow the instructions of engine instruction manual.Always store the fuel in a clean, approved and sealed container. If the container is steel, ensure it is not corroded.If the container is not fi lled to its recommended capacity, air can accelerate fuel deterioration.Always store fuel away from direct sunlight, in a dark, cool environment.
Service Record
Your servicing Webb approved dealer will stamp & date the below relevant sections, when the correct service actions have been completed.
PLEASE ENSURE THE SERVICE BOOK IS AVAILABLE FOR THE DEALER, DURING SERVICE WORK.
1st ServiceThis must be stamped by an approved service dealer to
qualify for a free second year warranty.
24 Months
Date Date
36 Months
12 Months
Date
INSTRUCTION MANUAL

Warranty
5. General(a) Most warrantable failures show up within the fi rst few weeks of use. These failures are usually straightforward and warranty assessment is relatively easy.(b) Failures relating to cutter decks and belts need careful investigation, as the cause may not always be straightforward. Look for damage to blades and pulleys especially when the cutter belt or blade boss have snapped or cracked as this could be due to impact damage.(c) Customers should always refer to the operator/instruction manual when any disputed problem arises, you will fi nd most areas covered within the manual.
Protecting your machine
MaintenanceRegular maintenance of your Webb machine is essential to ensure it operates, safely, effi ciently and therefore reducing the environmental impact.It is the owner’s responsibility to ensure that their Webb machine is maintained at specifi c intervals. Any approved Webb service dealer can undertake a service, which are specialised in our products and will be aware of your particular machine and any technical updates which will save valuable time & money.If you are using your machine in dry, dusty or high temperatures, you will need to service the machine more regularly.
FuelDue to ongoing efforts by fuel companies to reduce emissions, unleaded petrol will oxidize & deteriorate in storage overtime, leaving residue from detergent components.Fuel deterioration problems may occur when petrol is stored for over 30 days. If you are planning to store fuel for over 30 days, we recommend you add Handy Parts Sure-Start fuel stabilizer to fresh fuel after purchasing. Sure-Start cannot reconstitute stale fuel.
StorageWhen storing your machine for an extended period, we do recommend that you follow the instructions of engine instruction manual.Always store the fuel in a clean, approved and sealed container. If the container is steel, ensure it is not corroded.If the container is not fi lled to its recommended capacity, air can accelerate fuel deterioration.Always store fuel away from direct sunlight, in a dark, cool environment.
Service Record
Your servicing Webb approved dealer will stamp & date the below relevant sections, when the correct service actions have been completed.
PLEASE ENSURE THE SERVICE BOOK IS AVAILABLE FOR THE DEALER, DURING SERVICE WORK.
1st ServiceThis must be stamped by an approved service dealer to
qualify for a free second year warranty.
24 Months
Date Date
36 Months
12 Months
Date
INSTRUCTION MANUALSERVICE BOOK

Service Record
48 Months
Date
Date
Date
Date
Date
Date
Date
Date
72 Months
96 Months
120 Months
60 Months
84 Months
108 Months
132 Months
*House Number *House Name
*Address 1
*Address 2
*Town
*County
*Postcode
Home Tel Mobile Tel
If you have registered online, this form is not necessary. PLEASE POST THIS COPY TO THE ADDRESS OVERLEAF
*Title *Forename *Surname
Age 18 to 25 26 to 35 36 to 45 46 to 60 61 to 80 81 & over
*Usage Domestic Use Commercial/Professional/Hire Use
Personal Information (* Compulsory)
*Model No:
*Product No:
*Serial No:
*Date of Purchase:
Product Information (* Compulsory)
Webb Lawnmowers’ privacy commitment to machine owners: Thank you for completing this form. The information supplied, helps us to improve the products & services we provide, including information that we believe is relevant to your and/or your machine. We value your trust by giving us this information about yourself and we are committed to protecting your privacy. From time to time Webb, its associated companies, authorised dealers or third parties working on our behalf may wish to contact you regarding our products, services, offers, technical improvements or just opinions, which may be used for marketing, research or analysis purposes. If you DO NOT wish to be contacted by either of the following methods, please tick the relevant box POST TELEPHONE If you would like us to contact you by Email, please tick this box You may give Webb Lawnmowers notice in writing at any time that you no longer wish to receive direct marketing communications
*Dealer Stamp (Complete Address)
*Dealer Name
*Dealer Address
*Date of Purchase
*Selling Retailer (If dealer stamp not available)
INSTRUCTION MANUAL

Service Record
48 Months
Date
Date
Date
Date
Date
Date
Date
Date
72 Months
96 Months
120 Months
60 Months
84 Months
108 Months
132 Months
*House Number *House Name
*Address 1
*Address 2
*Town
*County
*Postcode
Home Tel Mobile Tel
If you have registered online, this form is not necessary. PLEASE POST THIS COPY TO THE ADDRESS OVERLEAF
*Title *Forename *Surname
Age 18 to 25 26 to 35 36 to 45 46 to 60 61 to 80 81 & over
*Usage Domestic Use Commercial/Professional/Hire Use
Personal Information (* Compulsory)
*Model No:
*Product No:
*Serial No:
*Date of Purchase:
Product Information (* Compulsory)
Webb Lawnmowers’ privacy commitment to machine owners: Thank you for completing this form. The information supplied, helps us to improve the products & services we provide, including information that we believe is relevant to your and/or your machine. We value your trust by giving us this information about yourself and we are committed to protecting your privacy. From time to time Webb, its associated companies, authorised dealers or third parties working on our behalf may wish to contact you regarding our products, services, offers, technical improvements or just opinions, which may be used for marketing, research or analysis purposes. If you DO NOT wish to be contacted by either of the following methods, please tick the relevant box POST TELEPHONE If you would like us to contact you by Email, please tick this box You may give Webb Lawnmowers notice in writing at any time that you no longer wish to receive direct marketing communications
*Dealer Stamp (Complete Address)
*Dealer Name
*Dealer Address
*Date of Purchase
*Selling Retailer (If dealer stamp not available)
INSTRUCTION MANUALSERVICE BOOK

Webb LawnmowersMurdock Road
DorcanSwindonWiltshireSN3 5HY