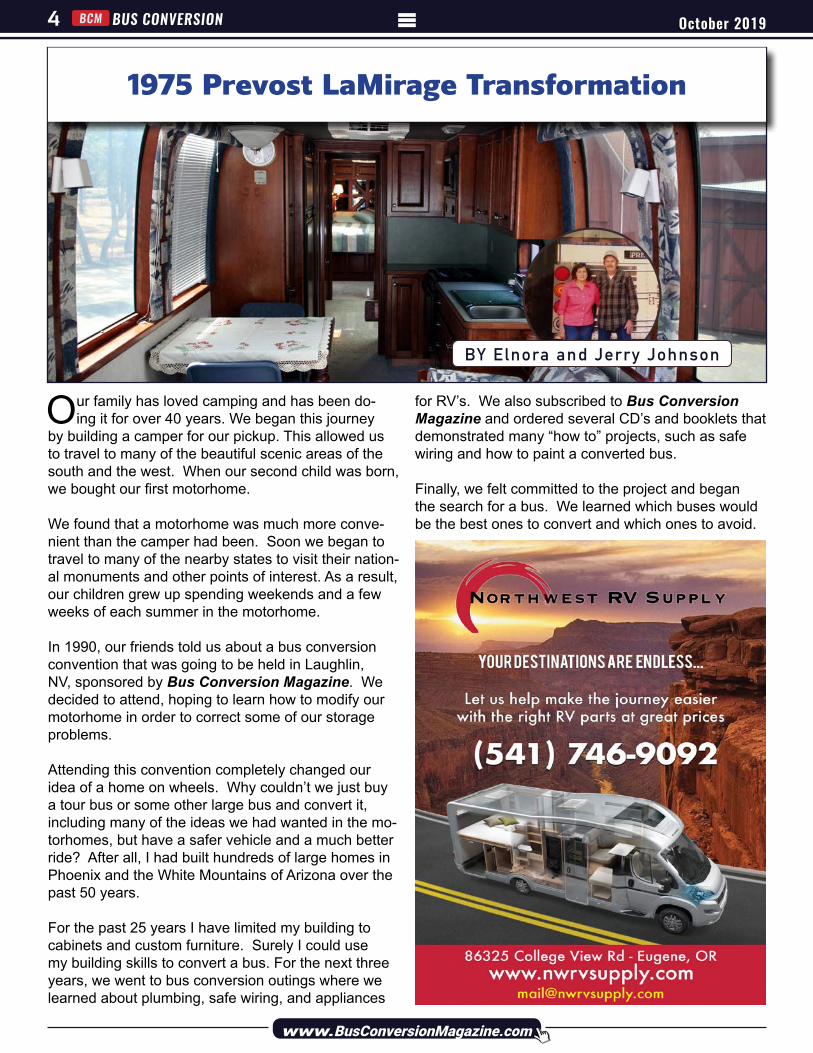
1975 prevost lamirage transformation · 1975 prevost lamirage transformation our family has loved...
TRANSCRIPT
BCM BUS CONVERSION October 20194
www.BusConversionMagazine.com
1975 Prevost LaMirage Transformation
Our family has loved camping and has been do-ing it for over 40 years. We began this journey
by building a camper for our pickup. This allowed us to travel to many of the beautiful scenic areas of the south and the west. When our second child was born, we bought our first motorhome.
We found that a motorhome was much more conve-nient than the camper had been. Soon we began to travel to many of the nearby states to visit their nation-al monuments and other points of interest. As a result, our children grew up spending weekends and a few weeks of each summer in the motorhome.
In 1990, our friends told us about a bus conversion convention that was going to be held in Laughlin, NV, sponsored by Bus Conversion Magazine. We decided to attend, hoping to learn how to modify our motorhome in order to correct some of our storage problems. Attending this convention completely changed our idea of a home on wheels. Why couldn’t we just buy a tour bus or some other large bus and convert it, including many of the ideas we had wanted in the mo-torhomes, but have a safer vehicle and a much better ride? After all, I had built hundreds of large homes in Phoenix and the White Mountains of Arizona over the past 50 years.
For the past 25 years I have limited my building to cabinets and custom furniture. Surely I could use my building skills to convert a bus. For the next three years, we went to bus conversion outings where we learned about plumbing, safe wiring, and appliances
for RV’s. We also subscribed to Bus Conversion Magazine and ordered several CD’s and booklets that demonstrated many “how to” projects, such as safe wiring and how to paint a converted bus.
Finally, we felt committed to the project and began the search for a bus. We learned which buses would be the best ones to convert and which ones to avoid.
BY Elnora and Jerry Johnson
October 2019
www.BusConversionMagazine.com
BCMBUS CONVERSION 5
Not all buses can be successfully and safely con-verted. We checked on a few buses that had been started but not finished. We decided that we didn’t want to put money and effort into a project someone had given up on. Besides, we wanted to put our own ideas into the project. We had always liked the appearance of the Prevost La Mirage with its curved windows extending up past the roofline. Soon we limited our search to the Pre-vost La Mirage. It proved to be a vain search the first year because there were not very many Prevost’s on the market at that time. We were still determined to hold out for another year in order to find the bus we wanted for this big, expensive project.
Our luck changed that summer as we traveled I-40 through Memphis. We were keeping a lookout for buses when suddenly there they were! Several Pre-vost’s were parked outside a garage within sight of the interstate. Needless to say, we found the next exit and stopped to look at the buses.
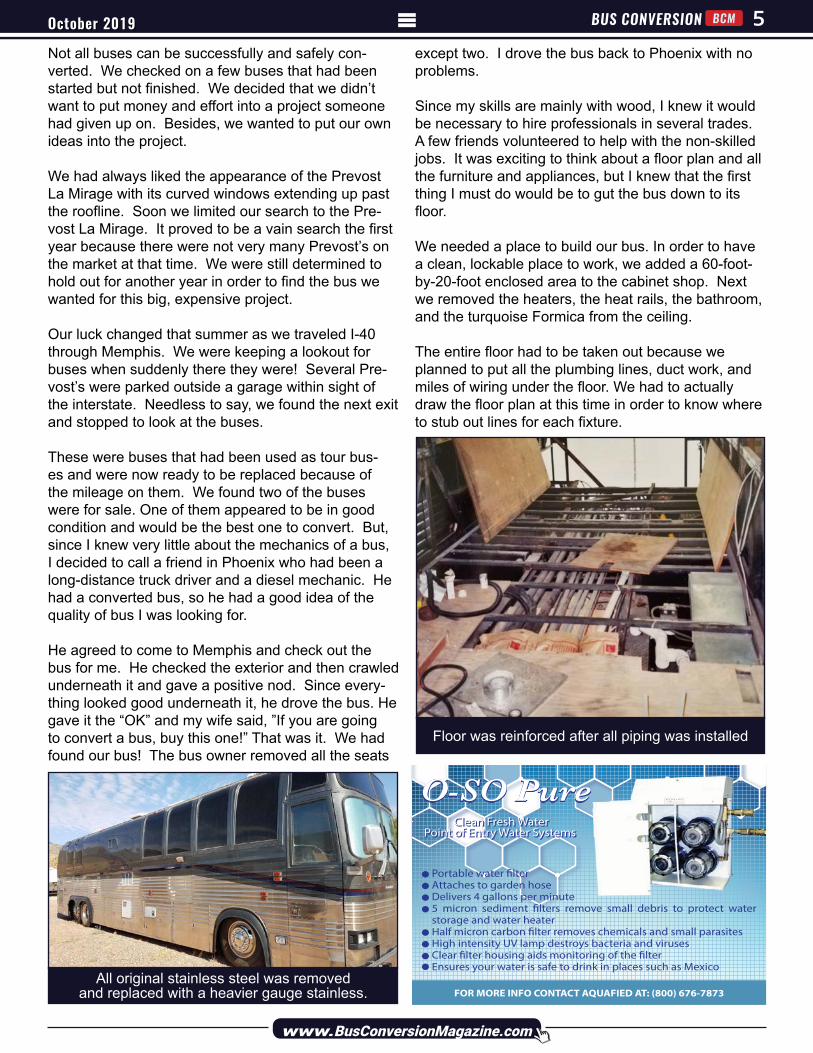
These were buses that had been used as tour bus-es and were now ready to be replaced because of the mileage on them. We found two of the buses were for sale. One of them appeared to be in good condition and would be the best one to convert. But, since I knew very little about the mechanics of a bus, I decided to call a friend in Phoenix who had been a long-distance truck driver and a diesel mechanic. He had a converted bus, so he had a good idea of the quality of bus I was looking for. He agreed to come to Memphis and check out the bus for me. He checked the exterior and then crawled underneath it and gave a positive nod. Since every-thing looked good underneath it, he drove the bus. He gave it the “OK” and my wife said, ”If you are going to convert a bus, buy this one!” That was it. We had found our bus! The bus owner removed all the seats
except two. I drove the bus back to Phoenix with no problems.
Since my skills are mainly with wood, I knew it would be necessary to hire professionals in several trades. A few friends volunteered to help with the non-skilled jobs. It was exciting to think about a floor plan and all the furniture and appliances, but I knew that the first thing I must do would be to gut the bus down to its floor. We needed a place to build our bus. In order to have a clean, lockable place to work, we added a 60-foot-by-20-foot enclosed area to the cabinet shop. Next we removed the heaters, the heat rails, the bathroom, and the turquoise Formica from the ceiling.
The entire floor had to be taken out because we planned to put all the plumbing lines, duct work, and miles of wiring under the floor. We had to actually draw the floor plan at this time in order to know where to stub out lines for each fixture.
All original stainless steel was removed and replaced with a heavier gauge stainless.
Floor was reinforced after all piping was installed
O-SO PureO-SO Pure
FOR MORE INFO CONTACT AQUAFIED AT: (800) 676-7873
Clean Fresh WaterPoint of Entry Water Systems
Clean Fresh WaterPoint of Entry Water Systems
Portable water �lterAttaches to garden hoseDelivers 4 gallons per minute5 micron sediment �lters remove small debris to protect water storage and water heaterHalf micron carbon �lter removes chemicals and small parasitesHigh intensity UV lamp destroys bacteria and virusesClear �lter housing aids monitoring of the �lterEnsures your water is safe to drink in places such as Mexico
BCM BUS CONVERSION October 20196
www.BusConversionMagazine.com
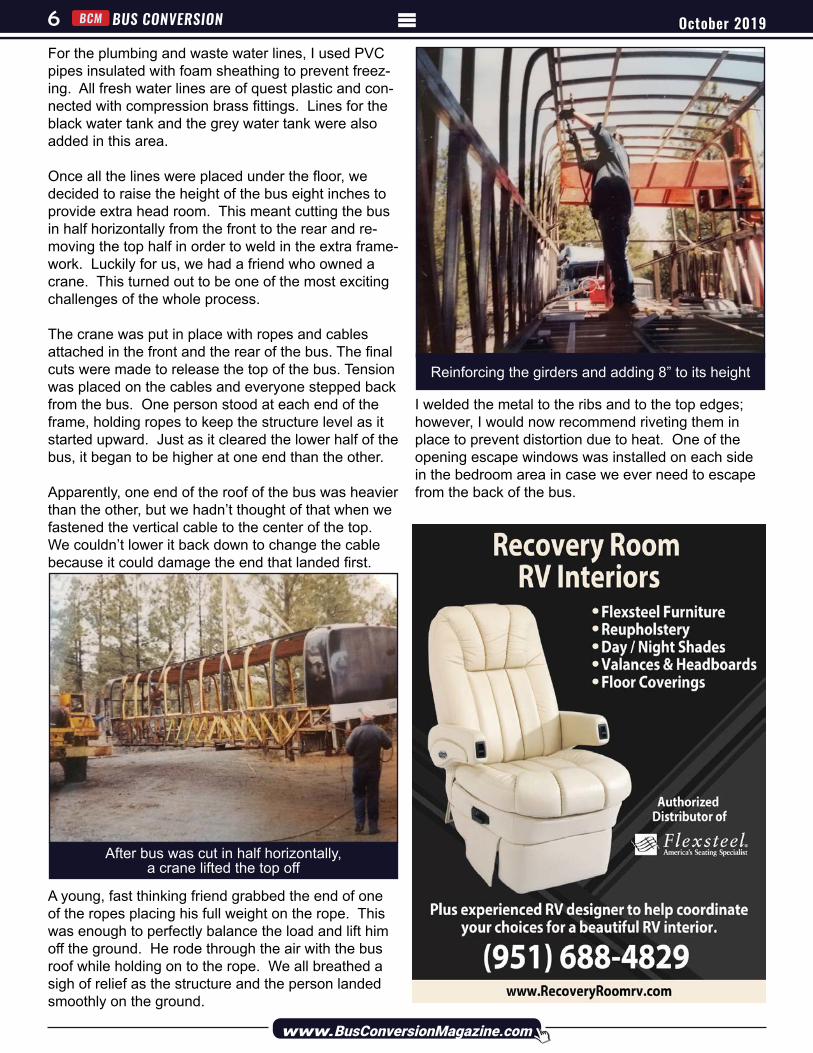
For the plumbing and waste water lines, I used PVC pipes insulated with foam sheathing to prevent freez-ing. All fresh water lines are of quest plastic and con-nected with compression brass fittings. Lines for the black water tank and the grey water tank were also added in this area. Once all the lines were placed under the floor, we decided to raise the height of the bus eight inches to provide extra head room. This meant cutting the bus in half horizontally from the front to the rear and re-moving the top half in order to weld in the extra frame-work. Luckily for us, we had a friend who owned a crane. This turned out to be one of the most exciting challenges of the whole process.
The crane was put in place with ropes and cables attached in the front and the rear of the bus. The final cuts were made to release the top of the bus. Tension was placed on the cables and everyone stepped back from the bus. One person stood at each end of the frame, holding ropes to keep the structure level as it started upward. Just as it cleared the lower half of the bus, it began to be higher at one end than the other. Apparently, one end of the roof of the bus was heavier than the other, but we hadn’t thought of that when we fastened the vertical cable to the center of the top. We couldn’t lower it back down to change the cable because it could damage the end that landed first.
A young, fast thinking friend grabbed the end of one of the ropes placing his full weight on the rope. This was enough to perfectly balance the load and lift him off the ground. He rode through the air with the bus roof while holding on to the rope. We all breathed a sigh of relief as the structure and the person landed smoothly on the ground.
I welded the metal to the ribs and to the top edges; however, I would now recommend riveting them in place to prevent distortion due to heat. One of the opening escape windows was installed on each side in the bedroom area in case we ever need to escape from the back of the bus.
After bus was cut in half horizontally,a crane lifted the top off
Reinforcing the girders and adding 8” to its height
October 2019
www.BusConversionMagazine.com
BCMBUS CONVERSION 7
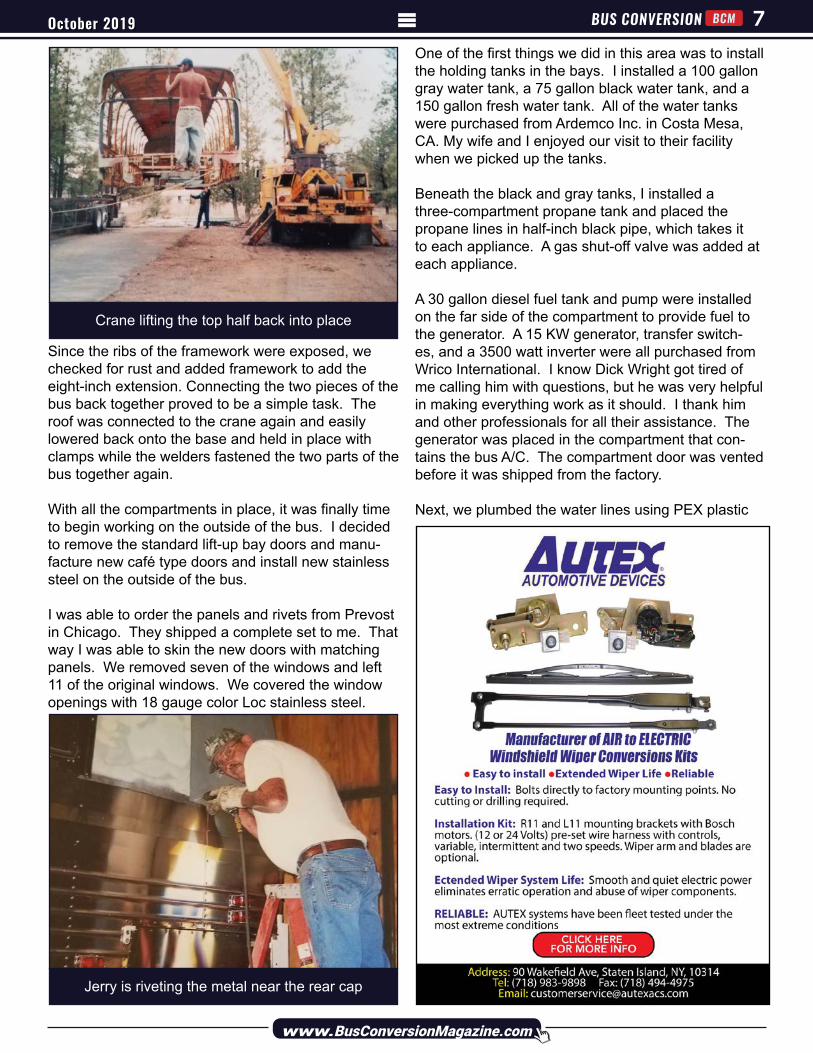
Since the ribs of the framework were exposed, we checked for rust and added framework to add the eight-inch extension. Connecting the two pieces of the bus back together proved to be a simple task. The roof was connected to the crane again and easily lowered back onto the base and held in place with clamps while the welders fastened the two parts of the bus together again. With all the compartments in place, it was finally time to begin working on the outside of the bus. I decided to remove the standard lift-up bay doors and manu-facture new café type doors and install new stainless steel on the outside of the bus. I was able to order the panels and rivets from Prevost in Chicago. They shipped a complete set to me. That way I was able to skin the new doors with matching panels. We removed seven of the windows and left 11 of the original windows. We covered the window openings with 18 gauge color Loc stainless steel.
One of the first things we did in this area was to install the holding tanks in the bays. I installed a 100 gallon gray water tank, a 75 gallon black water tank, and a 150 gallon fresh water tank. All of the water tanks were purchased from Ardemco Inc. in Costa Mesa, CA. My wife and I enjoyed our visit to their facility when we picked up the tanks.
Beneath the black and gray tanks, I installed a three-compartment propane tank and placed the propane lines in half-inch black pipe, which takes it to each appliance. A gas shut-off valve was added at each appliance. A 30 gallon diesel fuel tank and pump were installed on the far side of the compartment to provide fuel to the generator. A 15 KW generator, transfer switch-es, and a 3500 watt inverter were all purchased from Wrico International. I know Dick Wright got tired of me calling him with questions, but he was very helpful in making everything work as it should. I thank him and other professionals for all their assistance. The generator was placed in the compartment that con-tains the bus A/C. The compartment door was vented before it was shipped from the factory. Next, we plumbed the water lines using PEX plastic
Crane lifting the top half back into place
Jerry is riveting the metal near the rear cap

1975 Prevost LaMirage
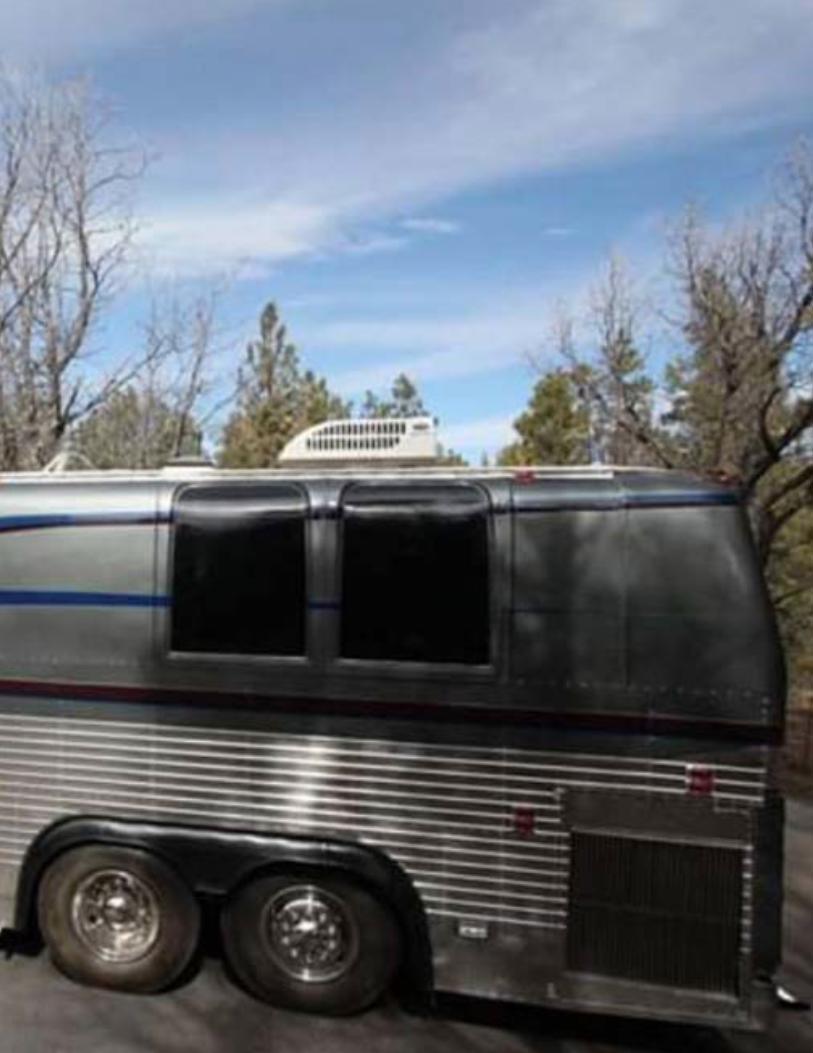
1975 Prevost LaMirage

BCM BUS CONVERSION October 201910
www.BusConversionMagazine.com
lines. We used a 10 gallon combination hot water heater (110 volt electric/propane). I used a standard demand RV water pump for the supply. The water goes through a filter system into a pressure tank to make a steady flow of water. When all the necessary tanks, etc. were installed, we still had one whole bay available for tools and storage of tables, chairs, and overflow from the living area.
Definitely the toughest project of all was to replace the 8V71 engine, which didn’t have enough power for me and leaked oil. After much research, I chose a Series 60 Detroit power plant that I located in a Bus Conver-sion Magazine classified ad.
The next problem was how to get it from its location in Indiana to our home in Arizona. We have a friend who is a truck driver. I gave him a call and found that he just happened to be in Indiana at that time and would pick it up and take it as far as Provo, Utah. I met him there with a trailer and picked it up.
Then I secured a 755 Allison transmission to fit the new engine. This posed another problem. The en-gine-transmission combination was too long for the compartment. While reworking the framework and raising the roof, we extended the engine compartment
16 inches to accommodate the new power plant. Once the engine was installed, all the wiring for the engine and transmission was installed by Dan Linhart of Tucson. The miles of wiring in the wiring harness was beyond my capabilities. The next step was to replace the roof, which had been removed down to the framework. We used 18 gauge color Loc steel which we welded to the framework of the roof. When we finished the welding, we were ready to install air conditioners.
We installed three Carrier 13,500 BTU A/C heat pump/air conditioners and three Fantastic roof vents for circulation and ventilation. When we finished, we sealed the roof with P.C. Ceramic white to seal any leaks. This gave a white reflective surface to help reflect the Arizona sun.
Since the under floor work was completed and the ceiling was raised, the fun was ready to begin on the inside. I covered the floor with three-quarter-inch ma-rine plywood and screwed it to the steel framework. Now we were finally ready to draw the final floor plan by chalking in where each appliance would be placed. This was actually planned when we put the plumbing

October 2019
www.BusConversionMagazine.com
BCMBUS CONVERSION 11
and the electrical wiring under the floor. The kitchen appliances featured large three-way (AC/DC/propane) refrigerator/freezer and an upgraded oven and cook-top.
Most motorhomes have a hood with a small fan that removes very little of the cooking odors. I decided to modify a regular house hood and vent. I easily found one that was the right width, but the depth would be too far forward. To remedy this, I shortened the hood from front to back using a die grinder to cut off about eight inches vertically from the front of the hood. I made a panel of cherry wood to cover the opening. This gave me a good place to put the fan and light switches. Now we have a powerful fan, and the cher-ry panel is very decorative. As soon as the kitchen appliances were in place, we could see the space left for furniture.
We purchased a patterned Flexsteel sofa and a barrel chair for the living/kitchen area. I also bought extra material of both patterns which my wife used when she made the window valences. We wanted a television, but not be the dominant piece of furniture. I decided to build a ceiling mounted cherry cabinet above and in front of the driver’s seat. When the cabinet is unlocked, the cabinet door opens and lowers the TV downward making it visible from anywhere in the living area. An entertainment cen-ter is located between the driver’s seat and the sofa. The driver’s seat and the passenger’s seat both turn around to add more seating for the living area. I feel that the entryway to a bus should be as inviting as the entry to your home. Therefore, I tried to make it unique, yet practical. When a person enters the bus, you will notice that the left side of the door has a bank of switches to control the outside light, spotlights for the steps, a map light above the passenger’s seat, and an overhead light.
Next to the refrigerator is one of three large pantries.
The entrance has diamond plate steps edged with cherry. Lights are along both sides of the steps.

BCM BUS CONVERSION October 201912
www.BusConversionMagazine.com
The steps and the sides of the entry are made of raised panels of cherry wood. One of the side panels opens to reveal a fire extinguisher for easy access from the inside or the outside. For the floor, I used granite like that in the bathroom for easy cleaning of the landing floor. I added a large magazine rack near the passenger seat for the atlas and other reading materials.
The original gear shift was located to the right of the driver, which seemed very inconvenient. I moved it to the left of the driver’s seat by building a six inch wide instrument panel along the wall of the bus under the driver’s window. The Jake brake, cruise control, and stop engine override switches are also located on this panel. The rest of the instrument panel is locat-ed along the firewall with the backup camera. Both instrument panels are covered with Amboyna burl wood.
The passenger’s seat posed quite a problem. I had to solve the problem of the passenger’s feet being suspended over the steps while we were traveling. There were several options, with each one having its own problems. Finally, I decided to use an air ram. We also wanted the passenger seat to be able to rotate 180 degrees toward the living room.
First of all, I had to build a platform to house the mov-ing parts. The air ram I used was actually built to be used as a school bus door opener. I placed a toggle switch on the side of the base of the chair. When the toggle switch is pushed forward, the footrest moves forward across the opening above the steps. This has worked very well for us.
Now we could see the amount of space left for cabi-nets. I have worked with many varieties of wood, but cherry is my favorite wood for fine furniture. Raised panels were used wherever possible such as the raised panels on the refrigerator/freezer doors as well as all the cabinet doors. The cherry wood was finished with red mahogany stain and sealed with several coats of lacquer.
The only other wood used was red cedar for the inside of both closets. The kitchen cabinets reach from the end of the sofa to the end wall. There was enough space left to make a return cabinet along the adjacent wall. The lower cabinets feature slide-out shelves under the sink to provide easy access to the supplies stored there.
Two problems that we had with standard motorhomes
were doors popping open and drawers sliding out as we drove down the road. We discovered that one solution to both problems is to use magnets. There are drawer guides made with magnets at the back of the drawers to prevent them from sliding out easily. We used standard house magnetic catches on the cabinet doors. Another simple safety idea is to build a little lip on the front edge of each shelf.
I am sure that everyone has used shelf paper, but if you haven’t tried the rubberized grip shelf liner, you will be surprised at how well it holds things in place. It will even hold small decorative items securely on the counter or a table while you travel.
Next to the refrigerator, I built a cabinet with a pantry in the top half and drawers in the bottom half. The only other item needed in the kitchen was a table. We considered several types of tables and finally decided to make a table patterned after the one in our home. It is a 32 inch square English library table with leaves that slide out beneath the floating table top. Of course, it is made of cherry wood. I created a god’s eye pattern covering most of the top and trimmed the edges with more cherry.

October 2019
www.BusConversionMagazine.com
BCMBUS CONVERSION 13
The table has two large legs that fit into a horizontal base. My wife used the turning lathe to turn the 5-inch diameter wood into interesting shaped legs. The table was finished to match the rest of the cabinets and furniture. If we need more eating space, we always carry the folding TV trays, which can be used by the sofa.
Our previous motorhomes have had dark paneling on the walls that made the whole area look dark. We wanted this bus to look light and bright. We consid-ered iced oak paneling like what we had added to our last motorhome. Finally, we decided on washable vi-nyl wallpaper. We chose a muted pattern with colors that coordinated with the sofa, valances, and carpet.
Since we would be moving through a variety of humid-ity and temperatures, we were concerned about the vinyl separating at the seams. We decided to choose 42-inch wide paper and hang it horizontally rather than vertically. The window trim would seal it at the top and the bottom edge would be caught at the floor level. We hung it with regular wallpaper paste. We used the same method in the bedroom. The wallpaper in the bathroom is a watercolor muted stripe. We had to hang it vertically because of the curved walls.
Everyone who has a motorhome or a bus wants it to look open and inviting while preserving privacy. In an effort to achieve both, I kept the hall straight through the bus. However, raised panel cherry pocket doors were placed at each end of the bathroom. Privacy can be enjoyed by closing either door.
I also added a linen closet, a dry goods pantry, and a cedar lined clothes closet along one wall. We also added a Fantastic fan like the one in the kitchen. The toilet area has a small window which we took out of the sleeper area of a big rig. We also installed a sleeper window above the kitchen sink.
The plush driver’s seat and passenger’s seat can be turned around to add additonal seating

BCM BUS CONVERSION October 201914
www.BusConversionMagazine.com
Pocket doors are ideal for buses and motorhomes because they don’t waste the “swing” space when the door is open. Commercial strength Velcro is ideal to hold the doors in place when they are open. After the frame is built, but before the door is inserted, a person must attach one side of the Velcro to the back of the pocket door frame. Attach the other part of the Velcro to the edge of the door. Be sure to attach a pocket door latch to hold the door closed. This method has worked well for us.
Motorhome bathrooms have always been cramped and too small, with showers where you bump your el-bows on both walls. Maybe we made ours a little too
large, but we had the space and used plenty of it for our bathroom. First of all, I didn’t want the toilet area to show when the door was open. I partitioned off part of the bathroom in order to provide a private toilet area. I placed the electrical control panel on the wall above the toilet and then hung a picture over it.
The worst complaint we have ever had about moto-rhome bathrooms was the size of the shower. We decided to remedy this by installing a regular home shower. This would have worked well with a bus that had vertical walls, but the Prevost, with its curved walls near the ceiling, posed a problem.
No bumping your elbows in this large shower
The Cockpit ready for travel
Want a FREE 1- year Subscription?
Send us a 10-15 minute video of your bus. Include a walk around the outside, showing the engine and the bays and a walk through the inside. Describe your bus and its fea-tures on the video. Zip it up and send it to me via Dropbox or your preferred method of delivery. We will add it to our YouTube channel for everyone to see and include a link to it in our next issue. We will give you a 1-year extension to your subscription in exchange for your being able to show our readers your bus. All buses shapes and sized are welcome.
Email it to [email protected] or send it on a thumb drive to the address on page 2.
To view our current videos which we are adding weekly,
October 2019
www.BusConversionMagazine.com
BCMBUS CONVERSION 15
First, we had to get the shower stall into the bus. The only way to do this was to bring it in over the engine. This had to be done before the back cap was reat-tached. Setting it in place would have been easy if the bus had vertical walls from floor to ceiling. When we had it in position, we could see that we had to cut a few inches off its height to make the shower stall set against a vertical wall. This meant that we had to have a custom built shower door.
To give the stall the normal height, I glued Formica from the top of the shower stall to the ceiling. Then I attached the shower stall to the Formica. I also at-tached Formica across the ceiling above the stall to prevent moisture from collecting there. When the shower was finished, we could laugh at the challenges and how we had solved each one of them. We are enjoying the large shower stall. One bit of advice is that if you are converting a Prevost La Mirage, I wouldn’t recommend a home shower unless you want to spend three days struggling with it like we did. Thank goodness the rest of the bathroom didn’t pose any major problems.
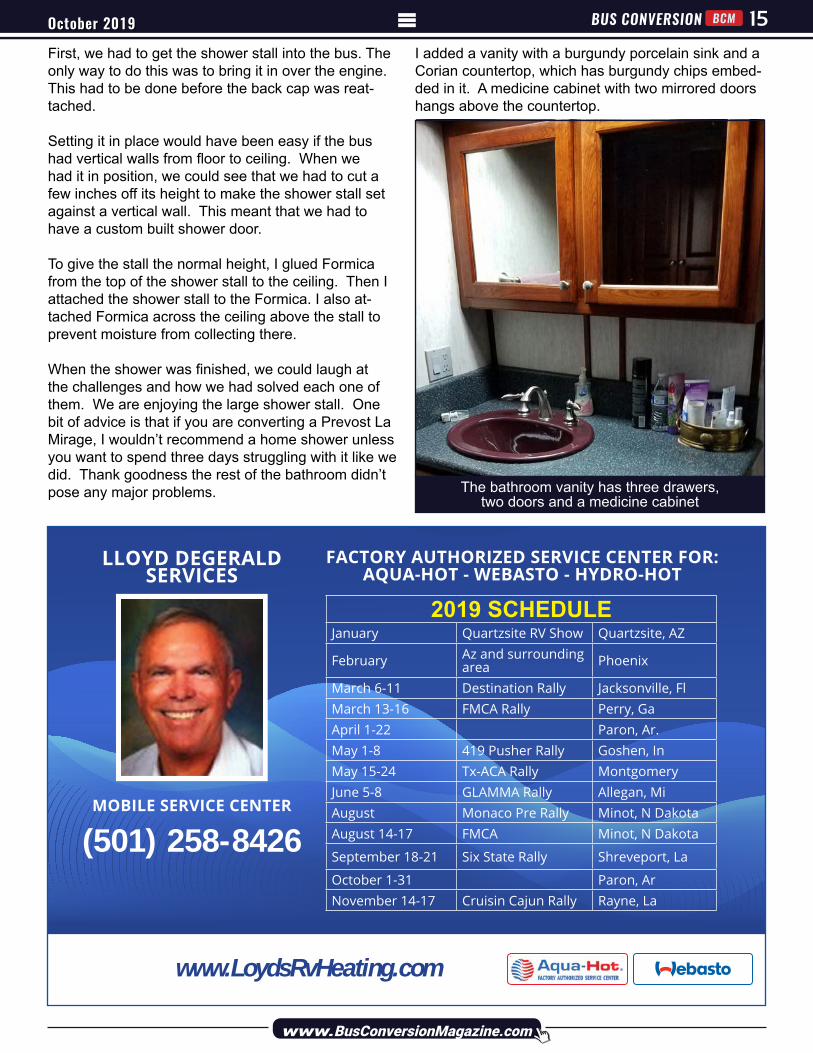
I added a vanity with a burgundy porcelain sink and a Corian countertop, which has burgundy chips embed-ded in it. A medicine cabinet with two mirrored doors hangs above the countertop.
The bathroom vanity has three drawers,two doors and a medicine cabinet
(501) 258-8426MOBILE SERVICE CENTER
LLOYD DEGERALD SERVICES
FACTORY AUTHORIZED SERVICE CENTER FOR:AQUA-HOT - WEBASTO - HYDRO-HOT
www.LoydsRvHeating.com
2019 SCHEDULEJanuary Quartzsite RV Show Quartzsite, AZ
February Az and surrounding area Phoenix
March 6-11 Destination Rally Jacksonville, FlMarch 13-16 FMCA Rally Perry, GaApril 1-22 Paron, Ar. May 1-8 419 Pusher Rally Goshen, InMay 15-24 Tx-ACA Rally MontgomeryJune 5-8 GLAMMA Rally Allegan, MiAugust Monaco Pre Rally Minot, N Dakota August 14-17 FMCA Minot, N Dakota
September 18-21 Six State Rally Shreveport, La
October 1-31 Paron, ArNovember 14-17 Cruisin Cajun Rally Rayne, La

BCM BUS CONVERSION October 201916
www.BusConversionMagazine.com
The only thing left to finish the bathroom was the granite floor. Since any RV has some vibrations when it is moving, we laid down a rubber mesh designed for use in areas where earthquakes occur. The granite squares were laid on top of the mesh and held in place with Kwikset.
The bedroom reaches from the bathroom to the back of the bus. The bedroom has a bank of drawers with a place for a television if one is needed. It also has a cedar lined clothes closet with drawers beneath. The 54-inch-by-78-inch bed is raised 16 inches above the floor because the engine is under part of the bed. This gives us about 20 inches on each side of the bed, allowing us to walk around three sides of the bed.
Raised panels form the sides of the bed. The area beneath the bed and above the engine is insulated with stainless steel and covered with plywood, which has foil backed urethane foam attached to it. These insulating materials keep the engine noise and fumes from entering the bedroom. A large removable panel under the bed provides access to the engine.
The last two feet of the raised area has a built in ce-dar storage area. A gas piston was installed to raise the end of the mattress and gain easy access to the storage area. The back wall of the bedroom has a middle section made of beveled smoked glass mirrors to form the area of the headboard. Storage cabinets fill in the rest of back wall.
My wife ordered extra upholstery material to match the furniture in the living room. She used this to make the trim for all the living room windows and to make the valances. The photo shows the pattern she devel-oped between the windows and how the valance ties the windows together.
We placed small spot lights on each vertical partition of the window treatment. The bedroom windows were completed in the same manner with different material.
We used mini blinds throughout the bus.
With everything almost completed, we were ready to paint the bus. We had looked at the paint job of many buses that we saw on the road. My wife want-ed something not too complicated, yet colorful. She drew a design to scale, but needed it to be 12 feet long for one side and 16 feet long for the other side. She finally took it to a local graphics shop where they did the enlarging of her drawing.
After applying primer and the base coat, it was time for the graphics. My wife insisted on having a quar-ter-inch fluorescent green stripe to outline the colors. She didn’t realize the extra amount of taping and spraying that would be required for that little stripe. But, she was right because the stripe did make the colors stand out better. The final coats of clear coat were applied.
The only step left was to load the bus with all of our clothes and supplies and enjoy the fruits of our labor.
Editor’s Note: This beautiful bus is now for sale. See more photos on our Classified Ad page on our web-site: https://www.busconversionmagazine.com/1975-prevost-la-mirage-bus/
Smoked beveled glass creates an interesting headboard. Look at the storage space too!

October 2019
www.BusConversionMagazine.com
BCMBUS CONVERSION 17
A close up of the simple colorful exterior design
BCM BUS CONVERSION October 201918
www.BusConversionMagazine.com
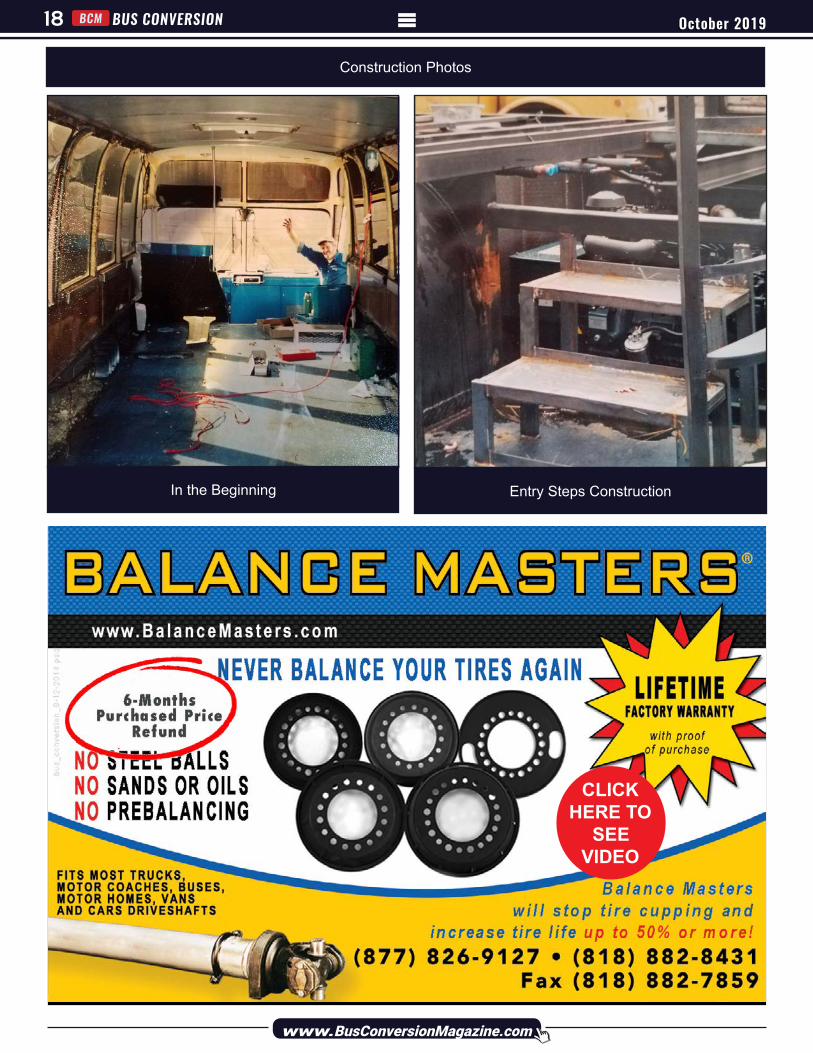
In the Beginning
Construction Photos
Entry Steps Construction
CLICK HERE TO
SEEVIDEO
October 2019
www.BusConversionMagazine.com
BCMBUS CONVERSION 19
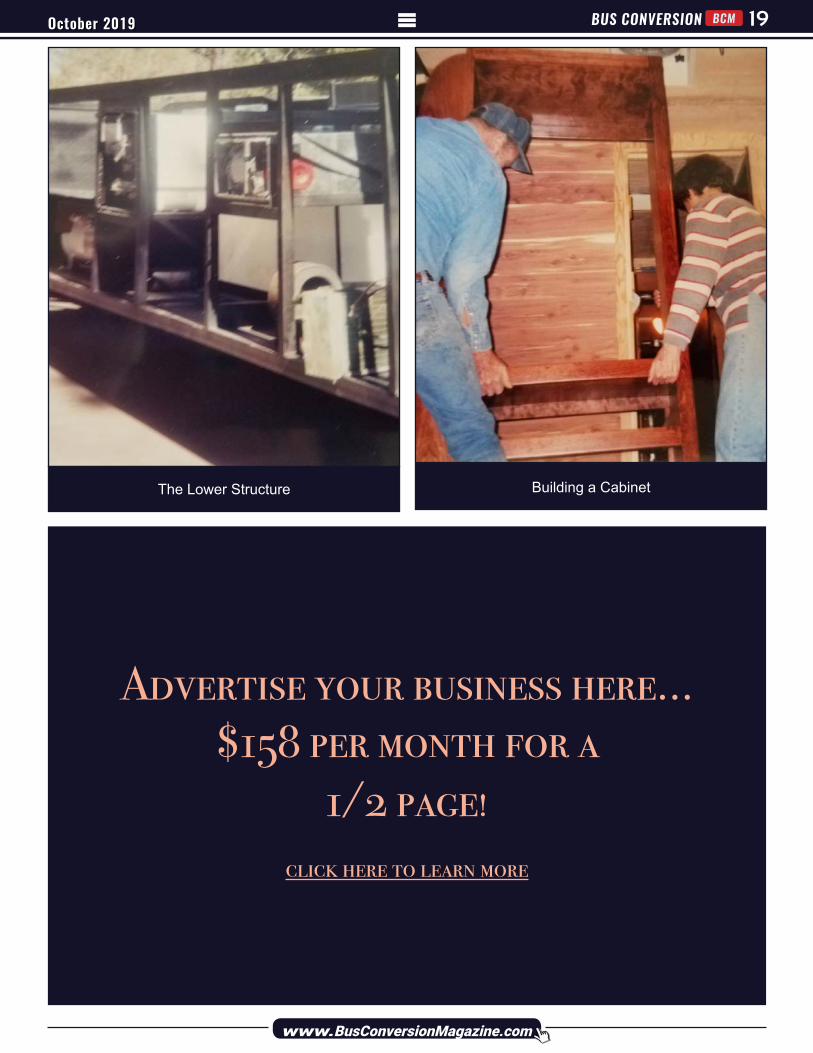
The Lower Structure Building a Cabinet
Advertise your business here…$158 per month for a
1/2 page!click here to learn more
BCM BUS CONVERSION October 201920
www.BusConversionMagazine.com
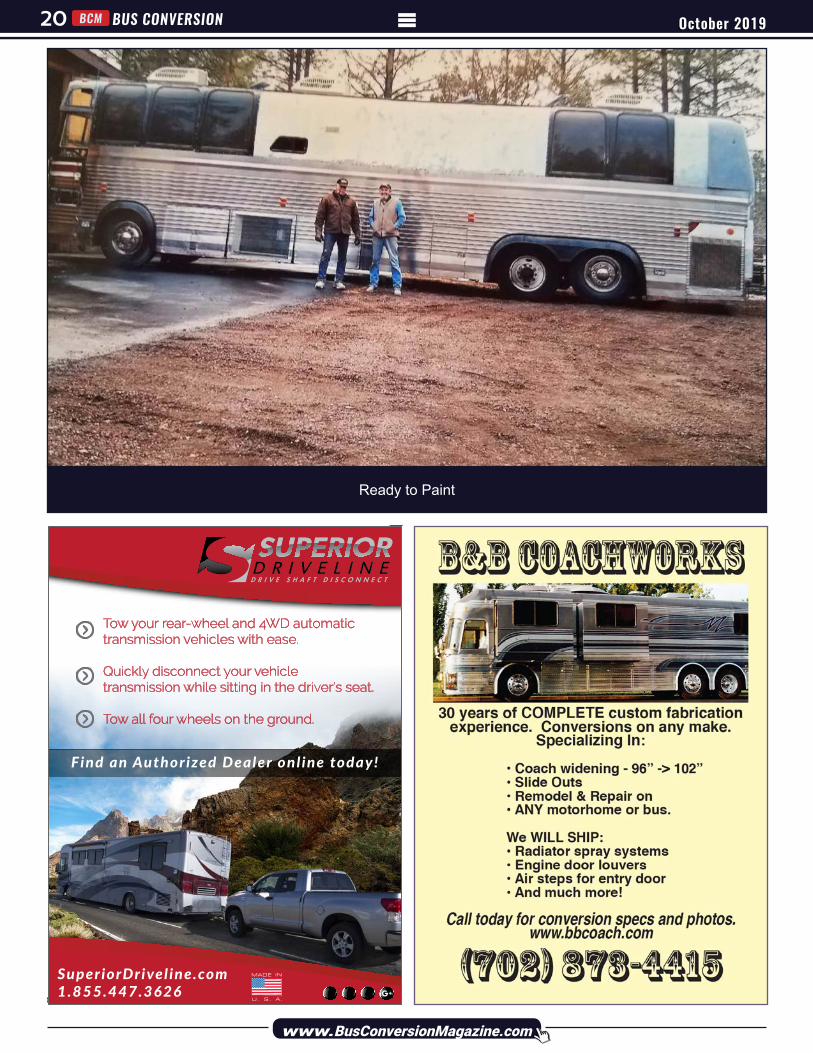
Ready to Paint
Tow your rear-wheel and 4WD automatic transmission vehicles with ease.
Quickly disconnect your vehicle transmission while sitting in the driver’s seat.
Tow all four wheels on the ground.
D R I V E S H A F T D I S C O N N E C T
SuperiorDrivel ine.com1.855.447.3626
Find an Authorized Dealer onl ine today!
October 2019
www.BusConversionMagazine.com
BCMBUS CONVERSION 21
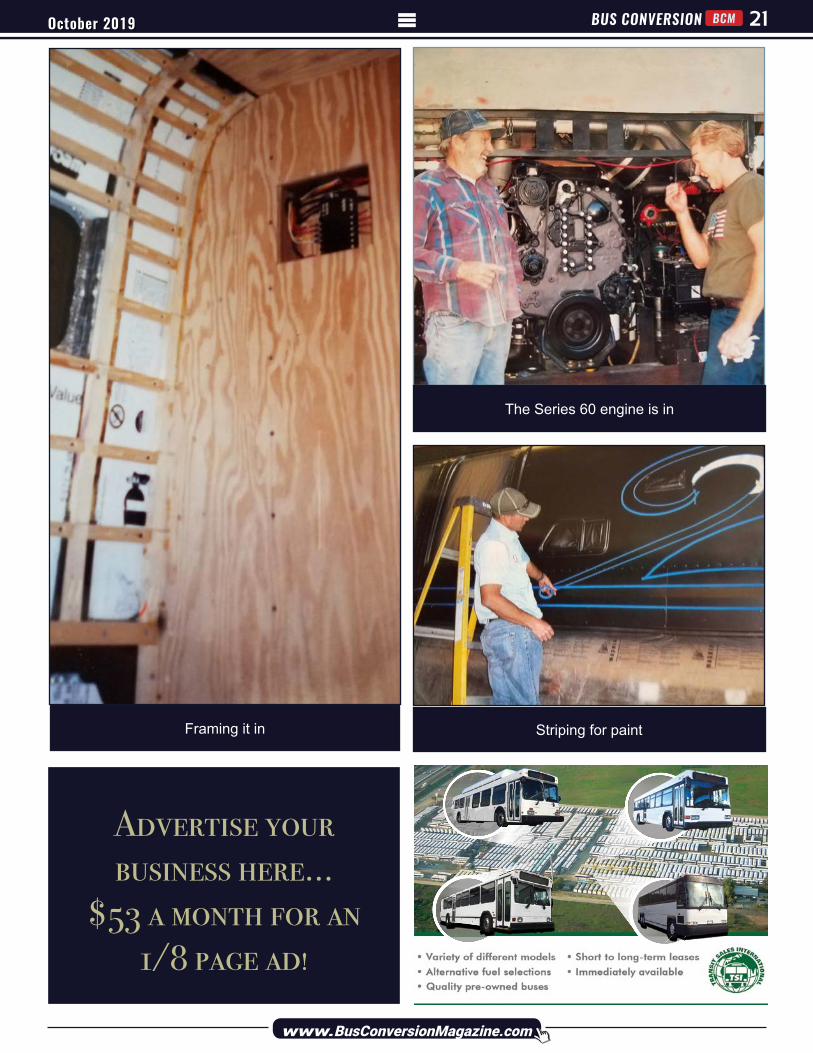
The Series 60 engine is in
Striping for paintFraming it in
Advertise your business here…
$53 a month for an1/8 page ad!

BCM BUS CONVERSION October 201922
www.BusConversionMagazine.com
• 1975 Prevost LaMirage• Manufacturer: Prevost Car• Years Converted: 2004-2009• Conversion by: Jerry and Elnora Johnson, and
friends• Vehicle Weight: 38,750 lbs. fully loaded• Fuel Tank: 160 gallons • Engine: 60 Series Detroit• Transmission: HT755CR with Allison retarder• Generator: 15KW Diesel by Wrico with 3500W
Inverter• Batteries: Starting 2-12V HD; House 6-6V
deep cycle in 12V series• Miles per gallon: 6.5• Raised roof: 8 inches• Overall length: 41ft. 8in.• Overall height: 12ft. 6in.• Overall width: 96in.• Backup Camera: Wrico International• Air Conditioners: 3 Carrier roof-mounted heat
pumps • Exhaust fans: 3 Fantastic fans• Insulation: Walls-3” Polyfoam; Ceiling-3 1/2”
fiberglass plus 1 ½” foam
• Fresh water tanks: 130 gal. Plastic by Ardem-co Inc.
• Gray water tank: 80 gal. Plastic by Ardemco Inc.
• Black water tank: 80 gal. Plastic by Ardemco Inc.
• Water pump: Shurflo• Water filter: Aqua Pure whole house• Plumbing: Drain lines P.V.C.; Supply lines-
PEX with brass fittings• Propane: 40 gal. with 3 tanks connected hori-
zontally • All solid furniture: Cherry wood with stain and
lacquer finish• Other furniture: sofa, chairs, driver and pas-
senger seats are by Flexsteel• Floor covering: living room and bedroom are
carpeted; bathroom and entry have marble tile• Refrigerator: Norcold RV• Stove: Atwood-three burners and oven • Microwave: Samsung
BUS SPECIFICATIONS
P PRVRVacific ar ts
Welcome to Pacific RV PartsThe Best Source for
all Your RV Parts.If you need RV Parts or Accessories for your:
Bus Conversion - RV - MotorhomeTrailer - 5th Wheel - Toy Hauler
Camper - Tent TrailerWe specialize in Velvac RV Bus Mirrors.
www.VelvacRVMirrors.comWe are here to serve you with
Great Pricing & Excellent Service!
Dometic Penguin Duo Therm 13,500 BTU Cool-Only
Air Conditioner$64588
Suburban SF-30Q30,000 BTU RV Furnace
$71588
Suburban 10 Gallon RV Water Heater
$42588
Maxxfan Ventilator White RV Roof Vent
$24888
www.PacificRVParts.com
(888) 600-4845info@Pacif icRVParts.com
We can assist you with any and all of your RV Parts needs.All in stock orders usually ship the next business day.

October 2019
www.BusConversionMagazine.com
BCMBUS CONVERSION 23
Jerry and Elnora Johnson live in Lakeside, Arizona. Jerry is a licensed contractor who has built hundreds of homes in the Phoenix area and in the White Mountain of Arizona. 25 years ago he switched his focus to build-ing custom furniture and cabinets. Elnora taught history and government for 34 years before she retired. Both enjoy camping, Dutch oven cooking, fishing and interact-ing with their daughters, grandchildren and great-grandchildren.
BY Elnora and Jerry Johnson
Want to be Famous?
If you have a finished, or almost finished bus, tractor trailer, truck, or any unusual conversion and you want us to feature it on the cover of BCM, then send us an email about your rig and a photo of the outside and one of the inside and we will contact you about including your story in our magazine. Everyone who submits a feature article will receive a free 5-year extension to their subscription. We also are in need of non-feature articles as well. If you have a non-feature story you would like to submit about something specific about your bus or a trip you took in your bus, send it along too.
If you have interesting photos about any bus or bus parts, send them along. All non-feature articles and photos will receive a free 1-3 year subscription to the magazine depending on how extensive it is.
This magazine is written by Bus Nuts for Bus Nuts and without your articles, there would be
no Bus Conversion Magazine.
Email your information to: [email protected]