2 getting to know your outlook - general motors · congratulations on your purchase of a saturn...
TRANSCRIPT

Congratulations on your purchase of a Saturn OUTLOOK. Please read this information and your OwnerManual to ensure an outstanding ownership experience. Note that your vehicle may not include all thefeatures described in this booklet. Keep this booklet with your Owner Manual for easy reference.
DRIVER INFORMATIONInstrument Panel . . . . . . . . . . . . .2Instrument Panel Cluster . . . . . . .3Driver Information Center . . . . . . .4
SAFETY & SECURITYRemote Keyless Entry . . . . . . . . .5OnStar® . . . . . . . . . . . . . . . . . . . . . .6Child Restraints (LATCH) . . . . . . .6
COMFORT Seat Adjustments . . . . . . . . . . . . .62nd-Row Seats . . . . . . . . . . . . . . .73rd-Row Seats . . . . . . . . . . . . . . . .8Heated Seat Controls . . . . . . . . . .8Memory Seat and Mirrors . . . . . . .9Steering Wheel Adjustment . . . . .9Dual Automatic Climate Controls . . . . . . . . . . . . . . . . . . . . .9Manual Climate Controls . . . . . .10Rear Seat Climate Controls . . . .11
ENTERTAINMENT Audio System Features . . . . . . .12Navigation Entertainment System . . . . . . . . . . . . . . . . . . . . .14Audio Steering Wheel Controls .14Bluetooth® System . . . . . . . . . . .14Rear Seat Audio and DVD Rear Seat Entertainment Systems . . . . . . . . . . . . . . . . . . . .15XM® Radio . . . . . . . . . . . . . . . . . .16
CONVENIENCE Automatic Headlamp System . . .16Interior Lighting Features . . . . . .16Windshield Wipers and Washer .17Heated Washer Fluid . . . . . . . . . .17Outside Power Foldaway Mirrors . . . . . . . . . . . . . . . . . . . . .18Power Windows . . . . . . . . . . . . . .18Sunroof . . . . . . . . . . . . . . . . . . . . .18Cruise Control . . . . . . . . . . . . . . .19
Rear Convenience Center . . . . .19Center Console Features . . . . . .192nd-Row Console Features . . . .20115-Volt Outlet . . . . . . . . . . . . . . .20Ultrasonic Rear Park Assist . . . .20Power Liftgate . . . . . . . . . . . . . . .20Remote Vehicle Start . . . . . . . . .21
PERFORMANCE & MAINTENANCE Refueling the Vehicle . . . . . . . . .22Automatic Transmission Operation . . . . . . . . . . . . . . . . . . .22StabiliTrak® – Stability ControlSystem . . . . . . . . . . . . . . . . . . . . .22Trailer Towing . . . . . . . . . . . . . . .22Tire Pressure Monitor . . . . . . . . .23Resetting the Oil Life System . .23
OWNER INFORMATIONRoadside Assistance . . . . . . . . .24My Saturn . . . . . . . . . . . . . . . . . . .24

Getting to Know Your OUTLOOK2
See Section 3 of your Owner Manual.
DRIVER INFORMATION
Instrument Panel
The main features of the instrumentpanel include:
A. Air OutletsB. Turn Signal/Windshield
Wipers/Multifunction LeverC. Instrument Panel ClusterD. Driver Information Center Buttons
(if equipped)E. Hazard Warning Flashers ButtonF. Audio System/Navigation System
(if equipped)G. Passenger Airbag Status IndicatorH. Exterior Lamps ControlI. Instrument Panel Brightness ControlJ. Hood Release
D GA AFB EA C
O PH I K ML NJ S TRQ VPU
K. Cruise ControlsL. Tilt and Telescopic Steering Wheel
LeverM. HornN. Audio Steering Wheel Controls
(if equipped)O. Climate ControlsP. Heated Seat Buttons (if equipped)Q. Shift LeverR. Traction Control ButtonS. Tow/Haul Mode Button (if equipped)T. Power Liftgate Button (if equipped)U. Accessory Power OutletV. Glove Box

3
See Section 3 of your Owner Manual.
B LIDCA
Note: The instrument panel clusteris designed to let you know aboutmany important aspects of yourvehicle’s operation. It is importantto read your Owner Manual andbecome familiar with the informationbeing relayed to you by the lights,gauges and indicators, as well aswhat action can be taken to ensuresafety and to prevent damage.
E GF H KJ
Instrument Panel Cluster
Your vehicle’s instrument panel isequipped with this cluster or one verysimilar to it. The instrument panel clusterincludes these key features:
A. Engine Coolant Temperature GaugeB. TachometerC. Malfunction Indicator Lamp
(Check Engine Light)D. Tire Pressure Warning LightE. Driver Information CenterF. Fuel GaugeG. SpeedometerH. Security LightI. Cruise Control Set Light
J. Antilock Brake System Warning Light
K. StabiliTrak Warning LightL. Voltmeter
Getting to Know Your OUTLOOK4
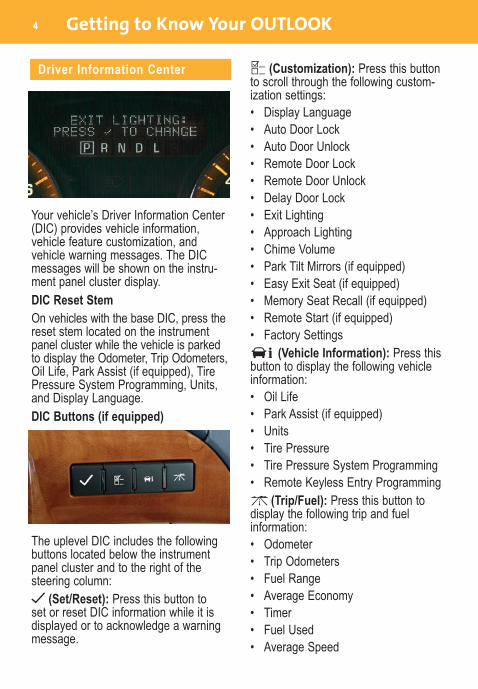
Driver Information Center
Your vehicle’s Driver Information Center(DIC) provides vehicle information,vehicle feature customization, andvehicle warning messages. The DICmessages will be shown on the instru-ment panel cluster display. DIC Reset StemOn vehicles with the base DIC, press thereset stem located on the instrumentpanel cluster while the vehicle is parkedto display the Odometer, Trip Odometers,Oil Life, Park Assist (if equipped), TirePressure System Programming, Units,and Display Language.DIC Buttons (if equipped)
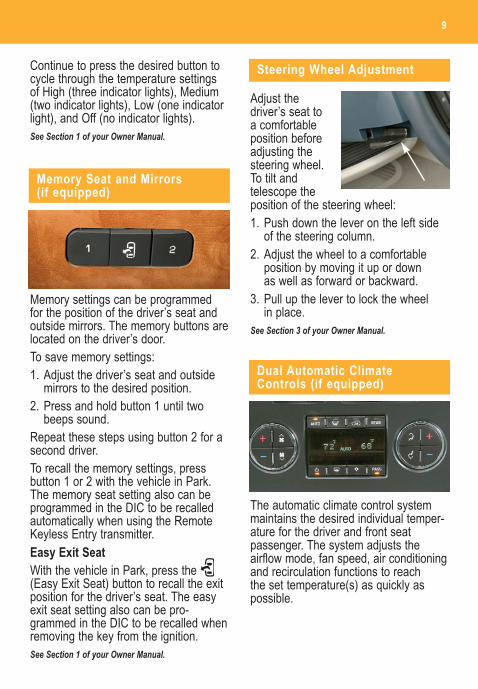
The uplevel DIC includes the followingbuttons located below the instrumentpanel cluster and to the right of thesteering column:
(Set/Reset): Press this button toset or reset DIC information while it isdisplayed or to acknowledge a warningmessage.
(Customization): Press this buttonto scroll through the following custom-ization settings:• Display Language • Auto Door Lock • Auto Door Unlock • Remote Door Lock • Remote Door Unlock • Delay Door Lock • Exit Lighting • Approach Lighting • Chime Volume • Park Tilt Mirrors (if equipped)• Easy Exit Seat (if equipped)• Memory Seat Recall (if equipped)• Remote Start (if equipped)• Factory Settings
(Vehicle Information): Press thisbutton to display the following vehicleinformation:• Oil Life• Park Assist (if equipped)• Units• Tire Pressure• Tire Pressure System Programming• Remote Keyless Entry Programming
(Trip/Fuel): Press this button todisplay the following trip and fuelinformation:• Odometer• Trip Odometers• Fuel Range• Average Economy• Timer• Fuel Used• Average Speed

5
SAFETY & SECURITY
Customization Settings with DICButtonsTo customize features:1. With the vehicle in Park, turn on the
ignition.2. Press the (Customization) button
to enter the Feature Settings menu.3. Press the button to scroll through
the available customization features.4. With the desired feature displayed,
press the (Set/Reset) button toaccess the settings.
5. Press the button to scroll throughthe available settings.
6. With the desired setting displayed,press the button to select it.
7. Press the button to scroll to thenext available customization feature.
8. To exit the Feature Settings menu,press the button until FEATURESETTINGS EXIT is displayed, andthen press the button; or pressthe button or the button.
Warnings and MessagesThe DIC provides a variety of vehiclewarning messages (depending onoptional equipment) if a problem issensed in a vehicle system. To acknowl-edge a message and clear it from thedisplay, press the DIC reset stem or anyDIC button. Some urgent messagescannot be cleared from the DIC display. If you have a current OnStar subscrip-tion, and a warning message appears,you can press the OnStar button andspeak to an OnStar Advisor. In manyvehicles, OnStar Advisors can accesscertain diagnostic information and can
tell you how serious the problem is andwhat you should do about it.
See Section 3 of your Owner Manual.
Note: Your vehicle’s warnings and mes-sages provide critical information thatcan prevent damage to your vehicle.Review your Owner Manual to becomefamiliar with the information displayedand the action required.
Remote Keyless Entry
The RemoteKeyless Entry(RKE) transmitterallows you to lockand unlock yourvehicle and per-form other func-tions while up toapproximately 195feet away from the vehicle. RKE functions include:
(Remote Vehicle Start)(if equipped): This feature can be usedto start the engine from outside thevehicle. (See Remote Vehicle Start.)
(Lock): Press this button to lockall the doors. RKE feedback (lightflash and/or horn chirp) can beprogrammed using the DriverInformation Center (DIC).
(Unlock): Press this button to unlockthe driver’s door. Press it again withinfive seconds to unlock all remainingdoors. RKE feedback (light flash) can beprogrammed using the DIC.

Getting to Know Your OUTLOOK6
OnStar®
Your vehicle may feature the OnStarSafe & Sound Plan or the uplevelOnStar Directions & Connections Plan,with one year of OnStar service from thedate you purchased your new vehicle.OnStar offers a variety of capabilities,such as Remote Door Unlock, AutomaticNotification of Airbag Deployment, andHands-Free Calling. In addition, mostvehicles can get driving directions usingTurn-by-Turn Navigation or DestinationDownload (if equipped). Press theOnStar button to ask an OnStar Advisorabout the service plan you have or toupgrade your plan.For more information, refer to yourOnStar Owner’s Guide, call1-888-4-ONSTAR (1-888-466-7827),or visit onstar.com.See Section 2 of your Owner Manual.
COMFORT
(Power Liftgate) (if equipped):Press and hold this button until theliftgate starts moving to open and closethe liftgate. The taillamps will flash and achime will sound when the liftgate ismoving.
(Vehicle Locator/Panic Alarm):Press and release this button to locateyour vehicle. The turn signal lamps willflash and the horn will sound three times.Press and hold the button to activatethe panic alarm. The turn signal lampswill flash and the horn will sound for 30seconds. Press the button again or turnthe ignition to On to cancel the alarm.See Section 2 of your Owner Manual.
Child Restraints (LATCH)
Your vehicle is equipped with LATCHanchors, and may have top tethers foruse with a LATCH-compatible childrestraint. The LATCH anchors arelocated in the 2nd-row outboard seatingpositions. If your child restraint is notcompatible with the LATCH system, youmay still use it by installing the childrestraint with the safety belt system.Choose a child seat that is appropriatefor the child’s age and size (weightand height).See Section 1 of your Owner Manual.
Seat Adjustments
Manual Seat Height Adjustment
To raise the driver’s seat, ratchet uprepeatedly the lever located on the frontoutboard side of the seat cushion. Tolower the seat, ratchet the lever downrepeatedly.Manual Seatback Recline Adjustment
Lift the lever located on the lower out-board side of the seatback and movethe seatback to the desired position;then release the lever.

7
2nd-Row Seats
Entering or Exiting the 3rd-Row Seats
The 2nd-row SmartSlide™ seats alloweasy access to the 3rd-row seats.To enter or exit the 3rd-row seats:1. Make sure nothing is on the 2nd-row
seat or the floor in front of the seat.2. Before sliding the 60/40 split bench
seat, fold the center armrest into theupright position in the seatback.
3. Rotate therelease leverlocated on theupper-outboardside of theseatbackforward.
4. Push the top of the seatback forward.The seat cushion will fold up auto-matically and the entire seat will slideforward.
To return the 2nd-row seat to the seatingposition:1. Make sure nothing is on the floor
behind the 2nd-row seat.2. Push the top of the seatback rear-
ward until the seatback and floortracks lock.
3. Push down at the rear of the seatcushion to lock it in place.
4. Pull on the seatback to be sure it islocked in place.
Manual Lumbar Support Adjustment(if equipped)
To increase the amount of lumbarsupport, pull up the lever located on theinboard side of the seatback. To de-crease support, push down on the lever.Power Seat Adjustment (if equipped)
Use the horizontal control (A) on theoutboard side of the seat cushion tomove the seat forward/rearward and —on the driver’s seat only — up/down,as well as to raise/lower the front or rearof the seat cushion.Power Seatback Recline Adjustment(if equipped)Use the vertical control (B) on theoutboard side of the seat cushion torecline/raise the seatback.Power Lumbar Support Adjustment (if equipped)Use the control pad (C) on the outboardside of the seat cushion to increase/decrease lumbar support.See Section 1 of your Owner Manual.
CBA
Power Seat controls

Getting to Know Your OUTLOOK8
3rd-Row Seats
The 3rd-row 60/40 split bench seatfeatures folding seatbacks. Prior to fold-ing a seatback, make sure all of thesafety belts are unbuckled, nothing is onthe 3rd-row seat, and the 2nd-row seatis not reclined.
Lift the lever (A) on the upper-backoutboard corner of the seatback until thehead restraint folds forward, and thenfold down the seatback.To return the seatback to the uprightposition, pull the seatback strap (B) fromthe rear of the vehicle or lift up the seat-back from inside the vehicle. Pull on theseatback to make sure it is locked inplace. Lift up the head restraint to lock itin place.See Section 1 of your Owner Manual.
Sliding the SeatsTo slide the 2nd-row seats for more legroom in the 2nd or 3rd row:1. Make sure nothing is on the floor in
front or behind the 2nd-row seat.2. Pull
outward onthe handlelocatedon the out-board sideof the seatcushionand slide the seat forward orrearward.
3. Release the handle.4. Pull on the seat to make sure it is
locked in place.Folding the SeatbacksTo fold the seatbacks forward to createa flat load floor:1. Pull outward on the handle located on
the outboard side of the seat cushionand slide the seat rearward.
2. Fold the armrest(s) into the uprightposition.
3. Pull forward on the strap located onthe outboard side of the seatback andfold down the seatback.
To returnthe seat-backsupright,pull upthe seat-back andpush it rearward until it locks in place.
See Section 1 of your Owner Manual.
Heated Seat Controls (if equipped)
The following heated front seat controlsare located on the center console infront of the shift lever:
(Heated Seat/Seatback): Press thebottom button to turn on the heated seatcushion and seatback.
(Heated Seatback): Press the topbutton to turn on the heated seatback.
A
B
Note: The 2nd- and 3rd-row headrestraints are not height adjustable.
9
Continue to press the desired button tocycle through the temperature settingsof High (three indicator lights), Medium(two indicator lights), Low (one indicatorlight), and Off (no indicator lights).See Section 1 of your Owner Manual.
Memory Seat and Mirrors (if equipped)
Memory settings can be programmedfor the position of the driver’s seat andoutside mirrors. The memory buttons arelocated on the driver’s door.To save memory settings:1. Adjust the driver’s seat and outside
mirrors to the desired position.2. Press and hold button 1 until two
beeps sound.Repeat these steps using button 2 for asecond driver.To recall the memory settings, pressbutton 1 or 2 with the vehicle in Park.The memory seat setting also can beprogrammed in the DIC to be recalledautomatically when using the RemoteKeyless Entry transmitter.Easy Exit SeatWith the vehicle in Park, press the (Easy Exit Seat) button to recall the exitposition for the driver’s seat. The easyexit seat setting also can be pro-grammed in the DIC to be recalled whenremoving the key from the ignition.See Section 1 of your Owner Manual.
Steering Wheel Adjustment
Adjust thedriver’s seat toa comfortableposition beforeadjusting thesteering wheel.To tilt andtelescope theposition of the steering wheel:1. Push down the lever on the left side
of the steering column.2. Adjust the wheel to a comfortable
position by moving it up or downas well as forward or backward.
3. Pull up the lever to lock the wheelin place.
See Section 3 of your Owner Manual.
Dual Automatic Climate Controls (if equipped)
The automatic climate control systemmaintains the desired individual temper-ature for the driver and front seatpassenger. The system adjusts theairflow mode, fan speed, air conditioningand recirculation functions to reachthe set temperature(s) as quickly aspossible.

Getting to Know Your OUTLOOK10
Automatic Operation1. Press the AUTO button.2. Set the desired driver’s and front
passenger’s temperature using the+ or – temperature buttons. Allowtime for the system to reach thedesired temperature.
Manual OperationTo operate the system manually, use thefollowing controls:
(On/Off): Press this button to turn thesystem on or off.Temperature Control: Press the + or –temperature button(s) to raise or lowerthe temperature setting(s).PASS (Passenger TemperatureControl): Press this button to turn thepassenger temperature setting on or off.Until adjusted, the passenger tempera-ture will be the same as the driver’s.
(Fan): Press the up or down buttonto increase or decrease fan speed.
(Airflow Mode): Press the up ordown button to change the direction
of the airflow to the floor, vent or defogoutlets.
(Air Conditioning): Press thisbutton to turn the air conditioning systemon or off.
(Recirculation): Press this buttonto recirculate air inside the vehicle. Thismode keeps outside air from enteringthe vehicle. The recirculation feature willoperate only when the vent or bi-levelairflow setting is selected.REAR (Rear Climate Control): Pressthis button to turn the rear climate con-trol system on or off.
(Defrost): Press this button todirect most of the air to the windshieldand some air to the side window andfloor outlets.
(Rear Window Defogger): Pressthis button to activate the rear windowdefogger. The defogger will turn offautomatically or can be turned off bypressing the button again.See Section 3 of your Owner Manual
Manual Climate Controls
The climate controls include thefollowing functions:
(Fan): Turn the fan knob (A) toincrease or decrease fan speed.
(Off): Turn the fan knob to the Offposition to turn off the system.
(Air Conditioning): Press the centerof the fan knob to turn the air condition-ing system on or off.REAR (Rear Climate Control): Pressthis button to turn the rear climate con-trol system on or off.Temperature: Turn the temperatureknob (B) to raise or lower the tempera-ture setting.
A B C

11
Rear Seat Climate Controls
The rear seat climate control system canbe operated using the front climate con-trols on the instrument panel or the rearcontrol panel, which is located in therear of the console or integrated withthe Rear Seat Audio (RSA) controls(if equipped).
(Recirculation): Press this buttonto recirculate air inside the vehicle. Thismode keeps outside air from enteringthe vehicle. The recirculation feature willoperate only when the vent or bi-levelairflow setting is selected.Airflow ModesTurn the airflow mode knob (C) tochange the direction of the airflow to thefloor, vent or defog outlets. The knobcan be positioned between two modesfor a wide range of airflow adjustments.
(Vent): Directs air to the ventoutlets.
(Bi-Level): Directs air to the ventand floor outlets.
(Floor): Directs most of the air tothe floor outlets and some air to thewindshield and side window outlets.
(Defog): Directs air to the wind-shield, side window and floor outlets.
(Defrost): Directs most of the air tothe windshield and some air to the sidewindow and floor outlets.
(Rear Window Defogger): Pressthe center of the airflow mode knobto activate the rear window defogger.The defogger will turn off automaticallyor can be turned off by pressing theknob again.See Section 3 of your Owner Manual.
To turn the rear system on or off, pressthe REAR button on the front controlpanel. The settings in the rear will bethe same as in the front until they arechanged by rear occupants using therear controls.Rear Control PanelTo operate the system, use the followingrear controls:
(Fan): Turn the left knob to adjustfan speed or to turn off the system.Temperature Control: Turn the centerknob to adjust the temperature setting.
(Airflow Mode): Turn the right knobto adjust the direction of the airflowbetween the floor and headliner outlets.Rear Controls with Rear Seat Audio
To operate the system, use the followingcontrols that are integrated with the RSAcontrols:
(Fan): Press the up or down buttonto adjust fan speed or to turn off thesystem.
(Airflow Mode): Press this buttonto adjust the direction of the airflowbetween the floor and headliner outlets.+ – (Temperature Control): Press the+ or – button to adjust the temperaturesetting from 0 (cooler) to 12 (warmer).See Section 3 of your Owner Manual.

Getting to Know Your OUTLOOK12
Audio System Features
While most of the features on your radiowill look familiar, some of the followingmay be new:
(Power/Volume): Press this knob toturn the system on or off. Turn the knobto adjust the volume.
(Tune): Turn this knob to select radiostations or, when a CD is playing, toselect a track or MP3 file. Tone and Speaker Control: Pressthe (Tune) knob to adjust the tonecontrol (bass/treble) or speaker control(balance/fade) setting. Turn the knob orpress the SEEK, FWD or REV button toadjust the selected setting.
(Information): Press this button todisplay additional information related tothe current FM-RDS or XM station, orMP3 song.FAV (Favorite): Press this button to gothrough up to six pages of any combi-nation (AM, FM, or XM, if equipped) ofpreset favorite radio stations. On eachpage, up to six stations are available byusing the six pushbuttons below theradio display.
ENTERTAINMENT BAND: Press this button to switch toFM, AM, or XM (if equipped). Whenplaying a CD or portable audio player,press this button to play the radioinstead.CD/AUX: Press this button to play a CDinstead of the radio. Press again and thesystem will automatically search for aportable audio player connected to theauxiliary input jack.EQ (Equalization): Press this button toselect preset equalization settings.CAT (Category) (if equipped): Pressthis button to find XM stations within adesired category.Auxiliary Input Jack: A portable audioplayer (such as an iPod® or other MP3player) can be connected to the auxiliaryinput jack located on the radio. Pressthe CD/AUX button to begin playingaudio from the portable player over thevehicle speakers. To optimize speakervolume, fully increase the volume levelof the portable player.Setting Favorite StationsBefore setting your favorite stations,shift the vehicle into Park.
Note: Engaging in extended searchingfor specific audio stations or songs byusing buttons and knobs — or givingextended attention to entertainment tasks— can lead you to look away from theroad frequently or for prolonged periods,which may cause you to miss seeingthings on the road that you need to see.Avoid engaging in extended searching forspecific items while driving.

13
You can set up to six pages of anycombination (AM, FM, or XM, ifequipped) of favorite radio stations, withup to six stations stored on each page.
To set the number of favorite stationpages:1. Press the MENU button to display the
radio setup menu.2. Press the pushbutton located below
the FAV 1–6 label on the radiodisplay.
3. Select the desired number of favoritestation pages.
4. Press the FAV button. You may nowbegin storing your favorite stations forthe chosen number of pages.
To store favorite stations:1. Tune in the desired radio station.2. Press the FAV button to display the
page where the station is to be stored.3. Press and hold one of the six push-
buttons until a beep sounds to storethe station.
4. Repeat the steps for each pushbuttonon each page.
Setting the TimeTo set the time:1. Turn on the radio.2. Press the (Clock) button. Or, if
equipped, press the MENU buttonuntil the clock option is displayed;and then press the pushbuttonlocated under the clock option label.
The HR, MIN, MM, DD, YYYY labelswill appear on the display.
3. Press the pushbutton under any ofthe labels to be changed.
4. Press the pushbutton again, the rightSEEK arrow or the FWD button toincrease the numbers. Press the leftSEEK arrow or the REV button todecrease the numbers. Rotating the
(Tune) knob also will increase ordecrease the selected label.
5. Press the Clock or MENU buttonagain to set the currently displayedtime and date.
Radio Data SystemWhen you tune to a Radio Data System(RDS) station, the station name or callletters will appear on the display insteadof the frequency. Depending on the RDSstation, additional text information maybe available by pressing the (Information) button.RDS features are available for use onlyon FM stations that broadcast RDSinformation. RDS relies on receivingspecific information from these stationsand will work only when the informationis available.Playing MP3 FilesYour audio system has MP3 file play-back capability. A CD-R containing MP3audio tracks will play automatically wheninserted into the CD player. An MP3label will be displayed.See Section 3 of your Owner Manual.
Getting to Know Your OUTLOOK14
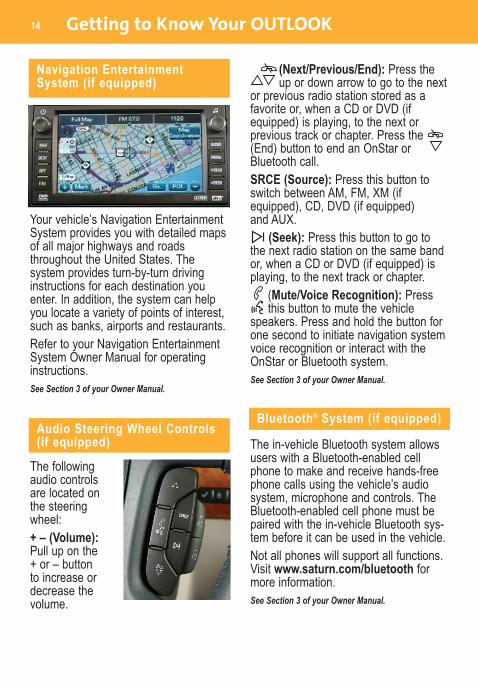
Navigation EntertainmentSystem (if equipped)
Your vehicle’s Navigation EntertainmentSystem provides you with detailed mapsof all major highways and roadsthroughout the United States. Thesystem provides turn-by-turn drivinginstructions for each destination youenter. In addition, the system can helpyou locate a variety of points of interest,such as banks, airports and restaurants.Refer to your Navigation EntertainmentSystem Owner Manual for operatinginstructions.See Section 3 of your Owner Manual.
Audio Steering Wheel Controls(if equipped)
The followingaudio controlsare located onthe steeringwheel:+ – (Volume):Pull up on the+ or – buttonto increase ordecrease thevolume.
(Next/Previous/End): Press theup or down arrow to go to the next
or previous radio station stored as afavorite or, when a CD or DVD (ifequipped) is playing, to the next orprevious track or chapter. Press the (End) button to end an OnStar orBluetooth call.SRCE (Source): Press this button toswitch between AM, FM, XM (ifequipped), CD, DVD (if equipped)and AUX.
(Seek): Press this button to go tothe next radio station on the same bandor, when a CD or DVD (if equipped) isplaying, to the next track or chapter.
(Mute/Voice Recognition): Pressthis button to mute the vehicle
speakers. Press and hold the button forone second to initiate navigation systemvoice recognition or interact with theOnStar or Bluetooth system.See Section 3 of your Owner Manual.
Bluetooth® System (if equipped)
The in-vehicle Bluetooth system allowsusers with a Bluetooth-enabled cellphone to make and receive hands-freephone calls using the vehicle’s audiosystem, microphone and controls. TheBluetooth-enabled cell phone must bepaired with the in-vehicle Bluetooth sys-tem before it can be used in the vehicle.Not all phones will support all functions.Visit www.saturn.com/bluetooth formore information.See Section 3 of your Owner Manual.

15
Rear Seat Audio and DVD RearSeat Entertainment Systems (if equipped)
Rear Seat AudioThe Rear Seat Audio (RSA) systemallows front seat and rear seat passen-gers to listen to different entertainmentsources at the same time using the rearseat controls and wired headphones(not supplied) or wireless headphones(if equipped). To select an entertainment source(radio, CD, or DVD, if equipped):• Press the SRCE (Source) button. To adjust the volume:• Turn the left volume knob to adjust
the left wired headphones and theright volume knob to adjust the rightwired headphones. On wireless head-phones, adjust volume using theheadphone volume control.
DVD Rear Seat EntertainmentThe Rear Seat Entertainment (RSE)system includes a CD/DVD player aspart of the front radio, a video displayscreen, audio/video jacks, two wirelessheadphones, and a remote control.To play a DVD:1. Turn the ignition to the Accessory or
On position.
2. Push the release button on the DVDdisplay console to fold down thevideo screen.
3. Insert a DVD into the DVD slot in theradio. It will turn on the video screenand begin playing automatically. Itmay be necessary to press the Playpushbutton on the radio or the remotecontrol to start playing the movie ifthe DVD stops at a menu screen.
4. To listen to the DVD through thevehicle speakers, press the DVD/CDAUX button. Adjust volume using theradio volume control.To listen to the DVD through theheadphones, press the On/Off buttonon the headphones. Adjust volumeusing the headphone volume control.
5. To control DVD playback, use theremote control or the front radiopushbuttons.
Parental ControlThe Parental Control feature turns offthe video screen and Rear Seat Audio tohelp gain the attention of rear passen-gers, such as when using headphones. To enable the Parental Control feature,press and hold the radio power buttonfor two seconds. To turn off ParentalControl, press and hold the radio buttonagain for two seconds.See Section 3 of your Owner Manual.
Note: Aim the remote control at thevideo screen, not the DVD player,for proper operation.

Getting to Know Your OUTLOOK16
XM® Radio
XM Radio provides more than 170channels of digital-quality sound thatgoes wherever you go — coast to coast.After a free three-month trial period,activation and service subscriptionfees apply. Service is based in thecontinental United States and Canada.For more information, visit XM onlineat www.XMradio.com or call 1-800-929-2100.See Section 3 of your Owner Manual.
CONVENIENCE
Automatic Headlamp System
Your vehicle is equipped with anAutomatic Headlamp System, whichturns on the Daytime Running Lamps inthe daytime and the headlamps andother exterior lamps at night or whennecessary.The system uses a light sensor,located on top of the instrument panel,to determine light conditions. For properoperation, avoid placing any objects onor near the sensor.Exterior Lamps ControlThe exterior lamps can be operatedusing the control knob located on the left
side of the instrument panel. The knobcan be rotated to the following positions:AUTO (Automatic Lamp Control):This position enables the AutomaticHeadlamp System.
(On/Off): Momentarily turn the con-trol knob to this position to turn theAutomatic Headlamp System off or onagain.
(Parking Lamps): This positionturns on the parking lamps andtaillamps.
(Headlamps): This position turnson the headlamps, parking lamps andtaillamps.
(Fog Lamps) (if equipped): Pressthis button on the exterior lamps controlknob to turn the fog lamps on or off.See Section 3 of your Owner Manual.
Interior Lighting Features
Instrument Panel BrightnessThe (Instrument Panel Brightness)control knob is located on the left side ofthe instrument panel. To brighten or dimthe instrument panel lights, press theknob; it will pop out. Turn the knob toadjust the intensity of the lights.Dome LampsThe dome lamps will come on when adoor is open. The lamps also can beturned on by fully rotating the instrumentpanel brightness control knob clockwise.To disable the dome lamps, press the
(Dome Lamp Override) buttonlocated above the instrument panelbrightness control knob.See Section 3 of your Owner Manual.

Rear Wiper and WasherThe rear wiperand washerbutton, locatedon the centerconsole in frontof the shiftlever, includesthe followingfunctions:
(Rear Wiper): Press the top ofthe button (A) to turn the rear wiper onor off.
(Washer): Press the bottom of thebutton (B) to spray washer fluid on therear window.See Section 3 of your Owner Manual.
17
Windshield Wipers and Washer
The wipercontrols,located onthe multi-functionlever onthe leftside of thesteering column, include the followingfunctions:
(Mist): Rotate the control band tothis position to turn the wipers on forone wipe.
(Off): Rotate the control band to thisposition to turn off the wipers.
(Delay): Rotate the control band toone of these positions to adjust the
delay between wipes. The wipersactivate more often as the band isrotated upward.1 (Low): Rotate the control band to thisposition to turn the wipers on the Lowspeed setting.2 (High): Rotate the control band to thisposition to turn the wipers on the Highspeed setting.
(Washer Fluid): Push the buttonon the end of the lever to spray washerfluid on the windshield.
B
A
Heated Washer Fluid (if equipped)
Press the (HeatedWasher Fluid) buttonon the left side of theinstrument panel tospray heated washerfluid on the windshield.This will help clear ice,tree sap or bugs fromthe windshield. It may take up to 40 sec-onds to heat the washer fluid, afterwhich the wipers will automatically turnon for four heated wash cycles. Pressthe button again to cancel any remainingcycles.See Section 3 of your Owner Manual.
Getting to Know Your OUTLOOK18
Express-Down WindowsTo operate the driver or front passengerexpress-down window (if equipped),press the switch completely and thewindow will go all the way down auto-matically. Press the switch partway toopen the window a small amount. Tostop the window, pull up on the switchmomentarily. Express-Up Window (if equipped)To operate the driver express-upwindow, pull up the switch completelyand the window will go all the way upautomatically. To stop the window, pushdown on the switch momentarily.Window LockoutPress the (Window Lockout) switchon the driver’s door armrest to preventthe rear windows from operating exceptfrom the driver’s position. Press theswitch again to turn off the lockoutfeature.See Section 2 of your Owner Manual.
Sunroof (if equipped)
The following sunroof and sunshadeswitches are located on the headlinerabove the rearview mirror:Express-Open/Express-Close: Fromthe closed position, press the rear of thedriver’s side switch (A) to express-openthe sunroof. Press the front of the switchto express-close the sunroof.
A B
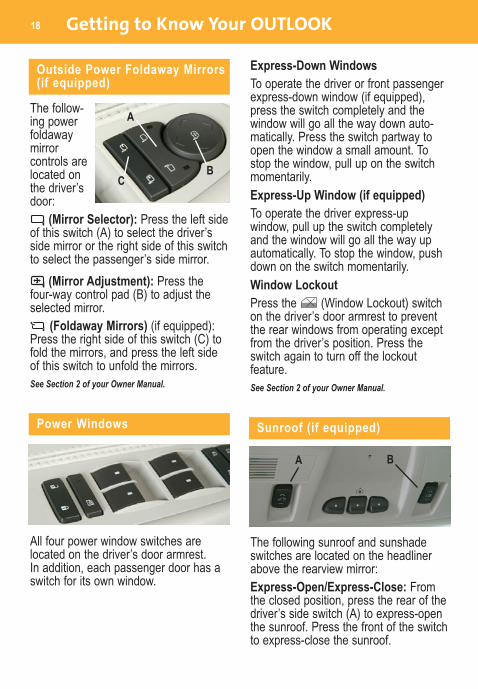
Outside Power Foldaway Mirrors(if equipped)
The follow-ing powerfoldawaymirrorcontrols arelocated onthe driver’sdoor:
(Mirror Selector): Press the left sideof this switch (A) to select the driver’sside mirror or the right side of this switchto select the passenger’s side mirror.
(Mirror Adjustment): Press thefour-way control pad (B) to adjust theselected mirror.
(Foldaway Mirrors) (if equipped):Press the right side of this switch (C) tofold the mirrors, and press the left sideof this switch to unfold the mirrors.See Section 2 of your Owner Manual.
B
A
C
Power Windows
All four power window switches arelocated on the driver’s door armrest.In addition, each passenger door has aswitch for its own window.
19
Cruise Control
The cruise controlbuttons are locatedon the steeringwheel. They includethe followingfunctions:
(On/Off):Press this button toenable the cruisecontrol system.SET– (Set): Press this button to set aspeed. If the system is active, press andrelease this button to decrease speed1 mph, or press and hold the button todecrease speed more than 1 mph.When the cruise control is set, the (Cruise Control) symbol will illuminate inthe instrument panel cluster.RES+ (Resume): Press this button toresume a set speed. If the system isactive, press and release this button toincrease speed 1 mph, or press andhold the button to increase speed morethan 1 mph.
Vent: From the closed position, pressand hold the front of the driver’s sideswitch (A) to vent the sunroof. Pressand hold the rear of the switch to closethe sunroof.Front Sunshade: Push up and slightlyforward on the sunshade handle andthen release it rearward to open themanual sunshade.Rear Sunshade (if equipped): Pressand release the rear of the passenger’sside switch (B) to express-open the sun-shade over the 2nd-row seats. Pressand release the front of the switch toexpress-close the sunshade.See Section 2 of your Owner Manual.
Rear Convenience Center
The rear convenience center, locatedbehind the 3rd-row seats, features addi-tional storage compartments. To open,pull the handle up and lift the cover.See Section 2 of your Owner Manual.
(Cancel): Press this button tocancel the cruise control but retain theset speed in memory.See Section 3 of your Owner Manual.
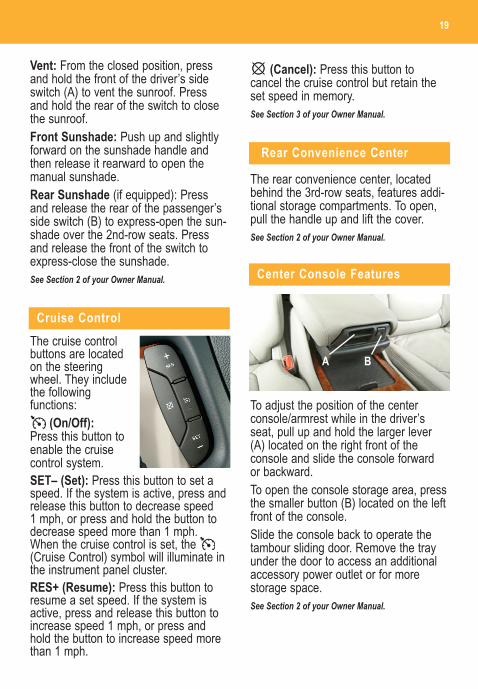
Center Console Features
To adjust the position of the centerconsole/armrest while in the driver’sseat, pull up and hold the larger lever(A) located on the right front of theconsole and slide the console forwardor backward.To open the console storage area, pressthe smaller button (B) located on the leftfront of the console.Slide the console back to operate thetambour sliding door. Remove the trayunder the door to access an additionalaccessory power outlet or for morestorage space.See Section 2 of your Owner Manual.
A B

The rear park-ing assistdisplay islocated nearthe rear windowand providesthe followingindicators when an object is detected:• At 8 ft. (2.5 m), one light illuminates.• At 40 in. (1.0 m), two lights illuminate.• At 23 in. (0.6 m), all three lights
illuminate.• At 12 in. (0.3 m), a chime sounds and
all three lights flash.Use the Driver Information Center toturn off the system when towing. Thesystem automatically turns back on aftereach vehicle start.Rear Vision Camera (if equipped)When the vehicle is shifted intoReverse, a view of the area behind thevehicle is displayed on the inside rear-view mirror or the navigation systemscreen (if equipped).The camera is located above the rearlicense plate. Clean the camera lenswith water and a soft cloth.See Section 2 of your Owner Manual.
Getting to Know Your OUTLOOK20
115-Volt Outlet (if equipped)
The 115-volt power outlet is located onthe back of the center console. With theignition turned to Accessory or On, itprovides convenient plug-in power to runelectronic equipment such as videogames or a cell phone charger.See Section 3 of your Owner Manual.
Ultrasonic Rear Park Assist (if equipped)
This feature uses ultrasonic sensors onthe rear bumpers to help you avoid col-liding with objects when parking thevehicle. It operates only at speeds lessthan 5 mph.
Power Liftgate (if equipped)
There are several ways to open andclose the power liftgate:• Press and hold the (Power
Liftgate) button on the RemoteKeyless Entry transmitter until theliftgate starts moving. Press it againto reverse operation.
2nd-Row Console Features (if equipped)
To open the upper storage area, pressthe upper button located on the front ofthe console. To open the lower storage area, pressthe lower button located on the front ofthe console. To fold the top of the console forward forincreased storage space, slide the frontconsole completely forward; then lift upthe handle on the rear of the 2nd-rowconsole and pull forward.See Section 2 of your Owner Manual.

21
• Press the (Power Liftgate) buttonon the center console in front of theshift lever. Press it again to reverseoperation.
• Press the touchpad on the liftgatehandle to open. Press it again toreverse operation.
• Press the button on the bottom of theliftgate, next to the liftgate latch, toclose. Press it again to reverseoperation.
To disable all power liftgate controls,switch the button on the centerconsole to the OFF position. The liftgatecan be opened and closed manually.See Section 2 of your Owner Manual.
Remote Vehicle Start (if equipped)
This feature allows you to start theengine from outside the vehicle by usingthe Remote Keyless Entry (RKE) trans-mitter. The remote start capability mustbe turned on using the DriverInformation Center.The vehicle’s automatic climate controlsystem (if equipped) will default to aheating or cooling mode based on
outside temperature, and the manualclimate control system will turn on at thesame setting as when the vehicle waslast turned off.Starting the VehicleTo remote-start the vehicle:1. Aim the RKE transmitter at the
vehicle. (Transmitter range is withinapproximately 195 feet of thevehicle.)
2. Press and release the (Lock)button on the transmitter.
3. Immediately press and hold the (Remote Start) button for about fourseconds. When the vehicle starts, theparking lamps will light and remain onwhile the engine is running. Theengine will continue running for 10minutes.
4. Repeat these steps for a 10-minutetime extension. Only two consecutiveremote starts are allowed.
When you enter the vehicle after aremote start, the key must be inserted inthe ignition and turned to the On posi-tion before driving.
Canceling a Remote Start• Press and hold the (Remote Start)
button until the parking lamps turn off.• Press and release the Hazard
Warning Flashers button. Press itagain to turn off the flashers.
• Turn the key in the ignition switch tothe On position and then off.
See Section 2 of your Owner Manual.
Note: The Remote Vehicle Start featurewill not operate if the key is in the igni-tion, the hood or liftgate is open, or theCheck Engine light is illuminated on theinstrument panel cluster.

Getting to Know Your OUTLOOK22
PERFORMANCE & MAINTENANCE
Refueling the Vehicle
To open the fuel door, press the centerof the rear edge of the door and it willpop open slightly. Pull the door to openit fully.When closing the fuel door, press thecenter of the rear edge of the door untilit is flush with the side of the vehicle.See Section 5 of your Owner Manual.
Automatic TransmissionOperation
The automatictransmission hasan ElectronicRange Selectmode that enablesthe driver to selectthe top-gear limitdesired for thecurrent driving conditions, such as whendriving on downhill grades. This providesengine braking and reduces brake wear.To use this feature, move the shift leverto the Low (L) range position and selecta lower or higher driving gear using the+ / – button on the side of the shift lever.The display on the instrument panelcluster will show the current gearselection. The transmission will be limited to thegear selected and lower gears. Gearshigher than the gear selected will not beavailable.If current vehicle speed is too high ortoo low for the requested gear, the shiftwill not occur.See Section 2 of your Owner Manual.
StabiliTrak® – Stability ControlSystem
StabiliTrak is an advanced computer-controlled vehicle stability and tractionenhancement system that assists withdirectional control of the vehicle indifficult driving conditions. It turns onautomatically every time you start yourvehicle.To limit wheelspin and help maintaindirectional control, you should alwaysleave the system on. However, if yourvehicle becomes stuck and rocking thevehicle is required, the system shouldbe turned off.To turn off the tractioncontrol part of thesystem, press the
(Traction Control)button located on thecenter console infront of the shift lever. When the system is turned off, theTraction Control light will illuminate.See Section 4 of your Owner Manual.
Trailer Towing
The Tow/Haul mode(if equipped) assistswhen pulling a heavytrailer by reducing thefrequency of trans-mission shifts andimproves the control of vehicle speed.To turn on this feature, press the (Tow/Haul) button located on the centerconsole in front of the shift lever. Press itagain to turn off the feature.See Section 4 of your Owner Manual.
23
Tire Pressure Monitor
The Tire Pressure Monitor alerts youwhen a significant reduction in pressureoccurs in one or more of your vehicle’stires by illuminating the (Low TirePressure) warning light on the instru-ment panel. The low tire pressurewarning light will remain on until youcorrect the tire pressure.A CHECK TIRE PRESSURE messagemay appear on the DIC.Correcting the Tire PressureWhen the low tire pressure warning lightilluminates, you must inflate the tire tothe proper tire pressure (just as youmust refuel the vehicle when the lowfuel warning light illuminates). The Tireand Loading Information label, locatedon the center pillar below the driver’sdoor latch, shows the correct tire pres-sure for the tires when they’re cold.“Cold” means your vehicle has beensitting for at least three hours or drivenno more than one mile. You can temporarily remove the DICmessage by acknowledging it with yourDIC controls. However, at the nextvehicle start-up, the DIC message willreappear if the tire pressure has notbeen corrected.During cooler conditions, the low tirepressure warning light may appear whenthe vehicle is first started and then turnoff as you start to drive. This could bean early indicator that your tire pres-sures are getting low and the tires needto be inflated to the proper pressure.
Note: The Tire Pressure Monitor canalert you about low tire pressure, but itdoesn’t replace normal monthly tiremaintenance.
See Section 5 of your Owner Manual.
Resetting the Oil Life System
The Oil Life System calculates engineoil life based on vehicle use anddisplays CHANGE OIL SOON in theDriver Information Center (DIC) whenit’s necessary to change your engine oiland filter. The Oil Life System shouldbe reset to 100% only following an oilchange.To reset the Oil Life System (withoutDIC):1. Turn on the ignition, with the
engine off.2. Fully press and release the accelera-
tor pedal slowly three times withinfive seconds.
3. Turn off the ignition.To reset the Oil Life System (with DIC):1. Turn on the ignition, with the
engine off.2. Press the (Vehicle Information)
button until the DIC displays OIL LIFEREMAINING.
3. Press and hold the (Set/Reset)button until 100% is displayed.
4. Turn off the ignition.See Section 5 of your Owner Manual.

Getting to Know Your OUTLOOK24
15919284 A
My Saturn
1-800-553-6000 TTY Users: 1-888-889-2438As the proud owner of a new Saturn vehi-cle, you are automatically enrolled in theSaturn Roadside Assistance program.This value-added service is intended toprovide you with peace of mind as youdrive in the city or travel the open road. Saturn’s Roadside Assistance toll-freenumber is staffed by a team of technicallytrained advisors who are available 24hours a day, 365 days a year, to provideminor repair information or make arrange-ments to tow your vehicle to the nearestSaturn retailer.Saturn will provide the following servicesfor 5 years/100,000 miles at no expenseto you:• Fuel delivery• Lockout service (identification
required)• Tow to nearest retailer for warranty
service• Flat tire assistance• Jump startsIn many instances, mechanical failuresare covered under Saturn’s comprehen-sive warranty. However, when other ser-vices are utilized, our advisors will explainany payment obligations you might incur.
The complimentary My Saturn ownerswebsite is a one-stop resource toenhance your Saturn ownership experi-ence. Exclusive owner benefits includeonline vehicle maintenance schedules,service reminders, frequently askedquestions, retailer information and more.Visit My Saturn today at Saturn.comand enjoy the ride.
For prompt and efficient assistance whencalling, please provide the following infor-mation to the advisor:• Location of the vehicle• Telephone number and your location• Vehicle model, year and color• Vehicle mileage• Vehicle Identification Number (VIN)• Vehicle license plate numberSaturn reserves the right to limit servicesor reimbursement to an owner or driverwhen, in Saturn’s judgment, the claimsbecome excessive in frequency or type ofoccurrence.Roadside Assistance and OnStar(if equipped)If you have a current OnStar subscription,press the OnStar button and the vehiclewill send your current GPS location to anOnStar Advisor who will speak to you,assess your problem, contact RoadsideAssistance and relay your exact locationso you will get the help you need.
Certain restrictions, precautions and safety procedures apply to your vehicle. Please read your Owner Manualfor complete instructions. All information contained herein is based on information available at the time ofprinting and is subject to change without notice. Copyright 2008 by GM Corp. All rights reserved.
!15919284=A!
Roadside Assistance
OWNER INFORMATION