2 troubleshooting when using the copy/document server function · when the machine does not operate...
TRANSCRIPT

When the Machine Does Not Operate As Wanted
Troubleshooting When Using the Copy/Document Server Function
Troubleshooting When Using the Facsimile Function
Troubleshooting When Using the Printer Function
Troubleshooting When Using the Scanner Function
Clearing Misfeeds
Appendix
1
2
3
4
5
6
7
Read this manual carefully before you use this machine and keep it handy for future reference. For safe and correct use, be sure to read the Safety Information in "About This Machine" before using the machine.
TroubleshootingOperating Instructions


Documentation for This Machine
1

TABLE OF CONTENTSDocumentation for This Machine.......................................................................................................................1
Manuals for This Machine.................................................................................................................................6
Notice..................................................................................................................................................................8
Important.........................................................................................................................................................8
How to Read This Manual.................................................................................................................................9
Symbols...........................................................................................................................................................9
Names of Major Items...................................................................................................................................9
Notes............................................................................................................................................................10
Laws and Regulations......................................................................................................................................11
Legal Prohibition..........................................................................................................................................11
1. When the Machine Does Not Operate As Wanted
Indicators..........................................................................................................................................................13
Panel Tone........................................................................................................................................................14
Checking Machine Status and Settings..........................................................................................................15
When an Indicator to the Right of a Function Key Is Lit.................................................................................18
When You Have Problems Operating the Machine.....................................................................................20
When a Job Is Not Performed.........................................................................................................................24
2. Troubleshooting When Using the Copy/Document Server Function
Messages Displayed When Using the Copy/Document Server Function..................................................27
When You Cannot Make Clear Copies.........................................................................................................32
When You Cannot Make Copies As Wanted...............................................................................................36
Display During Connect Copy....................................................................................................................42
If Connect Copy Is Canceled......................................................................................................................43
If You Cannot Exit from Connect Copy......................................................................................................44
When Memory Is Full..................................................................................................................................45
3. Troubleshooting When Using the Facsimile Function
Adjusting the Volume.......................................................................................................................................47
Messages Displayed When Using the Facsimile Function............................................................................49
When You Cannot Send or Receive Fax Messages As Wanted.................................................................60
When Memory Is Full..................................................................................................................................66
If an Error Report Is Printed..............................................................................................................................67
Turning Off the Main Power / In the Event of Power Failure.......................................................................68
When an Error Occurs Using Internet Fax.....................................................................................................69
2

Error Mail Notification.................................................................................................................................69
Error Report (E-mail)....................................................................................................................................69
Server-Generated Error E-mail...................................................................................................................69
4. Troubleshooting When Using the Printer Function
Messages Displayed When Installing the Printer Driver...............................................................................71
Windows 2000...........................................................................................................................................71
Windows XP Professional or Windows Server 2003/2003 R2.............................................................71
Windows XP Home Edition.........................................................................................................................72
Windows Vista.............................................................................................................................................72
Windows Server 2008...............................................................................................................................73
If USB Connection Fails...................................................................................................................................74
Messages Displayed When Using the Printer Function.................................................................................75
Status Messages..........................................................................................................................................75
Messages Displayed on the Control Panel When Using the Printer Function.........................................76
Other Messages...........................................................................................................................................78
When You Cannot Print...................................................................................................................................87
When the Data In Indicator Does Not Light Up or Flash..........................................................................89
Other Printing Problems...................................................................................................................................91
5. Troubleshooting When Using the Scanner Function
When Scanning Is Not Done As Expected..................................................................................................101
When You Cannot Send Scanned Files.......................................................................................................103
When Stored Files Cannot Be Accessed.................................................................................................103
When You Cannot Browse the Network to Send a Scan File...............................................................103
When the TWAIN Driver Cannot Be Started..........................................................................................103
When Stored Files Cannot Be Edited......................................................................................................104
When the Network Delivery Function Cannot Be Used.........................................................................104
When S/MIME Cannot Be Used............................................................................................................104
When You Cannot Send Scan Files Using WSD....................................................................................105
Operations Are Not Possible When Messages Are Displayed............................................................105
Messages Displayed When Using the Scanner Function...........................................................................107
Messages Displayed on the Control Panel When Using the Scanner Function...................................107
Messages Displayed on the Client Computer.........................................................................................116
3
6. Clearing Misfeeds
Removing Jammed Paper..............................................................................................................................121
Locating Jammed Paper............................................................................................................................121
Removing Jammed Paper.........................................................................................................................123
When A1 is Displayed..............................................................................................................................123
When A2 is Displayed..............................................................................................................................124
When B is Displayed.................................................................................................................................124
When C is Displayed................................................................................................................................124
When D is Displayed................................................................................................................................125
When E is Displayed.................................................................................................................................126
When F is Displayed.................................................................................................................................126
When N1 - N5 is Displayed....................................................................................................................127
When N6 - N22 is Displayed..................................................................................................................128
When P1 is Displayed...............................................................................................................................129
When P2 is Displayed...............................................................................................................................129
When Q is Displayed................................................................................................................................130
When R1 - R4 is Displayed in the Case of Finisher SR 4030................................................................131
When R5 - R8 is Displayed in the Case of Finisher SR 4030................................................................132
When R1 - R4 is Displayed in the Case of Finisher SR 4040................................................................133
When R5 - R7 is Displayed in the Case of Finisher SR 4040................................................................133
When R8 - R12 is Displayed in the Case of Finisher SR 4040.............................................................134
When R1 - R3 is Displayed in the Case of Finisher SR 4050................................................................135
When R4 - R7 is Displayed in the Case of Finisher SR 4050................................................................136
When U is Displayed................................................................................................................................136
When W is Displayed...............................................................................................................................137
Removing Jammed Staples...........................................................................................................................138
Finisher SR4030 / SR4040.....................................................................................................................138
Finisher SR4040 (Saddle Stitch)..............................................................................................................139
Finisher SR4050........................................................................................................................................139
Removing Punch Waste.................................................................................................................................141
Finisher SR4030 / SR4040.....................................................................................................................141
Finisher SR4050........................................................................................................................................142
Removing Staple Waste................................................................................................................................144
4
Finisher SR4050........................................................................................................................................144
7. Appendix
Pausing Copy When Using the Finisher SR4050.......................................................................................147
When Z-folded Paper Is Not Properly Aligned...........................................................................................148
Finisher SR4040........................................................................................................................................148
Finisher SR4050........................................................................................................................................148
Multi-Folding Unit......................................................................................................................................150
Trademarks.....................................................................................................................................................151
INDEX...........................................................................................................................................................153
5

Manuals for This MachineRead this manual carefully before you use this machine.
Refer to the manuals that are relevant to what you want to do with the machine.
• Media differ according to manual.
• The printed and electronic versions of a manual have the same contents.
• Adobe Acrobat Reader/Adobe Reader must be installed in order to view the manuals as PDF files.
• A Web browser must be installed in order to view the html manuals.
About This Machine
Before using the machine, be sure to read the section of this manual entitled Safety Information.
This manual introduces the machine's various functions.
It also explains the control panel, preparation procedures for using the machine, how to enter text,how to install the CD-ROMs provided, and how to replace paper, toner, staples, and otherconsumables.
Troubleshooting
Provides a guide for resolving common usage-related problems.
Copy and Document Server Reference
Explains Copier and Document Server functions and operations. Also refer to this manual forexplanations on how to place originals.
Facsimile Reference
Explains Facsimile functions and operations.
Printer Reference
Explains Printer functions and operations.
Scanner Reference
Explains Scanner functions and operations.
Network and System Settings Guide
Explains how to connect the machine to a network, configure and operate the machine in a networkenvironment, and use the software provided. Also explains how to change User Tools settings andhow to register information in the Address Book.
Security Reference
This manual is for administrators of the machine. It explains security functions that you can use toprevent unauthorized use of the machine, data tampering, or information leakage. For enhancedsecurity, we recommend that you first make the following settings:
• Install the Device Certificate.
6
• Enable SSL (Secure Sockets Layer) Encryption.
• Change the user name and password of the administrator using Web Image Monitor.
For details, see "Setting Up the Machine", Security Reference.
Be sure to read this manual when setting the enhanced security functions, or user and administratorauthentication.
PostScript 3 Supplement
Explains how to set up and use PostScript 3.
Other manuals
• UNIX Supplement
• Quick Reference Copy Guide
• Quick Reference Printer Guide
• Quick Reference Fax Guide
• Quick Reference Scanner Guide
• Manuals for DeskTopBinder Lite
• DeskTopBinder Lite Setup Guide
• DeskTopBinder Introduction Guide
• Auto Document Link Guide
• Manuals provided are specific to machine types.
• For "UNIX Supplement", please visit our Web site or consult an authorized dealer. This manualincludes descriptions of functions and settings that might not be available on this machine.
• The following software products are referred to using general names:
Product name General name
DeskTopBinder Lite and DeskTopBinder Professional *1 DeskTopBinder
*1 Optional
7

Notice
Important
In no event will the company be liable for direct, indirect, special, incidental, or consequential damagesas a result of handling or operating the machine.
For good copy quality, the supplier recommends that you use genuine toner from the supplier.
The supplier shall not be responsible for any damage or expense that might result from the use of partsother than genuine parts from the supplier with your office products.
8

How to Read This Manual
Symbols
This manual uses the following symbols:
Indicates points to pay attention to when using the machine, and explanations of likely causes of papermisfeeds, damage to originals, or loss of data. Be sure to read these explanations.
Indicates supplementary explanations of the machine's functions, and instructions on resolving user errors.
This symbol is located at the end of sections. It indicates where you can find further relevant information.
[ ]
Indicates the names of keys that appear on the machine's display panel.
[ ]
Indicates the names of keys on the machine's control panel.
Indicates instructions in book form.
Indicates instructions in sheet form.
Indicates instructions stored in a file on a provided CD-ROM.
Indicates instructions provided on this company's Web site.
Names of Major Items
Major items of this machine are referred to as follows in this manual:
• Auto Document Feeder ADF
• Large Capacity Tray LCT
9

Notes
Contents of this manual are subject to change without prior notice.
Two kinds of size notation are employed in this manual. With this machine refer to the metric version.
Some illustrations in this manual might be slightly different from the machine.
Certain options might not be available in some countries. For details, please contact your local dealer.
Depending on which country you are in, certain units may be optional. For details, please contact yourlocal dealer.
10
Laws and Regulations
Legal Prohibition
Do not copy or print any item for which reproduction is prohibited by law.
Copying or printing the following items is generally prohibited by local law:
bank notes, revenue stamps, bonds, stock certificates, bank drafts, checks, passports, driver's licenses.
The preceding list is meant as a guide only and is not inclusive. We assume no responsibility for itscompleteness or accuracy. If you have any questions concerning the legality of copying or printing certainitems, consult with your legal advisor.
11

12

1. When the Machine Does Not OperateAs WantedThis chapter describes basic troubleshooting procedures that are applicable to all functions of this machine.
IndicatorsThis section describes the indicators displayed when the machine requires the user to remove misfed paper,to add paper, or to perform other procedures.
Indicator Status
: Misfeed indicator Appears when a misfeed occurs.
See p.121 "Removing Jammed Paper".
: Load Paper indicator Appears when paper runs out.
See "Loading Paper", About This Machine .
: Add Toner indicator Appears when toner runs out.
See "Adding Toner", About This Machine .
: Add Staple indicator Appears when staples run out.
See "Adding Staples", About This Machine .
: Waste Toner Full indicator Appears when the waste toner bottle is full.
Contact your sales or service representative.
: Empty Hole Punch Receptacleindicator
Appears when the hole punch receptacle is full.
See p.141 "Removing Punch Waste".
: Empty Waste Staple Receptacleindicator
Appears when the waste staple receptacle is full.
See p.144 "Removing Staple Waste".
: Service Call indicator Appears when the machine is malfunctioning or requiresmaintenance.
: Open Cover indicator Appears when the front cover, etc., is open.
13
1

Panel ToneThe following table describes the meaning of the various beep patterns that the machine produces to alertusers about left originals and other machine conditions.
Beep pattern Meaning Cause
Single short beep. Panel/screen inputaccepted.
A control panel or screen key waspressed.
Short, then long beep. Panel/screen input rejected. An invalid key was pressed on thecontrol panel or screen, or the enteredpassword was incorrect.
Single long beep. Job completed successfully. A Copier/Document Server Featuresjob has finished.
Two long beeps. Machine has warmed up. After cooling or being switched on, themachine has fully warmed up and isready for use.
Five long beeps. Soft alert. The initial screen returns when themachine goes into energy-saving modeand when simplified display is canceled.
Five long beeps repeatedfour times.
Soft alert. An original has been left on the exposureglass or paper is empty.
Five short beeps repeatedfive times.
Strong alert. The machine requires user attentionbecause paper has jammed, the tonerneeds replenishing, or other problemshave occurred.
• Users cannot mute the machine's beep alerts. When the machine beeps to alert users of a paper jamor toner request, if the machine's covers are opened and closed repeatedly within a short space oftime, the beep alert might continue, even after normal status has resumed.
• You can select to enable or disable beep alerts. For details about Panel Key Sound, see "SystemSettings", Network and System Settings Guide .
1. When the Machine Does Not Operate As Wanted
14
1

Checking Machine Status and SettingsYou can check the machine's system status.
Maintenance Info
You can check the following items under [Maintenance Info]:
• [Remaining Toner]
Displays the amount of remaining toner.
• [No Staples]
Displays whether there are staples remaining or not.
• [Punch Receptacle Full]
Displays whether the hole punch receptacle is full.
• [Waste Staple Receptacle Full]
Displays whether the waste staple receptacle is full.
• [Paper Tray]
Displays the paper type and size loaded in the paper tray.
• [Output Tray Full]
Displays whether the output tray is overloaded.
• [Original Misfeed]
Displays the state of and solutions for original misfeeds.
• [Paper Misfeed]
Displays the state of and solutions for paper jams.
• [Cover Open]
Indicates whether the front cover, duplex unit, etc., is open.
Data Storage
You can check the following items under [Data Storage]:
• [HDD Remaining Memory]
Displays the amount of available hard disk drive memory.
• [HDD File(s)]
Displays the total number of jobs stored in the hard disk drive.
• [Print Job(s)]
Displays the number of jobs for "Hold Print Job (s):", "Stored Print Job (s):", "Locked Print Job (s):",and "Sample Print Job (s):".
• [Fax TX / RX File(s)]
Checking Machine Status and Settings
15
1

Displays the number of "Transmission Standby File(s):", "Memory Lock File(s):", "RX Print StandbyFile(s):", and other files stored in the hard disk drive.
• [Memory Erase Status]
Displays the state of the memory data.
Machine Address Info
You can check the following items under [Machine Address Info]:
• [Fax No.]
Displays the machine's fax number.
• [H.323 Own Fax No.]
Displays the machine's alias telephone number.
• [SIP User Name]
Displays the machine's SIP user name.
• [Fax E-mail Account]
Displays the machine's fax e-mail account.
• [Machine IPv4 Address]
Displays the machine's IPv4 address.
• [Machine IPv6 Address]
Displays the machine's IPv6 address.
Enquiry
You can check the following items under [Enquiry]:
• [Machine Repairs]
Displays the machine number and contact number which are required for service.
• [Sales Representative]
Displays the sales representative's telephone number.
• [Supply Order]
Displays the contact number for placing supply orders.
• [Supply Details]
Displays the name of toner, staples, etc., used on the machine.
1. When the Machine Does Not Operate As Wanted
16
1

1. On the control panel, press [System Status].
2. Press each tab and check the contents.
3. After checking the information, press [Exit]. The previous screen returns.
• [No Staples], [Punch Receptacle Full], [Waste Staple Receptacle Full], [Output Tray Full], [OriginalMisfeed], [Paper Misfeed], and [Cover Open] appear on the [Maintenance Info] tab only when theseerrors occur.
• For details about how to locate and remove misfeeds, see "Removing Jammed Paper".
• p.121 "Removing Jammed Paper"
Checking Machine Status and Settings
17
1

When an Indicator to the Right of a Function KeyIs LitWhen an indicator to the right of a function key lights up, press the corresponding function key. Then, followthe instructions displayed on the control panel.
BQN037S
If an error occurs in the function you are using, check the message that appears on the control panel, andthen refer to "Messages Displayed" for the relevant function.
The following table explains problems that cause the indicator to light.
Problem Cause Solution
Documents and reports donot print out.
The paper output tray is full. Remove the prints from the tray.
Documents and reports donot print out.
There is no paper left. Load paper. See "Loading Paper",About This Machine .
An error has occurred. The function whose indicatoris lit is defective.
Check the displayed message and takean appropriate action. See "MessagesDisplayed" of each chapter.
You can use other functions normally.
1. When the Machine Does Not Operate As Wanted
18
1
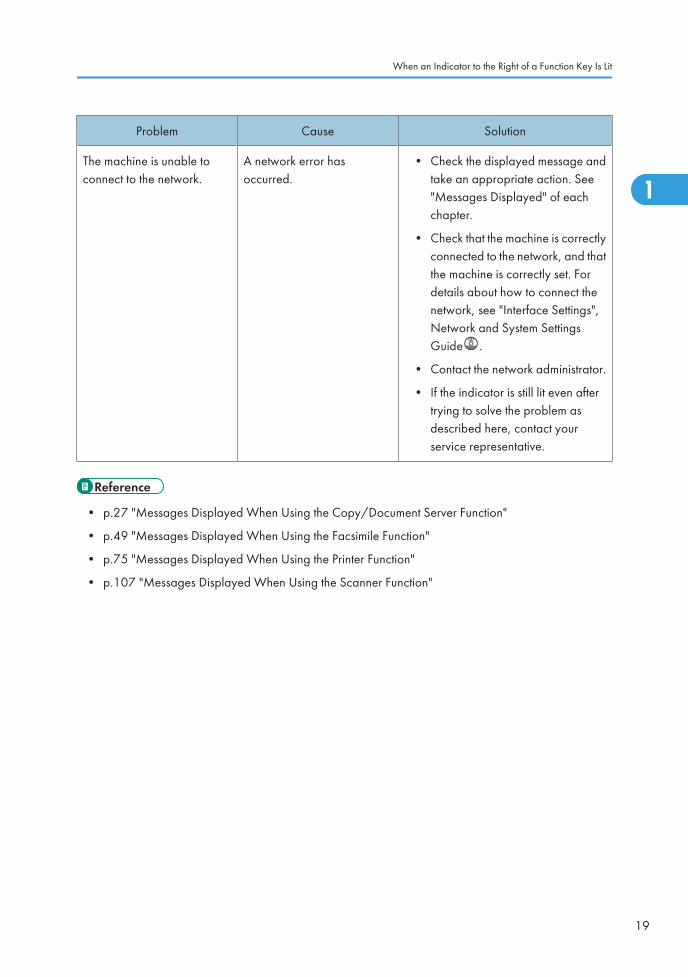
Problem Cause Solution
The machine is unable toconnect to the network.
A network error hasoccurred.
• Check the displayed message andtake an appropriate action. See"Messages Displayed" of eachchapter.
• Check that the machine is correctlyconnected to the network, and thatthe machine is correctly set. Fordetails about how to connect thenetwork, see "Interface Settings",Network and System SettingsGuide .
• Contact the network administrator.
• If the indicator is still lit even aftertrying to solve the problem asdescribed here, contact yourservice representative.
• p.27 "Messages Displayed When Using the Copy/Document Server Function"
• p.49 "Messages Displayed When Using the Facsimile Function"
• p.75 "Messages Displayed When Using the Printer Function"
• p.107 "Messages Displayed When Using the Scanner Function"
When an Indicator to the Right of a Function Key Is Lit
19
1

When You Have Problems Operating theMachineThis section describes common problems and messages.
If other messages appear, follow the instructions displayed.
Problem Cause Solution
Although the copier screenappears when the machine isturned on using the mainpower switch, it cannot beswitched to another screen bypressing the [Printer] or[Scanner] key.
Functions other than thecopier function are not yetready.
Wait a little longer.
The machine has just beenturned on and the User Toolsscreen is displayed, but theUser Tools menu has itemsmissing.
Functions other than thecopier function are not yetready. Time required variesby function. Functions appearin the User Tools menu whenthey become ready for use.
Wait a little longer.
The operation switchindicator continues blinkingand does not turn off whenpressed.
This occurs in the followingcases:
• The ADF is open.
• The machine iscommunicating withexternal equipment.
• The hard disk is active.
• Close the ADF.
• Check if the machine iscommunicating with externalequipment.
• Wait a little longer.
The display is off. The machine is in EnergySaver mode.
Press the [Energy Saver] key to cancelEnergy Saver mode.
The display is off. The operation switch is turnedoff.
Turn on the operation switch.
Nothing happens when theoperation switch is turned on.
The main power switch isturned off.
Turn on the main power switch.
1. When the Machine Does Not Operate As Wanted
20
1

Problem Cause Solution
"Please wait." appears. This message appears whenyou turn on the operationswitch.
Wait for a while. If the machine does notget ready in a minute, contact yourservice representative.
"Please wait." appears. This message appears whenthe machine is warming up.
• Wait for a while. If the machinedoes not get ready in a couple ofminutes, contact your servicerepresentative.
• Wait until the message disappears.Do not turn off the main powerswitch while the message isshowing.
"Please wait." appears. This message appears whenyou change the tonercartridge.
Wait for a while. If the message does notdisappear in two minutes, contact yourservice representative.
"Memory is full. Do you wantto store scanned file?"appears.
The scanned originalsexceed the number ofsheets/pages that can bestored in the hard disk.
• Press [Store File] to store pages thathave been scanned. Deleteunnecessary files by pressing[Delete File].
• Press [No] if you are not storingpages that have been scanned.Delete unnecessary files bypressing [Delete File].
The user code entry screen isdisplayed.
Users are restricted by UserCode Authentication.
Enter the user code (up to eight digits),and then press [OK].
The Authentication screenappears.
Basic Authentication,Windows Authentication,LDAP Authentication orIntegration ServerAuthentication is set.
Enter your login user name and userpassword. See "When theAuthentication Screen is Displayed",About This Machine .
"Authentication has failed."appears.
The entered login user nameor login password is notcorrect.
Ask the user administrator for the correctlogin user name and login password.
"Authentication has failed."appears.
The machine cannot performauthentication.
Contact the administrator.
When You Have Problems Operating the Machine
21
1

Problem Cause Solution
"You do not have theprivileges to use this function."continues to be displayedeven though you haveentered a valid user name.
The logged in user name doesnot have permission for theselected function.
Contact the administrator about thepermission for the required function.
An error message remains,even if misfed paper isremoved.
• When a misfeedmessage appears, itremains until you openand close the cover asrequired.
• Paper is still jammed inthe tray.
Remove misfed paper, and then openand close the cover. See p.121"Removing Jammed Paper".
Original images are printedon the reverse side of thepaper.
You may have loaded thepaper incorrectly.
Load paper correctly. Place paper in thepaper tray with the print side down. LCTand Bypass tray with the print side up.
Misfeeds occur frequently. The tray's side or end fencesmay not be set properly.
• Remove the misfed paper. Seep.121 "Removing JammedPaper".
• Check the side or end fences areset properly. Also, check the sidefences are locked. See "Changingthe Paper Size", About ThisMachine .
Misfeeds occur frequently. Paper of undetectable sizehas been loaded.
• Remove the misfed paper. Seep.121 "Removing JammedPaper".
• If you load a paper size that is notselected automatically, you needto specify the paper size with thecontrol panel. See "Changing to aSize That Is Not AutomaticallyDetected", About This Machine
.
1. When the Machine Does Not Operate As Wanted
22
1
Problem Cause Solution
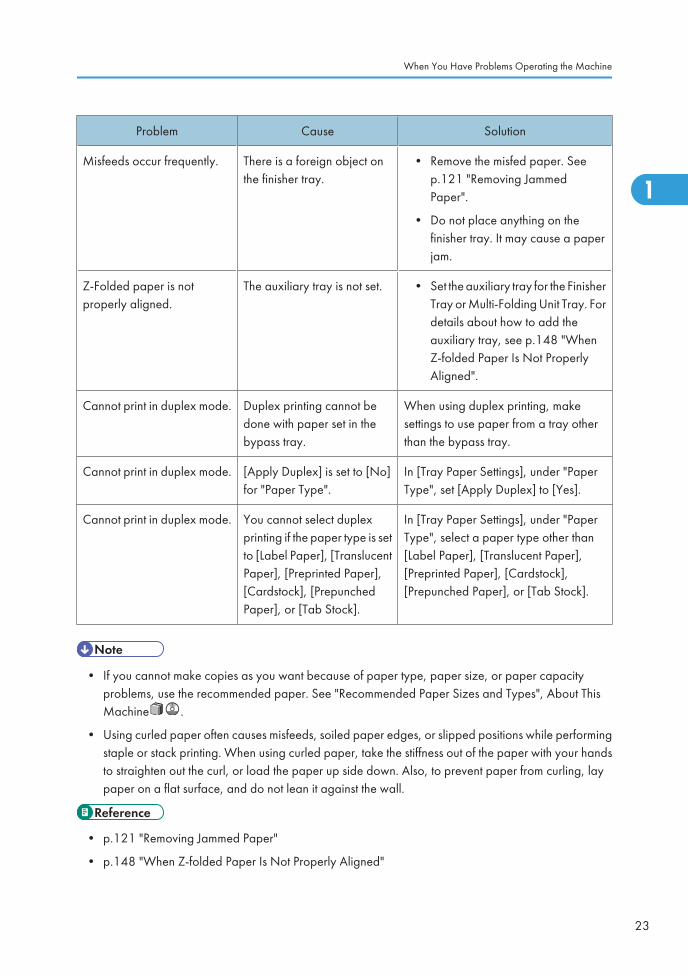
Misfeeds occur frequently. There is a foreign object onthe finisher tray.
• Remove the misfed paper. Seep.121 "Removing JammedPaper".
• Do not place anything on thefinisher tray. It may cause a paperjam.
Z-Folded paper is notproperly aligned.
The auxiliary tray is not set. • Set the auxiliary tray for the FinisherTray or Multi-Folding Unit Tray. Fordetails about how to add theauxiliary tray, see p.148 "WhenZ-folded Paper Is Not ProperlyAligned".
Cannot print in duplex mode. Duplex printing cannot bedone with paper set in thebypass tray.
When using duplex printing, makesettings to use paper from a tray otherthan the bypass tray.
Cannot print in duplex mode. [Apply Duplex] is set to [No]for "Paper Type".
In [Tray Paper Settings], under "PaperType", set [Apply Duplex] to [Yes].
Cannot print in duplex mode. You cannot select duplexprinting if the paper type is setto [Label Paper], [TranslucentPaper], [Preprinted Paper],[Cardstock], [PrepunchedPaper], or [Tab Stock].
In [Tray Paper Settings], under "PaperType", select a paper type other than[Label Paper], [Translucent Paper],[Preprinted Paper], [Cardstock],[Prepunched Paper], or [Tab Stock].
• If you cannot make copies as you want because of paper type, paper size, or paper capacityproblems, use the recommended paper. See "Recommended Paper Sizes and Types", About ThisMachine .
• Using curled paper often causes misfeeds, soiled paper edges, or slipped positions while performingstaple or stack printing. When using curled paper, take the stiffness out of the paper with your handsto straighten out the curl, or load the paper up side down. Also, to prevent paper from curling, laypaper on a flat surface, and do not lean it against the wall.
• p.121 "Removing Jammed Paper"
• p.148 "When Z-folded Paper Is Not Properly Aligned"
When You Have Problems Operating the Machine
23
1

When a Job Is Not PerformedIf you are not able to carry out your job, it may be that the machine is being used by another function.
Wait until the current job is completed before trying again. In certain cases, you can carry out another jobusing a different function while the current job is being performed. Performing multiple functionssimultaneously like this is called "Multi-accessing".
Combination Chart
Function Compatibility
The chart shows Function Compatibility when print priority is set to [Interleave]. For details about PrintPriority, see "System Settings", Network and System Settings Guide .
: Simultaneous operations are possible.
: Operation is enabled when the relevant function key is pressed and remote switching (of thescanner/external extension) is done.
: Operation is enabled when the [Interrupt] key is pressed to interrupt the preceding operation.
: Operation is performed automatically once the preceding operation ends.
: The operation must be started once the preceding operation ends. (Simultaneous operations arenot possible.)
1. When the Machine Does Not Operate As Wanted
24
1

BQN001S
*1 Simultaneous operations are only possible after the preceding job documents are all scanned and [New Job]appears.
*2 You can scan a document after the preceding job documents are all scanned.
*3 Operation is possible when the line is different from the line which is currently being used.
*4 During stapling, printing automatically starts after the current job.
*5 Stapling is not available.
*6 Simultaneous operation becomes possible after you press [New Job].
*7 During parallel reception, any subsequent job is suspended until the reception is completed.
• Stapling cannot be used at the same time for multiple functions.
When a Job Is Not Performed
25
1

• If the machine is capable of executing multiple functions simultaneously, specify which function shouldhave priority in "Print Priority". This setting is factory-preset to "Display Mode". For details about PrintPriority, see "General Features", Network and System Settings Guide .
• When Finisher SR4030, Finisher SR4040, or Finisher SR4050 is installed on the machine, you canspecify the output tray where documents are delivered. For details about Output Tray Settings, see"General Features", Network and System Settings Guide .
• While printing is in progress, scanning a document using another function may take longer than usual.
1. When the Machine Does Not Operate As Wanted
26
1

2. Troubleshooting When Using theCopy/Document Server FunctionThis chapter describes likely causes of and possible solutions for copier/document server functionproblems.
Messages Displayed When Using the Copy/Document Server FunctionThis section describes the machine's main messages. If other messages appear, follow the instructions theycontain.
• If you cannot make copies as you want because of the paper type, paper size or paper capacityproblems, use recommended paper. See "Recommended Paper Sizes and Types", About ThisMachine .
• For messages that are not listed here, see "When You Have Problems Operating the Machine".
• p.20 "When You Have Problems Operating the Machine"
Message Cause Solution
"Authentication has failed." The entered login user nameor login password is notcorrect.
Ask the user administrator for the correctlogin user name and login password.
"Authentication has failed." The machine cannot performauthentication.
Contact the administrator.
"Cannot detect original size." The original placed on theexposure glass is a non-standard size.
• Place the original on the exposureglass again. Face the originaldown.
• If the machine cannot detect thesize of the original, specify the sizemanually - do not use Auto PaperSelect mode or the Auto Reduce/Enlarge function. See "SizesDetectable with Auto PaperSelect", Copy and DocumentServer Reference .
27
2

Message Cause Solution
"Cannot detect original size." Original is not placed, or theoriginal placed on theexposure glass is a non-standard size.
• Place the original correctly.
• Specify the paper size.
• When placing an original directlyon the exposure glass, the lifting/lowering action of the ADF triggersthe automatic original sizedetection process. Lift the ADF bymore than 30 degrees.
"Cannot punch this papersize."
The Punch function cannot beused with paper sizeselected.
Select a proper paper size. See"Appendix", About This Machine .
"Cannot staple paper of thissize."
The Staple function cannot beused with paper sizeselected.
Select a proper paper size. See"Appendix", About This Machine .
"Check original orientation." Original is not placed in aproper orientation.
Change the orientation of the original.
"Check paper size." An irregular paper size is set. If you press the [Start] key, the copy willstart onto the selected paper.
"Duplex is not available withthis paper size."
A paper size not available inDuplex mode has beenselected.
Select a proper paper size. See "DuplexCopying", Copy and Document ServerReference .
"Exceeded max. number ofpages per file. Do you wantto store the scanned pages as1 file?"
The number of scannedpages exceeds the capacityper file of the DocumentServer.
To store scanned pages as a file, press[Store File]. Scanned data is stored as afile in the Document Server. If you do notwant to store scanned pages, press[No]. Scanned data is deleted.
"Exceeded the maximumnumber of multi-sheet fold.Printing will be cancelled."
A print job was canceledbecause more than themaximum number of multi-sheet folds was specified.
Specify fewer sheets for the multi-sheetfold function.
"File being stored exceededmax. number of pages perfile. Copying will bestopped."
The scanned originals havetoo many pages to store asone document.
Press [Exit], and then store again with anappropriate number of pages.
2. Troubleshooting When Using the Copy/Document Server Function
28
2

Message Cause Solution
"Magazine or Booklet modeis not available due to mixedimage mode."
You selected the "Magazine"or "Booklet" function fororiginals scanned usingdifferent functions, such ascopy and printer.
Make sure originals for the "Magazine"or "Booklet" function are scanned usingthe same function.
"Maximum number of sets isn."
(A figure is placed at n.)
The number of copiesexceeds the maximum copyquantity.
You can change the maximum copyquantity from [Max. Copy Quantity] in[General Features] under [Copier /Document Server Features]. For detailsabout Max. Copy Quantity, see"General Features", Copy andDocument Server Reference .
"Original is being scanned byanother function. Switch tothe following function, thenpress the Stop key to cancelscanning or press the Startkey to continue."
A function of the machineother than the Copier functionis being used such as theDocument Server function.
Cancel the job in progress. For example,press [Exit], and then press the[Document Server] key. Next, press the[Clear/Stop] key. When the message"The Clear / Stop key was pressed. Areyou sure you want to stop scanning?"appears, press [Stop].
"Please wait." The destination list is beingupdated from the networkusing SmartDeviceMonitorfor Admin. Depending on thenumber of destinations to beupdated, there may be somedelay before you can resumeoperation. Operations arenot possible while thismessage is displayed.
Wait until the message disappears. Donot switch off the power while thismessage is displayed.
"Rotate Sort is not availablewith this paper size."
A size of paper for whichRotate Sort is not available isselected.
Select a proper paper size. See "Sort",Copy and Document Server Reference
.
"Stapling capacityexceeded."
The number of sheets per setis over the staple capacity.
Check the stapler capacity. See"Appendix", About This Machine .
Messages Displayed When Using the Copy/Document Server Function
29
2

Message Cause Solution
"The selected file(s)contained file(s) withoutaccess privileges. Only file(s)with access privileges will bedeleted."
You have tried to delete fileswithout the authority to do so.
Files can be deleted by the person whocreated the file. To delete a file whichyou are not authorized to delete, contactthe person who created the file.
"You do not have theprivileges to use this function."
The logged in user name doesnot have permission for theselected function.
Contact the administrator about thepermission for the required function.
Connect Copy
Message Cause Solution
"Cannot connect to the sub-machine. Check the status ofthe sub-machine."
The indicator is lit.
The hard disk of the sub-machine is malfunctioning.
Press [Exit] on the main machine andfollow the instructions on the display.
"Cannot print from the sub-machine. Check the status ofthe sub-machine."
A paper misfeed hasoccurred on the sub-machine, or toner or othersupplies need to bereplenished.
Follow the instructions displayed. Fordetails about adding toner, see "AddingToner", About This Machine .
For details about paper misfeeds, seep.121 "Removing Jammed Paper", orp.138 "Removing Jammed Staples".
If the sub-machine's display indicatesthat a cover is open, follow theinstructions displayed.
"Cannot print from the sub-machine. Check the status ofthe sub-machine."
The sub-machine's User Toolsmenu is open.
Press the [User Tools/Counter] key toclose the User Tools menu.
"Cannot print from the sub-machine. Sub-machine willbe disconnected."
The sub-machine hasstopped due to power failureor communication error.
Continue copying using the mainmachine.
"Fold is available only whenSort mode is selected inConnect Copy."
Sort has not been selectedwith fold.
Select the Sort function.
"No stamp data in the sub-machine."
Stamp data on the sub-machine has been deleted.
Reprogram the stamp on the sub-machine.
2. Troubleshooting When Using the Copy/Document Server Function
30
2

Message Cause Solution
"Sub-machine does not havethe same paper setting(s)."
Paper type or tray settings onthe two machines do notmatch.
Make the same settings on bothmachines.
"Sub-machine is in Interruptmode."
The sub-machine is inInterrupt mode.
Press the [Interrupt] key on the sub-machine to cancel Interrupt mode.
"Sub-machine paper settingsmust be the same to use thistray."
Paper tray settings on the twomachines do not match.
Make the same settings on bothmachines.
"The Cover Sheet setting(s) ofthe sub-machine is differentfrom the main machine."
The Cover Sheet settings onthe two machines do notmatch.
Make the same settings on bothmachines.
"The Designation Sheetsetting(s) of sub-machine isdifferent from main machine."
Designation Sheet settings onthe two machines do notmatch.
Make the same settings on bothmachines.
"The Slip Sheet setting(s) ofthe sub-machine is differentfrom the main machine."
Slip Sheet settings on the twomachines do not match.
Make the same settings on bothmachines.
Messages Displayed When Using the Copy/Document Server Function
31
2
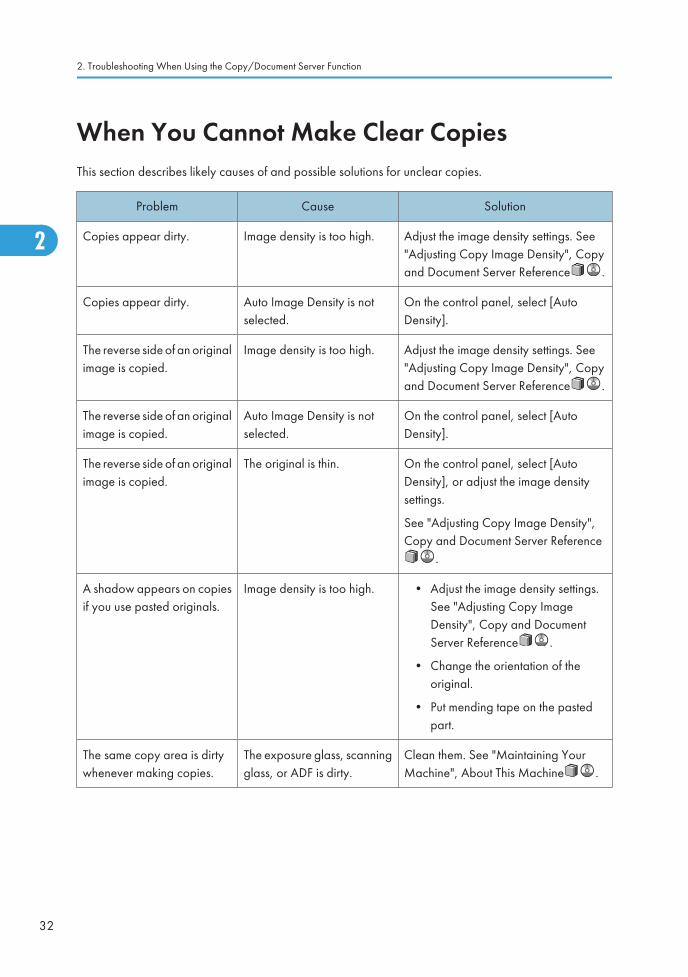
When You Cannot Make Clear CopiesThis section describes likely causes of and possible solutions for unclear copies.
Problem Cause Solution
Copies appear dirty. Image density is too high. Adjust the image density settings. See"Adjusting Copy Image Density", Copyand Document Server Reference .
Copies appear dirty. Auto Image Density is notselected.
On the control panel, select [AutoDensity].
The reverse side of an originalimage is copied.
Image density is too high. Adjust the image density settings. See"Adjusting Copy Image Density", Copyand Document Server Reference .
The reverse side of an originalimage is copied.
Auto Image Density is notselected.
On the control panel, select [AutoDensity].
The reverse side of an originalimage is copied.
The original is thin. On the control panel, select [AutoDensity], or adjust the image densitysettings.
See "Adjusting Copy Image Density",Copy and Document Server Reference
.
A shadow appears on copiesif you use pasted originals.
Image density is too high. • Adjust the image density settings.See "Adjusting Copy ImageDensity", Copy and DocumentServer Reference .
• Change the orientation of theoriginal.
• Put mending tape on the pastedpart.
The same copy area is dirtywhenever making copies.
The exposure glass, scanningglass, or ADF is dirty.
Clean them. See "Maintaining YourMachine", About This Machine .
2. Troubleshooting When Using the Copy/Document Server Function
32
2

Problem Cause Solution
The same copy area is dirtywhenever making copies.
• The original that hasalready been printed isscanned.
• Original Type is set to[Text / Photo], and anoriginal with text andphotographs that canhardly be distinguishedfrom each other isloaded.
On the control panel, press [GenerationCopy], and then begin copying.
Copies are too light. Image density is too light. Adjust the image density settings. See"Adjusting Copy Image Density", Copyand Document Server Reference .
Copies are too light. A light copy may result whenyou use damp or rough grainpaper.
Use recommended paper only and besure its storage environment meets therecommended temperature andhumidity conditions. For details aboutrecommended paper and the properway to store it, see "RecommendedPaper Sizes and Types" and "PaperStorage", About This Machine .
Parts of images are notcopied.
The original is not setcorrectly.
Set originals correctly. See "PlacingOriginals", Copy and Document ServerReference .
Parts of images are notcopied.
The correct paper size is notselected.
Select the proper paper size.
Parts of images are notcopied.
Even if you place originals inthe ADF correctly, margin ofa few millimeters on all foursides of the original might notbe copied.
Use "Create Margin" function to reducethe image of its original size.
For details about missing image area,see "Create Margin", Copy andDocument Server Reference .
Images appear only partially. The paper is damp. Use paper that has been stored in therecommended temperature andhumidity conditions. For details aboutthe proper way to store it, see "PaperStorage", About This Machine .
When You Cannot Make Clear Copies
33
2

Problem Cause Solution
Black lines appear. The exposure glass orscanning glass is dirty.
Clean them. See "Maintaining YourMachine", About This Machine .
White lines appear. The exposure glass orscanning glass is dirty.
Clean them. See "Maintaining YourMachine", About This Machine .
Copies are blank. The original is not setcorrectly.
When using the exposure glass, face theoriginals down. When using the ADF,face them up.
A moiré pattern is producedon copies.
Your original has a dotpattern image or many lines.
Place the original on the exposure glassat a slight angle.
Black spots appear on thecopy of a photographic print.
Because of high humidity, thephotographic print has stuckto the exposure glass.
Place the print on the exposure glass ineither of the following ways:
• Place an OHP transparency on theexposure glass, and then place theprint on the OHP transparency.
• Place the print on the exposureglass, and then place two or threesheets of white paper on it. Leavethe ADF open when copying.
White stripes appear on theOHP.
Fragments of paper are stuckto the OHP.
Use a dry cloth to wipe any paperfragments off the back of the OHP.
2. Troubleshooting When Using the Copy/Document Server Function
34
2

Problem Cause Solution
The image on the back side ofduplex copies has mottledblank patches or is smudged.
Missing patches andsmudges are caused bymoisture leaking from thepaper.
• Do not install the machine in areasthat are susceptible to lowtemperatures.
• Use paper that has been storedwhere temperature and humidityconditions meet the limitations werecommend. For details about thepaper storage conditions werecommend, see "Paper Storage",About This Machine .
• Install the Optional anti-humidityheater. For details about the anti-humidity heater, contact yourservice representative.
When You Cannot Make Clear Copies
35
2

When You Cannot Make Copies As WantedThis section describes likely causes of and possible solutions for unsatisfactory copy results.
Basic
Problem Cause Solution
Misfeeds occur frequently. The number of sheets loadedexceeds the capacity of themachine.
Load paper only as high as the upperlimit markings on the side fences of thepaper tray, LCT, or bypass tray.
Misfeeds occur frequently. The paper tray's side fencesare set too tightly.
Push the side fences lightly, and thenreset it.
Misfeeds occur frequently. The paper is damp. Use paper that has been stored in therecommended temperature andhumidity conditions. See "PaperStorage", About This Machine .
Misfeeds occur frequently. The paper is too thick or toothin.
Use recommended paper. See"Recommended Paper Sizes andTypes", About This Machine .
Misfeeds occur frequently. The copy paper is wrinkled orhas been folded/creased.
Use recommended paper only and besure its storage environment meets therecommended temperature andhumidity conditions. For details aboutrecommended paper and the properway to store it, see "RecommendedPaper Sizes and Types" and "PaperStorage", About This Machine .
Misfeeds occur frequently. Printed paper is being used. Do not load sheets that have alreadybeen copied or printed onto by anothermachine.
Misfeeds occur frequently. Sheets are sticking together. Fan the sheets thoroughly beforeloading them. Alternatively, feed thesheets into the machine one at a time.
Copy paper becomescreased.
The paper is damp. Use paper that has been stored in therecommended temperature andhumidity conditions. See "PaperStorage", About This Machine .
2. Troubleshooting When Using the Copy/Document Server Function
36
2
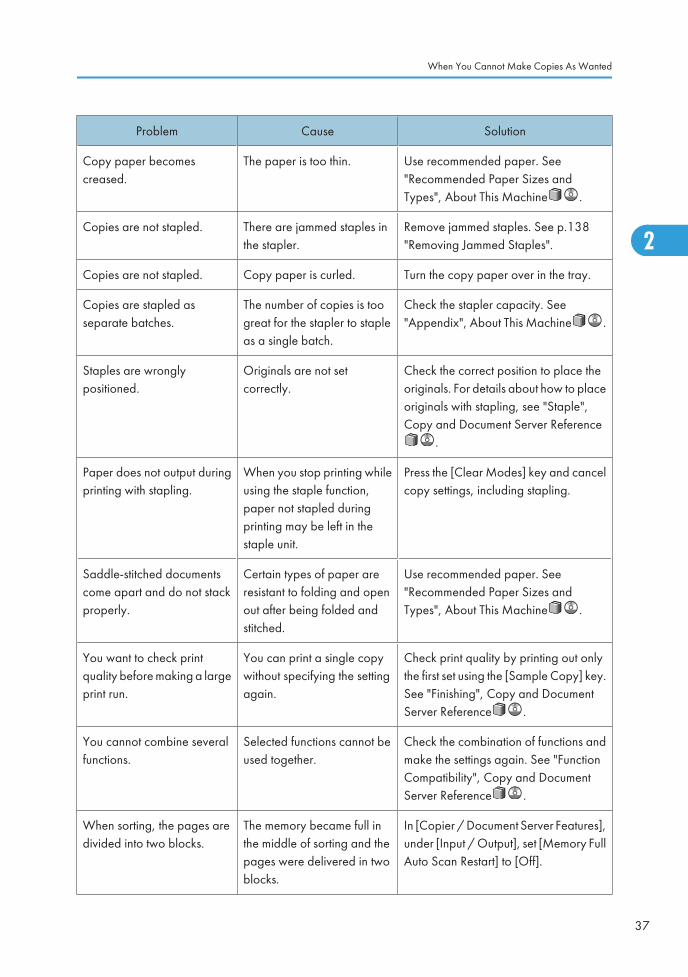
Problem Cause Solution
Copy paper becomescreased.
The paper is too thin. Use recommended paper. See"Recommended Paper Sizes andTypes", About This Machine .
Copies are not stapled. There are jammed staples inthe stapler.
Remove jammed staples. See p.138"Removing Jammed Staples".
Copies are not stapled. Copy paper is curled. Turn the copy paper over in the tray.
Copies are stapled asseparate batches.
The number of copies is toogreat for the stapler to stapleas a single batch.
Check the stapler capacity. See"Appendix", About This Machine .
Staples are wronglypositioned.
Originals are not setcorrectly.
Check the correct position to place theoriginals. For details about how to placeoriginals with stapling, see "Staple",Copy and Document Server Reference
.
Paper does not output duringprinting with stapling.
When you stop printing whileusing the staple function,paper not stapled duringprinting may be left in thestaple unit.
Press the [Clear Modes] key and cancelcopy settings, including stapling.
Saddle-stitched documentscome apart and do not stackproperly.
Certain types of paper areresistant to folding and openout after being folded andstitched.
Use recommended paper. See"Recommended Paper Sizes andTypes", About This Machine .
You want to check printquality before making a largeprint run.
You can print a single copywithout specifying the settingagain.
Check print quality by printing out onlythe first set using the [Sample Copy] key.See "Finishing", Copy and DocumentServer Reference .
You cannot combine severalfunctions.
Selected functions cannot beused together.
Check the combination of functions andmake the settings again. See "FunctionCompatibility", Copy and DocumentServer Reference .
When sorting, the pages aredivided into two blocks.
The memory became full inthe middle of sorting and thepages were delivered in twoblocks.
In [Copier / Document Server Features],under [Input / Output], set [Memory FullAuto Scan Restart] to [Off].
When You Cannot Make Copies As Wanted
37
2

Problem Cause Solution
The copy is grayed out or atext pattern appears in thebackground of the copy.
You have copied a copy-guarded document protectedfrom unauthorized copying.
Check the document. For details abouthow to prevent unauthorized copying ofthe document, see "Using [Data securityfor copying]", Printer Reference .
Images are skewed. The side fences in the paperfeed tray are not set properly.
Make sure the side fences are setproperly. For details about how to set theside fences, see "Changing the PaperSize", About This Machine .
Images are skewed. The paper is feeding in at aslant.
Load the paper correctly. See "LoadingPaper", About This Machine .
Edges of sheets are creased. The paper is damp. Use paper that has been stored in therecommended temperature andhumidity conditions. See "PaperStorage", About This Machine .
Edges of sheets are creased. You are using non-recommended paper.
Use recommended paper. See"Recommended Paper Sizes andTypes", About This Machine .
Sheets are feeding intogether, resulting in jams.
Sheets are sticking together. Fan the pages to loosen the paperbefore loading it. Alternatively, feed thepaper one sheet at a time.
"Add Staple" messageappears and the Staplefunction cannot be used.
The staple cartridge is not setproperly.
Make sure the staple cartridge is setproperly.
Edit
Problem Cause Solution
In "Double Copies" mode,parts of the original imageare not copied.
Combination of original andcopy paper is not correct.
Specify the paper size again. Forexample, select A3 for A4 originals.See "Double Copies", Copy andDocument Server Reference .
In "Erase Border", "EraseCentre", or "Erase Centre /Border" mode, parts of theoriginal image are notcopied.
You set a wide erasedmargin.
Make the margin width narrower. Youcan adjust it between 2 - 99 mm (0.1 -3.9 inches).
2. Troubleshooting When Using the Copy/Document Server Function
38
2

Problem Cause Solution
In "Erase Border", "EraseCentre", or "Erase Centre /Border" mode, parts of theoriginal image are notcopied.
Originals are not scannedcorrectly.
Place the originals correctly.
In "Margin Adjustment"mode, parts of the originalimage are not copied.
• You set a wide erasedmargin.
• There is a lack of marginspace on the oppositeside of the bindingposition.
Set a narrower margin with User Tools.You can set the width between 0 - 30mm (0 - 1.2 inches).
In "Image Repeat" mode, theoriginal image is not copiedrepeatedly.
You selected copy paper thesame size as the originals, oryou did not select the properreproduction ratio.
Select copy paper larger than theoriginals or select the properreproduction ratio.
Stamp
Problem Cause Solution
The stamp position is wrong. The paper orientation iswrong.
Check the paper orientation and stampposition.
The stamp is not printed on theback side of sheets whenduplex copying.
The back side stamp positionis incorrect for the paper size.
Reset the back side stamp position. Fordetails about Duplex Back PageStamping Position, see "Copier /Document Server Features", Copy andDocument Server Reference .
Combine
Problem Cause Solution
Copies made with the"Booklet" or "Magazine"function cannot be folded intoa book correctly.
You selected a setting ("Opento Left" or "Open to Right")that does not match theorientation of originals.
In [Copier / Document Server Features],under [Edit], set [Orientation: Booklet,Magazine] properly.
When You Cannot Make Copies As Wanted
39
2

Problem Cause Solution
When using "Combine",parts of the image are notcopied.
You specified a reproductionratio that does not match thesizes of your originals andcopy paper.
When you specify a reproduction ratiousing Manual Paper Select mode, makesure the ratio matches your originals andthe copy paper. Select the correctreproduction ratio before usingCombine mode. See "One-SidedCombine", "Two-Sided Combine", or"Auto Reduce/Enlarge", Copy andDocument Server Reference .
Copies are not in correctorder.
You placed the originals inthe incorrect order.
When placing a stack of originals in theADF, the last page should be on thebottom.
If you place an original on the exposureglass, start with the first page to becopied.
Duplex
Problem Cause Solution
Cannot print in duplex mode. You have loaded paper onthe bypass tray.
Remove paper loaded on the bypasstray. Load paper in a tray other thanbypass tray.
Cannot print in duplex mode. You have loaded thick paperheavier than 128 g/m2.
Change the paper.
Cannot print in duplex mode. [Apply Duplex] is set to [No]for "Paper Type".
In [Tray Paper Settings], under "PaperType", set [Apply Duplex] to [Yes].
Copies are not in correctorder.
You placed the originals inthe incorrect order.
When placing a stack of originals in theADF, the last page should be on thebottom.
If you place an original on the exposureglass, start with the first page to becopied.
When using "Duplex", copy ismade top to bottom eventhough [Top to Top] isselected.
You placed the originals inthe wrong orientation.
Place the original in the correctorientation. See "Duplex Copying",Copy and Document Server Reference
.
2. Troubleshooting When Using the Copy/Document Server Function
40
2

Document Server
Problem Cause Solution
Cannot access file. The file is passwordprotected.
Contact the administrator.
To delete the files stored in the documentserver, select [Delete All Files inDocument Server] under [AdministratorTools] in [System Settings]. As this willpermanently delete every single file,make sure the document server does notcontain any files you want to keep. Fordetails about Delete All Files inDocument Server, see "AdministratorTools", Network and System SettingsGuide .
You cannot find out what isstored in a file.
You may not be able toascertain the contents of a filesimply from the file name.
You can switch the Select File screenbetween [List] and [Thumbnails] displayto check the contents of the file. Checkinformation other than the file name.
• List display
The file name, data of storage, anduser name are shown.
• Thumbnails display
An image of the stored fileappears.
You can enlarge the image by pressing[Preview]. See "Checking the Details ofa Stored Document", Copy andDocument Server Reference .
When You Cannot Make Copies As Wanted
41
2
Problem Cause Solution
Memory frequently becomesfull.
The document server memoryis full.
Delete unnecessary files. On the fileselection display, select unnecessaryfiles, and then press [Delete File]. If thisdoes not increase available memory, dothe following.
• Switch to the scanner screen, andthen delete unnecessary filesstored under the scanner function.
• Switch to the printer screen, andthen delete unnecessary filesstored under Sample Print, LockedPrint, Hold Print, or Stored Print.
"Cannot display preview ofthis page." appears, and youcannot check the thumbnailimage.
The image data may havebeen corrupted.
Press [Exit] to display the preview screenwithout a thumbnail.
If the selected document containsseveral pages, press [Switch] on the"Display Page" area to change thepage, and then a preview of the nextpage will appear.
Connect Copy
Problem Cause Solution
You cannot staple, punch, orfold.
The main and sub-machinesdo not have the same optioninstalled.
Press [Connect Copy] to cancel ConnectCopy.
You get different copy resultsfrom the main and sub-machines.
The Copy Quality settingdiffers on the two machines.
On the control panel, select [Edit /Stamp]. Select [Copy Quality] in [Edit /Stamp], and then make the same settingon both machines.
Display During Connect Copy
This section describes the display during Connect Copy.
2. Troubleshooting When Using the Copy/Document Server Function
42
2

Problem Cause Solution
[Connect Copy] is notdisplayed.
The sub-machine's mainpower is off.
Turn on the sub-machine's main power.
[Connect Copy] is notdisplayed.
Functions that cannot be usedwith Connect Copy areselected on the main machine(such as storing or copyingthe first page of a documentin the Document Server).
Cancel the functions selected on themain machine.
[Connect Copy] is notdisplayed.
The main machine is inInterrupt mode.
Press the [Interrupt] key on the sub-machine to cancel Interrupt mode.
[Connect Copy] is notdisplayed.
The [Connect Copy KeyDisplay] setting is off.
Select [Display] for the [Connect CopyKey Display] setting.
[Connect Copy] is notdisplayed.
The cable connecting the twomachines is damaged.
Contact your service representative.
[Connect Copy] is notdisplayed.
The is lit. Follow the instructions displayed.
[Connect Copy] appearsfaded.
Functions that cannot be usedwith Connect Copy havebeen set.
Press the [Clear Modes] key to clear thesettings.
If Connect Copy Is Canceled
This section describes causes and remedies when Connect Copy is canceled.
Problem Cause Solution
The machine cancelsConnect Copy.
The main machine's mainpower is off, or the operationswitch has been pressed.
Turn on the sub-machine's main poweror operation switch, and then press[Connect Copy].
When You Cannot Make Copies As Wanted
43
2

Problem Cause Solution
The machine cancelsConnect Copy.
The sub-machine's mainpower is off.
A message instructing you to check thesub-machine appears on the display ofthe main machine. Press [Cancel] toclear Connect Copy. Turn on the sub-machine's main power, press ConnectCopy, and then make your settingsagain.
The machine cancelsConnect Copy.
The Weekly Timer setting iscoming into effect on the mainmachine.
Turn on the main machine's operationswitch, and then press [Connect Copy].
For details about Weekly Timer:Monday - Sunday, see "SystemSettings", Network and System SettingsGuide .
An error message indicatesthe main machine has brokendown.
The is lit. Copying is not possible. Follow theinstructions displayed.
If You Cannot Exit from Connect Copy
This section describes causes and remedies if you cannot exit from Connect Copy.
Problem Cause Solution
There is no response whenyou press [Connect Copy].
Scanning is in progress. Press the [Clear/Stop] key on the mainmachine, and then press [Stop].
There is no response whenyou press [Connect Copy].
Copying is in progress. Press the [Clear/Stop] key on the mainmachine, and then press [Stop].
2. Troubleshooting When Using the Copy/Document Server Function
44
2

Problem Cause Solution
There is no response whenyou press [Connect Copy].
A paper misfeed hasoccurred on either the mainmachine or sub-machine.
• Follow the instructions displayed.For details, see p.121 "RemovingJammed Paper" and p.138"Removing Jammed Staples".
• If the sub-machine's displayindicates that a cover is open,follow the instructions displayed.
• To cancel Connect Copy, Press the[Clear/Stop] key on the mainmachine, and then press [Stop].
There is no response whenyou press [Connect Copy].
The [Clear/Stop] key hasbeen pressed on the mainmachine.
To cancel Connect Copy, Press the[Clear/Stop] key on the main machine,and then press [Stop].
There is no response whenyou press [Connect Copy].
Toner or other supplies needto be replaced on either themain machine or sub-machine.
• Follow the instructions displayed.For details about loading paper oradding toner and staples, see"Loading Paper", "Adding Toner",and "Adding Staples", About ThisMachine . For details aboutremoving punch and staple waste,see p.141 "Removing PunchWaste" and p.144 "RemovingStaple Waste".
• To cancel Connect Copy, Press the[Clear/Stop] key on the mainmachine, and then press [Stop].
When Memory Is Full
This section describes likely causes of and possible solutions for problems related to full memory.
When You Cannot Make Copies As Wanted
45
2

Message Cause Solution
"Memory is full. nn originalshave been scanned. Press[Print] to copy scannedoriginals. Do not removeremaining originals."
"n" in the message representsa changeable number.
The scanned originalsexceeds the number of pagesthat can be stored in memory.
Press [Print] to copy scanned originalsand cancel the scanning data. Press[Stop] to cancel the scanning data andnot copy.
"Press [Continue] to scan andcopy remaining originals."
The machine checked if theremaining originals should becopied, after the scannedoriginals were printed.
To continue copying, remove all copies,and then press [Continue]. To stopcopying, press [Stop].
Connect Copy
Message Cause Solution
"Sub-machine memory is full.Sub-machine will bedisconnected."
The quantity of data exceedsthe capacity of the sub-machines.
Continue printing on the main machine.
• If you set [Memory Full Auto Scan Restart] in [Input / Output] of User Tools to [On], even if the memorybecomes full, the memory overflow message will not be displayed. The machine will make copies ofthe scanned originals first, and then automatically proceed to scan and to copy the remainingoriginals. In this case, the resulting sorted pages will not be sequential. For details about Memory FullAuto Scan Restart, see "Input/Output", Copy and Document Server Reference .
2. Troubleshooting When Using the Copy/Document Server Function
46
2

3. Troubleshooting When Using theFacsimile FunctionThis chapter describes likely causes of and possible solutions for facsimile function problems.
Adjusting the VolumeThis section describes how to adjust the volume.
You can change the volume of the following sounds that the machine makes.
On Hook Mode
Heard when [On Hook] is pressed.
At Transmission
Heard when "Immediate Transmission" is performed.
At Reception
Heard when the machine receives a document.
At Dialing
Heard after pressing the [Start] key, until the line connects to the destination.
At Printing
Heard when a received document is printed.
1. Press the [User Tools / Counter] key.
BQN036S
2. Press [Facsimile Features].
3. Check that [General Settings] screen appears.
47
3

4. Press [Adjust Sound Volume].
5. Press [Lower] or [Louder] to adjust the volume, and then press [OK].
You can hear the actual volume by pressing [Check].
If you press [Cancel], the volume setting is canceled. The display returns to that of step 4.
You can set the volume level to between 0 and 7.
6. Press the [User Tools / Counter] key.
The standby display appears.
• You can adjust the On Hook volume when you press [On Hook]. See "On Hook Dial", FacsimileReference .
3. Troubleshooting When Using the Facsimile Function
48
3

Messages Displayed When Using the FacsimileFunctionThis section describes the machine's main messages. If other messages appear, follow their instructions.
Message Cause Solution
"Authentication has failed." The entered login user nameor login password is notcorrect.
Ask the user administrator for the correctlogin user name and login password.
"Authentication has failed." The machine cannot performauthentication.
Contact the administrator.
"Cannot detect original size.Select scan size."
The machine failed to detectthe size of the original.
On the control panel, under [Scan Size],specify the scan area in [Scan Settings],and then resend the document.
"Check whether there areany network problems."
[13-10]
The alias telephone numberyou entered is alreadyregistered on the gatekeeperby another device.
• In [Facsimile Features], under[Initial Settings], select [H.323Settings], and then check that thealias telephone number is correctlyprogrammed. You can also use theWeb Image Monitor forconfirmation. See the Web ImageMonitor's Help.
• Contact the network administrator.
"Check whether there areany network problems."
[13-11]
Cannot access gatekeeper. • In [Facsimile Features], under[Initial Settings], select [H.323Settings], and then check that"Gatekeeper Address" is correctlyprogrammed. You can also use theWeb Image Monitor forconfirmation. See the Web ImageMonitor's Help.
• Contact the network administrator.
Messages Displayed When Using the Facsimile Function
49
3

Message Cause Solution
"Check whether there areany network problems."
[13-17]
Registering of user name isrejected by SIP server.
• In [Facsimile Features], under[Initial Settings], select [SIPSettings], and then check "SIPServer IP Address" and "SIP UserName" are correctly programmed.You can also use the Web ImageMonitor for confirmation. See theWeb Image Monitor's Help.
• Contact the network administrator.
"Check whether there areany network problems."
[13-18]
Cannot access SIP server. • In [Facsimile Features], under[Initial Settings], select [SIPSettings], and then check that "SIPServer IP Address" is correctlyprogrammed. You can also use theWeb Image Monitor forconfirmation. See the Web ImageMonitor's Help.
• Contact the network administrator.
"Check whether there areany network problems."
[13-24]
The password registered forthe SIP server is not the sameas the password registered forthis machine.
Contact the administrator.
3. Troubleshooting When Using the Facsimile Function
50
3

Message Cause Solution
"Check whether there areany network problems."
[13-25]
In [Effective Protocol], the IPaddress is not enabled, or anincorrect IP address has beenregistered.
• In [System Settings], under[Interface Settings], select[Effective Protocol], and then checkthat "IPv4" is programmed to"Active". You can also use the WebImage Monitor for confirmation.See the Web Image Monitor'sHelp.
• In [System Settings], under[Interface Settings], select[Machine IPv4 Address], and thencheck the IP address is correctlyprogrammed. You can also use theWeb Image Monitor forconfirmation. See the Web ImageMonitor's Help.
• Contact the administrator.
"Check whether there areany network problems."
[13-26]
The "Effective Protocol" and"SIP Server IP Address"settings are different, or anincorrect IP address has beenregistered.
• In [System Settings], under[Interface Settings], check the IPaddress is correctly programmed.You can also use the Web ImageMonitor for confirmation. See theWeb Image Monitor's Help.
• Contact the administrator.
Messages Displayed When Using the Facsimile Function
51
3

Message Cause Solution
"Check whether there areany network problems."
[14-01]
The DNS server, SMTP server,or folder specified forforwarding to was not found,or, the destination for InternetFax around (not through) theSMTP server could not befound.
• In [System Settings], under[Interface Settings], check that theDNS server is correctlyprogrammed. You can also use theWeb Image Monitor forconfirmation. See the Web ImageMonitor's Help.
• In [System Settings], under [FileTransfer], select [SMTP Server],and then check that "Server Name"or "Port No." is correctlyprogrammed. You can also use theWeb Image Monitor forconfirmation. See the Web ImageMonitor's Help.
• Check that the folder forforwarding is correctly specified.
• Check that the computer in whichthe folder for forwarding isspecified is correctly operated.
• Check that the LAN cable iscorrectly connected to themachine.
• Contact the network administratorof the destinations.
• Contact the network administrator.
3. Troubleshooting When Using the Facsimile Function
52
3

Message Cause Solution
"Check whether there areany network problems."
[14-09]
E-mail transmission wasrefused by SMTPauthentication, POP beforeSMTP authentication or loginauthentication of the computerin which the folder for transferis specified.
• In [System Settings], under [FileTransfer], select [SMTPAuthentication], [POP beforeSMTP], or [Fax E-mail Account],and then check that "User Name"and "Password" are correctlyprogrammed. You can also use theWeb Image Monitor forconfirmation. See the Web ImageMonitor's Help.
• Check that the user ID andpassword for the computer inwhich the folder for forwarding isspecified are correctlyprogrammed.
• Check that the folder forforwarding is correctly specified.
• Check that the computer in whichthe folder for forwarding isspecified is correctly operated.
• Contact the network administrator.
"Check whether there areany network problems."
[14-33]
Neither the machine's nor theadministrator's e-mail addressis registered.
• In [System Settings], under [FileTransfer], select [Fax E-mailAccount], and then check that "E-mail Address" is correctlyprogrammed. You can also use theWeb Image Monitor forconfirmation. See the Web ImageMonitor's Help.
• Contact the network administrator.
Messages Displayed When Using the Facsimile Function
53
3

Message Cause Solution
"Check whether there areany network problems."
[15-01]
No POP3/IMAP4 serveraddress is programmed.
• In [System Settings], under [FileTransfer], select [POP3 / IMAP4Settings], and then check that"Server Name" is correctlyprogrammed. You can also use theWeb Image Monitor forconfirmation. See the Web ImageMonitor's Help.
• Contact the network administrator.
"Check whether there areany network problems."
[15-02]
Cannot log on to the POP3/IMAP4 server.
• In [System Settings], under [FileTransfer], select [Fax E-mailAccount], and then check that"User Name" and "Password" arecorrectly programmed. You canalso use the Web Image Monitorfor confirmation. See the WebImage Monitor's Help.
• Contact the network administrator.
"Check whether there areany network problems."
[15-03]
No machine e-mail address isprogrammed.
• In [System Settings], under [FileTransfer], check that the machine e-mail address is correctlyprogrammed. You can also use theWeb Image Monitor forconfirmation. See the Web ImageMonitor's Help.
• Contact the network administrator.
3. Troubleshooting When Using the Facsimile Function
54
3

Message Cause Solution
"Check whether there areany network problems."
[15-11]
Cannot find the DNS server orPOP3/IMAP4 server.
• In [System Settings], under[Interface Settings], check that theIP address of the DNS Server iscorrectly programmed. You canalso use the Web Image Monitorfor confirmation. See the WebImage Monitor's Help.
• In [System Settings], under [FileTransfer], select [POP3 / IMAP4Settings], and then check that"Server Name" is correctlyprogrammed. You can also use theWeb Image Monitor forconfirmation. See the Web ImageMonitor's Help.
• In [System Settings], under [FileTransfer], select [E-mailCommunication Port], and thencheck that the port number of thePOP3/IMAP4 server is correctlyprogrammed. You can also use theWeb Image Monitor forconfirmation. See the Web ImageMonitor's Help.
• Check that the LAN cable iscorrectly connected to themachine.
• In [System Settings], under [FileTransfer], select [ReceptionProtocol], and then check that thereception protocol is correctlyprogrammed. You can also use theWeb Image Monitor. See the WebImage Monitor's Help.
• Contact the network administrator.
Messages Displayed When Using the Facsimile Function
55
3

Message Cause Solution
"Check whether there areany network problems."
[15-12]
Cannot log on to the POP3/IMAP4 server.
• In [System Settings], under [FileTransfer], select [Fax E-mailAccount], and then check that"User Name" and "Password" arecorrectly programmed. You canalso use the Web Image Monitorfor confirmation. See the WebImage Monitor's Help.
• In [System Settings], under [FileTransfer], check that the user nameand password for POP beforeSMTP authentication are correctlyprogrammed. You can also use theWeb Image Monitor forconfirmation. See the Web ImageMonitor's Help.
• Contact the network administrator.
"Connection with LDAPserver has failed. Check theserver status."
A network error has occurredand connection has failed.
• Try the operation once more. If themessage is still shown, the networkmay be crowded.
• In [System Settings], under[Administrator Tools], check thesettings of LDAP server. For details,see "Programming the LDAPserver", Network and SystemSettings Guide .
"Error occurred, andtransmission was cancelled."
• Original jammed duringImmediate Transmission.
• A problem occurred inthe machine, or noiseoccurred on thetelephone line.
Press [Exit], and then send thedocuments again.
"Exceeded max. No. ofdisplay search results. Max.:n"
(A figure is placed at n.)
The number of search resultshas exceeded the maximumnumber of items that can bedisplayed.
Search again after changing the searchconditions.
3. Troubleshooting When Using the Facsimile Function
56
3

Message Cause Solution
"Exceeded time limit forLDAP server search. Checkthe server status."
A network error has occurredand connection has failed.
• Try the operation once more. If themessage is still shown, the networkmay be crowded.
• In [System Settings], under[Administrator Tools], check thesettings of LDAP server. For details,see "Programming the LDAPserver", Network and SystemSettings Guide .
"Functional problems withfacsimile. Data will beinitialized."
There is a problem with thefax.
Record the code number shown on thedisplay and contact your servicerepresentative. Other functions can beused.
"LDAP server authenticationhas failed. Check thesettings."
A network error has occurredand connection has failed.
Make settings correctly for the username and the password for LDAP serverauthentication.
"Original is being scannedby another function. Switchto the following function,then press the Stop key tocancel scanning or press theStart key to continue."
A function of the machineother than the Facsimilefunction is being used such asthe Document Server function.
Before sending a file by fax, cancel thejob in progress. For example, press[Exit], and then press the [DocumentServer] key. Next, press the [Clear/Stop] key. When the message "TheClear / Stop key was pressed. Are yousure you want to stop scanning?"appears, press [Stop].
"Put original back, check itand press the Start key."
Original jammed duringMemory Transmission.
Press [Exit], and then send thedocuments again.
"Remove paper from CopyTray."
Copy Tray is full. Remove the paper. If the other tray isalso full, the tray name shown on thedisplay changes. Remove paper fromthe tray indicated on the display.
Messages Displayed When Using the Facsimile Function
57
3
Message Cause Solution
"Some invalid destination(s)contained. Do you want toselect only valid destination(s)?"
The specified group containsfax destinations, e-maildestinations, and/or folderdestinations, either of whichare incompatible with thespecified transmissionmethod.
In the message that appears at eachtransmission, press [Select].
"Some page(s) are nearblank. To cancel, press theStop key."
The first page of the documentis almost blank.
The original's blank side might havebeen scanned. Be sure to place youroriginals correctly. For details aboutdetermining the cause of blank pages,see "Detecting Blank Sheet", FacsimileReference .
"Some page(s) are nearblank."
The first page of the documentis almost blank.
The original's blank side might havebeen scanned. Be sure to place youroriginals correctly. For details aboutdetermining the cause of blank pages,see "Detecting Blank Sheet", FacsimileReference .
"The selected file(s)contained file(s) withoutaccess privileges. Only file(s) with access privileges willbe deleted."
You tried to delete a documentfor which you do not havepermission to delete.
Only the administrator can delete thisdocument. Contact the administrator ifyou want to delete a document for whichyou do not have permission to delete.
"Updating the destinationlist... Please wait. Specifieddestination(s) or sender'sname has been cleared."
The destination list is beingupdated from the networkusing SmartDeviceMonitor forAdmin or Web ImageMonitor.
Wait until the message disappears. Donot switch off the power while thismessage is displayed. Depending on thenumber of destinations to be updated,there may be some delay before youcan resume operation. Operation is notpossible while this message is displayed.
"You do not have theprivileges to use thisfunction."
The logged in user name doesnot have permission for theselected function.
Contact the administrator about thepermission for the required function.
3. Troubleshooting When Using the Facsimile Function
58
3

• If "Check whether there are any network problems." appears, the machine is not correctly connectedto the network or the settings of the machine are not correct. If you do not need to connect to a network,you can specify the setting so this message is not displayed, and then the [Facsimile] key no longerlights. For details about how to do this, see "Parameter Settings", Facsimile Reference . If youreconnect the machine to the network, be sure to set "Display" by configuring the appropriate UserParameter.
• If the paper tray runs out of paper, "There is no paper. Load paper." appears on the display, askingyou to add paper. If there is paper left in the other trays, you can receive documents as usual, evenif the message appears on the display. You can turn this function on or off with "Parameter Settings".For details about how to do this, see "Parameter Settings", Facsimile Reference .
Messages Displayed When Using the Facsimile Function
59
3

When You Cannot Send or Receive FaxMessages As WantedThis section describes likely causes of and possible solutions for transmission and reception-relatedproblems.
Transmission/Reception
Problem Cause Solution
Both transmission andreception are impossible.
The modular cord may bedisconnected.
Make sure the modular cord is correctlyconnected. See "Connecting theMachine to a Telephone Line andTelephone", Network and SystemSettings Guide .
Transmission
Problem Cause Solution
Document appears blank atthe other end.
The original was placedupside down.
When the original is placed directly onthe exposure glass, the side to bescanned must face down. When theoriginal is fed via the ADF, the side to bescanned must face up.
Printed or sent images arespotty.
The ADF, exposure glass, orscanning glass is dirty.
Clean them. See "Maintaining YourMachine", About This Machine .Make sure ink or correction fluid is drybefore placing originals.
Transmission failed due to"maximum e-mail size" error.
If the e-mail size specified onthe machine is too large, theInternet Fax document cannotbe sent.
In [Facsimile Features], under [SendSettings], set [Max. E-mail Size] to [Off],or set the maximum e-mail size to alarger value. Then, re-send thedocument.
3. Troubleshooting When Using the Facsimile Function
60
3

Problem Cause Solution
When using On Hook Dial orManual Dial, "Receivg."appears and transmission isnot allowed.
If the machine fails to detectthe size of the original when[Start] key is pressed, itperforms a receivingoperation.
Press [Scan Size] in [Scan Settings],select the scan area, and then resend thedocument.
If you use On Hook Dial or Manual Dialfrequently, it is recommended that youset "Receive documents by pressing the[Start] key when originals are not set." to"Off" in User Parameters. If this is set to"Off", when using Manual Dial youcannot receive by pressing the [Start]key. For details about how to do this, see"Parameter Settings", FacsimileReference .
LAN-Fax Driver does notwork.
The entered login user name,login password, or driverencryption key is incorrect.
Check your login user name, loginpassword, or driver encryption key, andenter them correctly. Contact theadministrator.
LAN-Fax Driver does notwork.
A high security level is set bythe extended securityfunction.
Contact the administrator.
Although a groupspecification was set for thefollowing, reception was notpossible.
Receiving Station ofInformation Box,Forwarding, Forwarding ofSpecial Sender, ReceptionReport e-mail, E-mail TXResults, routing e-mailreceived via SMTP.
The number of specifieddestinations exceeds themaximum number that can bespecified as a group.
A maximum of 500 parties can bespecified for a group. Check if there aremore than the specified numbersregistered in the address book. If agroup was registered in another groupor specified as Receiving Stations 1 to 5for the Transfer Box, transmission iscanceled but an error message does notappear.
When You Cannot Send or Receive Fax Messages As Wanted
61
3

Reception
Problem Cause Solution
The machine failed to printreceived fax documents.
If this happened when theReceiving File indicator waslit, low paper may havecaused printing to stop.
• Load paper into the tray.
• Add toner.
For details about Substitute Reception,see "Substitute Reception", FacsimileReference .
The machine failed to printreceived fax documents.
In [Facsimile Features], under[Reception Settings], [Store]has been selected for[Reception File Setting].
Print the fax documents using a Webbrowser or the Print Stored RX Filefunction. See "Printing Received andStored Documents" and "Viewing,Printing, and Deleting Received FaxDocuments Using a Web ImageMonitor", Facsimile Reference .
The machine failed to printreceived fax documents.
An alert indicator is lit. Load paper into the tray. See "LoadingPaper", About This Machine .
While pressing [Manual E-mail RX], "Cannot receive E-mails currently." appears ande-mail cannot be received.
The machine is receiving anon-demand e-mail message(e-mail inquiry from theadministrator).
After the e-mail is received, press[Manual E-mail RX], and then try again.
Printing
Problem Cause Solution
Print is slanted. The tray's side fences mightnot be locked.
Make sure the side fences are locked.See "Changing the Paper Size", AboutThis Machine .
Print is slanted. The paper is fed at a slant. Load the paper correctly. See "LoadingPaper", About This Machine .
Misfeeds occur frequently. The number of feeding in thepaper tray exceeds thecapacity of the machine.
Load paper only as high as the upperlimit markings on the side fences of thepaper tray, LCT, or bypass tray.
Misfeeds occur frequently. The paper tray's side fencesare set too tightly.
Push the side fences lightly, and thenreset it.
3. Troubleshooting When Using the Facsimile Function
62
3

Problem Cause Solution
Misfeeds occur frequently. The paper is damp. Use paper that has been stored in therecommended temperature andhumidity conditions. See "PaperStorage", About This Machine .
Misfeeds occur frequently. The paper is too thick or toothin.
Use recommended paper. See"Recommended Paper Sizes andTypes", About This Machine .
Misfeeds occur frequently. The paper is wrinkled or hasbeen folded/creased.
Use recommended paper only and besure its storage environment meets therecommended temperature andhumidity conditions. For details aboutrecommended paper and the properway to store it, see "RecommendedPaper Sizes and Types" and "PaperStorage", About This Machine .
Misfeeds occur frequently. Printed paper is being used. Do not load sheets that have alreadybeen copied or printed onto by anothermachine.
Misfeeds occur frequently. Sheets are sticking together. Fan the sheets thoroughly beforeloading them. Alternatively, feed thesheets into the machine one at a time.
Sheets are feeding intogether, resulting in jams.
The pages are stickingtogether.
Fan the sheets thoroughly beforeloading them. Alternatively, feed thesheets into the machine one at a time.
Copy paper becomescreased.
Printed paper is being used. Do not load sheets that have alreadybeen copied or printed onto by anothermachine.
Copy paper becomescreased.
The paper is damp. Use paper that has been stored in therecommended temperature andhumidity conditions. See "PaperStorage", About This Machine .
Copy paper becomescreased.
The paper is too thin. Use recommended paper. See"Recommended Paper Sizes andTypes", About This Machine .
When You Cannot Send or Receive Fax Messages As Wanted
63
3

Problem Cause Solution
Edges of sheets are creased. The paper is damp. Use paper that has been stored in therecommended temperature andhumidity conditions. See "PaperStorage", About This Machine .
Edges of sheets are creased. You are using non-recommended paper.
Use recommended paper. See"Recommended Paper Sizes andTypes", About This Machine .
Images are only partiallyprinted.
The paper is damp. Use paper that has been stored in therecommended temperature andhumidity conditions. See "PaperStorage", About This Machine .
Black lines appear on theprint produced at thedestination.
The ADF, exposure glass orscanning glass is dirty.
Clean them. See "Maintaining YourMachine", About This Machine .
Background of receivedimages appears dirty. Imagesfrom the back of the pageappear.
Image density is too high. Adjust the scan density settings. Fordetails about how to change the density,see "Density (Contrast)", FacsimileReference .
Received image is too light. When using moist, rough, orprocessed paper, areas ofprint may not be fullyreproduced.
Use recommended paper. See"Recommended Paper Sizes andTypes", About This Machine .
Received image is too light. The image density has beenset too low.
Increase the scanning density. Fordetails about how to change the density,see "Density (Contrast)", FacsimileReference .
Received image is too light. The original of the transmittedfax was printed on paper thatis too thin.
Ask the sender to reprint the original onthicker paper and fax it again.
3. Troubleshooting When Using the Facsimile Function
64
3

Problem Cause Solution
The image on the back side ofduplex copies has mottledblank patches or is smudged.
Missing patches andsmudges are caused bymoisture leaking from thepaper.
• Do not install the machine in areasthat are susceptible to lowtemperature.
• Use paper that has been storedwhere temperature and humidityconditions meet the limitations werecommend. For details about thepaper storage conditions werecommend, see "Paper Storage",About This Machine .
• Install the Optional anti-humidityheater. For details about the anti-humidity heater, contact yourservice representative.
Others
Problem Cause Solution
All fax documents stored inmemory have been lost.Those documents includeones stored through MemoryTransmission/Reception,Memory Lock, or SubstituteReception.
When about one hour passesafter power to the machine isturned off, all fax documentsstored in memory are lost.
If any documents have been lost for thisreason, a Power Failure Report isautomatically printed when the machineis turned on. If fax documents stored forMemory Transmission have been lost,check the destinations and resend thedocuments. If fax documents receivedthrough Memory, Memory Lock orSubstitute Reception have been lost, askthe senders to resend the documents.See p.68 "Turning Off the MainPower / In the Event of Power Failure".
When a correct password isentered, you cannot printdocuments that appear in thePersonal box or Informationbox, or transmit / print outstored documents.
Documents are locked by asecurity function if incorrectpasswords are entered acertain number of times.
Contact the administrator.
When You Cannot Send or Receive Fax Messages As Wanted
65
3

Problem Cause Solution
[Prg. Dest.] or [Manual Entry]does not appear.
This function is madeunavailable by the enhancedsecurity function.
Contact the administrator.
The following functions arenot available: Forwarding,Store File in the InformationBox, routing e-mail receivedvia SMTP.
This function is madeunavailable by the enhancedsecurity function.
Contact the administrator.
Cannot print JPEG format fileswith the Mail to Print function.
Only JFIF files are printable.
(JFIF is a JPEG subformat.)
Make sure the files you are trying to printare in JFIF subformat.
When Memory Is Full
This section describes likely causes of and possible solutions for problems related to full memory.
Message Cause Solution
"Memory is full. Cannot scanmore. Transmission will bestopped."
The memory is full. If you press [Exit], the machine returns tostandby mode and starts transmitting thestored pages.
Check the pages that have not been sentusing the Communication Result Report,and then resend those pages.
3. Troubleshooting When Using the Facsimile Function
66
3
If an Error Report Is PrintedAn Error Report is printed if a document cannot be successfully sent or received.
Possible causes include a problem with the machine or noise on the telephone line. If an error occurs duringtransmission, resend the original. If an error occurs during reception, ask the sender to resend the document.
• If an error happens frequently, contact your service representative.
• The "Page" column gives the total number of pages. The "Page not sent" or "Page not received" columngives the number of pages not sent or received successfully.
• You can display destinations by configuring the appropriate User Parameter. For details about howto do this, see "Parameter Settings", Facsimile Reference .
• You can display sender names by configuring the appropriate User Parameter. For details about howto do this, see "Parameter Settings", Facsimile Reference .
If an Error Report Is Printed
67
3

Turning Off the Main Power / In the Event ofPower FailureThe following notes concern power failure and turning off the machine.
• When you disconnect the power plug from the wall outlet, always pull the plug (not the cable).
• Do not turn off the main power switch while the power indicator is lit or blinking. If you do, the harddisk and memory may be damaged and failure could result.
• Turn off the main power switch before pulling out the plug. If you pull out the plug with the switch on,the hard disk and memory may be damaged and failure could result.
• Make sure 100% is shown on the display before you unplug the machine. If a lower value is shown,some data is currently present in memory.
• Right after a power failure, the internal battery needs to be sufficiently recharged to guard againstfuture data loss. Keep the machine plugged in and the main power switch on for about 24 hours afterthe power loss.
Even if the main power switch is turned off, the contents of the machine memory (for example, programmednumbers) will not be lost. However, if power is lost for about one hour because the main power switch isturned off, there is a power cut, or the power cable is removed, contents of the Fax memory are lost. Lostitems will include any fax documents stored in memory using Memory Transmission/Reception, or MemoryLock.
If a file was deleted from memory, a Power Failure Report is automatically printed as soon as the poweris restored.
This report can be used to identify lost files. If a memory stored for Memory Transmission was lost, resendit. If a document received by Memory Reception or Substitute Reception was lost, ask the sender to resendit.
3. Troubleshooting When Using the Facsimile Function
68
3

When an Error Occurs Using Internet FaxThis section describes reports that the machine sends if an Internet Fax error occurs.
Error Mail Notification
The machine sends the Error Mail Notification to the sender when it is unable to successfully receive aparticular e-mail message. A "cc" of this notification is also sent to the administrator's e-mail address whenone is specified.
• If an incoming Internet Fax from another party bypasses the SMTP server, even if reception is notsuccessful, an Error Mail Notification is not sent to the sender.
• You can select to send Error Mail Notification by configuring the appropriate User Parameter. Fordetails about how to do this, see "Parameter Settings", Facsimile Reference .
• If Error Mail Notification cannot be sent, the Error Report (E-mail) is printed by the machine.
• If an error occurs when an e-mail is received via SMTP, the SMTP server sends an error e-mail to theoriginator of the document.
Error Report (E-mail)
The Error Report (E-mail) is printed by the machine when it is unable to send an Error Mail Notification.
Server-Generated Error E-mail
The transmitting server sends this error e-mail to the originator of e-mail that cannot be transmittedsuccessfully (due to reasons such as specifying an incorrect e-mail address).
• If an Internet Fax transmission bypasses the SMTP server, even if transmission is not successful, anerror e-mail is not sent from the server.
• After a server-generated error e-mail is printed, the first page of the sent document is printed.
When an Error Occurs Using Internet Fax
69
3

3. Troubleshooting When Using the Facsimile Function
70
3
4. Troubleshooting When Using thePrinter FunctionThis chapter describes likely causes of and possible solutions for printer function problems.
Messages Displayed When Installing the PrinterDriverThis section describes what to do if a message appears when installing the printer driver.
Message number 58 or 34 indicates that the printer driver cannot be installed using Auto Run. Install theprinter driver using [Add Printer] or [Install Printer].
Message number 58 appears if there is a newer version of the printer driver already installed.
Windows 2000
This section describes the procedure under Windows 2000.
1. On the [Start] menu, point to [Settings], and then click [Printers].
2. Double-click the Add Printer icon.
3. Follow the instructions in Add Printer Wizard.
If the printer driver is on a CD-ROM, the location of the driver is \DRIVERS\(RPCS, PCL6, or PCL5E)\XP_VISTA\(language)\DISK1. If the installer starts, click [Cancel] to quit.
4. Specify a port.
• Available ports vary according to your Windows operating system or the type of interface. For details,see "Preparing the Machine", Printer Reference .
Windows XP Professional or Windows Server 2003/2003 R2
This section describes the procedure under Windows XP Professional or Windows Server 2003/2003R2.
1. On the [start] menu, click [Printers and Faxes].
2. Click [Add a printer].
71
4

3. Follow the instructions in Add Printer Wizard.
If the printer driver is on a CD-ROM, the location of the driver is \DRIVERS\(RPCS, PCL6, or PCL5E)\XP_VISTA\(language)\DISK1. If the installer starts, click [Cancel] to quit.
4. Specify a port.
• Available ports vary according to your Windows operating system or the type of interface. For details,see "Preparing the Machine", Printer Reference .
Windows XP Home Edition
This section describes the procedure under Windows XP Home Edition.
1. On the [start] menu, click [Control Panel].
2. Click [Printers and Other Hardware].
3. Click [Printers and Faxes].
4. Click [Add a printer].
5. Follow the instructions in Add Printer Wizard.
If the printer driver is on a CD-ROM, the location of the driver is \DRIVERS\(RPCS, PCL6, or PCL5E)\XP_VISTA\(language)\DISK1. If the installer starts, click [Cancel] to quit.
6. Specify a port.
• Available ports vary according to your Windows operating system or the type of interface. For details,see "Preparing the Machine", Printer Reference .
Windows Vista
This section describes the procedure under Windows Vista.
1. On the Start menu, click [Control Panel].
2. Click [Hardware and Sound].
3. Click [Printers].
4. Click [Add a printer].
5. Follow the instructions in Add Printer Wizard.
If the printer driver is on a CD-ROM, the location of the driver is \DRIVERS\(RPCS, PCL6, or PCL5E)\XP_VISTA\(language)\DISK1. If the installer starts, click [Cancel] to quit.
6. Specify a port.
4. Troubleshooting When Using the Printer Function
72
4

• Available ports vary according to your Windows operating system or the type of interface. For details,see "Preparing the Machine", Printer Reference .
Windows Server 2008
This section describes the procedure under Windows Server 2008.
1. On the [Start] menu, click [Control Panel].
2. Click [Hardware and Sound].
3. Click [Printers].
4. Click [Add a printer].
5. Follow the instructions in Add Printer Wizard.
If the printer driver is on a CD-ROM, the location of the driver is \DRIVERS\(RPCS, PCL6, or PCL5E)\XP_VISTA\(language)\DISK1. If the installer starts, click [Cancel] to quit.
6. Specify a port.
• Available ports vary according to your Windows operating system or the type of interface. For details,see "Preparing the Machine", Printer Reference .
Messages Displayed When Installing the Printer Driver
73
4

If USB Connection FailsThis section describes how to troubleshoot a problem related to USB connections.
Problem Cause Solution
The machine is notautomatically recognized.
The USB cable is notconnected properly.
Disconnect the USB cable, and then turnoff the main power switch. Turn themachine on again. When the machinehas fully booted up, reconnect the USBcable.
Windows has alreadyconfigured the USB settings.
Check whether the computerhas identified the machine asan unsupported device.
Open Windows' Device Manager, andthen, under [Universal Serial Buscontrollers], remove any conflictingdevices. Conflicting devices have a [!] or[?] icon by them. Take care not toaccidentally remove required devices.For details, see Windows Help.
4. Troubleshooting When Using the Printer Function
74
4

Messages Displayed When Using the PrinterFunctionThis section describes the principal messages that appear on the panel display. If a message not describedhere appears, act according to the message.
Status Messages
This section describes the machine status messages.
Message Status
"Hex Dump Mode" In Hex Dump mode, the machine receives data inhexadecimal format. Turn off the machine after printing, andthen turn it back on.
"Job Suspended..." Printing was temporarily stopped by SmartDeviceMonitor forClient.
You can resume printing via [My Job List] inSmartDeviceMonitor for Client, or via the Web ImageMonitor. To resume printing via Web Image Monitor, checkwith your system administrator first.
"Offline" The machine is offline. To start printing, switch the machineonline by pressing [ Online].
"Please wait." This message might appear for a second or two while themachine is preparing, performing initial adjustments, oradding toner. Wait a while.
"Printing..." The machine is printing. Wait a while.
"Ready" This is the default ready message. The machine is ready foruse. No action is required.
"Resetting job..." The machine is resetting the print job. Wait until "Ready"appears on the display panel.
"Setting change..." The machine is changing settings. You cannot use the controlpanel while this message is displayed. Wait a while.
"Waiting for print data..." The machine is waiting for the next data to print. Wait a while.
Messages Displayed When Using the Printer Function
75
4

Messages Displayed on the Control Panel When Using the Printer Function
This section describes likely causes of and possible solutions for the error messages that appear on thecontrol panel.
• Before turning the main power off, see "Turning On/Off the Power", About This Machine .
Message Cause Solution
"Authentication has failed." The entered login user nameor login password is notcorrect.
Ask the user administrator for the correctlogin user name and login password.
"Authentication has failed." The machine cannot performauthentication.
Contact the administrator.
"Cannot connect with thewireless card. Turn the mainpower switch off, then checkthe card."
• The wireless LANinterface unit was notinserted when themachine was turned on.
• The wireless LANinterface unit was pulledout after the machinewas turned on.
• The settings are notupdated although theunit is detected.
Turn off the machine, and check thewireless LAN interface unit is insertedcorrectly. Then, turn the machine onagain. If the message appears again,call your service representative.
"Hardware Problem:Ethernet"
An error has occurred in theEthernet board.
Turn the main power switch off, andback on again. If the message appearsagain, contact your servicerepresentative.
"Hardware Problem: HDD" An error has occurred in thehard disk drive.
Turn the main power switch off, andback on again. If the message appearsagain, contact your servicerepresentative.
"Hardware Problem: ParallelI/F"
An error has occurred in theparallel interface board.
Turn the main power switch off, andback on again. If the message appearsagain, contact your servicerepresentative.
4. Troubleshooting When Using the Printer Function
76
4

Message Cause Solution
"Hardware Problem: USB" An error has occurred in theUSB interface.
Turn the main power switch off, andback on again. If the message appearsagain, contact your servicerepresentative.
"Hardware Problem:Wireless Board"
Access to the wireless boardin which the wireless LANinterface unit is inserted ispossible, but an error wasdetected.
Turn off the machine, and check thewireless board is inserted correctly.Then, turn the machine on again. If themessage appears again, call yourservice representative.
"Hardware Problem:Wireless Card"
• The installed wirelessLAN or Bluetooth card isnot compatible with thismachine.
• An error has occurred ineither the wireless LANor Bluetooth card.
Turn off the machine, and check thewireless card. Then, turn the machine onagain. If the message appears again,call your service representative.
"IPDS font error. Turn the mainpower switch off then on.Press [Reset IPDS Fonts] inPrinter Features."
An IPDS font error occurred. Contact the machine administrator.
"Load following paper in n."
"To cancel job, press [JobReset]."
(A figure is placed at n)
The printer driver settings areincorrect or the tray does notcontain paper of the sizeselected in the printer driver.
Check the printer driver settings arecorrect, and then load paper of the sizeselected in the printer driver into the inputtray. For details about how to change thepaper size, see "Changing the PaperSize", About This Machine .
"Paper size and type aremismatched. Select anothertray from the following andpress [Continue]. To canceljob, press [Job Reset]. Papersize and type can also bechanged in User Tool."
The printer driver settings areincorrect or the tray does notcontain paper of the size ortype selected in the printerdriver.
Check the printer driver settings arecorrect, and then load paper of the sizeselected in the printer driver into the inputtray. For details about how to change thepaper size, see "Changing the PaperSize", About This Machine .
"Problem: Printer Font Error" An error has occurred in thefont settings.
Contact your service representative.
Messages Displayed When Using the Printer Function
77
4

Message Cause Solution
"The selected file(s)contained file(s) withoutaccess privileges. Only file(s)with access privileges will bedeleted."
You have tried to delete fileswithout the authority to do so.
Files can be deleted by the person whocreated the file. To delete a file whichyou are not authorized to delete, contactthe person who created the file.
"The tray selected for otherpages is the same as the onefor Slip Sheets ([Designate]).Cannot print. Check thesetting."
The tray selected for otherpages is the same as the onefor slip sheets.
Reset the job. Be sure the tray you selectfor slip sheets is not providing paper forother pages.
"Updating the destinationlist... Please wait. Specifieddestination(s) or sender'sname has been cleared."
The destination list is beingupdated from the networkusing SmartDeviceMonitorfor Admin or Web ImageMonitor.
Wait until the message disappears. Donot switch off the power while thismessage is displayed. Depending on thenumber of destinations to be updated,there may be some delay before youcan resume operation. Operations arenot possible while this message isdisplayed.
"You do not have theprivileges to use this function."
The logged in user name doesnot have permission for theselected function.
Contact the administrator about thepermission for the required function.
Other Messages
This section describes likely causes of and possible solutions for the error messages that are printed on theerror logs or reports.
Message Cause Solution
"84: Error" There is no work areaavailable for imageprocessing.
• In [Printer Features], under[System], set [Memory Usage] to[Font Priority].
• Decrease the number of files sent tothe machine.
"85: Error" The specified graphics libraryis unavailable.
Check that the data is valid.
4. Troubleshooting When Using the Printer Function
78
4

Message Cause Solution
"86: Error" Parameters of the controlcode are invalid.
Check the print settings.
"91: Error" Printing was canceled by theauto job cancel function dueto a command error.
Check that the data is valid.
"92: Error" Printing was canceledbecause [Job Reset] or the[Clear/Stop] key wasselected on the machine'scontrol panel.
Perform the print operation again ifnecessary.
"A function which cannot beused with Fold mode was set.The job has been cancelled."
A print job was cancelledbecause a function(s) notavailable with Fold wasselected.
Cancel the function(s) not available withFold. For details about the functions notavailable with Fold, see "Fold", PrinterReference .
"Address Book is currently inuse by another function.Authentication has failed."
The machine currently cannotperform authenticationbecause the address book isbeing used by anotherfunction.
Wait a while, and then retry theoperation.
"Auto-registration of userinformation has failed."
Automatic registration ofinformation for LDAPAuthentication or WindowsAuthentication failedbecause the address book isfull.
Contact the administrator.
"Classification Code isincorrect."
The classification code hasnot been entered, or theclassification code has beenentered incorrectly.
Enter the correct classification code.
"Classification Code isincorrect."
The classification code is notsupported with the printerdriver.
Select Optional for classification code.For details about how to specifyclassification code settings, see"Configuring Classification Codes",Printer Reference .
Messages Displayed When Using the Printer Function
79
4

Message Cause Solution
"Collate has beencancelled."
Collate was canceled. Turn the main power switch off and thenback on again. If the message appearsagain, contact your sales or servicerepresentative.
"Command Error" An RPCS command erroroccurred.
Check using the following procedure:
• Check if the communicationbetween the computer and themachine is working correctly.
• Check if the correct printer driver isbeing used.
• Check if the machine's memory sizeis set correctly in the printer driver.
• Check that the printer driver is themost up-to-date version available.
"Compressed Data Error." The printer detected corruptcompressed data.
• Check the connection between thecomputer and the printer.
• Check that the program you usedto compress the data is functioningcorrectly.
"Data storage error." You tried to print a SamplePrint, Locked Print, Hold Print,or Stored Print file, or to storea file in the document serverwhen the HDD wasmalfunctioning.
Contact your service representative.
"Document Server is notavailable to use. Cannotstore."
You cannot use the documentserver function.
Contact the administrator.
"Duplex has been cancelled." Duplex printing wascanceled.
• Select the proper paper size for theduplex function. See"Specifications for the Main Unit",About This Machine .
• In [System Settings], under [TrayPaper Settings] / [Paper Type], set[Apply Duplex] to [Yes].
4. Troubleshooting When Using the Printer Function
80
4

Message Cause Solution
"Error has occurred." A syntax error, etc., occurred. Check that the PDF file is valid.
"Exceeded max. capacity ofDocument Server. Cannotstore."
The HDD became full after afile was stored.
Delete some of the files stored in thedocument server or reduce the size thatyou want to send.
"Exceeded max. number offiles of Document Server.Cannot store."
The maximum file capacity ofthe document server wasexceeded.
Delete some of the files stored in thedocument server.
"Exceeded max. number offiles to print for temporary /stored jobs."
While printing a Sample Print,Locked Print, Hold Print orStored Print file, the maximumfile capacity was exceeded.
Delete unneeded files stored in themachine.
"Exceeded max. number ofpages of Document Server.Cannot store."
The maximum page capacityof the document server wasexceeded.
Delete some of the files stored in thedocument server or reduce the numberof pages that you want to send.
"Exceeded max. number ofpages to print fortemporary / stored jobs."
While printing a Sample Print,Locked Print, Hold Print orStored Print file, the maximumpage capacity wasexceeded.
Delete unneeded files stored in themachine.
Reduce the number of pages to print.
"Exceeded max. pages.Collate is incomplete."
The number of pagesexceeds the maximumnumber of sheets that you canuse Collate with.
Reduce the number of pages to print.
"Exceeded the maximumnumber of multi-sheet fold.The job has been cancelled."
The maximum number ofmulti-sheet fold wasexceeded.
Specify fewer sheets for the multi-sheetfold function.
Multi-sheet folding can be applied to amaximum of three sheets at once.
"Failed to obtain file system." PDF direct printing could notbe performed because the filesystem could not be obtained.
Turn the main power switch off, andback on again. If the message appearsagain, contact your servicerepresentative.
"File system is full." PDF file do not print outbecause the capacity of thefile system is full.
Delete all unnecessary files from thehard disk, or decrease the file size sentto the machine.
Messages Displayed When Using the Printer Function
81
4

Message Cause Solution
"Fold is not available with thesettings. The job has beencancelled."
Fold function is not availablewith the current settings.
Check the paper settings. For detailsabout the limitations of the Fold function,see "Fold", Printer Reference .
"Folding Unit Error." There is a problem with theMulti-Folding Unit.
Contact your service representative.
"HDD is full." The HDD became full whileprinting a Sample Print,Locked Print, Hold Print orStored Print file.
Delete unneeded files stored in themachine.
Alternatively, reduce the data size of theSample Print, Locked Print, Hold Print orStored Print file.
"HDD is full." When printing with thePostScript 3 printer driver, theHDD's capacity for fonts andforms has been exceeded.
Delete unneeded forms or fontsregistered in the machine.
"I/O buffer overflow." An input buffer overflowoccurred.
• In [Printer Features], under[System], set [Memory Usage] to[Font Priority].
• In [Printer Features], under [HostInterface], select [I/O Buffer], andthen set the maximum buffer size toa larger value.
• Reduce the number of files beingsent to the machine.
"Information for userauthentication is alreadyregistered for another user."
The user name for LDAP orRDH authentication wasalready registered in adifferent server with adifferent ID, and aduplication of the user nameoccurred due to a switchingof domains (servers),etc.
Contact the administrator.
4. Troubleshooting When Using the Printer Function
82
4
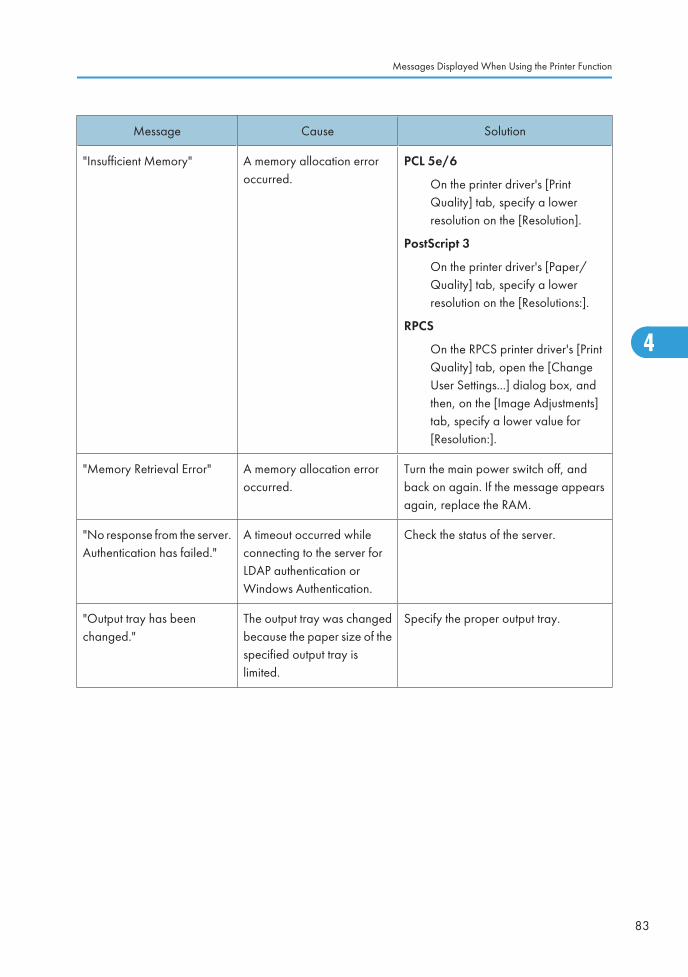
Message Cause Solution
"Insufficient Memory" A memory allocation erroroccurred.
PCL 5e/6
On the printer driver's [PrintQuality] tab, specify a lowerresolution on the [Resolution].
PostScript 3
On the printer driver's [Paper/Quality] tab, specify a lowerresolution on the [Resolutions:].
RPCS
On the RPCS printer driver's [PrintQuality] tab, open the [ChangeUser Settings...] dialog box, andthen, on the [Image Adjustments]tab, specify a lower value for[Resolution:].
"Memory Retrieval Error" A memory allocation erroroccurred.
Turn the main power switch off, andback on again. If the message appearsagain, replace the RAM.
"No response from the server.Authentication has failed."
A timeout occurred whileconnecting to the server forLDAP authentication orWindows Authentication.
Check the status of the server.
"Output tray has beenchanged."
The output tray was changedbecause the paper size of thespecified output tray islimited.
Specify the proper output tray.
Messages Displayed When Using the Printer Function
83
4

Message Cause Solution
"Print overrun." Images were discarded whileprinting.
PCL 5e/6
On the printer driver's [PrintQuality] tab, specify a lowerresolution on the [Resolution].
PostScript 3
On the printer driver's [Paper/Quality] tab, specify a lowerresolution on the [Resolutions:].
RPCS
On the RPCS printer driver's [PrintQuality] tab, open the [ChangeUser Settings...] dialog box, andthen, on the [Image Adjustments]tab, specify a lower value for[Resolution:].
"Punch has been cancelled." Punch printing was canceled. Check the paper orientation, printorientation, and punch position. Certainsettings can produce print results thatmight not be as expected.
"Receiving data failed." Data reception was aborted. Resend the data.
"Selected ppr. size is notsupported. Job wascancelled."
Job reset is automaticallyperformed if the specifiedpaper size is incorrect.
Specify the correct paper size and printthe file again.
"Sending data failed." The machine received acommand to stoptransmission from the printerdriver.
Check if the computer is workingcorrectly.
"Staple has been cancelled." Stapling printing wascanceled.
Check the paper orientation, paperquantity, print orientation, and stapleposition. Certain settings can produceprint results that might not be asexpected.
"The entered password isincorrect."
The password of theencrypted PDF file has beenentered incorrectly.
Enter the correct password.
4. Troubleshooting When Using the Printer Function
84
4

Message Cause Solution
"The print job has beencancelled because capturefile(s) could not be stored:Exceeded max. memory."
The HDD became full after afile was stored.
Delete the files stored in the documentserver or reduce the file size to be sent.
"The print job has beencancelled because capturefile(s) could not be stored:Exceeded max. number offiles."
The maximum file capacity ofthe document server wasexceeded.
Delete the files stored in the documentserver.
"The print job has beencancelled because capturefile(s) could not be stored:Exceeded max. number ofpages per file."
The maximum page capacityof the document server wasexceeded.
Delete some of the files stored in thedocument server or reduce the numberof pages that you want to send.
"You do not have a privilegeto print this PDF file."
The logged in user is notallowed to print the selectedPDF document.
Check the security settings of the PDFdocument.
"You do not have a privilegeto use this function. This jobhas been cancelled."
The entered login user nameor login password is notcorrect.
Check that the user name and passwordare correct.
"You do not have a privilegeto use this function. This jobhas been cancelled."
The logged in user is notallowed to use the selectedfunction.
Contact the administrator.
"Z-fold error." Z-folding was canceled. Check the tray, paper orientation, printorientation, and Z-fold settings again.
If printing does not start, contact your service representative.
• The contents of errors may be printed on the Configuration Page. Check the Configuration Page inconjunction with the error log. For details about how to print the Configuration Page, see "List/TestPrint", Printer Reference .
Checking the Error Log
If files could not be stored due to printing errors, identify the cause of the errors by checking the error logon the control panel.
Messages Displayed When Using the Printer Function
85
4

• The most recent 50 errors are stored in the error log. If a new error is added when there are 50 errorsalready stored, the oldest error is deleted. However, if the earliest error is a Sample Print, LockedPrint, Hold Print, or Stored Print error, it is not deleted. The error is stored separately until the numberof errors reaches 30.
• If the main power switch is turned off, the log is deleted.
• You cannot view [Error Log] on the simplified display.
1. Press the [Printer] key to display the printer screen.
BQN035S
2. Press [Error Log].
An error log list appears.
3. Press the desired job list, and then press [Details].
A detailed error log appears.
4. Troubleshooting When Using the Printer Function
86
4

When You Cannot PrintThis section describes what to do if printing does not start even after performing [Print].
Problem Cause Solution
Printing does not start. The power is off. Check the cable is securely plugged intothe power outlet and the machine. Turnon the main power switch.
Printing does not start. The machine is set to"Offline".
Press [ Online].
Printing does not start. The cause is displayed on thedisplay of the control panel.
Check the error message or warningstatus on the display panel and take therequired action.
Printing does not start. The interface cable is notconnected correctly.
Connect the interface cable securely. Ifit has a fastener, fasten that securely aswell. See "Connecting to the Interfaces",Network and System Settings Guide
.
Printing does not start. The correct interface cable isnot being used.
The type of interface cable you shoulduse depends on the computer. Be sure touse the correct one. If the cable isdamaged or worn, replace it. See"Connecting to the Interfaces", Networkand System Settings Guide .
Printing does not start. The interface cable wasconnected after the machinewas switched on.
Connect the interface cable beforeturning on the machine.
Printing does not start. If the machine is usingwireless LAN, failure to printmight result from a weakwireless signal.
In [System Settings], under [InterfaceSettings], select [Wireless LAN], andthen press [Wireless LAN Signal] tocheck signal status. If signal quality ispoor, move the machine to a locationwhere radio waves can pass or removeobjects that might cause interference.
(You can check signal status only whenusing wireless LAN in the infrastructuremode.)
When You Cannot Print
87
4

Problem Cause Solution
Printing does not start. If the machine is usingwireless LAN, SSID settingsare incorrect.
Check using the machine's display panelthat the SSID is correctly set. See"Connecting the Machine", Networkand System Settings Guide .
Printing does not start. If the machine is usingwireless LAN, the receiver'sMAC address may bepreventing communicationwith the access point.
Check access point settings when in theinfrastructure mode. Depending on theaccess point, client access may belimited by MAC address. Also, checkthere are no problems in transmissionbetween access point and wired clients,and between access point and wirelessclients.
Printing does not start. The wireless LAN interface isnot working.
Confirm the orange LED is lit, and thegreen LED is lit or blinks duringtransmission.
Printing does not start. The login user name, loginpassword, or driverencryption key is invalid.
Check the login user name, loginpassword, or driver encryption key.
Printing does not start. Advanced encryption hasbeen set using the ExtendedSecurity function.
Check the settings of the ExtendedSecurity function with the administrator.
Data In indicator does notlight up or flash.
If the Data In indicator doesnot light up or flash even afterthe print job starts, themachine has not received thedata.
• When the machine is connected toa computer via a cable, check thecomputer print port settings arecorrect. For details, see p.89"When the Data In Indicator DoesNot Light Up or Flash".
• When it is networked with acomputer, contact theadministrator.
[List / Test Print] is disabled. A mechanical error mighthave occurred.
Contact your service representative.
4. Troubleshooting When Using the Printer Function
88
4

Problem Cause Solution
Printing does not start whenusing the extended wirelessLAN in Ad-hoc mode.
The correct Communicationmode is not set.
• Turn the main power off and backon. See "Turning On/Off thePower", About This Machine
.
• In [System Settings], under[Interface Settings], select[Wireless LAN], and then set[Communication Mode] to[802.11 Ad-hoc Mode] and[Security Method] to [Off]. Then atthe other side, set [SSID Setting]and [Ad-hoc Channel] to the samevalues.
If printing does not start, consult your service representative.
When the Data In Indicator Does Not Light Up or Flash
When the Data In indicator does not light up or flash after starting a print job, data is not being sent to themachine.
When the machine is connected to the computer using the interface cable
This section describes how to check the print port when the Data In indicator does not light up or blink.
Check if the print port setting is correct. When it is connected using a parallel interface, connect it to LPT1or LPT2.
For Windows 2000
1. Click the [Start] button, point to [Settings], and then click [Printers].
2. Click the icon of the machine. On the [File] menu, click [Properties].
3. Click the [Ports] tab.
4. In the [Print to the following port(s)] list, confirm the correct port is selected.
For Windows XP Professional or Windows Server 2003/2003 R2
1. Click the [start] button, and then click [Printers and Faxes].
2. Click the icon of the machine. On the [File] menu, click [Properties].
3. Click the [Ports] tab.
4. In the [Print to the following port(s)] list, confirm the correct port is selected.
When You Cannot Print
89
4

For Windows XP Home Edition
1. Click the [start] button, and then click [Control Panel].
2. Click [Printers and Other Hardware].
3. Click [Printers and Faxes].
4. Click the icon of the machine. On the [File] menu, click [Properties].
5. Click the [Ports] tab.
6. In the [Print to the following port(s)] list, confirm the correct port is selected.
For Windows Vista
1. Click the Start button, and then click [Control Panel].
2. Click [Hardware and Sound].
3. Click [Printers].
4. Click the icon of the machine. On the [Organize] menu, click [Properties].
5. Click the [Ports] tab.
6. In the [Print to the following port(s)] list, confirm the correct port is selected.
For Windows Server 2008
1. Click the [Start] button, and then click [Control Panel].
2. Click [Hardware and Sound].
3. Click [Printers].
4. Click the icon of the machine. On the [Organize] menu, click [Properties].
5. Click the [Ports] tab.
6. In the [Print to the following port(s)] list, confirm the correct port is selected.
Network connection
Contact the network administrator.
4. Troubleshooting When Using the Printer Function
90
4
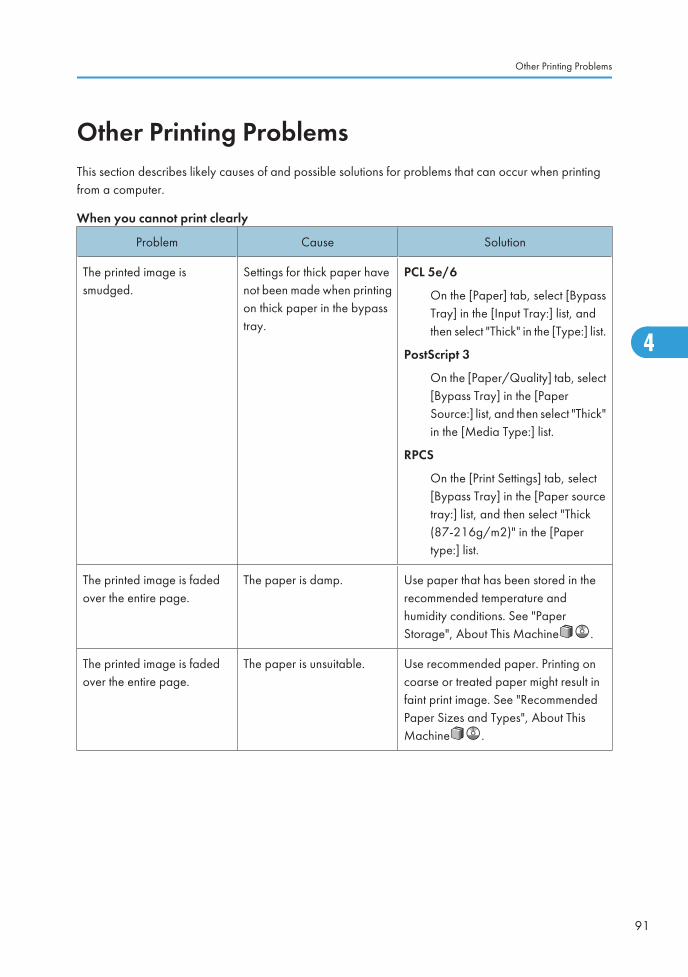
Other Printing ProblemsThis section describes likely causes of and possible solutions for problems that can occur when printingfrom a computer.
When you cannot print clearly
Problem Cause Solution
The printed image issmudged.
Settings for thick paper havenot been made when printingon thick paper in the bypasstray.
PCL 5e/6
On the [Paper] tab, select [BypassTray] in the [Input Tray:] list, andthen select "Thick" in the [Type:] list.
PostScript 3
On the [Paper/Quality] tab, select[Bypass Tray] in the [PaperSource:] list, and then select "Thick"in the [Media Type:] list.
RPCS
On the [Print Settings] tab, select[Bypass Tray] in the [Paper sourcetray:] list, and then select "Thick(87-216g/m2)" in the [Papertype:] list.
The printed image is fadedover the entire page.
The paper is damp. Use paper that has been stored in therecommended temperature andhumidity conditions. See "PaperStorage", About This Machine .
The printed image is fadedover the entire page.
The paper is unsuitable. Use recommended paper. Printing oncoarse or treated paper might result infaint print image. See "RecommendedPaper Sizes and Types", About ThisMachine .
Other Printing Problems
91
4

Problem Cause Solution
The printed image is fadedover the entire page.
If the [Toner saving] isselected in the printer driversettings, the entire page willbe faded when printed.
PCL 5e/6
On the [Print Quality] tab, select[Off] on the [Toner Saving] area.
PostScript 3
On the [Paper/Quality] tab, select[Through] or [Edge Smoothing] inthe [Print Mode] list.
RPCS
On the [Print Quality] tab, clear the[Toner saving] check box.
Images smudge whenrubbed. (Toner is not fixed.)
The specified paper type andthe paper that is actuallyloaded might be different. Forexample, thick paper mightbe loaded but not specifiedas the paper type.
PCL 5e/6
On the [Paper] tab, select a properpaper type in the [Type:] list.
PostScript 3
On the [Paper/Quality] tab, selecta proper paper type in the [MediaType] list.
RPCS
On the [Print Settings] tab, select aproper paper type in the [Papertype:] list.
The printed image is differentfrom the image on thecomputer's display.
Printing will be performed bythe machine's graphicprocessing function.
On the RPCS printer driver's [PrintQuality] tab, display the [Change UserSettings...] dialog box, ensure that [Printas bitmap] on [Misc.] tab is checked,and then print.
When printing graphics, theoutput and the screen aredifferent.
If the printer driver isconfigured to use thegraphics command, thegraphics command from themachine is used to print.
If you want to print accurately, set theprinter driver to print without using thegraphics command. See the printerdriver Help.
Lines of garbled or unwantedalphanumeric charactersappear.
An incorrect printer languagemight have been selected.
Select the correct printer driver and printthe file again.
4. Troubleshooting When Using the Printer Function
92
4

Problem Cause Solution
Images are cut off, or excessis printed.
You may be using papersmaller than the size selectedin the application.
Use the same size paper as that selectedin the application. If you cannot loadpaper of the correct size, use thereduction function to reduce the image,and then print. See the printer driverHelp.
Page layout is not asexpected.
Print areas differ dependingon machine used. Informationthat fits on a single page onone machine may not fit on asingle page of anothermachine.
On the RPCS printer driver's [PrinterConfiguration] dialogue box, adjust the[Printable area:] setting. See the printerdriver Help.
Photo images are coarse. Some applications print atlower resolution.
PCL 5e/6
On the printer driver's [PrintQuality] tab, specify a higherresolution on the [Resolution].
PostScript 3
On the printer driver's [Paper/Quality] tab, specify a higherresolution on the [Resolutions:].
RPCS
• On the printer driver's [PrintQuality] tab, select[Photograph] on the[Document type].
• On the printer driver's [PrintQuality] tab, open the[Change User Settings...]dialog box, and then on the[Image Adjustments] tab,specify a higher resolution onthe [Resolution].
Other Printing Problems
93
4

Problem Cause Solution
A solid line is printed as adashed line or appearsblurred.
Dither patterns do not match. PostScript 3
On the printer driver's [Advanced]tab, change the [Dithering:] setting.
RPCS
On the printer driver's [PrintQuality] tab, open the [ChangeUser Settings...] dialog box, andthen, on the [Image Adjustments]tab, change the [Dithering:] setting.See the printer driver Help.
Fine lines are fuzzy, ofinconsistent thickness, or donot appear.
Super fine lines have beenspecified in the application.
PostScript 3
On the printer driver's [Advanced]tab, change the [Dithering:] setting.
RPCS
On the printer driver's [PrintQuality] tab, open the [ChangeUser Settings...] dialog box, andthen, on the [Image Adjustments]tab, change the [Dithering:] setting.See the printer driver Help.
If the problem continues after youchange the dithering settings, use thesettings of the application in which theimage was created to change thethickness of the lines.
4. Troubleshooting When Using the Printer Function
94
4

When paper is not fed properly
Problem Cause Solution
Paper is not fed from theselected tray.
When you are using aWindows operating system,printer driver settings overridethose settings using thedisplay panel.
PCL 5e/6
On the printer driver's [Paper] tab,in the [Input Tray:] list, select thedesired input tray.
PostScript 3
On the printer driver's [Paper/Quality] tab, in the [Paper Source:]list, select the desired input tray.
RPCS
On the printer driver's [PrintSettings] tab, in the [Paper sourcetray:] list, select the desired inputtray.
Images are printed at a slant. The tray's side fences mightnot be locked.
Check the side fences are locked. See"Changing the Paper Size", About ThisMachine .
Images are printed at a slant. The paper is feeding in at aslant.
Load the paper correctly. See "LoadingPaper", About This Machine .
Misfeeds occur frequently. The number of sheets loadedexceeds the capacity of themachine.
Load paper only as high as the upperlimit markings on the side fences of thepaper tray, LCT, or bypass tray.
Misfeeds occur frequently. The paper tray's side fencesare set too tightly.
Push the side fences lightly, and thenreset it.
Misfeeds occur frequently. The paper is damp. Use paper that has been stored in therecommended temperature andhumidity conditions. See "PaperStorage", About This Machine .
Misfeeds occur frequently. The paper is too thick or toothin.
Use recommended paper. See"Recommended Paper Sizes andTypes", About This Machine .
Other Printing Problems
95
4

Problem Cause Solution
Misfeeds occur frequently. The paper is wrinkled or hasbeen folded/creased.
Use recommended paper only and besure its storage environment meets therecommended temperature andhumidity conditions. For details aboutrecommended paper and the properway to store it, see "RecommendedPaper Sizes and Types" and "PaperStorage", About This Machine .
Misfeeds occur frequently. Printed paper is being used. Do not load sheets that have alreadybeen copied or printed onto by anothermachine.
Misfeeds occur frequently. Sheets are sticking together. Fan the sheets thoroughly beforeloading them. Alternatively, feed thesheets into the machine one at a time.
Sheets are feeding intogether, resulting in jams.
Sheets are sticking together. Fan the sheets thoroughly beforeloading them. Alternatively, feed thesheets into the machine one at a time.
Copy paper becomescreased.
The paper is damp. Use paper that has been stored in therecommended temperature andhumidity conditions. See "PaperStorage", About This Machine .
Copy paper becomescreased.
The paper is too thin. Use recommended paper. See"Recommended Paper Sizes andTypes", About This Machine .
Edges of sheets are creased. The paper is damp. Use paper that has been stored in therecommended temperature andhumidity conditions. See "PaperStorage", About This Machine .
Edges of sheets are creased. You are using non-recommended paper.
Use recommended paper. See"Recommended Paper Sizes andTypes", About This Machine .
Duplex printing ismalfunctioning.
Duplex printing cannot bedone with paper set in thebypass tray.
When using duplex printing, makesettings to use paper from a tray otherthan the bypass tray.
4. Troubleshooting When Using the Printer Function
96
4

Problem Cause Solution
Duplex printing ismalfunctioning.
You have loaded thick paperheavier than 128 g/m2.
Change the paper.
Duplex printing ismalfunctioning.
[Apply Duplex] is set to [No]for "Paper Type".
In [Tray Paper Settings], under "PaperType", set [Apply Duplex] to [Yes].
Duplex printing ismalfunctioning.
You cannot select duplexprinting if the paper type is setto [Thick Paper].
In [Tray Paper Settings], under "PaperType", select a paper thickness otherthan [Thick Paper].
The image on the back side ofduplex copies has mottledblank patches or is smudged.
Missing patches andsmudges are caused bymoisture leaking from thepaper.
• Do not install the machine in areasthat are susceptible to lowtemperature.
• Use paper that has been storedwhere temperature and humidityconditions meet the limitations werecommend. For details about thepaper storage conditions werecommend, see "Paper Storage",About This Machine .
• Install the Optional anti-humidityheater. For details about the anti-humidity heater, contact yourservice representative.
White stripes appear on theOHP.
Fragments of paper are stuckto the OHP.
Use a dry cloth to wipe any paperfragments off the back of the OHP.
Other printing problems
Problem Cause Solution
It takes a long time tocomplete a print job.
"Sleep mode" might be set. The machine requires time to warm up ifit has been in "Sleep mode". In [SystemSettings], under [Timer Settings], select[Auto Off Timer], and then specify"Sleep mode".
Other Printing Problems
97
4

Problem Cause Solution
It takes a long time tocomplete a print job.
Photographs and other dataintensive pages take a longtime for the machine toprocess, so simply wait whenprinting such data.
If the Data In indicator is blinking, datahas been received by the printer. Waitfor a moment.
Changing the following settings with theprinter driver may help speed upprinting:
PCL 5e/6
On the printer driver's [PrintQuality] tab, specify a lowerresolution on the [Resolution].
PostScript 3
On the printer driver's [Paper/Quality] tab, specify a lowerresolution on the [Resolutions:].
RPCS
• On the RPCS printer driver's[Print Quality] tab, select[High Speed] on the [Printpriority].
• On the RPCS printer driver's[Print Quality] tab, open the[Change User Setting…]dialog box, and then [ImageAdjustments] tab, select [Fast]or [High Speed] for [Imageprocessing priority:].
• On the RPCS printer driver's[Print Quality] tab, open the[Change User Settings...]dialog box, and then, on the[Image Adjustments] tab,specify a lower value for[Resolution:].
4. Troubleshooting When Using the Printer Function
98
4

Problem Cause Solution
It takes a long time tocomplete a print job.
Documents with a lot ofcharacters may take sometime to print.
On the RPCS printer driver's [PrintQuality] tab, display the [Change UserSettings...] dialog box, ensure that[Change methods to extract TrueTypefonts] is checked, and then print.
Images are printed in thewrong orientation.
The feed orientation youselected and the feedorientation selected in theprinter driver's option setupmight not be the same.
Set the same settings for both themachine's feed orientation and the feedorientation specified in [Paper sourcetray settings:] on the RPCS printer driver's[Change Accessories] tab.
When using Windows2000/ XP/ Vista andWindows Server 2003/2003 R2/ 2008, optionalcomponents connected to themachine are not recognized.
Bidirectional communicationis not working.
Set up optional devices on the Propertiesof the printer. See the printer driver Help.
When using Windows2000/ XP/ Vista andWindows Server 2003/2003 R2/ 2008, combinedprinting, booklet printing, orAuto Reduce / Enlargeprinting does not come out asexpected.
The correct application orprinter driver settings are notmade.
Make sure the application's paper sizeand orientation settings match those ofthe printer driver. If a different paper sizeand orientation are set, select the samesize and orientation.
A print instruction was issuedfrom the computer, butprinting did not start.
User Authentication mayhave been set.
Contact the administrators.
The print job is not canceledeven when the machine isswitched to offline status.
Even when the machine isoffline, printing is performedwhen [Job AcceptancePriority] has been set in[Parallel Interface] in the[Interface Settings] in theSystem Settings menu.
Change the setting of Signal Control toPrinter priority. See "Interface Settings",Network and System Settings Guide
.
Other Printing Problems
99
4

Problem Cause Solution
PDF files do not print out/cannot perform PDF directprint.
PDF files are password-protected.
To print password-protected PDF files,enter the password in the [PDF Menu] oron Web Image Monitor. For details, see"Printing a PDF File Directly", PrinterReference , or the Web ImageMonitor's Help.
PDF files do not print out/cannot perform PDF directprint.
PDF files cannot be printed ifthey are print-disabled in PDFfile security setting.
Change the PDF file security setting.
PDF direct print producesstrange or malformedcharacters.
Fonts were not embedded. Embed fonts in the PDF file you want toprint and then print.
Printing by Bluetooth is slow. The number of jobs exceedsthe capacity of the machine.
Reduce the number of jobs.
Printing by Bluetooth is slow. • A communication errormight have occurred.
• Interference from thewireless LAN devicescan reducecommunication speed.
• Bluetooth transmissionspeeds are not high.
• Remove the machine from closeproximity with the wireless LANdevices.
• If there are active wireless LANdevices or other Bluetooth devicesnearby, relocate the machine ordisable those devices.
If the problem cannot be solved, contact your service representative.
4. Troubleshooting When Using the Printer Function
100
4

5. Troubleshooting When Using theScanner FunctionThis chapter describes likely causes of and possible solutions for scanner function problems.
When Scanning Is Not Done As ExpectedThis section describes causes and remedies when scan results are not as expected.
Problem Cause Solution
The scanned image is dirty. The exposure glass, scanningglass or ADF is dirty.
Clean them. See "Maintaining YourMachine", About This Machine .
The image is distorted or outof position.
The original was movedduring scanning.
Do not move the original duringscanning.
The image is distorted or outof position.
The original was not pressedflat against the exposureglass.
Make sure the original is pressed flatagainst the exposure glass.
The scanned image is upsidedown.
The original was placedupside down.
Place the original in the correctorientation. See "Setting of OriginalFeed Type", Scanner Reference .
No image results fromscanning.
The original was placed withthe front and back reversed.
When the original is placed directly onthe exposure glass, the side to bescanned must face down. When theoriginal is fed via the ADF, the side to bescanned must face up.
Images are scanned inrotated.
If you set the original with itstop edge backward and savefull colour/gray scale imagesas a TIFF or JPEG file, they arescanned in rotated.
When placing a stack of originals in theADF, place their top edges first. See"Setting of Original Feed Type",Scanner Reference .
101
5
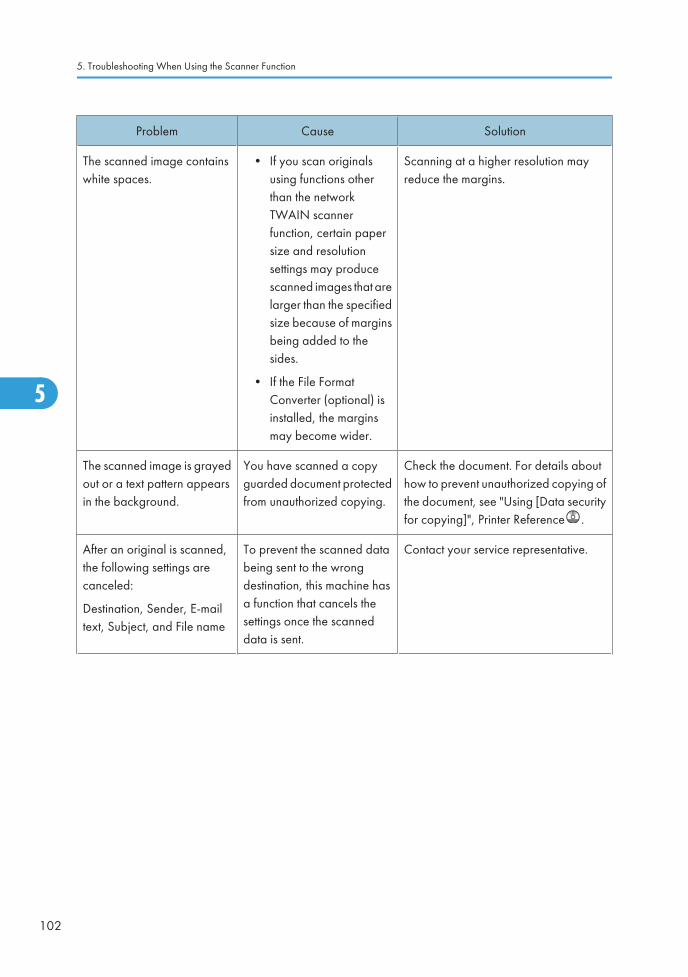
Problem Cause Solution
The scanned image containswhite spaces.
• If you scan originalsusing functions otherthan the networkTWAIN scannerfunction, certain papersize and resolutionsettings may producescanned images that arelarger than the specifiedsize because of marginsbeing added to thesides.
• If the File FormatConverter (optional) isinstalled, the marginsmay become wider.
Scanning at a higher resolution mayreduce the margins.
The scanned image is grayedout or a text pattern appearsin the background.
You have scanned a copyguarded document protectedfrom unauthorized copying.
Check the document. For details abouthow to prevent unauthorized copying ofthe document, see "Using [Data securityfor copying]", Printer Reference .
After an original is scanned,the following settings arecanceled:
Destination, Sender, E-mailtext, Subject, and File name
To prevent the scanned databeing sent to the wrongdestination, this machine hasa function that cancels thesettings once the scanneddata is sent.
Contact your service representative.
5. Troubleshooting When Using the Scanner Function
102
5
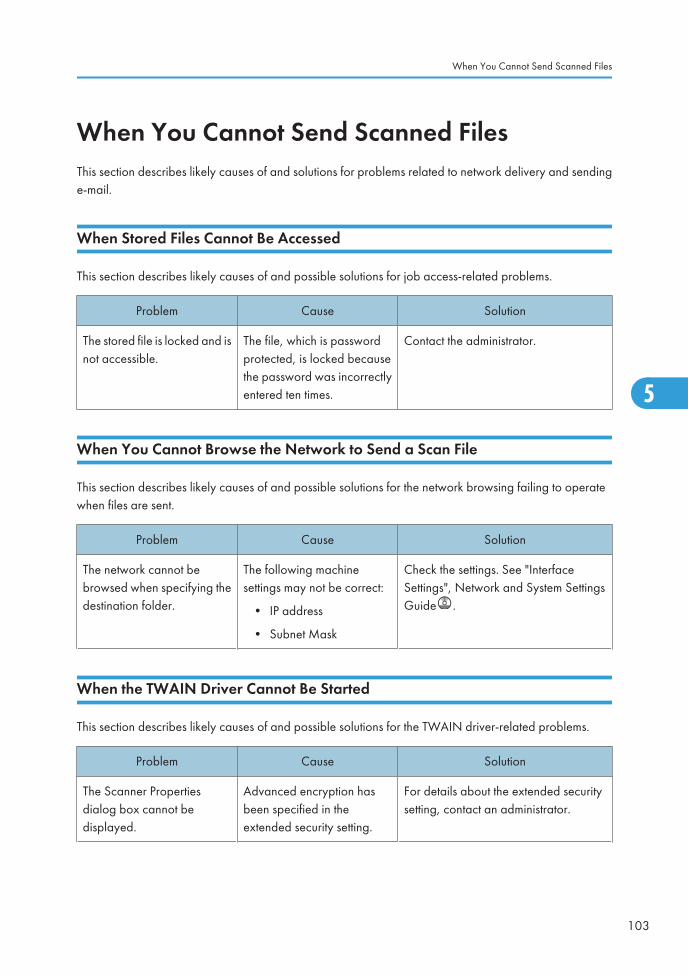
When You Cannot Send Scanned FilesThis section describes likely causes of and solutions for problems related to network delivery and sendinge-mail.
When Stored Files Cannot Be Accessed
This section describes likely causes of and possible solutions for job access-related problems.
Problem Cause Solution
The stored file is locked and isnot accessible.
The file, which is passwordprotected, is locked becausethe password was incorrectlyentered ten times.
Contact the administrator.
When You Cannot Browse the Network to Send a Scan File
This section describes likely causes of and possible solutions for the network browsing failing to operatewhen files are sent.
Problem Cause Solution
The network cannot bebrowsed when specifying thedestination folder.
The following machinesettings may not be correct:
• IP address
• Subnet Mask
Check the settings. See "InterfaceSettings", Network and System SettingsGuide .
When the TWAIN Driver Cannot Be Started
This section describes likely causes of and possible solutions for the TWAIN driver-related problems.
Problem Cause Solution
The Scanner Propertiesdialog box cannot bedisplayed.
Advanced encryption hasbeen specified in theextended security setting.
For details about the extended securitysetting, contact an administrator.
When You Cannot Send Scanned Files
103
5

When Stored Files Cannot Be Edited
This section describes likely causes of and possible solutions for stored files being unable to be edited.
Problem Cause Solution
Stored files cannot bedeleted. File names andpasswords cannot bechanged. Files cannot beredelivered.
Limits have been imposedusing the available extendedsecurity function.
Contact the administrator.
When the Network Delivery Function Cannot Be Used
This section describes likely causes of and possible solutions for the network delivery function problems.
Problem Cause Solution
Cannot use the networkdelivery function.
The delivery software may bean old version or a securitysetting may be specified.
Contact the administrator.
Cannot use the networkdelivery function.
The network delivery functionsetting is not correct.
Specify it correctly. See "NetworkSettings Required to Use the NetworkDelivery Scanner", Network and SystemSettings Guide .
When S/MIME Cannot Be Used
This section describes likely causes of and possible solutions for S/MIME-related problems.
Problem Cause Solution
If several destinations areselected for the broadcastingsequence, the data is sentover twice.
Encrypted e-mails are sent tothe destinations for which S/MIME authentication is set,and plain text e-mails are sentto the destinations for whichS/MIME authentication is notset.
Make sure S/MIME-authenticationdestinations are separate from plain textdestinations.
Contact the administrator for detailsabout destination settings.
5. Troubleshooting When Using the Scanner Function
104
5

Problem Cause Solution
When putting a signature onan e-mail using S/MIME, ane-mail address for "Sender" isnot set for "From".
When S/MIME is applied,the administrator appears inthe "From" field, and thesender appears in the "Reply-to" field.
Contact the administrator.
• Using S/MIME makes e-mail larger than when not using S/MIME.
When You Cannot Send Scan Files Using WSD
This section describes likely causes of and possible solutions for sending scan files using WSD.
Problem Cause Solution
The WSD scanner functioncannot be used.
Scan Profile is not set on theclient computer.
Set Scan Profile. For details about howto do this, see "Changing a ScanProfile", Scanner Reference .
The WSD scanner functioncannot be used.
The [Take no action] settinghas been selected on theclient computer, forcing theclient computer to remaininactive when it receives scandata.
Open scanner Properties, click the[Events] tab, and then select [Start thisProgram] as the computer's response onreceipt of scan data. For details, seeyour operating system's Help.
Although scanning wasperformed by the clientcomputer, the WSD scannerfunction cannot be used.
WSD scanning cannot beperformed from a clientcomputer.
Use the machine's control panel to sendscan data to a client computer by WSD.Alternatively, disable WSD scanningand use TWAIN to send scan data to aclient computer.
Operations Are Not Possible When Messages Are Displayed
This section describes likely causes of and possible solutions for messages that appear and when themachine fails to operate.
When You Cannot Send Scanned Files
105
5

Message Cause Solution
"Destination list / machinesettings are updated.Selected destinations orfunction settings have beencleared. Please re-select thesettings."
The destination list is beingupdated from the networkusing SmartDeviceMonitorfor Admin. Depending on thenumber of destinations to beupdated, there may be somedelay before you can resumeoperation. Operations arenot possible while thismessage is displayed.
Wait until the message disappears. Donot switch off the power while thismessage is displayed.
5. Troubleshooting When Using the Scanner Function
106
5

Messages Displayed When Using the ScannerFunctionThis section describes likely causes of and possible solutions for error messages that may appear on themachine's control panel and the client computer.
Messages Displayed on the Control Panel When Using the Scanner Function
This section describes likely causes of and possible solutions for the error messages that appear on thecontrol panel.
• If a message not described here appears, act according to the message. For details about how toturn off the main power switch, see "Turning On/Off the Power", About This Machine .
Message Cause Solution
"Authentication has failed." The entered login user nameor login password is notcorrect.
Ask the user administrator for the correctlogin user name and login password.
"Authentication has failed." The machine cannot performauthentication.
Contact the administrator.
"Authentication with thedestination has failed. Checksettings. To check the currentstatus, press [Scanned FilesStatus]."
The entered user name orpassword was invalid.
• Check that the user name andpassword are correct.
• Check that the ID and password forthe destination folder are correct.
• A password of 128 or morecharacters may not be recognized.
"Cannot communicate withPC. Contact theadministrator."
WSD (Device) protocol orWSD (Scanner) protocol isdisabled.
Use IPv4 or IPv6, located in[Configuration] in Web Image Monitor,to enable WSD (Device) and WSD(Scanner).
Messages Displayed When Using the Scanner Function
107
5

Message Cause Solution
"Cannot detect original size.Select scan size."
The original placed on theexposure glass is anonstandard size.
• Place the original correctly.
• Specify the scan size.
• When placing an original directlyon the exposure glass, the lifting/lowering action of the ADF triggersthe automatic original sizedetection process. Lift the ADF bymore than 30 degrees.
"Cannot find the specifiedpath. Please check thesettings."
The destination computername or folder name isinvalid.
Check whether the computer name andthe folder name for the destination arecorrect.
"Cannot find the specifiedpath. Please check thesettings."
An antivirus program or afirewall is preventing themachine connecting to yourcomputer.
• Antivirus programs and firewallscan prevent client computers fromestablishing connection with thismachine.
• To prevent an antivirus applicationblocking the connection, registerthe facsimile program in theantivirus program's exclusion list.For details about the procedure forexcluding a program, see yourantivirus application's Help.
• To prevent a firewall blocking theconnection, register the machine'sIP address in the firewall's IPaddress exclusion settings. Fordetails about the procedure forexcluding an IP address, see yourfirewall's Help.
"Cannot start scanningbecause communication wasfailed."
Scan Profile is not set on theclient computer.
Set Scan Profile. For details about howto do this, see "Changing a ScanProfile", Scanner Reference .
5. Troubleshooting When Using the Scanner Function
108
5

Message Cause Solution
"Cannot start scanningbecause communication wasfailed."
The [Take no action] settinghas been selected on theclient computer, forcing theclient computer to remaininactive when it receives scandata.
Open scanner Properties, click the[Events] tab, then select [Start thisProgram] as the computer's response onreceipt of scan data. For details, seeyour operating system's Help.
"Cannot start scanning.Check the setting(s) on thePC."
The Scan Profile might beincorrectly configured.
Check the Scan Profile configuration.
"Cannot write on the memorystorage device. Check thememory storage device andmachine settings."
The memory device is faulty,or the file name contains acharacter that cannot beused.
• Check to see if the memory deviceis defective.
• Check the memory device. It mightbe unformatted, or its format mightbe incompatible with this machine.
• Check the file name set at the timeof scanning. For details on thecharacters that can be used in filenames, see "Specifying the FileName", Scanner Reference .
"Cannot write on the memorystorage device becauseremaining free space isinsufficient."
The memory device is full andscan data cannot be saved.Even if the memory deviceappears to have sufficientfree space, data might not besaved if the maximum numberof files that can be saved isexceeded.
Replace the memory device.
If the document is scanned with [ScanSettings] set to "Divide" or "Single", dataalready written to the memory device issaved as is. Replace the memory deviceand press [Retry] to save the remainingdata, or press [Cancel] to redo the scan.
"Cannot write on the memorystorage device because thedevice is write-protected."
The memory device is write-protected.
Unlock the write-protection on thememory device.
"Captured file exceededmax. number of pages perfile. Cannot send the scanneddata."
The maximum number ofpages per file has beenexceeded.
Reduce the number of pages in thetransmitted file, and then resend the file.See "Storage function", ScannerReference .
Messages Displayed When Using the Scanner Function
109
5
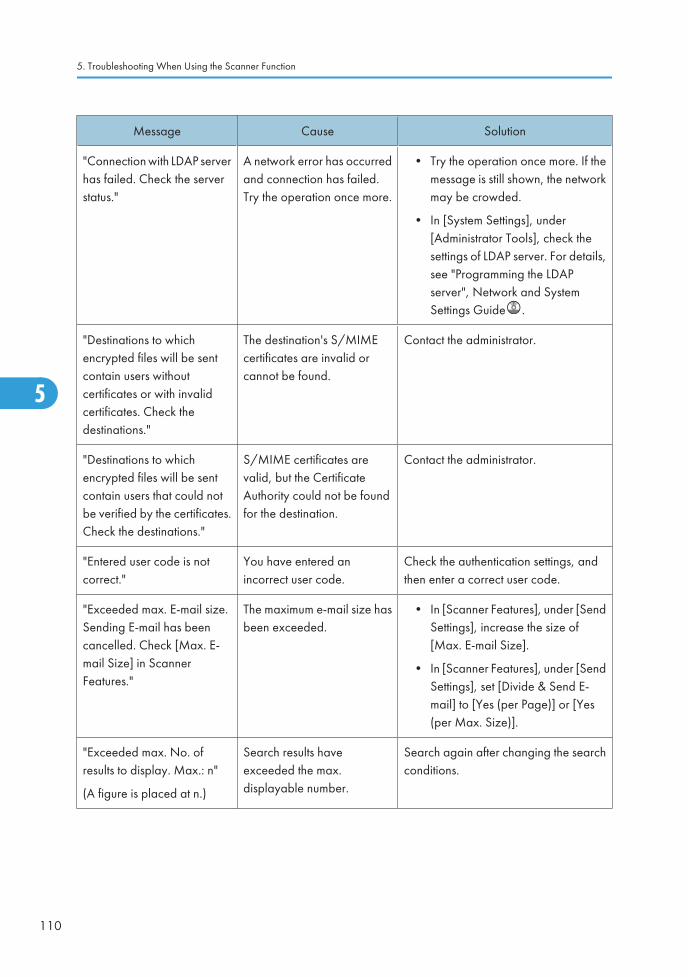
Message Cause Solution
"Connection with LDAP serverhas failed. Check the serverstatus."
A network error has occurredand connection has failed.Try the operation once more.
• Try the operation once more. If themessage is still shown, the networkmay be crowded.
• In [System Settings], under[Administrator Tools], check thesettings of LDAP server. For details,see "Programming the LDAPserver", Network and SystemSettings Guide .
"Destinations to whichencrypted files will be sentcontain users withoutcertificates or with invalidcertificates. Check thedestinations."
The destination's S/MIMEcertificates are invalid orcannot be found.
Contact the administrator.
"Destinations to whichencrypted files will be sentcontain users that could notbe verified by the certificates.Check the destinations."
S/MIME certificates arevalid, but the CertificateAuthority could not be foundfor the destination.
Contact the administrator.
"Entered user code is notcorrect."
You have entered anincorrect user code.
Check the authentication settings, andthen enter a correct user code.
"Exceeded max. E-mail size.Sending E-mail has beencancelled. Check [Max. E-mail Size] in ScannerFeatures."
The maximum e-mail size hasbeen exceeded.
• In [Scanner Features], under [SendSettings], increase the size of[Max. E-mail Size].
• In [Scanner Features], under [SendSettings], set [Divide & Send E-mail] to [Yes (per Page)] or [Yes(per Max. Size)].
"Exceeded max. No. ofresults to display. Max.: n"
(A figure is placed at n.)
Search results haveexceeded the max.displayable number.
Search again after changing the searchconditions.
5. Troubleshooting When Using the Scanner Function
110
5

Message Cause Solution
"Exceeded max. datacapacity. Check scanningresolution, then press Startkey again."
The scanned data exceededmaximum data capacity.
Specify the scan size and resolutionagain. Note that it may not be possibleto scan very large originals at a highresolution. See "Relationship betweenResolution and Scan Size", ScannerReference .
"Exceeded max. datacapacity. Check the scanningresolution, then reset original(s)."
The scanned originalexceeded maximum datacapacity.
Specify the scan size and resolutionagain. Note that it may not be possibleto scan very large originals at a highresolution. See "Relationship betweenResolution and Scan Size", ScannerReference .
"Exceeded max. number ofalphanumeric characters forthe path."
The maximum number ofspecifiable alphanumericcharacters in a path has beenexceeded.
The maximum number of characterswhich can be entered for the path is 256.Check the number of characters youentered, and then enter the path again.
"Exceeded max. number ofalphanumeric characters."
The maximum enterablenumber of alphanumericcharacters has beenexceeded.
Check the maximum number ofcharacters which can be entered, andthen enter it again. See "Values ofVarious Set Items for Transmission/Storage/Delivery Function", ScannerReference .
"Exceeded max. number offiles which can be sent at thesame time. Reduce thenumber of the selected files."
The number of files exceededthe maximum numberpossible.
Reduce the number of files and sendthem again.
"Exceeded max. number offiles which can be used inDocument Server at the sametime."
The maximum number of filesthat can be stored in thedocument server has beenexceeded.
Check the files stored by the otherfunctions, and then delete unneededfiles. For details about how to deletefiles, see "Document Server", Copy andDocument Server Reference .
"Exceeded max. number ofpages per file. Do you wantto store the scanned pages as1 file?"
The file being stored hasexceeded the max. number ofpages for one file.
Specify whether to store the data or not.Scan the pages that were not scannedand store them as a new file. See"Storing Files Using the ScannerFunction", Scanner Reference .
Messages Displayed When Using the Scanner Function
111
5

Message Cause Solution
"Exceeded max. number ofstandby files. Try again afterthe current file is sent."
The maximum number ofstandby files was exceeded.
There are 100 files waiting in thesending queue for e-mail, Scan toFolder, or delivery functions. Wait untilfiles have been sent.
"Exceeded max. number ofstored files. Cannot send thescanned data as capturingfiles is unavailable."
Too many files are waiting tobe delivered.
Try again after they have beendelivered.
"Exceeded max. pagecapacity per file. Press [Send]to send the scanned data, orpress [Cancel] to delete."
The number of scannedpages exceeded maximumpage capacity.
Select whether to send the data so far.
"Exceeded max. pagecapacity per file. Press[Write] to write the scanneddata to the memory storagedevice, or press [Cancel] todelete."
The scan could not becompleted because themaximum number of pagesthat can be scanned by thismachine was exceededduring writing to the Memorydevice.
Reduce the number of documents to bewritten to the memory device and tryagain.
"Exceeded maximum numberof file to store. Delete allunnecessary files."
Too many files are waiting tobe delivered.
Please try again after they have beendelivered.
"Exceeded time limit for LDAPserver search. Check theserver status."
A network error has occurredand connection has failed.
• Try the operation once more. If themessage is still shown, the networkmay be crowded.
• In [System Settings], under[Administrator Tools], check thesettings of LDAP server. For details,see "Programming the LDAPserver", Network and SystemSettings Guide .
"Invalid certificates or no S/MIME certificates werefound."
The destination's S/MIMEcertificates are invalid orcannot be found.
Contact the administrator.
5. Troubleshooting When Using the Scanner Function
112
5

Message Cause Solution
"LDAP server authenticationhas failed. Check thesettings."
The user name and passworddiffer from those set for LDAPAuthentication.
In [System Settings], under[Administrator Tools], check the settingsof LDAP server. For details, see"Programming the LDAP server",Network and System Settings Guide
.
"Memory is full. Cannot scan.The scanned data will bedeleted."
Because of insufficient harddisk space, the first pagecould not be scanned.
Try one of the following measures:
• Wait for a while, and then retry thescan operation.
• Reduce the scan area or scanningresolution. See "Scan Settings",Scanner Reference .
• Delete unneeded stored files. See"Deleting a Stored File", ScannerReference .
"Memory is full. Do you wantto store scanned file?"
Because there is not enoughfree hard disk space in themachine for storing in theDocument Server, only someof the pages could bescanned.
Specify whether to use the data or not.
"Memory is full. Press [Write]to write the current scanneddata to the memory storagedevice, or press [Cancel] todelete."
The scan could not becompleted because therewas insufficient hard diskmemory at the time of savingto the memory device.
Select whether or not to save thescanned document to the memorydevice.
"Memory is full. Scanning hasbeen cancelled. Press [Send]to send the scanned data, orpress [Cancel] to delete."
Because there is not enoughfree hard disk space in themachine for delivering orsending by e-mail whilestoring in the DocumentServer, only some of thepages could be scanned.
Specify whether to use the data or not.
"Memory storage device notdetected. Insert the device."
There is no memory deviceinserted.
Insert a memory device, or check to seewhether the memory device is properlyinserted in the media slot.
Messages Displayed When Using the Scanner Function
113
5

Message Cause Solution
"No paper. Load paper ofone of the following sizes."
No paper is set in thespecified paper tray.
Load paper of the sizes listed in themessage. See "Loading Paper", AboutThis Machine .
"Now loading WSD... Pleasewait."
WSD scanner function isbeing prepared.
Wait a while.
"Only one memory storagedevice can be used in onetime. Please remove all othermemory storage devices toresume writing."
Only one memory device canbe connected at a time.
Insert one memory device only in themedia slot.
"Original is being scanned byanother function. Switch tothe following function, thenpress the Stop key to cancelscanning or press the Startkey to continue."
A function of the machineother than the Scannerfunction is being used such asthe Copier function.
Cancel the job in progress.
For example, press [Exit], and then pressthe [Copy] key. Next, press the [Clear/Stop] key. When the message "TheClear / Stop key was pressed. Are yousure you want to stop scanning?"appears, press [Stop].
"Output buffer is full. Sendingthe data has been cancelled.Please try again later."
Too many jobs are in standbystate, and sending wascanceled.
Retry sending after sending jobs instandby state completes.
"Preparing to send data...Please wait."
Data is being prepared forsending to a client computer.
Wait until the data has been sent.
This message might reappear if themachine is operating on a mixednetwork or if changes were made tonetwork settings during WSD scanningtransmission. Check with your systemadministrator.
"SMTP authentication E-mailaddress and Administrator E-mail address mismatch."
The SMTP authentication e-mail address and theadministrator's e-mailaddress do not match.
Contact the administrator.
"Selected file is currently inuse. File name cannot bechanged."
You cannot change the nameof a file whose status is"Waiting..." or that is beingedited with DeskTopBinder.
Cancel transmission ("Waiting..." statuscleared) or the DeskTopBinder setting,and then change the file name.
5. Troubleshooting When Using the Scanner Function
114
5

Message Cause Solution
"Selected file is currently inuse. Password cannot bechanged."
You cannot change thepassword of a file whosestatus is "Waiting..." or that isbeing edited withDeskTopBinder.
Cancel transmission ("Waiting..." statuscleared) or the DeskTopBinder setting,and then change the password.
"Selected file is currently inuse. User name cannot bechanged."
You cannot change thesender's name whose status is"Waiting..." or that is beingedited with DeskTopBinder.
Cancel transmission ("Waiting..." statuscleared) or the DeskTopBinder setting,and then change the user name.
"Sending the data has failed.The data will be resent later."
A network error has occurredand a file was not sentcorrectly.
Wait until sending is retriedautomatically after the preset interval. Ifsending fails again, contact the networkadministrator.
"Some invalid destination(s)contained. Do you want toselect only valid destination(s)?"
The specified group containse-mail destinations and Scanto Folder destinations, eitherof which are incompatiblewith the specifiedtransmission method.
In the message that appears at eachtransmission, press [Select].
"Some of selected files arecurrently in use. They couldnot be deleted."
You cannot delete a file whichis waiting to be transmitted("Waiting..." statusdisplayed) or whoseinformation is being changedwith DeskTopBinder.
Cancel transmission ("Waiting..." statuscleared) or the DeskTopBinder setting,and then delete the file.
"The destination list has beenupdated. Specifieddestination(s) or sender'sname has been cleared."
A specified destination orsender's name was clearedwhen the destination list in thedelivery server was updated.
Specify the destination or sender's nameagain.
"The entered file namecontains invalid character(s).Enter the file name againusing any of the following 1byte characters. " 0 to 9 ", " Ato Z ", " a to z ", " . - _""
The file name contains acharacter that cannot beused.
Check the file name set at the time ofscanning. For details about charactersthat can be used in file names, see"Specifying the File Name", ScannerReference .
Messages Displayed When Using the Scanner Function
115
5
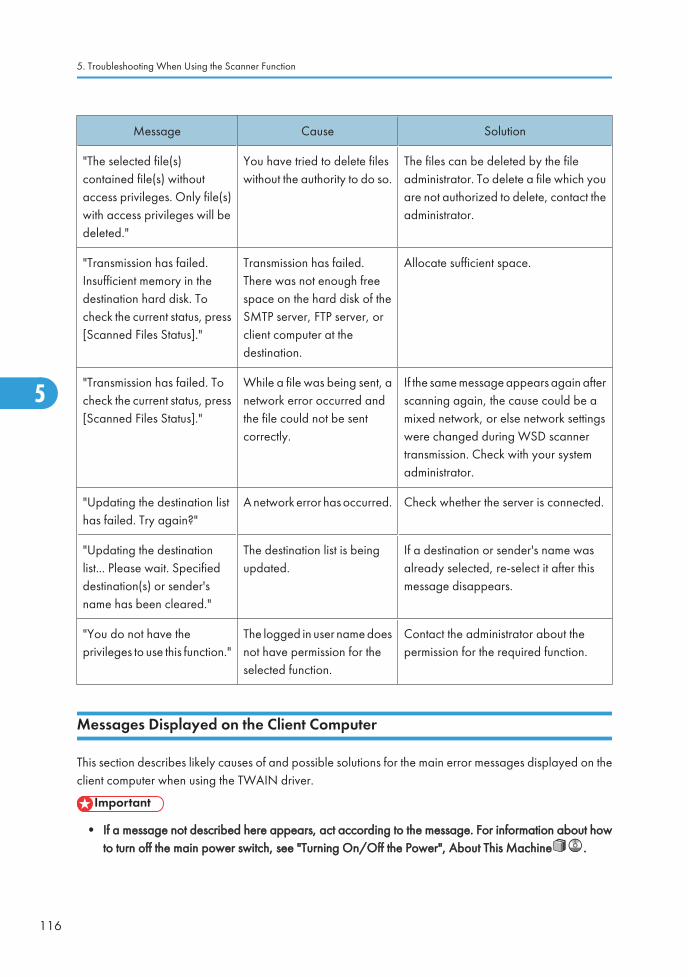
Message Cause Solution
"The selected file(s)contained file(s) withoutaccess privileges. Only file(s)with access privileges will bedeleted."
You have tried to delete fileswithout the authority to do so.
The files can be deleted by the fileadministrator. To delete a file which youare not authorized to delete, contact theadministrator.
"Transmission has failed.Insufficient memory in thedestination hard disk. Tocheck the current status, press[Scanned Files Status]."
Transmission has failed.There was not enough freespace on the hard disk of theSMTP server, FTP server, orclient computer at thedestination.
Allocate sufficient space.
"Transmission has failed. Tocheck the current status, press[Scanned Files Status]."
While a file was being sent, anetwork error occurred andthe file could not be sentcorrectly.
If the same message appears again afterscanning again, the cause could be amixed network, or else network settingswere changed during WSD scannertransmission. Check with your systemadministrator.
"Updating the destination listhas failed. Try again?"
A network error has occurred. Check whether the server is connected.
"Updating the destinationlist... Please wait. Specifieddestination(s) or sender'sname has been cleared."
The destination list is beingupdated.
If a destination or sender's name wasalready selected, re-select it after thismessage disappears.
"You do not have theprivileges to use this function."
The logged in user name doesnot have permission for theselected function.
Contact the administrator about thepermission for the required function.
Messages Displayed on the Client Computer
This section describes likely causes of and possible solutions for the main error messages displayed on theclient computer when using the TWAIN driver.
• If a message not described here appears, act according to the message. For information about howto turn off the main power switch, see "Turning On/Off the Power", About This Machine .
5. Troubleshooting When Using the Scanner Function
116
5

Message Cause Solution
"Any of Login User Name,Login Password or DriverEncryption Key is incorrect."
The entered login user name,password, or driverencryption key was invalid.
• Check the login user name, loginpassword, and driver encryptionkey.
• Permission to use this function hasnot been granted. Contact theadministrator.
"Call Service"
"Please call your servicerepresentative."
An unrecoverable error hasoccurred in the machine.
Contact your service representative.
"Cannot add any morescanning mode."
The maximum number ofregisterable scan modes hasbeen exceeded.
The maximum number of modes that canbe stored is 100. Delete unneededmodes.
"Cannot connect to thescanner. Check the networkAccess Mask settings in UserTools."
An access mask is set. Contact the network or scanneradministrator.
"Cannot detect the paper sizeof the original. Specify thescanning size."
The set original wasmisaligned.
• Place the original correctly.
• Specify the scan size.
• When placing an original directlyon the exposure glass, the lifting/lowering action of the ADF triggersthe automatic original sizedetection process. Lift the ADF bymore than 30 degrees.
"Cannot find "XXX" scannerused for the previous scan."YYY" will be used instead."
("XXX" and "YYY" indicatescanner names.)
The main power switch of thepreviously used scanner is notset to "On".
Check whether the main power switch ofthe scanner used for the previous scan isturned on.
Messages Displayed When Using the Scanner Function
117
5

Message Cause Solution
"Cannot find "XXX" scannerused for the previous scan."YYY" will be used instead."
("XXX" and "YYY" indicatescanner names.)
The machine is not connectedto the network correctly.
• Check that the previously usedscanner is connected to thenetwork correctly.
• Cancel the Personal Firewall of theclient computer. For details, seeWindows Help.
• Use an application such as telnet tomake sure SNMPv1 or SNMPv2 isset as the machine's protocol. See"Connecting the Machine" "Usingtelnet", Network and SystemSettings Guide .
• Select the scanner used for theprevious scan.
"Cannot specify any morescanning area."
The maximum number ofregisterable scan areas hasbeen exceeded.
The maximum number of scanning areasthat can be stored is 100. Deleteunneeded scanning areas.
"Clear Misfeed(s) in ADF." A paper misfeed hasoccurred inside the ADF.
Remove jammed originals, and placethem again. For details, see p.121"Removing Jammed Paper".
• Check whether the originals aresuitable to be scanned by themachine.
"Communication error hasoccurred on the network."
A communication error hasoccurred on the network.
Check whether the client computer canuse the TCP/IP protocol.
"Error has occurred in thescanner driver."
An error has occurred in thedriver.
• Check whether the network cableis connected correctly to the clientcomputer.
• Check whether the Ethernet boardof the client computer is recognizedcorrectly by Windows.
• Check whether the client computercan use the TCP/IP protocol.
5. Troubleshooting When Using the Scanner Function
118
5
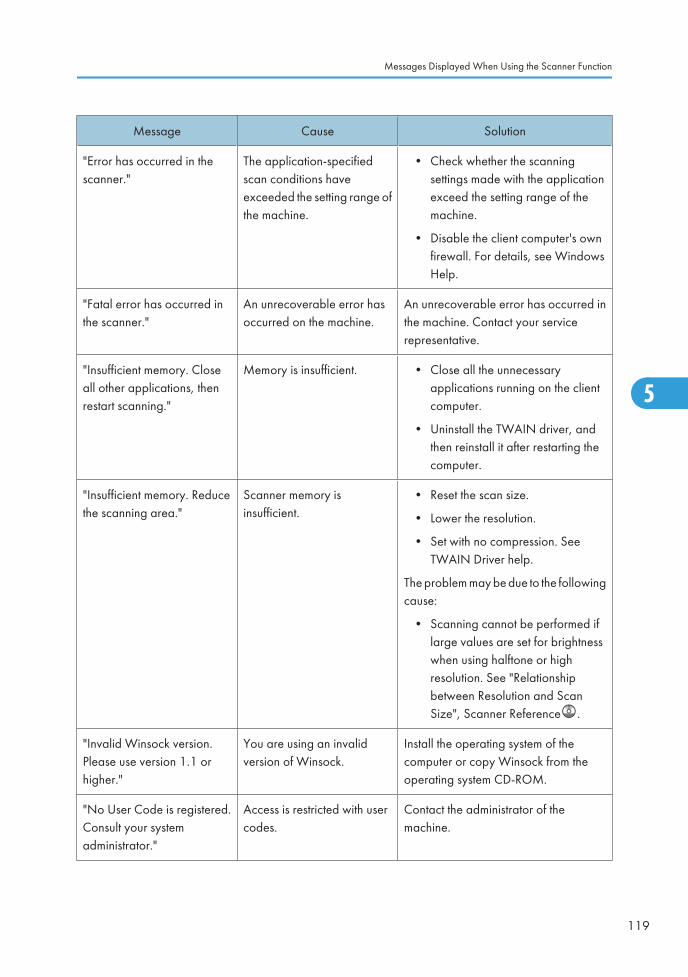
Message Cause Solution
"Error has occurred in thescanner."
The application-specifiedscan conditions haveexceeded the setting range ofthe machine.
• Check whether the scanningsettings made with the applicationexceed the setting range of themachine.
• Disable the client computer's ownfirewall. For details, see WindowsHelp.
"Fatal error has occurred inthe scanner."
An unrecoverable error hasoccurred on the machine.
An unrecoverable error has occurred inthe machine. Contact your servicerepresentative.
"Insufficient memory. Closeall other applications, thenrestart scanning."
Memory is insufficient. • Close all the unnecessaryapplications running on the clientcomputer.
• Uninstall the TWAIN driver, andthen reinstall it after restarting thecomputer.
"Insufficient memory. Reducethe scanning area."
Scanner memory isinsufficient.
• Reset the scan size.
• Lower the resolution.
• Set with no compression. SeeTWAIN Driver help.
The problem may be due to the followingcause:
• Scanning cannot be performed iflarge values are set for brightnesswhen using halftone or highresolution. See "Relationshipbetween Resolution and ScanSize", Scanner Reference .
"Invalid Winsock version.Please use version 1.1 orhigher."
You are using an invalidversion of Winsock.
Install the operating system of thecomputer or copy Winsock from theoperating system CD-ROM.
"No User Code is registered.Consult your systemadministrator."
Access is restricted with usercodes.
Contact the administrator of themachine.
Messages Displayed When Using the Scanner Function
119
5

Message Cause Solution
"No response from thescanner."
The machine or clientcomputer is not connected tothe network correctly.
Check whether the machine or clientcomputer is connected to the networkcorrectly.
"No response from thescanner."
The network is crowded. Wait for a while, and then try toreconnect.
"Scanner is in use for otherfunction. Please wait."
A function of the machineother than the Scannerfunction is being used such asthe Copier function.
• Wait for a while and reconnect.
• Cancel the job in progress.
For example, press [Exit], and thenpress the [Copy] key. Next, pressthe [Clear/Stop] key. When themessage "The Clear / Stop keywas pressed. Are you sure youwant to stop scanning?" appears,press [Stop].
"Scanner is not available onthe specified device."
The TWAIN scanner functioncannot be used on thismachine.
Contact your service representative.
"Scanner is not available.Check the scannerconnection status."
The machine's main powerswitch is off.
Set the main power switch to "On".
"Scanner is not available.Check the scannerconnection status."
The machine is not connectedto the network correctly.
• Check whether the machine isconnected to the network correctly.
• Deselect the personal firewallfunction of the client computer. Fordetails, see Windows Help.
• Use an application such as telnet tomake sure SNMPv1 or SNMPv2 isset as the machine's protocol. See"Using telnet", Network andSystem Settings Guide .
"Scanner is not ready. Checkthe scanner and the options."
The ADF cover is open. Check whether the ADF cover is closed.
"The name is already in use.Check the registered names."
You tried to register a namethat is already in use.
Use another name.
5. Troubleshooting When Using the Scanner Function
120
5

6. Clearing MisfeedsThis chapter describes what to do when paper or originals misfeed (become jammed inside the machine).
Removing Jammed PaperThis section describes how to locate and remove jammed paper.
• The inside of the machine could be very hot. Do not touch any parts other than specified in thisdocument when removing misfed paper. Otherwise, it may cause burn injury.
• The fusing section of this machine might be very hot. Caution should be taken when removing misfedpaper.
• Keep your hands clear of the booklet finisher tray when pulling out or pushing in the finisher's stapleunit. You can trap your fingers if you do not.
• When clearing misfeeds, do not turn off the operation switch. If you do, your copy settings will belost.
• To prevent misfeeds, do not leave any torn scraps of paper inside the machine.
• Contact your service representative if misfeeds occur frequently.
Locating Jammed Paper
If a misfeed happens, remove the misfed paper or original following the procedures stated on the stickerinside the finisher or front cover.
A misfeed has occurred in the place corresponding to the letter displayed on the control panel.
121
6

BQM018S
1. Press the key of the section from where you want to remove the jammed paper.
6. Clearing Misfeeds
122
6

2. After each step is complete, press [Next]. To go back to the previous step, press [Previous].
3. When all jammed paper is removed, restore the machine to the original state.
• More than one misfeed may be indicated. When this happens, check all the areas indicated.
Removing Jammed Paper
This section describes how to remove jammed paper.
• The internal parts of the machine may be hot. Wait for the duplex unit to cool down before clearinga paper jam in the unit.
• When removing jammed sheets, take care to touch only those areas explicitly indicated in the manual.
• Do not remove the fusing unit. Doing so will result in loss of print quality.
• Inside the finisher, or inside the front cover, there is a sticker explaining how to remove misfed paper.
• If a detailed removal instruction appears on the right of the screen, follow it.
• You can also use the procedure indicated in [System Status] to remove jammed paper.
When A1 is Displayed
BQN004S
Removing Jammed Paper
123
6

When A2 is Displayed
BQN005S
When B is Displayed
BQN006S
When C is Displayed
BQN007S
6. Clearing Misfeeds
124
6

When D is Displayed
BQN008S
Removing Jammed Paper
125
6

When E is Displayed
BQN009S
When F is Displayed
BQN010S
6. Clearing Misfeeds
126
6

When N1 - N5 is Displayed
BQL042S
Removing Jammed Paper
127
6
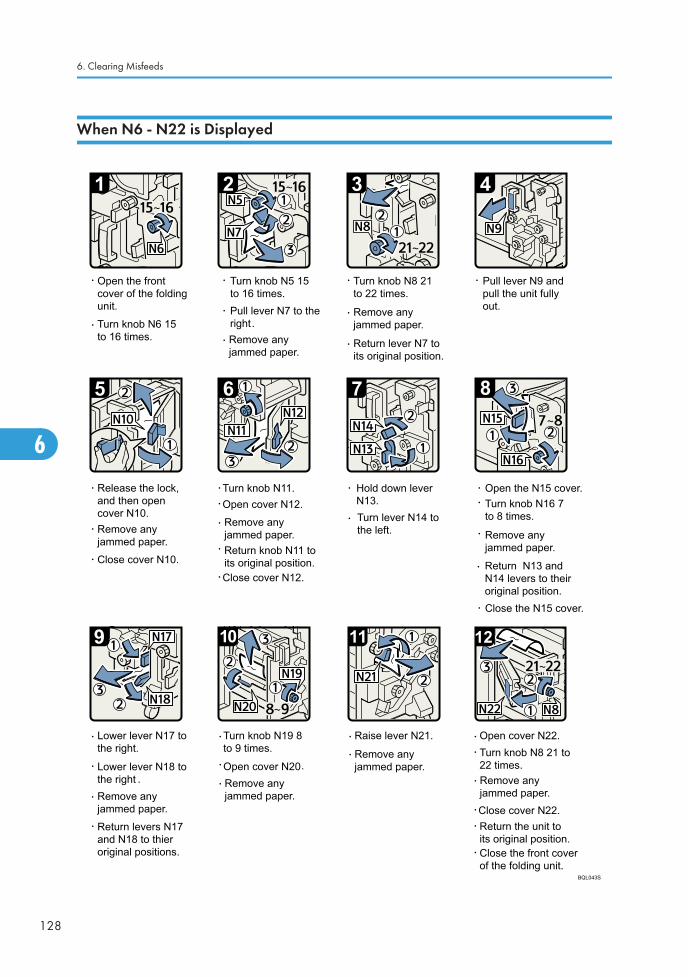
When N6 - N22 is Displayed
BQL043S
6. Clearing Misfeeds
128
6

When P1 is Displayed
BQN015S
When P2 is Displayed
BQN016S
Removing Jammed Paper
129
6

When Q is Displayed
BQN028S
6. Clearing Misfeeds
130
6

When R1 - R4 is Displayed in the Case of Finisher SR 4030
BQN017S
Removing Jammed Paper
131
6

When R5 - R8 is Displayed in the Case of Finisher SR 4030
BQN018S
6. Clearing Misfeeds
132
6

When R1 - R4 is Displayed in the Case of Finisher SR 4040
BQN019S
When R5 - R7 is Displayed in the Case of Finisher SR 4040
BQN020S
Removing Jammed Paper
133
6

When R8 - R12 is Displayed in the Case of Finisher SR 4040
BQN021S
6. Clearing Misfeeds
134
6

When R1 - R3 is Displayed in the Case of Finisher SR 4050
BQN013S
Removing Jammed Paper
135
6

When R4 - R7 is Displayed in the Case of Finisher SR 4050
BQN014S
When U is Displayed
BQN003S
6. Clearing Misfeeds
136
6

When W is Displayed
BQN002S
Removing Jammed Paper
137
6

Removing Jammed StaplesThis section describes how to remove jammed staples.
• Keep your hands clear of the booklet finisher tray when pulling out or pushing in the finisher's stapleunit. You can trap your fingers if you do not.
• Curled paper may cause staples to jam. To avoid this, turn paper over in the tray.
• When the finisher is installed, after removing jammed staples, staples will not be ejected the first fewtimes you try to use the stapler.
• Remove the jammed staples according to the finisher type. Check the type if you are unsure. For detailsabout type of finisher, see "Appendix", About This Machine .
Finisher SR4030 / SR4040
This section describes how to remove jammed staples from the Finisher SR4030 and SR4040.
BQN029S
6. Clearing Misfeeds
138
6
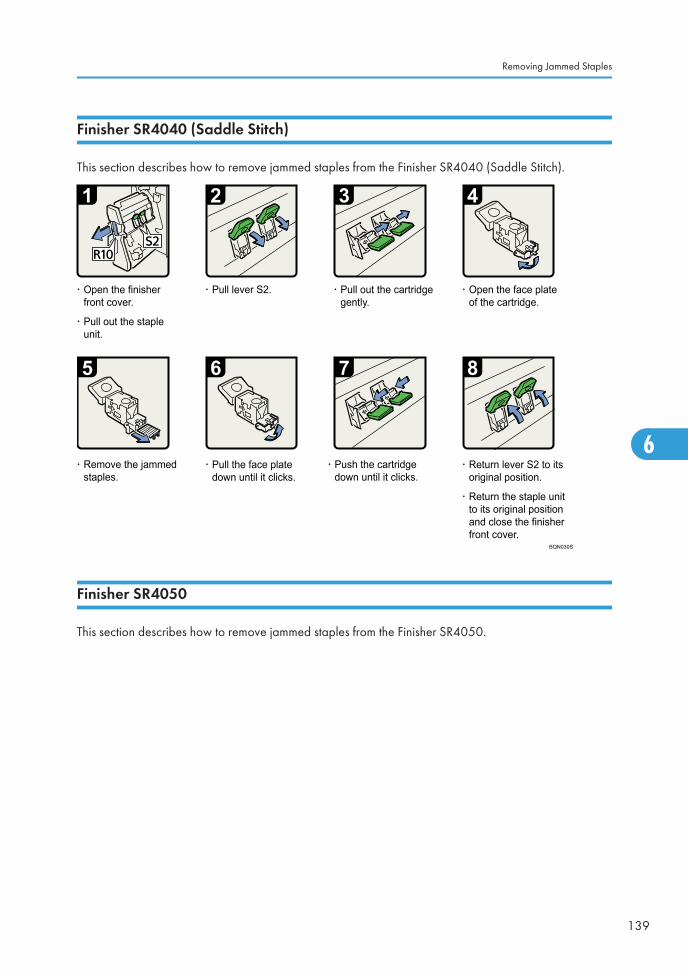
Finisher SR4040 (Saddle Stitch)
This section describes how to remove jammed staples from the Finisher SR4040 (Saddle Stitch).
BQN030S
Finisher SR4050
This section describes how to remove jammed staples from the Finisher SR4050.
Removing Jammed Staples
139
6

BQN012S
6. Clearing Misfeeds
140
6

Removing Punch WasteThis section describes how to remove punch waste.
Finisher SR4030 / SR4040
The following procedure describes how to remove punch waste from the Finisher SR4030 and FinisherSR4040.
• While "Hole Punch Receptacle is full." is displayed, you cannot use the Punch function.
• "Hole Punch Receptacle is full." is displayed until the punch waste box is reinstalled.
• If the message is still displayed, reinstall the punch waste box.
1. Open the finisher front cover.
BQN022S
2. Pull out the punch waste box carefully, and then remove punch waste.
BQM003S
Removing Punch Waste
141
6

3. Reinstall the punch waste box.
BQM004S
4. Close the finisher front cover.
"Hole Punch Receptacle is full." disappears.
Finisher SR4050
The following procedure describes how to remove punch waste from the Finisher SR4050.
• While "Hole Punch Receptacle is full." is displayed, you cannot use the Punch function.
• "Hole Punch Receptacle is full." is displayed until the punch waste box is reinstalled.
• If the message is still displayed, reinstall the punch waste box.
1. Open the finisher front cover.
BQN023S
6. Clearing Misfeeds
142
6
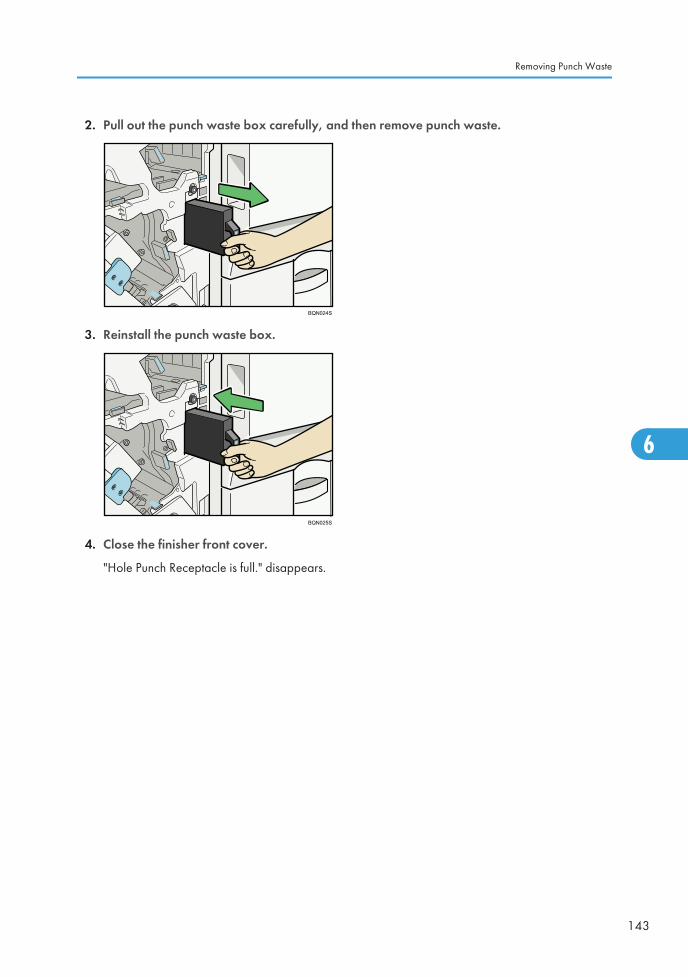
2. Pull out the punch waste box carefully, and then remove punch waste.
BQN024S
3. Reinstall the punch waste box.
BQN025S
4. Close the finisher front cover.
"Hole Punch Receptacle is full." disappears.
Removing Punch Waste
143
6

Removing Staple WasteThis section describes how to remove staple waste.
Finisher SR4050
The following procedure describes how to remove staple waste from the Finisher SR4050.
• While "Waste Staple Receptacle is full." is displayed, you cannot use the Staple function.
• "Waste Staple Receptacle is full." is displayed until the staple waste box is reinstalled.
• If the message is still displayed, reinstall the staple waste box.
1. Open the finisher front cover.
BQN023S
2. Pull out the staple waste box carefully, and then remove staple waste.
BQN026S
6. Clearing Misfeeds
144
6

3. Reinstall the staple waste box.
BQN027S
4. Close the finisher front cover.
"Waste Staple Receptacle is full." disappears.
Removing Staple Waste
145
6

6. Clearing Misfeeds
146
6

7. Appendix
Pausing Copy When Using the Finisher SR4050Use the following procedure to temporarily interrupt a long copy run when using the Finisher SR4050.
1. Press the [Suspend/Resume] key.
The key lights up.
BQM027S
2. Remove the stack of paper from the finisher shift tray.
3. Press the [Suspend/Resume] key.
The key turns off, and then copying restarts.
BQM038S
• You can suspend copy only when the output tray is specified as the finisher shift tray.
• Depending on the print image, the prints might not be stacked properly. In such a case, pause printing,remove the prints, and then resume printing.
147
7

When Z-folded Paper Is Not Properly AlignedInstall the auxiliary Z-fold support tray if Z-folded prints are not output tidily.
Finisher SR4040
Use the following procedure to attach the Z-fold support tray for the Finisher SR4040 to the Finisher ShiftTray or Finisher Upper Tray.
1. Remove the prints.
2. Attach the Z-fold support tray to the finisher upper tray or finisher shift tray.
Finisher Upper Tray:
BAS012S
Finisher Shift Tray:
BQM025S
Finisher SR4050
Use the following procedure to attach the Z-fold support tray for the Finisher SR4050 to the Finisher ShiftTray or Finisher Upper Tray.
7. Appendix
148
7

1. Press the [Suspend/Resume] key.
The key lights up.
BQM027S
2. Remove the prints.
Set the Z-fold support tray for the finisher upper tray or finisher shift tray.
Finisher Upper Tray:
BJU066S
Finisher Shift Tray:
BQM026S
When Z-folded Paper Is Not Properly Aligned
149
7

Multi-Folding Unit
Use the following procedure to attach the Z-fold support tray for the Multi-Folding Unit to the Multi-FoldingUnit Tray.
1. Open the front cover of the Multi-Folding Unit and take out the Z-fold support tray for Multi-Folding Unit (located at the bottom of the Multi-Folding Unit).
BQL071S
2. Set the Z-fold support tray for Multi-Folding Unit in the slope of the Multi-Folding Unit Trayso that it is flush against the end fence.
BQL072S
3. Close the front cover of Multi-Folding Unit.
• When you have finished using the Z-fold support tray for Multi-Folding Unit, open the front cover ofthe Multi-Folding Unit and re-attach the tray to its stowage hook.
7. Appendix
150
7

TrademarksAdobe, Acrobat, Acrobat Reader, Adobe Reader, and PostScript are either registered trademarks ortrademarks of Adobe Systems Incorporated in the United States and/or other countries.
Apple and TrueType are trademarks of Apple Inc., registered in the U.S. and other countries.
The Bluetooth® word mark and logos are registered trademarks owned by Bluetooth SIG, Inc. and anyuse of such marks by Ricoh Company, Ltd. is under license.
PCL® is a registered trademark of Hewlett-Packard Company.
UNIX is a registered trademark in the United States and other countries, licensed exclusively through X/Open Company Limited.
Microsoft®, Windows®, Windows NT®, Windows Server®, and Windows Vista® are either registeredtrademarks or trademarks of Microsoft Corporation in the United States and/or other countries.
The proper names of the Windows operating systems are as follows:
• The product names of Windows 2000 are as follows:
Microsoft® Windows® 2000 Professional
Microsoft® Windows® 2000 Server
Microsoft® Windows® 2000 Advanced Server
• The product names of Windows XP are as follows:
Microsoft® Windows® XP Professional
Microsoft® Windows® XP Home Edition
Microsoft® Windows® XP Media Center Edition
Microsoft® Windows® XP Tablet PC Edition
• The product names of Windows Vista are as follows:
Microsoft® Windows Vista® Ultimate
Microsoft® Windows Vista® Business
Microsoft® Windows Vista® Home Premium
Microsoft® Windows Vista® Home Basic
Microsoft® Windows Vista® Enterprise
• The product names of Windows Server 2003 are as follows:
Microsoft® Windows Server® 2003 Standard Edition
Microsoft® Windows Server® 2003 Enterprise Edition
Microsoft® Windows Server® 2003 Web Edition
Microsoft® Windows Server® 2003 Datacenter Edition
• The product names of Windows Server 2003 R2 are as follows:
Trademarks
151
7

Microsoft® Windows Server® 2003 R2 Standard Edition
Microsoft® Windows Server® 2003 R2 Enterprise Edition
Microsoft® Windows Server® 2003 R2 Datacenter Edition
• The product names of Windows Server 2008 are as follows:
Microsoft® Windows Server® 2008 Standard
Microsoft® Windows Server® 2008 Enterprise
Microsoft® Windows Server® 2008 Datacenter
Other product names used herein are for identification purposes only and might be trademarks of theirrespective companies. We disclaim any and all rights to those marks.
7. Appendix
152
7

INDEXA
Adjusting the volume.............................................47
C
Cannot browse the network to send a scan file....................................................................................103
Cannot exit from connect copy............................44
Cannot make clear copies....................................32
Cannot make copies as wanted...........................36
Cannot print...........................................................87
Cannot send or receive fax messages as wanted...................................................................................60
Cannot send scanned files..................................103
Checking machine status and settings.................15
Checking the error log..........................................85
Clearing misfeeds................................................121
Combine.................................................................36
Connect copy...........................................42, 43, 44
Connect copy is canceled....................................43
Control panel................................................76, 107
Copy/Document Server function.........................27
D
Data storage..........................................................15
Display during connect copy................................42
Document Server...................................................36
Duplex....................................................................36
E
Edit..........................................................................36
Enquiry...................................................................15
Error log.................................................................85
Error Mail Notification..........................................69
Error occurs using Internet Fax.............................69
Error Report (E-mail)..............................................69
F
Facsimile function..................................................49
Finisher SR4030.........................................138, 141
Finisher SR4040................................138, 141, 148
Finisher SR4040 (Saddle Stitch)........................139
Finisher SR4050...............139, 142, 144, 147, 148
H
How to read this manual.........................................9
I
If an error report is printed....................................67
If USB connection fails..........................................74
Indicators................................................................13
J
Job is not performed..............................................24
L
Legal Prohibition....................................................11
Locating jammed paper......................................121
M
Machine address info...........................................15
Maintenance info..................................................15
Manuals for this machine........................................6Memory is full........................................................45
Messages displayed.......................27, 49, 75, 107
Messages displayed on the client computer.........................................................................................116
Messages displayed on the control panel whenusing the printer function.......................................76
Messages displayed on the control panel whenusing the scanner function..................................107
Messages displayed when installing the printerdriver......................................................................71
Multi-accessing......................................................24
Multi-Folding Unit................................................150
N
Names of major items.............................................9Network connection..............................................89
Network delivery function cannot be used.......104
Notes......................................................................10
Notice.......................................................................8
O
Operations are not possible when messages aredisplayed.............................................................105
Other Messages....................................................78
Other printing problems........................................91
P
Panel tone..............................................................14
Pausing copy when using the Finisher SR4050....................................................................................147
153

Printer function.......................................................75
Printing....................................................................60
Problems operating the machine..........................20
R
Reception...............................................................60
Removing jammed paper..........................121, 123
Removing jammed staples..................................138
Removing punch waste.......................................141
Removing staple waste.......................................144
S
Scanner function..................................................107
Scanning is not done as expected.....................101
Server-Generated error e-mail............................69
Stamp.....................................................................36
Status messages.....................................................75
Stored files cannot be accessed........................103
Stored files cannot be edited.............................104
Symbols....................................................................9
T
Trademarks..........................................................151
Transmission...........................................................60
Transmission/Reception.......................................60
Turning off the main power / In the event of powerfailure......................................................................68
TWAIN.................................................................116
TWAIN driver cannot be started.......................103
W
When A1 is Displayed........................................123
When A2 is Displayed........................................124
When an indicator to the right of a function key is lit................................................................................18
When B is Displayed..........................................124
When C is Displayed..........................................124
When D is Displayed..........................................125
When E is Displayed...........................................126
When F is Displayed...........................................126
When folded paper is not properly aligned.....148
When memory is full..............................................66
When N1 - N5 is Displayed..............................127
When N6 - N22 is Displayed...........................128
When P1 is Displayed........................................129
When P2 is Displayed........................................129
When paper is not fed properly...........................91
When Q is Displayed.........................................130
When R1 - R3 is Displayed in the Case of FinisherSR 4050..............................................................135
When R1 - R4 is Displayed in the Case of FinisherSR 4030..............................................................131
When R1 - R4 is Displayed in the Case of FinisherSR 4040..............................................................133
When R4 - R7 is Displayed in the Case of FinisherSR 4050..............................................................136
When R5 - R7 is Displayed in the Case of FinisherSR 4040..............................................................133
When R5 - R8 is Displayed in the Case of FinisherSR 4030..............................................................132
When R8 - R12 is Displayed in the Case of FinisherSR 4040..............................................................134
When S/MIME cannot be used........................104
When the data in indicator does not light up or flash................................................................................89
When the machine is connected to the computerusing the interface cable.......................................89
When U is Displayed..........................................136
When W is Displayed.........................................137
When you cannot print clearly.............................91
When You Cannot Send Scan Files Using WSD..................................................................................105
Windows 2000.....................................................71
Windows Server 2003/2003 R2.......................71
Windows Server 2008.........................................73
Windows Vista.......................................................72
Windows XP Home Edition...................................72
Windows XP Professional.....................................71
Z
z-folded paper....................................................148
154

MEMO
155

MEMO
156 AE AE D062-7146

Copyright © 2009

Operating Instructions Troubleshooting
D062-7146AE AE
Type for MP 8001/Aficio MP 8001Type for MP 9001/Aficio MP 9001
Type for MP 7001/Aficio MP 7001Type for MP 6001/Aficio MP 6001