200 gear kit - recreational motorsports
TRANSCRIPT
1
OEM BELT PULLY REMOVAL 1. Loosen track as far as it will go, this will take pressure off of drive shaft.
2. Remove driven (secondary) clutch and remove chain case cover. Keep track of all bolts they will be reused.
3. Remove top shaft and small pulley, shaft will pull out hard due to belt pressure on it.
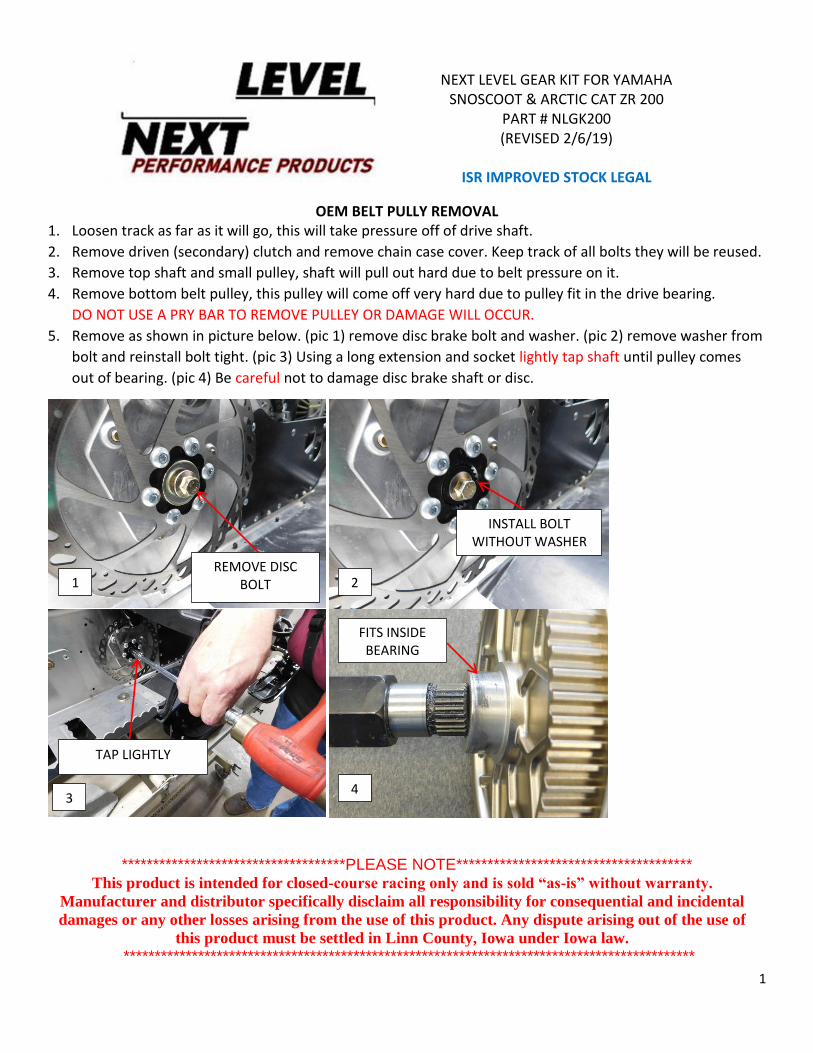
4. Remove bottom belt pulley, this pulley will come off very hard due to pulley fit in the drive bearing.
DO NOT USE A PRY BAR TO REMOVE PULLEY OR DAMAGE WILL OCCUR.
5. Remove as shown in picture below. (pic 1) remove disc brake bolt and washer. (pic 2) remove washer from
bolt and reinstall bolt tight. (pic 3) Using a long extension and socket lightly tap shaft until pulley comes
out of bearing. (pic 4) Be careful not to damage disc brake shaft or disc.
************************************PLEASE NOTE**************************************
This product is intended for closed-course racing only and is sold “as-is” without warranty.
Manufacturer and distributor specifically disclaim all responsibility for consequential and incidental
damages or any other losses arising from the use of this product. Any dispute arising out of the use of
this product must be settled in Linn County, Iowa under Iowa law.
********************************************************************************************
NEXT LEVEL GEAR KIT FOR YAMAHA SNOSCOOT & ARCTIC CAT ZR 200
PART # NLGK200 (REVISED 2/6/19)
ISR IMPROVED STOCK LEGAL
REMOVE DISC BOLT
INSTALL BOLT WITHOUT WASHER
FITS INSIDE BEARING
TAP LIGHTLY
4 3
2 1

2
INSTALLING NEW HUB
1. Carefully reinstall shaft into disc brake hub if it came out disc, install bolt and washer back in shaft and
tighten.
2. Because new hub is machined steel it can rust, make sure to apply grease on shaft and spline before
installing. (pic 5)
3. Because of track side pressure on shaft and bearing fit to hub. The new hub will slide into bearing with
some pressure needed. DO NOT drive hub into bearing with a hammer this will damage bearing and
hub.
4. When installing top sprocket make sure (NL 20) markings face out for proper sprocket alignment.
SEE NEXT PAGE TO CONTINUE
FOR MORE HELP WITH THIS INSTALLATION YOU CAN CONTACT OUR TECH LINE (319) 462-6932 MONDAY THROUGH FRIDAY 8:30AM TO 5PM
APPLY GREASE HERE
5
PROPER DRIVE SPROCKET INSTALLATION
OEM WASHER
3
ADJUSTING CHAIN TENSIONER
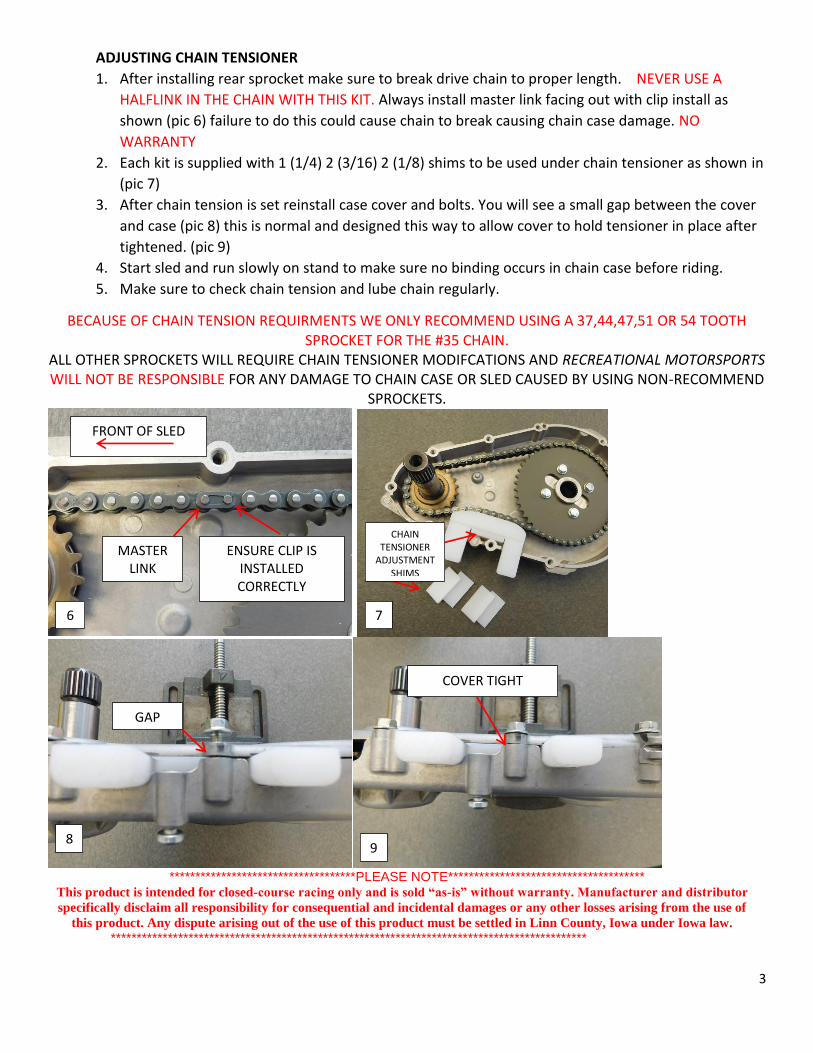
1. After installing rear sprocket make sure to break drive chain to proper length. NEVER USE A
HALFLINK IN THE CHAIN WITH THIS KIT. Always install master link facing out with clip install as
shown (pic 6) failure to do this could cause chain to break causing chain case damage. NO
WARRANTY
2. Each kit is supplied with 1 (1/4) 2 (3/16) 2 (1/8) shims to be used under chain tensioner as shown in
(pic 7)
3. After chain tension is set reinstall case cover and bolts. You will see a small gap between the cover
and case (pic 8) this is normal and designed this way to allow cover to hold tensioner in place after
tightened. (pic 9)
4. Start sled and run slowly on stand to make sure no binding occurs in chain case before riding.
5. Make sure to check chain tension and lube chain regularly.
BECAUSE OF CHAIN TENSION REQUIRMENTS WE ONLY RECOMMEND USING A 37,44,47,51 OR 54 TOOTH SPROCKET FOR THE #35 CHAIN.
ALL OTHER SPROCKETS WILL REQUIRE CHAIN TENSIONER MODIFCATIONS AND RECREATIONAL MOTORSPORTS WILL NOT BE RESPONSIBLE FOR ANY DAMAGE TO CHAIN CASE OR SLED CAUSED BY USING NON-RECOMMEND
SPROCKETS.
************************************PLEASE NOTE**************************************
This product is intended for closed-course racing only and is sold “as-is” without warranty. Manufacturer and distributor
specifically disclaim all responsibility for consequential and incidental damages or any other losses arising from the use of
this product. Any dispute arising out of the use of this product must be settled in Linn County, Iowa under Iowa law.
********************************************************************************************
FRONT OF SLED
MASTER LINK
ENSURE CLIP IS INSTALLED CORRECTLY
CHAIN TENSIONER
ADJUSTMENT SHIMS
6 7
GAP
8
COVER TIGHT
9