2000-b pick-up reel - macdon industries ltd. rotating any reel not mounted on a header, be sure the...
TRANSCRIPT
2000-BPICK-UP REEL
OPERATOR’S MANUAL
Form 46240 Issue 01/00
Sugg. Retail: $10.00

1
INTRODUCTION Your new Model 2000-B cam-action Pick-Up Reel is ideal for downed-crop conditions and may be mounted on most windrowers and combines. This manual is provided to assist you in the Assembly, Operation and Maintenance of your MacDon Pick-Up Reel. As well, a Service Parts listing is included. Use the manual as your first source of information about the reel. CAREFULLY READ THE MANUAL BEFORE ATTEMPTING TO ASSEMBLE, MOUNT OR USE THE REEL. Repair or replacement parts may be ordered from your nearest authorized dealer. When ordering, be sure to include the following information: 1. Serial number of reel. The serial number is located on the L/H cam assembly. 2. Part number, description and quantity of each part. 3. Make and header width of windrower or combine. Keep this manual handy for reference and to pass on to new operators or owners. Call your Dealer if you need assistance, information or additional copies of this manual. NOTE: A mounting parts list was shipped with the mounting package for your particular windrower or combine. Keep the list with this manual for future reference. NOTE: For assembly and parts description purposes, right and left hand are determined from the Operator's position, facing forward (in the direction of travel). These may be abbreviated using R/H and L/H. The cam assemblies at either end of the reel are identified as right or left hand with decals. WARRANTY CLAIMS: When claiming warranty, be sure to include all of the following information: 1. Serial number of reel. 2. Date purchased. 3. Date of failure. 4. Description of failure. 5. Part number and quantity of failed parts. TABLE OF CONTENTS Page INTRODUCTION............................................................................................................................. 1 SAFETY ..................................................................................................................................... 2 - 4 ASSEMBLY.............................................................................................................................. 5 - 12 OPERATION .......................................................................................................................... 13 - 15
SAFETY.................................................................................................................................. 13 ADJUSTMENTS ................................................................................................................ 14,15
TROUBLE SHOOTING .......................................................................................................... 16 - 20 MAINTENANCE ..................................................................................................................... 21 - 23 PARTS ................................................................................................................................... 24 - 27 INDEX ........................................................................................................................................... 28

2
SAFETY
This safety alert symbol indicates important safety messages in this manual. When you see this symbol, carefully read the message that follows and be alert to the possibility of personal injury or death. If this reel is used by an employee, or is loaned or rented, make certain that, prior to operating, the user: 1. Is instructed in safe and proper use.
2. Reviews and understands this manual.
BEFORE STARTING
Read this manual completely and make sure you understand it before attempting assembly or operation. Study all safety messages in this manual, as well as the combine or windrower manual. Read all the safety signs on the machine. Clear the area of other persons. Clean reflective surfaces on the machine. Learn and practice safe use of controls before operating. It is your responsibility to understand and follow manufacturers' instructions on machine operation, service, and to observe pertinent laws and regulations. To help prevent personal injuries during assembly, operation and maintenance; use protective shoes, a hard hat, protective glasses or goggles, and close-fitting clothing. Provide a first aid kit for use in case of accident.
ASSEMBLY AND SERVICE
Before rotating any reel not mounted on a header, be sure the reel is securely attached to stable supports at both ends so it cannot tip or fall. Install and maintain all recommended shields and safety signs. The reel drive must be properly shielded. Install and maintain all recommended shields and safety signs. Do not crawl under, or climb over or through the reel assembly.

3
SAFETY
ASSEMBLY AND SERVICE (continued)
The reel weighs between 400 lbs. (15') and 800 lbs. (30') and must be adequately supported. When positioning the reel, be sure a stop is in place to prevent the reel from sliding off the reel support arms. See header Operator's Manual for reel clearance and fore-aft adjustments. Do not service or adjust reel until: 1. The header is resting on the ground and the reel is fully lowered. If it is necessary to service in the raised
position, first engage header and reel cylinder stops. 2. Header clutch is disengaged. 3. The engine is stopped and the key removed from the start switch. 4. The park brake is set. 5. All moving parts have stopped.
OPERATING
Be aware and stay clear of rotating machine parts which cannot be shielded. Keep shields installed and wear close fitting clothing to help protect from entanglement and injury. Lower or block all hydraulically or mechanically elevated implements, including the reel and other attachments before leaving the equipment. Be aware that accidents often happen when the operator is tired or in a hurry to get finished. Take the time to consider the safest way. Never ignore warning signs of fatigue.
SIGNAL WORDS
Note the use of the signal words DANGER, WARNING, and CAUTION with safety messages. The appropriate signal word for each message has been selected using the following guidelines: DANGER - Indicates an imminently hazardous situation that, if not avoided, will result in death or serious
injury. WARNING- Indicates a potentially hazardous situation that, if not avoided, could result in death or serious
injury. It is also used to alert against unsafe practices. CAUTION - Indicates a potentially hazardous situation that, if not avoided, may result in minor or moderate
injury. It is also used as a reminder of good safety practices.

4
SAFETY
SAFETY SIGNS
• Keep safety signs clean and legible at all times. • Replace safety signs that are missing or become illegible. • If original parts on which a safety sign was installed are replaced, be sure the repair part also bears the
current safety sign. • Safety signs are available from your Dealer Parts Department. • To install safety signs:
1. Be sure the installation area is clean and dry. 2. Decide on the exact position before you remove the backing paper. 3. Remove the smaller portion of the split backing paper. 4. Place the sign in position and slowly peel back the remaining paper, smoothing the sign as it is applied. 5. Small air pockets can be smoothed out or pricked with a pin.
• The following safety sign appears on the pick-up reel main tube. • As well, the following or similar reel-related safety signs may appear on your combine or windrower
header.

5
ASSEMBLY
CAUTION:To help prevent injury, use protective shoes, a hard hat, protective glasses or goggles, and close fitting clothing.
CAUTION: Be careful when cutting strapping and shipping wire. Release of pressure can cause sudden
movement. Remove wire and strapping from the assembly area. 1. IDENTIFY LEFT/RIGHT END:
Lay bats down as they were strapped to center tube. Do not turn end for end. Notches (A) in bats should line up with lugs (B) on reel center tube. Identify left and right ends of center tube by the decal (C) at each end.
2. SUPPORT CENTER TUBE on suitable
stands.
WARNING: The completed reel weighs between 400 lbs. (15') and 800 lbs. (30') and must be adequately supported.
NOTE: Be sure reel is located where it can be easily approached when mounting on header.
SUPPORT CENTER TUBE
IDENTIFY LEFT & RIGHT ENDS

6
ASSEMBLY 3. SLIDE REEL ARM ASSEMBLIES ONTO
CENTER TUBE. NOTE: The lug pattern is different at each end of the tube. The pattern at each end continues towards the center of the tube. The number of positions with the same lug pattern determines the number of arm assemblies to be installed from that end. EXAMPLE: Lug pattern (A) is repeated at three positions; slide three reel arm assemblies (C) on that end. Lug pattern (B) is repeated at two positions; slide two assemblies (C) on that end. To install arm assemblies: • With disc of assembly facing in, match the three
notches (D) in the arm disc with the three end lugs on the center tube and slide assembly over these lugs.
• Rotate assembly until any notch in disc aligns with the fourth (offset) lug and slide on.
• Repeat until all assemblies are on reel tube, past the first set of lugs at each end.
• Fasten one arm assembly at each end, using
3/8 NC x 1-1/2 carriage bolts and flange nuts as follows: Place the disc between the one offset lug (E) and the other three lugs (F) and rotate to align holes in disc with lugs on tube. Install hardware finger tight only, with bolt heads against lugs.
NOTE: It is sufficient to fasten only the outside arm assemblies at this stage, leaving the rest of the arm assemblies close to the end of the reel. Final positioning is easier after the reel is mounted.
IDENTIFY LUG PATTERN & SLIDE ON ARM ASSEMBLIES
LINE UP 3 LUGS, SLIDE ON, ROTATE TO LINE UP OFFSET LUG
D
ATTACH ONE ARM ASSEMBLY EACH END
E
F

7
ASSEMBLY 4. INSTALL END SHAFTS from mounting
package using four 3/8 NC flange bolts.
NOTE: End shaft can be identified as right or left by the decal on the support to which it is assembled. Be sure the drive end shaft is installed at the proper end of the reel for your machine.
IMPORTANT: Tighten the four bolts evenly to pull shaft straight into tube. Plate (A) must contact disc (B). When contact is made, torque bolts to 35 ft.lbs. (47 N⋅m).
Slide one 3 inch O.D. washer (C) from mounting package onto each end shaft.
5. ASSEMBLE AND INSTALL CAMS. a. Identify left and right reel supports (A) (from
mounting package) by the decal on each part. b. Attach each reel support (A) to a cam track (B)
with one 3/8 NC x 3/4 carriage bolt and flange nut at (C). (Both cam tracks are the same.) IMPORTANT: Do not install bolt in adjustment slots until reel is mounted. Damage to reel may result if ends are not evenly adjusted.
c. Slide reel support/cam track assemblies onto
end shafts, matching rotation decals on center tube to decals on reel supports.
d. Identify right and left cam arm assemblies (D)
by the decal on each cam ring. Position the cam arms collapsed or removed for shipping and tighten locknuts to 150 ft.lbs. (200 N⋅m).
e. Slide right and left cam arm assemblies (D)
over cam tracks at respective ends of reel, ensuring that rotation decals on center tube, reel supports and cam rings all match.
INSTALL END SHAFTS & WASHER
A
C
B
ASSEMBLE AND INSTALL CAMS (LEFT HAND SHOWN)
B
A
D
C

8
ASSEMBLY
WARNING: Before rotating the reel be sure L/H & R/H mounts are well clamped so that reel cannot tip or fall.
CAUTION: To prevent cam arm assemblies from sliding sideways off of cam tracks as reel is mounted,
wire-tie cam arm assembly to the outer reel arm assembly (fastened in step 3). 6. MOUNT REEL TO HEADER SUPPORT ARMS.
NOTE: If header is not available, position new stands at left and right mounts and clamp reel securely. Remove supports under reel center tube.
See insert sheet supplied with mounting package for mounting instructions.
WARNING: The reel weighs between 400 lbs. (15') and 800 lbs. (30') and must be adequately supported. When
positioning, be sure a stop is in place to prevent the reel from sliding off the reel support arms.
WARNING: The reel drive must be properly shielded. Install and maintain all recommended shields and safety signs.
7. ATTACH REMAINING REEL ARM
ASSEMBLIES to center tube using 3/8 NC x 1-1/2 long carriage bolts and flange locknuts as follows:
Position arm assembly at the set of lugs where it is to be installed. Place the disc between the one offset lug (A) and the other three lugs (B) and rotate to align holes in disc with lugs on tube. Install hardware finger tight only, with bolt heads (C) against lugs.
MOUNT REEL SAFELY
ATTACH REEL ARM ASSEMBLIES
A
C
C
B

9
ASSEMBLY 8. ATTACH CRANKS TO BAT ASSEMBLIES: a. Left and right cranks are bundled separately.
Identify left and right cranks by the decal on one crank per bundle.
b. Install left (E) and right cranks into bat
assemblies (F). Be sure orientation of bats is as shown. At Left Cranks Only: Fasten with 5/16 NC x 1-1/2 inch hex socket head capscrews and special tapered nuts (H). (Taper against bat). Tighten hardware only until bat is clamped to tube (0 to 1 ½ threads showing). Do not collapse bat and tube by over-tightening.
IMPORTANT: Do not install hardware for right cranks at this stage. This hardware will be installed at Step 15.
c. 36' Header Only: At inboard end of L/H and R/H
reels, install fingers in end bats. (See Step 11 for procedure). Install 5/16 NC x 3/4 carriage bolt and flange nut at (D), tightening only until fingers are clamped. Attach end bats to bat assemblies similar to cranks, (Step 8 b, above). NOTE: Clamping of end bat fingers prior to installation of end bat is necessary to provide proper fit-up between end bat and formed bat.
9. ATTACH BATS TO REEL ARMS: a. Assemble bearing halves (A) and steel strap (B)
onto reel bats.
NOTE: Apply a thin layer of grease on all plastic bearings to prolong bearing life.
b. Check that left and right hand decals on bat
assemblies and cam assemblies match. Attach bats to reel arms (C) as shown with 5/16 x 2 1/4 inch hex head capscrews and flange locknuts (D). FINGER TIGHTEN ONLY.
c. Straighten bats, then tighten hardware at arm
discs only. See Step 14 for proper torques.
WARNING: Do not crawl under, or climb over or through the reel assembly.
ATTACH BATS TO REEL ARMS
INSTALL CRANKS INTO BATS - FASTEN LEFT HAND ONLY
E
H
F
CLAMP FINGERS IN END BATS BEFORE INSTALLATION (36' HEADER ONLY)
D

10
ASSEMBLY
10. ATTACH CAM ARMS (F) to cranks on bat assemblies using 5/8 x 1-3/8 hex head shoulder bolts and lock nuts. Finger tighten only.
NOTE: There are two positions on the crank for
connecting cam arms. See "Recommended Settings" chart on page 14 and choose the position best suited to your conditions. (Position "Y" is shown here.)
IMPORTANT: Install hardware with bolt head
inboard. Once a cam arm position is chosen, ensure all arms are in the same position at both ends of the reel.
11. INSTALL FINGERS in bats using tool (A) provided, ensuring button snaps into hole (B) in bat.
For steel fingers, pre-assemble finger (F) and
clip (G) and install as above.
ATTACH CAM ARMS
F
INSTALL FINGERS
B
A
STEEL FINGERS
G
F
11
ASSEMBLY
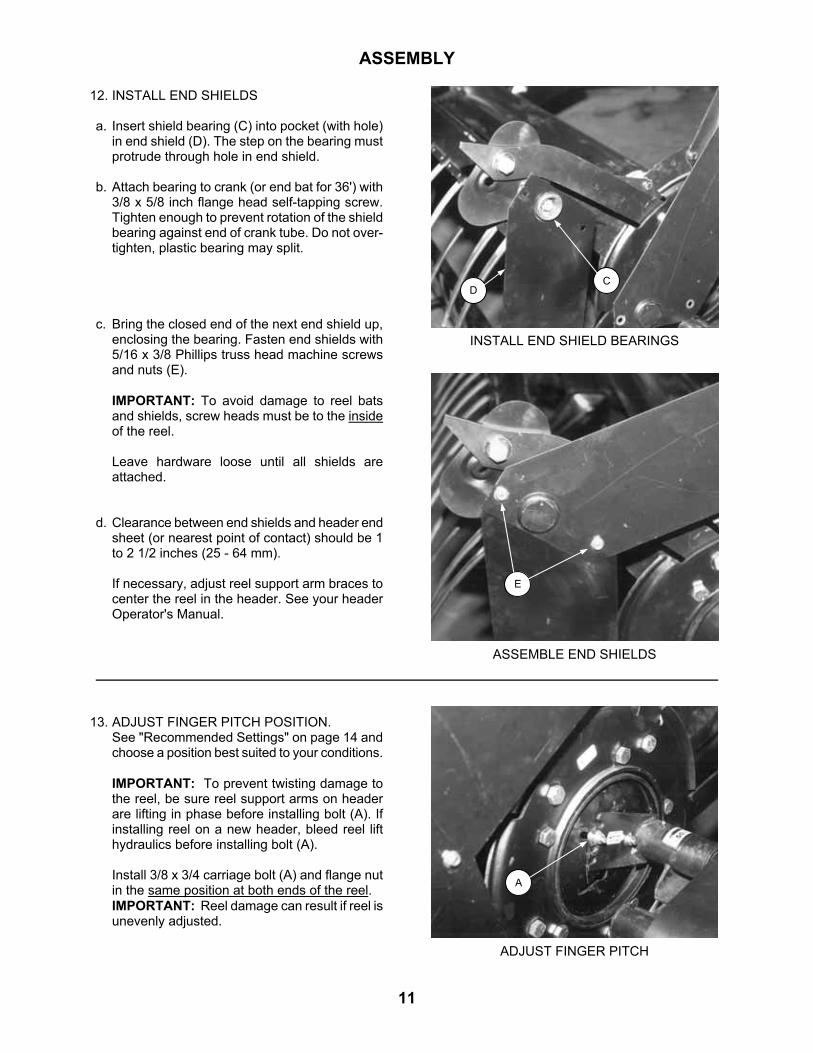
12. INSTALL END SHIELDS a. Insert shield bearing (C) into pocket (with hole)
in end shield (D). The step on the bearing must protrude through hole in end shield.
b. Attach bearing to crank (or end bat for 36') with
3/8 x 5/8 inch flange head self-tapping screw. Tighten enough to prevent rotation of the shield bearing against end of crank tube. Do not over-tighten, plastic bearing may split.
c. Bring the closed end of the next end shield up,
enclosing the bearing. Fasten end shields with 5/16 x 3/8 Phillips truss head machine screws and nuts (E).
IMPORTANT: To avoid damage to reel bats
and shields, screw heads must be to the inside of the reel.
Leave hardware loose until all shields are
attached. d. Clearance between end shields and header end
sheet (or nearest point of contact) should be 1 to 2 1/2 inches (25 - 64 mm).
If necessary, adjust reel support arm braces to
center the reel in the header. See your header Operator's Manual.
13. ADJUST FINGER PITCH POSITION. See "Recommended Settings" on page 14 and
choose a position best suited to your conditions. IMPORTANT: To prevent twisting damage to
the reel, be sure reel support arms on header are lifting in phase before installing bolt (A). If installing reel on a new header, bleed reel lift hydraulics before installing bolt (A).
Install 3/8 x 3/4 carriage bolt (A) and flange nut
in the same position at both ends of the reel. IMPORTANT: Reel damage can result if reel is
unevenly adjusted.
INSTALL END SHIELD BEARINGS
C D
ASSEMBLE END SHIELDS
E
ADJUST FINGER PITCH
A

12
ASSEMBLY
14. TIGHTEN HARDWARE - Tighten all reel hardware to the following torques, measured on the locknuts:
5/8" hardware: 150 ft.lbs. (200 N⋅m) - cam arms to cranks 3/8" hardware: 22 ft.lbs. (30 N⋅m) - arm discs to center tube - reel supports to cam tracks
5/16" hex socket head hardware: 22 ft.lbs.(30 N⋅m) - cranks to bats - end bats to bats (36' only) 5/16" Phillips head hardware: 12 ft.lbs.(16 N⋅m) - end shields NOTE: At bearing straps, tighten only until
plastic bearing is clamped. DO NOT CRUSH BEARING BY OVER-TIGHTENING. Bolt thread at bearing straps should not protrude more than 3/16 inch (4 mm) above nut.
15. INSTALL AND TIGHTEN R/H CRANK HARDWARE - After tightening all assembled hardware, check that both cams are in time (at the same position). When they are timed, attach right cranks to bats, using the same hardware and procedure as described for the left side in Step 8.
Tighten only until bat is clamped to crank tube. Do not collapse bat and tube by over-tightening.
16. Perform Pre-Delivery Checklist (yellow page at
back of this book). IMPORTANT: Reel works best when fingers
come as close to cutterbar as possible without interference. Be aware that flexing of header and reel over bumps can result in contact if clearance settings are insufficient. See page 15 for minimum clearance settings.
Refer to windrower or combine Operator's Manual for reel clearance adjustment. On some models it may be necessary to install risers on the reel support arms to achieve adequate clearance. If so, these will have been included in the mounting package.

13
OPERATION
WARNING: Do not service or adjust reel until:
1. The header is resting on the ground. 2. The reel is fully lowered or securely blocked. 3. The engine is stopped and the key removed
from the start switch. 4. The park brake is set.
WARNING: Be aware and stay clear of rotating parts that cannot be shielded. Keep shields installed and
wear close fitting clothing to help protect from entanglement and injury.

14
OPERATION PICK-UP REEL ADJUSTMENTS The reel has a series of adjustments which affect crop flow into the sickle and conveyors. This section describes these adjustments and gives recommended settings for several crops and conditions. The Trouble Shooting section of this manual includes some tips to improve performance. Finger Pitch is the angle the fingers operate at in relation to the ground. In the illustration below, finger pitch on right is more aggressive than pitch on left. Generally, a more aggressive finger pitch is required for crops that are down, tangled or matted. A less aggressive finger pitch is suitable for standing crop. Adjustment of the finger pitch is achieved in two stages: 1. Select Cam Arm Position - This is a major
adjustment made by moving cam arm mounting bolt to position X or position Y as shown. All cam arms at both ends of the reel must be in the same position. Position X is a less aggressive setting, recommended for standing or partially down crops. Position Y is a more aggressive setting, recommended for down and tangled crops.
CAM ARM POSITION
ADVANTAGES
DISADVANTAGES
X
Best release of crop. Larger "bite" (more gather) at crop entry.
Heavier loads on reel and drive. Less lift.
Y
Lighter loads on reel and drive. Better lifting action.
At high RPM, may cause "tossing" of plants in short, light crops.
2. Select Finger Pitch - This is a fine-tuning adjustment made by selecting range slot P or Q and pitch notch J,
K, L, M, N or O. Range slot P is more aggressive than slot Q. Pitch notch J is least aggressive, notch O is most aggressive. Select a position aggressive enough to provide sufficient lift, yet still release crop properly. TIP: In bushy crop that sits high on the drapers or augers, try a more aggressive finger pitch to reduce carry-over.
RECOMMENDED SETTINGS
CROP CONDITIONS
CROP TYPE
CAM ARM POSITION
RANGE SLOT
FINGER PITCH NOTCH *
Standing or Partially Down
Alfalfa, Rice, Short Cereal
X
P
L or M
Y
Q
M
Canola, Peas
Y
P
J
Tall Cereal
Y
P
K or L
Rice
Y
P
L or M
Thick, Heavily Matted, Mostly Down
Soybeans
X
P
M
* NOTE: Recommended finger pitch notches are for MacDon 942 and 960/962 Headers. This will vary for other headers.
FINGER PITCH ADJUSTMENTS

15
OPERATION PICK-UP REEL CAM ARM POSITION AND FINGER PITCH ADJUSTMENT PROCEDURES IMPORTANT: To avoid reel damage, be sure the same notch and range slot are being used at both ends of the reel. Be sure crank position is consistent at all cam arms at both ends. To adjust cam arm position: 1. Lower the reel or engage reel support arm
props. 2. Lower header fully. 3. Reposition cam arm bolt from position (X) to
position (Y) or vice versa. 4. Repeat at all cam arms, both sides. 5. Tighten cam arm bolts to 170 ft.lbs. (230 N⋅m). To adjust finger pitch angle: 1. Lower the reel and header fully. 2. Loosen carriage bolts (S) and (T) on both L/H
and R/H cam assemblies. 3. Slide the front carriage bolt (S) out of the notch
at each end. (To change to alternate range slot (Q), remove loosened bolt and nut from keyhole slot.)
4. Adjust to desired position as follows:
Grasping one bat to keep it from rotating relative to the reel, rotate reel by hand to move cam to desired position. If cam remains stationary, use a 3/8 drive ratchet handle (V) in alternate range slot to rotate the cam. Slide carriage bolt into new notch and tighten bolts (S) and (T) to 22 ft.lbs. (30 N⋅m).
5. Check clearance to cutterbar:
When operating reel with an aggressive finger pitch, be sure that fingers will not contact sickle when flexed back by crop, as at (R). Minimum finger path to guard clearance (W) is: 3/4" (20 mm) for headers under 21' 1 1/4" (30 mm) for 21' header 1 1/2" (40 mm) for 25' header 2" (50 mm) for 30' header Check clearance along entire cutterbar length. See "Reel Clearance to Cutterbar" in your header Operator's Manual.
NOTE: For auger and Multi-Crop headers, finger path should come as close to augers as possible without contact.
CAM ARM POSITION ADJUSTMENT
CHECK CLEARANCE TO SICKLE(AND AUGERS IF APPLICABLE)
FINGER PITCH ADJUSTMENT
S T
Q V

16
TROUBLESHOOTING SYMPTOM PROBLEM SOLUTION REF. CROP LOSS AT CUTTERBAR Does not pick-up down crop. Cutterbar too high. Lower cutterbar. * Header angle too flat. Steepen header angle. * Reel too high. Lower reel. * Reel too far back. Move reel forward. * Ground speed too fast
for reel speed. Reduce ground speed or
increase reel speed. *
* Reel fingers not lifting
crop sufficiently. Move cam arms to pos'n. Y
to increase finger pitch aggressiveness.
14
Install lifter guards. ** Heads shattering or breaking off.
Reel speed too fast. Reduce reel speed. *
Reel too low. Raise reel. * Ground speed too fast. Reduce ground speed. * Crop too ripe. Operate at night when
humidity is higher. ---
Cut grain falling ahead of cutterbar.
Ground speed too slow. Increase ground speed. *
Reel speed too slow Increase reel speed. * Reel too high. Lower reel. * Cutterbar too high. Lower cutterbar. * Reel too far forward. Move reel back on support
arms. *
Worn or broken sickle
components. Replace. *
Strips of uncut material. Crowding uncut crop. Allow enough room for crop
to be fed to cutterbar. ---
Broken sickle sections. Replace. *
* See your Header or Power Unit Operator's Manual. ** See your dealer.

17
TROUBLESHOOTING SYMPTOM PROBLEM SOLUTION REF. CROP LOSS AT CUTTERBAR (continued) Crop not being cut at ends. Reel too high or not
centered in header. Lower reel or adjust
horizontal position. *
* Sickle hold-downs not
adjusted properly. Adjust hold-downs so sickle
works freely, but still keep sections from lifting off guards.
*
Sickle sections or guards
are worn or broken. Check and replace all worn
and broken cutting parts. *
Header is not level. Level header. * Reel fingers not lifting
crop properly ahead of sickle.
Increase finger pitch aggressiveness.
14
Divider runs down thick
crop at ends, prevent-ing proper feeding.
Replace 3 or 4 end guards with stub guards.
**
CUTTING ACTION & SICKLE COMPONENTS Ragged or uneven cutting of crop.
Sickle hold-downs not adjusted properly.
Adjust hold-downs so sickle works freely, but still keep sections from lifting off guards.
*
Sickle sections or guards
are worn or broken. Check and replace all worn
and broken cutting parts. *
Sickle is not operating at
recommended speed. Check engine speed of
windrower. *
Ground speed too fast
for reel speed. Reduce ground speed or
increase reel speed. *
* Reel fingers not lifting
crop properly ahead of sickle.
Increase finger pitch aggressiveness.
14
Cutterbar too high. Lower cutting height. * Header angle too flat. Steepen header angle. * Bent sickle, causing
binding of cutting parts. Straighten a bent sickle.
Align guards. *
* * See your Header or Power Unit Operator's Manual. ** See your dealer.

18
TROUBLESHOOTING SYMPTOM PROBLEM SOLUTION REF. CUTTING ACTION & SICKLE COMPONENTS Ragged or uneven cutting of crop. (continued)
Cutting edge of guards not close enough or parallel to sickle sections.
Align guards. *
Tangled or tough to cut
crop. Install stub guards. *
Reel too far back. Move reel forward. * Loose sickle drive belt. Adjust drive belt tension. * Sickle plugging. Reel too high or too far
forward. Lower reel or move reel
rearward. *
* Ground speed too slow. Increase ground speed. * Loose sickle drive belt. Adjust drive belt tension. * Improper sickle hold-
down adjustment. Adjust hold-down so sickle
is held against guard cutting surface.
*
Dull or broken sickle
sections. Replace. *
Bent or broken guards. Align or replace. * Reel fingers not lifting
crop properly ahead of sickle.
Increase finger pitch aggressiveness.
14
Steel pick-up fingers
contacting sickle. Increase reel clearance to
cutterbar. *
Header float too heavy. Adjust float springs for
lighter float. *
Mud or dirt build-up on
cutterbar. Raise cutterbar by lowering
skid shoes. *
Flatten header angle. * Sickle is not operating at
recommended speed. Check engine speed of
windrower. *
* See your Header or Power Unit Operator's Manual.

19
TROUBLESHOOTING SYMPTOM PROBLEM SOLUTION REF. REEL DELIVERY Reel not releasing crop. In heavy crop, fingers
starting to flip over before releasing crop.
Move to a more aggressive finger pitch notch.
14
In light crop, cam arms in
position Y. Move cam arms to position
X. 14
Reel speed too fast. Reduce speed of reel to
allow crop to fall onto augers properly. Reel speed should be slightly faster than ground speed.
*
Reel too low. Raise reel. * Reel too far back. Move reel forward. * Wrapping on reel end. Finger pitch too
aggressive. Decrease finger pitch
aggressiveness. 14
Reel too low. Raise reel. * Reel speed too fast. Reduce reel speed. * Reel not centered in
header. Center reel in header. *
Reel releases crop too quickly.
Finger pitch not aggressive enough.
Increase finger pitch aggressiveness.
14
Reel too far forward. Move reel back. * Reel motion is uneven in heavy crop.
Reel speed too fast. Reduce reel speed. *
Reel taking too much
"bite" at crop entry. Move cam arms to position
Y. 14
Reel fingers not
aggressive enough. Move to a more aggressive
finger pitch notch. 14
Reel too low. Raise reel. * Relief pressure too low. Increase relief pressure. * Relief valve malfunction. Replace relief valve. - * See your Header or Power Unit Operator's Manual.

20
TROUBLESHOOTING SYMPTOM PROBLEM SOLUTION REF. REEL DELIVERY (continued) Early wear and/or destruction of cam components.
Reel adjustments not the same at both ends of reel.
Adjust cam arm position, finger pitch range slot and notch to same at both ends.
14
Premature destruction of cam arm bearings.
Cam arms bent, causing bearing misalignment.
Straighten cam arms to set bearings parallel.
---
Destruction of end shields. Reel not centered in
header. Center reel in header. *
CONVEYOR FEEDING Crop builds up on conveyors.
Cutterbar too low. Raise cutting height. *
Conveyor speed too
slow. Increase conveyor speed. *
Reel too far back. Move reel forward * Reel speed too fast. Reduce reel speed. * Reel too low. Raise reel. * Ground speed too fast. Reduce ground speed. * Bunchy feeding from cutterbar to conveyors.
Reel too far forward. Move reel back on support arms.
*
Reel too high. Lower reel. * Reel speed too slow. Increase reel speed. * Cutterbar too high. Lower cutting height. * Ground speed too slow. Increase ground speed. * * - See your Header or Power Unit Operator's Manual.

21
MAINTENANCE
CAUTION: To help prevent personal injuries; use protective shoes, a hard hat, protective glasses or goggles, and close-fitting clothing.
CAUTION: Install and maintain all recommended shields and safety signs.
WARNING: Do not service or adjust the reel until:
1. The header is resting on the ground. 2. The reel is fully lowered or adequately
supported. 3. The engine is stopped and the key removed
from the start switch. 4. The park brake is set. LUBRICATION 1. Center Tube Bearings (A) - Grease every 50
hours of operation using SAE Multi-Purpose Grease.
Procedure: Wipe grease fitting with a clean cloth before lubricating avoid injecting dirt and grit. Leave excess lubricant on fitting after lubricating to shield from dirt. This excess is to be wiped away at next lubrication. If grease fitting will not take lubricant, clean fitting and lubricant passageway thoroughly. Replace with new fitting if necessary.
2. Plastic Bearings - Grease all bearings during
assembly and oil before storage to prevent rusting of shafts under bearings.
MAINTENANCE CHECKLIST Periodically: 1. Check that all bolts and nuts are tight. See
Assembly Step 14 for proper torques. 2. Examine bearings for excessive wear.
GREASE CENTER TUBE BEARINGS
A

22
MAINTENANCE FINGER REMOVAL a. Insert screwdriver in slot in finger button and tap
to push button into bat and down.
NOTE: For 36' Header: On end bats at center of header, 5/16 flange nut (C) must be loosened to allow finger removal.
b. Insert screwdriver into buttonhole in bat and pry
top of finger down until it can be removed from pocket.
c. Use tool supplied to install new finger. For steel
fingers, pre-assemble finger (D) and clip (E) and install.
FINGER REMOVAL
STEEL FINGER ASSEMBLY
E
D
LOOSEN BOLT TO REMOVE END BAT FINGERS (36' ONLY)
C

23

24
REPAIR PARTS

25
REPAIR PARTS
REF PART DESCRIPTION QTY SERIAL
NUMBER NUMBER 1 27171 DISC - arm................................................................................................ A/R 2 35017 ARM - reel................................................................................................. A/R 3 48083 BEARING HALF - bat ............................................................................... A/R 4 27166 STRAP - bearing ...................................................................................... A/R 5 48008 BAT - reel, 54" (1380 mm)........................................................................ A/R 48009 BAT - reel, 60" (1535 mm)........................................................................ A/R 48010 BAT - reel, 66" (1690 mm)........................................................................ A/R 48011 BAT - reel, 72" (1840 mm)........................................................................ A/R 6 48070 CRANK - L/H, long ................................................................................... A/R 48071 CRANK - R/H, long................................................................................... A/R 48128 CRANK - L/H, short .................................................................................. A/R 48129 CRANK - R/H, short.................................................................................. A/R 7 48095 BAT - INBOARD END, L/H reel - 36' 960 only ............................................. 5 48135 BAT - INBOARD END, L/H reel - 36' 962 only ............................................. 5 48096 BAT - INBOARD END, R/H reel - 36' 960 only............................................. 5 48136 BAT - INBOARD END, R/H reel - 36' 962 only............................................. 5 8 REF COLLAR - shaft, See Mounting Packages ............................................... A/R 9 27984 TUBE - bat connector ............................................................................... A/R 10 27985 FINGER - pick-up, plastic ......................................................................... A/R 11 48086 BEARING - end shield (was 35660) ......................................................... A/R 12 48023 SHIELD - end, 5 bat reel ............................................................................ 10 48024 SHIELD - end, 6 bat reel ............................................................................ 12 13 REF WASHER - flat, see Mounting Packages ................................................. A/R 14 REF SUPPORT R/H - see Mounting Packages ................................................... 1 15 REF SUPPORT L/H - see Mounting Packages .................................................... 1 16 48065 CAM TRACK ................................................................................................ 2 17 48058 RING - cam, L/H, 5 bat reel .......................................................................... 1 48059 RING - cam, R/H, 5 bat reel ......................................................................... 1 48060 RING - cam, L/H, 6 bat reel .......................................................................... 1 48061 RING - cam, R/H, 6 bat reel ......................................................................... 1 18 50184 BEARING - ball......................................................................................... A/R 19 48051 ARM - cam............................................................................................... A/R 20 50185 BEARING - ball......................................................................................... A/R 21 48050 BOLT - shoulder, special .......................................................................... A/R 25 23165 DECAL - 50 hour grease .............................................................................. 2 26 35689 NUT - special, 5/16 inch NC ..................................................................... A/R 27 REF TUBE - main, see listing on page 27 ............................................................ 1 28 REF TUBE - end, L/H, see Mounting Packages................................................... 1 29 REF TUBE - end, R/H, see Mounting Packages .................................................. 1 31 35661 TOOL - finger/adjuster .................................................................................. 1 35 35396 DECAL - reel rotation, left............................................................................. 3 36 35397 DECAL - reel rotation, right .......................................................................... 3 37 26697 REFLECTOR - amber .................................................................................. 2 38 35243 DECAL - CAUTION, general safety.............................................................. 2 39 35282 FINGER - Pick-Up, steel........................................................................... A/R 40 35281 CLIP - steel finger ..................................................................................... A/R A-P Hardware See Page 27.
NOTE: A mounting parts list was shipped with the mounting package for your particular windrower or combine. Keep the list with this manual for future reference.

26
REPAIR PARTS

27
REPAIR PARTS REF PART DESCRIPTION QTY SERIAL
NUMBER NUMBER A 30808 SCREW - machine, Phillips Truss Head, 5/16 NC x 3/8 inch B 30280 NUT - lock, flange head, 5/16 inch NC distorted thread C REF HARDWARE - mounting, see Mounting Package D 30228 NUT - lock, flange head, 3/8 inch NC distorted thread E 21484 BOLT - round head, square neck, 3/8 NC x 1-1/2 inch F 30712 BOLT - flange head, 3/8 NC x 2 1/2 inch (thread full) G 21569 CAPSCREW - hex head, 5/16 NC x 2 inch H 30504 CAPSCREW - hex socket head, 5/16 NC x 1-1/2 inch J 21472 BOLT - round head, square neck, 3/8 NC x 3/4 inch K 50076 BOLT - flange head, 3/8 NC x 5/8 inch L 21281 BOLT - round head, square neck, 5/16 NC x 3/4 inch M 101898 SCREW - flange head, self tapping, 3/8 x 5/8 inch N 21594 BOLT - hex head, 5/8 NC x 1-1/2 inch P 18666 NUT - lock, 5/8 NC distorted thread 27 35058 Main Tube - 128 inches (3245 mm) long - 12 ft. header............................... 1 35059 Main Tube - 134 inches (3400 mm) long - 12 ½ ft. header........................... 1 35060 Main Tube - 140 inches (3550 mm) long - 13 ft. header............................... 1 35061 Main Tube - 146 inches (3705 mm) long - 13 ½ ft. header........................... 1 35064 Main Tube - 164 inches (4155 mm) long - 15 ft. header............................... 1 35065 Main Tube - 170 inches (4310 mm) long - 15 ½ ft. header........................... 1 35066 Main Tube - 176 inches (4460 mm) long - 16 ft. header............................... 1 35067 Main Tube - 182 inches (4615 mm) long - 16 ½ ft. header........................... 1 35068 Main Tube - 188 inches (4770 mm) long - 17 ft. header............................... 1 35069 Main Tube - 194 inches (4920 mm) long - 17 ½ ft. header........................... 1 35070 Main Tube - 200 inches (5075 mm) long - 18 ft. & 36 ft. (qty 2) headers .... 1 35071 Main Tube - 206 inches (5230 mm) long - 18 ½ ft. header........................... 1 35072 Main Tube - 212 inches (5380 mm) long - 19 ft. header............................... 1 35073 Main Tube - 218 inches (5535 mm) long - 19 ½ ft. header........................... 1 35074 Main Tube - 224 inches (5680 mm) long - 20 ft. header............................... 1 35075 Main Tube - 230 inches (5830 mm) long - 20 ½ ft. header........................... 1 35076 Main Tube - 236 inches (5985 mm) long - 21 ft. header............................... 1 35077 Main Tube - 242 inches (6140 mm) long - 21 ½ ft. header........................... 1 35078 Main Tube - 248 inches (6290 mm) long - 22 ft. header............................... 1 35079 Main Tube - 254 inches (6445 mm) long - 22 ½ ft. header........................... 1 35082 Main Tube - 272 inches (6905 mm) long - 24 ft. header............................... 1 35083 Main Tube - 278 inches (7060 mm) long - 24 ½ ft. header........................... 1 35084 Main Tube - 284 inches (7210 mm) long - 25 ft. header............................... 1 35087 Main Tube - 302 inches (7660 mm) long - 26 ½ ft. header........................... 1 35088 Main Tube - 308 inches (7815 mm) long - 27 ft. header............................... 1 35091 Main Tube - 338 inches (8580 mm) long - 29 ½ ft. header........................... 1 35092 Main Tube - 344 inches (8735 mm) long - 30 ft. header............................... 1 35093 Main Tube - 350 inches (8890 mm) long - 30 ½ ft. header........................... 1

28
INDEX Page Adjustments................................................................................................................................... 14 Assembly......................................................................................................................................... 5 Cam Arm Position Recommendations .......................................................................................... 14 Cam Arm Position Adjustment ...................................................................................................... 15 Finger Pitch Adjustment ................................................................................................................ 15 Finger Pitch Recommendations .................................................................................................... 14 Finger Removal & Replacement ................................................................................................... 22 Hardware Torque .......................................................................................................................... 12 Lubrication..................................................................................................................................... 21 Maintenance.................................................................................................................................. 21 Operation....................................................................................................................................... 13 Parts Listing................................................................................................................................... 24 Safety
Alert Symbol.............................................................................................................................. 2 Assembly & Service .................................................................................................................. 2 Before Starting .......................................................................................................................... 2 Operating .................................................................................................................................. 3 Signal Words............................................................................................................................. 3 Signs ......................................................................................................................................... 4
Trouble Shooting ........................................................................................................................... 16 Warranty Claims.............................................................................................................................. 1

2000-B Pick-Up Reel Pre-Delivery Checklist Perform these checks and adjustments prior to delivery to your customer. See the Operator's Manual for adjustment details.
CAUTION: Carefully follow the instructions given. Be alert for safety related messages which bring your attention to hazards and unsafe practices.
Reel Serial Number __________________
Check for shipping damage or missing parts. Be sure all shipping dunnage is removed. Grease all plastic bearings during assembly and grease center tube bearings at end supports. Set cam arm in the “X” position. Ensure cam arm bolts have nut on bearing side. Set finger pitch in third notch from the top and use the top range slot. Set reel fore-aft to center the reel over the cutterbar. Check finger clearance to cutterbar: Under 21’ header – ¾ “ (20 mm), 21’ – 1 ¼” (30 mm), 25’ – 1 ½” (40 mm), 30’ – 2” (50 mm) Recommended reel speed is 10% above ground speed.
Date Checked: Checked by: __________________