2014 fiat uconnect 4.3/8.4 multimedia · uconnect ® 4.3/8.4 fia tfreemont english the data...
TRANSCRIPT

U C O N N E C T ® 4 . 3 / 8 . 4
F I A T F R E E M O N TENGLISH
The data contained in this publication is intended merely as a guide. FIAT reserves the right to modify the models and versions described in this booklet at any time for technical and commercial reasons.
If you have any further questions please consult your FIAT dealer. Printed in recycled paper without chlorine.
1516562_EE_FIAT_Freemont_UCONNECT_cover.indd 1 8/29/13 9:49 AM

TABLE OF CONTENTS
1 INTRODUCTION . . . . . . . . . . . . . . . . . . . . . . . . . . . . . . . . . . . . . . . . . . . . . . . . . . . . . . . . . . . . . . . . . . . 3
2 UCONNECT® 4.3 . . . . . . . . . . . . . . . . . . . . . . . . . . . . . . . . . . . . . . . . . . . . . . . . . . . . . . . . . . . . . . . . . . . 9
3 UCONNECT® 8.4 & 8.4N . . . . . . . . . . . . . . . . . . . . . . . . . . . . . . . . . . . . . . . . . . . . . . . . . . . . . . . . . . . . 21
4 SAFETY GUIDELINES . . . . . . . . . . . . . . . . . . . . . . . . . . . . . . . . . . . . . . . . . . . . . . . . . . . . . . . . . . . . . . 57
1

2
1
INTRODUCTION
• Uconnect® 4.3 INTRODUCTION . . . . . . . . . . . . . . .4• Uconnect® 4.3 System . . . . . . . . . . . . . . . . . . . . .4
• Uconnect® 8.4 . . . . . . . . . . . . . . . . . . . . . . . . . . . . .6• Uconnect® 8.4 System . . . . . . . . . . . . . . . . . . . . .6
3
Uconnect® 4.3 INTRODUCTION
Uconnect® 4.3 System
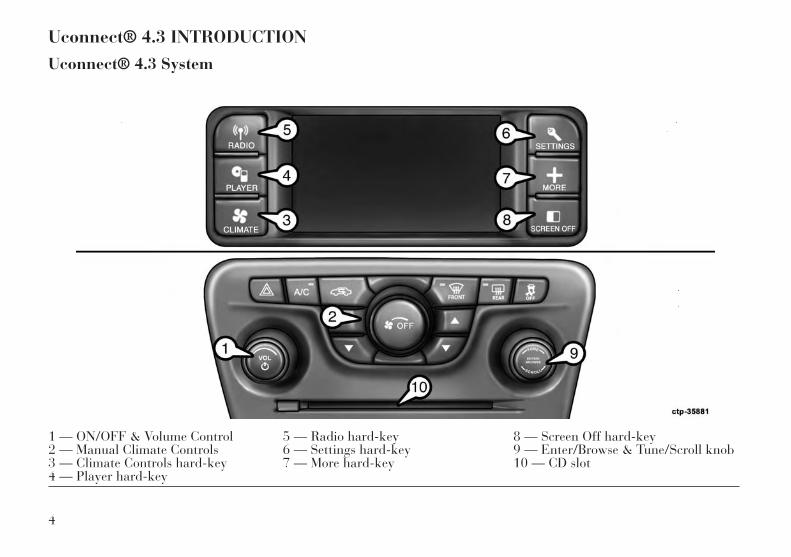
1 — ON/OFF & Volume Control 5 — Radio hard-key 8 — Screen Off hard-key2 — Manual Climate Controls 6 — Settings hard-key 9 — Enter/Browse & Tune/Scroll knob3 — Climate Controls hard-key 7 — More hard-key 10 — CD slot4 — Player hard-key
4
Uconnect® 4.3 System
WARNING!Driving while distracted can resultin loss of vehicle control, accidentand injury. It is strongly recom-mended that you use extreme cau-tion when using any device or fea-ture that may take your focus offthe road or your hands off the steer-ing wheel. Your primary responsi-bility is the safe operation of yourvehicle.
(1) ON/OFF & VOLUME
Press the ON/OFF button to turn thesystem ON or OFF. Rotate the rotaryknob to adjust the Volume.
NOTE: If the ignition is switchedOFF with the radio in standbymode, the radio memorizes thestandby mode when the ignition isturned ON again. Press the ON/OFF VOLUME Control to turn theradio ON. It is possible to eject theCD and to display the time if thesystem is off.
(2)(3) CLIMATE CONTROLS
Manual Climate Controls and ClimateControl Hard-key. Refer to ClimateControls in your vehicles Owner'sManual for further details.
(4) PLAYER
Press the PLAYER hard-key to accessmedia sources such as: Disc, USB De-vice and AUX as long as the requestedmedia is present.
(5) RADIO
Press the RADIO hard-key to enter theRadio Mode. The different tunermodes; FM, AM, MW, LW or SW can beselected by touching the correspondingsoft-keys in the Radio Mode.
(6) SETTINGS
Press the SETTINGS hard-key to ac-cess the Settings list. Clock, Display,Audio and Bluetooth® Settings aredescribed in this manual. See yourvehicles Owner's Manual for moredetails.
(7) MORE
Press the MORE hard-key to access ad-ditional options. Options available suchas: Uconnect® Phone (if equipped) andCompass can be accessed by touchingthe corresponding soft-key in the MoreMenu.
(8) SCREEN OFF
Press the SCREEN OFF hard-key toturn the touchscreen OFF. To turn thescreen back ON, just touch the screen.
(9) ENTER/BROWSE &TUNE/SCROLL
Press the ENTER/BROWSE button toaccept a highlighted selection on thescreen. Rotate the TUNE/SCROLLrotary knob to scroll through a list ortune a radio station.
(10) CD SLOT
When inserting a disc, make sure thelabel is facing up. Press the Eject but-ton to eject the disc.
5

Uconnect® 8.4
Uconnect® 8.4 System
1 — ON/OFF & Volume Control 5 — Controls soft-key 9 — More soft-key2 — Climate Control hard-keys 6 — Climate soft-key 10 — Enter/Browse & Tune/Scroll knob3 — Radio soft-key 7 — Nav soft-key (if equipped) 11 — SD Card slot4 — Player soft-key 8 — Phone soft-key (if equipped) 12 — Disc slot
6

Uconnect® 8.4 System
WARNING!ALWAYS drive safely with yourhands on the wheel. You have fullresponsibility and assume all risksrelated to the use of the Uconnect®features and applications in this ve-hicle. Only use Uconnect® when it issafe to do so. Failure to do so mayresult in an accident involving seriousinjury or death.
(1) ON/OFF VOLUME
Press the ON/OFF button to turn theunit ON or OFF. Rotate the rotaryknob to adjust the Volume.
NOTE: If the ignition is switchedOFF with the radio in standbymode, the radio memorizes thestandby mode when the ignition isturned ON again. Press the ON/OFF VOLUME Control to turn theradio ON. It is possible to eject theDisc and to display the time if thesystem is off. The navigation soft-ware is always working when theignition is switched ON, even if theradio is in standby mode.
(2) CLIMATE CONTROLS(Manual Controls)
Refer to Climate Controls in yourvehicles Owner's Manual for furtherdetails.
(3) RADIO
Press the Radio soft-key to enter theRadio Mode. The different tunermodes; FM, AM, DAB, MW, LW or SWcan be selected by touching the corre-sponding soft-keys in the Radio Mode.
(4) PLAYER
Press the Player soft-key to accessmedia sources such as: Disc, USB De-vice and AUX as long as the requestedmedia is present.
(5) CONTROLS
Press the Controls soft-key to accessthe Settings list. Controls such as;Heated Seats, Heated Steering Wheel,Vented Seats, etc. can be selected orturned ON/OFF by touching the cor-responding soft-key.
(6) CLIMATE (On-Screen Controls)
Refer to Climate Controls in yourvehicles Owner's Manual for furtherdetails.
(7) NAV (8.4N Only)
Press the Nav soft-key to access theNavigation feature. Refer to the Navi-gation section in this manual for fur-ther details.
(8) PHONE
Press the Phone soft-key to access theUconnect® Phone feature. Refer tothe Uconnect® Phone section in theOwner's Manual for further details.
(9) MORE
Press the More soft-key to access ad-ditional options and settings.
(10) ENTER/BROWSE &TUNE/SCROLL
Press the ENTER/BROWSE button toaccept a highlighted selection on thescreen. Rotate the TUNE/SCROLLrotary knob to scroll through a list ortune a radio station.
7

(11) SD CARD SLOT
Insert an SD Card containing audiomedia files in order to play themthrough the vehicle’s sound system.
(12) DISC SLOT
When inserting a disc, make sure thelabel is facing up. Press the Eject but-ton to eject the disc.
8
2
Uconnect® 4.3
• RADIO MODE . . . . . . . . . . . . . . . . . . . . . . . . . . . .11• Overview . . . . . . . . . . . . . . . . . . . . . . . . . . . . . .11• Common Radio Functions . . . . . . . . . . . . . . . . .11• Seek And Direct Tune Functions . . . . . . . . . . . .12• Setting Presets . . . . . . . . . . . . . . . . . . . . . . . . . .13• Audio . . . . . . . . . . . . . . . . . . . . . . . . . . . . . . . . .14
• OPERATING INSTRUCTIONS — CD MODE . . . . . .14• Overview . . . . . . . . . . . . . . . . . . . . . . . . . . . . . .14• Seek Up/Down . . . . . . . . . . . . . . . . . . . . . . . . . .15• Browse . . . . . . . . . . . . . . . . . . . . . . . . . . . . . . . .15• Source . . . . . . . . . . . . . . . . . . . . . . . . . . . . . . . .16• Info . . . . . . . . . . . . . . . . . . . . . . . . . . . . . . . . . .16• Shuffle . . . . . . . . . . . . . . . . . . . . . . . . . . . . . . . .16• Audio . . . . . . . . . . . . . . . . . . . . . . . . . . . . . . . . .16
• OPERATING INSTRUCTIONS – USB/iPod®MODE . . . . . . . . . . . . . . . . . . . . . . . . . . . . . . . . . .16• Overview . . . . . . . . . . . . . . . . . . . . . . . . . . . . . .16• Seek Up/Down . . . . . . . . . . . . . . . . . . . . . . . . . .16• Browse . . . . . . . . . . . . . . . . . . . . . . . . . . . . . . . .16• Source . . . . . . . . . . . . . . . . . . . . . . . . . . . . . . . .17• Info . . . . . . . . . . . . . . . . . . . . . . . . . . . . . . . . . .17
9
• Shuffle . . . . . . . . . . . . . . . . . . . . . . . . . . . . . . . .17• Audio . . . . . . . . . . . . . . . . . . . . . . . . . . . . . . . . .17
• AUX MODE . . . . . . . . . . . . . . . . . . . . . . . . . . . . . .17• Overview . . . . . . . . . . . . . . . . . . . . . . . . . . . . . .17• Source . . . . . . . . . . . . . . . . . . . . . . . . . . . . . . . .17• Audio . . . . . . . . . . . . . . . . . . . . . . . . . . . . . . . . .17
• OPERATING INSTRUCTIONS — Bluetooth®MODE . . . . . . . . . . . . . . . . . . . . . . . . . . . . . . . . . .18• Overview . . . . . . . . . . . . . . . . . . . . . . . . . . . . . .18• Seek Up/Down . . . . . . . . . . . . . . . . . . . . . . . . . .18• Source . . . . . . . . . . . . . . . . . . . . . . . . . . . . . . . .18• Info – If Equipped . . . . . . . . . . . . . . . . . . . . . . .18• Audio . . . . . . . . . . . . . . . . . . . . . . . . . . . . . . . . .18
• OPERATING INSTRUCTIONS — MORE &SETTINGS . . . . . . . . . . . . . . . . . . . . . . . . . . . . . . .18• More Main Menu . . . . . . . . . . . . . . . . . . . . . . . .18• Clock Setting . . . . . . . . . . . . . . . . . . . . . . . . . . .19• Settings Main Menu . . . . . . . . . . . . . . . . . . . . . .19• Display. . . . . . . . . . . . . . . . . . . . . . . . . . . . . . . .20
10
RADIO MODE
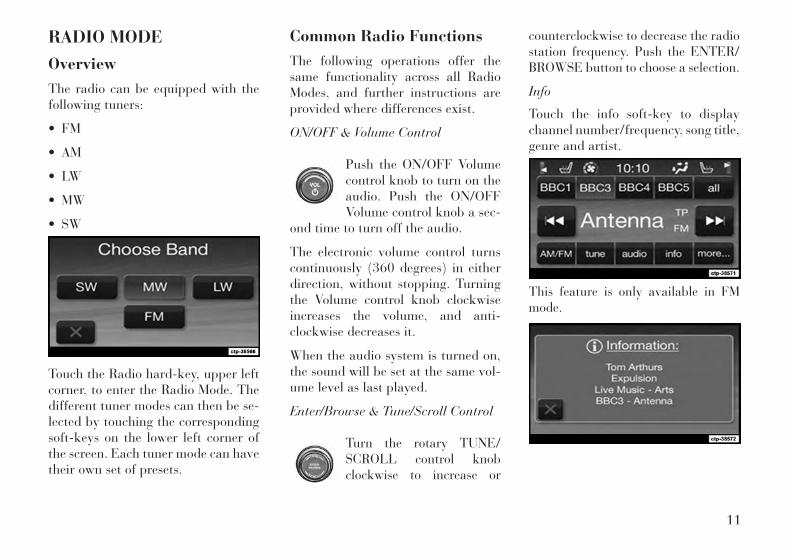
OverviewThe radio can be equipped with thefollowing tuners:
• FM
• AM
• LW
• MW
• SW
Touch the Radio hard-key, upper leftcorner, to enter the Radio Mode. Thedifferent tuner modes can then be se-lected by touching the correspondingsoft-keys on the lower left corner ofthe screen. Each tuner mode can havetheir own set of presets.
Common Radio FunctionsThe following operations offer thesame functionality across all RadioModes, and further instructions areprovided where differences exist.
ON/OFF & Volume Control
Push the ON/OFF Volumecontrol knob to turn on theaudio. Push the ON/OFFVolume control knob a sec-
ond time to turn off the audio.
The electronic volume control turnscontinuously (360 degrees) in eitherdirection, without stopping. Turningthe Volume control knob clockwiseincreases the volume, and anti-clockwise decreases it.
When the audio system is turned on,the sound will be set at the same vol-ume level as last played.
Enter/Browse & Tune/Scroll Control
Turn the rotary TUNE/SCROLL control knobclockwise to increase or
counterclockwise to decrease the radiostation frequency. Push the ENTER/BROWSE button to choose a selection.
Info
Touch the info soft-key to displaychannel number/frequency, song title,genre and artist.
This feature is only available in FMmode.
11
Exit
The Exit soft-key, provides a means toclose the Direct Tune Screen.
More
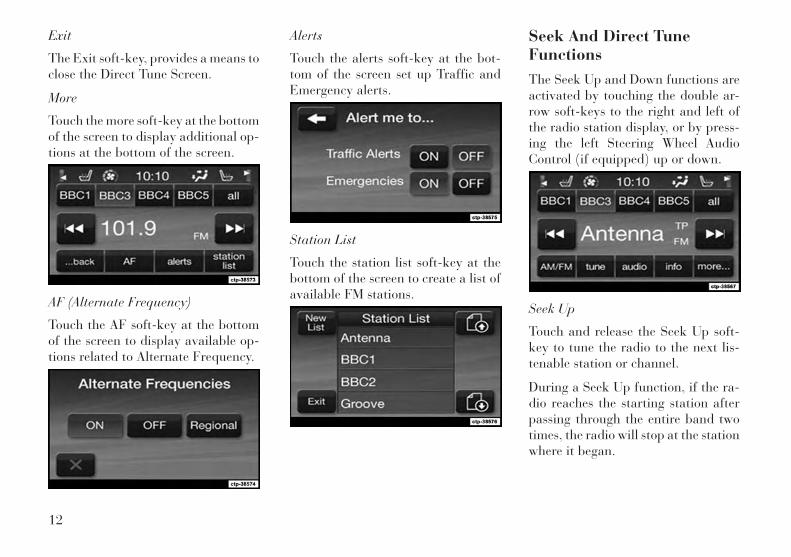
Touch the more soft-key at the bottomof the screen to display additional op-tions at the bottom of the screen.
AF (Alternate Frequency)
Touch the AF soft-key at the bottomof the screen to display available op-tions related to Alternate Frequency.
Alerts
Touch the alerts soft-key at the bot-tom of the screen set up Traffic andEmergency alerts.
Station List
Touch the station list soft-key at thebottom of the screen to create a list ofavailable FM stations.
Seek And Direct TuneFunctionsThe Seek Up and Down functions areactivated by touching the double ar-row soft-keys to the right and left ofthe radio station display, or by press-ing the left Steering Wheel AudioControl (if equipped) up or down.
Seek Up
Touch and release the Seek Up soft-key to tune the radio to the next lis-tenable station or channel.
During a Seek Up function, if the ra-dio reaches the starting station afterpassing through the entire band twotimes, the radio will stop at the stationwhere it began.
12

Fast Seek Up
Touch and hold the Seek Up soft-keyto advance the radio through theavailable stations or channels at afaster rate, the radio stops at the nextavailable station or channel when thesoft-key is released.
Seek Down
Touch and release the Seek Downsoft-key to tune the radio to the nextlistenable station or channel.
During a Seek Down function, if theradio reaches the starting station afterpassing through the entire band twotimes, the radio will stop at the stationwhere it began.
Fast Seek Down
Touch and hold the Seek Down soft-key to advance the radio through theavailable stations or channel at afaster rate, the radio stops at the nextavailable station or channel when thesoft-key is released.
Direct Tune
The Direct Tune soft-key screen isavailable in all radio modes and canbe used to direct tune the radio to adesired station or channel. Press theTune soft-key located at the bottom ofthe radio screen.
Press the available number soft-keyto begin selecting a desired station.Once a number has been entered, anynumbers that are no longer possible(stations that cannot be reached) willbecome deactivated/grayed out.
If you accidently entered the wrongstation number, touch the CLR soft-key to clear the radio station numbersand reenter the correct station num-ber.
Once the last digit of a station hasbeen entered, the DIRECT TUNEscreen will close and the system willautomatically tune to that station.
The selected Station or Channel num-ber is displayed in the Direct Tune textbox.
Setting PresetsThe Presets are available for all RadioModes, and are activated by touchingany of the four Preset soft-keys, lo-cated at the top of the screen.
When you are receiving a station thatyou wish to commit into memory,press and hold the desired numberedsoft-key for more than two seconds oruntil you hear a confirmation beep.
The Radio stores up to 12 presets ineach of the Radio modes. A set of 4presets are visible at the top of theradio screen.
All Presets Button
Touching the "all" soft-key on theradio home screen will display all ofthe preset stations for that mode.
Return to Main Radio Screen
You can return to the Main RadioScreen, by either touching the Exitsoft-key or pressing the Radio hard-key.
13
Audio
1. Press the SETTINGS hard-key onthe right side of the unit.
2. Scroll down and press the Audiosoft-key to open the Audio menu.
NOTE: It is possible to navigate theAudio options by either touchingthe appropriate area on the screenor by using the Scroll knob andpressing the Enter button.
3. The Audio Menu shows the follow-ing options for you to customize youraudio settings:
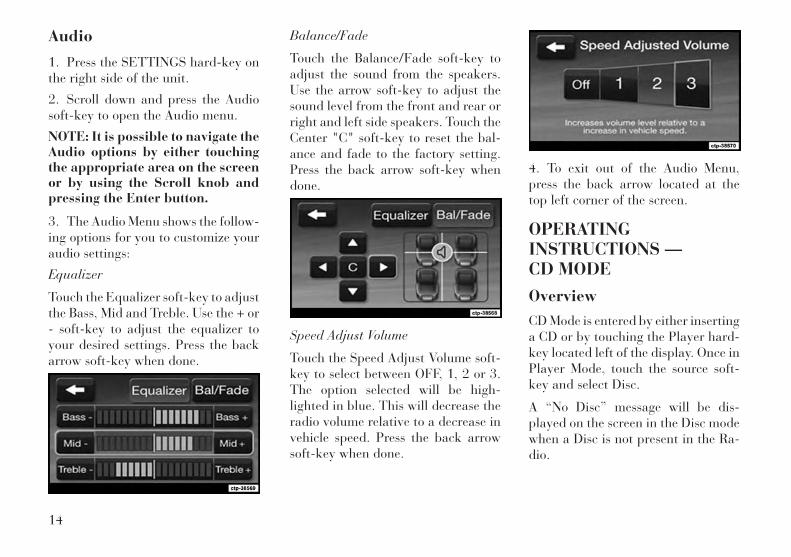
Equalizer
Touch the Equalizer soft-key to adjustthe Bass, Mid and Treble. Use the + or- soft-key to adjust the equalizer toyour desired settings. Press the backarrow soft-key when done.
Balance/Fade
Touch the Balance/Fade soft-key toadjust the sound from the speakers.Use the arrow soft-key to adjust thesound level from the front and rear orright and left side speakers. Touch theCenter "C" soft-key to reset the bal-ance and fade to the factory setting.Press the back arrow soft-key whendone.
Speed Adjust Volume
Touch the Speed Adjust Volume soft-key to select between OFF, 1, 2 or 3.The option selected will be high-lighted in blue. This will decrease theradio volume relative to a decrease invehicle speed. Press the back arrowsoft-key when done.
4. To exit out of the Audio Menu,press the back arrow located at thetop left corner of the screen.
OPERATINGINSTRUCTIONS —CD MODE
OverviewCD Mode is entered by either insertinga CD or by touching the Player hard-key located left of the display. Once inPlayer Mode, touch the source soft-key and select Disc.
A “No Disc” message will be dis-played on the screen in the Disc modewhen a Disc is not present in the Ra-dio.
14

Inserting Compact Disc
Gently insert one CD into the CDplayer with the CD label facing up.The CD will automatically be pulledinto the CD player and the CD iconwill illuminate on the radio display.If a CD does not go into the slot morethan 1.0 in (2.5 cm), a disc may al-ready be loaded and must be ejectedbefore a new disc can be loaded.
If you insert a disc with the ignitionON and the radio ON, the unit willswitch to CD mode and begin to playwhen you insert the disc. The displaywill show the track number, and indextime in minutes and seconds. Play willbegin at the start of track 1.
CAUTION!• This CD player will accept 4-3/4
in (12 cm) discs only. The use ofother sized discs may damagethe CD player mechanism.
• Do not use adhesive labels.These labels can peel away andjam the player mechanism.
(Continued)
CAUTION! (Continued)
• Uconnect® 4.3 is a single CDplayer. Do not attempt to insert asecond CD if one is alreadyloaded.
• Dual-media disc types (one sideis a DVD, the other side is a CD)should not be used, and they cancause damage to the player.
EJECT Button - Ejecting a CD
Press the EJECT button toeject the CD.
If you have ejected a disc and have notremoved it within 10 seconds, it willbe reloaded. If the CD is not removed,the radio will reinsert the CD but willnot play it.
A disc can be ejected with the radioand ignition OFF.
Seek Up/DownTouch and release the right arrowsoft-key for the next selection on theCD. Touch and release the left arrowsoft-key to return to the beginning ofthe current selection, or return to thebeginning of the previous selection ifthe CD is within the first second of thecurrent selection.
Fast Seek Up
Touch and hold the right arrow soft-key and the CD player will begin tofast forward through the current trackuntil the soft-key is released.
Fast Seek Down
Touch and hold the left arrow soft-keyand the CD player will begin to re-wind through the current track untilthe soft-key is released.
BrowseTouch the browse soft-key to scrollthrough and select a desired track onthe CD. Touch the exit soft-key if youwish to cancel the browse function.
15
SourceTouch the Source soft-key to select thedesired audio source, CD, AUX orUSB. This screen will time out after afew seconds and return to the mainradio screen if no selection is made.
InfoTouch the Info soft-key to display thecurrent track information. Touch the"X" soft-key to cancel this feature.
ShuffleTouch the more... soft-key then theshuffle soft-key to play the selectionson the compact disc in random orderto provide an interesting change ofpace. Touch the soft-key a secondtime to turn this feature off.
AudioRefer to Operating Instructions – RadioMode for adjusting the audio settings.
OPERATINGINSTRUCTIONS –USB/iPod® MODE
OverviewUSB/iPod® Mode is entered by eitherinserting a USB Jump Drive or iPod®cable into the USB port or by touchingthe Player hard-key located left of thedisplay. Once in Player Mode, touchthe source soft-key and select USB/iPod®.
Inserting USB/iPod® Device
Gently insert the USB/iPod® deviceinto the USB Port. If you insert aUSB/iPod® device with the ignitionON and the radio ON, the unit willswitch to USB/iPod® mode and beginto play when you insert the device.The display will show the track num-ber, and index time in minutes andseconds. Play will begin at the start oftrack 1.
Seek Up/DownTouch and release the right arrowsoft-key for the next selection on the
USB/iPod®® device. Touch and re-lease the left arrow soft-key to returnto the beginning of the current selec-tion, or return to the beginning of theprevious selection if the USB/iPod®device is within the first second of thecurrent selection.
Fast Seek Up
Touch and hold the right arrow soft-key and the USB/iPod®® device willbegin to fast forward through the cur-rent track until the soft-key is released.
Fast Seek Down
Touch and hold the left arrow soft-keyand the USB/iPod® device will beginto rewind through the current trackuntil the soft-key is released.
BrowseTouch the Browse soft-key to selectArtist, Albums, Genres, Songs, Play-lists or Folders from the USB/iPod®device. Once the desired selection ismade you can chose from the avail-able media by touching the soft-key.Touch the exit soft-key if you wish tocancel the browse function.
16
SourceTouch the Source soft-key to select thedesired audio source, CD, AUX orUSB/iPod®. This screen will time outafter a few seconds and return to themain radio screen if no selection ismade.
InfoTouch the Info soft-key to display thecurrent track information. Touch the"X" soft-key to cancel this feature.
ShuffleTouch the more... soft-key then theshuffle soft-key to play the selectionson the USB/iPod® device in randomorder to provide an interesting changeof pace. Touch the soft-key a secondtime to turn this feature off.
AudioRefer to Operating Instructions – RadioMode for adjusting the audio settings.
AUX MODE
OverviewAUX Mode is entered by inserting aAUX device using a cable with a 3.5mm audio jack into the AUX port orby touching the Player hard-key lo-cated left of the display. Once inPlayer Mode, touch the source soft-key and select AUX.
Inserting Auxiliary Device
Gently insert the Auxiliary devicecable into the AUX Port. If you inserta Auxiliary device with the ignitionON and the radio ON, the unit willswitch to AUX mode and begin to playwhen you insert the device cable.
Controlling the Auxiliary Device
The control of the auxiliary device(e.g., selecting playlists, play, fast for-ward, etc.) cannot be provided by theradio; use the device controls instead.Adjust the volume with the ON/OFFVOLUME rotary knob, or with thevolume of the attached device.
NOTE: The vehicle radio unit isacting as the amplifier for audiooutput from the Auxiliary device.Therefore if the volume control onthe Auxiliary device is set too low,there will be insufficient audio sig-nal for the radio unit to play themusic on the device.
SourceTouch the Source soft-key to select thedesired audio source, CD, AUX orUSB. This screen will time out after afew seconds and return to the mainradio screen if no selection is made.
AudioRefer to Operating Instructions – RadioMode for adjusting the audio settings.
17
OPERATINGINSTRUCTIONS —Bluetooth® MODE
OverviewBluetooth® Streaming Audio (BTSA)or Bluetooth® Mode is entered bypairing a Bluetooth® device, contain-ing music, to the Uconnect® system.
Before proceeding, the Bluetooth®device needs to be paired throughUconnect® Phone to communicatewith the Uconnect® System.
NOTE: See the pairing procedurein the Owner's Manual for furtherdetails.
Once the Bluetooth® device is pairedto the Uconnect® System, touch thePlayer hard-key located on the leftside of the display. Once in PlayerMode, touch the source soft-key andselect Bluetooth®.
Seek Up/DownTouch and release the right arrowsoft-key for the next selection on theBluetooth® device. Touch and release
the left arrow soft-key to return to thebeginning of the current selection, orreturn to the beginning of the previ-ous selection if the Bluetooth® deviceis within the first second of the currentselection.
Fast Seek Up
Touch and hold the right arrow soft-key and the Bluetooth® device willbegin to fast forward through the cur-rent track until the soft-key is re-leased.
Fast Seek Down
Touch and hold the left arrow soft-keyand the Bluetooth® device will beginto rewind through the current trackuntil the soft-key is released.
SourceTouch the Source soft-key to select thedesired audio source, CD, USB/iPod®, AUX or Bluetooth®. Thisscreen will time out after a few sec-onds and return to the main radioscreen if no selection is made.
Info – If EquippedTouch the Info soft-key to display thecurrent track information. Touch theInfo soft-key a second time to cancelthis feature.
AudioRefer to Operating Instructions – Ra-dio Mode for adjusting the audio set-tings.
OPERATINGINSTRUCTIONS —MORE & SETTINGS
More Main MenuPress the More hard-key to display theMore Main Menu. The More MainMenu contains the following options:
• Economy (If Equipped)
Refer to "Understanding Your Instru-ment Panel," "Uconnect® System"section in your vehicle Owner’sManual for details.
18
• Phone
Refer to "Understanding The Fea-tures Of Your Vehicle," "Uconnect®"section in your vehicle Owner’sManual for details.
• Outlet (If Equipped)
Refer to "Understanding The FeaturesOf Your Vehicle," "Power Inverter"section in your vehicle Owner’s Manualfor details.
• Time
Refer to this section for details.
• Compass
Refer to "Understanding Your Instru-ment Panel," "Uconnect® System"section in your vehicle Owner’sManual for details.
Clock Setting
1. There are two ways to enter theclock setting procedure on theUconnect® 4.3.
• Press the More hard-key on theright side of the display. Nextpress the Time soft-key and thenpress the Set soft-key.
• Press the Settings hard-key onthe right side of the display, thenpress the Clock soft-key. TheTime setting screen is displayedand the clock can be adjusted asdescribed in the following proce-dure.
NOTE: In the Clock Setting Menuyou can also select Display Clock.Display Clock turns the clock dis-play in the status bar on or off.
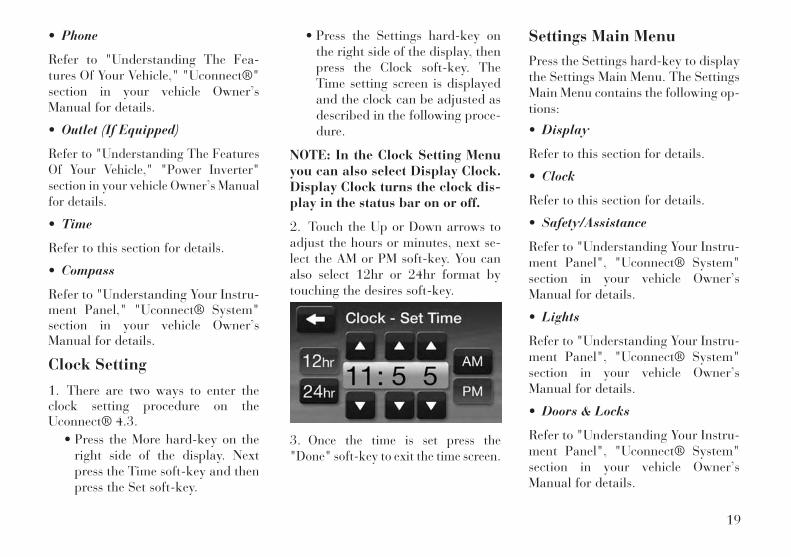
2. Touch the Up or Down arrows toadjust the hours or minutes, next se-lect the AM or PM soft-key. You canalso select 12hr or 24hr format bytouching the desires soft-key.
3. Once the time is set press the"Done" soft-key to exit the time screen.
Settings Main MenuPress the Settings hard-key to displaythe Settings Main Menu. The SettingsMain Menu contains the following op-tions:
• Display
Refer to this section for details.
• Clock
Refer to this section for details.
• Safety/Assistance
Refer to "Understanding Your Instru-ment Panel", "Uconnect® System"section in your vehicle Owner’sManual for details.
• Lights
Refer to "Understanding Your Instru-ment Panel", "Uconnect® System"section in your vehicle Owner’sManual for details.
• Doors & Locks
Refer to "Understanding Your Instru-ment Panel", "Uconnect® System"section in your vehicle Owner’sManual for details.
19

• Heated Seats
Refer to "Understanding The Fea-tures Of Your Vehicle", "Seats" sec-tion in your vehicle Owner’s Manualfor details.
• Engine Off Options
Refer to "Understanding Your Instru-ment Panel", "Uconnect® System"section in your vehicle Owner’sManual for details.
• Compass Settings
Refer to "Understanding Your Instru-ment Panel", "Uconnect® System"section in your vehicle Owner’sManual for details.
• Audio
Refer to the Operating Instructions –Radio section in this manual fordetails.
• Phone/Bluetooth®
Refer to "Understanding The Fea-tures Of Your Vehicle", "Uconnect®4.3" section in your vehicle Owner’sManual for details.
DisplayYour Uconnect® display can be cus-tomized by following the steps:
1. Press the SETTINGS hard-key onthe right side of the display.
2. Then press the Display soft-key.
3. The Display Menu shows the fol-lowing options for you to customizeyour display.
• Brightness
Touch the Brightness soft-key and usethe + or - soft-keys to adjust thebrightness of the display screen withthe headlights on or off. Press theback arrow soft-key when done.
• Mode
Touch the Mode soft-key to adjust thedisplay screen brightness for Day,Night or Auto selection. Press theback arrow soft-key when done.
• Language
Touch the Language soft-key to selectbetween English, French, Spanish,German, Italian or Dutch. Press theback arrow soft-key when done.
• Units
Touch the Units soft-key to select be-tween U.S. and Metric units of mea-sure. Press the back arrow soft-keywhen done.
• Touchscreen Beep
Touch the Touchscreen Beep soft-keyto turn the ON or OFF the soundheard when a screen soft-key ispressed. Press the back arrow soft-keywhen done.
4. Touch the Exit soft-key to exitfrom the Display Menu.
20
3
Uconnect® 8.4 & 8.4N
• RADIO MODE . . . . . . . . . . . . . . . . . . . . . . . . . . . .24• Overview . . . . . . . . . . . . . . . . . . . . . . . . . . . . . .24• Common Radio Functions . . . . . . . . . . . . . . . . .24• Seek and Direct Tune Functions. . . . . . . . . . . . .24• Setting Presets . . . . . . . . . . . . . . . . . . . . . . . . . .25• Audio . . . . . . . . . . . . . . . . . . . . . . . . . . . . . . . . .26
• DISC MODE . . . . . . . . . . . . . . . . . . . . . . . . . . . . . .27• Overview . . . . . . . . . . . . . . . . . . . . . . . . . . . . . .27• Seek Up/Down . . . . . . . . . . . . . . . . . . . . . . . . . .28• Browse . . . . . . . . . . . . . . . . . . . . . . . . . . . . . . . .28• Source . . . . . . . . . . . . . . . . . . . . . . . . . . . . . . . .28• Repeat – If Equipped . . . . . . . . . . . . . . . . . . . . .28• Shuffle . . . . . . . . . . . . . . . . . . . . . . . . . . . . . . . .28• Info – If Equipped . . . . . . . . . . . . . . . . . . . . . . .29• Tracks . . . . . . . . . . . . . . . . . . . . . . . . . . . . . . . .29• Audio . . . . . . . . . . . . . . . . . . . . . . . . . . . . . . . . .29
• USB/iPod® MODE . . . . . . . . . . . . . . . . . . . . . . . . .29• Overview . . . . . . . . . . . . . . . . . . . . . . . . . . . . . .29• Seek Up/Down . . . . . . . . . . . . . . . . . . . . . . . . . .29• Browse . . . . . . . . . . . . . . . . . . . . . . . . . . . . . . . .30• Source . . . . . . . . . . . . . . . . . . . . . . . . . . . . . . . .31
21
• Repeat – If Equipped . . . . . . . . . . . . . . . . . . . . .31• Shuffle . . . . . . . . . . . . . . . . . . . . . . . . . . . . . . . .31• Info – If Equipped . . . . . . . . . . . . . . . . . . . . . . .31• Tracks . . . . . . . . . . . . . . . . . . . . . . . . . . . . . . . .31• Audio . . . . . . . . . . . . . . . . . . . . . . . . . . . . . . . . .31
• AUX MODE . . . . . . . . . . . . . . . . . . . . . . . . . . . . . .32• Overview . . . . . . . . . . . . . . . . . . . . . . . . . . . . . .32• Source . . . . . . . . . . . . . . . . . . . . . . . . . . . . . . . .32• Audio . . . . . . . . . . . . . . . . . . . . . . . . . . . . . . . . .32
• SD CARD MODE . . . . . . . . . . . . . . . . . . . . . . . . . .32• Overview . . . . . . . . . . . . . . . . . . . . . . . . . . . . . .32• Seek Up/Down . . . . . . . . . . . . . . . . . . . . . . . . . .33• Browse . . . . . . . . . . . . . . . . . . . . . . . . . . . . . . . .33• Source . . . . . . . . . . . . . . . . . . . . . . . . . . . . . . . .34• Repeat . . . . . . . . . . . . . . . . . . . . . . . . . . . . . . . .34• Shuffle . . . . . . . . . . . . . . . . . . . . . . . . . . . . . . . .35• Info . . . . . . . . . . . . . . . . . . . . . . . . . . . . . . . . . .35• Tracks . . . . . . . . . . . . . . . . . . . . . . . . . . . . . . . .35• Audio . . . . . . . . . . . . . . . . . . . . . . . . . . . . . . . . .35
• Bluetooth® MODE . . . . . . . . . . . . . . . . . . . . . . . . .35• Overview . . . . . . . . . . . . . . . . . . . . . . . . . . . . . .35• Seek Up/Down . . . . . . . . . . . . . . . . . . . . . . . . . .35• Source . . . . . . . . . . . . . . . . . . . . . . . . . . . . . . . .36• Repeat – If Equipped . . . . . . . . . . . . . . . . . . . . .36• Info – If Equipped . . . . . . . . . . . . . . . . . . . . . . .36• Tracks – If Equipped . . . . . . . . . . . . . . . . . . . . .36• Audio . . . . . . . . . . . . . . . . . . . . . . . . . . . . . . . . .36
22
• NAVIGATION (8.4N ONLY) . . . . . . . . . . . . . . . . . . .36• Getting Started . . . . . . . . . . . . . . . . . . . . . . . . . .36• Find It and Go!. . . . . . . . . . . . . . . . . . . . . . . . . .36• Where To? . . . . . . . . . . . . . . . . . . . . . . . . . . . . .38• Favorites . . . . . . . . . . . . . . . . . . . . . . . . . . . . . .40• The Main Pages . . . . . . . . . . . . . . . . . . . . . . . . .42• Creating and Editing Routes. . . . . . . . . . . . . . . .43• Customizing the Settings . . . . . . . . . . . . . . . . . .45• Appendix . . . . . . . . . . . . . . . . . . . . . . . . . . . . . .46• Safety Precautions and Important Information. . .46
• MORE/SETTINGS . . . . . . . . . . . . . . . . . . . . . . . . .54• More Main Menu . . . . . . . . . . . . . . . . . . . . . . . .54• Settings Main Menu . . . . . . . . . . . . . . . . . . . . . .55• Display. . . . . . . . . . . . . . . . . . . . . . . . . . . . . . . .55• Clock Setting . . . . . . . . . . . . . . . . . . . . . . . . . . .56
23
RADIO MODE
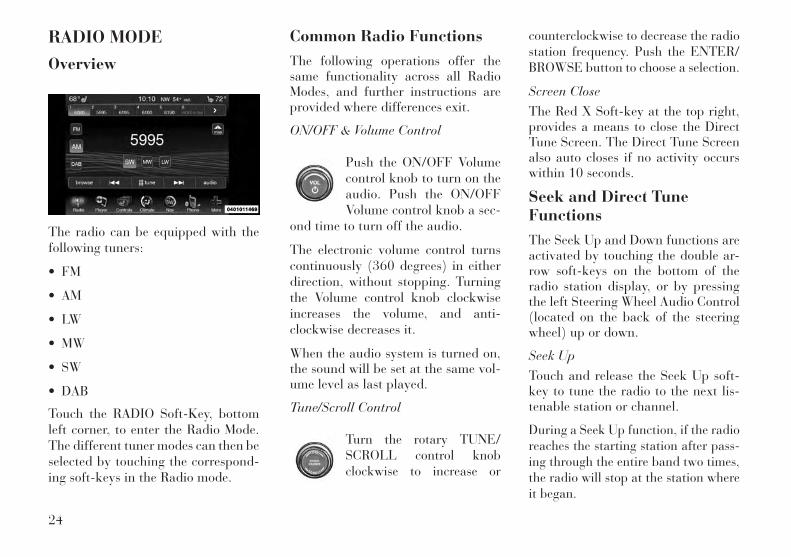
Overview
The radio can be equipped with thefollowing tuners:
• FM
• AM
• LW
• MW
• SW
• DAB
Touch the RADIO Soft-Key, bottomleft corner, to enter the Radio Mode.The different tuner modes can then beselected by touching the correspond-ing soft-keys in the Radio mode.
Common Radio FunctionsThe following operations offer thesame functionality across all RadioModes, and further instructions areprovided where differences exit.
ON/OFF & Volume Control
Push the ON/OFF Volumecontrol knob to turn on theaudio. Push the ON/OFFVolume control knob a sec-
ond time to turn off the audio.
The electronic volume control turnscontinuously (360 degrees) in eitherdirection, without stopping. Turningthe Volume control knob clockwiseincreases the volume, and anti-clockwise decreases it.
When the audio system is turned on,the sound will be set at the same vol-ume level as last played.
Tune/Scroll Control
Turn the rotary TUNE/SCROLL control knobclockwise to increase or
counterclockwise to decrease the radiostation frequency. Push the ENTER/BROWSE button to choose a selection.
Screen CloseThe Red X Soft-key at the top right,provides a means to close the DirectTune Screen. The Direct Tune Screenalso auto closes if no activity occurswithin 10 seconds.
Seek and Direct TuneFunctionsThe Seek Up and Down functions areactivated by touching the double ar-row soft-keys on the bottom of theradio station display, or by pressingthe left Steering Wheel Audio Control(located on the back of the steeringwheel) up or down.
Seek UpTouch and release the Seek Up soft-key to tune the radio to the next lis-tenable station or channel.
During a Seek Up function, if the radioreaches the starting station after pass-ing through the entire band two times,the radio will stop at the station whereit began.
24
Fast Seek Up
Touch and hold the Seek Up soft-keyto advance the radio through theavailable stations or channels at afaster rate, the radio stops at the nextavailable station or channel when thesoft-key is released.
Seek Down
Touch and release the Seek Downsoft-key to tune the radio to the nextlistenable station or channel.
During a Seek Down function, if theradio reaches the starting station afterpassing through the entire band twotimes, the radio will stop at the stationwhere it began.
Fast Seek Down
Touch and hold the Seek Down soft-key to advance the radio through theavailable stations or channel at afaster rate, the radio stops at the nextavailable station or channel when thesoft-key is released.
Direct Tune
Press the Tune soft-key located at thebottom of the radio screen. The DirectTune soft-key screen is available in alltuner modes and can be used to directtune the radio to a desired station orchannel.
Press the available number soft-keyto begin selecting a desired station.Once a number has been entered, anynumbers that are no longer possible(stations that cannot be reached) willbecome deactivated / grayed out.
Once the last digit of a station hasbeen entered, the DIRECT TUNE willbe tuned to that station. Touch the Xsoft-key to close Direct Tune.
The selected Station or Channel num-ber is displayed in the Direct Tune textbox.
GO
When touched, the green GO soft-keyallows the you to commit an entry, atwhich time the radio will tune to theentered station or channel and closethe Direct Tune Screen.
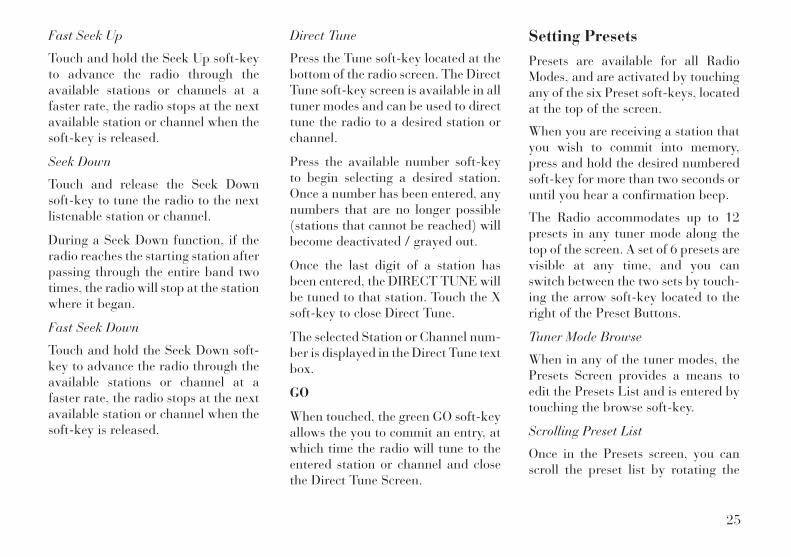
Setting PresetsPresets are available for all RadioModes, and are activated by touchingany of the six Preset soft-keys, locatedat the top of the screen.
When you are receiving a station thatyou wish to commit into memory,press and hold the desired numberedsoft-key for more than two seconds oruntil you hear a confirmation beep.
The Radio accommodates up to 12presets in any tuner mode along thetop of the screen. A set of 6 presets arevisible at any time, and you canswitch between the two sets by touch-ing the arrow soft-key located to theright of the Preset Buttons.
Tuner Mode Browse
When in any of the tuner modes, thePresets Screen provides a means toedit the Presets List and is entered bytouching the browse soft-key.
Scrolling Preset List
Once in the Presets screen, you canscroll the preset list by rotating the
25

Tune Knob, or by touching the Upand Down arrow keys, located on theright of the screen.
Preset Selection from List
A Preset can be selected by touchingany of the listed Presets, or by press-ing the ENTER/BROWSE button onthe Tune Knob to select the currentlyhighlighted Preset.
When selected, the radio tunes to thestation stored in the Preset and re-turns to the main radio screen.
Deleting Presets
A Preset can be deleted in the Presetsscreen by touching the Trash Can Iconfor the corresponding Preset.
Return to Main Radio Screen
You can return to the Main RadioScreen, by touching the X soft-keywhen in the Presets screen.
Browse
Touch the browse soft-key in anytuner mode to edit the Presets.
AudioTouch of the Audio soft-key to acti-vate the Audio settings screen to ad-just Balance\Fade, Equalizer, AndSpeed Adjusted Volume.
You can return to the Radio screen bytouching the X located at the topright.
Balance/Fade
Touch the Balance/Fade soft-key toBalance audio between the frontspeakers or fade the audio betweenthe rear and front speakers.
Touching the Front, Rear, Left, orRight soft-keys or touch and drag theSpeaker Icon to adjust the Balance/Fade.
Equalizer
Touch the Equalizer soft-key to acti-vate the Equalizer screen.
Touch the + or - soft-keys, or touchand drag the level bar for each of theequalizer bands. The level value,which spans between ±9, is displayedat the bottom of each of the Bands.
Speed Adjusted Volume
Touch the Speed Adjusted Volumesoft-key to activate the Speed Ad-justed Volume screen. The SpeedAdjusted Volume is adjusted bytouching of the Off, 1, 2 or 3 buttons.This alters the automatic adjustmentof the audio volume with variation tovehicle speed.
26
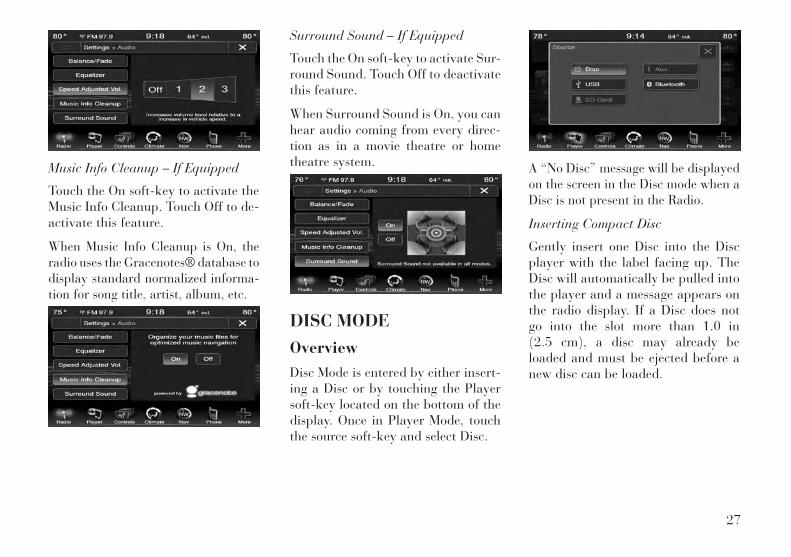
Music Info Cleanup – If Equipped
Touch the On soft-key to activate theMusic Info Cleanup. Touch Off to de-activate this feature.
When Music Info Cleanup is On, theradio uses the Gracenotes® database todisplay standard normalized informa-tion for song title, artist, album, etc.
Surround Sound – If Equipped
Touch the On soft-key to activate Sur-round Sound. Touch Off to deactivatethis feature.
When Surround Sound is On, you canhear audio coming from every direc-tion as in a movie theatre or hometheatre system.
DISC MODE
OverviewDisc Mode is entered by either insert-ing a Disc or by touching the Playersoft-key located on the bottom of thedisplay. Once in Player Mode, touchthe source soft-key and select Disc.
A “No Disc” message will be displayedon the screen in the Disc mode when aDisc is not present in the Radio.
Inserting Compact Disc
Gently insert one Disc into the Discplayer with the label facing up. TheDisc will automatically be pulled intothe player and a message appears onthe radio display. If a Disc does notgo into the slot more than 1.0 in(2.5 cm), a disc may already beloaded and must be ejected before anew disc can be loaded.
27
If you insert a disc with the ignition inthe ACC or RUN position and theradio ON, the unit will switch from toDisc mode and begin to play when youinsert the disc. The display will showthe track number, and index time inminutes and seconds. Play will beginat the start of track 1.
CAUTION!• This Disc player will accept
4-3/4 in (12 cm) discs only. Theuse of other sized discs maydamage the Disc player mecha-nism.
• Do not use adhesive labels.These labels can peel away andjam the player mechanism.
• Uconnect® is a single Discplayer. Do not attempt to insert asecond Disc if one is alreadyloaded.
• Dual-media disc types (one sideis a DVD, the other side is a CD)should not be used, and they cancause damage to the player.
EJECT Button - Ejecting a Disc
Press the EJECT button toeject the Disc.
If you have ejected a disc and have notremoved it within 10 seconds, it willbe reloaded. If the Disc is not re-moved, the radio will reinsert the Discbut will not play it.
A disc can be ejected with the radioand ignition OFF.
Seek Up/DownTouch and release the right arrowsoft-key for the next selection on theDisc. Touch and release the left arrowsoft-key to return to the beginning ofthe current selection, or return to thebeginning of the previous selection ifthe Disc is within the first second ofthe current selection.
Fast Seek UpTouch and hold the right arrow soft-key and the Disc player will begin tofast forward through the current trackuntil the soft-key is released.
Fast Seek Down
Touch and hold the left arrow soft-keyand the Disc player will begin to re-wind through the current track untilthe soft-key is released.
BrowseTouch the Browse soft-key to scrollthrough and select a desired track onthe Disc. Touch the X soft-key if youwish to cancel the browse function.
SourceTouch the Source soft-key to select thedesired audio source, Disc/USB/SDCard/AUX/Bluetooth®.
Repeat – If EquippedTouch the Repeat soft-key to togglethe repeat functionality. The Repeatsoft-key is highlighted when active.The Radio will continue to play thecurrent track, repeatedly, as long asthe repeat is active.
ShuffleTouch the Shuffle soft-key to play theselections on the compact disc in ran-dom order to provide an interesting
28
change of pace. Touch the soft-key asecond time to turn this feature off.
Info – If EquippedTouch the Info soft-key to display thecurrent track information. Touch theInfo soft-key a second time to cancelthis feature.
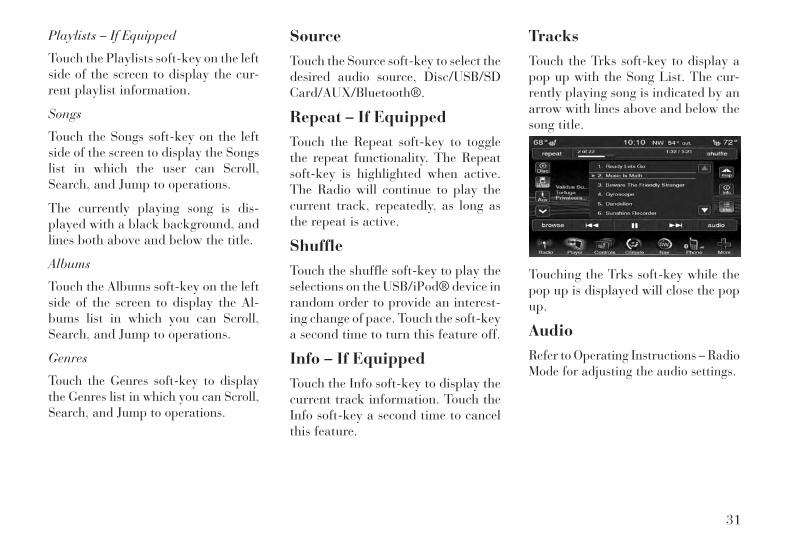
TracksTouch the Trks soft-key to display apop up with the Song List. The cur-rently playing song is indicated by anarrow with lines above and below thesong title.
Touching the Trks soft-key while thepop up is displayed will close the popup.
AudioRefer to Operating Instructions – RadioMode for adjusting the audio settings.
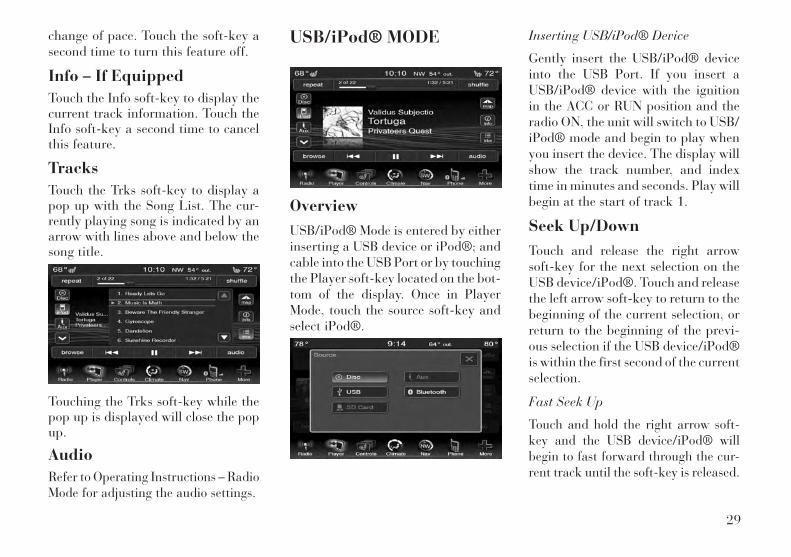
USB/iPod® MODE
OverviewUSB/iPod® Mode is entered by eitherinserting a USB device or iPod®; andcable into the USB Port or by touchingthe Player soft-key located on the bot-tom of the display. Once in PlayerMode, touch the source soft-key andselect iPod®.
Inserting USB/iPod® Device
Gently insert the USB/iPod® deviceinto the USB Port. If you insert aUSB/iPod® device with the ignitionin the ACC or RUN position and theradio ON, the unit will switch to USB/iPod® mode and begin to play whenyou insert the device. The display willshow the track number, and indextime in minutes and seconds. Play willbegin at the start of track 1.
Seek Up/DownTouch and release the right arrowsoft-key for the next selection on theUSB device/iPod®. Touch and releasethe left arrow soft-key to return to thebeginning of the current selection, orreturn to the beginning of the previ-ous selection if the USB device/iPod®is within the first second of the currentselection.
Fast Seek Up
Touch and hold the right arrow soft-key and the USB device/iPod® willbegin to fast forward through the cur-rent track until the soft-key is released.
29
Fast Seek Down
Touch and hold the left arrow soft-keyand the USB device/iPod® will beginto rewind through the current trackuntil the soft-key is released.
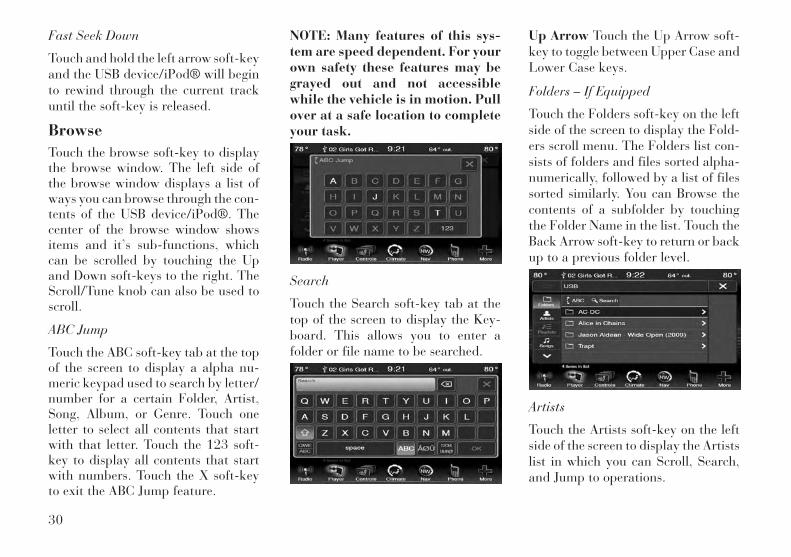
BrowseTouch the browse soft-key to displaythe browse window. The left side ofthe browse window displays a list ofways you can browse through the con-tents of the USB device/iPod®. Thecenter of the browse window showsitems and it’s sub-functions, whichcan be scrolled by touching the Upand Down soft-keys to the right. TheScroll/Tune knob can also be used toscroll.
ABC Jump
Touch the ABC soft-key tab at the topof the screen to display a alpha nu-meric keypad used to search by letter/number for a certain Folder, Artist,Song, Album, or Genre. Touch oneletter to select all contents that startwith that letter. Touch the 123 soft-key to display all contents that startwith numbers. Touch the X soft-keyto exit the ABC Jump feature.
NOTE: Many features of this sys-tem are speed dependent. For yourown safety these features may begrayed out and not accessiblewhile the vehicle is in motion. Pullover at a safe location to completeyour task.
Search
Touch the Search soft-key tab at thetop of the screen to display the Key-board. This allows you to enter afolder or file name to be searched.
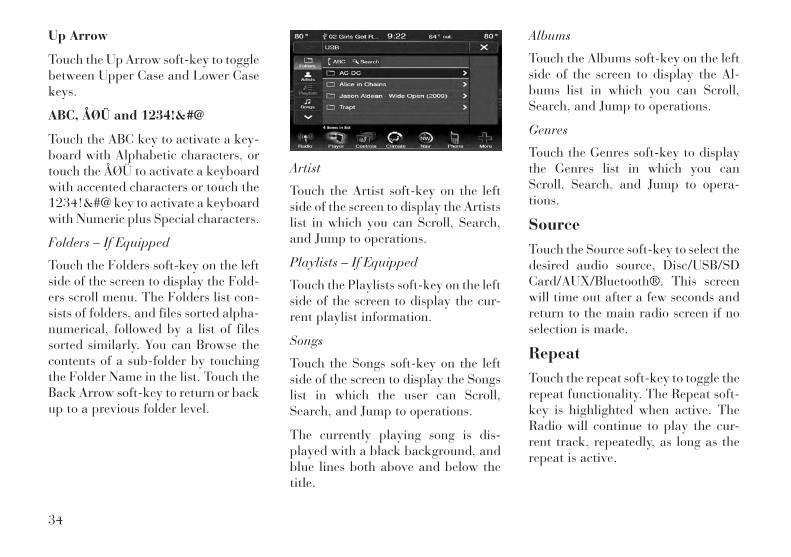
Up Arrow Touch the Up Arrow soft-key to toggle between Upper Case andLower Case keys.
Folders – If Equipped
Touch the Folders soft-key on the leftside of the screen to display the Fold-ers scroll menu. The Folders list con-sists of folders and files sorted alpha-numerically, followed by a list of filessorted similarly. You can Browse thecontents of a subfolder by touchingthe Folder Name in the list. Touch theBack Arrow soft-key to return or backup to a previous folder level.
Artists
Touch the Artists soft-key on the leftside of the screen to display the Artistslist in which you can Scroll, Search,and Jump to operations.
30
Playlists – If Equipped
Touch the Playlists soft-key on the leftside of the screen to display the cur-rent playlist information.
Songs
Touch the Songs soft-key on the leftside of the screen to display the Songslist in which the user can Scroll,Search, and Jump to operations.
The currently playing song is dis-played with a black background, andlines both above and below the title.
Albums
Touch the Albums soft-key on the leftside of the screen to display the Al-bums list in which you can Scroll,Search, and Jump to operations.
Genres
Touch the Genres soft-key to displaythe Genres list in which you can Scroll,Search, and Jump to operations.
SourceTouch the Source soft-key to select thedesired audio source, Disc/USB/SDCard/AUX/Bluetooth®.
Repeat – If EquippedTouch the Repeat soft-key to togglethe repeat functionality. The Repeatsoft-key is highlighted when active.The Radio will continue to play thecurrent track, repeatedly, as long asthe repeat is active.
ShuffleTouch the shuffle soft-key to play theselections on the USB/iPod® device inrandom order to provide an interest-ing change of pace. Touch the soft-keya second time to turn this feature off.
Info – If EquippedTouch the Info soft-key to display thecurrent track information. Touch theInfo soft-key a second time to cancelthis feature.
TracksTouch the Trks soft-key to display apop up with the Song List. The cur-rently playing song is indicated by anarrow with lines above and below thesong title.
Touching the Trks soft-key while thepop up is displayed will close the popup.
AudioRefer to Operating Instructions – RadioMode for adjusting the audio settings.
31
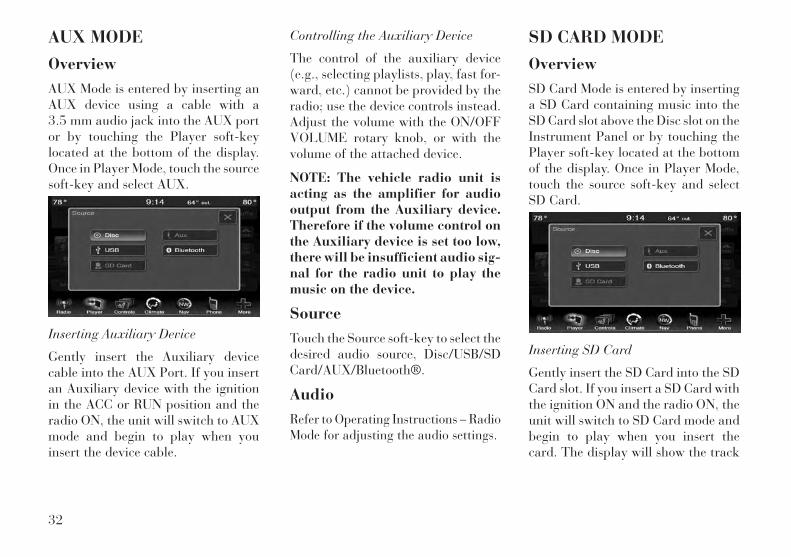
AUX MODE
OverviewAUX Mode is entered by inserting anAUX device using a cable with a3.5 mm audio jack into the AUX portor by touching the Player soft-keylocated at the bottom of the display.Once in Player Mode, touch the sourcesoft-key and select AUX.
Inserting Auxiliary Device
Gently insert the Auxiliary devicecable into the AUX Port. If you insertan Auxiliary device with the ignitionin the ACC or RUN position and theradio ON, the unit will switch to AUXmode and begin to play when youinsert the device cable.
Controlling the Auxiliary Device
The control of the auxiliary device(e.g., selecting playlists, play, fast for-ward, etc.) cannot be provided by theradio; use the device controls instead.Adjust the volume with the ON/OFFVOLUME rotary knob, or with thevolume of the attached device.
NOTE: The vehicle radio unit isacting as the amplifier for audiooutput from the Auxiliary device.Therefore if the volume control onthe Auxiliary device is set too low,there will be insufficient audio sig-nal for the radio unit to play themusic on the device.
SourceTouch the Source soft-key to select thedesired audio source, Disc/USB/SDCard/AUX/Bluetooth®.
AudioRefer to Operating Instructions – RadioMode for adjusting the audio settings.
SD CARD MODE
OverviewSD Card Mode is entered by insertinga SD Card containing music into theSD Card slot above the Disc slot on theInstrument Panel or by touching thePlayer soft-key located at the bottomof the display. Once in Player Mode,touch the source soft-key and selectSD Card.
Inserting SD Card
Gently insert the SD Card into the SDCard slot. If you insert a SD Card withthe ignition ON and the radio ON, theunit will switch to SD Card mode andbegin to play when you insert thecard. The display will show the track
32
number, and index time in minutesand seconds. Play will begin at thestart of track 1.
Seek Up/DownTouch and release the right arrowsoft-key for the next selection on theSD Card. Touch and release the leftarrow soft-key to return to the begin-ning of the current selection, or returnto the beginning of the previous selec-tion if the SD Card is within the firstsecond of the current selection.
Fast Seek Up
Touch and hold the right arrow soft-key and the SD Card will begin to fastforward through the current track un-til the soft-key is released.
Fast Seek Down
Touch and hold the left arrow soft-keyand the SD Card will begin to rewindthrough the current track until thesoft-key is released.
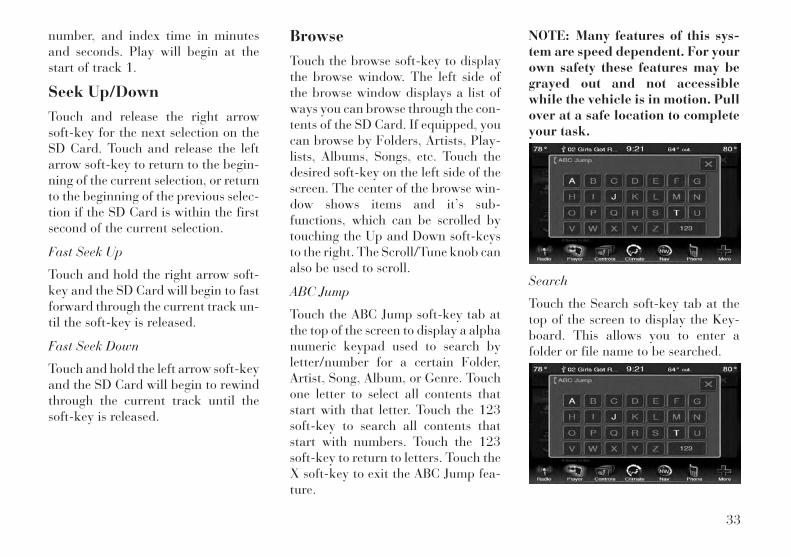
BrowseTouch the browse soft-key to displaythe browse window. The left side ofthe browse window displays a list ofways you can browse through the con-tents of the SD Card. If equipped, youcan browse by Folders, Artists, Play-lists, Albums, Songs, etc. Touch thedesired soft-key on the left side of thescreen. The center of the browse win-dow shows items and it’s sub-functions, which can be scrolled bytouching the Up and Down soft-keysto the right. The Scroll/Tune knob canalso be used to scroll.
ABC Jump
Touch the ABC Jump soft-key tab atthe top of the screen to display a alphanumeric keypad used to search byletter/number for a certain Folder,Artist, Song, Album, or Genre. Touchone letter to select all contents thatstart with that letter. Touch the 123soft-key to search all contents thatstart with numbers. Touch the 123soft-key to return to letters. Touch theX soft-key to exit the ABC Jump fea-ture.
NOTE: Many features of this sys-tem are speed dependent. For yourown safety these features may begrayed out and not accessiblewhile the vehicle is in motion. Pullover at a safe location to completeyour task.
Search
Touch the Search soft-key tab at thetop of the screen to display the Key-board. This allows you to enter afolder or file name to be searched.
33
Up Arrow
Touch the Up Arrow soft-key to togglebetween Upper Case and Lower Casekeys.
ABC, ÅØÜ and 1234!&#@
Touch the ABC key to activate a key-board with Alphabetic characters, ortouch the ÅØÜ to activate a keyboardwith accented characters or touch the1234!&#@ key to activate a keyboardwith Numeric plus Special characters.
Folders – If Equipped
Touch the Folders soft-key on the leftside of the screen to display the Fold-ers scroll menu. The Folders list con-sists of folders, and files sorted alpha-numerical, followed by a list of filessorted similarly. You can Browse thecontents of a sub-folder by touchingthe Folder Name in the list. Touch theBack Arrow soft-key to return or backup to a previous folder level.
Artist
Touch the Artist soft-key on the leftside of the screen to display the Artistslist in which you can Scroll, Search,and Jump to operations.
Playlists – If Equipped
Touch the Playlists soft-key on the leftside of the screen to display the cur-rent playlist information.
Songs
Touch the Songs soft-key on the leftside of the screen to display the Songslist in which the user can Scroll,Search, and Jump to operations.
The currently playing song is dis-played with a black background, andblue lines both above and below thetitle.
Albums
Touch the Albums soft-key on the leftside of the screen to display the Al-bums list in which you can Scroll,Search, and Jump to operations.
Genres
Touch the Genres soft-key to displaythe Genres list in which you canScroll, Search, and Jump to opera-tions.
SourceTouch the Source soft-key to select thedesired audio source, Disc/USB/SDCard/AUX/Bluetooth®. This screenwill time out after a few seconds andreturn to the main radio screen if noselection is made.
RepeatTouch the repeat soft-key to toggle therepeat functionality. The Repeat soft-key is highlighted when active. TheRadio will continue to play the cur-rent track, repeatedly, as long as therepeat is active.
34
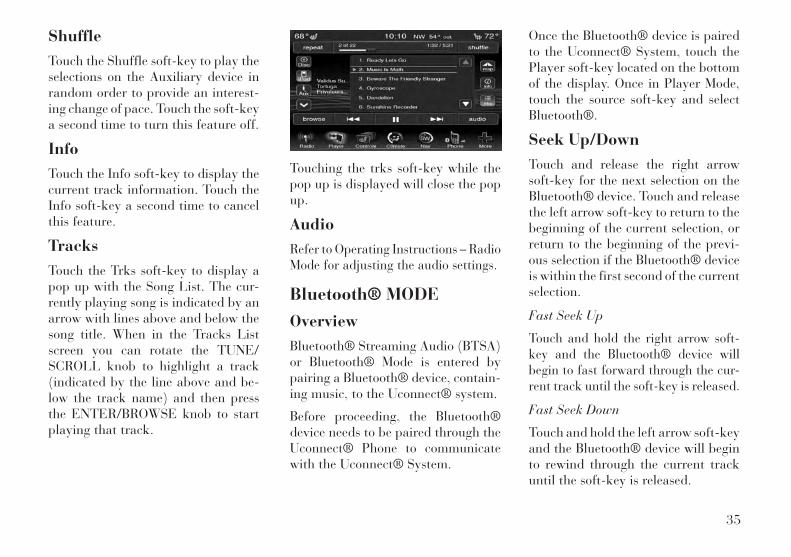
ShuffleTouch the Shuffle soft-key to play theselections on the Auxiliary device inrandom order to provide an interest-ing change of pace. Touch the soft-keya second time to turn this feature off.
InfoTouch the Info soft-key to display thecurrent track information. Touch theInfo soft-key a second time to cancelthis feature.
TracksTouch the Trks soft-key to display apop up with the Song List. The cur-rently playing song is indicated by anarrow with lines above and below thesong title. When in the Tracks Listscreen you can rotate the TUNE/SCROLL knob to highlight a track(indicated by the line above and be-low the track name) and then pressthe ENTER/BROWSE knob to startplaying that track.
Touching the trks soft-key while thepop up is displayed will close the popup.
AudioRefer to Operating Instructions – RadioMode for adjusting the audio settings.
Bluetooth® MODE
OverviewBluetooth® Streaming Audio (BTSA)or Bluetooth® Mode is entered bypairing a Bluetooth® device, contain-ing music, to the Uconnect® system.
Before proceeding, the Bluetooth®device needs to be paired through theUconnect® Phone to communicatewith the Uconnect® System.
Once the Bluetooth® device is pairedto the Uconnect® System, touch thePlayer soft-key located on the bottomof the display. Once in Player Mode,touch the source soft-key and selectBluetooth®.
Seek Up/DownTouch and release the right arrowsoft-key for the next selection on theBluetooth® device. Touch and releasethe left arrow soft-key to return to thebeginning of the current selection, orreturn to the beginning of the previ-ous selection if the Bluetooth® deviceis within the first second of the currentselection.
Fast Seek Up
Touch and hold the right arrow soft-key and the Bluetooth® device willbegin to fast forward through the cur-rent track until the soft-key is released.
Fast Seek Down
Touch and hold the left arrow soft-keyand the Bluetooth® device will beginto rewind through the current trackuntil the soft-key is released.
35
SourceTouch the Source soft-key to select thedesired audio source, Disc/USB/SDCard/AUX/Bluetooth®.
Repeat – If EquippedTouch the Repeat soft-key to togglethe repeat functionality. The Repeatsoft-key is highlighted when active.The Radio will continue to play thecurrent track, repeatedly, as long asthe repeat is active.
Info – If EquippedTouch the Info soft-key to display thecurrent track information. Touch theInfo soft-key a second time to cancelthis feature.
Tracks – If EquippedTouch the trks soft-key to display apop up with the Song List. The cur-rently playing song is indicated by anarrow and lines above and below thesong title.
Touching the trks soft-key while thepop up is displayed will close the popup.
AudioRefer to Operating Instructions – RadioMode for adjusting the audio settings.
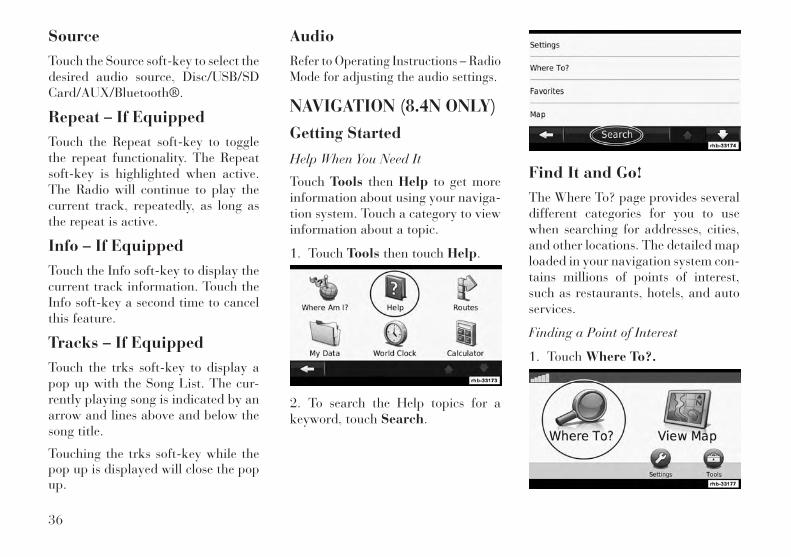
NAVIGATION (8.4N ONLY)
Getting Started
Help When You Need It
Touch Tools then Help to get moreinformation about using your naviga-tion system. Touch a category to viewinformation about a topic.
1. Touch Tools then touch Help.
2. To search the Help topics for akeyword, touch Search.
Find It and Go!The Where To? page provides severaldifferent categories for you to usewhen searching for addresses, cities,and other locations. The detailed maploaded in your navigation system con-tains millions of points of interest,such as restaurants, hotels, and autoservices.
Finding a Point of Interest
1. Touch Where To?.
36
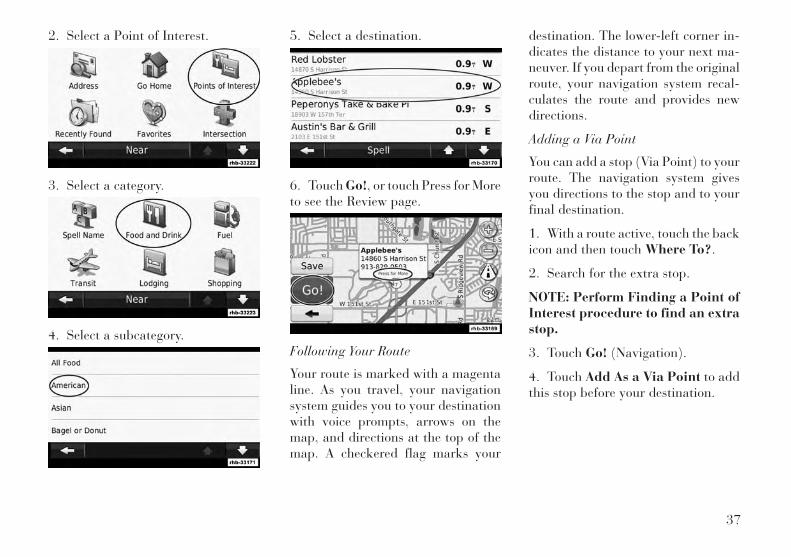
2. Select a Point of Interest.
3. Select a category.
4. Select a subcategory.
5. Select a destination.
6. Touch Go!, or touch Press for Moreto see the Review page.
Following Your Route
Your route is marked with a magentaline. As you travel, your navigationsystem guides you to your destinationwith voice prompts, arrows on themap, and directions at the top of themap. A checkered flag marks your
destination. The lower-left corner in-dicates the distance to your next ma-neuver. If you depart from the originalroute, your navigation system recal-culates the route and provides newdirections.
Adding a Via Point
You can add a stop (Via Point) to yourroute. The navigation system givesyou directions to the stop and to yourfinal destination.
1. With a route active, touch the backicon and then touch Where To?.
2. Search for the extra stop.
NOTE: Perform Finding a Point ofInterest procedure to find an extrastop.
3. Touch Go! (Navigation).
4. Touch Add As a Via Point to addthis stop before your destination.
37
Taking a Detour
If a road on your route is closed, youcan take a detour.
1. With a route active, touch the backicon.
2. Touch Detour.
The navigation system attempts to getyou back on your original route asquickly as possible. If the route youare currently taking is the only rea-sonable option, the navigation systemmight not calculate a detour.
Stopping the Route
1. With a route active, touch the backicon.
2. Touch Stop.
Custom POIs (Points of Interest)
You can manually load custom pointsof interest (POI) databases, availablefrom Garmin. Visit www.garmin.comfor more details. Some custom POIdatabases contain alert informationfor points such as safety cameras andschool zones. The navigation systemcan notify you when you approachone of these points.
NOTE: Garmin is not responsiblefor the consequences of using acustom POI database, or for theaccuracy of the safety camera orother custom POI database.
After downloading your POI database,use the Garmin POI Loader to installthe POIs onto a DVD. Use the DVD toload the POIs. The POI Loader is avail-able at www.garmin.com/products/poiloader. Refer to the POI LoaderHelp file for more information; clickHelp to open the Help file.
NOTE: Each time you load customPOIs to the navigation system, anyother custom POIs already savedin the system will be overwritten.
Finding Custom POIs
To view a list of the custom POIsloaded in your navigation system:
1. Touch Where To?.
2. Then touch Extras.
3. Lastly, touch Custom POIs.
Deleting Custom POIs
To delete all custom POIs from yournavigation system:
1. Touch Tools.
2. Touch My Data.
3. Touch Custom POIs.
4. Touch Delete All.
5. Lastly, touch Yes to confirm.
Where To?The Where To? page provides severaldifferent categories you can use tosearch for locations.
Searching Near Another LocationYour navigation system automaticallysearches for places near your currentlocation.
1. Touch Where To?, then touchNear.
2. Select an option:
• Where I Am Now — search nearyour current location.
• A Different City — search near thecity you enter.
38
• A Recent Destination — searchnear a recent destination.
• A Favorite Destination — searchnear a favorite destination.
• My Current Route — search alongyour route.
• My Destination — search nearyour current destination.
3. Touch OK.
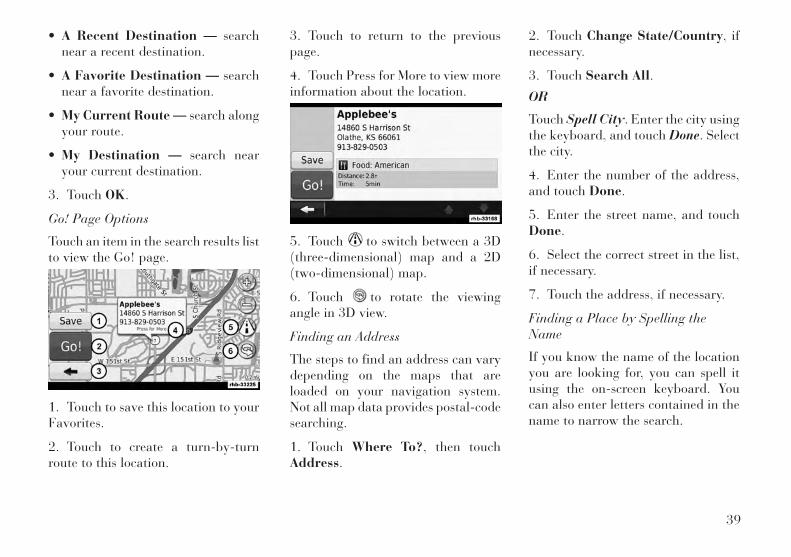
Go! Page Options
Touch an item in the search results listto view the Go! page.
1. Touch to save this location to yourFavorites.
2. Touch to create a turn-by-turnroute to this location.
3. Touch to return to the previouspage.
4. Touch Press for More to view moreinformation about the location.
5. Touch to switch between a 3D(three-dimensional) map and a 2D(two-dimensional) map.
6. Touch to rotate the viewingangle in 3D view.
Finding an Address
The steps to find an address can varydepending on the maps that areloaded on your navigation system.Not all map data provides postal-codesearching.
1. Touch Where To?, then touchAddress.
2. Touch Change State/Country, ifnecessary.
3. Touch Search All.
OR
Touch Spell City. Enter the city usingthe keyboard, and touch Done. Selectthe city.
4. Enter the number of the address,and touch Done.
5. Enter the street name, and touchDone.
6. Select the correct street in the list,if necessary.
7. Touch the address, if necessary.
Finding a Place by Spelling theName
If you know the name of the locationyou are looking for, you can spell itusing the on-screen keyboard. Youcan also enter letters contained in thename to narrow the search.
39

1. Touch Where To?, then touchPoints of Interest and then SpellName.
2. Using the on-screen keyboard, en-ter letters in the name.
3. Touch Done.
Using the On-Screen Keyboard
When an on-screen keyboard ap-pears, touch a letter or number toenter it.
NOTE: Many features of this sys-tem are speed dependent. For yourown safety these features may begrayed out and not accessiblewhile the vehicle is in motion. Pullover at a safe location to completeyour task.
Finding Places in a Different Area
You can search for locations in a dif-ferent area, such as a different city ornear your destination.
1. From the subcategories list, touchNear.
2. Select one of the search options.
Narrowing Your Search
To narrow your search, you cansearch near a different city.
1. Touch Where To?, then touchNear.
2. Touch A Different City.
3. Enter part of the name, and touchDone.
FavoritesYou can save all of your favoritesplaces in Favorites. You can also saveyour home location in Favorites.
Saving Places You Find
1. After you have found a place youwant to save, touch Save on the Go!page.
2. Touch OK. The place is saved inFavorites.
40
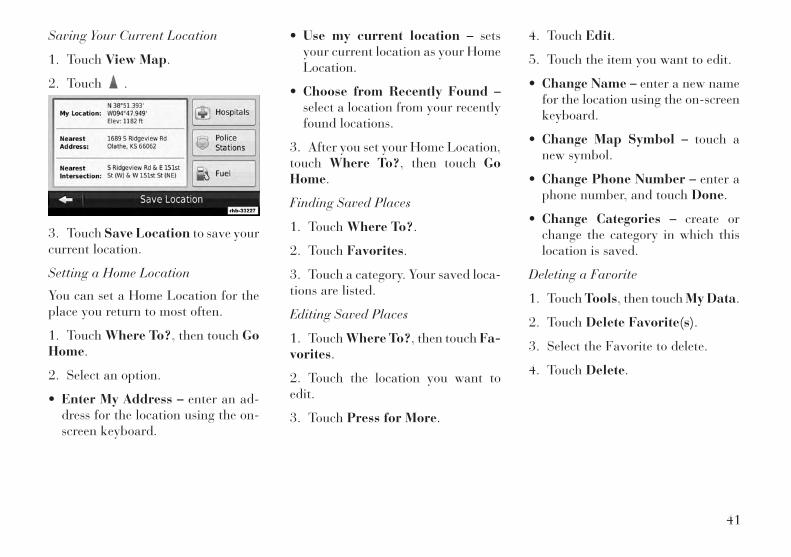
Saving Your Current Location
1. Touch View Map.
2. Touch .
3. Touch Save Location to save yourcurrent location.
Setting a Home Location
You can set a Home Location for theplace you return to most often.
1. Touch Where To?, then touch GoHome.
2. Select an option.
• Enter My Address – enter an ad-dress for the location using the on-screen keyboard.
• Use my current location – setsyour current location as your HomeLocation.
• Choose from Recently Found –select a location from your recentlyfound locations.
3. After you set your Home Location,touch Where To?, then touch GoHome.
Finding Saved Places
1. Touch Where To?.
2. Touch Favorites.
3. Touch a category. Your saved loca-tions are listed.
Editing Saved Places
1. Touch Where To?, then touch Fa-vorites.
2. Touch the location you want toedit.
3. Touch Press for More.
4. Touch Edit.
5. Touch the item you want to edit.
• Change Name – enter a new namefor the location using the on-screenkeyboard.
• Change Map Symbol – touch anew symbol.
• Change Phone Number – enter aphone number, and touch Done.
• Change Categories – create orchange the category in which thislocation is saved.
Deleting a Favorite
1. Touch Tools, then touch My Data.
2. Touch Delete Favorite(s).
3. Select the Favorite to delete.
4. Touch Delete.
41

The Main PagesThis section provides details aboutthe Map Page, the Trip Computer, theTurn List, Lane assist, and the GPSInfo Page.
Viewing the Map Page
Touch View Map to open the map.Touch an area of the map to see addi-tional information, as shown below.The vehicle icon shows your cur-rent location.
1. Distance to the next turn. Touch toview and hear next turn details. Laneassistance also displays in this area.
2. While navigating a route, touchthe text bar to open the Turn List.
3. Touch to zoom in.
4. Touch to zoom out.
5. Touch to change the data field.
6. Touch the Speed data field toopen the Trip Computer.
7. Touch to view the Where Am I?page.
NOTE:
• A speed limit icon may ap-pear as you travel on majorroadways. This icon displays thecurrent speed limit of the road-way.
• The speed limit icon function isfor information only and doesnot replace the driver’s respon-sibility to abide by all postedspeed limits and to use safe driv-ing judgment at all times.Garmin shall not be responsiblefor any traffic fines or citationsthat the user may receive forfailing to follow all applicabletraffic laws.
Trip Computer
The Trip Computer displays your cur-rent speed and provides helpful statis-tics about your trip. To view the TripComputer, touch the Speed field onthe Map page.
Resetting Trip Information
If you want accurate trip information,reset the trip information before be-ginning a trip. Touch Reset to resetthe information on the Trip Computerpage.
Turn List
When you are navigating a route, theTurn List displays turn-by-turn in-structions for your entire route andthe distance between turns. Touch thetext bar on the top of the Map page toview the Turn List. Touch a turn onthe list to view the Next Turn page forthat turn. Touch Show Map to viewthe entire route on the map.
42

Next Turn Page
When you are navigating a route, theNext Turn page shows the turn on themap and the distance and time leftbefore you reach the turn. To view anupcoming turn on the map, touch theupperleft corner of the Map page, ortouch any turn on the Turn List page.
Lane Assist Page – If Equipped
When available, the Lane Assist pagemay display a view of the upcomingjunction and in which lane you should
be driving. To view the Lane Assistpage, touch the upper-left corner ofthe Map page. You can also access theLane Assist page from the Next Turnpage.
GPS Info Page
From the Nav Menu page, touch in theupper left corner to view the GPS Infopage.
1. Sky view
2. Satellite signal-strength bars
The sky view shows the satellites youare receiving. The satellite signal-strength bars indicate the strengthof each satellite you are receiving.A solid bar indicates that the GPSsatellite is ready for use.
Creating and Editing RoutesThis section describes how to createand customize your routes.
Creating a New Custom Route
1. Touch Where To? (or Tools).
2. Touch Routes.
3. Touch Add.
4. Touch Add New Start Point.
5. Find a location for your startingpoint, and touch Select Start Point.
NOTE: Perform Finding a Point ofInterest procedure to find yourstarting point.
6. Touch Add New Start Point “+”.
7. Find a location for your endingpoint, and touch Select.
43
NOTE: Perform Finding a Point ofInterest procedure to find yourending point.
8. Touch + to add another location toyour route. Touch – to remove a loca-tion.
9. Touch Next to calculate your routeand view it on the map. Touch Save tosave your changes.
Editing Custom Routes
Touch Where To? (or Tools), thentouch Routes.
1. Select the route you want to edit.
2. Touch Edit (in the upper left cor-ner).
3. Touch the item to edit.
• Add or Remove Points – touchedit end point an add or removepoints from the route.
• Optimally Reorder Points – opti-mally reorder the points.
• Delete – (delete trip) remove thisroute.
• Change Name – enter a new name,and touch Done.
Your changes are saved automaticallywhen you exit any of the route editpages.
Saving and Modifying the ActiveRoute
1. Touch Where To? (or Tools),then touch Routes.
2. Touch a relevant trip and activateit.
3. Touch in the Settings in the upperleft corner.
4. Touch Edit the End Point.
5. Touch Add or Remove Points.
6. Add, remove or reorder.
7. Select the point the needs to beadded or removed.
8. Touch Save.
Navigating a Saved Route
1. Touch Where To? (or Tools),then touch Routes.
2. Touch the route you want to navi-gate, and touch Go! (Navigation).
3. Select the next point.
4. Touch Start.
Deleting All Saved Routes
1. Touch Tools.
2. Touch My Data.
3. Touch Deleted SelectedRoute(s).
4. Touch Select All.
5. Lastly, touch Yes.
Stopping Your Route
With a route active, touch back icon,then touch Stop.
Adding a Detour to a Route
If a road on your route is closed orcongested with traffic, you can take adetour.
1. With a route active on the MainMap, touch the back arrow icon.
2. Touch Detour.
The navigation system attempts to getyou back on your original route asquickly as possible. If the route youare currently taking is the only rea-sonable option, the navigation systemmight not calculate a detour.
44
Customizing the SettingsThis section describes how to custom-ize the settings of your GPS naviga-tion system.
Customizing the Navigation System
1. Touch Settings.
2. Touch the setting you want tochange.
3. Touch the button above the settingname to change it.
Changing the System Settings
Touch Settings, then touch System.
• GPS Simulator – enable the simu-lator to turn off the GPS mode andsimulate navigation.
• About – display the software ver-sion number, the unit number andthe unit ID number.
• Restore – touch Settings icon in theupper left corner to restore theoriginal system settings.
Changing the Map Settings
Touch Settings, then touch Map.
• Map Detail – adjust the amount ofdetail shown on the map. More de-tail may cause the map to redrawslower.
• Map View – select a mapperspective.
• Vehicle – touch Change to changethe icon used to display your posi-tion on the map. Touch the icon youwant to use, and touch Save.
• Trip Log – show or hide the log ofyour travels. To clear your trip log:
1. Touch Tools.
2. Touch My Data.
3. Lastly, touch Clear Trip Log.
• Map Data Layout – select Stan-dard to display the default datafields on the Map. Select MoreData to display additional, cus-tomizable data fields on the left sideof the map.
• Info – view the maps loaded onyour navigation system and theirversion. Touch a map to enable(check mark) or disable (no checkmark) that map.
• Restore – restore the original mapsettings.
• Update Map – update map data.
Changing the Navigation Settings
Touch Settings, then touch Naviga-tion.
• Route Preference – select a pref-erence for calculating your routeand select the trip type.
• Avoidances – select the road typesyou want to avoid or you wouldprefer to use on your routes.
• Restore – touch the Settings icon inthe upper left corner to restore theoriginal navigation settings.
• Voice Prompts – turn voiceprompts on or off.
• My trends™
45

Adjusting the Display Settings
Touch Settings, then touch Display.
• Color Mode – select Day for a lightbackground, Night for a back-ground, or Auto to automaticallyswitch between the two.
Updating the Time Settings
Touch Settings, then touch Time.
• Time Format – select a 12–hour,24–hour or UTC time format.
• Synchronize with GPS
Setting the Languages
Touch Settings, then touch Lan-guage.
• Voice Language – select a voice.
• Keyboard – select the keyboard foryour language. You can also changethe keyboard language mode fromany keyboard by touching theMode button.
• Restore – restore the original lan-guages.
AppendixThis appendix provides additional in-formation about your navigation sys-tem, such as how to update the soft-ware and map data.
Updating the Map Data
Navigation map database updates areperiodically made available, whenfeasible and appropriate to custom-ers. Visit http://Fiat.navigation.comor ask your Dealer or Service Centerfor details.
Safety Precautions andImportant InformationRead this information carefully beforestarting to operate the navigation sys-tem and follow the instructions in thismanual. Garmin shall not be liable forproblems or accidents resulting fromfailure to observe the instructions inthis manual.
WARNINGS
To prevent injury or fire, take thefollowing precautions:
• To prevent a short circuit, never putor leave any metallic objects (suchas coins or metal tools) inside theunit.
• Do not watch or fix your eyes on theunit’s display when you are drivingfor any extended period.
Failure to avoid the followingpotentially hazardous situationscould result in an accident or col-lision resulting in death or seriousinjury.
• When navigating, carefully com-pare information displayed on thenavigation system to all availablenavigation sources, including infor-mation from street signs, visualsightings, and maps. For safety, al-ways resolve any discrepancies orquestions before continuing navi-gation.
• Always operate the vehicle in a safemanner.
46
• Do not become distracted by thenavigation system while driving,and always be fully aware of alldriving conditions. Minimize theamount of time spent viewing thescreen of the navigation systemwhile driving.
• Do not enter destinations, changesettings, or access any functions re-quiring prolonged use of the navi-gation system controls while driv-ing. Stop your vehicle in a safe andlegal manner before attemptingsuch operations.
• Keep the system volume at a lowenough level to be able to hear out-side noises while driving. If you canno longer hear outside noises, youmay be unable to react adequatelyto the traffic situation.
• This may cause accidents.
• The navigation system will not dis-play the correct current position ofthe vehicle the first time it is usedafter purchase, or if the vehicle bat-tery is disconnected. GPS satellite
signals will soon be received, how-ever, and the correct position willbe displayed.
• Be careful of the ambient tempera-ture. Using the navigation systemat extreme temperatures can lead tomalfunction or damage. Also notethat the unit can be damaged bystrong vibration, by metal objects,or by water getting inside the unit.
CAUTIONS
Failure to avoid the following po-tentially hazardous situations mayresult in injury or property damage.
• The navigation system is designed toprovide you with route suggestions.It does not reflect road closures orroad conditions, weather conditions,or other factors that may affectsafety or timing while driving.
• Use the navigation system only as anavigational aid. Do not attempt touse the navigation system for anypurpose requiring precise measure-ment of direction, distance, loca-tion, or topography.
• The Global Positioning System(GPS) is operated by the UnitedStates government, which is solelyresponsible for its accuracy andmaintenance. The government sys-tem is subject to changes that couldaffect the accuracy and perfor-mance of all GPS equipment, in-cluding the navigation system.
• Although the navigation system is aprecision navigation device, anynavigation device can be misusedor misinterpreted and, therefore,become unsafe.
IMPORTANT INFORMATION
Vehicle Battery Preservation
• This navigation system can be usedwhen the ignition key is turned toON or ACC. To preserve the bat-tery, however, it should be usedwith the engine running wheneverpossible. Using the navigation sys-tem for a long time with the engineswitched off can cause the batteryto run down.
47
Map Data Information
• One of our goals is to provide cus-tomers with the most complete andaccurate cartography that is avail-able to us at a reasonable cost. Weuse a combination of governmentaland private data sources, which weidentify in product literature andcopyright messages displayed to theconsumer. Virtually all data sourcescontain some inaccurate or incom-plete data. In some countries, com-plete and accurate map informa-tion is either not available or isprohibitively expensive.
Software License Agreement
• BY USING THIS NAVIGATIONSYSTEM, YOU AGREE TO BEBOUND BY THE TERMS ANDCONDITIONS OF THE FOLLOW-ING SOFTWARE LICENSEAGREEMENT. PLEASE READTHIS AGREEMENT CAREFULLY.
• Garmin grants you a limited licenseto use the software embedded inthis device (the “Software”) in bi-
nary executable form in the normaloperation of the product. Title,ownership rights, and intellectualproperty rights in and to the Soft-ware remain in Garmin.
• You acknowledge that the Softwareis the property of Garmin and isprotected under the United Statesof America copyright laws and in-ternational copyright treaties. Youfurther acknowledge that the struc-ture, organization, and code of theSoftware are valuable trade secretsof Garmin and that the Software insource code form remains a valu-able trade secret of Garmin. Youagree not to decompile, disas-semble, modify, reverse assemble,reverse engineer, or reduce to hu-man readable form the Software orany part thereof or create any de-rivative works based on the Soft-ware. You agree not to export orre-export the Software to any coun-try in violation of the export controllaws of the United States ofAmerica.
NAVTEQ® End-user LicenseAgreement
• The software embedded in yourGarmin product (the “Software”) isowned by Garmin Ltd. or its sub-sidiaries (“Garmin”). The third-party map data embedded in oraccompanying your Garmin prod-uct (the “Data”) is owned byNAVTEQ North America LLC andis licensed to Garmin. Both theSoftware and Data are protectedunder copyright laws and interna-tional copyright treaties. The Soft-ware and Data are licensed, notsold. The Software and Data areprovided under the following li-cense and are subject to the follow-ing terms and conditions which areagreed to by End User (“you” or“your”), on the one hand, andGarmin and its licensors (includingtheir licensors and suppliers) andaffiliated companies on the otherhand.
48
• IMPORTANT: CAREFULLYREAD THIS LICENSE BEFOREUSING THIS PRODUCT. IN-STALLING, COPYING, OR OTH-ERWISE USING THIS PRODUCTINDICATES YOUR ACKNOWL-EDGMENT THAT YOU HAVEREAD THIS LICENSE ANDAGREE TO ITS TERMS. IF YOUDO NOT AGREE, RETURN THECOMPLETE PRODUCT WITHIN10 DAYS OF THE DATE YOU AC-QUIRED IT (IF PURCHASEDNEW) FOR A FULL REFUND TOONE OF THE FOLLOWING: (1)THE DEALER FROM WHICH YOUPURCHASED THIS PRODUCT; (2)Garmin INTERNATIONAL, INC.CUSTOMER SERVICE, 1200 EAST151st STREET, OLATHE, KS66062, USA; (3) Garmin (EU-ROPE) LTD., LIBERTY HOUSE,HOUNSDOWN BUSINESS PARK,SOUTHAMPTON, SO40 9LR,UNITED KINGDOM; OR (4)Garmin CORPORATION CUS-TOMER SERVICE, No. 68, JANG-SHU 2nd ROAD, SIJHIH, TAIPEICOUNTY, TAIWAN.
License Terms and Conditions
• Garmin (“we” or “us”) providesyou with storage media containingthe computer Software (the “Soft-ware”) and the embedded or ac-companying digital map Data, in-cluding any “online” or electronicdocumentation and printed materi-als (together called the “Product”for purposes of this License Agree-ment), and grants you a limited,non-exclusive license to use theProduct in accordance with theterms of this Agreement. You agreeto use this Data together with theGarmin product for solely personal,or if applicable, for use in yourbusiness’ internal operations, andnot for service bureau, time-sharing, resale or other similar pur-poses. Accordingly, but subject tothe restrictions set forth in the fol-lowing paragraphs, you may copythis Data only as necessary for youruse to (i) view it, and (ii) save it,provided that you do not removeany copyright notices that appearand do not modify the Software orData in any way. You agree not to
otherwise reproduce, copy, modify,decompile, disassemble, reverse en-gineer or create derivative works ofany portion of the Product, andmay not transfer or distribute it inany form, for any purpose, exceptto the extent permitted by manda-tory laws.
• Restrictions. Except where youhave been specifically licensed todo so by Garmin, and without lim-iting the preceding paragraph, youmay not use this Data with anyproducts, systems, or applicationsinstalled or otherwise connected toor in communication with vehicles,and which are capable of dispatch,fleet management or similar appli-cations where the Data is used by acentral control center in dispatch-ing a fleet of vehicles. In addition,you are prohibited from renting orleasing the Data or the Garminproducts containing the Data toany other person or third party.Only those rental car companiesthat are specifically authorized byGarmin in writing to rent Garmin
49
products containing the Data totheir rental customers are permit-ted to rent out such products.
• No Warranty. This Product (in-cluding the Data) is provided to you“as is,” and you agree to use it atyour own risk. Garmin and its li-censors (and their licensors andsuppliers) make no guarantees,representations or warranties ofany kind, express or implied, aris-ing by law or otherwise, includingbut not limited to, content, quality,accuracy, completeness, effective-ness, reliability, merchantability,fitness for a particular purpose,usefulness, use or results to be ob-tained from the Product, or that theData or server will be uninter-rupted or error-free.
• Disclaimer of Warranty. GarminAND ITS LICENSORS (INCLUD-ING THEIR LICENSORS ANDSUPPLIERS) DISCLAIM ANYWARRANTIES, EXPRESS OR IM-PLIED, OF QUALITY, PERFOR-MANCE, MERCHANTABILITY,FITNESS FOR A PARTICULAR
PURPOSE OR NONINFRINGE-MENT. NO ORAL OR WRITTENADVICE OR INFORMATIONPROVIDED BY Garmin OR ITSSUPPLIERS AND LICENSORSSHALL CREATE A WARRANTY,AND YOU ARE NOT ENTITLEDTO RELY ON ANY SUCH ADVICEOR INFORMATION. THIS DIS-CLAIMER OF WARRANTIES ISAN ESSENTIAL CONDITION OFTHIS AGREEMENT. Some States,Territories and Countries do not al-low certain warranty exclusions, soto that extent the above exclusionmay not apply to you.
• Disclaimer of Liability. GarminAND ITS LICENSORS (INCLUD-ING THEIR LICENSORS ANDSUPPLIERS) SHALL NOT BE LI-ABLE TO YOU: IN RESPECT OFANY CLAIM, DEMAND OR AC-TION, IRRESPECTIVE OF THENATURE OF THE CAUSE OFTHE CLAIM, DEMAND OR AC-TION ALLEGING ANY LOSS, IN-JURY OR DAMAGES, DIRECT OR
INDIRECT, WHICH MAY RE-SULT FROM THE USE OR POS-SESSION OF THE INFORMA-TION; OR FOR ANY LOSS OFPROFIT, REVENUE, CON-TRACTS OR SAVINGS, OR ANYOTHER DIRECT, INDIRECT, IN-CIDENTAL, SPECIAL OR CON-SEQUENTIAL DAMAGES ARIS-ING OUT OF YOUR USE OF ORINABILITY TO USE THIS INFOR-MATION, ANY DEFECT IN THEDATA OR INFORMATION, ORTHE BREACH OF THESETERMS OR CONDITIONS,WHETHER IN AN ACTION INCONTRACT OR TORT OR BASEDON A WARRANTY, EVEN IFGarmin OR ITS LICENSORSHAVE BEEN ADVISED OF THEPOSSIBILITY OF SUCH DAM-AGES. Garmin’S AND ITS LICEN-SORS’ TOTAL AGGREGATE LI-ABILITY WITH RESPECT TO ITSOBLIGATIONS UNDER THISAGREEMENT OR OTHERWISEWITH RESPECT TO THE GarminPRODUCT OR THE DATASHALL NOT EXCEED $1.00.
50
Some States, Territories and Coun-tries do not allow certain liabilityexclusions or damages limitations,so to that extent the above may notapply to you.
• Disclaimer of Endorsement. Ref-erence to any products, services,processes, hypertext links to thirdparties or other Data by tradename, trademark, manufacturer,supplier or otherwise does not nec-essarily constitute or imply its en-dorsement, sponsorship or recom-mendation by Garmin or itslicensors. Product and service in-formation are the sole responsibil-ity of each individual vendor. TheNAVTEQ name and logo, theNAVTEQ and NAVTEQ ONBOARD trademarks and logos, andother trademarks and trade namesowned by NAVTEQ North AmericaLLC may not be used in any com-mercial manner without the priorwritten consent of NAVTEQ.
• Export Control. You agree not toexport from anywhere any part ofthe Data provided to you or any
direct product thereof except incompliance with, and with all li-censes and approvals required un-der, applicable export laws, rulesand regulations.
• Indemnity. You agree to indem-nify, defend and hold Garmin andits licensors (including their respec-tive licensors, suppliers, assignees,subsidiaries, affiliated companies,and the respective officers, direc-tors, employees, shareholders,agents and representatives of eachof them) free and harmless fromand against any liability, loss, in-jury (including injuries resulting indeath), demand, action, cost, ex-pense, or claim of any kind or char-acter, including but not limited toattorney’s fees, arising out of or inconnection with any use or posses-sion by you of the Product (includ-ing the Data).
• Entire Agreement. These termsand conditions constitute the entireagreement between Garmin (and itslicensors, including their licensorsand suppliers) and you pertaining to
the subject matter hereof, and su-persedes in their entirety any and allwritten or oral agreements previ-ously existing between us with re-spect to such subject matter.
• Governing Law. (a) For EuropeanUnion NAVTEQ Data The aboveterms and conditions shall be gov-erned by the laws of the Nether-lands, without giving effect to (i) itsconflict of laws provisions, or (ii)the United Nations Convention forContracts for the International Saleof Goods, which is explicitly ex-cluded. You agree to submit to thejurisdiction of the Netherlands forany and all disputes, claims andactions arising from or in connec-tion with the Data provided to youhereunder. (b) For North AmericanNAVTEQ Data and other non-European Union NAVTEQ DataThe above terms and conditionsshall be governed by the laws ofIllinois, without giving effect to (i)its conflict of laws provisions, or (ii)the United Nations Convention forContracts for the International Sale
51
of Goods, which is explicitly ex-cluded. You agree to submit to thejurisdiction of Illinois for any andall disputes, claims and actionsarising from or in connection withthe Data provided to youhereunder.
• Government End Users. If EndUser is an agency, department, orother entity of the United StatesGovernment, or funded in whole orin part by the U.S. Government,then use, duplication, reproduc-tion, release, modification, disclo-sure or transfer of the Product andaccompanying documentation issubject to restrictions as set forth inDFARS 252.227-7014(a)(1) (JUN1995) (DOD commercial computersoftware definition), DFARS27.7202-1 (DOD policy on com-mercial computer software), FAR52.227-19 (JUN 1987) (commer-cial computer software clause forcivilian agencies), DFARS252.227-7015 (NOV 1995) (DODtechnical data – commercial itemsclause); FAR 52.227-14 AlternatesI, II, and III (JUN 1987) (civilian
agency technical data and noncom-mercial computer software clause);and/or FAR 12.211 and FAR12.212 (commercial item acquisi-tions), as applicable. In case of con-flict between any of the FAR andDFARS provisions listed herein andthis License, the construction thatprovides greater limitations on theGovernment’s rights shall control.The contractor/manufacturer isGarmin International, Inc., 1200East 151st Street, Olathe, KS66062, USA and NAVTEQ NorthAmerica LLC, 222 MerchandiseMart Plaza, Suite 900, Chicago,Illinois 60654.
DMTI Spatial, Inc. End User LicenseAgreement
• The software embedded in yourGarmin product is owned byGarmin Ltd. or its subsidiaries(“Garmin”). The third-party postalcode data (the “Licensed Product”)embedded in or accompanyingyour Garmin product is owned byDMTI Spatial, Inc. and is licensedto Garmin. Both the software and
Licensed Product are protected un-der copyright laws and interna-tional copyright treaties. THIS is alegal Agreement between you, theend user, and DMTI Spatial, Inc.BY LOADING THE PRODUCT(S)WITH THIS AGREEMENT YOUARE AGREEING TO BE BOUNDBY THE TERMS OF THISAGREEMENT. IF YOU DO NOTAGREE TO THE TERMS OFTHIS AGREEMENT, PROMPTLY(within 7 days of purchase) RE-TURN THE PRODUCTS ANDANY ACCOMPANYING ITEMS(including written materials) TOGarmin INTERNATIONAL, INC.CUSTOMER SERVICE, 1200EAST 151ST STREET, OLATHE,KANSAS 66062, FOR A REFUND.
• DMTI Spatial hereby grants to youa non-exclusive, non-transferablelicense to use the data containedon the media in this package (the“Licensed Product”) solely for per-sonal non-commercial use or inter-nal use in your business, on a singlecomputer, Pocket PC, or Palm de-vice in conjunction with Garmin
52
software, and with compatibleGarmin products that you person-ally own. Your use of the data issubject to the following terms andconditions:
• You acknowledge that the LicensedProduct(s) belong to DMTI Spatialand its third party supplier, andthat the Licensed Product(s) arecopyrighted. Unauthorized copyingof the Licensed Product(s), is ex-pressly forbidden and you may beheld legally responsible for copy-right infringement which is causedor encouraged by your failure toabide by the terms of this agree-ment. You may make one archivalcopy of the Licensed Product(s),solely for your own use, subject tothe following restrictions: (1) Thearchival copy must be treated in thesame way as the original copy; (2)No copy may be used while anyother copy is in use. If you make anarchival copy of the Licensed Prod-uct(s), you must include on it thecopyright notice that is on the origi-nal media.
• You may not reproduce, sell, rent,lease, loan, distribute or sublicensethe Licensed Product(s) or other-wise transfer the Licensed Prod-uct(s) to any third party, use theLicensed Product for commercialpurposes except for internal use inyour business, decompile, disas-semble, reverseengineer the Li-censed Product(s), or use the Li-censed Product to create anyderived product for any of theseprohibited purposes. You may notplace the Licensed Product(s) onthe Internet without a prior writtenagreement with DMTI Spatial.
• In no event shall DMTI Spatial orits third party supplier(s) be liableto you or your organization for anyindirect damages including any lostprofits, lost savings, interruption ofbusiness, loss of business opportu-nities or other incidental or conse-quential damages, arising out ofyour possession, use of, or inabilityto use the Licensed Product(s),even if DMTI Spatial, its third partysupplier(s), or any authorized
dealer, has been advised of the pos-sibility of the damages, or for anyclaim by any other party. In noevent shall DMTI Spatial have anyliability for damage in excess of thelicense fee paid for the LicensedProduct(s).
• You shall indemnify and holdDMTI Spatial, its third party sup-plier(s) and their officers, employ-ees and agents, harmless from andagainst any claim, demand or ac-tion, irrespective of the nature ofthe claim, demand or action, alleg-ing loss, costs, damages, expenses,or injury (including injury fromdeath) resulting from your autho-rized or unauthorized, use, posses-sion, modification, or alteration ofthe Licensed Product(s).
• THE LICENSED PRODUCT(S)AND THE ASSOCIATED WRIT-TEN MATERIALS IN CONNEC-TION THEREWITH ARE PRO-VIDED “AS IS” WITHOUTWARRANTY OF ANY KIND, EI-THER EXPRESSED OR IM-PLIED, ARISING BY LAW OR
53
OTHERWISE, INCLUDING BUTNOT LIMITED TO WARRANTIESOF EFFECTIVENESS, COM-PLETENESS, ACCURACY, MER-CHANTABILITY OR FITNESSFOR A PARTICULAR PURPOSE.THE ENTIRE RISK AS TO THEQUALITY AND PERFORMANCEOF THE LICENSED PROD-UCT(S) IS WITH YOU, THE ENDUSER. NO ORAL OR WRITTENADVICE GIVEN BY DMTI SPA-TIAL OR ITS DEALERS, DIS-TRIBUTORS, AGENTS OR EM-PLOYEES CREATES AWARRANTY OR IN NAY WAY IN-CREASES DMTI SPATIAL’S LI-ABILITY AND YOU MAY NOTRELY ON ANY SUCH INFORMA-TION OR ADVICE.
• No statement or recommendationmade or assistance given by DMTISpatial or by its representatives oremployees shall constitute a waiverby DMTI Spatial or any of the
provisions herein. Nor does or willDMTI Spatial warrant any servicesit may provide in connection withthe use of the Licensed product(s),to include any assistance, training,or other consultation with you.
• This license is effective until termi-nated. This license will terminateautomatically without notice fromDMTI Spatial if you fail to complywith any provision of this LicenseAgreement. Upon termination, youshall destroy or return the LicensedProduct(s) including any writtenmaterials and all copies of the Li-censed Product(s) and any writtenmaterials in connection therewithhave been destroyed or returned toDMTI Spatial.
• This Agreement shall be governedby the laws of the Province ofOntario.
• ©2007 DMTI Spatial Inc. (exceptfor data licensed from third parties).
• DMTI Spatial is an authorized userand distributor of selected StatisticsCanada Computer files under Li-censing Agreement 6230.
• © Copyright, HER MAJESTY THEQUEEN IN RIGHT OF CANADA,as represented by the Minister ofIndustry, Statistics Canada 1996.
• Digital Topographic Data producedunder license from Her Majesty theQueen in Right of Canada, withpermission of Natural ResourcesCanada.
MORE/SETTINGS
More Main MenuThe More Main Menu consists of thefollowing options:
• Settings
• Refer to the Settings information inthis section for more details.
54
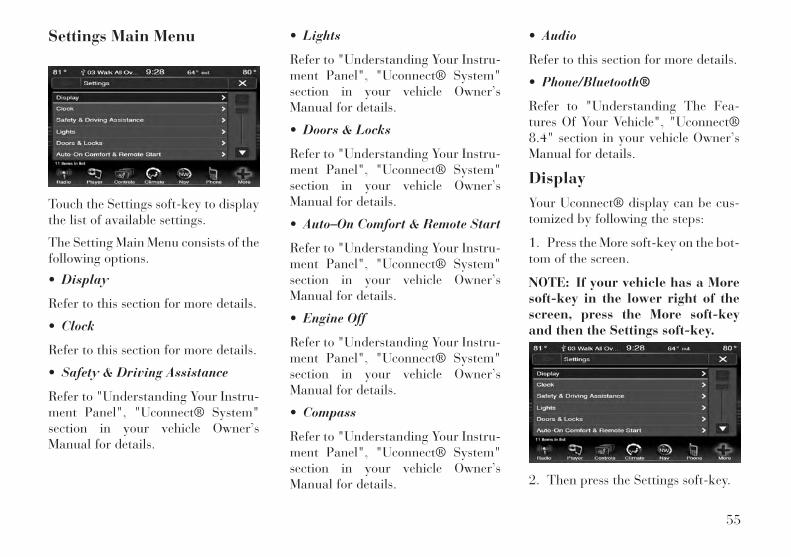
Settings Main Menu
Touch the Settings soft-key to displaythe list of available settings.
The Setting Main Menu consists of thefollowing options.
• Display
Refer to this section for more details.
• Clock
Refer to this section for more details.
• Safety & Driving Assistance
Refer to "Understanding Your Instru-ment Panel", "Uconnect® System"section in your vehicle Owner’sManual for details.
• Lights
Refer to "Understanding Your Instru-ment Panel", "Uconnect® System"section in your vehicle Owner’sManual for details.
• Doors & Locks
Refer to "Understanding Your Instru-ment Panel", "Uconnect® System"section in your vehicle Owner’sManual for details.
• Auto–On Comfort & Remote Start
Refer to "Understanding Your Instru-ment Panel", "Uconnect® System"section in your vehicle Owner’sManual for details.
• Engine Off
Refer to "Understanding Your Instru-ment Panel", "Uconnect® System"section in your vehicle Owner’sManual for details.
• Compass
Refer to "Understanding Your Instru-ment Panel", "Uconnect® System"section in your vehicle Owner’sManual for details.
• Audio
Refer to this section for more details.
• Phone/Bluetooth®
Refer to "Understanding The Fea-tures Of Your Vehicle", "Uconnect®8.4" section in your vehicle Owner’sManual for details.
DisplayYour Uconnect® display can be cus-tomized by following the steps:
1. Press the More soft-key on the bot-tom of the screen.
NOTE: If your vehicle has a Moresoft-key in the lower right of thescreen, press the More soft-keyand then the Settings soft-key.
2. Then press the Settings soft-key.
55

3. Press the Display soft-key to enterthe Display Menu.
4. The Display Menu shows the fol-lowing options for you to customizeyour display.
• Display Mode• Display Brightness with Head-
lights On• Display Brightness with Head-
lights Off• Set Language• Units• Voice Response Length• Touchscreen Beep• Control Screen Time-Out• Navigation Turn-by-Turn Dis-
played in the Cluster (If Equipped)• Fuel Saver Displayed in the Clus-
ter (If Equipped)
5. Touch the + or – soft-key to changethe Brightness. Or touch the checkmark or empty box to change a selec-tion.
NOTE: The check-mark indicatesthe current selection is active.
6. Touch the X soft-key to exit fromthe Display Menu and Settings.
Clock Setting1. Press the Settings soft-key on thebottom of the screen.
NOTE: If your vehicle has a Moresoft-key in the lower right of thescreen, press the More soft-keyand then the Settings soft-key.
NOTE: The Clock Setting Menucan also be accessed by touchingthe time as it is displayed on thescreen.
2. Press the Clock soft-key to enterthe Clock Menu
3. In the Set Time screen, press the +or – soft-keys to adjust the hours orminutes.
4. Other options available:• Sync with GPS Time• Time Format• Show Time in Status Bar
5. Touch the check mark or emptybox to change a selection.
NOTE: The check-mark indicatesthe current selection is active.
56
4
SAFETY GUIDELINES
• Warnings . . . . . . . . . . . . . . . . . . . . . . . . . . . . . . . .58• Safety References . . . . . . . . . . . . . . . . . . . . . . . . . .58• Intended Use . . . . . . . . . . . . . . . . . . . . . . . . . . . . .58• System Care . . . . . . . . . . . . . . . . . . . . . . . . . . . . . .58
• Safe Usage of the Uconnect® System . . . . . . . . . . .58• Connections . . . . . . . . . . . . . . . . . . . . . . . . . . . . .58• Touchscreen . . . . . . . . . . . . . . . . . . . . . . . . . . . . .58• Disc Drive . . . . . . . . . . . . . . . . . . . . . . . . . . . . . .59• GPS Navigation Antenna – If Equipped. . . . . . . . . .59• Other Electronic Devices . . . . . . . . . . . . . . . . . . . .59
• Gracenote® . . . . . . . . . . . . . . . . . . . . . . . . . . . . . .59• About Gracenote. . . . . . . . . . . . . . . . . . . . . . . . .59• Gracenote Proprietary Legends . . . . . . . . . . . . .59• Gracenote® End User License Agreement. . . . . .60
57

WarningsThis manual contains WARNINGSagainst operating procedures thatcould result in an accident or bodilyinjury. If you do not read the entiremanual, you may miss important in-formation. Observe all WARNINGS!
The information given in this manualis subject to change.
Safety ReferencesBefore operating this system for thefirst time, please read this manualcarefully. Note the safety precautionsdescribed in this manual. If you haveany questions, please contact the ve-hicle manufacturer or your autho-rized dealer.
Intended UseGenerally recognized rules of radiotechnology were maintained duringthe development and manufacture ofthis system. When using this product,be aware of area-specific norms andguidelines.
System Care
Safe Usage of the Uconnect®SystemRead all instructions in this manualcarefully before using your system toensure proper usage!
Your system is a sophisticated elec-tronic device. Do not let young chil-dren use your system.
Permanent hearing loss may occur ifyou play your music or the system atloud volumes. Exercise caution whensetting the volume on your system.
Driving is a complex activity that re-quires your full attention. If you'reengaged in driving or any activity thatrequires your full attention, we rec-ommend that you not use your sys-tem.
NOTE: Many features of this sys-tem are speed dependent. For yourown safety, it is not possible to usethe touchscreen keyboard whilethe vehicle is in motion.
Keep drinks, rain, and other sourcesof moisture away from your system.Besides damage to your system, mois-ture can cause electric shocks as withany electronic device.
ConnectionsNever force any connector into theports of your system. Make sure yourconnectors are the correct shape andsize before you connect.
Any attached cable should be routedso that it will not apply any pressureto the connection.
TouchscreenDo not touch the screen with any hardor sharp objects (pen, USB stick, jew-elry, etc.) which could scratch thetouchscreen surface!
NOTE: It is possible to use a plasticstylus for press screen enabled de-vices such as a PDA and Pocket PCs.
Do not spray any liquid or causticchemicals directly on the screen! Usea clean and dry micro fiber lens clean-ing cloth in order to clean the touch-screen.
58
If necessary, use a lint-free clothdampened with a cleaning solution,such as isopropyl alcohol, or an iso-propyl alcohol and water solution ra-tio of 50:50. Be sure to follow thesolvent manufacturer's precautionsand directions.
Disc DriveDo not insert any damaged, warped,scratched or dirty Discs into the Discplayer.
Discs that have been modified with anadhesive label should not be used inthe Disc player.
Do not insert more than one Disc at atime into the drive slot.
GPS Navigation Antenna –If EquippedThe antenna for the navigation GPSsystem is mounted in various loca-tions (depending on the vehiclemodel) within the dashboard. Do notplace items on the dashboard aroundthe GPS antenna location. Objectsplaced within the line of sight of the
antenna will decrease performance.Do not place items directly on orabove the antenna.
Other Electronic DevicesYou may bring other electronic de-vices into your vehicle (e.g., PDA,iPod®, laptop computer, etc.). Someof these devices may cause electro-magnetic interference with the GPS.If a degradation in the navigation sys-tem is observed, turn the devices off,or keep them as far away from theGPS antenna as possible.
Gracenote®
This navigation radio is equippedwith the Gracenote® Music Recogni-tion Service, with an embedded data-base to look up album, song title,
genre and artist information. Datawill be found for most Audio CDs(CDA discs). Data will not be foundfor DVDs or data discs (those withMP3 or WMA files).
About GracenoteMusic recognition technology andrelated data are provided byGracenote®. Gracenote is the indus-try standard in music recognitiontechnology and related content deliv-ery. For more information visitwww.gracenote.com.
Gracenote ProprietaryLegendsCD and music-related data fromGracenote, Inc., copyright © 2000 topresent Gracenote. Gracenote Soft-ware, copyright © 2000 to presentGracenote. One or more patents ownedby Gracenote apply to this productand service. See the Gracenote websitefor a non-exhaustive list of applicableGracenote patents. Gracenote, CDDB,MusicID, MediaVOCS, the Gracenotelogo and logotype, and the "Powered
59
by Gracenote" logo are either regis-tered trademarks or trademarks ofGracenote in the United States and/orother countries.
Gracenote® End UserLicense AgreementThis application or device containssoftware from Gracenote, Inc. of Em-eryville, California (“Gracenote”).The software from Gracenote (the“Gracenote Software”) enables thisapplication to perform disc and/or fileidentification and obtain music-related information, including name,artist, track, and title information(“Gracenote Data”) from online serv-ers or embedded databases (collec-tively, “Gracenote Servers”) and toperform other functions. You may useGracenote Data only by means of theintended End-User functions of thisapplication or device. You agree thatyou will use Gracenote Data, theGracenote Software, and GracenoteServers for your own personal non-commercial use only. You agree not toassign, copy, transfer or transmit theGracenote Software or any Gracenote
Data to any third party. YOU AGREENOT TO USE OR EXPLOITGRACENOTE DATA, THEGRACENOTE SOFTWARE, ORGRACENOTE SERVERS, EXCEPTAS EXPRESSLY PERMITTEDHEREIN. You agree that your non-exclusive license to use the GracenoteData, the Gracenote Software, andGracenote Servers will terminate ifyou violate these restrictions. If yourlicense terminates, you agree to ceaseany and all use of the GracenoteData, the Gracenote Software, andGracenote Servers. Gracenote re-serves all rights in Gracenote Data,the Gracenote Software, and theGracenote Servers, including all own-ership rights. Under no circumstanceswill Gracenote become liable for anypayment to you for any informationthat you provide. You agree thatGracenote, Inc. may enforce its rightsunder this Agreement against you di-rectly in its own name. The Gracenoteservice uses a unique identifier totrack queries for statistical purposes.The purpose of a randomly assignednumeric identifier is to allow the
Gracenote service to count querieswithout knowing anything about whoyou are. For more information, see theweb page for the Gracenote PrivacyPolicy for the Gracenote service. TheGracenote Software and each item ofGracenote Data are licensed to you“AS IS.” Gracenote makes no repre-sentations or warranties, express orimplied, regarding the accuracy ofany Gracenote Data from in theGracenote Servers. Gracenote re-serves the right to delete data fromthe Gracenote Servers or to changedata categories for any cause thatGracenote deems sufficient. No war-ranty is made that the Gracenote Soft-ware or Gracenote Servers are error-free or that functioning of GracenoteSoftware or Gracenote Servers willbe uninterrupted. Gracenote is notobligated to provide you with newenhanced or additional data types orcategories that Gracenote may pro-vide in the future and is free to discon-tinue its services at any time.GRACENOTE DISCLAIMS ALLWARRANTIES EXPRESS OR IM-PLIED, INCLUDING, BUT NOT
60

LIMITED TO, IMPLIED WAR-RANTIES OF MERCHANTABILITY,FITNESS FOR A PARTICULARPURPOSE, TITLE, AND NON-INFRINGEMENT. GRACENOTEDOES NOT WARRANT THE RE-SULTS THAT WILL BE OBTAINEDBY YOUR USE OF THEGRACENOTE SOFTWARE OR ANYGRACENOTE SERVER. IN NOCASE WILL GRACENOTE BE LI-ABLE FOR ANY CONSEQUENTIALOR INCIDENTAL DAMAGES ORFOR ANY LOST PROFITS OR LOSTREVENUES. copyright © 2000 topresent Gracenote.
61

Notes

Notes
Notes
Fiat Group Automobiles S.p.A. - Parts & Services - Technical Services - Service EngineeringLargo Senatore G. Agnelli, 3 - 10040 Volvera - Torino (Italia)
Print n. 530.04.534 - 09/2013 - Edition 1
U C O N N E C T ® 4 . 3 / 8 . 4
F I A T F R E E M O N TENGLISH
The data contained in this publication is intended merely as a guide. FIAT reserves the right to modify the models and versions described in this booklet at any time for technical and commercial reasons.
If you have any further questions please consult your FIAT dealer. Printed in recycled paper without chlorine.
1516562_EE_FIAT_Freemont_UCONNECT_cover.indd 1 8/29/13 9:49 AM