2015 caaspp administration of the online interim tests resource … · ation of the online interim...
TRANSCRIPT
C A L I F O R N I A Assessment of Student Performance and Progress
Administration of the OnlineInterim Tests Resource Guide
Winter/Spring 2015Smarter Balanced Interim Assessments for English Language Arts/Literacy and Mathematics
Updated February 24, 2015Prepared by the Smarter Balanced Assessment Consortium©California customization prepared by Educational Testing Service®
© Smarter Balanced Assessment Consortium, 2014 Descriptions of the operation of the Test Delivery System, Test Information Distribution Engine, and related systems are property of the American Institutes for Research® (AIR) and are used with permission of AIR.

-2-
Interim Assessment Administration Resource Guide
TABLE OF CONTENTS FOR THE INTERIM ASSESSMENT
ADMINISTRATION RESOURCE GUIDE
Administering Online INTERIM Tests ............................................................................................................ 4
Accessing the Test Administrator (TA) Interface ....................................................................................... 4
Selecting Interim Tests ............................................................................................................................ 5
Generating the Session ID ....................................................................................................................... 6
Beginning Testing ................................................................................................................................... 7
Viewing Students’ Test Settings and Approving Students for Testing ........................................................ 8
Monitoring the Test Session .................................................................................................................. 15
Pausing a Student’s Test ....................................................................................................................... 18
Stopping a Test Session and Logging Off ............................................................................................... 19
Understanding the Student Testing Site..................................................................................................... 21
Test Layout ........................................................................................................................................... 21
Global and Context Menus .................................................................................................................... 22
Universal Tools Available in Online Tests ............................................................................................... 25
Change Log ............................................................................................................................................... 32
List of Tables
Table 1. Student Test Settings ........................................................................................................................... 9 Table 2. Students in Your Test Session Column Descriptions ..................................................................... 16 Table 3. Chronological Test Statuses during Testing .................................................................................... 17 Table 4. Other Test Statuses ............................................................................................................................ 18 Table 5. Universal Test Tools ........................................................................................................................... 25 Table 6. ELA Performance Task Test Tools .................................................................................................... 26
Table of Figures
Figure 1. [Test Administrator Interface] button ........................................................................................................ 5 Figure 2. Sign In Web form......................................................................................................................................... 5 Figure 3. TA Interface ................................................................................................................................................. 5 Figure 4. Start the live session .................................................................................................................................. 6 Figure 5. Select a test category ................................................................................................................................. 6 Figure 6. Select a grade and content area ................................................................................................................ 6 Figure 7. Generate Session ID ................................................................................................................................... 7 Figure 8. Test Addition message box ......................................................................................................................... 7 Figure 9. Sample Your Tests screen .......................................................................................................................... 8 Figure 10. Approvals and Test Settings screen ...................................................................................................... 11 Figure 11. Approvals and test settings for selected student ................................................................................. 12 Figure 12. No students awaiting approval .............................................................................................................. 13 Figure 13. Students awaiting approval ................................................................................................................... 13 Figure 14. Students awaiting approval ................................................................................................................... 14 Figure 15. Approvals and Student Test Settings screen ........................................................................................ 14 Figure 16. Deny student entry to test session ........................................................................................................ 15 Figure 17. Students in Your Test Session table ...................................................................................................... 15 Figure 18. Students in Your Test Session table ...................................................................................................... 18 Figure 19. TA Site banner containing [Stop Session] button ................................................................................. 19 Figure 20. Sample item page ................................................................................................................................... 21

-3-
Interim Assessment Administration Resource Guide
Figure 21. Sample global menu ............................................................................................................................... 22 Figure 22. Overview of elements for multiple-choice/selected-response items .................................................. 23 Figure 23. Sample context menu for items ............................................................................................................. 23 Figure 24. Sample context menu for answer options ............................................................................................ 23 Figure 25. [Expand/Collapse Passage] button ....................................................................................................... 26 Figure 26. Passage context menu with ASL ............................................................................................................ 27 Figure 27. Sample ASL video in test ........................................................................................................................ 27 Figure 28. Sample glossary window displaying two glossaries .............................................................................. 28 Figure 29. Masking: Preview area ........................................................................................................................... 29 Figure 30. Masking: Masked area ........................................................................................................................... 29 Figure 31. Print options in global menu .................................................................................................................. 30 Figure 32. Print item in context menu ..................................................................................................................... 30 Figure 33. Print Request Submitted message ........................................................................................................ 30 Figure 34. TA Interface [Print] button ...................................................................................................................... 30 Figure 35. Print request preview (TA Interface) ...................................................................................................... 31 Figure 36. Speak Tool options for items ................................................................................................................. 31
Table of Acronyms and Initialisms in the Administration of the Online Interim Tests Resource Guide
Term Meaning
ASL American Sign Language
CAASPP California Assessment of Student Performance and Progress
CALPADS California Longitudinal Pupil Achievement Data System
ELA English language arts/literacy
IAB Interim Assessment Block
ICA Interim Comprehensive Assessment
LEA Local educational agency
PT performance task
SC CAASPP Test Site Coordinator
SSID Statewide Student Identifier
TA Test Administrator
TOMS Test Operations Management System
TTS text-to-speech

-4-
Interim Assessment Administration Resource Guide
ADMINISTERING ONLINE INTERIM TESTS
You must create a test session before students can log on to the Student Testing Site to take Interim
tests. In order for a student to take a specific test, it must be included in your test session.
This section contains information on how to start a test session, add tests to the session, verify
students’ test settings, approve students for testing, and monitor their progress.
Warning: Check students’ information and test settings before test sessions.
Students who require test settings other than the default must have their settings
updated in the Test Operations Management System (TOMS) before testing begins. For
information about test settings, including accommodations, refer to the TOMS Online
Student Test Settings User Guide and the Smarter Balanced Usability, Accessibility, and
Accommodations Guidelines. Both documents are linked on the California Assessment of
Student Performance and Progress (CAASPP) Instructions and Manuals Web page at
http://caaspp.org/administration/instructions/.
If you have a student whose test settings are incorrect, do not approve him or her for
testing. Contact your local educational agency (LEA) CAASPP Coordinator or CAASPP Test
Site Coordinator (SC) (as appropriate) to have the student’s information updated in
TOMS.
Accessing the Test Administrator (TA) Interface
Note: Before you begin, you must enable pop-ups in your browser by turning off your
browser’s pop-up blocker. If you do not, you will see an error message. What follows are
three common ways to turn off a pop-up blocker:
Internet Explorer
1. Access “Internet Options.”
2. Select the Privacy tab.
3. Uncheck the “Turn on Pop-up Blocker” box.
4. Select [OK].
Mozilla Firefox
1. Access “Options.”
2. Select the Content tab.
3. Uncheck the “Block pop-up windows” box.
4. Select [OK].
Google Chrome
1. Access “Settings”
2. Scroll to the bottom of the Web page and select the [Show advanced settings…] link.
3. In the Privacy section, select the [Content settings…] button.
4. Scroll down to the Pop-ups section.
5. Select the Allow all sites to show pop-ups radio button.
6. Select [Done].
7. Exit the Settings Web page.

-5-
Interim Assessment Administration Resource Guide
The Test Administrator (TA) must create a test session before students can log on to the Student
Testing Site to take Interim tests. When a TA creates a test session, a unique Session ID is randomly
generated. This Session ID must be provided to the students before they log on. To create a session,
follow these steps:
1. The TA logs on to the TA Interface by going
to the CAASPP portal at http://caaspp.org,
selecting the [Test Administrator Interface]
button (Figure 1), and then entering the
username and password on the Sign In
Web form (Figure 2) and selecting [Log In].
2. The TA creates a test session. The test
selection box is located in the upper-left
corner of the screen, shown in Figure 3. To
create a test session, the TA may select the
test category, grade, and content area
(subject). This will select available tests,
including all grade levels and content areas.
Figure 1. [Test Administrator Interface] button
Figure 2. Sign In Web form
Figure 3. TA Interface
Selecting Interim Tests
To help ensure the correct selection of tests, the TA interface has been modified to include required
test filter selections.
When you log on to the TA Interface, no tests will be automatically listed in the test selection box. TAs
will be required to select a Category (Smarter Fixed Interim, Smarter Fixed Interim Performance
Tasks) or both a Grade and Subject.
Once a selection is made, the filtered test list will display, and you will be able to select one or more
tests to include in the session.

-6-
Interim Assessment Administration Resource Guide
1. The TA begins the test session. To begin, select the [Start Live Session] button, which is
highlighted in Figure 4.
Figure 4. Start the live session
2. The TA selects the test category. Select “Smarter Fixed Interim” or “Smarter Fixed Interim
Performance Tasks” from the Category drop-down list, which is highlighted in Figure 5.
Alternately, the TA can select the grade and content area. Select the appropriate grade and
content area for the class being tested in the session, which is highlighted in Figure 6.
Figure 5. Select a test category
Figure 6. Select a grade and content area
Generating the Session ID
Caution: A test session automatically ends when you manually stop the session or log off
of the Test Administrator (TA) Site. While a student can resume a test opportunity in a new
session, the test session cannot be resumed. In order for students to resume testing, you
will need to create a new test session and give them the new Session ID. Students cannot
access previous (closed) test sessions.
1. The TA informs students of the test Session ID. The system-generated Session ID appears in
the top-right center of the screen. It is circled in Figure 7.

-7-
Interim Assessment Administration Resource Guide
Figure 7. Generate Session ID
TAs should write the test Session ID on the board or another place where students
can see it. The test Session ID must be entered as it is written, without extra spaces
or characters. Make sure to retain the Session ID until testing is complete. If the
student pauses the test during a test session, he or she will need to log back on to
the assessment with the same Session ID.
2. The TA informs students of the test session in which they are participating. In addition to the
test Session ID, TAs must clearly communicate to students whether they are participating in
the performance task (PT) or non-performance task (non-PT) in English language arts/literacy
(ELA) or mathematics. This will help ensure that students select the correct Interim
assessment. If TAs are unsure of which content area or test their students are participating
in, they should contact the SC for clarification.
3. The TA may add additional Interim tests. Add additional tests to a session in progress in the
same manner as the original test(s). Once you confirm their selection before the test is
added by selecting [Yes] in the Test Addition message box (shown in Figure 8), the additional
student(s) is/are eligible to test. For security purposes, tests must be added to an in-
progress session individually. Multiple tests cannot be selected at the same time once a
session is in progress.
Figure 8. Test Addition message box
Note: While tests may be added to an active test session after it has started, they cannot be
removed from the session.
Beginning Testing
1. Students log on and select the appropriate test. Students log on with their Confirmation Code
(legal first name as it appears in the California Longitudinal Pupil Achievement Data System
[CALPADS]), CA-SSID (Statewide Student Identifier), and Session ID. Students will then
confirm their identity (to verify that they logged on with the correct credentials), and select a
test. Students may only select a test for which they have been pre-assigned.

-8-
Interim Assessment Administration Resource Guide
Figure 9. Sample Your Tests screen
On the Your Tests screen, the student will see a number of available tests and be
able to select from the available tests. A sample of this screen is shown in Figure 9.
TAs should direct students to select the appropriate test based on what the TA is
planning to administer at that time. The TA should direct students to the content area
“ELA” or “Math” and the test type “NonPT” or “PT.”
Viewing Students’ Test Settings and Approving Students for Testing
After you have started the test session and given the students the Session ID, they can begin the
logon process. You must approve students before they can begin testing. This process includes
viewing each student’s test settings and verifying that they are correct.
About Interim Student Test Settings
If a student’s default test settings have not been pre-set in TOMS, the student is automatically
assigned the default for each test setting (for that respective test). It is important to note that the
default settings can vary by test. Only the test settings available for that test will be displayed on the
Approvals and Student Test Settings screen for that student.
Table 1 details the embedded test settings that can be assigned to a student’s test through the TA
Interface.
Warning: If a student requires a different test setting for an Interim Assessment that
cannot be changed in the TA Interface, the student should not test. Student test settings
must be updated in TOMS before testing begins.
Important: Student test settings that can be modified in the TA Interface for Interim
assessments will not be modifiable in the interface for the Summative assessments.

-9-
Interim Assessment Administration Resource Guide
Table 1. Student Test Settings
Test Settings Options Descriptions and Notes
Language English (default) All tests are presented in English.
Students whose language is set to Spanish for
math tests will view items in both English and
Spanish (stacked translation). Test directions will
also be translated into Spanish.
Students who require tests in braille should have
the braille option selected.
Braille
Spanish (mathematics)
Includes the following
Designated Supports:
Translations (stacked);
and
Translated test directions
American Sign
Language
(ASL)
Do not show ASL videos
(default)
Allows students to view test content translated
into ASL by a human signer.
Show ASL videos
Closed
Captioning
Off (default) This accommodation is used for students who are
deaf or hard of hearing and who typically access
information presented via audio by reading words
that appear in synchrony with the audio
presentation and may need this support to
access audio content.
On
Color Contrast Black on White (default) By default, tests are presented with black text on
a white background. Students who need a
different combination of text and background
should select the appropriate option.
Black on Rose
Medium Gray on Light Gray
Yellow on Blue
Reverse Contrast
Masking Masking Not Available
(default)
Allows the blocking of content that is not of
immediate need or that may be distracting to the
student. Masking Available
Permissive
Mode
Permissive Mode Disabled
(default) Permissive mode should be enabled for students
who require access to accessibility software in
order to interact with the test (e.g., screen
readers, magnifiers, etc.).
When permissive mode is disabled, the only
application that can be open on the computer is
the secure browser.
Permissive Mode Enabled

-10-
Interim Assessment Administration Resource Guide
Test Settings Options Descriptions and Notes
Print on
Demand
None (default) Allows student to request printing of items and
stimuli.
Note: If a student requires items to be printed,
and this is not set, you must deny the student
and ask your SC to have the LEA CAASPP
Coordinator contact the California Department of
Education. You must provide the student’s SSID
as well as the reason for the request.
Items
Stimuli
Items and Stimuli
Print Size Level 0 (No Zoom) = 1X
(default)
The print size the student should have when
starting the test. The selected print size becomes
the default for all items in that test.
The default print size (Level 0—No Zoom) is 14
point for all tests.
Level 1 = 1.5X
Level 2 = 1.75X
Level 3 = 2.5X
Level 4 = 3X
Test Shell Standard (default) By default, all tests use the standard interface.
This interface is compatible with all supported
desktops and tablets. The streamlined interface
presents the test in an alternate, simplified
format in which the items are displayed below the
stimuli.
Important: The streamlined interface is not
intended to be tablet compatible.
Streamlined
Text-to-
Speech
No Text-to-Speech (default) Students with this test setting enabled may listen
to the read-aloud of the items and/or stimuli in
the assessment.
Note: Text-to-Speech is not available in Spanish.
Items (English language arts/
literacy [ELA])
Stimuli (ELA)
Stimuli and Items
(ELA and mathematics)
-11-
Interim Assessment Administration Resource Guide
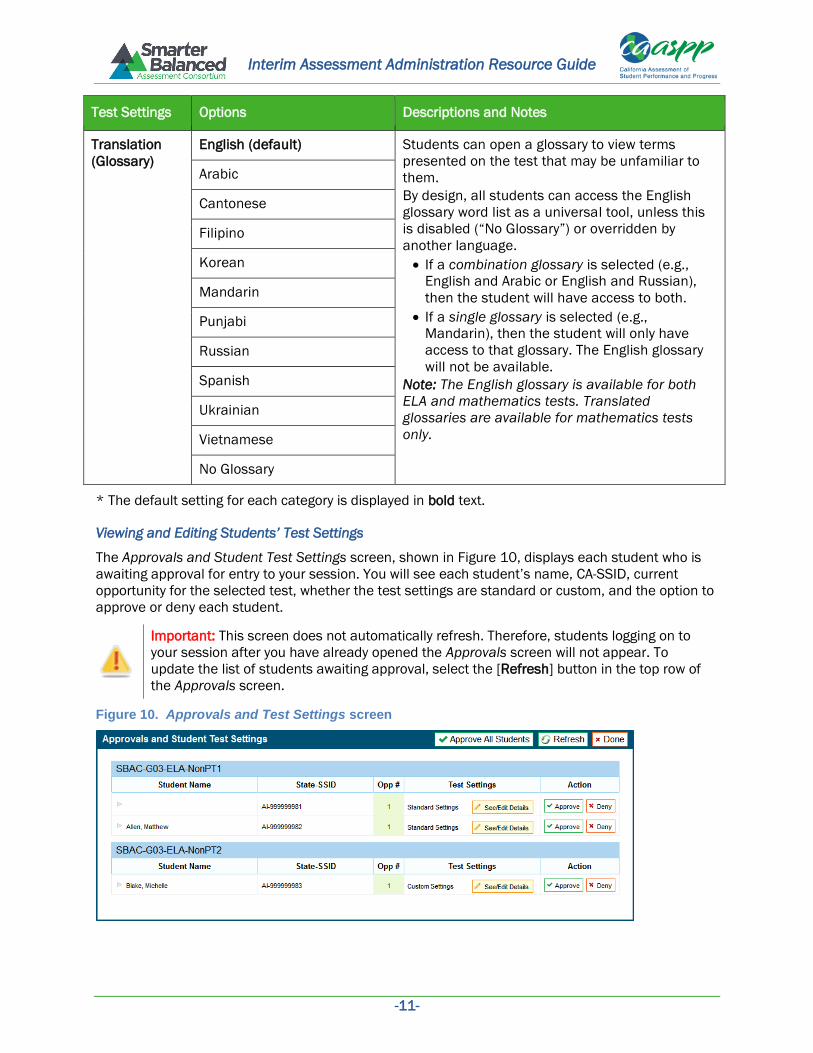
Test Settings Options Descriptions and Notes
Translation
(Glossary)
English (default) Students can open a glossary to view terms
presented on the test that may be unfamiliar to
them.
By design, all students can access the English
glossary word list as a universal tool, unless this
is disabled (“No Glossary”) or overridden by
another language.
If a combination glossary is selected (e.g.,
English and Arabic or English and Russian),
then the student will have access to both.
If a single glossary is selected (e.g.,
Mandarin), then the student will only have
access to that glossary. The English glossary
will not be available.
Note: The English glossary is available for both
ELA and mathematics tests. Translated
glossaries are available for mathematics tests
only.
Arabic
Cantonese
Filipino
Korean
Mandarin
Punjabi
Russian
Spanish
Ukrainian
Vietnamese
No Glossary
* The default setting for each category is displayed in bold text.
Viewing and Editing Students’ Test Settings
The Approvals and Student Test Settings screen, shown in Figure 10, displays each student who is
awaiting approval for entry to your session. You will see each student’s name, CA-SSID, current
opportunity for the selected test, whether the test settings are standard or custom, and the option to
approve or deny each student.
Important: This screen does not automatically refresh. Therefore, students logging on to
your session after you have already opened the Approvals screen will not appear. To
update the list of students awaiting approval, select the [Refresh] button in the top row of
the Approvals screen.
Figure 10. Approvals and Test Settings screen

-12-
Interim Assessment Administration Resource Guide
About the Test Settings column:
Students with Standard test settings are students whose test settings are set to
default.
Students with Custom test settings are those who have at least one test setting that
is not the default. Test settings include color choices, a different print size than the
default, text-to-speech, American Sign Language, Translation (Glossary), etc.
Viewing a Student’s Interim Test Settings:
1. Select the [See/Edit Details] button for that student. The screen will change to show the
student’s test information.
Adjusting a Student’s Interim Test Settings and Accommodations
Some of the student’s information on this screen is read-only. Students’ default test settings should
be preset in TOMS by the LEA CAASPP Coordinator or SC (as appropriate).
Important: Student test settings that can be modified in the TA Interface for Interim
assessments will not be modifiable in the interface for the Summative assessments.
For more information about editable test settings, refer to Table 1.
Figure 11. Approvals and test settings for selected student
Review each student’s information to ensure that he or she has the correct test setting options; a
sample is shown in Figure 11. If a student’s settings are incorrect, he or she should not test.
Warning: A student who is resuming a test will have the test settings that were
established at the time the student began the test. If the settings are not correct when
the student starts or resumes the test, the student’s test will need to be reset.

-13-
Interim Assessment Administration Resource Guide
Changing/Confirming a Student’s Settings in the TA Interface:
1. For each editable test setting, select the correct option.
2. Confirm the test settings.
a. Select [Set] to confirm the selected test settings and return to the list of students
awaiting approval. You will still have to approve the student for testing.
b. Select [Set & Approve] to confirm the selected test settings and approve the student for
testing.
Notification of Students Awaiting Approval (Approvals Preview)
The right side of the top panel of the TA Interface contains the [Approvals (#)] section, which displays
the number of students awaiting approval and a preview list of students’ names and tests.
Once students begin requesting entry to your test session, the [Approvals (#)] preview table will
become active. The table will display those students who are awaiting approval. You will see each
student’s name and the test he or she selected. Students are able to select only one test. Figure 12
shows what the screen looks like when there are no students awaiting approval. Figure 13 shows the
preview table.
Approvals Notification and Preview Table
Figure 12. No students awaiting approval Figure 13. Students awaiting approval
[Approvals] button is not selectable
[Approvals] button says [Approvals (0)]
Preview table says “No students awaiting
approval”
[Approvals]button is selectable
[Approvals] button says [Approvals (#)]
Preview table lists each student and his or her
selected test
Viewing students awaiting approval:
1. Select the [Approvals (#)] button to access the Approvals and Student Test Settings screen.
Approving Students for Testing
1. The TA views and approves students who are waiting for test session approval. After students
have selected a test, the TA verifies that each student selected the appropriate test before
approving that student for testing.

-14-
Interim Assessment Administration Resource Guide
The right side of the top panel of the TA Interface contains the [Approvals (#)] section, which
displays the number of students awaiting approval and a preview list of students’ names and
tests.
Figure 14. Students awaiting approval
About test names:
Tests labeled “ICA” are Interim Comprehensive Assessments (ICAs).
Tests labeled “IAB” are Interim Assessment Blocks (IABs).
After selecting [Approvals (#)], a new window will open. The Approvals and Student
Test Settings window, shown in Figure 15, will organize students by test name. You
may also view this screen after you have confirmed student test settings. On it, you
can approve individual students or approve all waiting students at once. The approval
process allows TAs to account for every student and verify that the test the student
has selected is the right one.
After all students on the list have been approved (or denied), whether individually or
all at once, the Approvals screen window will automatically close.
Figure 15. Approvals and Student Test Settings screen
If a student’s test is correct, the TA selects [Approve] for that student.
If all students’ tests are correct, the TA can select [Approve All Students].
If a student selected the wrong test, the TA should select [Deny]. The student will be logged
off and will need to log on again. Reasons for denial include:
– The student selected an ICA instead of an IAB.
– The student selected a mathematics test instead of an ELA test.
Note: You may approve all students who appear in the list. However, subsequent students
who log on to the test session after you have opened the Approvals screen will still need to
be approved.

-15-
Interim Assessment Administration Resource Guide
Denying Students Entry in to the Test Session
Although TAs can approve all students at the same time, students must be individually denied entry
in to the test session. TAs may deny students for one of the following reasons:
The student is not supposed to enter the session.
The student’s demographic information is incorrect.
The student’s required test settings are incorrect.
Figure 16. Deny student entry to test session
To deny a student entry in to the test session:
1. On the Approvals screen, select [Deny] for that student.
2. In the pop-up window that appears (shown in Figure 16), enter a brief reason for denying the
student.
3. Select the green [Deny] button.
The student will receive a message explaining the reason he or she was denied entry to the session.
The student will then be logged off and directed to the Sign In screen.
Monitoring the Test Session
1. The TA monitors student progress. It is very important that TAs monitor student progress
throughout the test session. This includes verifying that students are participating in the
appropriate content area and Interim assessment. The TA monitors the test each student is
taking by referring to the Students in Your Test Session table within the TA Interface, a
sample of which is shown in Figure 17.
Viewing Student Progress During Testing
Figure 17. Students in Your Test Session table

-16-
Interim Assessment Administration Resource Guide
Note: If a student’s row is grayed out, that student is not actively testing. This occurs when
the student’s test is paused or the student has completed and submitted the test.
The information the Students in Your Test Session table displays for each student in the test session
is described in Table 2.
Table 2. Students in Your Test Session Column Descriptions
Column Description
Student Name The first and last name of the student in the session (if populated in
CALPADS/TOMS).
State-SSID This column displays the CA-SSID associated with the student (in
CALPADS/TOMS).
Opportunity # Each student’s record indicates the opportunity number for that student’s
subject test.
Each student has two opportunities for each test.
Test The name of the test the student is taking.
Test Settings Each student’s test will display one of the following settings:
Standard Settings: Indicates that the default test settings are applied for this
student’s test opportunity.
Custom Settings: Indicates that one or more of the student’s test settings is
different from the default settings.
The [Binoculars] icon [ ] displayed in this column is selectable. Select the icon
for a student to view his or her test settings.
Requests When a student requests a printout of a reading passage or other test material,
a [Print] button will appear in this column. Select the [Print] button to review and
authorize or deny the student’s request.
Student
Status
This column lists the current status for each student in the test session.
The numbers (#/#) listed after the status show the student’s progress while
he or she is taking the test. The first number is the number of items the
student has answered. The second number is the total number of items that
will be administered.
Pause Test Select the [Pause] button to pause a student’s test. The student will be logged
off.
In the event that a student is taking an incorrect assessment, the TA can pause the student’s test.
The TA should then instruct the student to log off and log on again to select the correct test.
Important:
If you are using the TA Interface and you navigate to TOMS or the TA Practice or Training
Site, your session will stop, and all students in the session will be logged off. You cannot
resume your session. You will have to create a new session, and your students will have to
log on to the new session to resume testing. When you start a new session, give the new
Session ID to your students so that they can log on and resume testing.
If you accidentally close the TA Interface or TA Training Site while students are still testing,
your session will remain open until it times out after 30 minutes. You can open the
-17-
Interim Assessment Administration Resource Guide
browser and navigate back to the TA Interface. You will be prompted to enter your active
Session ID.
As a security measure, TAs are automatically logged off after 30 minutes of user inactivity
and student inactivity in the session, which will result in closing the test session. If this
occurs, you will have to create a new session, and your students will have to log on to the
new session to resume testing. When you start a new session, give the new Session ID to
your students so that they can log on and resume testing.
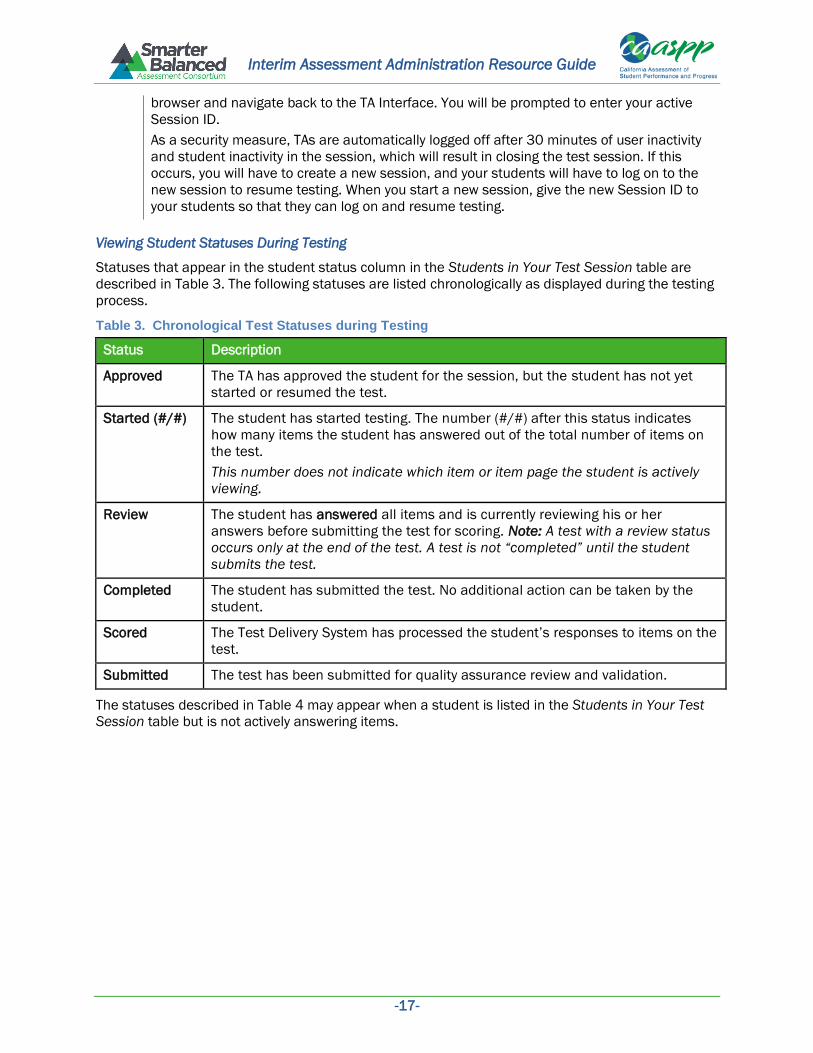
Viewing Student Statuses During Testing
Statuses that appear in the student status column in the Students in Your Test Session table are
described in Table 3. The following statuses are listed chronologically as displayed during the testing
process.
Table 3. Chronological Test Statuses during Testing
Status Description
Approved The TA has approved the student for the session, but the student has not yet
started or resumed the test.
Started (#/#) The student has started testing. The number (#/#) after this status indicates
how many items the student has answered out of the total number of items on
the test.
This number does not indicate which item or item page the student is actively
viewing.
Review The student has answered all items and is currently reviewing his or her
answers before submitting the test for scoring. Note: A test with a review status
occurs only at the end of the test. A test is not “completed” until the student
submits the test.
Completed The student has submitted the test. No additional action can be taken by the
student.
Scored The Test Delivery System has processed the student’s responses to items on the
test.
Submitted The test has been submitted for quality assurance review and validation.
The statuses described in Table 4 may appear when a student is listed in the Students in Your Test
Session table but is not actively answering items.

-18-
Interim Assessment Administration Resource Guide
Table 4. Other Test Statuses
Status Description
Denied The TA denied the student entry in to the session. If the student attempts to
enter the session again, this status will change to “Pending” until the TA
approves or denies the student.
Paused (#/#) The student’s test is currently paused. The following scenarios will result in a
paused status:
The student pauses his or her test by selecting the [Pause] button.
The student has been idle longer than 20 minutes, and the test was paused.
The TA pauses the student’s test.
The TA stops the session.
A technical problem with the student’s computer or browser has resulted in a
loss of connection to the Test Delivery System.
The time listed with this status indicates how long the student’s test has been in
the paused status.
Pending The student is awaiting TA approval for a new test opportunity.
Suspended The student is awaiting TA approval to resume a test opportunity.
Pausing a Student’s Test
TAs can pause an individual student’s test using the Pause Test column in the Students in Your Test
Session table, shown in Figure 18.
Students whose tests are paused will be logged off and returned to the Sign In screen. If they wish to
re-enter the session, they will need to log on and proceed through the approval process again. (If the
session has been stopped, the student will need to obtain a new Session ID in order to resume
testing.)
Figure 18. Students in Your Test Session table
To pause an individual student’s test:
1. In the Pause Test column, select the [Pause] button for that student.
2. Select [Yes] to confirm that you want the student’s test to be paused.
Note: When a student’s test is paused, the status column will display how long the test has
been paused (in minutes).
-19-
Interim Assessment Administration Resource Guide
Reminder: Students whose tests are paused for more than 20 minutes cannot return to
previous items in their test; they may only resume from the last item they were working on.
Resuming within the 20 minute period will allow students to move freely through the test.
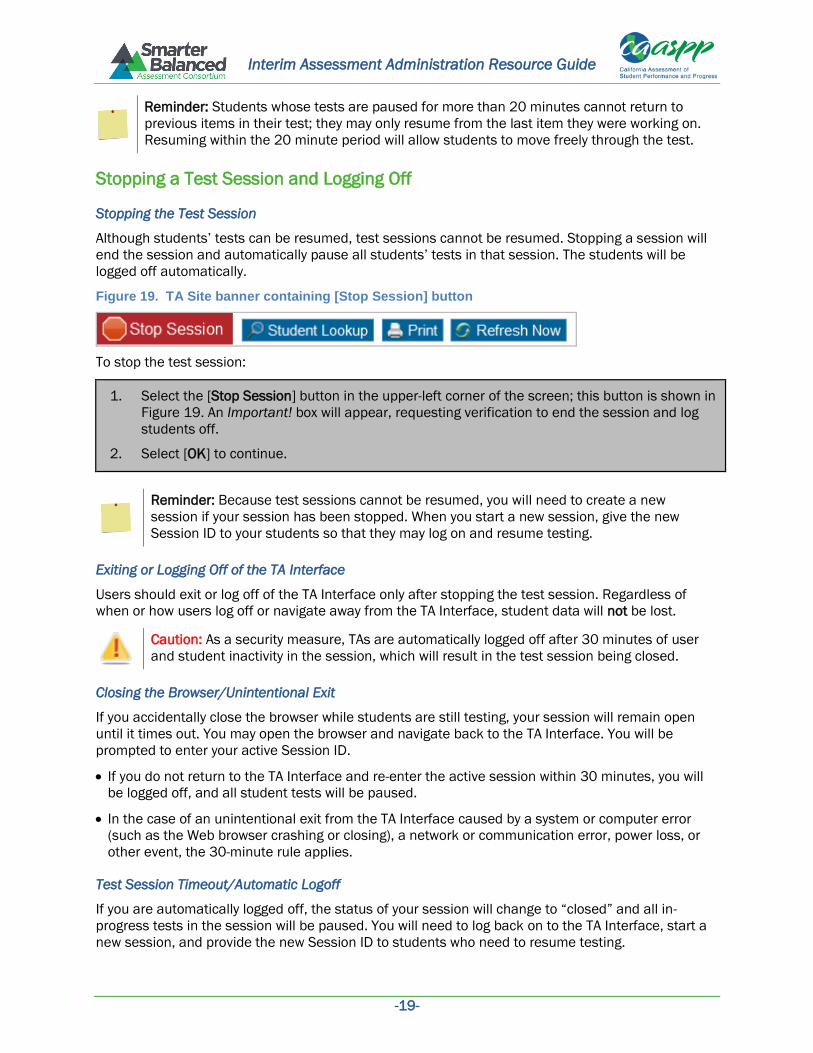
Stopping a Test Session and Logging Off
Stopping the Test Session
Although students’ tests can be resumed, test sessions cannot be resumed. Stopping a session will
end the session and automatically pause all students’ tests in that session. The students will be
logged off automatically.
Figure 19. TA Site banner containing [Stop Session] button
To stop the test session:
1. Select the [Stop Session] button in the upper-left corner of the screen; this button is shown in
Figure 19. An Important! box will appear, requesting verification to end the session and log
students off.
2. Select [OK] to continue.
Reminder: Because test sessions cannot be resumed, you will need to create a new
session if your session has been stopped. When you start a new session, give the new
Session ID to your students so that they may log on and resume testing.
Exiting or Logging Off of the TA Interface
Users should exit or log off of the TA Interface only after stopping the test session. Regardless of
when or how users log off or navigate away from the TA Interface, student data will not be lost.
Caution: As a security measure, TAs are automatically logged off after 30 minutes of user
and student inactivity in the session, which will result in the test session being closed.
Closing the Browser/Unintentional Exit
If you accidentally close the browser while students are still testing, your session will remain open
until it times out. You may open the browser and navigate back to the TA Interface. You will be
prompted to enter your active Session ID.
If you do not return to the TA Interface and re-enter the active session within 30 minutes, you will
be logged off, and all student tests will be paused.
In the case of an unintentional exit from the TA Interface caused by a system or computer error
(such as the Web browser crashing or closing), a network or communication error, power loss, or
other event, the 30-minute rule applies.
Test Session Timeout/Automatic Logoff
If you are automatically logged off, the status of your session will change to “closed” and all in-
progress tests in the session will be paused. You will need to log back on to the TA Interface, start a
new session, and provide the new Session ID to students who need to resume testing.

-20-
Interim Assessment Administration Resource Guide
Logging Off
To log off of the TA Interface (and all other Single Sign-On System applications), select the [Log Out]
button in the top-right corner of the screen.
Your session will be closed, and you will be directed to the CAASPP portal after you log off. You will
not be able to resume the test session.
Alert: This scenario also occurs when the TA navigates to another site from the TA
Interface. If you need to access TOMS or another application, you are encouraged to open
a separate browser window and use that window for other applications.
If you unintentionally log off of the TA Interface while students are still testing, all in-
progress tests will be paused and the students will be logged off. You cannot resume the
original session. You will need to log back on, start a new session, and provide the new
Session ID to students who need to log back on and resume testing.
-21-
Interim Assessment Administration Resource Guide
UNDERSTANDING THE STUDENT TESTING SITE
This section is designed to familiarize Test Administrators (TAs) with the Student Testing Site. It
describes what students see and the tools they have access to while taking the tests. This section
will address some of the common questions TAs and students may have.
This section covers the following:
Test layout
Online test tools
Test Layout
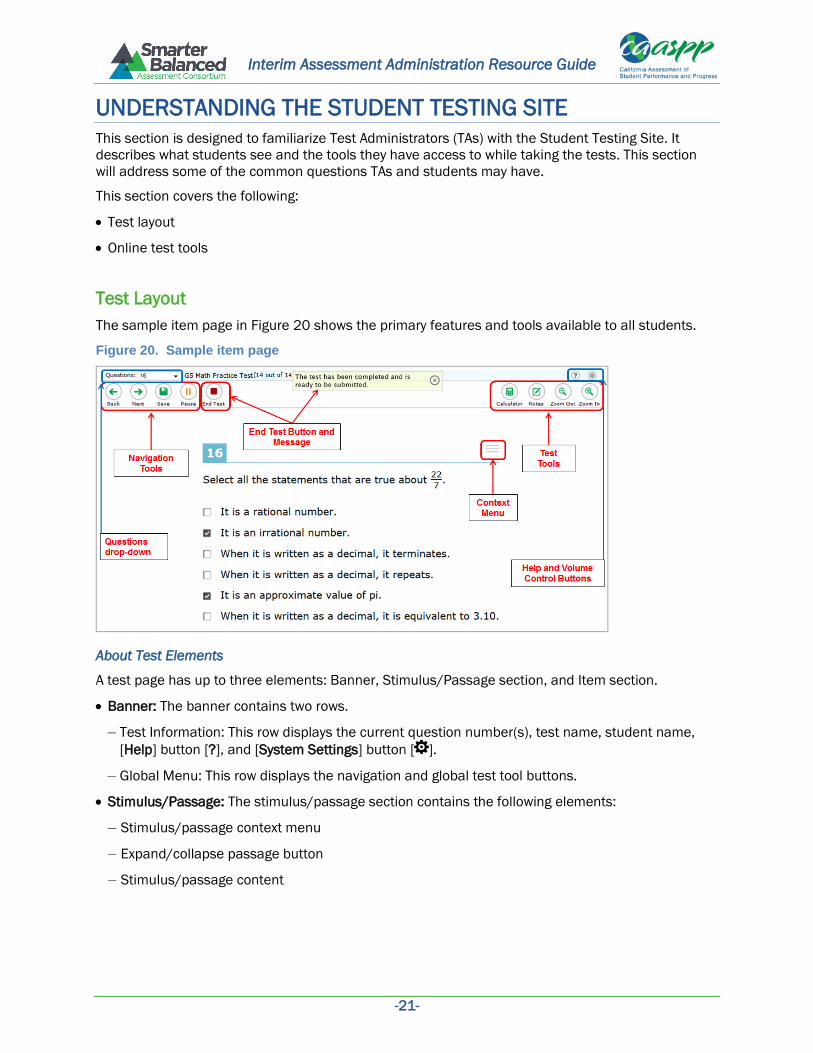
The sample item page in Figure 20 shows the primary features and tools available to all students.
Figure 20. Sample item page
About Test Elements
A test page has up to three elements: Banner, Stimulus/Passage section, and Item section.
Banner: The banner contains two rows.
– Test Information: This row displays the current question number(s), test name, student name,
[Help] button [?], and [System Settings] button [ ].
– Global Menu: This row displays the navigation and global test tool buttons.
Stimulus/Passage: The stimulus/passage section contains the following elements:
– Stimulus/passage context menu
– Expand/collapse passage button
– Stimulus/passage content

-22-
Interim Assessment Administration Resource Guide
Item: Each item contains the following elements:
– Item number
– Item context menu
– Item stem
– Response area/answer options
Global and Context Menus
The Global and Context Menus allow students to access on-screen tools. These tools can be
accessed using a mouse or keyboard shortcuts.
Global Menu
The Global Menu, shown in Figure 21, contains the navigation buttons as well as the global menu
tools.
Navigation buttons ([Back], [Next], [Pause], [Save], [End Test]) appear on the left side of the global
menu.
Test tools (e.g., [Help], [System Settings], [Zoom In], [Zoom Out], [Calculator]) appear on the right
side of the global menu.
Figure 21. Sample global menu
To open a test tool in the global menu:
1. Select the button for the tool (e.g., [Calculator]). Most tools will open in a pop-up window.
To use the zoom in and out buttons in the global menu:
1. To make text and images in the test larger, select the [Zoom In] button. The zoom state
persists until the [Zoom Out] button is selected. You can do this up to four times (levels). (The
global menu will not get larger.)
2. To make the text and images in the test smaller again, select the [Zoom Out] button. You can
do this up to four times (levels).
To open the system settings window and adjust the volume:
1. Select the [System Settings] cog wheel [ ] button in the upper right corner of the global
menu (next to the [Help] button [?]). The System Settings window will open.
2. Move the Volume slider to adjust the loudness of the audio.
3. Select [OK] to save the new volume setting.

-23-
Interim Assessment Administration Resource Guide
Context Menus
Tools such as text-to-speech, highlighter, and strikethrough, are accessed using context menus.
These context menus contain the options available for each area of a test item on a page. These
areas are called elements.
Elements include passages or prompts, test items, and answer options (A, B, C, and D). Each answer
option is a single element. Each element has its own context menu.
The context menu options vary depending on the following:
The element type (passage or stimulus, item, or answer option)
The tools available to students (e.g., text-to-speech is available only when using the secure
browser)
Figure 22 shows an overview of the elements for multiple-choice/selected response items. Figure 23
shows a sample context menu for items and Figure 24 shows a sample for answer options.
Figure 22. Overview of elements for multiple-choice/selected-response items
Figure 23. Sample context menu for items
Figure 24. Sample context menu for answer options
Opening a Context Menu for Passages and Items:
Accessing a context menu no longer depends solely on using the selection with the right mouse
button.
Note: Functions selected with the right mouse button are still available. Students who
prefer to select with the right mouse button may do so.

-24-
Interim Assessment Administration Resource Guide
Opening the Context Menu for a Passage or Item:
1. Select the [Context Menu] button [ ] at the upper right corner of the passage or item. The
context menu will open and display the available tools.
2. Select a tool to activate or open it.
Opening a Context Menu for Answer Options
Students may use the context menu button to view available tools for multiple-choice or multi-select
answer options. They may also select with their mouse or trackpad’s right mouse button.
The instructions to open the context menu for an answer option using the on-screen button differ
depending on device.
Mouse or trackpad
1. Select an answer option so that it is “active” (a light blue border will appear around it).
Caution: This will result in the answer option being selected until the student selects
a different option.
2. Select the [Context Menu] button [ ]. The context menu will open.
3. Select a tool to activate or open it.
Tablets
1. Tap an answer option so that it is “active” (a light blue border will appear around it).
Caution: This will result in the answer option being selected until the student selects
a different option.
2. Tap the [Context Menu] button. The context menu will open.
3. Select a tool to activate or open it.
To open the context menu for an answer option using selection with the right mouse button:
Two-button mouse
1. Select with the right mouse button anywhere on an answer option. The context menu will
open.
2. Select a tool to activate or open it.
Single-button mouse (for use with Mac computers)
1. Move the mouse to an answer option.
2. On the keyboard, press the [Ctrl] key and select the mouse button. The context menu will
open.
3. Select a tool to activate or open it.

-25-
Interim Assessment Administration Resource Guide
Chromebooks
1. Using the trackpad, move the mouse pointer to an answer option.
2. Press and hold the [Alt] key on the keyboard.
3. Press down on the track pad until it “clicks.” The context menu will open.
4. Select a tool to activate or open it.
Universal Tools Available in Online Tests
This section provides information about the online test tools available to students.
Universal Test Tools
The online tools described in Table 5 are available within all online tests for all students. These tools
can be turned off in the TA Interface before students begin testing.
Table 5. Universal Test Tools
Test Tool Description
[?] (Help) To access the Test Instructions and Help screen at any time, select [?].
[Zoom In] & [Zoom
Out]
To shrink or enlarge the font and images, select the [Zoom In] and [Zoom
Out] buttons.
English Glossary Some words have a light gray dotted outline. These words have synonyms
or descriptions. Select these words to open the glossary.
Stimulus Expansion
Tool
Passages and stimuli can be expanded for easier readability. For more
information, see the Stimulus Expansion Tool section on the next page.
Highlighter Highlight a section of text in a passage or test item.
Select text on the screen, select with the right mouse button, and select
[Highlight]. The selected text will become yellow.
Note: Text in images cannot be highlighted.
Mark (Flag) for
Review
Open the context menu for an item and select [Mark for Review].
Notepad Students may select [Notepad] in the context menu for any item they
would like to provide feedback for.
Strikethrough Cross out answer options for selected-response items.
Open the context menu for an answer option, and select [Strikethrough]. A
thick gray line will appear over the answer option.
Tutorial In the context menu for an item, select [Tutorial] to view a brief video
about the item type (selected-response, constructed-response, etc.).

-26-
Interim Assessment Administration Resource Guide
English Language Arts/Literacy (ELA) Performance Task Test Tools
The following online tools are available for English language arts/literacy (ELA) performance task (PT)
tests.
Note: Spell check and writing tools cannot be turned off.
Table 6. ELA Performance Task Test Tools
Test Tool Description
Global Notes Students may access a notepad throughout the test. This notepad allows
students to enter notes for themselves and is not item-specific.
To open the global notes notepad, select the [Notes] button in the Global
Menu bar.
Dictionary
(and Thesaurus)
Students may open the Merriam-Webster dictionary and thesaurus within
the test. This tool is available during the second segment of ELA
performance task tests.
To open the Dictionary and Thesaurus, select the [Dictionary] button in the
Global Menu bar.
Spell check For tests that contain writing responses, a spell check is available.
Writing tools For tests that contain writing responses, formatting tools are available.
Mathematics Test Tools: Online Calculator
In addition to the above universal tools, students also have access to online calculators for
mathematics tests:
Basic calculator: grade six
Scientific calculator: grades seven and eight
Graphing, Regression, and Scientific calculators: high school (grade eleven)
Stimulus Expansion Tool
Some items are associated with a passage or stimulus. Students can expand the passage section so
that it takes up a larger portion of the screen, making it easier to read. This action will cover a portion
of the items in the right pane.
Students will see an icon in the upper-right corner of the passage section that shows a double arrow
(circled in Figure 25).
Figure 25. [Expand/Collapse Passage] button
-27-
Interim Assessment Administration Resource Guide
To expand and collapse the passage section:
To expand the section, select the [Double Arrow] button [ ]. The section will expand and cover
the items.
To collapse the section, select the [Double Arrow] button again. The section will collapse to its
original size, and the items will be visible.
Accessing Tools for Embedded Designated Supports and Accommodations
The following embedded designated supports and accommodations require students to interact with
on-screen buttons and menus:
American Sign Language
Masking
Print on Demand
Text-to-Speech
Translation (Glossary)
This section provides information on how students can access these tools. These tools require the
appropriate accommodations to be set in the Test Operations Management System (TOMS) by the
LEA CAASPP Coordinator or the CAASPP Test Site Coordinator (SC).
American Sign Language Video Tool
Students who have the American Sign Language (ASL) accommodation can use the ASL tool to view
test content translated into ASL by a human signer. Translations are available for listening passages.
Warning: Students who require ASL must have the accommodation enabled in TOMS by
the LEA CAASPP Coordinator or SC prior to starting a test opportunity. The ASL
accommodation cannot be enabled after a student has started testing.
Figure 26. Passage context menu with ASL
Figure 27. Sample ASL video in test

-28-
Interim Assessment Administration Resource Guide
To access the ASL tool:
1. Open the passage Context Menu, shown in Figure 26.
2. Select [American Sign Language]. The video will open in the lower-left corner of the screen, as
shown in Figure 27.
The video may be moved to another part of the screen.
The video may be paused, resumed, and replayed.
The English Glossary and the Translation (Glossary) Tool
The English Glossary tool is a universal tool. All students have access to the English Glossary on ELA
and mathematics tests, unless it is disabled in the TA Interface.
The Translation (Glossary) tool is a designated support and must be set in TOMS by LEA CAASPP
Coordinators or CAASPP Test Site Coordinators before students begin testing. Translations are
available only for mathematics tests.
Both the English Glossary and Translation tool work the same way.
Note: Not all terms with a glossary will display synonyms or phrasal explanations for multiple
languages.
To open the glossary for a word or phrase:
1. Select or tap a word that has a dashed line above and below it (e.g., “fit” in the image above).
The glossary window will open.
2. If two glossaries are available for the selected word or phrase, two tabs will appear; this can
be seen in Figure 28. The active tab is blue. To view the synonym or translation in the other
glossary, select that tab.
Figure 28. Sample glossary window displaying two glossaries
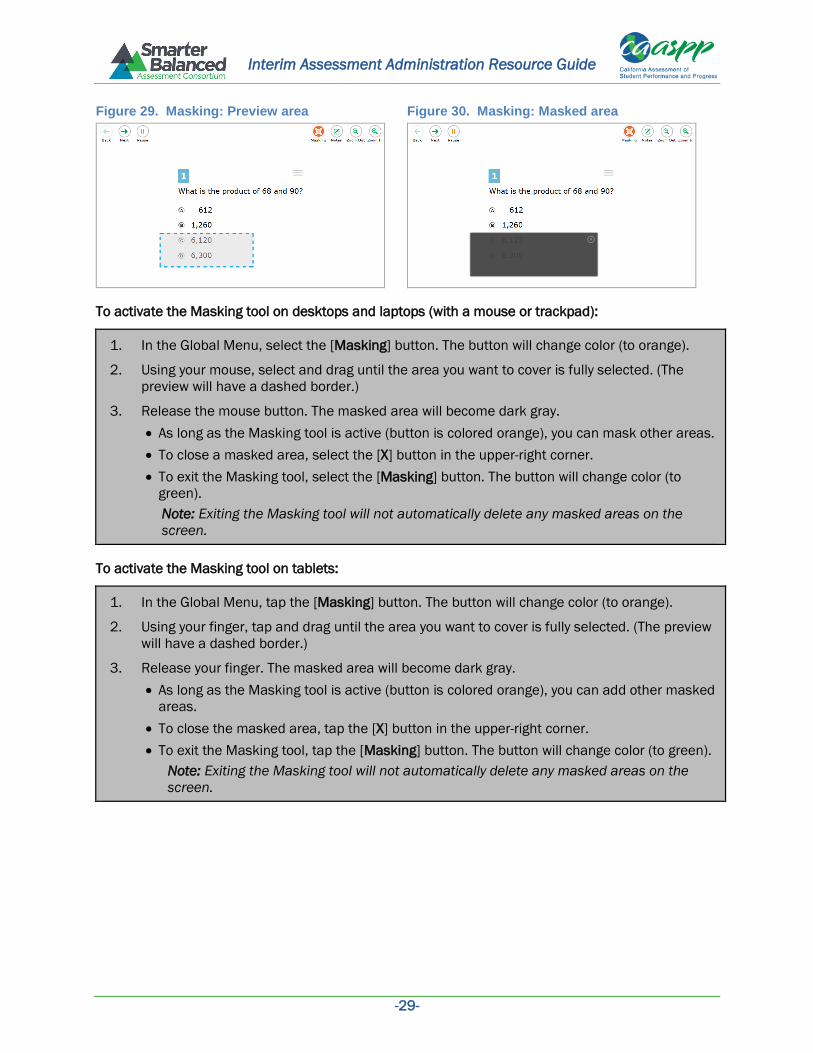
Masking Tool
Students who have masking as a designated support can use the Masking tool to allow them to
focus on one part of the screen at a time. Students who activate the Masking tool can mask as many
areas as needed. Figure 29 shows answer options that have been selected for masking. Figure 30
shows those areas masked.
-29-
Interim Assessment Administration Resource Guide
Figure 29. Masking: Preview area
Figure 30. Masking: Masked area
To activate the Masking tool on desktops and laptops (with a mouse or trackpad):
1. In the Global Menu, select the [Masking] button. The button will change color (to orange).
2. Using your mouse, select and drag until the area you want to cover is fully selected. (The
preview will have a dashed border.)
3. Release the mouse button. The masked area will become dark gray.
As long as the Masking tool is active (button is colored orange), you can mask other areas.
To close a masked area, select the [X] button in the upper-right corner.
To exit the Masking tool, select the [Masking] button. The button will change color (to
green).
Note: Exiting the Masking tool will not automatically delete any masked areas on the
screen.
To activate the Masking tool on tablets:
1. In the Global Menu, tap the [Masking] button. The button will change color (to orange).
2. Using your finger, tap and drag until the area you want to cover is fully selected. (The preview
will have a dashed border.)
3. Release your finger. The masked area will become dark gray.
As long as the Masking tool is active (button is colored orange), you can add other masked
areas.
To close the masked area, tap the [X] button in the upper-right corner.
To exit the Masking tool, tap the [Masking] button. The button will change color (to green).
Note: Exiting the Masking tool will not automatically delete any masked areas on the
screen.

-30-
Interim Assessment Administration Resource Guide
Print-on-Demand Tool
Students who are granted the print-on-demand accommodation may request printing of reading
passages or test items, or both.
Alert: LEA CAASPP Coordinators or SCs may enable print on demand for passages (stimuli)
for students in TOMS. If students require print on demand for items, the TA must ask the
SC to contact the LEA CAASPP Coordinator, who will need to contact the California
Department of Education with the request.
Students who have this accommodation will see the [Print Passage] icon and/or printer icon for each
item. Students who do not have an approved print-on-demand accommodation will not see any
printer icons.
The print-on-demand tool requires interacting with the TA, as student print requests are sent to the
TA Interface first. This tool requires significant attention to security and impact of the support on
other students. After the TA reviews and approves the print requests, the passages or items can be
sent to a printer that is connected to the TA’s computer or tablet.
1. To request a reading passage or item be
printed, the student must select the
corresponding [Print] option from the Global
Menu (shown in Figure 31) or context menu
(shown in Figure 32).
The following options may be available:
– Print Page: Print all test content on the
page (e.g., passage and items).
– Print Passage: Print only the passage on
the page.
– Print Item: Print only the selected item.
Figure 31. Print options in global menu
Figure 32. Print item in context menu
2. Once the print request has been sent, the
student will see a message, shown in
Figure 33, indicating that the request has
been sent to the TA.
Figure 33. Print Request Submitted message
3. On the TA Interface, the [Print] button will
appear in the Requests column in the
Students in Your Test Session table, shown
in Figure 34. Select the button to view the
student’s request.
Figure 34. TA Interface [Print] button

-31-
Interim Assessment Administration Resource Guide
4. Review the print request, shown in
Figure 35. If you approve the print request,
select [Approve]. A cover sheet containing
the student’s name and CA-SSID will open
in a new browser window. The requested
test content will not be displayed on your
screen at any time.
5. Select [Print] in the new window to
complete the print request and view the
printer dialog box. If necessary, adjust the
print settings for your printer (e.g., fit to
page).
6. Select [OK]. The approved test content will
be sent to the printer.
Figure 35. Print request preview (TA Interface)
Text-to-Speech Speak Tool
Students who will use text-to-speech (TTS) can use the Speak tool to listen to passages and/or test
items and answer options, which are shown in Figure 36.
Figure 36. Speak Tool options for items
Warning: Students who require TTS must have the accommodation enabled in TOMS prior
to starting a test opportunity. The TTS accommodation cannot be enabled after a student
has started testing.
Students who use the Speak tool must use headphones to listen to the audio. (It is recommended
that students use headphones with a built-in volume control for maximum audio adjustment
capability.)
Reminder: Text-to-speech settings should be tested and verified as working properly before
students begin their tests. Students who have text-to-speech can ensure that their settings
work as part of their test logon process.
To access the Speak tool:
1. Open the Context Menu for an area that contains text. The Context Menu will appear with the
available [Speak] options.
Students who select a portion of text and then open the Context Menu will be presented
with the option to listen to the selected text. This feature is primarily used with reading
passages.
2. Select the desired [Speak] option and the text will be spoken aloud.

-32-
Interim Assessment Administration Resource Guide
CHANGE LOG
Change Section Date
Updated number of possible test opportunities
to “two.”
Table 2, page 16, Opportunity #
Description
February 24, 2014