2017-1st korea - timorleste amenity science camp™티...pesquisa em educação científica têm se...
TRANSCRIPT

2017-1st
Korea - Timor Leste
Amenity Science Camp
2017. 8. 2. ~ 8. 4.EB Centro de Ensino Alpha
어메니티과학교육연구회Amenity Science Education Research Society
제1회 한국-동티모르
어메니티 과학캠프를 축하합니다.
어메니티과학교육연구회 회장 이성현
동티모르 학생 여러분, 어메니티 과학 캠프에 오신 것을 환영합니다.
어메니티과학교육연구회는 과학을 통해 세상을 아름답게 만들고자
합니다.
과학캠프를 통해서 학생 여러분도 자연이 얼마나 아름다운가를 경험
하고, 이렇게 아름다운 자연을 지키는 일에 동참해 주셨으면 좋겠습
니다.
이 캠프를 위해서 한국의 어메니티과학교육연구회 선생님들은 오랫
동안 준비했습니다.
비록 말은 잘 안 통하지만 서로의 눈빛으로라도 우리의 마음이 전
달되었으면 합니다.
그리고 처음부터 끝까지 준비해 주시고, 도와주신 이대훈 목사님께
감사드립니다.
올해 시작된 과학 캠프가 앞으로도 더욱 발전된 모습으로 계속되길
기대합니다.

Congratulations to
the 1st Korea-Timor Leste Amenity Science Camp
Chair of Amenity Science Education Research society
Lee Seong Hyun
Timor Leste students, Welcome to the Amenity Science Camp.
The Amenity science education research society wants to make the world beautiful
through science.
Through science camps, I hope students will experience how beautiful nature is, and
join in the work of preserving this beautiful nature.
For this camp, Korean amenity science education research society's teachers have
prepared for a long time.
Although the language does not work well, we want our minds to be delivered even in
the eyes of each other.
Thank you, Lee Dae Hun Pastor, for your help from the beginning to the end.
I hope that this year's science camp will continue to grow.
Parabéns à 1ª 'Coreia - Timor leste'
acampamento de ciência Amenity
Presidente da Amenity Science Education Research sociedade
Lee Seong Hyun
Estudantes de Timor-Leste, bem-vindo à acampamento de ciência Amenity.
A sociedade Amenity quer tornar o mundo bonito através da ciência.
Através dos campos de ciência, espero que os alunos experimentem a natureza
bela e se juntem ao trabalho de preservar essa bela natureza.
Para este acampamento, os professores da sociedade coreana Amenity de
pesquisa em educação científica têm se preparado há muito tempo.
Embora o idioma não funcione bem, queremos que nossas mentes sejam
entregues mesmo nos olhos dos outros.
Obrigado, Lee Dae hun Pastor, pela sua ajuda desde o início até o fim.
Espero que o acampamento de ciência deste ano continue a crescer.

Time TableTime 8/2(Wed) 8/3(Thur) 8/4(Fri)
09:00 ~ 09:30 Science Magic Show and Registration
09:30 ~ 10:20
Grade 5Flying Seed
of Life
Playing
the Vuvuzela
Making
Kaleidoscope
Grade 6 Straw RocketMaking a balancing
dragonfly
Total reflection
Magic cup
10:20 ~ 11:50 Snack time
11:50 ~ 12:40
Grade 5 Straw RocketMaking a balancing
dragonfly
Total reflection
Magic cup
Grade 6Flying Seed
of Life
Playing
the Vuvuzela
Making
Kaleidoscope
Contents1st DayFlying Seed of Life ································································································································ 6Straw rocket ·········································································································································· 10Straw spray ············································································································································ 12
2nd DayPlaying the Vuvuzela ··························································································································· 14Making a balancing dragonfly ··········································································································· 16Making a charcoal battery ················································································································· 18
3rd DayMake a kaleidoscope ··························································································································· 20Total reflection Magic cup ················································································································ 22Observing plant cells with a small glass bead microscope ····················································· 24
4th DayImage formation of convex lenses ·································································································· 26Small world Tour ································································································································· 28
MEMO ······················································································································································ 30
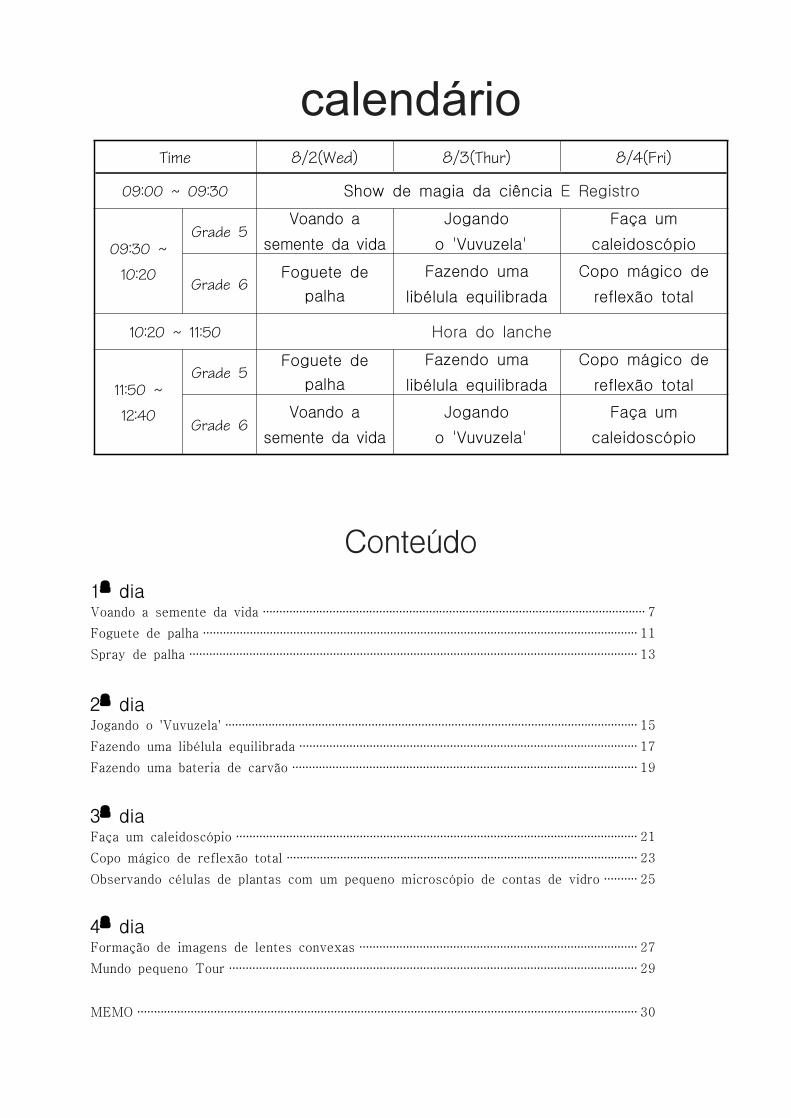
calendárioTime 8/2(Wed) 8/3(Thur) 8/4(Fri)
09:00 ~ 09:30 Show de magia da ciência E Registro
09:30 ~
10:20
Grade 5Voando a
semente da vida
Jogando
o 'Vuvuzela'
Faça um
caleidoscópio
Grade 6Foguete de
palha
Fazendo uma
libélula equilibrada
Copo mágico de
reflexão total
10:20 ~ 11:50 Hora do lanche
11:50 ~
12:40
Grade 5Foguete de
palha
Fazendo uma
libélula equilibrada
Copo mágico de
reflexão total
Grade 6Voando a
semente da vida
Jogando
o 'Vuvuzela'
Faça um
caleidoscópio
Conteúdo
1ª diaVoando a semente da vida ··················································································································· 7Foguete de palha ·································································································································· 11Spray de palha ······································································································································ 13
2ª diaJogando o 'Vuvuzela' ···························································································································· 15Fazendo uma libélula equilibrada ····································································································· 17Fazendo uma bateria de carvão ······································································································· 19
3ª diaFaça um caleidoscópio ························································································································ 21Copo mágico de reflexão total ········································································································· 23Observando células de plantas com um pequeno microscópio de contas de vidro ·········· 25
4ª diaFormação de imagens de lentes convexas ··················································································· 27Mundo pequeno Tour ·························································································································· 29
MEMO ······················································································································································ 30

- 6 -
<A>
<B>
[(1) (2) (3) (4)
Flying Seed of Life
Activity 1. Air fish 1) Throw a long paper in the air. How is it? 2) Make a air fish as shown in the picture. 3) Throw it by holding the tail. How is it? ⁂ Yes, it rotates and falls. Who made them spin? What's around us?
Activity 2. Leaf seed 1) Decorate the leaf seed beautifully. 2) Fold it like <A> and clamp it with a clothespin. 3) Hold it like <B> and throw the leaf seed high in the air. How is it? 4) Fold the leaf seed in the opposite direction to 3) and throw them high in the air. How is it? 5) What is the difference between 3) and 4)? ⁂ Yes. The leaf seed rotates in different directions. This is because the shape of the seed changes the degree of collision with the air. 6) Let the leaf seed turn clockwise. Also try to let it turn counterclockwise. How did you do?
Activity 3. Flying the seed of life(1) Attach the metal coin at the bottom of the styrofoam.(2) Put another styrofoam over it. Make sure the two are slightly shifted at the top.(3) Tape the bottom.(4) Bend styrofoam outward.
(5) Let's fly the seed of life using a rubber band like <Photo C>. In which direction does the seed spin while falling? Why do you think so?
Air fish
Leaf seed
<Photo C>

- 7 -
<B>
<A>
Voando a semente da v ida
Atividade 1. Peixe aéreo 1) Jogue um papel longo no ar. Como é? 2) Faça um peixe de ar como mostrado na imagem. 3) Lança-o segurando a cauda. Como é? ⁂ Sim, ele gira e cai. Quem os fez girar? O que há em torno de nós?
Atividade 2. Semente de folhas 1) Decore a lâmina de folhas lindamente. 2) Dobre-o como <A> e aperte-o com uma pinça de roupa. 3) Segure-o como <B> e atire a semente de folhas no alto do ar. Como é? 4) Dobre a semente de folhas na direção oposta para 3) <A> e jogue-os no alto. Como é? 5) Qual é a diferença entre 3) e 4)? ⁂ Sim.A semente de folhas gira em diferentes direções. Isso ocorre porque a forma da semente altera o grau de colisão com o ar. 6) Deixe a semente de folhas girar no sentido horário. Tente também permitir que ele gire no sentido anti-horário. Como você fez?
Atividade 3. Voando a semente da vida(1) Anexe a moeda de metal no fundo da isopor.(2) Coloque outro isopor sobre ele. Certifique-se de que os dois estão ligeiramente deslocados no topo.(3) Tape o fundo.(4) Dobre a isopor para fora.
(5) Vamos lançar a semente da vida usando uma faixa de borracha como <Foto C>. Em que direção a semente gira enquanto cai? Porque você acha isso?
Peixe aéreo
Semente de folhas
<Foto C>
Dobre cada alaligeiramente para fora

- 8 -
force
wind
wind
spin
forceforce
spin
force
force
force
wind
windspin
spin

- 9 -

- 10 -
<Photo 1>
[Straw rocket with wings folded]
Straw rocket
Activity 1. Send the straw away 1) Let's throw the straw away. How far did you throw it? 2) Cover one end of the thick straw with a rubber plug. Put the thin straw into a thick straw from the opposite end. Put the thin straw in your mouth and blow hard <Photo 1>. What happens? Why? ■ Yes. My exhalation is added to the air in the thick straw, The strength of the air in the thick straw is greater than the strength of the surrounding air.
Activity 2. Make your own straw rocket 1) Make wings with a colored paper.
2) Stick the thick straw through the paper wings, then glue the straw on the place you want to put wings 3) Attach the wings on the thick straw. Put a rubber cap on one end of the thick straw. Put the thin straw into the thick straw.
Activity 3. Blow away the straw rocket 1) Let's blow the thin straw in the thick straw. How is it? 2) Let's change the position of the rubber plug. How is it? 3) Let's change the shape of the wing. 4) Let's make the straw rocket flying with stunts. 5) Let's make a straw rocket to fly back. What did you do? ■ Yes. In order to fly the straw rocket well, it is necessary to make good use of the air resistance around it.
materials

- 11 -
<Foto 1>
[Foguete de palha com asas dobradas]
Foguete de pa lha
Atividade 1. Mande a palha para longe 1) Vamos tirar a palha. Até onde você jogou? 2) Cubra uma extremidade da palha grossa com um bujão de borracha.Coloque a palha fina em uma palha grossa do lado oposto.Coloque a palha fina na sua boca e sopre forte <Foto 1>. O que acontece?
Por quê? ■ Sim. Minha exalação é adicionada ao ar na palha grossa, a força do ar na palha grossa é maior do que a força do ar circundante.
Atividade 2. Faça seu próprio foguete de palha 1) Faça asas com um papel colorido.
2) Coloque a palha grossa nas asas de papel, então Cola a palha no lugar que você quer colocar asas 3) Anexe as asas na palha grossa. Coloque uma tampa de borracha em uma extremidade da palha grossa.Coloque a palha fina na palha grossa.
Atividade 3. Explodir o foguete de palha 1) Vamos passar a palha fina na grossa palha. Como é? 2) Vamos mudar a posição da ficha de borracha.Como é? 3) Vamos mudar a forma da asa. 4) Vamos fazer o foguete de palha voar com acrobacias. 5) Vamos fazer um foguete de palha para voar de volta. O que você fez? ■ Sim.Para voar bem o foguete de palha, é necessário fazer bom uso da resistência do ar em torno dele.
Materiais
- 12 -
When the water is sprayed well When water is not sprayed well
[Order of making a straw spray]
[Straw spray]
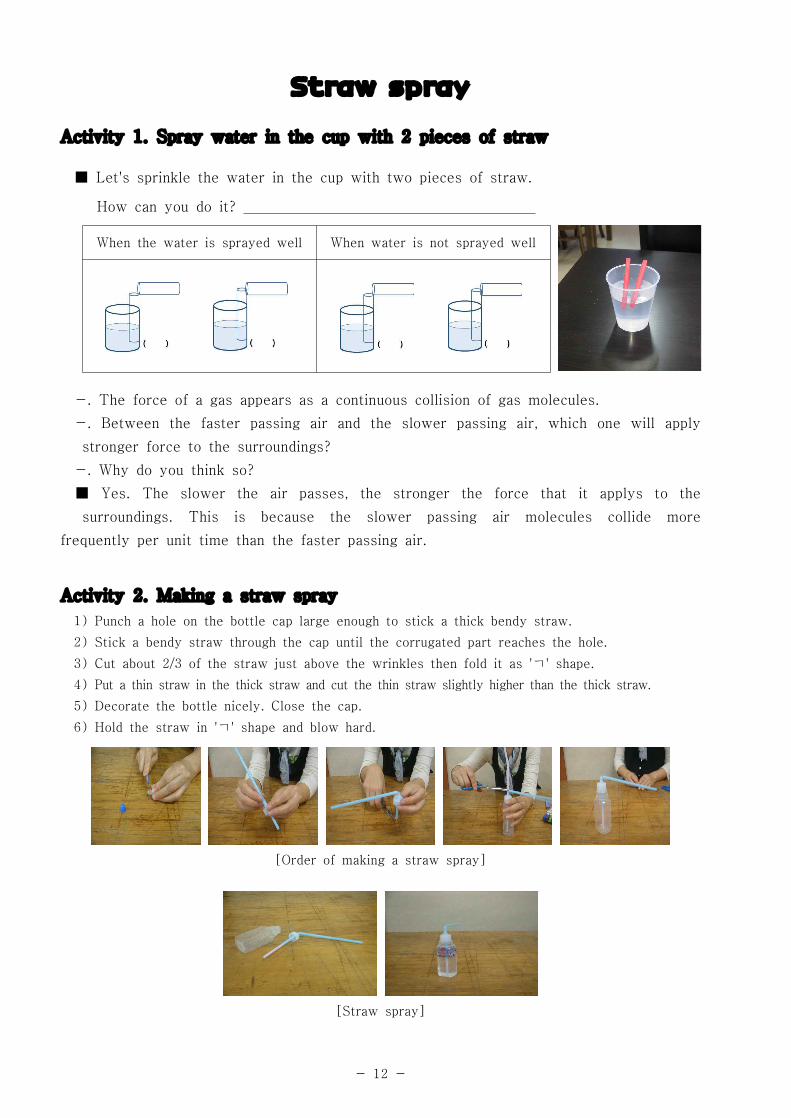
Straw spray
Activity 1. Spray water in the cup with 2 pieces of straw ■ Let's sprinkle the water in the cup with two pieces of straw. How can you do it?
-. The force of a gas appears as a continuous collision of gas molecules. -. Between the faster passing air and the slower passing air, which one will apply stronger force to the surroundings? -. Why do you think so? ■ Yes. The slower the air passes, the stronger the force that it applys to the surroundings. This is because the slower passing air molecules collide more frequently per unit time than the faster passing air.
Activity 2. Making a straw spray 1) Punch a hole on the bottle cap large enough to stick a thick bendy straw. 2) Stick a bendy straw through the cap until the corrugated part reaches the hole. 3) Cut about 2/3 of the straw just above the wrinkles then fold it as 'ㄱ' shape. 4) Put a thin straw in the thick straw and cut the thin straw slightly higher than the thick straw. 5) Decorate the bottle nicely. Close the cap. 6) Hold the straw in 'ㄱ' shape and blow hard.

- 13 -
Quando a água é bem pulverizada Quando a água não é bem pulverizada
[Ordem de fazer um spray de palha]
[Spray de palha]
Spray de palha
Atividade 1. Pulverizar água no copo com 2 pedaços de palha ■ Vamos polvilhar a água no copo com dois pedaços de palha. Como você pode fazer isso?
-. A força de um gás aparece como uma colisão contínua de moléculas de gás. -. Entre o ar que passa mais rápido e o ar que passa mais devagar, qual deles irá aplicar força mais forte ao meio ambiente? -. Porque você acha isso? ■ Sim.Quanto mais lento o ar passa, mais forte é a força que ele aplica aos arredores.Isso ocorre porque as moléculas de ar de passagem mais lentas colidem mais freqüentemente por unidade de tempo do que o ar que passa mais rapidamente.
Atividade 2. Fazendo um spray de palha 1) Aperte um buraco na tampa da garrafa o suficiente para enfiar uma palha aguda e aguda. 2) Coloque uma palha bendável através da tampa até a parte ondulada chegar ao buraco. 3) Corte cerca de 2/3 da palha logo acima das rugas, em seguida, dobre-a como forma 'ㄱ'. 4) Coloque uma fina palha na palha grossa e corte a palha fina ligeiramente superior à palha grossa. 5) Decore a garrafa bem. Feche a tampa. 6) Segure a palha na forma 'ㄱ' e sopre forte.

- 14 -
[materials]
[Vuvuzela]
Playing the Vuvuzela
Activity 1. Making a Vuvuzela(1) Cut the neck of a small balloon with scissors.(2) Roll the balloon neck and put it over the thick straw.(3) Drill a hole in the bottom of the cup (already open). Put this thick straw through the cup. (The height of the straw is 1cm higher than the cup, Block the hole in the bottom of the cup with the ballon.)(4) Cover the cup opening with the remaining balloon.(5) Insert a thin straw into the hole in the cup wall to the corrugation.
(1) (2) (3) (4) (5)
[Ordem de fazer uma Vuvuzela]
Activity 2. Playing the Vuvuzela 1) Let's make a sound with Vuvuzela. How can you do it? 2) What is the difference when it sounds well or not? 3) Make sounds in different heights. How did you do? ■ Yes. When we blow through the thin straw, our exhalation vibrate the air in the cup, and the vibration of the air vibrates the balloon that is put on the cup to generate sound. Sound is the wave of by the vibration of the object. Make several holes on the straw. If you blow the Vuvuzela while closing and the holes, you will be able to play it making sounds with different heights.

- 15 -
[Materiais]
[Vuvuzela]
Jogando o 'Vuvuze la '
Atividade 1. Fazendo uma 'Vuvuzela'(1) Corte o pescoço de um pequeno balão com uma tesoura.(2) Rode o pescoço do balão e coloque-o sobre a grossa palha.(3) Perfure um furo no fundo do copo (Já aberto). Coloque esta palha grossa através do copo. (A altura da palha é 1cm maior do que o copo, Bloqueie o orifício na parte inferior do copo com o balão.)(4) Cubra a abertura do copo com o balão restante.(5) Insira uma palha fina no orifício na parede do copo até a corrugação.
(1) (2) (3) (4) (5)
[Ordem de fazer uma Vuvuzela]
Atividade 2. Jogando o 'Vuvuzela’ 1) Vamos fazer um som com 'Vuvuzela'. Como você pode fazer isso? 2) Qual a diferença quando soa bem ou não? 3) Faça sons em diferentes alturas. Como você fez? ■ Sim.Quando passamos pela fina palha, a nossa expiração vibra o ar no copo e a vibração do ar vibra o balão que é colocado no copo para gerar som.O som é a onda da vibração do objeto.Faça vários furos na palha.Se você explodir o 'Vuvuzela' ao fechar e os buracos, você poderá reproduzi-lo fazendo sons com diferentes alturas.

- 16 -
[materials]
Making a balancing dragonfly
Activity 1. Making a balancing dragonfly 1) Color the dragonfly sketch with the oil makers. 2) Cut all the dragonfly sketches with scissors. All four pieces. 3) Peel off the double-sided tape on the sketches. All three spots. 4) Small wings are attached to large wing tips. 5) The tail is attached to the body. Fold the mouth in 'ㄱ' shape.
Activity 2. Balancing dragonfly sitting at the tip of branches 1) Wind a still wire around the can to make a branch. 2) Let's put the dragonfly at the tip of the branch. How is it? 3) Hang beads at the tips of the branches and tilt the can at an angle. Is it possible? 4) Let's put a dragonfly on the bead. Is it possible?
Activity 3. Balancing Dragonfly attracted to the magnet 1) Put the balancing dragonfly on the floor. Try to attract the dragonfly with a straw rubbed with a tissue. Is it attracted? 2) Try attracting the dragonfly on the floor with a neodymium magnet. Is it attracted? Yes. This is because the frictional force is large and the attractive force is weak. 3) Let's take the straw rubbed with a tissue near the dragonfly on the tip of the branch. How is it? 4) Let's bring a strong neodymium magnet close to the balancing dragonfly at the tip of the branches. How is it? Yes, This is because the dragonfly put at the center of gravity feels smaller frictional force. 5) Let's put the dragonfly in my hand. It makes a ring with a wire. Let's put a dragonfly at the tip of the branch of the ring. Let's drag the dragon with straw or neodymium.
[Do not be dragged.]

- 17 -
[Materiais]
Fazendo uma libé lu la equ il ib rada
Atividade 1. Fazendo uma libélula de equilíbrio 1) Coloque o esboço da libélula com os fabricantes de óleo. 2) Corte todos os esboços de libélula com tesoura. Todas as quatro peças. 3) Retire a fita dupla face nos esboços. Os três pontos. 4) Pequenas asas estão ligadas a grandes pontas de asa. 5) A cauda está ligada ao corpo. Dobre a boca na forma 'ㄱ'.
Activity 2. Balancing dragonfly sitting at the tip of branches 1) Wind a still wire around the can to make a branch. 2) Let's put the dragonfly at the tip of the branch. How is it? 3) Hang beads at the tips of the branches and tilt the can at an angle. Is it possible? 4) Let's put a dragonfly on the bead. Is it possible?
Atividade 3. Balançando libélula atraída para o ímã 1) Coloque a libélula equilibrada no chão. Tente atrair a libélula com uma palha esfregada com um tecido. É atraído? 2) Tente atrair a libélula no chão com um ímã de neodímio. É atraído? Sim. Isso ocorre porque a força de fricção é grande e a força atrativa é fraca. 3) Vamos pegar a palha esfregada com um tecido perto da libélula na ponta do ramo. Como é? 4) Vamos trazer um forte ímã de neodímio perto da libélula de equilíbrio na ponta dos ramos. Como é? Sim, porque a libélula colocada no centro da gravidade sente menor força de fricção. 5) Vamos colocar a libélula na minha mão. Faz um anel com um fio. Vamos colocar uma libélula na ponta do ramo do anel. Vamos arrastar o dragão com palha ou neodímio.
[Não seja arrastado]

- 18 -
Making a charcoal battery
■ Materials : charcoal, kitchen towel, salt water, aluminum foil, motor.■ Method : 1) Wrap charcoal with kitchen towel. 2) Wet the kitchen towel with salt water. 3) Wrap kitchen towel with aluminum foil.
1)
2)
3)
[Charcoal battery]
4) Put one pole of the motor on charcoal and the other pole on aluminum foil. How is it? 5) Let's connect in the opposite direction. How is it?
■ Principle : All materials have electrons. Some materials tend to give out electrons and some tend to receive electrons. The current is the movement of these electrons. 1) Aluminum foil : gives out electrons. (good electron donor) 2) Charcoal : Receives an electron. (good electron acceptor) 3) Salt water : Remove the received electrons. 4) Kitchen towel : Hold the salt water. When all the salt water disappears, or when all the aluminum is reacted, the current does not flow.

- 19 -
Fazendo uma bateria de carvão
■ Materiais : carvão, toalha de cozinha, água salgada, papel alumínio, motor.■ Método : 1) Enrole carvão com toalha de cozinha. 2) Molhe a toalha de cozinha com água salgada. 3) Enrole a toalha de cozinha com papel alumínio.
1)
2)
3)
[Bateria de carvão vegetal]
4) Coloque um pólo do motor sobre o carvão e o outro pólo na folha de alumínio. Como é? 5) Vamos nos conectar na direção oposta. Como é?
■ Princípio : todos os materiais possuem elétrons.Alguns materiais tendem a distribuir elétrons e alguns tendem a receber elétrons.A corrente é o movimento desses elétrons. 1) Folha de alumínio: distribui elétrons.(Bom doador de elétrons) 2) Carvão vegetal: recebe um elétron.(Bom aceitador de elétrons) 3) Água salgada: retire os elétrons recebidos. 4) Toalha de cozinha: segure a água salgada. Quando toda a água salgada desaparece, ou quando todo o alumínio é reagido, a corrente não flui.

- 20 -
[Materials needed]
(1) (2) (3) (4)
Make a kaleidoscope
▣ Materials : plastic mirrors 3, cardboard, colored pencils, transparent vinyl, rubber bands, paper, awl, paper column.
Activity 1. Seeing more clearly in the dark(1) Draw pictures on the paper.(2) Let's look at the picture from the back of the paper. How is it? (3) Let's look through the paper column. How is it?
■ Yes, things in the bright side are seen more clearly when you see them from the dark.
Activity 2. Making a kaleidoscope(1) Peel off the double-sided tape on the back of three plastic mirrors and stick it to cardboard.
The first mirror is attached against one edge, and the spaces between the mirrors should be 0.1 mm (half of the grid).
(2) Fold the mirror plate once into a triangular prism shape and refold .(3) Remove vinyl cover on the mirror plates.(4) Fold it back into a triangular pillar
shape, peel off the double-sided tape in the cardboard, and attach it to make a triangular mirror pole.
Activity 3. Kaleidoscope play(1) Cover the paper on one side of the mirror column and secure it with a rubber band.(2) Drill a small hole in the paper with an awl.(3) Cover the hole with your fingers and observe on the other side. How is it?■ Yes. Various images reflected many times by triangular mirror columns.(4) Draw pictures on the paper and observe it.(5) Let's put things in it and observe.(6) Put the transparent vinyl on the other side and observe it through a hole drilled in the paper.

- 21 -
[Materiais necessários]
(1) (2) (3) (4)
Faça um cale idoscópio
▣ Materiais : espelhos plásticos 3, papelão, lápis colorido, vinil transparente, borracha, papel, alumínio, coluna de papel.
Atividade 1. Ver mais claramente no escuro(1) Desenhe imagens no papel.
(2) Vejamos a imagem da parte de trás do papel. Como é? (3) Olhe através da coluna de papel. Como é?
■ Sim, as coisas do lado positivo são vistas mais claramente quando você as vê do escuro.
Atividade 2. Fazendo um caleidoscópio(1) Retire a fita dupla face na parte de trás de três espelhos de plástico e coloque-o em
papelão.O primeiro espelho está encaixado contra uma extremidade, e os espaços entre os espelhos devem ser 0,1 mm (metade da grade).
(2) Dobre a placa do espelho uma vez em uma forma de prisma triangular e redobla.(3) Remova a cobertura de vinil nas placas do espelho.(4) Dobre-o de volta em uma forma
de pilar triangular, retire a fita dupla face no cartão e prenda-a para formar um espelho de espelho triangular.
Atividade 3. Jogo de caleidoscópio(1) Cubra o papel de um lado da coluna do espelho e fixe-o com uma elástica.
(2) Perfure um pequeno orifício no papel com um fio. (3) Cubra o orifício com os dedos e observe do outro lado. Como é? ■ Sim. Várias imagens refletidas muitas vezes por colunas de espelhos triangulares. (4) Desenhe imagens no papel e observe. (5) Vamos colocar coisas nele e observar. (6) Coloque o vinil transparente do outro lado e observe-o através de um furo perfurado no papel.
- 22 -
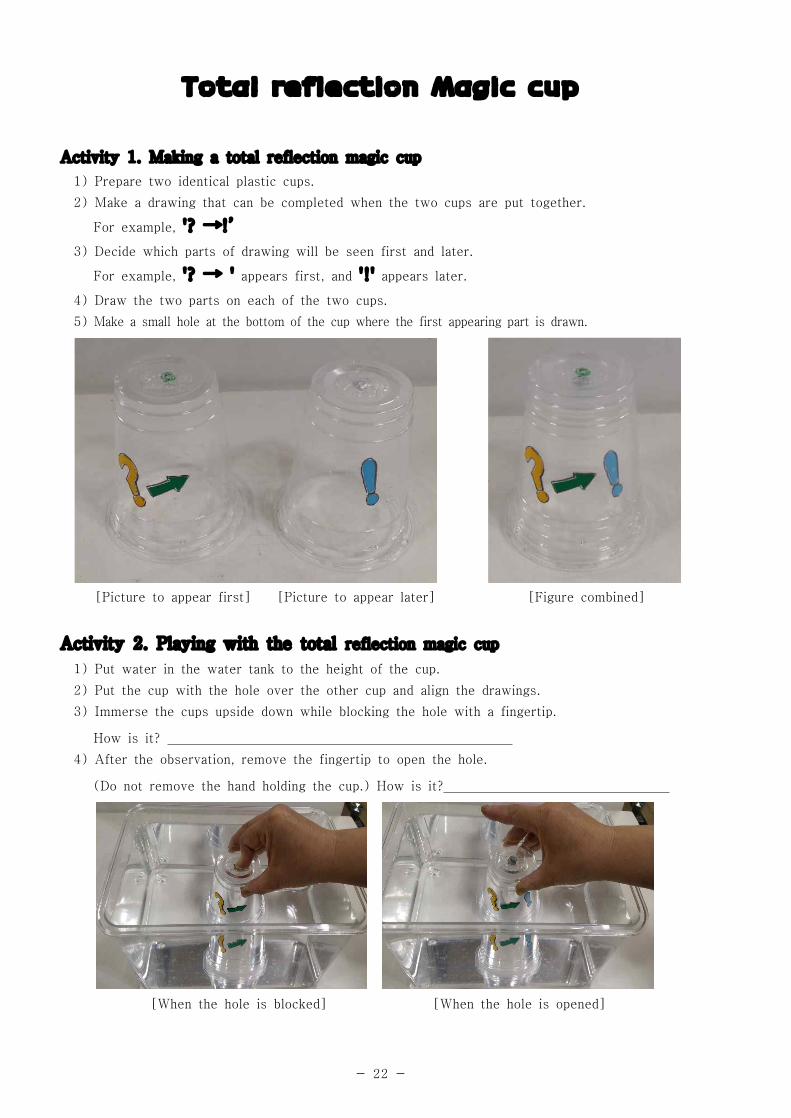
Total reflection Magic cup
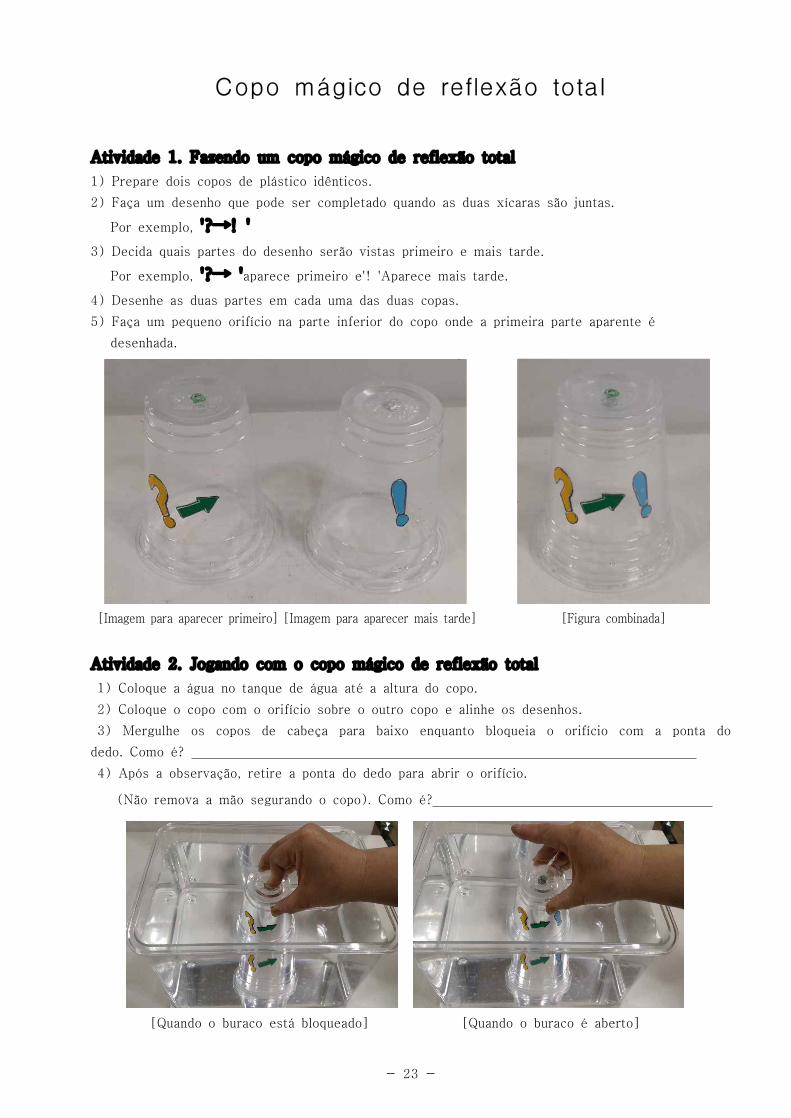
Activity 1. Making a total reflection magic cup 1) Prepare two identical plastic cups. 2) Make a drawing that can be completed when the two cups are put together. For example, '? →!’ 3) Decide which parts of drawing will be seen first and later. For example, '? → ' appears first, and '!' appears later. 4) Draw the two parts on each of the two cups. 5) Make a small hole at the bottom of the cup where the first appearing part is drawn.
[Picture to appear first] [Picture to appear later] [Figure combined]
Activity 2. Playing with the total reflection magic cup 1) Put water in the water tank to the height of the cup. 2) Put the cup with the hole over the other cup and align the drawings. 3) Immerse the cups upside down while blocking the hole with a fingertip. How is it? 4) After the observation, remove the fingertip to open the hole. (Do not remove the hand holding the cup.) How is it?
[When the hole is blocked] [When the hole is opened]
- 23 -
Copo mágico de reflexão to ta l
Atividade 1. Fazendo um copo mágico de reflexão total1) Prepare dois copos de plástico idênticos.2) Faça um desenho que pode ser completado quando as duas xícaras são juntas. Por exemplo, '?→! '3) Decida quais partes do desenho serão vistas primeiro e mais tarde. Por exemplo, '?→ 'aparece primeiro e'! 'Aparece mais tarde.4) Desenhe as duas partes em cada uma das duas copas.5) Faça um pequeno orifício na parte inferior do copo onde a primeira parte aparente é desenhada.
[Imagem para aparecer primeiro] [Imagem para aparecer mais tarde] [Figura combinada]
Atividade 2. Jogando com o copo mágico de reflexão total 1) Coloque a água no tanque de água até a altura do copo. 2) Coloque o copo com o orifício sobre o outro copo e alinhe os desenhos. 3) Mergulhe os copos de cabeça para baixo enquanto bloqueia o orifício com a ponta do dedo. Como é? 4) Após a observação, retire a ponta do dedo para abrir o orifício. (Não remova a mão segurando o copo). Como é?
[Quando o buraco está bloqueado] [Quando o buraco é aberto]
- 24 -
?
Observing plant cells with a small glass bead microscope
▣ Materials: large and small water filled PET bottles, large and small glass beads, small glass bead microscope, transparent manicure, cellophane tape. plant leaf, mini microscopes.
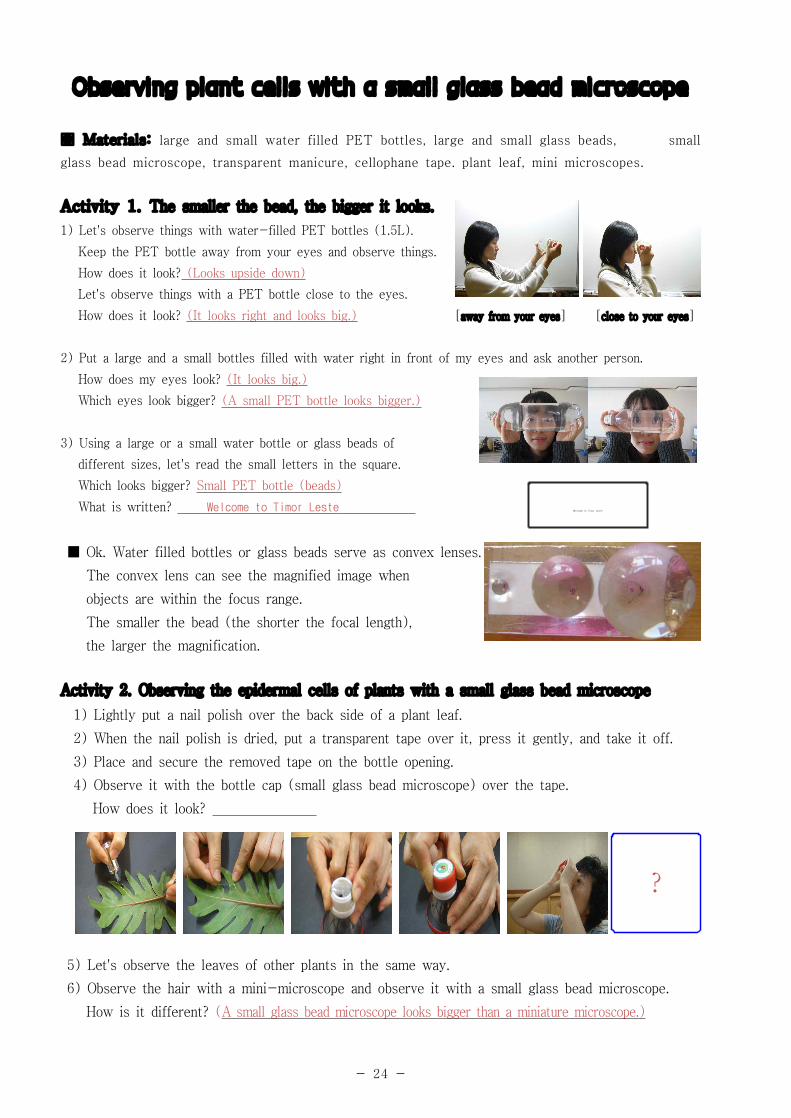
Activity 1. The smaller the bead, the bigger it looks.1) Let's observe things with water-filled PET bottles (1.5L). Keep the PET bottle away from your eyes and observe things. How does it look? (Looks upside down) Let's observe things with a PET bottle close to the eyes. How does it look? (It looks right and looks big.) 2) Put a large and a small bottles filled with water right in front of my eyes and ask another person. How does my eyes look? (It looks big.) Which eyes look bigger? (A small PET bottle looks bigger.) 3) Using a large or a small water bottle or glass beads of different sizes, let's read the small letters in the square. Which looks bigger? Small PET bottle (beads) What is written? Welcome to Timor Leste
■ Ok. Water filled bottles or glass beads serve as convex lenses. The convex lens can see the magnified image when objects are within the focus range. The smaller the bead (the shorter the focal length), the larger the magnification.
Activity 2. Observing the epidermal cells of plants with a small glass bead microscope 1) Lightly put a nail polish over the back side of a plant leaf. 2) When the nail polish is dried, put a transparent tape over it, press it gently, and take it off. 3) Place and secure the removed tape on the bottle opening. 4) Observe it with the bottle cap (small glass bead microscope) over the tape. How does it look?
5) Let's observe the leaves of other plants in the same way. 6) Observe the hair with a mini-microscope and observe it with a small glass bead microscope. How is it different? (A small glass bead microscope looks bigger than a miniature microscope.)
Welcome to Timor Leste
[away from your eyes] [close to your eyes]

- 25 -
?
Observando células de plantas com um pequeno microscópio de contas de vidro
▣ Materiais : garrafas de PET grandes e pequenas cheias de água, contas de vidro grandes e pequenas, microscópio de grânulos de vidro pequeno, manicure transparente, fita de celofane, folha de planta, mini microscópios.Atividade 1. Quanto menor o talão, maior é o aspecto.1) Observemos coisas com garrafas de PET cheias de água (1,5L).Mantenha a garrafa de PET longe de seus olhos e observe as coisas.Como se parece? (Olha de cabeça para baixo) Vamos observar as coisas com uma garrafa PET perto dos olhos.Como se parece? (Parece certo e parece grande.) 2) Coloque uma grande e uma pequena garrafa cheiacom água na frente dos meus olhos e pergunte a outrapessoa. Como meus olhos se parecem? (Parece grande)Que olhos parecem maiores?(Uma pequena garrafa de PET parece maior). 3) Usando uma garrafa de água grande ou pequena ou contas de vidro de diferentes tamanhos, vamos ler as letras pequenas no quadrado.O que parece maior? Garrafa PET pequena (contas)O que está escrito? Bem-vindo a Timor-Leste■ Está bem.Frascos ou contas de vidro cheias de águaservem como lentes convexas.A lente convexa pode ver a imagem ampliada quando os objetos estão dentro da faixa de foco.Quanto menor o talão (menor a distância focal), maior a ampliação.
Atividade 2. Observando as células epidérmicas das plantas com um pequeno microscópio de contas de vidro1) Coloque levemente uma manicure na parte de trás de uma folha de planta.2) Quando a manicure estiver seca, coloque uma fita transparente sobre ela, pressione-a suavemente e tire-a.3) Coloque e prenda a fita removida na abertura da garrafa.4) Observe com a tampa do frasco (pequeno microscópio de contas de vidro) sobre a fita adesiva. Como se parece?
5) Observemos as folhas de outras plantas do mesmo modo.6) Observe o cabelo com um mini-microscópio e observe-o com um pequeno microscópio de contas de vidro. Como é diferente? (Um pequeno microscópio de contas de vidro parece maior do que um microscópio em miniatura).
Welcome to Timor Leste
[Longe de seus olhos] [perto de seus olhos]

- 26 -
Optical axis
object
image
▣ The type of images with convex lens1) When the object is placed outside the focal point: the image is true but inverted2) When the object is placed inside the focal point, the image is false but upright. (It is an enlarged image.)
▣ The magnification of the convex lens If the lens has higher curvature, which means the focal length is shorter, the image is larger.
▣ The light goes straight, reflexes and refracts.
▣ Drawing images made by convex lensRay(①) which moves parallel to the optical axis is refracted at the lens and passes the focus point(F).Ray(③) passes the center and does not refract but keep travels straight.Ray(②) passes through the focus point moves parallel after it is refracted at the lens.These three rays meet at one point and image is formed at the point.

- 27 -
▣ O tipo de imagens com lente convexa1) Quando o objeto é colocado fora do ponto focal: a imagem é verdadeira, mas invertida2) Quando o objeto é colocado dentro do ponto focal, a imagem é falsa, mas vertical.(É uma imagem ampliada.)
▣ A ampliação da lente convexaSe a lente tiver uma maior curvatura, o que significa que a distância focal é menor, a imagem é maior.
▣ A luz fica reta, reflete e se refracta.
▣ Desenho de imagens feitas por lente convexaRay (①) que se move paralelamente ao eixo óptico é refratado na lente e passa o ponto de foco (F).Ray (③) passa pelo centro e não refractou, mas continua viajando diretamente.Ray (②) passa pelo ponto de foco move-se paralelo depois que ele é refratado na lente.Esses três raios se encontram em um ponto e a imagem é formada no ponto.
Eixo óptico
objeto
imagem
- 28 -
glass dust hair
Cuticle of Onion
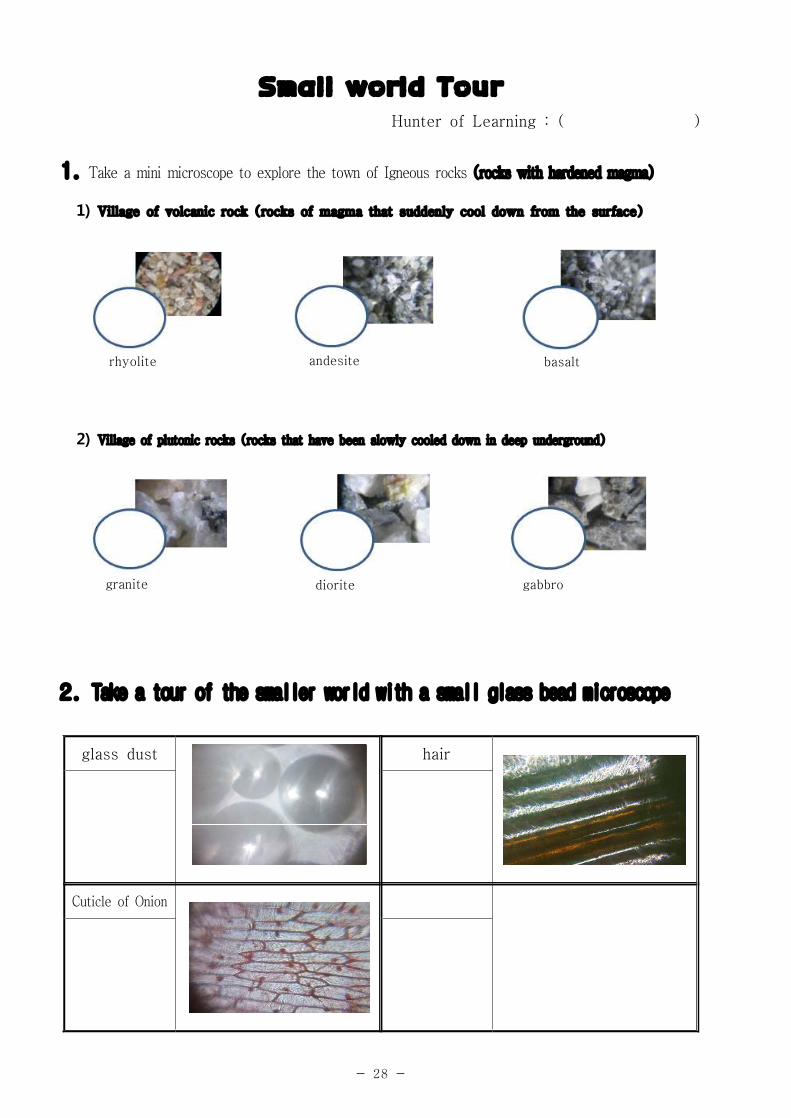
Small world Tour
Hunter of Learning : ( )
1. Take a mini microscope to explore the town of Igneous rocks (rocks with hardened magma) 1) Village of volcanic rock (rocks of magma that suddenly cool down from the surface)
rhyolite andesite basalt
2) Village of plutonic rocks (rocks that have been slowly cooled down in deep underground)
granite diorite gabbro
2. Take a tour of the smaller world with a small glass bead microscope

- 29 -
Pó de vidro cabelo
Cuticle de Cebola
Mundo pequeno Tour
Hunter of Learning : ( )
1. Faça um mini microscópio para explorar a cidade das rochas de Igneous (rochas com magma endurecido) 1) Vila de rocha vulcânica (rochas de magma que repentinamente esfriam da superfície)
Riólito Andesite basalto
2) Aldeia de rochas plutônicas (rochas que foram lentamente arrefecidas no profundo subterrâneo)
granito Diorite Gabbro
2. Faça um passeio pelo mundo menor com um pequeno microscópio de contas de vidro

- 30 -
MEMO
- 31 -
2017-1st
Korea - Timor Leste
Amenity Science Camp
일시 : 2017. 8. 2 ~ 2017. 8. 4
장소 : EB Centro de Ensino Alpha
주관 : 어메니티과학교육연구회
후원 : CASE(Center for Amenity Science Education)
[ 도움을 주신 분들 ]
1. 민들레 유치원 박영경 원장님 : 단체 티 100벌
2. 손과 머리 박성윤 사장님 : 에코 LED 손전등 만들기 100세트
3. 4D 프레임 박호걸 소장님 : 플러렌 구조 축구공 100세트
4. 해닮 최미숙 대표님 : 무한회전체의 비밀, 화려한 빛의 세계 각 100세트
5. 과학을 사랑하는 사람들의 모임 : 빨대 분무기 100세트
6. 화학을 사랑하는 사람들의 모임 : PS 열쇠 고리 만들기 100세트
7. 자바실험 이동준 선생님 : 칼라 프린트의 원리 100세트
8. 경북과학교사모임 : 움직이는 만화경 100세트
9. 참 과학 성종규 선생님 : 화성암, 퇴적암, 변성암 표본 50세트
10. 어메니티과학교육연구회 이성현 회장님 : 현금 50만원
11. 어메니티과학교육연구회 심정애 선생님 : 현금 50만원