technologies · 2019-03-13 · navigating the main menu 7 main menu the main menu allows access to...
TRANSCRIPT
aaxaTECHNOLOGIES
User Guide

Caution!WARNING: Please use this product as instructed. Misuse may cause injury or death.
DO NOT use while driving.
DO NOT expose to water or wet surfaces. Electric shock may occur.
DO NOT expose the projected LED image to your eyes or the eyes of others. DO NOT block or restrict airflow from ventilation holes as this may cause the projector to overheat.
Keep the projector and charger away from any heat sources.
Caution for Headphone Use• Prolonged use at high volume may
impair your hearing.• High volume during walking or driving
may cause distractions and result in injury or death.
Table of ContentsChapter 1: At a Glance P300 Neo-S Introduction Remote & Touchpad Accessories Chapter 2: Getting Started
Focus Adjustment / Throw DistanceNavigating the Main MenuConnecting to WiFiConnecting to a BT deviceLoading External Content
Chapter 3: Menu ScreensVideos Menu Photos MenuConnecting via Digital InputConnecting via VGAConnecting to Composite VideoBrowserStreaming Applications
AppsSmartphone MirroringOffice
Chapter 4: Settings MenuBrightness SettingsWiFi SettingsAdvanced SettingsLanguageDisplay SettingsBluetooth SettingsBackup & ResetAbout
Chapter 5: Technical DetailsTroubleshootingSpecificationsNotes
11245678
10131717212326283031
33343741424344454647484950505253
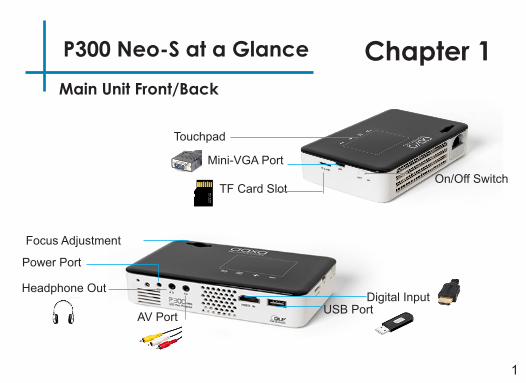
P300 Neo-S at a Glance Chapter 1
Digital InputUSB Port
Main Unit Front/Back
AV Port
Headphone Out
Power Port
1
Focus Adjustment
Touchpad
TF Card Slot
Mini-VGA PortOn/Off Switch
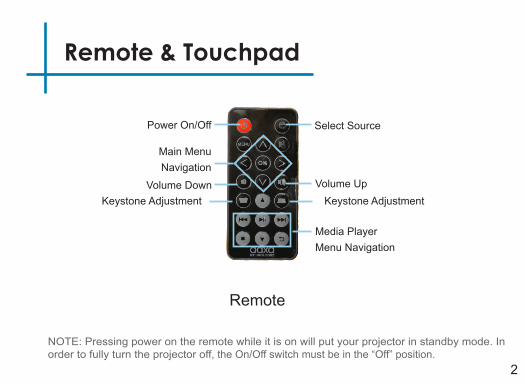
Remote & Touchpad
2
NOTE: Pressing power on the remote while it is on will put your projector in standby mode. In order to fully turn the projector off, the On/Off switch must be in the “Off” position.
Remote
Power On/Off Select Source
Main Menu Navigation
Media Player Menu Navigation
Volume UpVolume DownKeystone Adjustment Keystone Adjustment
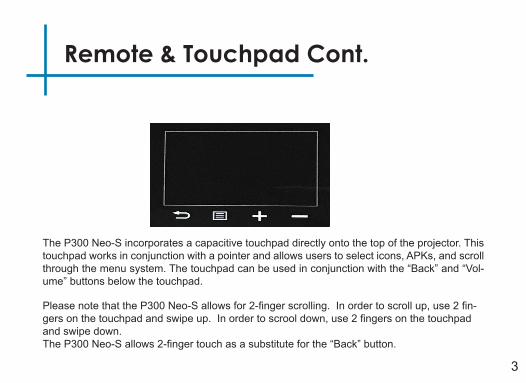
Remote & Touchpad Cont.
The P300 Neo-S incorporates a capacitive touchpad directly onto the top of the projector. This touchpad works in conjunction with a pointer and allows users to select icons, APKs, and scroll through the menu system. The touchpad can be used in conjunction with the “Back” and “Vol-ume” buttons below the touchpad.
3
Please note that the P300 Neo-S allows for 2-finger scrolling. In order to scroll up, use 2 fin-gers on the touchpad and swipe up. In order to scrool down, use 2 fingers on the touchpad and swipe down.The P300 Neo-S allows 2-finger touch as a substitute for the “Back” button.
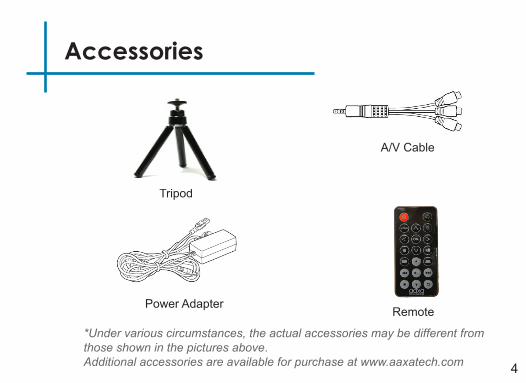
Accessories
4
*Under various circumstances, the actual accessories may be different from those shown in the pictures above.Additional accessories are available for purchase at www.aaxatech.com
RemotePower Adapter
A/V Cable
Tripod
Getting Started
1. Connect the power cord to the P300 Neo-S.2. Connect the other end of the power cord into the wall power source.3. Move the On/Off swtich to the “On” position. Your projector should start up.
5
Powering ON the projector
Chapter 2
Powering OFF the projector1. To turn off the projector, use the power button on the remote or the On/Off switch.
Using the On/Off switch will fully turn off the projector.
1. The P300 Neo-S needs to be plugged in and charged for four to five hours before operation. Please ensure the On/Off switch is in the “Off” position during this time
Plugging In the projector
Connecting to WiFi1. View page 8 for details.
Connecting to a Bluetooth Device1. View page 10 for details.

Focus Adjustment / Throw Distance
6
DIAGONAL SCREEN SIZE
16:9 Aspect Ratio
Throw Distance Unit: Inches
2030405060708090
Diagonal SizeUnit: Inches
1320273340475360
• Spin the focus wheel left or right until the image becomes clear.
Focus Adjustment
Throw Distance Chart
Throw Ratio 1.5*minimum throw distance: 15 inches
Navigating the Main Menu
7
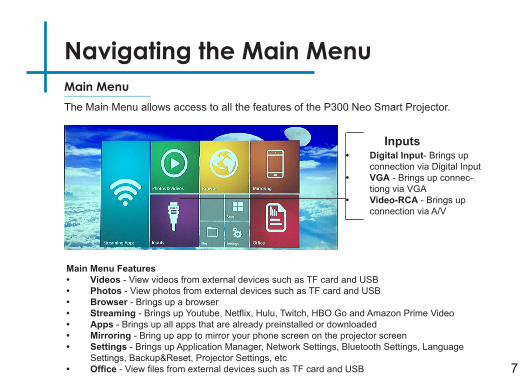
Main MenuThe Main Menu allows access to all the features of the P300 Neo Smart Projector.
Main Menu Features• Videos - View videos from external devices such as TF card and USB• Photos - View photos from external devices such as TF card and USB• Browser - Brings up a browser• Streaming - Brings up Youtube, Netflix, Hulu, Twitch, HBO Go and Amazon Prime Video• Apps - Brings up all apps that are already preinstalled or downloaded• Mirroring - Bring up app to mirror your phone screen on the projector screen• Settings - Brings up Application Manager, Network Settings, Bluetooth Settings, Language
Settings, Backup&Reset, Projector Settings, etc• Office- View files from external devices such as TF card and USB
• Digital Input- Brings up connection via Digital Input
• VGA - Brings up connec-tiong via VGA
• Video-RCA - Brings up connection via A/V
Inputs
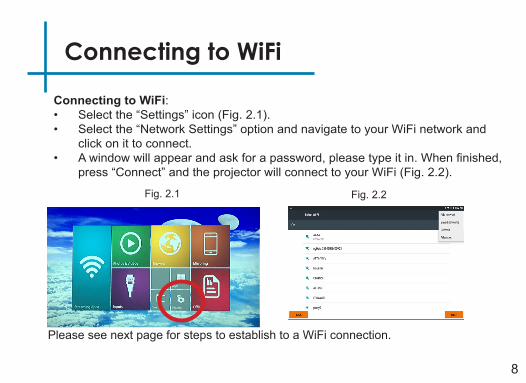
Connecting to WiFi
8
Please see next page for steps to establish to a WiFi connection.
Connecting to WiFi:• Select the “Settings” icon (Fig. 2.1). • Select the “Network Settings” option and navigate to your WiFi network and
click on it to connect.• A window will appear and ask for a password, please type it in. When finished,
press “Connect” and the projector will connect to your WiFi (Fig. 2.2).
Fig. 2.1 Fig. 2.2
Connecting to WiFi FAQ
9
Connecting to WiFi:The P300 Neo-S features a WiFi chipset capable of 802.11 b/g/n connection. This means it is compatible with most WiFi routers. To connect to a WiFi router, follow the following steps: Step 1: Access the Network Settings Submenu: Settings -> Network Settings Step 2: Turn WiFi radio to “On” by highlighting and toggling the WiFi Button under WiFi settings Step 3: Select the appropriate Router Step 4: Enter the router password in the password selection (by pressing “OK”). It is recommended that the automatic IP address acquisition be turned on
Troubleshooting 1. Unable to connect a. Check Security Settings – WPA/WPA2 PSK b. Check if Router is in range
Connecting to a Bluetooth Device
10Please see next page for steps to connect to a Bluetooth device
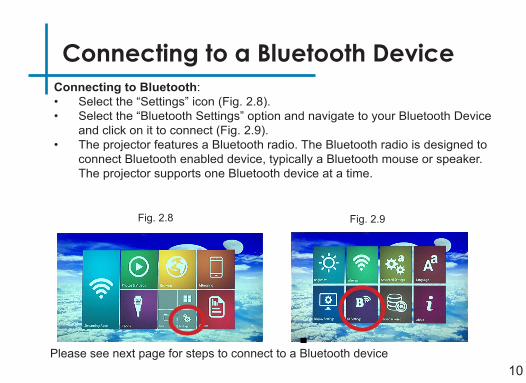
Connecting to Bluetooth:• Select the “Settings” icon (Fig. 2.8).• Select the “Bluetooth Settings” option and navigate to your Bluetooth Device
and click on it to connect (Fig. 2.9).• The projector features a Bluetooth radio. The Bluetooth radio is designed to
connect Bluetooth enabled device, typically a Bluetooth mouse or speaker. The projector supports one Bluetooth device at a time.
Fig. 2.8 Fig. 2.9
Bluetooth Speaker or Mouse
11
To connect a Bluetooth Speaker or Mouse
Step 1: Access the Bluetooth Menu (Settings Bluetooth)
Step 2: Turn on Bluetooth functionality
Step 3: Turn on your Bluetooth device and enable discovery. This varies with each device. Some devices require the power switch to be turned “ON”. Other devices have a Bluetooth icon that is pressed to make the device “discoverable”
Step 4: If your device does not pop up automatically, click on the three vertical dots at the top of the page and click “Refresh”
Step 5: Highlight your device and click “OK” to connect. Your device should show “connecting.” If a PIN is asked, try 0000 or 1234 – these are the standard PIN codes. If this does not work, check with your device manufacturer for the PIN
Troubleshooting
12
• Disconnecting. It takes 10-15 seconds for a BT device to connect or discon-nect from the system. Failure to wait for this time could result in an improper connection. Check to ensure device is connected in the BT submenu.
• If the Bluetooth device does not automatically reconnect please go to the Bluetooth settings and press on the device to reconnnect to it.
• If the device still does not reconnect please press on the icon on the right of the device’s name to unpair the device and pair it again.
Loading External Content
13
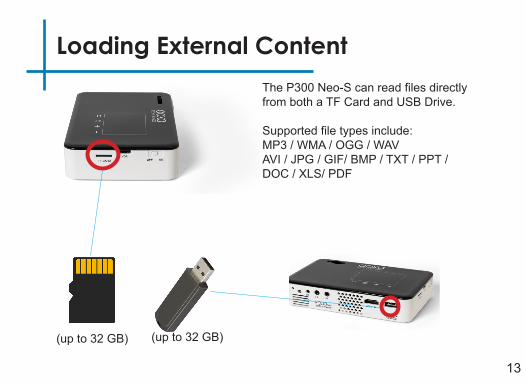
The P300 Neo-S can read files directly from both a TF Card and USB Drive.
Supported file types include: MP3 / WMA / OGG / WAV AVI / JPG / GIF/ BMP / TXT / PPT / DOC / XLS/ PDF
(up to 32 GB) (up to 32 GB)
Loading External Content Cont.
14(up to 32 GB)
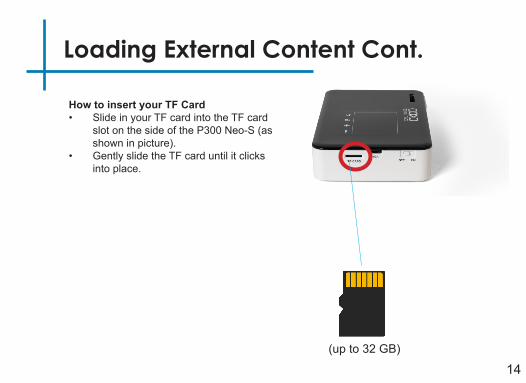
How to insert your TF Card• Slide in your TF card into the TF card
slot on the side of the P300 Neo-S (as shown in picture).
• Gently slide the TF card until it clicks into place.
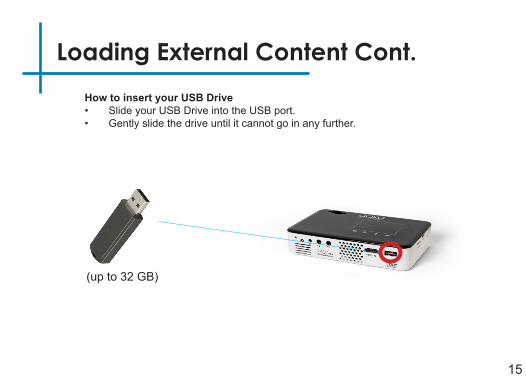
Loading External Content Cont.How to insert your USB Drive• Slide your USB Drive into the USB port.• Gently slide the drive until it cannot go in any further.
(up to 32 GB)
15
15 16
Loading External Content Cont.
Photos & Videos Menu• Videos and Photos can be played by clicking “Photos & Video”
on the Main Menu.Files Menu• All files can be shown by clicking “Files” on the Main Menu.OfficeMenu• .pdf, .docx, .xls, .ppt, .txt can be shown by clicking “Office” on the
Main Menu.
Once your TF Card or USB Drive is inserted into the projector, the TF Card or USB Drive Storage will be loaded automatically and the content can be found through:
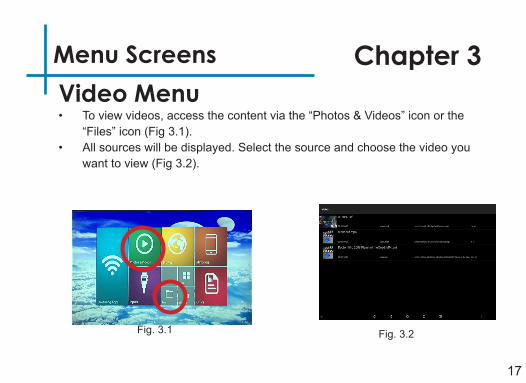
• To view videos, access the content via the “Photos & Videos” icon or the “Files” icon (Fig 3.1).
• All sources will be displayed. Select the source and choose the video you want to view (Fig 3.2).
17
Fig. 3.1 Fig. 3.2
Menu Screens Chapter 3Video Menu
18
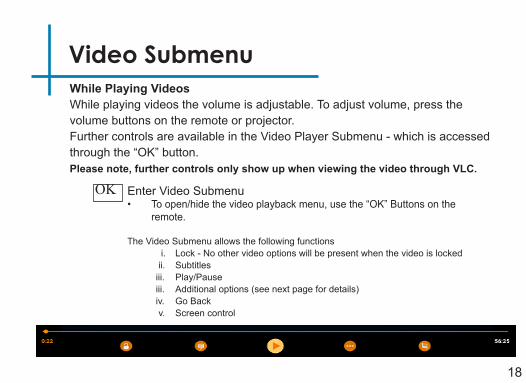
Video SubmenuWhile Playing VideosWhile playing videos the volume is adjustable. To adjust volume, press the volume buttons on the remote or projector. Further controls are available in the Video Player Submenu - which is accessed through the “OK” button.Please note, further controls only show up when viewing the video through VLC.
OK Enter Video Submenu• To open/hide the video playback menu, use the “OK” Buttons on the
remote.
The Video Submenu allows the following functions i. Lock - No other video options will be present when the video is locked ii. Subtitles iii. Play/Pause iii. Additional options (see next page for details) iv. Go Back v. Screen control
19
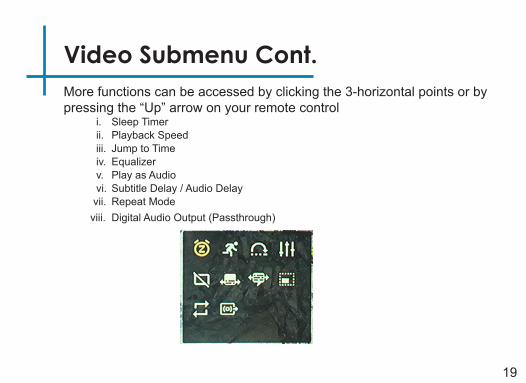
Video Submenu Cont.More functions can be accessed by clicking the 3-horizontal points or by pressing the “Up” arrow on your remote control i. Sleep Timer ii. Playback Speed iii. Jump to Time iv. Equalizer v. Play as Audio vi. Subtitle Delay / Audio Delay vii. Repeat Mode viii. Digital Audio Output (Passthrough)
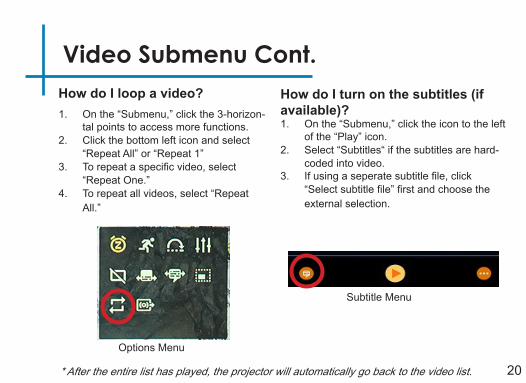
How do I loop a video?
20
Video Submenu Cont.How do I turn on the subtitles (if available)?1. On the “Submenu,” click the icon to the left
of the “Play” icon.2. Select “Subtitles“ if the subtitles are hard-
coded into video.3. If using a seperate subtitle file, click
“Select subtitle file” first and choose the external selection.
* After the entire list has played, the projector will automatically go back to the video list.
1. On the “Submenu,” click the 3-horizon-tal points to access more functions.
2. Click the bottom left icon and select “Repeat All” or “Repeat 1”
3. To repeat a specific video, select “Repeat One.”
4. To repeat all videos, select “Repeat All.”
Subtitle Menu
Options Menu
Photos Menu
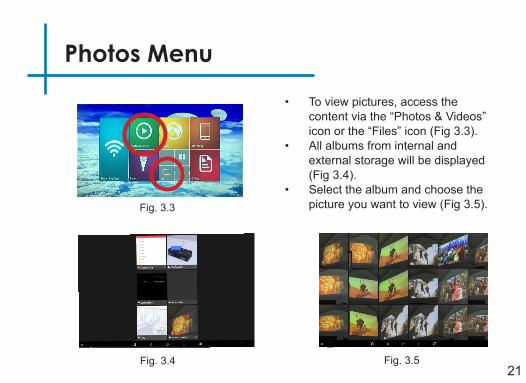
• To view pictures, access the content via the “Photos & Videos” icon or the “Files” icon (Fig 3.3).
• All albums from internal and external storage will be displayed (Fig 3.4).
• Select the album and choose the picture you want to view (Fig 3.5).
21
Fig. 3.3
Fig. 3.4 Fig. 3.5
22
Photo Menu Cont.
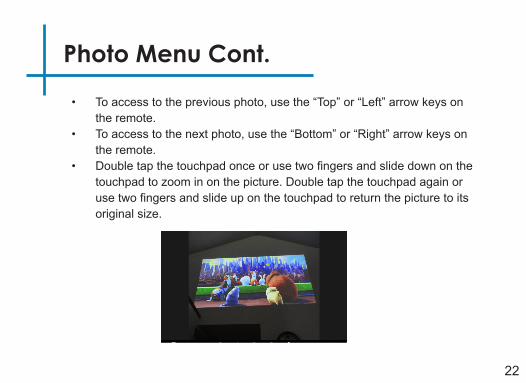
• To access to the previous photo, use the “Top” or “Left” arrow keys on the remote.
• To access to the next photo, use the “Bottom” or “Right” arrow keys on the remote.
• Double tap the touchpad once or use two fingers and slide down on the touchpad to zoom in on the picture. Double tap the touchpad again or use two fingers and slide up on the touchpad to return the picture to its original size.
Connecting to a Device via Digital Input
23
Connectivity to Multimedia Devices
The P300 Neo-S can connect to many media devices including: computers, lap-tops, iPhones, iPads, DVD players, smart phones, cameras, video game consoles and other peripherals with ease.
*Some smartphones require video out capabilities to be displayed with the P300 Neo-S. Check with your phone manufac-turer.
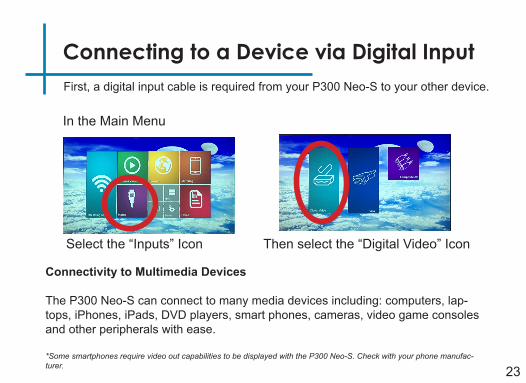
In the Main Menu
Select the “Inputs” Icon Then select the “Digital Video” Icon
First, a digital input cable is required from your P300 Neo-S to your other device.
24
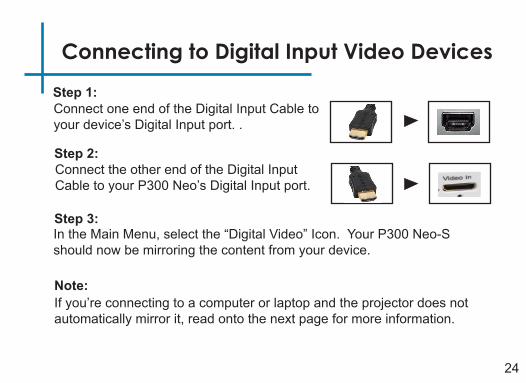
Connecting to Digital Input Video Devices
Connect one end of the Digital Input Cable to your device’s Digital Input port. .
Step 1:
Step 2:
Step 3:In the Main Menu, select the “Digital Video” Icon. Your P300 Neo-S should now be mirroring the content from your device.
Connect the other end of the Digital Input Cable to your P300 Neo’s Digital Input port.
If you’re connecting to a computer or laptop and the projector does not automatically mirror it, read onto the next page for more information.
Note:
Connecting to a Computer via Digital Input
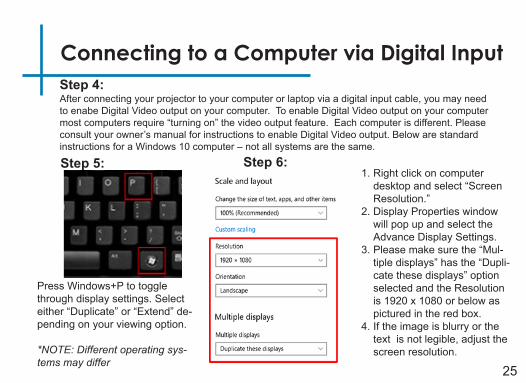
After connecting your projector to your computer or laptop via a digital input cable, you may need to enabe Digital Video output on your computer. To enable Digital Video output on your computer most computers require “turning on” the video output feature. Each computer is different. Please consult your owner’s manual for instructions to enable Digital Video output. Below are standard instructions for a Windows 10 computer – not all systems are the same.
Press Windows+P to toggle through display settings. Select either “Duplicate” or “Extend” de-pending on your viewing option.
*NOTE: Different operating sys-tems may differ
Step 5:1. Right click on computer
desktop and select “Screen Resolution.”
2. Display Properties window will pop up and select the Advance Display Settings.
3. Please make sure the “Mul-tiple displays” has the “Dupli-cate these displays” option selected and the Resolution is 1920 x 1080 or below as pictured in the red box.
4. If the image is blurry or the text is not legible, adjust the screen resolution.
Step 6:
25
Step 4:
26
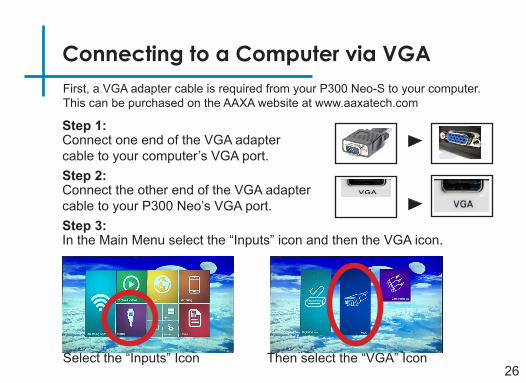
Connecting to a Computer via VGA
Select the “Inputs” Icon Then select the “VGA” Icon
First, a VGA adapter cable is required from your P300 Neo-S to your computer. This can be purchased on the AAXA website at www.aaxatech.com
Step 1:Connect one end of the VGA adapter cable to your computer’s VGA port.Step 2:Connect the other end of the VGA adapter cable to your P300 Neo’s VGA port.Step 3:In the Main Menu select the “Inputs” icon and then the VGA icon.
27
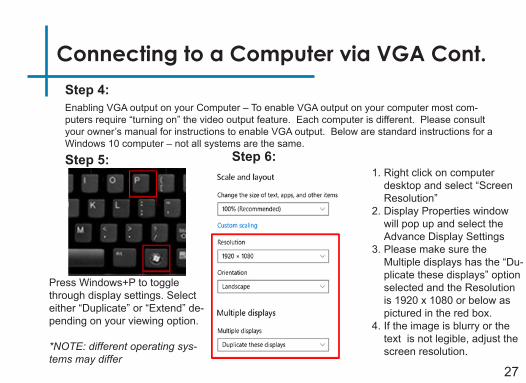
Connecting to a Computer via VGA Cont.Step 4:Enabling VGA output on your Computer – To enable VGA output on your computer most com-puters require “turning on” the video output feature. Each computer is different. Please consult your owner’s manual for instructions to enable VGA output. Below are standard instructions for a Windows 10 computer – not all systems are the same.
Press Windows+P to toggle through display settings. Select either “Duplicate” or “Extend” de-pending on your viewing option.
*NOTE: different operating sys-tems may differ
Step 5:1. Right click on computer
desktop and select “Screen Resolution”
2. Display Properties window will pop up and select the Advance Display Settings
3. Please make sure the Multiple displays has the “Du-plicate these displays” option selected and the Resolution is 1920 x 1080 or below as pictured in the red box.
4. If the image is blurry or the text is not legible, adjust the screen resolution.
Step 6:
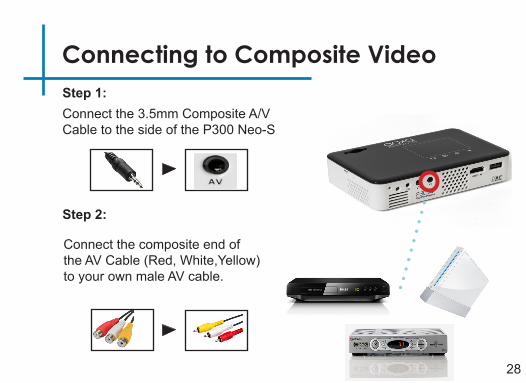
Connecting to Composite Video
Connect the 3.5mm Composite A/V Cable to the side of the P300 Neo-S
Connect the composite end of the AV Cable (Red, White,Yellow) to your own male AV cable.
Step 1:
Step 2:
28
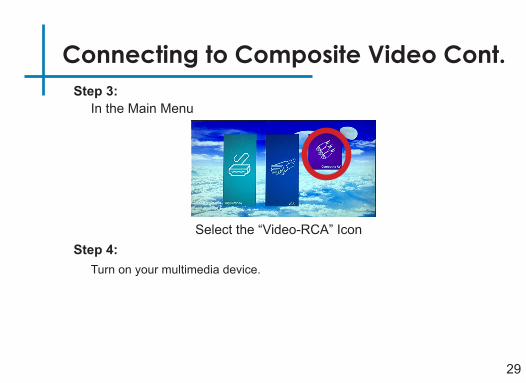
Connecting to Composite Video Cont.
In the Main Menu
Turn on your multimedia device.
Select the “Video-RCA” Icon
Step 3:
Step 4:
29
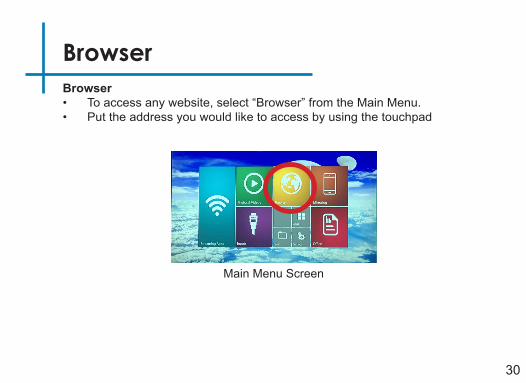
Browser• To access any website, select “Browser” from the Main Menu.• Put the address you would like to access by using the touchpad
Browser
30
Main Menu Screen
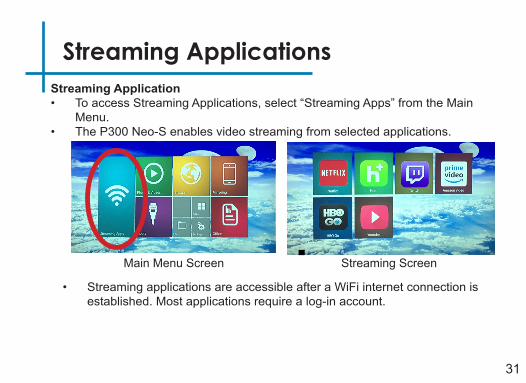
Streaming Application• To access Streaming Applications, select “Streaming Apps” from the Main
Menu.• The P300 Neo-S enables video streaming from selected applications.
Streaming Applications
31
Main Menu Screen
• Streaming applications are accessible after a WiFi internet connection is established. Most applications require a log-in account.
Streaming Screen

32
Streaming Applications Cont.TroubleshootingApplication Hangs or Freezes• Try clearing the cache (see Settings -> Storage)• Click on “Cached data” and then select “OK” when prompted.Update Required• If an update is required, you may be able to obtain through the Google Play
Store found in the “Apps”Poor Video Playback• Possible Causes: Poor WiFi Connection Too many open applications More than one Bluetooth device connected
Apps
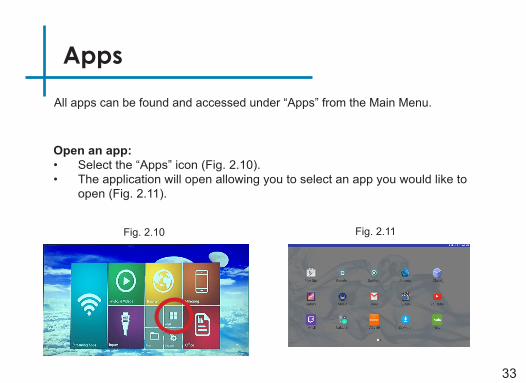
All apps can be found and accessed under “Apps” from the Main Menu.
Open an app:• Select the “Apps” icon (Fig. 2.10). • The application will open allowing you to select an app you would like to
open (Fig. 2.11).
Fig. 2.10
33
Fig. 2.11
Smartphone Mirroring
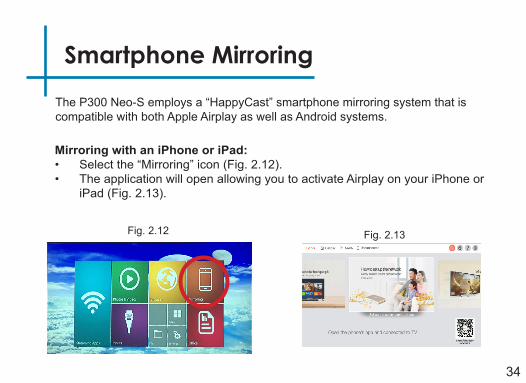
The P300 Neo-S employs a “HappyCast” smartphone mirroring system that is compatible with both Apple Airplay as well as Android systems.
Mirroring with an iPhone or iPad:• Select the “Mirroring” icon (Fig. 2.12).• The application will open allowing you to activate Airplay on your iPhone or
iPad (Fig. 2.13).
Fig. 2.12
34
Fig. 2.13
iPhone Smartphone Mirroring
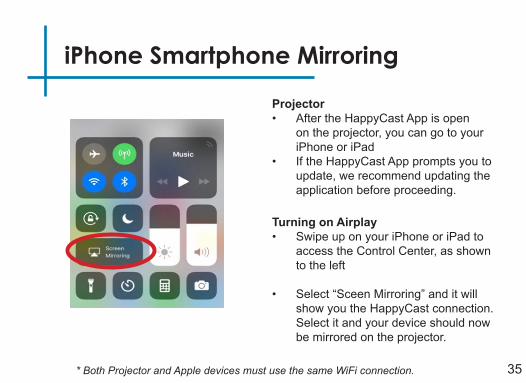
Projector• After the HappyCast App is open
on the projector, you can go to your iPhone or iPad
• If the HappyCast App prompts you to update, we recommend updating the application before proceeding.
Turning on Airplay• Swipe up on your iPhone or iPad to
access the Control Center, as shown to the left
• Select “Sceen Mirroring” and it will show you the HappyCast connection. Select it and your device should now be mirrored on the projector.
35* Both Projector and Apple devices must use the same WiFi connection.
Android Smartphone Mirroring
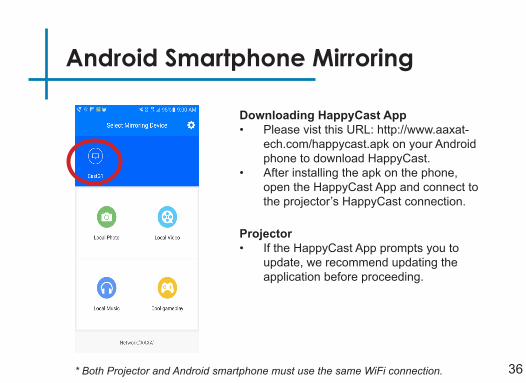
Downloading HappyCast App• Please vist this URL: http://www.aaxat-
ech.com/happycast.apk on your Android phone to download HappyCast.
• After installing the apk on the phone, open the HappyCast App and connect to the projector’s HappyCast connection.
36* Both Projector and Android smartphone must use the same WiFi connection.
Projector• If the HappyCast App prompts you to
update, we recommend updating the application before proceeding.
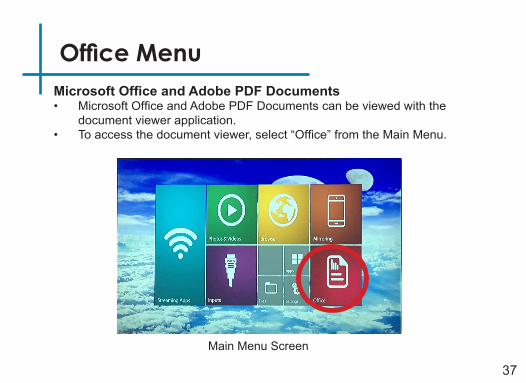
Office Menu
37
MicrosoftOfficeandAdobePDFDocuments• Microsoft Office and Adobe PDF Documents can be viewed with the
document viewer application.• To access the document viewer, select “Office” from the Main Menu.
Main Menu Screen
38
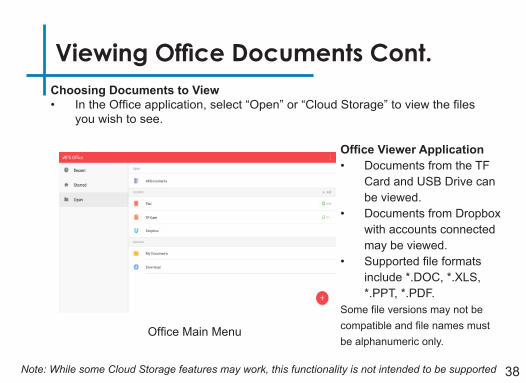
Choosing Documents to View• In the Office application, select “Open” or “Cloud Storage” to view the files
you wish to see.
Viewing Office Documents Cont.
Office Main Menu
OfficeViewerApplication• Documents from the TF
Card and USB Drive can be viewed.
• Documents from Dropbox with accounts connected may be viewed.
• Supported file formats include *.DOC, *.XLS, *.PPT, *.PDF.
Some file versions may not be compatible and file names must be alphanumeric only.
Note: While some Cloud Storage features may work, this functionality is not intended to be supported
39
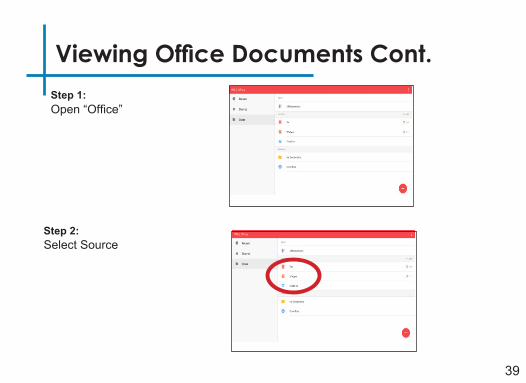
Step 1: Open “Office”
Viewing Office Documents Cont.
Step 2:Select Source
Viewing Office Documents Cont.
40
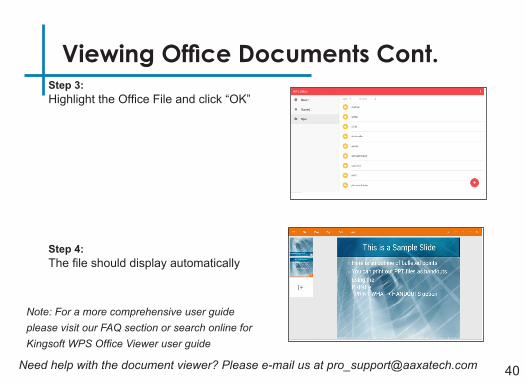
Note: For a more comprehensive user guide please visit our FAQ section or search online for Kingsoft WPS Office Viewer user guide
Need help with the document viewer? Please e-mail us at [email protected]
Step 3:Highlight the Office File and click “OK”
Step 4:The file should display automatically
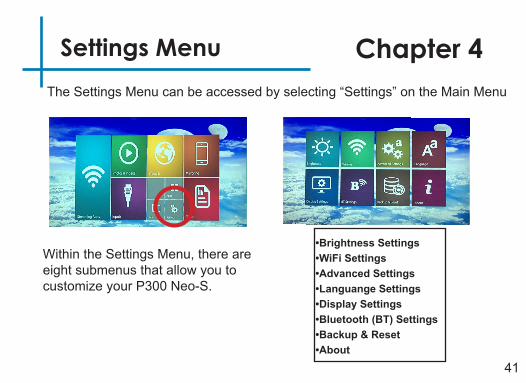
Settings Menu
41
The Settings Menu can be accessed by selecting “Settings” on the Main Menu
•BrightnessSettings•WiFiSettings•AdvancedSettings•LanguangeSettings•DisplaySettings•Bluetooth(BT)Settings•Backup&Reset•About
Within the Settings Menu, there are eight submenus that allow you to customize your P300 Neo-S.
Chapter 4
42
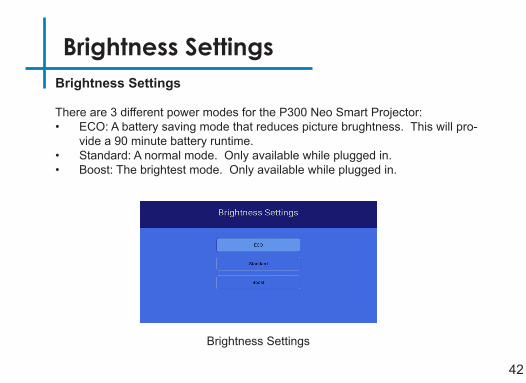
Brightness Settings Brightness Settings
There are 3 different power modes for the P300 Neo Smart Projector:• ECO: A battery saving mode that reduces picture brughtness. This will pro-
vide a 90 minute battery runtime.• Standard: A normal mode. Only available while plugged in.• Boost: The brightest mode. Only available while plugged in.
Brightness Settings
WiFi Settings
43
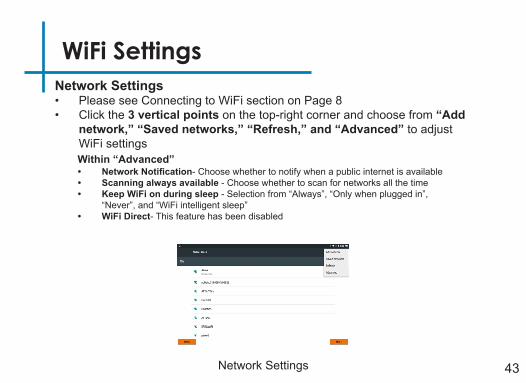
Network Settings• Please see Connecting to WiFi section on Page 8• Click the 3 vertical points on the top-right corner and choose from “Add
network,” “Saved networks,” “Refresh,” and “Advanced” to adjust WiFi settings
• NetworkNotification- Choose whether to notify when a public internet is available• Scanning always available - Choose whether to scan for networks all the time• Keep WiFi on during sleep - Selection from “Always”, “Only when plugged in”,
“Never”, and “WiFi intelligent sleep”• WiFi Direct- This feature has been disabled
Within “Advanced”
Network Settings
Advanced Settings
44
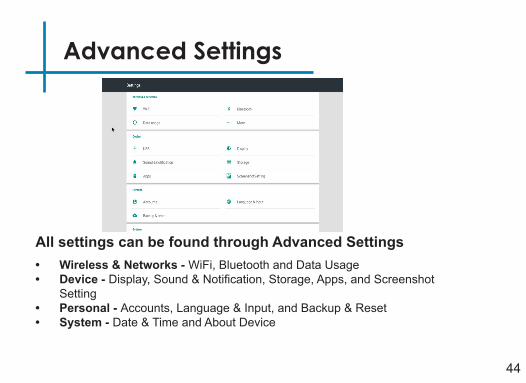
• Wireless & Networks - WiFi, Bluetooth and Data Usage• Device - Display, Sound & Notification, Storage, Apps, and Screenshot
Setting• Personal - Accounts, Language & Input, and Backup & Reset• System - Date & Time and About Device
All settings can be found through Advanced Settings

Language Settings
45
Language Settings• Selecting a Language: The projector supports more than 30 languages • Keyboard & Input Method: The input method is a standard AOSP English key-
board • Speech: Text-to-speech output• Mouse/Trackpad: Pointer speed is adjustable
Language Settings
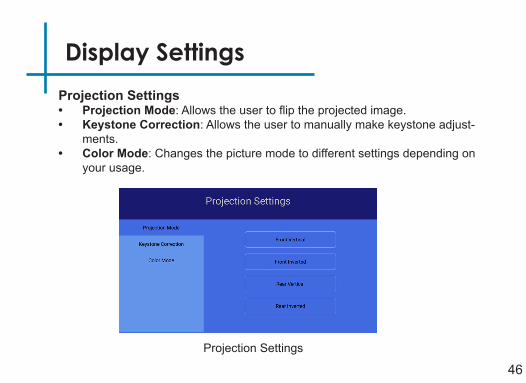
Display Settings
46
Projection Settings• Projection Mode: Allows the user to flip the projected image.• Keystone Correction: Allows the user to manually make keystone adjust-
ments.• Color Mode: Changes the picture mode to different settings depending on
your usage.
Projection Settings
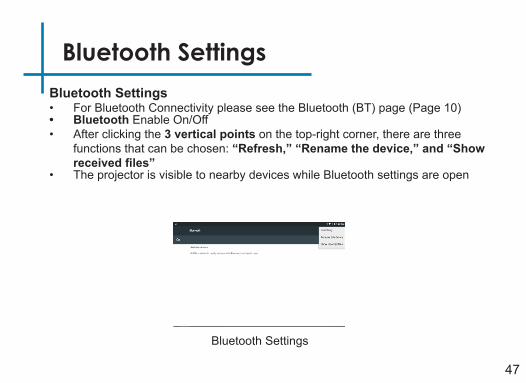
Bluetooth Settings
47
Bluetooth Settings• For Bluetooth Connectivity please see the Bluetooth (BT) page (Page 10)• Bluetooth Enable On/Off• After clicking the 3 vertical points on the top-right corner, there are three
functions that can be chosen: “Refresh,” “Rename the device,” and “Show receivedfiles”
• The projector is visible to nearby devices while Bluetooth settings are open
Bluetooth Settings
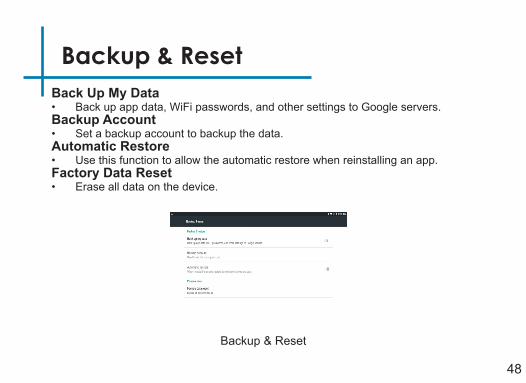
Backup & Reset
48
Back Up My Data• Back up app data, WiFi passwords, and other settings to Google servers.Backup Account• Set a backup account to backup the data.Automatic Restore• Use this function to allow the automatic restore when reinstalling an app.Factory Data Reset• Erase all data on the device.
Backup & Reset
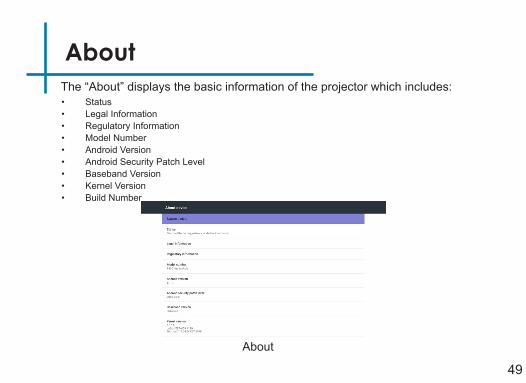
About
49
The “About” displays the basic information of the projector which includes:
About
• Status• Legal Information• Regulatory Information• Model Number• Android Version• Android Security Patch Level• Baseband Version• Kernel Version• Build Number
49
Technical Details Chapter 5
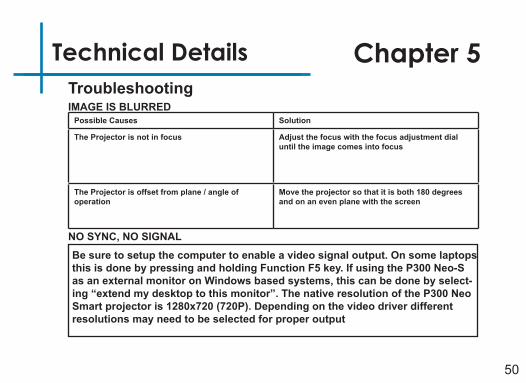
IMAGE IS BLURREDPossible Causes Solution
The Projector is not in focus Adjust the focus with the focus adjustment dial until the image comes into focus
The Projector is offset from plane / angle of operation
Move the projector so that it is both 180 degrees and on an even plane with the screen
NO SYNC, NO SIGNAL
Troubleshooting
Be sure to setup the computer to enable a video signal output. On some laptops this is done by pressing and holding Function F5 key. If using the P300 Neo-S as an external monitor on Windows based systems, this can be done by select-ing “extend my desktop to this monitor”. The native resolution of the P300 Neo Smart projector is 1280x720 (720P). Depending on the video driver different resolutions may need to be selected for proper output
50
51
Technical Details Cont.
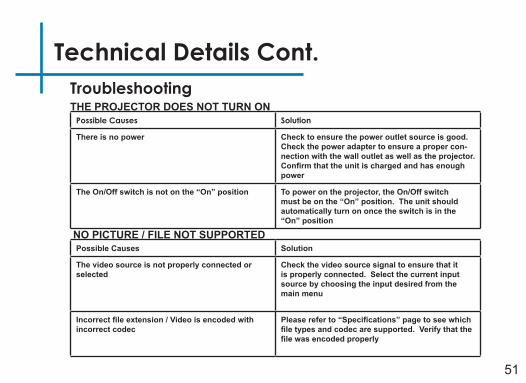
THE PROJECTOR DOES NOT TURN ONPossible Causes Solution
There is no power Check to ensure the power outlet source is good. Check the power adapter to ensure a proper con-nection with the wall outlet as well as the projector. Confirmthattheunitischargedandhasenoughpower
The On/Off switch is not on the “On” position To power on the projector, the On/Off switch must be on the “On” position. The unit should automatically turn on once the switch is in the “On” position
NO PICTURE / FILE NOT SUPPORTEDPossible Causes Solution
The video source is not properly connected or selected
Check the video source signal to ensure that it is properly connected. Select the current input source by choosing the input desired from the main menu
Incorrectfileextension/Videoisencodedwithincorrect codec
Pleasereferto“Specifications”pagetoseewhichfiletypesandcodecaresupported.Verifythatthefilewasencodedproperly
Troubleshooting
52
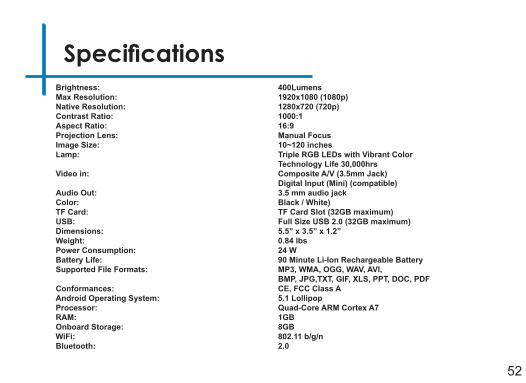
SpecificationsBrightness:Max Resolution: Native Resolution:Contrast Ratio:Aspect Ratio:Projection Lens:Image Size: Lamp: Video in:
Audio Out:Color:TF Card:USB:Dimensions: Weight:Power Consumption:Battery Life:Supported File Formats:
Conformances:Android Operating System:Processor:RAM:Onboard Storage:WiFi:Bluetooth:
400Lumens1920x1080 (1080p) 1280x720 (720p)1000:116:9Manual Focus10~120 inches Triple RGB LEDs with Vibrant Color Technology Life 30,000hrs Composite A/V (3.5mm Jack)Digital Input (Mini) (compatible)3.5 mm audio jackBlack / White)TF Card Slot (32GB maximum) Full Size USB 2.0 (32GB maximum)5.5” x 3.5” x 1.2” 0.84 lbs24 W90 Minute Li-Ion Rechargeable BatteryMP3, WMA, OGG, WAV, AVI, BMP, JPG,TXT, GIF, XLS, PPT, DOC, PDFCE, FCC Class A5.1 LollipopQuad-Core ARM Cortex A71GB8GB802.11 b/g/n2.0

53
Notes

Please direct all customer service inquiries to:
AAXA Technologies, Inc.17691 Mitchell N., Unit #B
Irvine, CA 92614(714) 957-1999