2019 pioneer 700 (sxs700m2/m2d/m4/m4d) owner's manual
TRANSCRIPT
Conten
ConContentsThese pmanuaThe firssection
DriverThe mmodirelate
InstrumThe lcontr
BeforeThe iand oare reand t
Basic OHowplus
ServiciWhy knowinstru
Tips ...Howenvir
31HL3650
tents
ages give an overview of the contents of your owner’s l.t page of each section lists the topics discussed in that .
& Passenger Safety .........................................................1ost important safety guidelines, how accessories and
fications can affect your safety, and the location of safety-d labels on your vehicle.
ents & Controls ............................................................11ocation, function and operation of the indicators, driver ols, and other operational components.
Driving...........................................................................69mportance of wearing a seat belt, helmet, protective eyewear ther protective gear, how to make sure you and your Honda ady to drive, plus load limits and guidelines on carrying cargo owing a trailer.
peration & Driving Guidelines.....................................81 to start and stop the engine, select a driving mode and gear, guidelines for driving on hills and other off-road situations.
ng Your Honda ............................................................101your vehicle needs regular maintenance, what you need to before servicing your vehicle, a maintenance schedule, and ctions for specific maintenance and adjustment items.
.......................................................................................193
ts
to store and transport your Honda, and how to be an onmentally responsible driver.
2019 Pioneer 700 (SXS700M2/M2D/M4/M4D) MOM 16641 (1803)
TakingWha
TechniID nu
ConsuInformanu
Index.Alph
Quick Hand
Contents
Care of the Unexpected.............................................203t to do if you have a flat tire, your engine won’t start, etc.
cal Information ............................................................227mbers, technical specifications, and other technical facts.
mer Information ...........................................................245mation on warranties, emissions controls, how to get a service al, and how to contact Honda.
.......................................................................................251abetical listing of topics in the manual.
Referencey facts about fuel, engine oil, tire sizes, and air pressure.
Contents
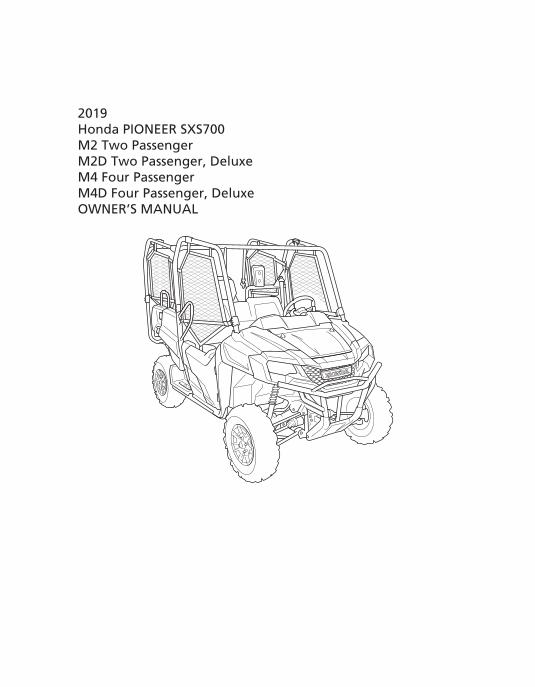
2019HondaM2 TwM2D TM4 FoM4D FOWNE
PIONEER SXS700o Passengerwo Passenger, Deluxeur Passengerour Passenger, DeluxeR’S MANUAL
Introdu
IntrIntroductionCongraHondapeopleevery p
Before this owinformfor, theof each
To protmaintaimportdrive a
As youby a damag
Be sureundersaware
If you hrepairsis dedic
Please we willinformYou mUSA: wCanada
N
oduction
tulations on choosing your Honda Pioneer. When you own a , you’re part of a worldwide family of satisfied customers– who appreciate Honda’s reputation for building quality into roduct.
you begin driving your vehicle, we recommend that you read ner’s manual. It’s full of facts, instructions, safety ation, and helpful tips. To help you find what you are looking manual contains a detailed list of contents at the beginning section and an alphabetical index at the back of the book.
ect your investment, we urge you to keep your vehicle well ined. Scheduled service is a must, of course, but it’s also ant to observe the break-in guidelines and perform all pre-nd other periodic checks detailed in this manual.
read this manual, you will find information that is preceded symbol. This information is intended to help you avoid
e to your Honda, other property, or the environment.
to read the Warranties Booklet (page 247) so you tand the coverages that protect your new Honda and are of your rights and responsibilities.
ave any questions, or if you ever need special service or , remember that your dealer knows your Honda SXS best and ated to your complete satisfaction.
report any change of address or ownership to your dealer so be able to contact you concerning important product
OTICE
ction
ation.ay also want to visit our website at ww.powersports.honda.com. : www.honda.ca.
• The
SXS700
SXS700
SXS700
SXS700
• The• The
A
AC
CM
A
AC
CM
Introduction
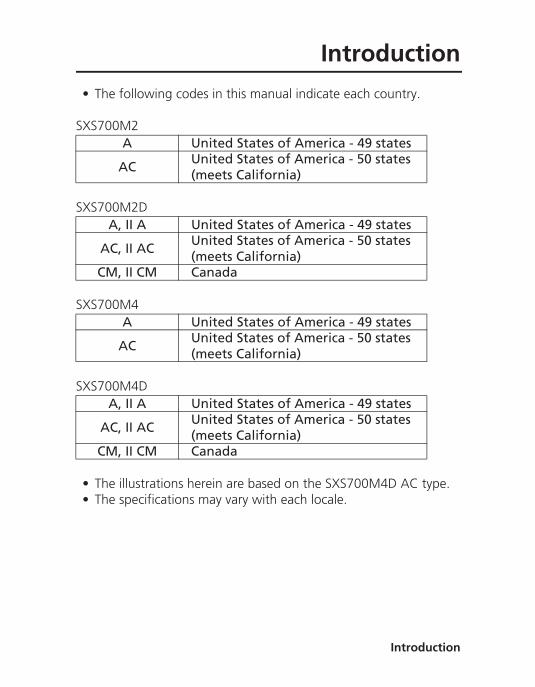
following codes in this manual indicate each country.
M2
M2D
M4
M4D
illustrations herein are based on the SXS700M4D AC type. specifications may vary with each locale.
A United States of America - 49 states
ACUnited States of America - 50 states (meets California)
, II A United States of America - 49 states
, II ACUnited States of America - 50 states (meets California)
, II CM Canada
A United States of America - 49 states
ACUnited States of America - 50 states (meets California)
, II A United States of America - 49 states
, II ACUnited States of America - 50 states (meets California)
, II CM Canada
Introduction
A Few
A FeA Few Words About SafetyYour saoperati
To helpprovidein this could h
Of couwith opgood ju
You wiincludin
Safety
SafetysymbolCAUTI
These s
3
3W
3C
w Words About Safety
fety, and the safety of others, is very important. And ng your Honda safely is an important responsibility.
you make informed decisions about safety, we have d operating procedures and other information on labels and
manual. This information alerts you to potential hazards that urt you or others.
rse, it is not possible to warn you about all hazards associated erating or maintaining this vehicle. You must use your own dgment.
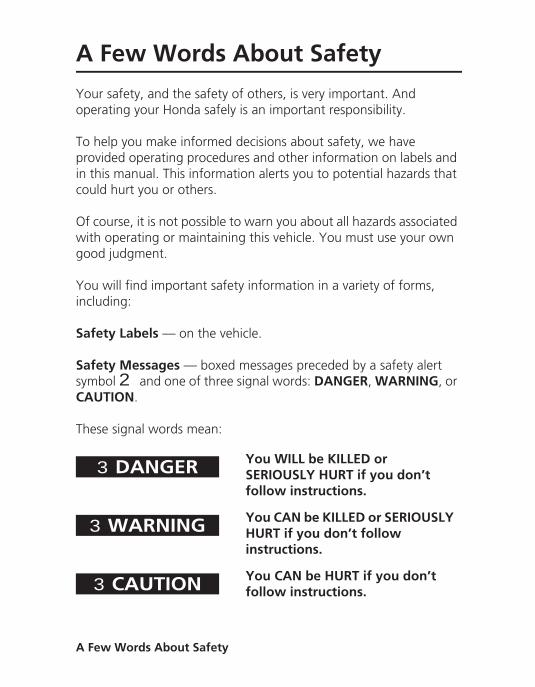
ll find important safety information in a variety of forms, g:
Labels — on the vehicle.
Messages — boxed messages preceded by a safety alert 2 and one of three signal words: DANGER, WARNING, or ON.
ignal words mean:
DANGER You WILL be KILLED or SERIOUSLY HURT if you don’t follow instructions.
ARNING You CAN be KILLED or SERIOUSLY HURT if you don’t follow instructions.
Words About Safety
AUTION You CAN be HURT if you don’t follow instructions.
Safety“Impor
Safetypage 1
Instruc
In addithat caread it
A Few Words About Safety
Headings — such as “Important Safety Reminders” or tant Safety Precautions.”
Section — “Driver & Passenger Safety,” beginning on .
tions — how to operate this vehicle correctly and safely.
tion to the above, your owner's manual is full of information n help you safely operate and maintain your vehicle. So please carefully.
A Few Words About Safety
Driver & Passenger SafetyThis serecommfew molocatio
ImportAccessSafety
Driver & Passenger Safety
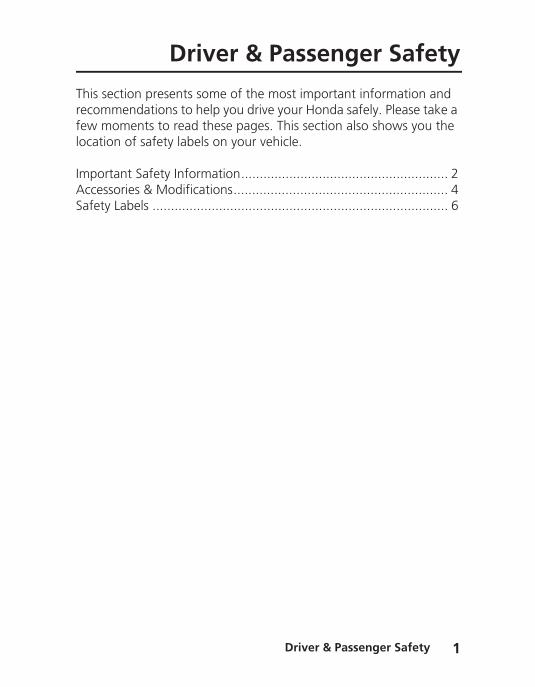
ction presents some of the most important information and endations to help you drive your Honda safely. Please take a ments to read these pages. This section also shows you the
n of safety labels on your vehicle.
ant Safety Information........................................................ 2ories & Modifications.......................................................... 4Labels ................................................................................ 6
Driver & Passenger Safety 1
D2
Imp
There iYou’ll fThe fol
The driseat bebe tall if needto ride restrain
Wearinprotect
We recstrap. Wgloves,
Makingand secinside tor turn
Follow
Alwa
Prote
Keep
ortant Safety Information
s much that you can do to protect yourself and passenger(s). ind many helpful recommendations throughout this manual. lowing are those we consider to be most important.
ver should be at least 16 years old and tall enough to wear the lt properly and reach all the controls. A passenger should also enough for the seat belt to fit properly and brace themselves, ed, placing both feet firmly on the floor. Never allow anyone in the middle of the bench seat. There is no seat belt to them.
g a seat belt and positioning it properly is your best ion against injury in a crash or rollover.
ommend that occupants always wear a helmet with a chin e also recommend that you wear eye protection, boots,
and other protection gear (page 71).
sure the doors are closed and the side nets are rolled down ure help keep the driver’s and passenger’s arms and legs he occupant protective structure (OPS) should the vehicle tip over.
Age and Size Recommendations
ys Wear a Seat Belt
ct Your Head and Eyes
Doors and Side Nets Closed
river & Passenger Safety
Your ve(SXS70(SXS70area, aserious
Do notmake spossibl
It’s impoperatiif you ainspectmainte
Alcohojudgmecan alsor drug
Your vedesignaother itroads.
Neve
Obey
Keep
Don’t
Stay O
Important Safety Information
hicle was designed to either carry a driver and one passenger 0M2/M2D) or a driver and up to three passengers 0M4/M4D). Never carry additional passengers in the cargo s they could be thrown against or out of the vehicle and be ly hurt or killed.
carry more than 1,000 lb (454 kg) in the cargo bed, and ure all cargo is properly loaded as forward and centered as e and secured to prevent shifting.
ortant to keep your vehicle properly maintained and in safe ng condition. Having a breakdown can be difficult, especially re stranded far from your base. To help avoid problems, your Honda before each use and perform all recommended nance.
l and driving don’t mix. Even one drink can affect your nt and your ability to respond to changing conditions. Drugs
o impair your abilities. So don’t drive after consuming alcohol s.
r Carry a Passenger in the Cargo Area
Loading Limits & Guidelines
Your Vehicle in Safe Condition
Drink and Drive
ff Public Roads
Driver & Passenger Safety 3
hicle has been designed for use on private property and ted off-highway areas. It does not have turn signals or many ems required for use on either paved or unpaved public
D4
Acc
Modifyunsafeaccesso
We stroAccesstested accessoselectio
You shamounvehicle
Check guideli
• Magrointe
• Do elecloss
Acces
essories & Modifications
ing your vehicle or using non-Honda accessories can make it . Before you consider making any modifications or adding an ry, be sure to read the following information.
ngly recommend that you use only Honda Genuine ories that have been specifically designed or approved and for your vehicle. Because Honda cannot test all other ries, you must be personally responsible for the proper n, installation, and use of non-Honda accessories.
ould also be aware that accessories add weight, reducing the t of cargo and total weight you can carry, and can raise the 's center of gravity, increasing the risk of a rollover.
with your dealer for assistance, and always follow these nes:
ke sure the accessory does not obscure any lights, reduce und clearance, limit suspension travel or steering travel, or rfere with operating any controls.not add any electrical equipment that will exceed the vehicle’s trical system capacity (page 233). A blown fuse can cause a of lights or engine power (page 216).
sories
WARNING 3WARNINGImproper accessories or modifications can cause a crash in which you can be seriously
river & Passenger Safety
hurt or killed.
Follow all instructions in this owner’s manual regarding accessories and modifications.
We stromodifyoperatihandlin
We alsequipmsystemarea.
Modi
Accessories & Modifications
ngly advise you not to remove any original equipment or your Honda in any way that would change its design or on. Such changes could seriously impair your vehicle’s g, stability, and braking and make it unsafe to drive.
o advise you not to make any modifications or remove any ent (such as the spark arrester, muffler, or emissions control
components) that would make your vehicle illegal in your
fications
Driver & Passenger Safety 5
D6
Safe
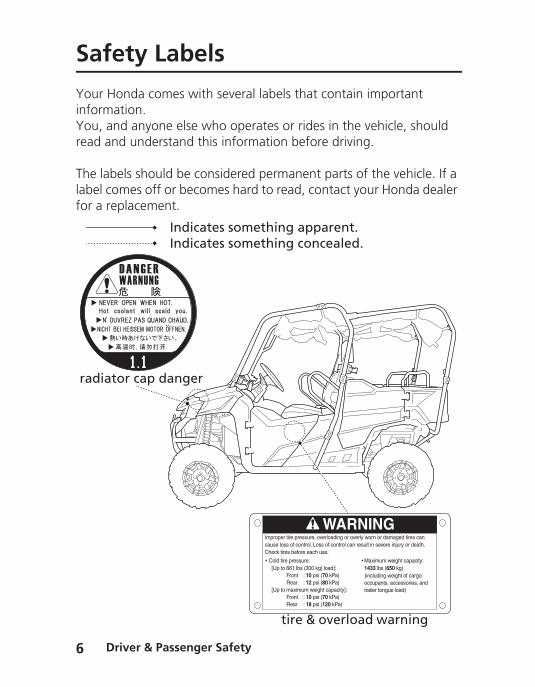
Your HinformYou, anread an
The lablabel cofor a re
radiat
ty Labels
onda comes with several labels that contain important ation.d anyone else who operates or rides in the vehicle, should d understand this information before driving.
els should be considered permanent parts of the vehicle. If a mes off or becomes hard to read, contact your Honda dealer placement.
Indicates something apparent.Indicates something concealed.
or cap danger
river & Passenger Safety
tire & overload warning

Safety Labels
Driver & Passenger Safety 7
general warning tag
D8
Safe
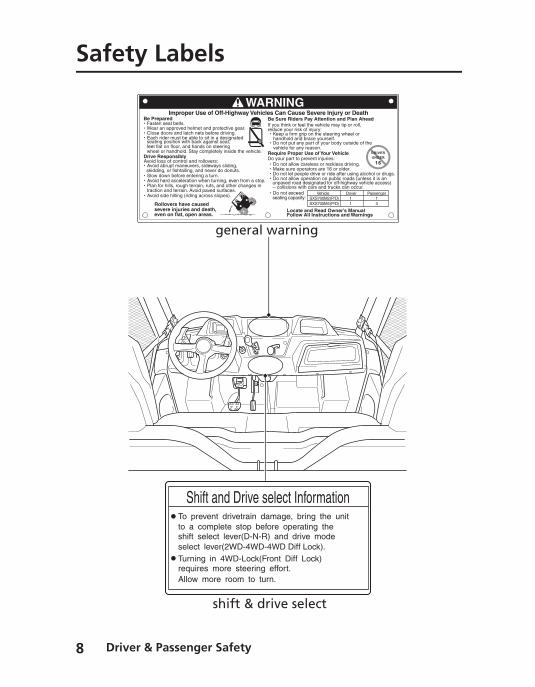
ty Labelsgeneral warning
river & Passenger Safety
shift & drive select

lo
(SXS7
Safety Labels
ading warning rear passenger warning
00M2/M2D) (SXS700M4/M4D)
(SXS700M4/M4D only)
Driver & Passenger Safety 9
trailer hitch
OSHA

D10
BLANK PAGE
river & Passenger Safety
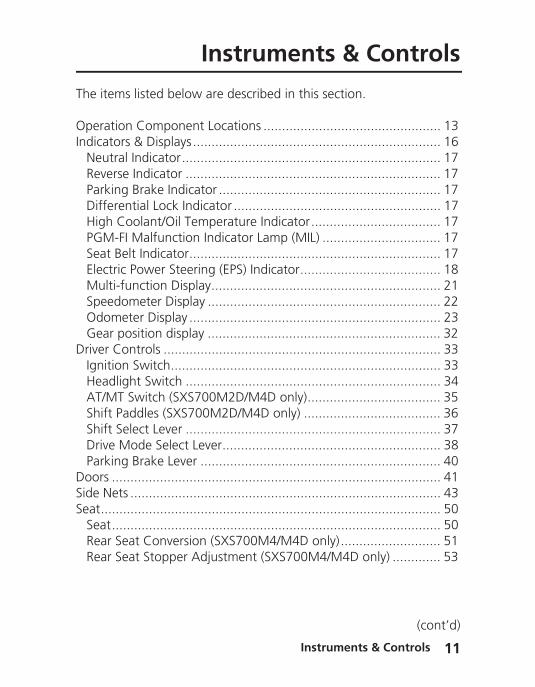
Instruments & ControlsThe ite
OperatIndicat
NeutReverParkiDiffeHigh PGMSeat ElectrMultiSpeeOdomGear
Driver CIgnitiHeadAT/MShift Shift DriveParki
Doors .Side NeSeat....
Seat.Rear Rear
Instruments & Controls
ms listed below are described in this section.
ion Component Locations ................................................ 13ors & Displays ................................................................... 16ral Indicator...................................................................... 17se Indicator ..................................................................... 17ng Brake Indicator ............................................................ 17rential Lock Indicator ........................................................ 17Coolant/Oil Temperature Indicator................................... 17-FI Malfunction Indicator Lamp (MIL) ................................ 17Belt Indicator.................................................................... 17ic Power Steering (EPS) Indicator...................................... 18-function Display.............................................................. 21dometer Display ............................................................... 22
eter Display .................................................................... 23 position display ............................................................... 32
ontrols ........................................................................... 33on Switch......................................................................... 33light Switch ..................................................................... 34T Switch (SXS700M2D/M4D only).................................... 35Paddles (SXS700M2D/M4D only) ..................................... 36Select Lever ..................................................................... 37 Mode Select Lever........................................................... 38ng Brake Lever ................................................................. 40........................................................................................ 41ts .................................................................................... 43........................................................................................ 50........................................................................................ 50Seat Conversion (SXS700M4/M4D only)........................... 51
Instruments & Controls 11
(cont’d)
Seat Stopper Adjustment (SXS700M4/M4D only) ............. 53
In12
Inst
Seat BePassenStorageAccessCargo
TailgaTie-DTilt B
Trailer
ruments & Controls
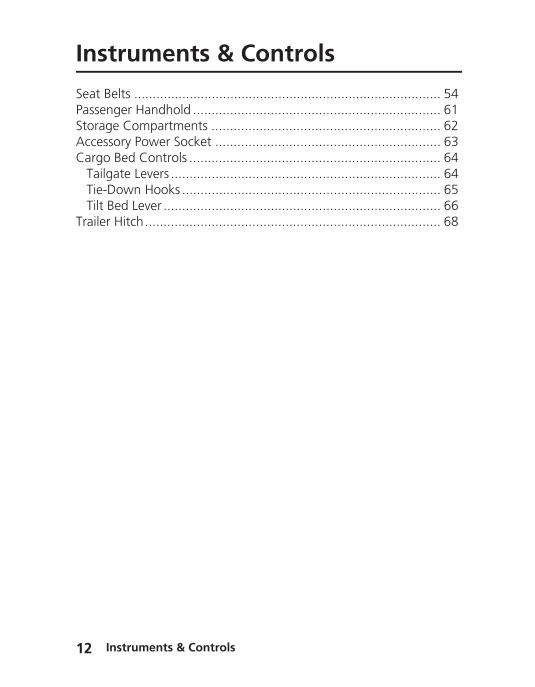
lts ................................................................................... 54ger Handhold ................................................................... 61 Compartments .............................................................. 62
ory Power Socket ............................................................. 63Bed Controls .................................................................... 64te Levers ......................................................................... 64
own Hooks ...................................................................... 65ed Lever ........................................................................... 66Hitch................................................................................ 68
struments & Controls
O
headswitc(page
park(pag
do(SX(pa
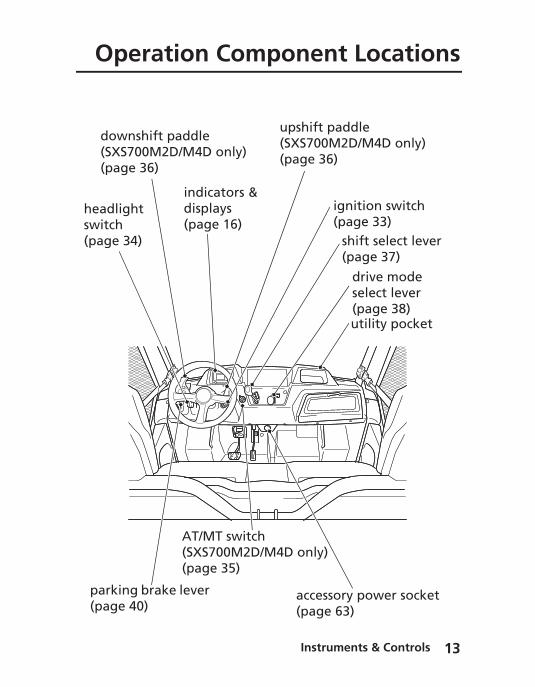
peration Component Locations
light h
34)
ignition switch (page 33)
drive mode select lever(page 38)
shift select lever (page 37)
indicators & displays(page 16)
utility pocket
AT/MT switch(SXS700M2D/M4D only)(page 35)
wnshift paddleS700M2D/M4D only)ge 36)
upshift paddle(SXS700M2D/M4D only)(page 36)
Instruments & Controls 13
accessory power socket (page 63)
ing brake lever e 40)
In14
Ope
front
fr
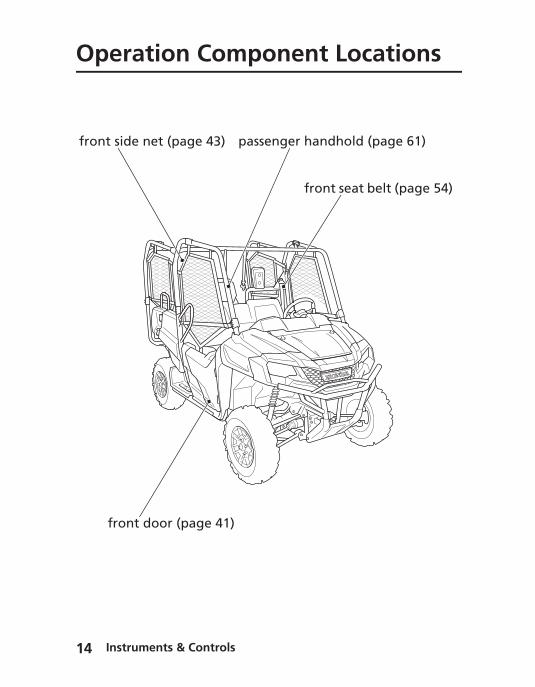
ration Component Locations
front seat belt (page 54)
side net (page 43)
ont door (page 41)
passenger handhold (page 61)
struments & Controls

O
rear d(SXS7(page
tilt b
peration Component Locations
oor 00M4/M4D only) 41)
rear side net (SXS700M4/M4D only) (page 43)
rear seat belt (SXS700M4/M4D only) (page 54)
ed lever (page 66)
cargo bed (page 64)
tailgate levers(page 64)
rear seat (SXS700M4/M4D only) (page 50)
Instruments & Controls 15
trailer hitch receiver (page 68)
In16
Indi
The indalert yomore eare des
Lamp CThe indignition
If one odealer
parkin
reversindica
neutrindica
differlock indica
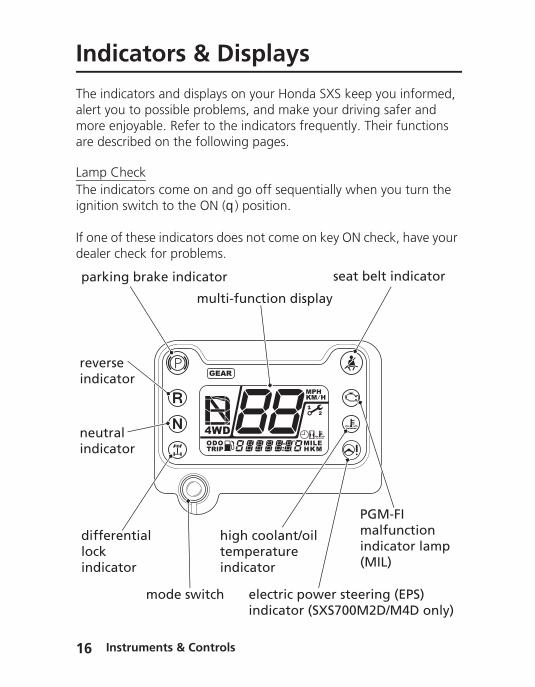
cators & Displays
icators and displays on your Honda SXS keep you informed, u to possible problems, and make your driving safer and njoyable. Refer to the indicators frequently. Their functions cribed on the following pages.
heckicators come on and go off sequentially when you turn the switch to the ON (q) position.
f these indicators does not come on key ON check, have your check for problems.
g brake indicator
multi-function display
PGM-FI malfunction indicator lamp (MIL)
seat belt indicator
e tor
al tor
ential
tor
high coolant/oil temperature indicator
struments & Controls
mode switch electric power steering (EPS) indicator (SXS700M2D/M4D only)
adverseon whioff, an
speed a
latchedIf the dspeed w
Indicators & Displays
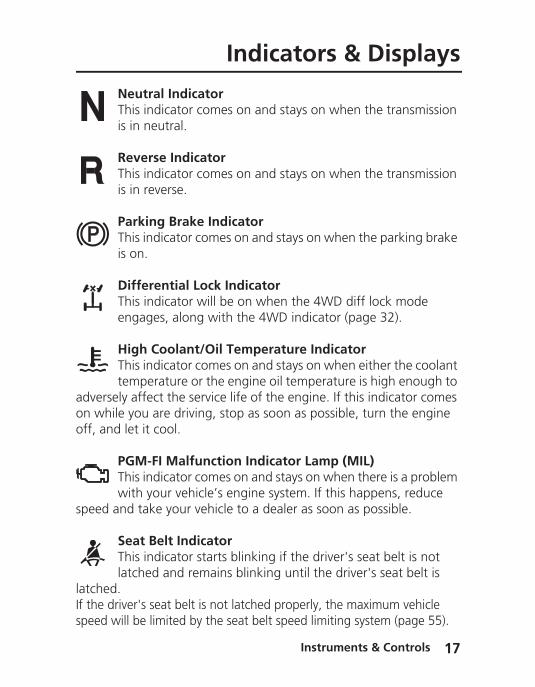
Neutral IndicatorThis indicator comes on and stays on when the transmission is in neutral.
Reverse IndicatorThis indicator comes on and stays on when the transmission is in reverse.
Parking Brake IndicatorThis indicator comes on and stays on when the parking brake is on.
Differential Lock IndicatorThis indicator will be on when the 4WD diff lock mode engages, along with the 4WD indicator (page 32).
High Coolant/Oil Temperature IndicatorThis indicator comes on and stays on when either the coolant temperature or the engine oil temperature is high enough to ly affect the service life of the engine. If this indicator comes
le you are driving, stop as soon as possible, turn the engine d let it cool.
PGM-FI Malfunction Indicator Lamp (MIL)This indicator comes on and stays on when there is a problem with your vehicle’s engine system. If this happens, reduce nd take your vehicle to a dealer as soon as possible.
Seat Belt IndicatorThis indicator starts blinking if the driver's seat belt is not
Instruments & Controls 17
latched and remains blinking until the driver's seat belt is .river's seat belt is not latched properly, the maximum vehicle ill be limited by the seat belt speed limiting system (page 55).

In18
Indi
and remThis indthe ele
cators & Displays
Electric Power Steering (EPS) Indicator(SXS700M2D/M4D only)This indicator comes on when the ignition switch is turned on ains on until the engine is started.icator comes on and stays on when there is abnormality in
ctric power steering system.
struments & Controls
Multidispla
SpdiOd
Gedi
Mode
Indicators & Displays
-function y
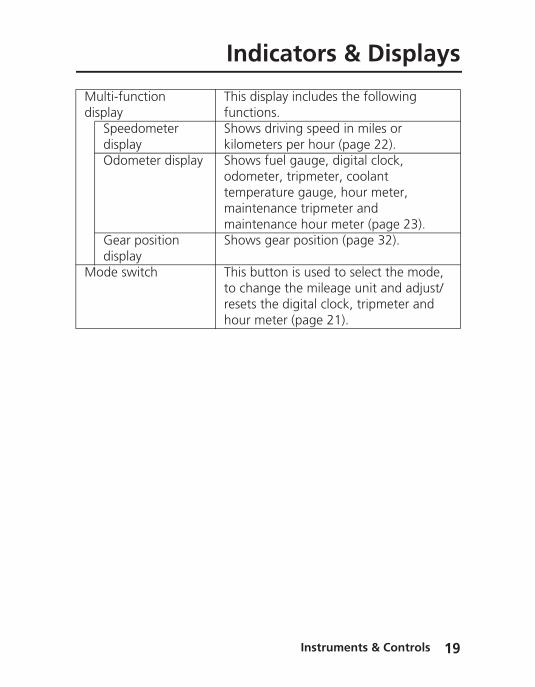
This display includes the following functions.
eedometer splay
Shows driving speed in miles or kilometers per hour (page 22).
ometer display Shows fuel gauge, digital clock, odometer, tripmeter, coolant temperature gauge, hour meter, maintenance tripmeter and maintenance hour meter (page 23).
ar position splay
Shows gear position (page 32).
switch This button is used to select the mode, to change the mileage unit and adjust/resets the digital clock, tripmeter and hour meter (page 21).
Instruments & Controls 19
In20
Indi
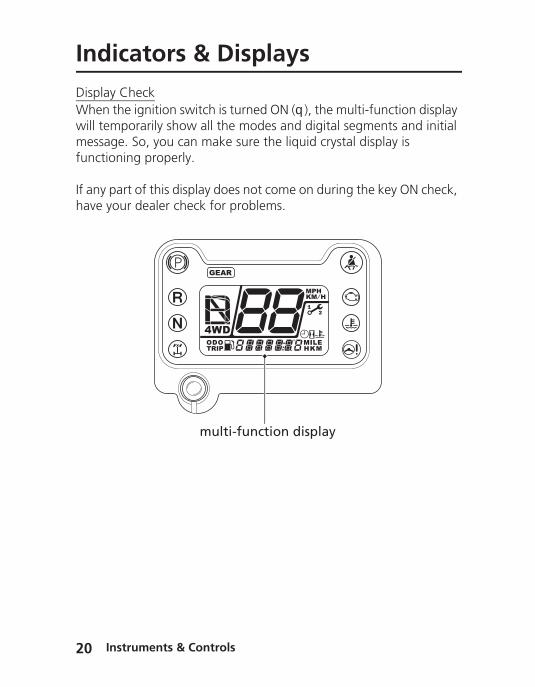
DisplayWhen twill temmessagfunctio
If any phave yo
cators & Displays
Checkhe ignition switch is turned ON (q), the multi-function display porarily show all the modes and digital segments and initial e. So, you can make sure the liquid crystal display is ning properly.
art of this display does not come on during the key ON check, ur dealer check for problems.
multi-function display
struments & Controls
The mudisplay
Multi
SpeeOdoGea
m
gear
Indicators & Displays
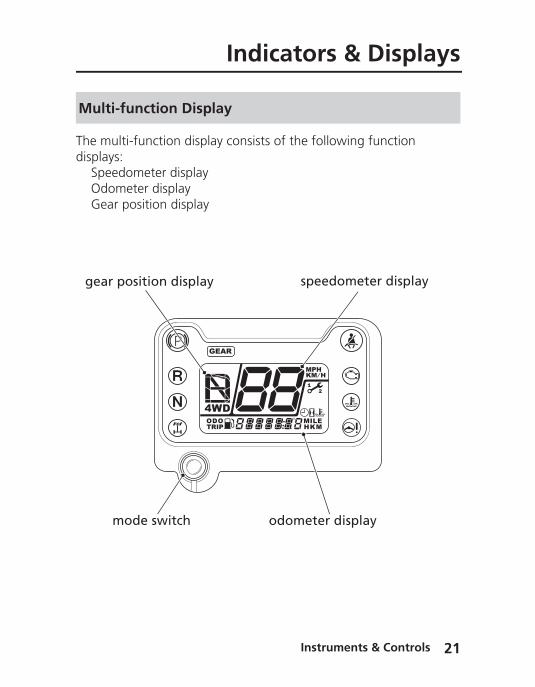
lti-function display consists of the following function s:
-function Display
dometer displaymeter displayr position display
ode switch
position display speedometer display
odometer display
Instruments & Controls 21

In22
Indi
This dis
MileagThe speshow in
To chamore tstoppe
SpeedoIf the ssimultabe limilimiting
Speed
cators & Displays
play shows speed in miles or kilometers per hour.
e Unit Changeedometer, odometer, tripmeter and maintenance tripmeter either “MPH” and “MILE” or “KM/H” and “KM”.
nge the mileage unit, press and hold the mode switch for han 5 seconds in odometer mode (page 23) with the vehicle d.
meter Blinkingpeedometer digits and seat belt indicator blink
ometer Display
mode switch
KM
MILE
KM/H
MPH
struments & Controls
neously, while you are driving, maximum vehicle speed will ted to no more than 15 mph (24 km/h) by the seat belt speed system (page 55).
This discoolanand maEach timthe illu
If therenot prethe dis
Odom
D
Wis
Indicators & Displays
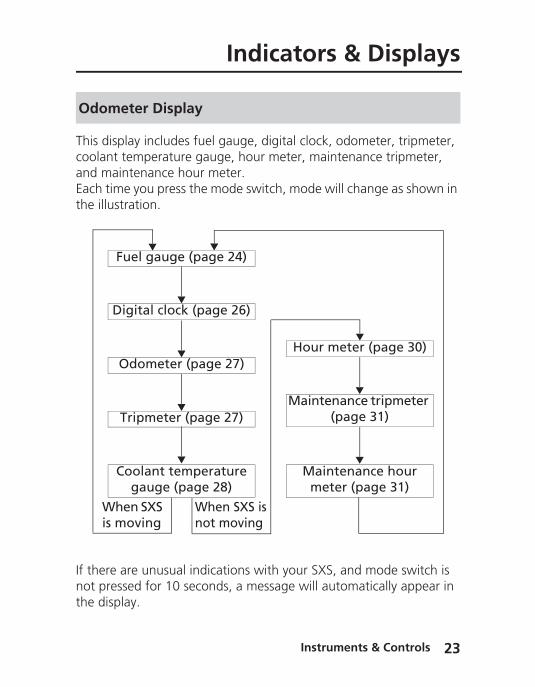
play includes fuel gauge, digital clock, odometer, tripmeter, t temperature gauge, hour meter, maintenance tripmeter, intenance hour meter.e you press the mode switch, mode will change as shown in
stration.
eter Display
Fuel gauge (page 24)
igital clock (page 26)
Odometer (page 27)
Tripmeter (page 27)
Coolant temperature gauge (page 28)
Hour meter (page 30)
Maintenance tripmeter (page 31)
Maintenance hour meter (page 31)
hen SXS moving
When SXS is not moving
Instruments & Controls 23
are unusual indications with your SXS, and mode switch is ssed for 10 seconds, a message will automatically appear in play.
In24
Indi
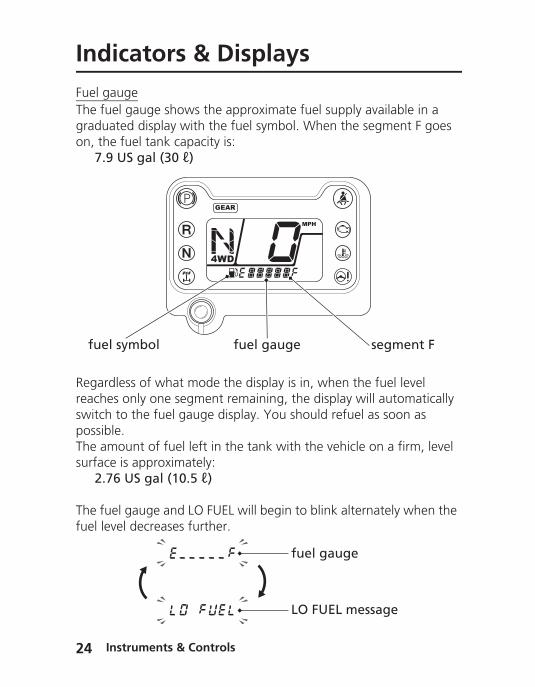
Fuel gaThe fuegraduaon, the
7.9
Regardreacheswitch possiblThe amsurface
2.7
The fuefuel lev
fuel
cators & Displays
ugel gauge shows the approximate fuel supply available in a ted display with the fuel symbol. When the segment F goes fuel tank capacity is: US gal (30 ℓ)
less of what mode the display is in, when the fuel level s only one segment remaining, the display will automatically to the fuel gauge display. You should refuel as soon as e.ount of fuel left in the tank with the vehicle on a firm, level is approximately:6 US gal (10.5 ℓ)
l gauge and LO FUEL will begin to blink alternately when the el decreases further.
symbol fuel gauge segment F
fuel gauge
struments & Controls
LO FUEL message
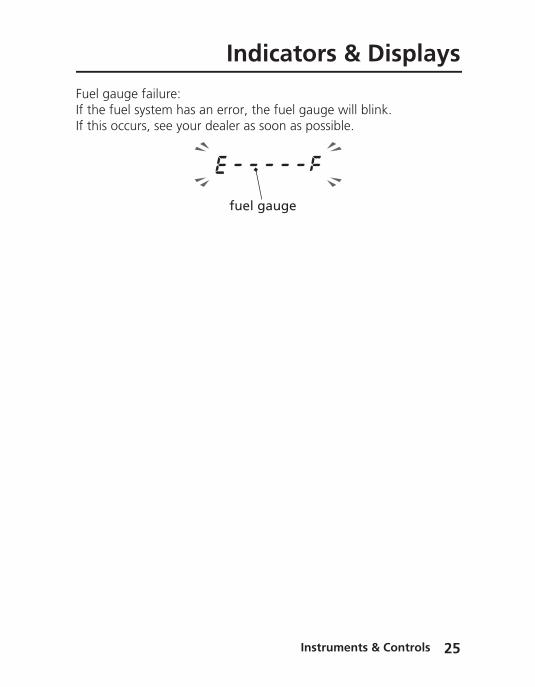
Fuel gaIf the fIf this o
Indicators & Displays
uge failure:uel system has an error, the fuel gauge will blink.ccurs, see your dealer as soon as possible.
fuel gauge
Instruments & Controls 25
In26
Indi
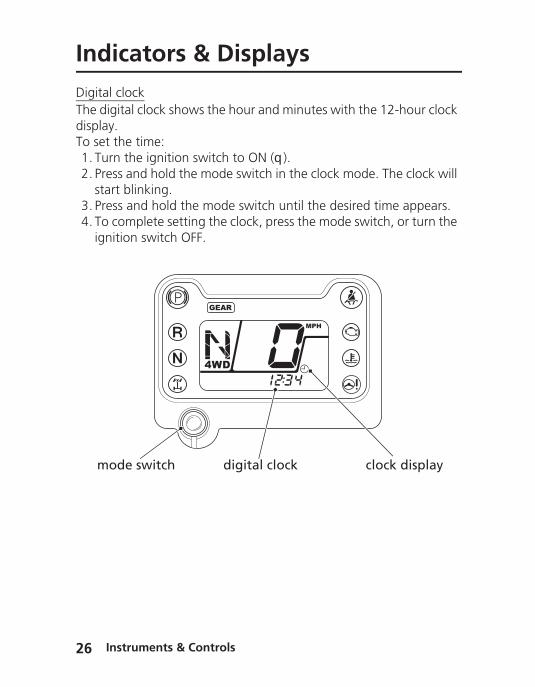
Digital The digdisplayTo set 1. Tur2. Pres
star3. Pres4. To c
igni
mo
cators & Displays
clockital clock shows the hour and minutes with the 12-hour clock .the time:n the ignition switch to ON (q).s and hold the mode switch in the clock mode. The clock will t blinking.s and hold the mode switch until the desired time appears.omplete setting the clock, press the mode switch, or turn the tion switch OFF.
de switch digital clock clock display
struments & Controls
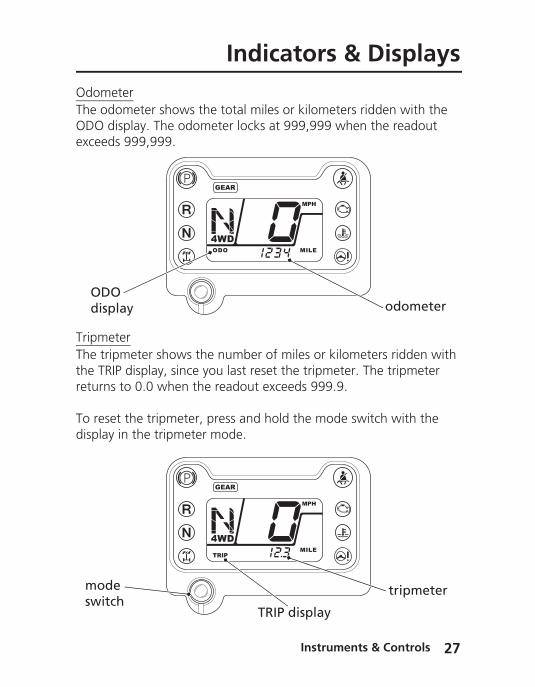
OdomeThe odODO dexceed
TripmeThe tripthe TRIreturns
To resedisplay
ODOdisp
modswitc
Indicators & Displays
terometer shows the total miles or kilometers ridden with the isplay. The odometer locks at 999,999 when the readout s 999,999.
termeter shows the number of miles or kilometers ridden with
P display, since you last reset the tripmeter. The tripmeter to 0.0 when the readout exceeds 999.9.
t the tripmeter, press and hold the mode switch with the in the tripmeter mode.
lay odometer
Instruments & Controls 27
e h
TRIP display
tripmeter
In28
Indi
CoolanThe cowith thmove aSXS to the sec
If all seH and appearcoolanRead pbeen c
NOTContinengine
coolatempgaug
C
segm
cators & Displays
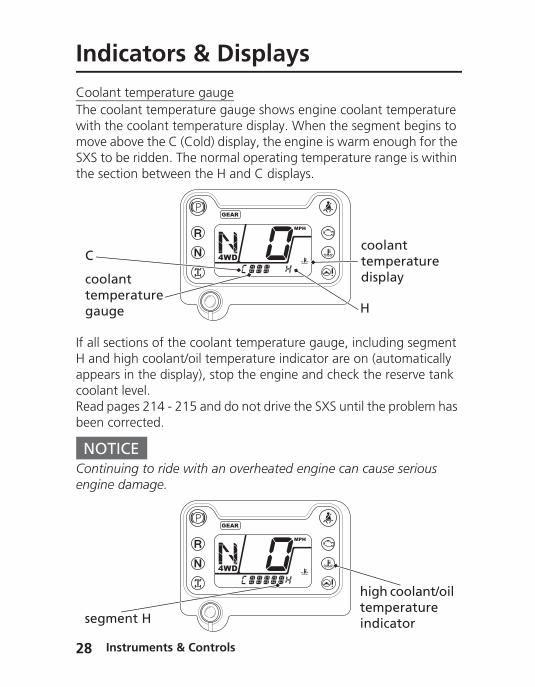
t temperature gaugeolant temperature gauge shows engine coolant temperature e coolant temperature display. When the segment begins to bove the C (Cold) display, the engine is warm enough for the be ridden. The normal operating temperature range is within tion between the H and C displays.
ctions of the coolant temperature gauge, including segment high coolant/oil temperature indicator are on (automatically s in the display), stop the engine and check the reserve tank t level.ages 214 - 215 and do not drive the SXS until the problem has orrected.
ICEuing to ride with an overheated engine can cause serious damage.
nt erature e
coolant temperature display
H
struments & Controls
ent H
high coolant/oil temperature indicator
CoolanIf the ctempercoolanIf this o
co
Indicators & Displays
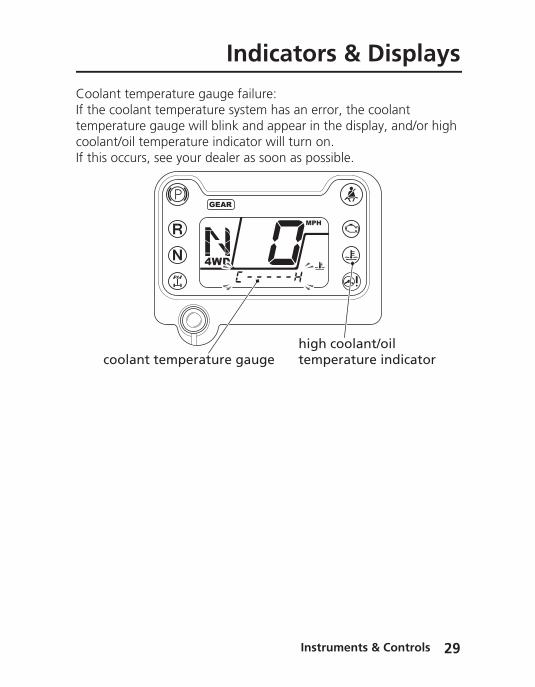
t temperature gauge failure:oolant temperature system has an error, the coolant ature gauge will blink and appear in the display, and/or high t/oil temperature indicator will turn on.ccurs, see your dealer as soon as possible.
olant temperature gaugehigh coolant/oil temperature indicator
Instruments & Controls 29
In30
Indi
Hour mThe hois ON (exceed
cators & Displays
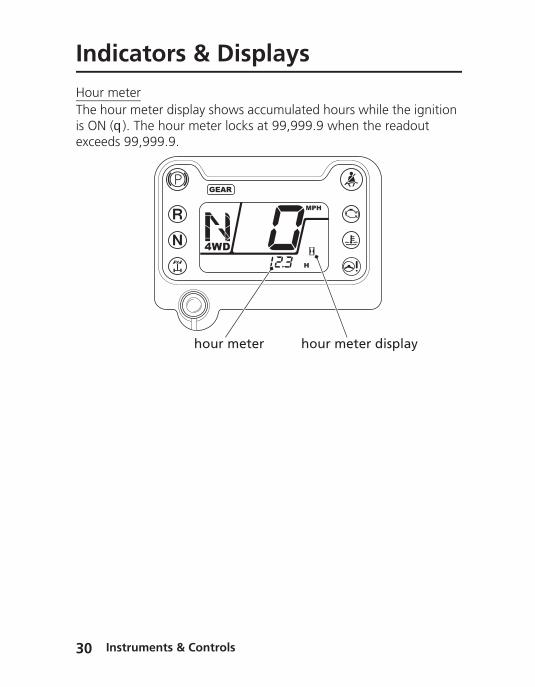
eterur meter display shows accumulated hours while the ignition q). The hour meter locks at 99,999.9 when the readout s 99,999.9.
hour meter hour meter display
struments & Controls

MainteThe mamileagmainte(page 1
Reset tIf the sminderafter p
ResettiTo reseand turlight upminderAlso threset.See mo
mod
m
Indicators & Displays
nance minder indicatorintenance minder indicator appears in the display when the
e or operating hours on your Honda SXS reaches the nance interval specified on the maintenance schedule 09).
he indicator after each scheduled maintenance is performed. cheduled maintenance is performed before the maintenance indicator appears, be sure to reset the maintenance minder erforming the scheduled maintenance.
ng the indicator:t the indicator, press and continue to hold the mode switch n the ignition switch to ON (q). The indicator message will , and after 2 seconds will blink twice, the maintenance indicator is reset.e maintenance tripmeter and maintenance hour meter will
re details about maintenance minder indicator on page 107.
maintenance minder indicator
Instruments & Controls 31
e switch
aintenance tripmeter maintenance hour meter
mode switch
In32
Indi
Gear pThe geignition
The ind
(SXS70When numbe
“–” wiltransmthe gea
If the gswitch positioblinks,
4WD inThis indengage
Gear
gepoin
cators & Displays
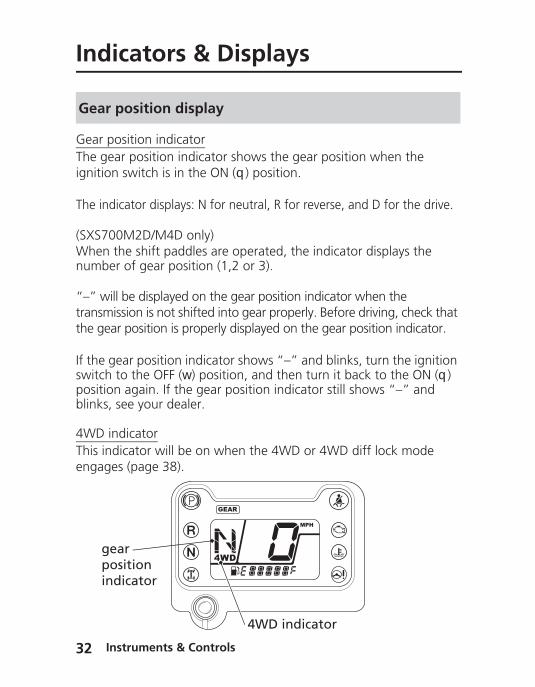
osition indicatorar position indicator shows the gear position when the switch is in the ON (q) position.
icator displays: N for neutral, R for reverse, and D for the drive.
0M2D/M4D only)the shift paddles are operated, the indicator displays the r of gear position (1,2 or 3).
l be displayed on the gear position indicator when the ission is not shifted into gear properly. Before driving, check that r position is properly displayed on the gear position indicator.
ear position indicator shows “–” and blinks, turn the ignition to the OFF (w) position, and then turn it back to the ON (q) n again. If the gear position indicator still shows “–” and see your dealer.
dicatoricator will be on when the 4WD or 4WD diff lock mode s (page 38).
position display
ar sition
struments & Controls
dicator
4WD indicator
The ignstart an
OFF (wbe inse
ON (q)power
STARTwill aut
Igniti
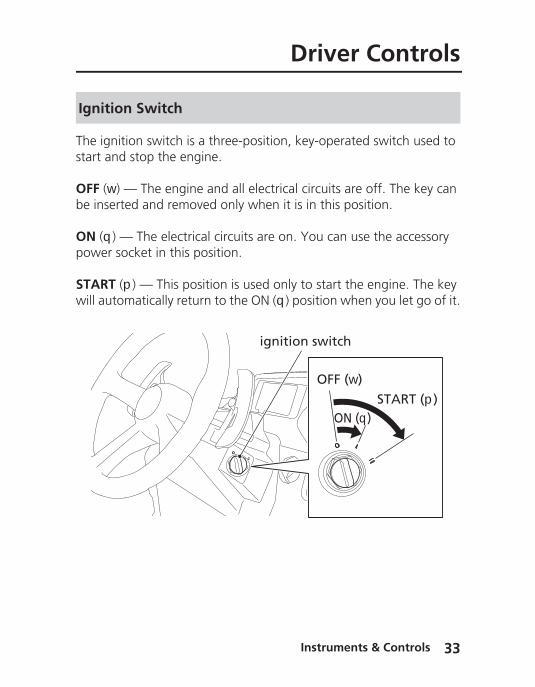
Driver Controls
ition switch is a three-position, key-operated switch used to d stop the engine.
) — The engine and all electrical circuits are off. The key can rted and removed only when it is in this position.
— The electrical circuits are on. You can use the accessory socket in this position.
(p) — This position is used only to start the engine. The key omatically return to the ON (q) position when you let go of it.
on Switch
OFF (w)
ON (q)
ignition switch
START (p)
Instruments & Controls 33
In34
Driv
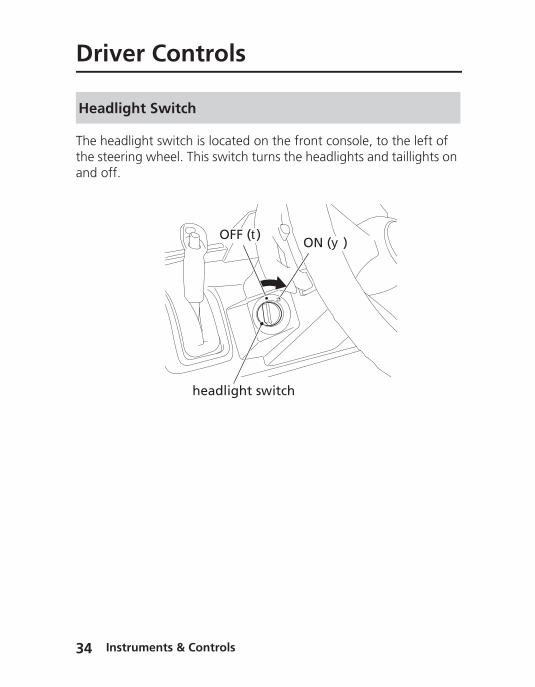
The hethe steand off
Head
er Controls
adlight switch is located on the front console, to the left of ering wheel. This switch turns the headlights and taillights on .
light Switch
headlight switch
OFF (t)ON (y)
struments & Controls
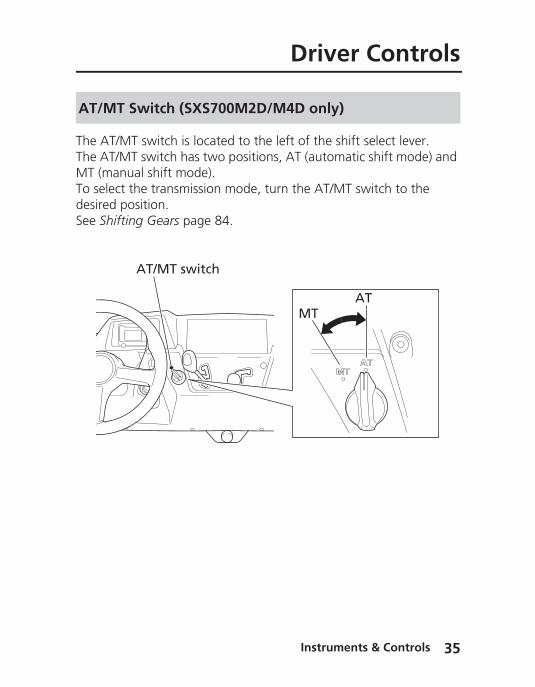
The ATThe ATMT (maTo seledesiredSee Sh
AT/M
Driver Controls
/MT switch is located to the left of the shift select lever./MT switch has two positions, AT (automatic shift mode) and nual shift mode).
ct the transmission mode, turn the AT/MT switch to the position.ifting Gears page 84.
T Switch (SXS700M2D/M4D only)
AT/MT switch
ATMT
Instruments & Controls 35
In36
Driv
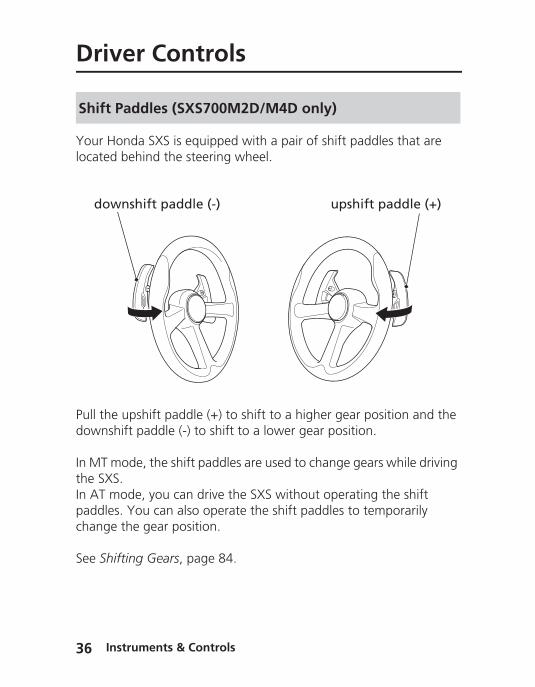
Your Hlocated
Pull thedowns
In MT mthe SXSIn AT mpaddlechange
See Sh
Shift
dow
er Controls
onda SXS is equipped with a pair of shift paddles that are behind the steering wheel.
upshift paddle (+) to shift to a higher gear position and the hift paddle (-) to shift to a lower gear position.
ode, the shift paddles are used to change gears while driving .ode, you can drive the SXS without operating the shift
s. You can also operate the shift paddles to temporarily the gear position.
ifting Gears, page 84.
Paddles (SXS700M2D/M4D only)
nshift paddle (-) upshift paddle (+)
struments & Controls
Your Hshift sepositio
You shstoppeidling. vehicle
NOTDo notabove transm
Shift
s
Driver Controls
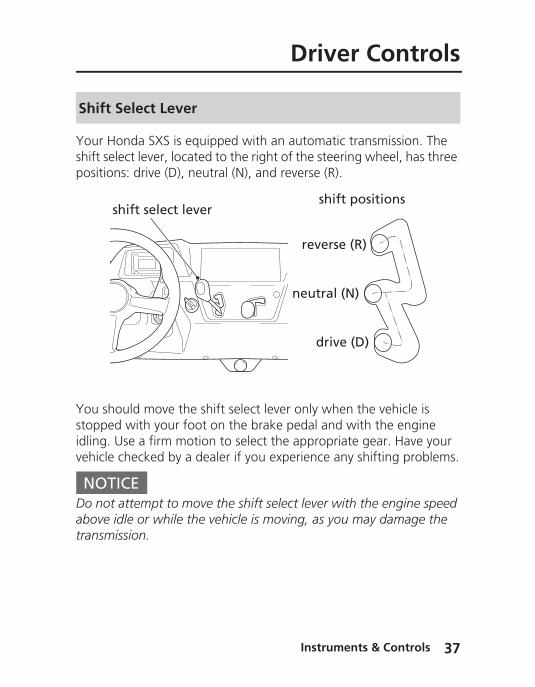
onda SXS is equipped with an automatic transmission. The lect lever, located to the right of the steering wheel, has three ns: drive (D), neutral (N), and reverse (R).
ould move the shift select lever only when the vehicle is d with your foot on the brake pedal and with the engine Use a firm motion to select the appropriate gear. Have your checked by a dealer if you experience any shifting problems.
ICE attempt to move the shift select lever with the engine speed idle or while the vehicle is moving, as you may damage the ission.
Select Lever
hift select levershift positions
reverse (R)
drive (D)
neutral (N)
Instruments & Controls 37
In38
Driv
The drilever, h
To chedifferen
2WD mBoth in
4WD mThe 4W
4WD DThe 4Wthe 4W
Drive
driv
er Controls
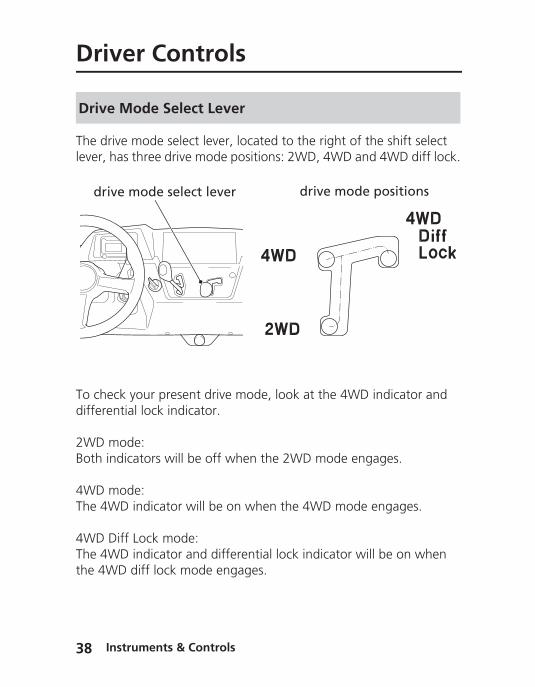
ve mode select lever, located to the right of the shift select as three drive mode positions: 2WD, 4WD and 4WD diff lock.
ck your present drive mode, look at the 4WD indicator and tial lock indicator.
ode:dicators will be off when the 2WD mode engages.
ode:D indicator will be on when the 4WD mode engages.
iff Lock mode:D indicator and differential lock indicator will be on when
Mode Select Lever
e mode select lever drive mode positions
struments & Controls
D diff lock mode engages.
You shand the
NOTChangidrivetra
After cleft turindicatpositio
Driver Controls
ould change drive modes only when the vehicle is stopped engine is idling.
ICEng drive modes while the vehicle is moving could damage the in.
hanging the drive mode, drive several yards, making right and ns, and make sure that indicators work properly. If the ors do not go out or come on according to the drive mode n, see your dealer.
Instruments & Controls 39
In40
Driv
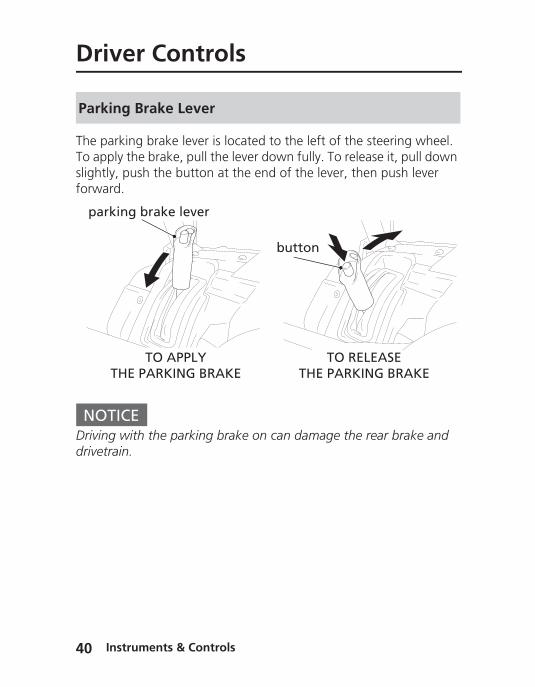
The paTo appslightlyforwar
NOTDrivingdrivetra
Parkin
T
park
er Controls
rking brake lever is located to the left of the steering wheel. ly the brake, pull the lever down fully. To release it, pull down , push the button at the end of the lever, then push lever d.
ICE with the parking brake on can damage the rear brake and in.
g Brake Lever
button
TO APPLYHE PARKING BRAKE
ing brake lever
TO RELEASETHE PARKING BRAKE
struments & Controls

Your Hor othekeep thyour veclosed
If a doorepair oDo not
SXS700Do notrear doup une
The lef
Open1. Pull2. Ope
Close1. Clo2. Ma
han
Doors
onda SXS is equipped with doors to prevent branches, gravel, r debris from getting inside the driver’s compartment, and to e driver’s and passenger’s legs and feet inside the vehicle if hicle ever tips or overturns. Be sure all doors are securely before driving your Honda SXS, and never remove a door.
r is damaged or does not close securely, see your dealer for r replacement.
drive the Honda SXS with the doors open or removed.
M4/M4D only open the rear door while the cargo bed is raised. Opening the ors while the cargo bed is raised, will cause the seats to flip xpectedly.
t and right doors can be opened in the same manner.
up the handle.n the door.
se the door securely until the second latch click is heard.ke sure the door is closed securely.
FRONT REAR(SXS700M4/M4D only)
Instruments & Controls 41
dle handle
In42
Doo
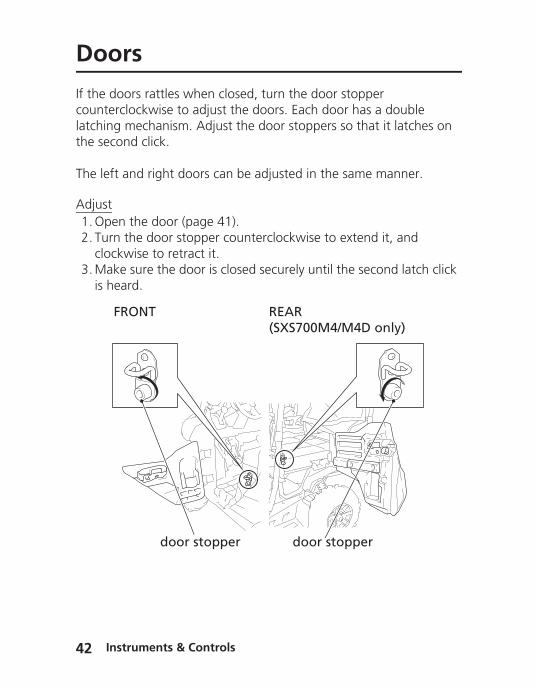
If the dcountelatchinthe sec
The lef
Adjust1. Ope2. Tur
cloc3. Ma
is h
rs
oors rattles when closed, turn the door stopper rclockwise to adjust the doors. Each door has a double g mechanism. Adjust the door stoppers so that it latches on ond click.
t and right doors can be adjusted in the same manner.
n the door (page 41).n the door stopper counterclockwise to extend it, and kwise to retract it.
ke sure the door is closed securely until the second latch click eard.
door stopper
FRONT REAR(SXS700M4/M4D only)
door stopper
struments & Controls
Your Hother dkeep thoccupaovertur
The sidsnap hshouldD-rings
Be sureSXS, anconditideterioyour de
Side Nets
onda SXS is equipped with side nets to prevent branches, or ebris from getting inside the driver’s compartment, and to e driver’s and passenger’s hands and arms inside the nt protective structure (OPS) if the vehicle ever tips or ns.
e nets are secured to the OPS with side net D-rings, side net ooks and side net buckles. To function properly, the side nets be tight. If a side net is loose, tighten the belts on the side net .
the side nets are properly latched before driving your Honda d never remove side nets from the vehicle. Inspect the
on of the side net and its mounting hardware. If there is wear, ration, damage, or they do not latch and tighten securely, see aler for repair or replacement.
Instruments & Controls 43

In44
Side
The lef
Inspectspecifie
Front1. Hoo2. Tigh
Side N
side
Nets
t and right side nets can be set up in the same manner.
the side nets and their mounting hardware for damage as d in the maintenance schedule on page 109.
k the side net snap hooks and fasten the side net buckle.ten the belt on the lower side net D-ring.
ets Set Up
side net snap hook
side netside net D-ring
struments & Controls
net buckle
belt
Rear (S1. Hoo2. Tigh
Side neInspectbecomreplace
b
side
Side Nets
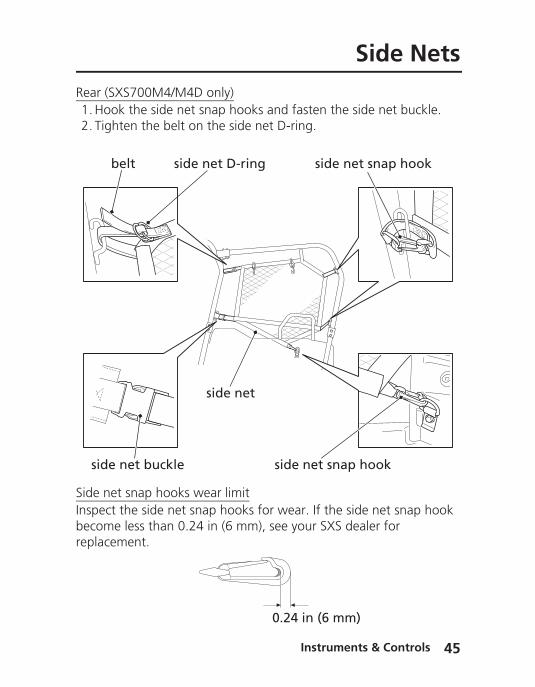
XS700M4/M4D only)k the side net snap hooks and fasten the side net buckle.ten the belt on the side net D-ring.
t snap hooks wear limit the side net snap hooks for wear. If the side net snap hook e less than 0.24 in (6 mm), see your SXS dealer for ment.
elt side net D-ring side net snap hook
side net
net buckle side net snap hook
Instruments & Controls 45
0.24 in (6 mm)
In46
Side
The lef
Open1. Rele2. Hoo
side
Close1. Unh2. Fast
Alwaysfastene
Front
Nets
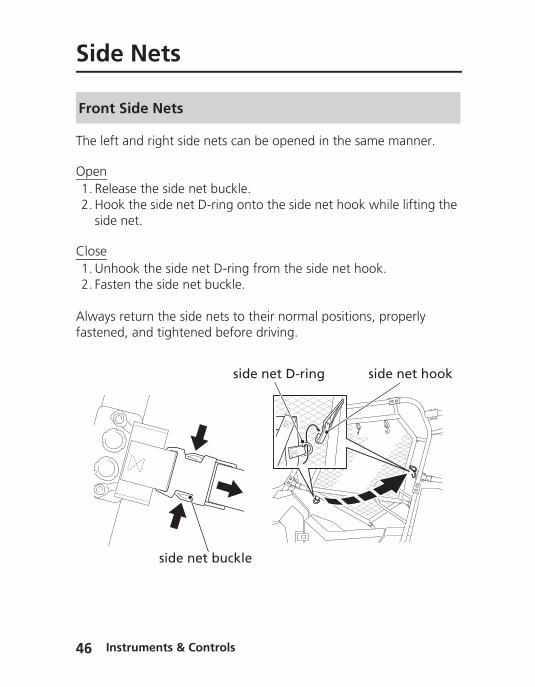
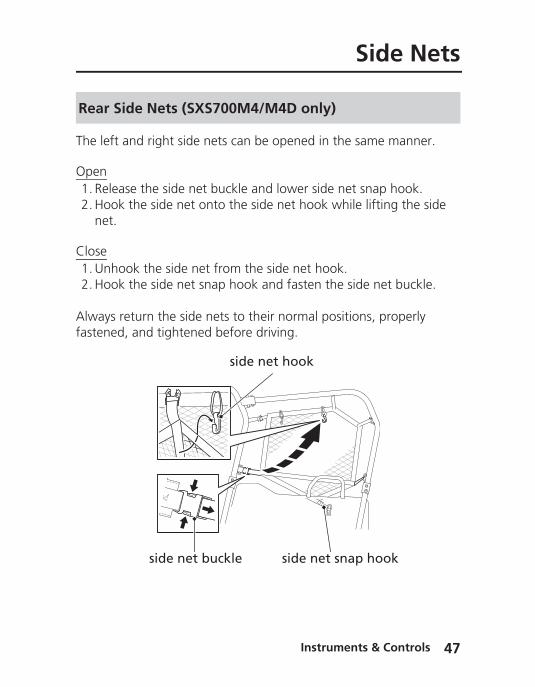
t and right side nets can be opened in the same manner.
ase the side net buckle.k the side net D-ring onto the side net hook while lifting the net.
ook the side net D-ring from the side net hook.en the side net buckle.
return the side nets to their normal positions, properly d, and tightened before driving.
Side Nets
side net buckle
side net D-ring side net hook
struments & Controls
The lef
Open1. Rele2. Hoo
net
Close1. Unh2. Hoo
Alwaysfastene
Rear
Side Nets
t and right side nets can be opened in the same manner.
ase the side net buckle and lower side net snap hook.k the side net onto the side net hook while lifting the side
.
ook the side net from the side net hook.k the side net snap hook and fasten the side net buckle.
return the side nets to their normal positions, properly d, and tightened before driving.
Side Nets (SXS700M4/M4D only)
side net buckle
side net hook
side net snap hook
Instruments & Controls 47
In48
Side
The sidyour H
Front S1. Rele2. Unh
stay3. Roll
on 4. Hoo
net
Front S1. Unh2. Fast
Tigh
Alwaysfastene
Roll U
side n
Nets
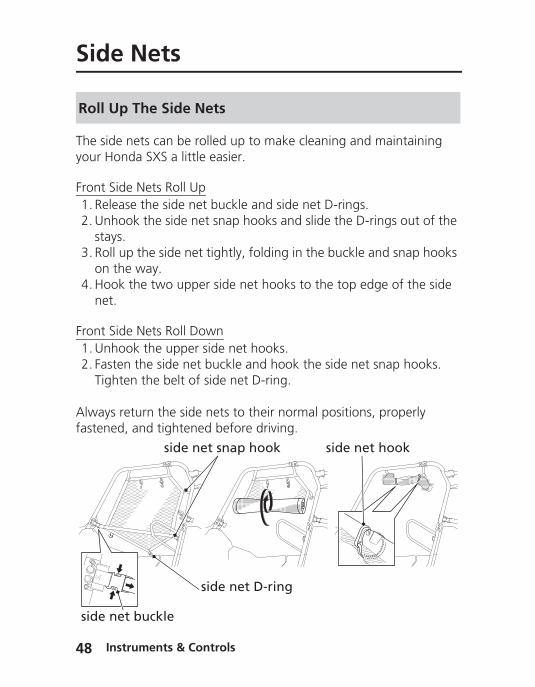
e nets can be rolled up to make cleaning and maintaining onda SXS a little easier.
ide Nets Roll Upase the side net buckle and side net D-rings.ook the side net snap hooks and slide the D-rings out of the s. up the side net tightly, folding in the buckle and snap hooks the way.k the two upper side net hooks to the top edge of the side
.
ide Nets Roll Downook the upper side net hooks.en the side net buckle and hook the side net snap hooks. ten the belt of side net D-ring.
return the side nets to their normal positions, properly d, and tightened before driving.
p The Side Nets
side net snap hook side net hook
struments & Controls
side net D-ring
et buckle

Rear Si1. Rele2. Unh
stay3. Roll
on 4. Hoo
net
Rear Si1. Unh2. Hoo
Alwaysfastene
side
Side Nets
de Nets Roll Up (SXS700M4/M4D only)ase the side net buckle.ook the side net snap hooks and slide the D-rings out of the s. up the side net tightly, folding in the buckle and snap hooks the way.k the two upper side net hooks to the top edge of the side
.
de Nets Roll Down (SXS700M4/M4D only)ook the upper side net hooks.k the side net snap hooks and fasten the side net buckle.
return the side nets to their normal positions, properly d, and tightened before driving.
side net snap hook
net buckle
side net hook
Instruments & Controls 49
In50
Sea
SXS700Your Hcarry o
SXS700Your Hjump sseats a
The cenand is, someo
Do notcenter controlduring
Seat
t
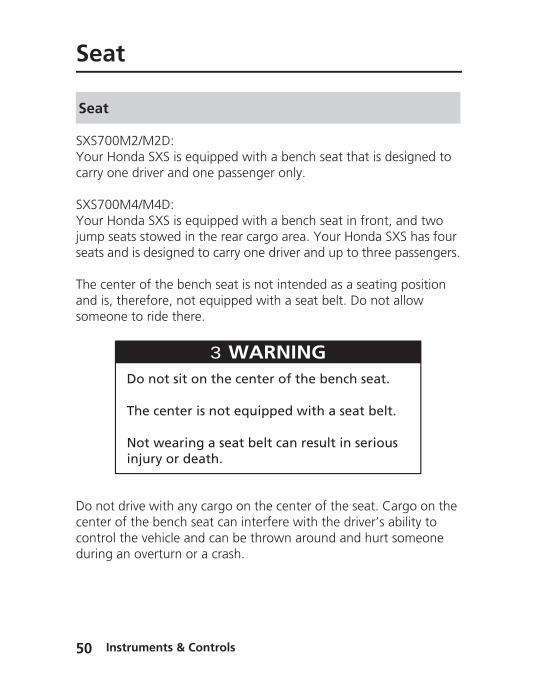
M2/M2D:onda SXS is equipped with a bench seat that is designed to ne driver and one passenger only.
M4/M4D:onda SXS is equipped with a bench seat in front, and two eats stowed in the rear cargo area. Your Honda SXS has four nd is designed to carry one driver and up to three passengers.
ter of the bench seat is not intended as a seating position therefore, not equipped with a seat belt. Do not allow ne to ride there.
drive with any cargo on the center of the seat. Cargo on the of the bench seat can interfere with the driver’s ability to the vehicle and can be thrown around and hurt someone an overturn or a crash.
WARNING 3WARNINGDo not sit on the center of the bench seat.
The center is not equipped with a seat belt.
Not wearing a seat belt can result in serious injury or death.
struments & Controls
Unfold1. Park
side2. Ope3. Lift 4. Unh5. Fold
slot
Do notthe reaflip up Fold uppositio
Rear
strap
Seat
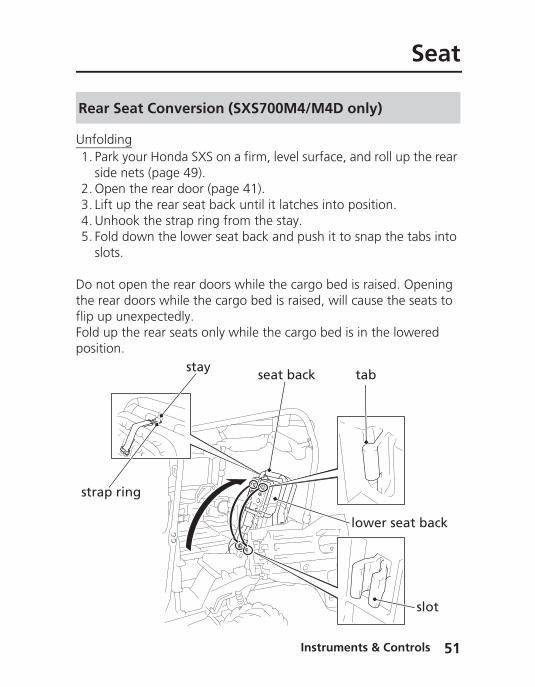
ing your Honda SXS on a firm, level surface, and roll up the rear nets (page 49).n the rear door (page 41).up the rear seat back until it latches into position.ook the strap ring from the stay. down the lower seat back and push it to snap the tabs into s.
open the rear doors while the cargo bed is raised. Opening r doors while the cargo bed is raised, will cause the seats to unexpectedly. the rear seats only while the cargo bed is in the lowered
n.
Seat Conversion (SXS700M4/M4D only)
ring
seat back tab
lower seat back
stay
Instruments & Controls 51
slot

In52
Sea
Storing1. Park
side2. Ope3. Fold
Be s4. Pull5. Wh
s
se
t
your Honda SXS on a firm, level surface, and roll up the rear nets (page 49).n the rear door (page 41). up the lower seat back and hook the strap ring to the stay.ure the seat belt buckles are lowered. the handle up and flip the seat back forward.ile pushing down on the rear seat, close the rear door.
seat back
trap ring
stay
handle
lower seat backat belt buckles
struments & Controls
If the rif the dRear se
1. Loo2. Adj3. Tigh
Rear
Seat
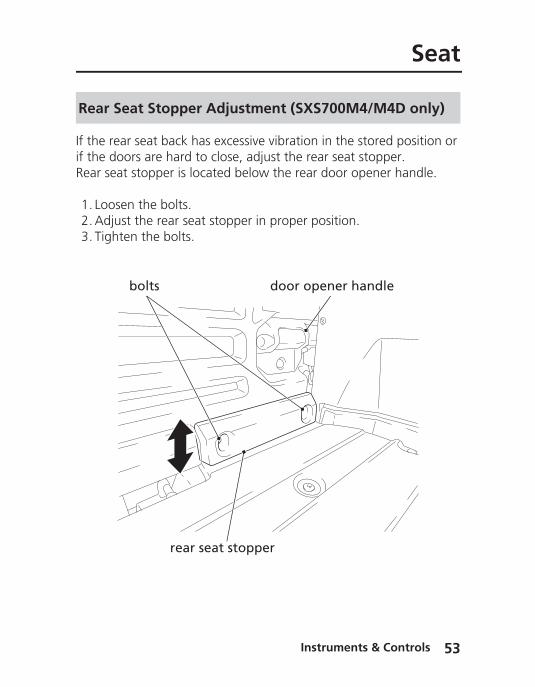
ear seat back has excessive vibration in the stored position or oors are hard to close, adjust the rear seat stopper.at stopper is located below the rear door opener handle.
sen the bolts.ust the rear seat stopper in proper position.ten the bolts.
Seat Stopper Adjustment (SXS700M4/M4D only)
bolts door opener handle
rear seat stopper
Instruments & Controls 53
In54
Sea
Your Hseatingyou woproperinjuriesbuckle
Of couBut in m
t Belts
onda SXS is equipped with lap/shoulder seat belts in each position. A seat belt keeps you connected to the vehicle so n’t be thrown out during a crash or rollover. Together with a
helmet, a seat belt is your best protection against serious in any type of crash, so make sure all occupants always up before driving.
rse, seat belts cannot completely protect you in every crash. ost cases, seat belts can reduce your risk of serious injury.
WARNING 3WARNINGNot wearing a seat belt, or wearing one improperly, can result in serious injury or death in a crash or rollover.
Make sure the driver and any passengers always wear their seat belts properly.
struments & Controls

Seat BeWhen vehicle
When tsystem• Lim
(24• Cau
sim
To retu1. Pro2. Rele
The spespeedoand co
To avodeploysecurelfastenethe vehvehiclebelt is dsecond
Seat Belts
lt Speed Limiting Systemthe driver's seat belt is not latched properly, the maximum speed will be limited by the seat belt speed limiting system.
he driver's seat belt is not latched, the seat belt speed limiting will:it the maximum vehicle speed to no more than 15 mph km/h).se the seat belt indicator and speedometer to blink ultaneously.
rn the vehicle to normal operation the driver must:perly deploy and latch their seat belt.ase the throttle for one second if the vehicle is moving.
ed limitation will be removed and seat belt indicator and meter will stop blinking after the driver follows this procedure rrectly deploys and fastens their seat belt.
id speed limitations altogether, the driver should always and fasten their seat belt (and require all passengers to be y belted) before driving the vehicle and keep their seat belt d while underway. If the driver unlatches their seat belt while icle is travelling at speeds greater than 15 mph (24 km/h), the speed will be limited to 15 mph or less until the driver's seat eployed and properly latched and throttle is released for one .
Instruments & Controls 55
In56
Sea
How yo
Front1. Inse
mak
2. Checau
3. Poshipsthelets
4. Maand
To unla
t Belts
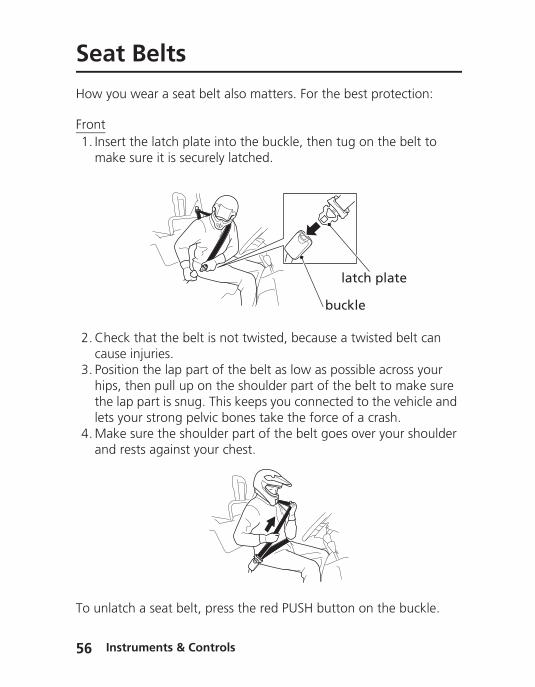
u wear a seat belt also matters. For the best protection:
rt the latch plate into the buckle, then tug on the belt to e sure it is securely latched.
ck that the belt is not twisted, because a twisted belt can se injuries.ition the lap part of the belt as low as possible across your , then pull up on the shoulder part of the belt to make sure
lap part is snug. This keeps you connected to the vehicle and your strong pelvic bones take the force of a crash.ke sure the shoulder part of the belt goes over your shoulder rests against your chest.
buckle
latch plate
struments & Controls
tch a seat belt, press the red PUSH button on the buckle.
Rear (S1. Inse2. Inse
the
3. Checau
4. Poshipsthelets
5. Maand
To unla
OUTB
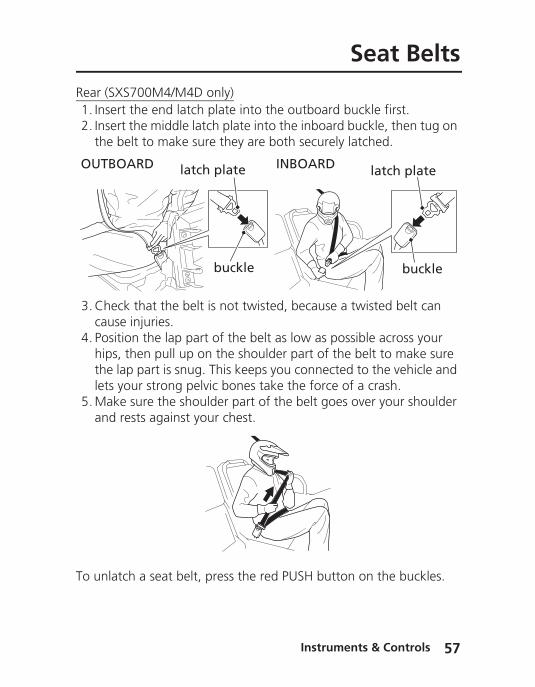
Seat Belts
XS700M4/M4D only)rt the end latch plate into the outboard buckle first.rt the middle latch plate into the inboard buckle, then tug on
belt to make sure they are both securely latched.
ck that the belt is not twisted, because a twisted belt can se injuries.ition the lap part of the belt as low as possible across your , then pull up on the shoulder part of the belt to make sure
lap part is snug. This keeps you connected to the vehicle and your strong pelvic bones take the force of a crash.ke sure the shoulder part of the belt goes over your shoulder rests against your chest.
buckle
latch plate
buckle
latch plateOARD INBOARD
Instruments & Controls 57
tch a seat belt, press the red PUSH button on the buckles.

In58
Sea
Rear SeFor thebelts w
How toHook t
t Belts
at Belt Holders (SXS700M4/M4D only) rear seat belts, there are seat belt holders to secure the seat hen using the cargo bed.
secure the seat belt:he end latch plate of the rear seat belt to the seat belt holder.
seat belt holder
latch plate
struments & Controls
Seat BeThe seamechaThe bethe seapart of
Unlock1. To u2. Hol
side
Seat Belts
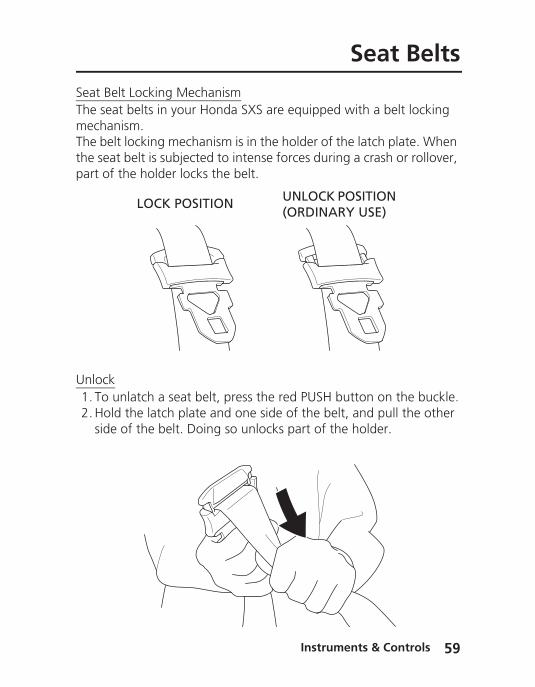
lt Locking Mechanismt belts in your Honda SXS are equipped with a belt locking
nism.lt locking mechanism is in the holder of the latch plate. When t belt is subjected to intense forces during a crash or rollover, the holder locks the belt.
nlatch a seat belt, press the red PUSH button on the buckle.d the latch plate and one side of the belt, and pull the other of the belt. Doing so unlocks part of the holder.
LOCK POSITION UNLOCK POSITION (ORDINARY USE)
Instruments & Controls 59
In60
Sea
If you hsure tothe belretracto
Each seconditikeepinretracto
Do noteffectiv
If a seareplacemay noincidenneeded
t Belts
ave been driving in an extremely muddy or dusty area, be inspect your belt and remove any dirt or debris before letting t retract into the retractor. Failure to do so could clog the r and make it inoperable.
at belt has an emergency locking retractor. In normal driving ons, the retractor lets you move freely in your seat while g some tension on the belt. During a crash or rollover, the r automatically locks the belt to help restrain your body.
put any accessories on a seat belt, as that may reduce the eness of the belt and increase the chance of injury in a crash.
t belt is worn in a crash, the seat belt assembly must be d by your dealer. A belt that has been worn during a crash t provide the same level of protection in a subsequent t. The dealer should check the retractor and replace it if .
struments & Controls
The ocpassenbumpyfloorbo
Passe
FRON
REAR
Passenger Handhold
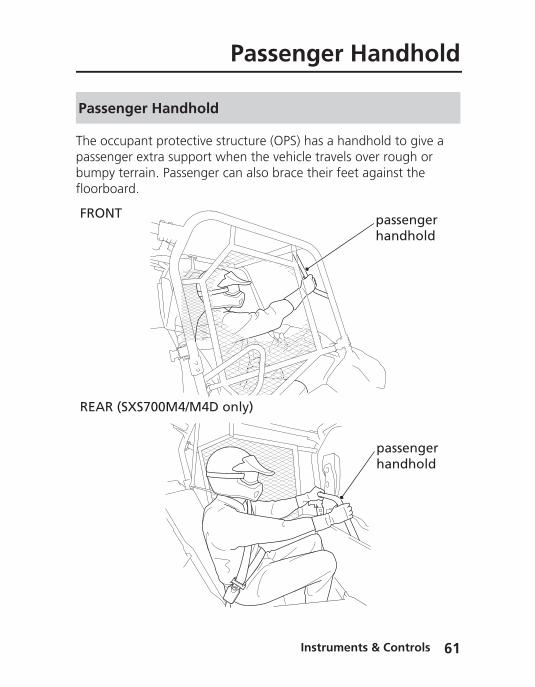
cupant protective structure (OPS) has a handhold to give a ger extra support when the vehicle travels over rough or terrain. Passenger can also brace their feet against the ard.
nger Handhold
passenger handhold
passenger handhold
T
(SXS700M4/M4D only)
Instruments & Controls 61
In62
Sto
Your Hside po
To opethe cov
side
docum
rage Compartments
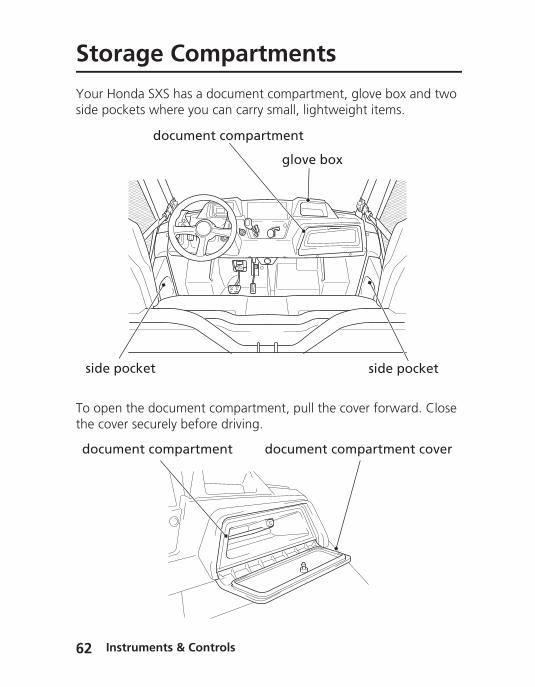
onda SXS has a document compartment, glove box and two ckets where you can carry small, lightweight items.
n the document compartment, pull the cover forward. Close er securely before driving.
pocket side pocket
document compartment
glove box
ent compartment document compartment cover
struments & Controls
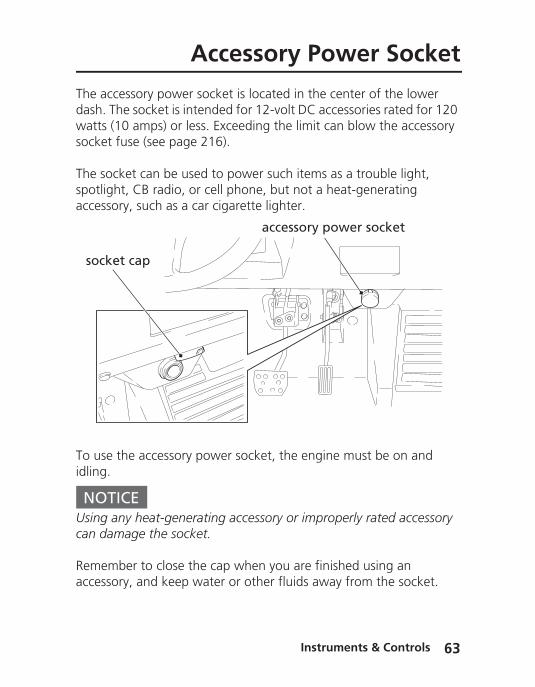
The accdash. Twatts (socket
The socspotligaccesso
To use idling.
NOTUsing acan da
Rememaccesso
socke
Accessory Power Socket
essory power socket is located in the center of the lower he socket is intended for 12-volt DC accessories rated for 120 10 amps) or less. Exceeding the limit can blow the accessory fuse (see page 216).
ket can be used to power such items as a trouble light, ht, CB radio, or cell phone, but not a heat-generating ry, such as a car cigarette lighter.
the accessory power socket, the engine must be on and
ICEny heat-generating accessory or improperly rated accessory
mage the socket.
ber to close the cap when you are finished using an
accessory power socket
t cap
Instruments & Controls 63
ry, and keep water or other fluids away from the socket.
In64
Car
See pa
Before parkingTo lowhook athe upr
Do not
Tailga
go Bed Controls
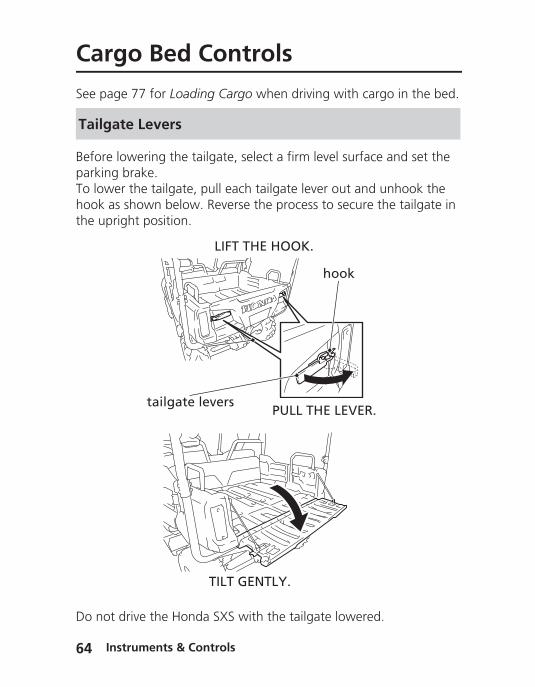
ge 77 for Loading Cargo when driving with cargo in the bed.
lowering the tailgate, select a firm level surface and set the brake.
er the tailgate, pull each tailgate lever out and unhook the s shown below. Reverse the process to secure the tailgate in ight position.
te Levers
LIFT THE HOOK.
PULL THE LEVER.tailgate levers
hook
struments & Controls
drive the Honda SXS with the tailgate lowered.
TILT GENTLY.
The carBefore the par
Tie-D
Cargo Bed Controls
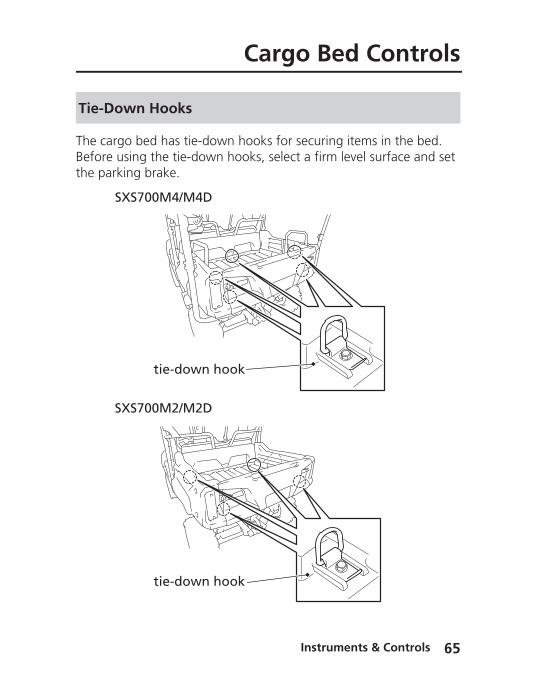
go bed has tie-down hooks for securing items in the bed.using the tie-down hooks, select a firm level surface and set king brake.
own Hooks
tie-down hook
SXS700M4/M4D
SXS700M2/M2D
Instruments & Controls 65
tie-down hook
In66
Car
Before parkingYour HUsing tto dumthe car
To raisehas bee
SXS700Make sbed. Thjump spassen
1. Pull2. Rais
Do notraised.
SXS700Do notthe reaflip up
Tilt B
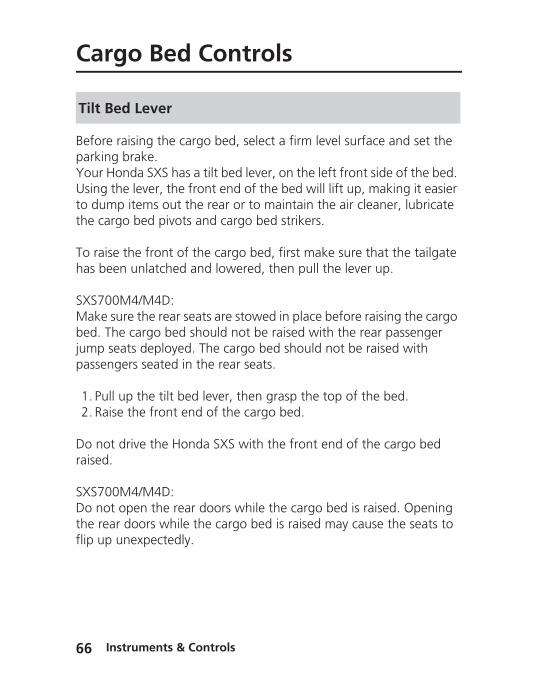
go Bed Controls
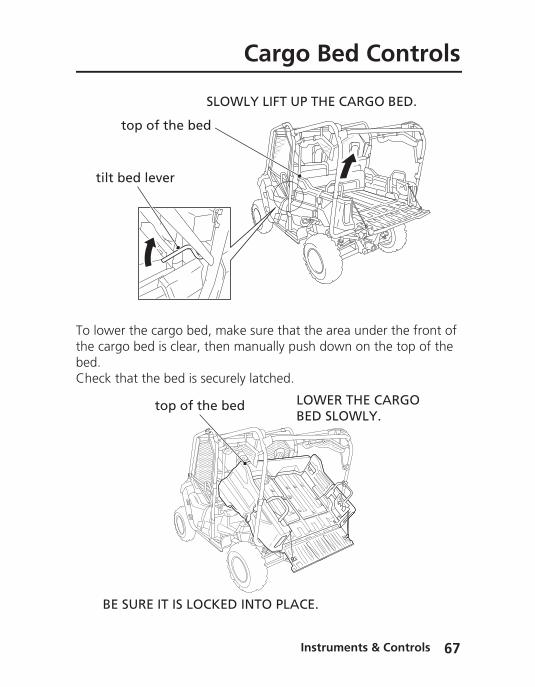
raising the cargo bed, select a firm level surface and set the brake.onda SXS has a tilt bed lever, on the left front side of the bed. he lever, the front end of the bed will lift up, making it easier p items out the rear or to maintain the air cleaner, lubricate go bed pivots and cargo bed strikers.
the front of the cargo bed, first make sure that the tailgate n unlatched and lowered, then pull the lever up.
M4/M4D:ure the rear seats are stowed in place before raising the cargo e cargo bed should not be raised with the rear passenger
eats deployed. The cargo bed should not be raised with gers seated in the rear seats.
up the tilt bed lever, then grasp the top of the bed.e the front end of the cargo bed.
drive the Honda SXS with the front end of the cargo bed
M4/M4D: open the rear doors while the cargo bed is raised. Opening r doors while the cargo bed is raised may cause the seats to unexpectedly.
ed Lever
struments & Controls
To lowthe carbed.Check
tilt
BE
Cargo Bed Controls
er the cargo bed, make sure that the area under the front of go bed is clear, then manually push down on the top of the
that the bed is securely latched.
bed lever
top of the bed
SLOWLY LIFT UP THE CARGO BED.
top of the bed LOWER THE CARGO BED SLOWLY.
Instruments & Controls 67
SURE IT IS LOCKED INTO PLACE.
In68
Trai
Your Ha 2 inchHonda
See pa
ler Hitch
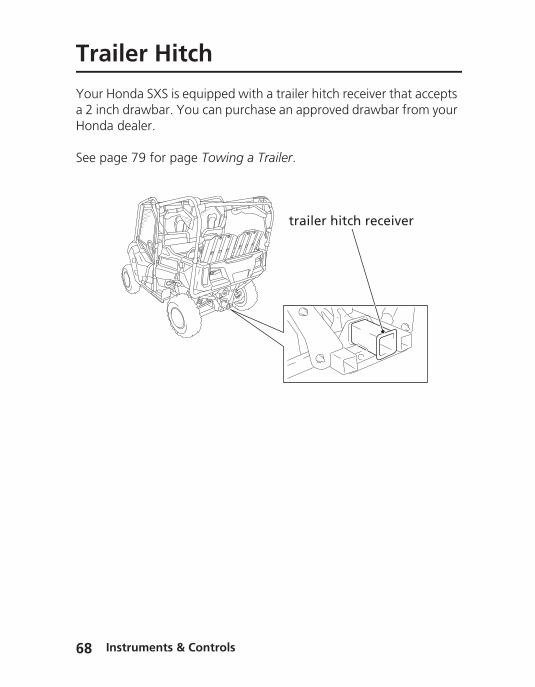
onda SXS is equipped with a trailer hitch receiver that accepts drawbar. You can purchase an approved drawbar from your
dealer.
ge 79 for page Towing a Trailer.
trailer hitch receiver
struments & Controls
Before DrivingBefore are botreadineinclude
Are YoAge &ProteGet tDon’
Is YourPre-d
LoadinCargLoad
TowingTowiChecLoad
Before Driving
driving your SXS, you need to make sure you and your vehicle h ready. This section discusses how to evaluate your driving ss and what items you should check on your vehicle. It also s important information about loading cargo.
u Ready to Drive?............................................................. 70 Size Recommendations ................................................. 70
ctive Apparel ................................................................... 71o Know Your Vehicle ....................................................... 72t Drink & Drive ................................................................. 72 Vehicle Ready to Drive?................................................... 73rive Inspection ................................................................. 74g Cargo............................................................................ 77o Limit.............................................................................. 77ing Guidelines .................................................................. 78 a Trailer.......................................................................... 79
ng Limits .......................................................................... 79king Loads ....................................................................... 79ing a Trailer ...................................................................... 80
Before Driving 69
B70
Are
Before carefulmake s
The dritheir sepassenand rid
Age &
You Ready to Drive?
driving your Honda SXS for the first time, we urge you to ly read this owner’s manual and the labels on your vehicle and ure you understand all the safety information.
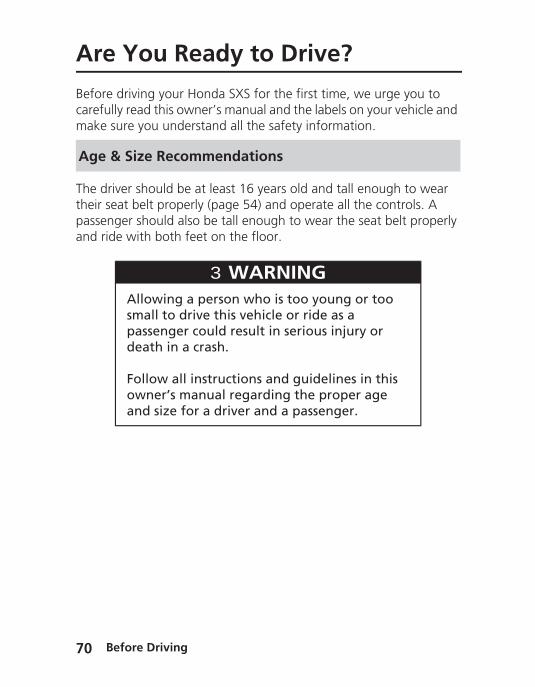
ver should be at least 16 years old and tall enough to wear at belt properly (page 54) and operate all the controls. A ger should also be tall enough to wear the seat belt properly e with both feet on the floor.
Size Recommendations
WARNING 3WARNINGAllowing a person who is too young or too small to drive this vehicle or ride as a passenger could result in serious injury or death in a crash.
Follow all instructions and guidelines in this owner’s manual regarding the proper age and size for a driver and a passenger.
efore Driving
To helpstructualways
To protrecommshield.
For yougloves,drive.
Prote
Are You Ready to Drive?
prevent head injury from striking an occupant protective re (OPS) or other hard object, we recommend that occupants wear a helmet secured with a chin strap.
ect the eyes from brush and flying objects, we also end that occupants wear impact-resistant goggles or a face
r safety, we also recommend that you always wear boots, long pants, and a long-sleeved shirt or jacket whenever you
ctive Apparel
WARNING 3WARNINGDriving or riding in this vehicle without a proper helmet and eye protection can result in serious injury or death in a crash.
Always wear a helmet secured with a chin strap, eye protection (goggles or face shield), gloves, boots, long-sleeved shirt or jacket and long pants when driving or riding in this vehicle.
Before Driving 71
B72
Are
Becauslearn htake timaccustodifferenterrain
It’s weljudgmetherefoelse dri
Get to
Don’t
You Ready to Drive?
e all vehicles have unique characteristics, it’s important to ow this one operates and handles. We recommend that you
e to practice using the different controls, and get med to how the vehicle accelerates, brakes, and turns in t driving modes, on different surfaces, and on different
conditions.
l known that alcohol and drugs can seriously affect a person’s nt, perception, and ability to safely operate any vehicle. We re strongly recommend that you do not drive, or let anyone ve or ride in this vehicle, after consuming alcohol or drugs.
Know Your Vehicle
Drink & Drive
WARNING 3WARNINGOperating this vehicle after consuming alcohol or drugs can result in a crash in which you or others can be seriously injured or killed.
Never drive this vehicle after consuming alcohol or drugs.
efore Driving
I
Before and conot onlinconve
If your drive itdamag
s Your Vehicle Ready to Drive?
driving your Honda SXS, it’s important to inspect the vehicle rrect any problem you find. A pre-drive inspection is a must, y for safety, but because having a breakdown can be a major nience.
vehicle has overturned or been involved in a crash, do not until it has been inspected by your dealer. There may be e or other problems you cannot see.
WARNING 3WARNINGImproperly maintaining this vehicle or failing to correct a problem before driving can cause a crash in which you or someone else can be seriously hurt or killed.
Always perform a pre-drive inspection and correct any problems before you operate the vehicle.
Before Driving 73
B74
Is Y
Check
Pre-d
Oil Lev
Coolan
Fuel Le
Brake F
Tires
Wheel
Drivesh
our Vehicle Ready to Drive?
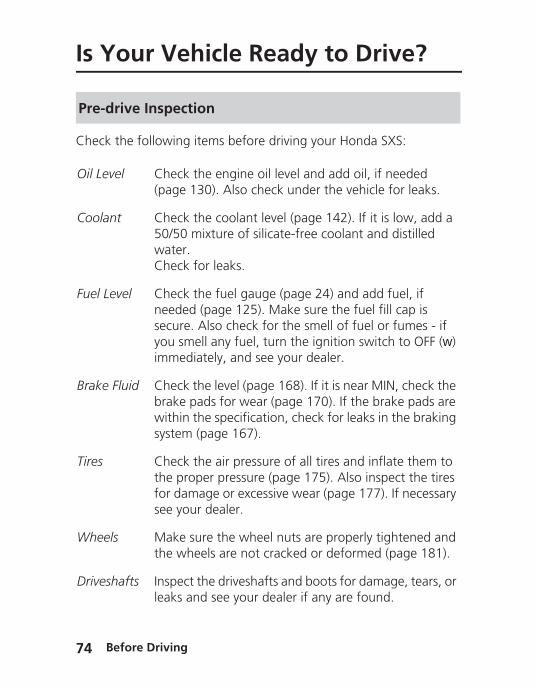
the following items before driving your Honda SXS:
rive Inspection
el Check the engine oil level and add oil, if needed (page 130). Also check under the vehicle for leaks.
t Check the coolant level (page 142). If it is low, add a 50/50 mixture of silicate-free coolant and distilled water.Check for leaks.
vel Check the fuel gauge (page 24) and add fuel, if needed (page 125). Make sure the fuel fill cap is secure. Also check for the smell of fuel or fumes - if you smell any fuel, turn the ignition switch to OFF (w) immediately, and see your dealer.
luid Check the level (page 168). If it is near MIN, check the brake pads for wear (page 170). If the brake pads are within the specification, check for leaks in the braking system (page 167).
Check the air pressure of all tires and inflate them to the proper pressure (page 175). Also inspect the tires for damage or excessive wear (page 177). If necessary see your dealer.
s Make sure the wheel nuts are properly tightened and the wheels are not cracked or deformed (page 181).
efore Driving
afts Inspect the driveshafts and boots for damage, tears, or leaks and see your dealer if any are found.
I
SteerinGearboBoots
Underb
Air Cle
Air CleHousinDrain T
Suspen
Lights
Contro
Tie-rod
Cargo
s Your Vehicle Ready to Drive?
g x and
Check the steering to make sure it turns smoothly in both directions. Check for any tears in the boots.If any tears are found, see your dealer.
ody Check for and remove any debris stuck in the underbody; take extra care in your inspection if the vehicle was last driven in deep grass, brush, a wetland, or flooded area. Check for any visible dents or cracks. If any dents or cracks are found, see your dealer.
aner Inspect the air cleaner element (page 147) to insure it is clean and evenly oiled.
aner g ube
Check for deposits in the drain tube. If necessary, clean the tube (page 150) and check the air cleaner housing.
sion Check the condition of all suspension components. Be sure to look for bends or oil leaks in the cushion damper. Check for tears in the boots of the front arm ball joint.
Make sure the headlights, taillights, and brake lights are working properly.
ls Check that all driving controls, including the accelerator pedal, brake pedal, parking brake lever, drive mode select lever, and the shift select lever are operating smoothly.
Ends The wheels need to be lifted off the ground to correctly check the tie-rod ends, so it cannot be done in the pre-drive inspection. To have the tie-rod ends properly inspected, see your dealer.
Before Driving 75
(cont’d)
Be sure items in the cargo bed are within the cargo limit and are properly secured to prevent shifting (pages 77, 78).
B76
Is Y
NOTExhausAccumcatalysAlways
Rememcorrect
Seat Be
Side N
ExhausSystem
our Vehicle Ready to Drive?
ICEt system and catalyst operate at very high temperatures.ulated debris and vegetation that contact the exhaust/ t can catch on fire. conduct a pre-ride inspection and remove accumulated debris.
lts Make sure all seat belts are in good condition and operate properly. The seat belts must move smoothly when pulled out, and retract on their own when released.The latch plates should click securely into the buckles and release when the release buttons are pushed firmly.
ets Make sure all side nets and their mounting hardware are in good condition and that they latch and tighten securely.
t Make sure no materials or debris are sticking to, or accumulating around, the exhaust system. If any such debris is found, remove it so there's no chance for it to catch on fire. Start the engine and listen for any leaks.
3CAUTIONExhaust system and catalyst operate at very high temperatures.You can be burned if you touch the exhaust system or catalyst.Do not touch the exhaust system or catalyst without letting the system cool down.
efore Driving
ber to take care of any problem you find or have your dealer it before you drive your Honda SXS.
Your vethat is vehicleunsafefollowi
See pa
Cargo
MaximThis inctongue
MaximThis inctongue
Loading Cargo
hicle was designed to carry cargo. However, carrying a load too heavy or improperly loaded can adversely affect your ’s handling, stability, and stopping distance and make it . Before carrying any type of cargo, be sure to read the ng pages.
ge 95 for guidelines on driving with cargo.
Limit
um weight capacity = 1,433 lb (650 kg)ludes the weight of cargo, occupants, accessories, and trailer load.
um cargo weight = 1,000 lb (454 kg)ludes all items in the cargo bed, any accessories, and the load if you are towing a trailer (see page 79).
WARNING 3WARNINGOverloading the cargo bed or failing to secure cargo properly can cause a crash in which you or others could be seriously hurt or killed.
Follow the cargo limits and loading guidelines in this owner’s manual.
Before Driving 77
B78
Loa
• Ma• Plac
and• Use
shif• Do
cau• Be a
veh• Nev
of tthro
Loadi
ding Cargo
ke sure the tires are properly inflated (page 175).e all items on the floor of the cargo bed, and as far forward centered as possible. the tie-down hooks (page 65) to secure any items that could t position while you are driving.not let items extend over the side rails, as they could get ght on something.ware that carrying tall, heavy items will significantly raise the
icle’s center of gravity, increasing the chance of a rollover.er let a passenger ride in the cargo area or hang onto the side he vehicle, even for a short distance. The person could be wn off the vehicle or cause a crash.
ng Guidelines
WARNING 3WARNINGDriving with a passenger in the cargo area can result in very serious injury or death if the person is thrown against the vehicle or out of the bed.
A passenger should only ride in the passenger’s seat and wear their seat belt properly.
efore Driving
Your vefollow
There a
The tonvehiclepage 7
Total TCheck addingthe we
Towin
MaximThis in
MaximThe we
Check
Towing a Trailer
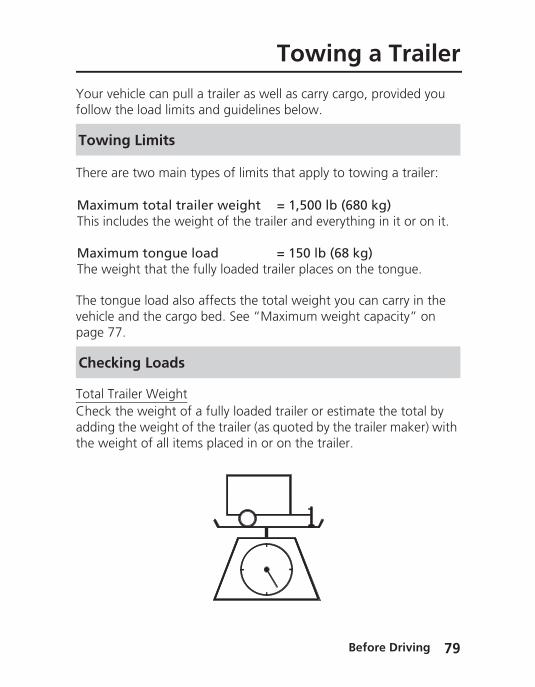
hicle can pull a trailer as well as carry cargo, provided you the load limits and guidelines below.
re two main types of limits that apply to towing a trailer:
gue load also affects the total weight you can carry in the and the cargo bed. See “Maximum weight capacity” on 7.
railer Weightthe weight of a fully loaded trailer or estimate the total by the weight of the trailer (as quoted by the trailer maker) with ight of all items placed in or on the trailer.
g Limits
um total trailer weight = 1,500 lb (680 kg)cludes the weight of the trailer and everything in it or on it.
um tongue load = 150 lb (68 kg)ight that the fully loaded trailer places on the tongue.
ing Loads
Before Driving 79
B80
Tow
To achload tothen re
• Alwor c
• Secdriv
Loadi
ing a Trailer
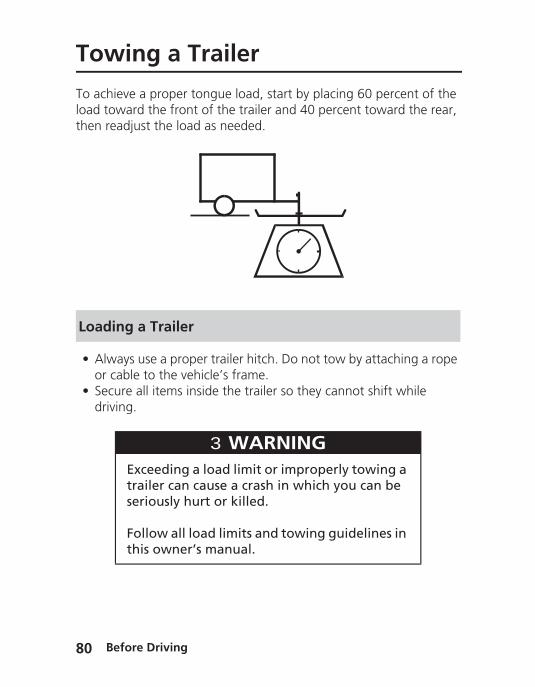
ieve a proper tongue load, start by placing 60 percent of the ward the front of the trailer and 40 percent toward the rear, adjust the load as needed.
ays use a proper trailer hitch. Do not tow by attaching a rope able to the vehicle’s frame.ure all items inside the trailer so they cannot shift while ing.
ng a Trailer
WARNING 3WARNINGExceeding a load limit or improperly towing a trailer can cause a crash in which you can be seriously hurt or killed.
Follow all load limits and towing guidelines in this owner’s manual.
efore Driving
Basic Operation & Driving GuidThis secIt also pdriving
Basic OStartiShiftiSelecParki
DrivingSafe Off-rBasicDrivinDrivinDrivin
Basic Operation & DrivingGuidelines
elinestion gives information on how to start and stop your engine. rovides guidelines for operating on different types of terrain,
with cargo, and towing a trailer.
peration .......................................................................... 82ng & Stopping the Engine................................................ 82ng Gears.......................................................................... 84ting a Drive Mode ............................................................ 89ng .................................................................................... 90 Guidelines ...................................................................... 91Driving Precautions .......................................................... 91oad Driving Considerations............................................... 93 Driving ............................................................................ 95g on Hills ........................................................................ 96g Through Water ............................................................ 99g at Night ....................................................................... 99
Basic Operation & Driving Guidelines 81
B82
Bas
For safventilatsoon acolorle
The stathe braYou shdrive yo
Before 1. Ma
secu2. Ma3. Che
fast4. Fast
the5. Wh
pan
Starti
ic Operation
ety, we recommend that you start the engine in a well-ed area. If that is not practical, move the vehicle outdoors as
s possible. The engine’s exhaust contains carbon monoxide, a ss and odorless gas that can cause illness and even death.
rter motor will operate when the transmission is in neutral or ke pedal is pressed.ould do the following checks and adjustments before you ur vehicle.
START:ke sure the doors, side nets, tailgate and front hood are rely closed.
ke sure the cargo bed is securely lowered.ck that any items you may be carrying are stored properly or ened down securely.
ng & Stopping the Engine
WARNING 3WARNINGRunning the engine of your vehicle while in an enclosed or even partially enclosed area can cause a rapid build-up of toxic carbon monoxide gas.
Breathing this colorless, odorless gas can quickly cause unconsciousness and lead to death.
Only run your vehicle's engine when it is located in a well ventilated area outdoors.
asic Operation & Driving Guidelines
en your seat belt. Check that any passenger has fastened ir seat belt as well.en you start the engine, check the indicators in the instrument el.
Starting1. App2. Ma
ped3. To s
inseposImmretuDo secoIf ththeto S
4. If thrighhalfIf ththe
5. If thdoweng
Basic Operation
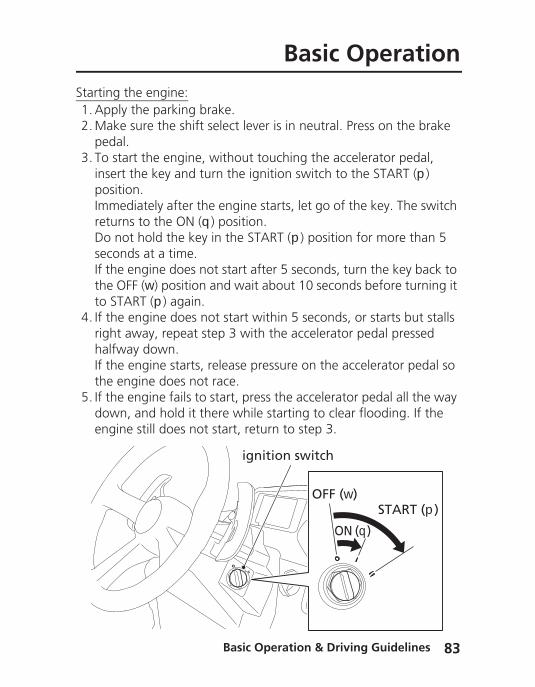
the engine:ly the parking brake.
ke sure the shift select lever is in neutral. Press on the brake al.tart the engine, without touching the accelerator pedal, rt the key and turn the ignition switch to the START (p) ition.ediately after the engine starts, let go of the key. The switch rns to the ON (q) position.not hold the key in the START (p) position for more than 5 nds at a time.e engine does not start after 5 seconds, turn the key back to
OFF (w) position and wait about 10 seconds before turning it TART (p) again.e engine does not start within 5 seconds, or starts but stalls t away, repeat step 3 with the accelerator pedal pressed way down.e engine starts, release pressure on the accelerator pedal so
engine does not race.e engine fails to start, press the accelerator pedal all the way n, and hold it there while starting to clear flooding. If the
ine still does not start, return to step 3.
OFF (w)
ON (q)
ignition switch
START (p)
Basic Operation & Driving Guidelines 83
B84
Bas
To stopRememplan to
SelectiYou cathe shi
Rememselect l
(SXS70When tbetweemode,
Shifti
ic Operation
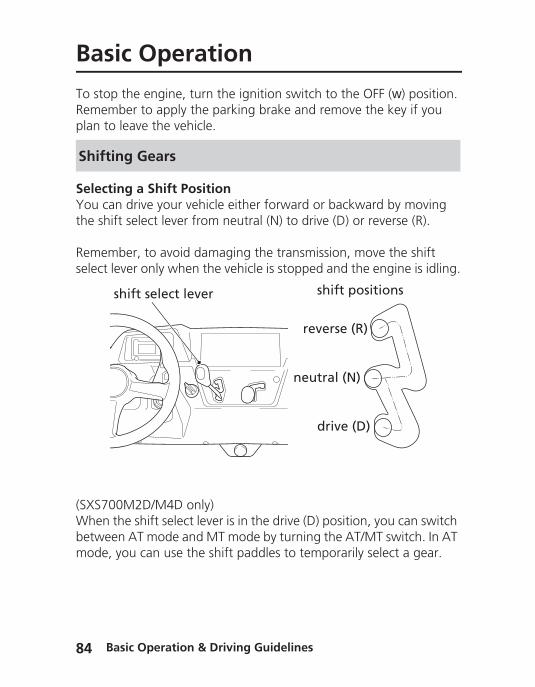
the engine, turn the ignition switch to the OFF (w) position.ber to apply the parking brake and remove the key if you leave the vehicle.
ng a Shift Positionn drive your vehicle either forward or backward by moving ft select lever from neutral (N) to drive (D) or reverse (R).
ber, to avoid damaging the transmission, move the shift ever only when the vehicle is stopped and the engine is idling.
0M2D/M4D only)he shift select lever is in the drive (D) position, you can switch n AT mode and MT mode by turning the AT/MT switch. In AT you can use the shift paddles to temporarily select a gear.
ng Gears
shift select lever
reverse (R)
drive (D)
neutral (N)
shift positions
asic Operation & Driving Guidelines
SelectiYour H
AT moThis moaccordYou cawhile dshown
MT moIn this operati• Hol
conthe
• Thethe
• TheMT
• YouFor
Basic Operation
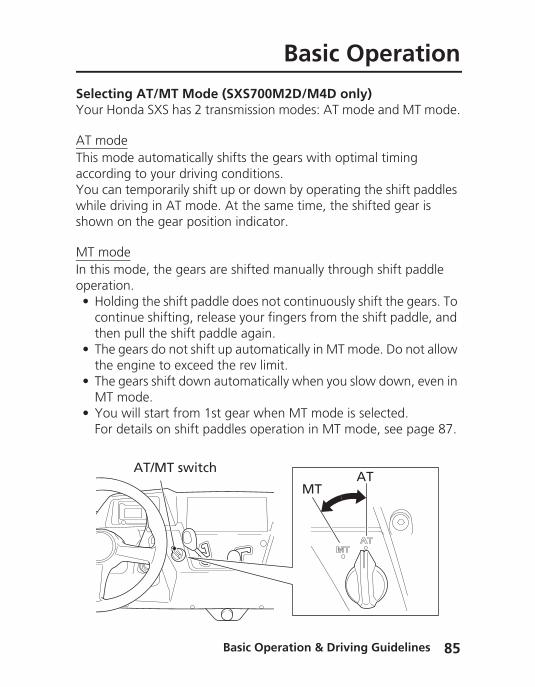
ng AT/MT Mode (SXS700M2D/M4D only)onda SXS has 2 transmission modes: AT mode and MT mode.
dede automatically shifts the gears with optimal timing
ing to your driving conditions.n temporarily shift up or down by operating the shift paddles riving in AT mode. At the same time, the shifted gear is
on the gear position indicator.
demode, the gears are shifted manually through shift paddle on.ding the shift paddle does not continuously shift the gears. To tinue shifting, release your fingers from the shift paddle, and n pull the shift paddle again. gears do not shift up automatically in MT mode. Do not allow engine to exceed the rev limit. gears shift down automatically when you slow down, even in mode. will start from 1st gear when MT mode is selected.details on shift paddles operation in MT mode, see page 87.
AT/MT switchAT
MT
Basic Operation & Driving Guidelines 85
B86
Bas
DrivinAfter sproced1. Wit
bra2. Wit
pos3. (SX
Sele4. Rele
by g
Tempomode iYou caeven wWhen “D” dipositioBecausreturns• Wh• Wh
aut
Shift LiDuringengine
ic Operation
g in AT modetarting the engine and letting it warm up, follow this ure:h the shift select lever in neutral (N), release the parking ke, but continue to press the brake pedal.h the throttle closed, move the shift select lever into drive (D) ition.S700M2D/M4D only)ct AT mode by turning the AT/MT switch.ase pressure from the brake pedal and increase engine speed radually pressing the accelerator pedal.
rarily changing gears by operating the shift paddle while AT s selected (SXS700M2D/M4D only)n temporarily change gears by operating the shift paddles hile AT mode is selected.operating the shift paddles while AT mode is selected, the splayed in the gear position indicator changes to a gear n number (1 – 3). e the gear change is temporary, the vehicle automatically to normal AT mode under the following conditions:en the shift paddles are not operated for a prescribed timeen the vehicle speed is reduced or increased beyond the omatic shifting speed
mit: MT mode, downshifts may not be executed if it causes the to exceed the rev limit.
asic Operation & Driving Guidelines
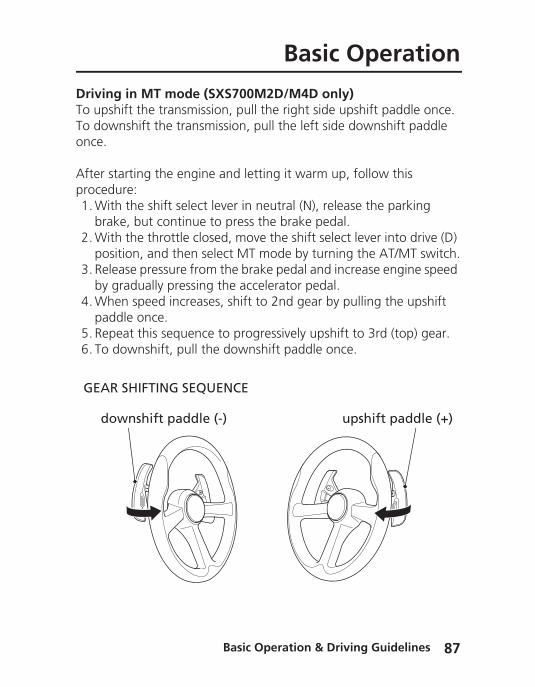
DrivinTo upsTo dowonce.
After sproced1. Wit
bra2. Wit
pos3. Rele
by g4. Wh
pad5. Rep6. To d
do
GEAR
Basic Operation
g in MT mode (SXS700M2D/M4D only)hift the transmission, pull the right side upshift paddle once. nshift the transmission, pull the left side downshift paddle
tarting the engine and letting it warm up, follow this ure:h the shift select lever in neutral (N), release the parking ke, but continue to press the brake pedal.h the throttle closed, move the shift select lever into drive (D) ition, and then select MT mode by turning the AT/MT switch.ase pressure from the brake pedal and increase engine speed radually pressing the accelerator pedal.
en speed increases, shift to 2nd gear by pulling the upshift dle once.eat this sequence to progressively upshift to 3rd (top) gear.ownshift, pull the downshift paddle once.
wnshift paddle (-)
SHIFTING SEQUENCE
upshift paddle (+)
Basic Operation & Driving Guidelines 87
B88
Bas
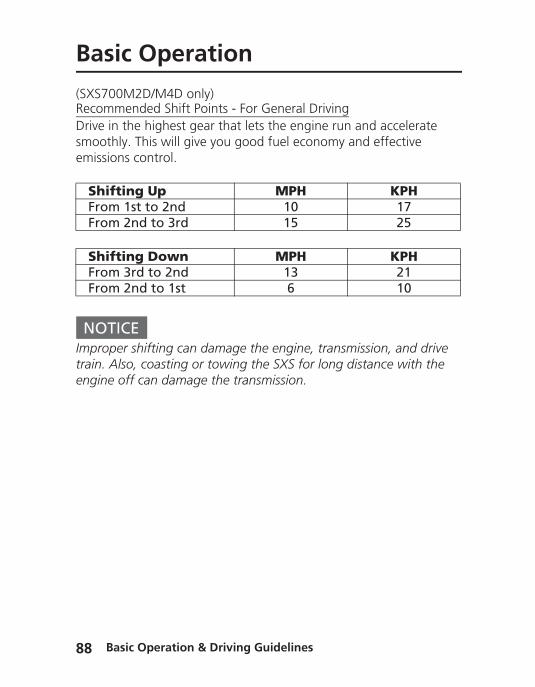
(SXS70RecomDrive insmoothemissio
NOTImproptrain. Aengine
ShifFromFrom
ShifFromFrom
ic Operation
0M2D/M4D only)mended Shift Points - For General Driving the highest gear that lets the engine run and accelerate ly. This will give you good fuel economy and effective ns control.
ICEer shifting can damage the engine, transmission, and drive lso, coasting or towing the SXS for long distance with the
off can damage the transmission.
ting Up MPH KPH 1st to 2nd 10 17 2nd to 3rd 15 25
ting Down MPH KPH 3rd to 2nd 13 21 2nd to 1st 6 10
asic Operation & Driving Guidelines
Before to anotSee pa
Selec
2WD
4WD
4WD DLock
Basic Operation
using the drive mode select lever to change from one mode her, be sure the vehicle is stopped and the engine is idling.
ge 38 for additional information.
ting a Drive Mode
This mode supplies power to the rear wheels only, this mode is best for surfaces with good traction.This mode supplies power to the front and rear wheels. Steering will require slightly more effort than with 2WD. This mode is recommended for driving on surfaces with relatively poor traction.
iff This mode supplies power to the front and rear wheels, and locks the front differential. As a result, steering will require extra space and effort. Select this mode for maximum traction.
Basic Operation & Driving Guidelines 89
B90
Bas
Look foslope oon a slo
After b1. Kee
(N).2. Set 3. Tur
key
Fully pubrake.
Parkin
ic Operation
r a level parking area with a firm surface. Avoid parking on a r on loose or slippery surfaces when possible. If you must park pe, block the wheels to help keep the vehicle from sliding.
ringing your vehicle to a stop:p your foot on the brake pedal while you shift into neutral
the parking brake.n the ignition switch to the OFF (w) position, and remove the .
sh the parking brake lever forward when releasing parking
g
asic Operation & Driving Guidelines
Your Hhelp prstructucan pre
The folguidelisafely.
Before “Driversection
We alsHighwawww.Rinterac• Key• Safe• The
Safe D
Driving Guidelines
onda SXS has been designed with many safety features to otect you. These include a strong occupant protection re, seat belts, doors, and side nets. However, no safety system vent all injuries.
lowing pages contain important precautions and driving nes to help you make good decisions and operate your vehicle
driving your Honda SXS for the first time, please review the & Passenger Safety” section (page 1), the “Before Driving” (page 69), and the precautions below.
o recommend that you complete the Recreational Off-y Vehicle (ROV) E-Course. The free course is available at OHVA.org. The two-hour ROV E-Course is a multi-media,
tive, online safety course that reinforces:
WARNING 3WARNINGFailure to follow the driving guidelines in this owner’s manual can lead to a crash or overturn in which you or others can be seriously hurt or killed.
Follow all safe-driving guidelines in this owner’s manual.
riving Precautions
Basic Operation & Driving Guidelines 91
risk factors associated with ROV operation driving practices that will reduce risk of injury
best resources for learning about your particular vehicle
B92
Driv
The ROoffers tand reg
Off-higYour Hand sitpaved drive oRemembefore “no tre
ControDrivingincreaswhen dtrailer.
Use ExtWhen terrain holes, ovisibilitto keep
Do NotKeep aattempwhich killed.
ing Guidelines
HVA (Recreational Off-Highway Vehicle Association) also he hands-on ROV Basic Driver Course (RBDC). Information on istration for the RBDC is available at www.ROHVA.org.
hway Use Onlyonda SXS was designed for use on a wide variety of terrain uations. However, it should not be driven on any public road, or unpaved, because it is not equipped to legally or safely n such roads.ber to obey all local off-road regulations, obtain permission driving on someone else’s private property, and respect all spassing” signs.
l Speed at excessive speed for the terrain or other conditions es the chance of a crash or overturn. Always reduce speed riving on hilly terrain, or when carrying cargo or towing a
ra Care on Unfamiliar Terraindriving in a new area, keep your speed low and check the ahead for possible problems, such as large rocks, bumps, r drop-offs. Don’t drive fast on unfamiliar terrain or when
y is limited. If you drive in an area with other vehicles, be sure a safe distance to avoid a collision.
Perform Stuntsll four wheels on the ground at all times. Showing off or ting to perform stunts could lead to a crash or overturn in the driver, a passenger, or others could be seriously hurt or
asic Operation & Driving Guidelines
Your Hevent tHondatires w
VehicleThe Hovehicleoff-higcenter also eqin sand
These aand ridyou ma
Off-higDrivingmeans You wothere toand dribumpyand po
Off-ro
Driving Guidelines
onda SXS was designed and intended for off-road use. In the hat you must drive on a paved surface, be aware that your SXS will feel and handle different than it does on dirt. The ill also wear much faster.
Designnda SXS handles somewhat differently from on-highway s due in part to features that allow it to perform its role as an hway utility vehicle. For example, this Honda SXS has a higher of gravity than cars designed for use only on pavement. It is uipped with large low-pressure tires that allow good traction , loose dirt, wet grass and other low-traction surfaces.
dvantages come at some cost. Because your vehicle is taller es higher off the ground, it can more easily tip or roll over if ke abrupt turns or drive on sloped terrain.
hway Environments on private property, or in approved off-highway areas, you leave a generally predictable and orderly world behind. n’t find lane markers or traffic signals, and no one will be warn you of trouble ahead. It’s up to you to assess situations
ve within limits. The terrain has limits (it may be too steep or , for example). The vehicle has limits (e.g., traction, stability, wer). And you may be limited by lack of experience.
ad Driving Considerations
Basic Operation & Driving Guidelines 93
B94
Driv
SurfaceThe kinyour veneed m
Avoid ahard susurfacehandle
ReadinBecausyou neenough
As youconditisand oslope ayour eydamag
ControWhethkeep yomoving
When the terbumpybrake oNever g
ing Guidelines
Considerationsd of surface you drive on can have important effects on how hicle handles. For example, on loose or soft surfaces you’ll ore time and distance to accelerate, turn, or brake to a stop.
ny sudden sharp turn, particularly on pavement and other rfaces. And always slow down after moving from one type of to another until you get accustomed to how your vehicle s.
g the Terraine visual information comes in unpredictable ways off-road, ed to stay alert, constantly survey the terrain, and go slow to analyze situations and make good decisions.
r eyes search the terrain ahead, watch for changes in surface ons. One minute you can be on firm soil and the next in soft r deep mud. A path can quickly change from level to bumpy, t a dangerous angle, or disappear in a drop-off. Always keep es open for holes, washouts, or obstacles that could upset or e the vehicle.
lling Speeder you travel off-road or on pavement, the general rule is to ur speed low. Of course, you’ll need enough speed to keep forward, but too much speed leads to problems.
driving off-road at higher speeds, you have less time to read rain and make good decisions. The drive can also be more , and there’s a greater chance of the vehicle sliding if you
asic Operation & Driving Guidelines
r turn quickly on wet soil, gravel, or another slippery surface. o faster than conditions allow.
DrivingThe adhow yoweight
Please trailer:
• Do load
• Kee• Allo• Do • (SX
UseMT
MakingThe baand granot ma
If your of the regaine
BrakingThe bebrake pbrakingdirt. Av
Basic
Driving Guidelines
with Cargo or Pulling a Trailerded weight of carrying cargo or pulling a trailer will affect ur vehicle accelerates, brakes, and handles. The added and length of a trailer will affect your directional control.
follow these guidelines whenever you carry cargo or pull a
not exceed the cargo limit and towing limits (see page 77 for ing cargo and page 79 for towing a trailer).p speed low, particularly when driving on hills.w extra distance to accelerate, turn and slow or stop.not drive across a steep slope with a trailer. S700M2D/M4D only) lower gears when towing a trailer or carrying extra cargo on mode.
Turnssic turning technique for Honda SXS is to drive at low speed dually adjust the amount of steering to suit the surface. Do ke sudden sharp turns, either off-road or on pavement.
vehicle ever skids sideways during a turn, steer in the direction skid. Also, avoid hard braking or accelerating until you have d directional control.
st off-road braking technique is to gently step down on the
Driving
Basic Operation & Driving Guidelines 95
edal, then increase pressure as more braking is needed. Light may be all you need on soft surfaces, such as sand or loose oid hard braking on any surface.

B96
Driv
Hills prif you aroad drvehicle
Even if below
ApproaWhen yyou, yoexamp
• Is thwhenot
• Is thspin
• Areveh
• If ththe
• Do
If you dan asce
Drivin
ing Guidelines
esent some of the greatest challenges and hazards, especially re carrying cargo or pulling a trailer. If you are new to off-iving, start with gentle inclines, take time to learn how your handles on slopes, and read the information that follows.
you have previous off-road driving experience, the guidelines should serve as important reminders.
ching a Hillou approach a hill, you need to decide whether it is one that ur passengers, your cargo and your vehicle can handle. For
le, ask yourself:
e hill too steep? Is the incline constant, or are there places re it gets suddenly steeper? If you run out of power, you may
be able to continue forward.ere enough traction for you to make it to the top without ning the wheels or sliding backwards? there obstacles, such as rocks or ruts, that could upset your icle and make it roll over?ere is no safe predetermined path, can you drive straight up
hill without turning?you know what is on the other side of the hill?
o not know the answers to these questions before beginning nt, you should stop and walk up the hill to find out.
g on Hills
asic Operation & Driving Guidelines
DrivingIf you d• Sele• App
hill.• Ma• Red
vehthe
If You If a hillmainta• Sto• If yo
mo• If yo
theusin
DrivingBefore evaluatfrom thAsk yo• Is th• Is th• Can• Is th
Driving Guidelines
Up a Hillecide that it is safe to drive your Honda SXS up a hill:ct an appropriate drive mode and gear for the hill.roach the hill with enough speed to smoothly start up the
intain a steady speed as you climb the hill.uce speed as you approach the top, and watch for other icles that may be approaching the top from the other side of hill.
Stall Going Up a Hill is steeper than you expected, traction is poor, or you don’t in sufficient speed, you may begin to stall. If that happens:p the vehicle and set the parking brake.u have passenger(s), you may want to have them get out and
ve away from the vehicle.u are headed straight up the hill, shift into reverse, release
parking brake, and slowly back straight down the hill, gently g the brake pedal to control speed.
Down a Hilldriving down a hill, as with driving up a hill, you need to e whether you can make it safely to the bottom and away e slope.
urself:e hill too steep to maintain speed and steering control?e surface too rough or too slippery? you drive straight down without turning?ere a safe exit when you reach the bottom of the hill?
Basic Operation & Driving Guidelines 97
B98
Driv
If you d• Hol
hill.• Gen
the
CrossinBefore • A h
driv• Wh
wheforwnarof t
• If yodoweve
If you cbumpsbefore drive a
AvoidinWhen and othand caudrive o
ing Guidelines
ecide it is safe to drive down a hill:d the steering wheel firmly and drive straight back down the
tly apply the brakes to help control speed, but do not “ride” brakes.
g a Hilltraversing a hill, consider these facts:ill that you can drive straight up or down can be too steep to e across.en you drive straight up or down a slope, the length of the elbase reduces the chance of tipping over backward or ard, but when you drive across a slope, the vehicle’s
rower track and higher center of gravity increases the chance ipping or rolling over.u drive across a slope and an uphill wheel hits a bump, or a nhill wheel drops into a hole, your vehicle will tip downward
n more.
an’t clearly see all terrain conditions (good traction, no , holes or other obstacles, etc.), stop and walk the slope you drive on it. If you have any doubt whether you can safely cross a slope, don’t do it. Find another route.
g Obstaclesdriving off-road, always watch for bumps, pot holes, rain ruts er obstacles. Large bumps and holes can bounce you around se you to lose control or get stuck. Slow down whenever you
n rough terrain.
asic Operation & Driving Guidelines
Before • The• The
yougropos
• Botent
• TheRemmu
If you d• Pro• Wa
hole• Avo
cau
If you dcautiou
Drivin
Drivin
Driving Guidelines
driving through water, stop and make sure that: water is not more than about 10 inches (25 cm) deep. water is not flowing too fast. Deep rushing water can sweep downstream. Even very shallow rushing water can wash the und from under your tires and cause you to lose traction and sibly roll over.h banks have gradual slopes and good traction, so you can er the stream and exit safely. surface under the water appears to provide good traction.ember, the water may hide hazards, such as rocks, holes,
d, or slippery vegetation.
ecide you can safely cross the water:ceed at a slow, steady speed.tch for submerged obstacles, including slippery rocks and s.id getting the spark plugs or air cleaner wet, as this would se the engine to stop.
rive your Honda SXS at night, always drive slower and more sly than you would in daylight.
g Through Water
g at Night
Basic Operation & Driving Guidelines 99
B100
BLANK PAGE
asic Operation & Driving Guidelines

To helpMainteinstrucsafety pkeepin
For info
For infoof the UResourCanada
USA OMaintedevicevehicle“certif
Before The ImMainte
ImpoMainteMainte
ServiceMainteTool KiOwnerFront HAir GuiClip Re
Servicing Your HondaServicing Your Honda keep your Honda SXS in good shape, this section includes a
nance Schedule for required service and step-by-step tions for specific maintenance tasks. You’ll also find important recautions, information on fuels and oils, and tips for
g your Honda looking good.
rmation about replacing fuses, see page 216.
rmation about the exhaust emission and noise requirements .S. Environmental Protection Agency (EPA), the California Air
ces Board (CARB), and Environment and Climate Change (ECCC), see page 237.
nlynance, replacement or repair of the emission control
s and systems may be performed by any off-road utility repair establishment or individual using parts that are
ied” to EPA standards.
You Service Your Hondaportance of Maintenance ............................................... 103nance Safety.................................................................. 104rtant Safety Precautions ................................................. 105nance Schedule ............................................................. 106nance Record................................................................. 111
Preparationsnance Component Locations ......................................... 112t .................................................................................... 117
Servicing Your Honda 101
(cont’d)
’s Manual Storage .......................................................... 118ood............................................................................... 119de Plate Removal ........................................................... 120moval ............................................................................ 121
Se102
Serv
Seat ReJack Up
ServiceFluids, Fuel ....EngineFront FRear FiCoolanAir CleLubrica
EngineAccelerSpark PSpark AExhaus
ChassisSuspenFrame.BrakesTires ...WheelsDrivesh
ElectricBattery
Appear
icing Your Honda
moval............................................................................ 122 Point & Support Point .................................................. 123
ProceduresFilters & Lubricants...................................................................................... 124 Oil & Filter ..................................................................... 127inal Gear Oil................................................................... 137nal Gear Oil .................................................................... 139t .................................................................................... 141aner ............................................................................... 146tion ............................................................................... 151
ator Pedal...................................................................... 156lugs............................................................................... 158rrester .......................................................................... 161
t System......................................................................... 163
sion ............................................................................... 164...................................................................................... 166...................................................................................... 167...................................................................................... 174..................................................................................... 181aft Boots ....................................................................... 182
al..................................................................................... 183
rvicing Your Honda
ance Care...................................................................... 188
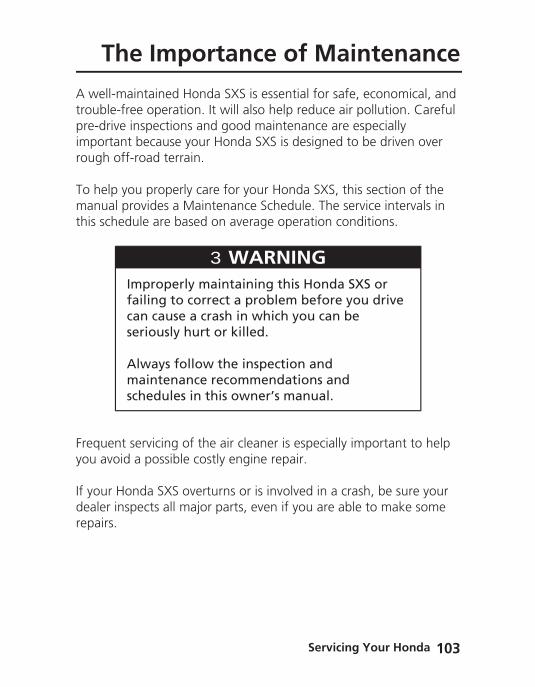
Before You Service Your Honda
T
A well-troublepre-driimportrough
To helpmanuathis sch
Frequeyou avo
If your dealer repairs
he Importance of Maintenance
maintained Honda SXS is essential for safe, economical, and -free operation. It will also help reduce air pollution. Careful ve inspections and good maintenance are especially ant because your Honda SXS is designed to be driven over off-road terrain.
you properly care for your Honda SXS, this section of the l provides a Maintenance Schedule. The service intervals in edule are based on average operation conditions.
nt servicing of the air cleaner is especially important to help id a possible costly engine repair.
Honda SXS overturns or is involved in a crash, be sure your inspects all major parts, even if you are able to make some .
WARNING 3WARNINGImproperly maintaining this Honda SXS or failing to correct a problem before you drive can cause a crash in which you can be seriously hurt or killed.
Always follow the inspection and maintenance recommendations and schedules in this owner’s manual.
Servicing Your Honda 103
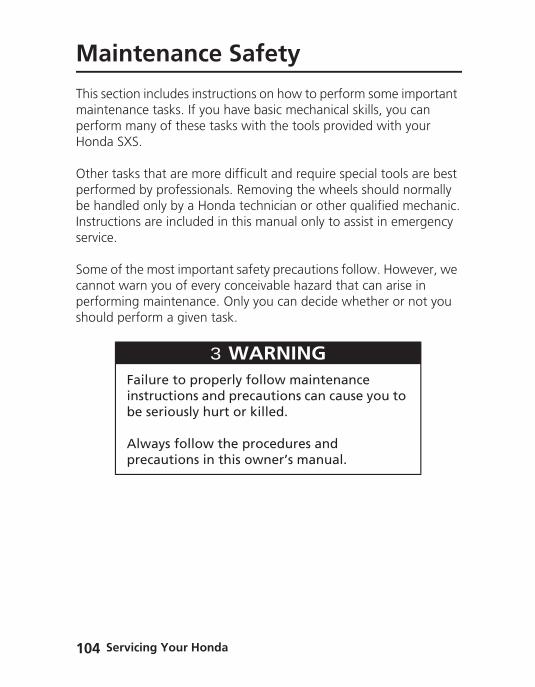
Se104
Mai
This secmainteperformHonda
Other tperformbe hanInstrucservice
Some ocannotperformshould
ntenance Safety
tion includes instructions on how to perform some important nance tasks. If you have basic mechanical skills, you can many of these tasks with the tools provided with your
SXS.
asks that are more difficult and require special tools are best ed by professionals. Removing the wheels should normally
dled only by a Honda technician or other qualified mechanic.tions are included in this manual only to assist in emergency .
f the most important safety precautions follow. However, we warn you of every conceivable hazard that can arise in ing maintenance. Only you can decide whether or not you
perform a given task.
WARNING 3WARNINGFailure to properly follow maintenance instructions and precautions can cause you to be seriously hurt or killed.
Always follow the procedures and precautions in this owner’s manual.
rvicing Your Honda
• MarepCartheBurbefInjuinst
• Reathe
• To rworgasfrom
Rememis fully and relequivalskills reofficial
Impo
Maintenance Safety
ke sure the engine is off before you begin any maintenance or airs. This will help eliminate several potential hazards:bon monoxide poisoning from engine exhaust. Be sure re is adequate ventilation whenever you operate the engine.ns from hot parts. Let the engine and exhaust system cool ore touching.ry from moving parts. Do not run the engine unless
ructed to do so.d the instructions before you begin, and make sure you have tools and skills required.educe the possibility of a fire or explosion, be careful when king around gasoline. Use only non-flammable solvent, not oline, to clean parts. Keep cigarettes, sparks, and flames away
all fuel-related parts.
ber that your Honda dealer knows your Honda SXS best and equipped to maintain and repair it. To ensure the best quality iability, use only new Honda Genuine Parts or other ents for repair and replacement. If you have the tools and quired for additional maintenance jobs, you can purchase an Honda Service Manual (page 246).
rtant Safety Precautions
Servicing Your Honda 105
Se106
Mai
The reqyou shoattentioscheduemissio
The seraveragserviceConsulindividu
Some ibasic mare proprocedWe recunless and eqprovide(page 2
If you dassistanSXS beto do yequivalreliabili
ntenance Schedule
uired Maintenance Schedule that follows specifies how often uld have your Honda SXS serviced, and what things need n. It is essential to have your Honda SXS serviced as
led to maintain safe, dependable performance, and proper n control.
vice intervals in this Maintenance Schedule are based on e driving conditions. Some items will need more frequent if you drive in unusually wet or dusty areas or at full throttle. t your dealer for recommendations applicable to your al needs and use.
tems in the Maintenance Schedule can be performed with echanical skills and hand tools. Procedures for these items vided in this manual. Other items involve more extensive ures and may require special training, tools, and equipment. ommend that you have your dealer perform these tasks you have advanced mechanical skills and the required tools uipment. Procedures for such items in this schedule are d in an official Honda Service Manual available for purchase 46).
o not feel capable of performing a given task or need ce, remember that your Honda dealer knows your Honda
st and is fully equipped to maintain and repair it. If you decide our own maintenance, use only Honda Genuine Parts or their ents for repair or replacement to ensure the best quality and ty.
rvicing Your Honda

Performthis sec
MainteThe madisplayreacheschedu
Mainte
Maintenance Schedule
the pre-ride inspection (page 74) and owner maintenance in tion at each scheduled maintenance period.
nance Minder Messages on the Multi-function Displayintenance minder indicator appears in the multi-function when the mileage or operating hours on your Honda SXS s the maintenance interval specified on the maintenance le.
nance Minder Indicators:Initial MaintenanceAppears at 100 miles (150 km) or 20 operating hours, whichever comes first. See Initial Maintenance on the maintenance schedule.Regular Maintenance Interval 1Appears 600 miles (1,000 km) or 100 operating hours after the Initial Maintenance is performed and maintenance minder is reset (page 31). See Regular Maintenance Interval for 100, 300, and 500 operating hours (or corresponding mileage interval, whichever comes first) in the maintenance schedule.Regular Maintenance Interval 2Appears 600 miles (1,000 km) or 100 operating hours after Regular Maintenance Interval 1 is performed and maintenance minder is reset (page 31). See Regular Maintenance Interval for 200, 400, and 600 operating hours (or corresponding mileage interval, whichever comes first) in the maintenance schedule.
Servicing Your Honda 107
Se108
Mai
• Theof t
• Thealte
• ConodohistInte
Each itknowlerequire
Summa
NOTES
* Shtoth
** In on
Note 1
Note 2
Note 3
Note 4
ntenance Schedule
Initial Maintenance indicator appears only once over the life he vehicle. Regular Maintenance Interval 1 and 2 indicators will appear rnately over the life of the vehicle.sider the total mileage and operating hours shown on the meter/hour meter, along with your vehicle maintenance ory, to determine the appropriate Regular Maintenance rval to follow on the maintenance schedule.
em on the maintenance schedule requires some mechanical dge. Certain items (particularly those marked * and **) may more technical information and tools. Consult your dealer.
ry of Maintenance Schedule Notes:
:
ould be serviced by your dealer, unless you have the proper ols and service data, and are mechanically qualified. Refer to e official Honda Service Manual (page 246).the interest of safety, we recommend these items be serviced ly by your dealer.
Service more frequently when operating in dusty areas, sand or snow.Service more frequently when operated in muddy, very wet conditions, or freezing temperatures.Service more frequently when operated in muddy conditions.Check the underbody whenever the under guard has been hit.
rvicing Your Honda
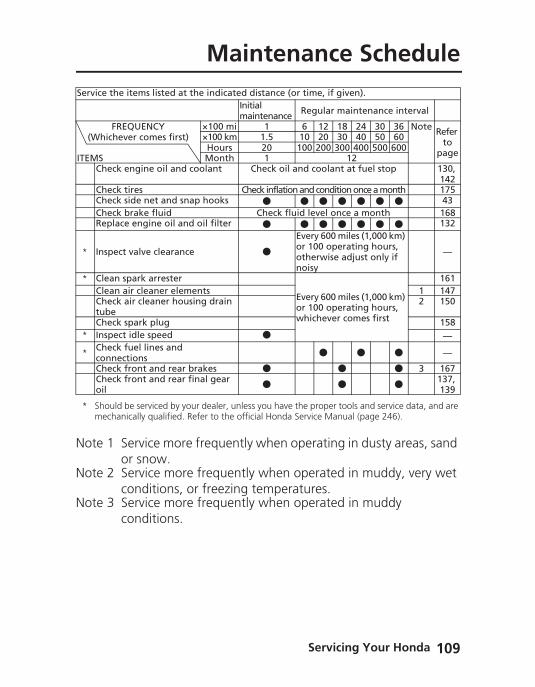
* Shoumech
Service t
F(Which
ITEMSChec
ChecChecChecRepl
* Insp
* CleaCleaChectubeChec
* Insp
*ChecconnChecChecoil
Note 1
Note 2
Note 3
Maintenance Schedule
ld be serviced by your dealer, unless you have the proper tools and service data, and are anically qualified. Refer to the official Honda Service Manual (page 246).
he items listed at the indicated distance (or time, if given).Initialmaintenance Regular maintenance interval
REQUENCYever comes first)
×100 mi 1 6 12 18 24 30 36 Note Refer to
page
×100 km 1.5 10 20 30 40 50 60Hours 20 100 200 300 400 500 600Month 1 12
k engine oil and coolant Check oil and coolant at fuel stop 130, 142
k tires Check inflation and condition once a month 175k side net and snap hooks 43k brake fluid Check fluid level once a month 168ace engine oil and oil filter 132
ect valve clearance
Every 600 miles (1,000 km) or 100 operating hours, otherwise adjust only if noisy
—
n spark arrester
Every 600 miles (1,000 km) or 100 operating hours, whichever comes first
161n air cleaner elements 1 147k air cleaner housing drain 2 150
k spark plug 158ect idle speed —k fuel lines and ections —
k front and rear brakes 3 167k front and rear final gear 137,
139
Service more frequently when operating in dusty areas, sand or snow.Service more frequently when operated in muddy, very wet conditions, or freezing temperatures.Service more frequently when operated in muddy conditions.
Servicing Your Honda 109
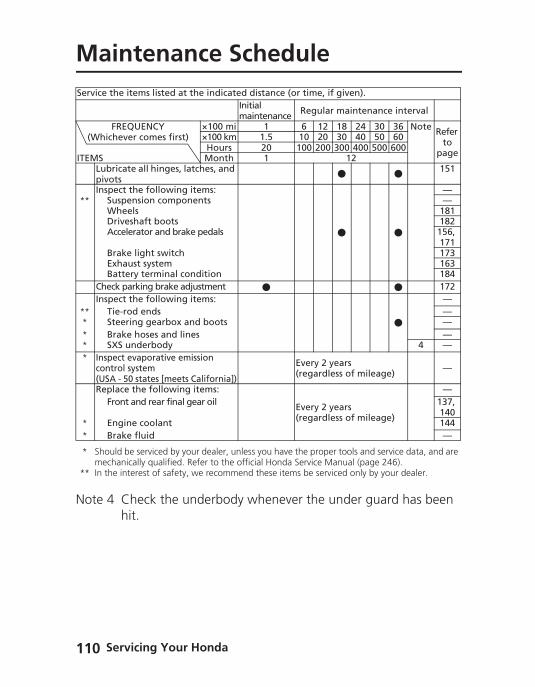
Se110
Mai
* Shoumech
** In the
Service t
F(Which
ITEMSLubrpivoInsp
** SuWDA
BrExBa
ChecInsp
** Ti* St* Br* SX* Inspe
cont(USARepl
Fr
* En* Br
Note 4
ntenance Schedule
ld be serviced by your dealer, unless you have the proper tools and service data, and are anically qualified. Refer to the official Honda Service Manual (page 246). interest of safety, we recommend these items be serviced only by your dealer.
he items listed at the indicated distance (or time, if given).Initialmaintenance Regular maintenance interval
REQUENCYever comes first)
×100 mi 1 6 12 18 24 30 36 Note Refer to
page
×100 km 1.5 10 20 30 40 50 60Hours 20 100 200 300 400 500 600Month 1 12
icate all hinges, latches, and ts
151
ect the following items: —spension components —heels 181
riveshaft boots 182ccelerator and brake pedals 156,
171ake light switch 173haust system 163ttery terminal condition 184
k parking brake adjustment 172ect the following items: —e-rod ends —eering gearbox and boots —ake hoses and lines —S underbody 4 —ct evaporative emission
rol system - 50 states [meets California])
Every 2 years(regardless of mileage) —
ace the following items:
Every 2 years(regardless of mileage)
—ont and rear final gear oil 137,
140gine coolant 144ake fluid —
Check the underbody whenever the under guard has been hit.
rvicing Your Honda
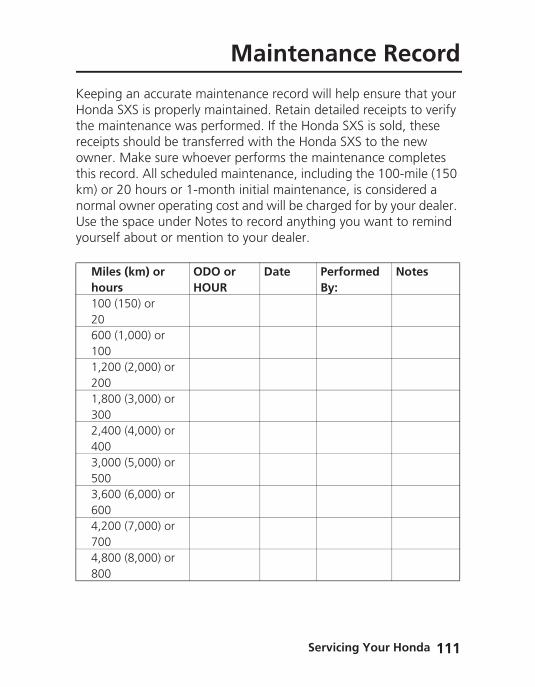
KeepinHondathe mareceiptowner.this reckm) or normalUse theyoursel
Milehou100 20600 1001,202001,803002,404003,005003,606004,207004,80800
Maintenance Record
g an accurate maintenance record will help ensure that your SXS is properly maintained. Retain detailed receipts to verify intenance was performed. If the Honda SXS is sold, these s should be transferred with the Honda SXS to the new Make sure whoever performs the maintenance completes ord. All scheduled maintenance, including the 100-mile (150 20 hours or 1-month initial maintenance, is considered a owner operating cost and will be charged for by your dealer. space under Notes to record anything you want to remind f about or mention to your dealer.
s (km) or rs
ODO or HOUR
Date Performed By:
Notes
(150) or
(1,000) or
0 (2,000) or
0 (3,000) or
0 (4,000) or
0 (5,000) or
0 (6,000) or
0 (7,000) or
0 (8,000) or
Servicing Your Honda 111
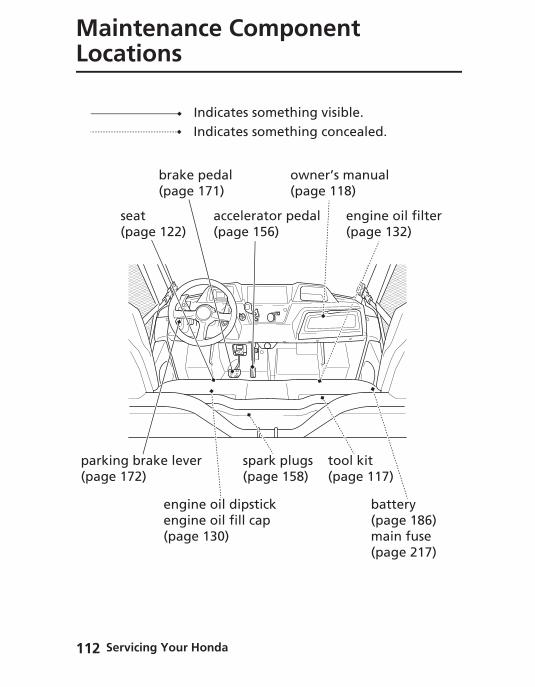
Se112
Service PreparationsMaiLoc
parkin(page
ntenance Component ations
Indicates something visible.
seat (page 122)
brake pedal(page 171)
accelerator pedal(page 156)
g brake lever172)
Indicates something concealed.
engine oil dipstickengine oil fill cap(page 130)
tool kit(page 117)
engine oil filter(page 132)
battery (page 186)main fuse (page 217)
spark plugs(page 158)
owner’s manual(page 118)
rvicing Your Honda
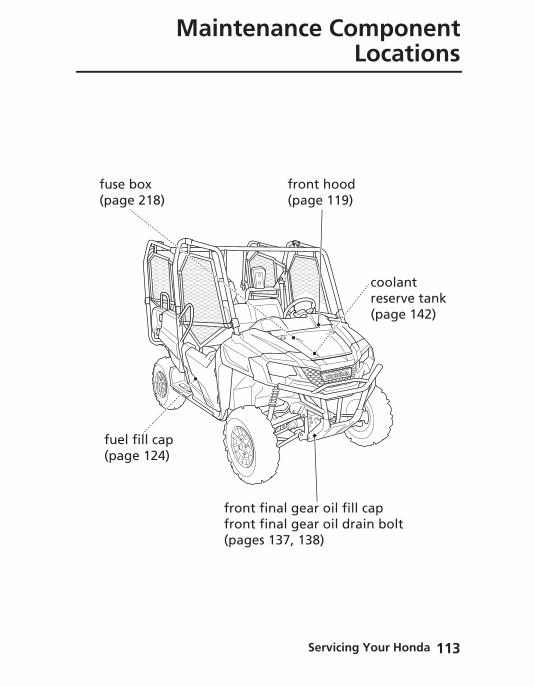
fu(p
fus(pa
Maintenance ComponentLocations
coolant reserve tank (page 142)
el fill cap age 124)
front final gear oil fill capfront final gear oil drain bolt (pages 137, 138)
e box ge 218)
front hood (page 119)
Servicing Your Honda 113
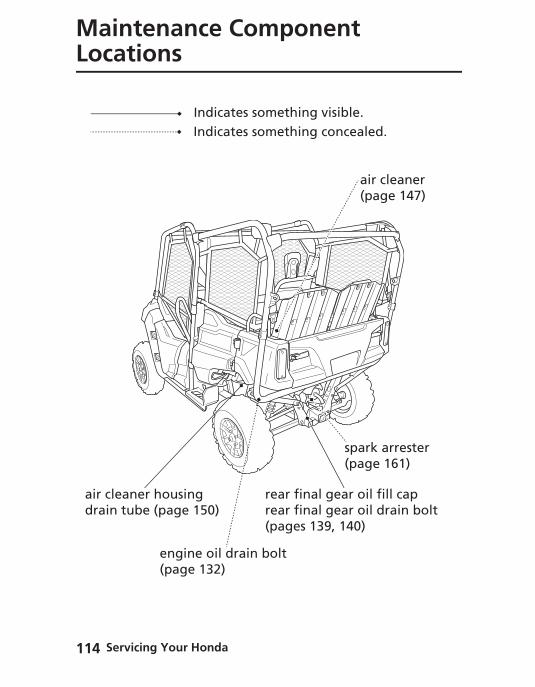
Se114
MaiLoc
air cldrain
ntenance Component ations
engine oil drain bolt
rear final gear oil fill caprear final gear oil drain bolt (pages 139, 140)
eaner housing tube (page 150)
air cleaner(page 147)
Indicates something visible.Indicates something concealed.
spark arrester(page 161)
rvicing Your Honda
(page 132)
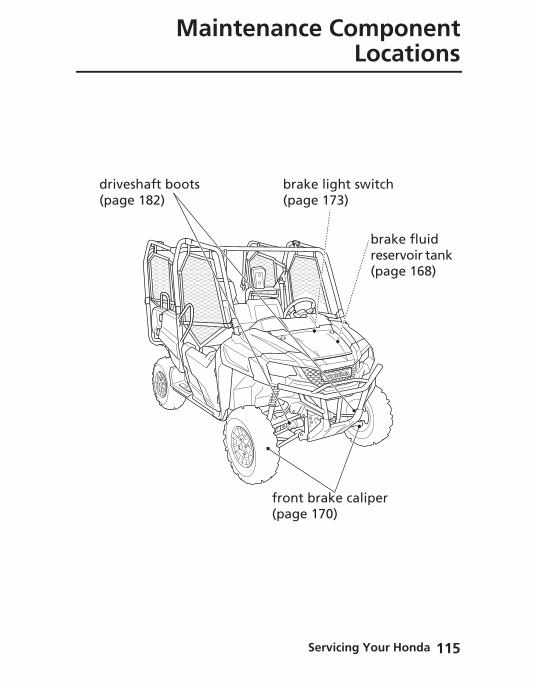
dri(pa
Maintenance ComponentLocations
brake fluid reservoir tank (page 168)
front brake caliper (page 170)
veshaft boots ge 182)
brake light switch (page 173)
Servicing Your Honda 115
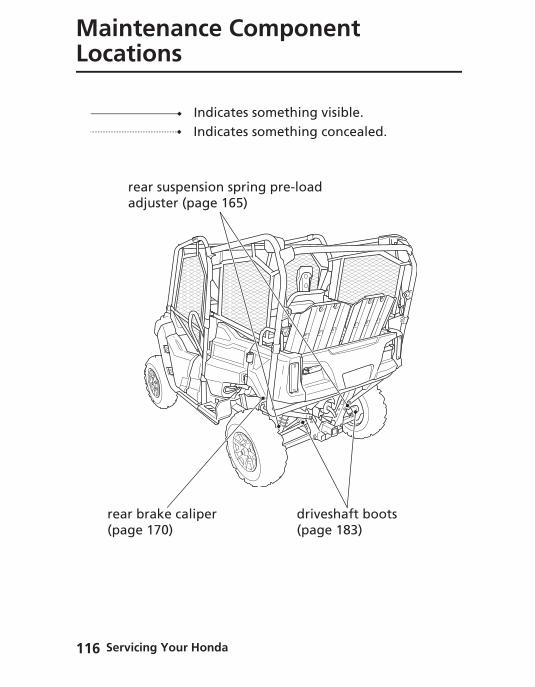
Se116
MaiLoc
re(p
ntenance Component ations
driveshaft boots(page 183)
ar brake caliperage 170)
rear suspension spring pre-load adjuster (page 165)
Indicates something visible.Indicates something concealed.
rvicing Your Honda
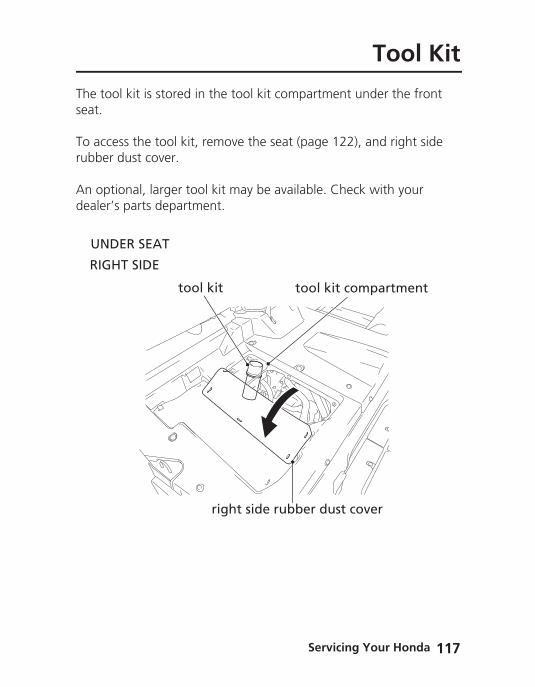
The tooseat.
To accerubber
An optdealer’
UND
RIGH
Tool Kit
l kit is stored in the tool kit compartment under the front
ss the tool kit, remove the seat (page 122), and right side dust cover.
ional, larger tool kit may be available. Check with your s parts department.
ER SEAT
tool kit
T SIDE
tool kit compartment
right side rubber dust cover
Servicing Your Honda 117
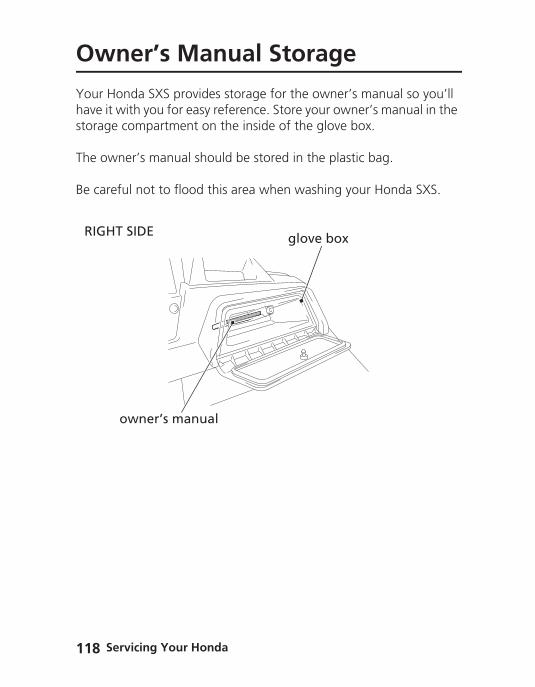
Se118
Ow
Your Hhave it storage
The ow
Be care
RIGH
ner’s Manual Storage
onda SXS provides storage for the owner’s manual so you’ll with you for easy reference. Store your owner’s manual in the compartment on the inside of the glove box.
ner’s manual should be stored in the plastic bag.
ful not to flood this area when washing your Honda SXS.
owner’s manual
T SIDE glove box
rvicing Your Honda
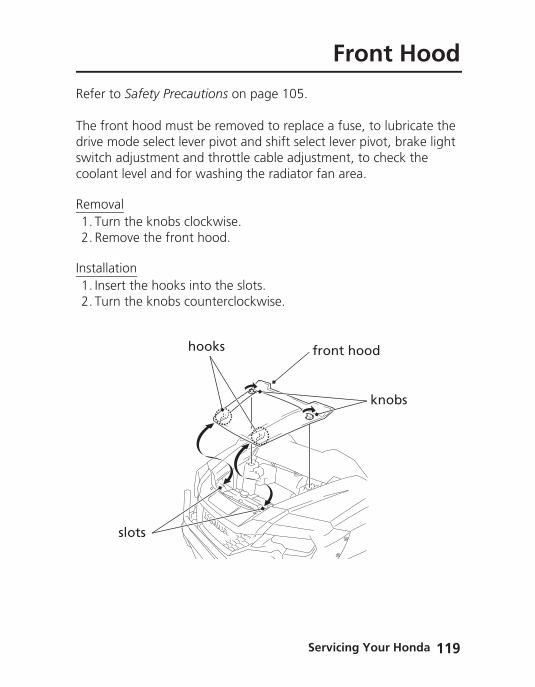
Refer t
The frodrive mswitch coolan
Remov1. Tur2. Rem
Installa1. Inse2. Tur
Front Hood
o Safety Precautions on page 105.
nt hood must be removed to replace a fuse, to lubricate the ode select lever pivot and shift select lever pivot, brake light adjustment and throttle cable adjustment, to check the t level and for washing the radiator fan area.
aln the knobs clockwise.ove the front hood.
tionrt the hooks into the slots.
n the knobs counterclockwise.
knobs
hooks front hood
slots
Servicing Your Honda 119

Se120
Air
Refer t
The airadjustm
Remov1. Rem2. Rem3. Pull4. Rem
Installa1. Inse2. Inst3. Inst4. Inst
ai
Guide Plate Removal
o Safety Precautions on page 105.
guide plate must be removed to the brake light switch ent and throttle cable adjustment.
alove the front hood (page 119).ove the clips (page 121).
out the clamp while pressing both side of the anchor.ove the air guide plate.
tionrt the prongs into the frame.all the clamp until it seats properly.all the clips.all the front hood.
clips
r guide plate anchor
rvicing Your Honda
prongprong clamp
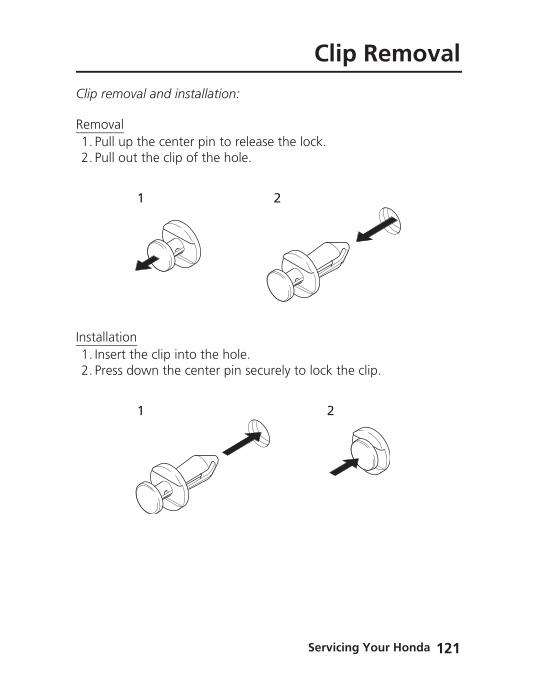
Clip rem
Remov1. Pull2. Pull
Installa1. Inse2. Pres
Clip Removal
oval and installation:
al up the center pin to release the lock. out the clip of the hole.
tionrt the clip into the hole.s down the center pin securely to lock the clip.
1 2
1 2
Servicing Your Honda 121
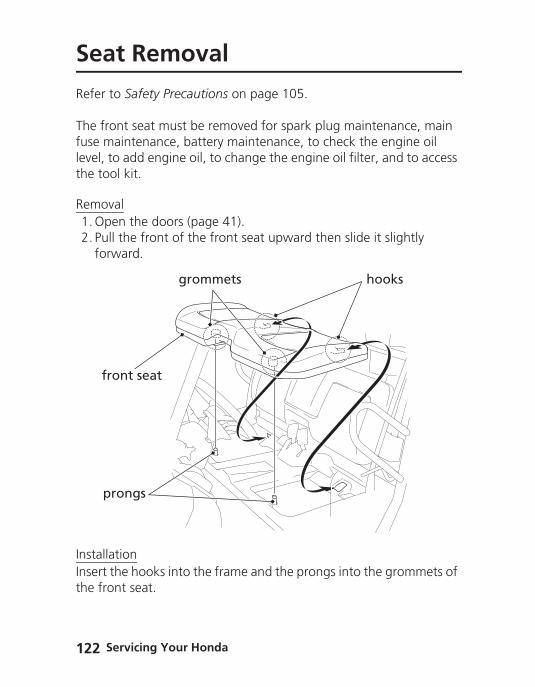
Se122
Sea
Refer t
The frofuse mlevel, tothe too
Remov1. Ope2. Pull
forw
InstallaInsert tthe fro
pr
fro
t Removal
o Safety Precautions on page 105.
nt seat must be removed for spark plug maintenance, main aintenance, battery maintenance, to check the engine oil add engine oil, to change the engine oil filter, and to access l kit.
aln the doors (page 41).
the front of the front seat upward then slide it slightly ard.
tion
ongs
grommets
nt seat
hooks
rvicing Your Honda
he hooks into the frame and the prongs into the grommets of nt seat.
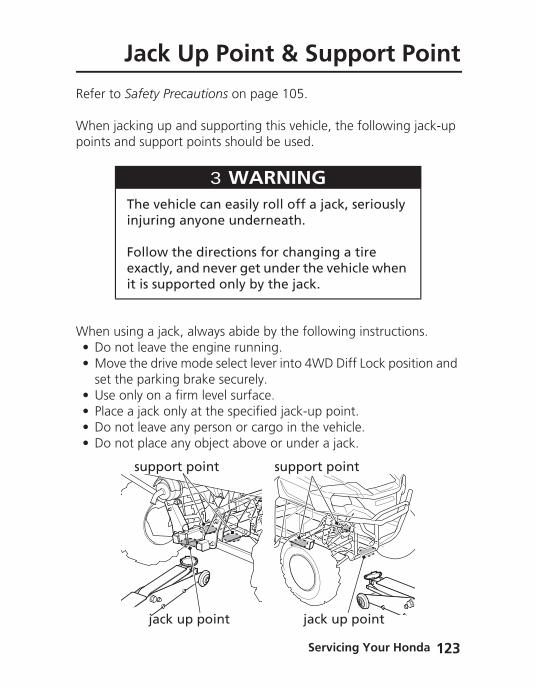
Refer t
When points
When • Do • Mo
set • Use• Plac• Do • Do
Jack Up Point & Support Point
o Safety Precautions on page 105.
jacking up and supporting this vehicle, the following jack-up and support points should be used.
using a jack, always abide by the following instructions.not leave the engine running.ve the drive mode select lever into 4WD Diff Lock position and the parking brake securely. only on a firm level surface.e a jack only at the specified jack-up point.not leave any person or cargo in the vehicle.not place any object above or under a jack.
WARNING 3WARNINGThe vehicle can easily roll off a jack, seriously injuring anyone underneath.
Follow the directions for changing a tire exactly, and never get under the vehicle when it is supported only by the jack.
support pointsupport point
Servicing Your Honda 123
jack up point jack up point
Se124
Service ProceduresFluids, Filters & Lubricants
Fue
Refer t
Use ondamagwhere unlead
Your epump ostationon the
Use of “sparkengineheavy l
If pinginormalpersists
Never uAvoid g
Fuel R
typepum
l
o Safety Precautions on page 105.
ly unleaded fuel in your Honda. The use of leaded fuel will e the catalytic converter. If you drive your Honda in a country leaded fuel might be available, take precautions to use only ed fuel.
ngine is designed to use any unleaded gasoline that has a ctane number of 86 or higher. Gasoline pumps at service
s normally display the pump octane number. For information use of oxygenated fuels, see page 241.
lower octane gasoline can cause persistent “pinging” or knock” (a loud rapping noise) which, if severe, can lead to damage. Light pinging experienced while operating under a oad, such as climbing a hill, is no cause for concern.
ng or spark knock occurs at a steady engine speed under load, change brands of gasoline. If pinging or spark knock , consult your dealer.
se stale or contaminated gasoline or an oil/gasoline mixture. etting dirt, dust, or water in the fuel tank.
ecommendation
unleadedp octane number 86 (or higher)
rvicing Your Honda
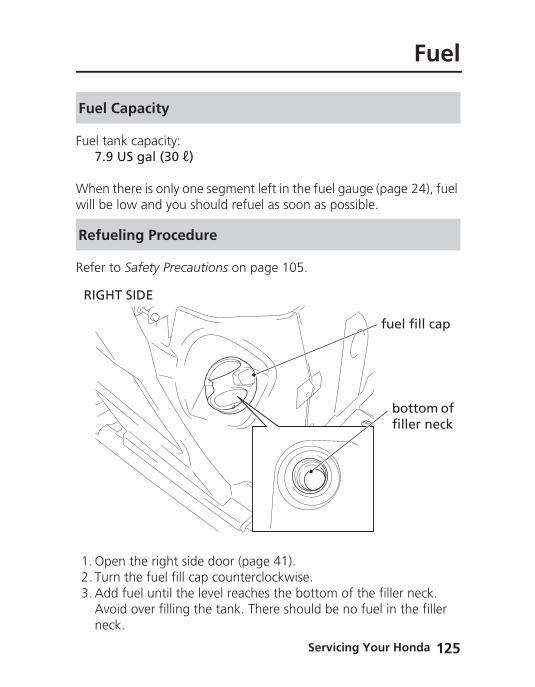
Fuel ta7.9
When twill be
Refer t
1. Ope2. Tur3. Add
Avonec
Fuel C
Refue
RIGH
Fuel
nk capacity: US gal (30 ℓ)
here is only one segment left in the fuel gauge (page 24), fuel low and you should refuel as soon as possible.
o Safety Precautions on page 105.
n the right side door (page 41).
apacity
ling Procedure
fuel fill cap
T SIDE
bottom of filler neck
Servicing Your Honda 125
n the fuel fill cap counterclockwise. fuel until the level reaches the bottom of the filler neck. id over filling the tank. There should be no fuel in the filler k.
Se126
Fue
4. (ExcAftethe(ACAfteclos
If you rpart or
NOTGasolinpaintedDo notmatte pbe plac
l
ept AC, II AC type)r refueling, turn the fuel fill cap clockwise securely and close
door., II AC type)r refueling, turn the fuel fill cap clockwise until it clicks and e the door.
eplace the fuel fill cap, use a Honda Genuine replacement equivalent.
ICEe can damage camouflage coating, painted, and matte surfaces.
allow spilled gasoline to pool on camouflage, painted, and ainted bodywork. Also, do not allow gasoline soaked rags to ed on camouflage, painted, and matte painted bodywork.
WARNING 3WARNINGGasoline is highly flammable and explosive. You can be burned or seriously injured when handling fuel.
• Stop the engine and keep heat, sparks and flame away.
• Handle fuel only outdoors.• Wipe up spills immediately.
rvicing Your Honda
Engineand the
Using taddingbest oithe engyour enserious
Changpage 1shouldmainte
Engine Oil & Filter
oil quality is a major factor that affects both the performance service life of the engine.
he proper oil (page 128) and filter, and regularly checking, , and changing oil will help extend your engine’s life. Even the l wears out. Changing oil helps get rid of dirt and deposits in ine. Operating the engine with old or dirty oil can damage gine. Running the engine with insufficient oil can cause
damage to the engine and transmission.
e the engine oil as specified in the maintenance schedule on 09. When running in very dusty conditions, oil changes be performed more frequently than specified in the nance schedule.
Servicing Your Honda 127
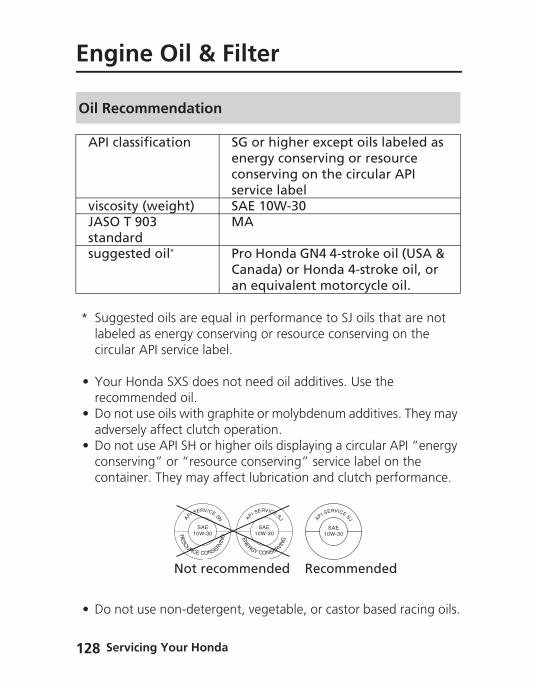
Se128
Eng
* Suglabecirc
• Youreco
• Do adv
• Do concon
• Do
Oil Re
API c
viscoJASOstansugg
ine Oil & Filter
gested oils are equal in performance to SJ oils that are not led as energy conserving or resource conserving on the
ular API service label.
r Honda SXS does not need oil additives. Use the mmended oil.
not use oils with graphite or molybdenum additives. They may ersely affect clutch operation.not use API SH or higher oils displaying a circular API “energy serving” or “resource conserving” service label on the tainer. They may affect lubrication and clutch performance.
commendation
lassification SG or higher except oils labeled as energy conserving or resource conserving on the circular API service label
sity (weight) SAE 10W-30 T 903
dardMA
ested oil* Pro Honda GN4 4-stroke oil (USA & Canada) or Honda 4-stroke oil, or an equivalent motorcycle oil.
rvicing Your Honda
not use non-detergent, vegetable, or castor based racing oils.
Not recommended Recommended
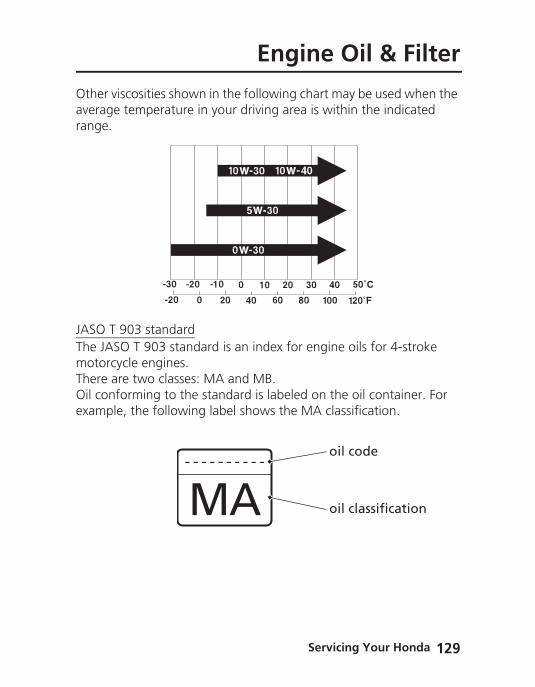
Other vaveragrange.
JASO TThe JAmotorcThere aOil conexamp
Engine Oil & Filter
iscosities shown in the following chart may be used when the e temperature in your driving area is within the indicated
903 standardSO T 903 standard is an index for engine oils for 4-stroke ycle engines.re two classes: MA and MB.forming to the standard is labeled on the oil container. For le, the following label shows the MA classification.
oil code
oil classification
Servicing Your Honda 129
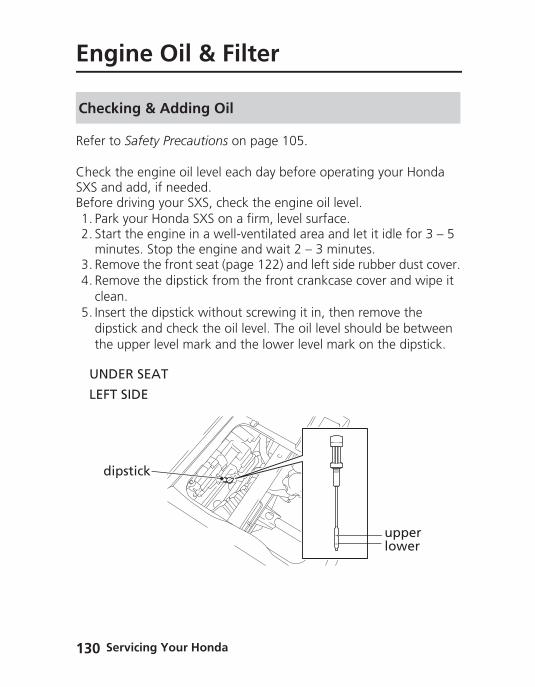
Se130
Eng
Refer t
Check SXS anBefore 1. Park2. Star
min3. Rem4. Rem
clea5. Inse
dipsthe
Check
UND
LEFT
di
ine Oil & Filter
o Safety Precautions on page 105.
the engine oil level each day before operating your Honda d add, if needed.driving your SXS, check the engine oil level. your Honda SXS on a firm, level surface.t the engine in a well-ventilated area and let it idle for 3 – 5 utes. Stop the engine and wait 2 – 3 minutes.ove the front seat (page 122) and left side rubber dust cover.ove the dipstick from the front crankcase cover and wipe it n.rt the dipstick without screwing it in, then remove the tick and check the oil level. The oil level should be between
upper level mark and the lower level mark on the dipstick.
ing & Adding Oil
ER SEAT
SIDE
pstick
upperlower
rvicing Your Honda

6. If respeintoDo
7. Rein
NOTRunninengine
LEFT
UND
rubbedust cover
Engine Oil & Filter
quired, remove the oil fill cap and slowly or carefully add the cified oil into the fill cap hole (this is a long hose, and it drains engine SLOWLY), up to the upper level mark on the dipstick. not overfill.stall the oil fill cap, dipstick, rubber dust cover and front seat.
ICEg the engine with an improper oil level can cause serious damage.
SIDE
oil fill cap
ER SEAT
r
Servicing Your Honda 131
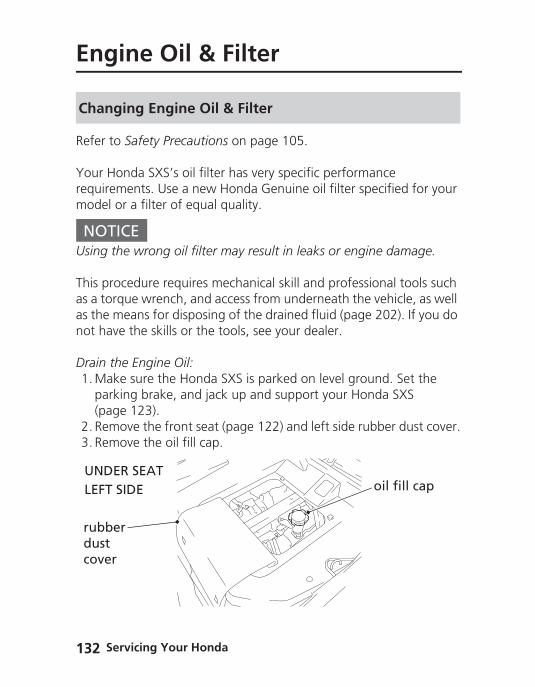
Se132
Eng
Refer t
Your Hrequiremodel
NOTUsing t
This pras a toras the mnot hav
Drain t1. Ma
par(pag
2. Rem3. Rem
Chan
LEFT UND
rubbdust cover
ine Oil & Filter
o Safety Precautions on page 105.
onda SXS’s oil filter has very specific performance ments. Use a new Honda Genuine oil filter specified for your or a filter of equal quality.
ICEhe wrong oil filter may result in leaks or engine damage.
ocedure requires mechanical skill and professional tools such que wrench, and access from underneath the vehicle, as well eans for disposing of the drained fluid (page 202). If you do
e the skills or the tools, see your dealer.
he Engine Oil:ke sure the Honda SXS is parked on level ground. Set the king brake, and jack up and support your Honda SXS e 123).ove the front seat (page 122) and left side rubber dust cover.ove the oil fill cap.
ging Engine Oil & Filter
SIDE oil fill capER SEAT
er
rvicing Your Honda
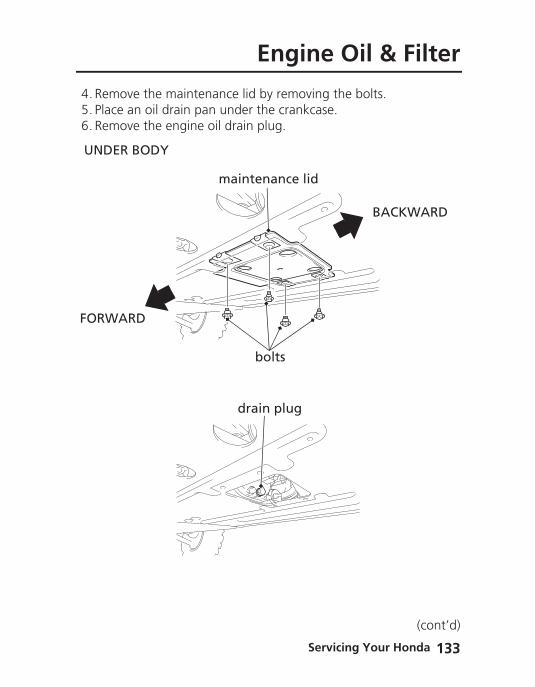
4. Rem5. Plac6. Rem
UNDE
FORW
Engine Oil & Filter
ove the maintenance lid by removing the bolts.e an oil drain pan under the crankcase.ove the engine oil drain plug.
R BODY
maintenance lid
drain plug
bolts
BACKWARD
ARD
Servicing Your Honda 133
(cont’d)
Se134
Eng
Install a7. Rem8. Rem
Let 9. Rem
10. Remthe
11. RemAppintonewUsequaa noeng
12. InsttheOil
1
NOTImpropdamag
ine Oil & Filter
New Engine Oil Filter:ove the right side rubber dust cover.ove the oil filter bolt and oil filter cover.
the remaining oil drain out.ove the oil filter from the oil filter cover.ove the spring and washer. Do not discard the washer with
old oil filter.ove the O-rings from the oil filter bolt and oil filter cover. ly a thin coat of engine oil to new O-rings and install them the grooves of the oil filter cover and oil filter bolt. Insert a oil filter to the oil filter cover.
only the Honda Genuine oil filter or a filter of equivalent lity specified for your model. Using the wrong Honda filter or n-Honda filter which is not of equivalent quality may cause
ine damage.all the oil filter cover and tighten the oil filter bolt. Make sure oil filter bolt is tightened securely to the specified torque.filter bolt torque:3 lbf·ft (18 N·m, 1.8 kgf·m)
ICEer installation of the oil filter can cause serious engine e.
rvicing Your Honda
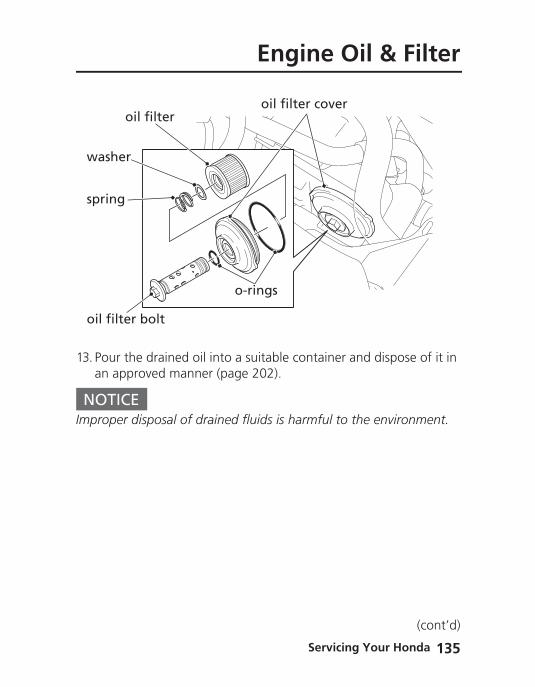
13. Pouan a
NOTImprop
wash
sprin
oil fi
Engine Oil & Filter
r the drained oil into a suitable container and dispose of it in pproved manner (page 202).
ICEer disposal of drained fluids is harmful to the environment.
oil filter coveroil filter
er
g
lter bolt
o-rings
Servicing Your Honda 135
(cont’d)
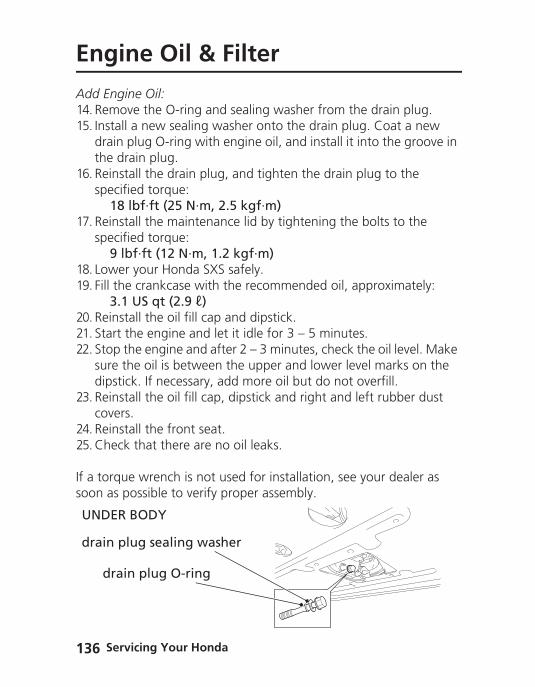
Se136
Eng
Add En14. Rem15. Inst
drathe
16. Reinspe
117. Rein
spe9
18. Low19. Fill
320. Rein21. Star22. Sto
suredips
23. Reincov
24. Rein25. Che
If a torsoon a
UNDE
drain
dr
ine Oil & Filter
gine Oil:ove the O-ring and sealing washer from the drain plug.
all a new sealing washer onto the drain plug. Coat a new in plug O-ring with engine oil, and install it into the groove in drain plug.stall the drain plug, and tighten the drain plug to the
cified torque:8 lbf·ft (25 N·m, 2.5 kgf·m)stall the maintenance lid by tightening the bolts to the
cified torque: lbf·ft (12 N·m, 1.2 kgf·m)er your Honda SXS safely.
the crankcase with the recommended oil, approximately:.1 US qt (2.9 ℓ)stall the oil fill cap and dipstick.t the engine and let it idle for 3 – 5 minutes.
p the engine and after 2 – 3 minutes, check the oil level. Make the oil is between the upper and lower level marks on the tick. If necessary, add more oil but do not overfill.stall the oil fill cap, dipstick and right and left rubber dust
ers.stall the front seat.ck that there are no oil leaks.
que wrench is not used for installation, see your dealer as s possible to verify proper assembly.
R BODY
plug sealing washer
rvicing Your Honda
ain plug O-ring
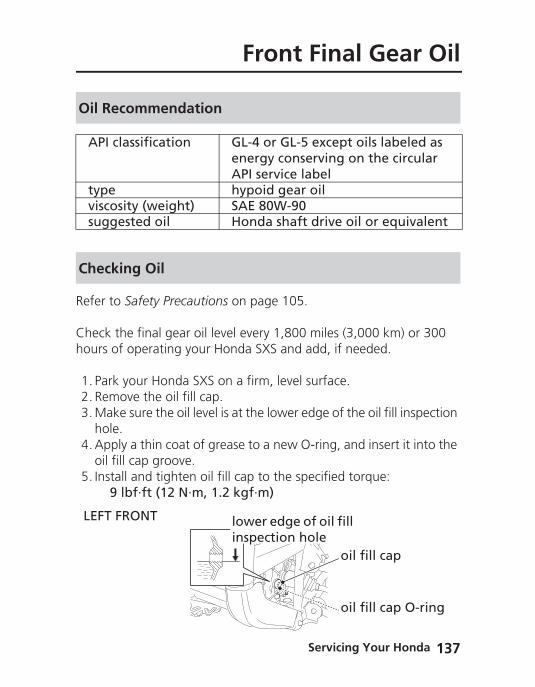
Refer t
Check hours o
1. Park2. Rem3. Ma
hole4. App
oil f5. Inst
9
Oil Re
API c
typeviscosugg
Check
LEFT
Front Final Gear Oil
o Safety Precautions on page 105.
the final gear oil level every 1,800 miles (3,000 km) or 300 f operating your Honda SXS and add, if needed.
your Honda SXS on a firm, level surface.ove the oil fill cap.
ke sure the oil level is at the lower edge of the oil fill inspection .ly a thin coat of grease to a new O-ring, and insert it into the ill cap groove.all and tighten oil fill cap to the specified torque: lbf·ft (12 N·m, 1.2 kgf·m)
commendation
lassification GL-4 or GL-5 except oils labeled as energy conserving on the circular API service labelhypoid gear oil
sity (weight) SAE 80W-90ested oil Honda shaft drive oil or equivalent
ing Oil
FRONT lower edge of oil fill inspection hole
oil fill cap
Servicing Your Honda 137
oil fill cap O-ring
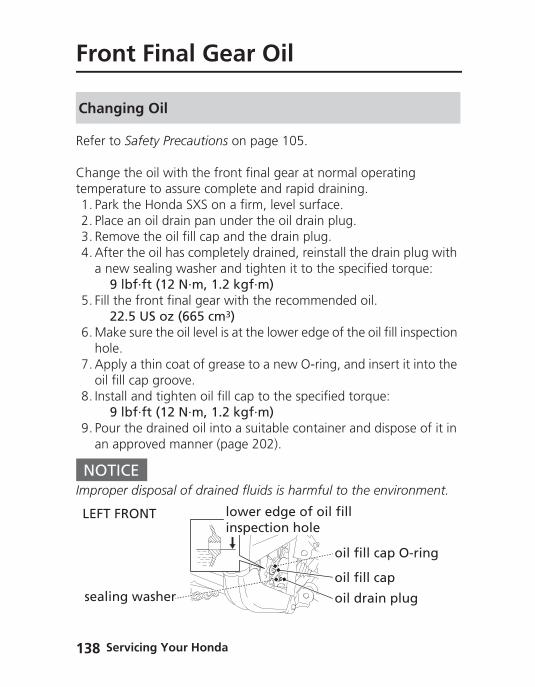
Se138
Fron
Refer t
Changtemper1. Park2. Plac3. Rem4. Afte
a ne9
5. Fill 2
6. Mahole
7. Appoil f
8. Inst9
9. Pouan a
NOTImprop
Chan
LEFT
sealin
t Final Gear Oil
o Safety Precautions on page 105.
e the oil with the front final gear at normal operating ature to assure complete and rapid draining. the Honda SXS on a firm, level surface.e an oil drain pan under the oil drain plug.ove the oil fill cap and the drain plug.r the oil has completely drained, reinstall the drain plug with w sealing washer and tighten it to the specified torque: lbf·ft (12 N·m, 1.2 kgf·m)
the front final gear with the recommended oil.2.5 US oz (665 cm3)
ke sure the oil level is at the lower edge of the oil fill inspection .ly a thin coat of grease to a new O-ring, and insert it into the ill cap groove.all and tighten oil fill cap to the specified torque: lbf·ft (12 N·m, 1.2 kgf·m)r the drained oil into a suitable container and dispose of it in pproved manner (page 202).
ICEer disposal of drained fluids is harmful to the environment.
ging Oil
FRONT lower edge of oil fill inspection hole
oil fill cap O-ring
rvicing Your Honda
oil fill cap
oil drain plugg washer
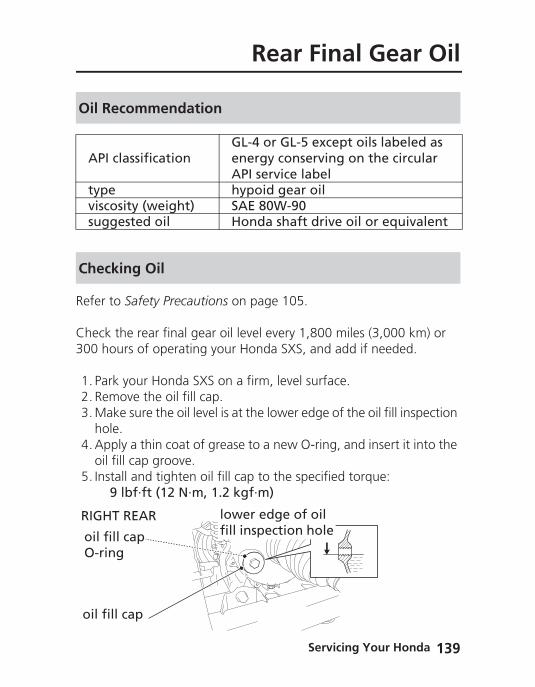
Refer t
Check 300 ho
1. Park2. Rem3. Ma
hole4. App
oil f5. Inst
9
Oil Re
API c
typeviscosugg
Check
RIGHT
oil fil
oil filO-rin
Rear Final Gear Oil
o Safety Precautions on page 105.
the rear final gear oil level every 1,800 miles (3,000 km) or urs of operating your Honda SXS, and add if needed.
your Honda SXS on a firm, level surface.ove the oil fill cap.
ke sure the oil level is at the lower edge of the oil fill inspection .ly a thin coat of grease to a new O-ring, and insert it into the ill cap groove.all and tighten oil fill cap to the specified torque: lbf·ft (12 N·m, 1.2 kgf·m)
commendation
lassificationGL-4 or GL-5 except oils labeled as energy conserving on the circular API service labelhypoid gear oil
sity (weight) SAE 80W-90ested oil Honda shaft drive oil or equivalent
ing Oil
REAR lower edge of oil fill inspection holel cap
g
Servicing Your Honda 139
l cap
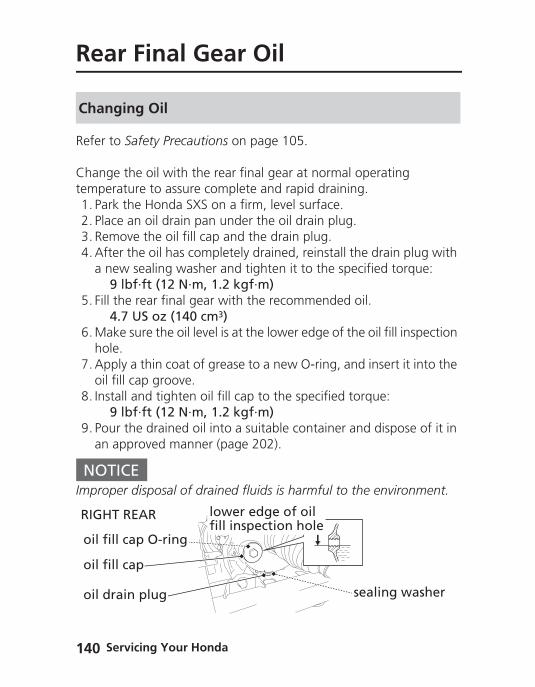
Se140
Rea
Refer t
Changtemper1. Park2. Plac3. Rem4. Afte
a ne9
5. Fill 4
6. Mahole
7. Appoil f
8. Inst9
9. Pouan a
NOTImprop
Chan
RIGHT
oil fil
oil fil
oil dr
r Final Gear Oil
o Safety Precautions on page 105.
e the oil with the rear final gear at normal operating ature to assure complete and rapid draining. the Honda SXS on a firm, level surface.e an oil drain pan under the oil drain plug.ove the oil fill cap and the drain plug.r the oil has completely drained, reinstall the drain plug with w sealing washer and tighten it to the specified torque: lbf·ft (12 N·m, 1.2 kgf·m)
the rear final gear with the recommended oil..7 US oz (140 cm3)
ke sure the oil level is at the lower edge of the oil fill inspection .ly a thin coat of grease to a new O-ring, and insert it into the ill cap groove.all and tighten oil fill cap to the specified torque: lbf·ft (12 N·m, 1.2 kgf·m)r the drained oil into a suitable container and dispose of it in pproved manner (page 202).
ICEer disposal of drained fluids is harmful to the environment.
ging Oil
REAR lower edge of oil fill inspection hole
l cap
l cap O-ring
rvicing Your Honda
ain plug sealing washer
Your Hthroughead.
Maintaproper
Use Proglycol aspecificantifree
Use onis high engine
NOTUsing cwater pmay ca
The facwater imost oprotect
Decreaprovide
Coola
Coolant
onda SXS’s liquid cooling system dissipates engine heat h the coolant jacket that surrounds the cylinder and cylinder
ining the coolant will allow the cooling system to work ly and prevent freezing, overheating, and corrosion.
Honda HP Coolant or an equivalent high-quality ethylene ntifreeze containing corrosion protection inhibitors ally recommended for use in aluminum engines. Check the ze container label.
ly distilled water as a part of the coolant solution. Water that in mineral content or salt may be harmful to the aluminum .
ICEoolant with silicate inhibitors may cause premature wear of ump seals or blockage of radiator passages. Using tap water use engine damage.
tory provides a 50/50 solution of antifreeze and distilled n this Honda SXS. This coolant solution is recommended for perating temperatures and provides good corrosion ion.
sing the concentration of antifreeze to less than 40% will not proper corrosion protection.
nt Recommendation
Servicing Your Honda 141
Se142
Coo
Increasbecausconcenprovidesystem
Refer t
Check Honda
1. Ma2. Rem3. Wit
cooandIf thfor
Check
lant
ing the concentration of antifreeze is not recommended e it decreases cooling system performance. Higher trations of antifreeze (up to 60%) should only be used to additional protection against freezing. Check the cooling
frequently during freezing weather.
o Safety Precautions on page 105.
the engine coolant level every day before operating your SXS and add, if needed.
ke sure the vehicle is parked on a firm, level surface.ove the front hood (page 119).
h the engine at normal operating temperature, check the lant level in the reserve tank. It should be between the MAX MIN level marks.e reserve tank is empty, or if coolant loss is excessive, check leaks and see your dealer for repair.
ing & Adding Coolant
rvicing Your Honda
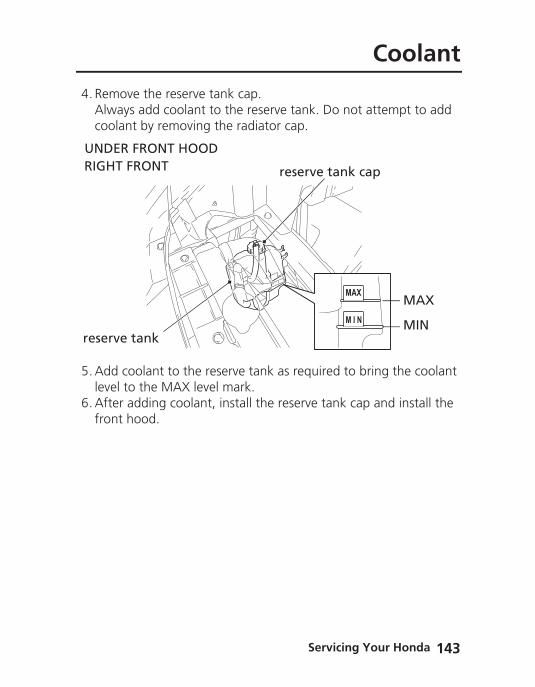
4. RemAlwcoo
5. Addleve
6. Aftefron
UNDRIGH
reser
Coolant
ove the reserve tank cap.ays add coolant to the reserve tank. Do not attempt to add lant by removing the radiator cap.
coolant to the reserve tank as required to bring the coolant l to the MAX level mark.r adding coolant, install the reserve tank cap and install the t hood.
MAX
M I N
ER FRONT HOODT FRONT reserve tank cap
ve tank
MAX
MIN
Servicing Your Honda 143
Se144
Coo
Refer t
Coolanproperto the
To propEnviron
NOTImprop
Coola
lant
o Safety Precautions on page 105.
t should be replaced by your dealer, unless you have the tools and service data, and are mechanically qualified. Refer official Honda Service Manual.
erly dispose of drained coolant, refer to You & the ment, page 202.
ICEer disposal of drained fluids is harmful to the environment.
nt Replacement
WARNING 3WARNINGRemoving the radiator cap while the engine is hot can cause the coolant to spray out, seriously scalding you.
Always let the engine and radiator cool down before removing the radiator cap.
rvicing Your Honda
Refer t
Check mud, ocheckeflow is
Clean t
To clea1. Rem2. Wa
NOTDo notpressur
Radia
Coolant
o Safety Precautions on page 105.
the air passages for clogging or damage. Remove insects, r any obstruction with low water pressure. Have the radiator d by your dealer if more than 20% of the radiator surface air restricted.
he radiator core after driving your Honda SXS in mud.
n the radiator core:ove the front hood (page 119).
sh the radiator core with low water pressure.
ICE apply high pressure water directly to the radiator core. High e water can damage the radiator core fins.
tor Core
Servicing Your Honda 145
Se146
Air
Refer t
Proper vehicleA dirtydirt, du
Serviceor dustservice
Your Hrequireyour m
NOTUsing t
Proper or damand sp
NOTImpropperform
Cleaner
o Safety Precautions on page 105.
air cleaner maintenance is very important for off-road s., water-soaked, worn-out, or defective air cleaner will allow st, mud, and other impurities to pass into the engine.
the air cleaner more frequently if you drive in unusually wet y areas. Your dealer can help you determine the correct interval for your driving conditions.
onda SXS’s air cleaner has very specific performance ments. Use a new Honda Genuine air cleaner specified for odel or an air cleaner of equal quality.
ICEhe wrong air cleaner may result in premature engine wear.
air cleaner maintenance can prevent premature engine wear age, expensive repairs, low engine power, poor gas mileage, ark plug fouling.
ICEer or lack of proper air cleaner maintenance can cause poor ance and premature engine wear.
rvicing Your Honda
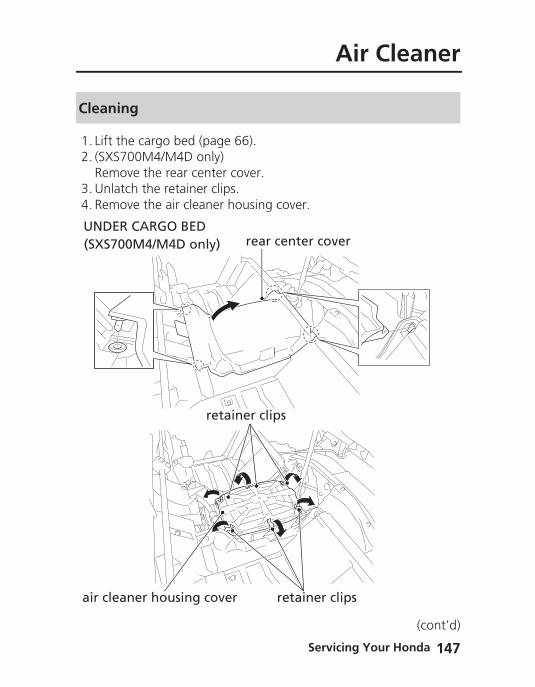
1. Lift 2. (SX
Rem3. Unl4. Rem
Clean
UNDE
air cle
(SXS7
Air Cleaner
the cargo bed (page 66).S700M4/M4D only)ove the rear center cover.
atch the retainer clips.ove the air cleaner housing cover.
ing
R CARGO BEDrear center cover
retainer clips
00M4/M4D only)
Servicing Your Honda 147
(cont’d)
retainer clipsaner housing cover
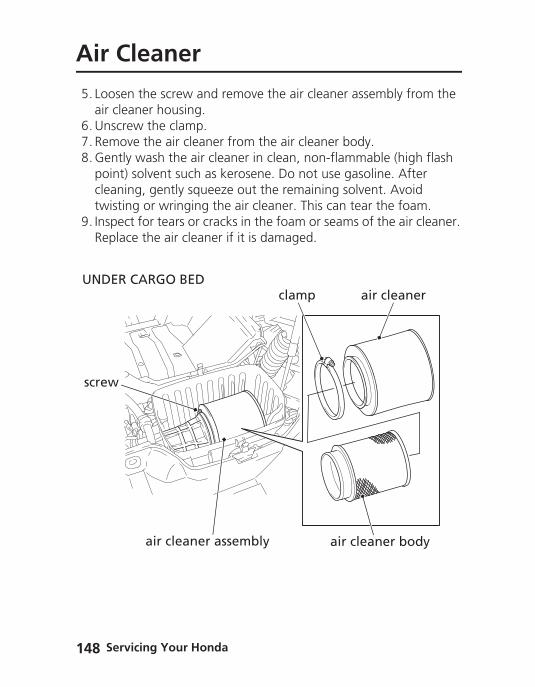
Se148
Air
5. Looair c
6. Uns7. Rem8. Gen
poincleatwis
9. InspRep
screw
UNDE
Cleaner
sen the screw and remove the air cleaner assembly from the leaner housing.crew the clamp.ove the air cleaner from the air cleaner body.tly wash the air cleaner in clean, non-flammable (high flash t) solvent such as kerosene. Do not use gasoline. After ning, gently squeeze out the remaining solvent. Avoid ting or wringing the air cleaner. This can tear the foam.ect for tears or cracks in the foam or seams of the air cleaner.lace the air cleaner if it is damaged.
R CARGO BED
air cleaner assembly
clamp air cleaner
air cleaner body
rvicing Your Honda

10. Alloair c
11. Pouentthekeebef
12. Inst13. Inst14. Inse15. Fast16. Rea17. Low
Air Cleaner
w the air cleaner to dry thoroughly before applying oil. A wet leaner will not fully absorb the oil.r clean Pro Honda Foam Filter Oil or an equivalent over the ire surface of the air cleaner. Use both hands to evenly spread oil into the air cleaner. Gently squeeze out any excess oil. (To p your hands dry, place the air cleaner in a clean plastic bag ore spreading the oil into the air cleaner.)all the air cleaner on the air cleaner body.all the clamp.rt the air cleaner assembly into the air cleaner housing.en the screw.ssemble in the reverse order of removal.er the cargo bed.
Servicing Your Honda 149
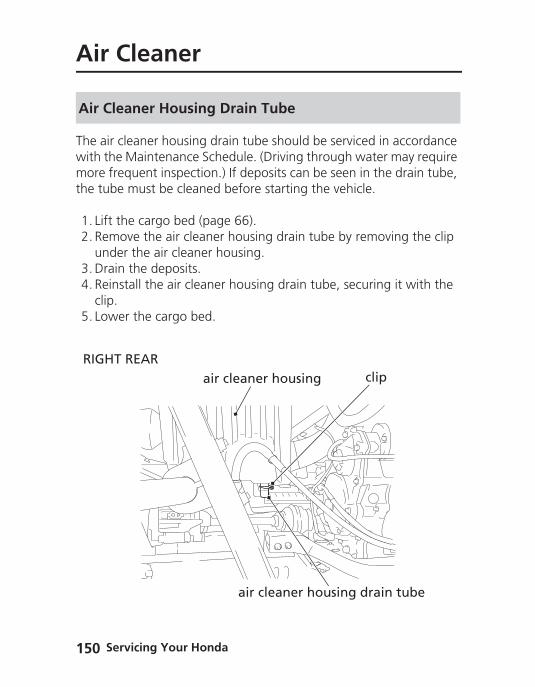
Se150
Air
The airwith thmore fthe tub
1. Lift 2. Rem
und3. Dra4. Rein
clip5. Low
Air Cl
RIGH
Cleaner
cleaner housing drain tube should be serviced in accordance e Maintenance Schedule. (Driving through water may require requent inspection.) If deposits can be seen in the drain tube, e must be cleaned before starting the vehicle.
the cargo bed (page 66).ove the air cleaner housing drain tube by removing the clip er the air cleaner housing.in the deposits.stall the air cleaner housing drain tube, securing it with the
.er the cargo bed.
eaner Housing Drain Tube
T REARair cleaner housing clip
rvicing Your Honda
air cleaner housing drain tube
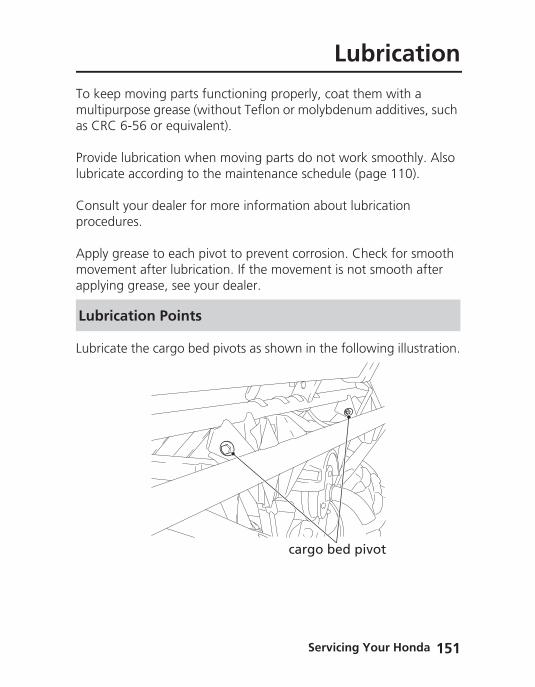
To keemultipuas CRC
Providelubrica
Consulproced
Apply gmovemapplyin
Lubrica
Lubri
Lubrication
p moving parts functioning properly, coat them with a rpose grease (without Teflon or molybdenum additives, such 6-56 or equivalent).
lubrication when moving parts do not work smoothly. Also te according to the maintenance schedule (page 110).
t your dealer for more information about lubrication ures.
rease to each pivot to prevent corrosion. Check for smooth ent after lubrication. If the movement is not smooth after g grease, see your dealer.
te the cargo bed pivots as shown in the following illustration.
cation Points
cargo bed pivot
Servicing Your Honda 151
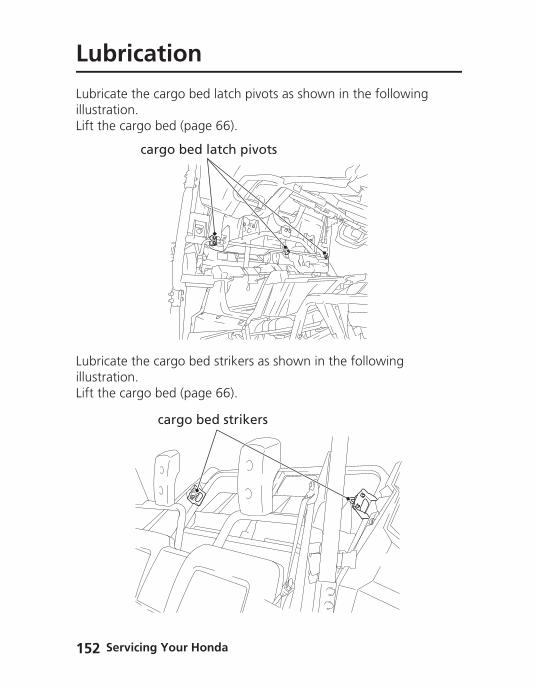
Se152
Lub
LubricaillustratLift the
LubricaillustratLift the
rication
te the cargo bed latch pivots as shown in the following ion. cargo bed (page 66).
te the cargo bed strikers as shown in the following ion. cargo bed (page 66).
cargo bed latch pivots
cargo bed strikers
rvicing Your Honda
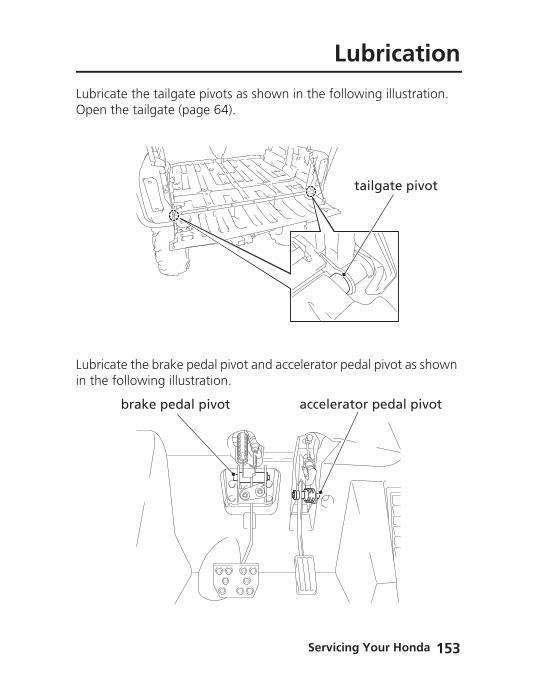
LubricaOpen t
Lubricain the f
Lubrication
te the tailgate pivots as shown in the following illustration.he tailgate (page 64).
te the brake pedal pivot and accelerator pedal pivot as shown ollowing illustration.
tailgate pivot
accelerator pedal pivotbrake pedal pivot
Servicing Your Honda 153
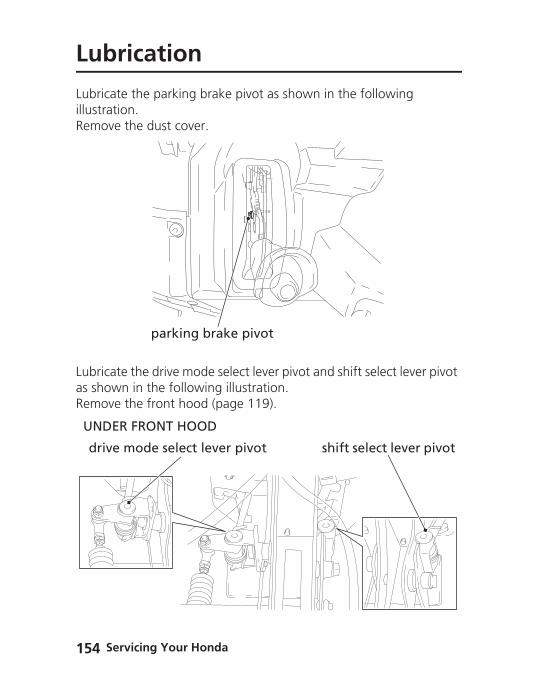
Se154
Lub
LubricaillustratRemov
Lubricaas showRemov
UNDE
drive
rication
te the parking brake pivot as shown in the following ion.e the dust cover.
te the drive mode select lever pivot and shift select lever pivot n in the following illustration.
e the front hood (page 119).
parking brake pivot
R FRONT HOOD
mode select lever pivot shift select lever pivot
rvicing Your Honda

Lubricathe doo
Lubrica
door
(SXS7
Lubrication
te the door latch as shown in the following illustration. Open r (page 41).
te the rear seat latch as shown in the following illustration.
latch door latch
(SXS700M4/M4D only)
00M4/M4D only)
rear seat latch
Servicing Your Honda 155
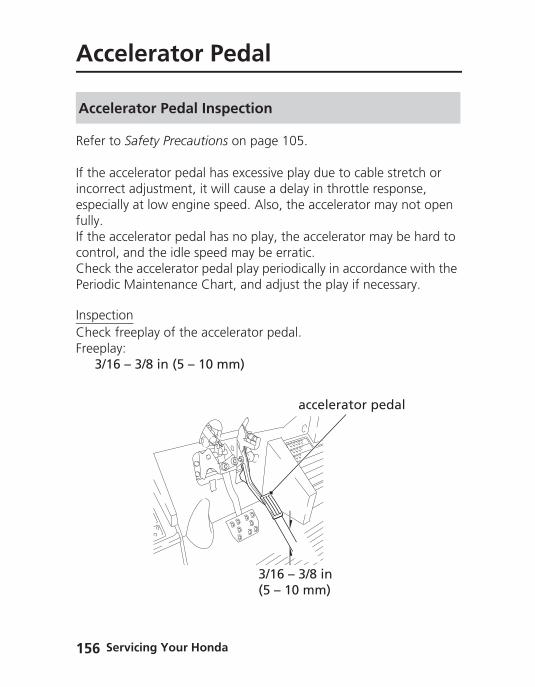
Se156
Engine
Acc
Refer t
If the aincorreespeciafully.If the acontrolCheck Periodi
InspectCheck Freepla
3/1
Accel
elerator Pedal
o Safety Precautions on page 105.
ccelerator pedal has excessive play due to cable stretch or ct adjustment, it will cause a delay in throttle response, lly at low engine speed. Also, the accelerator may not open
ccelerator pedal has no play, the accelerator may be hard to , and the idle speed may be erratic.the accelerator pedal play periodically in accordance with the c Maintenance Chart, and adjust the play if necessary.
ionfreeplay of the accelerator pedal.y:6 – 3/8 in (5 – 10 mm)
erator Pedal Inspection
accelerator pedal
rvicing Your Honda
3/16 – 3/8 in (5 – 10 mm)
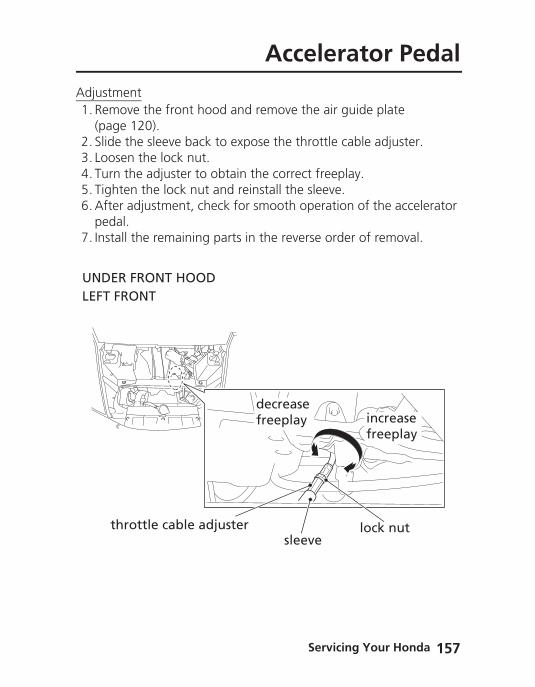
Adjustm1. Rem
(pag2. Slid3. Loo4. Tur5. Tigh6. Afte
ped7. Inst
UNDELEFT
t
Accelerator Pedal
entove the front hood and remove the air guide plate e 120).
e the sleeve back to expose the throttle cable adjuster.sen the lock nut.n the adjuster to obtain the correct freeplay.ten the lock nut and reinstall the sleeve.r adjustment, check for smooth operation of the accelerator al.all the remaining parts in the reverse order of removal.
R FRONT HOODFRONT
lock nuthrottle cable adjustersleeve
increase freeplay
decrease freeplay
Servicing Your Honda 157
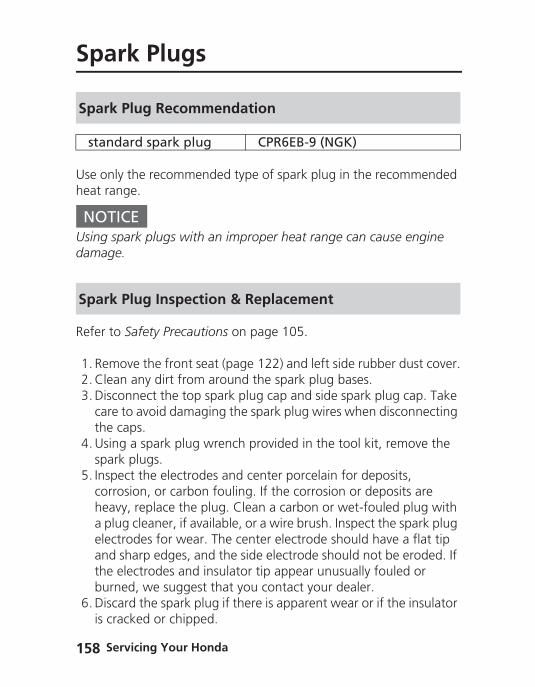
Se158
Spa
Use onheat ra
NOTUsing sdamag
Refer t
1. Rem2. Cle3. Disc
carethe
4. Usinspa
5. Inspcorrheaa plelecandthebur
6. Discis cr
Spark
stan
Spark
rk Plugs
ly the recommended type of spark plug in the recommended nge.
ICEpark plugs with an improper heat range can cause engine e.
o Safety Precautions on page 105.
ove the front seat (page 122) and left side rubber dust cover.an any dirt from around the spark plug bases.onnect the top spark plug cap and side spark plug cap. Take to avoid damaging the spark plug wires when disconnecting
caps.g a spark plug wrench provided in the tool kit, remove the
rk plugs.ect the electrodes and center porcelain for deposits, osion, or carbon fouling. If the corrosion or deposits are vy, replace the plug. Clean a carbon or wet-fouled plug with ug cleaner, if available, or a wire brush. Inspect the spark plug trodes for wear. The center electrode should have a flat tip sharp edges, and the side electrode should not be eroded. If
Plug Recommendation
dard spark plug CPR6EB-9 (NGK)
Plug Inspection & Replacement
rvicing Your Honda
electrodes and insulator tip appear unusually fouled or ned, we suggest that you contact your dealer.ard the spark plug if there is apparent wear or if the insulator acked or chipped.
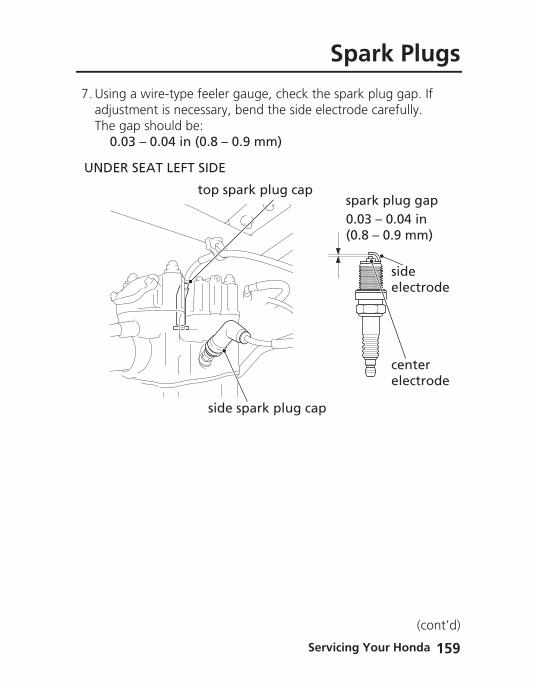
7. UsinadjuThe
0
UNDE
Spark Plugs
g a wire-type feeler gauge, check the spark plug gap. If stment is necessary, bend the side electrode carefully. gap should be:.03 – 0.04 in (0.8 – 0.9 mm)
top spark plug cap
side electrode
spark plug gap0.03 – 0.04 in (0.8 – 0.9 mm)
R SEAT LEFT SIDE
center electrode
side spark plug cap
Servicing Your Honda 159
(cont’d)
Se160
Spa
8. Witto p
9. Tigh• If
• Ifa)
bc)
NOTAn impplug is the thr
10. Concab
11. Inst
rk Plugs
h the plug washer attached, thread the spark plug in by hand revent cross-threading.ten the spark plug:
the old plug is good:1/8 turn after it seats.
installing a new plug, tighten it twice to prevent loosening:First, tighten the plug:1/2 turn after it seats.
) Then loosen the plug.Next, tighten the plug again:1/8 turn after it seats.
ICEroperly tightened spark plug can damage the engine. If a too loose, the piston may be damaged. If a plug is too tight, eads may be damaged.
nect the spark plug caps. Take care to avoid pinching any les or wires.all the front seat.
rvicing Your Honda
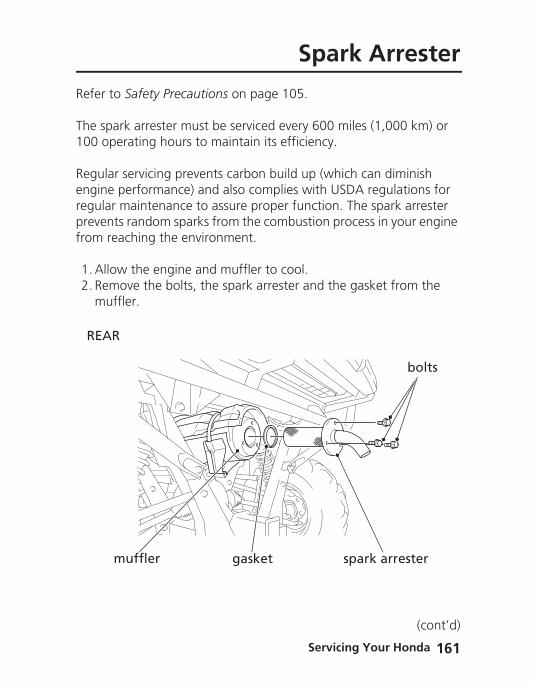
Refer t
The spa100 op
Regulaengineregularprevenfrom re
1. Allo2. Rem
mu
REAR
Spark Arrester
o Safety Precautions on page 105.
rk arrester must be serviced every 600 miles (1,000 km) or erating hours to maintain its efficiency.
r servicing prevents carbon build up (which can diminish performance) and also complies with USDA regulations for maintenance to assure proper function. The spark arrester ts random sparks from the combustion process in your engine aching the environment.
w the engine and muffler to cool.ove the bolts, the spark arrester and the gasket from the
ffler.
bolts
Servicing Your Honda 161
(cont’d)
muffler gasket spark arrester
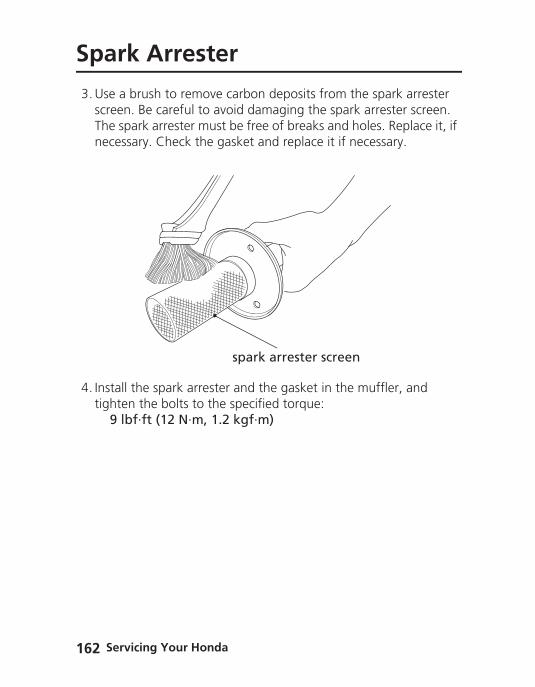
Se162
Spa
3. UsescreThenec
4. Insttigh
9
rk Arrester
a brush to remove carbon deposits from the spark arrester en. Be careful to avoid damaging the spark arrester screen. spark arrester must be free of breaks and holes. Replace it, if essary. Check the gasket and replace it if necessary.
all the spark arrester and the gasket in the muffler, and ten the bolts to the specified torque: lbf·ft (12 N·m, 1.2 kgf·m)
spark arrester screen
rvicing Your Honda
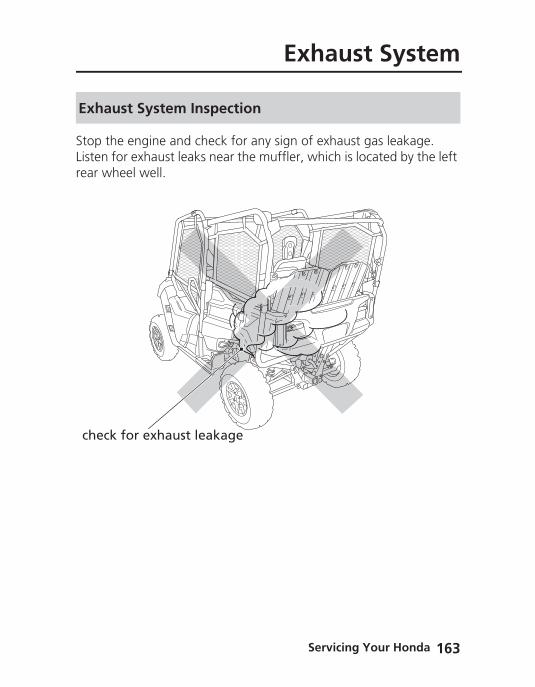
Stop thListen frear wh
Exhau
check
Exhaust System
e engine and check for any sign of exhaust gas leakage.or exhaust leaks near the muffler, which is located by the left eel well.
st System Inspection
for exhaust leakage
Servicing Your Honda 163
Se164
Chassis
Sus
Your frdampinof your
The oil and rebare ma
The spramoun
Considyour noconditi
The waexperie
Lower for lighfirmer
Using asuspen
Do notsee youlimited
Rear
pension
ont and rear suspension systems use springs and hydraulic g devices that suspend your weight and most of the weight Honda SXS.
damper systems hydraulically control the natural compression ound of the suspension springs so that traction and comfort
intained as the wheels ride over rough terrain.
ing pre-loads for your rear suspension system adjust the t of force required to begin compression of the spring.
er adjusting your suspensions pre-load whenever you change rmal load, by adding cargo or accessories, or when driving
ons change.
y you drive your Honda SXS and the type of ride you want to nce can also influence your suspension needs.
spring pre-load provides a softer ride and is usually preferred t loads and smooth terrain. Higher spring pre-load provides a ride and is recommended for heavy loads and rough terrain.
pin spanner, which is available from your dealer, the rear sion can be adjusted for carrying heavier cargo.
attempt to disassemble, service, or dispose of the damper; r dealer. The instructions found in this owner’s manual are
to adjustments of the shock assembly only.
Suspension Adjustment
rvicing Your Honda
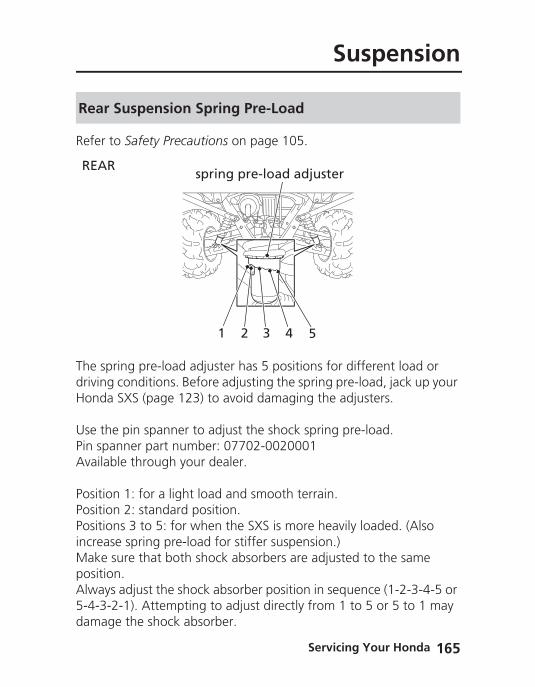
Refer t
The sprdrivingHonda
Use thePin spaAvailab
PositionPositionPositionincreasMake spositioAlways5-4-3-2damag
Rear
REAR
Suspension
o Safety Precautions on page 105.
ing pre-load adjuster has 5 positions for different load or conditions. Before adjusting the spring pre-load, jack up your SXS (page 123) to avoid damaging the adjusters.
pin spanner to adjust the shock spring pre-load.nner part number: 07702-0020001le through your dealer.
1: for a light load and smooth terrain. 2: standard position.s 3 to 5: for when the SXS is more heavily loaded. (Also
e spring pre-load for stiffer suspension.)ure that both shock absorbers are adjusted to the same
Suspension Spring Pre-Load
spring pre-load adjuster
1 2 3 4 5
Servicing Your Honda 165
n. adjust the shock absorber position in sequence (1-2-3-4-5 or -1). Attempting to adjust directly from 1 to 5 or 5 to 1 may e the shock absorber.
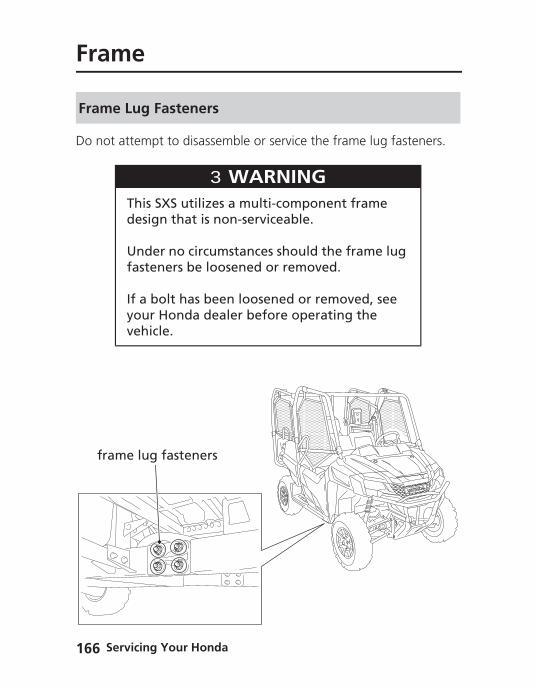
Se166
Fram
Do not
Frame
fra
e
attempt to disassemble or service the frame lug fasteners.
Lug Fasteners
WARNING 3WARNINGThis SXS utilizes a multi-component frame design that is non-serviceable.
Under no circumstances should the frame lug fasteners be loosened or removed.
If a bolt has been loosened or removed, see your Honda dealer before operating the vehicle.
me lug fasteners
rvicing Your Honda
The hyheat gewheels
As the A leak
There amust bfrequen
If the bspongy
Refer t
Push dnormalCheck
The recbrake ffrom a sealed have ab
Brake
Brake
brak
Brakes
draulic disc braking system on your Honda SXS dissipates the nerated by the friction of the brake pads on the disc as the are slowed.
front and rear brake pads wear, the brake fluid level will drop. in the system will also cause the level to drop.
re no adjustments to perform, but fluid level and pad wear e inspected periodically. The system must also be inspected tly to ensure there are no fluid leaks.
rake pedal freeplay seems abnormal or the pedal feels , see your dealer to have the air bled from the system.
o Safety Precautions on page 105.
own on the brake pedal to check that the controls operate ly.for damage to the brake pads and disc plate.
ommended brake fluid is Honda DOT 4 Brake Fluid, or any luid of equal quality and performance. Use fresh brake fluid sealed container. Be sure to read the label before opening the container. An opened container may be contaminated or may
Operation Check
Fluid Recommendation
e fluid Honda DOT 4 Brake Fluid
Servicing Your Honda 167
sorbed moisture from the air.
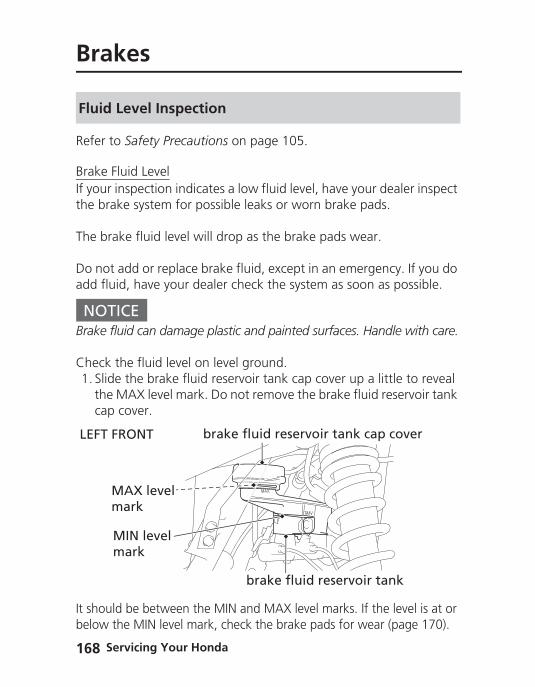
Se168
Bra
Refer t
Brake FIf your the bra
The bra
Do notadd flu
NOTBrake f
Check 1. Slid
thecap
It shoulbelow t
Fluid
LEFT F
Mm
Mm
kes
o Safety Precautions on page 105.
luid Levelinspection indicates a low fluid level, have your dealer inspect ke system for possible leaks or worn brake pads.
ke fluid level will drop as the brake pads wear.
add or replace brake fluid, except in an emergency. If you do id, have your dealer check the system as soon as possible.
ICEluid can damage plastic and painted surfaces. Handle with care.
the fluid level on level ground.e the brake fluid reservoir tank cap cover up a little to reveal MAX level mark. Do not remove the brake fluid reservoir tank cover.
Level Inspection
brake fluid reservoir tank cap coverRONT
AX level ark
IN level ark
rvicing Your Honda
d be between the MIN and MAX level marks. If the level is at or he MIN level mark, check the brake pads for wear (page 170).
brake fluid reservoir tank
2. Retpos
Worn byour br
Wipe uIf brakeclean wIf brakeand, if
• Ma• Che
hos
Other
Brakes
urn the brake fluid reservoir tank cap cover to its normal ition.
rake pads should be replaced. If the pads are not worn, have ake system inspected for leaks.
p spills immediately. Avoid contact with skin or eyes. fluid comes in contact with your eyes, wash them out with ater and immediately call a doctor. fluid comes in contact with your skin, wash with clean water necessary, call a doctor.
ke sure there are no fluid leaks.ck for deterioration or cracks in the hoses and fittings. If the es are worn or cracked, have them replaced by your dealer.
Inspections
Servicing Your Honda 169
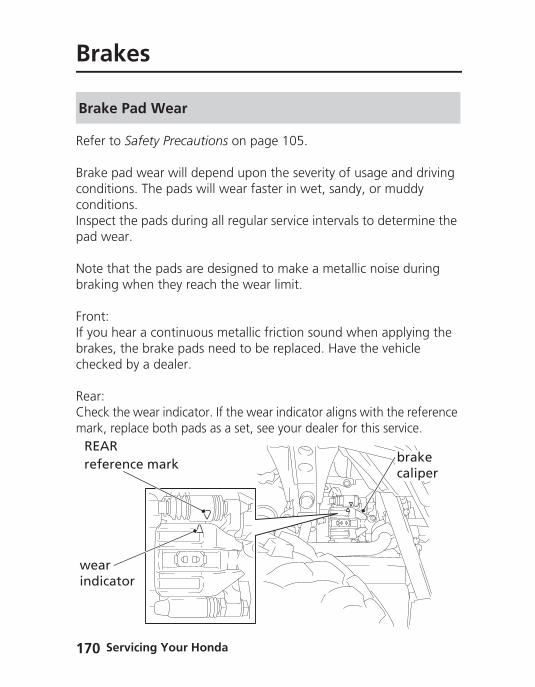
Se170
Bra
Refer t
Brake pconditiconditiInspectpad we
Note thbraking
Front:If you hbrakes,checke
Rear:Check tmark, r
Brake
referREAR
wear indica
kes
o Safety Precautions on page 105.
ad wear will depend upon the severity of usage and driving ons. The pads will wear faster in wet, sandy, or muddy ons. the pads during all regular service intervals to determine the ar.
at the pads are designed to make a metallic noise during when they reach the wear limit.
ear a continuous metallic friction sound when applying the the brake pads need to be replaced. Have the vehicle d by a dealer.
he wear indicator. If the wear indicator aligns with the reference eplace both pads as a set, see your dealer for this service.
Pad Wear
brake caliper
ence mark
rvicing Your Honda
tor
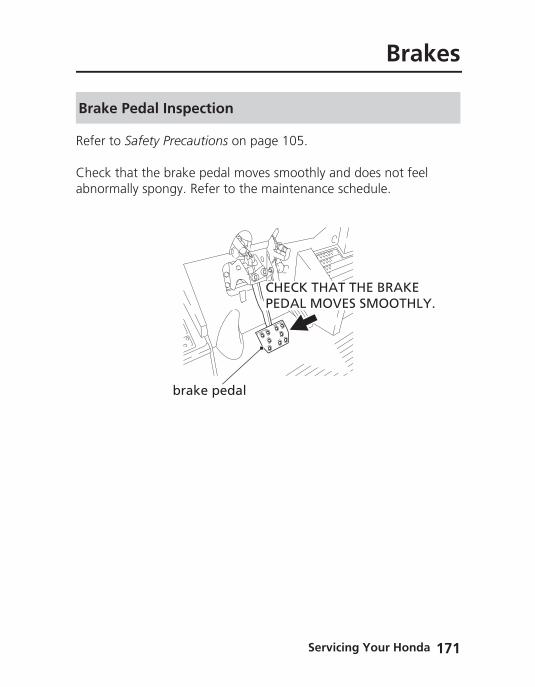
Refer t
Check abnorm
Brake
Brakes
o Safety Precautions on page 105.
that the brake pedal moves smoothly and does not feel ally spongy. Refer to the maintenance schedule.
Pedal Inspection
CHECK THAT THE BRAKE PEDAL MOVES SMOOTHLY.
brake pedal
Servicing Your Honda 171
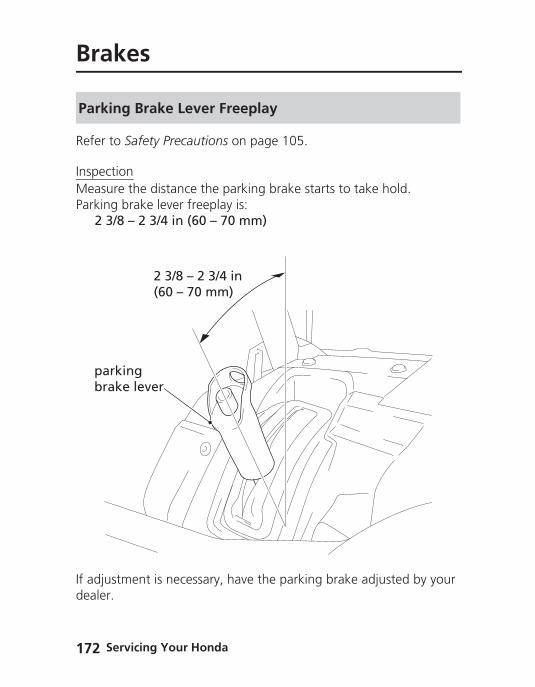
Se172
Bra
Refer t
InspectMeasuParking
2 3
If adjusdealer.
Parkin
parbra
kes
o Safety Precautions on page 105.
ionre the distance the parking brake starts to take hold. brake lever freeplay is:
/8 – 2 3/4 in (60 – 70 mm)
g Brake Lever Freeplay
king ke lever
2 3/8 – 2 3/4 in (60 – 70 mm)
rvicing Your Honda
tment is necessary, have the parking brake adjusted by your

Refer t
Periodilocatedabove The braAdjustmadjustinlate, an
Brake
UNDLEFT
Brakes
o Safety Precautions on page 105.
cally check the operation of the brake light switch. It is under the air guide plate (page 120) in the front hood, just
-- and slightly behind -- the brake fluid reservoir.ke light should turn on just before the brake works.ent is done by holding the switch body and turning the g nut. Turn the nut in direction (A) if the switch operates too d in direction (B) if the switch operates too soon.
Light Switch Adjustment
ER FRONT HOOD SIDE
brake light switch
AB
Servicing Your Honda 173
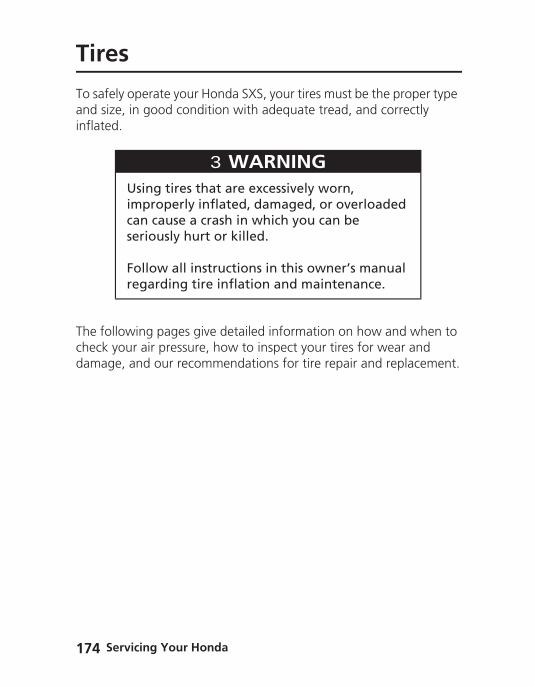
Se174
Tire
To safeand sizinflated
The folcheck ydamag
s
ly operate your Honda SXS, your tires must be the proper type e, in good condition with adequate tread, and correctly .
lowing pages give detailed information on how and when to our air pressure, how to inspect your tires for wear and e, and our recommendations for tire repair and replacement.
WARNING 3WARNINGUsing tires that are excessively worn, improperly inflated, damaged, or overloaded can cause a crash in which you can be seriously hurt or killed.
Follow all instructions in this owner’s manual regarding tire inflation and maintenance.
rvicing Your Honda
Refer t
Properltread liunevenbeing oharshlyuneven
Make scaps.
Air Pr
Tires
o Safety Precautions on page 105.
y inflated tires provide the best combination of handling, fe, and driving comfort. Generally, underinflated tires wear ly, adversely affect handling, and are more likely to fail from verheated. Overinflated tires make your Honda SXS drive , are more prone to damage from surface hazards, and wear ly.
ure the valve stem caps are secure. If necessary, install new
essure
Servicing Your Honda 175
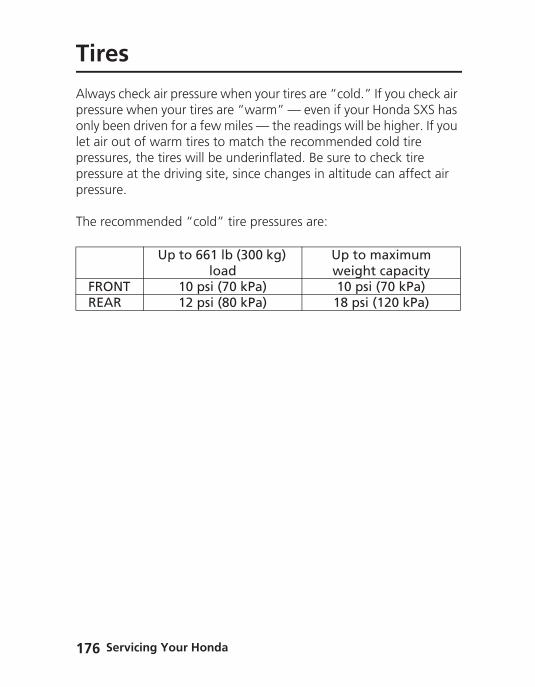
Se176
Tire
Alwayspressuronly belet air opressurpressurpressur
The rec
FROREA
s
check air pressure when your tires are “cold.” If you check air e when your tires are “warm” — even if your Honda SXS has en driven for a few miles — the readings will be higher. If you ut of warm tires to match the recommended cold tire es, the tires will be underinflated. Be sure to check tire e at the driving site, since changes in altitude can affect air e.
ommended “cold” tire pressures are:
Up to 661 lb (300 kg) load
Up to maximum weight capacity
NT 10 psi (70 kPa) 10 psi (70 kPa)R 12 psi (80 kPa) 18 psi (120 kPa)
rvicing Your Honda
A manpressurpossibipressurcheck tdamag
Refer t
Whene• Bum
tire• Cut
fab• Nai
trea• Exc
Inspe
Tires
ually operated tire pump should be used rather than the high e system found in service stations. This will minimize the lity of tire damage from overinflation. If you use a high e system at a service station, add air in small amounts and he pressure increase frequently to prevent possible tire e from overinflation.
o Safety Precautions on page 105.
ver you check the tire pressures, you should also look for:ps or bulges in the side of the tire or the tread. Replace any
that has a bump or bulge.s, slits, or cracks in the tires. Replace the tire if you can see ric or cord.
WARNING 3WARNINGOperating this Honda SXS with improper tires, uneven tire pressure, damaged tires, or overloading the tires may cause loss of control, and you could be seriously injured or killed.
• Always use the size and type tires specified in this owner’s manual for this vehicle.
• Always maintain proper tire pressure as described in this owner’s manual.
ction
Servicing Your Honda 177
ls or other foreign objects embedded in the side of the tire or d.
essive tread wear.
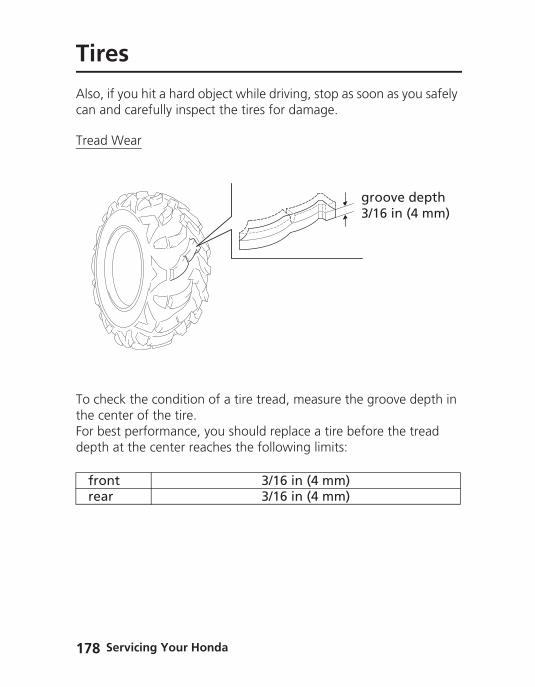
Se178
Tire
Also, ifcan an
Tread W
To chethe cenFor besdepth a
fronrear
s
you hit a hard object while driving, stop as soon as you safely d carefully inspect the tires for damage.
ear
ck the condition of a tire tread, measure the groove depth in ter of the tire.t performance, you should replace a tire before the tread t the center reaches the following limits:
t 3/16 in (4 mm)3/16 in (4 mm)
groove depth3/16 in (4 mm)
rvicing Your Honda
Refer t
We stropunctueither tperform
A tempsituatiodrive vereplaceinformpage 2
A perma tire hyou shonot be tire rep
If you hrecomm
Tire R
Tires
o Safety Precautions on page 105.
ngly recommend that you replace, not repair, any tire that is red or damaged. As discussed below, a tire that is repaired, emporarily or permanently, will have lower speed and ance limits than a new or undamaged tire.
orary repair can sometimes be made in an emergency n. However, since a temporary repair may not hold, you must ry slowly, preferably without any cargo, and have the tire d or permanently repaired as soon as possible. (For more ation on temporary repairs, see If You Have a Flat Tire, 11.)
anent repair, such as an internal plug patch, can be made if as only a small puncture in the tread area. With such a repair, uld drive very slowly for the first 24 hours. However you may able to safely carry as much weight. If you choose to have a aired, be sure the repair work is performed by a professional.
ave a tire professionally repaired at a non-Honda facility, we end that you have the work checked by your Honda dealer.
epair
Servicing Your Honda 179
Se180
Tire
Refer t
The tireperformcombin
It is besmust resize an
The rec
When Have thIf you hrecomm
Tire R
fronrear
s
o Safety Precautions on page 105.
s that came on your Honda SXS were designed to match the ance capabilities of the vehicle and provide the best ation of handling, braking, and comfort.
t to replace all four tires. However, if that is not possible, you place the tires in pairs (front or rear) with tires of the same
d type as the originals. Never replace just one tire.
ommended tires for your Honda SXS are:
you replace a tire, remember:
eplacement
WARNING 3WARNINGInstalling improper tires on your Honda SXS can affect handling and stability. This can cause a crash in which you can be seriously hurt or killed.
Always use the size and type of tires recommended in this owner’s manual.
t 25X8.00-12 NHS BLACKSTONE OTR HP-00725X10.00-12 NHS BLACKSTONE OTR HP-007
rvicing Your Honda
e tire replaced by your Honda dealer, if possible.ave a tire professionally replaced at a non-Honda facility, we end that you have the work checked by your Honda dealer.
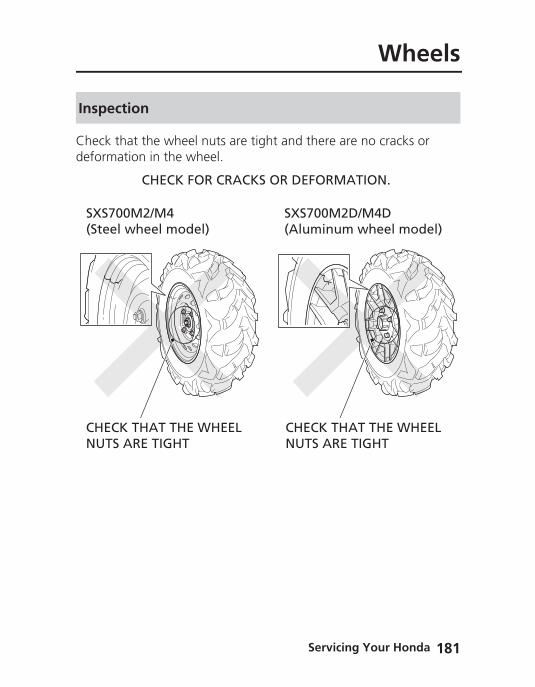
Check deform
Inspe
CHECNUTS
SXS7(Stee
Wheels
that the wheel nuts are tight and there are no cracks or ation in the wheel.
ction
CHECK FOR CRACKS OR DEFORMATION.
CHECK THAT THE WHEEL NUTS ARE TIGHT
K THAT THE WHEEL ARE TIGHT
00M2/M4l wheel model)
SXS700M2D/M4D(Aluminum wheel model)
Servicing Your Honda 181
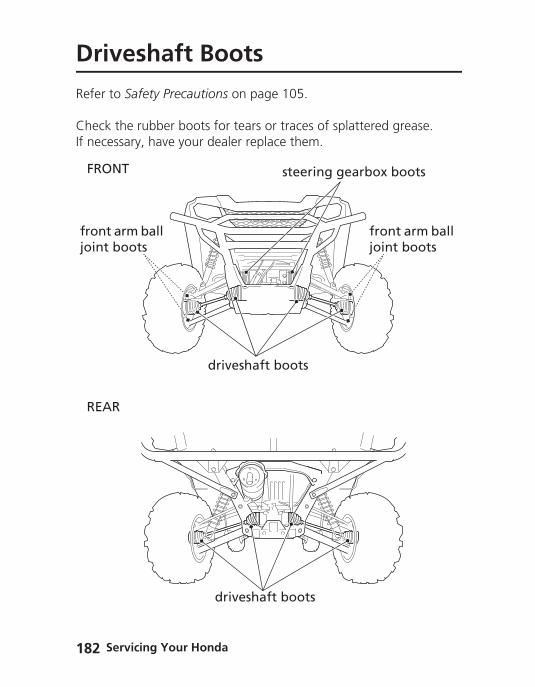
Se182
Driv
Refer t
Check If nece
FRON
REAR
front joint b
eshaft Boots
o Safety Precautions on page 105.
the rubber boots for tears or traces of splattered grease.ssary, have your dealer replace them.
T
driveshaft boots
steering gearbox boots
arm ball oots
front arm ball joint boots
rvicing Your Honda
driveshaft boots
Electrical
Your Hhave toyou wo
NOTYour bdamag
Electricthe ignallows your Hocharge
If you dwe recbattery
If you p
If your starting
WARNlead an
Battery
onda SXS has a maintenance-free type battery. You do not check the battery electrolyte level or add distilled water as uld with a conventional-type battery.
ICEattery is a maintenance-free type and can be permanently ed if the cap strip is removed.
al accessories use current from the battery, some even when ition is OFF (w). Limited operation of your Honda SXS also the battery to discharge. If you have electrical accessories on nda SXS, or do not drive frequently, we recommend that you
the battery frequently (see Battery Charging, page 187).
o not expect to drive your Honda SXS for at least two weeks, ommend you remove the battery, or at least disconnect the cables (negative cable first).
lan to store your Honda SXS, see Battery Storage, page 184.
battery seems weak and/or is leaking electrolyte (causing slow or other electrical problems), see your dealer.
ING: Battery posts, terminals and related accessories contain d lead compounds. Wash your hands after handling.
Servicing Your Honda 183
Se184
Bat
Refer t
If you pbatterymainta
If you dbattery
Check removewater. with pl
You wislow chBefore that fo
Batte
tery
o Safety Precautions on page 105.
lan to store your Honda SXS, we recommend you remove the and store it where it can be charged every 30 days to in its service life.
o not remove the battery, we recommend disconnecting the cables (negative cable first).
the terminals for corrosion (a white or yellowish powder). To it, cover the terminals with a solution of baking soda and It will bubble up and turn brown. When this stops, wash it off ain water. Dry off the battery with a cloth or paper towel.
ll get the best storage results from removing the battery and arging it every 30 days (see Battery Charging, page 187).you remove the battery, be sure to read all the information llows, as well as the information on the battery label.
ry Storage
WARNING 3WARNINGThe battery gives off explosive hydrogen gas during normal operation.
A spark or flame can cause the battery to explode with enough force to kill or seriously hurt you.
rvicing Your Honda
Wear protective clothing and a face shield, or have a skilled mechanic do the battery maintenance.

The ba
Remov1. Ma2. Rem
cov3. Rele4. Disc
the5. Rem6. Cha
bee7. Sto
area8. Cle
the9. Slow
day
posit
ru
Battery
ttery is located under the front seat.
alke sure the ignition switch is OFF (w).ove the front seat (page 122) and right side rubber dust
er.ase the ring and remove the rubber band.onnect the negative (-) terminal lead from the battery first,
n disconnect the positive (+) terminal lead.ove the battery from the battery box.rge the battery (see the following section), unless you have n driving regularly.re your battery in an easy-to-reach location off the floor, in an protected from freezing temperature and direct sunlight.
an the battery box after removing the battery for storage. Dry battery box.
charge the battery (see following section) once every 30 s.
ive (+) terminal lead battery
Servicing Your Honda 185
bber band negative (-) terminal lead

Se186
Bat
InstallaReinstaBe suretermina
Make sreconn
tery
tionll in the reverse order of removal. to connect the positive (+) terminal first, then the negative (-) l.
ure the clock is set to the proper time after the battery is ected (page 26).
rvicing Your Honda
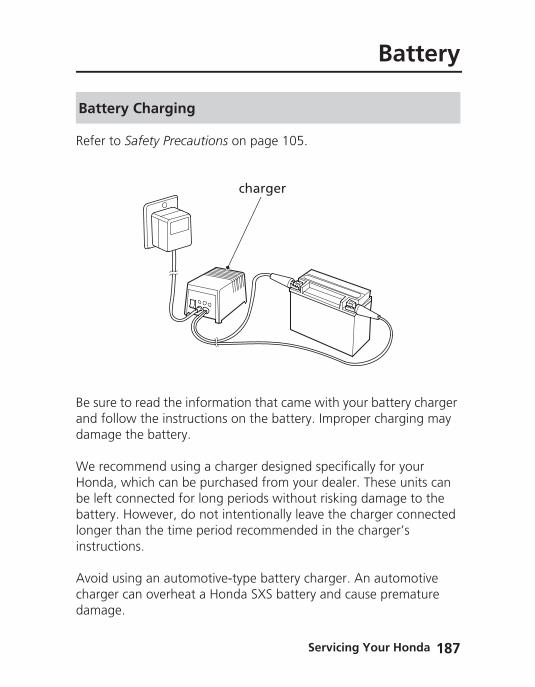
Refer t
Be sureand foldamag
We recHondabe left batterylonger instruc
Avoid uchargedamag
Batte
Battery
o Safety Precautions on page 105.
to read the information that came with your battery charger low the instructions on the battery. Improper charging may e the battery.
ommend using a charger designed specifically for your , which can be purchased from your dealer. These units can connected for long periods without risking damage to the . However, do not intentionally leave the charger connected than the time period recommended in the charger’s tions.
ry Charging
charger
Servicing Your Honda 187
sing an automotive-type battery charger. An automotive r can overheat a Honda SXS battery and cause premature e.
Se188
App
Frequelonger.FrequeHonda
Refer t
• To c– w– H– a – a
Fosp
– a • Avo
solvcam
• If yoeng
• Parkmaysun
• Spoyou
• Cle• We
Honwas
NOTHigh pr
Gene
earance Care
nt cleaning and polishing will keep your Honda looking newer
nt cleaning also identifies you as an owner who values his SXS. A clean Honda SXS is also easier to inspect and service.
o Safety Precautions on page 105.
lean your Honda SXS, you may use:aterondabritemild, neutral detergent and watermild spray and wipe cleaner/polisherr matte painted surfaces, use a spray cleaner avoid using a ray cleaner/polishmild spray and rinse cleaner/degreaser and waterid products that contain harsh detergents or chemical ents that could damage the metal, paint, plastic, and ouflage coating on your Honda SXS.ur Honda SXS is still warm from recent operation, give the ine and exhaust system time to cool off. in a shady area. Washing your Honda SXS in bright sunlight cause the finish to fade because water droplets intensify the ’s brightness.tting is also more likely because surface water can dry before have time to wipe it off.an your Honda SXS regularly to protect surface finishes.recommend the use of a low pressure garden hose to wash your da SXS. High pressure washers (like those at coin-operated car
ral Recommendations
rvicing Your Honda
hers) can damage certain parts of your Honda SXS.
ICEessure water (or air) can damage certain parts of your Honda SXS.
• Aftecoo
Refer t
1. Rinsloos
2. Fill sucwas
3. Wacheto r
4. Aftecleacorr
5. DrywatAs y
6. Starhea
7. As athenorThewhi
AnyfewHowinsi
Wash
Appearance Care
r cleaning, inspect for damage, wear, and leaks (fuel, oil, lant and brake fluid).
o Safety Precautions on page 105.
e your Honda SXS thoroughly with cool water to remove e dirt.
a bucket with cool water. Mix in a mild, neutral detergent, h as dish washing liquid or a product made especially for hing motorcycles or automobiles.sh your Honda SXS with a sponge or soft towel. As you wash, ck for heavy grime. If necessary, use a mild cleaner/degreaser emove the grime.r washing, rinse your Honda SXS thoroughly with plenty of n water to remove any residue. Detergent residue can ode alloy parts. your Honda SXS with a chamois or a soft towel. Leaving er on the surface to air dry can cause dulling and water spots. ou dry, inspect for chips and scratches.t the engine and let it idle for several minutes. The engine t will help dry moist areas. precaution, drive your Honda SXS at a slow speed and apply
brakes several times. This will help dry the brakes and restore mal braking performance. headlights' inside lens may fog temporarily after washing or le driving in the rain. This does not impact the headlight function.
ing Your Honda SXS with a Mild Detergent
Servicing Your Honda 189
condensation inside the headlight should dissipate after a minutes of running the engine with the headlight(s) on.ever, if you see a large amount of water or ice accumulated
de the lens(es), have your vehicle inspected by your dealer.
Se190
App
Refer t
Avoid ucompo
Sugges
* For spra
Spray
HonDustsmu
Ligh
HeavBrak
Dullor al
earance Care
o Safety Precautions on page 105.
sing spray cleaner products on the tires or suspension nents.
tions for using spray cleaners:
Cleaning Your Honda SXS
da SXS condition Recommended Cleaning and fingerprint dges.
Apply a spray cleaner/polish* and wipe paint, chrome, glass, and clear plastic.
t road grime. Spray any difficult-to-reach or very dirty areas with a spray cleaner/degreaser.Rinse and dry.Apply a spray cleaner/polish* and wipe with a non-abrasive cloth.
y grime. Oil leaks. e dust.
Use a spray cleaner/degreaser. If necessary, rub with a sponge.Rinse and dry.Apply a spray cleaner/polish* and wipe with a non-abrasive cloth.
, corroded chrome uminum.
Apply a high quality chrome/aluminum polish and wipe
rvicing Your Honda
matte painted surfaces, use a spray cleaner avoid using a y cleaner/polish.
with a non-abrasive cloth.
Refer t
AluminClean ta wet scleaner
After wThen awax.
For stapolish t
Refer t
The exhstainedare sticdebris
To remthen rin
If necefine texmud or
AlumSXS70
Exhau
Appearance Care
o Safety Precautions on page 105.
um may corrode from contact with dirt, mud, or road salt.he wheels after driving through any of these substances. Use ponge and mild detergent. Avoid stiff brushes, steel wool, or s containing abrasives or chemical compounds.
ashing, rinse with plenty of water and dry with a clean cloth.pply a mild, commercially available spray cleaner/polish or
ined or dull-looking wheels, use a quality chrome/aluminum o restore the finish.
o Safety Precautions on page 105.
aust pipe and muffler are stainless steel but may become by mud or dust. Make sure no flammable materials or debris king to the exhaust system. If any flammable materials or is found, remove it.
ove mud or dust, use a wet sponge and a liquid kitchen abrasive, se well with clean water. Dry with chamois or a soft towel.
ssary, remove heat stains by using a commercially available
inum Wheel Maintenance 0M2D/M4D (Aluminum wheel model)
st Pipe and Muffler Maintenance
Servicing Your Honda 191
ture compound. Then rinse by the same manner as removing dust.
Se192
App
Refer t
(ExceptAfter wavailabthe jobmotorcthe ins
If a surhas touyour Hpaint.
If the fprevenlayers o
Refer t
Use a sclean t
Do notcomposurface
Finish
Clean
earance Care
o Safety Precautions on page 105.
for matte painted surface)ashing your Honda SXS, consider using a commercially le spray cleaner/polish or quality liquid or paste wax to finish . Use only a non-abrasive polish or wax made specifically for ycles or automobiles. Apply the polish or wax according to tructions on the container.
face on your Honda SXS is chipped or scratched, your dealer ch-up paint to match your Honda SXS’s color. Be sure to use
onda SXS’s color code (page 229) when you buy touch-up
rame has a chip that exposes the metal, first apply primer (to t corrosion) and then apply the touch-up paint. Several thin f touch-up paint are better than one thick coat.
o Safety Precautions on page 105.
oft cloth or sponge, plenty of water, and a mild detergent to he matte paint. Dry with a soft cloth.
use polishing compounds or wax containing polishing unds. These can damage or discolor the matte painted .
ing Touches
ing Matte Painted Surfaces
rvicing Your Honda

TipsHere’s adventan env
PrepariWhaWha
TranspStoring
PrepaRemo
You &
Tips
some helpful advice on how to prepare for an off-road ure, how to transport and store your Honda, and how to be ironmentally responsible Honda SXS owner.
ng for a Drive................................................................. 194t to Take to the Operating Area...................................... 194t to Take on the Trail ...................................................... 195orting Your Honda ......................................................... 196 Your Honda.................................................................. 198ration for Storage.......................................................... 199val from Storage ........................................................... 201
the Environment ............................................................ 202
Tips 193
Ti194
Prep
A safe preparahave tryou exp
Before specialother dof Land(Canadsources
Along take alsome oUnexpe
We recyour owinclude• a to• tire• wire• extr
What
aring for a Drive
and enjoyable drive begins with good planning and tion. Always drive with at least one other person in case you
ouble, and let someone know where you’re going and when ect to return.
driving in an unfamiliar area, find out in advance if you need permits, get maps so you can study the terrain, and talk to rivers who know the area. The Forest Service and the Bureau Management (USA only), the Ministry of Natural Resources a only), driver’s clubs, and off-road magazines are good of information.
with your Honda SXS and personal safety gear, you should ong some tools and supplies in case you have a problem. For f the difficulties you might encounter, see Taking Care of the cted, which begins on page 203.
ommend that you always take water, food, a first aid kit, and ner’s manual. Other items you should consider taking along
:ol kit repair supplies and tools, duct tape, and ropea gasoline and a fire extinguisher
to Take to the Operating Area
ps

What yhow lohow ex
If you dtrail, beAlso, b(page 7
What
Preparing for a Drive
ou take with you during a ride depends on the kind of terrain, ng you expect to drive, how far you might go from help, and perienced you or your companions are in making repairs.
ecide to take some tools, spare parts, or other supplies on the sure you can carry them safely and know how to use them.
e sure to follow the loading guidelines and weight limit 7).
to Take on the Trail
Tips 195
Ti196
Tran
Do nota traile
Follow 1. Set
Loc
sporting Your Honda
tow your Honda SXS behind a car or other vehicle except on r.
these procedures:the parking brake, and the drive mode selector in 4WD Diff k.
ps
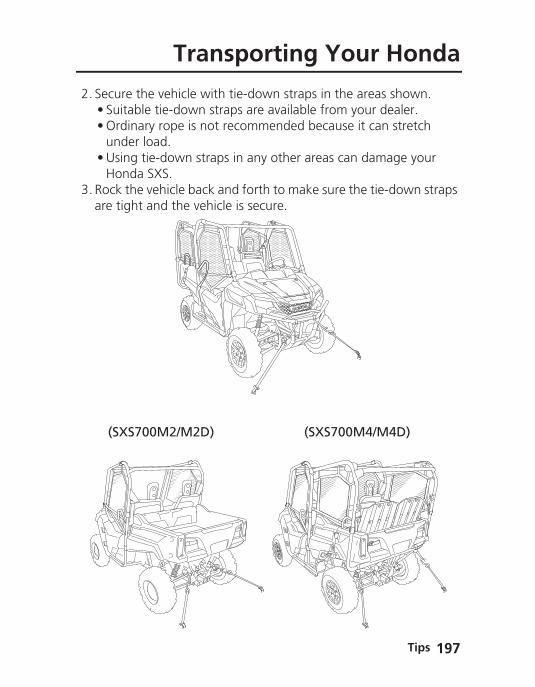
2. Sec• Su• O
u• U
H3. Roc
are
(S
Transporting Your Honda
ure the vehicle with tie-down straps in the areas shown.itable tie-down straps are available from your dealer.
rdinary rope is not recommended because it can stretch nder load.sing tie-down straps in any other areas can damage your onda SXS.k the vehicle back and forth to make sure the tie-down straps tight and the vehicle is secure.
(SXS700M4/M4D)XS700M2/M2D)
Tips 197

Ti198
Sto
If you wwinter,before will be
(USA oFor moStorage
(CanadFor mowww.hWarran
We sugHondathe det
ring Your Honda
on’t be driving for an extended period, such as during the thoroughly inspect your Honda SXS and correct any problem storing it. That way, needed repairs won’t be forgotten and it easier to get your Honda SXS running again.
nly)re information about storage, refer to the Honda Winter Guide, available from your dealer.
a only)re information about storage, visit our website at onda.ca and look up “Storage Tips” under the “Honda ty” in the Warranty tab for your Model.
gest you perform the following procedures to keep your SXS in top condition. These storage procedures will reduce erioration that can occur during storage.
ps
Refer t
1. Cha2. Ma
solu3. Fill 4. To p
• Rd
• RD
• Pocy
• Tuth
• Rco
Prepa
Storing Your Honda
o Safety Precautions on page 105.
nge the engine oil and filter (page 132).ke sure the cooling system is filled with a 50/50% antifreeze tion (page 141).
the fuel tank. Make sure the fuel fill cap is properly installed.revent rusting in the cylinder, perform the following:
emove the front seat and left side rubber dust cover, and isconnect the spark plug caps from the spark plugs.emove the spark plugs.o not connect the spark plugs to the spark plug caps.ur a tablespoon (15 – 20 cc) of clean engine oil into the linder and cover the spark plug holes with a piece of cloth.rn the ignition switch to the START (p) position and crank e engine several times to distribute the oil.
einstall the spark plugs, spark plug caps, left side rubber dust ver and the front seat.
ration for Storage
Tips 199
(cont’d)
Ti200
Sto
5. Remprocha
6. Wamat
7. Infla8. Sto
awavari
9. Plac10. Cov
or sand
ring Your Honda
ove the battery and charge it fully. Store it in an area tected from freezing temperatures and direct sunlight. Slow rge the battery (page 187) once a month.
sh and dry your Honda SXS. Wax all painted surfaces (except te painted surface).te the tires to their recommended pressures (page 176).
re your Honda SXS in an unheated area, free of dampness, y from sunlight, with a minimum of daily temperature ation.e your Honda SXS on blocks to lift all tires off the floor.er your Honda SXS with a porous material. Avoid using plastic imilar non-breathing, coated materials that restrict air flow allow heat and moisture to accumulate.
WARNING 3WARNINGThe battery gives off explosive hydrogen gas during normal operation.
A spark or flame can cause the battery to explode with enough force to kill or seriously hurt you.
Wear protective clothing and a face shield, or have a skilled mechanic do the battery maintenance.
ps
Refer t
1. Unc2. If yo
cha3. If yo
ask4. Cha5. Perf
Hon
Remo
Storing Your Honda
o Safety Precautions on page 105.
over and clean your Honda SXS.ur Honda SXS has been stored for more than four months —
nge the engine oil (page 132).ur Honda SXS has been stored for more than two months —
your dealer to drain and replace the fuel.rge the battery (page 187) as required. Install the battery.orm a pre-ride inspection (page 74), then test-ride your da SXS at low speeds.
val from Storage
Tips 201
Ti202
You
Ownindo youwildlife
FollowiHonda
• Tretharoa
• Keequiemoexhalso
• Chowhethaatmsolv
• Recoil igasrefuandprosealocafindhow
& the Environment
g and operating a Honda SXS can be enjoyable, but you must r part to protect nature. When you show respect for the land, , and other people, you also help preserve off-road driving.
ng are tips on how you can be an environmentally responsible SXS owner.
ad Lightly. Stay on existing paths and trails, avoid surfaces t are easily damaged, and drive only in areas approved for off-d vehicles.p the Noise Down. Loud vehicles can be offensive. Drive as tly as possible, don’t remove your spark arrester, and don’t
dify the muffler or any other part of your air intake and aust systems. Such modifications not only increase noise, they reduce engine performance and may be illegal.ose Sensible Cleaners. Use a biodegradable detergent n you wash your Honda SXS. Avoid aerosol spray cleaners
t contain chlorofluorocarbons (CFCs) which damage the osphere’s protective ozone layer. Don’t throw cleaning ents away; see the following guidelines for proper disposal.ycle Wastes. It’s illegal and thoughtless to put used engine n the trash, down a drain, or on the ground. Used oil, oline, and cleaning solvents contain poisons that can hurt se workers and contaminate our drinking water, lakes, rivers, oceans. Before changing your oil, make sure you have the per containers. Put oil and other toxic wastes in separate led containers and take them to a recycling center. Call your l or state office of public works or environmental services to a recycling center in your area, and to get instructions on to dispose of non-recyclable wastes.
ps
TTaking Care of the UnexpectedWith althat soadvice read thfor a D
GeneraIf YourIf the TIf You If the HIf a FusIf You If You If the BIf a CoIf the V
aking Care of the Unexpected
l the challenges you can encounter off-road, there’s a chance metime something may go wrong. This section gives practical to help you deal with a wide range of problems. Take time to is section before you drive. Also review the tips in Preparing rive (page 194).
l Guidelines ................................................................... 204 Engine Quits or Won’t Start .......................................... 206ransmission Is Not Functioning Properly ......................... 209Have a Flat Tire............................................................... 211igh Coolant/Oil Temperature Indicator Lights................. 214e Blows.......................................................................... 216Crash ............................................................................. 221Lose Your Key ................................................................ 222attery Is Low.................................................................. 223mponent Fails................................................................. 225ehicle Speed Does Not Exceed 15 mph (24 km/h) .......... 226
Taking Care of the Unexpected 203

Ta204
Tak
Keepinthe poscan ari
Rememcame wsupplieyour ow
If someas soontire, orfeel rigendang
After syour Hbefore
If a proskills totrail an
When suppliethe saf
Gene
ing Care of the Unexpected
g your Honda SXS well-maintained is the best way to reduce sibility of having a problem while driving. However, problems
se even with well-maintained machines.
ber to take along your owner’s manual, the tool kit that ith your Honda SXS, and any other items (such as tire repair
s and additional tools) that might help you solve a problem on n.
thing goes wrong during a drive, the first thing to do is stop as you safely can. Do not continue driving if you have a flat
you hear an unusual noise, or your Honda SXS just doesn’t ht. If you continue driving, you could cause more damage and er your own safety.
topping, take time to assess the situation. Carefully inspect onda SXS to identify the problem, then consider your options you decide what to do.
blem is relatively minor and you have the tools, supplies, and make a permanent repair, you may be able to fix it on the d continue driving.
a problem is more serious — or you don’t have the tools, s, experience, or time to deal with it — you need to choose est way to get yourself and your Honda SXS back home.
ral Guidelines
king Care of the Unexpected
T
Shouldguideli• Alw• Tak
dec• If th
andrep
• Do in s
Additio
aking Care of the Unexpected
you ever have a problem while driving, please follow these nes:ays put personal safety first.e time to assess the situation and your options before iding what to do.e problem is relatively minor and you have the tools, supplies, skills to make a temporary repair, be sure to have permanent airs made as soon as possible.not continue driving if you are hurt or your Honda SXS is not afe driving condition.nal recommendations for specific problems follow.
Taking Care of the Unexpected 205
Ta206
If YStar
Proper performbe a sim
If you hengineyou can
If your START to the starter but the
our Engine Quits or Won’t t
operation and maintenance can prevent starting and engine ance problems. In many cases, the cause of the problem may ple operational oversight.
ave a problem starting the engine — or experience poor performance — the following information may help you. If ’t correct the problem, see your dealer.
SXS won’t start, listen as you turn the ignition key to the (p) position. If you don’t hear the starter motor turning, refer Starter motor doesn’t operate symptom. If you can hear the motor working normally, refer to the Starter motor works, engine won’t start symptom.
king Care of the Unexpected

SYMPP
tranneutblow
battlow
fault
SYMP
Pout floo
loosspar
loos
wea
If Your Engine Quits or Won’tStart
TOM: Starter motor doesn’t operate. OSSIBLE CAUSE WHAT TO DOsmission not in ral
Shift into neutral or press on the brake pedal.
n fuse Replace with a new fuse of the same rating (page 216).
ery lead loose Tighten the battery lead.battery Charge the battery (page 187).
If charging doesn’t help, see your dealer.
y starter motor If all possible causes are negative, the starter motor may be faulty. See your dealer.
TOM: Starter motor works, but the engine won’t start.
OSSIBLE CAUSE WHAT TO DOof fuel Fill the fuel tank.ded engine See starting the engine step 5
(page 83).e or unconnected k plug caps
Install the spark plug caps securely. If the engine still won’t start, see your dealer.
e battery cables Tighten the battery terminal bolts.
k battery Charge the battery (page 187). If charging doesn’t help, see your dealer.
Taking Care of the Unexpected 207
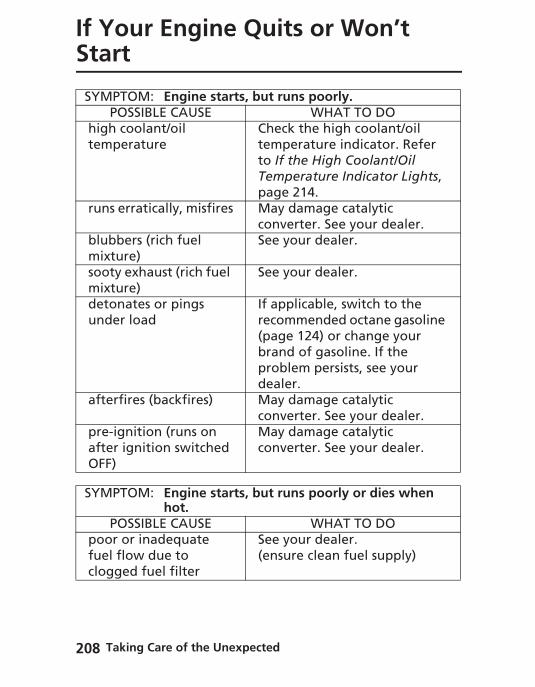
Ta208
If YStar
SYMPP
hightemp
runs
blubmixtsootmixtdetounde
afte
pre-afteOFF)
SYMP
Ppoorfuel clog
our Engine Quits or Won’t t
TOM: Engine starts, but runs poorly. OSSIBLE CAUSE WHAT TO DO coolant/oil erature
Check the high coolant/oil temperature indicator. Refer to If the High Coolant/Oil Temperature Indicator Lights, page 214.
erratically, misfires May damage catalytic converter. See your dealer.
bers (rich fuel ure)
See your dealer.
y exhaust (rich fuel ure)
See your dealer.
nates or pings r load
If applicable, switch to the recommended octane gasoline (page 124) or change your brand of gasoline. If the problem persists, see your dealer.
rfires (backfires) May damage catalytic converter. See your dealer.
ignition (runs on r ignition switched
May damage catalytic converter. See your dealer.
TOM: Engine starts, but runs poorly or dies when hot.
OSSIBLE CAUSE WHAT TO DO or inadequate flow due to
See your dealer.(ensure clean fuel supply)
king Care of the Unexpected
ged fuel filter
When PGM-Findicat
See you
If the Ppositio1. Sto2. Tur3. Afte
pos4. Che
pos
When on the You mHowev
When tpositioRestartand tra
If the Transmission Is NotFunctioning Properly
the automatic transmission is not shifting properly, the I malfunction indicator lamp (MIL) lights and the gear position or will blink.
r dealer to check and restore the automatic transmission.
GM-FI malfunction indicator lamp (MIL) lights and the gear n indicator blinks while driving, perform the following:p the SXS.n the ignition switch to the OFF (w) position.r the engine stops, turn the ignition switch to the ON (q)
ition.ck the PGM-FI malfunction indicator lamp (MIL) and gear ition indicator.
the PGM-FI malfunction indicator lamp (MIL) and the display gear position indicator return to normal:ay drive the SXS as usual after restarting the engine.er, we urge you to have your SXS inspected by your dealer.
he PGM-FI malfunction indicator lamp (MIL) is lit and the gear n indicator is blinking: the engine; drive the SXS to a location where it can be loaded nsported to your dealer.
Taking Care of the Unexpected 209
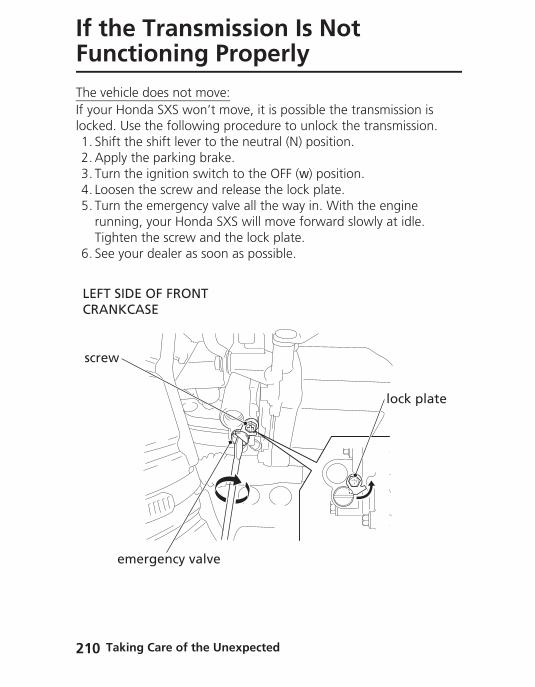
Ta210
If thFun
The vehIf your locked.1. Shif2. App3. Tur4. Loo5. Tur
runTigh
6. See
LEFT CRAN
screw
e Transmission Is Not ctioning Properly
icle does not move:Honda SXS won’t move, it is possible the transmission is Use the following procedure to unlock the transmission.t the shift lever to the neutral (N) position.ly the parking brake.
n the ignition switch to the OFF (w) position.sen the screw and release the lock plate.n the emergency valve all the way in. With the engine ning, your Honda SXS will move forward slowly at idle. ten the screw and the lock plate.
your dealer as soon as possible.
SIDE OF FRONT KCASE
lock plate
emergency valve
king Care of the Unexpected
How yotire dam
If you hmake aoutsidetires.)
A plugstationinstructo mak
As soodealer.Any tir
Wheneor avaipump a
If the letire mudamaginstallin
If you afor helpflat tireoff theovertur
If You Have a Flat Tire
u handle a flat tire on the trail depends on how serious the age is, and what tools and supplies you have with you.
ave a slow leak or a minor puncture, use the plug method to temporary repair. (The plug method is applied from the of the tire and is the same as that for conventional tubeless
-type repair kit, available at most auto parts stores or service s, provides a plug, an installation tool, tire cement, and an tion sheet. Follow the instructions provided with the repair kit e a temporary repair.
n as possible, have the tire permanently repaired by your
e that cannot be repaired should be replaced.
ver the Honda SXS is to be operated far from service facilities lable transportation, we recommend that you carry a tire nd a repair kit with the vehicle.
ak is more serious, or a temporary repair doesn't hold, the st be replaced. The tire will also need to be replaced if it is ed (page 177). Replacing a tire involves removing and re-g the wheel (page 212).
re unable to repair a flat tire on the trail, you will need to send . We strongly recommend that you do not try to drive with a . The Honda SXS will be hard to handle, and if the tire comes rim, it may lock up the wheel and cause you to crash or
Taking Care of the Unexpected 211
n.
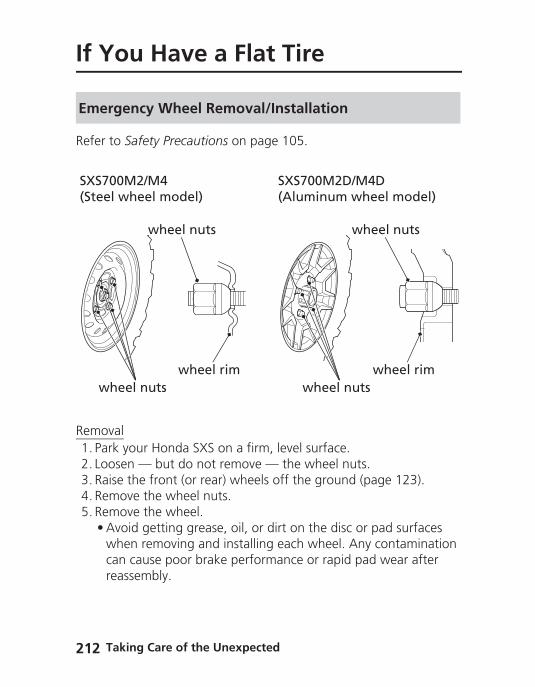
Ta212
If Y
Refer t
Remov1. Park2. Loo3. Rais4. Rem5. Rem
• Awcare
Emer
wh
SXS70(Steel
ou Have a Flat Tire
o Safety Precautions on page 105.
al your Honda SXS on a firm, level surface.sen — but do not remove — the wheel nuts.e the front (or rear) wheels off the ground (page 123).ove the wheel nuts.ove the wheel.
void getting grease, oil, or dirt on the disc or pad surfaces hen removing and installing each wheel. Any contamination n cause poor brake performance or rapid pad wear after
gency Wheel Removal/Installation
wheel nutswheel rim
wheel nuts
eel nutswheel rim
wheel nuts
0M2/M4 wheel model)
SXS700M2D/M4D(Aluminum wheel model)
king Care of the Unexpected
assembly.
Installa1. Tho2. Pos3. Pos
rim4. Han
Honcris
SXS9
SXS8
If a torsoon alead to
If You Have a Flat Tire
tionroughly clean hub and wheel.ition the wheel.ition the wheel nuts so that the tapered sides face the wheel .d-tighten the wheel nuts on the wheel, then lower the da SXS to the ground before tightening the nuts in a
scross (rather than circular) pattern to the specified torque:
700M2/M4 (Steel wheel model)8 lbf·ft (133 N·m, 13.6 kgf·m)
700M2D/M4D (Aluminum wheel model)0 lbf·ft (108 N·m, 11 kgf·m)
que wrench was not used for installation, see your dealer as s possible to verify proper assembly. Improper assembly may loss of control and braking capability.
Taking Care of the Unexpected 213
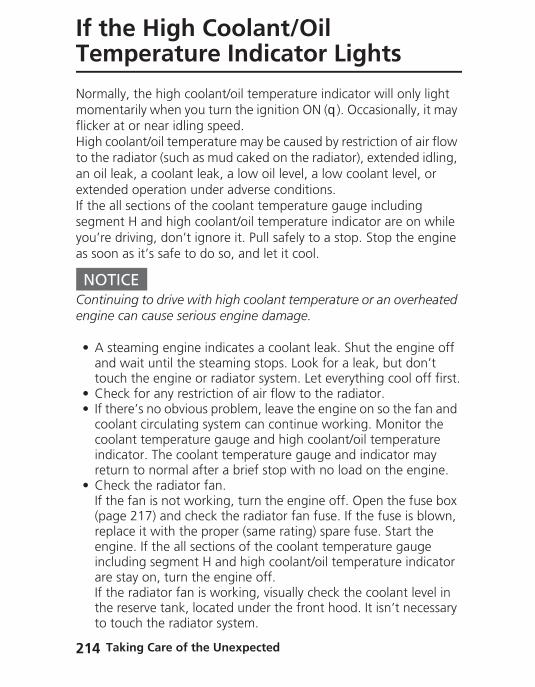
Ta214
If thTem
Normamomenflicker High coto the ran oil lextendIf the asegmenyou’re as soon
NOTContinengine
• A standtou
• Che• If th
coocooindiretu
• CheIf th(pagrepenginclare If ththeto t
e High Coolant/Oil perature Indicator Lights
lly, the high coolant/oil temperature indicator will only light tarily when you turn the ignition ON (q). Occasionally, it may
at or near idling speed.olant/oil temperature may be caused by restriction of air flow adiator (such as mud caked on the radiator), extended idling, eak, a coolant leak, a low oil level, a low coolant level, or ed operation under adverse conditions.ll sections of the coolant temperature gauge including t H and high coolant/oil temperature indicator are on while
driving, don’t ignore it. Pull safely to a stop. Stop the engine as it’s safe to do so, and let it cool.
ICEuing to drive with high coolant temperature or an overheated can cause serious engine damage.
eaming engine indicates a coolant leak. Shut the engine off wait until the steaming stops. Look for a leak, but don’t ch the engine or radiator system. Let everything cool off first.ck for any restriction of air flow to the radiator.ere’s no obvious problem, leave the engine on so the fan and lant circulating system can continue working. Monitor the lant temperature gauge and high coolant/oil temperature cator. The coolant temperature gauge and indicator may rn to normal after a brief stop with no load on the engine.ck the radiator fan.e fan is not working, turn the engine off. Open the fuse box e 217) and check the radiator fan fuse. If the fuse is blown,
lace it with the proper (same rating) spare fuse. Start the ine. If the all sections of the coolant temperature gauge uding segment H and high coolant/oil temperature indicator
king Care of the Unexpected
stay on, turn the engine off.e radiator fan is working, visually check the coolant level in
reserve tank, located under the front hood. It isn’t necessary ouch the radiator system.
• If thcoochetemIf threpTranIf thhas
• Che• Che
(pagSXS
• Starand
If the cresumeis repai
If therewatchito stopyour H
If the High Coolant/OilTemperature Indicator Lights
e reserve tank is low or empty, don’t drive without adding lant (page 142). After adding coolant, turn the engine on and ck the coolant temperature gauge and high coolant/oil perature indicator.e indicator doesn’t turn off, do not drive. The engine needs
air.sport your Honda SXS to a dealer (page 196).e temperature drops to normal, check the coolant level. If it gone down, add more coolant.ck for an oil leak.ck the oil level. If necessary, add the recommended oil e 128) to the upper level mark. If you must leave your Honda
to get oil, secure it as much as possible.t the engine, and check that the coolant temperature gauge high coolant/oil temperature indicator are normal.
oolant temperature gauge and indicator return to normal, driving. If there is a leak, do not drive the SXS until the leak red by your dealer.
’s a mild coolant leak, you can drive for a while, carefully ng the coolant temperature gauge and indicator. Be prepared and add more coolant or water. If the leak is bad, transport onda SXS to your dealer (page 196).
Taking Care of the Unexpected 215
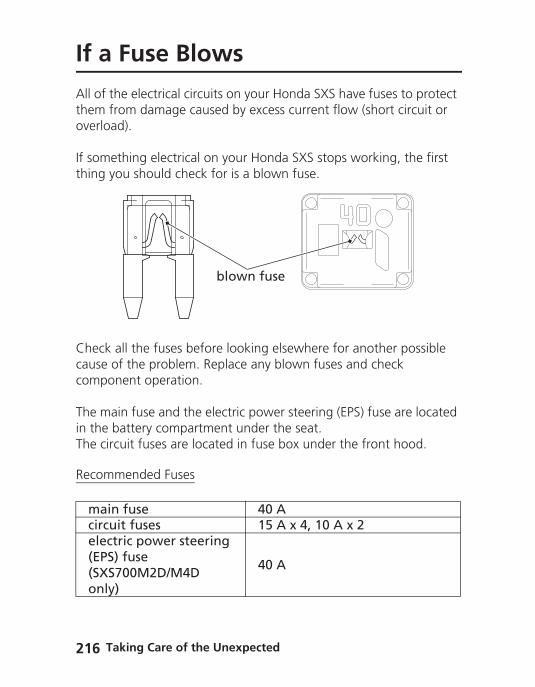
Ta216
If a
All of tthem foverloa
If something y
Check cause ocompo
The main the bThe cir
Recom
maincircuelect(EPS(SXSonly
Fuse Blows
he electrical circuits on your Honda SXS have fuses to protect rom damage caused by excess current flow (short circuit or d).
thing electrical on your Honda SXS stops working, the first ou should check for is a blown fuse.
all the fuses before looking elsewhere for another possible f the problem. Replace any blown fuses and check nent operation.
in fuse and the electric power steering (EPS) fuse are located attery compartment under the seat.
cuit fuses are located in fuse box under the front hood.
mended Fuses
fuse 40 Ait fuses 15 A x 4, 10 A x 2ric power steering ) fuse
40 A
blown fuse
king Care of the Unexpected
700M2D/M4D )
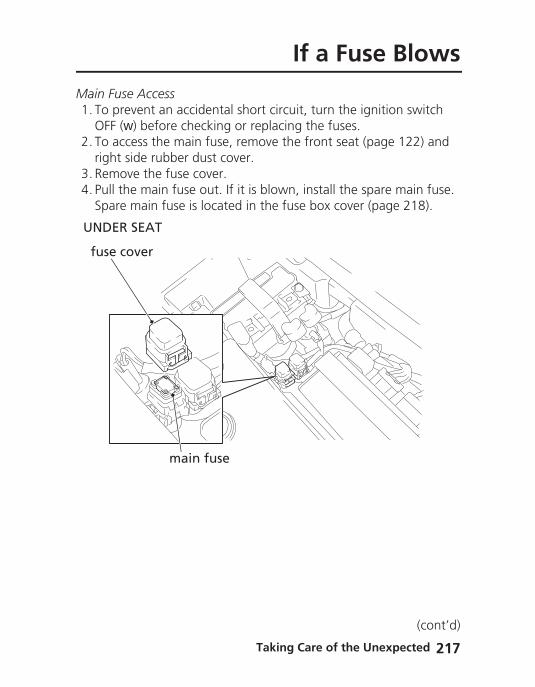
Main F1. To p
OFF2. To a
righ3. Rem4. Pull
Spa
fuse
UNDE
If a Fuse Blows
use Accessrevent an accidental short circuit, turn the ignition switch (w) before checking or replacing the fuses.ccess the main fuse, remove the front seat (page 122) and t side rubber dust cover.ove the fuse cover.
the main fuse out. If it is blown, install the spare main fuse. re main fuse is located in the fuse box cover (page 218).
main fuse
cover
R SEAT
Taking Care of the Unexpected 217
(cont’d)
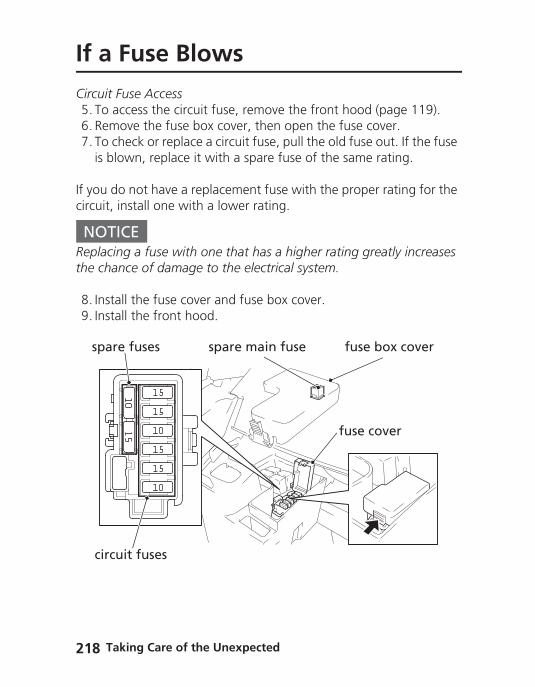
Ta218
If a
Circuit 5. To a6. Rem7. To c
is b
If you dcircuit,
NOTReplacithe cha
8. Inst9. Inst
circ
spar
Fuse Blows
Fuse Accessccess the circuit fuse, remove the front hood (page 119).ove the fuse box cover, then open the fuse cover.heck or replace a circuit fuse, pull the old fuse out. If the fuse
lown, replace it with a spare fuse of the same rating.
o not have a replacement fuse with the proper rating for the install one with a lower rating.
ICEng a fuse with one that has a higher rating greatly increases nce of damage to the electrical system.
all the fuse cover and fuse box cover.all the front hood.
uit fuses
e fuses fuse box cover
fuse cover
spare main fuse
king Care of the Unexpected
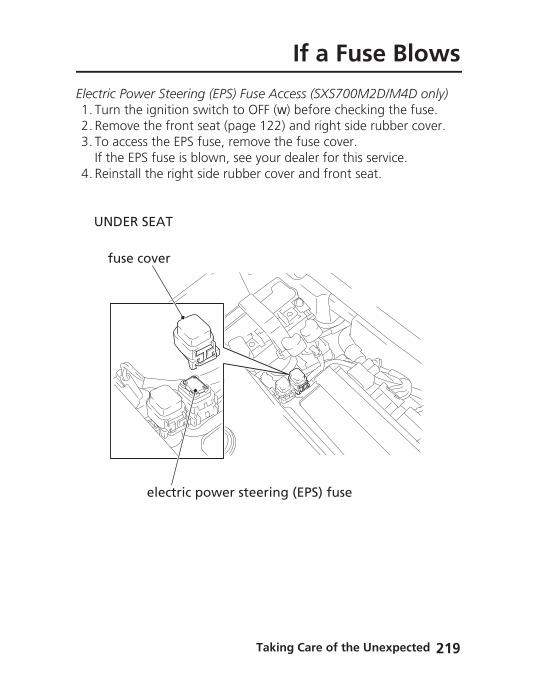
Electric1. Tur2. Rem3. To a
If th4. Rein
UN
fu
If a Fuse Blows
Power Steering (EPS) Fuse Access (SXS700M2D/M4D only)n the ignition switch to OFF (w) before checking the fuse.ove the front seat (page 122) and right side rubber cover.ccess the EPS fuse, remove the fuse cover.e EPS fuse is blown, see your dealer for this service.stall the right side rubber cover and front seat.
DER SEAT
se cover
electric power steering (EPS) fuse
Taking Care of the Unexpected 219
Ta220
If a
If you dwithourating ftempor
If you rreplaceremem
If the rethere isLeave tchecke
Fuse Blows
o not have a spare fuse and you cannot drive the Honda SXS t fixing the problem, take a fuse of the same rating or a lower rom one of the other circuits that you can do without arily.
eplace a blown fuse with a spare fuse that has a lower rating, the fuse with the correct rating as soon as you can. Also ber to replace any spare fuses that were installed.
placement fuse of the same rating burns out in a short time, probably a serious electrical problem on your Honda SXS. he blown fuse in that circuit and have your Honda SXS d by your dealer.
king Care of the Unexpected

Personhas beewhethesomeo
If you devaluatit off atightnewheel,
If therebut decslowly
SometiWhen any proframe sany ser
If You Crash
al safety is your first priority after a crash. If you or anyone else n injured, take time to assess the severity of the injuries and r it is safe to continue driving. If you cannot drive safely, send
ne for help. Do not drive if you will risk further injury.
ecide that you are capable of driving your SXS safely, first e the condition of your SXS. If the engine is still running, turn nd look it over carefully; inspect it for fluid leaks, check the ss of critical nuts and bolts securing such parts as the steering control levers, brakes, and wheels.
is minor damage, or you are unsure about possible damage ide to try driving the Honda SXS back to your base, drive
and cautiously.
mes, crash damage is hidden or not immediately apparent. you get home, thoroughly check your Honda SXS and correct blems you find. Also, be sure to have your dealer check the uspension, seat belts, and occupant protective structure after ious crash.
Taking Care of the Unexpected 221
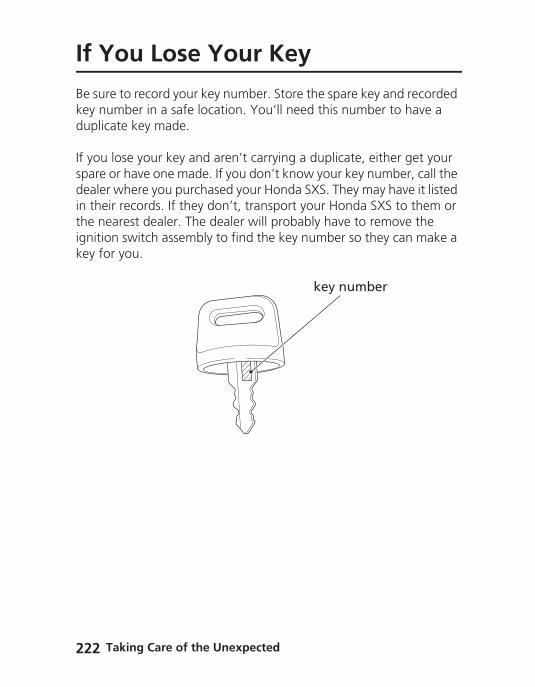
Ta222
If Y
Be surekey nuduplica
If you lspare odealer in theirthe neaignitionkey for
ou Lose Your Key
to record your key number. Store the spare key and recorded mber in a safe location. You’ll need this number to have a te key made.
ose your key and aren’t carrying a duplicate, either get your r have one made. If you don’t know your key number, call the where you purchased your Honda SXS. They may have it listed records. If they don’t, transport your Honda SXS to them or rest dealer. The dealer will probably have to remove the switch assembly to find the key number so they can make a
you.
key number
king Care of the Unexpected
If the bpoorly,Jump sInsteadIf you ccontac
WARNlead an
Howevthe ins
NOTIf a batAttemprupture
Use a bequival
If the Battery Is Low
attery is low, the starter motor doesn’t operate or works and you can’t start the engine.tarting your Honda SXS should be avoided., the battery should be removed and recharged (page 187).an’t charge the battery or it appears unable to hold a charge, t your dealer.
ING: Battery posts, terminals and related accessories contain d lead compounds. Wash your hands after handling.
er, when there is no option other than jump starting, follow tructions given below.
ICEtery sits in extreme cold, the electrolyte inside can freeze.ting to jump start with a frozen battery can cause it to .
WARNING 3WARNINGThe battery gives off explosive hydrogen gas during normal operation.A spark or flame can cause the battery to explode with enough force to kill or seriously hurt you.
Wear protective clothing and a face shield, or have a skilled mechanic do the battery maintenance.
Taking Care of the Unexpected 223
attery that is the same as the one in the vehicle or an ent.

Ta224
If th
1. To pOFF
2. Remcov
3. Usinof tpospos
4. Conbatjum
5. Aftejumposthe
6. Clo• D
n• If
reb
UNDERIGHT
charg
jumcabl
e Battery Is Low
revent an accidental short circuit, turn the ignition switch (w).ove the front seat (page 122) and right side rubber dust
er.g a fully charged 12-volt battery, connect the positive (+) side
he jumper cable to the charged battery, and connect the itive (+) side on the other end of the jumper cable to the itive (+) terminal of vehicle battery.nect the negative (-) side of the jumper cable to the charged
tery, and connect the negative (-) side on the other end of the per cable to the front right door latch striker.r starting the engine, remove the negative (-) sides of the per cable from the vehicle and the battery. Then remove the itive (+) sides of the jumper cable from the vehicle battery and charged battery.se the rubber dust cover and install the front seat.o not let the positive (+) side of the jumper cable touch on the egative (-) terminal. the jumper cable is connected to the battery with the polarity versed, the battery can explode or the electrical system will
e seriously damaged.
R SEAT SIDE
per e
vehicle battery
king Care of the Unexpected
ed battery right door latch striker
The bradamagtrailsidetools a
• If anreddrivspe
• If yoyoudamdou
If a Component Fails
ke lines, control cables, and other components can be ed as you drive in dense brush or over rocky terrain. Making a repair depends on how serious the damage is and what
nd supplies you have with you.
y component in the brake system is damaged, you may have uced or limited stopping power. If you decide to continue ing back to your base, do so cautiously and at a very low ed.u damage the accelerator cable or other critical component, r Honda SXS may be unsafe to drive. Carefully assess the age and make any repairs that you can. But if there is any bt, it’s best to be conservative and safe.
Taking Care of the Unexpected 225
Ta226
If thExc
If the dvehiclethe seaAlso th
Make sIf the p
e Vehicle Speed Does Not eed 15 mph (24 km/h)
river's side seat belt is not latched properly, the maximum speed will be limited to no more than 15 mph (24 km/h) by t belt speed limiting system (page 55).e seat belt indicator and speedometer digits blink.
ure that the driver's side seat belt is latched properly.roblem persists, see your dealer.
king Care of the Unexpected

Technical InformationThis sedata, pbreak-i
VehicleSpecificBreak-iEmissioOxygenCatalyt
Technical Information
ction contains dimensions, capacities, and other technical lus information on government requirements and how to n your Honda SXS.
Identification ................................................................ 228ations ........................................................................... 230n Guidelines................................................................... 236n Control Systems ......................................................... 237ated Fuels ..................................................................... 241ic Converter ................................................................... 243
Technical Information 227
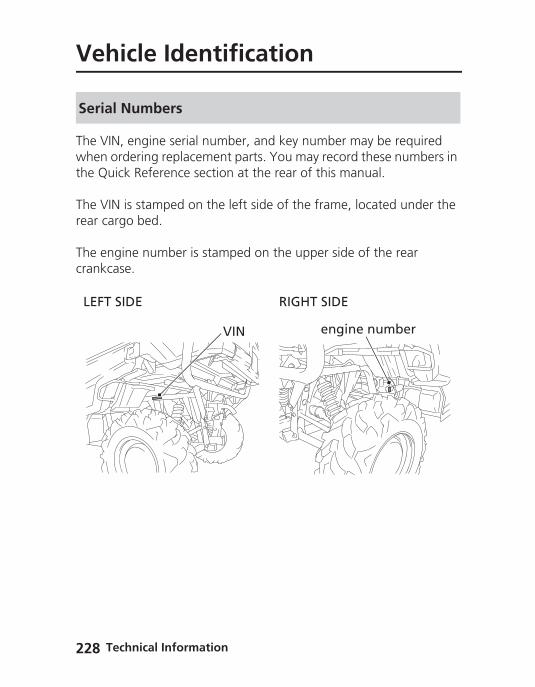
Te228
Veh
The VINwhen othe Qu
The VINrear ca
The encrankca
Serial
LEFT
icle Identification
, engine serial number, and key number may be required rdering replacement parts. You may record these numbers in ick Reference section at the rear of this manual.
is stamped on the left side of the frame, located under the rgo bed.
gine number is stamped on the upper side of the rear se.
Numbers
VIN
SIDE RIGHT SIDE
engine number
chnical Information
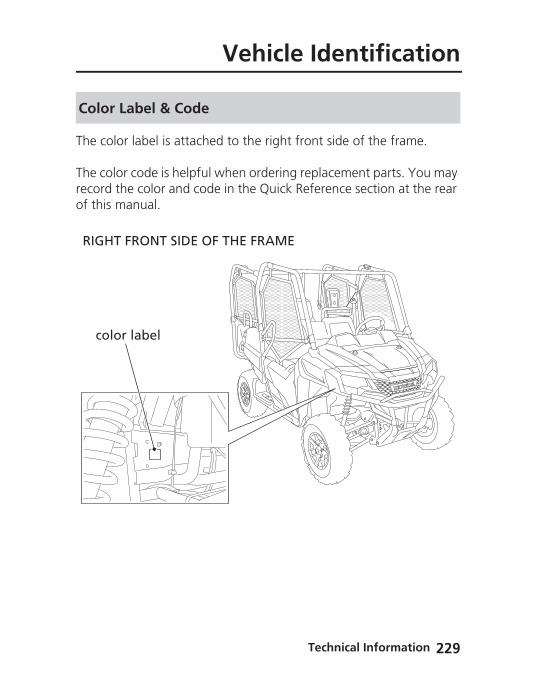
The co
The colrecord of this
Color
RIGH
col
Vehicle Identification
lor label is attached to the right front side of the frame.
or code is helpful when ordering replacement parts. You may the color and code in the Quick Reference section at the rear manual.
Label & Code
T FRONT SIDE OF THE FRAME
or label
Technical Information 229
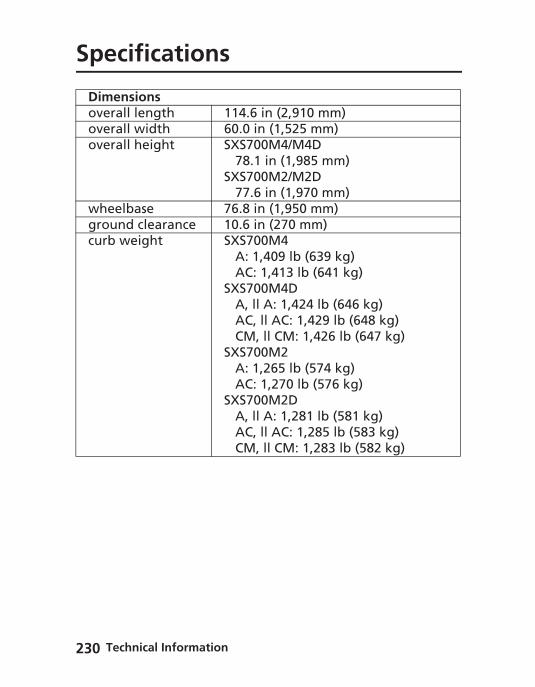
Te230
Spe
Dimoveroverover
whegroucurb
cifications
ensionsall length 114.6 in (2,910 mm)all width 60.0 in (1,525 mm)all height SXS700M4/M4D
78.1 in (1,985 mm)SXS700M2/M2D
77.6 in (1,970 mm)elbase 76.8 in (1,950 mm)nd clearance 10.6 in (270 mm) weight SXS700M4
A: 1,409 lb (639 kg)AC: 1,413 lb (641 kg)
SXS700M4DA, ll A: 1,424 lb (646 kg)AC, ll AC: 1,429 lb (648 kg)CM, ll CM: 1,426 lb (647 kg)
SXS700M2A: 1,265 lb (574 kg)AC: 1,270 lb (576 kg)
SXS700M2DA, ll A: 1,281 lb (581 kg)AC, ll AC: 1,285 lb (583 kg)CM, ll CM: 1,283 lb (582 kg)
chnical Information
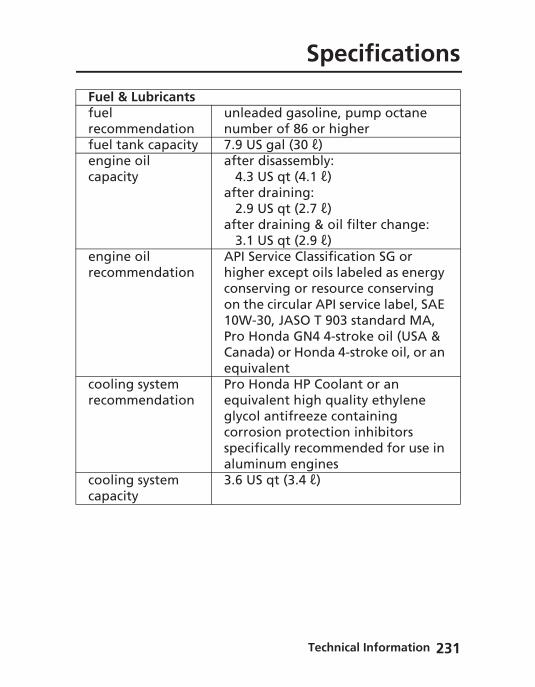
Fuelfuel recofuel engicapa
engireco
coolreco
coolcapa
Specifications
& Lubricants
mmendationunleaded gasoline, pump octane number of 86 or higher
tank capacity 7.9 US gal (30 ℓ)ne oil city
after disassembly:4.3 US qt (4.1 ℓ)
after draining:2.9 US qt (2.7 ℓ)
after draining & oil filter change:3.1 US qt (2.9 ℓ)
ne oil mmendation
API Service Classification SG or higher except oils labeled as energy conserving or resource conserving on the circular API service label, SAE 10W-30, JASO T 903 standard MA, Pro Honda GN4 4-stroke oil (USA & Canada) or Honda 4-stroke oil, or an equivalent
ing system mmendation
Pro Honda HP Coolant or an equivalent high quality ethylene glycol antifreeze containing corrosion protection inhibitors specifically recommended for use in aluminum engines
ing system city
3.6 US qt (3.4 ℓ)
Technical Information 231
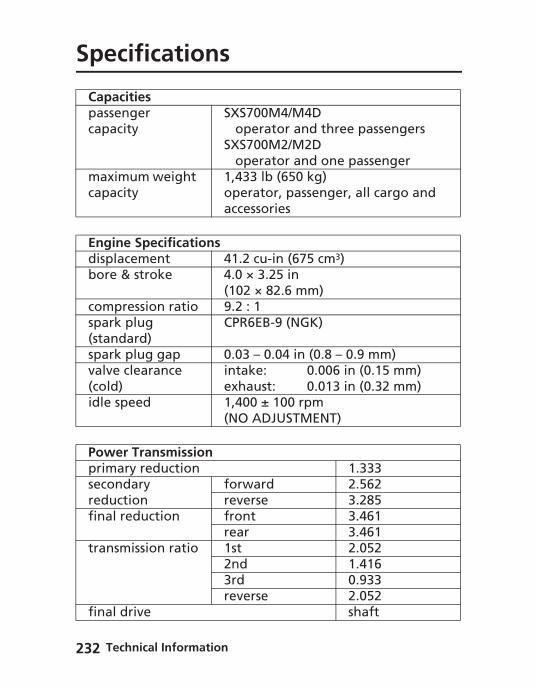
Te232
Spe
Capapasscapa
maxcapa
Engidispbore
comspar(stansparvalve(coldidle
Powprimsecoredufinal
tran
final
cifications
citiesenger city
SXS700M4/M4Doperator and three passengers
SXS700M2/M2Doperator and one passenger
imum weight city
1,433 lb (650 kg) operator, passenger, all cargo and accessories
ne Specificationslacement 41.2 cu-in (675 cm3) & stroke 4.0 × 3.25 in
(102 × 82.6 mm)pression ratio 9.2 : 1k plug dard)
CPR6EB-9 (NGK)
k plug gap 0.03 – 0.04 in (0.8 – 0.9 mm) clearance )
intake: 0.006 in (0.15 mm)exhaust: 0.013 in (0.32 mm)
speed 1,400 ± 100 rpm (NO ADJUSTMENT)
er Transmissionary reduction 1.333ndary ction
forward 2.562reverse 3.285
reduction front 3.461rear 3.461
smission ratio 1st 2.0522nd 1.416
chnical Information
3rd 0.933reverse 2.052
drive shaft
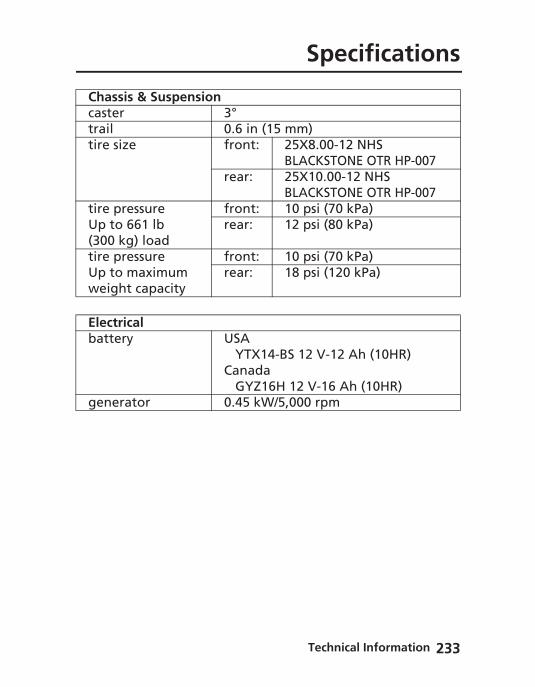
Chascastetrailtire
tire Up t(300tire Up tweig
Electbatt
gene
Specifications
sis & Suspensionr 3°
0.6 in (15 mm)size front: 25X8.00-12 NHS
BLACKSTONE OTR HP-007rear: 25X10.00-12 NHS
BLACKSTONE OTR HP-007pressureo 661 lb kg) load
front: 10 psi (70 kPa)rear: 12 psi (80 kPa)
pressureo maximum ht capacity
front: 10 psi (70 kPa)rear: 18 psi (120 kPa)
ricalery USA
YTX14-BS 12 V-12 Ah (10HR)Canada
GYZ16H 12 V-16 Ah (10HR)rator 0.45 kW/5,000 rpm
Technical Information 233
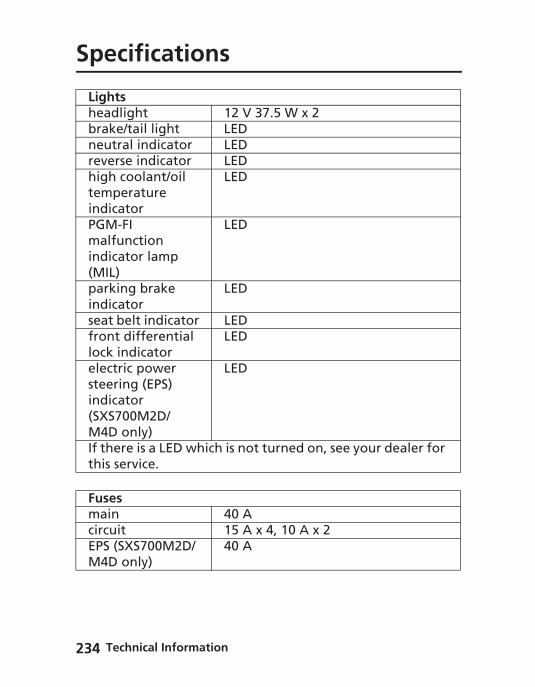
Te234
Spe
LighheadbrakneutrevehightempindicPGMmalfindic(MILparkindicseatfronlockelectsteeindic(SXSM4DIf ththis
FusemaincircuEPS M4D
cifications
tslight 12 V 37.5 W x 2e/tail light LEDral indicator LEDrse indicator LED coolant/oil erature ator
LED
-FI unction ator lamp )
LED
ing brake ator
LED
belt indicator LEDt differential indicator
LED
ric power ring (EPS) ator 700M2D/ only)
LED
ere is a LED which is not turned on, see your dealer for service.
s40 A
it 15 A x 4, 10 A x 2(SXS700M2D/ only)
40 A
chnical Information
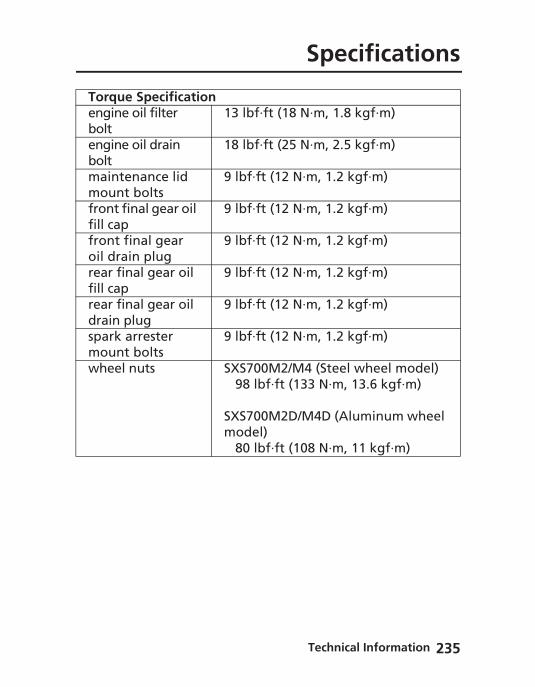
Torqengiboltengiboltmainmoufronfill cfronoil drear fill crear drainsparmouwhe
Specifications
ue Specificationne oil filter 13 lbf·ft (18 N·m, 1.8 kgf·m)
ne oil drain 18 lbf·ft (25 N·m, 2.5 kgf·m)
tenance lid nt bolts
9 lbf·ft (12 N·m, 1.2 kgf·m)
t final gear oil ap
9 lbf·ft (12 N·m, 1.2 kgf·m)
t final gear rain plug
9 lbf·ft (12 N·m, 1.2 kgf·m)
final gear oil ap
9 lbf·ft (12 N·m, 1.2 kgf·m)
final gear oil plug
9 lbf·ft (12 N·m, 1.2 kgf·m)
k arrester nt bolts
9 lbf·ft (12 N·m, 1.2 kgf·m)
el nuts SXS700M2/M4 (Steel wheel model)98 lbf·ft (133 N·m, 13.6 kgf·m)
SXS700M2D/M4D (Aluminum wheel model)
80 lbf·ft (108 N·m, 11 kgf·m)
Technical Information 235
Te236
Bre
Help aspayingday or
During
ak-in Guidelines
sure your Honda SXS’s future reliability and performance by extra attention to how you drive during the first operating 15 miles (25 km).
this period, avoid full-throttle starts and rapid acceleration.
chnical Information

ExhauThe U.SResourCanadaexhausand ma
The Veright fr
RIGH
vehic
vehic(Cana
Emission Control Systems
st Emission Requirements. Environmental Protection Agency (EPA), the California Air
ces Board (CARB), and Environment and Climate Change (ECCC) require that your SXS comply with applicable
t emissions standards during its useful life, when operated intained according to the instructions provided.
hicle Emission Control Information Label is attached on the ont side of the frame.
T FRONT SIDE OF THE FRAME
le emission control information label da model only)
Technical Information 237
le emission control information label

Te238
Emi
SourceThe conitrogeoxides conditito sunlis toxic
Hondamonox
ExhauThe exhthree-wNo adjuinspectThe exhemissio
Evapo(USA -An evacharcooff. Th
ModelsAn addevaporrequire
CrankcThe endischarreturne
ssion Control Systems
of Exhaust Emissionsmbustion process produces carbon monoxide (CO), oxides of n (NOx) and hydrocarbons (HC). Control of hydrocarbons and of nitrogen is very important because, under certain ons, they react to form photochemical smog when subjected ight. Carbon monoxide does not react in the same way, but it .
Motor Co., Ltd. utilizes various systems to reduce carbon ide, oxides of nitrogen and hydrocarbons.
st Emission Control Systemaust emission control system includes an oxygen sensor, a ay catalytic converter and a PGM-FI system.stment to this system should be made although periodic
ion of the components is recommended.aust emission control system is separate from the crankcase n control system.
rative Emission Control System 50 States [meets California])porative emissions control system uses a canister filled with al to adsorb fuel vapor from the fuel tank while the engine is e vapor is drawn into the engine and burned while driving.
sold in and used in California:-on or modified part must be compliant with applicable ARB ative emission control standards. A violation of this ment is punishable by civil and/or criminal punishment.
chnical Information
ase Emission Control Systemgine is equipped with a closed crankcase system to prevent ging crankcase emissions into the atmosphere. Blow-by gas is d to the combustion chamber through the air cleaner.
ProbleEmissiIf you ainspect
Sympto1. Har2. Rou3. Mis4. Afte5. Poo
Federaelemenperformexclusivsanctioemissio
If you lutility vinformused fo
Emission Control Systems
ms That May Affect Off-road Utility Vehicle Exhaust onsre aware of any of the following symptoms, have the vehicle ed and repaired by your off-road utility vehicle dealer.
ms:d starting or stalling after startinggh idlefiring or backfiring during accelerationr-burning (backfiring)r performance (driveability) and poor fuel economy
l regulations prohibit removing or disabling a device or t of design that may affect your engine’s emission ance unless your Honda off-road utility vehicle will be used ely in competition. If you modify your engine for use in ned competition events, you must deface or destroy the n control information label.
oan, sell, or give your competition modified Honda off-road ehicle to someone else, according to applicable law, you must the new owner/operator in writing that the vehicle is to be r competition only.
Technical Information 239

Te240
Emi
Noise TAMPEState lafollowiinoperarepair oincorpoprior touse; ordesign
AMONTHE FO• Rem
any• Rem• Lac• Rem
repcom
Fuel PeThis veregulatCaliforClimateThe fuevehicleTampeto redutechno
ssion Control Systems
Emission Control SystemRING WITH THE NOISE CONTROL SYSTEM IS PROHIBITED:ws prohibit, or Canadian provincial laws may prohibit, the
ng acts or the causing thereof: (1) The removal or rendering tive by any person, other than for purposes of maintenance, r replacement, of any device or element of design rated into any new vehicle for the purpose of noise control its sale or delivery to the ultimate purchaser or while it is in
(2) the use of the vehicle after such device or element of has been removed or rendered inoperative by any person.
G THOSE ACTS PRESUMED TO CONSTITUTE TAMPERING ARE LLOWING ACTS:oval of, or puncturing the muffler, baffles, header pipes or
other component which conducts exhaust gases.oval of, or puncturing of any part of the intake system.
k of proper maintenance.oving or disabling any emissions compliance component, or
lacing any compliance component with a non-compliant ponent.
rmeation Emission Control Systemhicle complies with the Fuel Permeation Emission Control ions of the U.S. Environmental Protection Agency (EPA), the nia Air Resources Board (CARB), and Environment and Change Canada (ECCC).l tank, fuel hoses, and fuel vapor charge hoses used on this
incorporate fuel permeation control technologies.ring with the fuel tank, fuel hoses, or fuel vapor charge hoses ce or defeat the effectiveness of the fuel permeation
chnical Information
logies is prohibited by federal regulations.
Some cether coxygenUnitedemissioIf you uminimuBefore Some spump.
The folnon-ro
ETHANYou mGasolin“GasohDo notThe useE85) ofmay cadamagnot be
Oxygenated Fuels
onventional gasolines are being blended with alcohol or an ompound. These gasolines are collectively referred to as ated fuels. To meet clean air standards, some areas of the States and Canada use oxygenated fuels to help reduce ns.se an oxygenated fuel, be sure it is unleaded and meets the m octane rating requirement.using an oxygenated fuel, try to confirm the fuel’s contents.tates/provinces require this information to be posted on the
lowing are the EPA-approved percentages of oxygenates for ad vehicles:
OL (ethyl or grain alcohol) up to 10% by volumeay use gasoline containing up to 10% ethanol by volume. e containing ethanol may be marketed under the name ol”.
use gasoline containing more than 10% ethanol by volume. of gasoline containing a higher percentage (e.g. E15, E20, ethanol has not been approved for use in this vehicle and use starting and/or performance problems and can also e metal, rubber, and plastic parts of the fuel system and are covered by the Distributor’s Limited Warranty.
Technical Information 241
Te242
Oxy
METHAYou mmethancorrosimore tperformplastic
If you nservice
Fuel sysof an ooxygen
Oxygenspill fue
NOTOxygenspilled
genated Fuels
NOL (methyl or wood alcohol) up to 5% by Volumeay use gasoline containing methanol containing up to 5% ol by volume as long as it also contains cosolvents and
on inhibitors to protect the fuel system. Gasoline containing han 5% methanol by volume may cause starting and/or
ance problems. It may also damage metal, rubber, and parts of your fuel system.
otice any undesirable operating symptoms, try another station or switch to another brand of gasoline.
tem damage or performance problems resulting from the use xygenated fuel containing more than the percentages of ates mentioned above are not covered under warranty.
ated fuels can damage paint and plastic. Be careful not to l when filling the fuel tank. Wipe up any spills immediately.
ICEated fuels can damage paint and plastic. Damage caused by fuel is not covered by warranty.
chnical Information
This SXcatalytipromoaffectin
The catmust b
The catchemicmateriadry lea
A defeimpair your SX
• Alwgascata
• Keeengdam
• If yorunHav
Catalytic Converter
S is equipped with a three way catalytic converter. The c converter contains precious metals that serve as catalysts, ting chemical reactions to convert the exhaust gasses without g the metals.
alytic converter acts on HC, CO, and NOx. A replacement unit e an original Honda part or its equivalent.
alytic converter must operate at a high temperature for the al reactions to take place. It can set fire to any combustible ls that come near it. Park your SXS away from high grasses,
ves, or other flammables.
ctive catalytic converter contributes to air pollution, and can your engine’s performance. Follow these guidelines to protect S’s catalytic converter.
ays use unleaded gasoline. Even a small amount of leaded oline can contaminate the catalyst metals, making the lytic converter ineffective.p the engine in good running condition. A poorly running ine can cause the catalytic converter to overheat causing age to the converter or the SXS.ur engine is misfiring, backfiring, stalling, or otherwise not
ning properly, stop driving and turn off the engine.e your SXS serviced as soon as possible.
Technical Information 243
Te244
BLANK PAGE
chnical Information
Consumer InformationThis sean offic
AuthorWarranWarranContacYour H
Consumer Information
ction contains information on your warranty and how to get ial Honda service manual.
ized Manuals ................................................................. 246ty Coverage .................................................................. 247ty Service ...................................................................... 248ting Honda .................................................................... 249onda Dealer ................................................................... 250
Consumer Information 245

C246
Aut
The Seyour Hto orde
Also avCommbasic sescooter
(USA oThe Wiand Sescooter
These Hbut moif they Special
Pu61HL
61CSS95031HL
horized Manuals
rvice Manual used by your authorized dealer is available from onda dealer or Helm, Inc. (USA only, Canada: See your dealer r authorized manuals.)
ailable but not necessary to service your model is the Honda on Service Manual which explains theory of operation and rvice information for various systems on Honda motorcycles, s, ATVs, SXSs and PWCs.
nly)nter Storage Guide in conjunction with the Owner’s Manual rvice Manual can help you prepare your Honda motorcycle, , ATV, and SXS for winter storage.
onda manuals are written for the professional technician, st mechanically capable owners should find them easy to use have the proper tools and observe proper safety standards. Honda tools are necessary for some procedures.
Order On-Line: www.helminc.com
blication Item No. Description305 2019 SXS700M2/M2D/M4/M4D
PIONEER Service Manual
M00 Common Service Manual7 (USA only) Winter Storage Guide3650 2019 SXS700M2/M2D/M4/M4D
PIONEER Owner’s Manual
onsumer Information
Order Toll Free: 1-888-CYCLE93 (1-888-292-5393)(NOTE: For Credit Card Orders Only)
Monday - Friday 8:00 AM - 6:00 PM EST
Your n• Hon• Emi
There athese wyour HHonda
Canadaat www
It is impmateriadoes nothe Ho
Your wyour owand seroccur d
AlmostHondadealer.
Warranty Coverage
ew Honda is covered by these warranties:da SXS Limited Warrantyssion Control System Warranty
re responsibilities, restrictions, and exclusions which apply to arranties. Please read the Warranties Booklet given to you by
onda dealer at the time of purchase. Be sure to keep your owner’s card with your Warranties Booklet.
: Please refer to the Warranty Booklet posted on our website .honda.ca.
ortant to realize that your warranty applies to defects in l or workmanship of your Honda. Your warranty coverage t apply to normal wear or deterioration associated with using
nda SXS.
arranty coverage will not be voided if you choose to perform n maintenance. However, you should have the proper tools
vice information and be mechanically qualified. Failures that ue directly to improper maintenance are not covered.
all of your warranty coverage can be extended through the Protection Plan (USA only). For more information, see your
Consumer Information 247
C248
Wa
Please is not iwarrantires, e
If you bserviceinspectSXS, yogive yowarran
If you hrepair,
Sometimisunddealer’problemmanagthe Serthe Ow
rranty Service
remember that recommended maintenance interval servicing ncluded in your warranty coverage. Additionally, your ty does not apply to the normal wear of items (such as brakes, tc.).
elieve you have a problem with your Honda SXS, call the department of your dealer. Make an appointment for an ion and diagnosis. Remember, as the owner of the Honda u will be asked to authorize that inspection. Your dealer will u the results of the inspection. If the problem is covered under ty, your dealer will perform the warranty repairs for you.
ave questions about warranty coverage or the nature of the it is best to talk to the Service Manager of your dealer.
mes, in spite of the best intentions of all concerned, a erstanding may occur. If you aren’t satisfied with your s handling of the situation, we suggest you discuss your
with the appropriate member of the dealership’s ement team. If the problem has already been reviewed with vice Manager, Parts Manager, Sales Manager, etc., contact ner of the dealership or their designated representative.
onsumer Information
Your oyou miowner’doesn’
If you hrememoperatedifferen
If you wwith yoaddresMotorc2200, T(866) 7
CanadaBoulevfacsimiE-mail:
Please • nam• pro• dat• dea
We wilyour co
Contacting Honda
wner’s manual was written to cover most of the questions ght ask about your Honda. Any questions not answered in the s manual can be answered by your dealer. If your dealer t have the answer right away, they will get it for you.
ave a difference of opinion with your dealer, please ber that each dealership is independently owned and d. That’s why it’s important to work to resolve any ces at the dealership level.
ish to comment on your experiences with your Honda or ur dealer, please send your comments to the following
s:ycle Division, American Honda Motor Co., Inc., P.O. Box orrance, CA 90509-2200, mailstop: 100-4C-7B, telephone: 84-1870.
: Honda Canada Inc., Customer Relations Dept, 180 Honda ard, Markham, Ontario L6C 0H9, telephone: (888) 946-6329, le: (877) 939-0909. [email protected]
include the following information in your letter:e, address, and telephone number
duct model, year, and VINe of purchaseler name and address
l likely ask your dealer to respond, or possibly acknowledge mments directly.
Consumer Information 249

C250
You
Once yorganizservice
The serunexpefrom Hinspect
The paproducaccessointo yoYou’ll aavailab
The salalmost
Your Hdrivingsource area.
We’re continudepend
r Honda Dealer
ou purchase your new Honda, get familiar with the ation of your Honda dealer so you can utilize the full range of
s available.
vice department is there to perform regular maintenance and cted repairs. It has the latest available service information onda. The service department will also handle warranty ions and repairs.
rts department offers Honda Genuine Parts, Pro Honda ts, Honda Genuine Accessories (USA only), and Honda ries and products (Canada only). The same quality that went
ur Honda can be found in Honda Genuine replacement parts. lso find comparable quality in the accessories and products
le from the parts department.
es department offers the Honda Protection Plan to extend all of your warranty coverage (USA only).
onda dealer can inform you about competition and other events in your area. You'll also find that your dealer is a of information about safety training available in your local
sure you’ll be as pleased with the service your Honda dealer es to provide after the sale as you are with the quality and ability of your Honda.
onsumer Information
Index
Aaccessoaccessoage anair clea
bodyfilter hous
air guidair presAmericappareappearAT/MTauthor
Bbatterybrakes,
fluid pad wparkiparkipeda
break-i
Ccapacitcare, acargo,
bed limit
catalyti
Index
ries ...................................................................................4ry power socket ..............................................................63
d size recommendation ......................................................2ner, ......................................................................................148......................................................................................146
ing drain tube ................................................................150e plate removal .............................................................120sure, tire ........................................................................175an Honda, contacting ....................................................249l, protective ......................................................................71ance care .......................................................................188 switch .............................................................................35ized manuals ..................................................................246
.....................................................................................183
......................................................................................167ear ...............................................................................170
ng brake lever ..................................................................40ng brake lever freeplay ...................................................172l inspection ....................................................................171n guidelines ...................................................................236
y, fuel ............................................................................125ppearance ......................................................................188
Index 251
.........................................................................................64
.....................................................................................3, 77c converter ....................................................................243
In252
Indecleaninclimbinclip remcolor lacompa
ownestoratool k
compoconsumcoolancrash, icrossincustom
Ddigital dipstickdoors .drive mdrive mdriveshdriving
basicclothprecaprepasafetthrou
Eelectricemissio
xg, appearance care ........................................................188g hills ..............................................................................96oval ..............................................................................121
bel ................................................................................229rtment,r’s manual .....................................................................118
ge ....................................................................................62it ..................................................................................117
nent fails ........................................................................225er information ..............................................................245
t temperature gauge ........................................................28f you ..............................................................................221g a hill ..............................................................................98er service .......................................................................249
clock ................................................................................26 .....................................................................................130.........................................................................................41ode .................................................................................89ode select lever ...............................................................38aft boots ........................................................................182, operations ......................................................................81ing .........................................................................2, 70, 71utions .............................................................................91ring for .........................................................................194
y ........................................................................................2gh water .........................................................................99
dex
power steering (EPS) indicator .........................................18n control systems ..........................................................237
enginenumboil ...pingistartistoppwon’
environ
Ffinal geflat tirefour wframe fuel gafuel,
fill caoxygrecomtank
fuses .
Ggap, spgasohogasolingear pogear po
Hheadlig
Index,er .................................................................................228
.......................................................................................127ng ..................................................................................124ng ....................................................................................82ing ..................................................................................82t start ............................................................................206ment .............................................................................202
ar oil .....................................................................137, 139 .....................................................................................211heel drive indicator ...........................................................32.......................................................................................166uge ..................................................................................24
p ...................................................................................125enated ...........................................................................241
mendation ...................................................................124capacity .........................................................................125.......................................................................................216
ark plug ................................................................159, 232l ....................................................................................241e ....................................................................................124sition display ...................................................................32sition indicator ................................................................32
Index 253
ht switch .........................................................................34
In254
Indehill,
approcrossdrivindrivinstopp
hour m
Iidentifiignitionindicat
differelectgear high neutrparkiPGMreverseat
inspect
Kkey,
lost .numb
kit, too
Llabels, limit, cloading
x
aching a hill ....................................................................96ing a hill ...........................................................................98g down a hill ...................................................................97g up a hill ........................................................................97ing on a hill .....................................................................97eter .................................................................................30
cation, vehicle ................................................................228 switch ............................................................................33
ors,ential lock indicator .........................................................17
ric power steering (EPS) indicator ......................................18position indicator .............................................................32coolant/oil temperature indicator .............................17, 214al indicator ......................................................................17ng brake indicator ............................................................17-FI malfunction indicator lamp (MIL) .................................17se indicator ......................................................................17belt indicator ....................................................................17ion, pre-drive ...................................................................74
.......................................................................................222er .................................................................................222
l ....................................................................................117
dex
safety .................................................................................6argo .............................................................................3, 77 guidelines ......................................................................78
lubricaenginfinal point
Mmainte
impomainprecarecorsafetsched
manuamaximmodificmulti-f
Nneutralnoise enumbe
Oobstaclodomeodomeoil,
enginfinal high
owner’oxygen
Indextion,e oil ..............................................................................128
gear oil ..................................................................137, 139s ....................................................................................151
nance,rtance ............................................................................103tenance minder indicator .........................................31, 107utions ...........................................................................105d ...................................................................................111y ....................................................................................104ule ................................................................................106
l, service .........................................................................246um weight limit ............................................................3, 77ations ................................................................................5
unction display .................................................................21
indicator .........................................................................17mission control systems .................................................240rs, serial .........................................................................228
es, avoiding .....................................................................98ter ...................................................................................27ter display ........................................................................23
e ...................................................................................128
Index 255
gear .......................................................................137, 139coolant/oil temperature indicator .............................17, 214s manual storage ...........................................................118ated fuels ......................................................................241
In256
Inde
Pparkingpassen
handno ca
pedal, pingingplug, spre-driproblemprotect
Rremovareverse
Ssafety,
drivinimpolabel
scheduseat,
beltsremo
serial nservice
customanuwarra
shiftingside nespark a
x
.......................................................................................90ger,hold .................................................................................61rrying in cargo bed ............................................................3
accelerator .....................................................................156, engine ........................................................................124
park ...............................................................................158ve inspection ....................................................................74
s, unexpected ..............................................................204ive apparel .......................................................................71
l, seat ............................................................................122 indicator .........................................................................17
g precautions ..................................................................91rtant precautions ...........................................................105s .........................................................................................6le, maintenance .............................................................106
........................................................................................54val .................................................................................122umbers ..........................................................................228,mer ...............................................................................249als ................................................................................246
dex
nty ................................................................................248 .......................................................................................37ts .....................................................................................43rrester ...........................................................................161
spark kspark pspecificspeedospeedostarting
engintroub
stoppinstorage
owneSXS
suspenadjussprin
switch,headigniti
Ttailgatetires,
air prflat .repaireplathrea
tool kittrailer htrailer t
operaweig
transpo
Indexnock ..............................................................................124lugs ...............................................................................158ations ............................................................................230meter ..............................................................................22meter display ...................................................................22,e .....................................................................................82leshooting .....................................................................206g engine .........................................................................82,r’s manual .....................................................................118.......................................................................................198sion,tment ............................................................................164g pre-load ......................................................................165
light .................................................................................34on ....................................................................................33
levers .............................................................................64
essure ............................................................................175.......................................................................................211ring ................................................................................179cing ...............................................................................180d conditions ..........................................................177, 178 .....................................................................................117itch .................................................................................68owing,
Index 257
tional guidelines .............................................................79ht limits ............................................................................79rting your Honda ..........................................................196

In258
Indetripmettroubletroubleturning
Vvehicle
Wwarninwarran
coverextenservic
washinwater, weightwheel
xer ....................................................................................27, unexpected .................................................................203shooting, starting ..........................................................206, on level ground .............................................................95
identification no. (VIN) ..................................................228
g labels ..............................................................................6ty,age ...............................................................................247ded ...............................................................................247e ...................................................................................248g your SXS .....................................................................189driving through ................................................................99 limit ................................................................................77removal ..........................................................................212
dex
Quick R
QuiQuick ReferenceThe folneed toimport
The enrepair. fluids a
Freque• Eng• Air
(poRecord
How
ck Reference
lowing is a brief, but important collection of information you know about your Honda. You’ll also find space to record
ant notes.
gine of your Honda can be the most expensive component to Proper maintenance, especially the use of the recommended nd filters, prevents premature wear and damage.
nt causes of costly repairs are:ine oil — insufficient quantity, improper oil.cleaner — dirty, leaking because of improper installation or seal). important information on the following page:
To Avoid Costly Repairs
eference
EnginVINColoOwn
AdCitPh
DealAdCitPhSer
Quick Reference
e No.
r Labeler’s Namedressy/Stateoneer’s Namedressy/Stateonevice Mgr.
Quick Reference
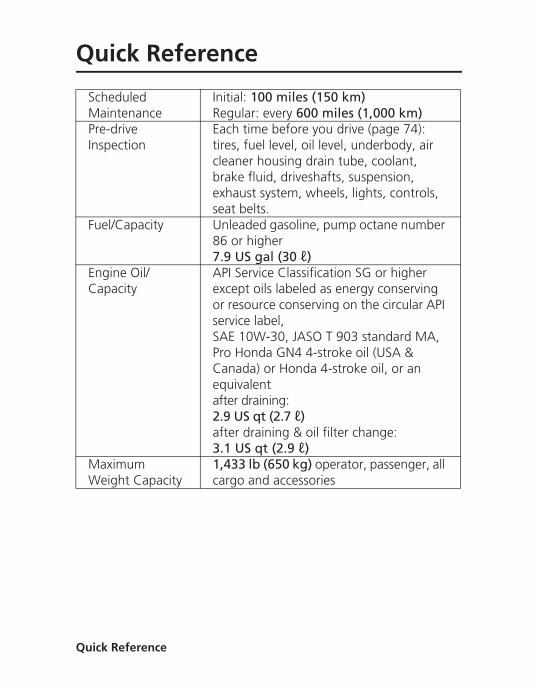
Quick R
Qui
ScheMainPre-dInspe
Fuel/
EnginCapa
MaxiWeig
ck Reference
duled tenance
Initial: 100 miles (150 km)Regular: every 600 miles (1,000 km)
rive ction
Each time before you drive (page 74): tires, fuel level, oil level, underbody, air cleaner housing drain tube, coolant, brake fluid, driveshafts, suspension, exhaust system, wheels, lights, controls, seat belts.
Capacity Unleaded gasoline, pump octane number 86 or higher7.9 US gal (30 ℓ)
e Oil/city
API Service Classification SG or higher except oils labeled as energy conserving or resource conserving on the circular API service label, SAE 10W-30, JASO T 903 standard MA, Pro Honda GN4 4-stroke oil (USA & Canada) or Honda 4-stroke oil, or an equivalentafter draining: 2.9 US qt (2.7 ℓ)after draining & oil filter change:3.1 US qt (2.9 ℓ)
mum ht Capacity
1,433 lb (650 kg) operator, passenger, all cargo and accessories
eference
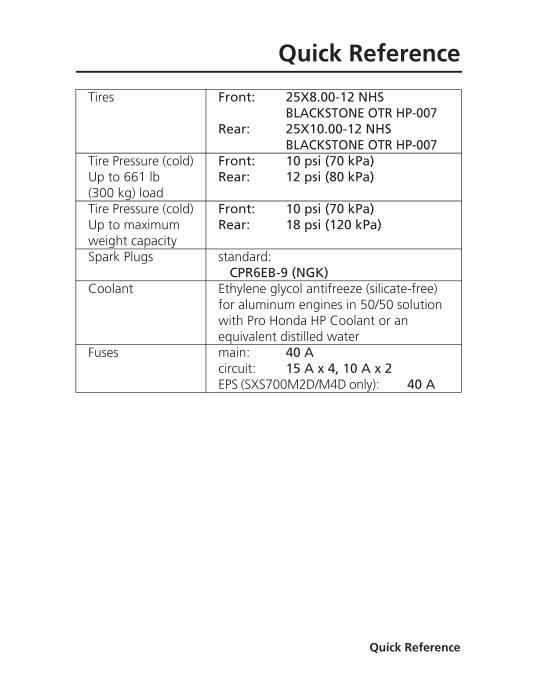
Tires
Tire PUp to(300Tire PUp toweigSpar
Cool
Fuse
Quick Reference
Front: 25X8.00-12 NHSBLACKSTONE OTR HP-007
Rear: 25X10.00-12 NHSBLACKSTONE OTR HP-007
ressure (cold) 661 lb
kg) load
Front: 10 psi (70 kPa)Rear: 12 psi (80 kPa)
ressure (cold) maximum
ht capacity
Front: 10 psi (70 kPa)Rear: 18 psi (120 kPa)
k Plugs standard:CPR6EB-9 (NGK)
ant Ethylene glycol antifreeze (silicate-free) for aluminum engines in 50/50 solution with Pro Honda HP Coolant or an equivalent distilled water
s main: 40 Acircuit: 15 A x 4, 10 A x 2EPS (SXS700M2D/M4D only): 40 A
Quick Reference
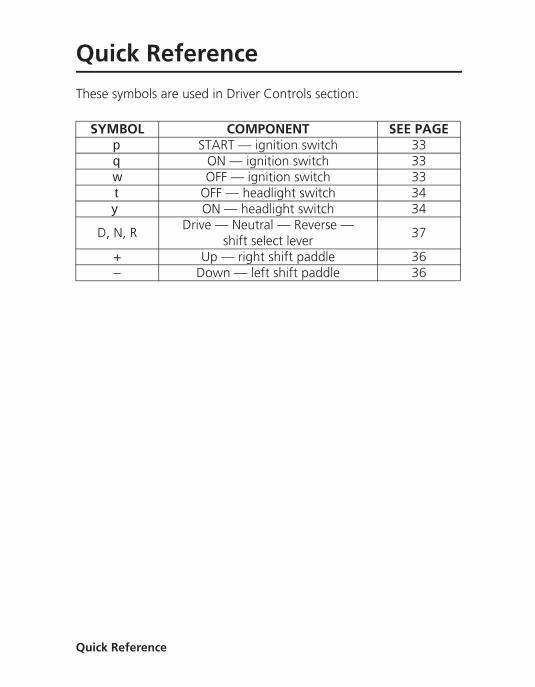
Quick R
Qui
These s
SYMp
q
w
y
D,
ck Reference
ymbols are used in Driver Controls section:
BOL COMPONENT SEE PAGESTART — ignition switch 33
ON — ignition switch 33OFF — ignition switch 33
t OFF — headlight switch 34ON — headlight switch 34
N, RDrive — Neutral — Reverse —
shift select lever37
+ Up — right shift paddle 36– Down — left shift paddle 36
eference