21st century physics & astronomy labcoloradoscienceconference.org/files/celestial navigation and...
TRANSCRIPT
Celestial Navigation and Stellar Magnitudes - 1
21st Century Physics & Astronomy Lab
Names:___________________________
___________________________
___________________________
Section: __________________________
Date: ____________________________

Celestial Navigation and Stellar Magnitudes - 2
21st Century Physics & Astronomy Lab
Celestial Navigation and Stellar Magnitudes
Authors: T. Wolfe, A. Fullard, L. Huk, P. Hallam
Purpose of the Experiment
To introduce you to some basic ideas of observational astronomy, including
coordinate systems, celestial navigation, the magnitude scale and calculating
distances to stars.
To understand what light pollution is, the problems it causes, and its solutions.

Celestial Navigation and Stellar Magnitudes - 3
Background Information
This lab will explore concepts of the Celestial Sphere by performing celestial
navigation calculations based on data obtained from a meridian transit observation of a
single star. With this exercise, you will be able to calculate your position on Earth with
relative accuracy. Additionally, you will learn about the stellar magnitude system with
which the brightness of stars are categorized.
The Celestial Sphere and Celestial Coordinates
While the use of the Horizon coordinate system is convenient for measuring the
position of a celestial body at a particular point in time, it is limited in the sense that a
star’s Horizon coordinates will change within a short amount of time. Thus, a system in
which a star has fixed coordinates is more useful in providing an actual map of the sky.
Astronomers use a grid of Celestial coordinates in order to provide just that. This
coordinate system maps the night sky according to a grid, called the Celestial Sphere,
which is an extension of the longitude and latitude system on Earth, but projected onto
the sky. See Figure 1 for a labeled diagram of this system.
Figure 1: The Celestial Sphere, showing example right ascensions and declination lines. Image credit:
davidpratt.info/earth

Celestial Navigation and Stellar Magnitudes - 4
Instead of making use of the terms longitude and latitude, the Celestial Sphere
uses right ascension and declination, respectively. Declination, the Celestial Sphere’s
latitude, spans from -90° (or 90°S) at the South Celestial Pole, to 0° at the Celestial
Equator, to +90° (or 90°N) at the North Celestial Pole. Right ascension, the Celestial
Sphere’s longitude, increases Eastward from a location on the Celestial Sphere known as
the Vernal Equinox. This is the point at which the Celestial Equator is intersected by the
Ecliptic (the path of the Sun mapped on the Celestial Sphere), where the Sun would move
Northward past this point during the month of March. Unlike longitude, however, right
ascension is measured in hours instead of degrees. Historically, this convention was
conceived due to the importance of measuring a star’s position in the sky at a specific
point in time, as the diurnal motion of the Celestial Sphere causes the stars to appear to
move with respect to one’s point of observation on Earth. Because the Earth rotates at a
rate of about 360° in 24 hours, right ascension is measured from 0 to 24 hours.
It is important to remember the co-alignment between Earth and the Celestial
Sphere, as indicated previously. This means that a coordinate in Earth latitude is equal to
a coordinate of declination, and an “hour angle” in right ascension corresponds to a 15°
angle of longitude on Earth (since Earth rotates at 15°/hour). Figure 2 demonstrates this
co-alignment.
Figure 2: Depiction of the Celestial Sphere surrounding the Earth, showing coord reference lines for both
the Celestial coordinate system and Earth latitude and longitude. Image credit: jrjohnson.net/wp-content

Celestial Navigation and Stellar Magnitudes - 5
Celestial Navigation
A useful way to demonstrate the link between the Celestial Sphere and Earth
coordinates is to practice a celestial navigation technique similar to that used by sailors,
explorers, and anyone in need of finding their position on Earth, throughout history. The
basis of this method involves calculating your longitude and latitude coordinates by
finding the local time that a star transits (or crosses) your local meridian (a reference
coordinate line passing from North to South in the sky, directly overhead), and measuring
that star’s altitude in the sky during this event. To do this accurately you will need a clear
night sky, a clock, an astrolabe, knowledge of your local time zone, and some ability to
correct for factors that affect accurate time calculations regarding transit measurements.
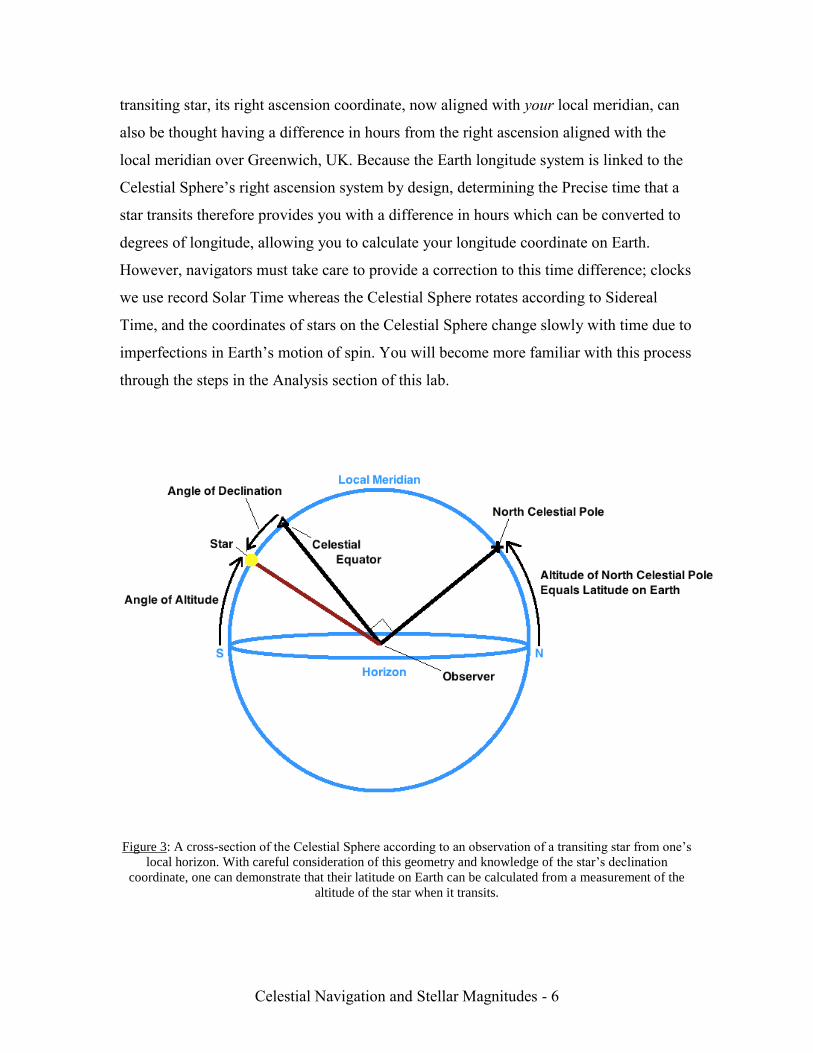
To find your latitude, the simplest method is to measure the altitude of the
Celestial Pole relevant to the hemisphere on Earth (North or South) encompassing your
location. In the Northern hemisphere, the star Polaris can be used as it is very close in
position to the North Celestial Pole. Because of this, it is also known as the North Star: if
you stood at Earth’s North Pole (90°N latitude), Polaris would be directly overhead (90°
altitude). Were you to travel South from that position, Polaris would decrease in altitude
until you reached Earth’s Equator (0° latitude), where it would basically be on the
horizon (0° altitude). Therefore, the altitude of Polaris as seen from anywhere in the
Northern Hemisphere is equal to the latitude of that location.
However, Polaris does not provide a useful means of determining one’s longitude.
Thus, observing other stars during their meridian transit provides better data with which
to calculate your position on Earth. The altitude of a star during its transit, while not
equal to your latitude, can be used to derive your latitude with some extra calculation.
Figure 3 demonstrates the arrangement of angles that provide this relationship, which you
will use later in the lab.
The local time that a transit occurs actually contains information about your
longitude on Earth, due to Earth’s known rotation rate and the layout of the Celestial
Sphere with respect to Earth coordinates. The simplest way to think about this is that your
time zone standards have a known difference in hours from the global time zone
standard, Universal Time (UT, also known as Greenwich Mean Time), corresponding to
0° Earth longitude which runs through Greenwich in the United Kingdom. For a
Celestial Navigation and Stellar Magnitudes - 6
transiting star, its right ascension coordinate, now aligned with your local meridian, can
also be thought having a difference in hours from the right ascension aligned with the
local meridian over Greenwich, UK. Because the Earth longitude system is linked to the
Celestial Sphere’s right ascension system by design, determining the Precise time that a
star transits therefore provides you with a difference in hours which can be converted to
degrees of longitude, allowing you to calculate your longitude coordinate on Earth.
However, navigators must take care to provide a correction to this time difference; clocks
we use record Solar Time whereas the Celestial Sphere rotates according to Sidereal
Time, and the coordinates of stars on the Celestial Sphere change slowly with time due to
imperfections in Earth’s motion of spin. You will become more familiar with this process
through the steps in the Analysis section of this lab.
Figure 3: A cross-section of the Celestial Sphere according to an observation of a transiting star from one’s
local horizon. With careful consideration of this geometry and knowledge of the star’s declination
coordinate, one can demonstrate that their latitude on Earth can be calculated from a measurement of the
altitude of the star when it transits.

Celestial Navigation and Stellar Magnitudes - 7
Magnitude Scale
The magnitude scale is a scale for indicating the brightness of objects in the night
sky. The key features of the scale are:
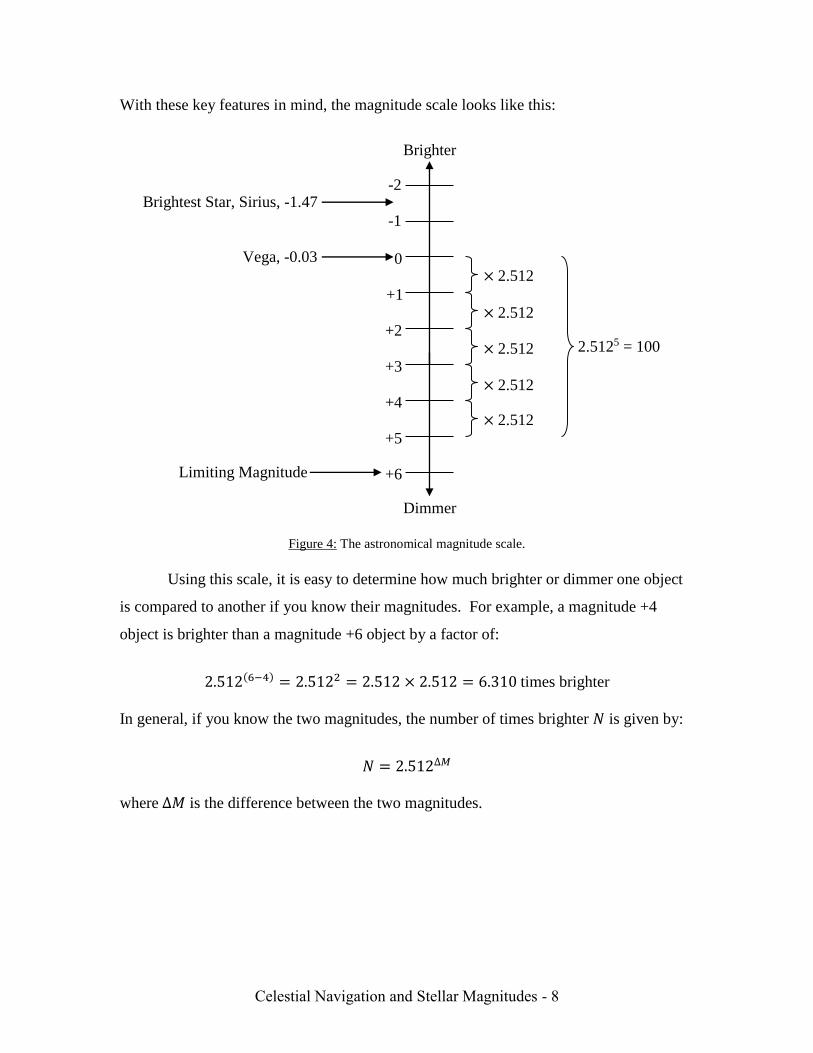
The zero point on the scale is roughly based on the star Vega, which has a
magnitude close to zero of -0.03.
More negative values on the scale indicate brighter objects. Thus, an object with
a magnitude +1 is dimmer than an object with a -1. Similarly, +3 is dimmer than
+1. This is somewhat counterintuitive. The reason for this is that when the scale
was first created around 2000 years ago by the Greek astronomer Hipparchus, he
gave the 1st brightest group of stars in the sky a magnitude 1, the 2nd brightest
group were given a magnitude 2, etc. Later, when more accurate measurements
of the brightness of stars became feasible, it was discovered that some stars are
brighter than first magnitude and thus were assigned negative numbers (i.e. 0
being brighter than +1, and -1 being brighter than 0, etc.).
The differences in brightness on the scale are based on a change of 5 magnitudes
corresponding to 100 times the brightness. Thus, a change of 1 magnitude on the
scale is √1005
= 2.512. Thus, it is a logarithmic scale.
Celestial Navigation and Stellar Magnitudes - 8
With these key features in mind, the magnitude scale looks like this:
Figure 4: The astronomical magnitude scale.
Using this scale, it is easy to determine how much brighter or dimmer one object
is compared to another if you know their magnitudes. For example, a magnitude +4
object is brighter than a magnitude +6 object by a factor of:
2.512(6−4) = 2.5122 = 2.512 × 2.512 = 6.310 times brighter
In general, if you know the two magnitudes, the number of times brighter 𝑁 is given by:
𝑁 = 2.512∆𝑀
where ∆𝑀 is the difference between the two magnitudes.
-2
-1
0
+1
+2
+3
+4
+5
+6
× 2.512
× 2.512
2.5125 = 100
Brighter
Dimmer
Limiting Magnitude
Brightest Star, Sirius, -1.47
× 2.512
× 2.512
× 2.512
Vega, -0.03

Celestial Navigation and Stellar Magnitudes - 9
We need to define three basic types of magnitude that are useful in astronomy:
apparent magnitude, absolute magnitude and limiting magnitude.
Apparent Magnitude, m The apparent brightness of an object as seen from Earth.
Absolute Magnitude, M A measure of the brightness of an object (either intrinsic
brightness or due to reflected light in the case of planets).
For stars, the absolute magnitude is equal to the apparent
magnitude of an object if it were viewed from a distance of
10 parsecs (32.62 light-years or 1.917 × 10¹⁴ miles).
Limiting Magnitude The faintest apparent magnitude detectable by a given
instrument. This term usually refers to the magnitude of the
faintest stars that can be seen with the unaided human eye.
On a good, reasonably clear night this value is around +6.
There is a connection between an object’s apparent magnitude and its absolute
magnitude: a bright object that is farther away will appear dimmer. Conversely, a dim
object that is close by will appear brighter. This is why absolute magnitude is equal to a
star’s apparent magnitude when viewed at a distance of 10 parsecs. If you could place all
of the stars in the sky at a distance of 10 parsecs from the Earth, you could compare their
intrinsic brightness directly to each other without having to account for differences in
distance. It might occur to you that if you know a star’s apparent magnitude (which is
relatively easy to measure) and a star’s absolute magnitude (which can be determined if
you know something about how stars work), you can figure out how far away the star is.
In fact, this is an easy calculation to perform:
𝑑 = 100.2(𝑚−𝑀+5)
where 𝑑 is the distance to the star in parsecs, 𝑚 is the apparent magnitude, and 𝑀 is the
absolute magnitude. Solving for the absolute magnitude in terms of distance, we have:
𝑀 = 𝑚 − 5[𝑙𝑜𝑔10(𝑑) − 1]

Celestial Navigation and Stellar Magnitudes - 10
The Lab
Purpose of the Experiment:
To introduce you to some basic ideas of observational astronomy, including the
magnitude scale and calculating distances to stars. To understand what light pollution is,
the problems it causes, and its solutions. To give you a brief overview of Starry Night
College.
Apparatus
Windows PC (Indoors)
Starry Night College (Indoors)
Astrolabe
Tripod
Adhesive
Bull’s-eye level
Flashlight/headlamp with red cellophane
Celestial Navigation and Stellar Magnitudes - 11
Part Ia: Celestial Navigation (OUTDOOR-ONLY)
Skip to Part Ib if performing the lab indoors (page 17)
In order to observe the transit of a star and accurately record its time, you must
have an instrument calibrated to the Cardinal directions. Thus, an astrolabe will make a
suitable instrument for this measurement, once calibrated so that the 0° mark on it’s
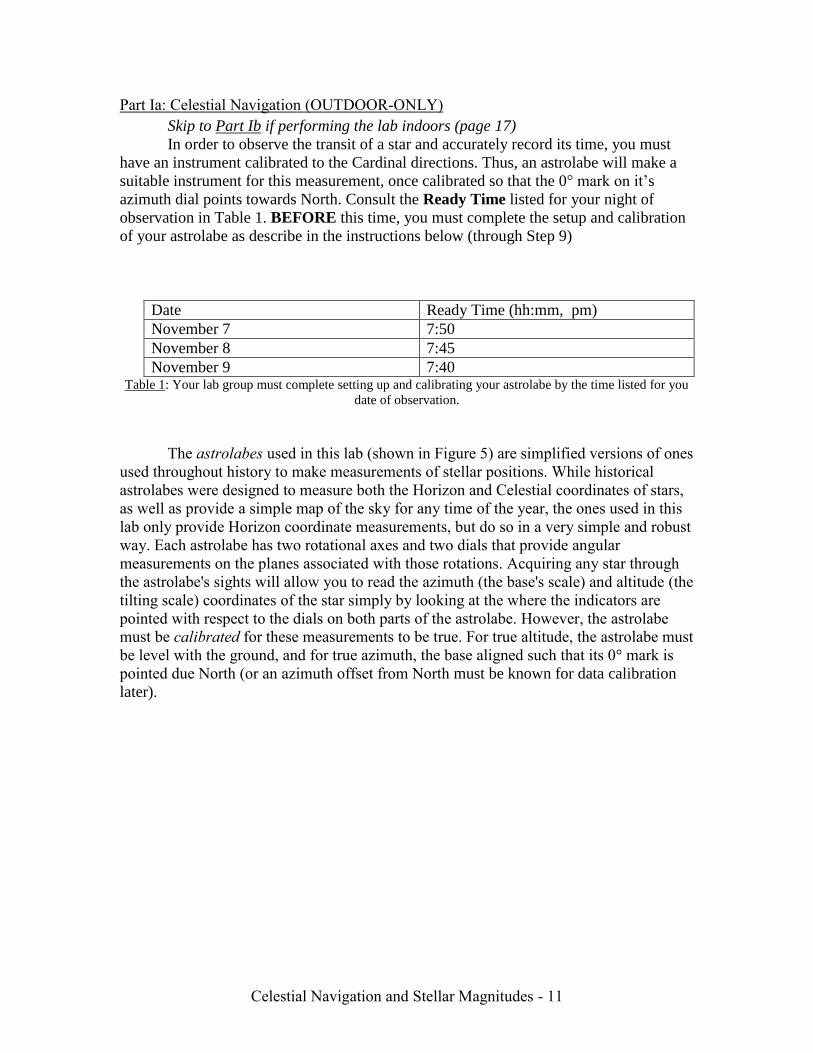
azimuth dial points towards North. Consult the Ready Time listed for your night of
observation in Table 1. BEFORE this time, you must complete the setup and calibration
of your astrolabe as describe in the instructions below (through Step 9)
Date Ready Time (hh:mm, pm)
November 7 7:50
November 8 7:45
November 9 7:40 Table 1: Your lab group must complete setting up and calibrating your astrolabe by the time listed for you
date of observation.
The astrolabes used in this lab (shown in Figure 5) are simplified versions of ones
used throughout history to make measurements of stellar positions. While historical
astrolabes were designed to measure both the Horizon and Celestial coordinates of stars,
as well as provide a simple map of the sky for any time of the year, the ones used in this
lab only provide Horizon coordinate measurements, but do so in a very simple and robust
way. Each astrolabe has two rotational axes and two dials that provide angular
measurements on the planes associated with those rotations. Acquiring any star through
the astrolabe's sights will allow you to read the azimuth (the base's scale) and altitude (the
tilting scale) coordinates of the star simply by looking at the where the indicators are
pointed with respect to the dials on both parts of the astrolabe. However, the astrolabe
must be calibrated for these measurements to be true. For true altitude, the astrolabe must
be level with the ground, and for true azimuth, the base aligned such that its 0° mark is
pointed due North (or an azimuth offset from North must be known for data calibration
later).

Celestial Navigation and Stellar Magnitudes - 12
Figure 5: The astrolabe that will be used for taking measurements throughout the lab
The tripods you’ll be using are fairly simple. Each tripod has adjustable legs (in length
and separation from each other) that can be locked in place using the three leg-locks on
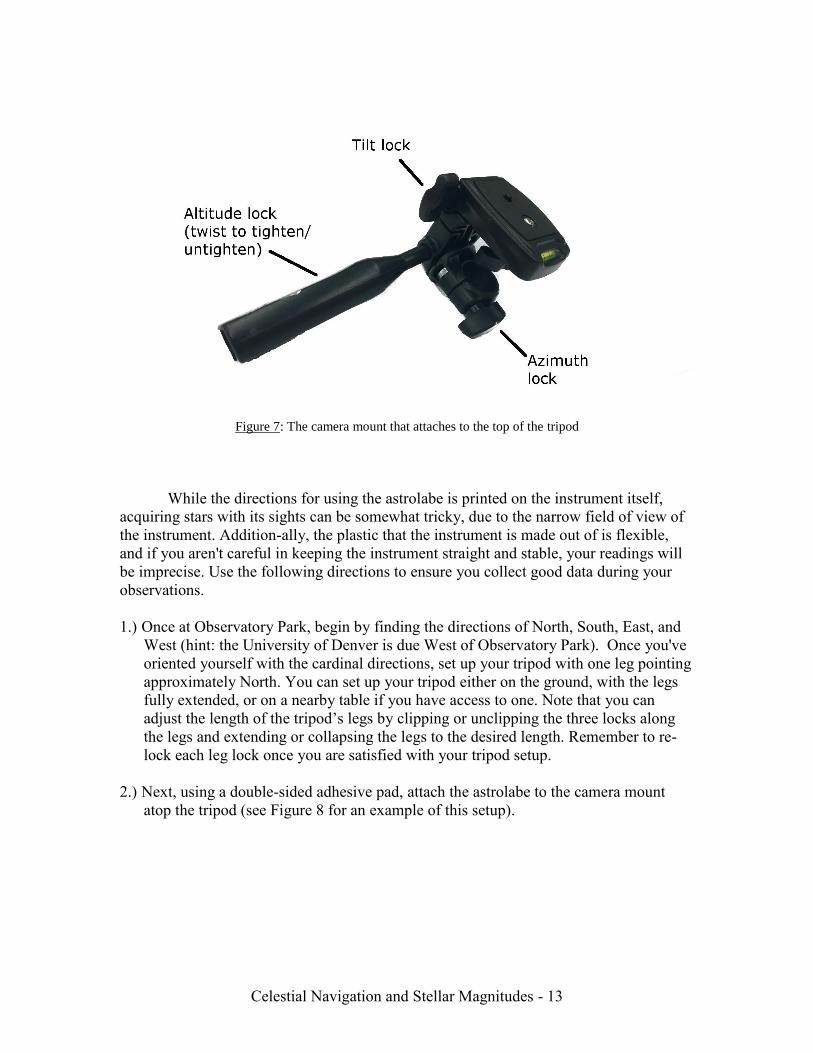
each leg. These leg-locks are indicated in Figure 6 Additionally, the camera mount on the
top of the tripod can be locked in its orientation using an altitude lock, azimuth lock, and
tilt lock. Each of these locks are indicated in Figure 7.
Figure 6: The simple camera tripod that will serve as a mount for the astrolabe
Celestial Navigation and Stellar Magnitudes - 13
Figure 7: The camera mount that attaches to the top of the tripod
While the directions for using the astrolabe is printed on the instrument itself,
acquiring stars with its sights can be somewhat tricky, due to the narrow field of view of
the instrument. Addition-ally, the plastic that the instrument is made out of is flexible,
and if you aren't careful in keeping the instrument straight and stable, your readings will
be imprecise. Use the following directions to ensure you collect good data during your
observations.
1.) Once at Observatory Park, begin by finding the directions of North, South, East, and
West (hint: the University of Denver is due West of Observatory Park). Once you've
oriented yourself with the cardinal directions, set up your tripod with one leg pointing
approximately North. You can set up your tripod either on the ground, with the legs
fully extended, or on a nearby table if you have access to one. Note that you can
adjust the length of the tripod’s legs by clipping or unclipping the three locks along
the legs and extending or collapsing the legs to the desired length. Remember to re-
lock each leg lock once you are satisfied with your tripod setup.
2.) Next, using a double-sided adhesive pad, attach the astrolabe to the camera mount
atop the tripod (see Figure 8 for an example of this setup).

Celestial Navigation and Stellar Magnitudes - 14
Figure 8: Tripod and astrolabe assembled together
3.) Then place the bull's eye level on top of the astrolabe’s azimuth dial. Adjust the length
of the tripod legs and make the surface of the mount level by observing the bubble
inside the level until it is within its circle marking. Lock down the tripod's legs at this
point and try not to bump the tripod for the rest of the observing session. If you do,
you will have to double-check that the tripod is level and re-level it if necessary.
4.) To calibrate the astrolabe's azimuth dial, you will need to acquire Polaris (α UMi, the
North Star) in the astrolabe's sights. In order to find Polaris, first find The Big
Dipper, the asterism depicted in Figure 9. This asterism is located slightly West of
North. If you cannot find it on your own, ask your TA for assistance. The portion of
The Big Dipper that is currently lowest in the sky may be hard to see due to Denver's
light pollution.
5.) Once you can identify The Big Dipper, note the two stars that form the edge of the
“cup” portion of the dipper. The lower of these two stars will be the lowest star in the
asterism. Facing the asterism, the upper of the two, called Dubhe, will be brighter, a

Celestial Navigation and Stellar Magnitudes - 15
little higher and to the right of the lower. These two stars are referred to as the
“pointer stars”, as you can use them to envision a line that points approximately to
Polaris, which will be the next obviously bright stars along that line. Use this method
to find Polaris now.
6.) Polaris is referred to as the North Star since it is at a point in the sky nearly in-line
with where the Earth's North Pole points, if the North Pole were considered to be an
imaginary line pointing from its location on Earth into space. In other words, finding
Polaris allows you to find due North form your location. At this time, sight Polaris
by crouch or kneel behind the astrolabe and begin tilting the altitude axis of the
instrument toward the star's position in the sky. Once at the approximately correct
altitude, use both your eyes, looking along the astrolabe's sights, and adjust the
astrolabe so it is pointed directly towards the star you wish to measure.
7.) Have a group member make sure that the astrolabe is stable and that it's vertical
portion is straight up and down during this next step. Close one eye and with the
other, look through the astrolabe's sights and try to acquire the target star in the
instrument's field of view. A good methodology for this is to look through the sight
closest to your eye at an angle so that you can see the star you wish to acquire, but
outside of the sight farthest from your eye. Next, while continuing to look through the
sight closest to your eye, move the astrolabe in small amounts so that you begin to
eclipse the target star with the sight farthest from your eye. Once the star is eclipsed
by the other sight, keep moving the astrolabe in the correct direction to get the star
exactly in the field of view of the further sight.
8.) Once sighted on Polaris, rotate the base of the astrolabe (or the head of the tripod by
loosening the azimuth lock slightly) until the azimuth dial reads 0° while Polaris is
sighted. Record the altitude reading of the astrolabe to the nearest 0.5° in the field
provided below.
Altitude of Polaris (°)
NOTE: If the tripod or Astrolabe get knocked out of alignment during the lab, you
record a new azimuth offset by re-sighting Polaris using the procedure above. Be
sure to make note of what measurements the re-recorded offset corresponds to.
Celestial Navigation and Stellar Magnitudes - 16
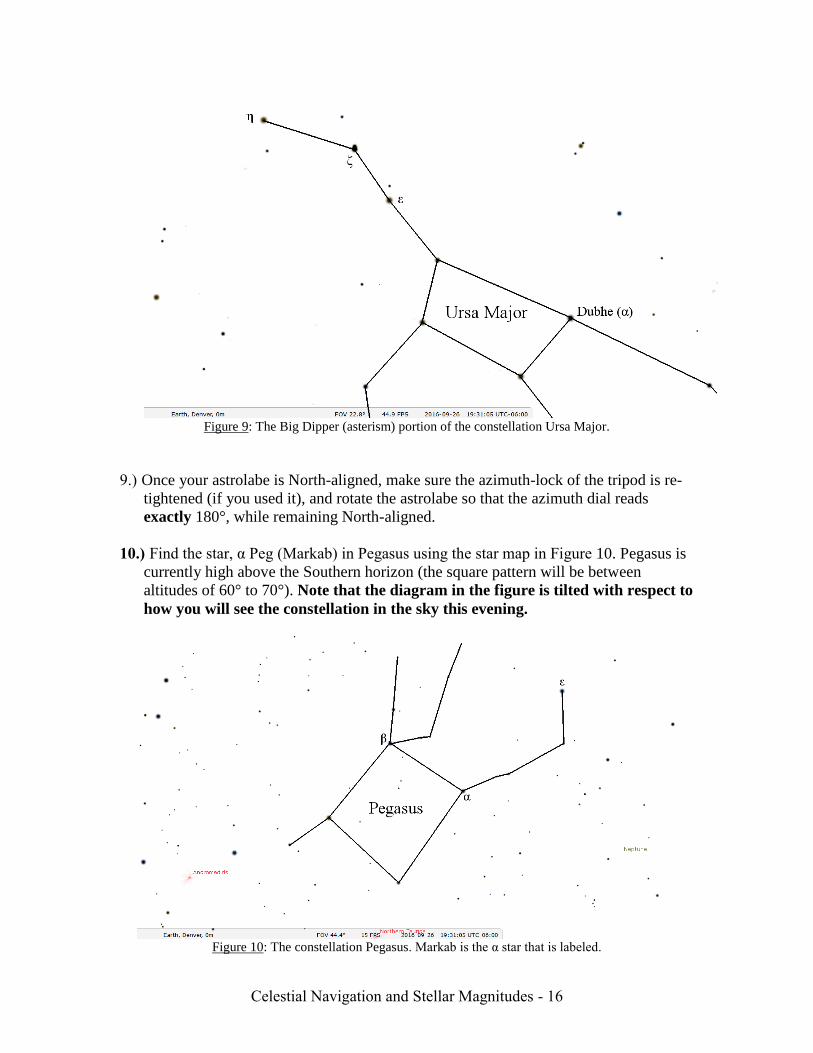
Figure 9: The Big Dipper (asterism) portion of the constellation Ursa Major.
9.) Once your astrolabe is North-aligned, make sure the azimuth-lock of the tripod is re-
tightened (if you used it), and rotate the astrolabe so that the azimuth dial reads
exactly 180°, while remaining North-aligned.
10.) Find the star, α Peg (Markab) in Pegasus using the star map in Figure 10. Pegasus is
currently high above the Southern horizon (the square pattern will be between
altitudes of 60° to 70°). Note that the diagram in the figure is tilted with respect to
how you will see the constellation in the sky this evening.
Figure 10: The constellation Pegasus. Markab is the α star that is labeled.

Celestial Navigation and Stellar Magnitudes - 17
11.) Once you’ve found α Peg, use the Astrolabe to check to see if the star has transited:
keep the astrolabe pointed at 180° azimuth but adjust the altitude to see if the star is in
its field of view. By definition, transit will be when you can see the star through the
astrolabe while the astrolabe reads 180° azimuth. The transit will occur a short time
after the Ready Times listed in Table 1. So, if you are set up well before the ready
time, you can leave your astrolabe alone and wait until then before taking any
measurements (you may start Part II of the lab if this is the case, but don’t forget to
start checking for α Peg’s transit once your clock reads that night’s Ready Time).
12.) Once your clock reads the Ready time, start checking to see if α Peg has reached
transit. Keep checking approximately every 30 seconds until you can see the star
through your astrolabe, while the astrolabe’s azimuth dial reads 180°. Once transit
has occurred, immediately record the time, and the altitude of α Peg into the fields
provided below.
Time of Transit for α Peg (hh:mm) Altitude of α Peg at Transit (°)
Proceed to Part IIa of this lab, on page 18.
Part Ib: Celestial Navigation (INDOOR-ONLY)
Due to the unpredictable nature of weather, it is an unfortunate reality that your
GTA may have decided to take you to the lab room to perform your measurements
indoors using the Starry Night College software.
1.) At a lab computer, open the Starry Night College 6. Click on the File menu, then
click “Open”. Find and open the file “Markab Transit”, found in the Celestial
Navigation & Stellar Magnitudes folder via the 21st Cen shortcut on the desktop of
the computer you are using. Once open, you will see a view of the night sky in the
software for the current date, with the local meridian already displayed.
2.) Use the “Stop Time” button to stop the flow of time in the software. Next, change the
time listed in the upper-left of the screen to the “Ready Time” listed in Table 1 for the
night your lab is meeting.
3.) Press CTRL+F to open the “Find” pane in the software and type in “Markab”, then
press enter. This will show you the star on-screen and should center your view. If
your view is not centered, right-click the star and left-click “Center” in the pop-up
menu.
4.) Change the “Time Flow Rate” to 300x and press play in order to observe Markab
approaching the local meridian. Once Markab is exactly on the meridian, press “Stop
Time” to pause the software. Record the time of day listed in the upper-left (including
hours, minutes, AND seconds), and approximate the latitude of the star using the

Celestial Navigation and Stellar Magnitudes - 18
markings shown on the meridian. Write these two values down in their respective
fields in Table 1.
Time of Transit for α Peg (hh:mm:ss) Altitude of α Peg at Transit (°)
Proceed to the indoor Magnitudes portion of this lab, Part IIb (page 21).
Part IIa: The Magnitude Scale (OUTDOOR-ONLY)
Skip to Part IIb (page 21) if doing this lab indoors.
In Table 2, you will find a list of stars and magnitudes for the stars in the
constellations Lyra and Cygnus. The first 6 stars in this list have their approximate
apparent magnitudes marked with an X under the number corresponding to that
magnitude. These stars will serve as calibration stars for the evening, and you will use
the given magnitudes of these stars to characterize the brightness of each other star in the
list.
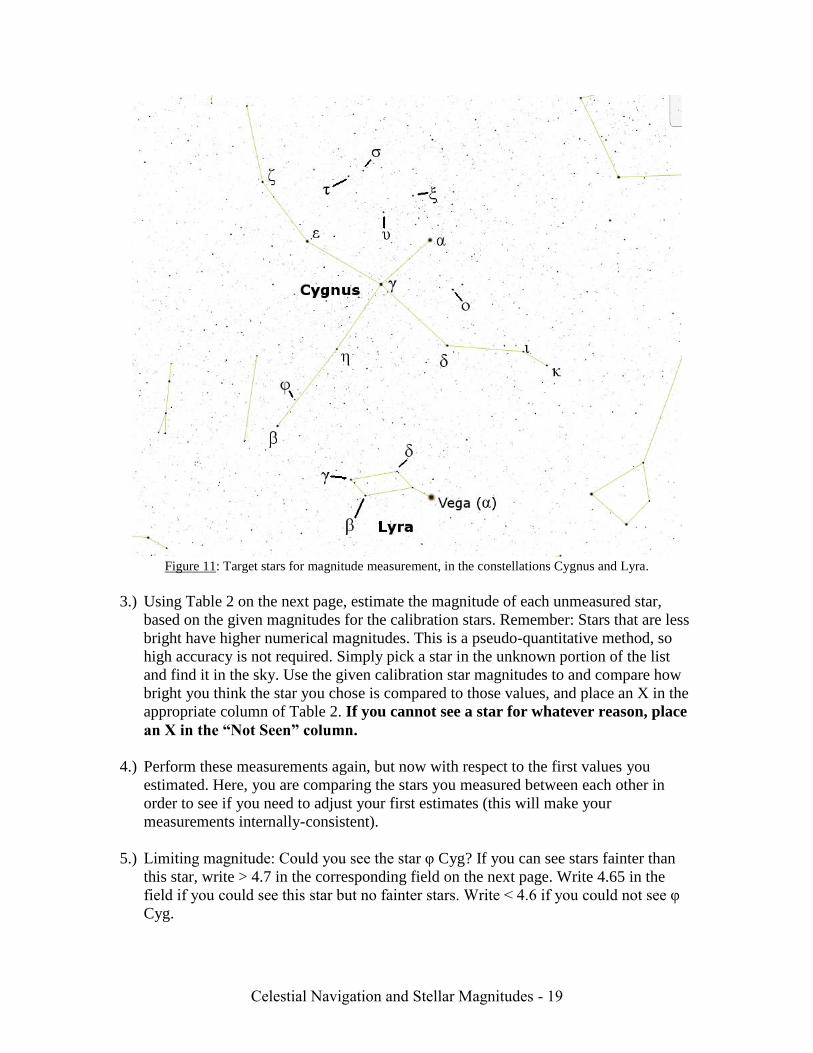
1.) Start by finding the constellations Lyra and Cygnus. Figure 11 on the next page
provides a star map as an aid, with the stars you will “measure” labeled clearly. Lyra
can be found easily by finding the brightest star in the sky at this time of night, Vega.
Cygnus represents a cross (swan)-shaped star pattern in the sky with the brightest star
in the constellation, Deneb, at the tip of this cross (the Swan’s tail). This pattern will
be in the Western portion of the sky, about 20° to 40° below zenith (the point straight-
up in the sky). From Vega, Deneb is the next brightest star in the sky, following a
path towards zenith. If you cannot find the constellations based on these clues, ask a
TA for assistance.
2.) Once you’ve found the constellations, familiarize yourself with the layout of the
labeled stars and where they appear in the sky.
Celestial Navigation and Stellar Magnitudes - 19
Figure 11: Target stars for magnitude measurement, in the constellations Cygnus and Lyra.
3.) Using Table 2 on the next page, estimate the magnitude of each unmeasured star,
based on the given magnitudes for the calibration stars. Remember: Stars that are less
bright have higher numerical magnitudes. This is a pseudo-quantitative method, so
high accuracy is not required. Simply pick a star in the unknown portion of the list
and find it in the sky. Use the given calibration star magnitudes to and compare how
bright you think the star you chose is compared to those values, and place an X in the
appropriate column of Table 2. If you cannot see a star for whatever reason, place
an X in the “Not Seen” column.
4.) Perform these measurements again, but now with respect to the first values you
estimated. Here, you are comparing the stars you measured between each other in
order to see if you need to adjust your first estimates (this will make your
measurements internally-consistent).
5.) Limiting magnitude: Could you see the star φ Cyg? If you can see stars fainter than
this star, write > 4.7 in the corresponding field on the next page. Write 4.65 in the
field if you could see this star but no fainter stars. Write < 4.6 if you could not see φ
Cyg.

Celestial Navigation and Stellar Magnitudes - 20
Star Not
Seen
0.0 1.3 1.5 1.7 1.9 2.1 2.3 2.5 2.7 2.9 3.1 3.3 3.5 3.7 3.9 4.1 4.3 4.5 4.7
Vega X
ε Cyg X
β Cyg X
ι Cyg X
υ Cyg X
σ Cyg X
α Cyg
γ Cyg
δ Cyg
ζ Cyg
η Cyg
κ Cyg
ξ Cyg
ο Cyg
τ Cyg
φ Cyg
β Lyr
γ Lyr
δ Lyr Table 2: Stars in Cygnus and Lyra
Limiting Magnitude

Celestial Navigation and Stellar Magnitudes - 21
Part IIb: The Magnitude Scale (INDOOR-ONLY)
1.) Open Starry Night. Make sure that the time and date are set to September 25, 2014 at
exactly 9:00:00 PM, and that the ‘Stop Time’ button in Starry Night is pressed.
2.) The stars in the following list are all members of the 30 brightest stars in the night
sky. Of those 30, the stars below are the ones that are prominent when viewed from
Denver in the fall evening sky.
Star Constellation Apparent
Magnitude m
Rank Absolute
Magnitude M
Rank
Fomalhaut
Deneb
Capella
Vega
Altair
a.) Using the ‘Find’ tab, locate the first star on the list.
b.) Determine what constellation it is in, and record that in the table above.
c.) First, right click on the star and choose ‘Deselect <star name>’ from the pop
up menu (there is a bug in Starry Night that prevents some information from
being displayed unless the star is deselected). Next, right click the star again
and select ‘Show Info’ from the pop up menu. Expand the ‘Other Data’ layer
and record the star’s apparent and absolute magnitudes in the table above.
d.) Repeat Steps (a) through (d) for the remaining stars.
e.) Rank the stars in terms of both their absolute and apparent magnitudes (1 =
brightest, 5 = dimmest).
Celestial Navigation and Stellar Magnitudes - 22
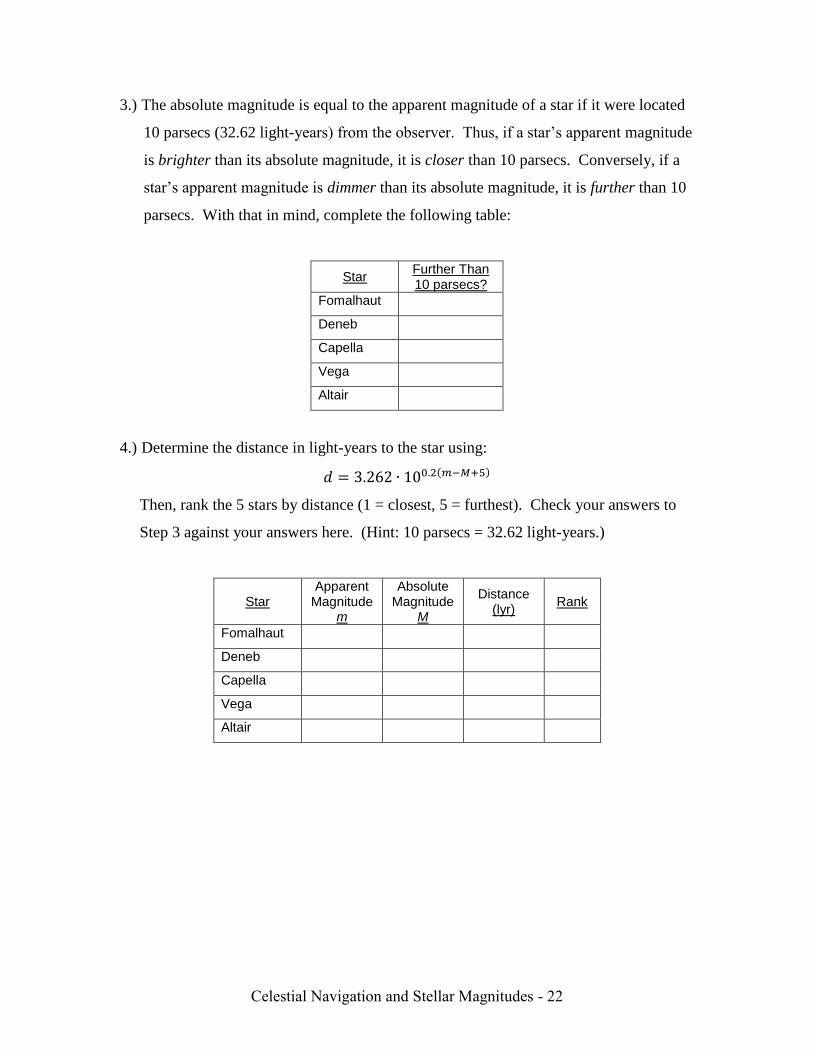
3.) The absolute magnitude is equal to the apparent magnitude of a star if it were located
10 parsecs (32.62 light-years) from the observer. Thus, if a star’s apparent magnitude
is brighter than its absolute magnitude, it is closer than 10 parsecs. Conversely, if a
star’s apparent magnitude is dimmer than its absolute magnitude, it is further than 10
parsecs. With that in mind, complete the following table:
Star Further Than 10 parsecs?
Fomalhaut
Deneb
Capella
Vega
Altair
4.) Determine the distance in light-years to the star using:
𝑑 = 3.262 ∙ 100.2(𝑚−𝑀+5)
Then, rank the 5 stars by distance (1 = closest, 5 = furthest). Check your answers to
Step 3 against your answers here. (Hint: 10 parsecs = 32.62 light-years.)
Star Apparent
Magnitude m
Absolute Magnitude
M
Distance (lyr)
Rank
Fomalhaut
Deneb
Capella
Vega
Altair

Celestial Navigation and Stellar Magnitudes - 23
5.) Using your answers to Step 4 above, indicate the positions of each star on the
apparent magnitude, absolute magnitude and distance scales shown below. Label
each position with the star’s name. If a star does not lie on the scale, briefly state why
not.
Apparent Magnitude Absolute Magnitude Distance
Dimmer
-6
-5
-4
-3
-2
-1
0
+1
+2
Brighter
-7
-8
-9
Dimmer
-6
-5
-4
-3
-2
-1
0
+1
+2
Brighter
-7
-8
-9
10 lyr
Farther
0 lyr
20 lyr
30 lyr
40 lyr
50 lyr
60 lyr
70 lyr
80 lyr
90 lyr
100 lyr
110 lyr
120 lyr
10 parsecs
Celestial Navigation and Stellar Magnitudes - 24
6.) Pick a star whose rank for apparent magnitude is low (i.e. closer to 5), but whose rank
for absolute magnitude is high (i.e. closer to 1). State which star you picked. Explain
this discrepancy in rank. Is this star one of the thirty brightest stars in the sky because
it is actually bright or just because it is relatively close to the Earth?
7.) The limiting magnitude is the dimmest magnitude visible to the unaided human eye.
The limiting magnitude is +6 under good, dark sky conditions.
a.) In Starry Night, select ‘Viewing Location>>Denver, United States (with
Reset)’ from drop down menu on the toolbar. Make sure that that the ‘Stop
Time’ button in Starry Night is pressed, and the time and date are set to
September 25, 2014 at exactly 9:00:00 PM.
b.) Right click on any “empty” part of the sky. Make sure the options ‘Local
Light Pollution’ and ‘Distant Light Pollution’ are NOT selected.
c.) Find and center on Ursa Minor, and then right click on it to ‘Deselect Ursa
Minor’. Next, right click on the sky and select ‘Show Constellations’. With
no light pollution, there should be 7 main stars clearly visible in the stick
figure. Right click and select ‘Hide Constellations’.
d.) Open the ‘Options’ tab and expand the ‘Local View’ layer. Click on the
‘Local Light Pollution’ label (it will become a button when you hover the
cursor over it). In the ‘Local View Options’ dialog box that pops up, select
‘Local Light Pollution’, ‘Distant Light Pollution’, ‘Large city in North’,
‘Smaller city in South’ and slide the bar all the way over to ‘More’. Then
click ‘OK’. These settings will mimic the light pollution conditions on the
South edge of Denver with Colorado Springs’ light dome visible to the South,
and Denver’s in the North.

Celestial Navigation and Stellar Magnitudes - 25
e.) Toggle both ‘Local Light Pollution’ and ‘Distant Light Pollution’ on and off.
Explain what each setting does to the view of the night sky.
f.) Turn both types of light pollution back on. Of the stars still visible of the
original 7, locate the dimmest one. (You may wish to alternately ‘Show
Constellations’ and ‘Hide Constellations’ to outline Ursa Minor, but make
your determination of the dimmest still-visible star with the constellations
hidden.) What is the name of this star and what is its apparent
magnitude? The apparent magnitude of this star is a reasonable estimate of
the limiting magnitude in Denver.
Star Name Apparent Magnitude
𝛼 Polaris +1.96
𝛽 Kochab +2.06
𝛾 Pherkad +3.00
𝛿 Delta Ursae Minoris +4.34
𝜖 Epsilon Ursae Minoris +4.18
𝜁 Zeta Ursae Minoris +4.28
𝜂 Eta Ursae Minoris +4.93
Figure 5: Bayer designations for the 7 brightest stars in Ursa Minor.
How many times brighter is this magnitude than the +6 quoted for dark skies?
𝛼
𝛽
𝛾
𝛿 𝜖
𝜁
𝜂
Celestial Navigation and Stellar Magnitudes - 26
Part I Analysis:
1.) Use the altitude of a Polaris that you recorded during your observations to infer your
latitude. Remember, since you are in the Northern Hemisphere, the altitude of the
North Celestial Pole is equal to your latitude on Earth. Indicate whether this is North
latitude or South latitude.
Latitude from Polaris Altitude
2.) Use the altitude, α, you recorded for the transit star you observed (α Peg), along with
its declination δ (in this case, +15°12’18.96’’), to calculate your latitude on Earth a
different way. The relationship between latitude and these values is shown in the
equation below. You will need to convert the value for declination into degrees-
only units before doing the calculation. Remember, there are 60’’ in 1’, and 60’ in
1°. Indicate whether this is North latitude or South latitude.
𝐿𝑎𝑡𝑖𝑡𝑢𝑑𝑒 = 90° − (α − δ)
Latitude from α Peg Transit Altitude
3.) Which of the results from steps 1.) and 2.) is closer to the correct value for the latitude
of Denver, 39.7392°? You will use whichever is closest for the rest of your analysis.
Note that the uncertainty corresponding to this result is +/- 0.5°. Record this value,
with “+/-0.5°” next to it, in the “Latitude” field of Table 3. Writing your answer this
way indicates that you only know that your location is between your closest value
MINUS 0.5°, and your closest value PLUS 0.5°.
𝑀𝑆𝑇𝑡𝑟𝑎𝑛𝑠𝑖𝑡 UT GAST Longitude Latitude
Results Table 3: Transit measurement results
4.) It will be more useful to state your recorded transit time according to your time zone’s
(Mountain time, in this case) standards. Using your recorded Transit Time from your
observations, convert this value to 24 hour-scaled Mountain Standard Time
(𝑀𝑆𝑇𝑡𝑟𝑎𝑛𝑠𝑖𝑡), using the equation,
𝑀𝑆𝑇𝑡𝑟𝑎𝑛𝑠𝑖𝑡 = 𝑇𝑟𝑎𝑛𝑠𝑖𝑡 𝑇𝑖𝑚𝑒 + 12ℎ𝑟
where the Transit Time is the time you recorded for α Peg’s transit in your observations.
Record this value in the appropriate field of Table 3, to the nearest 0.0001 hour. Be
Careful: When you calculate values using time, and your time is recorded in
hours:minutes:seconds (or hours:minutes for the outdoor instructions) format, you must
convert BOTH the stated minutes and seconds into units of hours before adding them to
the stated hours. Once they are converted, you may then add them to the stated hour
measurement in order to obtain your final answer, in units of hours only.

Celestial Navigation and Stellar Magnitudes - 27
5.) Using your value of 𝑀𝑆𝑇𝑡𝑟𝑎𝑛𝑠𝑖𝑡, calculate the transit’s corresponding Universal Time
(UT) using the following equation. Keep this value to the nearest 0.0001 hours, and
record it in Table 3. For an explanation of Universal Time, and why this step must be
performed, consult the Celestial Navigation portion of the Background Information in
this document.
𝑈𝑇 = 𝑀𝑆𝑇𝑡𝑟𝑎𝑛𝑠𝑖𝑡 + 7ℎ𝑟 − 24ℎ𝑟
6.) Next, you will need to find the Greenwich Apparent Sidereal Time (GAST) of the
transit. This is Universal Time summed with an applied correction for your date of
observation. These corrections must be date-specific, so use the correction for your
date of observation. Their values are: November 7: -10.8231 hrs, November 8: -
10.7584 hrs, November 9: -10.6920 hrs (note the minus signs). Add this value to
your measured UT, and record the result to the nearest 0.0001 hours in Table 3, under
the “GAST” field. This is done for several reasons: 1) the second measured in
sidereal time is shorter than that of UT (essentially the difference between solar and
sidereal time), and 2) there are small changes in the positions of stars themselves over
time, due to imperfections in the Earth’s rotation. These corrections are provided to
allow you to skip over some of the more complicated math involved in this process,
which is beyond the scope of this lab.
7.) We can now begin to link your recorded transit measurement to your position on
Earth. First find α Peg’s Hour Angle (essentially a time-dependent version of right
ascension, useful for things like celestial navigation); this can be calculated with
𝐻𝑜𝑢𝑟 𝐴𝑛𝑔𝑙𝑒 = 𝑅𝐴 − 𝐺𝐴𝑆𝑇
where RA is the right ascension of α Peg (23hr : 04min : 45.65sec). Remember to
convert RA to hours-only units, to the nearest 0.0001, before doing the
calculation. GAST is the value you recorded in Table 3 in Step 6. Now calculate
your longitude using the equation,
𝐿𝑜𝑛𝑔𝑖𝑡𝑢𝑑𝑒 = 360° − (Hour Angle ∗ 15°/hr)
Record your result, indicating whether this is E(ast, positive) longitude or W(est,
negative) longitude, in Table 3 under the appropriate field. Similar to your latitude
measurement, your result is uncertain based on the accuracy of the device used to
make the measurement. Optimistically, this value is 2.5°; write “+/- 2.5°” with your
longitude result in Table 3.
8.) Produce a map of your latitude and longitude results with respect to Denver. To do
this, use a computer and internet browser to go to the website maps.google.com. In
the search field, type in your latitude and longitude results from Table 3 in the format
“[latitude value]X, [longitude value]Y”, where the bracketed statements should be
the corresponding results from Table 3 (without the brackets or “+/-” undertainty
statements), and X and Y should indicate whether your results for latitude and

Celestial Navigation and Stellar Magnitudes - 28
longitude were N or S (North or South), and E or W (East or West), respectively.
Pressing “Enter” on the keyboard should then show you the location on Earth that
corresponds to these coordinates. Hopefully your result shows that you performed
your observation in, or at least very near to, Denver, CO!
Additionally, you can search for the upper-and-lower-bounds of both your latitude
and longitude results based on the measurement uncertainties you wrote. Simply take
your direct results for either, add or subtract the corresponding uncertainty (for upper
or lower bounds, respectively), and re-enter these new coordinates in Google Maps to
get a sense of how far off these uncertainties are on Earth compared to your direct
results. Essentially, your result is defined by an area subtended by these upper and
lower bounds based on the uncertainty in your measurement.
9.) Using the methods described in Step 8, your lab group will need to print off a Google
Map that indicates the following locations simultaneously (as in, on the same map,
and not separate maps):
The location corresponding to the central, direct values (without uncertainty
offsets) of your latitude and longitude results
The location of your upper bounds of both latitude and longitude
The location of your lower bounds of both latitude and longitude
The location of your upper bound of latitude but lower bound of longitude
The location of your lower bound of latitude but upper bound of longitude
This map is to be turned in with the rest of your results from the lab.
10.) Comment on your results. Does the area defined by the uncertainties in your
measurement, centered on your direct result, place you in Denver (in other words,
were you successful in your attempt at celestial navigation)? If not, describe where on
Earth your results indicate that you are, and comment on what might have caused you
to be imprecise in determining your location. A few things to note: If you are sure
your observational measurements are of good quality, you may want to double-check
your calculations if your results indicate you are significantly far from Denver, CO. If
your results indicate you are in Colorado at all, then you did a good job!

Celestial Navigation and Stellar Magnitudes - 29
Part II Analysis (OUTDOOR-ONLY):
Note: The calculations in this part of the lab are significantly faster to complete
using spreadsheet software like Microsoft Excel. It is recommended that you use
such software to calculate your results.
1.) As mentioned in the Background Information, magnitudes can help determine
distances to stars if a star’s absolute magnitude, M, is known. You will calculate the
distances to each of the stars you measured in Part II (outdoor version) by using the
values for Absolute Magnitude given in Table 4. First, calculate the distance
modulus, μ, using the following equation, for each star.
μ = m − M
m are the magnitudes you measured for each star, recorded in Table 2.
2.) Now find the distances, d, to each star using the next equation. This distance is in units
of parsecs (or pc). This unit is used because it represents one of the primary methods
scientists use to determine the distances to star. Another useful unit, the light year, is
sometimes more commonly heard of, though you will not use it in this lab (these units
are related with the following conversion: 1 pc = 3.26 light years).
𝑑 = 100.2(μ+1)
Be careful: This equation indicates that you are raising the number 10 to the power
0.2(μ+1). Make sure you use the correct mathematical operations on your calculator
(i.e., don’t multiply 10 by 0.2(μ+1)).
3.) Calculate the percent difference for each star you observed (but NOT those with the
provided magnitudes in Table 2) using the equation below and the Actual Apparent
Magnitudes values given in Table 4. Remember that if your result is negative, you
should ignore the minus sign, as the difference that you take in the equation is the
absolute value of the difference.
% 𝐷𝑖𝑓𝑓𝑒𝑟𝑒𝑛𝑐𝑒 = |𝑀𝑒𝑎𝑠𝑢𝑟𝑒𝑑 𝑚 − 𝐴𝑐𝑡𝑢𝑎𝑙 𝑚|
𝐴𝑐𝑡𝑢𝑎𝑙 𝑚∗ 100%
4.) Recall the weather (and moonlight) conditions of your observation, and reflect on the %
Difference values you calculated in Table 4. Did the weather or moon phase affect your
ability to determine the apparent magnitudes of stars you observed? If so, describe how.

Celestial Navigation and Stellar Magnitudes - 30
Star M μ (mags) d (pc) Actual m %
Difference
Vega -8.75 0.03 -----------
ε Cyg 0.74 2.46 -----------
β Cyg -2.23 3.03 -----------
ι Cyg 0.87 3.75 -----------
υ Cyg -1.26 3.93 -----------
σ Cyg -6.56 4.21 -----------
α Cyg -8.75 1.25
γ Cyg -6.18 4.65
δ Cyg -0.76 3.87
ζ Cyg -0.15 2.84
η Cyg 0.72 3.78
κ Cyg 0.89 3.93
ξ Cyg -4.09 2.21
ο Cyg -3.76 3.71
τ Cyg 2.11 3.18
φ Cyg 0.22 3.71
β Lyr -3.91 3.52
γ Lyr ----------- ----------- ----------- 3.26
δ Lyr ----------- ----------- ----------- 4.30 Table 4: Part II stellar distances results.
5.) What was the limiting magnitude you listed in Part II? Note that humans can normally
see out to a magnitude of 6 on a clear night. Based on this, how much do you think
Denver’s light pollution affects the darkness of the sky that you observed? Or, were
there other factors that evening that you believe impacted your ability to see fainter
stars?
6.) The Sun has an apparent magnitude of -26.74, but an absolute magnitude of 4.83.
Calculate how many times brighter the Sun’s apparent magnitude is compared to Vega,
using the actual apparent magnitude m listed in Table 4 and the equation below. Do the
same to compare their absolute magnitudes M. Based on these comparisons, and how
the Magnitude System is defined in the Background Information of this document, do
you think that these two stars are similar types of stars, or different? Whatever answer
you give, describe why.
𝑇𝑖𝑚𝑒𝑠 𝐵𝑟𝑖𝑔ℎ𝑡𝑒𝑟 = 2.512𝑚𝑠𝑢𝑛−𝑚𝑣𝑒𝑔𝑎
Celestial Navigation and Stellar Magnitudes - 31
7.) Be creative: suggest some potential improvements that can be made to light pollution
issues in city areas such as Denver.
Extra Credit questions are on the next page.

Celestial Navigation and Stellar Magnitudes - 32
Extra Credit:
1.) (10 pts) Use the geometry of the Celestial Sphere shown in Figure 3 to prove the
relationship you used in Part I Analysis, regarding an observer’s latitude is given by
the measured altitude of a star, if it’s declination is known:
𝐿𝑎𝑡𝑖𝑡𝑢𝑑𝑒 = 90° − (α − δ)
Note that Figure 3 shows a star with negative declination, whereas the declination of
α Peg, the star you observed, is positive. You should still be able to derive this
relationship generally (full extra credit points awarded for a full derivation, showing
or reasoning each step explicitly).
2.) (5 pts) Provide some feedback about this lab: What did you like about it? Was it
effective in teaching you some basic observational astronomy tools and techniques?
What criticisms of this lab do you have, if any?

Celestial Navigation and Stellar Magnitudes - 33
Calculations Page: