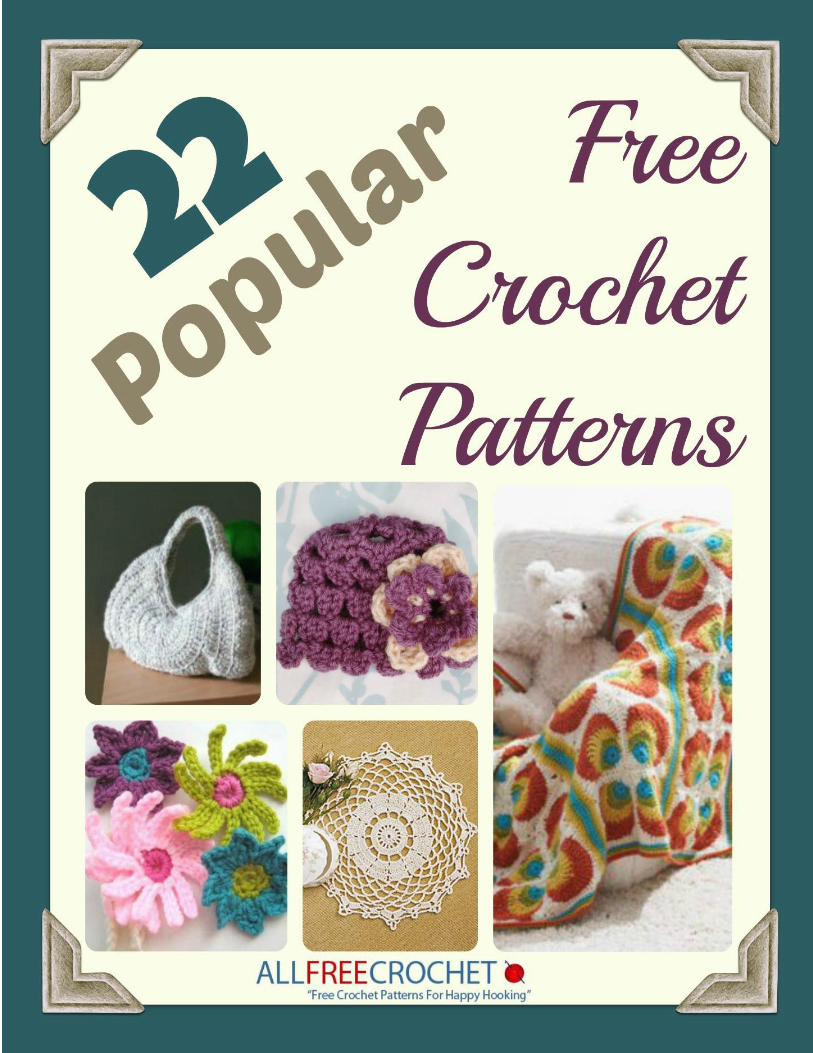
22 popular free crochet patterns
DESCRIPTION
Crochet patternsTRANSCRIPT
2 | P a g e
22 Popular Free Crochet Patterns
Copyright 2014 by Prime Publishing LLC
All rights reserved. No part of this book may be reproduced or transmitted in any form or by any means, electronic or mechanical, including photocopying, recording, or by any information storage or retrieval system,
without written permission from the publisher, except in the case of brief quotations embodied in critical articles and reviews.
Trademarks are property of their respective holders. When used, trademarks are for the benefit of the trademark owner only.
Published by Prime Publishing LLC, 3400 Dundee Road, Northbrook, IL 60062 www.primecp.com
Free Crochet Projects
Free Craft Projects Free DIY Wedding Ideas
Free Paper Craft Projects Free Knitting Projects Free Holiday Craft Projects
Free Sewing Projects Free Quilt Projects Free Jewelry Projects
Free Christmas Crafts Free Kids’ Craft Projects Free Crochet Afghan Patterns
3 | P a g e
Dear Crocheters, Sometimes we aren’t always sure of what pattern to start crocheting. There are so many patterns and styles to choose from that we get lost, confused, and scared to actually pick one. It can be so hard to find something that feels just right for your mood and the amount of time you want to spend on it. We want to help you out a little bit by giving you this extra special eBook, 22 Popular Free Crochet Patterns.
We picked out some of the most popular patterns on AllFreeCrochet, compiled them together right here, and are giving them to you in full for free. It really can’t get any better than that! No more searching, no more giving up, no more wasting your time. Just take a quick look at our table of contents below to see which category seems right for you, and start moving those hooks.
Take a few minutes, hours, or days to work up some of these crochet patterns. They vary in size, style, color and purpose because, obviously, it’s a collection of everything you like the most! You’ll find crochet hats, baby blankets, doilies, and even more types of patterns in the pages below. All you have to do is take a peek and you’ll be hooked. (Literally and figuratively!)
People may have constantly changing tastes, but there are certain things that just keeping staying popular over and over again no matter how many things we throw at you. Sometimes it’s nice to see what other people are working up, too, so you can feel like you’re in the loop. Everyone loves this collection of popular free crochet patterns so much that we knew they deserved to all be together in one place.
Happy Hooking!
Sincerely,
The Editors of AllFreeCrochet
AllFreeCrochet.com
Our eBooks, like all of our craft projects, are absolutely FREE to members of our crafting community. Please feel free to share with family and friends and ask them to sign up at our website for our free e-mail newsletter, Hooked on Crochet.
4 | P a g e
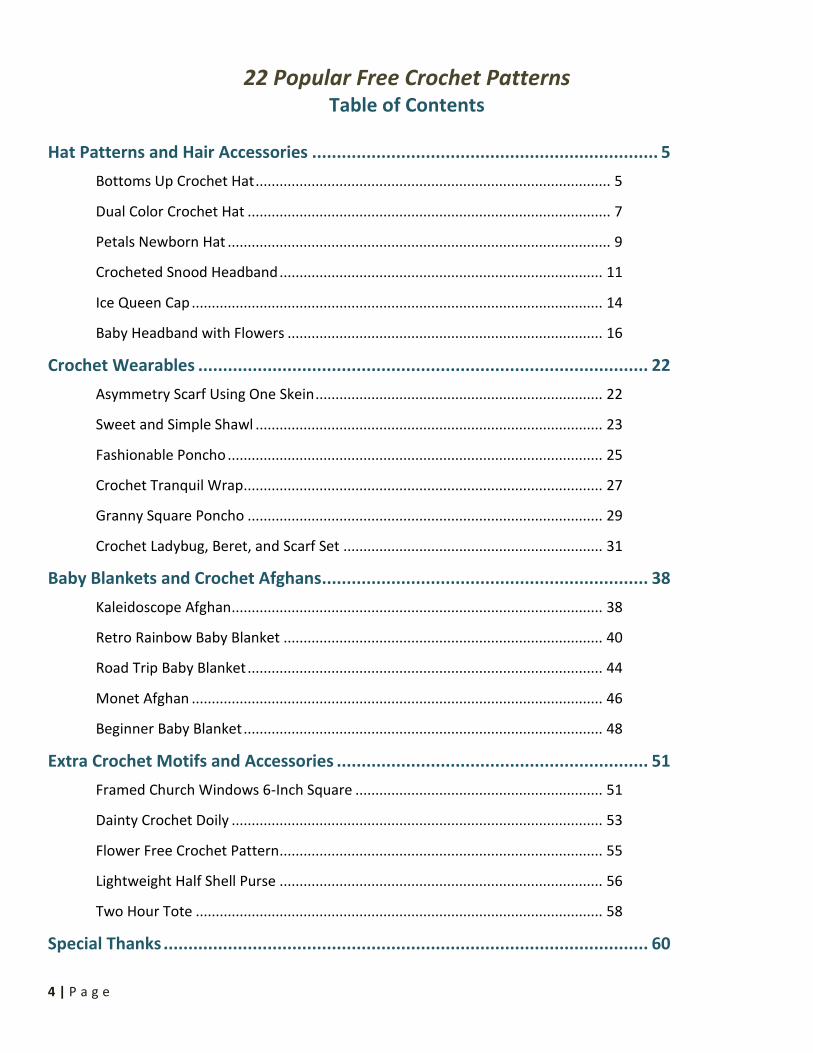
22 Popular Free Crochet Patterns
Table of Contents
Hat Patterns and Hair Accessories ...................................................................... 5
Bottoms Up Crochet Hat ......................................................................................... 5
Dual Color Crochet Hat ........................................................................................... 7
Petals Newborn Hat ................................................................................................ 9
Crocheted Snood Headband ................................................................................. 11
Ice Queen Cap ....................................................................................................... 14
Baby Headband with Flowers ............................................................................... 16
Crochet Wearables ........................................................................................... 22
Asymmetry Scarf Using One Skein ........................................................................ 22
Sweet and Simple Shawl ....................................................................................... 23
Fashionable Poncho .............................................................................................. 25
Crochet Tranquil Wrap .......................................................................................... 27
Granny Square Poncho ......................................................................................... 29
Crochet Ladybug, Beret, and Scarf Set ................................................................. 31
Baby Blankets and Crochet Afghans .................................................................. 38
Kaleidoscope Afghan ............................................................................................. 38
Retro Rainbow Baby Blanket ................................................................................ 40
Road Trip Baby Blanket ......................................................................................... 44
Monet Afghan ....................................................................................................... 46
Beginner Baby Blanket .......................................................................................... 48
Extra Crochet Motifs and Accessories ............................................................... 51
Framed Church Windows 6-Inch Square .............................................................. 51
Dainty Crochet Doily ............................................................................................. 53
Flower Free Crochet Pattern ................................................................................. 55
Lightweight Half Shell Purse ................................................................................. 56
Two Hour Tote ...................................................................................................... 58
Special Thanks .................................................................................................. 60

5 | P a g e
Hat Patterns and Hair Accessories
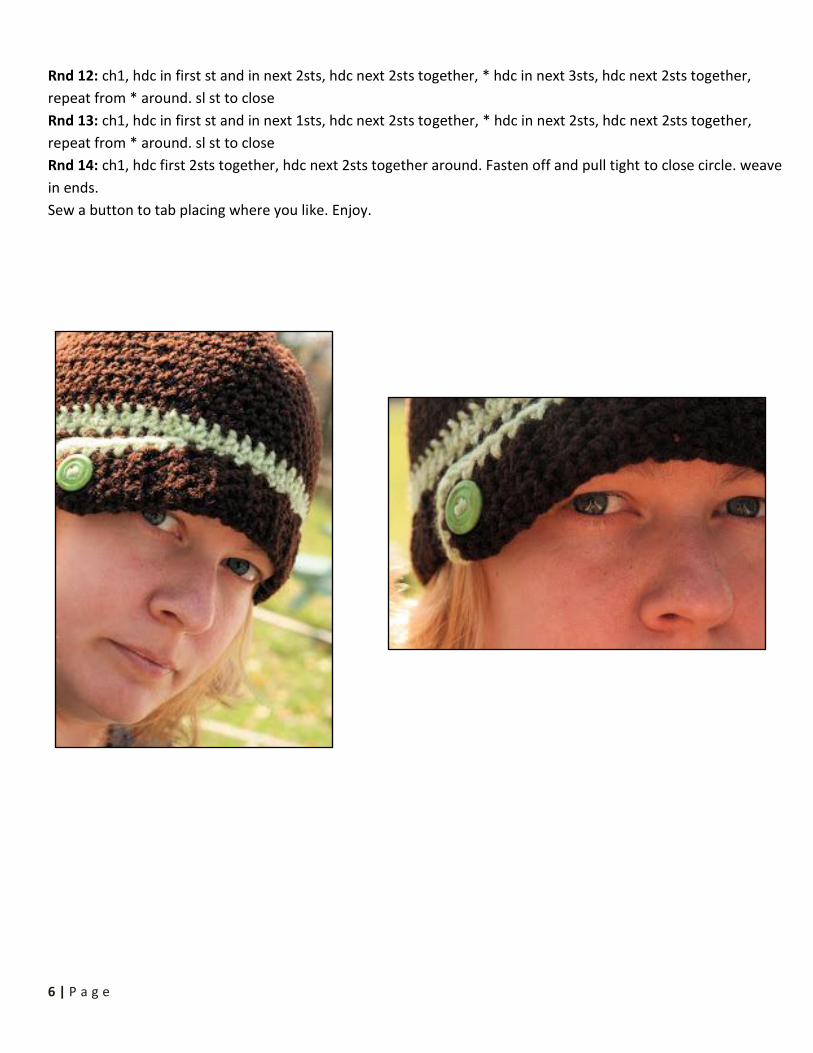
Bottoms Up Crochet Hat
By: Valerie Whitten from ValliesKids
You will love this Bottoms Up Crochet Hat pattern because it is just perfect for the winter time. This crochet hat has a cute side button closure that you can add, but you don't have to if it doesn't appeal to you. Even use any color yarn you wish if you're going to keep it for yourself, or work it up for a friend in their favorite colors as a cute crochet gift. This crochet beanie really shows how you can be simple and stylish with one accessory.
Materials:
Worsted Weight Yarn
Crochet Hook: I/9 or 5.5 mm
Button
Skill Level: Intermediate
Instructions:
Band:
Row 1: ch5, 1hdc in first st and in each st across. (4hdc)
Row 2: ch1, hdc in first st and in each st across. Turn.
Row 3: repeat rnd 2 for however length needed to fit around head plus an extra inch and a half (mine was 23 1/2
inches)
Optional Color Change:
Ch1, sc across to end of row, 2sc in corner st, working in ends of sc rows, sc evenly across piece. Slip st to form
circle 1 1/2 inch from end opposite end of piece.
Rnd 1: ch1, 2hdc in first st, hdc in each of next 2sts, * 2hdc in next st, hdc in each of next 2sts, repeat from *
around. sl st to top of first hdc (changing back to main color)
Rnd 2: ch1, hdc around, sl st to close.
Rnd 3-8: Repeat round 2
Rnd 9: ch1, hdc in first st and in next 5sts, hdc next 2 sts together, * hdc in next 6sts, hdc next 2sts together,
repeat from * around. (depending on your length, the last set might not come out to an even count)
Rnd 10: ch1, hdc in first st and in next 4sts, hdc next 2sts together, * hdc in next 5sts, hdc next 2sts together,
repeat from * around. sl st to close
Rnd 11: ch1, hdc in first st and in next 3sts, hdc next 2sts together, * hdc in next 4sts, hdc next 2sts together,
repeat from * around. sl st to close
6 | P a g e
Rnd 12: ch1, hdc in first st and in next 2sts, hdc next 2sts together, * hdc in next 3sts, hdc next 2sts together,
repeat from * around. sl st to close
Rnd 13: ch1, hdc in first st and in next 1sts, hdc next 2sts together, * hdc in next 2sts, hdc next 2sts together,
repeat from * around. sl st to close
Rnd 14: ch1, hdc first 2sts together, hdc next 2sts together around. Fasten off and pull tight to close circle. weave
in ends.
Sew a button to tab placing where you like. Enjoy.
7 | P a g e
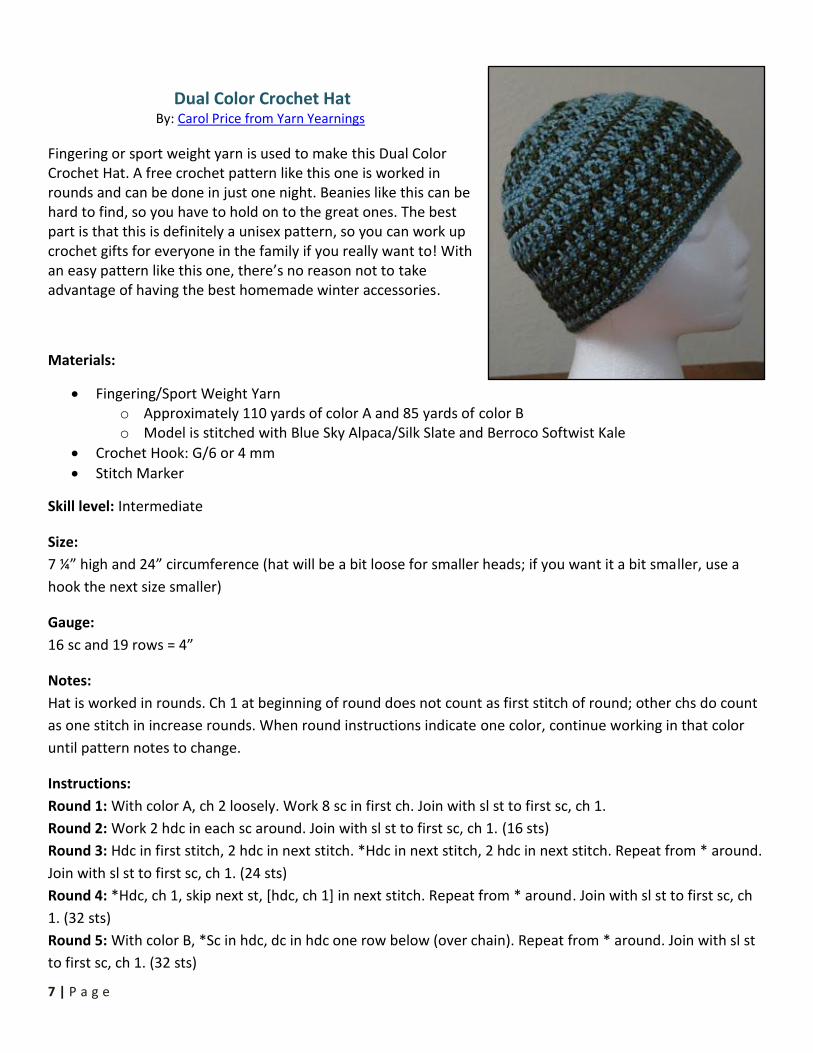
Dual Color Crochet Hat By: Carol Price from Yarn Yearnings
Fingering or sport weight yarn is used to make this Dual Color Crochet Hat. A free crochet pattern like this one is worked in rounds and can be done in just one night. Beanies like this can be hard to find, so you have to hold on to the great ones. The best part is that this is definitely a unisex pattern, so you can work up crochet gifts for everyone in the family if you really want to! With an easy pattern like this one, there’s no reason not to take advantage of having the best homemade winter accessories.
Materials:
Fingering/Sport Weight Yarn o Approximately 110 yards of color A and 85 yards of color B o Model is stitched with Blue Sky Alpaca/Silk Slate and Berroco Softwist Kale
Crochet Hook: G/6 or 4 mm
Stitch Marker
Skill level: Intermediate
Size:
7 ¼” high and 24” circumference (hat will be a bit loose for smaller heads; if you want it a bit smaller, use a
hook the next size smaller)
Gauge:
16 sc and 19 rows = 4”
Notes:
Hat is worked in rounds. Ch 1 at beginning of round does not count as first stitch of round; other chs do count
as one stitch in increase rounds. When round instructions indicate one color, continue working in that color
until pattern notes to change.
Instructions:
Round 1: With color A, ch 2 loosely. Work 8 sc in first ch. Join with sl st to first sc, ch 1.
Round 2: Work 2 hdc in each sc around. Join with sl st to first sc, ch 1. (16 sts)
Round 3: Hdc in first stitch, 2 hdc in next stitch. *Hdc in next stitch, 2 hdc in next stitch. Repeat from * around.
Join with sl st to first sc, ch 1. (24 sts)
Round 4: *Hdc, ch 1, skip next st, [hdc, ch 1] in next stitch. Repeat from * around. Join with sl st to first sc, ch
1. (32 sts)
Round 5: With color B, *Sc in hdc, dc in hdc one row below (over chain). Repeat from * around. Join with sl st
to first sc, ch 1. (32 sts)

8 | P a g e
Round 6: With color A, *hdc in next 3 sts, 2 hdc in next stitch. Repeat from * around. Join with sl st to first sc,
ch 1. (40 sts)
Round 7: With color B, *[hdc, ch 1, skip next st] twice, [hdc, ch 1] in next stitch. Repeat from * around. Join
with sl st to first sc, ch 1. (48 sts)
Round 8: With color A, *Sc in hdc, dc in hdc one row below (over chain). Repeat from * around. Join with sl st
to first sc, ch 1. (48 sts)
Round 9: With color B, *hdc in next 5 sts, 2 hdc in next stitch. Repeat from * around. Join with sl st to first sc,
ch 1. (56 sts)
Round 10: *[hdc, ch 1, skip next st] 3 times, [hdc, ch 1] in next stitch. Repeat from * around. Join with sl st to
first sc, ch 1. (64 sts)
Round 11: With color A, *Sc in hdc, dc in hdc one row below (over chain). Repeat from * around. Join with sl st
to first sc, ch 1. (64 sts)
Round 12: *Hdc in next 7 sts, 2 hdc in next stitch. Repeat from * around. Join with sl st to first sc, ch 1. (72 sts)
Round 13: *Hdc in next 8 sts, 2 hdc in next stitch. Repeat from * around. Join with sl st to first sc, ch 1. (80 sts)
Round 14: With color B, *Hdc, ch 1, skip next stitch. Repeat from * around. Join with sl st to first sc, ch 1. (80
sts)
Round 15: With color A, *[sc in hdc, dc in hdc one row below (over chain)] 4 times, sc in next stitch, 2 dc in hdc
one row below. Repeat from * around. Join with sl st to first sc, ch 1. (88 sts)
Round 16: With color B, hdc in each stitch around. (88 sts)
Round 17: With color A, *hdc in next 10 sts, 2 hdc in next stitch (96 sts).
Round 18: With color B, *hdc in next stitch, ch 1, skip next stitch. Repeat from * around. Join with sl st to first
sc, ch 1.
Round 19: With color A, *Sc in hdc, dc in hdc one row below (over chain). Repeat from * around. Join with sl st
to first sc, ch 1.
Round 20: With color A, *hdc in next stitch, ch 1, skip next stitch. Repeat from * around. Join with sl st to first
sc, ch 1.
Round 21: With color B, *Sc in hdc, dc in hdc one row below
(over chain). Repeat from * around. Join with sl st to first sc,
ch 1.
Rounds 22-25: Repeat rounds 18-21.
Round 26: With color A, repeat round 18.
Round 27: With color B, repeat round 19.
Rounds 28-31: Repeat rounds 26 and 27 twice.
Round 32: With color A, sc in each stitch around.
Round 33: With color B, sc in each stitch around.
Round 34: Repeat round 32.
Fasten off and weave in ends.
9 | P a g e
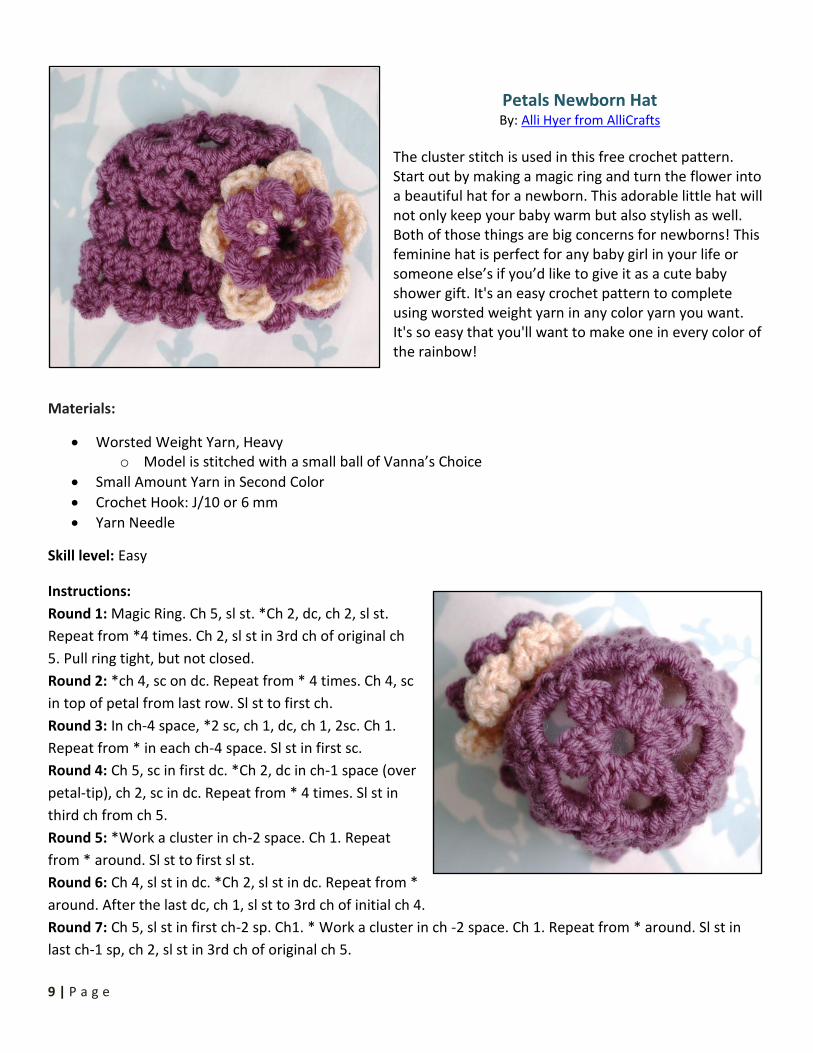
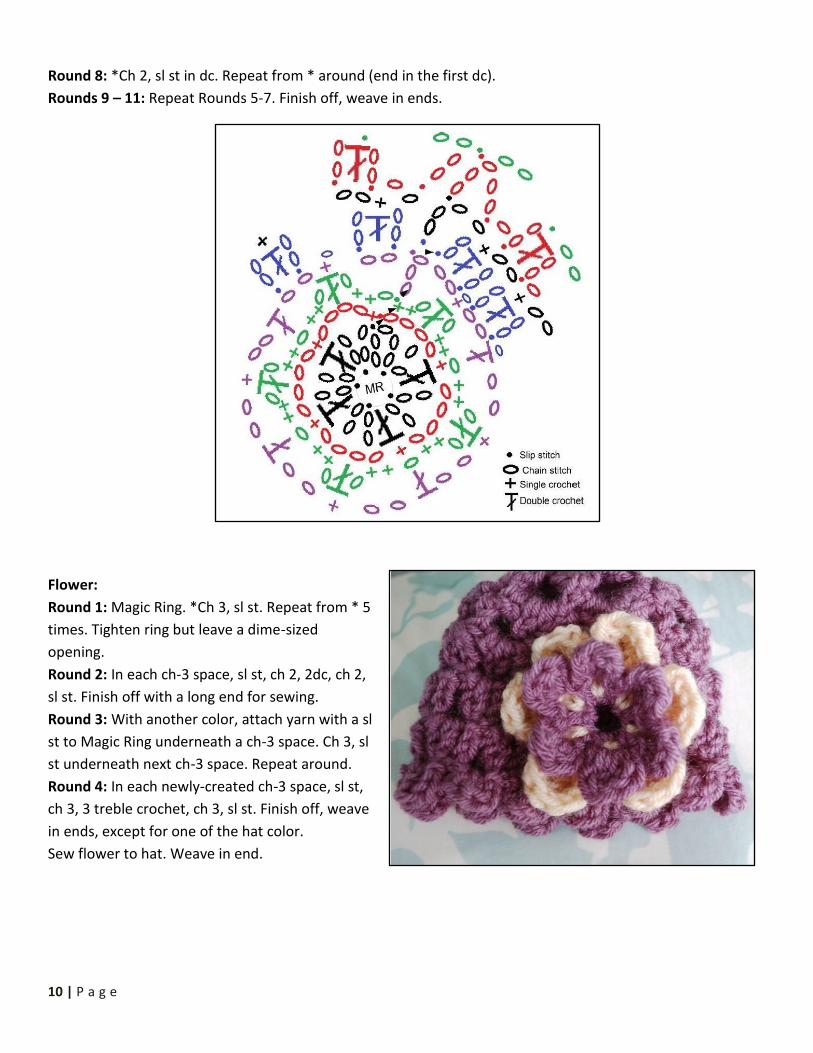
Petals Newborn Hat By: Alli Hyer from AlliCrafts
The cluster stitch is used in this free crochet pattern. Start out by making a magic ring and turn the flower into a beautiful hat for a newborn. This adorable little hat will not only keep your baby warm but also stylish as well. Both of those things are big concerns for newborns! This feminine hat is perfect for any baby girl in your life or someone else’s if you’d like to give it as a cute baby shower gift. It's an easy crochet pattern to complete using worsted weight yarn in any color yarn you want. It's so easy that you'll want to make one in every color of the rainbow!
Materials:
Worsted Weight Yarn, Heavy o Model is stitched with a small ball of Vanna’s Choice
Small Amount Yarn in Second Color
Crochet Hook: J/10 or 6 mm
Yarn Needle
Skill level: Easy
Instructions:
Round 1: Magic Ring. Ch 5, sl st. *Ch 2, dc, ch 2, sl st.
Repeat from *4 times. Ch 2, sl st in 3rd ch of original ch
5. Pull ring tight, but not closed.
Round 2: *ch 4, sc on dc. Repeat from * 4 times. Ch 4, sc
in top of petal from last row. Sl st to first ch.
Round 3: In ch-4 space, *2 sc, ch 1, dc, ch 1, 2sc. Ch 1.
Repeat from * in each ch-4 space. Sl st in first sc.
Round 4: Ch 5, sc in first dc. *Ch 2, dc in ch-1 space (over
petal-tip), ch 2, sc in dc. Repeat from * 4 times. Sl st in
third ch from ch 5.
Round 5: *Work a cluster in ch-2 space. Ch 1. Repeat
from * around. Sl st to first sl st.
Round 6: Ch 4, sl st in dc. *Ch 2, sl st in dc. Repeat from *
around. After the last dc, ch 1, sl st to 3rd ch of initial ch 4.
Round 7: Ch 5, sl st in first ch-2 sp. Ch1. * Work a cluster in ch -2 space. Ch 1. Repeat from * around. Sl st in
last ch-1 sp, ch 2, sl st in 3rd ch of original ch 5.
10 | P a g e
Round 8: *Ch 2, sl st in dc. Repeat from * around (end in the first dc).
Rounds 9 – 11: Repeat Rounds 5-7. Finish off, weave in ends.
Flower:
Round 1: Magic Ring. *Ch 3, sl st. Repeat from * 5
times. Tighten ring but leave a dime-sized
opening.
Round 2: In each ch-3 space, sl st, ch 2, 2dc, ch 2,
sl st. Finish off with a long end for sewing.
Round 3: With another color, attach yarn with a sl
st to Magic Ring underneath a ch-3 space. Ch 3, sl
st underneath next ch-3 space. Repeat around.
Round 4: In each newly-created ch-3 space, sl st,
ch 3, 3 treble crochet, ch 3, sl st. Finish off, weave
in ends, except for one of the hat color.
Sew flower to hat. Weave in end.
11 | P a g e
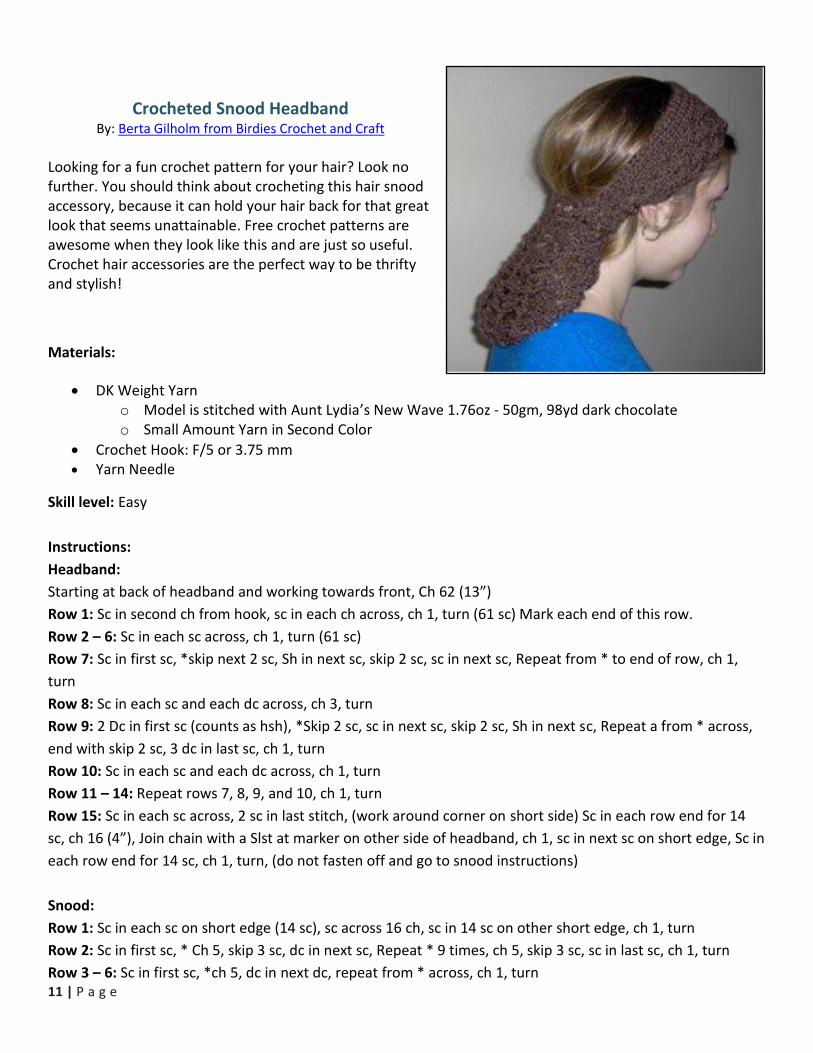
Crocheted Snood Headband By: Berta Gilholm from Birdies Crochet and Craft
Looking for a fun crochet pattern for your hair? Look no further. You should think about crocheting this hair snood accessory, because it can hold your hair back for that great look that seems unattainable. Free crochet patterns are awesome when they look like this and are just so useful. Crochet hair accessories are the perfect way to be thrifty and stylish!
Materials:
DK Weight Yarn o Model is stitched with Aunt Lydia’s New Wave 1.76oz - 50gm, 98yd dark chocolate o Small Amount Yarn in Second Color
Crochet Hook: F/5 or 3.75 mm Yarn Needle
Skill level: Easy
Instructions:
Headband:
Starting at back of headband and working towards front, Ch 62 (13”)
Row 1: Sc in second ch from hook, sc in each ch across, ch 1, turn (61 sc) Mark each end of this row.
Row 2 – 6: Sc in each sc across, ch 1, turn (61 sc)
Row 7: Sc in first sc, *skip next 2 sc, Sh in next sc, skip 2 sc, sc in next sc, Repeat from * to end of row, ch 1,
turn
Row 8: Sc in each sc and each dc across, ch 3, turn
Row 9: 2 Dc in first sc (counts as hsh), *Skip 2 sc, sc in next sc, skip 2 sc, Sh in next sc, Repeat a from * across,
end with skip 2 sc, 3 dc in last sc, ch 1, turn
Row 10: Sc in each sc and each dc across, ch 1, turn
Row 11 – 14: Repeat rows 7, 8, 9, and 10, ch 1, turn
Row 15: Sc in each sc across, 2 sc in last stitch, (work around corner on short side) Sc in each row end for 14
sc, ch 16 (4”), Join chain with a Slst at marker on other side of headband, ch 1, sc in next sc on short edge, Sc in
each row end for 14 sc, ch 1, turn, (do not fasten off and go to snood instructions)
Snood:
Row 1: Sc in each sc on short edge (14 sc), sc across 16 ch, sc in 14 sc on other short edge, ch 1, turn
Row 2: Sc in first sc, * Ch 5, skip 3 sc, dc in next sc, Repeat * 9 times, ch 5, skip 3 sc, sc in last sc, ch 1, turn
Row 3 – 6: Sc in first sc, *ch 5, dc in next dc, repeat from * across, ch 1, turn

12 | P a g e
Row 7 – 8: Repeat row 2, but Ch 6 instead of 5
Row 9 – 10: Repeat row 2, but Ch 7 instead of 5
Row 11: Repeat row 2, but Ch 8 instead of 5
Row 12 – 13: Repeat rows 9 and 10
Row 14 – 15: Repeat rows 7 and 8
Row 16: Repeat row 2
Row 17: Repeat row 2, but Ch 4 instead of 5
Row 18 - 19: Repeat row 2, but Ch 3 instead of 5
Row 20 - 21: Repeat row 2, but Ch 2 instead of 5
Row 22: Repeat row 2, but Ch 1 instead of 5, fasten off
Finishing: Sew each end of a skinny 12” piece of elastic to inside of first and last stitch of row 1 at beginning of
snood, then join yarn at side and sc all the way across and over thin elastic and through sides and lower edge
of snood bottom (Last row of netting, not headband). Fasten off and weave in ends.
Make headband buttons as below.
Headband Buttons: (Make 1 set for each side)
Step 1. (First side button) Make a magic circle, sc in circle 10 times, slst in first sc and pull tight, tie off and
weave in ends.
Step 2. Repeat 1 for second button, but leave a 12” tail at beginning and end, tie tails pull tight, do not weave
in or end .
Step 3. Thread both tails through button center of second button, fold bottom headband into 2 pleats, weave
tails through pleats and first button, whip stitch 2 times back into second button to secure, run tails back
through middle of pleats and through first button, pull tight, knot, tie off and trim tails.
Step 4. Repeat for second side of headband for other set of buttons.
14 | P a g e
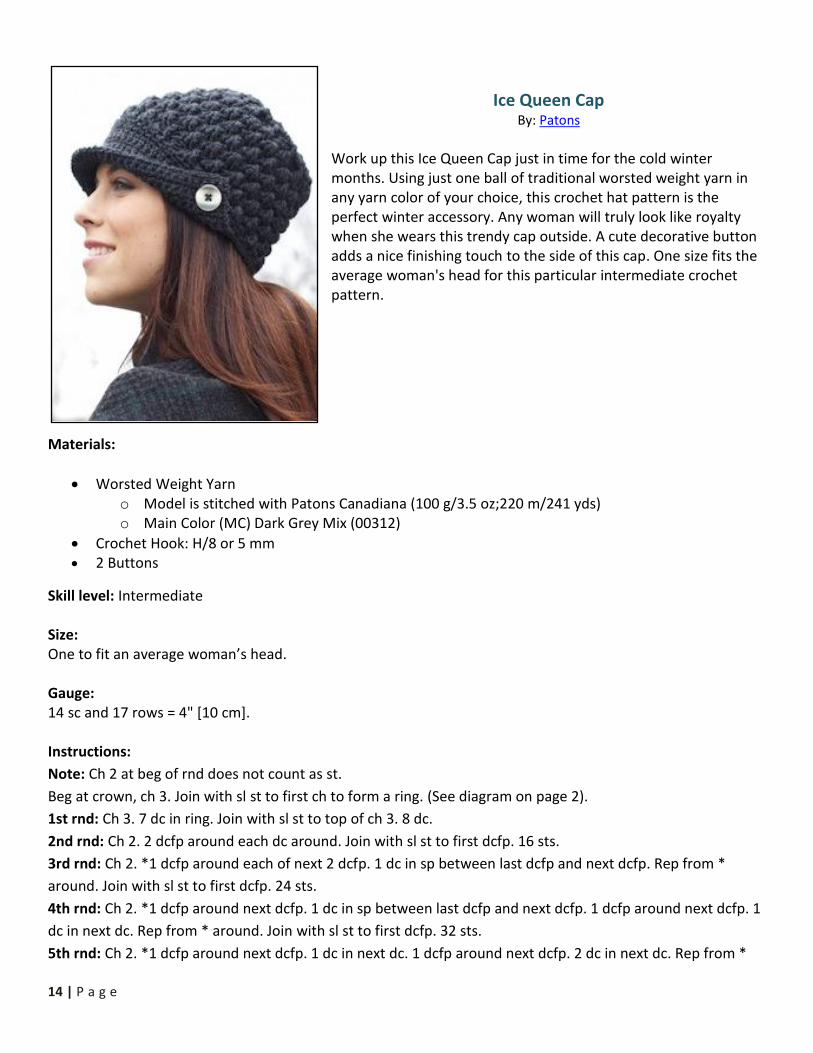
Ice Queen Cap
By: Patons
Work up this Ice Queen Cap just in time for the cold winter months. Using just one ball of traditional worsted weight yarn in any yarn color of your choice, this crochet hat pattern is the perfect winter accessory. Any woman will truly look like royalty when she wears this trendy cap outside. A cute decorative button adds a nice finishing touch to the side of this cap. One size fits the average woman's head for this particular intermediate crochet pattern.
Materials:
Worsted Weight Yarn o Model is stitched with Patons Canadiana (100 g/3.5 oz;220 m/241 yds) o Main Color (MC) Dark Grey Mix (00312)
Crochet Hook: H/8 or 5 mm 2 Buttons
Skill level: Intermediate Size: One to fit an average woman’s head. Gauge: 14 sc and 17 rows = 4" [10 cm]. Instructions:
Note: Ch 2 at beg of rnd does not count as st.
Beg at crown, ch 3. Join with sl st to first ch to form a ring. (See diagram on page 2).
1st rnd: Ch 3. 7 dc in ring. Join with sl st to top of ch 3. 8 dc.
2nd rnd: Ch 2. 2 dcfp around each dc around. Join with sl st to first dcfp. 16 sts.
3rd rnd: Ch 2. *1 dcfp around each of next 2 dcfp. 1 dc in sp between last dcfp and next dcfp. Rep from *
around. Join with sl st to first dcfp. 24 sts.
4th rnd: Ch 2. *1 dcfp around next dcfp. 1 dc in sp between last dcfp and next dcfp. 1 dcfp around next dcfp. 1
dc in next dc. Rep from * around. Join with sl st to first dcfp. 32 sts.
5th rnd: Ch 2. *1 dcfp around next dcfp. 1 dc in next dc. 1 dcfp around next dcfp. 2 dc in next dc. Rep from *
15 | P a g e
around. Join with sl st to first dcfp. 40 sts.
6th rnd: Ch 2. *1 dcfp around next dcfp. 2 dc in next dc. 1 dcfp around next dcfp. 1 dc in each of next 2 dc. Rep
from * around. Join with sl st tofirst dcfp. 48 sts.
7th rnd: Ch 2. *1 dcfp around next dcfp. 1 dc in each of next 2 dc. 1 dcfp around next dcfp. 2 dc in next dc. 1 dc
in next dc. Rep from * around. Join with sl st to first dcfp. 56 sts.
8th rnd: Ch 2. *1 dcfp around next dcfp. 2 dc in next dc. 1 dc in next dc. 1 dcfp around next dcfp. 1 dc in each
of next 3 dc. Rep from * around. Join with sl st to first dcfp. 64 sts.
9th rnd: Ch 1. 1 sc in each st around. Join with sl st to first sc. 64 sc.
10th rnd: Ch 2. *3 dcfp around dcfp 2 rows below. Miss next sc. 1 dc in next sc. Miss next sc. Rep from * 15
times more. Join with sl st to firstdcfp.
11th rnd: As 9th rnd.
12th rnd: Sl st in next st. Ch 3 (counts as dc). Miss next sc. 3 dcfp around dc 2 rows below. Miss next sc. *1 dc
in next sc. Miss next sc. 3 dcfparound dc 2 rows below. Miss next sc. Rep from * 14 times more. Join with sl st
to top of ch 3.
13th rnd: As 9th rnd.
14th rnd: Sl st in each of next 2 sts. Ch 3 (counts as dc). Miss next sc. 3 dcfp around dc 2 rows below. Miss next
sc. *1 dc in next sc. Miss next sc. 3 dcfp around dc 2 rows below. Miss next sc. Rep from * 14 timesmore. Join
with sl st to top of ch 3.
Rep 13th and 14th rnds until work from beg measures 8" [20.5 cm], ending on a 14th rnd. Do not fasten off.
Band:
1st and 2nd rnds: Ch 1. 1 sc in each st around.
Join with sl st to first sc. 64 sc. Do not fasten off.
Brim: Beg working in rows
1st row: Ch 1. 1 sc in each of next 46 sc. Turn. Leave rem sc unworked.
2nd to 10th rows: Ch 1. 1 sc in each sc to end of row. Turn.
Fasten off at end of last row.
FINISHING
Fold Brim of Hat at corners and sew into place with button on each side as shown in photo.
16 | P a g e
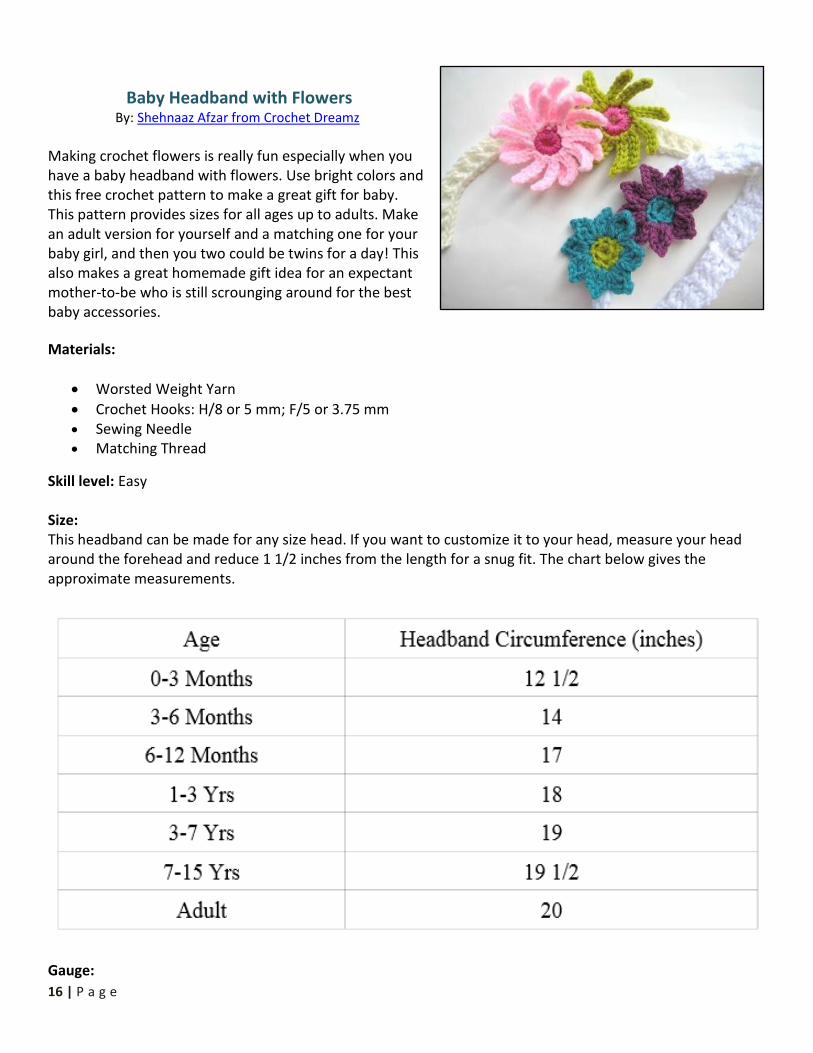
Baby Headband with Flowers By: Shehnaaz Afzar from Crochet Dreamz
Making crochet flowers is really fun especially when you have a baby headband with flowers. Use bright colors and this free crochet pattern to make a great gift for baby. This pattern provides sizes for all ages up to adults. Make an adult version for yourself and a matching one for your baby girl, and then you two could be twins for a day! This also makes a great homemade gift idea for an expectant mother-to-be who is still scrounging around for the best baby accessories.
Materials:
Worsted Weight Yarn
Crochet Hooks: H/8 or 5 mm; F/5 or 3.75 mm Sewing Needle
Matching Thread
Skill level: Easy Size: This headband can be made for any size head. If you want to customize it to your head, measure your head around the forehead and reduce 1 1/2 inches from the length for a snug fit. The chart below gives the approximate measurements.
Gauge:
17 | P a g e
Gauge is not important for this project. Note: The pictures are meant to support the pattern but do not include every step. Instructions:
Pink Flower:
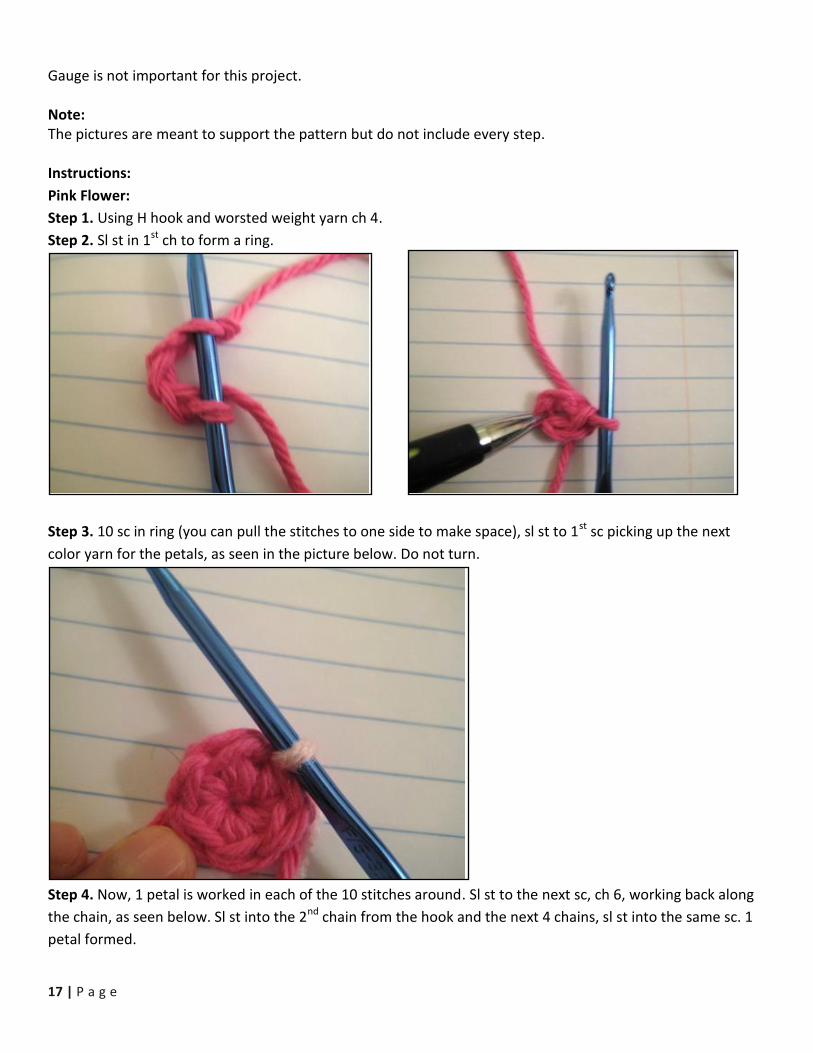
Step 1. Using H hook and worsted weight yarn ch 4.
Step 2. Sl st in 1st ch to form a ring.
Step 3. 10 sc in ring (you can pull the stitches to one side to make space), sl st to 1st sc picking up the next
color yarn for the petals, as seen in the picture below. Do not turn.
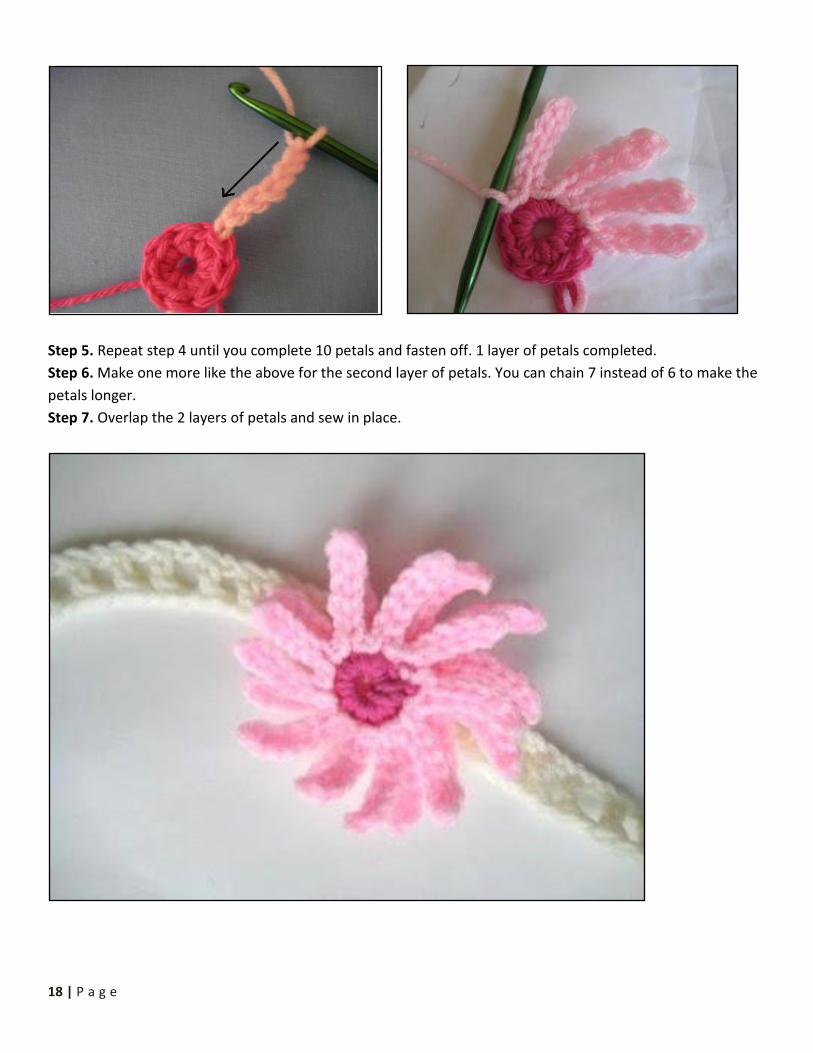
Step 4. Now, 1 petal is worked in each of the 10 stitches around. Sl st to the next sc, ch 6, working back along
the chain, as seen below. Sl st into the 2nd chain from the hook and the next 4 chains, sl st into the same sc. 1
petal formed.
18 | P a g e
Step 5. Repeat step 4 until you complete 10 petals and fasten off. 1 layer of petals completed.
Step 6. Make one more like the above for the second layer of petals. You can chain 7 instead of 6 to make the
petals longer.
Step 7. Overlap the 2 layers of petals and sew in place.
19 | P a g e
Band for the Pink Flower:
Step 1. Using H hook, chain as long as you want your band to be.
(See sizing chart above.) Add 3 ch for turning. (For example, if
you chained 70 to get the length you need, you still chain an
extra 3 after that.)
Step 2. 1 dc in the 3rd chain from the hook, ch 1, skip 1 ch, 1 dc
in next, ch 1, * (skip 1 ch, 1 dc in next), repeat from * until you
reach the end of your chain. Your band will look like a ladder.
Step 3. Sl st the ends of the band together and sew the flower
onto the join to hide it.
Blue Flower:
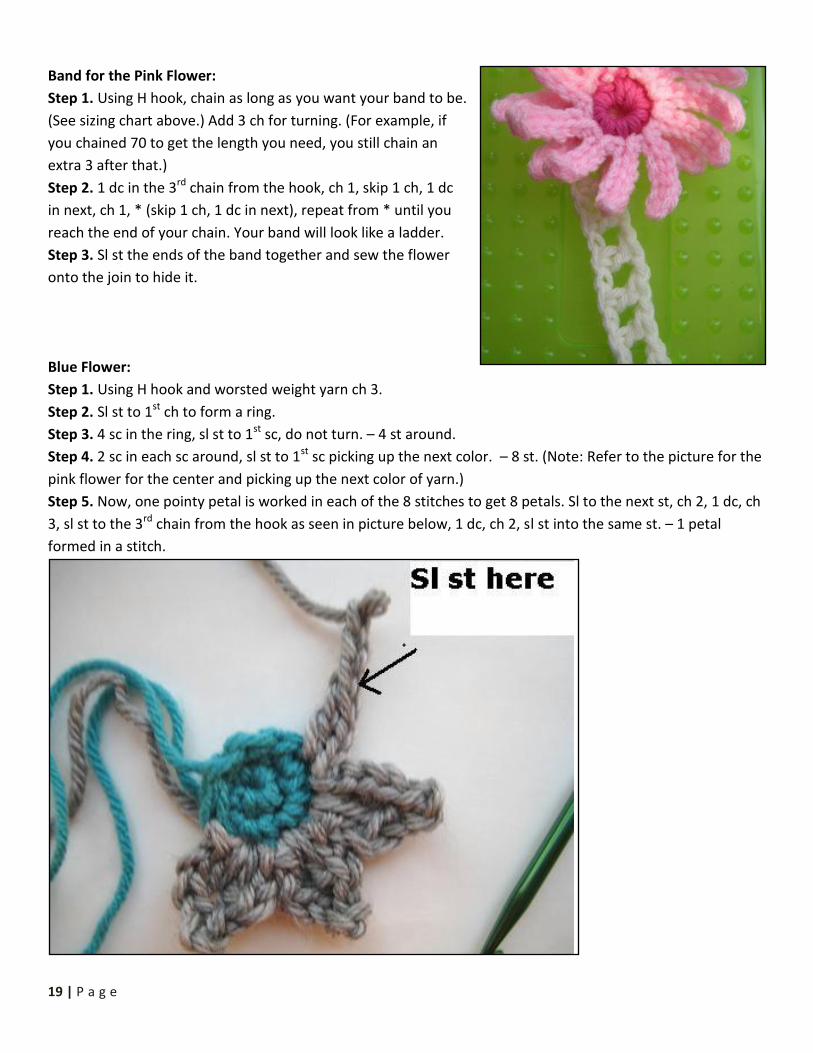
Step 1. Using H hook and worsted weight yarn ch 3.
Step 2. Sl st to 1st ch to form a ring.
Step 3. 4 sc in the ring, sl st to 1st sc, do not turn. – 4 st around.
Step 4. 2 sc in each sc around, sl st to 1st sc picking up the next color. – 8 st. (Note: Refer to the picture for the
pink flower for the center and picking up the next color of yarn.)
Step 5. Now, one pointy petal is worked in each of the 8 stitches to get 8 petals. Sl to the next st, ch 2, 1 dc, ch
3, sl st to the 3rd chain from the hook as seen in picture below, 1 dc, ch 2, sl st into the same st. – 1 petal
formed in a stitch.
20 | P a g e
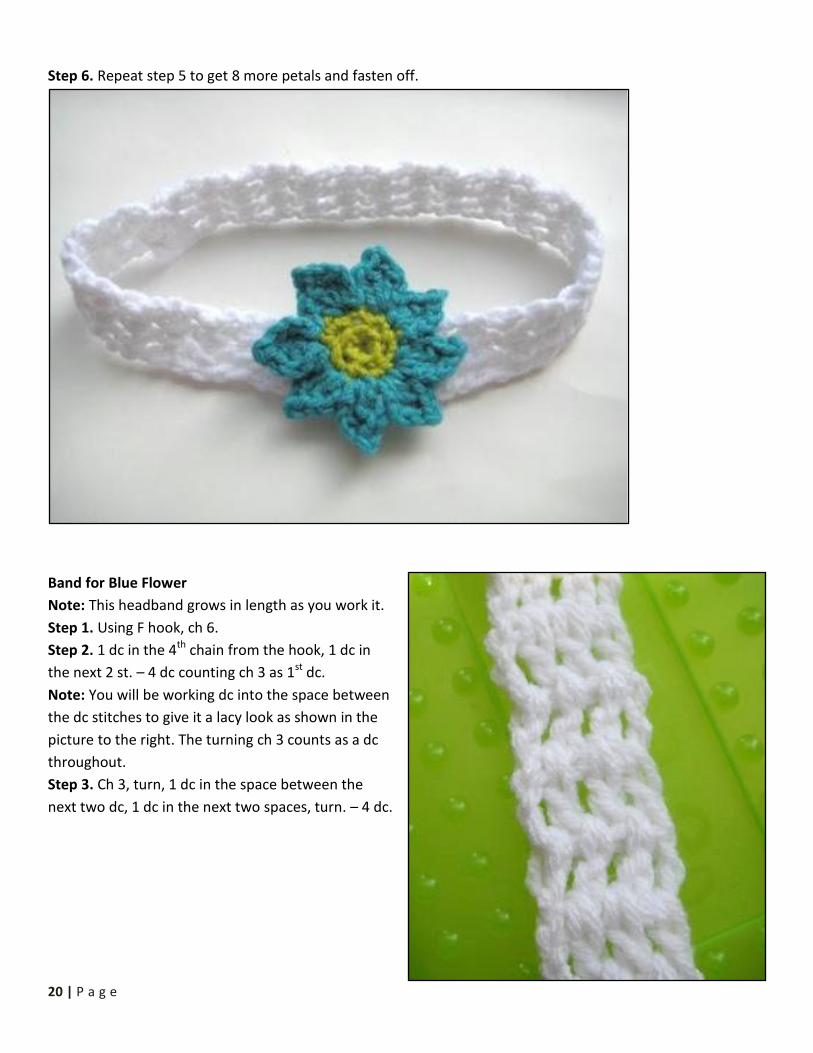
Step 6. Repeat step 5 to get 8 more petals and fasten off.
Band for Blue Flower
Note: This headband grows in length as you work it.
Step 1. Using F hook, ch 6.
Step 2. 1 dc in the 4th chain from the hook, 1 dc in
the next 2 st. – 4 dc counting ch 3 as 1st dc.
Note: You will be working dc into the space between
the dc stitches to give it a lacy look as shown in the
picture to the right. The turning ch 3 counts as a dc
throughout.
Step 3. Ch 3, turn, 1 dc in the space between the
next two dc, 1 dc in the next two spaces, turn. – 4 dc.

21 | P a g e
Step 4. Repeat step 3 for the length you want. Give a tug to the band before you measure it.
Step 5. Sl st the ends together and sew the flower onto the joint to hide it.
22 | P a g e
Crochet Wearables
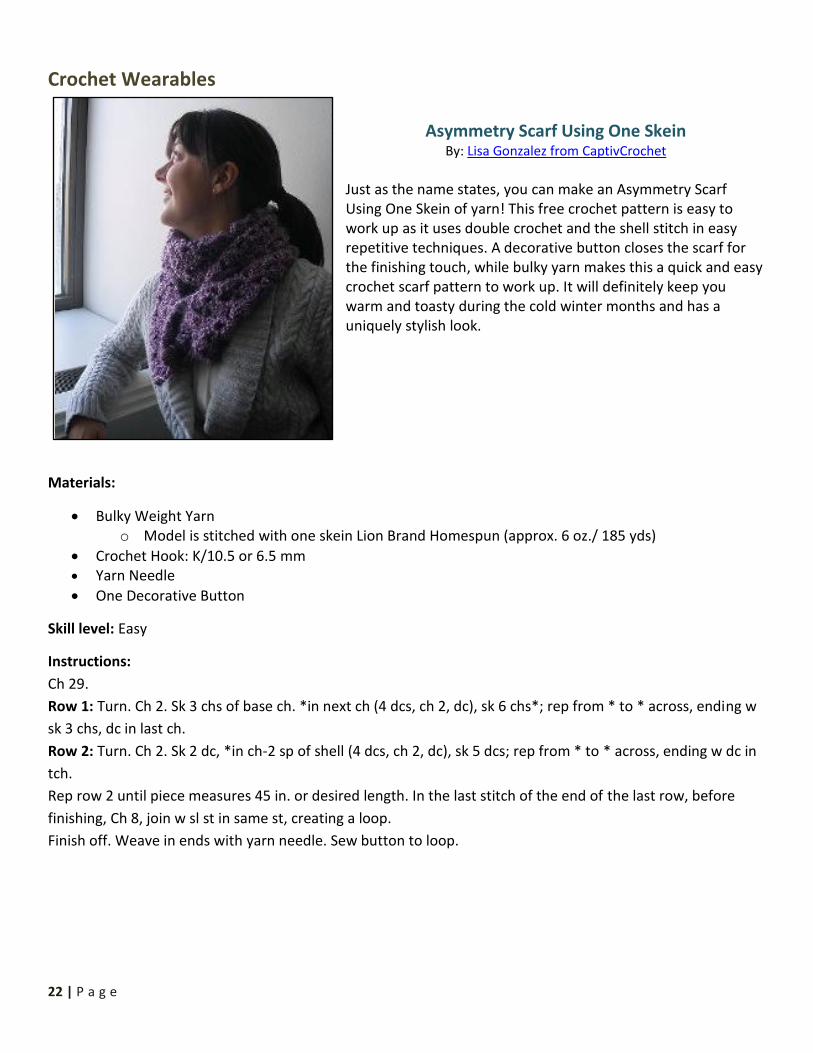
Asymmetry Scarf Using One Skein
By: Lisa Gonzalez from CaptivCrochet
Just as the name states, you can make an Asymmetry Scarf Using One Skein of yarn! This free crochet pattern is easy to work up as it uses double crochet and the shell stitch in easy repetitive techniques. A decorative button closes the scarf for the finishing touch, while bulky yarn makes this a quick and easy crochet scarf pattern to work up. It will definitely keep you warm and toasty during the cold winter months and has a uniquely stylish look.
Materials:
Bulky Weight Yarn o Model is stitched with one skein Lion Brand Homespun (approx. 6 oz./ 185 yds)
Crochet Hook: K/10.5 or 6.5 mm Yarn Needle
One Decorative Button
Skill level: Easy
Instructions:
Ch 29.
Row 1: Turn. Ch 2. Sk 3 chs of base ch. *in next ch (4 dcs, ch 2, dc), sk 6 chs*; rep from * to * across, ending w
sk 3 chs, dc in last ch.
Row 2: Turn. Ch 2. Sk 2 dc, *in ch-2 sp of shell (4 dcs, ch 2, dc), sk 5 dcs; rep from * to * across, ending w dc in
tch.
Rep row 2 until piece measures 45 in. or desired length. In the last stitch of the end of the last row, before
finishing, Ch 8, join w sl st in same st, creating a loop.
Finish off. Weave in ends with yarn needle. Sew button to loop.

23 | P a g e
Sweet and Simple Shawl By: Elizabeth Mareno from Bizzy Crochet
This free easy crochet pattern is great for those who are just beginning to crochet. Make a Sweet and Simple Shawl for yourself and you're sure to stay warm and stylish year-round. This shawl is great for any time of year, even a nice summer night. Brown is a great color for fall, but you could use light pink or pale blue for the summer months. You can even make it any length you want so that it is totally personalized for you.
Materials:
Light Weight Yarn o Model is stitched with 350g/12.25 oz of Patons Astra – Dark Tan
Crochet Hook: G/6 or 4 mm
Large Eye Needle for Finishing
Skill level: Beginner
Size: 24” w x 60” l, but you can make it whatever size you want. Width is from neck to waist, not shoulder to shoulder. Make it long so that it will wrap around you.
Instructions:
Ch 91.
Row 1: Sc in 2nd ch from hook, (ch3, sk 2ch, sc in next ch) across to last 2sc, ch3, sk next ch, sc in last ch (30-
ch3)

24 | P a g e
Row 2: Ch4(cts as dc, ch1), turn, (sc in ch3, ch1, dc in next sc, ch1) repeat 39 times, sc in ch3, ch1, dc in last sc.
(31dc)
Row 3: Ch1, turn, sc in dc, (ch3, sk sc-ch1-sc, sc in next dc) across, sc in 3rd ch of ch4 from prev row (30-ch3)
Repeat rows 2 and 3 until desired length is reached.

25 | P a g e
Fashionable Poncho By: Caron International Yarns
This ponchini is not only a different kind of outfit, but it makes a great fashion statement. You can wear it two different ways and it's an easy crochet pattern perfect for anyone to make. Sometimes all you need is a small extra layer for those chilly restaurants or late nights out. Don’t be weighed down by bulky coats and scarves; work up this cute little poncho for a fashionable and totally useful accessory.
Materials:
Bulky Weight Yarn o Model is stitched with Caron International’s Fling 0007 Twilight, 6 balls o Note: This yarn has been discontinued. Specifications on the yarn: pigtail chenille, chunky or
bulky weight yarn, 37 yds/33 m.
Crochet Hook: K/10.5 or 6.5 mm
Stitch Markers
Tapestry Needle
Sewing Needle
Matching Thread
Two 1” Buttons
Skill level: Easy
Gauge: In single crochet, 8 sts = 4”/10 cm.
Notes: 1. Ponchini may be worn two ways: either with the buttons in the front and back, or with a button at each shoulder. 2. Place a marker between 2 center sc; count 25 to marker, then 25 from marker to end.
Instructions:
Back and Front: (both alike)
Foundation Row: Ch 51.
Row 1: Beginning in second ch from hook, sc in second ch and in each ch across; turn—50 sc.
Row 2: Ch 1, sc in each sc across, turn.
26 | P a g e
Repeat Row 2 until piece measures 10" from beginning.
Fasten off.
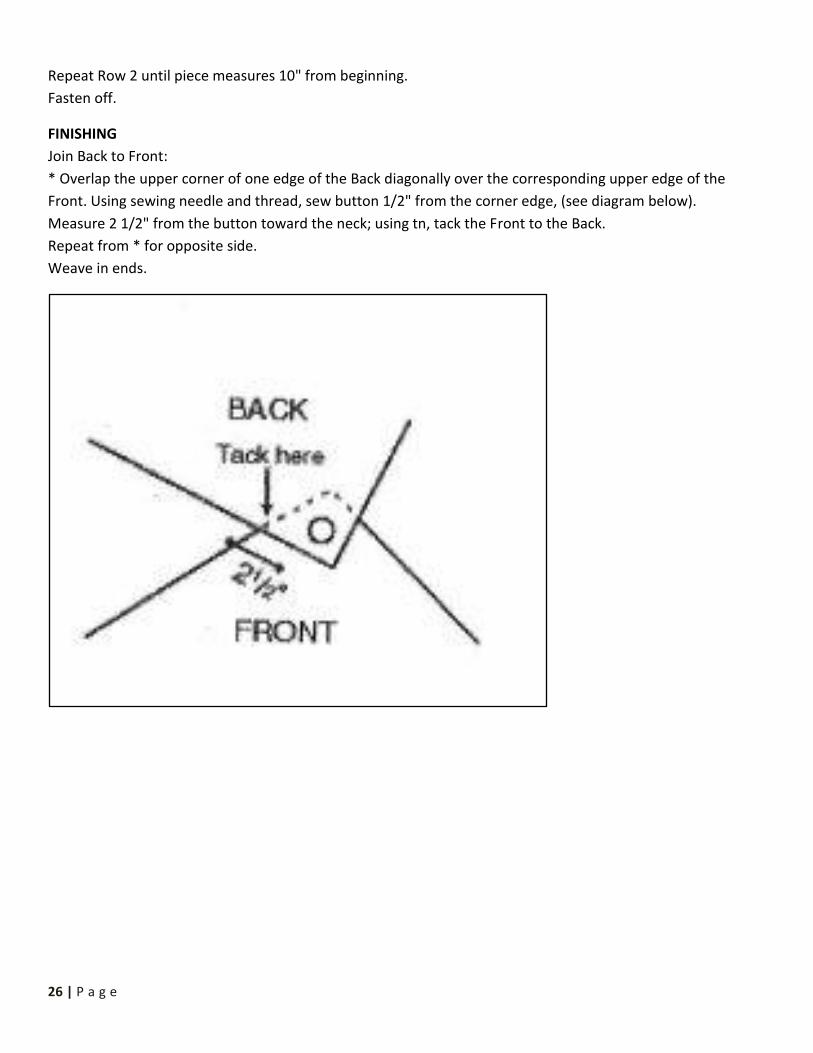
FINISHING
Join Back to Front:
* Overlap the upper corner of one edge of the Back diagonally over the corresponding upper edge of the
Front. Using sewing needle and thread, sew button 1/2" from the corner edge, (see diagram below).
Measure 2 1/2" from the button toward the neck; using tn, tack the Front to the Back.
Repeat from * for opposite side.
Weave in ends.
27 | P a g e
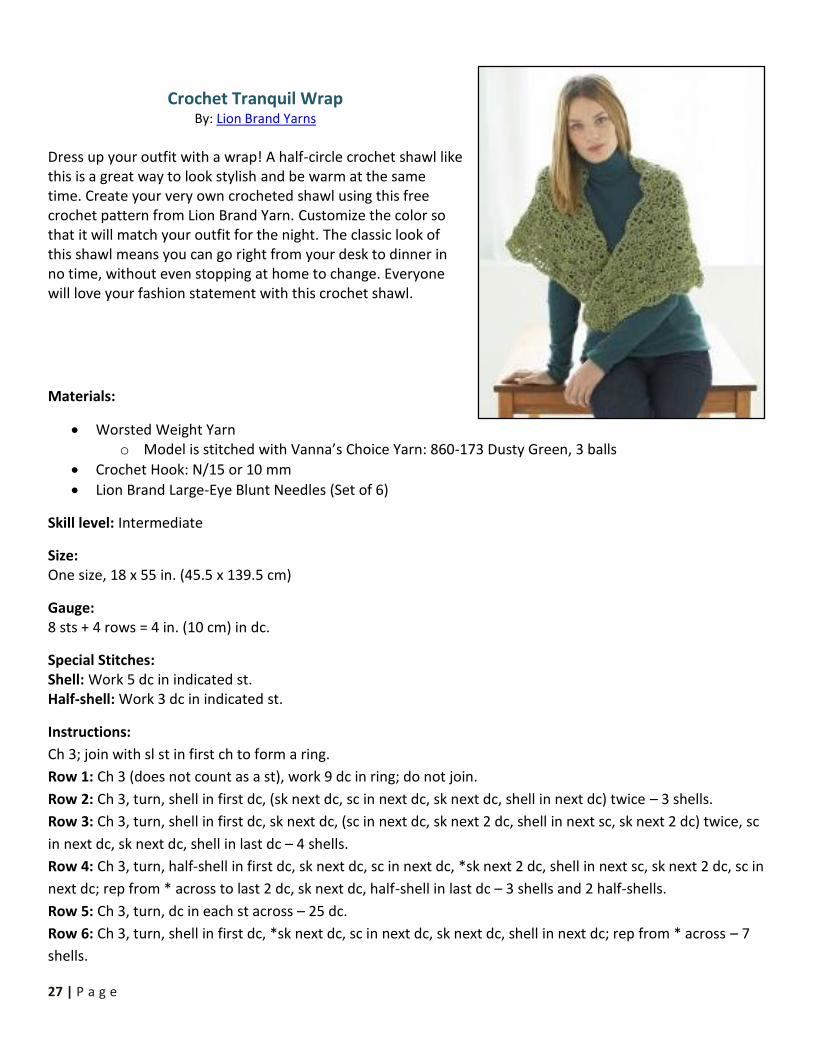
Crochet Tranquil Wrap By: Lion Brand Yarns
Dress up your outfit with a wrap! A half-circle crochet shawl like this is a great way to look stylish and be warm at the same time. Create your very own crocheted shawl using this free crochet pattern from Lion Brand Yarn. Customize the color so that it will match your outfit for the night. The classic look of this shawl means you can go right from your desk to dinner in no time, without even stopping at home to change. Everyone will love your fashion statement with this crochet shawl.
Materials:
Worsted Weight Yarn o Model is stitched with Vanna’s Choice Yarn: 860-173 Dusty Green, 3 balls
Crochet Hook: N/15 or 10 mm
Lion Brand Large-Eye Blunt Needles (Set of 6)
Skill level: Intermediate
Size: One size, 18 x 55 in. (45.5 x 139.5 cm)
Gauge: 8 sts + 4 rows = 4 in. (10 cm) in dc.
Special Stitches: Shell: Work 5 dc in indicated st. Half-shell: Work 3 dc in indicated st.
Instructions:
Ch 3; join with sl st in first ch to form a ring.
Row 1: Ch 3 (does not count as a st), work 9 dc in ring; do not join.
Row 2: Ch 3, turn, shell in first dc, (sk next dc, sc in next dc, sk next dc, shell in next dc) twice – 3 shells.
Row 3: Ch 3, turn, shell in first dc, sk next dc, (sc in next dc, sk next 2 dc, shell in next sc, sk next 2 dc) twice, sc
in next dc, sk next dc, shell in last dc – 4 shells.
Row 4: Ch 3, turn, half-shell in first dc, sk next dc, sc in next dc, *sk next 2 dc, shell in next sc, sk next 2 dc, sc in
next dc; rep from * across to last 2 dc, sk next dc, half-shell in last dc – 3 shells and 2 half-shells.
Row 5: Ch 3, turn, dc in each st across – 25 dc.
Row 6: Ch 3, turn, shell in first dc, *sk next dc, sc in next dc, sk next dc, shell in next dc; rep from * across – 7
shells.
28 | P a g e
Row 7: Rep Row 4 – 6 shells and 2 half-shells.
Row 8: Ch 1, turn, sc in first dc, *sk next 2 dc, shell in next sc, sk next 2 dc, sc in next dc; rep from * across – 7
shells.
Row 9: Ch 3, turn, shell in first sc, *sk next 2 dc, sc in next dc, sk next 2 dc, shell in next sc; rep from * across –
8 shells.
Rows 10–21: Rep Rows 4–9 twice – 23 shells.
Rows 22 and 23: Rep Rows 4 and 5 – 139 dc.
Fasten off.
FINISHING
Edging
From right side, join yarn with sl st anywhere along outside edge of Wrap.
Round 1: Working in sts and ends of rows around all edges of Wrap, work (sc in next st, dc in next 2 sts, trc in
next 2 sts, dc in next 2 sts) evenly spaced around. Fasten off.
Weave in ends.
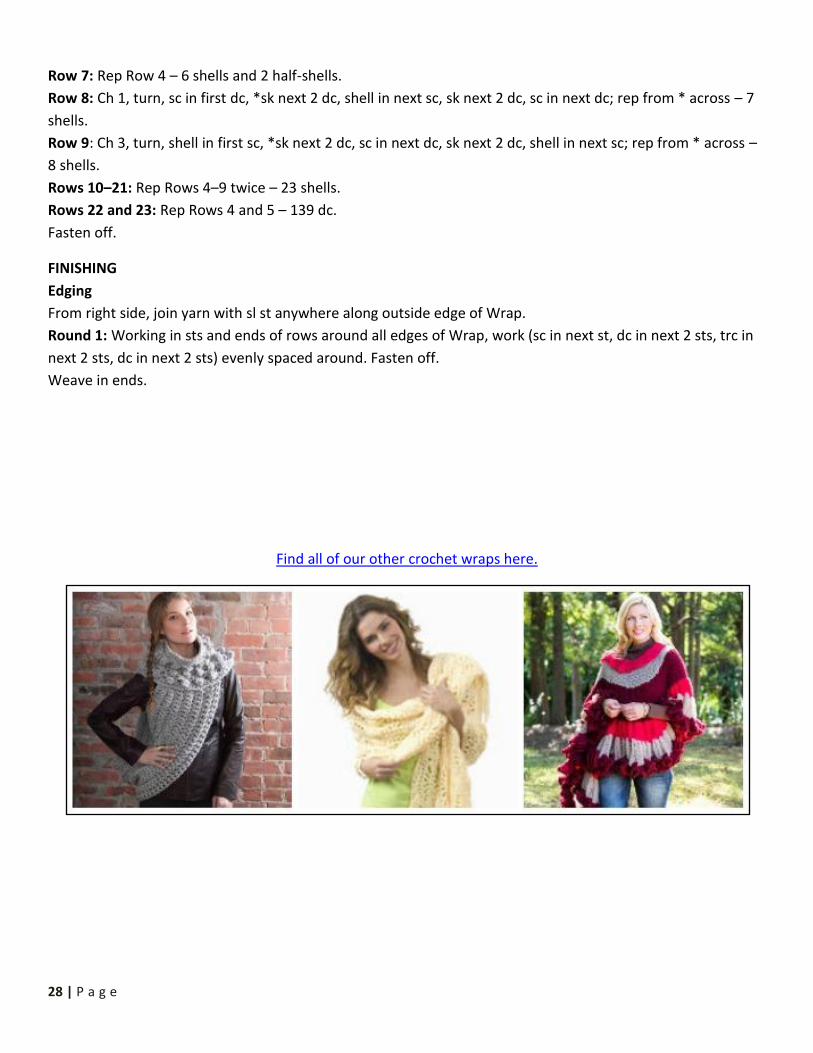
Find all of our other crochet wraps here.

29 | P a g e
Granny Square Poncho By: Donna Collinsworth from Donna’s Crochet Designs
Crochet this fun floral print granny square poncho with Donna. Free crochet poncho patterns like this one are great to wear in the spring and summer. The light and airy nature of this poncho will make you want to wear it all the time because it’s just so comfortable. Put a little bit of sunshine in your day with the bright and cute floral pattern.
Materials:
Crochet Thread o Model is stitched with 2-150 yd balls size 10 crochet thread in each of the following colors:
Orchid Pink, Frosty Green, and Maize; and 4-350 yd balls size 10 crochet thread in Deft Blue
Crochet Hook: 7 or 1.65 mm steel hook
Thread Needle
Skill level: Advanced
Size: Med/Large Child
Gauge: Block = 2” square
Special Stitches: Shell: Work 5 dc in indicated st. Half-shell: Work 3 dc in indicated st.
Instructions:
BLOCK:
With color A and 7 hook ch-6 sl st to form a ring.
RND 1: Ch-3, work 2 dc in ring, ch-2, (3 dc, ch-2) 3 times sl st top beg ch-3, fasten off.
RND 2: With color B join in any ch-2 sp, ch-3, (2 dc, ch-2, 3 dc) same sp, ch-2, (3 dc, ch-2, 3 dc, ch-2) 3 times, sl
st top beg ch-3, fasten off.
RND 3: With color C join in any corner ch-2 sp, ch-3, (2 dc, ch-2, 3 dc) same sp, ch-2,* (3 dc, ch-2) next ch-2 sp,
(3 dc, ch-2, 3 dc, ch-2) next ch-2 sp, * rep bet ** 3 times, 3 dc next ch-2 sp, ch-2, sl st top beg ch-3, fasten off.
RND 4: With color D join in any ch-2 corner sp, ch-3, (2 dc, ch-2, 3 dc) same sp, ch-2, * (3 dc, ch-2) next 2 ch-2
sps, (3 dc, ch-2, 3 dc, ch-2) next ch-2 sp, * rep bet ** 3 times, (3 dc, ch-2) next 2 ch-2 sps, sl st top beg ch-3,
fasten off.
RND 5: With Blue in any corner ch-2 sp, ch-3, (2 dc, ch-2, 3 dc) same sp, ch-2, (3 dc, ch-2) next 3 ch-2 sps, (3 dc,

30 | P a g e
ch-2, 3 dc, ch-2) next ch-2 sp, * rep bet ** 3 times, (3 dc, ch-2) next 3 ch-2 sps, sl st top beg ch-3, do not turn.
RND 6: Sl st next 2 sts and into ch-2 sp, ch-2, (2 dc, ch-2, 3 dc) same sp, ch-2,* (3 dc, ch-2) next 4 ch-2 sps, (3
dc, ch-2, 3 dc, ch-2) next ch-2 sp, * rep bet ** 3 times, (3 dc, ch-2) next 4 ch-2 sps, sl st top beg ch-3, fasten off.
BLOCK ONE:
Rnd 1 use green. Rnd 2 use blue. Rnd 3 use pink. Rnd 4 use yellow. Rnd 5-6 use blue. -Make 43 of these.
BLOCK TWO:
Rnd 1 use blue. Rnd 2 use green. Rnd 3 use yellow. Rnd 4 use pink. Rnd 5-6 use blue. -Make 43 of these.
BLOCK THREE:
Rnd 1 use pink. Rnd 2 use blue. Rnd 3 use green. Rnd 4 use yellow. Rnd 5-6 use blue. -Make 44 of these.
Long section, with needle and blue thread sew tog 5 rows or 19 blocks long alternating block placement. Sew
the 5 rows tog.
Short section sew tog 5 rows of 8 blocks long alternating block placement. Sew the 5 rows tog.
Sew the short end (5 blocks) of the short section to the long edge of the long section making an L. Sew the
other short end to the long edge to complete the poncho.
NECK EDGING:
With blue thread and 7 hook join in any ch-2 sp, ch-1, work 2 sc same sp, sc ea st and work 2 sc ea ch-2 sp
around, sl st top beg sc, fasten off.
BOTTOM EDGING:
With blue and 7 hook join in any st, ch-2, dc same sp as ch-2, dc next 3 sts, (ch-2, dc next 3 sts) around bottom
ending with ch-2, sl st top beg dc, fasten off.
FRINGE:
Cut four 4” long lengths of blue thread. Fold in half, insert hook in any ch-2 sp bottom edging, you through lp
made when you folded the thread lengths in half, pull through. Insert loose ends into lp and pull tight. Rep in
every ch-2 sp on edging.

31 | P a g e
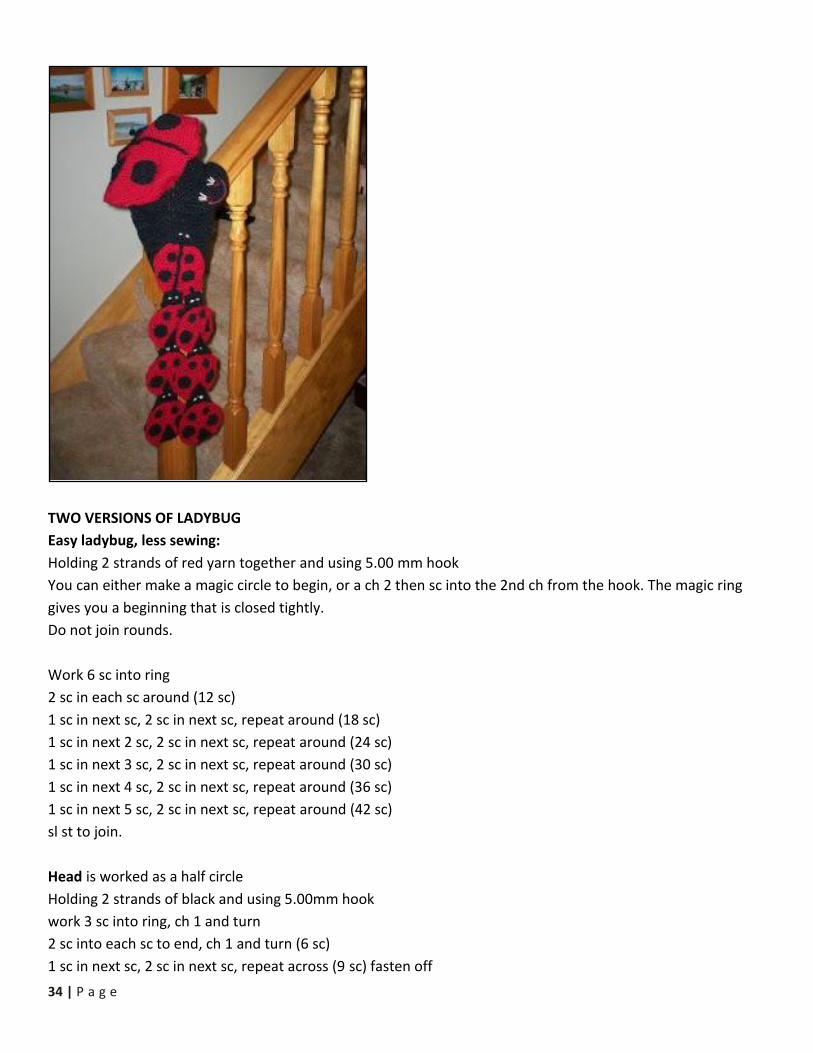
Crochet Ladybug, Beret, and Scarf Set By: Cathy Wood from Cats Rockin’ Crochet
This is one of the cutest designs you will ever see. With this free crochet pattern you can make a matching crochet ladybug beret and scarf set that will continue to be the most adorable accessories in your closet. Wear them forever until you pass them on to your daughter so that she can be a part of this cute and fun style. If you use 2 strands of 8 ply yarn, you’ll have some added warmth!
Materials:
Light Worsted Weight Yarn o Beret is stitched with 2 x 50 gm balls of 8 ply red; 2 x 50 gm balls of 8 ply black o Scarf is stitched with 2 x 50 gm balls of 8 ply red; 2 x 50 gm balls of 8 ply black
Crochet Hooks: G/6 or 4 mm; H/8 or 5 mm
Small Amount White Yarn (For sewing eyes)
Sewing Needle
Stitch Marker
Skill level: Advanced
Size: Beret: For a small adult head. Scarf: Approx 55 inches in length.
Notes: 1. Beret and Peak are made by using 2 strands of yarn together, which gives you a 16 ply Beret. 2. Do not join rounds. Use a stitch marker between rounds. 3. Alternate increases for a more rounded effect, such as sc then increase, increase then sc. Instructions are given for only sc then increase. 4. Scarf is worked beginning at neck part, then the lady bugs are attached to both ends of the neck part. 5. Use 8 lady bugs total for scarf: 4 at each end. 6. Turning ch 3 is counted as the first dc in every row.
Instructions:
Beret:
With 2 strands of red yarn and H hook, Ch 4, sl st to form a ring.
8 sc into ring (8 sc)
2 sc in each sc around (16 sc)
1 sc in next sc, 2 sc in next sc, repeat to end of the round (24 sc)
1 sc in next 2 sc, 2 sc in next sc, repeat to end of round (32 sc)
1 sc in next 3 sc, 2 sc in next sc, repeat to end of round, (40 sc)
32 | P a g e
1 sc in next 4 sc, 2 sc in next sc, repeat to end of round (48 sc)
1 sc in next 5 sc, 2 sc in next sc, repeat to end of round (56 sc)
work 1 sc in each sc around (56 sc)
1 sc in next 5 sc, 2 sc in next sc, repeat to end of round (56 sc)
1 sc in next 6 sc, 2 sc in next sc, repeat to end of round (64 sc)
1 sc in next 7 sc, 2 sc in next sc, repeat to end of round (72 sc)
1 sc in next 8 sc, 2 sc in next sc, repeat to end of round (80 sc)
work 1 sc in each sc around (80 sc)
1 sc in next 9 sc, 2 sc in next sc, repeat to end of round (88 sc)
1 sc in next 10 sc, 2 sc in next sc, repeat to end of round (96 sc)
work 1 sc in each sc around (96 sc)
1 sc in next 10 sc, 2 sc in next sc, repeat to end of round (96 sc)
1 sc in next 11 sc, 2 sc in next sc, repeat to end of round (104 sc)
This should give you an approximate width of 10 inches in diameter, if you want a wider beret, keep increasing
in the above manner to get your width. If puckering occurs, work a row without increases.
Work 1 round of sc in back loops only
Decrease rounds are the reverse of the increase rounds
1 sc in next 11 sc, sc 2 sc together, repeat to end of round (96 sc)
1 sc in next 10 sc, sc 2 sc together, repeat to end of round (88 sc)
1 sc in next 9 sc, sc 2 sc together, repeat to end of round (80 sc)
1 sc in next 8 sc, sc 2 sc together, repeat to end of round (72 sc)
1 sc in next 7 sc, sc 2 sc together, repeat to end of round (64 sc)
1 sc in next 6 sc, sc 2 sc together, repeat to end of round (56 sc)
1 sc in next 5 sc, sc 2 sc together, repeat to end of round (48 sc) Stop decreasing here (row 26) for a medium
sized beret.
1 sc in next 4 sc, sc 2 sc together, repeat to end of round (40 sc)
work next 5 rows in sc, with 2 strands of black, without decrease or length desired. Fasten off.
Peak for beret
Using 2 strands of black and size 5.00 mm hook
Ch 2
work 4 sc into 2nd ch from hook, ch 1 and turn
2 sc in each sc across, ch 1 turn (8 sc)
1 sc in next sc, 2 sc in next, repeat to end, ch 1 and turn (12 sc)
1 sc in next 2 sc, 2 sc in next, repeat to end, ch 1 and turn (16 sc)
keep increasing in this manner until you have 28 sc or width desired. Fasten off
Attach peak to beret, sew in all loose ends.
The back split is worked with a single strand of black yarn in sc through the red beret with a size 4.00 mm

33 | P a g e
hook.
Feelers are sewn in black as pictured below.
Make a face on the peak.
Make 2 small dots, using a single strand of black and using size 4.00 mm hook.
Work 4 sc into a ring, do not join,
work 2 sc into each sc around (8 sc), fasten off leaving a length for sewing.
Make 2 large dots, using a single strand of black and using size 4.00 mm hook.
Work 4 sc into a ring, do not join,
work 2 sc into each sc around (8 sc),
work 1 sc in next sc, 2 sc in next sc around (8 sc) fasten off leaving a length for sewing.
Attach dots head.
Sew in all loose ends.
Scarf:
Neck Part
Holding 2 strands of black together and using 5.00 mm hook
Ch 15
work 1 dc in 4th ch from hook and in each ch across, ch 3 and turn (13 dc)
work 1 dc in next dc across, ch 3 and turn (13 dc)
repeat row 2 until you get 31 rows in total, or length desired. Fasten off and weave in ends.
34 | P a g e
TWO VERSIONS OF LADYBUG
Easy ladybug, less sewing:
Holding 2 strands of red yarn together and using 5.00 mm hook
You can either make a magic circle to begin, or a ch 2 then sc into the 2nd ch from the hook. The magic ring
gives you a beginning that is closed tightly.
Do not join rounds.
Work 6 sc into ring
2 sc in each sc around (12 sc)
1 sc in next sc, 2 sc in next sc, repeat around (18 sc)
1 sc in next 2 sc, 2 sc in next sc, repeat around (24 sc)
1 sc in next 3 sc, 2 sc in next sc, repeat around (30 sc)
1 sc in next 4 sc, 2 sc in next sc, repeat around (36 sc)
1 sc in next 5 sc, 2 sc in next sc, repeat around (42 sc)
sl st to join.
Head is worked as a half circle
Holding 2 strands of black and using 5.00mm hook
work 3 sc into ring, ch 1 and turn
2 sc into each sc to end, ch 1 and turn (6 sc)
1 sc in next sc, 2 sc in next sc, repeat across (9 sc) fasten off

35 | P a g e
Attach head to body.
The back split is worked in sc through the red body.
Using a single strand of black and a size 4.00 mm hook attach yarn to the centre area of the head closest to
the red body, sc evenly down the length of body.
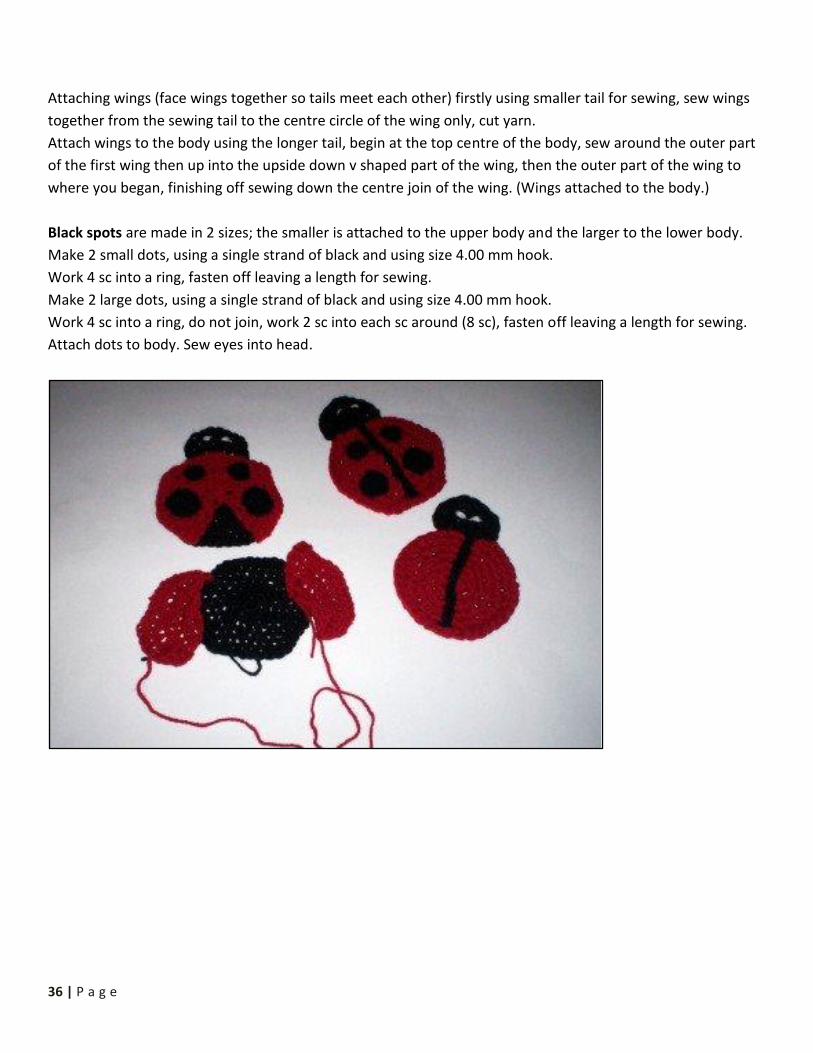
Black spots are made in 2 sizes; the smaller is attached to the upper body and the larger to the lower body.
Make 2 small dots, using a single strand of black and using size 4.00 mm hook.
Work 4 sc into a ring, fasten off leaving a length for sewing.
Make 2 large dots, using a single strand of black and using size 4.00 mm hook.
Work 4 sc into a ring, do not join, work 2 sc into each sc around (8 sc), fasten off leaving a length for sewing.
Attach dots to body. Sew eyes into head.
Single strand ladybug, more sewing:
Made in 4 parts using a single strand of yarn and a size 4.00 mm hook
Black body
Work 6 sc into ring
2 sc in each sc around (12 sc)
1 sc in next sc, 2 sc in next sc, repeat around (18 sc)
1 sc in next 2 sc, 2 sc in next sc, repeat around (24 sc)
1 sc in next 3 sc, 2 sc in next sc, repeat around (30 sc)
1 sc in next 4 sc, 2 sc in next sc, repeat around (36 sc)
1 sc in next 5 sc, 2 sc in next sc, repeat around (42 sc)
sl st to join.
Black head
Work 3 sc into ring, ch 1 and turn
2 sc into each sc across, ch 1 and turn (6sc)
1 sc into next sc, 2 sc into next sc, repeat to end ch 1 and turn (9 sc)
1 sc into next 2 sc, 2 sc into next sc, repeat to end ch 1 and turn (12 sc)
Attach head to body.
Red Wings, make 2
Work 3 sc into ring, ch 1 and turn
2 sc into each sc across, ch 1 and turn (6sc)
1 sc into next sc, 2 sc into next sc, repeat to end ch 1 and turn (9 sc)
1 sc into next 2 sc, 2 sc into next sc, repeat to end ch 1 and turn (12 sc)
1 sc into next sc 3, 2 sc into next sc, repeat to end ch 1 and turn (15 sc)
1 sc into next sc 4, 2 sc into next sc, repeat to end ch 1 and turn (18 sc)
1 sc into next sc 5, 2 sc into next sc, repeat to end (21 sc)
Fasten off leaving a medium sized tail for sewing on 1st wing and a longer tail for sewing on the 2nd wing.
36 | P a g e
Attaching wings (face wings together so tails meet each other) firstly using smaller tail for sewing, sew wings
together from the sewing tail to the centre circle of the wing only, cut yarn.
Attach wings to the body using the longer tail, begin at the top centre of the body, sew around the outer part
of the first wing then up into the upside down v shaped part of the wing, then the outer part of the wing to
where you began, finishing off sewing down the centre join of the wing. (Wings attached to the body.)
Black spots are made in 2 sizes; the smaller is attached to the upper body and the larger to the lower body.
Make 2 small dots, using a single strand of black and using size 4.00 mm hook.
Work 4 sc into a ring, fasten off leaving a length for sewing.
Make 2 large dots, using a single strand of black and using size 4.00 mm hook.
Work 4 sc into a ring, do not join, work 2 sc into each sc around (8 sc), fasten off leaving a length for sewing.
Attach dots to body. Sew eyes into head.
38 | P a g e
Baby Blankets and Crochet Afghans
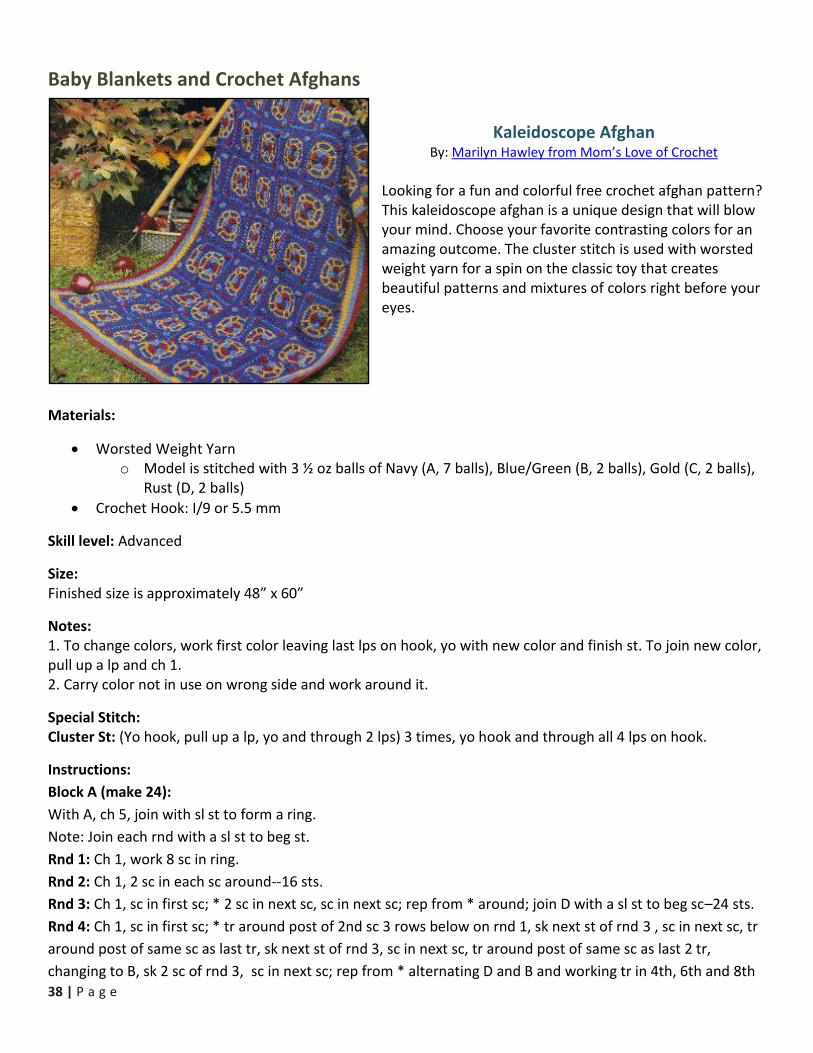
Kaleidoscope Afghan
By: Marilyn Hawley from Mom’s Love of Crochet
Looking for a fun and colorful free crochet afghan pattern? This kaleidoscope afghan is a unique design that will blow your mind. Choose your favorite contrasting colors for an amazing outcome. The cluster stitch is used with worsted weight yarn for a spin on the classic toy that creates beautiful patterns and mixtures of colors right before your eyes.
Materials:
Worsted Weight Yarn o Model is stitched with 3 ½ oz balls of Navy (A, 7 balls), Blue/Green (B, 2 balls), Gold (C, 2 balls),
Rust (D, 2 balls)
Crochet Hook: I/9 or 5.5 mm
Skill level: Advanced
Size: Finished size is approximately 48” x 60”
Notes: 1. To change colors, work first color leaving last lps on hook, yo with new color and finish st. To join new color, pull up a lp and ch 1. 2. Carry color not in use on wrong side and work around it.
Special Stitch: Cluster St: (Yo hook, pull up a lp, yo and through 2 lps) 3 times, yo hook and through all 4 lps on hook.
Instructions:
Block A (make 24):
With A, ch 5, join with sl st to form a ring.
Note: Join each rnd with a sl st to beg st.
Rnd 1: Ch 1, work 8 sc in ring.
Rnd 2: Ch 1, 2 sc in each sc around--16 sts.
Rnd 3: Ch 1, sc in first sc; * 2 sc in next sc, sc in next sc; rep from * around; join D with a sl st to beg sc–24 sts.
Rnd 4: Ch 1, sc in first sc; * tr around post of 2nd sc 3 rows below on rnd 1, sk next st of rnd 3 , sc in next sc, tr
around post of same sc as last tr, sk next st of rnd 3, sc in next sc, tr around post of same sc as last 2 tr,
changing to B, sk 2 sc of rnd 3, sc in next sc; rep from * alternating D and B and working tr in 4th, 6th and 8th
39 | P a g e
sc of rnd 1; join C with a sl st to beg sc. Cut D and B.
Rnd 5: Ch 1, sc in first st; * sc in next st, 2 sc in next st, sc in next st; rep from * around; change to A with a sl st
to beg sc–32 sc.
Rnd 6: Ch 1; * sc in next sc, 2 sc in next sc, sc in next 2 sc; rep from * around–40 sc.
Rnd 7: Ch 1; * 2 sc in first st, sc in next 4 sts; rep from * around–48 sc; change to C with a sl st to beg sc.
Rnd 8: Note: Do not sk any sc on rnd 7. Ch 1, sc in first sc, tr around post of sc 3 rows, directly below on rind 5;
* sc in next 8 sc, sk 4 sc of rnd 5 and tr around post of next sc, sc in next 4 sc of rnd 7, sk 2 sts of rnd 5 and tr
around post of next sc; rep from * around, ending last rep with 3 sc; change to A with a sl st to beg sc–56 sts.
Cut C.
Rnd 9: Ch 3 (counts as first dc); * dc in next 2 sts, hdc in next 2 sts, sc in next 3 sts, hdc in next 2 sts, dc in next
3 sts, (dc, tr, ch 1, tr, dc) in next st–corner made, dc in next st; rep from * around, ending last rep with corner;
sl st to top of beg ch-3--68 sts and 4 ch-1 sps.
Rnd 10: Ch 1; * sc in each st to first corner tr, changing to B in last st, work cluster around post of corner tr,
hdc in ch-1 sp, cluster around post of next tr, changing to A; rep from * around. Cut B.
Rnd 11: Ch 1, alternating A and D, sc in each st around, working 3 sc in hdc of each corner, Cut D.
Rnd 12: With A, ch 1; * sc in A sc of rnd 11, ch 1, sk B st; rep from * around, working (sc, ch 1, sc) in 2nd sc of
each 3-sc corner group. Join and fasten off.
Bock B (make 24):
Work as for Block A, substituting color D with B in rnd 10 and color B with D in rnd 11.
Finishing:
Joining: Using A, join blocks in checkerboard fashion, whip stitching edges together through the ch-1 sps.
Assemble in six rows with eight blocks each.
Border:
Rnd 1: Join C in any corner and ch 1, sc in each sc and ch sp around, working 3 sc in each corner; join with a sl
st to beg sc.
Rnds 2-4: Ch 1, sc in each st around, working 3 sc in each center corner st; sl st to beg sc. Fasten off at end of
rnd 4.
Rnds 5-8: Join B and rep rnd 2. Fasten off at end of rnd 8.
Rnds 9-12: Join D and rep rnd 2. Fasten off and weave in ends.

40 | P a g e
Retro Rainbow Baby Blanket By: Bernat
This Retro Rainbow Baby Blanket is perfect for baby boys and girls alike. The bright rainbow motifs will look great in any nursery, no matter the color scheme. This is an advanced crochet afghan pattern for ambitious crocheters to complete, but the end product is definitely worth it. It's a great pattern to make for any mother-to-be, including yourself! Work it up for the nursery in your own home, or know that it will be put to good use elsewhere by using it as a one-of-a-kind baby shower gift.
Materials:
Worsted Weight Yarn o Model is stitched with Sheep(ish) by Vickie Howell: 00004 White(ish) (MC, 3 balls), 00017
Turquoise(ish) (A, 1 ball), 00020 Chartreuse(ish) (B, 2 balls), 00012 Yellow(ish) (C, 2 balls), 00014 Coral(ish) (D, 3 balls)
Crochet Hook: H/8 or 5 mm
Stitch Marker
Skill level: Advanced
Size: Approx 42" x 48" [106.5 x 122 cm]
Gauge: 1 Block= 5½" [14 cm] square.
Stitch Combos:
Stitch Combo 1: Yoh and draw up a loop in 2nd horizontal bar of stitch just made. Yoh and draw up a loop in
next st of 3rd row. (Yoh and draw through 2 loops on hook) 4 times - 1 loop rem on hook. 1 dc in 2nd
horizontal bar of last st made. Yoh and draw up a loop in same sp as last dc. Draw up a loop in 3rd horizontal
bar of last long st made. Draw up a loop in same st of Row 3 - (5 loops on hook). Yoh and draw through 1 loop
on hook. (Yoh and draw through 2 loops on hook) 4 times - (1 loop left on hook).
Stitch Combo 2: Yoh and draw up a loop in 2nd horizontal bar of stitch just made. Draw up a loop in 3rd
horizontal bar of last long st made. Draw up a loop in next st of 3rd row. Yoh and draw through 1 loop on
hook. (Yoh and draw through 2 loops on hook) 4 times - (1 loop left on hook). 1 dc in 2nd horizontal bar of
stitch just made. Yoh and draw up a loop in same sp as last dc. Draw up a loop in 3rd horizontal bar of last long
st made. Yoh and draw up a loop in same st of Row 3. (Yoh and draw through 2 loops on hook) 5 times - (1
loop left on hook).
41 | P a g e
Stitch Combo 3: Yoh and draw up a loop in 2nd horizontal bar of stitch just made. Yoh and draw up a loop in
3rd horizontal bar of last long st made. Yoh and draw up a loop in next st of Row 3. (Yoh and draw through 2
loops on hook) 6 times - (1 loop left on hook). 1 dc in 2nd horizontal bar of last st made. Yoh and draw up a
loop in same sp as last dc. Yoh and draw up a loop in 4th horizontal bar of last long st made. Draw up a loop in
same st of Row 3. (Yoh and draw through 2 loops on hook) 5 times - (1 loop left on hook).
Stitch Combo 4: Yoh and draw up a loop in 2nd horizontal bar of stitch just made. Yoh and draw up a loop in
3rd horizontal bar of last long st made. Draw up a loop in 4th horizontal bar of last long st made. Draw up a
loop in next st of Row 3. Yoh and draw through 1 loop on hook. (Yoh and draw through 2 loops on hook) 6
times - (1 loop left on hook). Yoh and draw up a loop in 2nd horizontal bar of stitch just made. Yoh and draw
up a loop in 4th horizontal bar of last long st made. (Yoh and draw through 2 loops on hook) 4 times - (1 loop
left on hook, place marker on this stitch). Yoh and draw up a loop in 2nd horizontal bar of stitch just made.
Yoh and draw up a loop in 4th horizontal bar of last long st made. Draw up a loop in 5th horizontal bar of last
long st made. Draw up a loop in same st of Row 3. Yoh and draw through 1 loop on hook. (Yoh and draw
through 2 loops on hook) 6 times - (1 loop left on hook).
Stitch Combo 5: Yoh and draw up a loop in 2nd horizontal bar of stitch just made. Yoh and draw up a loop in
4th horizontal bar of last long st made. Draw up a loop in 5th horizontal bar of last long st made. Draw up a
loop in next st of Row 3. (Yoh and draw through 2 loops on hook) 6 times - (1 loop left on hook). 1 dc in 2nd
horizontal bar of stitch just made. Yoh and draw up a loop in same sp as last dc. Draw up a loop in 4th
horizontal bar of last long st made. Yoh and draw up a loop in same st of Row 3. (Yoh and draw through 2
loops on hook) 5 times - (1 loop left on hook).
Stitch Combo 6: Yoh and draw up a loop in 2nd horizontal bar of stitch just made. Draw up a loop in 3rd
horizontal bar of stitch just made. Yoh and draw up a loop in next st of Row 3. (Yoh and draw through 2 loops
on hook) 5 times - (1 loop left on hook). 1 dc in 2nd horizontal bar of stitch just made. Yoh and draw up a loop
in same sp as last dc. Draw up a loop in 3rd horizontal bar of last long st made. Yoh and draw up a loop in
same st of Row 3. Yoh and draw through 1 loop on hook. (Yoh and draw through 2 loops on hook) 5 times - (1
loop left on hook).
Stitch Combo 7: Yoh and draw up a loop in 2nd horizontal bar of stitch just made. Yoh and draw up a loop in
next st of Row 3. (Yoh and draw through 2 loops on hook) 4 times - (1 loop left on hook). 1 dc in 2nd horizontal
bar of stitch just made. Yoh and draw up a loop in same sp as last dc. Yoh and draw up a loop in same st of
Row 3. Yoh and draw through 1 loop on hook. (Yoh and draw through 2 loops on hook) 4 times - (1 loop left on
hook).
42 | P a g e
43 | P a g e
Instructions:
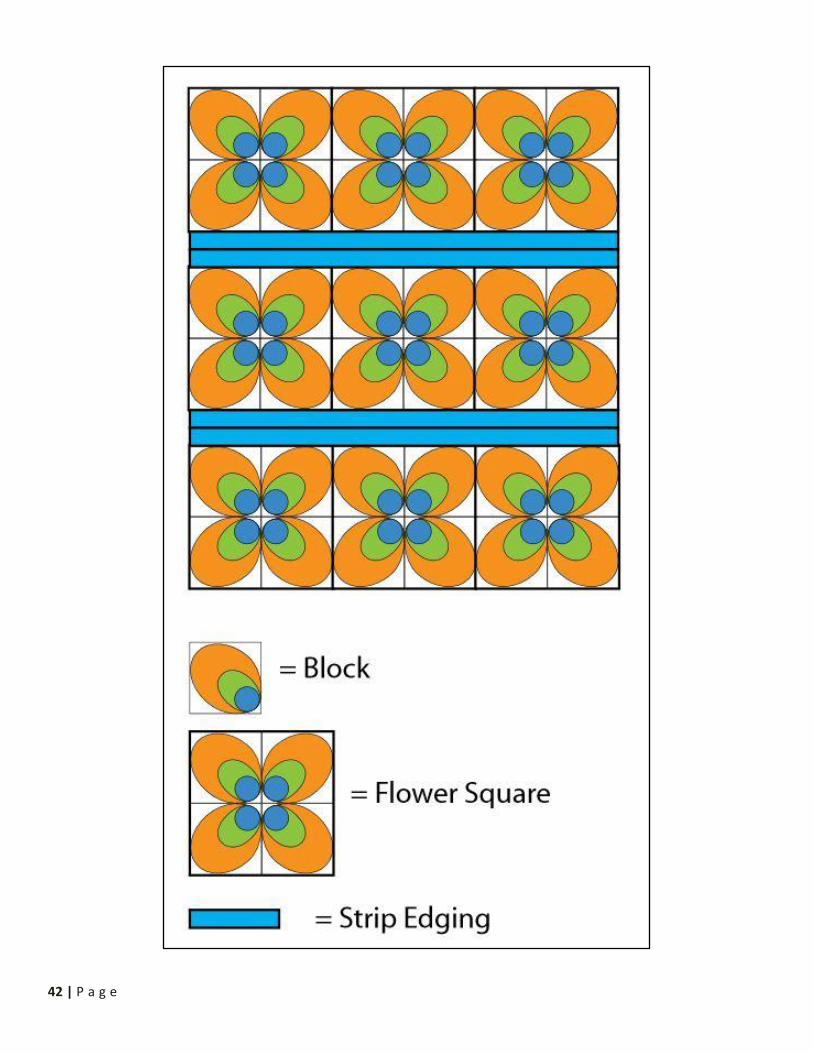
Block (make 36) See diagram. With A, ch 4. Join with sl st to first ch to form a ring.
1st rnd: Ch 2 (does not count as st). (2 hdc. 3 dc. 2 tr. 3 dc. 2 hdc) into ring. Join with sl st to top of first hdc.
Fasten off. 12 sts.
2nd row: Miss first hdc. Join B with sl st in next hdc. Ch 1. Miss same hdc where sl st was made. 2 sc in next dc.
(2 hdc. 1 dc) in next dc. (2 dc. 1 tr) in next dc. 3 tr in next tr. (1 tr. 2 dc) in next tr. (1 dc. 2 hdc) in next dc. 2 sc in
next dc. Ch 1. Sl st in next hdc. Fasten off. 21 sts, including ch-1 sps.
3rd row: Miss first 2 sc of 2nd row. Join C with sl st in next hdc. Ch 1. Miss same hdc where sl st was made. 1 sc
in next hdc. 1 hdc in next dc. 1 dc in next dc. 2 tr in next dc. 2 tr in next tr. (1 tr. 1 dtr) in next tr. 3 dtr in next tr.
(1 dtr. 1 tr) in next tr. 2 tr in next tr. 2 tr in next dc. 1 dc in next dc. 1 hdc in next dc. 1 sc in next dc. Ch 1. Sl st in
next hdc. Fasten off. 23 sts, including ch-1 sps.
4th row: Join D with sl st in first hdc of 3rd row. Ch 1. Miss same hdc where sl st was made. 1 sc in next st. 1
hdc in next st. 1 dc in next st. (1 dc. 1 tr) in next st. (1 tr. 2 dtr) in next st. Stitch Combo 1. Stitch Combo 2.
Stitch Combo 3. Stitch Combo 4. Stitch Combo 5. Stitch Combo 6. Stitch Combo 7. (2 dtr. 1 tr) in next st. (1 tr. 1
dc) in next st. 1 dc in next st. 1 hdc in next st. 1 sc in next st. Ch 1. Sl st in next st. Fasten off.
Note: When working 5th rnd, ch-1 sp counts as st. Sl st does not count as st.
5th rnd: Join MC with sl st in marked st. Ch 6 (counts as tr and ch 2). 2 tr in same sp as sl st, *1 tr in next st. 1
dc in next st. 1 hdc in each of next 3 sts. 1 sc in each of next 2 sts. 1 hdc in each of next 3 sts. 1 dc in next st. 1
tr in next st.** (2 tr. Ch 2. 2 tr) in next st. Rep from * twice more, then from * to ** once. 1 tr in same sp as
first sl st. Join with sl st to 4th ch of ch 6. Fasten off.
FINISHING
Using flat seam, join 4 Blocks into Flower Square. Sew Flower Squares into 3 Strips, having 3 Flower Squares in
each Strip.
Side Strip Edging: **1st row: (RS). Join C with sl st in corner ch-2 sp of Strip. Ch 3 (counts as dc). Working
across long edge of Strip, 1 dc in each st to end of Strip, working 1 dc in each ch-2 sp. Fasten off.
2nd row: (RS). Join B with sl st to top of ch 3. Ch 2 (does not count as st). 1 hdc in each dc to end of row.
Fasten off.
3rd row: (RS). Join A with sl st to top of ch 2. Ch 1. 1 sc in each hdc to end of row. Fasten off.** Rep for Second
Strip.
Middle Strip Edgings
Work from ** to ** as given for Side Strip Edging. Rep on opposite side of same Strip.
With A, sew Strips tog into Blanket as shown in diagram.
Blanket edging:
**1st rnd: (RS). Join MC with sl st to top right ch-2 sp corner of Blanket. Ch 1. *1 sc in each st to next corner,
working 1 sc in each ch-2 sp. (1 sc. Ch 2. 1 sc) in next corner ch-2 sp. Rep from * twice more. 1 sc in each st to
end of rnd. (1 sc. Ch 2) in first ch-2 sp. Join A with sl st to first sc. Break MC.
2nd rnd: With A, ch 1. 1 sc in each sc around, working (1 sc. Ch 2. 1 sc) in corner ch-2 sps. Join B with sl st to
first sc. Break A.
3rd to 5th rnds: Rep 2nd rnd, changing colors in this sequence: B, C, and D. Fasten off at end of last rnd.

44 | P a g e
Road Trip Baby Blanket By: Michele Wilcox for Red Heart Yarns
Bring this Road Trip Baby Blanket with you whenever you leave the house. This free crochet afghan pattern is great for comforting your sleeping baby any time you are on-the-go. It's made using super bulky (and super soft) yarn, so it works up quickly and has a lot of cushion. It's perfect for long road trips, plane rides, or just errands around town. Babies will love snuggling with this soft and cuddly blanket. Choose any color Red Heart Snuggle Bunny yarn you want for this easy crochet pattern.
Materials:
Super Bulky Weight Yarn o Model is stitched with Red Heart Snuggle Bunny: 9802 Bluebird (A, 4 balls) and 9010 Cottontail
(B, 3 balls)
Susan Bates Crochet Hook: P/16 or 16 mm
Skill level: Easy
Size: Blanket measures 30” x 30” (76 cm x 76 cm)
Gauge: 6 dc = 4”; 8 rows = 5”
Notes: To change color, work last stitch of old color to last yarn over. Yarn over with new color and draw through all loops on hook to complete stitch. Proceed with new color. Carry old color loosely up side of piece until next needed.
Special Abbreviations: 4-dc Cl (4 double crochet cluster) Yarn over, insert hook in indicated stitch, yarn over and draw up a loop, yarn over and draw through 2 loops on hook; [yarn over, insert hook in same stitch, yarn over and draw up a loop, yarn over and draw through 2 loops on hook] 3 times, yarn over and draw through all 5 loops on hook, ch 1 to close cluster. sc2tog (single crochet 2 stitches together) [Insert hook in next stitch, yarn over and draw up a loop] twice, yarn over and draw through all 3 loops on hook.

45 | P a g e
Instructions:
With A, ch 51.
Row 1: Dc in 4th ch from hook and each remaining ch across – 49 sts.
Row 2: Ch 1, turn, sc in each st across, changing to B in last st.
Row 3: Ch 1, turn, sc in next 8 sts, 4-dc Cl in next st, [sc in next 7 sts, 4-dc Cl in next st] 4 times, sc in next 8 sts.
Row 4: Ch 1, turn, sc in each st across, changing to A in last st.
Row 5: Ch 3 (counts as first dc here and throughout), turn, dc in next st and in each remaining st across.
Row 6: Repeat Row 2.
Row 7: Ch 1, turn, sc in next 4 sts, 4-dc Cl in next st, [sc in next 7 sts, 4-dc Cl in next st] 5 times, sc in last 4 sts.
Row 8: Repeat Row 4.
Row 9: Repeat Row 5.
Rows 10-33: Repeat Rows 2-9, 3 times.
Rows 34-38: Repeat Rows 2-6.
Fasten off.
Border
Join A with sc in any stitch, sc evenly around entire blanket, working 4 sc in each corner and working over
carried sections of yarn along side.
FINISHING
Weave in ends.

46 | P a g e
Monet Afghan By: Drew Emborsky from The Crochet Dude
This stunning crochet throw has a wonderfully bright and colorful pattern that is sure to light up any room. The colors used for the Monet Afghan were inspired by the beautiful artwork of French impressionist Claude Monet, which explains the name. This is a great crochet blanket to make for springtime. Take it with you on your next picnic, or just leave it draped over your sofa to add some color to your living room. Homemade afghans are a quick and cost-effective way to give any room of your house a mini makeover.
Materials:
Worsted Weight Yarn o Model is stitched with Red Heart Water Lily (one 6 oz skein for each square) and White (two 8
oz skeins for the joining and border)
Crochet Hook: H/8 or 5 mm
Skill level: Intermediate
Size: The finished afghan measures approximately 46” x 66” Each square measures 13” x 13”
Notes: It’s important not to start a new skein in the middle of the square because of the patterning of the colors.
Instructions:
Make 12 squares.
Row 1: Ch 47, sc in second ch from hook and in each ch across. (46 sc)
Row 2: Ch 1, (sc, 2 dc) in first st, *skip 2 sc, (sc, 2 dc) in next st * across. Sc in last st.
Row 3-33: Ch 1, (sc, 2 dc) in each single crochet across ending with a sc in the last st.
Row 34: sc in each st across. Do not fasten off.
Sc evenly around square working 3 sc in each corner. Fasten off.
Join squares together using a simplified Lattice Technique as follows:
Rnd 1: With contrasting color join with a sc in any corner, work 2 more sc in same st, work 47 sc on each side
and work 3 sc in each corner. Join with a slip st.
Rnd 2: Slip st into corner st. Ch1, (sc, ch 4, sc) in same st. (Ch 3, skip 2 sc, sc in next st) around, working (sc, ch
4, sc) in each corner st. Slip st to first sc, fasten off.
Lay the squares out in a 3 by 4 pattern. First join squares together to make three long strips with four squares
47 | P a g e
each. Then join the three strips together to create afghan. Join by making a sc in corner loop, ch 3, sc in
corresponding loop on opposite square. Ch 3, sc in next loop of first square, ch 3, sc in corresponding loop of
opposite square, and so on back and forth.
Once joined, edge entire afghan by working three rounds of (sc, ch 3) in each loop.
If you love this crochet afghan, check out our entire collection of afghan patterns!

48 | P a g e
Beginner Baby Blanket By: Rebecca Langford from Little Monkeys Crochet
Choose your favorite combination of colors and work up this Beginner Baby Blanket today. If you've never made a baby blanket before, then this is the perfect crochet pattern to start with. This beginner crochet pattern features a simple striped design that's created by repeating rows of double crochet. Depending on what colors you choose, this crocheted afghan can be made for either a baby boy or baby girl. Either way, it's a wonderful homemade gift to make for any new mom.
Materials:
Soft Worsted Weight Yarn o Model is stitched with the following: o A: White (Hobby Lobby’s I Love This Yarn) Approx. 210 yards o B: Soft Fern (Bernat Satin) Approx. 140 yards o C: Lagoon (Bernat Satin) Approx. 140 yards o D: Strawberry (Caron Simply Soft) Approx. 140 yards o E: Grey Mist (Hobby Lobby’s I Love This Yarn) Approx. 70 yards
Crochet Hook: I/9 or 5.5 mm
Skill level: Beginner
Size: Finished size is approximately 26” x 30”
Notes: 1. Ch 2 does NOT count as starting DC. 2. To get such straight edges, the trick is that when you Ch 2 at the beginning of a new row, make your first DC in the NEXT stitch. Then at the end of the row, when it seems like you’re out of stitches but need to make one more, make it in the Ch 2 knot from the previous row.
Special Stitch: FDC (foundationless double crochet): First DC: Ch 3. Yo and insert hk into third ch from hk. Draw up a loop (you will have 3 loops on your hook), then yo and pull through only the first loop. (You will still have 3 loops on your hook.) Now, complete the DC as normal. Next DC (repeat the following steps for as many DCs as you need): Yo and insert hk into the loops of the last DC. It’s a little hard to see at first, but you’ll get the hang of it once you get going. Draw up the loop and Ch 1 from the loop. Yo, draw through the first two loops. Yo again and draw through remaining two loops.
49 | P a g e
Instructions:
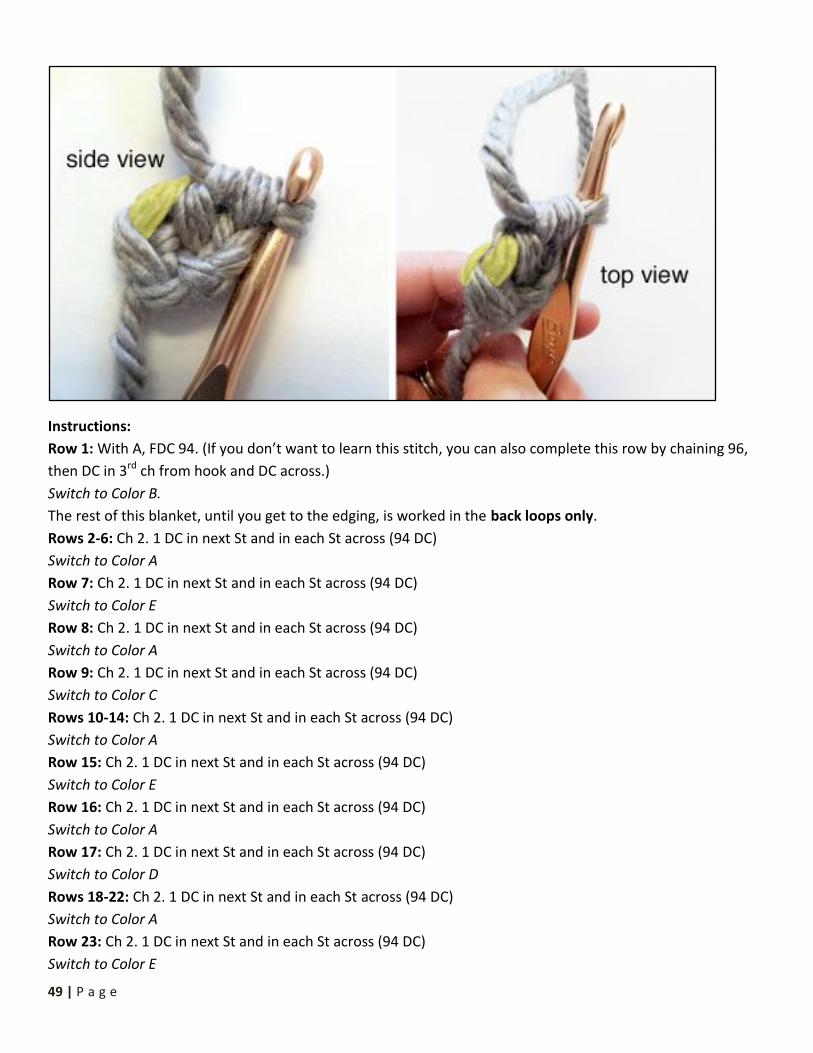
Row 1: With A, FDC 94. (If you don’t want to learn this stitch, you can also complete this row by chaining 96,
then DC in 3rd ch from hook and DC across.)
Switch to Color B.
The rest of this blanket, until you get to the edging, is worked in the back loops only.
Rows 2-6: Ch 2. 1 DC in next St and in each St across (94 DC)
Switch to Color A
Row 7: Ch 2. 1 DC in next St and in each St across (94 DC)
Switch to Color E
Row 8: Ch 2. 1 DC in next St and in each St across (94 DC)
Switch to Color A
Row 9: Ch 2. 1 DC in next St and in each St across (94 DC)
Switch to Color C
Rows 10-14: Ch 2. 1 DC in next St and in each St across (94 DC)
Switch to Color A
Row 15: Ch 2. 1 DC in next St and in each St across (94 DC)
Switch to Color E
Row 16: Ch 2. 1 DC in next St and in each St across (94 DC)
Switch to Color A
Row 17: Ch 2. 1 DC in next St and in each St across (94 DC)
Switch to Color D
Rows 18-22: Ch 2. 1 DC in next St and in each St across (94 DC)
Switch to Color A
Row 23: Ch 2. 1 DC in next St and in each St across (94 DC)
Switch to Color E

50 | P a g e
Row 24: Ch 2. 1 DC in next St and in each St across (94 DC)
Switch to Color A
Row 25: Ch 2. 1 DC in next St and in each St across (94 DC)
Rows 26-47: Repeat rows 2-23
EDGING:
With Color A (which you should have ended on in row 47),
Ch 1. SC evenly around the entire blanket, using 3 SC in each corner. Ch 2. 1 DC in each SC around, using 4 DC
in each corner. Fasten off. Weave in all ends.
Baby Blanket (Color Change Shortcut Pattern):
The rows are worked in the following colors:
1. White
2. Soft Fern
3. Soft Fern
4. Soft Fern
5. Soft Fern
6. Soft Fern
7. White
8. Grey Mist
9. White
10. Lagoon
11. Lagoon
12. Lagoon
13. Lagoon
14. Lagoon
15. White
16. Grey Mist
17. White
18. Strawberry
19. Strawberry
20. Strawberry
21. Strawberry
22. Strawberry
23. White
24. Grey Mist
25. White
26. Soft Fern
27. Soft Fern
28. Soft Fern
29. Soft Fern
30. Soft Fern
31. White
32. Grey Mist
33. White
34. Lagoon
35. Lagoon
36. Lagoon
37. Lagoon
38. Lagoon
39. White
40. Grey Mist
41. White
42. Strawberry
43. Strawberry
44. Strawberry
45. Strawberry
46. Strawberry
47. White
51 | P a g e
Extra Crochet Motifs and Accessories
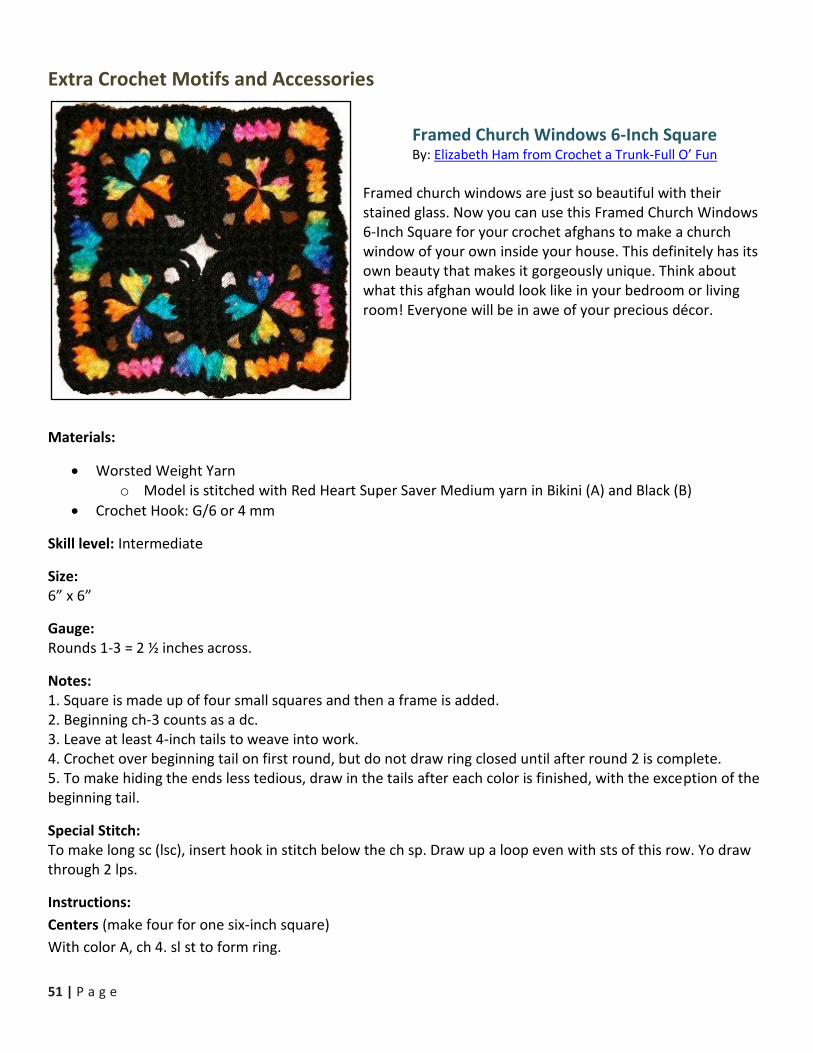
Framed Church Windows 6-Inch Square By: Elizabeth Ham from Crochet a Trunk-Full O’ Fun
Framed church windows are just so beautiful with their stained glass. Now you can use this Framed Church Windows 6-Inch Square for your crochet afghans to make a church window of your own inside your house. This definitely has its own beauty that makes it gorgeously unique. Think about what this afghan would look like in your bedroom or living room! Everyone will be in awe of your precious décor.
Materials:
Worsted Weight Yarn o Model is stitched with Red Heart Super Saver Medium yarn in Bikini (A) and Black (B)
Crochet Hook: G/6 or 4 mm
Skill level: Intermediate
Size: 6” x 6”
Gauge: Rounds 1-3 = 2 ½ inches across.
Notes: 1. Square is made up of four small squares and then a frame is added. 2. Beginning ch-3 counts as a dc. 3. Leave at least 4-inch tails to weave into work. 4. Crochet over beginning tail on first round, but do not draw ring closed until after round 2 is complete. 5. To make hiding the ends less tedious, draw in the tails after each color is finished, with the exception of the beginning tail.
Special Stitch: To make long sc (lsc), insert hook in stitch below the ch sp. Draw up a loop even with sts of this row. Yo draw through 2 lps.
Instructions:
Centers (make four for one six-inch square)
With color A, ch 4. sl st to form ring.
52 | P a g e
Round 1: Working over beginning tail and through ring, ch 3 (counts as 1 dc), dc, (ch 3, 2 dc) 3 times. Ch 3, sl st
in top of beg ch-3. end off A.
Round 2: Join B with a sc in first dc. Sc in next dc, * working over ch-3 sp and into center ring, (tr, ch 3, tr).
corner made. Sc in next 2 dc. Repeat from * twice more, make one more corner. sl st in beg sc.
Round 3: ch 1, sc in same sc, sc in next sc, sc in next tr. * (sc, ch 3, sc) in next ch-3 sp. Sc in tr, sc in next 2 sc, sc
in tr. Repeat from * around, ending with sc in tr, sl st in beg sc. Break off B. (Right side is facing)
Holding small squares right sides together, using B whip stitch through both layers and under both top threads
of the sc's bordering the square on one side. DO NOT stitch through the corner chain stitches. arrange like a 4-
patch quilt square. (see photo as a guide)
Frame
Round 1: Join A in any corner ch-3 space, ch 2, 4 hdc in ch-3 sp. ** ch 1, sk 1 sc, hdc in next 4 sc, ch 1, sk 1 sc,*
(3 hdc, 1 dc) in next ch-3 sp. (Dc, 3 hdc) in next ch-3 sp. repeat from ** to *. make 5 hdc in corner ch-3 sp.
Repeat from ** around square. sl st in top of beg ch-2. Break off A.
Round 2: Join B in center hdc of corner. Ch 1, (sc, ch 2, sc) in same st as joining. Sc in next 2 hdc, ** Lsc around
ch-1 and into skipped sc below. Sc in next 4 hdc, lsc around ch-1 and into next skipped sc below, * sc in next 3
hdc, sk next dc, sc in sp between dc's, sk next dc, sc in next 3 hdc, repeat from ** to *. Sc in 2 hdc, (sc, ch 2, sc)
in next hdc, sc in next 2 hdc. Repeat from ** around square. Break off B. Draw in remaining tails.
Find the complete collection of AllFreeCrochet’s published eBooks here!
53 | P a g e
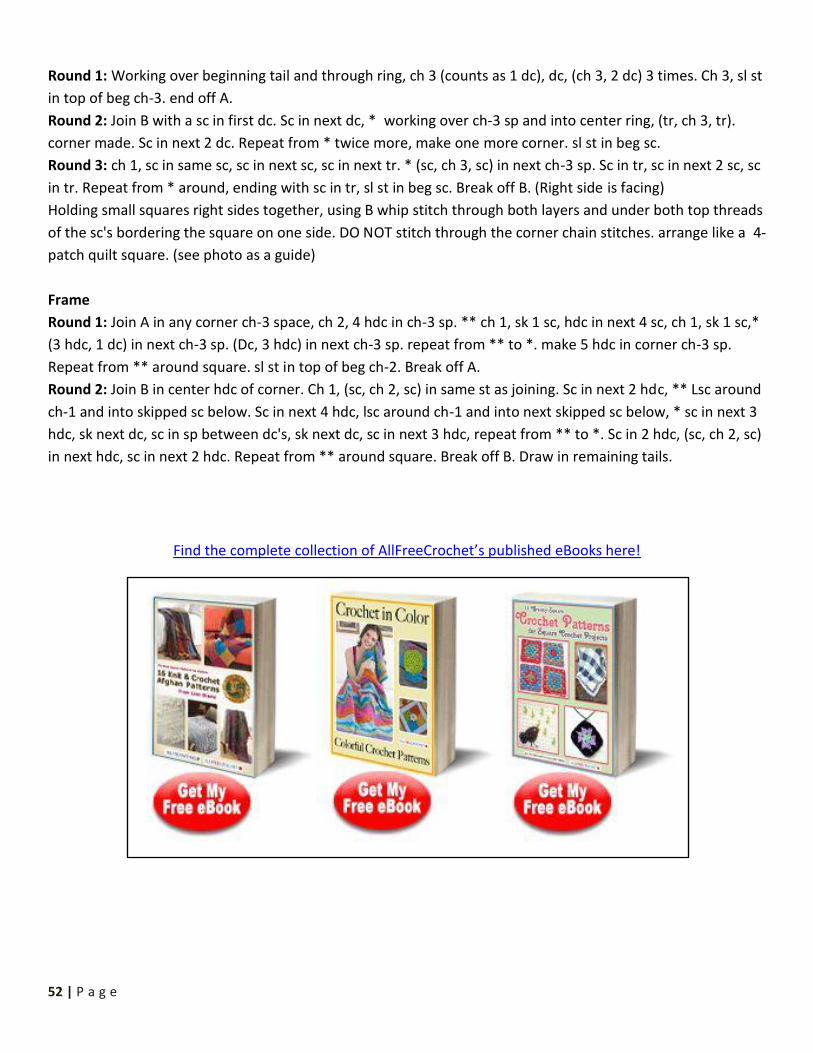
Dainty Crochet Doily
By: Bernat
A doily pattern like this one is just so elegant that you won’t even want to get it dirty. As a decoration alone, this Dainty Crochet Doily is definitely worth your time. Cover your table with them, put vases on top of them, or use them as accents for the fine china that has been sitting in a glass cupboard forever. The elegance of this doily will bring a similar atmosphere to your kitchen and dining area, especially when you have guests. Give them a reason to be jealous of your beautiful kitchen décor!
Materials:
Lace Cotton o Model is stitched with 1 ball of Bernat Handicrafter Crochet Cotton (14 oz/400 g) (1 doily = 66
yds [62 m])
Crochet Hook: C/2 or 2.75 mm
Skill level: Intermediate
Size: Finished size is 9 ¼” [23.5 cm] in diameter.
Gauge: Center motif (to 3rd rnd) = 1 ¾” [4.5 cm] in diameter.
Instructions:
Ch 6. Join with sl st to form ring.
1st rnd: Ch 3 (counts as 1 dc). 15 dc in ring. Ss in top of ch-3. 16 dc.
2nd rnd: Ch 4 (counts as 1 dc and ch-1). Miss next dc. (1 dc in next dc. Ch 1) 15 times. Ch 1. Sl st in 3rd ch of ch-
4.
3rd rnd: Ss in ch-1 sp. Ch 3. 2 dc in same ch-1 sp as ss. 3 dc in every ch-1 sp around. 48 dc. Sl st in top of ch-3.
4th rnd: Ch 8. Miss first 4 dc. 1 dc in next dc. (Ch 5. Miss next 3 dc. 1 dc in next dc) 10 times. Ch 5. Ss in 3rd ch
of ch-8.
5th rnd: Ch 3 (counts as 1 dc). 6 dc in first ch-5 sp. 7 dc in every ch-5 sp around. Sl st to top of ch-3. 84 dc.
6th rnd: Ch 3 (counts as 1 dc). Miss 1st dc. 1 dc in each of next 6 dc. Ch 2. *1 dc in each of next 7 dc. Ch 2. Rep
from * around. Ss in top of ch-3.
7th rnd: Ch 3. 1 dc in same st. 1 dc in each of next 5 dc. 2 dc in next dc. Ch 2. Miss ch-2 sp. *2 dc in next dc. 1
dc in each of next 5 dc. 2 dc in next dc. Ch 2. Miss ch-2 sp. Rep from * around ending with ss in top of ch-3.
8th rnd: *Ch 7. Miss next 3 dc. 1 sc in next dc. Ch 7. 1 sc in next ch-2 sp. Rep from * 11 times more. Ch 3. 1 tr in
last ch-2 sp.

54 | P a g e
9th rnd: Ch 7. 1 sc in first ch-7 sp. *Ch 7. 1 sc in next ch-7 sp. Rep from * to last ch-7 sp. Ch 3. 1 tr in first tr.
10th rnd: Ch 8. 1 sc in first ch- 7 sp. *Ch 8. 1 sc in next ch-7 sp. Rep from * to last ch-7 sp. Ch 4. 1 tr in first tr.
11th rnd: Ch 8. 1 sc in first ch-8 sp. *Ch 8. 1 sc in next ch-8 sp. Rep from * to last ch-8 sp. Ch 4. 1 tr in first tr.
12th rnd: Ch 9. 1 sc in first ch-8 sp. *Ch 9. 1 sc in next ch-8 sp. Rep from * to last ch-8 sp. Ch 5. 1 tr in first tr.
13th rnd: Ch 9. 1 sc in first ch-9 sp. *Ch 9. 1 sc in next ch-9 sp. Rep from * to last ch-9 sp. Ch 5. 1 tr in first tr.
14th rnd: Ch 3. *(5 dc. Ch 3. 5 dc) in next ch-9 sp. (2 dc. Ch 2. 2 dc) in next ch-9 sp. Rep from * around. Sl st to
top of ch-3.
15th rnd: *Ch 5. (1 dc. Ch 2. 1 dc. Ch 5. 1 dc. Ch 2. 1 dc) in next ch-3 sp. Ch 5. (1 sc. Ch 5. 1 sc) in next ch-2 sp.
Rep from * around. Ch 5. Sl st in first ch of ch-5. Fasten off.
See more gorgeous doilies here!
55 | P a g e
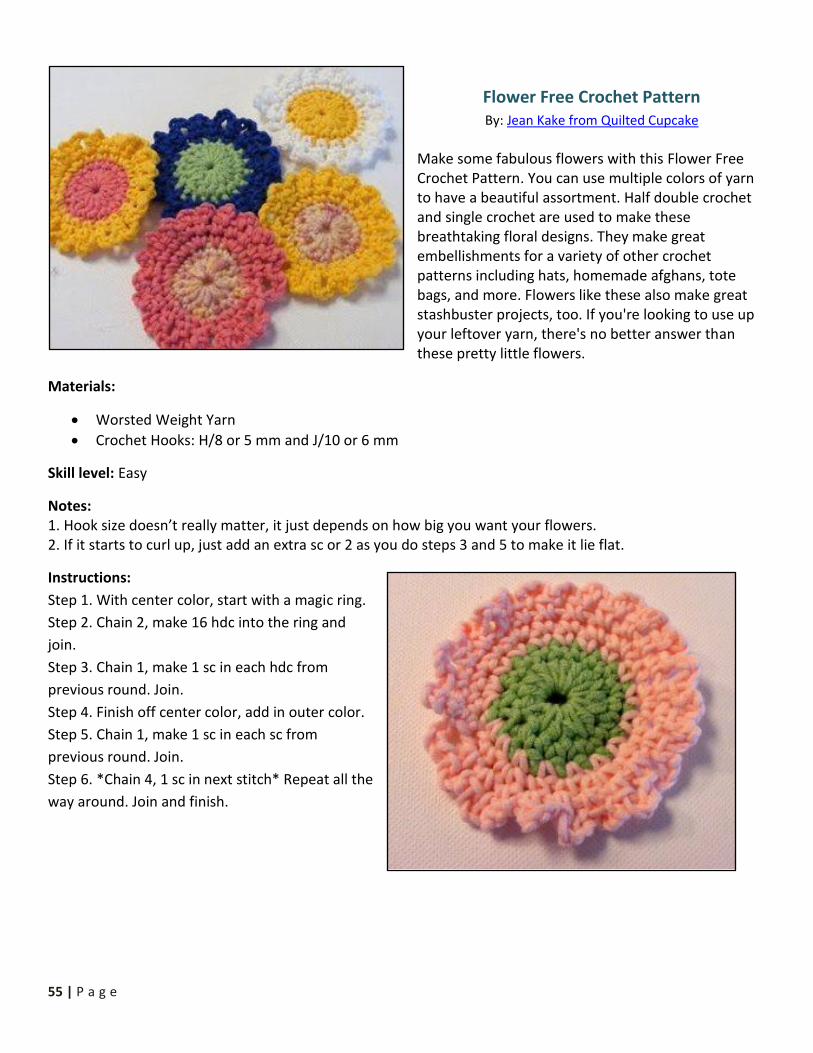
Flower Free Crochet Pattern By: Jean Kake from Quilted Cupcake
Make some fabulous flowers with this Flower Free Crochet Pattern. You can use multiple colors of yarn to have a beautiful assortment. Half double crochet and single crochet are used to make these breathtaking floral designs. They make great embellishments for a variety of other crochet patterns including hats, homemade afghans, tote bags, and more. Flowers like these also make great stashbuster projects, too. If you're looking to use up your leftover yarn, there's no better answer than these pretty little flowers.
Materials:
Worsted Weight Yarn
Crochet Hooks: H/8 or 5 mm and J/10 or 6 mm
Skill level: Easy
Notes: 1. Hook size doesn’t really matter, it just depends on how big you want your flowers. 2. If it starts to curl up, just add an extra sc or 2 as you do steps 3 and 5 to make it lie flat.
Instructions:
Step 1. With center color, start with a magic ring.
Step 2. Chain 2, make 16 hdc into the ring and
join.
Step 3. Chain 1, make 1 sc in each hdc from
previous round. Join.
Step 4. Finish off center color, add in outer color.
Step 5. Chain 1, make 1 sc in each sc from
previous round. Join.
Step 6. *Chain 4, 1 sc in next stitch* Repeat all the
way around. Join and finish.

56 | P a g e
Lightweight Half Shell Purse By: Drew Emborsky from The Crochet Dude
Make a chic lightweight half shell purse from Drew Emborsky. This free crochet pattern is perfect for the warmer months when accessorizing can be hard. Who doesn't like a new bag? It's just the right size for everyday use. All of your daily essentials will fit nicely inside this bag, including your cell phone, wallet, and car keys. This purse is perfect for over-the-shoulder use and it will fit snugly under your arm. Sport weight yarn is used for this stylish and trendy bag.
Materials:
Sport Weight Yarn o Approximately 3 oz.
Crochet Hook: H/8 or 5 mm
Skill level: Intermediate
Size: Finished size is approximately 12” at its widest point and 10” tall with handle.
Gauge: 14 sts & 3 rows = 4” x 4” in dc.
Notes: Divide yarn into two equal amounts and hold two strands of sport weight yarn together throughout.
Instructions:
FOR SIDES (make 2)
Rnd 1: Ch 4, 11 dc in fourth ch from hook, slip st to top of beginning ch. (12 dc)
Rnd 2: Ch 3, dc in same st, 2 dc in each st around. Slip st to top of beginning ch. (24 dc)
The following are only partial rounds used to create an oblong shaped fabric:
Rnd 3: Ch 3, dc in same st. 2 dc in next 19 sts, leaving four sts un-worked. (40 dc)
Rnd 4: Ch 1, turn, sc in front loop of same st and in front loop of each st around. (40 sc)
Rnd 5: Ch 3, turn, dc in each st around. (40 dc)
Rnd 6: Ch 1, turn, sc in front loop of same st, *2 sc in front loop of next st, sc in front loop of next st* around.
(60 sc)
Rnd 7: Ch 3, turn, dc in each st around. (60 dc)
Rnd 8: Ch 1, turn, sc in front loop of same st, *2 sc in front loop of next st, sc in front loop of next st* nine
times. (28 sc)
Rnd 9: Ch 3, turn, dc in each st around. (28 dc)

57 | P a g e
Rnd 10: Ch 1, turn, sc in front loop of same st, *2 sc in front loop of next st, sc in front loop of next st* 12
times. (37 sc)
Rnd 11: Ch 3, turn, dc in each st around. (37 dc) Fasten off.
With wrong side facing, skip 23 sts on Rnd 7 and continue as follows:
Rnd 8: Attach with a sc in the front loop of st, *2 sc in front loop of next st, sc in front loop of next st* nine
times. (28 sc)
Rnd 9: Ch 3, turn, dc in each st around. (28 dc)
Rnd 10: Ch 1, turn, slip st in same st and next 2 sts, sc in front loop of next st, *2 sc in front loop of next st, sc
in front loop of next st* 12 times. (37 sc)
Rnd 11: Ch 3, turn, dc in each st around. (37 dc) Fasten off.
ASSEMBLY
With right sides facing join together with a row of sc leaving center of purse open. Fasten off, turn right side
out. Make handle by joining two sts to the right of one of the top seams. Crochet 22 rows of 4 sc. Whipstitch
handle to opposite side of purse. Work one row of sc around sides of purse handles and around U shaped
section of each side. Use the closure of your choice. The photo shows a simple snap closure sewn into the
inside of the purse.
You can never have too many purses. See our entire collection here!
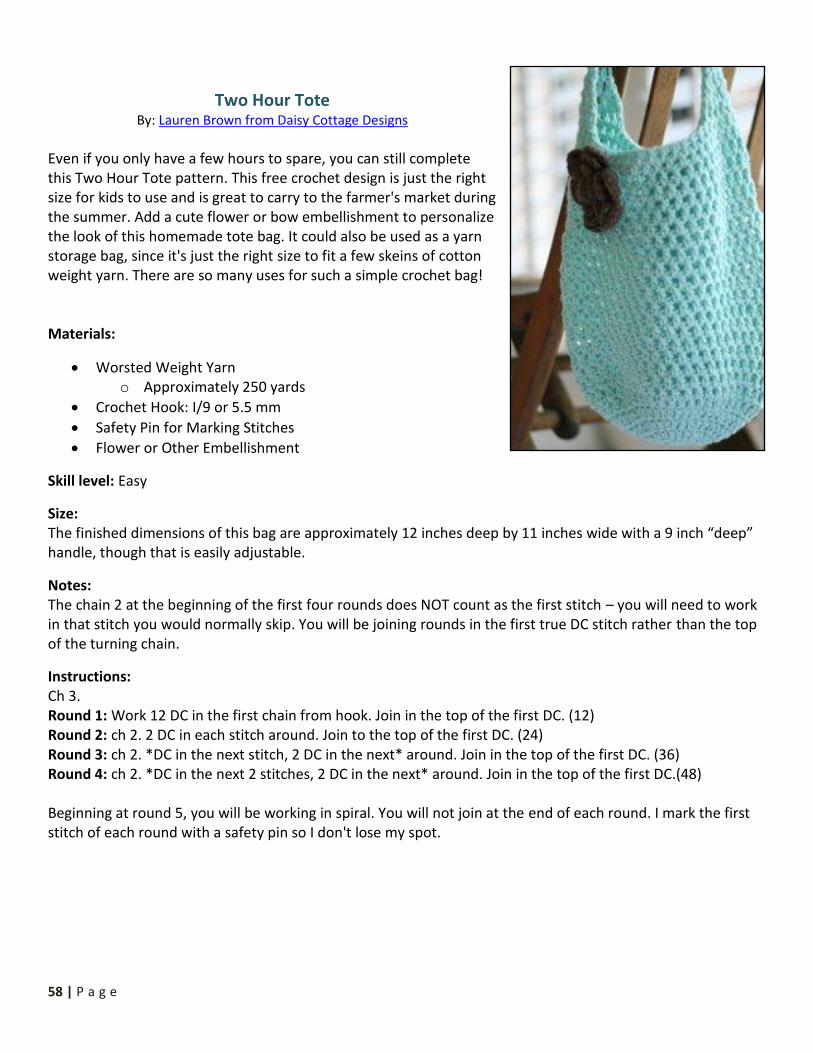
58 | P a g e
Two Hour Tote
By: Lauren Brown from Daisy Cottage Designs
Even if you only have a few hours to spare, you can still complete this Two Hour Tote pattern. This free crochet design is just the right size for kids to use and is great to carry to the farmer's market during the summer. Add a cute flower or bow embellishment to personalize the look of this homemade tote bag. It could also be used as a yarn storage bag, since it's just the right size to fit a few skeins of cotton weight yarn. There are so many uses for such a simple crochet bag! Materials:
Worsted Weight Yarn o Approximately 250 yards
Crochet Hook: I/9 or 5.5 mm
Safety Pin for Marking Stitches
Flower or Other Embellishment
Skill level: Easy
Size: The finished dimensions of this bag are approximately 12 inches deep by 11 inches wide with a 9 inch “deep” handle, though that is easily adjustable.
Notes: The chain 2 at the beginning of the first four rounds does NOT count as the first stitch – you will need to work in that stitch you would normally skip. You will be joining rounds in the first true DC stitch rather than the top of the turning chain.
Instructions: Ch 3. Round 1: Work 12 DC in the first chain from hook. Join in the top of the first DC. (12) Round 2: ch 2. 2 DC in each stitch around. Join to the top of the first DC. (24) Round 3: ch 2. *DC in the next stitch, 2 DC in the next* around. Join in the top of the first DC. (36) Round 4: ch 2. *DC in the next 2 stitches, 2 DC in the next* around. Join in the top of the first DC.(48) Beginning at round 5, you will be working in spiral. You will not join at the end of each round. I mark the first stitch of each round with a safety pin so I don't lose my spot.
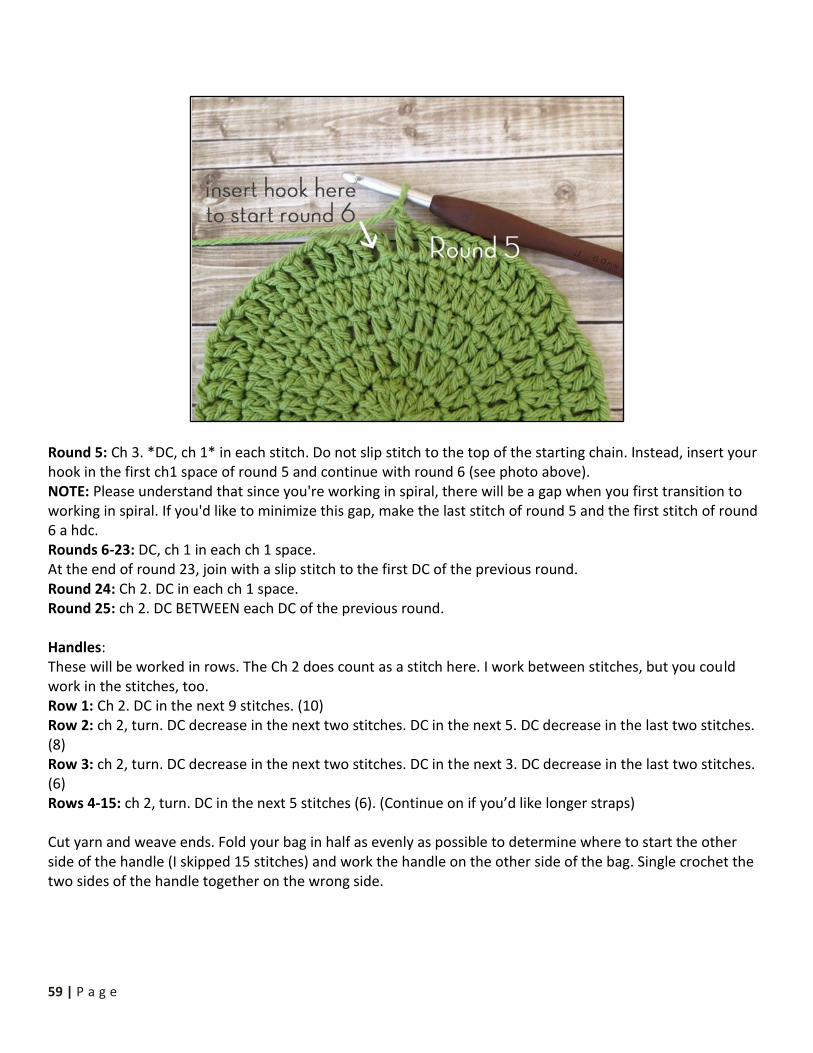
59 | P a g e
Round 5: Ch 3. *DC, ch 1* in each stitch. Do not slip stitch to the top of the starting chain. Instead, insert your hook in the first ch1 space of round 5 and continue with round 6 (see photo above). NOTE: Please understand that since you're working in spiral, there will be a gap when you first transition to working in spiral. If you'd like to minimize this gap, make the last stitch of round 5 and the first stitch of round 6 a hdc. Rounds 6-23: DC, ch 1 in each ch 1 space. At the end of round 23, join with a slip stitch to the first DC of the previous round. Round 24: Ch 2. DC in each ch 1 space. Round 25: ch 2. DC BETWEEN each DC of the previous round. Handles: These will be worked in rows. The Ch 2 does count as a stitch here. I work between stitches, but you could work in the stitches, too. Row 1: Ch 2. DC in the next 9 stitches. (10) Row 2: ch 2, turn. DC decrease in the next two stitches. DC in the next 5. DC decrease in the last two stitches. (8) Row 3: ch 2, turn. DC decrease in the next two stitches. DC in the next 3. DC decrease in the last two stitches. (6) Rows 4-15: ch 2, turn. DC in the next 5 stitches (6). (Continue on if you’d like longer straps) Cut yarn and weave ends. Fold your bag in half as evenly as possible to determine where to start the other side of the handle (I skipped 15 stitches) and work the handle on the other side of the bag. Single crochet the two sides of the handle together on the wrong side.
60 | P a g e
22 Popular Free Crochet Patterns
Included in this eBook: Hat Patterns and Hair Accessories
Crochet Wearables Baby Blankets and Crochet Afghans
Extra Crochet Motifs and Accessories
Sign up for our free crochet newsletter and receive more collections, free crochet patterns, quick tips, home décor ideas and more right in your inbox every week.
Special Thanks
Bloggers: Alli Hyer from AlliCrafts Berta Gilholm from Birdies Crochet and Craft Carol Price from Yarn Yearnings Cathy Wood from Cats Rockin’ Crochet Donna Collinsworth from Donna’s Crochet Designs Drew Emborsky from The Crochet Dude Elizabeth Ham from Crochet a Trunk-Full O’ Fun Elizabeth Mareno from Bizzy Crochet
Jean Kake from Quilted Cupcake Lauren Brown from Daisy Cottage Designs Lisa Gonzalez from CaptivCrochet Marilyn Hawley from Mom’s Love of Crochet Rebecca Langford from Little Monkeys Crochet Shehnaaz Afzar from Crochet Dreamz Valerie Whitten from ValliesKids
Yarn Companies: Bernat
Caron International Yarns Lion Brand Yarns
Patons Red Heart Yarns
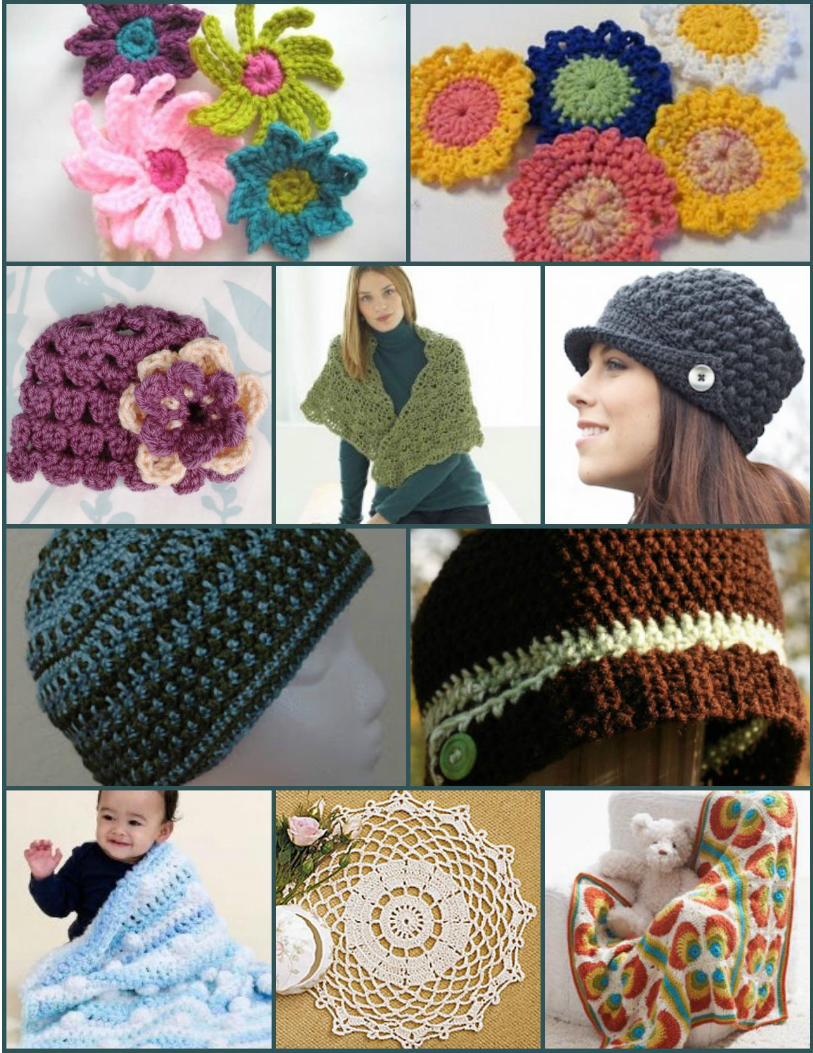
61 | P a g e