2.5 peak hp motor electric chain saw - …s manual 2.5 peak hp motor electric chain saw model no....
TRANSCRIPT

Operator's Manual
2.5 Peak HP Motor
ELECTRIC CHAIN SAW
Model No.358.341151 - 14 in. Bar
• Safety
• Assembly• Operation• Maintenance
• Espar_ol, p. 16
®WARNING:Read and follow all Safety Rules and OperatingInstructions before first use of this product.
For answers to your questions about this product:Call 7 am-7 pm, Mon-Sat; Sun, 10 am-7 pm
• 1-800-235-5878 (Hours listed are Central Time)
Sears, Roebuck and Co., Hoffman Estates, IL 60179 U.S.A.
530164053 9/12/06

Warranty 2 Parts Available 14Safety Rules 2 Storage 14Assembly 6 Troubleshooting Table 15Operation 7 Spanish 16Maintenance 11 Parts Ordering Back CoverService and Adjustments 13
FULL ONE YEAR FULL WARRANTY ON CRAFTSMAN ELECTRIC CHAIN SAWWhen used and maintained according to the operator's manual, if this product failsdue to a defect in material or workmanship within one year from the date of pur-chase, return it to any Sears store or other Craftsman outlet in the United States forfree replacement.This warranty excludes the bar and chain, which are expendable parts that canwear out from normal use in less than one year.This warranty applies for only 30 days from purchase date if this product is usedfor commercial or rental purposes.This warranty gives you specific legal rights, and you may also have other rightswhich vary from state to state.Sears. Roebuck and Co. Hoffman Estates. IL 60179
4t_WARNING: When using electricgardening appliances, basic safetyprecautions must always be followedto reduce the risk of fire, electric shock,and serious injury. Read and follow allinstructions.
WARNING: Always disconnectunit from power source when makingrepairs, adjustments, and when chang-ing accessories and attachments suchas saw bar, chain or guards.Because a chain saw is a high-speedwoodcutting tool, special precautionsmust be observed to reduce risk of acci-dents. Careless or improper use of thistool can cause serious injury.PLAN AHEAD• Restrict the use of your saw to adult
users who understand and can fol-low the safety rules, precautions,and operating instructions found inthis manual.
• Dress properly. Wear protective gear.Always use steel-toed safety foot-wear with non-slip soles; snug-fittingclothing; heavy-duty, non-slip gloves;eye protection such as non-fogging,vented goggles or face screen; anapproved safety hard hat; and soundbarriers (ear plugs or mufflers) to pro-tect your hearing. Regular usersshould have hearing checked regu-
larly as chain saw noise can damagehearing.
• Secure hair above shoulder length. Donot wear loose clothing or jewelry; theycan get caught in moving parts.
Headng _ Safety HatProtection ''_ ioo_ .... Eye
ProtectionSnug
Fitting Heavy DutyClothing Gloves
Safety Safety Chaps
Shoes
• Keep all parts of your body awayfrom the chain when saw is running.
• Keep children away. Do not let visitorscontact chain saw or extension cord.
All visitors should be kept at least 30feet (10 meters) away from work area.
• Do not handle or operate a chainsaw when you are fatigued, ill, upset,or if you have taken alcohol, drugs,or medication. You must be in goodphysical condition and mentally alert.If you have any condition that mightbe aggravated by strenuous work,check with doctor before operating.Watch what you are doing. Use com-mon sense.

• Donotstartcuttinguntilyouhaveaclearworkarea,securefooting,andespeciallyifyouarefellingatree,aretreatpath.Keepworkareaclean.OPERATEYOURSAW SAFELY
• Do not operate with one hand. Seri-ous injury to the operator, helpers, orbystanders may result from one-handed operation. A chain saw is in-tended for two-handed use.
• Do not operate saw from a ladder orin a tree.
• Make sure the chain will not makecontact with any object while startingthe saw. Never start the saw whenthe guide bar is in a cut.
• Don't force chain saw. It will do thejob better and safer at the rate forwhich it was intended.
• Do not put pressure on the saw, es-pecially at the end of the cut. Doingso can cause you to lose controlwhen the cut is completed.
• Stop the saw before setting it down.• Hand carry saw only when motor is
stopped. Carry the chain saw by thefront handle with the saw stopped, fin-ger off the switch, the guide bar andsaw chain to the rear.
• Use the right tool, cut wood only.Don't use chain saw for purpose notintended; for example, don't usechain saw for cutting plastic, mason-ry, non-wood building materials.
• Do not operate a chain saw that isdamaged, improperly adjusted, ornot completely and securely as-sembled. Always replace bar, chain,hand guard, or other parts immedi-ately if they become damaged, bro-ken, or are otherwise removed.
• Inspect chain saw cords periodicallyand if damaged, have repaired by aSears Service Center.
MAINTAIN YOUR SAW IN GOODWORKING ORDER• Have all chain saw service per-
formed by a Sears Service Centerexcept the items listed in the MAINTE-NANCE section of this manual.
• Make certain saw chain stops mov-ing when trigger switch is released.
• Keep the handles dry and clean andfree from oil and grease.
• Keep oil cap and fasteners securelytightened.
• Nonconforming replacement compo-nents or the removal of safety devicesmay cause damage to the unit andpossible injury to the operator or by-
standers. Use only Craftsman acces-sories and replacement parts as rec-ommended. Never modify your saw.
• Maintain chain saw with care.• Keep unit sharp and clean for better
and safer performance.• Follow instructions for lubricating and
changing accessories.• Unplug the chain saw from the power
source when not in use, before servic-ing, and when changing accessoriesand attachments, such as saw chainand guard.
• Check for damaged parts. Before fur-ther use of the chain saw, a guard orother part that is damaged should becarefully checked to determine that itwill operate properly and perform itsintended function. Check for alignmentof moving parts, binding of movingparts, breakage of parts, mounting andany other conditions that may affect itsoperation. A guard or other part that isdamaged should be properly repairedor replaced by a Sears Service Centerunless otherwise indicated elsewherein the operator's manual.
• When not in use, chain saws shouldbe stored in a dry, high or locked-upplace out of the reach of children.
• When storing saw, unplug and use abar sheath or carrying case.
ELECTRICAL SAFETY
,_WARNING: Avoid a dangerousenvironment. To reduce the risk ofelectrical shock, do not use in rain, indamp or wet locations, or aroundswimming pools, hot tubs, etc. Do notexpose to snow, rain, or water to avoidthe possibility of electrical shock. Donot handle extension cord or plug withwet hands.• Use a voltage supply as shown on the
nameplate of the unit.• Avoid dangerous situations. Do not
use in the presence of flammable liq-uids or gases to avoid creating a fireor explosion and/or causing damageto unit.
• To reduce the risk of electrical shock,this appliance has a polarized plug(one blade is wider than the other) andwill require the use of a polarized ex-tension cord. The appliance plug will fitinto a polarized extension cord onlyone way. If the plug does not fit fullyinto the extension cord, reverse the
plug.Iftheplugstilldoesnotfit,obtainacorrectpolarizedextensioncord.Apolarizedextensioncordwillrequiretheuseofapolarizedwalloutlet.Thisplugwillfitintothepolarizedwalloutletonlyoneway.Ifplugdoesnotfitfullyintothewalloutlet,reversetheplug.Iftheplugstilldoesnotfit,contactaqualifiedelectriciantoinstalltheproperwalloutlet.Donotchangetheequip-mentplug,extensioncordreceptacle,orextensioncordpluginanyway.
• Toreduceriskofelectricalshock,useextensioncordsspecificallymarkedassuitableforoutdoorappliances.Theelectricalratingofthecordmustnotbelessthantheratingoftheunit.Thecordmustbemarkedwithsuffix"W-A"(inCanada,"W").Useapolarizedcord.Makesureyourextensioncordisingoodcondition.Inspectextensioncordbeforeuseandreplaceifdam-aged.Donotuseadamagedcord.Cordinsulationmustbeintactwithnocracksordeterioration.Plugconnec-torsmustbeundamaged.Anunder-sizedextensioncordwillcauseadropinlinevoltageresultinginlossofpow-erandoverheating.Ifindoubt,usethenextheaviergauge.Thelowerthegaugenumber,theheavierthecord(seeSELECTANEXTENSIONCORDintheOPERATIONsection).Donotusemultiplecords.
• Donotabusecord.Nevercarrytheunitbytheextensioncordoryankextensioncordtodisconnectunit.
• Secureextensioncordtopowercordtopreventdisconnectionfromunit.
• Donotusetheunitiftheswitchdoesnotturntheunitonandoffproperly,orifthelock-outdoesnotwork.Re-pairstotheswitchmustbemadebyaSearsServiceCenter.
• Keepextensioncordclearofopera-torandobstaclesatalltimes.Posi-tioncordsothatitwillnotbecaughtonbranches.Donotexposecordstoheat,oil,water,orsharpedges.
• Toavoidthepossibilityofelectricshock,avoidbodycontactwithanygroundedconductor,suchasmetalfencesorpipes.
• GroundFaultCircuitInterrupter(GFCI)protectionshouldbeprovidedoncircuitoroutlettobeused.Re-ceptaclesareavailablehavingbuilt-inGFCIprotectionandmaybeusedforthismeasureofsafety.Inspectchainsawcordsperiodicallyandif
damaged,haverepairedbyaSearsServiceCenter.
GUARD AGAINST KICKBACKFollow all safety rules to help avoid kick-back and other forces which can resultin serious injury.
\ p'_ _.<'!,,Kickback Path
Avoid Obstructions
Clear The Working Area
_WARNING: Avoid kickback whichcan result in serious injury. Kickbackis the backward, upward or sudden for-ward motion of the guide bar occurringwhen the saw chain near the upper tipof the guide bar contacts any objectsuch as a log or branch, or when thewood closes in and pinches the sawchain in the cut. Contacting a foreignobject in the wood can also result inloss of chain saw control.• Rotational Kickback can occur
when the moving chain contacts anobject at the upper tip of the guidebar. This contact can cause thechain to dig into the object, whichstops the chain for an instant. Theresult is a lightning fast, reversereaction which kicks the guide bar upand back toward the operator.
• Pinch-Kickback can occur when thethe wood closes in and pinches themoving saw chain in the cut alongthe top of the guide bar and the sawchain is suddenly stopped. This sud-den stopping of the chain results in areversal of the chain force used tocut wood and causes the saw to
move in the opposite direction of thechain rotation. The saw is drivenstraight back toward the operator.
• Pull-In can occur when the movingchain contacts a foreign object in thewood in the cut along the bottom ofthe guide bar and the saw chain issuddenly stopped. This sudden stop-ping pulls the saw forward and awayfrom the operator and could easilycause the operator to lose control ofthe saw.

REDUCETHE CHANCE OFKICKBACKThe following precautions should befollowed to minimize kickback.• Recognize that kickback can happen.
With a basic understanding of kick-back, you can reduce the element ofsurprise which contributes to acci-dents.
• Never let the moving chain contactany object at the tip of the guide bar.
• Keep working area free from obstruc-tions such as other trees, branches,rocks, fences, stumps, etc. Eliminateor avoid any obstruction that yoursaw chain could hit while cutting.
• When cutting a branch, do not let theguide bar contact another branch orother objects around it.
• Keep saw chain sharp and properlytensioned. A loose or dull chain canincrease the chance of kickback.Follow manufacturer's chain sharp-ening and maintenance instructions.Check tension at regular intervals,but never with engine running. Makesure bar mounting nuts are securelytightened.
• Begin and continue cutting at fullspeed. If the chain is moving at aslower speed, there is greaterchance of kickback occurring.
• Use extreme caution when re-enter-
ing a cut.• Do not attempt cuts starting with the
tip of the bar (plunge cuts).• Watch for shifting logs or other ob-
jects that could close a cut and pinchor fall onto chain.
• Use the specified Reduced-KickbackGuide Bar and Low Kickback Chain.
Avoid Pinch-Kickback:• Be extremely aware of situations or
obstructions that can cause materialto pinch the top of or otherwise stopthe chain.
• Do not cut more than one log at atime.
• Do not twist the saw as the bar iswithdrawn from an undercut whenbucking.
Avoid Putl-ln:• Always begin cutting with the saw at
full speed and the saw housingagainst wood.
• Use wedges made of plastic orwood. Never use metal to hold thecut open.
MAINTAIN CONTROL
Never ReverseHand Positions
Correct Position
Keep a firm gripwith both hands,left thumb under
handle
Correct Grip Incorrect Grip
• A good, firm grip on the saw withboth hands will help you maintaincontrol. Don't let go. Grip the rearhandle with your right hand whetheryou are right or left handed. Wrap thefingers of your left hand over andaround the front handlebar, and yourleft thumb under the front handlebar.Keep your left arm straight with theelbow locked.
• Position your left hand on the fronthandlebar so it is in a straight linewith your right hand on the rear han-dle when making bucking cuts.Stand slightly to the left side of thesaw to keep your body from being ina direct line with the cutting chain.
• Stand with your weight evenly bal-anced on both feet.
• Do not overreach. You could be drawnor thrown off balance and lose control.
• Do not cut above shoulder height. Itis difficult to maintain control of sawabove shoulder height.
KICKBACK SAFETY FEATURES
_IWARNING: Tile following fea-tures are included on your saw to helpreduce hazard of kickback; however,such features will not totally eliminatethis danger. Do not rely only on safetydevices.• Hand Guard: designed to reduce the
chance of your left hand contactingthe chain if your hand slips offthefront handlebar.
• Position of front and rear handlebars:designed with distance betweenhandles and "in-line" with each other.The spread and "in-line" position ofthe hands provided by this designwork together to give balance andresistance in controlling the pivot ofthe saw back toward the operator ifkickback occurs.
• Reduced-Kickback Guide Bar: de-
signed with a small radius tip whichreduces the size of the kickbackdanger zone on the bar tip. This type

barhasbeendemonstratedtosignif-icantlyreducethenumberandseri-ousnessofkickbackswhentestedinaccordancewithANSIB175.1.
___& SmallRadiusTipGuideBar
L_JLarge Radius {_Tip Guide Bar
• Low Kickback Chain has met kick-
back performance requirements
when tested on the representative
sample of these chain saws speci-fied in ANSI B175.1.
Low Kickback Chain
/ Contoured Depth Gauge
,l_l_t_-.. -_ Elongated Guard Link_. Deflects Kickback Force
_ And Allows Wood To"_./" Gradually Ride Into Cutter
SAFETY NOTICE: Exposure to vibra-tions through prolonged use of handtools could cause blood vessel ornerve damage in the fingers, hands,and joints of people prone tocirculation disorders or abnormalswelling. Prolonged use in cold weath-er has been linked to blood vesseldamage in otherwise healthy people. Ifsymptoms occur such as numbness,pain, loss of strength, change in skincolor or texture, or loss of feeling in thefingers, hands, or joints, discontinuethe use of this tool and seek medicalattention. An anti-vibration systemdoes not guarantee the avoidance ofthese problems. Users who operatepower tools on a continual and regularbasis must closely monitor their physi-cal condition and the condition of thistool.
DOUBLE INSULATIONCONSTRUCTIONThis unit is double insulated to help pro-tect against electric shock. Double in-sulation construction consists of twoseparate "layers" of electrical insulationinstead of grounding.Tools built with this insulation system arenot intended to be grounded. Nogrounding means is provided on thisunit, nor should a means of groundingbe added to this unit. As a result, the ex-tension cord used with this unit can beplugged into any polarized 120 volt elec-trical outlet.Safety precautions must be observedwhen operating any electrical tool. Thedouble insulation system only providesadded protection against injury resultingfrom an internal electrical insulationfailure.
_lJ WARNING: All electrical repairsto this unit, including housing, switch,motor, etc., must be diagnosed and re-paired by qualified service personnel.Replacement parts for a double insu-lated appliance must be identical to theparts they replace. A double insulatedappliance is marked with the words"double insulation" or "double insu-lated". The symbol [] (square within asquare) may also be marked on theappliance. Failure to have the unit re-paired by Sears service personnel cancause the double insulation construc-tion to become ineffective and result inserious injury.STANDARDS: This product is listed byUnderwriters Laboratories, Inc. in ac-cordance with UL Standard 1662.
SAVE THESE INSTRUCTIONS
dt_WARNING: Before using chainsaw, ensure all fasteners are secure.
CARTON CONTENTSModel 358.341151• Chain Saw (fully assembled)• Bar Sheath• Gloves
Examine parts for damage. Do not usedamaged parts.
NOTE: If you need assistance or findparts missing or damaged, please call1-800-235-5878.
ASSEMBLYYour saw is fully assembled; no as-sembly is necessary.
KNOWYOURSAWREAD THIS OPERATOR'S MANUAL AND SAFETY RULES BEFORE OPERATING YOURCHAIN SAW. Compare the illustrations with your unit to familiarize yourself with thelocation of the various controls and adjustments. Save this manual for future ref-erence.
Oiler Actuator/ Chain Adjustment Bar SprocketBar Oil Cap Screw Hole
Lock-out
Button _
ChainBar
Trigger Switch
Power Cord
TRIGGER SWITCHThe TRIGGER SWITCH is used to turnon the unit. Squeeze the trigger switchto operate the unit after lock-outbutton has been pushed in. Releasethe trigger to turn the unit off.TRIGGER LOCK-OUT BUTTONThe TRIGGER LOCK-OUT BUTTON is acontrol feature designed to prevent themotor from being accidently started.When the rear handle is gripped in anormal cutting position, the triggerlock-out button can be pushed in bythe thumb, permitting the index fingerto squeeze the trigger. It is not neces-sary to maintain pressure on the trig-ger lock-out button once the triggerhas been engaged.
BAR OIL CAP/OILER ACTUATORThe BAR OIL CAP is used to access thebar oil tank and pressed to supply oilto chain.CHAIN ADJUSTMENT SCREWThe CHAIN ADJUSTMENT SCREW isused to adjust the chain tension.POWER CORDThe POWER CORD is used to connectthe chain saw to an approved exten-sion cord.CHAIN TENSIONIt is normal for a new chain to stretchduring first 15 minutes of operation.You should check your chain tensionfrequently. Readjust chain after every15 minutes of operation.See CHECKCHAIN TENSION under the SERVICEAND ADJUSTMENTS section.
OPERATING INSTRUCTIONSUse only a voltage supply as specifiedon your unit.SELECT AN EXTENSION CORDExtension cords are available for thisunit at Sears.
MINIMUM WIRE GAUGERECOMMENDATIONS
25 if, 50 ft. 1O0 ft.Volts(7.67 m) (15.24 m) (30.48 m)
16 16 14120 A.W.G.* A.W.G.* A.W.G.*
ATTACH THE EXTENSION CORD TOYOUR CHAIN SAWTo prevent disconnection from unit, se-cure extension cord to power cord asshown in the following illustration.
*American Wire Gauge
BEFORE STARTING SAW
_,WARNING: Be sure to read the
electrical safety information in theSAFETY RULES section of this manual
before you begin, If you do not under-stand the electrical safety informationdo not attempt to use your unit. Seekhelp from someone that does under-stand the information or call the cus-
tomer assistance help line at1-800-235-5878.GUIDE BAR AND CHAIN OILThe bar and chain require lubrication,The manually-operated chain oilerprovides lubrication to the chain andguide bar. Be sure to fill the bar oil tankbefore each cutting session. The oileractivator/bar oil cap must be used reg-ularly and often enough to maintain athin film of oil on the bar and chainwhile saw is cutting. It is recom-mended that the oiler actuator/bar oilcap be operated every ten (10) sec-onds and held for approximately three(3) seconds each time it is 3ressed.
OPERATING TIPS
For maximum guide bar and chain life,we recommend you use Craftsmanchain saw bar oil. If Craftsman bar oil isnot available, you may use a goodgrade SAE 30 oil until you are able toobtain Craftsman brand. The oil output ismanually metered during operation. Usea funnel to fill the tank. Replace oil capsecurely. Check oil level after every 15minutes of operation.STOPPING YOUR SAW• Release the trigger switch.• If motor does not stop, disconnect
the extension cord. Discontinue useof the unit until repaired by a SearsService Center.
STARTING YOUR SAW1. Connect the saw to a power
source using the proper size exten-sion cord (see SELECT AN EXTEN-SION CORD).
2. Push in switch lock out button.3. Squeeze and hold the trigger
switch.
• Check chain tension before first useand after 1 minute of operation. SeeCHECK CHAIN TENSION in the SER-VICE AND ADJUSTMENTS section.
• Cut wood only. Do not cut metal,plastics, masonry, non-wood buildingmaterials, etc.
• Stop the saw if the chain strikes aforeign object. Inspect the saw andrepair parts as necessary.
• Keep the chain out of dirt and sand.Even a small amount of dirt willquickly dull a chain and increase thepossibility of kickback.
• Practice cutting a few small logs usingthe following steps. This will help youget the "feel" of using your saw beforeyou begin a major sawing operation.• Squeeze the trigger switch and al-
low unit to reach full speed beforecutting.
• Begin cutting with the saw frameagainst the log.
• Keep the motor at full speed the en-tire time you are cutting.
• Release trigger switch as soon as cutis completed, allowing motor to stop.
• Keep the cord away from the cuttingarea. Position cord so it will not becaught on branches and the likeduring cutting.
• To avoid losing control when cut iscomplete, do not put pressure onsaw at end of cut.
• Stop motor before setting saw down.TREE FELLING TECHNIQUESCheck for broken or dead brancheswhich can fall while cutting causing seri-ous injury. Do not cut near buildings orelectrical wires if you do not know thedirection of tree fall, nor cut at nightsince you will not be able to see well,nor during bad weather such as rain,snow, strong winds, etc. If the treemakes contact with any utility line, theutility complany should be notified im-mediately.• Carefully plan your sawing operation in
advance.• Clear the work area. You need a clear
area all around the tree so you canhave secure footing.
• The chain saw operator should keepon the uphill side of the terrain as thetree is likely to roll or slide downhillafter it is felled.
• Study the natural conditions that cancause the tree to fall in a particulardirection, such as:• The wind direction and speed.• The lean of the tree. The lean of a tree
might not be apparent due to uneven

orslopingterrain.Useaplumborlev- lean.eltodeterminethedirectionoftree

• Weightandbranchesononeside.• Surroundingtreesandobstacles.
• Lookfordecayandrot.Ifthetrunkisrotted,itcansnapandfalltowardtheoperator.
• Makesurethereisenoughroomforthetreetofall.Maintainadistanceof2-1/2treelengthsfromthenearestpersonorotherobjects.Motornoisecandrownoutawarningcall.
• Removedirt,stones,loosebark,nails,staples,andwirefromthetreewherecutsaretobemade.
_'_"e Planaclearretreatpath
:t.... U_ '- DirectionofFall45 ° / ,_,
FELLING LARGE TREES(6 inches in diameter or larger)The notch method is used to fell largetrees. A notch is cut on the side of thetree in the desired direction of fall. Aftera felling cut is made on the oppositeside of tree, the tree will tend to fall inthe direction of the notch.NOTE: If tree has large buttress roots,remove them before making the notch.If using saw to remove buttress roots,keep saw chain from contactingground to prevent dulling of the chain.NOTCH CUT AND FELLING TREE• Make notch cut by cutting the top of
the notch first. Cut through 1/3 of thediameter of the tree. Next completethe notch by cutting the bottom. Seeillustration. Once notch is cut, re-move the wedge of wood from thetree.First cut _ 2" _ Felling cut here
Seco_)dcu._ j \ _inge
• After removing the wood from thenotch, make the felling cut on the op-posite side of the notch. This is doneby making a cut about two incheshigher than the center of the notch.This will leave enough uncut woodbetween the felling cut and the notchto form a hinge. This hinge will helpprevent the tree from falling in thewrong direction.
Hinge holds tree on stump and helpscontrol fall
Opening
of felling
cut
Closing ofnotch
NOTE: Before felling cut is complete,use wedges to open the cut if neces-sary to control the direction of fall. Toavoid kickback and chain damage, usewood or plastic wedges, but neversteel or iron wedges.• Be alert to signs that the tree is
ready to fall: cracking sounds, widen-ing of the felling cut, or movement inthe upper branches.
• As tree starts to fall, stop saw, put itdown, and get away quickly on yourplanned retreat path.
• DO NOT use your saw to cut down apartially fallen tree. Be extremely cau-tious with partially fallen trees that maybe poorly supported. When a treedoesn't fall completely, set saw asideand pull down tree with a cable winch,block and tackle, or tractor.
CUTTING A FALLEN TREE(BUCKING)Bucking is tile term used for cutting afallen tree to the desired log size.
Al_ WARNING: Do not stand on the
log being cut. Any portion can rollcausing loss of footing and control. Donot stand downhill of the log being cut.IMPORTANT POINTS• Cut only one log at a time.• Cut shattered wood very carefully;
sharp pieces of wood could be flungtoward operator.
• Use a sawhorse to cut small logs.Never allow another person to holdthe log while cutting and never holdthe log with your leg or foot.
• Do not cut in an area where logs,limbs, and roots are tangled. Draglogs into a clear area before cuttingthem by pulling out exposed andcleared logs first.
BUCKING TECHNIQUES
,i_ WARNING: If saw becomes
pinched or hung in a log, don't try toforce it out. You can lose control of thesaw, resulting in injury and/or damageto the saw. Stop the saw; drive awedge of plastic or wood into cut untilthe saw can be removed easily. Re-
10

startsawandcarefullyreenterthecut.Donotuseametalwedge.Donotat-tempttorestartyoursawwhenitispinchedorhunginalog.
Use a wedge to remove pinched saw,
Turn saw OFF and use a plastic orwooden wedge to force cut open.
Overcutting begins on the top side ofthe log with the bottom of the sawagainst the log. When overcutting uselight downward pressure.
Undercutting involves cutting on theunderside of the log with top of sawagainst the log. When undercuttinguse light upward pressure. Hold sawfirmly and maintain control. The sawwill tend to push back toward you.
WARNING: Never turn saw up-side down to undercut. The saw can-not be controlled in this position.Always make your first cut on the com-pression side of the log. The compres-sion side of the log is where the pres-sure of the log's weight is concentrated.First cut on compression side of log
Second cut
Second cut
First cut on compression side of log
BUCKING WITHOUT A SUPPORT• Overcut through 1/3 of the diameter
of the log.• Roll the log over and finish with a
second overcut.• Watch for logs with a compression
side. See illustration above for cut-ting logs with a compression side.
BUCKING USING A LOG ORSUPPORT STAND• Remember your first cut is always on
the compression side of the log.
(Refer to the illustration below foryour first and second cut)
• Your first cut should extend 1/3 of thediameter of the log.
• Finish with your second cut.
_Cut
", _ ._...__t Cut
Using a support standF_ 2; Cut
l_
1st Cut
LIMBING AND PRUNING
_IJWARNING: Be alert for and
guard against kickback. Do not allowthe moving chain to contact any otherbranches or objects at the nose of theguide bar when ]imbing or pruning. Al-lowing such contact can result in seri-ous iniu ry.
At_ WARNING: Never climb into a
tree to limb or prune. Do not stand onladders, platforms, a log, or in any po-sition which can cause you to loseyour balance or control of the saw.iMPORTANT POINTS• Watch out for springpoles. Spring-
poles are small size limbs which canwhip toward you or pull you off bal-ance. Use extreme caution whencutting small size limbs.
• Be alert for springback from anybranches that are bent or underpressure. Avoid being struck by the
branchorthesawwhenthetensioninthewoodfibersisreleased.
• Frequentlyclearbranchesoutofthewaytoavoidtrippingoverthem.
LIMBING• Limbatreeonlyafterit iscutdown.• Leavethelargerlimbsunderneath
thefelledtreetosupportthetreeasyouwork.
• Startatthebaseofthefelledtreeandworktowardthetop,cuttingbranchesandlimbs.Removesmalllimbswithonecut.
• Keepthetreebetweenyouandthechain.
• RemovelargerbrancheswiththecuttingtechniquesdescribedinBUCKINGWITHOUTASUPPORT,
• Alwaysuseanovercuttocutsmallandfreelyhanginglimbs.Undercut-tingcouldcauselimbstofallandpinchthesaw.
CUSTOMERRESPONSIBILITIES
PRUNING
_IIWARNING: Limit pruning to limbs
shoulder height or below. Do not cut ifbranches are higher than your shoul-der. Get a professional to do the job.• Make your first cut 1/3 of the way
through the bottom of the limb. Thiscut will make the limb sag so that itfalls easily on the second cut.
• Next make a second cut all the waythrough the limb.
• Finish the pruning operation by usingan overcut so that the stump of thelimb protrudes 1 to 2 inches from thetrunk of the tree.
Second cut
t First cut
1/3 of way
_ 3rd out 1 to 2 in.from trunk of tree
_IWARNING: Disconnect power source before performing maintenance.
Fill in dates as you complete Before After Every Serviceregular service Use Use 15 rain. Dates
Check for damaged/worn parts _,-
Check for loose fasteners/parts _,,
Check chain tension _,"
Check chain sharpness _"
Check guide bar _,"
Check bar and chain oil level _" _"
Inspect and clean unit & labels
Clean guide bar groove _"
GENERAL RECOMMENDATIONSThe warranty on this unit does not cov-er items that have been subjected tooperator abuse or negligence. To re-ceive full value from the warranty, theoperator must maintain unit as instruct-ed in this manual. Various adjustmentswill need to be made periodically toproperly maintain your unit. Impropermaintenance may cause damage tothe unit and possible injury to the oper-ator or bystanders=
CHECK FOR DAMAGED ORWORN PARTSContact Sears Service Center for re-placement of damaged or worn parts.NOTE: It is normal for a small amountof oil to appear under the saw aftermotor stops. Do not confuse this with aleaking oil tank.• Trigger Switch - Ensure the trigger
switch functions properly by squeez-ing and holding the trigger switch.Make sure motor starts and stops.
12
• OilTank- Discontinueuseofchainsawifoiltankshowssignsofdam-ageorleaks.
• PowerCord- Discontinueuseifchainsawpowercordshowssignsofdamageorwear.
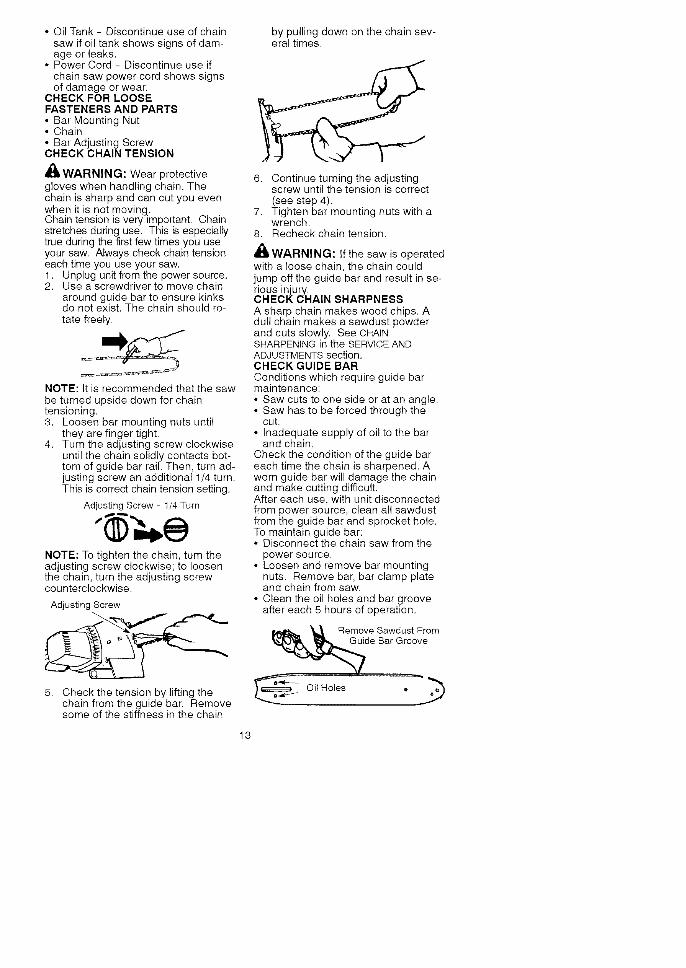
CHECKFORLOOSEFASTENERS AND PARTS• Bar Mounting Nut• Chain• Bar Adjusting ScrewCHECK CHAIN TENSION
WARNING: Wear protective
gloves when handling chain. Thechain is sharp and can cut you evenwhen it is not moving..Chain tension is very important. Chainstretches during use. This is especiallytrue during the first few times you useyour saw. Always check chain tensioneach time you use your saw.1. Unplug unit from the power source.2. Use a screwdriver to move chain
around guide bar to ensure kinksdo not exist. The chain should ro-tate freely.
NOTE: It is recommended that the sawbe turned upside down for chaintensioning.3. Loosen bar mounting nuts until
they are finger tight.4. Turn the adjusting screw clockwise
until the chain solidly contacts bot-tom of guide bar rail. Then, turn ad-justing screw an additional 1/4 turn.This is correct chain tension setting.
Adjusting Screw - 1/4 Turn
NOTE: To tighten the chain, turn theadjusting screw clockwise; to loosenthe chain, turn the adjusting screwcounterclockwise.
Adjusting Screw
5. Check the tension by lifting thechain from the guide bar. Removesome of the stiffness in the chain
by pulling down on the chain sev-eral times.
6. Continue turning the adjustingscrew until the tension is correct(see step 4).
7. Tighten bar mounting nuts with awrench.
8. Recheck chain tension.
_IL WARNING: If the saw is operatedwith a loose chain, the chain couldjump offthe guide bar and result in se-rious in'ur .CHEC_ €_'YHAINSHARPNESS
A sharp chain makes wood chips. Adull chain makes a sawdust powderand cuts slowly. See CHAINSHARPENING in the SERVICE ANDADJUSTMENTS section.CHECK GUIDE BARConditions which require guide barmaintenance:• Saw cuts to one side or at an angle.• Saw has to be forced through the
cut.• Inadequate supply of oil to the bar
and chain.Check the condition of the guide bareach time the chain is sharpened. Aworn guide bar will damage the chainand make cutting difficult.After each use, with unit disconnectedfrom power source, clean all sawdustfrom the guide bar and sprocket hole.To maintain guide bar:• Disconnect the chain saw from the
power source.• Loosen and remove bar mounting
nuts. Remove bar, bar clamp plateand chain from saw.
• Clean the oil holes and bar grooveafter each 5 hours of operation.
__ Romov: S eWdUrSctoFrOm
o'q_-_ Oil Holes o
13

• Burringofguidebarrailsisanormalprocessofrailwear.Removetheseburrswithaflatfile.
• Whenrailtopisuneven,useaflatfiletorestoresquareedgesandsides.
tT_ File Rail Edges_ N r_and Sides I U I
square ] ]Worn Groove Correct GrooveReplace the guide bar when thegroove is worn, the guide bar is bent orcracked, or when excess heating orburring of the rails occurs. If replace-ment is necessary, use only the guidebar specified for your saw in the repairparts list or on the decal located on thechain saw.
LUBRICATIONBar OilFill Cap
• Check bar and chain oil before use
and every 15 minutes while operatingthe saw. See GUIDE BAR AND CHAINOIL under the OPERATION section.
INSPECT AND CLEAN UNIT ANDLABELS• After each use, inspect complete unit
for loose or damaged parts. Cleanthe unit and Jabels using a dampcloth with a mild detergent.
• Wipe off the unit and labels with a
CHAIN SHARPENINGChain sharpening requires specialtools. You can purchase sharpeningtools at Sears or go to a professionalchain sharpener.
_i WARNING: Avoid accidental
starting. Always unplug saw from pow-er source before installing a bar and/orchain,CHAIN REPLACEMENT
_i WARNING: Wear protectivegloves when handling chain. Thechain is sharp and can cut you evenwhen it is not moving.It is normal for a new chain to stretchduring the first 15 minutes of operation.You should recheck your chain tensionfrequently and adjust the chain tensionas required. See CHECK CHAIN TEN-SION section.Replace the old chain when it be-comes worn or damaged. Use onlythe Low Kickback replacement chainspecified in the list of available re-placement parts. The chain must com-ply with kickback requirements of ANS!Bt 75.1 when tested with this saw.See your Sears Service Center to re-place and sharpen individual cutterson your chain.
TO REPLACE CHAIN:1. Disconnect the chain saw from the
power source.2. Turn the unit upside down on a flat
surface. Straighten out chain, thenlay it on a flat surface.
3 Remove bar mounting nuts, barclamp plate, and old chain.
4. Turn the adjusting screw counter-clockwise to move the adjustingpin almost as far as it will go to therear. Do not remove the adjustingscrew from the unit.
5. Hold chain with cutters facing asshown.
Tip ofBar
\CUTTERS MUST FACE IN
DIRECTfON OF ROTATION
14

Cutters DepthGauge
DriveLinks6. Slidethechainbetweenthehous-
ingandthesprocket,Placechainaroundthesprocketandfitthedrivelinksintotheguidebargrooveandthenaroundguidebarnose.
SprocketJ_
Night Housing J
7. Hold the guide bar against the sawframe and install the bar clampplate. Be sure the tab on the barclamp plate is toward the rear ofbar.
Adjusting Pin Slot,-_,,z_ Tab
Sar / IU/Clamp .J f" BarNuts_,_"_,, _Plate / I _------_f--_
8. Secure the guide bar and barclamp plate with the bar nuts; tight-en finger tight only.
CAUTION: If saw chain is installedbackwards, the saw will vibrate exces-sively and will not cut wood.CHAIN ADJUSTMENTSee CHECK CHAIN TENSION in theMAINTENANCE section.
CUSTOMER SERVICEABLE PARTS
_li WARNING: Use of any other ac-
cessory or attachment might present arisk of injury to the operator.
REPLACEMENT PART
Bar Mounting Nuts
Oil Cap
Guide Plate
Safety Lock Button
Bar Adjusting Screw
Bar Adjusting Pin
Spacer
Spacer Screw
File (5/32" dia,) Twin Pak
File Guide (File Holder)
Depth Gauge ToolChain -14"
Guide Bar - 14"
Bar & Chain Lubricant -1 qt.
Bar & Chain Lubricant -1 gal.
PART NO.
530015251
530029282
530029285
530025873
530015514
530023492
530015832
530015835
71-36524
71-36565
71-36557
71-3617
71-36365
71-36556
71-36554
AWARNING: Perform the following
steps after each use:• Allow the motor to cool before storing
or transporting.• Store chain saw and extension cord
in a well ventilated area• Store chain saw with all guards in
place and position chain saw so thatany sharp object cannot accidentallycause injury.
• Store chain saw unplugged, well outof the reach of children.
SEASONAL STORAGEPrepare your unit for storage at theend of the season or if it will not beused for 30 days or more.If your chain saw is to be stored for aperiod of time:• Clean it thoroughly before lengthy stor-
age.• Store in a clean dry area.• Lightly oil external metal surfaces
and guide bar.• Oil the chain and wrap it in heavy
paper or cloth.• Use bar sheath to cover bar.
15
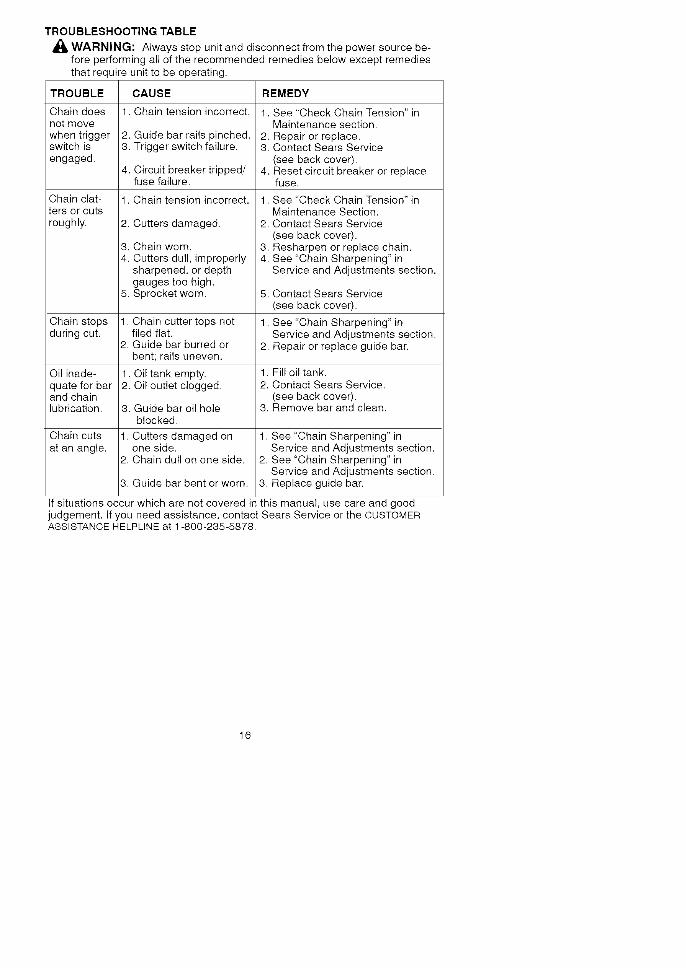
TROUBLESHOOTING TABLE
WARNING: Always stop unit and disconnect from tile power source be-fore performing all of the recommended remedies below except remediesthat require unit to be operating.
TROUBLE CAUSE
Chain does 1. Chain tension incorrect.not movewhen trigger 2. Guide bar rails pinched.switch is 3. Trigger switch failure.engaged.
4. Circuit breaker tripped/fuse failure.
1. Chain tension incorrect.Chain clat-ters or cutsroughly.
Chain stopsduring cut.
Oil inade-
quate for barand chainlubrication.
Chain cuts
at an angle.
2. Cutters damaged.
3. Chain worn.4. Cutters dull, improperly
sharpened, or depthgauges too high.
5. Sprocket worn.
1. Chain cutter tops notfiled flat.
2. Guide bar burred orbent; rails uneven.
1. Oil tank empty.2. Oil outlet clogged.
3. Guide bar oil holeblocked.
1. Cutters damaged onone side.
2. Chain dull on one side.
3. Guide bar bent or worn.
REMEDY
1. See "Check Chain Tension" inMaintenance section.
2. Repair or replace.3. Contact Sears Service
(see back cover).4. Reset circuit breaker or replace
fuse.
1. See "Check Chain Tension" inMaintenance Section.
2. Contact Sears Service(see back cover).
3. Resharpen or replace chain.4. See "Chain Sharpening" in
Service and Adjustments section.
5. Contact Sears Service(see back cover).
1. See "Chain Sharpening" inService and Adjustments section.
2. Repair or replace guide bar.
1. Fill oil tank.2. Contact Sears Service.
(see back cover).3. Remove bar and clean.
1. See "Chain Sharpening" inService and Adjustments section.
2. See "Chain Sharpening" inService and Adjustments section.
3. Replace guide bar.
If situations occur which are not covered in this manual, use care and goodjudgement. If you need assistance, contact Sears Service or the CUSTOMERASSISTANCE HELPLINE at 1-800-235-5878.
16
Garantia 16 ServicioyAjustes 29ReglasdeSeguridad 16 PiezasDisponibles 30Montaje 21 AImacenamiento 31Uso 22 TablaDiagn6stica 32Mantenimiento 27 RepuestosyEncargosContratapa
UNAI_IOCOMPLETODE GARANTiA PARA LA SIERRA DE CADENAELECTRICA DE LA MARCA CRAFTSMANSi este producto falla por un defecto en el material o de mano de obra dentro dela_o a partir de la fecha de compra y este se ha utilizado y mantenido de acuerdoal manual del usuario, envielo a cualquier tienda Sears o otra tienda Craftsmanen los Estados Unidos para su reemplazo gratuita.Esta garantia excluye la barra y la cadena, que son partes desechables y pue-den desgastarse al usarlas normalmente en menos de un aSo.Esta garantia es aplicable por s61o 30 dias desde la fecha de compra si este pro-ducto se usa con fines comerciales o se usa para arriendo.Esta garantia le otorga derechos legales especificos, y usted tambien puedetener otros derechos que varian de estado a estado.Sears, Roebuck and Co., Hoffman Estates, IL 60179
_ADVERTENCIA: Siempre quese use cualquier cortador electrico, de-ben observarse precauciones b&sicasde seguridad para reducir el riesgo deincendio, choque electrico, y acci-dentes personales. Lea todas las in-strucciones.
_,ADVERTENCIA: Siempre des-conecte la sierra de cadena del recursode energia cuando no se encuentre enuse, antes de efectuar servicio, y alcambiar accesorios, come Io es la cade-na de la sierra y el protector.Debido a que las sierra de cadena soninstrumentos para cortar madera a altavelocidad, deben observarse precau-ciones de seguridad especiales para re-ducir el riesgo de accidentes. El usedescuidado o indebido de esta herra-mienta puede causar graves heridas.PIENSE ANTES DE PROCEDER• Limite el uso de la sierra a aquellos
usuarios adultos que comprendan ypuedan implementar todas las pre-cauciones, reglas de seguridad einstrucciones de use que se encuen-tran en este manual.
• Vistase de forma apropiada. Use equi-po protector. Siempre use calzado deseguridad con puntas de acero y sue-las anti-deslizantes; ropa ajustada alcuerpo; guarantes gruesos de use in-dustrial anti-desluzantes; protecci6n de
ojos talescomo gafas de seguridadque no se la cara; casco duro aproba-do; y barrera de sonido (tapones deoido u orejeras anti-sonido) para pro-teger la audici6n. Los que usan sier-ras de fuerza habitualmente deber_tnhacerse revisar la audici6n freuente-mente ya que el ruido de las sierrasde cadena puede daSar los oidos.
• Mantenga el cabello por encima delnive] de los hombres. No desgastela ropa suelta o joyeria; pueden en-redarse en las piezas m6viles.
Proteci6n de Oidos Casco Duro
"---._.A_I_ - Proteccidn deRopa OjosAjustada _ Guantes deal Cuerpo Uso
,_ Industrial
Zapatos Pantorfilleras
de Segu._d _ de Seguridad
mdlli
• Mantenga todas las partes del cuer-po alejadas de la cadena siempreque el motor de la sierra se en-cuentre en funcionamiento.
• Mantenga a los ni_os alejados. Nopermita que ninguna persona hagacontacto con la sierra de cadena nicon el cable de extensi6n. Todos losespectadores deberb, n mantenerse
16

alejadosporIomenos10metros(30pies)delazonatrabajo.
• Nomanejeouselasierradecadenamientrasseencuentrefatigado,en-fermo,ansiosoobajolosefectosdelalcohol,drogasuotrosmedicamen-tos.Esimprescindiblequeustedseencuentreenbuenacondici6nfisicayalertmentalmente.Siustedsufredecualquiercondici6nquepuedaempeorarconeltrabajoarduo,ases6reseconsum@dicoantesdecomenzarausaresteproducto.ActQeconcautela,hagausodelbuensentidocomOn.
• Nopongaenmarchalasierrasintenerun&readetrabajodespejada,unasuperficieestableparapararsey,siest&derrubando&rboles,unca-minopredeterminadoderetroceso.Despejeymantengadelare&detra-bajo.USELA SIERRA OBSERVANDO TO-
DOS LOS PROCEDIMIENTOS DESEGURIDAD• Mantenga las dos manos en las
manijas siempre que el aparato est@en marcha. El uso del aparato conuna sola mano puede causar gravesheridas al usuario, a los asistentes oa los espectadores. Las sierras decadena est&n diseSadas para quese las use con las dos manos entodo momento.
• No haga uso de la sierra desde lasescaleras [email protected] ni los &rboles.
• Aseg_rese de que la cadena novaya a hacer contacto con ningOnobjeto antes de poner en marcha elmotor. Nunca arrancar la sierra conla barra guia dentro de un corte.
• No fuerce la sierra de cadena. Estahar& el trabajo de manera m&s eft-ciente y con mayor seguridad si seusa en la proporci6n para la cual fuediseSada.
• No aplique presi6n a la sierra, espe-cialmente al final del corte. El aplicarpresi6n puede hacer que se pierdael control al completarse el corte.
• Detenga el motor antes de apoyar lasierra en ningOn lado.
• Cuando traslade la sierra en la mano,hb,galo Onicamente con el motor apa-gado. Mueva la sierra de cadena porel mango delantero con el motor apa-gado, con los dedos alejados del inter-ruptor, con la barra guia y la sierra decadena mirando hacia atr&s.
• Use la herramienta correcta, cortemadera Onicamente. No use la sierrade madera para prop6sitos que no
sean otros que los prop6sitos para lacual fue diseSada - por ejemplo - nouse la sierra de cadena para cortarpl&stico, masoneria, o materiales deconstrucci6n que no sean de madera.
• No ponga en funcionamiento la sier-ra de cadena si est& daSada, incor-rectamente ajustada, o si no est& ar-mada completa y seguramente.Siempre cambie el barre, cadena,protector de mano, freno de cadena,o el otras piezas immediatamente sidaiTado, roto, o se sale por cualquiermotivo.
• Inspeccione peri6dicamente loscables de la sierra de cadena y si@stos se encuentran daSados, per-mita que sean reparados per unCentre de Servicio Sears.
MANTENGA LA SIERRA EN BUENASCONDICIONES DE FUNCIONAMIEN-TO• Lleve la sierra de cadena a un pro-
veedor de servicio Sears para quehaga todo servicio menos aquellosprocedimientos listados en la secci6nde MANTENIMIENTO de este manual.
• AsegOrese de que la cadena se de-tenga per completo cuando se sueltael interruptor en forma de gatillo.
• Mantenga las manijas secas, limpiasy libres de aceite o de mezcla decombustible.
• Mantenga las tapas y los fijadoresbien fijos.
• Componentes de repuesto que noconcuerden con las piezas originaleso la remoci6n de dispositivos de segu-ridad podria causar daSos al aparato yaccidentes al usuario o a especta-dores. Use exclusivamente los acce-sorios y repuestos Craftsman recom-endados. Nunca modifique la sierra.
• Mantenga su sierra de cadena concuidado.
• Mantenga la herramienta afilada ylimpia para mejor funcionamiento ymayor seguridad.
• Siga todas las instrucciones para lu-bricaci6n y cambio de accesorios.
• Desconecte la sierra de cadena delrecurso de energia cuando no se en-cuentre en uso, antes de efectuarservicio, y al cambiar accesorios,como Io es la cadena de la sierra yel protector.
• Inspeccione todas las piezas por sihubiera daSos. Antes de continuarcon el uso del aparato; el protector uotra pieza que se encuentre daSadadeber& ser inspeccionada cuidado-samente para determinar si pueden
17

usarsedeformaapropiadayparavierificarsipuedeefectuarelfuncio-namientoparaelcuealfuedise_ada.Inspeccioneelalineamientodelaspiezasmovibles,piezasmoviblesqueseencuentrenatascadas,larupturadepiezas,monturaycualqu-ierotracondici6nquepuedaafectarelusodelaparato.Elprotectorocu-alquierotrapiezaqueseencuentreda_adadeber_tsetreparadaapro-piadamenteodeber&serreemplaza-daporunCentrodeServicioSears,anoserqueseindiquedeotrafor-maenestemanualdelusuario.
• AInoencontrarseenuso,lassierrasdecadenadeber&nalmacenarseenunlugarseco,enunlugaraltoobajoIlave,fueradelalcancedelosni_os.
• AIalmacenarlasierra,useunafun-daounestuchedecarga.
SEGURIDAD ELECTRICA
_ADVERTENCIA: Evite ambi-
entes peligrosos. Para reducir el riesgode choque electrico, no use su aparatoen lugares h0medos o mojados ni cercade piscinas, de los hidromasajes, etc.No exponga el aparato a la nieve, a laIluvia ni al agua para evitar la posibilidadde choque el6ctrico. No toque el en-chufe del cable de extensi6n ni el delaparato con las manos mojadas.• Use el tipo de voltaje que se muestra
en su aparato.• Evite situaciones peligrosas. No use
en presencia de liquidos o gases in-flamables para evitar crear incendioo explosi6n y/o causar da_o al apa-rato.
• Para reducir el riesgo de choqueel6ctrico, este equipo cuenta con unenchufe polarizado (una aleta esm_ts ancha que la otra). Este en-chufe entrar& solamente en una solaposici6n en un enchufe polarizadodel cable de extensi6n. Aseg0resede tener un cable de extensi6n pola-rizado. A su vez, el enchufe polariza-do del cable de extensi6n polariza-do. A su vez, el enchufe polarizadodel cable de extensi6n entrar_t en eltomacorriente de una sola forma. Siel enchufe no entra completamenteen el tomacorriente, invierta el en-chufe. Si todavia no entra, contacteun electricista autorizado para queinstale el tomacorriente apropiado.No cambie el enchufe de ningunaforma.
• Para reducir el riesgo de choque el6c-trico, use cables de extensi6n es-
pecificamente marcados como com-patibles para el uso de aparatos deexterior, y que tengan una clasificaci6nel6ctrica no menor que la clasificaci6ndel aparato. El cable deber& venirmarcado con el sufijo '_N-A" ("W" enCanada). AsegOrese de que su cablede extensi6n este en buenas condi-clones de uso. Inspeccione el cablede extensi6n de m&s baja clasifica-ci6n, se podria crear una baja en elvoltaje resultando en la p@dida deelectricidad y calentamiento. Si se en-cuentra en duda, use un cable con laclasificaci6n siguiente de m&s alta es-cala. Mientras m&s bajo sea el calibredel cable, m&s grueso ser& el cable.(Yea SELECCION DEL CABLE DE EX-TENSION en la secci6n USO). No uti-lice las cables de extensi6n mOltiples.
• No abuse del cord6n. Nunca manejeel aparato por el cable de extensi6no tire del mismo para desconectar elaparato.
• Amarre el cable de extensi6n a cabledel aparato para asi evitar que sedesconecten el uno del otro.
• No use el aparato si el interruptor noenciende o apaga el aparato de for-ma apropiada, o si el cierre de salidano funciona. Reparaciones al inter-ruptor deber&n ser hechas por unCentro de Servicio Sears.
• Mantenga el cable de extensi6n librede todo obst&culo y alejado del usua-rio en todo momento. Mantenga elcable de manera que no pueda enre-darsecon las ramas. No exponga elcable al calor, aceite, agua o bordescon filo.
• Para evitar la posibilidad de choqueelectrico, evite el contacto del cuerpocon el conductor a tierra, como Ioson el metal, las cercas o tuberias.
• La proteccci6n del Interruptor de Fallade Circuito a Tierra (GFCI) deber& serprovista en el enchufe o circuito a serusados. Vienen disponibles recept&cu-los con el GFCI incluido y estos deb-er&n ser usados como medida de se-guridad. Inspeccione los cables de lasierra de cadena peri6dicamente y si&stos se encuentran daSados, permitque sean reparados pot una facilidadde servicio autorizada.
PROTEJASE CONTRA LASRECULADASUd. debe seguir todas las precau-clones e instrucciones de seguridadpara ayudar a evitar las reculadas ylas dem&s fuerzas que pueden causargraves heridas.
18

Trayectoriade la Reculada
Evite las Obstrucciones
_ADVERTENClA: Evite reculada
le pueden causar graves heridas. Reeu-lada es el movimiento hacia el frente,hacia atr_ts o r_.pidamente hacia ade-lante, esto puede ocurrir cuando la pun-ta de la barra guia de la sierra de cade-na entra en contacto con cualquierobjeto come puede ser otra rama o tron-co, o cuando la madera se cierra y atas-ca mientras se hace el corte. El entraren contacto con alg0n objeto extraflo ala madera le puede causar al usuario laperdida del control de la sierra de cade-ha.
• La Reeulada Rotacional puedeacontecer cuando la cadena en mo-vimiento entra en contacto con alg0nobjeto en la parte superior de la pun-ta de la barra guia puede causar quela cadena entre al material y se de-tenga por un instante. El resultadoes una reacci6n inversa, a velocidadde rel_tmpago, que hace recular labarra guia hacia arriba y hacia atr_.shacia el usuario.
• La Reeulada pot Ataseo acontecencuando la madera se cierra y atascala cadena en movimiento en el carte
a Io largo de la parte superior de labarra gula y la cadena se detiene re-pentinamente. Esta detenci6n re-pentina de la cadena tiene come re-sultado una inversi6n de la fuerza dela cadena usada para cortar maderay causa que la sierra se mueva ensentido opuesto al de la rotaci6n dela cadena. La sierra directamentehacia atr_ts en direcci6n al usuario.
• La Reeulada pot Impulsion puedeacontecer cuando la cadena en mo-vimiento entra en contacto con algOnobjeto extra_o a la madera en elcarte a Io largo de la parte inferior dela barra guia y la cadena se detienerepentinamente. Esta detenci6n re-pentina de la cadena tira de la sierra
adelante y lejos del usuario y podriahacer f_.cilmente al usuario perder elcontrol de la sierra.
REDUZCA LAS PROBABILIDADESDE RECULADALas siguientes precauciones deber_.nser seguidas para minimizar las recula-das.• Est6 consciente de la posibilidad de
reculada. Teniendo una buena com-prensi6n b_tsica de la reculada, ud.padre, reducir el elemento de sorpre-sa que contribuye a los accidentes.
• Nunca permita que la cadena en mo-vimiento toque ningOn objeto en lapunta de la barra guia.
• Mantenga el _trea de trabajo libre deobstrucciones come per ejemplootros _.rboles, ramas, piedras, cer-cas, tocones, etc. Elimine o evitetoda obstrucci6nes comp par ejem-pie otros _trboles, ramas, piedras,cercas, tocones, etc. Elimine o evitetoda obstrucci6n que la cadena pue-da tocar mientras ester cortando.
• AI cortar una rama, no deje la barraguia entrar en contacto con otrarama o otros objetos alrededor.
• Mantenga la sierra afilada y con latensi6n correct& Las cadenas conpoco file o flojasincrementan la pro-babilidad de reculada. Siga las in-strucciones del fabricante para afilary efectuar mantenimiento de la cade-na. Verifique la tensi6n a intervalosregulares con el motor parade, nun-ca en marcha. AsegOrese de que lastuercas de la freno de cadena est6n-parado, nunca en marcha.AsegOrese de que las tuercas de lafreno de cadena est6n ejustadas fir-memente.
• Empiece y efectQe la totalidad decada carte con el acelerador a fon-do. Si la cadena se est,. moviendo auna velocidad menor que la m_.xima,hay m_.s probabilidad de que la sier-ra recule.
• Use cuidado extremo al entrar denuevo en un carte ya empezado.
• No intente hacer cortes empezandocon la punta de la barra (cortes detaladro).
• Tenga cuidado con troncos que sedesplazan y con las dem_.s fuerzasque podrian cerrar un corte y apretarla cadena o bien caer sobre ella.
• Use la Barra Guia Reducidora deReculadas y la Cadena Minimizado-ra de Reculadas recomendadaspara su sierra.
19

Evite la Reculada pot Presion:• Mant6ngase siempre al tanto de
toda situaci6n u obstrucci6n quepueda apretar la cadena en la partesuperior de la barra o detener la ca-dena de cualquier forma.
• No carte m&s de un tronco a la vez.• AI seccionar troncos con carte as-
cendiente, no tuerza la sierra al sa-car la varra del corte.
Evite la Impulsion:• Siempre empiece a cortar con el mo-
tor acelerado a fondo y la caja de lasierra apoyada en el madera.
• Use cu_as de pl&stico o de madera,no de metal para mantener abierto elcorte.
MANTENGA EL CONTROLNunca invierta Mantenga el control
la posicion de con las dos manos,
las m_ con el d;°d° dPeUlg'J°rde,mango.
AgarrePosici6n Correcta Correcto Incorrecto
• Sostenga firmemente con las dosmanos le ayudar& a mantener elcontrol de la sierra. No afloje. Man-tenga la mano derecha envolviendototalmente la manija trasera, sea ud.derecho o zurdo. Sostenga la manijadelantera con la mano izquierda,colocando el pulgar debajo de lamanija con los fijo. Mantenga su bra-zo izquierda recta con el coda rigido.
• Coloque la mano izquierda en lamanija delantera, de modo quepuede en linea recta con la manoderecha en la manija trasera, cuan-do este haciendo cortes de seccio-namiento. P&rese levemente hacia laizquierda de la sierra para evitar queel cuerpo est6 e linea directa con lacadena.
• P&rese con el peso distribuido igual-mente entre los dos pies.• No se ex-tienda excesivamente, la sierrapuede impulsarlo o empujarlo y ud.puede perder el quililibrio y el controlde la sierra.
• No carte arriba del nivel de los ham-bros, puedsto que torna dificil man-tener el control de la sierra.
DISPOSITIVIOS DE SEGURIDADCONTRA LAS RECULADAS
_IbADVERTENCIA: Los siguientesdispositivos han sido incluidos en lasierra para ayudar a reducir el riesgode reculadas; sin embargo, tales im-plementos no puedn eliminar total-mente esta reacci6n peligrosa. No seconfie exclusivamente en los dispositi-vos de seguridad, ud. debe seguir to-das las precauciones e instruccionesde seguridad para ayudar a evitar lasreculadas y las dem&s fuerzad qauepueden causar graves heridas.• Protector de Mane Delantera, dis-
e_ado para reducir la probabilidadque su mano izquierda entre en con-tacto con la cadena, si la mane sedesprende de la manija delantera.
• La posici6n de las manijas delantera ytrasera, dise_adas con distancia entrelas manijas y "e linea" la una con laotra. La separaci6n y la colocaci6n enlinea que este dise_o provee se com-binan para dar equilibrio y resistenciapara controlar la propulsi6n de la sier-ra hacia el usuario si acontece unareculada.
• Barra Guia Reducidora de Recula-das, dise_ada con punta de radiopeque_o que reduce el tama_o de lazona de peligro en la punta de labarra. Las barras guias reducidorasde reculadas son aquellas que handemostrado que reducen significati-vamente la cantidad y la seriedad delas reculadas cuando han sido ex-aminadas de acuerdo con los requi-sitos de seguridad para las sierrasde cadena a gasolina establecidospar el Patr6n ANSI (American Na-tional Standards Institute, Inc.)B175.1.
Zonade Punta de Radio
_ Pequei5o BarraGuia
bono0_"_ o Ra de
Punta de Radio [-,'_xPelig_°Gaande BarraGuia
• Las Cadenas Minimizadoras de Re-culadas han satisfecho los requisitosde rendimiento del ANSI B175.1 (Re-quisites de Seguridad para las Sier-ras de Cadena a Gasolina) en prue-bas con una muestra representativade Sierras de cadena con desplaza-miento de menos de 3,8 pulgadas,coma se especifica en ANSI B175.1.
20
CadenaMinimizadoradeReculadasMarcadordeProfuedidadPerfilado
Es_abdnProtectorAlargadoDesvialaFuerzadeReacci6nyPermitequelaMaderaEntreGraduaimenteataCuchilla
AVISO DE SEGURIDAD: El estarexpuesto a las vibraciones a trav6s deluso prolongado de herramientas demanos puede causar daSos a losvasos sanguineos o a los nervios delos dedos, las manos y las coyunturasen aquellas personas que tienenpropensidad a los trastornos de lacirculaci6n o alas hinchazonesanormales. El uso prolongado entiempo frio ha sido asociado condaSos a los vasos sanguineos depersonas que por otra parte seencuentran en perfecto estado desalud. Si ocurren sintomas tales comoel entumecimiento, el dolor, la falta defuerza, los cambios, en el color o latextura de la piel o falta de sentido enlos dedos, las manos o las muSecas,deje de usar la m&quinainmediatamente y procure atenci6nm6dica. Los sistemas deanti-vibraciSn no garantizan que seeviten tales problemas. Los usuariosque hacen uso continuo yprolongando de las herramientas defuerza deben fiscalizar atentamente suestado fisico _ el estado del 3arato.
CONSTRUCCION DE DOBLEAISLAMIENTOEste aparato tiene un doble aislamientopara ayudar a proteger el mismo encontra de choques electricos. Laconstrucci6n de doble aislamiento con-siste en dos "capas" de aislamientoel6ctrico en lugar de tenet toma de tier-ra,
Herramientas y aparatos construidoscon el sistema de doble aislamiento nohan sido diseSados para que tomen tier-ra. No se ha provisto para esta m&quinaningQn medio para la toma de tierra, yno se deber&n aiTadir medios para latoma de tierra a la misma. Como resul-tado, el cable de extensi6n usado consu aparato puede ser enchufado en cu-alquier tomacorriente el6ctrico polariza-do de 120 voltios.Precauciones de seguridad deben serobservadas cuando se use cualquierherramienta electrica. El sistema dedoble aislamiento s61o provee protec-ci6n adicional en contra de accidentescausados por fallo interno de aislamien-to electrico.
PATRONES: Este producto est& enlis-tado por Underwriters Laboratories,Inc. de acuerdo con UL Standard1662.GUARDE ESTA INSTRUCClONES
41_ADVERTENCIA: Antes de usarla sierra de cadena, asegure todos losfijadores se encuentren bien ajusta-dos.CONTENIDO DE LA CAJAModelos 358.341151• Sierra de Cadena (completamente)• Protector para la Barra• Guantes
Verifique que no haya piezas daila-das. No use piezas da_adas.
AVlSO: Si necesita ayuda o encuen-tra piezas daSadas o piezas no in-cluidas en la caja, favor comunicarseal 1-800-235-5878.MONTAJEEl aparato viene completamente arma-do y no hay necesidad de montaje.
21
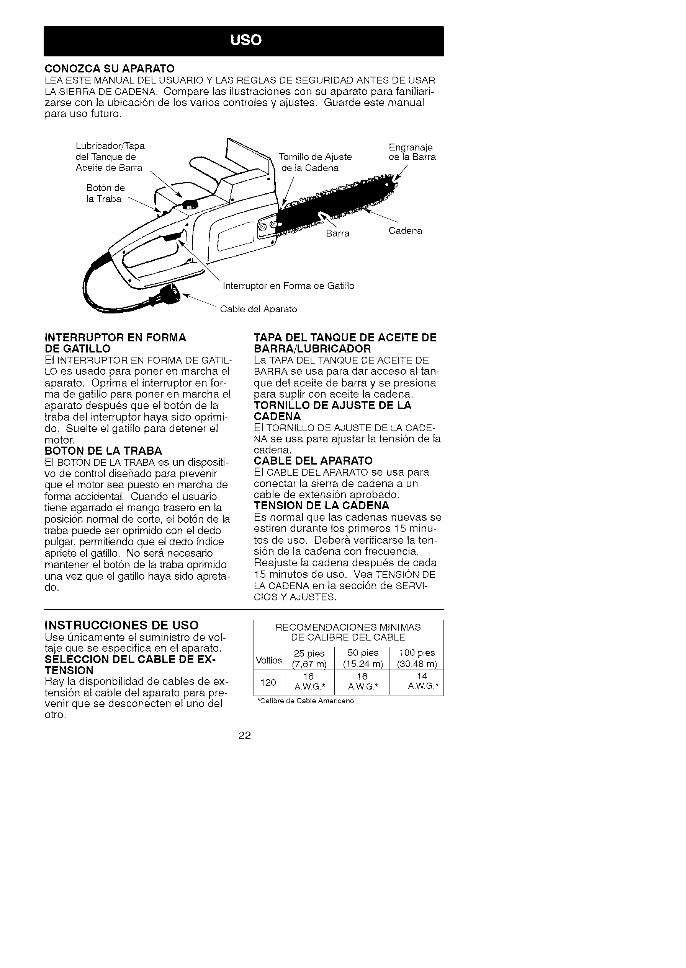
CONOZCASUAPARATOLEAESTEMANUALDELUSUARIOYLASREGLASDESEGURIDADANTESDEUSARLASIERRADECADENA.Comparelasilustracionesconsuaparatoparafaniliari-zarseconlaubicaci6ndelosvarioscontrolesyajustes.Guardeestemanualparausofuturo.
Lubricador/Tapa Engranajedel Tanque de Tornilto de Ajuste de la BarraAceite de Barra de la Cadena
Bot6n de
la Traba
Barra Cadena
Interruptor en Forma de Gatillo
_ Cable del Aparato
INTERRUPTOR EN FORMADE GATILLOEl INTERRUPTOR EN FORMA DE GATIL-LO es usado para poner en marcha elaparato. Oprima el interruptor en for-ma de gatillo para poner en marcha elaparato despu6s que el bot6n de latraba del interruptor haya sido oprimi-do. Suelte el gatillo para detener elmotor.BOTON DE LA TRABAEl BOTON DE LA TRABA es un dispositi-vo de control diseSado para prevenirque el motor sea puesto en marcha deforma accidental. Cuando el usuariotiene agarrado el mango trasero en laposici6n normal de corte, el bot6n de latraba puede set oprimido con el dedopulgar, permitiendo que el dedo indiceapriete el gatillo. No ser& necesariomantener el bot6n de la traba oprimidouna vez que el gatillo haya sido apreta-do.
TAPA DEL TANQUE DE ACEITE DEBARRA/LUBRICADORLa TAPA DEL TANQUE DE ACEITE DEBARRA se usa para dar acceso al tan-que del aceite de barra y se presionapara suplir con aceite la cadena.TORNILLO DE AJUSTE DE LACADENAEl TORNILLO DE AJUSTE DE LA CADE-NA se usa para ajustar la tensi6n de lacadena.CABLE DEL APARATOEl CABLE DELAPARATO se usa paraconectar la sierra de cadena a uncable de extensi6n aprobado.TENSION DE LA CADENAEs normal que las cadenas nuevas seestiren durante los primeros 15 minu-tos de uso. Deber& verificarse la ten-si6n de la cadena con frecuencia.Reajuste la cadena despu6s de cada15 minutos de uso. Vea TENSION DELA CADENA en la secci6n de SERVi-CiOS Y AJUSTES.
INSTRUCClONES DE USOUse _nicamente el suministro de vol-taje que se especifica en el aparato.SELECCION DEL CABLE DE EX-TENSIONHay la disponbilidad de cables de ex-tensi6n al cable del aparato para pre-venir que se desconecten el uno delotro.
RECOMENDACIONES MINIMASDE CALIBRE DEL CABLE
25 pies 50 pies 100 piesVoltios (7,67 m) (15,24 m) (30,48 m)
16 16 14120 A W.G.* A.W.G* A.W.G.*
• Calibre de Cable Amedcano
22

ATEELCABLEDEEXTENSIONALAPARATOAsegurelacabledeextensi6nescon-ectadosalcabledelaparatoel6ctricosegl3nIoilustracionparaprevenirladesconexi6ndeaparato.
ANTES DE PONER EL MOTOREN MARCHA
,_ADVERTENCIA: Lea toda la in-
formaci6n sobre la seguridad el6trica enla secci6n de REGLAS DE SEGURIDADde este manual antes de comenzar. Sino comprende la informaci6n o Ilameal tel6fono de ayuda al consumidor al1-800-235-5878.ACEtTE PARA BARRA Y PARA LACADENALa barra y la cadena requieren lubrica-ci6n. El lubricado manual de la cadenaprovee lubricaci6n continua a la cade-nay a la barra guia. No se olvide deIlenar el tanque de aceite para barraantes de cada usa. El lubricador/tapadel tanque de aceite de barra deber&ser utilizado con regularidad parasiempre mantener una capa fina deaceite en la barra y en la cadena mien-tras la sierra est6 cortando. Es recom-endable c Je el lubricador/ta )a del tan-
que de aceite de barra sea oprimidocada diez (10) segundos y oprimidopor aproximademente tres (3) segun-dos cada vez que se presione. Paraobtener la m_.xima prolongaci6n devida de la barra y la cadena, recomen-damos que use el aceite para barrasde sierra de cadena de la marcaCraftsman. Si el aceite Craftsman noester disponible, puee usarse un aceiteSAE 30 de buena calidad hasta quepueda conseguir el aceite Craftsman.La cantidad de lubricaci6n es medidamanualmente durante el funciona-miento de la sierra. Use un embudopara Ilenar el tanque de aceite. Re-ponga la tapa del tanque de aceite fir-menmente. Verifique el nivel de aceitedespu6s de cada 15 minutos de uso.PARA DETENER EL MOTOR• Suelte el interruptor en forma de ga-
tillo.• Si el motor no se detiene, desco-
necte el cable de extensi6n. No use
el aparato hasta que sea reparadopar un Centro de Servicio Sears.
PARA PONER EL MOTOREN MARCHA1. Conecte la sierra en un tomacor-
riente usando el cable de exten-si6n apropiado (vea SELEOCIONDEL CABLE DE EXTENSION).
2. Presione el bot6n de la traba delinterruptor.
3. Optima y sostenga el interruptor en
SUGERENCIAS PARA EL USOCORRECTO DEL APARATO• Verifique la tensi6n de la cadena
antes del primer usa y despu6s de 1minuto de funcionamiento. Yea Ten-si6n de la Cadena en la secci6n deMANTENIMIENTO.
• Corte madera Onicamente. No cartemetal, pl&stico, ladrillos, cemento, uotros materiales de construcci6n queno sean de madera, etc.
• Detenga la sierra si la cadena tocacualquier objeto ajeno. Inspeccionela sierra y repare las piezas segOn lanecesidad.
• Mantenga la cadena fuera de la su-ciedad, tierra y arena. La menorcantidad de suciedad desafilar_t lascadenas r&pidamente e incremen-tar& la posibiliadad de reculadas.
• Corte varios troncos pecqueSos comopr&ctica, usando la siguiente tecnica,
para "acostumbrarse" al manejo de lasierra, antes de empezar un proyectode grandes dimensiones.
Acelere el motor al maxima antesde empezar a cortar apretando elgatillo acelerador a fondo.Empiece el corte con el bastidor dela sierra apoyada contra el tronco.Mantenga el motor con el acelera-dot a fondo constantemente mien-tras corta.Suelte el interrupter en forma de ga-tillo inmediatamente al terminar decortar, permitiendo que el motor sedetenga.Mantenga el cable alejado de lazona de carte. Coloque el cable demanera que no se enrede con lasramas o cosas similares durante elcorte.
23

• Paranoperderelcontrolcuandosehayacompletadoelcarte,nolepongaprestonalasierraalfinaldelcorte.
• Detengaelmotorantesdeapoyarlasierraalfinalizaruncorte.
TECNICASPARA TUMBAR AR-BOLES
_ADVERTENCIA: Yea que nohaya ramas rotas o muertas quepodrian caerle encima mientras corta,causando heridas graves. No cortecerca de edificios y cables el6ctricos sino sabe la direcci6n de caida del&rbol, no corte durante la noche yaque no podr& vet bien, ni durante realtiempo como Iluvia, nieve, o vientosfuertes, etc. Si el &rbol hace contactocon alg0n cable de linea de servicop0blico, la compaSa de servicio p0bli-co deber& ser notificada de inmediato.• Planifique la operaci6n de corte cui-
dadosamente por adelantado.• Desloeje el &tea de trabajo. Usted
preclsa un &rea despejada en todoel contorno del &rbol donde puedapisar con firmeza en todo momento.
• El usuario de la sierra de cadenadeber& permanecer del lado cuestaarriba del terreno ya que es probableque el &rbol rodillo o se deslice cues-ta abajo despu6s de caer.
• Estudie las condiciones naturalesque puedan causar que el &rbol cai-ga en una direcci6n determinada.Entre tales condiciones figuran:• La direcci6n y velocidad del vien-
to.• El &ngulo de inclinaci6n del &rbol.
El &ngulo de los &rboles a vecesno se nota debido al declive delterreno o a terreno desparejo. Useplana o cordel de sonda para de-terminar la direcci6n de la inclina-ci6n del &rbol.
• El &rboles m&s pesado o tienem&s ramas de un lado.
• Arboles y obstaculos en derredor.• Verifique si hay porciones descom-
puestas o podridas. Si el tronco est&podrido, puede partirse y caer sobre elusuario.
• Aseg0rese de que haya suficienteespacio para la caida del &rbol.Mantenga una distancia equivalentea dos veces y medio el largo del&rbol que est& cortando entre el&rbol y la persona mAs cercana uotros objetos. El ruido del motor
puede impedir que se escuchen lasadvertencias gritadas.
• Retire la tierra, las piedras, la cortezasuelta, los clavos, las grapas y elalambre que pueda haber en el &rbolen el lugar del corte.
Planifique una ruta,_.. predeterminada y
"_-'oo_,_... despejada de retroceso
45° Direeclon de la_4 Caida
PARA CORTAR ARBOLESGRANDES(con di&metro de 15 cm (6 pulgadas) om_ts)Se usa el m6todo de carte de muescapara los &rboles grandes. La muescaes un corte en el lade del &rbol haciael cual se desea que caiga. Despu6sde hacer el corte de caida del lado op-uesto, el &rbol tendr& la tendencia decaer hacia el lado en que se ha hechoel corte de muesca.AVISO: Si el &rbol tiene raicesgrandes de apoyo, retirelas antes dehacer la muesca. Si us6 la sierra paraquitar raices grandes de apoyo, preve-nit la cadena de entrar en contactocon la tierra esto le previene de perderel filo.CORTE DE MUESCA Y TUMBADODEL ARBOL• Haga el corte de muesca cortando
primero la parte superior de la roues-ca. Haga que el corte atraviese untercio del di&metro del tronco. Luegocomplete el corte de muesca cortan-do la parte de abajo de la muesca.Vea la ilustraci6n. Una vez comple-tado el corte de muesca, retire lacuSa de madera del &rbol.
Corte final aquiPrimer Corte I 2.I _ /\t+,, *1/
Muesoa --...._X_X;: _._._
Segundo--'_f , ;_
• Despues de retirada la cuSa de mad-era del muesca, del lado opuesto alcorte de muesca haga el carte detumbado. El corte de tumbado debequedar a 5 cm (2 pulgadas) m&s arri-
24

baquelabasede1cortedemuesca.Esteprocedimientodejar&suficientemaderasincortarentreelcortedetumbadoylamuescaparaformarunabisagra.Estabisagraayudar&aevitarqueel&rbolciagaenladirec-ci6nequivocada.
La bisagra sostiene el _rbol en eltocon y ayuda a controlar la caida,
Abertura delcorte de caida
Cerradurade muesca
AVISO: Antes de completar eltumbado, use cuf_as para abrir elcorte, si sea necesario, para controlarla direcci6n de la caida. Use cuSas demadera o de pl_.stico, pero nunca deacero o de hierro, para evitar que lasierra recule y para evitar daf_os a lacadena.• Est6 alerta a los indicios de que el
&rbol est& por caer: los crujidos, elensanchamiento del corte de caida olos movimientos de las ramas superi-ores.
• En el instante en que el &rbol comien-za a caer, detenga la sierra ap6yelaen el sued y retroceda r&pidamentepor la trayectoria de retroceso previs-ta.
• NO corte los &rboles parcialmentecaidos con la sierra.Tome extremaprecauci6n con los &rboles parcial-mente caidos que cuentan con unapoyo precario. Cuando el &rbol nocae totalmente, ponga la sierra delado y use un montacargas a cable,un aparejo de poleas o un tractor parabajarlo.
CORTE DE ARBOL TUMBADO(SECCIONAMIENTO)El termino seccionamiento significacortar un &rbol tumbado en seccionesdel largo deseado.
_ADVERTENCIA: No se paresobre el tronco que est& siendo corta-do. Cualquier parte del tronco puederodar haciendo que el usuario pierdael equilibrio y el control. No se posi-clone cuesta abajo del tronco que est&siendo cortado.PUNTOS IMPORTANTES• Corte Onicamente un tronco a la vez.• Corte con sumo cuidado la madera
astillada. La sierra puede arrojar peda-
zos punteagudos y filosos hacia elusuario.
• Use un caballete para cortar troncospeque_os. Nunca permita que otrapersona sostenga el tronco mientrasusted corta, ni sostenga el troncocon la pierna o el pie.
• No corte en lugares donde hayatroncos, amas y raices entrelazadas.Arrastre los troncos hasta un lugardespejado antes de corarlos, empe-zando por los troncos expuenstos yla retirados.
TECNICAS PARA ELSECCIONAMIENTO
'_ADVERTENCIA: Si la sierra que-
da apretada o atascada dentro del tron-co, no intente sacarla a la fuerza. Puedeperder el control de la sierra, causandoheridas o daf_os al aparato. Pare la sier-ra, martille una curia de pl&stico o demadera en el corte hasta que la sierrasalga f&cilmente. Ponga la sierra denuevo en marcha y col6quela cuidado-samente de nuevo en el corte. Para evi-tar que la sierra recule y para evitardaSos a la cadena, no use cuSas demetal. No intente poner en marcha lasierra de nuevo cuando est& apretada oatascada en un tronco.
Use una cufm para sacar la sierraatascada,
Apague la sierra y use una cuba depl_tstico o de madera para abfir el tajo.
Corte Descendiente empieza desdeel lade superior del tronco con la partede abajo de la sierra apoyada contrael tronco; haga una leve presi6n haciaabajo.Corte descendiente Corte ascendente
Corte Ascendente empieza desde ellado inferior del tronco con la parte dearriba de la sierra apoyada contra eltronco; haga una leve fuerza hacia arri-ba. Sujete la sierra flrmemente paramantener el control. La sierra tendr& latendencia de empujar al usuario haciaatr&s.
25

_ADVERTENClA:Nuncainviertalasierraparahacercortesascen-dentes.Nosepodr&controlarlasierradeestaforma.Hagasiempreelprimercortede]ladedeltrancequeest&bajocompresi6n.Elladedecompresi6nde]troncoesdondelapresiondelpesodeltroncoseconcentra.Primercortedelladedeltroncobajocompresion
Segunde eerte
j Segundo corte
Pri_
bajo eompresidn
SECCIONAMIENTO SIN APOYO• Haga el carte descentiente atrave-
sando un tercio del di&metro deltronco.
• Haga rodar el tronco y termine conotro corte descendiente.
• Tenga cuidado con los troncos pres-ionados de un lade para evitar que lasierra atascada. Vea la ilustraci6nanterior para cortar troncos presiona-dos de un lade.
SECCIONAMIENTO USANDOTRONCO O CABALLETE DE APOYO• Recuerde que el primer corte
siempre es del lade presionado deltronco. (Vea en la ilustraci6n que si-gue el primero y segundo carte.)
• El primer corte deber& extenderse1/3 del di&metro del tronco.
• Termine con el segundo corte.
Usando un tronco como apoyo Segundo,_ Corte
_¢/ Primer Corte
Se__
Usando un caballete come apoyo
, °
L erOo e
/--
LSegundo
Corte
Primer Corte
PARA CORTAR RAMAS Y PODAR
_&ADVERTENCIA: Est6 alerta ytenga cuidado con los reculada.Cuando cortar ramas y podar, nuncapermita que la cadena en movimientotoque ningOn objeto en la punta de labarra guia. Permitir tal contacto puedecausar graves heridas.
_ADVERTENCIA: Nunca se suba
a los &rboles para cortar ramas ni parapodar. No se pare sabre escaleras,plataformas, troncos ni en ninguna po-sici6n que pueda causarle la p6rdidadel equilibrio o del control de la sierra.PUNTOS IMPORTANTES• Tenga cuidado con las ramas delga-
das bajo presi6n. El materaial depoco di&metro buede enredarse enla cadena, dando un latigazo alusuario o hacienda que pierda elequilibria. Use extreme cuidado alcortar ramas peque_as.
• Est6 alerta contra los rebotes de ra-mas dobladas o bajo presi6n. Eviteser golpeado par la rama o la sierracuando se suelte la tensi6n en lasfibras de la madera.
• Despeje frecuentemente las ramasacumuladas para no le hagan trope-zar.
PARA CORTAR RAMAS• Corte las ramas del &rbol [_nica-
mente despu6s de que se Io hayatumbado.
• Deje las ramas m&s gruesas debajodel &rbol tumbado para que apoyenel &rbol mientras usted trabaja.
• Empiece per la base del &rbol turn-bade y vaya trabajanco hacia eltope, cortando las ramas. Corte lasramas peque_as con uno corte.
• Mantenga el tronco del &rbol entreusted y la cadena.
26

• Retirelasramasm&sgrandescon]atecnicadeuntercioydosterciosdescritaenlasecci6ndeSECOIONA-MIENT©SINAPOYO.
• Usesiempreuncartedescentienteparacortarramaspequeflasyramasquecuelganlibremente.Loscortesascendientespodrianhacerquelasramascaiganyapretenlasierra.
PRUNING &rbol.
_,ADVERTENClA: Pode 0nica- 1mente las ramas que se encuentren a]a altura del hombro o m&s abajo. Nocarte ]as ramas que se encuentren /
m&s arriba de sus hombros. Busqueuna persona profesional para queefectue este tipo de trabajo.• Haga el primer carte en forma as-
cendiente atravesando 1/3 de]dib,metro de la rama. Este carte bar&
que el rama cede y caiga f&cilmenteen el segundo corte.
• Siguiente haga que el segundo carteun corte descendiente atravesandocompletamente la rama.
• Finalice la maniobra de podar dandoun cote de manera que el toc6n dela rama sobresalga de 3 a 5 cm (1 a2 pulgadas) desde el tronco del
/"_/ _._/3 del di_tmetro
/'_ Tercer oorte de1 a 2puigadas del tronco delt &rbol
RESPONSABILIDADES DEL USUARIO
_, ADVERTENCIA: Desconecte del recurso de energia antes de dar man-tenimiento a este aparato.
Anote ]as fechas al completar el Antes de Despu_,s Cada 15 Fechas deservicio de rutina Usar de Usar minutos Servicio
Verifique que no haya piezasda6adas/gastadas _"
Verifique que no haya fija- _,,dores/piezas sueltas
Verifique la tensi6n de la cadena _,,
Verifique e] filo de la cadena _"
Inspeccione la barra guia _"
Verifique e] nivel dei aceite
para barra y cadena
Inspeccione y limpie e] aparatoy las placas
Limpie el ranura de la barra
RECOMENDACIONES GENERALES
La garantia de este aparato no cubrelos articulos que ban side sometidos al
abuso o a la negligencia pot parte del
usuario. Para poder recibir el valor to-tal de ]a garanfia, el usuario deber&
hacer el mantenimiento tal y coma seindica en este manual. Har& falta hac-
er varios ajustes peri6dicos para man-
tener el aparato adecuadamente.• Una vez al aSo, inspeccione la barra
guia y la cadena para verificar queno est6n gastadas.
VERIFIQUE QUE NO HAYA PIEZASDANADAS O GASTADASEntre en contacto con el Centre deServicio Sears para el reemplazo depiezas daSadas o desgastadas.AVlSO: Es normal que aparezca unapequefla cantidad de aceite debajo de]a sierra despu6s de que el motor sedetiene. No confunda esto con p6rdi-das de aceite en el tanque.• Interruptor en farina de Gatillo - Aseg-
0rese de que el interrputor en formade gatillo est6 funcionando correcta-mente primero oprimiendolo y ]uegososteni6ndolo. AsegOrese de que el
27
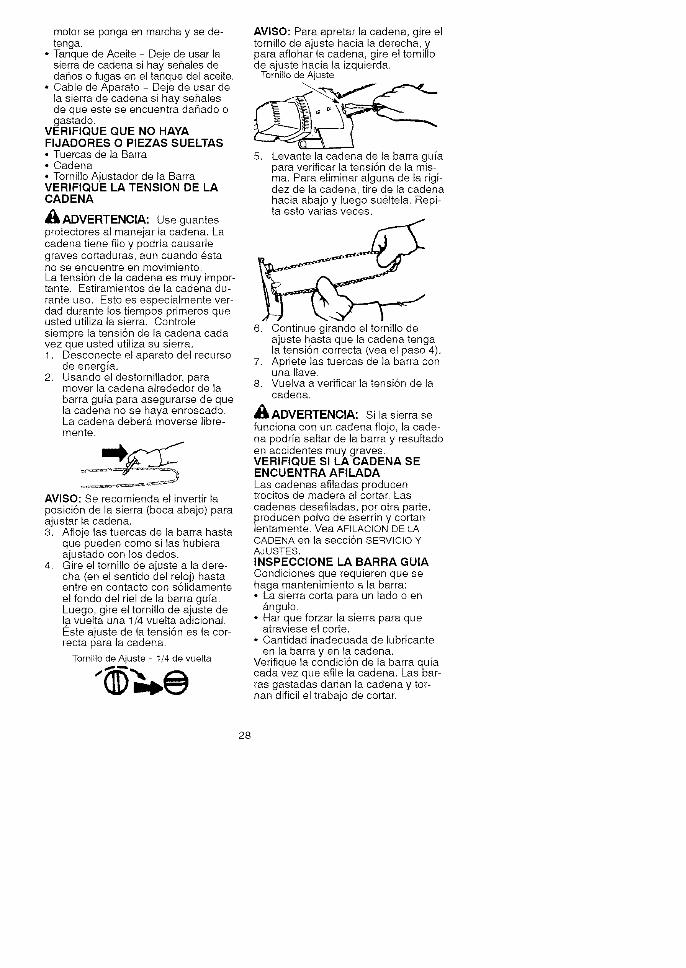
motorsepongaenmarchaysede-tenga.
• TanquedeAceite- Dejedeusarlasierradecadenasihayse_ialesdedaSosofugaseneltanquedelaceite.
• CabledeAparato- Dejedeusardelasierradecadenasihayse_alesdequeesteseencuentrada_adoogastado.
VERIFIQUE QUE NO HAYAFIJADORES O PIEZAS SUELTAS• Tuercas de la Barra• Cadena• Tornillo Ajustador de la BarraVERIFIQUE LA TENSION DE LACADENA
_ADVERTENCIA: Use guantesprotectores al manejar la cadena. Lacadena tiene filo y podria causadegraves cortaduras, aun cuando 6stano se encuentre en movimiento.La tensi6n de la cadena es muy impor-tante. Estiramientos de la cadena du-rante uso. Esto es especialmente ver-dad durante los tiempos primeros queusted utiliza la sierra. Controlesiempre la tensi6n de la cadena cadavez que usted utiliza su sierra.1. Desconecte el aparato del recurso
de energia.2. Usando el destornillador, para
mover la cadena alrededor de labarra guia para asegurarse de quela cadena no se haya enroscado.La cadena deber& moverse libre-mente.
AVISO: Se recomienda el invertir laposici6n de la sierra (boca abajo) paraajustar la cadena.3. Afloje las tuercas de la barra hasta
que pueden como si las hubieraajustado con los dedos.
4. Gire el tornillo de ajuste a la dere-cha (en el sentido del reloj) hastaentre en contacto con s61idamenteel fondo del riel de la barra guia.Luego, gire el tornillo de ajuste dela vuelta una 1/4 vuelta adicional.Este ajuste de la tensi6n es la cor-recta para la cadena.
Tornillo de Ajuste - 1/4 de vuelta
AVlSO: Para apretar la cadena, gire eltornillo de ajuste hacia la derecha, ypara aflohar la cadena, gire el tornillode ajuste hacia la izquierda.
Tornillo de Ajuste
5. Levante la cadena de la barra guiapara verificar la tensidn de la mis-ma. Para eliminar alguna de la rigi-dez de la cadena, tire de la cadenahacia abajo y luego su_ltela. Nepi-ta esto varias veces.
6. Continue girando el tornillo deajuste hasta que la cadena tengala tensi6n correcta (vea el paso 4).
7. Apriete las tuercas de la barra conuna Ilave.
8. Vuelva a verificar la tensi6n de lacadena.
_bADVERTENCIA: Si la sierra se
funciona con un cadena flojo, la cade-na podria saltar de la barra y resultadoen accidentes muy graves.VERIFIQUE Sl LA CADENA SEENCUENTRA AFILADALas cadenas afiladas producentrocitos de madera al cortar. Lascadenas desafiladas, por otra parte,producen polvo de aserrin y cortanlentamente. Yea AFILACION DE LACADENA en la secci6n SERVlCIO YAJUSTES.INSPECCIONE LA BARRA GUIACondiciones que requieren que sehaga mantenimiento a la barra:• La sierra corta para un lado o en
&ngulo.• Har que forzar la sierra para que
atraviese el corte.• Cantidad inadecuada de lubricante
en la barra yen la cadena.Verifique la condici6n de la barra quiacada vez que afile la cadena. Las bar-ras gastadas dat_an la cadena y tot-nan dificil el trabajo de cortar.
28

Despu6sdeusar,desconecteelapa-ratedelrecursodeenergia.Luego,limpietodoelaserrinycualquierotroescombrodelaranuradelabarraydelorificiodelengranaje.Paramantenerlabarraguia:• Desconectelasierradecadenadel
recursodeenergia.• Aflojeyretirelastuercasdelabarra.
Retirelabarra,laplacadelaabrazad-eraylacadenadelaparato.
• Limpielosodficiosdelaceiteyelra-nuradelabarradespuesdecada5horasdelaoperaci6n.RetireelAserrindela _t
Ranura de I_a_
_._-°-----_Orificios del aceite ._
• LOS rieles de la barra desarrollanprotuberancias al gastarse. Remu6u-na lima plana.
• Si la superficie superior del riel est&desnivelada, use una lima planapara restaurar la forma cuadrada.
]_Lr_ _ Encuadre los _ _L[]Bordes del Riels
con una Lima
Ranura Ranuracorrecta gastada
Cambie la barra guia si la ranura est&la barra est& torcida o astil-
lada, o si hay calentamiento excesivoo formaci6n de protuberancias en losdeles. Si es necesario cambiar la bar-ra, use exclusivamente la barra guiaespecificada para su sierra en la listade repuestos, especificada tambi6n enla calcomania de repuesto de barra ycadena que se encuentran en la sier-ra.LUBRICACION
Tapa del Tanque deAceite de la Barra
• Verifique el nivel del aceite para bar-ra y la cadena antes de usar y cada15 minutes mientras que usa la sier-ra. Vea ACEITE PARA BARRA Y LA CA-DENA en la secci6n USO.
INSPECCIONE Y LIMPIE EL APARA-TO Y LAS PLACAS• Despues de que cada use, inspec-
cione la aparato completa para sa-ber si hay piezas flojas o da_adas.Limpie el aparato y las placas usan-do un trapo hOmedo con detergentesuave.
• Seque el aparato con un trapo limpio, seco.
AFILACION DE LA CADENAEl afilar de la cadena requiere herra-mientas especiales. Estas herramien-tas se pueden comprar en Sears ousted puede Ilevar la cadena a un es-pecialista en afilaci6n.
,_ADVERTENClA: Evite poner enmarcha el motor de forma accidental.Siempre desconecte la sierra del re-curso de energia cuando vaya a insta-lar la barra y/o la cadena.REEMPLAZO DE LA CADENA
_._VERTENClA: Use guantes
protectores para tocar la cadena. Lacadena tiene filo y puede cortar a0nno estando en movimiento.Es normal que las cadenas nuevas seestiren durante los primeros 30 minu-tos de uso. Ser& por Io tanto necesario
verificar la tensi6n de la cadena fre-cuentemente y ajustar la tensi6nseg0n sea necesario. Vea TENSION DELA CADENA en la secci6n de MANTEN-IMIENTO.Cambie la cadena usada cuando est6gastada o da_ada. Use exclusiva-mente la cadena de repuesto Minimi-zadora de Reculadas que se especifi-ca en la lista de repuestos parareparaciones, la cadena y barra de re-puesto correctas tambien se especifi-can en una etiqueta ubicada en la sier-ra de cadena. El cadena debeconformar con requisitos de funciona-miento de reculada de ANSI B175.1cuando est& probado con esta sier-ra.Entre en contacto con el Centre deServicio de Sears para cambiar y afilarlas cuchillas individuales de la cadena.
29
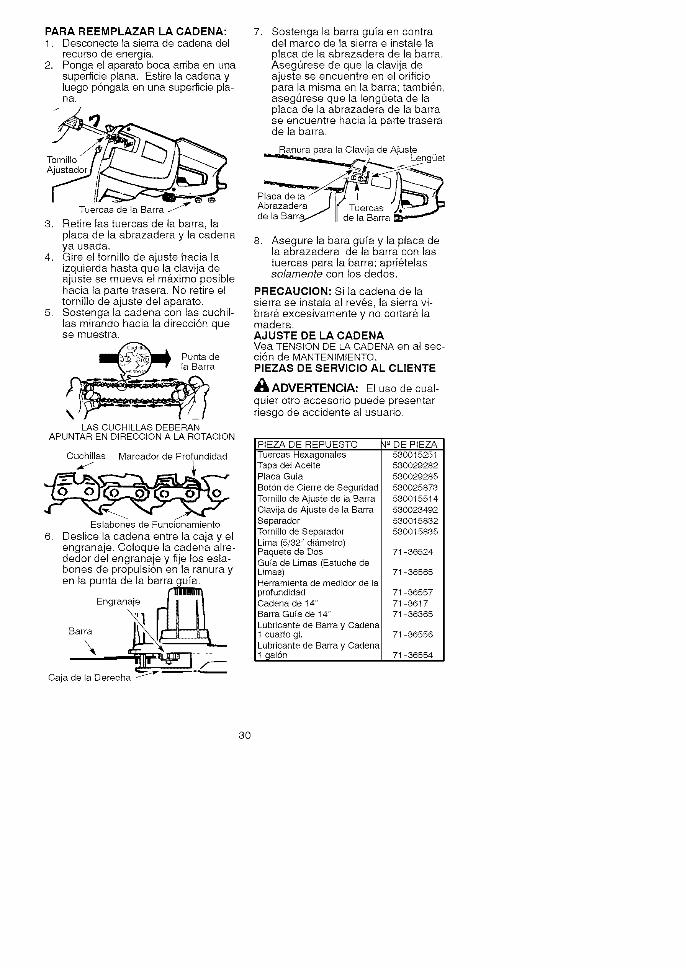
PARAREEMPLAZARLACADENA:1. Desconectelasierradecadenadel
recursodeenergia.2. Pongaelaparatobocaarribaenuna
superficieplan&Estirelacadenayluegop6ngalaenunasuperficiepla-ha.
3. Retire lae tuercae de la barra, laplaca de la abrazadera y la cadenaya ueada.
4. Gire el tornillo de ajuste hacia laizquierda hasta que la clavija deajuste se mueva el m&ximo posiblehacia la parte trasera. No retire eltornillo de ajuste del aparato.
5. Sostenga la cadena con las cuchil-las mirando hacia la direcci6n quese muestra.
PaUE_ta_tde
LAS CUCHILLAS DEBERANAPUNTAR EN DIREOOIQNA LA ROTACION
Cuchillas Marcador de Profundidad
Eslabones de Funcionamiento
6. Deslice la cadena entre la caja y elengranaje. Coloque la cadena alre-dedor del engranaie y fije los esla-bones de propulsion en la ranura yen la punta de la barra guia.
Engranaje _
Bar '_!
©aja de la Derecha _
7. Sostenga la barra guia en contradel marco de la sierra e instale laplaca de la abrazadera de la barra.AsegOrese de que la clavija deajuste se encuentre en el orificiopara la misma en la barra; tambi6n,asegOrese que la lengOeta de laplaca de la abrazadera de la barrase encuentre hacia la parte traserade la barra.
Ranura para la Clavija de Ajuste
Plata de la ! _1 I I _/IAbrazadera J I(f Tuercas _"._"_de la Barr_ ''f II deTa't3arra _ _'"'_
8. Asegure la bara guia y la placa dela abrazadera de la barra con lastuercas para la barra; apri6telassolamente con los dedos.
PRECAUClON: Si la cadena de lasierra se instala al rev6s, la sierra vi-brat& excesivamente y no cortar_t lamadera.AJUSTE DE LA CADENAYea TENSION DE LA CADENA en al sec-ci6n de MANTENIMIENTO.PIEZAS DE SERVlClO AL CLIENTE
_ADVERTENOIA: El uso de cual-
quiet otro accesorio puede presentarriesgo de accidente al usuario.
PiEZA DE REPUESTOTueroas mexagonalesTapa det AceitePlaca Guia
Boton de Cierre de SeguridadTornitlo de Ajuste de la Barra
Ciavija de Ajuste de ta BarraSeparadorTornillo de Separador
Lima (5/32" di&metro)Paquete de Dos
Guia de Limas (Estuche deUreas)Herramienta de medidor de la_rofundidad
Cadena de 14"Barra Guia de 14"
Lubricante de Barra y Oadena1 cuarto gLLubricante de Barra y Oadena1 gal6n
4° DE PIEZA530015251
530029282
530029285
530025873
530015514
530023492
530015832
530015835
71-36524
71-36565
71-36557
71-3617
71-36365
71-36556
71-38554
3O

_ADVERTENClA:Realicelossi-guientespasosdespu6sdecadauso:• Dejequeel motor se enfrie y fije
bien el aparato antes de guardarlo otransportarlo.
• Guarde la sierra y el cable de exten-si6n en un lugar bien ventilado.
• Guarde el aparato con todos los pro-tectores en su lugar y coloque el apa-rato de modo que las piezas con filono puedan causat heridas por acci-dente.
• Guarde el aparato en un lugar segu-ro y completamente fuera del al-cance de los niSos.
ESTACIONAL ALMACENAJEPrepare el aparato al final de la tempo-rada o si no Io va a usar par 30 d[as om_ts.Siva a guardar el aparato durante unperiodo largo:• Limpie la sierra a conciencia antes
del almacenaje.• AImacene en un lugar limpio y seco.• Aplique una pequeSa cantidad de
aceite alas superficies externasmet&licas y a la barra guia.
• Lubrique la cadena y envu_lvala enpapel grueso o en tela.
• Uso la protector de la barra para cu-brir la barra.
31

TABLA DIAGNOSTICA
_i ADVERTENCIA: Siempre apague el aparato y desconecte del recurso deenergia antes de hacer cualquiera de las reparaciones recomendadas acontinuaci6n excepto reparaciones que requieran que el aparato funcionar.
PROMBLEMA
La cadenano se mueveal oprimir elinterruptoren forma degatillo.
La cadena
golpetea ocorta despa-rejo.
Parada delcadenadentro delco_e.
Insuficien-cia deaceite paralubricar labarra y ca-dena=
La cadenacorta en_tngulo.
CAUSA
1. La cadena est&incorrectamentetensionada.
2. Los rieles de la barraest&n apretados.
3. Falla en el interruptoren forma de gatillo.
4. Cortacircuitos apagado/fusible quemado=
1= La cadena est,.incorrectamentetensionada=
2= Las cuchillas est_tnda_adas=
3. La cadena est,. gastada.4= Las cuchillas est_tn
desafiladas o malafiladas o los medidoresde profundidad est_tnmuy altos.
5= Engranaje desgastada=
1. La parte de arriba delas cuchillas no est_tnplanas.
2. La barra tiene
protuberancias o est,.torcida o los rielesest_.n desparejos.
1. El tanque de aceiteest,. vacio.
2. La salida de aceite estertapado.
3. El orificio para aceite enla barra ester tapado=
1= La cuchillas est_tnda_adas por un lado.
2= Cadena no esta afilada.
3= Barra guia esta dobladao desgastada.
SOLUCION1. Vea "Tensi6n de la Cadena"
en la secci6n Mantenimiento=
2. Repara o reemplace.
3. Entre en contacto con el
Servicio Sears (vea partetrasera del manual).
4. Reajuste el cortacircuitos oreemplace el fusible.
1. Vea "Tensi6n de la Cadena"en la secci6n Mantenimiento.
2. Entre en contacto con el
Servicio Sears (vea partetrasera del manual).
3. Afile o cambie la cadena.4. Vea "Afilaci6n de la Cadena"
en la secci6n Servicio yAjustes.
5. Entre en contacto con el
Servicio Sears (vea partetrasera del manual).
1. Yea "Afilaci6n de la Cadena"en la secci6n Servicio yAjustes.
2. Repara o reemplace labarra guia.
1. Llene el tanque de aceite=
2. Entre en contacto con elServicio Sears (vea partetrasera del manual).
3. Saque la barra y limpiela.
1. Yea "Afilaci6n de la Cadena"en la secci6n Servicio yAjustes.
2. Vea "Afilaci6n de la Cadena"en la secci6n Servicio yAjustes.
3. Reemplace la barra guia.
Si acontencen situaciones no previstas en este manual, actue con cautela yuse buen criterio. Si necesita ayuda, entre en contacto con el Centro de Servi-cio Sears o Ilame al TELEFONO DE AYUDA AL CONSUMIDOR al 1-800-235-5878.
32