2nd grade craft book proof2 - memoria press | classical ... · pdf filepersonification craft...
TRANSCRIPT

44
SUPPLY LIST
□ Acrylic paint (various colors)
□ Bottlecaps (12) □ Box (small) □ Brown paper bag □ Brown sugar or sand □ Buttons □ Cans (empty) □ Cardstock □ Cinnamon □ Circle sticker □ Clear lay film, 5” x 3.5” (overhead projector film)
□ Clothespins □ Construction paper (various colors)
□ Cotton balls □ Cotton swabs □ Craft sticks, miniature □ Crepe paper streamers (red, white, or blue)
□ Crinkle-cut (brown) □ Cupcake liner □ egg carton □ Felt (red, green, brown, white)
□ file folder □ fishing line □ flour □ foam bowl □ Foam cup, small □ fuzzy balls (orange) □ Gathered leaves, flowers, sticks, rocks
□ Glitter □ Glue (liquid & stick) □ Googly eyes
□ hole punch □ hot glue □ hot glue gun □ Iron □ kid’s sewing needle □ Led electric tealight □ Magazine clippings (something with underwater creatures like Kid’s National Geographic)
□ Markers □ needle and thread □ newspaper □ Paintbrushes □ Paper (white) □ Paper fastener □ Paper plates □ Paper towel □ Paper towel roll □ Pen □ Pencil □ Photos (from a child’s trip out of state/country, to a museum, to grandma’s house, etc.)
□ Pipe cleaners (black, orange, brown, white or silver)
□ Planting soil □ Plastic covering (i.e., bread, newspaper bag) or plastic wrap
□ Popcorn □ Popsicle sticks □ ribbon □ ribbon candy □ rubberbands □ salt □ scissors
□ Seeds (apple, pumpkin, packet)
□ shoebox □ stickers □ straws □ string □ Tape □ Tissue paper (white, red) □ Toilet paper rolls □ Twine □ Water □ Wax paper □ Wooden “boy” pieces from craft store (2)
□ Yarn (red)

5
INTRODUCTION
The creative arts are an essential part of the primary school education. By using the activities in this book, you can reinforce number and letter recognition, strengthen fine-motor skills, and foster creativity and confidence.
This book is intended to be a supplement to the second Grade curriculum. The best way to work through these craft activities is to begin with reading all directions (which are directed to the teacher) thoroughly and assembling any supplies you will need to complete the project. Please note that some activities require adult help, and several of the crafts contain small items.
While the crafts in this book have been carefully chosen to promote skill growth and coordination, the most important component is fun. Enjoy each of your creations and the time spent with your child making them!
3
CONTENTS
4 Supply List5 Introduction
6 A Visitor for Bear homemade Place Cards
7 Brother Theophane stain Glass Bible Verse
8 A House Is a House for Me Milk Carton house
9 Miss Twiggley’s Treehouse Soda Bottle Planter
10 Lyle, Lyle, Crocodile Clothespin Crocodile
11 A Picture Book of Christopher Columbus Paper Towel spy Glass
12 Katy No-Pocket felt apron
13 Wynken, Blynken, & Nod Night sky Tile
14 The Caboose That Got Loose Tissue Paper spruce Trees
15 The Owl and the Pussycat Painted rocks
16 TheLittleIsland sandpaper island
17 The Very First Thanksgiving Leaf Turkeys
18 Choo Choo Building a Train with shapes
19 The Polar Express frosted Glass Votive
20 How the Grinch Stole Christmas Clay heart ornament
21 SnowflakeBentley Beaded Snowflakes
22 The Moon Shines Down sponge Painted Moon
23 Norman the Doorman recycled sculptures
24 PickleChiffonPie Magazine silly Monsters
25 The Star-Spangled Banner Can Wind sock
26 Abe Lincoln Construction Paper Log Cabin
27 White Snow, Bright Snow Crayon resist
28 Patrick, Patron Saint of Ireland Bottlecap Shamrock Stamp
29 Doctor De Soto Puffy Paint Tooth
30 LittleToot homemade Bubbles
31 Rechenka’s Eggs Crayon resist eggs
32 The Glorious Flight Plane flight
33 Why Mosquitoes Buzz in People’s Ears Pipe Cleaner Mosquito
34 Fly High, Fly Low Cereal Bird feeder
35 Millions of Cats shapes
36 The Storm Book homemade rain Gauge
37 Mike Mulligan Personification Craft
38 A Time to Keep family scrapbook
39 Templates

66 A Visitor for Bear
A VISITOR FOR BEARHomemade Place Cards
Supplies: □ Cardstock (white, cut to 8” x 9”) □ ruler □ scissors
□ school pencil □ Crayons, markers, buttons, glitter, etc., for decorating
Teacher Guidelines:1. Begin by using the ruler to measure a grid on the cardstock. orient the paper so that
the 9” length is along the top and the 8” length is on the sides. starting at the 8” side, measure and mark the rows two inches apart. You should have marked 4 rows. from the top, divide the 9” length into 3” sections. You should have three columns on the 9” side. Your paper will be divided into a grid; have the child use the scissors to cut the paper apart into 2” x 3” sections. These will be the individual place cards.
2. have the child decorate the place cards around the edges, leaving a space in the middle to use the pencil and write the name of your guests. To display, take the cards and thread the bottom edge back and forth through the tines of a dinner fork so that they are angled up and display your guest’s name.

7Brother Theophane
BROTHER THEOPHANEStain Glass Bible Verse
Supplies: □ Printed or handwritten Bible verse on white paper
□ Permanent markers (various colors)
□ Wax paper (cut large enough to cover verse fully)
Teacher Guidelines:1. Choose a favorite Bible verse and write it out on the white paper (big enough to trace
and see clearly through the wax paper). Cover it with a sheet of wax paper large enough to cover the verse with room to decorate the edges. Trace the Bible verse through the wax paper using a black permanent marker.
2. discuss the meaning of the verse and let the child decide how they would choose to illustrate the verse.
3. With supervision, allow the child to decorate the wax paper using the markers.4. When finished, hold the wax paper up to a sunny window for a stained-glass effect.
88 A House is a House for Me
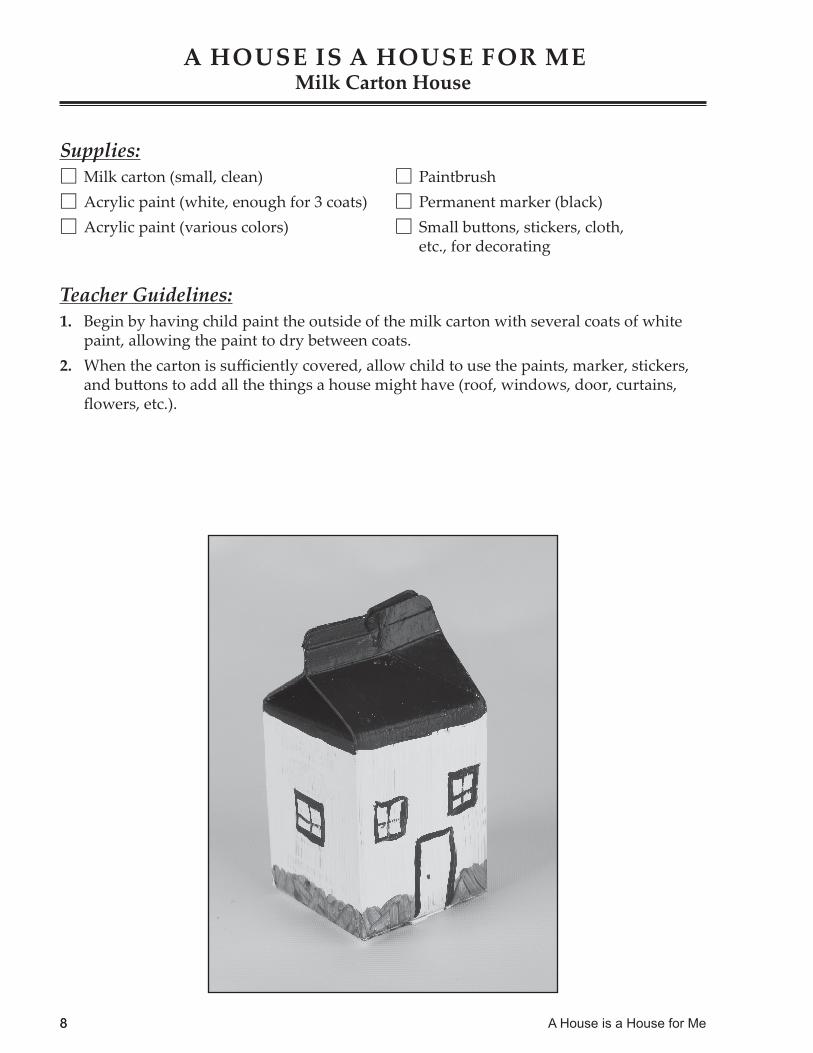
A HOUSE IS A HOUSE FOR MEMilk Carton House
Supplies: □ Milk carton (small, clean) □ acrylic paint (white, enough for 3 coats) □ acrylic paint (various colors)
□ Paintbrush □ Permanent marker (black) □ Small buttons, stickers, cloth, etc., for decorating
Teacher Guidelines:1. Begin by having child paint the outside of the milk carton with several coats of white
paint, allowing the paint to dry between coats.2. When the carton is sufficiently covered, allow child to use the paints, marker, stickers,
and buttons to add all the things a house might have (roof, windows, door, curtains, flowers, etc.).

9Miss Twiggley’s Treehouse
MISS TWIGGLEY’S TREEHOUSESodaBottlePlanter
Supplies: □ 2-liter bottle (empty, clean, with label removed)
□ scissors (for adult use only) □ acrylic paint (brown)
□ Paintbrush □ Potting soil □ Chia seeds □ Water
Teacher Guidelines:1. Using the scissors, cut the bottle six inches from the bottom. Discard the top portion of
the bottle, keeping the bottom.2. Have the child paint the outside of the bottle using the brown paint and paintbrush.
allow to dry completely.3. Fill bottle with potting soil, sprinkle seeds, and water.4. Place in sunshine. Water regularly.