30591 al-ko sensabrake lt-1000 actuator 8pp text + 6pp ... · 4 7. continue squeezing the pressure...
TRANSCRIPT
LT-1000 ACTUATOR MK VInstallation &Operating InstructionsV1.1/012010/SAB
Sensabrake™
This information MUST be distributed with the AL-KO Sensabrake™ trailer braking system and be kept with the towing vehicle for future reference.
AL-KO INTERNATIONALABN 96 003 086 813
FOR DETAILS OF YOUR NEAREST AL-KO AUTHORISED SERVICE AGENT PLEASE CONTACT OUR STATE OFFICES AS LISTED BELOW:
VICTORIAState Manager – Mr. Gerard L'Huillier
67-91 NATHAN ROAD, DANDENONG STH, VICTORIA 3175
TELEPHONE: (03) 9767 3700 FACSIMILE: (03) 9792 0877
NEW SOUTH WALESState Manager – Mr. Leo Sargent
14 TOOHEY ROAD, WETHERILL PARK, NEW SOUTH WALES 2164
TELEPHONE: (02) 8784 9400 FACSIMILE: (02) 9725 4557
QUEENSLANDState Manager – Mr. Mike Jovicic
13 UNION ROAD, YATALA, QUEENSLAND 4207 TELEPHONE: (07) 3386 6300 FACSIMILE: (07) 3386 6399
NEW ZEALANDManager – Mr. Mark Lovell
1 AIRPARK DRIVE, AIRPARK OAKS MANGERE, AUCKLAND
TELEPHONE: (09) 255 5611 FACSIMILE: (09) 255 5612
General OperationThe AL-KO Sensabrake™ has been designed to operate in all ‘normal’ environmental conditions and it has been left to the discretion of the installer as to the location of the actuator. Although the AL-KO Sensabrake™ housing is partly sealed to protect the internal components from the external environment, when exposed to corrosive environments such as salt water, fertiliser, and other caustic materials, care must be taken to protect the unit at all times. Although water-resistant, the AL-KO Sensabrake™ unit is NOT waterproof and should NEVER be submerged at any time. It is therefore suggested that the AL-KO Sensabrake™ unit be mounted towards the front of the towed vehicle and as high as practical (i.e. the bow post if used in the marine environment. Refer Fig. 1, Page 2).
WARNING:Never submerge the AL-KO Sensabrake™ actuator at any time. Submerging may cause system malfunction resulting in possible serious or fatal injuries and/or property damage. Submerging will void warranty.
WARNING:Never apply solvents or adhesives (including brake fluid) to the actuator housing as this may weaken the housing resulting in possible serious or fatal injuries and/or property damage. Brake Fluid will damage any painted surfaces.
InstallationActuator
IMPORTANT!Under no circumstances should any control system, other than approved AL-KO Sensabrake™ controllers, be used in conjunction with the AL-KO Sensabrake™ Actuator.
Mounting BracketThe AL-KO Sensabrake™ actuator incorporates four mounting holes on the base of the unit (Refer figure 3, Page 2). In order to attach the unit securely to the trailer and to minimise vibration, a sturdy mounting bracket must be fabricated.
Use a 6mm or 1/4" bolt with a suitable locking nut to fix the actuator to the trailer.
It is important to ensure the mounting bolts are not over tightened during installation.
If the rubber mounting grommet appears oval shaped (Refer figure 2, Page 2) it has become over tightened. When choosing a location for the mounting bracket, consider positioning of additional trailer accessories, such as a winch etc.
1
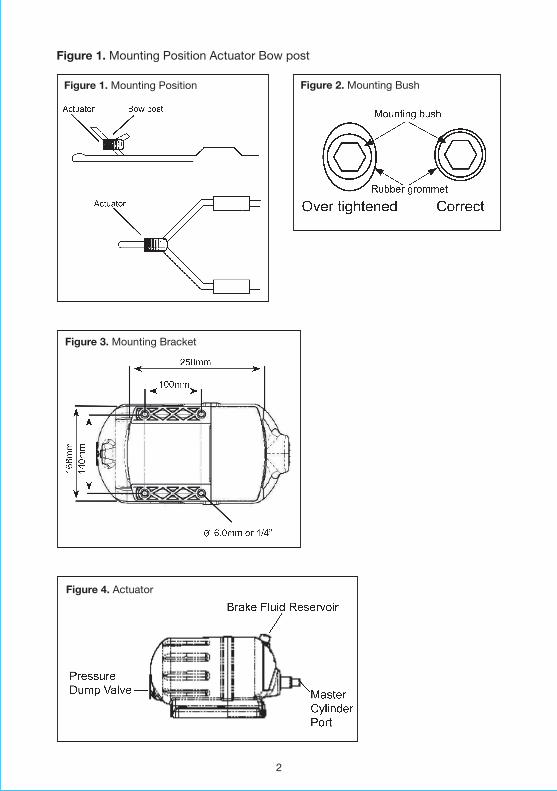
Figure 1. Mounting Position Actuator Bow post
2
Figure 1. Mounting Position Figure 2. Mounting Bush
Figure 3. Mounting Bracket
Figure 4. Actuator

HYDRAULIC CONNECTIONConnect the hydraulic brake line from the brake system on the towed vehicle to the brake port on the AL-KO Sensabrake™ actuator unit using a 3/8" UNF Brass Long Series Tube Nut.
Carefully fill the brake fluid reservoir by removing the filler cap. Always use new brake fluid. Never attempt to reuse brake fluid. The reservoir is full when the fluid reaches the bottom of the reservoir neck (the top of the sight glass). Do not over fill the reservoir. Be careful not to spill brake fluid between the reservoir and the front cover. The brake fluid level must never fall below the ‘minimum’ line indicated on the sight glass.
BleedingBleeding instructions using AL-KO Sensabrake™ Pressure Bleed Gun1. Fill reservoir with clean Dot 4 brake
fluid to just below the top of the sight glass.
2. Place the pressure bleed gun socket gently over the neck of the reservoir applying gentle pressure to locate the bleed socket O Ring in place
3. Do not push on with excessive force or damage may be caused to the reservoir or the O ring on the pressure bleed gun socket. Rub a small amount of brake fluid around the inside of the reservoir neck to assist fitting. Screw the cap fully closed.
4. Attach the bleed gun to the actuator fluid reservoir (as shown in diagram 1.) and place the other end in a bottle of new brake fluid
5. Open the bleed screw on the trailer brakes (start with the closest calliper/brake) at least one full turn. Place a clear flexible hose over the bleed screw and immerse the other end into a container partially filled with brake fluid.
6. Squeeze the pressure bleed gun repeatedly (not too fast or cavitation may occur) ensuring that the bulk brake fluid tank and the reservoir do not run out of brake fluid or air will enter the hydraulic system. At no stage let the fluid level in the reservoir fall below the minimum fluid level indicator.
3
(Diagram 2)
Bleeding
Diagram 1.Attaching the bleedgun to the actuator.

4
7. Continue squeezing the pressure bleed gun until the brake fluid in the flexible hose attached to the bleed screw is free of air bubbles and tighten the bleed screw.
8. Repeat the process for any other callipers/brakes on the same side of the trailer working away from the actuator.
9. Bleed the other side of the trailer starting with the closest calliper/brake to the actuator first as above.
10. Connect the trailer to the tow vehicle and start the vehicle to activate the actuator. Allow the compressor to fully charge the actuator (approx 120 seconds). Once the compressor has stopped, apply the brakes and hold on for a 5 second period and release. Repeat this 4 times.
11. Check the brake fluid level in the reservoir. It should not exceed the top of the sight glass maximum level. (see diagram 3).
12. Insert and tighten the fluid reservoir cap.
IMPORTANT: Before removing the pressure bleed gun from the reservoir, make sure that there is no pressure in the system (pressure bleed gun has fully returned to the rest position) or brake fluid spillage will occur causing paint damage.
WARNING:Correct bleeding of the actuator is critical as trapped air greatly reduces the efficiency of the brakes. When the bleeding process is complete, check all bleeder screws to ensure that they are secure and do not leak.
Failure to properly install, bleed, operate and maintain your AL-KO Sensabrake™ braking system can cause malfunction resulting in possible serious or fatal injuries and/or property damage.
Drum BrakesIf drum brakes are being used, a residual line pressure valve (obtain from a brake specialist) must be installed in the hydraulic line. This must be located BEFORE any split in the hydraulic line immediately after or as close as practical to the master cylinder port.
Note:Monitor the brake fluid level in the reservoir so that the actuator is not run without fluid. Running the unit without fluid will ingest air into the brake system that must be removed by bleeding.
Diagram 3.
5
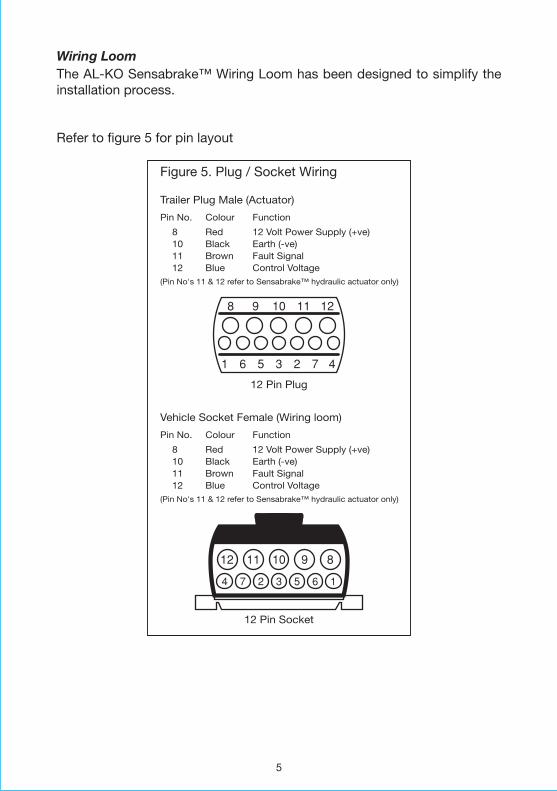
Wiring LoomThe AL-KO Sensabrake™ Wiring Loom has been designed to simplify the installation process.
Refer to figure 5 for pin layout
Figure 5. Plug / Socket Wiring
Trailer Plug Male (Actuator)
Pin No. Colour Function
8 Red 12 Volt Power Supply (+ve) 10 Black Earth (-ve) 11 Brown Fault Signal 12 Blue Control Voltage(Pin No's 11 & 12 refer to Sensabrake™ hydraulic actuator only)
Vehicle Socket Female (Wiring loom)
Pin No. Colour Function
8 Red 12 Volt Power Supply (+ve) 10 Black Earth (-ve) 11 Brown Fault Signal 12 Blue Control Voltage(Pin No's 11 & 12 refer to Sensabrake™ hydraulic actuator only)
12 Pin Plug
12 Pin Socket
11 128 9 10
1 6 5 3 2 7 4
3 5 6 1274
101112 9 8

6
Testing (Hydraulic AL-KO Sensabrake™ actuator only)After the initialisation sequence has been completed (see Sensabrake™ In Car Kit Installation & operating Instructions, page 6), test the system set-up as follows:
a. Turn on the ignition. The mouse will produce the ‘fault signal’ indicating that a sufficient pressure has not yet been achieved in the actuator. This signal will last for approximately 30 -40 seconds until a working pressure has been reached. This audible alarm can be silenced by pressing the panic button, but please note that in doing so the trailer brakes will be activated. If you choose to silence the alarm, do so only when in a stationary position. The fault signal will still be active by way of the flashing LED.
b. Once the ‘fault signal’ has stopped. Wait a further 60 seconds before undertaking brake proportionality testing. Find an appropriate stretch of road where brake testing can be undertaken without the disruption of other road users.
c. Set the gain control slider on the mouse to the middle position.
d. Driving at approximately 50km per hour apply the service brake via the pedal. Take note of the braking proportionality between the towing vehicle and the towed vehicle. If they are not similar repeat steps 1 and 2 in the ‘Initialisation Sequence’ until this is achieved.
e. When proportional braking has been established the system is ready for use.
IMPORTANT! WARNING:Please ensure trailer plug/socket is mounted in a position that does not enable water contact or pooling around terminals. The trailer plug/socket should be regularly sprayed with water dispersing agent or corrosion preventative compound.
7
Operation
WarningAlways ensure the towed vehicle and its load is secured. Failure to do so could result in possible serious damage or fatal injuries and/or property damage.
To ensure that the AL-KO Sensabrake™ system is functioning correctly, the brake actuator should be tested every time the towing vehicle is re- attached to the towed vehicle (Refer `Testing´ – page 6).
Air Pressure Dump ValveThe AL-KO Sensabrake™ reservoir incorporates an air pressure dump valve. As soon as the braking system is deactivated (i.e. ignition is turned off/trailer breaks away from the vehicle) the trailer brakes are automatically activated. In order to release the trailer brakes the air pressure dump valve must be pressed.
CAUTION: The service brake is not intended to be used as a park brake. Under no circumstances should the trailer be left detached from the vehicle with only the service brake activated. Either the wheels should be blocked or an independent park brake applied and then the actuator reservoir air dumped. Failure to do so could result in serious damage or injury.
Breakaway SystemA breakaway system is often required on a braked trailer. The breakaway system must be designed to automatically apply the brakes to the towed vehicle in the event that the trailer becomes separated from the tow vehicle.
The AL-KO Sensabrake™ does NOT require a separate power source for the activation of the breakaway system. In the event of a breakaway situation the disconnection of the power supply results in the trailer service brake being activated automatically.
In order to deactivate the brakes press the ‘air pressure dump valve’. Please check regulations in your area as to the requirements of trailer breakaway systems.
8
MAINTENANCEThe AL-KO Sensabrake™ is an intelligent trailer braking system that has on-board diagnostic software when used in conjunction with the AL-KO Sensabrake™ EVO controller. Should the system not perform as it should, the operator will be informed via a visual and audible alarm inside the tow vehicle.
This does not however mean that the system should not regularly be maintained.
It is recommended that before each use:
1. Check the brake fluid level of the AL-KO Sensabrake™ system.
2. Check all electrical leads and connectors for broken wires, damaged or corroded connectors etc. It is suggested that an appropriate corrosion preventive compound be periodically applied to all exposed wiring and connectors.
3. Brake fluid should be replaced annually or more frequently in heavy use.
WARNING:When not in use over extended periods of time, please ensure the actuator is activated periodically (approximately every four weeks) to ensure moving components remain in good operating condition and seals remain lubricated. Failure to do so may result in incorrect product performance and could result in serious damage or injury.
WARRANTY
LIMITED WARRANTY AND LIMITATIONS OF LIABILITYAll products manufactured by AL-KO International are warranted to be free from defects in material and workmanship under normal and proper use for a period of 12 months from installation.
No warranty claim will be allowed unless the material or workmanship defect is found within the warranty period, properly documented by the buyer and AL-KO International is notified within 7 days of the failure.
The warranty shall not apply to products altered or utilized in a manner not approved by AL-KO International, or subjected to abuse, misuse, improper maintenance, neglect or accident.
In the event of a warranty claim, AL-KO International will repair or replace the affected product upon the products return.
The purchaser agrees that under no circumstances will AL-KO International liability, whether based on contract, negligence, strict liability, or otherwise, exceed the buyers net purchase price, nor will AL-KO International be liable for any special, incidental, consequential, or exemplary damages.
The forgoing warranties will continue in effect for so long as the product is serviced and maintained in accordance with AL-KO International instructions and using genuine replacement parts.
For warranty or service assistance contact AL-KO International on:Australia +61 3 9767 3700New Zealand +64 (09) 255 5611Email [email protected] technical assistance please call AL-KO International or your AL-KO Sensabrake™ supplier.
AL-
KO
Int
ern
atio
nal P
ty L
tdA
BN
96
003
066
81
367
-91
Nat
han
Roa
d
Ph
one:
61
3 9
767
370
0
Dan
den
ong
So
uth
V
icto
ria
317
5
E
mai
l: i
nfo@
alko
.com
.au
Aus
tral
ia
W
eb:
w
ww
.alk
o.co
m.a
u
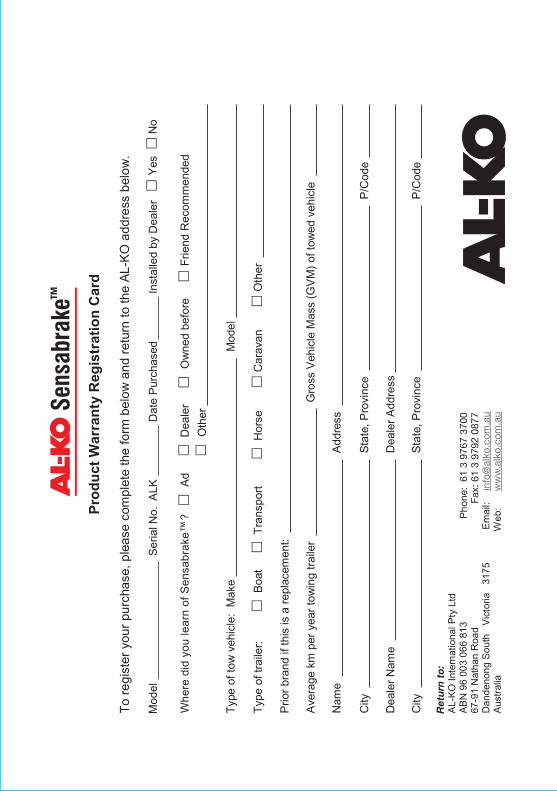
Pro
du
ct W
arra
nty
Reg
istr
atio
n C
ard
To
regi
ster
you
r pu
rcha
se,p
leas
e co
mpl
ete
the
form
bel
ow a
nd r
etur
n to
the
AL-
KO
add
ress
bel
ow.
�
Yes
�N
o
Whe
re d
id y
ou le
arn
of S
ens -
a-B
RA
KE
? �
Ad
�
Dea
ler
�
Ow
ned
befo
re
�
Frie
nd R
ecom
men
ded
�
Oth
er
Typ
e of
tow
veh
icle
: M
ake
M
odel
Typ
e of
trai
ler:
�
Boa
t �
T
rans
port
�
Hor
se
�
Car
avan
�O
ther
Prio
r br
and
if th
is is
a r
epla
cem
ent:
Ave
rage
km
per
yea
r to
win
g tr
aile
r
G
ross
Veh
icle
Mas
s (G
VM
) of
tow
ed v
ehic
le
Nam
e
A
ddre
ss
City
Sta
te, P
rovi
nce
P/C
ode
Dea
ler
Nam
e
D
eale
r A
ddre
ss
City
S
tate
, Pro
vinc
e
P
/Cod
e
Sens
abra
ke
Mod
elS
eria
lNo.
ALK
D
ate
Pur
chas
ed
Inst
alle
dby
Dea
ler
™Se
nsab
rake
info
@al
ko.c
om.a
uw
ww
.alk
o.co
m.a
u
Wh
ere
did
yo
u le
arn
of
Se
nsa
bra
ke™
? Pho
ne:
61 3
976
7 37
00Fa
x: 6
1 3
9792
087
7
Ret
urn
to: