310 cover 65e - alfahogar.com
TRANSCRIPT

Instruction book

IMPORTANT SAFETY INSTRUCTIONSThis appliance is not intended for use by persons (including children) with reduced physical, sensoryor mental capabilities, or lack of experience and knowledge, unless they have been given supervisionor instruction concerning use of the appliance by a person responsible for their safety.Children should be supervised to ensure that they do not play with the appliance.
When using an electrical appliance, basic safety precautions should always be followed, includingthe following:
This sewing machine is designed and manufactured for household use only.
Read all instructions before using this sewing machine.
DANGER— To reduce the risk of electric shock:1. An appliance should never be left unattended when plugged in. Always unplug this sewing
machine from the electric outlet immediately after using and before cleaning.2. Always unplug before replacing a sewing machine bulb. Replace bulb with same type rated 15
Watts.
WARNING— To reduce the risk of burns, fire, electric shock, or injury to persons:1. Do not allow to be used as a toy. Close attention is necessary when this sewing machine is
used by or near children.2. Use this appliance only for its intended use as described in this owner’s manual.
Use only attachments recommended by the manufacturer as contained in this owner’smanual.
3. Never operate this sewing machine if it has a damaged cord or plug, if it is not workingproperly, if it has been dropped or damaged, or dropped into water.Return this sewing machine to the nearest authorized dealer or service center for examination, repair, electrical or mechanical adjustment.
4. Never operate the appliance with any air opening blocked. Keep ventilation openings of thissewing machine and foot controller free from accumulation of lint, dust and loose cloth.
5. Never drop or insert any object into any opening.6. Do not use outdoors.7. Do not operate where aerosol (spray) products are being used or where oxygen is being
administered.8. To disconnect, turn all controls to the off (“O”) position, then remove plug from outlet.9. Do not unplug by pulling on cord. To unplug, grasp the plug, not the cord.
10. Keep fingers away from all moving parts. Special care is required around the sewing machineneedle.
11. Always use the proper needle plate. The wrong plate can cause the needle to break.12. Do not use bent needles.13. Do not pull or push fabric while stitching. It may deflect the needle causing it to break.14. Switch this sewing machine off (“O”) when making any adjustment in the needle area, such as
threading the needle, changing the needle, threading the bobbin or changing the presser foot,and the like.
15. Always unplug this sewing machine from the electrical outlet when removing covers,lubricating, or when making any other adjustments mentioned in this owner’s manual.
SAVE THESE INSTRUCTIONS
Please note that on disposal, this product must be safely recycled in accordance with relevant Nationallegislation relating to electrical/electronic products. If in doubt please contact your retailer for guidance.(European Union only)

1
TABLE OF CONTENTS
SECTION 1. NAMES OF PARTSNames of Parts ........................................... 2Extension Table ........................................... 3Standard Accessories ................................. 3Carrying Handle .......................................... 3
SECTION 2. GETTING READY TO SEWConnecting Machine to Power Supply ........4Before Using Your Sewing Machine ............4For Your Safety ............................................4Controlling Sewing Speed ...........................4Setting Spool Pins .......................................5Presser Foot Lifter .......................................5Changing Presser Foot ...............................5Changing Needles.......................................6To Check the Needle ................................... 6Thread and Needle Chart ...........................6Bobbin Winding ....................................... 7-8Threading the Machine ......................... 9-10Balancing Needle Thread Tension.............11Stitch Pattern Selector ..............................12Stitch Chart Panel .....................................12Stitch Length Dial ......................................12Adjusting Stretch Stitch .............................13Stitch Width Dial (3 dial model only)Reverse Stitch Button................................13Darning Plate ............................................13
SECTION 3. BASIC SEWINGStraight Stitch ............................................14To Change Sewing Direction .....................14Variable Needle Position (3 dial model only) .........................................................15Seam Guide Lines.....................................15Turning a Square Corner ...........................15Basic Zigzag..............................................16Tricot Stitch................................................16Straight Stretch Stitch ...............................17Zigzag Stretch Stitch .................................17Knit Stitch ..................................................18Button Sewing ...........................................18Buttonhole .................................................19Corded Buttonhole ....................................20Zipper Application .....................................21Pin Tucking ................................................22Free Hand Mending and Embroidery ........23Blind Hem Stitch........................................24
SECTION 4. DECORATIVE STITCHESShell Tuck ..................................................25Smocking ..................................................26Applique ....................................................27Box Stitch (3 dial model only) ....................27Decorative Stitch Patterns .........................28Stretch Stitch Patterns ..............................28
SECTION 5. CARE OF YOUR MACHINECleaning the Bobbin Case and the Shuttle Race ........................................................ 29Cleaning the Feed Dog .............................29Sewing Light ..............................................30Troubleshooting .........................................31

2
@7
Names of Parts
q Stitch pattern selector dial
w Stitch length dial
e Stitch width dial (3 dial model only)
r Reverse stitch control
t Bobbin winder stopper
y Bobbin winder spindle
u Spool pins
i Stitch chart panel
o Bobbin winding tension disc
!0 Thread guide
!1 Thread take-up lever
!2 Thread tension dial
!3 Face cover
!4 Needle plate
!5 Extension table (Accessory box)
!6 Carrying handle
!7 Handwheel
!8 Power switch
!9 Machine socket
@0 Free-arm
@1 Presser foot lifter
@2 Needle
@3 Needle clamp screw
@4 Presser foot holder
@5 Setscrew
@6 Presser foot
@7 Foot control
SECTION 1. NAMES OF PARTS
qw
e
r
t
yu
oi
!0
!1
!3
!2
!4
!5!6
!7
!8
!9
@00
@1
@2
@3
@6
@4
@5

3
Extension Table• Detaching the table
Pull the table away from the machine, asillustrated, for “free-arm” sewing of cuffsand sleeves. The extension table can beused as accessory box.
• Attaching the tablePush the extension table until it snaps intothe machine.
q w
e r
t y
Standard Accessories
q Bobbins
w Needle set
e Zipper foot
r Blind hem stitch foot
t Sliding buttonhole foot
y Buttonhole opener / Seam ripper
u Screwdriver (small)
i Darning plate
u i
Carrying HandlePress down the marks on the carryinghandle to raise the carrying handle.q Carrying handle
q

4
SECTION 2. GETTING READYTO SEWConnecting Machine to PowerSupplyq
w
r
t
e
For Your Safety* While in operation, always keep your eyes
on the sewing area. Do not touch anymoving parts, such as the thread take-uplever, handwheel or needle.
* Always turn off the power switch andunplug from the power supply:- When leaving the machine unattended- When attaching or removing any parts- When cleaning the machine
* Do not place anything on the foot control,when not sewing.
Before Using Your Sewing MachineBefore using your sewing machine for thefirst time, place a waste fabric under thepresser foot and run the machine with threadfor a few minutes. Wipe away any oil whichmay appear.
Controlling Sewing SpeedSewing speed can be varied by the footcontrol.The harder you press on the foot control, thefaster the machine runs.
CAUTION:Before connecting the power cord, makesure the voltage and frequency shown onthe machine conform to your electricalpower.
1. Turn off the power switch q.2. Insert the machine plug w into the
machine socket e.3. Insert the power supply plug r into the
outlet t.4. Turn on the power switch q to activate the
power and sewing light.
q Power switchw Machine pluge Machine socketr Power supply plugt Outlet

5
Presser Foot LifterThe presser foot lifter raises and lowers thepresser foot.You can raise it about 1/4˝ (0.6 cm) higherthan the normal up position to help placeheavy fabric under the foot.
q Presser foot lifterw Normal up positione Highest position
Setting Spool PinsThe spool pins are used for holding thespools of thread when feeding the thread tothe machine.To use, pull up the spool pins. Push down forstorage.
q Upper threadw Holee Tangle
Changing Presser Footq Presser footw Groovee Pin
q
e
q
w
e
e w
w
• To removeTurn the handwheel toward you to raise theneedle bar to its highest position.Raise the presser foot.Push the toe of the presser foot q to snapit off the foot holder.
• To attachPlace the presser foot so that the pin e onthe foot lines up directly below thegroove w of the foot holder.Lower the foot holder to lock the foot inplace.
CAUTION:When attaching or removing presser foot,turn OFF the power switch.
qw
q
e
NOTE:When using thread which has tendency totangle around a spool pin e, threadthrough the hole w of spool pin as shown.The hole should face the thread spool.

6
Thread and Needle Chart
Fabrics Thread Needle Size
Crepe de Chine, Voile, Fine Silk 65 (9)Lawn, Organdy, Fine Cotton orGeorgette, Fine Synthetic 75 (11)Tricot Fine Cotton
CoveredPolyester
Linens, Cotton, Piqué, 50 silk 75 (11)Serge, Double Knits, 50 to 80 Cotton orPercale 50 to 60 90 (14)
SyntheticCotton CoveredPolyester
Denim, Tweed, 50 silk 90 (14)Gabardine, orSuiting, Drapery and 40 to 50 Cotton 100 (16)Upholstery Fabric 40 to 50
SyntheticCotton CoveredPolyester
Lightweight
Mediumweight
Heavyweight
* In general, fine threads and needles areused for sewing thin fabrics, and thickerthreads and needles are used for sewingheavy fabrics.
* Always test thread and needle size on asmall piece of the fabric which will be usedfor actual sewing.
* Use the same thread for needle and bobbin.* When sewing stretch, very fine fabrics and
synthetics, use a stretch needle.A stretch needle effectively preventsskipped stitches.
Changing Needles
To Check the NeedlePlace the flat side of the needle on somethingflat (needle plate, glass etc.). The clearancebetween the needle and flat surface should beconsistent. Never use a bent or blunt needle.
CAUTION:When changing needles, turn OFF thepower switch.
Raise the needle by turning the handwheeltoward you and lower the presser foot.z Loosen the needle clamp screw by turning
it counterclockwise.Remove the needle from the clamp.
x Insert the new needle into the clamp withthe flat side away from you.When inserting the needle into the clamp,push it up as far as it will go and tightenthe clamp screw firmly with the screwdriver.
7
2
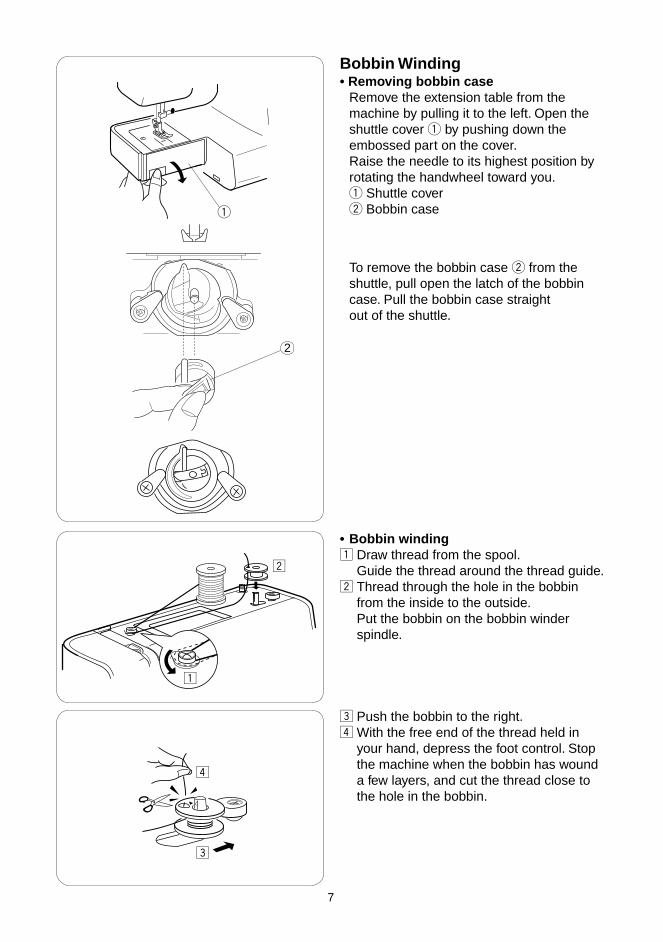
Bobbin Winding• Removing bobbin case
Remove the extension table from themachine by pulling it to the left. Open theshuttle cover q by pushing down theembossed part on the cover.Raise the needle to its highest position byrotating the handwheel toward you.q Shuttle coverw Bobbin case
To remove the bobbin case w from theshuttle, pull open the latch of the bobbincase. Pull the bobbin case straightout of the shuttle.
• Bobbin windingz Draw thread from the spool.
Guide the thread around the thread guide.x Thread through the hole in the bobbin
from the inside to the outside.Put the bobbin on the bobbin winderspindle.
q
x
z
v
c
c Push the bobbin to the right.v With the free end of the thread held in
your hand, depress the foot control. Stopthe machine when the bobbin has wounda few layers, and cut the thread close tothe hole in the bobbin.

8
• Inserting bobbin
z Place a bobbin in the bobbin case, makingsure the thread feeds clockwise from thebobbin.
x Draw the thread through the slot of thecase.
c Continue to draw the thread under thetension spring q and through theopening.Pull out about 4˝ (10 cm) of thread.q Tension spring
q
b Depress the foot control again. When thebobbin is fully wound, it stopsautomatically. Return the bobbin winderto its original position by moving thespindle to the left, and cut the thread.
Bobbin winding (continued)b
z
x
c

9
v
b
z
x
c
n
Threading the Machine• Threading the machine
* Raise the thread take-up lever to itshighest position by turning the handwheelcounterclockwise.
* Raise the presser foot lifter.* Place a spool on the spool pin, with thread
coming off as shown.
z Draw the end of thread around the upperthread guide.
c Firmly draw the thread up and from rightto left over the take-up lever then downinto the take-up lever eye.
x While holding the thread near the spool,draw the end of the thread down aroundthe check spring holder.
v Then draw the thread down and slip it intothe lower thread guide.
b Draw the thread down and slip it intoneedle bar thread guide on the left.
n Thread the needle eye from front to back.
z
x
c
v b n

10
• Drawing up bobbin thread
z Raise the presser foot. Hold the needlethread lightly with your left hand.
x Rotate the handwheel counterclockwise,toward you, for one complete turn. Bringthe bobbin thread up by pulling the needlethread up.
c Pull both threads 4˝ to 6˝ (10.0 to 15.0 cm)under and behind the presser foot.
z
x
c

11
q
w
er
t
y
• Adjust bobbin tension
In some instances, you may need to adjustthe bobbin thread tension.Turn the adjusting screw q in the directionof w when the bobbin thread tension is tootight.Turn the adjusting screw q in the directionof e when the bobbin thread tension is tooloose.q Adjusting screww Decrease tensione Increase tension
z Correct tensionThe thread tension is adjusted dependingon the sewing materials, layers of fabricand sewing method.The ideal straight stitch has threadslocked between two layers of fabric asillustrated.For an ideal zigzag stitch, the bobbinthread does not show on the right side(top side) of the fabric, and the needlethread shows slightly on the wrong side(bottom side) of the fabric.
q Needle thread (Top thread)w Bobbin thread (Bottom thread)e Right side (Top side) of fabricr Wrong side (Bottom side) of fabrict Thread tension dialy Setting mark
Balancing Needle Thread Tension
x Needle thread tension is too tightWhen the bobbin thread (bottom thread)will appear on the right side (top side) ofthe fabric, Loosen the needle threadtension by moving the dial to a lowernumber.
c Needle thread tension is too looseWhen the needle thread (top thread) willappear on the wrong side (bottom side) ofthe fabric, tighten the needle threadtension by moving the dial to a highernumber.
5
4
3
5
4
3
5
4
3
q
e
w
z
x
c

12
Stitch Pattern SelectorRaise the needle above the fabric.Turn the dial to select the desired pattern.
q Setting markw Stitch selector
NOTE:To avoid needle or fabric damage, makesure the needle is up and out of the fabricwhile selecting a stitch.
q
w
3 dial model 2 dial model
qStitch Length DialTurn the stitch length dial to set the desiredstitch length at the setting mark.The higher the number, the longer the stitchlength
q Setting mark
• “ ” is the recommended setting for
buttonhole stitching.
• Adjust the dial in the 0.5–4 range when you
sew the zigzag stitch.
3 dial model
2 dial model
Stitch Chart PanelPress down the mark on the stitch chartpanel to open it.
q Stitch chart panel
q

13
S.S.
q
As long as you keep the reverse stitch buttondepressed, the machines sew in backwards.
Adjusting Stretch StitchSet the stitch length control at "S.S." to sewthe stretch stitch pattern sewing.If the stretch stitch pattern is uneven, turn thestitch length dial in the direction of "–" tocompress it, or "+" to expand it.
Stitch Width Dial (3 dial modelonly)Turn the stitch width dial to set the desiredstitch width at the setting mark.The higher the number, the wider the stitchwidth.
q Setting mark
NOTE:Raise the needle above the fabric, whenyou turn the stitch width dial.
Reverse Stitch Button
Position the darning plate with 3 pins on thebottom.Fit the darning plate pins into the needleplate holes. The feed dogs will show throughthe darning plate holes.
Darning Plate
q

14
5
3
4
• Starting to sewRaise the presser foot and position the fabricnext to a seam guide line on the needle plate(5/8˝ [1.6 cm] is most common).Lower the needle to the point where youwant to start. Lower the presser foot and pullthe threads toward the back. Depress thefoot control.Gently guide the fabric along a seam guideline letting the fabric feed naturally.
Straight Stitchq Stitch pattern: 1 or 2w Presser foot: Zigzag foote Thread tension: 2 to 6r Stitch length: 1.5 to 4t Stitch width*: 0 or 5
SECTION 3. BASIC SEWING
To Change Sewing DirectionStop the machine and turn the handwheeltoward you to bring the needle down into thefabric. Raise the presser foot.Pivot the fabric around the needle to changesewing direction as desired.Lower the presser foot and continue sewing.
q w e
r t
• Finishing sewingTo fasten the ends of a seam, press thereverse stitch control and sew severalreverse stitches.
Raise the presser foot. Remove the fabric,draw the threads into the slit q on the backof the presser bar and pull the threads to cutthe threads as illustrated.
q Slit
NOTE:Stitch width is applicable to 3 dial modelonly.
q

15
Variable Needle Position (3 dialmodel only)When the straight stitch (pattern 1) isselected, you can move the needle betweencenter and left needle position by turning thestitch width dial.
q
Seam Guide LinesThe numbers on the needle plate indicate thedistance between the center needle positionq and the guideline w.
The numbers in back are fractions of an inch.The lines are 1/8˝ (0.3 cm) apart, and areengraved at 3/8˝, 4/8˝, 5/8˝ and 6/8˝.
The numbers in front are millimeters.The lines are 5 mm apart, and are engravedat 10 mm, 15 mm and 20 mm.
q Center needle positionw Guide linese Numbers
Turning a Square CornerTo turn a square corner 5/8˝ (1.6 cm) fromthe fabric edge.Stop stitching and lower the needle byturning the handwheel counterclockwise.Raise the presser foot and turn the fabric toline the edge with the 5/8˝ (1.6 cm) seamguide.Lower the presser foot and begin stitching inthe new direction.
q Cornering guide
w
e
q

16
The zigzag stitch is one of the most commonand versatile stitches. It can be a utility stitchfor button sewing, buttonhole making,hemming, overcasting, mending and darning.It can also be used to decorate with trims,appliques and cut work, or as a decorativestitch.
Basic Zigzagq Stitch pattern: 3w Presser foot: Zigzag foote Thread tension: 2 to 5r Stitch length: 0.5 to 4t Stitch width*: 1 or 5
Tricot Stitchq Stitch pattern: 4w Presser foot: Zigzag foote Thread tension: 1 to 4r Stitch length: 0.5 to 1.5t Stitch width*: 5
This stitch is used to finish the seamallowance on synthetics and other fabricsthat tend to pucker. Place your fabric to allowa 5/8˝ (1.6 cm) seam. Trim the seamallowance after sewing.Be careful not to cut the stitches.
5
3
4
q w e
r t
5
3
4
q w e
r t
17
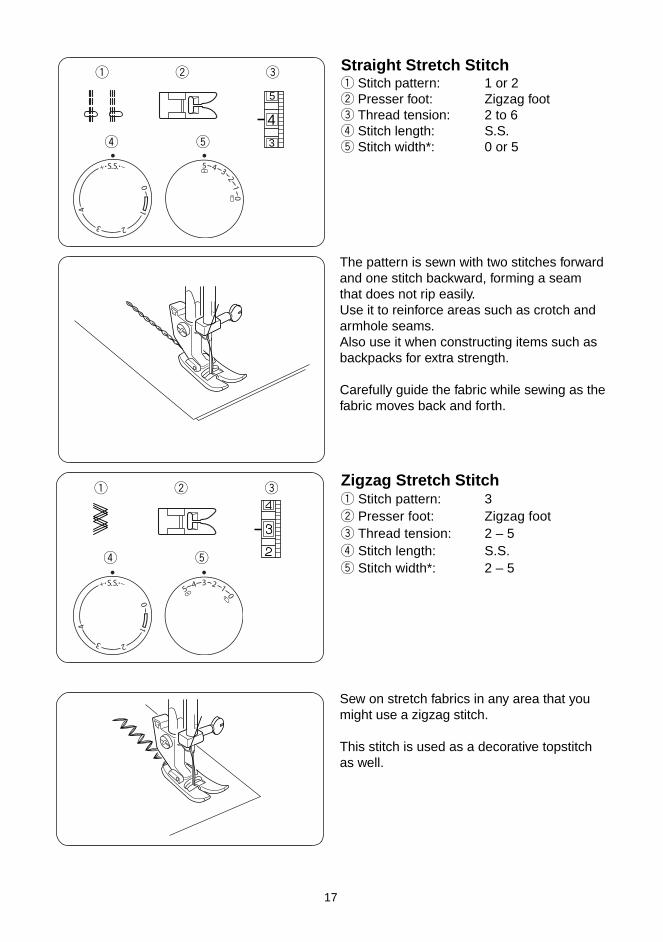
Straight Stretch Stitchq Stitch pattern: 1 or 2w Presser foot: Zigzag foote Thread tension: 2 to 6r Stitch length: S.S.t Stitch width*: 0 or 5
5
3
4
q w e
r t
The pattern is sewn with two stitches forwardand one stitch backward, forming a seamthat does not rip easily.Use it to reinforce areas such as crotch andarmhole seams.Also use it when constructing items such asbackpacks for extra strength.
Carefully guide the fabric while sewing as thefabric moves back and forth.
Zigzag Stretch Stitchq Stitch pattern: 3w Presser foot: Zigzag foote Thread tension: 2 – 5r Stitch length: S.S.t Stitch width*: 2 – 5
Sew on stretch fabrics in any area that youmight use a zigzag stitch.
This stitch is used as a decorative topstitchas well.
q w e
r t

18
z Attach the darning plate. Place the buttonbelow the zigzag foot, making sure toalign the holes with the horizontal slot inthe foot. Turn the handwheel, so that theneedle is in its leftmost position, and thendrop the needle through the left hole in thebutton.
x Lower the presser foot to hold thebutton in place. Determine which zigzagwidth setting matches the distancebetween the button holes. The needlemust go safely through each hole whensewing.
c Depress the foot control and sew about 10stitches.
v Trim excess threads from both sides of thefabric.
q w e
r t
y
Button Sewingq Stitch pattern: 3 (3 dial model)
2 to 3 (2 dial model)w Presser foot: Zigzag foote Thread tension: 2 to 6r Stitch length: Anyt Stitch width*: Adjust as necessaryy Darning plate
Knit Stitchq Stitch pattern: 6 (3 dial model)
7 (2 dial model)w Presser foot: Zigzag foote Thread tension: 1 to 4r Stitch length: S.S.t Stitch width*: 5
5
3
4
q w e
r t
This knit stitch is ideal for sewing swimwearand stretch velour because it provides thegreatest amount of elasticity and strength.Place your fabric to allow a 5/8˝ (1.6 cm)seam.Trim the seam allowance after sewing.
NOTE:If the presser foot slips off a small button,place a spacer of the same thicknessbehind the button to prevent the foot fromslipping.

19
(A)
(B)
(C)
zCarefully mark buttonhole length on fabric.Place the fabric under the foot with thebuttonhole marking running toward you.
xMove the slider (A) toward you so that thetop mark (C) on the slider meets the startmark (B). Line up the markings on the footwith the top mark on the fabric.
NOTE:The scale on the slider is engraved incentimeters.
cSet the pattern selector dial at “ ”.Sew forward until you reach the frontmarking of your buttonhole.Stop sewing at a left stitch.
vSet the pattern selector dial at “ ”.Sew 5 stitches. Stop sewing at a rightstitch.
bSet the pattern selector dial at “ ”.Sew until you reach the back marking ofthe buttonhole.Stop sewing at a right stitch.
nSet the pattern selector dial at “ ”.Sew a few bartacks and raise the needlefrom the fabric.Set the pattern selector dial at a straightstitch.Sew a few locking stitches.
mRemove the fabric from the machine andcut the sewing thread. Insert a pin insidethe bartack.Then cut the opening with a seam ripper.Take care not to cut the stitches.
5
3
4
q w e
r t
z x
c v b
n
m
Buttonholeq Stitch pattern: (BH)w Presser foot: Sliding buttonhole foote Thread tension: 1 to 5r Stitch length:t Stitch width*: 5
142
42
3
1
42
42
3

20
5
3
4
q w e
r t
Corded Buttonholeq Stitch pattern: (BH)w Presser foot: Sliding buttonhole foote Thread tension: 1 to 5r Stitch length:t Stitch width*: 5
142
42
3
q
z With the buttonhole foot raised, hook thecord on the cord spur at the back of thebuttonhole foot.q Spur
x Bring the ends toward you under thebuttonhole foot until they clear the frontend.
c Hook the filler cord into the forks on thefront of the foot to hold them tight.
v Lower the needle into the garment wherethe buttonhole will start and lower the foot.
b Depress the foot control gently and sewthe buttonhole. Each side of thebuttonhole and the bartacks will be sewnover the cord.
n Remove the fabric from the machine andcut the sewing threads.
m Pull the left end of the filler cord to tighten it.
, Thread the end through a darning needle,draw to the wrong side of the fabric andcut.
21
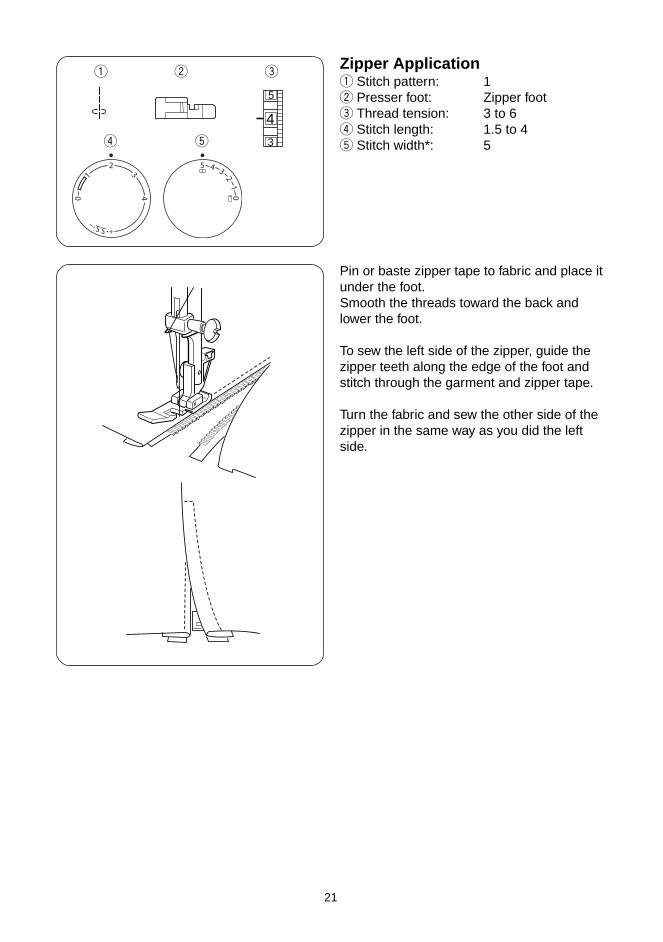
Pin or baste zipper tape to fabric and place itunder the foot.Smooth the threads toward the back andlower the foot.
To sew the left side of the zipper, guide thezipper teeth along the edge of the foot andstitch through the garment and zipper tape.
Turn the fabric and sew the other side of thezipper in the same way as you did the leftside.
5
3
4
q w e
r t
Zipper Applicationq Stitch pattern: 1w Presser foot: Zipper foote Thread tension: 3 to 6r Stitch length: 1.5 to 4t Stitch width*: 5

22
q w e
r t
Pin Tuckingq Stitch pattern: 1w Presser foot: Blind hem foote Thread tension: 3 to 6r Stitch length: 2t Stitch width*: 0 or 5
Fold the fabric wrong sides together andlower the needle into the fabric 1/16˝ (0.1 to0.2 cm) inside the folded edge.Lower the foot and turn the screw to alignthe guide on the foot with the folded edge.Sew slowly while guiding the folded edgealong the guide.
Open the fabric and iron press the tucks.
23
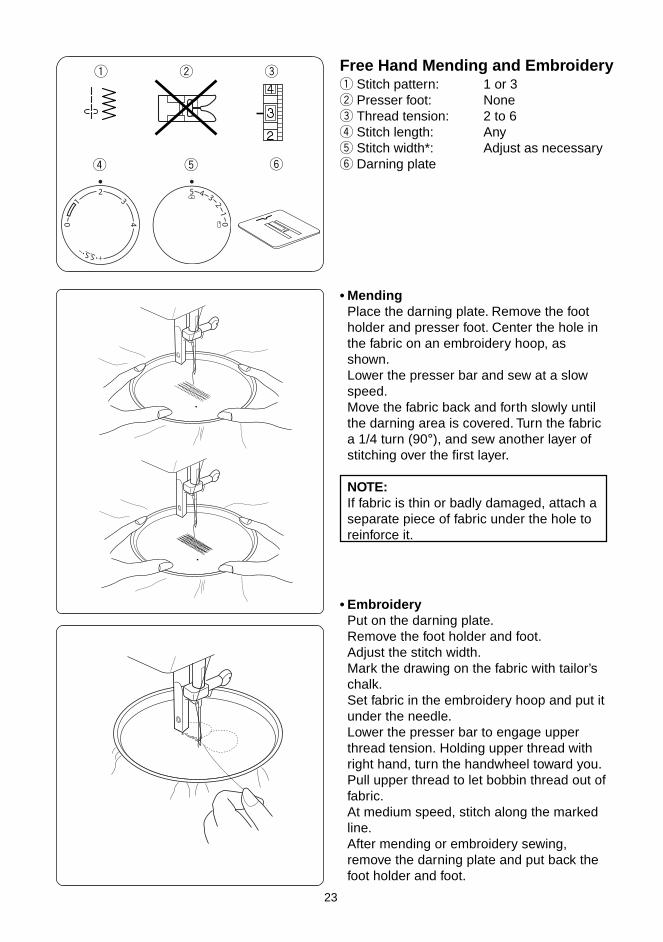
Free Hand Mending and Embroideryq Stitch pattern: 1 or 3w Presser foot: Nonee Thread tension: 2 to 6r Stitch length: Anyt Stitch width*: Adjust as necessaryy Darning plate
q w e
r t y
• MendingPlace the darning plate. Remove the footholder and presser foot. Center the hole inthe fabric on an embroidery hoop, asshown.Lower the presser bar and sew at a slowspeed.Move the fabric back and forth slowly untilthe darning area is covered. Turn the fabrica 1/4 turn (90°), and sew another layer ofstitching over the first layer.
NOTE:If fabric is thin or badly damaged, attach aseparate piece of fabric under the hole toreinforce it.
• EmbroideryPut on the darning plate.Remove the foot holder and foot.Adjust the stitch width.Mark the drawing on the fabric with tailor’schalk.Set fabric in the embroidery hoop and put itunder the needle.Lower the presser bar to engage upperthread tension. Holding upper thread withright hand, turn the handwheel toward you.Pull upper thread to let bobbin thread out offabric.At medium speed, stitch along the markedline.After mending or embroidery sewing,remove the darning plate and put back thefoot holder and foot.

24
z Fold up the hem and fold it back to from a1/4˝ (0.4 to 0.7cm) allowance asillustrated.
q Wrong side of the fabricw 1/4˝ (0.4 to 0.7 cm)
[A]Fold hem under the fabric for lightweightfabrics.
[B]On heavy weight fabrics tend to ravel, theraw edge should be overcast first.
x Position the fabric so that the needle justpierces the edge of the fold when theneedle swings to the extreme right.Lower the presser foot.
c Turn the guide screw to adjust the guidealigning with the folded edge.Sew along the folded edge guiding thefabric so the needle catches the foldededge.
e Guide screwr Guidet Folded edge
v Open the fold flat.y Right side of the fabric
*If the needle drops far left, the stitches willshow on the right side of the fabric.
q q
w w[A] [B]
t
r
e
y
q w e
r t
Blind Hem Stitchq Stitch pattern: 5 (3 dial model)
Stitch pattern: 5 or 6 (2 dial model)w Presser foot: Blind hem foote Thread tension: 2 to 4r Stitch length: 1 to 3t Stitch width*: 5

25
Use a lightweight fabric, such as tricot. Foldthe fabric and stitch on the bias q. You mayneed to increase the needle thread tensionslightly. Allow the needle to just clear thefolded edge of the fabric.If you sew rows of shell stitches, space therows at least 5/8˝ (1.5 cm) apart. You canalso sew shell stitches on knits or soft silkywoven fabrics in any direction.
q Bias
q
SECTION 4. DECORATIVESTITCHES
q w e
r t
Shell Tuckq Stitch pattern: 6 (3 dial model)
Stitch pattern: 7 (2 dial model)w Presser foot: Zigzag foote Thread tension: 6 to 8r Stitch length: 2 to 3t Stitch width*: 5

26
q
Choose a soft and lightweight fabric such asbatiste, gingham or challis. Cut the fabricthree times wider than the project width.Increase the stitch length to “4” and loosenthread tension to “1”. Sew rows of straightstitches 3/8˝ (1 cm) apart across the area tobe smocked.
q 3/8˝ (1 cm)
Knot the threads along one end. From theother end, pull the bobbin threads todistribute gathers evenly and secure thethreads.Return the thread tension to the originalsetting.
q w e
r t
Sew rows of the smocking stitch betweenthe gathering stitches.Remove the gathering stitches after finished.
Smockingq Stitch pattern: 1 and 4w Presser foot: Zigzag foote Thread tension: 1 to 4r Stitch length: S.S.t Stitch width*: 5
27
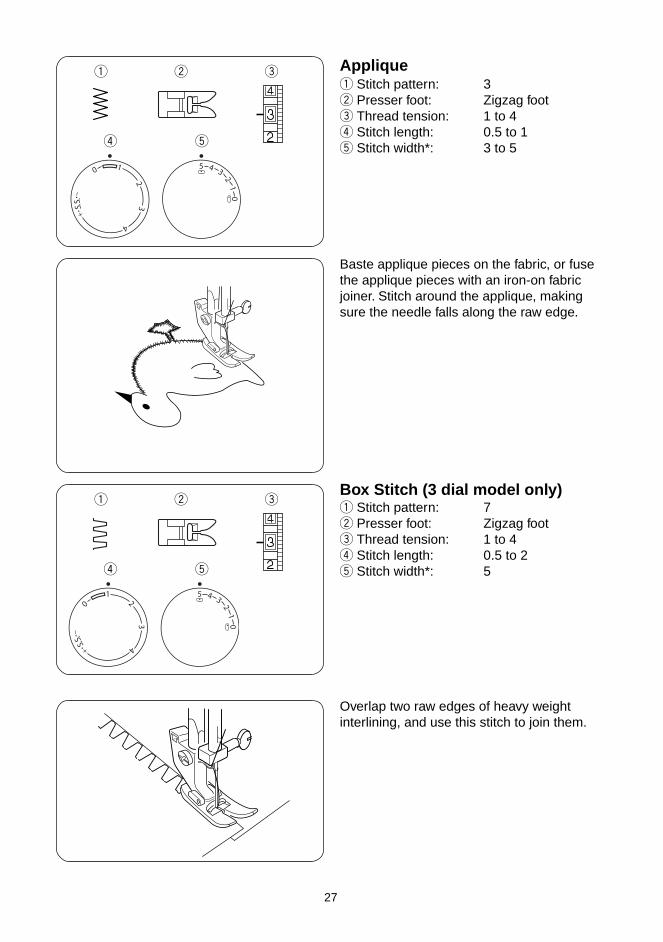
Baste applique pieces on the fabric, or fusethe applique pieces with an iron-on fabricjoiner. Stitch around the applique, makingsure the needle falls along the raw edge.
Overlap two raw edges of heavy weightinterlining, and use this stitch to join them.
Appliqueq Stitch pattern: 3w Presser foot: Zigzag foote Thread tension: 1 to 4r Stitch length: 0.5 to 1t Stitch width*: 3 to 5
q w e
r t
Box Stitch (3 dial model only)q Stitch pattern: 7w Presser foot: Zigzag foote Thread tension: 1 to 4r Stitch length: 0.5 to 2t Stitch width*: 5
q w e
r t
28
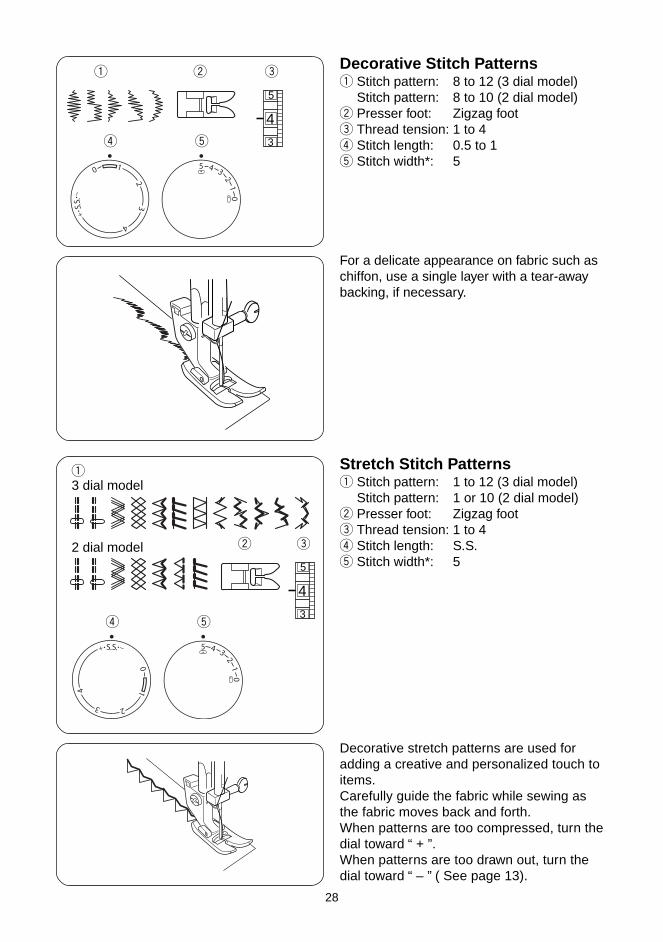
Decorative stretch patterns are used foradding a creative and personalized touch toitems.Carefully guide the fabric while sewing asthe fabric moves back and forth.When patterns are too compressed, turn thedial toward “ + ”.When patterns are too drawn out, turn thedial toward “ – ” ( See page 13).
For a delicate appearance on fabric such aschiffon, use a single layer with a tear-awaybacking, if necessary.
5
3
4
q w e
r t
3 dial model
2 dial model
q
5
3
4
w e
r t
Decorative Stitch Patternsq Stitch pattern: 8 to 12 (3 dial model)
Stitch pattern: 8 to 10 (2 dial model)w Presser foot: Zigzag foote Thread tension: 1 to 4r Stitch length: 0.5 to 1t Stitch width*: 5
Stretch Stitch Patternsq Stitch pattern: 1 to 12 (3 dial model)
Stitch pattern: 1 or 10 (2 dial model)w Presser foot: Zigzag foote Thread tension: 1 to 4r Stitch length: S.S.t Stitch width*: 5
29
SECTION 5. CARE OF YOURMACHINE
q
w
e
y
r
t
u
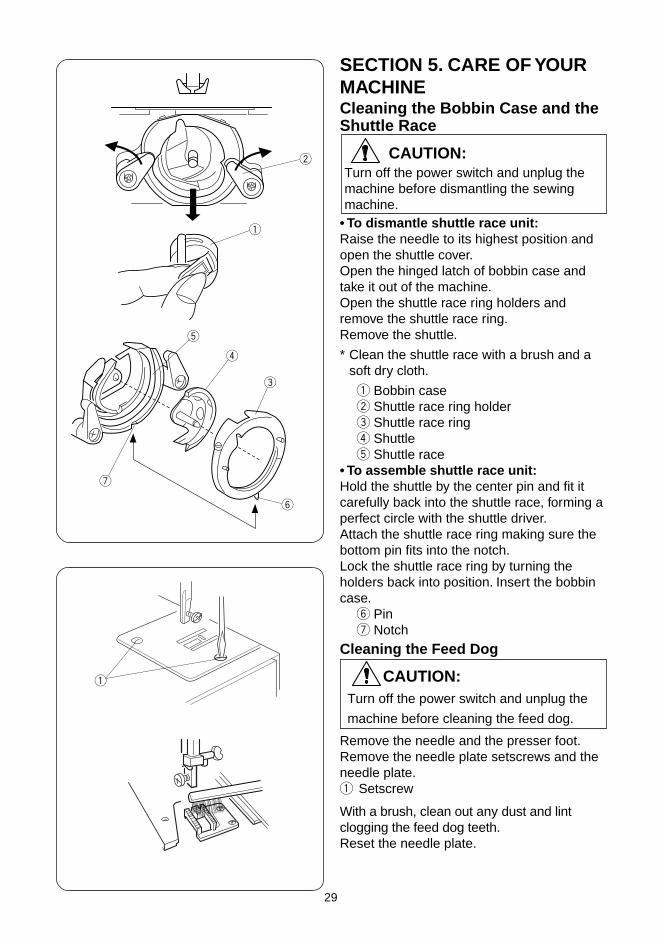
Cleaning the Bobbin Case and theShuttle Race
• To dismantle shuttle race unit:Raise the needle to its highest position andopen the shuttle cover.Open the hinged latch of bobbin case andtake it out of the machine.Open the shuttle race ring holders andremove the shuttle race ring.Remove the shuttle.
* Clean the shuttle race with a brush and asoft dry cloth.
q Bobbin casew Shuttle race ring holdere Shuttle race ringr Shuttlet Shuttle race
• To assemble shuttle race unit:Hold the shuttle by the center pin and fit itcarefully back into the shuttle race, forming aperfect circle with the shuttle driver.Attach the shuttle race ring making sure thebottom pin fits into the notch.Lock the shuttle race ring by turning theholders back into position. Insert the bobbincase.
y Pinu Notch
Cleaning the Feed Dog
Remove the needle and the presser foot.Remove the needle plate setscrews and theneedle plate.q Setscrew
With a brush, clean out any dust and lintclogging the feed dog teeth.Reset the needle plate.
CAUTION:Turn off the power switch and unplug the
machine before cleaning the feed dog.
q
CAUTION: Turn off the power switch and unplug the machine before dismantling the sewing machine.

30
Sewing LightThe sewing light is located behind the faceplate.To change the bulb, take the face plate offthe sewing machine by removing the cap andthe setscrew.
Unplug the power supply before changingthe bulb.Do not dismantle the machine other thanexplained in this manual.
To remove .... Push and twist to the left.To replace .... Push and twist to the right.
WARNINGThe bulb may be HOT. Protect yourfingers when handling it.
31
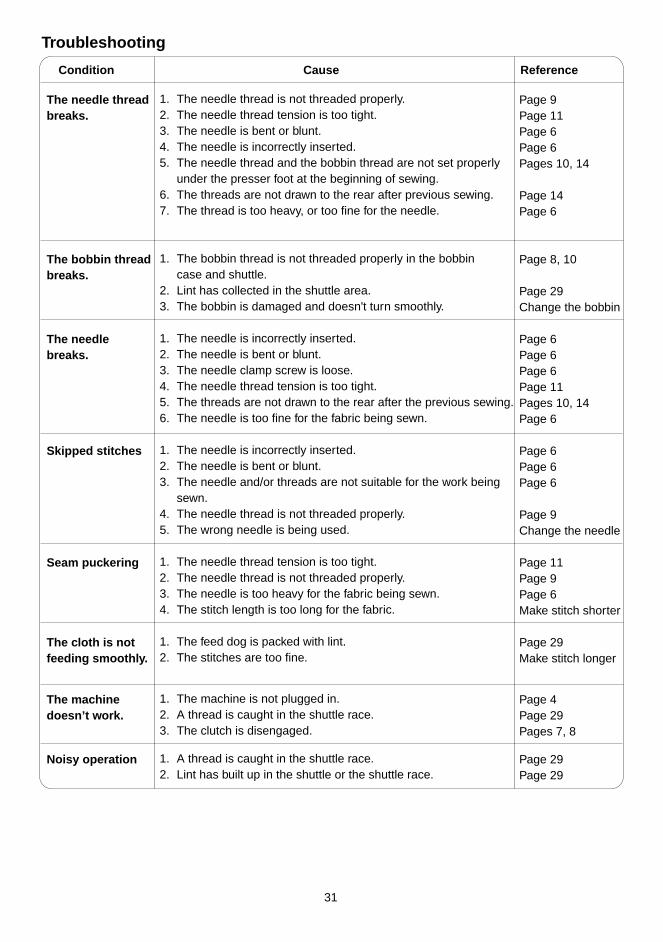
Troubleshooting
Condition Cause Reference
The needle threadbreaks.
The bobbin threadbreaks.
The needlebreaks.
Skipped stitches
Seam puckering
The cloth is notfeeding smoothly.
The machinedoesn’t work.
Noisy operation
1. The needle thread is not threaded properly.2. The needle thread tension is too tight.3. The needle is bent or blunt.4. The needle is incorrectly inserted.5. The needle thread and the bobbin thread are not set properly
under the presser foot at the beginning of sewing.6. The threads are not drawn to the rear after previous sewing.7. The thread is too heavy, or too fine for the needle.
1. The bobbin thread is not threaded properly in the bobbincase and shuttle.
2. Lint has collected in the shuttle area.3. The bobbin is damaged and doesn't turn smoothly.
1. The needle is incorrectly inserted.2. The needle is bent or blunt.3. The needle clamp screw is loose.4. The needle thread tension is too tight.5. The threads are not drawn to the rear after the previous sewing.6. The needle is too fine for the fabric being sewn.
1. The needle is incorrectly inserted.2. The needle is bent or blunt.3. The needle and/or threads are not suitable for the work being
sewn.4. The needle thread is not threaded properly.5. The wrong needle is being used.
1. The needle thread tension is too tight.2. The needle thread is not threaded properly.3. The needle is too heavy for the fabric being sewn.4. The stitch length is too long for the fabric.
1. The feed dog is packed with lint.2. The stitches are too fine.
1. The machine is not plugged in.2. A thread is caught in the shuttle race.3. The clutch is disengaged.
1. A thread is caught in the shuttle race.2. Lint has built up in the shuttle or the shuttle race.
Page 9Page 11Page 6Page 6Pages 10, 14
Page 14Page 6
Page 8, 10
Page 29Change the bobbin
Page 6Page 6Page 6Page 11Pages 10, 14Page 6
Page 6Page 6Page 6
Page 9Change the needle
Page 11Page 9Page 6Make stitch shorter
Page 29Make stitch longer
Page 4Page 29Pages 7, 8
Page 29Page 29


Printed in Thailand
310-800-XXX(ENG)