3102 workbook
DESCRIPTION
docTRANSCRIPT

Self Study Manuals
SUSE Linux Enterprise 11 Administration Workbook Course 3102
SUSE Linux Enterprise 11 Administration Workbook
Introduction
This workbook is designed to help you practice the skills associated with SUSE Linux Enterprise 11 Administration (Course 3102) objectives.
These skills, along with those taught in SUSE Linux Enterprise 11 Fundamentals (Course 3101), prepare you to take the Novell Certified Linux Administrator 11 (Novell CLA 11) certification test.
Before starting the exercises in this workbook, you need do the following:
• "Check the Media in Your Student Kit"
• "Set Up Your Practice Environment"
• "Review Exercise Issues and Tips"
• "Review the Course Scenario"
• "Review the Exercise Conventions"
Check the Media in Your Student Kit
Your 3102 student kit contains the following items:
• 3102 Course Manual: Printed course manual that contains instructional and reference content.
• 3102 Workbook: Printed workbook that contains stepbystep instructions for setting up and completing the 3102 course exercises.
• 3102 Course DVD: Contains the course manual and workbook in PDF format as well as a readme file. It also contains the following folders that contain various files required for completing the lab exercises for this course:
• Setup: Contains files used for the course setup.

• Exercises: Contains files used for the course exercises.
• Docs: Contains the SUSE Linux Enterprise 11 documentation, which is also available from .
• SUSE Linux Enterprise Server 11 DVD: SLES 11 installation media you will use to complete your lab exercises.
• SUSE Linux Enterprise Desktop 11 DVD: SLED 11 installation media you will use to complete your lab exercises.
Set Up Your Practice Environment
Set up your practice by completing the following:
• "Review the Setup Requirements"
• "Review the Setup Diagram"
• "Prepare Your Host Workstation"
Review the Setup Requirements
The following are the hardware and software requirements for your practice environment:
Setup Minimum Requirements
Hardware You need one host computer that meets the following requirements:
• Pentium IV 2 GHz (or faster) computer
• 2 GB RAM (4 GB recommended):
• 1024 MB (DA1 virtual server)
• 512 MB (DASLED virtual workstation)
• 40 GB (or more) hard disk space
• DVD drive
Make sure that the host computer is actually utilizing all of the installed RAM. If not, the exercises may run extremely slowly or even stall.
Software To complete the practice environment setup, you need the following software:

Setup Minimum Requirements
• 3102 Course DVD (included in your student kit), which contains software and files needed to complete the course exercises
• SUSE Linux Enterprise Server 11 DVD, which contains the SLES 11 installation media you will use to complete your lab exercises.
• SUSE Linux Enterprise Desktop 11 DVD, which contains the SLED 11 installation media you will use to complete your lab exercises.
Review the Setup Diagram
In this course, your host computer will run multiple virtual machines concurrently. The following depicts the relationship between the host computer and the virtual machines:

The following table lists the details about each virtual machine used in this course:
Virtual Machine Details
DA1 • Hostname: da1.digitalairlines.com
• Operating system: SUSE Linux Enterprise Server 11

Virtual Machine Details
• IP address: 172.17.8.101
• Subnet mask: 255.255.0.0
• Login information:
• Super user: root
• Password: novell
DASLED • Hostname: dasled.digitalairlines.com
• Operating system: SUSE Linux Enterprise Desktop 11
• IP address: 172.17.8.104
• Subnet mask: 255.255.0.0
• Login information:
• Super user: root
• Password: novell
Prepare Your Host Workstation
To complete the lab exercises in this course, you must first install and configure VMware virtualization software on your host workstation. To do this, complete the following:
1. Install SLED 11 on your host workstation.
During the installation, install the C/C++ Compiler and Tools pattern, as shown below:

During the installation, configure the following user accounts:
• geeko with a password of novell
• geeko with a password of novell
2. Configure the network interface on the workstation to use the Traditional Method with ifup network setup method instead of NetworkManager.
3. Install VMware Workstation on your host workstation.
VMware is virtualization software that allows you to run an operating system in parallel to your existing operating system installation. You can use VMware to install and configure multiple guest operating systems on your computer without repartitioning your disks.

In the first exercise in this course, you will install a virtual SLES 11 server and a virtual SLED 11 workstation that you will use to complete the remaining exercises in the course.
If you do not have VMware on your system, you can download a copy from the VMware Web site at . You can choose between the following products:
• VMware Server: Free version of the VMware product. It can be used to create, modify, and run VMware images. It does not allow you to create snapshots, however.
• VMware Workstation: Fullfeatured version of VMware. The software can be used to create, modify, and run VMware images. You can either purchase the software or get a free 30 days evaluation key.
• VMware Player: Free version of the VMware product. It can run existing virtual machines, but it can not be used to create VMware images nor does it allow you to create snapshots.
NOTE: If you need help installing a VMware product, visit .
4. Configure vmnet5 in VMware:
• Select Computer > More Applications > System > Virtual Network Editor .
• When prompted, enter your root user's password.
The following is displayed:
• Select vmnet1.
• In the Subnet IP field, enter 172.17.0.0, as shown below:
• Select Save.
• Open a terminal window and use the su command to switch to your root user account.
• At the shell prompt, enter vi /etc/vmware/networking.
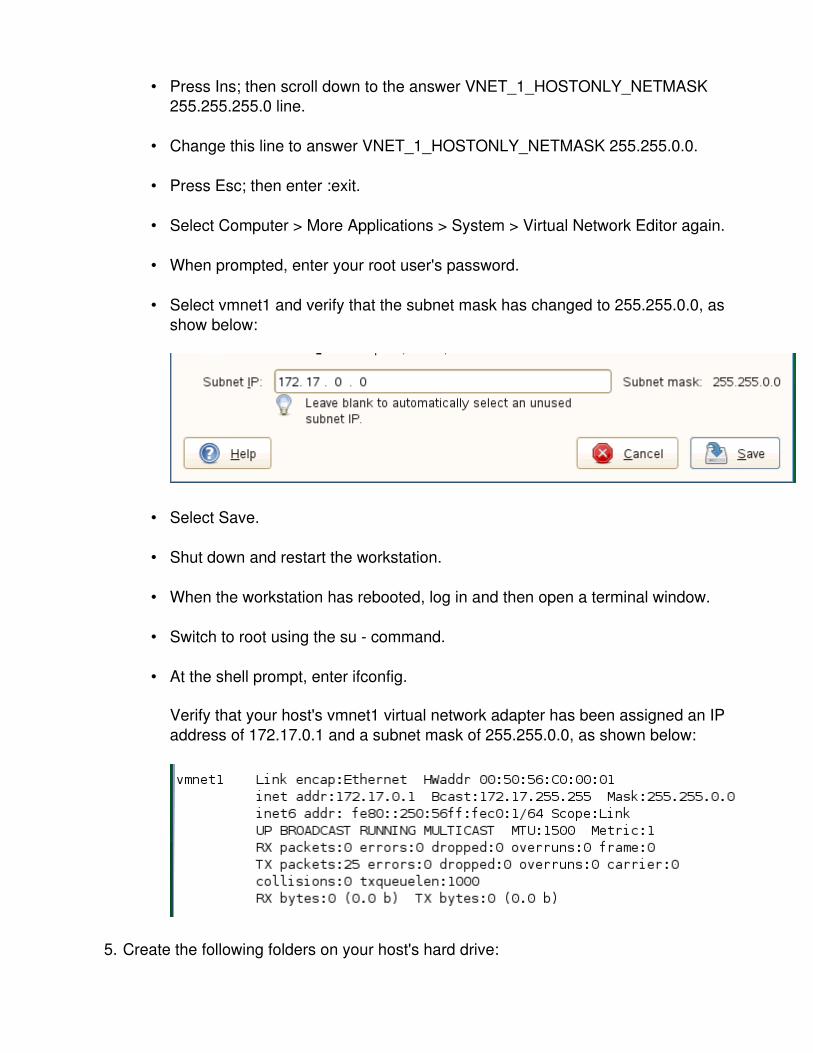
• Press Ins; then scroll down to the answer VNET_1_HOSTONLY_NETMASK 255.255.255.0 line.
• Change this line to answer VNET_1_HOSTONLY_NETMASK 255.255.0.0.
• Press Esc; then enter :exit.
• Select Computer > More Applications > System > Virtual Network Editor again.
• When prompted, enter your root user's password.
• Select vmnet1 and verify that the subnet mask has changed to 255.255.0.0, as show below:
• Select Save.
• Shut down and restart the workstation.
• When the workstation has rebooted, log in and then open a terminal window.
• Switch to root using the su command.
• At the shell prompt, enter ifconfig.
Verify that your host's vmnet1 virtual network adapter has been assigned an IP address of 172.17.0.1 and a subnet mask of 255.255.0.0, as shown below:
5. Create the following folders on your host's hard drive:

• /isos/3102
• /vms/3102
6. Copy the course ISO files from the Exercises folder on your course DVD to the /isos/3102 folder on your hard drive.
7. Copy the course virtual machine files from the Setup folder on your course DVD to the /vms/3102 directory on your hard drive.
8. Configure the hot keys used to release the focus from the virtual machine by doing the following:
• In the VMware window, select Edit > Preferences > Hot Keys .
• Mark Ctrl + Shift + Alt.
• Select OK.
Review Exercise Issues and Tips
Before starting the exercises, make sure you review the following:
• "Memory Issues"
• "Exercise Tips"
• "Browser Issues"
• "Exercise Notes"
Memory Issues
Although you perform the exercises with 2 GB of RAM on the host machine, the processing time for performing some administration tasks will be significantly slower than in a real hardware environment. Additional memory will increase the overall speed of the system.
Exercise Tips
Following are some tips that can help you when using this workbook to complete exercises:
• Exercise sequence: Although there are many tasks in the exercises that can be done at any time, the exercises often rely on tasks performed in earlier exercises.
For this reason, it's recommended that you perform the exercises in sequence to successfully complete all exercises.

• Keyboard entry problems: If you cannot use the keyboard to enter text, try selecting the virtual machine window with the mouse or try pressing Shift+Tab.
• Virtual machine shutdown: Before powering off a virtual machine, make sure you shut down the guest operating system cleanly first.
Browser Issues
Most of the labs in this course direct you to use a browser within the various virtual machines. This worked well during the testing of the labs and reduces dependencies on the host workstation.
However, if you find using a browser within a virtual machine cumbersome or slow, you can use a browser on the host workstation instead.
Exercise Notes
Review the following notes prior to completing the lab exercises in this course:
Exercise Notes
Exercise 22, Part III
At the end of Part III, students may have to reboot the system to be able to log back in as geeko.
Review the Course Scenario
The IT department of Digital Airlines is rolling out more and more SUSE Linux Enterprise 11 installations. Your task is to familiarize yourself with SUSE Linux Enterprise 11 to be able to take on a greater number of system administrator tasks on this platform.
You need additional experience in the following areas:
• Installation and configuration of SUSE Linux Enterprise 11
• File system maintenance
• Specialized aspects of user management (such as ACLs)
• Network configuration and fundamental network services
• Hardware management
• Backup and recovery
• Management of services and processes

• Remote administration
You decide to set up test servers and workstations in the lab to enhance your skills in these areas.
Review the Exercise Conventions
When working through an exercise, you will see conventions that indicate information you need to supply that is specific to your server.
The following describes the most common conventions:
• italicized/bolded text : This is a reference to a variable that is unique to your situation, such as the hostname of your server.
For example, if the hostname of your server is DA1, and you see the following,
hostname .digitalairlines.com
then you would enter
DA1.digitalairlines.com
• 172.17.8. xx : This is the IP address that is assigned to your SUSE Linux Enterprise system.
For example, if your IP address is 172.17.8.101, and you see the following:
172.17.8. xx
then you would enter
172.17.8.101
• Select: The word select is used in exercise steps to indicate a variety of actions including clicking a button on the interface and selecting a menu item.
• Enter and Type: The words enter and type have distinct meanings.
The word enter means to type text in a field or at a command line and press the Enter key when necessary. The word type means to type text without pressing the Enter key.
If you are directed to type a value, make sure you do not also press the Enter key or you might activate a process that you are not ready to start.

Install SUSE Linux Enterprise 11
In this section of the workbook, you learn how to do the following:
• "Install SUSE Linux Enterprise Server 11"
In this exercise, you install SUSE Linux Enterprise Server 11.
• "Install SUSE Linux Enterprise Desktop 11"
In this exercise, you install SUSE Linux Enterprise Desktop 11.
Install SUSE Linux Enterprise Server 11
In this exercise, you install a SUSE Linux Enterprise Server 11 system. Use the following specifications as a guideline for the installation:
• Create the following partitions:
• 1 GB swap partition.
• 6 GB for / (You should leave unpartitioned space on the hard disk to add partitions in later exercises).
• Use default software patterns, but add the C/C++ Compiler and Tools pattern.
• root password: novell
NOTE: This password is not appropriate for a production environment.
• Use a static IP address:
• IP address: 172.17.8.101
• Network mask: 255.255.0.0
• Hostname: da1
• Domain name: digitalairlines.com
• Name server: none
• Default gateway: none
• Use local authentication. Create a geeko user account with a password of novell.

• Skip the online update.
Do the following:
1. Insert your SLES 11 installation DVD into your host workstation's DVD drive.
2. On your host workstation, start VMware Workstation.
3. In VMware, select File > Open.
4. Browse to and select the /vms/3102/DA1/DA1.vmx file.
5. Select Power On This Virtual Machine.
6. If prompted to create a new identifier for the virtual machine, select Keep; then click OK.
7. When the GRUB installation screen appears, select Installation with the arrow keys and then press Enter.
Wait while Linux is loaded and the YaST Installation module starts.
8. In the Language Selection dialog, select your language and your keyboard layout.
NOTE: Although you can select any available language, the exercises in this manual are written for English US.
9. In the License Agreement field, select I Agree to the License Terms ; then click Next.
10.In the Media Check screen, select Start Check.
Wait while the media is checked.
11.When the media check is complete, click Next.
Wait while the system hardware is probed.
12.In the Installation Mode dialog, select New Installation ; then click Next.
13.In the Clock and Time Zone dialog, select your time zone.
14.Deselect Hardware Clock Set To UTC.
15.Adjust the date and time to the correct parameters, if needed.
16.When done, click Next.

17.In the Server Base Scenario screen, select Physical Machine ; then click Next.
The Installation Settings proposal dialog appears.
18.Change the partitioning settings by selecting Partitioning.
19.Select Custom Partitioning (for experts); then click Next.
20.Create a swap partition by doing the following:
1. Under System View, select Hard Disks > sda.
2. Select Add.
3. Select Primary Partition; then click Next.
4. Select Custom Size; then enter a size of 1 GB.
5. Click Next.
6. From the File System dropdown list, select Swap.
7. Add the swap partition by clicking Finish.
21.Create the root partition by doing the following:
1. Select Add.
2. Select Primary Partition; then click Next.
3. Select Custom Size; then enter a size of 6 GB.
4. Click Next.
5. Configure the following options:
• Select Ext3 from the File System dropdown list.
• Select / from the Mount Point dropdown list.
6. Add the root partition by clicking Finish.
Your partitions should appear as shown below:

22.Confirm the partitioning setup and return to the installation proposal by clicking Accept.
23.In the Installation Settings Overview, select Software.
24.Under Patterns, scroll down to and select C/C++ Compiler and Tools , as shown below:

25.Click OK.
26.If prompted to accept license agreements for packages to be installed, select Accept.
27.In the Installation Settings dialog, click Install.
28.In the confirmation dialog, click Install.
Wait while the disk is partitioned and the packages are installed. This may take up to 30 minutes to complete.
29.In the Password for the System Administrator "root" screen, enter novell in the password fields.

30.Click Next.
31.When warned that the password is too simple, click Yes.
32.When warned that the password uses only lowercase letters, click Yes.
33.In the Hostname and Domain Name dialog, enter DA1 in the Hostname field and digitalairlines.com in the Domain Name field.
34.Deselect Change Hostname via DHCP .
35.Select Write Hostname to /etc/hosts; then click Next.
36.In the Network Configuration screen under Firewall, click Open next to SSH Port is Blocked.
The entry will change to SSH Port is Open.
37.Select Network Interfaces.
38.Select the first detected network card; then click Edit.
39.Select Statically Assigned IP Address.
40.In the IP Address field, enter 172.17.8.101.
41.In the Subnet Mask field, enter 255.255.0.0.
42.In the Hostname field, enter DA1.
43.Click Next.
44.Select the Hostname/DNS tab.
Your hostname and domain name should already be filled. If not, enter a hostname of DA1 and the domain name digitalairlines.com.
NOTE: Because this virtual machine runs in hostonly mode, it is isolated from the rest of your network. In a production environment, you would configure one or more DNS server addresses and a gateway router address.
45.Return to the Network Configuration dialog by selecting OK.
46.Continue with the installation by clicking Next.
47.In the Test Internet Connection dialog, select No, Skip This Test ; then click Next.

48.In the Installation Overview dialog, accept the default settings by clicking Next.
49.In the User Authentication Method screen, select Local (/etc/passwd) ; then click Next.
50.In the New Local User screen, add a user named geeko by entering the following:
1. User's Full Name: Geeko Novell
2. User Login: geeko
3. Password: novell
51.Create the user by clicking Next.
52.Confirm the password warnings by clicking Yes twice.
53.In the Release Notes screen, review the release notes; then click Next.
54.In the Hardware Configuration dialog, review the settings suggested under Graphics Cards; then click Next.
55.Complete the installation process by clicking Finish.
Wait while the system is cloned and the graphical login is loaded.
56.Edit your hosts file by doing the following:
1. Log in to your DA1 server as geeko with a password of novell.
2. Select Computer > YaST.
3. When prompted, enter a root password of novell.
4. In YaST, select Network Services > Hostnames.
5. Click Add.
6. Specify the following:
• IP Address: 172.17.8.104
• Hostname: DASLED.digitalairlines.com
• Alias: DASLED
7. Click OK.

8. Click Finish.
9. Close YaST.
57.Install VMware Tools in your SLES 11 virtual machine by doing the following:
1. In your VMware window, select VM > Removable Devices > CDROM > Disconnect.
2. In your VMware window, select VM > Install VMware Tools > Install.
3. When prompted for the root user's password, enter novell.
A File Browser window opens displaying the files on the VMware Tools ISO image.
4. Rightclick the VMware Tools RPM file; then select Open with Install Software .
5. When prompted for the root user's password, enter novell.
Wait while the package is installed.
6. When complete, close the File Browser window.
7. Rightclick the VMware Tools icon on the desktop; then select Unmount Volume.
8. In your VMware window, select VM > Cancel VMware Tools Install.
9. In your VMware window, select VM > Removable Devices > CDROM > Connect.
10.When prompted for the root user's password, enter novell and click Authenticate.
11.Close the File Browser window.
12.Rightclick the desktop; then select Open In Terminal.
13.At the shell prompt, enter su followed by a password of novell and click Authenticate.
14.At the shell prompt, enter vmwareconfigtools.pl.
15.When prompted to build the vmhgfs module, enter yes.
16.When prompted for the location of the C header files, press Enter.

17.When prompted to build the vmxnet module, enter yes.
18.When prompted to configure your screen resolution, enter the appropriate menu option for 1024x768.
19.Reboot the system by entering init 6 at the shell prompt.
Install SUSE Linux Enterprise Desktop 11
In this exercise, you install a SUSE Linux Enterprise Desktop 11 system. Use the following specifications as a guideline for the installation:
• Use the default partitions proposed by YaST.
• Use default software selection, but add the C/C++ Compiler and Tools pattern.
• root password: novell
NOTE: This password is not appropriate for a production environment.
• Use a static IP address:
• IP address: 172.17.8.104
• Network mask: 255.255.0.0
• Hostname: dasled
• Domain name: digitalairlines.com
• Name server: none
• Default gateway: none
• Use local authentication. Create a geeko user account with a password of novell.
• Skip the online update.
Do the following:
1. If it's running, suspend your DA1 virtual server.
2. Insert your SLED 11 installation DVD into your host workstation's DVD drive.
3. In VMware, select File > Open.

4. Browse to and select the /vms/3102/DASLED/DASLED.vmx file.
5. Select Power On This Virtual Machine.
6. If prompted to create a new identifier for the virtual machine, select Keep; then click OK.
7. When the GRUB installation screen appears, select Installation with the arrow keys and press Enter.
Wait while Linux is loaded and the YaST Installation module starts.
8. In the Language Selection dialog, select your language and your keyboard layout.
9. In the License Agreement field, select I Agree to the License Terms ; then click Next.
10.In the Media Check screen, click Start Check.
Wait while the media is checked.
11.When the media check is complete, click Next.
Wait while the system's hardware is probed.
12.In the Installation Mode dialog, select New Installation; then click Next.
13.In the Clock and Time Zone dialog, select your time zone.
14.Deselect Hardware Clock Set To UTC.
15.Adjust the date and time to the correct parameters, if needed.
16.When done, click Next.
The following is displayed:

17.Create a new standard user by specifying the following:
• User's Full Name: Geeko Chameleon
• Username: geeko
• Password: novell
18.Select Use This Password for System Administrator; then click Next.
19.When prompted that the password is too simple, click Yes.
20.When prompted that the password uses only lower case letters, click Yes.

The Installation Settings proposal dialog appears.
21.In the Installation Settings Overview, select Software.
22.Under Patterns, scroll down to and select C/C++ Compiler and Tools , as shown below:
23.Click OK.
24.If prompted to accept license agreements for packages to be installed, select Accept until you return to the installation proposal.
25.In the Installation Settings Overview, click Install.

26.In the confirmation dialog, click Install.
Wait while the disk is partitioned and the packages are installed. This may take up to 45 minutes to complete.
27.At this point, your installation is complete. YaST displays the following:
28.Complete the installation process by clicking Finish.
Wait while the graphical login is loaded.
29.Assign a static IP address to your virtual SLED 11 workstation by doing the following:
• Log in to your DASLED workstation as geeko with a password of novell.

• Select Computer > YaST.
• When prompted for the root user's password, enter novell.
• Select Network Devices > Network Settings .
• When prompted that your network settings are currently managed by NetworkManager, click OK.
• Select Traditional Method with ifup; then click OK.
• In YaST, select Network Devices > Network Settings again.
• Select your network interface, then click Edit.
• Select Statically Assigned IP Address; then specify the following:
• IP Address: 172.17.8.104
• Subnet Mask: 255.255.0.0
• Hostname: DASLED
• Click Next.
• Select the Hostname/DNS tab; then specify the following:
• Hostname: DASLED
• Domain Name: digitalairlines.com
• Click OK.
30.Edit your hosts file by doing the following:
• In YaST, select Network Services > Hostnames.
• Click Add.
• Specify the following:
• IP Address: 172.17.8.101
• Hostname: DA1.digitalairlines.com

• Alias: DA1
• Click OK.
• Click Finish.
• Close YaST.
31.Install VMware Tools in your SLES 11 virtual machine by doing the following:
• Rightclick the DVD icon on your desktop; then select Unmount Volume .
• In your VMware window, select VM > Removable Devices > CDROM > Disconnect.
• In your VMware window, select VM > Install VMware Tools > Install.
A File Browser window opens displaying the files on the VMware Tools ISO image.
• Rightclick the VMware Tools RPM file; then select Open with Install Software .
• Select Install.
• When prompted for the root user's password, enter novell.
Wait while the package is installed.
• When complete, close the File Browser window.
• Rightclick the VMware Tools icon on the desktop; then select Unmount Volume.
• In your VMware window, select VM > Cancel VMware Tools Install.
• In your VMware window, select VM > Removable Devices > CDROM > Connect.
• Rightclick on the desktop; then select Open In Terminal .
• At the shell prompt, enter su followed by a password of novell.
• At the shell prompt, enter vmwareconfigtools.pl.
• When prompted to build the vmhgfs module, enter yes.

• When prompted for the location of the C header files, press Enter.
• When prompted to build the vmxnet module, enter yes.
• When prompted to configure your screen resolution, enter the appropriate menu option to specify 1024x768.
• Reboot the system by entering init 6 at the shell prompt.
Manage System Initialization
In this section of the workbook, you learn how to do the following:
• "Manage the Boot Loader"
In this exercise, you practice booting into a shell and modifying /boot/grub/menu.lst.
• "Manage Runlevels"
In this exercise, you practice configuring runlevels.
Manage the Boot Loader
In this exercise, you practice booting into a shell and modifying /boot/grub/menu.lst.
You enter init=/bin/bash at the boot prompt and modify /boot/grub/menu.lst to require a password before kernel parameters can be modified. You then test the new GRUB configuration.
NOTE: This exercise will not work with SUSE Linux Enterprise 11 running on physical hardware with a USB keyboard. USB drivers are usually loaded late in the init process. If your machine is equipped with a USB keyboard, you have to add the modules to the initial RAM disk for this exercise to work. To do this with a USB keyboard, complete the following steps first: Find out which USB modules are loaded by entering lsmod in a terminal window. Then start the YaST Control Center, and select System > /etc/sysconfig Editor . Expand System > Kernel. In INITRD_MODULES, add the appropriate modules (such as usbhid, uhdi_hcd, and/or ehci_hcd). Close the dialogs. In a terminal window (as root), enter mkinitrd.
Complete the following:
1. If your DASLED virtual workstation is running, suspend it.
2. If your DA1 virtual server is suspended, resume it.
3. If necessary, log in to DA1 as geeko with a password of novell.

4. Rightclick on the desktop; then select Open in Terminal .
5. In the terminal window, enter su followed by a password of novell.
6. Reboot the system by entering init 6 at the shell prompt.
7. When the GRUB boot menu is displayed, press Space to stop the timer.
8. In the Boot Options field, replace the vga=0x332 option with init=/bin/bash.
An example is shown below:
9. Press Enter.

After a few minutes, the bash prompt is displayed:
10.Remount the root partition readwritable by entering
mount o remount,rw, sync /
11.At the shell prompt, enter vi /boot/grub/menu.lst.
12.Press Ins.
13.Position the cursor at the beginning of the line starting with "gfxmenu".
14.Comment out the line by inserting a pound sign ( # ) in front of the line starting with "gfxmenu".
15.To avoid having the password displayed in cleartext in the configuration file, create an MD5Hash encrypted password by doing the following within vi:
1. Add a new, blank line after the "gfxmenu" line you just commented out.
2. Press Esc.
3. Enter :r! echo e "secret\nsecret" | grubmd5crypt.

This runs an external command from within the vi editor. The echo command sends the secret and secret text strings to the standard input of the grubmd5crypt command.
The grubmd5crypt command uses these strings as input for its Password: and Retype Password: prompts. It then encrypts the password.
The output from grubmd5crypt command is inserted into the file, including the encrypted password:
4. Arrow up to the line that reads stty: standard input: Invalid argument .
5. Type dd to delete the line.
6. Repeat this process to delete the following lines:
Password:
Retype Password:
stty: standard input: Invalid argument
7. Press Ins.

8. At the beginning of the line with the encrypted password, enter password md5.
An example is shown below:
Your hash value will be different than that shown above.
1. Save the file by pressing Esc and then entering :wq.
2. Reset the computer by entering reboot at the shell prompt.
You will notice that the start screen looks different now, because you turned off the graphical menu.
3. If you want to edit the kernel command line, press p and then enter a password of secret.
4. Select the SUSE Linux Enterprise Server 11 menu option and press Enter.
Wait while the system boots.
5. Undo the changes in /boot/grub/menu.lst:
1. Log in as geeko with a password of novell.

2. Open a terminal window and su to root using a password of novell.
3. At the shell prompt, enter vi /boot/grub/menu.lst.
4. Press Ins.
5. Put a comment sign ( #) at the beginning of the line beginning with password.
6. Remove the comment sign in front of the line starting with gfxmenu.
7. Save the file and close vi by pressing Esc and entering :wq.
8. At the shell prompt, enter exit > exit.
Manage Runlevels
In this exercise, you practice configuring runlevels. This exercise has four parts.
In the first part, you use the runlevel command to determine the current runlevel. You also use the init command to change to runlevel 3 and then back to 5.
In the second part, you activate the at service atd.
In the third part, you reboot your computer and boot into runlevel 3 instead of the default runlevel 5. You then login and switch to back to runlevel 5.
In the fourth part, you activate the rsync daemon using the YaST runlevel editor.
Complete the following:
• "Part I: View and Change the Current Runlevel"
• "Part II: Activate the atd Service"
• "Part III: Set a Runlevel at Boot Time"
• "Part IV: Enable rsyncd with YaST"
Part I: View and Change the Current Runlevel
To view and change the current runlevel, do the following:
1. If necessary, log in to your DA1 server as geeko with a password of novell.
2. Open a terminal window and su to root using a password of novell.

3. Check the previous and current runlevels by entering runlevel at the shell prompt.
List the runlevels in the table below:
Previous Current
Notice that the previous runlevel is listed as N, which means that there was no previous runlevel set.
3. Change to runlevel 3 by entering init 3 in the terminal window.
The graphical environment is terminated and you are left at a terminal login prompt:

5. Log in as root with a password of novell.
6. Check the previous and current runlevel by entering runlevel.
List the runlevels in the table below:
Previous Current
7. Switch to runlevel 5 by entering init 5.
The GUI login screen appears.
8. Log in as geeko with a password of novell.
Part II: Activate the atd Service
To activate the atd service, do the following:
1. Open a terminal window.
2. At the shell prompt, su to root with a password of novell.
3. View the current runlevel configuration for atd by entering chkconfig atd l at the shell prompt.
Notice that configuration is off for all runlevels.
4. Install the service to its predefined runlevels by entering
insserv d atd
5. Check the modified runlevel configuration for atd by entering chkconfig atd l again.
Notice that the default configuration for atd sets runlevels 2, 3, and 5 to on:

6. Change to the /etc/rc.d/rc3.d directory by entering cd /etc/rc.d/rc3.d at the shell prompt.
7. List the atd files in the directory by entering ls l *atd at the shell prompt.
Notice that there are two atd linksone is used to start the atd service and one is used to kill it:
8. Start the at service by entering rcatd start at the shell prompt.
9. Verify that the service is running by entering rcatd status at the shell prompt.
10.Switch to virtual terminal 1 by pressing Ctrl+Alt+F1.
11.Press Ctrl+c to bring up the shell prompt.
12.You should be still be logged in as root. Verify this by entering whoami at the shell prompt.
13.Switch to runlevel 1 by entering init 1 at the shell prompt.

14.When prompted, enter a root password of novell.
15.Determine if the atd service is running by entering rcatd status at the shell prompt.
The service is listed as unused because it is not configured to start at runlevel 1.
16.Switch back to your previous runlevel (5) by entering init 5 at the shell prompt.
The GUI login screen appears.
17.Log in as geeko with a password of novell.
18.Open a terminal session and enter su to switch to root using a password of novell.
19.From the command line, remove the atd service from system startup runlevels by entering chkconfig atd off.
20.View the current runlevel configuration for at by entering chkconfig atd l at the shell prompt.
Notice that the service is off for all runlevels.
21.Reenable the service to start at the default runlevels by entering chkconfig atd on at the shell prompt.
Part III: Set a Runlevel at Boot Time
To set a runlevel at boot time, do the following:
1. Reboot by entering init 6 at the shell prompt.
2. When the GRUB boot menu is displayed, press Space to stop the timer.
3. In the Boot Options field, add the number 3 at the end of the line, as shown below:

4. Press Enter to boot the Linux system to runlevel 3.
5. When the login prompt appears, log in as root with a password of novell.
6. Display the current runlevel by entering runlevel at the shell prompt.
7. Switch to runlevel 5 by entering init 5 at the shell prompt.
8. Switch back to the virtual terminal by pressing Ctrl+Alt+F1.
9. Press Ctrl+C.
10.Log out as root by entering exit.

11.Switch back to the graphical user interface by pressing Ctrl+Alt+F7.
12.Log in as geeko with a password of novell.
Part IV: Enable rsyncd with YaST
To enable rsyncd with YaST, do the following:
1. In the graphical desktop, select Computer > YaST.
2. Enter a password of novell.
The YaST Control Center appears.
3. Select System > System Services (Runlevel).
The Runlevel Editor: Services dialog appears.
4. Switch to a more detailed view (with additional options) by selecting Expert Mode.
5. Scroll to and select rsyncd.
6. Below the list, configure this service to start at runlevels 3 and 5 by selecting 3 and 5.
7. From the Set/Reset dropdown list, select Enable the Service .
8. Start the rsyncd service by selecting Start Now from the Start/Stop/Refresh dropdown list.
A status message appears indicating that the service started successfully.
9. Close the status message by selecting OK.
10.Stop the rsyncd service by selecting Stop Now from the Start/Stop/Refresh dropdown list.
A status message appears indicating that the service stopped successfully.
11.Close the status message by selecting OK.
12.Save the changes by selecting OK > Yes.
13.Close the YaST Control Center.

Administer Linux Processes and Services
In this section of the workbook, you learn how to do the following:
• "Manage Linux Processes"
In this exercise, you start and stop processes and change their priorities.
Manage Linux Processes
In this exercise, you practice starting and stopping processes and changing their priorities.
In the first part of the exercise, you start and suspend gcalctool, move it to the background and foreground, and then stop it.
In the second part, you start gcalctool and set the priority of the running program to a nice value of 5. Then you start xeyes with a nice value of 10.
Complete the following:
• "Part I: Move Processes to the Background"
• "Part II: Modify Process Priorities"
Part I: Move Processes to the Background
To move processes to the background, do the following:
1. If your DA1 server is running, suspend it.
2. If your DASLED workstation is suspended, resume it.
3. If necessary, log in to your DASLED virtual workstation as geeko with a password of novell.
4. Open a terminal window and su to root using a password of novell.
5. At the command line, display the processes that are currently owned by geeko by entering
ps lU geeko (with a lowercase L)
6. Display the processes that are currently owned by root by entering
ps lU root (with a lowercase L)
7. Start the GNOME Calculator program by entering gcalctool at the shell prompt.
Notice that the terminal is not available to receive new commands because no command line is displayed. This is because the calculator program is running in the foreground.
8. Arrange the calculator window and the terminal window so that you can see them both; then select the terminal window to activate it.
9. Suspend the calculator program by pressing Ctl+z.
10.Try using the calculator tool to calculate several numbers.
Because its process was suspended, the calculator does not respond.
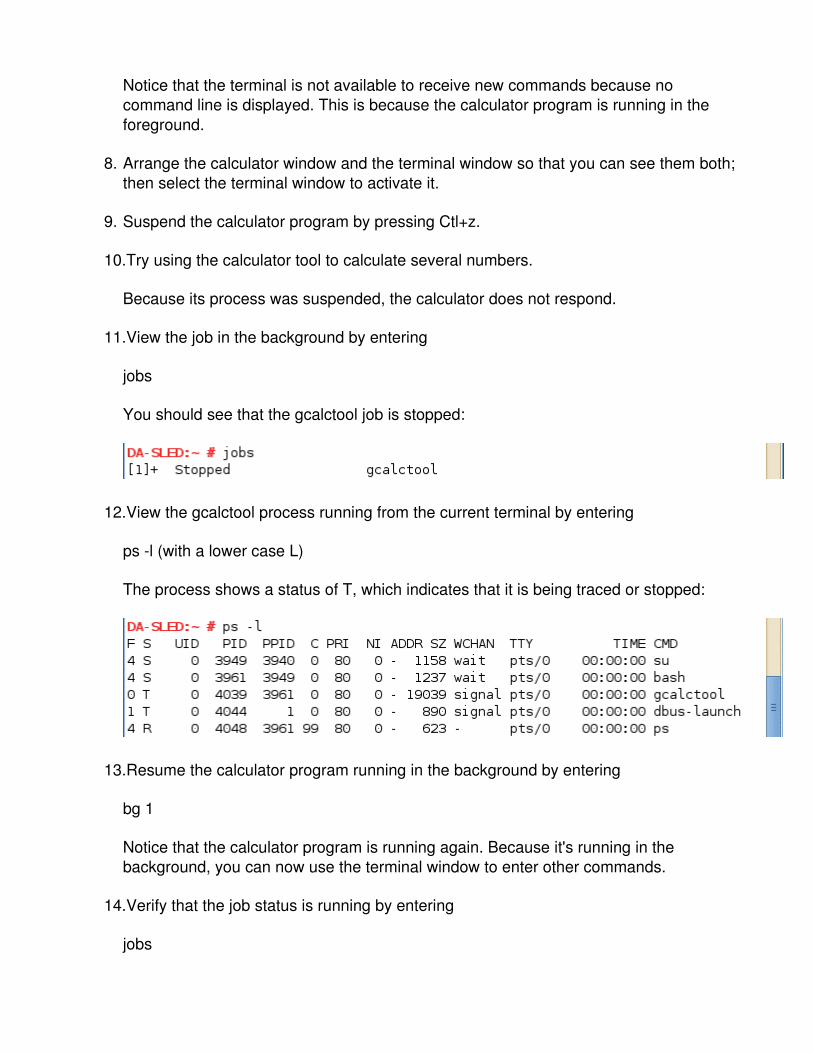
11.View the job in the background by entering
jobs
You should see that the gcalctool job is stopped:
12.View the gcalctool process running from the current terminal by entering
ps l (with a lower case L)
The process shows a status of T, which indicates that it is being traced or stopped:
13.Resume the calculator program running in the background by entering
bg 1
Notice that the calculator program is running again. Because it's running in the background, you can now use the terminal window to enter other commands.
14.Verify that the job status is running by entering
jobs

You should see that the gcalctool job is now running:
15.View the gcalctool branch in the process tree by entering
pstree p | grep gcalctool
Notice that the gcalctool process is listed at the end of the tree:
16.Bring the xosview process into the foreground by entering
fg 1
17.Close the calculator program.
18.Start the calculator in the background by entering
nohup gcalctool&
NOTE: The nohup command runs a command such that is ignores any hangup kill signals sent to it.
19.Close the terminal window.
The calculator program remains running.
20.Open a new terminal window.
21.Start the top program by entering
top
22.View only the processes started by root by typing u; then entering root.
23.Check for the calculator program (gcalctool) listed in top.
24.(Conditional) If you cannot find the gcalctool program, try maximizing the terminal window. You can also activate the Calculator window and use it to calculate several numbers. This should cause the gcalctool process to be moved near the top of the

output in top.
You can also enter F in top and select PID as the sort column. If needed, you can also reverse the sort order by pressing R
25.Record the PID of the gcalctool process:
26.Exit top by typing q.
27.View information about the gcalctool process by entering
ps PID_of_gcalctool_process
28.Switch to your root user account using the su command and a password of novell.
29.Stop the calculator program and check the status by entering the following commands:
kill PID_of_gcalctool_process ps aux | grep gcalctool
30.Start the xeyes program in the background by entering
xeyes&
31.Kill the xeyes program by entering
killall xeyes
Part II: Modify Process Priorities
To modify process priorities, do the following:
1. Switch back to your geeko user by entering exit at the shell prompt.
2. Start the gcalctool program in the background by entering
gcalctool&
3. Record the PID for gcalctool (displayed in the terminal window):
4. View the running process by entering
ps lf
Notice that the nice value (NI) is currently at 0.
5. Increase the priority of the process to a nice value of 5 by entering

renice 5 p PID_of_gcalctool_process
Notice that a regular user cannot change the nice value to a value below 0, only 020.
6. Switch to root ( su ) with a password of novell.
7. Try setting the nice value to 5 again by entering
renice 5 p PID_of_gcalctool_process
8. Check that the setting is effective by entering
ps lf (lower case L)
Notice that the process is not displayed, because ps lf only displays processes started by the current user. The calculator program was started by geeko (not root).
9. View all processes by entering
ps alf
The gcalctools process is now displayed.
10.Change the nice value for the gcalctools process to a higher priority by entering
renice 10 p PID_of_gcalctools_process
11.Verify that the gcalctools process nice value is set to 10 by entering
ps alf (with a lower case L)
12.Exit the shell running as root by entering
exit
You should now be user geeko again.
13.Start the xeyes program in the background with the nice value of +10 by entering
nice xeyes&
14.Verify that the xeyes process nice value is set to +10 by entering
ps lf (with a lower case L)
15.Kill the gcalctools and xeyes processes by entering the following commands:

kill PID_of_gcalctools_process killall xeyes
16.Close your terminal window.
Administer the Linux File System
In this section of the workbook, you learn how to do the following:
• "Configure Partitions on your Hard Drive"
In this exercise, you practice creating partitions and file systems with YaST and fdisk. You also use command line tools to create file systems.
• "Manage File Systems from the Command Line"
In this exercise, you practice managing file systems from the command line.
• "Create Logical Volumes"
In this exercise, you learn how to administer LVM with YaST.
• "Set Up and Configure Disk Quotas"
In this exercise, you learn how to administer quotas.
Configure Partitions on your Hard Drive
In this exercise, you practice creating partitions and file systems using YaST and fdisk. You also use command line tools to create file systems.
In the first part of this exercise, you use YaST to create the following partitions and file systems:
• An extended partition using the remaining disk space.
• One logical partition with a size of 500 MB, an ext3 file system, and a mount point of /apps.
• One logical partition with a size of 1 GB, a Reiser file system, and a mount point of /srv.
In the second part of this exercise, you use fdisk to create the following partitions:
• One partition of the partition type Win95/FAT32 with a size of 500 MB.

• Two partitions with the partition type Linux and sizes of 1 GB and 2 GB.
In the third part of this exercise, you create file systems on the partitions you created in the second part using the applicable options for mkfs:
• Create a FAT32 file system on /dev/sda7.
• Create an ext2 file system on /dev/sda8.
• Create a Reiser file system with a file system size of 625 MB on /dev/sda9.
To do this, you need to complete the following tasks:
• "Part I: Create Partitions and File Systems with YaST"
• "Part II: Partition Manually with fdisk"
• "Part III: Manage File Systems from the Command Line"
Part I: Create Partitions and File Systems with YaST
To create partitions and file systems with YaST, do the following:
1. If your DASLED virtual machine is currently running, suspend it.
2. If your DA1virtual machine is suspended, resume it.
3. If necessary, log into DA1 as geeko with a password of novell.
4. Open a terminal window and use the su command to switch to your root account using a password of novell.
5. At the shell prompt, enter yast2 disk.
A warning message appears.
6. Continue by clicking Yes.
After a few moments, the Expert Partitioner dialog appears.
7. Create an extended partition with YaST by doing the following:
1. From the System View, expand Hard Disks.
2. Highlight sda, then click Add.

3. For the New Partition Type, select Extended Partition; then click Next.
The New Partition Size dialog is displayed:
4. Make sure Maximum Size is selected; then click Finish.
You are returned to the Expert Partitioner dialog, with the extended partition listed as a new entry for your hard disk:

8. Create a new ext3 partition with YaST:
1. Click Add.
The New Partition Size dialog is displayed.
2. Verify that Custom Size is selected.
3. In the Size field, enter 500 MB; then click Next.
NOTE: Be sure to use uppercase characters when entering MB or GB in the Expert Partitioner fields.

The Formatting Options dialog is displayed:
4. Set the file system type to Ext2.
5. Under Mounting Options, select Mount Partition.
6. For the Mount Point, enter /apps.
7. Create the partition definition by clicking Finish.
You are returned to the Expert Partitioner dialog where the new partition is added to the list:

The asterisk ( *) after the mount point indicates the file system is not currently mounted.
1. Create a partition for the /srv directory:
1. With the sda disk selected, click Add.
2. With Custom Size selected, enter 1 GB in the Size field; then click Next.
3. In the File System dropdown list, select Reiser.
4. Under Mounting Options, select Mount Partition.

5. For the Mount Point, enter /srv.
6. Add the /srv partition by clicking Finish.
You are returned to the Expert Partitioner dialog where the new partition is added to the list:
10.Add the new partitions to the hard drive by clicking Next.
A dialog is displayed showing a summary of the changes.
11.Select Finish.

This commits the changes to disk and closes the Expert Partitioner dialog.
12.Verify creation of the new partition for /apps.
In the terminal window where you are logged in as root, verify that the new partitions have been mounted by entering mount.
You should see the following lines:
13.The contents of the /srv directory are no longer visible as it is currently used as the mount point for the /dev/sda6 partition. To copy the exists contents of the directory to the new partition, do the following:
1. Unmount /dev/sda6 by entering
umount /srv
2. Mount the partition /dev/sda6 under /mnt by entering
mount /dev/sda6 /mnt
3. Move the content of /srv to /mnt
mv /srv/* /mnt
4. Umount /mnt and mount /dev/sda6 again, using the entries in /etc/fstab
umount /mnt mount a
5. Verify that the files you moved are available again under /srv by entering
ls /srv/
14.Verify that the appropriate entry was added to the /etc/fstab for the new partitions by entering:
cat /etc/fstab
You should see the following:

These entries ensure that the new partitions are mounted when the system boots.
Part II: Partition Manually with fdisk
To partition manually from the command line with fdisk, do the following:
1. In the terminal window where you are logged in as root, start the utility fdisk on the first hard disk on your server by entering
fdisk /dev/sda
A message is displayed indicating that the number of cylinders is above 1024, which might cause problems under certain circumstances.
2. View the current partition table in fdisk by entering p.
Notice that there are five partitions defined on sda:
3. Create a new 500MB Win95 FAT32 logical partition in the extended partition you created earlier by doing the following:
1. Create a new partition by entering n.
2. Enter l (lower case L) for logical.
3. Accept the default first cylinder by pressing Enter.
4. Indicate the partition size by entering +500M.
5. Change the partition type to Win95 FAT32 by entering t (for type).
6. Enter 7 to select the partition you just created.

7. When prompted for a Hex code, enter b for Win95/FAT32.
8. Verify the new partition configuration by entering p.
Notice that the sda7 partition has been added to the table:
4. Create 2 more logical partitions with a partition type of Linux (the default) by doing the following:
1. Create a new partition by entering n.
2. Enter l (lower case L) to create a logical partition.
3. Accept the default first cylinder by pressing Enter.
4. Specify a partition size of 1 GB by entering +1G.
5. Create another new partition by entering n.
6. Enter l (lower case L) to create a logical partition.
7. Accept the default first cylinder by pressing Enter.
8. Indicate the partition size by entering +2G.
9. Verify the new partition configuration by entering p.
Notice that two new partitions (sda8 and sda9) have been added to the partition table:
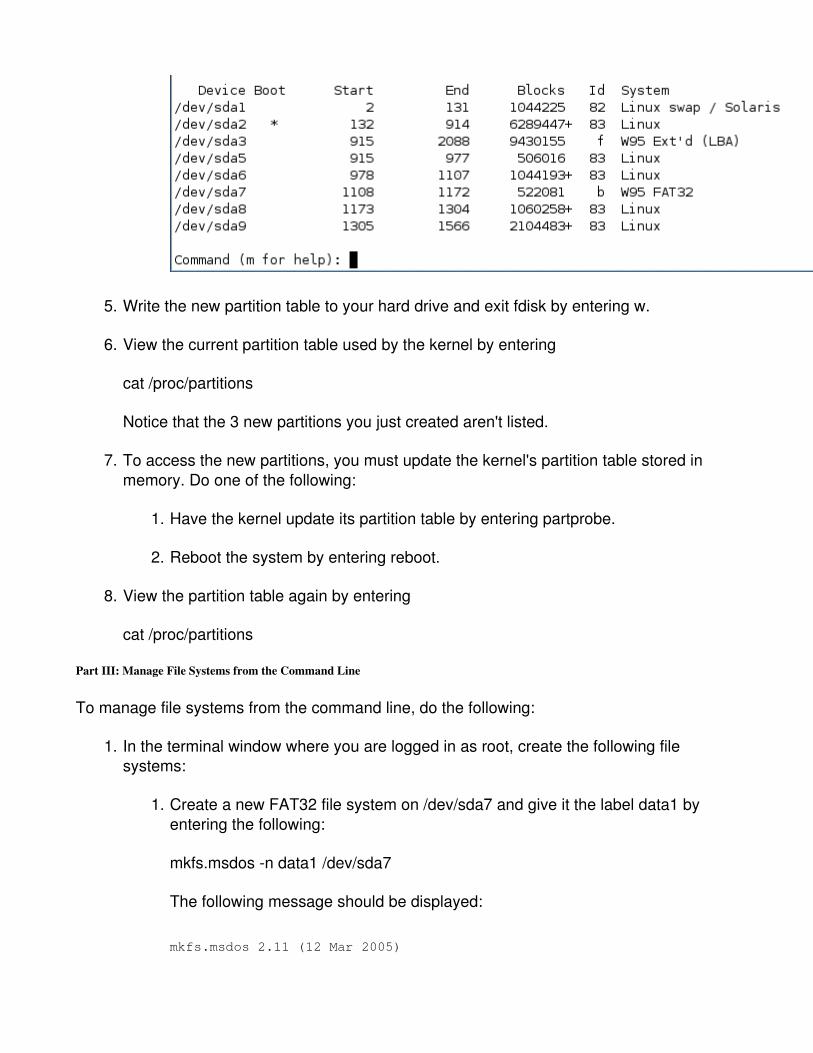
5. Write the new partition table to your hard drive and exit fdisk by entering w.
6. View the current partition table used by the kernel by entering
cat /proc/partitions
Notice that the 3 new partitions you just created aren't listed.
7. To access the new partitions, you must update the kernel's partition table stored in memory. Do one of the following:
1. Have the kernel update its partition table by entering partprobe.
2. Reboot the system by entering reboot.
8. View the partition table again by entering
cat /proc/partitions
Part III: Manage File Systems from the Command Line
To manage file systems from the command line, do the following:
1. In the terminal window where you are logged in as root, create the following file systems:
1. Create a new FAT32 file system on /dev/sda7 and give it the label data1 by entering the following:
mkfs.msdos n data1 /dev/sda7
The following message should be displayed:
mkfs.msdos 2.11 (12 Mar 2005)

This confirms the file system was created.
NOTE: Make sure you specify the correct device in the above command! If you specify the wrong device, no warning message will be displayed and the file system on the device will be overwritten.
2. Create a new ext2 file system on /dev/sda8 with verbose output by entering the following:
mkfs t ext2 v /dev/sda8
Notice that by adding the option v, extensive information about the new file system is displayed:
1. Create a new Reiser file system on /dev/sda9 that is 625 MB in size by entering
mkreiserfs /dev/sda9 160000
A warning message appears indicating that all data will be lost on /dev/sda9.
2. Continue by entering y.
2. Create the directories named data1, data2, and data3 under /export/ by entering

mkdir p /export/data{1,2,3}
3. Verify that the directories were created by entering
ls l /export
4. As root, add entries to the /etc/fstab file for the new file systems:
1. Open the file /etc/fstab in the vi editor by entering vi /etc/fstab at the shell prompt.
2. Press Ins.
3. At the end of the file fstab, add the following new lines:
/dev/sda7 /export/data1 vfat defaults 1 2 /dev/sda8 /export/data2 ext2 defaults 1 2 /dev/sda9 /export/data3 reiserfs defaults 1 2
NOTE: You must add an empty line after the last new entry at the end of the file, otherwise the mount command cannot read the file.
These new entries ensure the sda7, sda8, and sda9 partitions are mounted when starting or rebooting the system.
4. Save the changes to /etc/fstab by pressing Esc and then entering :wq.
5. In the terminal window, reread the /etc/fstab file and mount all of the new file systems by entering
mount a
6. View the information on the mounted file systems by entering the following two commands:
mount cat /proc/mounts
You should see entries for the three new partitions you just created, as shown in the following:

Manage File Systems from the Command Line
In this exercise, you practice managing file systems from the command line. In the previous exercise, you created several partitions and file systems.
In the first part of this exercise, you run e2fsck on the ext2 file system you created on /dev/sda5, which is mounted in /apps.
In the second part of the exercise, you convert the /dev/sda8 partition to an ext3 file system by adding a journal. You also add a label to it.
Finally, you resize the Reiser file system on /dev/sda9 to use the entire partition and not just 625 MB.

Complete the following:
• "Part I: Run e2fsck"
• "Part II: Customize the File Systems"
Part I: Run e2fsck
To run e2fsck, do the following:
1. If if your DA1 virtual machine is suspended, resume it.
2. If necessary, log into DA1 as geeko with a password of novell.
3. Open a terminal session and switch to your root user account by entering su followed by a password of novell at the shell prompt.
4. Unmount the file system on /dev/sda5 by entering
umount /apps
5. Verify that the file system is no longer mounted by entering
mount
The /dev/sda5 partition should not be listed in the output of the mount command.
6. Start a file system check on sda5 running in verbose mode with an automatic response of yes to all prompts by entering
e2fsck f y v /dev/sda5
7. Mount the /apps file system again by entering
mount /apps
8. Verify that the file system on /dev/sda5is mounted by entering mount
Part II: Customize the File Systems
In this part of the exercise, you add a journal to an ext2 file system, effectively making it an ext3 file system. Complete the following:
1. Modify the /dev/sda8 partition:
1. In the terminal window, umount the /dev/sda8 partition and view details about

the ext2 file system on it by entering
umount /dev/sda8 ; dumpe2fs /dev/sda8 | more
Notice the block size and the file system state.
2. Give the ext2 file system a volume name of /export/data2 while the file system is unmounted by entering
tune2fs L /export/data2 /dev/sda8
NOTE: It is common practice to use this naming convention. Naming a file system after its mount point can be useful in system rescue situations when the /etc/fstab file is not available.
3. Verify that the file system now has a volume name by entering
dumpe2fs /dev/sda8 | less
You should see that the volume name has been set to the partition's mount point, as shown below:
4. Add a journal to the file system (making it an ext3 file system) by entering
tune2fs j /dev/sda8
5. Verify that the file system now contains a journal by entering
dumpe2fs /dev/sda8 | less
You should see the following:

6. Mount /dev/sda8 again by entering
mount /dev/sda8
7. View information on the mounted file systems by entering
mount
Notice that the file system is still mounted as an ext2 file system.
8. Unmount the partition /dev/sda8 again by entering
umount /dev/sda8
9. Verify that the file system state is clean by entering
dumpe2fs /dev/sda8 | less
10.Edit the /etc/fstab file to change the file system type from ext2 to ext3 by entering vi /etc/fstab at the shell prompt.
11.Press Ins.
12.Locate the entry for /dev/sda8 and change the file system type from ext2 to ext3, as in the following:

13.Press Esc, then enter :exit to save the changes to the file and exit the vi editor.
14.At the command line, reread /etc/fstab and mount the partition as an ext3 file system by entering
mount a
15.Verify the change by entering
mount
You should see that /dev/sda8 has been mounted as an ext3 file system, as shown below:
16.Unmount the partition /dev/sda8 again by entering

umount /export/data2
17.Mount the partition as an ext2 file system manually by entering
mount t ext2 /dev/sda8 /export/data2
18.Verify that the file system is mounted without a journal (as an ext2 file system) by entering
mount
As you can see, ext3 is backward compatible with ext2:
1. Remount /dev/sda8 as an ext3 file system and verify the change by entering the following commands:
umount /export/data2 mount a mount
2. Modify the /dev/sda9 partition by doing the following:
1. View the size of the /dev/sda9 partition by entering
df h
Note the size of /dev/sda9, which should be similar to that shown in the following:
2. Unmount dev/sda9 by entering

umount /export/data3
3. While the partition is unmounted, add a label of /export/ data3 to the file system by entering
reiserfstune l /export/data3 /dev/sda9
4. Resize the partition to consume the entire partition by entering
resize_reiserfs /dev/sda9
NOTE: When no size is specified, the file system is resized to use all available space on the partition. Increasing the size of the ReiserFS is also possible when the file system is mounted.
5. Remount the partition by entering
mount a
6. View the size of the partition by entering
df h
The size is no longer 625 MB but is 2 GB or more, depending upon the size of your extended partition.
7. Unmount the partition so you can run a file system check on it by entering
umount /export/data3
8. Run a check on the file system on /dev/sda9 by entering
reiserfsck y /dev/sda9
9. Remount all file systems by entering
mount a
Create Logical Volumes
In this exercise, you learn how to administer LVM with YaST.
In the first part of this exercise, you use YaST to create two physical volumes (PVs) with a size of 1 GB each. You then add them to a volume group (VG) named projects.
Within the volume group, you next add two logical volumes named pilot (750 MB) and

production (750 MB) which will be mounted under /projects/pilot and /projects/production, respectively.
In the second part of the exercise, you increase the size of the logical volume production to the maximum space available within the volume group.
Complete the following:
• "Part I: Create LVM Physical Volumes, a Volume Group, and Logical Volumes"
• "Part II: Resize an LVM Volume"
Part I: Create LVM Physical Volumes, a Volume Group, and Logical Volumes
To create LVM Physical Volumes, a Volume Group, and Logical Volumes, do the following:
1. If your DA1 virtual machine is suspended, resume it.
2. If necessary, log into DA1 as geeko with a password of novell.
3. Start YaST by selecting Computer > YaST and entering a password of novell, when prompted.
4. Select System > Partitioner and acknowledge the warning message by selecting Yes.
The Expert Partitioner dialog appears.
5. Create a new LVM partition by doing the following:
1. From the System View, expand Hard Disks.
2. Highlight sda; then click Add.
3. Verify Custom Size is selected; then enter 1 GB in the Size field, as shown below:

1. Click Next.
2. Under Formatting Options, select Do not format partition.
3. Under File System ID, select 0x8E Linux LVM.
4. Save the partition definition by selecting Finish.
2. Create another 1 GB LVM partition by repeating the preceding step.
You should now have two 1 GB LVM partitions:

7. From the System View, select Volume Management; then click Add Volume Group.
8. Specify the following:
1. Volume Group Name: projects
2. Physical Extent Size: 4 MB
9. Add each Linux LVM physical volume to the volume group projects by Ctrlclicking /dev/sda10 and /dev/sda11 and then clicking Add.
10.Click Finish.

The Volume Management dialog appears displaying the newly added volume group:
11.Add a logical volume named pilot to the projects volume group by doing the following:
1. From the System View, select projects; then click Add.
The Add Logical Volume dialog appears.
2. Enter a Logical Volume name of pilot; then click Next.
3. Select Manual Size and enter 750 MB in the Size field; then click Next.
4. In the File System dropdown list, select Reiser.

5. Select Mount Partition; then enter a mount point of /projects/pilot.
6. Select Finish.
12.Add a logical volume named production to the projects volume group by doing the following:
1. From the System View, select projects; then click Add.
2. Enter a Logical Volume name of production; then click Next.
3. Select Manual Size and enter 750 MB in the Size field; then click Next.
4. In the File System dropdown list, select Reiser.
5. Select Mount Partition; then enter a mount point of /projects/production.
6. Select Finish.
You are returned to the Expert Partitioner.
13.In the Expert Partitioner, click Next.
A message appears; accept the changes by clicking Finish.
14.Open a terminal window and use the su command and a password of novell to switch to root.
15.View the new LVM file systems by entering
df h
You should see output similar to the following:

16.View the device names and mount locations by entering
cat /etc/fstab
You should see the following:
Part II: Resize an LVM Volume
To resize a LVM Volume, do the following:
1. In the terminal window where you are logged in as root, enter umount /projects/production .
2. From the YaST Control Center, select System > Partitioner and acknowledge the

warning message by selecting Yes.
The Expert Partitioner dialog appears.
3. From the System View, expand Volume Management.
4. Expand projects and select production; then click Resize.
The Resize Logical Volume dialog appears, as shown below:
Note the size of the volume.
4. Use the slider to select the maximum size available.
Notice that the size changes to the maximum space available.
5. Continue by clicking OK.
6. Save the changes by clicking Next; then apply the changes by clicking Finish.
7. From the terminal window, view the new size of production by entering
df h
You should see output similar to the following:

Set Up and Configure Disk Quotas
In this exercise, you learn how to administer quotas. You install the quota package and then configure quotas for /dev/sda8, which is mounted at /export/data2.
Complete the following:
1. If your DA1 virtual machine is suspended, resume it.
2. If necessary, log into DA1 as geeko with a password of novell.
3. Open a terminal window; then switch to root using the su command and a password of novell.
4. Install the quota package by entering yast i quota.
5. (Conditional) Insert the SLES 11 installation DVD, if prompted.
6. View the disk quota configuration for user geeko by entering
quota vu geeko
The lack of any output indicates there are no quotas currently configured for geeko.
7. Add quota mount options to the /dev/sda8 partition by doing the following:
1. Open the /etc/fstab file in the vi editor by entering
vi /etc/fstab
2. Press Ins and arrow down to the /dev/sda8 entry.
3. Edit the /dev/sda8 entry to the following:

/dev/sda8 /export/data2 ext3
defaults
,usrquota,grpquota 1 2
4. When you finish, press Esc; then save the file and exit by entering :wq.
8. Remount the file system so it that the changes in the /etc/fstab file are read by the system by entering
mount o remount /dev/sda8
NOTE: If you receive the error message "/export/data2 mounted already, or bad option", check the contents of the /etc/fstab file. You might have misspelled the usrquota or grpquota option.
9. Run quotacheck to initialize the quota database by entering
quotacheck mavug
NOTE: You will receive several status messages about old quota files. These indicate that this is a new quota database with no previous quota database files on the system.
10.Verify that the aquota.user and aquota.groups files exist in the /export/data2 directory by entering
ls l /export/data2
11.Turn quotas on for all file systems that are mounted with these options by entering
quotaon av
12.Make the quota system persistent after reboot by entering
insserv boot.quota
13.Set a quota for geeko with a soft block limit of about 20 MB and a hard block limit of about 30 MB on /dev/sda8 by entering
edquota u geeko
The quota editor appears in the vi editor.
14.Press Ins.

15.Under soft, remove the 0 and enter 20000.
16.Under hard, remove the 0 and enter 30000.
17.When you're finished, press Esc; then enter :wq.
18.View the quota information about all configured users by entering
repquota av
You should see the following:
19.(Optional) If you finish early, set a quota for the users group of 100 MB for the soft limit and 150 MB for the hard limit.
20.Test if the quotas by doing the following:
1. As root, create a directory named /export/data2/geeko and change the owner to geeko by doing the following:
mkdir /export/data2/geeko chown geeko.users /export/data2/geeko
2. Change to the user account geeko and create a file by entering
su geeko dd if=/dev/zero of=/export/data2/geeko/bigfile
After a short time, you should see a message indicating the quota was exceeded, as shown below:

21.Close all open windows.
Configure the Network Manually
In this section of the workbook, you learn how to do the following:
• "Configure the Network Connection Manually"
In this exercise, you learn how to configure the network manually.
Configure the Network Connection Manually
The purpose of this exercise is to familiarize you with manually configuring network settings.
In the first part, you use the ip command to find out the current settings for IP address, routes, mac address. In the second part, you use YaST to delete the current network configuration.
In the third part, you use the ip command to set up the network manually. In the fourth part, you recreate the file noted in Part I using an editor.
Complete the following:
• "Part I: Note the Current Network Configuration"
• "Part II: Delete the Current Network Setup with YaST"
• "Part III: Configure the Network Manually"
• "Part IV: Save the Network Connection to an Interface Configuration File"
Part I: Note the Current Network Configuration
To note the current network configuration, do the following:
1. If necessary, power on your DA1 virtual server and log in as geeko with a password of novell.

2. Open a terminal window and su to root using a password of novell.
3. Enter ip address show eth0 .
4. Under eth0, find the line starting with inet and record the IP address with the subnet mask displayed in that line:
• IP address:
• Subnet mask:
5. Enter ip route show.
Notice that a default gateway has not been assigned.
6. Enter ip link show eth0.
7. Find the line starting with link/ether and record the MAC address of the network card:
• MAC address:
Part II: Delete the Current Network Setup with YaST
To delete the current network setup with YaST, do the following:
1. Start YaST; then select Network Devices > Network Settings .
2. Select your network card; then click Delete.
3. Click OK.
4. Close YaST.
5. Verify that the network connection is not working any more by pinging your host system's vmnet1 virtual network interface. Enter the following at the shell prompt:
ping 172.17.0.1
You should see a message indicating that the network is unreachable.
6. Enter ip address show at the shell prompt.
Note that the state of your eth0 device is DOWN.

Part III: Configure the Network Manually
To configure the network manually, do the following:
1. Enter the following command at the shell prompt:
ip address add 172.17.8.101/16 brd + dev eth0
2. To activate the network device, enter
ip link set eth0 up
3. To set the default route, enter
ip route add default via 172.17.0.1
4. Verify that the network connection is working again by entering
ping 172.17.0.1
You should see your host system respond to the ping, as shown below:
Part IV: Save the Network Connection to an Interface Configuration File
To save the network connection to an interface configuration file, do the following:
1. In the terminal window, enter
cd /etc/sysconfig/network
2. Make a copy of the network configuration template by entering
cp ifcfg.template ifcfgeth0
3. Open the copied file in a text editor by entering vi ifcfgeth0 at the shell prompt.
4. Press Ins.
5. Find the following options and enter the indicated values:

• STARTMODE= 'auto'
• BOOTPROTO= 'static'
• IPADDR= '172.17.8.101/16'
• NETMASK= '255.255.0.0'
• BROADCAST= '172.17.255.255'
• Change BRIDGE='yes' to BRIDGE='no'
6. Press Esc; then save the file and exit vi by entering :wq.
7. Create a new file with vi called routes by entering vi routes at the shell prompt.
8. Press Ins; then add the following line to the file:
default 172.17.0.1
9. Press Esc; then save the file and exit vi by entering :wq.
10.Reboot your system by entering init 6 at the shell prompt.
Wait while the system reboots.
11.After rebooting, log in as geeko with a password of novell.
12.Open a terminal window.
13.Change to root using the su command and a password of novell.
14.Verify that the network configuration loaded correctly by entering the following commands:
ip address show eth0 ip route show
You should see the following:

15.Verify that the network connection is working properly by entering
ping 172.17.0.1
16.Close all open windows.
NOTE: If the network configuration doesn't work properly, use the YaST Network Card module to reconfigure the network card with the proper settings.
Manage Hardware
In this section of the workbook, you can find the following exercises:
• "Manage Linux Kernel Modules"
In this exercise, you load and unload kernel modules.
• "Obtain Hardware Configuration Information in YaST"
In this exercise, you learn how to obtain hardware configuration information on your computer.
• "Modify udev Rules”
In this exercise, you will modify a udev rule to rename your Ethernet interface.
Manage Linux Kernel Modules
In this exercise, load and unload kernel modules. Complete the following:
1. If necessary, power on your DA1 virtual server and log in as geeko with a password of novell.

2. Open a terminal window, then switch to the root user by entering su followed by a password of novell.
3. View the currently loaded kernel modules by entering lsmod at the shell prompt.
4. Scroll through the modules to see if the joystick module ( joydev) is loaded. If it's difficult to locate in the output, you can enter lsmod | grep joydev at the shell prompt.
You should see output similar to the following:
The 0 in the Used column indicates that the module is not in use.
NOTE: If the joydev module is not listed, skip to step Step 7

4. Remove the joystick module from the kernel memory by entering
rmmod joydev
5. Verify that the joydev kernel module was removed from memory by entering lsmod | grep joydev at the shell prompt.
Notice that the module joydev is no longer listed.
6. Load the joystick kernel module by entering
modprobe joydev
7. Verify that the joydev kernel module is loaded in memory by entering lsmod | grep joydev at the shell prompt.
8. View the kernel modules configuration by entering modprobe c | less at the shell prompt.
9. Scroll through the module configuration information by pressing Space.
10.When you have finished, return to the command line by typing q.
11.Create a list of kernel modules dependencies by entering
depmod v | less
Wait a few minutes for the information to be generated.
12.Scroll through the dependency information by pressing Space.
13.When you have finished, return to the command line by typing q.
14.Close the terminal window by entering exit twice.
Obtain Hardware Configuration Information in YaST
In this exercise, you obtain hardware configuration information about your computer. Complete the following:
1. If necessary, power on your DA1 virtual server and log in as geeko with a password of novell.
2. Select Computer > YaST.
3. When prompted, enter a root password of novell.

4. Select Hardware > Hardware Information.
Wait while the YaST module scans your hardware. This may take several minutes. When complete, you should see output similar to the following:
5. Review the results of the hardware detection.
6. Save the results to a file by doing the following:
1. Click Save to File.
2. Browse to the root user's home directory ( /root).

3. In the File Name field, enter hardware.txt.
4. Click Save.
5. Wait while the file is saved. This make take several minutes to complete.
7. Close the Hardware info window by clicking Close.
8. Close the YaST Control Center.
9. View the information saved in the hardware.txt file by doing the following:
1. Open a terminal window.
2. Switch to your root user account by entering su at the shell prompt, followed by a password of novell.
3. At the shell prompt, enter less ./hardware.txt.
You should see text similar to the following:

1. Use the Spacebar to browse through the results.
2. When finished, press q to exit.
2. Close all open windows.
Modify udev Rules
In this exercise, you modify a udev rule that renames your eth0 interface to eth1. Complete the following:
1. If necessary, power on your DA1 virtual server and log in as geeko with a password of novell.
2. Open a terminal window and switch to the root user account by entering su followed by a password of novell.
3. At the shell prompt, enter cd /etc/udev/rules.d.
4. Open the 70persistentnet.rules file in the vi editor by entering vi ./70persistentnet.rules at the shell prompt.
5. Press Ins.
6. Locate and scroll down to the line that sets the name of your network interface to eth0.
7. Change the NAME= eth0 parameter to NAME=eth1.
8. Press Esc.
9. Save your changes and exit the editor by entering :exit at the shell prompt.
10.Reboot your DA1 virtual server by entering init 6 at the shell prompt.
11.Wait for your default GRUB menu item to be selected to start the boot process.
12.When the system starts to boot, press Esc so you can view your system's boot messages.
You should see a message indicating eth0 is being renamed to eth1 by udev, as shown below:

You should also see a message indicating the eth1 interface has not been configured, as shown below:

This happens because there is no configuration for eth1 in /etc/sysconfig.
12.When the system has rebooted, log in as geeko with a password of novell.
13.Open a terminal session and switch to root with the su command and a password of novell.
14.At the shell prompt, enter cd /etc/udev/rules.d.
15.Open the 70persistentnet.rules file in the vi editor by entering vi ./70persistentnet.rules at the shell prompt.
16.Press Ins.

17.Change the NAME= eth1 parameter back to NAME=eth0.
18.Press Esc.
19.Save your changes and exit the editor by entering :exit at the shell prompt.
20.Reboot your DA1 virtual server by entering init 6 at the shell prompt.
21.Wait for your default GRUB menu item to be selected to start the boot process.
22.When the system starts to boot, press Esc so you can view your system's boot messages.
23.Verify that your network interface is now named eth0 and that the appropriate network configuration parameters are applied, as shown below:

Configure Remote Access
In this section of the workbook, you learn how to do the following:
• "Practice Using OpenSSH"
In this exercise, you learn how to use OpenSSH.
• "Perform Public Key Authentication"
In this exercise, you practice using SSH with public key authentication.
• "Use Remote Administration"

In this exercise, you configure remote administration.
• "Use Nomad"
In this exercise, you configure remote desktop using Nomad.
Practice Using OpenSSH
In this exercise, you practice using the SSH suite of utilities. You perform the following tasks:
• Log in remotely to your DA1 server as root.
• Remotely execute the ps aux command on DA1 without logging in to the server.
• Copy the /etc/hosts file from DA1 to your /tmp directory.
• Copy the /etc/hosts file from your workstation to the home directory of geeko on DA1.
• Using sftp, copy the /bin/date file from DA1 to /home/geeko on your workstation.
Do the following:
1. If necessary, power on both your DA1 and your DASLED virtual machines.
2. Log in to DA1 from DASLED by doing the following:
1. If necessary, log in to your DASLED workstation as geeko with a password of novell.
2. Rightclick the desktop; then select Open in Terminal.
3. At the command line, enter
ssh l geeko da1.digitalairlines.com
The following is displayed:

1. When prompted to continue, enter yes.
2. When prompted, enter a password of novell.
You are now logged in to the DA1 server as geeko.
3. Log out by entering exit.
2. Check the processes running on the DA1 server by entering the following at the shell prompt of your workstation:
ssh l geeko da1.digitalairlines.com ps aux
3. When prompted, enter a password of novell.
A list of all processes currently running on DA1 is displayed:

5. Copy the /etc/hosts file on your DA1 server to the /tmp directory on your workstation by entering the following at the workstation shell prompt:
scp [email protected]:/etc/hosts /tmp/
6. When prompted, enter a password of novell.
7. At the shell prompt, enter ls /tmp.
You should see the hosts file from the DA1 server in your /tmp directory, as shown below:

8. Copy the /etc/hosts file on your workstation to geeko's home directory on your DA1 server by entering the following:
scp /etc/hosts [email protected]:
9. When prompted, enter a password of novell.
10.Verify that the file was copied by doing the following:
1. Switch to your DA1 server.
2. If necessary, log in as geeko with a password of novell.
3. Doubleclick the geeko's Home icon on the desktop.
You should see the hosts file from the workstation in the geeko user's home directory:

1. Switch back to your workstation.
2. Use sftp to connect to your DA1 server as geeko by entering:
sftp [email protected]
3. When prompted, enter a password of novell.
4. Copy the /bin/date program from the DA1 server to geeko's home directory on your workstation by entering:
get /bin/date /home/geeko/
You should see output similar to the following:

14.Quit sftp by entering exit.
15.At the shell prompt, enter ls /home/geeko.
Verify that the date program has been copied to the geeko user's home directory:
Close all open windows on both virtual machines.
Perform Public Key Authentication
In this exercise, you practice using SSH with public key authentication.
First, you create an sshkey pair. Then you add the public key to the ~geeko/.ssh/authorized_keys file on your DA1 server and note the difference between logging in with and without a public key.
You then use sshagent to cache the private key and log in again to your DA1 server as geeko. Finally, you change the server configuration to allow only public key authentication.
Complete the following:
1. If necessary, power on your DA1 and DASLED virtual machines.
2. If necessary, log in to your DASLED workstation as geeko with a password of novell.
3. On your workstation, open a terminal window.
4. Generate an RSA key pair by doing the following:
1. At the terminal window, enter sshkeygen t rsa.
2. Accept the default location for the key ( /home/geeko/.ssh/id_rsa) by pressing Enter.

3. When prompted, enter a passphrase of novell.
Information about your key pair, such as the location of your identification and the public key, is displayed:
5. Add the RSA public key to the geeko user's ~/.ssh/authorized_keys file on DA1 by doing the following:
1. Copy the file to the home directory of geeko on the DA1 server by entering the following:
scp ~/.ssh/id_rsa.pub [email protected]:
2. When prompted, enter a password of novell.
3. Using ssh, log in as geeko to your DA1 server by entering
ssh l geeko da1.digitalairlines.com
4. When prompted, enter a password of novell.

5. Enter ls al.
6. If an .ssh directory does not exist, then create it by entering
mkdir .ssh
7. Copy the public key to the ~/.ssh/authorized_keys file by entering
cat id_rsa.pub >> .ssh/authorized_keys
6. Log out from the DA1 server by entering exit.
7. Using ssh, log in to your DA1 server as geeko by entering
ssh l geeko da1.digitalairlines.com
You are prompted for a password to unlock the private key:

8. Log in by entering novell; then log out by entering exit.
9. To track authentication, start the sshagent by entering sshagent bash .
10.Add your private key to the agent for authentication by entering
sshadd ~/.ssh/id_rsa
11.When prompted, enter a passphrase of novell.
12.Using ssh, log in as geeko to your DA1 server by entering
ssh l geeko da1.digitalairlines.com
This time you are not prompted for a password or passphrase.
13.Switch to user root by entering su followed by a password of novell.
14.At the shell prompt, enter vi /etc/ssh/sshd_config.
15.Do the following:
1. Enter /PasswordAuthentication to locate the PasswordAuthentication line.
2. Make sure it is set to no.
3. Enter /UsePAM to locate the UsePAM line.
4. Press Ins.
5. Change the value of UsePam from yes to no.
6. Press Esc.
7. Enter :exit to save the file and close the editor.
16.Restart sshd by entering rcsshd restart.
17.Enter ssh geeko@localhost.
18.When prompted to continue connecting, enter yes.
You should see an error message and no prompt for a password:

19.Using the vi editor, undo the changes made in Step 15; then restart sshd.
20.Log out as root by entering exit.
21.Log out from DA1 by entering exit.
22.Close all open windows.
Use Remote Administration
In this exercise, you configure remote administration.
This exercise has four parts. In the first part, you remotely access the textbased version of YaST on DA1 from your workstation.
Then in the second part, you remotely access the graphical version of YaST on DA1 from your workstation.
In the third part, you configure remote access to your DA1 server with the YaST Remote Administration module. In the fourth part, you access your server via VNC.
You need to complete the following tasks:
• "Part I: Remotely Access a TextBased Version of YaST"
• "Part II: Remotely Access the GUI Version of YaST”
• "Part III: Configure Remote Administration with YaST"
• "Part IV: Access Your DA1 Server Remotely"
Part I: Remotely Access a TextBased Version of YaST
Do the following:

1. If necessary, power on your DA1 and DASLED virtual machines.
2. If necessary, log in to your DASLED workstation as geeko with a password of novell.
3. Open a terminal window and enter:
4. When prompted for the password, enter novell.
5. Launch the ncursesbased version of YaST by entering yast2.
Despite the fact that you entered yast2, the textbased version of the YaST Control Center appears:
This is because X11 forwarding is not active in the default configuration of ssh.
5. Exit the YaST Control Center by pressing Alt+q.
6. Close the SSH session by entering exit.

Part II: Remotely Access the GUI Version of YaST
Do the following:
1. From the terminal window on your workstation, enter
ssh X [email protected]
2. When prompted for the password, enter novell.
3. Launch the GUIbased version of YaST by entering yast2.
Because the X option activated X11 forwarding, the GUIbased version of the YaST Control Center appears:

Part III: Configure Remote Administration with YaST
Do the following:
1. Install a Java browser plugin:
1. Select Software > Software Management .
2. In the search field, enter java1; then click Search.
3. From the search results, select java1_6_0ibmplugin.

4. Click Accept.
5. Accept the automatic changes by clicking Continue.
Wait while the packages are installed.
2. In the main window of YaST, select Network Devices > Remote Administration (VNC) .
The Remote Administration dialog appears:
3. Select Allow Remote Administration; then select Open Port in Firewall.
4. Click Finish.

5. Close YaST.
6. Restart the display manager by entering rcxdm restart at the shell prompt.
7. At the shell prompt, enter exit.
Your SUSE Linux Enterprise Server 11 system is ready to be accessed remotely.
Part IV: Access Your DA1 Server Remotely
To access the DA1 server from a web browser, do the following:
1. On your DASLED workstation desktop, open the Firefox web browser by selecting Computer > Firefox.
2. In the Location field, enter
http://da1.digitalairlines.com:5801
The following is displayed:

3. Log in to the remote server's desktop as geeko with a password of novell.
The desktop for your geeko on DA1 appears.
4. If time permits, try completing various administrative tasks and running commonlyused applications on DA1 through the VNC session.
5. When you're finish testing the desktop, close the VNC session by clicking Disconnect (at the top of the screen).
6. Close all open windows.

Use Nomad
In this exercise, you configure Nomad on your DASLED workstation. You establish an RDP connection between your host workstation and the DASLED virtual workstation.
Complete the following:
1. Verify that your DASLED workstation is running.
2. If necessary, log in to your DASLED workstation as geeko with a password of novell.
3. Install the Nomad packages on DASLED by doing the following:
1. Start YaST by selecting Computer > YaST.
2. When prompted, enter a root user password of novell.
3. Select Network Devices > Remote Administration (RDP) .
4. When prompted that xrdp needs to be installed, click Install.
5. (Conditional) If prompted, insert your SLED 11 installation DVD.
6. Wait while the RDP packages are installed.
When complete, the following is displayed:

1. Mark Allow Remote Administration and Open Port in Firewall .
2. Click Finish.
3. Close YaST.
2. Reboot DASLED by entering init 6 at the shell prompt.
3. After the system as rebooted, log in as geeko with a password of novell.
4. Open a terminal session and switch to root using the su command followed by a password of novell.

5. Verify that xrdp is running by entering rcxrdp status at the shell prompt.
The command should return a status of running.
6. Add dasled.digitalairlines.com to the /etc/hosts file on your host workstation ( not DASLED) by doing the following:
1. On your host workstation, start YaST.
2. In YaST, select Network Services > Hostnames.
3. Click Add.
4. Enter the following:
• IP Address: 172.17.8.104
• Hostname: dasled.digitalairlines.com
• Host Aliases: dasled
5. Click OK.
6. Click Finish.
7. Exit YaST.
7. Verify that the rdesktop and tsclient packages were installed when your host workstation was deployed by doing the following:
1. Open a terminal session on your host workstation.
2. At the shell prompt, switch to root by entering su followed by a password of novell.
3. At the shell prompt, enter rpm q rdesktop.
4. At the shell prompt, enter rpm q tsclient.
You should see that both packages have already been installed:

NOTE: If these packages were not automatically installed, use YaST to install them manually.
1. Configure a remote desktop connection on your host workstation by doing the following:
1. At the shell prompt on your host workstation, enter tsclient.
2. Click Add Connection > Windows Terminal Service .
The following is displayed:

3. In the Name field, enter DASLED Desktop.
4. In the Host field, enter DASLED.digitalairlines.com.
5. In the Username field, enter geeko.
6. In the Password field, enter novell.
7. Select Custom Window Size; then enter a screen geometry of 800 x 600.
8. Expand Advanced Options.
9. In the Connection Type dropdown list, select LAN.
10.Click OK.
The DASLED Desktop remote desktop connection is added to the Terminal Server Client window, as shown below:

11.Open the remote connection by doubleclicking DASLED Desktop .
The DASLED desktop is displayed in an rdesktop window, as shown below:

12.(Conditional) If time permits, experiment with the remote desktop. Try opening and using the various applications remotely.
13.When complete, click Computer > Logout > Log Out within the remote desktop session.
14.In the Terminal Server Client window, click the Exit icon.
15.At the shell prompt, enter exit twice.

Monitor SUSE Linux Enterprise 11
In this section of the workbook, you learn how to do the following:
• "Gather Information on your SLES 11 Server"
In this exercise, you learn how to get information on the computer you are using.
• "Manage System Logging"
In this exercise, you practice configuring syslogng and logrotate.
Gather Information on your SLES 11 Server
In this exercise, you learn how to get information about your DA1 server. You use the administration tools covered in this section to gather the following information on your server.
As you work through this exercise, write down the appropriate value in the righthand column of the following table:
System Parameter Value
OS
Hardware Architecture
Processor Type
Hostname
Kernel Release
Kernel Version (include date and time)
System Up Time
Load Averages
SLES 11 Version
System Date and Time
Model Name of Processor

System Parameter Value
Free Memory
Patch Level
Complete the following:
1. If necessary, power on your DA1 server and log in as geeko with a password of novell.
2. Open a terminal window and switch to root using the su command and a password of novell.
3. View the kernel release of the Linux distribution you are running by entering
uname r
4. View the computer's hardware architecture by entering
uname m
5. View the processor type for this Linux build by entering
uname p
6. View all information, including hostname, kernel release, and kernel version, by entering
uname a
7. View the system uptime and the load averages by entering
uptime
8. View the version of the SUSE Linux Enterprise Server distribution by entering
cat /etc/SuSErelease
9. View the system date and time by entering
date
10.View information on the processor by entering
cat /proc/cpuinfo

11.View the current memory statistics by entering
cat /proc/meminfo
Manage System Logging
In this exercise, you practice configuring syslogng and logrotate.
First, you configure syslogng to log messages of the local4 facility. The /var/log/local4 file is used for messages of the local4 facility no matter the priority. The /var/log/local4.debug file logs only messages with the debug priority. A third file, /var/log/local4.info, logs only messages with the info priority.
Then you configure logrotate to manage these log files. You create a /etc/logrotate.d/local4 file that does the following with these three files:
• Compresses the old logs
• Saves the old logs with a date extension
• Limits the oldest log to one day
• Limits the rotated logs saved to five
• Limits the maximum size of the file to 20 bytes
• Proceeds without error if a log file is missing
• Logs the date in the local4.info file each time a new log file is generated
NOTE: The above values (one day, five logs, 20 bytes) are used for demonstration purposes only. In a production environment, these values should be much higher.
Complete the following tasks to do this:
• "Part I: Modify the syslogng Configuration"
• "Part II: Configure logrotate"
Part I: Modify the syslogng Configuration
To modify the syslogng configuration, do the following:
1. If necessary, power on your DA1 server and log in as geeko with a password of novell.
2. Open a terminal window and switch to root using the su command and a password of

novell.
3. At the shell prompt, enter vi /etc/syslogng/syslogng.conf.in.
4. Press Ins.
5. Add the following lines at the bottom of the file to create filters for the messages you want to log:
filter f_local4debug { level(debug) and facility(local4);
};
filter f_local4info { level(info) and facility(local4);
};
filter f_local4 { facility(local4); };
6. Specify the destinations and log paths by adding the following lines:
destination local4debug { file("/var/log/local4.debug");
};
log { source(src); filter(f_local4debug);
destination(local4debug); };
destination local4info { file("/var/log/local4.info");
};

log { source(src); filter(f_local4info);
destination(local4info); };
destination local4 { file("/var/log/local4");
};
log { source(src); filter(f_local4); destination(local4); };
NOTE: Check your syntax carefully. If you make a mistake in this file, syslog won't start.
7. Save the changes and close the editor by pressing Esc and then entering :exit.
8. Restart the syslog daemon by entering rcsyslog restart at the shell prompt.
9. Open a new terminal window and enter su followed by a password of novell.
10.Check the configuration by logging an entry to the info level in the local4 facility by doing the following:
1. Enter the following in one of your terminal sessions to monitor the activity of the log file:
tail f retry /var/log/local4.info
NOTE: You will see warnings regarding the retry option and the fact that the file does not yet exist. You can disregard this error as the file will be created when you complete the next step.
2. In the other terminal window, log an entry to the info level in the local4 facility by entering
logger p local4.info "Info message 1"
3. Check the results in the second terminal window. The message is logged in the /var/log/local4.info file, as shown below:

The message should also be logged in the /var/log/local4 file and, because of other entries in /etc/syslogng/syslogng.conf, in /var/log/localmessages.
NOTE: If no messages appear, there might be something wrong with your syslog configuration, for instance a typo or a missing ";". To diagnose what is wrong, enter rcsyslog restart at the shell prompt and see if syslog starts properly. If there is an issue with the configuration, an error message will say so. Look for the line number shown in the output for the error, correct it, and restart syslog.
1. In the terminal window where the log activity is being monitored with tail, stop the monitoring by pressing Ctrl+c.
2. Repeat this process for the debug log level. Use the following command in the first terminal window:
tail f retry /var/log/local4.debug
Use the following command in the second terminal window:
logger p local4.debug "Info message 2"
NOTE: Only those level4 log files with entries will be compressed during log rotation in Part II of this exercise.
3. In the terminal window where the log activity is being monitored with tail, stop the monitoring by pressing Ctrl+c.
Part II: Configure logrotate
To configure logrotate, do the following:
1. At the shell prompt, enter vi /etc/logrotate.d/local4.
2. Press Ins.
3. Add the following content to the file:

/var/log/local4.debug /var/log/local4.info /var/log/local4
{
compress
dateext
maxage 1
rotate 5
size 20
postrotate
date >> /var/log/local4.info
endscript
}
NOTE: Make sure the directories in the first line are separated with spaces.
4. Press Esc; then save the changes and close the editor by entering :exit.
5. Switch to virtual terminal 1 by pressing Ctrl+Alt+F1.
6. Log in as root with a password of novell.
7. Rotate the logs manually by entering
logrotate /etc/logrotate.conf
8. Check the directory /var/log for the zipped local4 log files by entering
ls l /var/log | less
You see the following files:
• local4.debug current_date.bz2
• local4.info current_date.bz2
For example, if the current date is July 15, 2009, then the zipped file for local4.info will

be local4.info20090715.bz2.
The .bz2 extension is used because the command to compress files is set to bzip2 in /etc/logrotate.conf.
NOTE: Only those log files with entries are zipped.
9. Exit the list by entering q.
10.Check the contents of the local4.info zipped archive by entering
less /var/log/local4.info current_date. bz2
You should see the entries you added to the log file, as shown in the following:
11.Press q to exit.
12.Log out as root by entering
exit
13.Return to the GNOME desktop by pressing Ctrl+Alt+F7.
14.Close all open windows.
Administer Linux Processes and Services
In this section of the workbook, you learn how to do the following
• "Schedule Jobs with cron and at"
Schedule Jobs with cron and at
In this exercise, you practice scheduling jobs with at and cron.
In the first part of the exercise, you redirect the output of the finger command to /var/log/messages three minutes from the current time. Then you schedule the same job for tomorrow at noon. Finally, you schedule a program to run tomorrow at 2 p.m. and afterwards remove the job.

In the second part of the exercise, you create a cron job as a normal user that logs the output of finger to ~/users.log every minute and another cron job as root that backs up /etc/ to /export/data2/etc.tgz using tar and the options czvf every Tuesday at 2 a.m.
Complete the following:
• "Part I: Schedule Jobs with at"
• "Part II: Schedule Jobs with cron"
Part I: Schedule Jobs with at
To schedule jobs with at, do the following:
1. If necessary, power on your DA1 server and log in as geeko with a password of novell.
2. Open a terminal window and switch to root using the su command and a password of novell.
3. Check to see if the at service is running by entering rcatd status at the shell prompt.
4. If the command returns a status of unused, start the at service by entering rcatd start at the shell prompt.
5. Display the current date and time by entering date at the shell prompt.
6. Three minutes from now, log who is currently logged in to the /var/log/messages file by entering the following commands:
at hh : mm finger >> /var/log/messages
NOTE: Make sure you enter two > characters in the above command. If you have only one > character, all existing entries in /var/log/messages will be overwritten.
7. Exit the at editor by pressing Ctrl+d.
8. View the scheduled at jobs by entering atq (or at l ).
Note the job number listed.
9. Wait for the three minutes to pass.
10.When the time has past, enter tail /var/log/messages at the shell prompt.
Login information for geeko is listed at the end of the file. An example is shown below:

11.Schedule the same job to run tomorrow at noon by entering the following commands:
at noon tomorrow finger >> /var/log/messages
12.Exit the at editor by pressing Ctrl+d.
13.Schedule the date to be logged tomorrow at 2:00 p.m. to the /var/log/messages file by entering the following:
at 14:00 tomorrow date >> /var/log/messages
14.Exit the at editor by pressing Ctrl+d.
15.View the scheduled at jobs by entering atq (or at l ).
Notice that the two jobs are listed, each with an individual job number:
16.Remove the job scheduled for tomorrow at 2:00 p.m. by entering
atrm job_number
17.View the scheduled at jobs by entering atq (or at l ).
Only the job scheduled for 12:00 p.m. should still be listed.
Part II: Schedule Jobs with cron
To schedule jobs with cron, do the following:
1. At the shell prompt, return to the geeko user account by entering exit.
2. Schedule a cron job as geeko by doing the following:

1. Enter crontab e at the shell prompt.
The vi editor is displayed with geeko's crontab file loaded.
2. Press Ins to enter insert mode.
3. Schedule finger to run every minute and write the output to the ~/users.log file by entering the following:
* * * * * finger >> ~/users.log
4. Press Esc.
5. Save the file and exit the vi editor by entering :wq.
6. Watch the users.log file for a few minutes and validate that it is being updated by entering tail F ~/users.log at the shell prompt.
NOTE: The F option is a shortcut for f retry that keeps trying to open a file even if it is inaccessible when tail starts.
You should see output similar to the following:
1. When finished, press Ctrl+c to break out of tail.
2. Remove geeko's crontab file by entering crontab r at the shell prompt.
3. Verify that the crontab file no longer exists by entering crontab l at the shell prompt.
4. Verify that the cron job you defined in Step 2 is no longer active by entering tail f ~/users.log at the shell prompt.
Notice that entries to users.log are no longer being added.
5. Press Ctrl+c.

6. Schedule a cron job as root:
1. At the shell prompt, enter su followed by a password of novell.
2. Enter crontab e.
3. Press Ins.
4. Add a job that runs at 2:00 a.m. every Tuesday and creates a tarball of /etc that is saved in /tmp by entering the following:
0 2 * * 2 tar czvf /tmp/etc.tgz /etc
5. Press Esc.
6. Save the file and exit the vi editor by entering :wq.
7. Verify that the job is in the crontab file for root by entering crontab l at the shell prompt.
You should see the following:
8. Remove root's crontab file by entering crontab r at the shell prompt.
9. Verify that the crontab file no longer exists by entering crontab l at the shell prompt.
10.Close all open windows.
Manage Backup and Recovery
In this section of the workbook, you learn how to do the following:
• "Back Up System Files with YaST"
In this exercise, you learn how to perform a system backup with YaST.
• "Create Backup Files with tar"
In this exercise, you learn how to use tar.

• "Create Drive Images with dd (Optional)"
In this exercise, you use dd to create a drive image.
• "Back Up a Home Directory with rsync"
In this exercise, you learn how to use rsync.
• "Configure a cron Job for Data Backups"
In this exercise, you use cron for data backup.
Back Up System Files with YaST
In this exercise, you perform a system backup with the YaST System Backup module.
Complete the following:
1. If necessary, power on you DA1 server and log in as geeko with a password of novell.
2. Select Computer > YaST.
3. When prompted, enter a root password of novell.
4. In YaST, select System > System Backup.
5. Select Profile Management > Add.
6. Enter Course3102; then click OK.
The following is displayed:

7. In the Filename field, enter /tmp/course3102.tar.
8. Click Next.
9. In the Backup Options screen, use the default selections by clicking Next.
A list of directories and file systems which are not going to be included in the backup is displayed.
10.Under Items Excluded from Search, select Add > Directory.
11.Enter /home; then click OK.

We will assume that the home directories are backed up using a different utility. Your Search Constraints screen should appear as shown below:
12.Click OK.
13.In the profile overview, make sure the profile Course3102 is highlighted; then click Create Backup.
Wait until the backup has been completed. (This will take some time to complete.)
14.In the Backup Summary, click OK; then click OK in the System Backup screen.
15.Review the structure of the tar archive in /tmp/course3072.tar by doing the following:

1. Open a terminal window and switch to your root user account by entering su at the shell prompt followed by a password of novell.
2. At the shell prompt, enter tar tf /tmp/course3102.tar.
You should see output similar to the following:
Create Backup Files with tar
In this exercise, you use tar to create a full backup and an incremental backup.
Complete the following:
• "Part I: Create a Full Backup"
• "Part II: Create an Incremental Backup"
NOTE: In this exercise, you copy backup files to the directory /tmp. This is done for demonstration purposes only. You should never store an actual backup in the /tmp directory.
Part I: Create a Full Backup
To create a full backup, do the following:
1. If necessary, power on your DA1 server and log in as geeko with a password of novell.

2. Open a terminal window and su to root using a password of novell.
3. Change to the /srv/www directory by entering
cd /srv/www/
4. Create a tar archive of the htdocs directory by entering
tar czf /tmp/htdocs.tar.gz htdocs
5. Delete the htdocs directory by entering
rm r htdocs
6. Copy the backup archive to the /srv/www directory by entering
cp /tmp/htdocs.tar.gz /srv/www
7. Restore the htdocs directory by entering
tar xzf htdocs.tar.gz
8. View the content of the restored directory by entering
ls htdocs
Part II: Create an Incremental Backup
To create an incremental backup, do the following:
1. Create a full backup of the htdocs directory by entering
tar czv g /tmp/snapshot_file f /tmp/htdocs_full.tar.gz htdocs
2. Create a new file in the htdocs directory by entering
touch htdocs/incremental.html
3. Perform an incremental backup by entering
tar czv g /tmp/snapshot_file f /tmp/htdocs_incremental.tar.gz htdocs
Note that tar backs up the file incrementally.
4. View the content of the incremental backup file by entering

tar tzf /tmp/htdocs_incremental.tar.gz
You should see output similar to the following:
5. Remove the htdocs directory by entering
rm r htdocs
6. Unpack the full backup by entering
tar xzf /tmp/htdocs_full.tar.gz
7. Unpack the incremental backup by entering
tar xzf /tmp/htdocs_incremental.tar.gz
Close all open windows.
Create Drive Images with dd (Optional)
In this exercise, you use dd to create a drive image from an optical disc.
Complete the following:
1. Connect your DA1 virtual machine to the 3102_CD.iso file located in the Exercises/103 directory on your course DVD by doing the following:
1. If an optical disc icon is displayed on your DA1 desktop, rightclick it and select Unmount Volume.
2. In your DA1 VMware window, select VM > Removable Devices > CDROM > Disconnect.
3. If necessary, insert your 3102 course DVD in your host workstation's optical drive.
4. In your DA1 VMware window, select VM > Removable Devices > CDROM > Edit.
5. Select Use ISO Image; then browse to and select the 3102_CD.iso file located

in the Exercises/103 directory on your course DVD.
6. Select Connected; then click OK.
7. When prompted for root's password, enter novell.
You should see the GNOME File Browser window open displaying the contents of the disc:
2. Close the File Browser window.
3. Open a terminal window and su to root using a password of novell.
4. At the shell prompt, enter mount.
5. In the output, look for an entry

/dev/sr0 on /media/...
6. Note the corresponding device name (listed in the first column of the output):
7. Copy an image of the CD to the hard disk by entering the following at the shell prompt:
dd if=/dev/ device_name of=/tmp/course_cd.iso
You should see output similar to the following:
8. When the copy process is complete, mount the image file by entering
mount o loop /tmp/course_cd.iso /mnt/
9. Change to the /mnt/ directory by entering cd /mnt at the shell prompt.
10.Display the content of the image file by entering ls at the shell prompt.
You should see the files from the CD, as shown below:
11.Enter cd /media/3102_CD; then enter ls.
Note that the content of the image file is identical to the original CD:

12.Change to your home directory and unmount the image file by entering the following commands:
cd ~ umount /mnt
13.Delete the image file by entering
rm /tmp/course_cd.iso
14.Connect your DA1 virtual machine back to your host workstation's optical drive by doing the following:
1. Rightclick the 3102_CD volume on your desktop and select Unmount Volume.
2. In your DA1 VMware window, select VM > Removable Devices > CDROM > Disconnect.
3. If necessary, insert your SLES 11 installation DVD in your host workstation's optical drive.
4. In your DA1 VMware window, select VM > Removable Devices > CDROM > Edit.
5. Mark Use Physical Drive; then select your optical drive in the dropdown list displayed.
6. Mark Connected; then click OK.
7. When prompted for root's password, enter novell.
8. Close all open windows.
Back Up a Home Directory with rsync
In this exercise, you use rsync to backup a user's home directory.
Complete the following:

• "Part I: Perform a Local Backup with rsync"
• "Part II: Perform a Remote Backup with rsync”
Part I: Perform a Local Backup with rsync
To perform a local backup with rsync, do the following:
1. On your DA1 virtual server, log in as geeko with a password of novell (if necessary) and open a terminal window.
2. Switch to root using the su command along with a password of novell.
3. Create a test backup directory by entering mkdir /tmp/rsync_test at the shell prompt.
4. Copy geeko's home directory to the backup directory by entering the following command at the shell prompt:
rsync av /home/geeko /tmp/rsync_test
5. At the shell prompt, enter cd /tmp/rsync_test.
6. Enter ls to view the files copied by rsync.
You should see all of the files in geeko's home directory, as shown below:
7. At the shell prompt, enter cd ~.
8. Open a second terminal window.
9. As the geeko user, create a new file by entering touch new_file at the shell prompt.
10.Switch to the root terminal window and enter the same rsync command again:

rsync av /home/geeko /tmp/rsync_test
Notice that rsync transfers only the new file and the corresponding directory:
Part II: Perform a Remote Backup with rsync
In this part of the exercise, you preform a a remote backup to your DASLED virtual workstation from DA1. Do the following:
1. If necessary, power on your DASLED virtual workstation and wait for it to boot.
2. Open the ssh port in the firewall on DASLED by doing the following:
1. On DASLED, select Computer > YaST.
2. Select Security and Users > Firewall.
3. On the left, select Allowed Services.
4. In the Service to Allow dropdown list, select Secure Shell Server .
5. Click Add.
6. Click Next > Finish.
7. Close YaST.
3. Switch back to your DA1 server.
4. From the root terminal window on DA1, perform a remote backup of the geeko user's home directory on DASLED by entering the following at the shell prompt (all on one line):
rsync ave ssh root@dasled.digitalairlines.com:/home/geeko /tmp/rsync_test
5. When prompted to accept the security certificate, enter yes.

6. When prompted, enter a password of novell.
You should see the geeko user's files on DASLED being synchronized to your DA server, as shown below:
7. Switch to your DASLED workstation and do the following:
1. Open a terminal session on DASLED.
2. As geeko, create a new file in the geeko home directory by entering touch ~/new_file2 at the shell prompt.
8. Switch back to your DA1 server.
9. Enter the rsync command again at the shell prompt:
rsync ave ssh root@ dasled.digitalairlines.com :/home/geeko /tmp/rsync_test
10.When prompted, enter a password of novell.
Notice that only new files created since the last time rsyc was run are copied:

11.Clean up the backup directory by entering
rm r /tmp/rsync_test/*
12.Close all terminal windows on both virtual machines.
Configure a cron Job for Data Backups
In this exercise, use cron to automate the backup process.
Complete the following:
1. On your DA1 virtual server, log in as geeko with a password of novell (if necessary) and open a terminal window.
2. Switch to root using the su command and a password of novell.
3. Change to the /usr/local/bin/ directory by entering cd /usr/local/bin at the shell prompt.
4. Create the home_backup.sh file in the current directory by entering vi home_backup.sh at the shell prompt.
5. Press Ins; then add the following lines to the file:
#!/bin/bash
rsync a /home/geeko /tmp/rsync_test

6. Press Esc; then enter :exit to save the file and close the editor.
7. Make the file executable by entering chmod 744 home_backup.sh at the shell prompt.
8. To edit root's crontab, start the crontab editor by entering crontab e at the shell prompt.
9. Press Ins; then enter the following:
5_minutes_in_the_future
*
* * /usr/local/bin/home_backup.sh
For example, to have the backup script run at 3:30, you would enter the following:
30 15 * * * /usr/local/bin/home_backup.sh
10.Press Esc; then enter :exit to save the file and close the editor.
11.Wait five minutes, then verify that the backup ran by entering the following at the shell prompt:
ls /tmp/rsync_test
12.Close all open windows on DA1.
Administer User Access and Security
In this section of the workbook, you learn how to do the following:
• "Configure PAM Authentication"
In this exercise, you practice configuring PAM authentication.
• "Configure sudo"
In this exercise, you practice configuring sudo.

• "Configure the Password Security Settings"
In this exercise, you practice changing different security settings.
• "Use ACLs"
In this exercise, you practice using ACLs.
• "Configure SuSEfirewall2"
In this exercise, you practice configuring the hostbased firewall on SLES 11.
Configure PAM Authentication
In this exercise, you practice configuring PAM authentication on DA1. You will create a file that prevents all normal users (such as geeko) from logging in and test the system.
Complete the following:
1. If necessary, power on your DA1 server and log in as geeko with a password of novell.
2. In the graphical desktop, switch to virtual console 3 by pressing Ctrl+Alt+F3.
3. Log in as root with a password of novell.
4. Create the /etc/nologin file by entering the following command at the shell prompt:
echo No login possible > /etc/nologin
5. Switch to virtual console 4 by pressing Alt+F4.
6. Attempt to log in as geeko.
A "No login possible" and a "Login incorrect" message are displayed, indicating that you cannot log in to the system:

7. Switch back to virtual console 3 by pressing Alt+F3.
8. View the last lines of the file /var/log/messages by entering the following at the shell prompt:
tail /var/log/messages
Look for the "FAILED LOGIN" message for geeko that indicates the failed login attempt:
9. Edit the file /etc/pam.d/login configuration file by doing the following:
1. At the shell prompt, enter vi /etc/pam.d/login.
2. Switch to insert mode by pressing Ins.
3. Add a # sign to the beginning of the following line:
auth requisite pam_nologin.so
This PAM module checks to see if the file /etc/nologin exists. If it does, it does not allow regular users to log in by returning a failed status.
Now that this line is commented out, PAM will not check for the file. This means that all users can log in, even if the file exists.

4. Press Esc; then save the file by entering :w.
10.Test the modified PAM configuration file:
1. Switch to virtual console 4 by pressing Alt+F4.
2. Attempt to log in as geeko with a password of novell.
You are able to log in because PAM no longer checks for the /etc/nologin file.
3. Log out as geeko by entering exit.
11.Edit the file /etc/pam.d/login to uncomment the pam_nologin.so line:
1. Switch to virtual console 3 by pressing Alt+F3.
2. In the vi editor, press Ins.
3. Uncomment the pam_nologin.so line (by removing the # sign you entered before) so it looks like the following:
auth requisite pam_nologin.so
4. Press Esc; then save the file and exit vi by entering :wq.
12.On virtual console 4, try logging in again as geeko.
Again, you receive a "Login incorrect" message.
13.Press Alt+F3.
14.Delete the file /etc/nologin by entering rm /etc/nologin at the shell prompt.
15.Press Alt+F4.
16.Try again to log in as geeko with a password of novell.
Because the /etc/nologin file no longer exists, user login is enabled again.
17.Log out as geeko by entering exit.
18.Press Alt+F3.
19.Log out as root by entering exit.
20.Return to the server desktop by pressing Alt+F7.

Configure sudo
In this exercise, you practice configuring sudo to allow the geeko user to kill processes on DA1 as root. Complete the following:
1. If necessary, log into DA1 as geeko with a password of novell.
2. Open a terminal window.
3. Switch to root using the su command and password of novell.
4. At the shell prompt, enter visudo.
5. Press Ins.
6. Scroll down to the "Defaults targetpw..." line.
7. Comment out the following lines by placing a # at the beginning of each line:
Defaults targetpw # ask for the password of the target
user i.e. root
ALL ALL=(ALL) ALL # WARNING! Only use this together
with 'Defaults targetpw'!
8. Define a User_Alias named POWRUSRS that contains the geeko user account by adding the following line to the end of the file:
User_Alias POWRUSRS = geeko
9. Define a Cmnd_Alias named KPROCS that contains the kill and killall commands by adding the following line to the end of the file:
Cmnd_Alias KPROCS = /bin/kill, /usr/bin/killall
10.Define a Host_Alias named HSTS that contains the da1 host by adding the following line to the end of the file:

Host_Alias HSTS = da1
11.Using the aliases defined above, allow the geeko user to run the specified commands on da1 as root by adding the following line to the end of the file:
POWRUSRS HSTS = (root) KPROCS
12.Press Esc; then save your changes and exit the editor by entering :exit.
13.Test your configuration by doing the following:
1. At the shell prompt (as root), enter top to start the top process running.
2. Open a new terminal window.
3. At the shell prompt in the new terminal window (as geeko), enter sudo killall top.
4. When prompted, enter geeko's password of novell.

You should see that top is unloaded in the first terminal window, as shown below:
5. Close all open windows on the desktop.
Configure the Password Security Settings
In this exercise, you practice editing security settings. You will change the default behavior when Ctrl+Alt+Del is pressed. You will also change the encryption method from blowfish to MD5.
Complete the following:
1. If necessary, power on your DA1 virtual server and log in as geeko with a password of novell.
2. Open a terminal window on DA1.
3. Check the setting for the Ctrl+Alt+Del keystroke in the file /etc/inittab by entering

grep ctrlaltdel /etc/inittab
Note the current setting:
4. Start YaST by selecting Computer > YaST and entering a password of novell.
5. Select Security and Users > Local Security.
The Security Overview dialog appears.
6. On the left, select Predefined Security Configurations.
7. Make sure Custom Settings is selected.
8. On the left, select Password Settings.
9. From the Password Encryption Method dropdown list, select MD5.
10.On the left, select Boot Settings.
11.From the Interpretation of Ctrl + Alt + Del dropdown list, select Halt.
12.Apply the new security settings by clicking OK.
13.Close YaST.
14.To test the change, you must first activate the new configuration.
This can be done either by rebooting the system or by entering (as root) init q, which reloads the /etc/inittab file. You will do the latter:
1. In the terminal window, su to root using a password of novell.
2. Reload the /etc/inittab file by entering init q.
15.Verify that the Ctrl+Alt+Del setting has changed by entering
grep ctrlaltdel /etc/inittab
Notice that the setting is now shutdown h instead of what you noted in Step 2.
16.Test this setting by pressing Ctrl+Alt+F2 and then select Send Ctrl+Alt+Del.
The system shuts down instead of restarting.
17.Power the DA1 virtual machine back on and log in as geeko with a password of novell.

18.(Optional) Use the YaST Security settings module to change the default for Ctrl+Alt+Del back to Restart.
Use ACLs
In this exercise, you practice using ACLs. In the first part, you create the acl_test directory in /tmp and set rwx rights for the owner only. You then set ACLs to allow the geeko user to change into that directory.
In the second part, you create a file in the /tmp/acl_test directory as root using touch. Then you change the default ACLs for the /tmp/acl_test directory to give geeko read and write access to files and directories.
In the third part of this exercise, you practice removing the ACLs that you have set.
Complete the following:
• "Part I: Configure the ACL of a Directory"
• "Part II: Configure a Default ACL for a Directory"
• "Part III: Delete an ACL"
Part I: Configure the ACL of a Directory
To configure the ACL of a directory, do the following:
1. If necessary, log in to your DA1 server as geeko with a password of novell.
2. Open a terminal window and su to root using a password of novell.
3. Change to the directory /tmp by entering
cd /tmp
4. Create a test directory by entering
mkdir acl_test
5. Limit the file system permissions for the directory by entering
chmod 700 acl_test
6. Open a second terminal window as the geeko user.
7. Try changing to the test directory by entering

cd /tmp/acl_test/
The command fails, because geeko (who is not the owner of the directory) has no permission to read and change into the directory.
8. Switch to the root terminal session.
9. Display the minimum ACL of the directory by entering
getfacl acl_test
It should appear as follows:
10.Add an extended ACL by entering
setfacl m u:geeko:rwx acl_test/
11.Switch to the geeko terminal and try to access the directory again by entering
cd /tmp/acl_test
Because of the extended ACL, you can now change into the directory.
12.Switch to the root terminal and display the extended ACL of the directory by entering
getfacl /tmp/acl_test/
It should appear as follows:
Part II: Configure a Default ACL for a Directory
To configure a default ACL for a directory, do the following:

1. In the root terminal window, change to the directory acl_test by entering
cd /tmp/acl_test
2. Create a file by entering
touch without_default_acl
3. Display the ACL of the new file by entering
getfacl without_default_acl
Because there is no default ACL for the parent directory, the new file does not have an extended ACL either.
4. Set a default ACL for the acl_test directory by entering
setfacl d m u:geeko:rw /tmp/acl_test/
5. Create another test file by entering
touch with_default_acl
6. Display the ACL of the new file by entering
getfacl with_default_acl
Because this file was created after the default ACL of the parent directory was set, the new file inherited the ACL. This is shown below:
Part III: Delete an ACL
To delete ACL, do the following:
1. In the root terminal window, remove the ACL by entering

setfacl x u:geeko with_default_acl
2. Display the ACL again by entering
getfacl with_default_acl
As you can see, the ACL for the user geeko has been removed. If there were ACLs for other users, they would remain unaffected.
3. View the file attributes of with_default_acl by entering
ls l with_default_acl
There are still extended attributes (such as the mask "+") in the output.
4. Remove all ACLs by entering
setfacl b with_default_acl
5. Display the ACL again by entering the following commands:
getfacl with_default_acl ls l with_default_acl
Notice that the ACL has been removed, as shown below:
6. Close all terminal windows.
Configure SuSEfirewall2
In this exercise, you practice configuring SuSEfirewall2 on your DA1 server. You install and configure the Apache Web Server on DA1. Then you enable the firewall on DA1 and configure it to allow Web server traffic.
Complete the following:
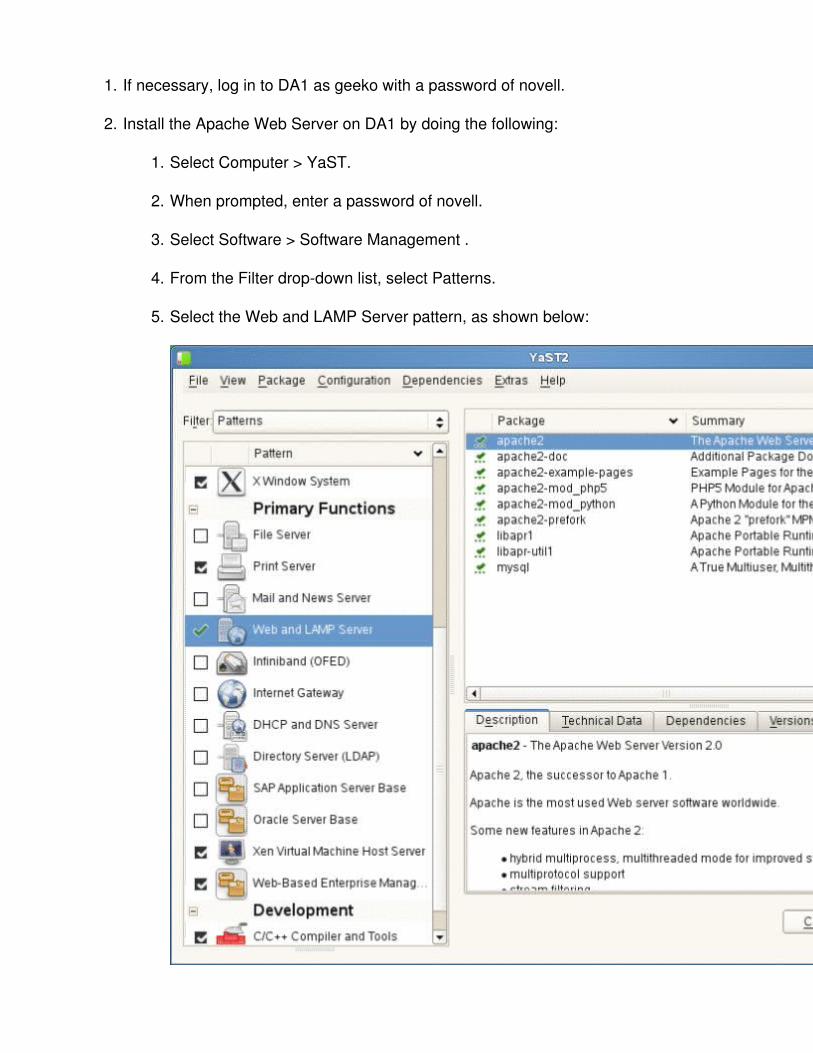
1. If necessary, log in to DA1 as geeko with a password of novell.
2. Install the Apache Web Server on DA1 by doing the following:
1. Select Computer > YaST.
2. When prompted, enter a password of novell.
3. Select Software > Software Management .
4. From the Filter dropdown list, select Patterns.
5. Select the Web and LAMP Server pattern, as shown below:

1. Click Accept.
2. In the Automatic Changes screen, click Continue.
3. If prompted, insert your SLES 11 installation DVD and click Retry.
Wait while the packages are installed.
4. When done, close YaST.
5. Open a terminal session.
6. Switch to root by entering su at the shell prompt followed by a password of novell.
7. Start Apache on DA1 by entering rcapache2 start at the shell prompt.
2. Test the Apache Web Server on DA1 by doing the following:
1. Select Computer > Firefox.
2. In the Address field, enter http://da1.digitalairlines.com.
You should see the following:
1. Close Firefox.
2. Enable SuSEfirewall2 on DA1 by doing the following:
1. Start YaST again on DA1.

2. Select Security and Users > Firewall.
3. In the StartUp screen, verify that mark Enable Firewall Automatic Starting is marked.
4. (Conditional) if your firewall isn't currently running, select Start Firewall Now.
You should see the firewall status change to running, as shown below:
5. Click Next.
The following settings should be scheduled to be applied to the firewall:

1. In the Summary screen, click Finish.
2. Close YaST.
2. Test the firewall configuration from your DASLED virtual workstation by doing the following:
1. If necessary, power on your DASLED virtual workstation and log in as geeko with a password of novell.
2. Start Firefox on DASLED.
3. In the Address field, enter http://da1.digitalairlines.com.

The server should fail to respond because the firewall on DA1 is blocking all network traffic except SSH traffic:
6. Configure the firewall on DA1 to allow Web server traffic by doing the following:
1. Switch to your DA1 virtual server.
2. Start YaST and select Security and Users > Firewall.
3. Select Allowed Services.
4. From the Service to Allow dropdown list, select HTTP Server ; then click Add.
5. From the Service to Allow dropdown list, select HTTPS Server ; then click Add.
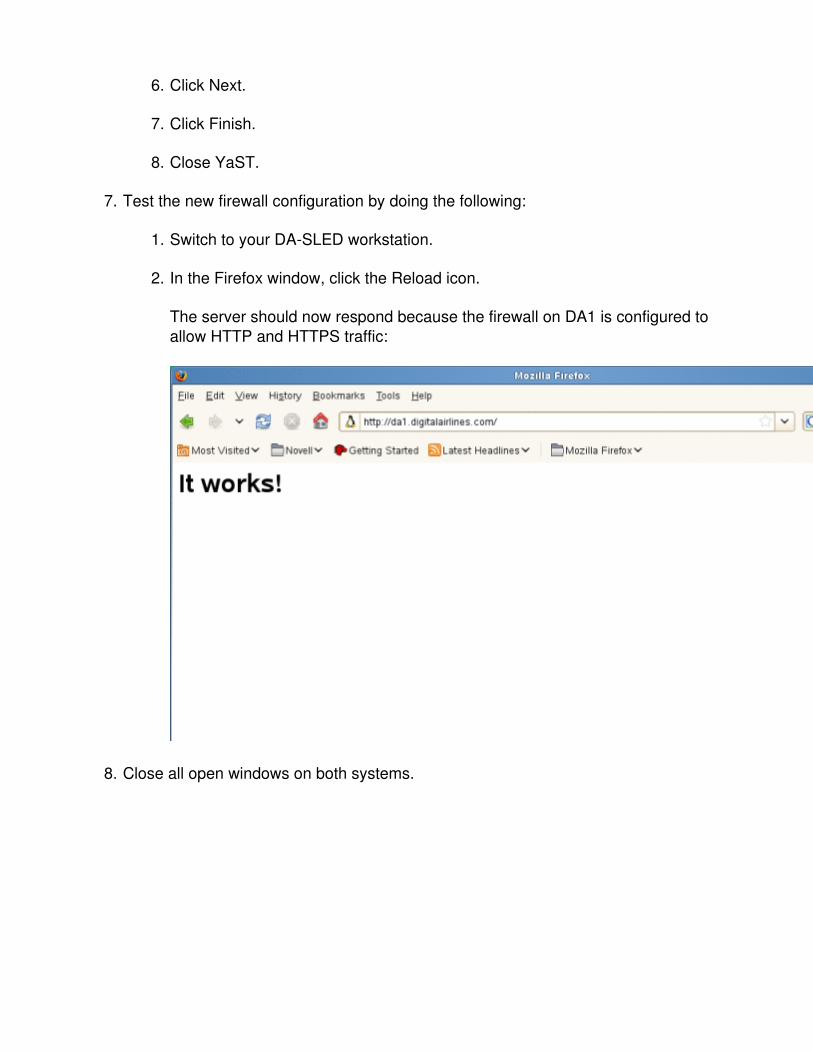
6. Click Next.
7. Click Finish.
8. Close YaST.
7. Test the new firewall configuration by doing the following:
1. Switch to your DASLED workstation.
2. In the Firefox window, click the Reload icon.
The server should now respond because the firewall on DA1 is configured to allow HTTP and HTTPS traffic:
8. Close all open windows on both systems.