360-series toyota fog light kit - amazon s3
TRANSCRIPT

360-SERIES TOYOTAFOG LIGHT KIT
INSTALLATION INSTRUCTIONS
IMPORTANTTHANK YOU FOR PURCHASING RIGID INDUSTRIES’ PRODUCTS FOR YOUR VEHICLE.
Please read through all of these Instructions and tips before proceeding with the installation. We do our best to provide a simple installation process for all applications however
a professional installation is always recommended.
Always disconnect any power sources connected to your vehiclebefore servicing fuses or electrical systems.
THIS KIT FITS THE FOLLOWING VEHICLES:2016-2020 Tacoma, 2014-2020 Tundra, 2014-2020 4Runner
KIT INCLUDES• (2) RIGID 360-Series SAE Lights
• (2) Toyota Round Light Bezels
• (4) Toyota Fog Light Pivot Adapters
• (2) Toyota Fog Carriers
• (2) Light Adjustment Screw
• Mounting Hardware

FIGURE 1
FIGURE 3
FIGURE 2
STEP 1Take both lights and place lens side down on a non scratch surface. Snap the 4 Fog Light pivot Adaptor into place. Once snapped into place take the 8 socket head cap screws and snug the Pivot Adaptors into place. Torque Spec 8 in/lbs
See Figure 1
STEP 3Run the ingress wire through the fog carrier so the wire is coming out of the back of the carrier. Align the carrier so the adjustment cradle is on the same side as the adjustment nut. The carrier will clip on the light using the pivot adjusters.
See Figure 3
STEP 2Install Nylon nut on each light on opposite sides. The nut presses through the bottom of the fl ange and clips into place.
See Figure 2
KIT DIAGRAMA - RIGID 360-Series SAE LightsB - Toyota Round Light BezelsC - Toyota Fog Light Pivot AdaptersD - Toyota Fog CarriersE - Light Adjustment Screw
AB
C
CD
E
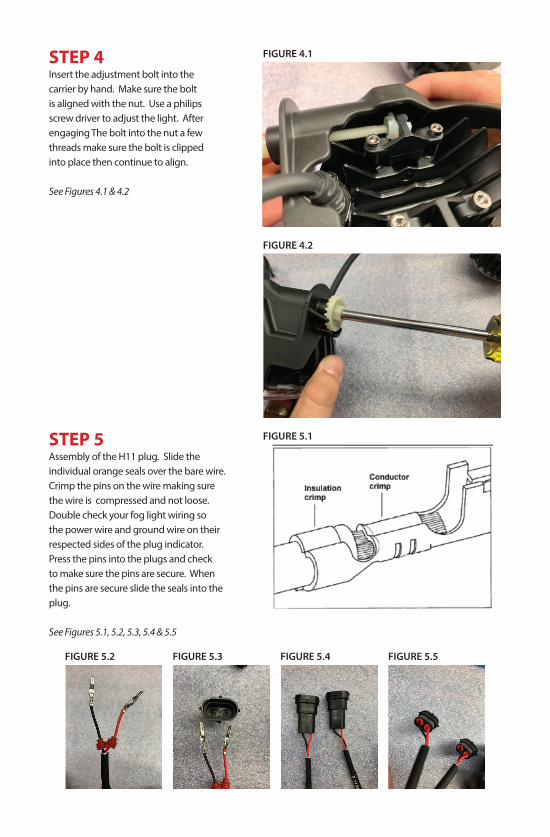
FIGURE 5.1
FIGURE 4.2
FIGURE 5.2 FIGURE 5.3 FIGURE 5.4 FIGURE 5.5
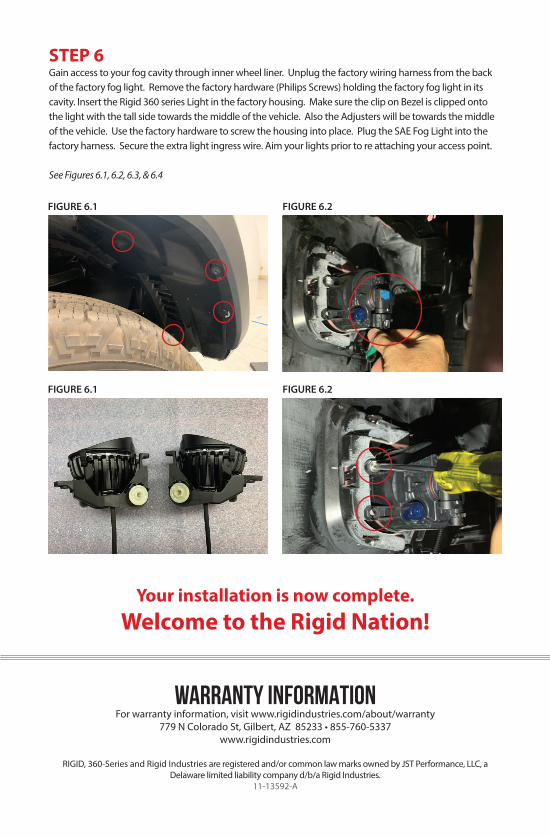
STEP 5Assembly of the H11 plug. Slide the individual orange seals over the bare wire. Crimp the pins on the wire making sure the wire is compressed and not loose. Double check your fog light wiring so the power wire and ground wire on their respected sides of the plug indicator. Press the pins into the plugs and check to make sure the pins are secure. When the pins are secure slide the seals into the plug.
See Figures 5.1, 5.2, 5.3, 5.4 & 5.5
FIGURE 4.1STEP 4Insert the adjustment bolt into the carrier by hand. Make sure the bolt is aligned with the nut. Use a philips screw driver to adjust the light. After engaging The bolt into the nut a few threads make sure the bolt is clipped into place then continue to align.
See Figures 4.1 & 4.2
WARRANTY INFORMATIONFor warranty information, visit www.rigidindustries.com/about/warranty
779 N Colorado St, Gilbert, AZ 85233 • 855-760-5337www.rigidindustries.com
RIGID, 360-Series and Rigid Industries are registered and/or common law marks owned by JST Performance, LLC, a Delaware limited liability company d/b/a Rigid Industries.
11-13592-A
Your installation is now complete.Welcome to the Rigid Nation!
FIGURE 6.1
FIGURE 6.1
FIGURE 6.2
FIGURE 6.2
STEP 6Gain access to your fog cavity through inner wheel liner. Unplug the factory wiring harness from the back of the factory fog light. Remove the factory hardware (Philips Screws) holding the factory fog light in its cavity. Insert the Rigid 360 series Light in the factory housing. Make sure the clip on Bezel is clipped onto the light with the tall side towards the middle of the vehicle. Also the Adjusters will be towards the middle of the vehicle. Use the factory hardware to screw the housing into place. Plug the SAE Fog Light into the factory harness. Secure the extra light ingress wire. Aim your lights prior to re attaching your access point.
See Figures 6.1, 6.2, 6.3, & 6.4