38911794j isp gb 0410 qxp5 entwurf - infusystem · chapter 7 start up graphs and trumpet curves ......
TRANSCRIPT

Infusomat® Spaceand Accessories
Instructions for Use
US Valid for software 586U
It is recommended that all pumps atyour institution are equipped withthe same software version.
Rx only

CONTENTS
*The availability ofthe listed featuresdepends on theconfiguration ofthe pump's biomed file.**Technical SafetyCheck.
2
Infusomat® Space Overview ...................................................................................................3Symbols on Product...................................................................................................................9Patient Safety ......................................................................................................................11Menu Structure / Navigation...............................................................................................13Entering values ......................................................................................................................15Chapter 1 Operation..........................................................................................................18 1.1 Inserting and Priming line in Pump......................................................................................18 1.2 Drug Library..................................................................................................................................20 1.3 Programming a PRIMary Infusion in the Drug Library ...................................................25 1.4 Programming a SECondary Infusion in the Drug Library ...............................................28 1.5 Programming an Intermittent Dose Over Time Infusion ................................................32 1.6 Programming a Loading Dose in the Drug Library...........................................................33 1.7 Programming a Bolus with Dose and Time in the Drug Library ..................................35 1.8 Manual Bolus...............................................................................................................................36 1.9 Changing Care Unit ...................................................................................................................37 1.10 Changing display while pump is running ...........................................................................38 1.11 Basic Infusion (programming the pump outside of the drug library) ........................38 1.12 IV Line Change and New Therapy Start...............................................................................40 1.13 End of Infusion............................................................................................................................41 1.14 Standby Mode .............................................................................................................................42
Chapter 2 Pump Menus....................................................................................................43 2.1 Infusion Totals .............................................................................................................................43 2.2 Options ..........................................................................................................................................44 2.2.1 Downstream Occlusion Pressure...............................................................................44 2.2.2 Upstream Pressure ........................................................................................................44 2.2.3 Alarm Volume .................................................................................................................44 2.2.4 Dose Rate Calculator....................................................................................................44 2.2.5 Data Lock .........................................................................................................................48 2.2.6 KVO Mode........................................................................................................................48 2.2.7 Contrast / Display Light / Keypad Light..................................................................48 2.2.8 Bolus Rate........................................................................................................................49 2.2.9 Date / Time......................................................................................................................49 2.2.10 Macro mode ....................................................................................................................49 2.3.11 Wireless Activation .......................................................................................................49 2.3 Status Menu.................................................................................................................................49
Chapter 3 Alarms................................................................................................................51 3.1 Device Alarms ..............................................................................................................................51 3.2 Pre-Alarms and Operating Alarms.........................................................................................51 3.3 Reminder Alarms ........................................................................................................................53 3.4 Alarm Prompts.............................................................................................................................54
Chapter 4 Wireless Drug Library Upload.....................................................................55Chapter 5 AutoProgramming and Barcoding.............................................................58Chapter 6 Battery Operation and Maintenance........................................................61 6.1 General...........................................................................................................................................61 6.2 Safety Instructions.....................................................................................................................62 6.3 Battery with WiFi .......................................................................................................................62 6.4 Battery maintenance.................................................................................................................63
Chapter 7 Start Up Graphs and Trumpet Curves ......................................................66Chapter 8 Technical Data.................................................................................................67Chapter 9 Warranty / Training / TSC** / Service / Disinfection / Disposal ......76Chapter 10 Optional Space Accessories.........................................................................80Ordering ......................................................................................................................84

INFUSOMAT SPACE® OVERVIEW
INFUSOMAT® SPACE OVERVIEW
3
Follow on screen prompts using arrow keys to navigate menus, select parameters, change values and respond to on screen prompts.
Press to clear values in programming screens or togo back one screen.
Press to Start/Stopinfusion.
Press to initiate auto-programmingorders when prompted.
Press to select and/or confirmvalues/settings/alarms/messages.
q c
k m
Port P3 for future options
Cover of Battery CompartmentBefore changing the battery, always disconnect the pump from the patient and switch the device off.To remove the battery cover, push the button below the battery compartment with the point of a pen and pull the cover away from the device. Slide the green locking mechanism on the back of the battery up and take out the batterypack for repalcement.A crank key used to open the pump door, which is stuck closed, is attached to the inside of the battery compartmentcover (for more information see subchapter 1.12).
Press toinitiatebolus.
Press to turnpump on/offand initiatestand bymode.
Port P2 for power supply, SpaceStation, combi leadand additional accessory leads (staff call, service plug)
Yellow LED: Pre-alarm, reminder alarm
Green or Red LED: or Green LED: InfusingRed LED: Operating or Device Alarm
Press toopen thepump door.
x
onB
Sf
Blue LED: Initiating connection to wireless battery or SpaceStation

INFUSOMAT® SPACE OVERVIEW
4
Attaching Pole Clamp to IV PolePosition the opening of the Pole Clamp onpole and turn the grey locking knob clock-wise until pole clamp is secured to IV pole.Turn grey knob counter clockwise to release.For vertical positioning of Pole Clamp pushrotation lever down and rotate pump either way until lever clicks into notch.Push lever for rotation.
Caution: Do not lean on pumpwhen attached to pole!
Caution: A maximum of three B. BraunSpace pumps can be stacked togetherwhen used with the PoleClamp SP.
Downstreampressure sensor
Anti-free flow clip(set based freeflow protection)
Upstreampressure sensor
Line guidecover
Line LoadingGuide
Airsensor
Rotation lever
Pole Clamp SP (model 8713130)
Pole clamprelease button
Pump based free flowprevention safety clamp
Openinglever
Yellow caution light

5
INFUSOMAT® SPACE OVERVIEW
The pump is now securely attached to PoleClamp.
• Do not position the pump unit over the patient.
• DO NOT use any Pole Clamp that shows signs of damage.
• DO NOT use Pole Clamp with missing clamp grids.
Underside viewClamp grids
Locking Devices TogetherA maximum of three pumps (Infusomat®Space or Perfusor® Space) may beinter-locked on a single pole clamp.
Caution: Avoid external mechanicalaction.
Line up the grooves of the lower pump withthe slots of the upper pump and slide thelower pump in until the lock clicks and thegreen buttons are aligned with each other.To disconnect, push green locking button ofupper pump and slide lower pump out.
Attaching Pump to Pole Clamp Line up slots on top sides of pump withgrooves of Pole Clamp and slide pump intoPole Clamp until locking mechanism clicks. To remove, simultaneously press releasebutton on frame and push handle downwhile pulling pump out from pole clamp.
Pole clamphandle
Pole clamp release button
Pump slots

INFUSOMAT® SPACE OVERVIEW
6
Attaching Pole Clamp to IV PolePosition the opening of the Pole Clampon pole and turn black knob clockwiseuntil pole clamp is secured to IV pole. Turn black knob counter clockwise torelease from IV pole.
Attaching Pump to Pole ClampLine up slots on top sides of pump withgrooves of Pole Clamp and slide pumpinto Pole Clamp until locking mecha-nism clicks.
Space Pole Clamp (speed clamp) (model 8713131)
The pump is now securely attached to thepole clamp.
• Do not position the pump unit over the patient.

7
INFUSOMAT® SPACE OVERVIEW
Locking Devices TogetherLine up the grooves of the lower pumpwith the slots of the upper pump andslide the lower pump until the lockclicks and the green buttons are alignedwith each other. To disconnect, pushgreen locking button of the upper pumpand slide lower pump out.
A maximum of three pumps (Infusomat®Space or Perfusor® Space) may be inter-locked on a single pole clamp.
Caution: Avoid external mechanical action.
Removing Pump from Pole ClampPull both end tabs simultaneously togently eject/release the pump from poleclamp. Slide pump out by hand to remove fully from pole clamp.
Vertical PositioningSimply turn the pump either way until itclicks into notch at 90 degree/verticalposition.
➀
➁ ➂

INFUSOMAT® SPACE OVERVIEW
8
Caution: Do not lean on pumpwhen attached to pole!
Caution: A maximum of three B. BraunSpace pumps can be stacked togetherwhen used with the Space Pole Clamp(speed clamp).
Power supply holderThe Space Pole Clamp (speed clamp) canhold up to 2 Space Power Supplies(8713112D) on the rear of the poleclamp.
DO NOT use any Pole Clamp that shows sig-ns of damage.

9
SYMBOLS ON PRODUCT
SYMBOLS ON PRODUCT
Symbol Explanation
See accompanying documents.
Type CF unit with defibrillation protection
Protection class II device
Symbol indicating separate collection for electrical and electronic equipment (2002/96/EC) only for valid for Europe,not applicable for US
CE mark compliant to Directive 93/42/EEC
Temperature Limit
Moisture Limit
Limitation of the atmospheric pressure
Mandatory action: see instruction for use.
Non-ionizing electromagnetic radiation
General warning sign (e.g. Caution)
Unsafe symbol (Do not use in MRI environment!)
Batch number
Serial number
LOT
SN

SYMBOLS ON PRODUCT
10
List of abbreviationsKVO = Keep Vein OpenLED = Light-Emitting Diode (indicator lamps)TPN = Total Parenteral Nutrition
VTBI = Volume To Be InfusedMRI = Magnetic Resonance ImagingBSA = Body Surface Area

11
PATIENT SAFETY
PATIENT SAFETY
Read Instructionsfor Use prior to operation. Theinfusion deviceshould only beused by trainedhealthcare professionals.
Indications for Use
The Infusomat® Space Volumetric Infusion Pump System is intended for use onadults, pediatrics, and neonates for the intermittent or continuous delivery ofparenteral fluids, medications, blood and blood products through clinicallyaccepted routes of administration. These routes include intravenous, intra-arterial, subcutaneous, and epidural.
Infusomat® Space Volumetric Infusion Pump System is intended to be used bytrained healthcare professionals in healthcare facilities.
Dedicated Disposables
The Infusomat Space is intended to be used with only dedicated disposableslabeled for the different routes of administration.
Warnings and Cautions
• The initial training of the Infusomat® Space is to be performed by B. Braun sales and/or clinical personnel or other authorized persons. After each soft- ware update, the user must refer to the Instructions for Use to review changes to the device and software.
Caution: Ensure the unit is properly positioned and secured (see ch. Infusomat® Space Overview). Do not position pump above patient or in a position where a patient could be harmed , should the pump fall.
• Prior to administration, visibly inspect the pump for damage, missing parts or contamination and check audible and visible alarms during selftest.
• Only connect to patient once the line has been correctly inserted and completely primed (chapter 1.1). Disconnect from patient during line change to prevent unintended delivery.
Caution: Insure the infusion line is free of kinks.
Caution: Do not operate in the presence of flammable anesthetics or in a hyperbaric oxygen chamber.
• Not be used adjacent and stacked with other equipment except B. Braun Space devices.
Caution: The Infusomat Space System is unsafe to use in proximity to magnetic resonance imaging (MRI) equipment.
• Compare the displayed value with the entered value prior to starting infusion.

12
PATIENT SAFETY
• Compare physician order to programming parameters including drug name, patient profile and dosing prior to starting infusion.
• Check default values pre-populated from drug library with physician order prior to starting infusion.
• Consider additional monitoring which may be required when infusing high risk medications.
• Consider plausibility of calculated flow rate for infusions programmed with BSA to assist in determining accuracy of patient height and weight values.
• If staff call is used, it is recommended to check the equipment once after connecting the pump to insure staff call is working.
• If the pump is dropped or is exposed to force, it must be checked by the service department.
• The default values and limits of the Drug Library provide a safety net and are not intended to be used to define treatment.
• Changes in position of pump height in relation to patient during infusion may lead to minor changes in flow accuracy.
• Do not allow liquids to enter into or come into contact with any openings or electrical connections on the pump or power supply. Fluid exposure in these areas may result in the risk of short circuit, corrosion or breakdown of sensitive electrical components, and/or electrical shock. If fluid exposure occurs, the device should be swapped out with another device in a manner that presents minimal interruption to patient care. The device should remain unplugged until it can be inspected by a trained technician for any evidence of damage and/or residual moisture which may impair the function of the device.
Safety Standards
Infusomat® Space satisfies all safety standards for medical electrical devices incompliance with IEC 60601-1:2005 and IEC 60601-2-24: 2012.
• The EMC-limits (electro-magnetic compatibility) according to IEC 60601-1- 2:2007 and IEC 60601-2-24: 2012 are maintained. If the equipment is operated in the vicinity of other equipment which may cause high levels of interference (e.g. HF surgical equipment, nuclear spin tomography units, mobile telephones etc.) may be disturbed. Maintain the protective distances recommended by the manufacturers of these devices.
• During transport of patients within the facility the Infusomat® Space needs to be fixed on a suitable restraint system by means of SpaceStation, Pole Clamp SP or Space Pole Clamp (speed clamp).
• When stored under temperature conditions beyond the defined operating conditions the Infusomat® Space needs to remain under room temperature at least one hour before usage.

13
At the top of the screen the last infusion is indicated. "Continue last infusion" question can be answered with Yes/Noquestion by pressing u for yes or dfor no. Pressing yes recalls all parametersof the last infusion prior to power off,both the last primary and secondary therapies are retained.
Parameters can be changed (e.g. rate inml/h) by opening the editor screenwith with l or k. When editing parameters, use the l or r tomove to the digit to be programmed.The white background indicates currentdigit. Use u or d to change currentsetting or C key to clear the values.Text on the bottom or top of the screen indicates infusion mode, softlimit symbol.
Display Meaning
Infusionmode
Unit of drug delivery
Infusion status information
Scrolling arrows indicate pump is infusingSet rate can be opened with l to edit
Set pressure limit
Soft limit indicator
Drug name
Current pressure level
Wireless
Connected to Power/Battery Status
Typical display during infusion:
Overview of Keys and Displays
MENU STRUCTURE / NAVIGATION
o On/Off key
x Door open key
sf Start/Stop key
nb Bolus key
C Clear and/or back key
K OK key
Q Keypad with arrows
m Initiation of Auto-programming order
All display screen shots are examples and may be different depending on pump configuration and infusion settings.
MENU STRUCTURE / NAVIGATION

14
MENU STRUCTURE / NAVIGATION
All status information is available in thebottom line of the display. The desiredinformation can be selected by using du and will be displayed (e. g. care area,drug long name, time/ VTBI remainingdrug concentration, total volume, infusedtotals for PRIMary and SECondary) untilchanged by user.
Display Meaning
Set pressure level with l or r and con-firm by pressing k.Cancel to edit pressure by using c.
Pre-alarms are indicated by a message onthe display (e.g. “VTBI near end”), anaudible tone and a flashing yellow LED.To confirm a pre-alarm press k.Operating alarms stop the infusion, an audible tone sounds and the red LED flashes. Confirm alarm by pressing k.Confirming does not provide an acousticfeedback.
This prompt appears if a user tries to editor change a parameter by pressing lwhen that parameter is unable to bechanged.
Press and hold o for 3 sec to turn pumpoff. A white bar stretches from left to rightand counts down the 3 sec.The IV line must be removed to power thepump off. Pump will go into stand-by ifthe IV line is not removed.

15
ENTERING VALUES
For an infusion parameter to be entered and/or edited, the pump displays the name ofthe value being edited (rate, doserate, etc), format and unit of measure (dosing unit,volume, time, etc).
In the screen below, a Doserate value is to be entered, which in this case is specified asmcg/kg/h. The underbars indicate the places which can be entered both to the leftand right side of the decimal point.
The value to be entered must be selected by using the arrow buttons to move the cursor so the desired numerical value to be changed is highlighted. Use the Left andRight arrows buttons to move the cursor and the Up and Down arrows keys to increaseor decrease the number.
Entering a new value:
Titrate an existing value:
Select the value to be changed by using the right r and left arrow l keys to high-light desired number, in this case the “ones” place.
ENTERING VALUES
For example, a value of 9.5 can be enteredby pressing the Up arrow button u in the“ones” place 9 times and then press theRight arrow button r once to move thecursor to the “tenths” decimal place andpressing the Up arrow button u 5 times.
Press the OK button k to confirm thevalue, as indicated in the title bar of thedisplay.
To Titrate to another value, e.g. 11.5 pressthe Down arrow button d eight times toget 1.5
Then press the Left arrow button l tomove the cursor to the “tens” place andpress the Up arrow button u once .

16
Arithmetic logic:
An alternative method for entering and titrating values uses arithmetic logic:
ENTERING VALUES
Pressing the Up arrow u one time in the“ones” place increases the value to 10.5
Pressing the Down arrow button d fromthe “ones” place decreases the value to9.5
Pressing the Up arrow button u from the“ones” place 2 times increases the value to11.5
Hard Limits:
The editor function keeps the displayed values between the minimum and maximumhard limits for the selected infusion parameter. This can be either general pump limitsor drug specific limits defined in the drug library. In case an increase of a value wouldexceed a hard limit, the pump displays the highest acceptable value presuming theuser wanted a maximum value.
Example: Assume the selected drug has a hard limit set at 15 mcg/kg/h.
Trying to titrate from 9.5 to 19.5. Press the Left button l to move the cursor to the“tens” place.
Press the Up button u in order to incre-ment to 19.5. As 19.5 is above the limit,the value displayed is 15, as the hard limitis the highest acceptable value.

17
IMPORTANT: If a value increase or decrease is not possible due to a hard limit (as 19.5could be expected in this case), the value of the hard limit is displayed as the highestacceptable value.
If the down arrow d is pressed on the above screen, the pump displays the previousvalue i.e. 9.5.
ENTERING VALUES
If the up arrow u is pressed on theabove screen, the pump displays a clearmessage that the value entered exceedsthe hard limit.
After the user confirms the message bypressing the OK button k, the pump pre-fills the programming editor field with thelast value programmed and confirmed prior to the value that created the alert.
While in the editor function the arrowbuttons Q and the OK button k areused to define and confirm a value, the C(clear) button c can be used to reset thevalue to 0.
To exit the editor function, press the C button c again. The value of the infusion parameter reverts to the last confirmed value.

18
OPERATION
1.1 Inserting IV Line and Priming in Pump
• Ensure that the pump is properly installed (see Infusomat Space Overview above). Check the equipment for completeness and damages.
• Spike infusion bag and fill drip chamber to 2/3 full.
• Press o to power on. The message “Self-test active” and the software version are displayed, two audible tones sound and all three LEDs (yellow, green/red and blue) flash once. The power supply indicator and the set pressure level are displayed followed by the set limit for the accumulated air volume and the max. size of air bubbles.
• Observe B. Braun landing page and press k to enter infusion parameters followed by IV line insertion, or press x and then press u to open the pump door and insert the line.
Note: Observe message indicating the roller clamp should be closed during set change.
Caution: Close the roller clamp before inserting the IV line and do not connect to patient until properly loaded and primed.
Chapter 1
OPERATION
Insert the IV line from right tothe left starting with the 2 holeclip.

19
• Firmly press tubing into the air sensor guide to make sure the line is properly inserted into the sensors. Thread the tubing through the notches on the right and left side of the pump.
• Close the pump door by firmly placing pressure with both hands on each side of the pump door, continue to press firmly until you hear and feel the motorized door latch pull the door shut. Do not open roller clamp until the pump directs you to do so when self test is completed.
Caution: Pump door will not close if the anti free flow clip is not properly inserted. Do not force door closed - if door is too difficult to close, check IV line and anti free-flow clip (green) for proper loading.
Caution: Before opening door, close roller clamp. If the door hook appears damaged or broken remove the pump from service.
• If priming is activated, press u to select yes to prime IV line and note prompt to disconnect IV line from patient before priming. Press k to confirm and begin priming. Respond to "priming stopped" message by confirming with k. Respond to "repeat priming" prompt with u for yes if line is not fully primed or d for no if fully primed. Please refer to the priming volume on each disposable label.
Chapter 1
OPERATION
Next attach the white clip. Insure silicone segment is notstretched or twisted, stars on tubingmust be in straight line and lineloading guide should not be twisted.
Insert the green anti-freeflow clip inthe green slot, in the direction indi-cated by the arrow, until the openinglever snaps out, yellow light goes outand pump based free flow protectionsafety clamp occludes the lines.
Anti-FreeFlow clip insertion
Door hook
Air sensorguide
Safetyclamp

20
Note: During priming, all air in line alarms are inactive.
• Connect IV line to the patient and observe B. Braun landing page. Press k to program infusion.
Note: Pump automatically powers up in the drug library for all new infusions.
Note: Last infusion, if any, will be displayed with prompt "Continue last infusion?".Press u for yes or d for no. If yes, confirm each infusion parameter by scrolling witht and pressing k to confirm values. If no, press k on B. Braun landing page to program new infusion.
1.2 Drug Library
The Space Infusomat powers up in the drug library, providing a safety net for cliniciansduring programming.
The drug library allows for up to 1200 drug names in up to 10 concentrations per drugto be sub-divided into 30 categories. These drugs can be assigned to 50 care units and16 Patient Profiles. Drug categories allow the drug names to be subdivided, such as bydrug type. Patient profiles allow one drug to have different settings such as dose limits,concentration, clinical advisories, pressure limits, and infusion type based on patienttype or condition. Care Units allow drugs to have different settings based on locationor classes of patients.
• The pump will prompt user to enter weight for weight based dosing and BSA for m2 dosing.
Note: Changing the weight during a weight based infusion or BSA during a m2
infusion will result in a change in the infusion rate to deliver the programmed dose atthe new weight.
Chapter 1
OPERATION

21
• Weight or BSA may be changed by scrolling to weight or BSA on home screen and editing weight or BSA.
• Drugs may have a clinical advisory set up in the drug library which must be confirmed by pressing l or k before proceeding.
Note: It is possible to view the clinical advisory at any time by accessing the Statusmenu from the home screen and scrolling to Drug Info, see Chapter 2.3 for details onthe Status Menu.
The Drug Library provides the ability to set limits for continuous infusions around rateor doserate, intermittent infusions with limits on dose and time, loading dose and pro-grammed bolus doses with dose and rate. In addition, default values may be entered inthe drug library and will be populated in the infusion parameters on the pump, thesevalues may be edited.
The Drug Library allows both soft and hard limits to be set. Soft limits may be over-ridden or value re-programmed per your institutional policy. Hard limits may not beover-ridden. The soft limit symbol appears to the left of the run screen, as seen in figure below, to indicate when infusion is within, below or above limits.
Soft Limits:
The following symbols describe the display status with regard to the limits:
The infusion is within the range of the lower and upper soft limits =
The infusion is below the upper soft limit =
The infusion is above the upper soft limit =
The infusion is above the upper soft limit =
The infusion is below the lower soft limit =
No soft or hard limits are set =
Chapter 1
OPERATION

22
Drugs may be marked for PRIMary only, SECondary only or both in the drug library.When selecting drugs, in the library drug names will only appear if marked for thatmode in the drug library file. In addidtion a drug may be marked to deactivate SECondary mode.
Hard Limits:
Two types of hard limits are possible. Hard limits may be set in the drug libraryfor rate/doserate, and amount or time of administration for each drug. If the setrate/doserate (continuous, bolus or loading) or amount (dose or volume) is out-side the values set in the drug library as a hard limit it is not possible to exceedthe hard limit.
In addition the pump has hard limits, the maximum rate of 1200ml/hr cannotbe exceeded. Additionally, the pump may be set in the configuration file tohave maximum limits for both continuous and bolus rates which cannot beexceeded, these also produce hard limit alerts when attempting to program values which exceed the set limit.
The hard limit message stays on the screen until confirmed by the user and the editorreverts to the last value that was confirmed.
Below are 3 examples of values entered that exceed the hard limit of the drug libraryor the pump:
Example 1: Drug with a upper hard limit set at 15 mcg/kg/h
Current value is 10 mcg/kg/h
Pressing the u once with the cursor in the tens column would produce a value of 20mcg/kg/h which is above the hard limit of 15 mcg/kg/h. The pump displays 15mcg/kg/hr, the hard limit value.
Chapter 1
OPERATION

23
When the u is pressed again the hard limit message is displayed and remains until confirmed by pressing k.
Upon pressing the k button, the pump editor field reverts to the last confirmed value programmed prior to the value that created the alert.
Example 2: Drug with a lower hard limit of 0.2 g
Current value is 0.3 g
Pressing the d once with the cursor in the tenths column displays value of 0.2 g which is at but not below the hard limit.
When the d is pressed once again with the cursor in the tenths column the hard limit message is displayed and remains until confirmed by pressing k.
Upon pressing k the pump editor reverts to the last confirmed value programmed prior to the value that created the alert.
Chapter 1
OPERATION

24
Example 3: Pump maximum rate is 1200ml/hr
Current value 1100ml/hr
Pressing the u once with the cursor in the hundreds column displays value of 1200ml/hr which is at but not above the hard limit.
When the u is pressed once again with the cursor in the hundreds column the hard limit message is displayed and remains until confirmed by pressing k.
Upon pressing k the pump editor field reverts to the last confirmed value programmed prior to the value that created the alert.
Note: It is important to carefully check default values to be certain they match physician order.
Chapter 1
OPERATION

25
1.3 Programming a PRIMary Infusion in Drug Library
When the IV line has been loaded and primed, the B Braun landing page appears.
• Press k to program an infusion.
Note: Programming of infusion parameters may be done prior to loading the IVline by pressing k from this screen.
• Select the Care Unit using the u and d arrows to scroll through the list and press the l arrow or k key to make selection.
Note: A basic infusion may be selected from this list. Basic infusions are addressed in Section 1.11.
Note: Scroll bar appears on all screens when additional information is available, use arrow keys to scroll. In all menus the screen always loops back to the top when bottom of list is reached.
• Select patient profile using Q arrow keys and confirm with l arrow or k. If no profile is set in the drug library, this step will be skipped.
• Select the drug category using Q arrow keys and confirming with l arrow or k. "All drugs" may be selected or search by specific category. If no categories have been set in the drug library this step will be skipped.
• All drugs are listed alphabetically. Navigate through the list with u and d arrows or use l and r arrows to quickly skip through the alphabet in groups of 3 (i.e. ABC-DEF) . Press l arrow or k to select drug.
Scroll bar
Chapter 1
OPERATION

26
Note: Care unit may be changed on any of the above navigation screens. This will re-quire re-programming the therapy when a care unit change is done prior to beginningthe infusion. See Section 1.9 for instructions on changing the Care Unit while infusing.
• Choose drug concentration using u and d arrows, press l arrow or k to select.
Note: Some drugs may be set up for more than one infusion type, such as Continuousand Dose over Time, choose the mode using u and d arrows. Select with l or kkey. Refer to Section 1.5 for instructions on Dose over Time therapy.
• After drug and concentration selection, the home screen will be displayed with rate, doserate or total dose highlighted in white depending on the infusion type and drug library settings. To program rate or doserate press l arrow or k to open the editor screen. The total dose editor will be dis- played for Dose over Time infusions.
• When editing parameters, use the r and l arrow keys to move to the digit to be programmed. The white background indicates current digit. The c key may be used to clear existing values. Use u or d to program new values. Text on the bottom of the screen indicates the parameter that changes based on programmed value in the editor, as an example if rate is being edited the time will appear on bottom of screen and will change based on rate change (this requires VTBI to have been entered). The top of the screen indicates infusion mode, confirm value with k , and soft limit symbol.
Chapter 1
OPERATION

27
Note: Home symbol is displayed in upper left of home screen. Home screen may be ac-cessed from run screen by pressing c key.
Note: Default values may be present when set in drug library, in this case the editorscreens do not appear, confirm values and presssf to begin the infusion or press larrow to edit default values. Observe green LED and arrows moving right to left in upper right of display indicating infusion is running.
Note: It is necessary to confirm that default values match physician order.
Note: While programming, the soft limit symbol appears above the value, indicatingwhere the value is in relation to the soft limits.
• Soft Limit Warning: a soft limit warning will be generated upon confirming a value that is outside the soft limit set in the drug library. A prompt will appear asking to override with programmed value. Press d for No to re- program, editor will appear with previously confirmed value. Press u for yes to over-ride soft limit.
Note: Change in soft limit symbol when over-ridden.
• Hard Limit Warning: when a hard limit value is exceeded, a message is dis- played indicating the value exceeds drug or pump limits. Press k to confirm alert, pump returns to the editor screen to re-program.
Note: The Space Infusomat may deliver rates to 1200ml/hr. It is possible in the serviceprogram to set lower rate limits for continuous and bolus infusions. When these limitsare set in the pump configuration file a hard limit alert is generated when programming exceeds set pump limits.
• Scroll down to enter and/or review VTBI and Time. VTBI is required to start the infusion. Time will be calculated when VTBI is entered. When time is entered, VTBI is calculated if rate/doserate has been programmed.
Chapter 1
OPERATION

28
• When all parameters have been entered and confirmed with k, “Start” appears in upper right of display.
• Presssf to begin infusion.
Note: PRIM will appear in upper left of screen to indicate PRIMary is running. Whenpump is stopped, PRIM appears next to home symbol.
Titration: The doserate/rate may be titrated while the pump is running.
• Press l arrow key to open editor.
• Program desired value, press k to confirm, the new doserate/rate is not active until confirmed.
Failure to confirm the new value results in a reminder alarm in 30 seconds. The pumpcontinues to infuse at the old rate until confirmed.
Note: Respond to soft and hard limit dose alerts that occur during titration as described above.
1.4 Programming a SECondary Infusion in the Drug Library
The Space Infusomat allows SECondary (piggyback) infusions to be programmed. Spikebag and prime SECondary tubing manually, close roller clamp and connect to primarytubing at needleless port above the pump.
• Stop PRIMary infusion by pressing sf key.
• Scroll to SECondary menu by pressing d arrow.
• Select SECondary by pressing l arrow or k key.
Four sub-menu items will be displayed: New SECondary, Use a Previous SEC infusion,Back to PRIM and Basic Infusion.
Chapter 1
OPERATION
29
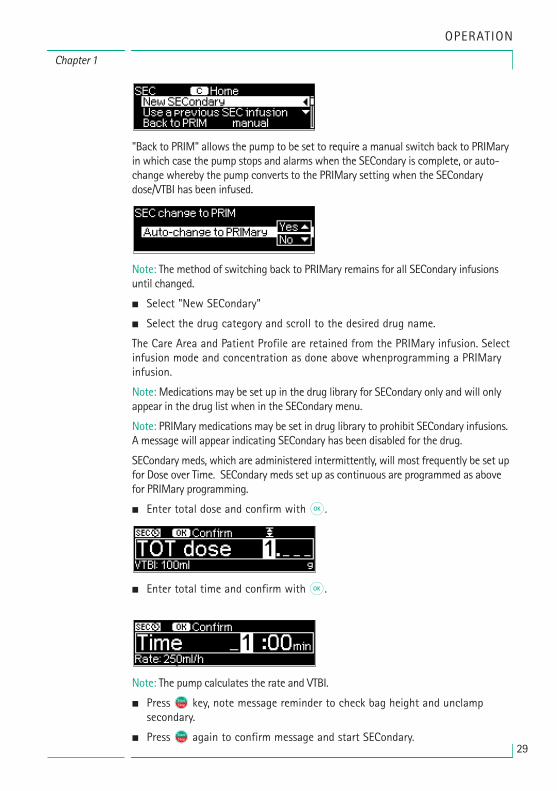
"Back to PRIM" allows the pump to be set to require a manual switch back to PRIMaryin which case the pump stops and alarms when the SECondary is complete, or auto-change whereby the pump converts to the PRIMary setting when the SECondarydose/VTBI has been infused.
Note: The method of switching back to PRIMary remains for all SECondary infusionsuntil changed.
• Select "New SECondary"
• Select the drug category and scroll to the desired drug name.
The Care Area and Patient Profile are retained from the PRIMary infusion. Selectinfusion mode and concentration as done above whenprogramming a PRIMaryinfusion.
Note: Medications may be set up in the drug library for SECondary only and will onlyappear in the drug list when in the SECondary menu.
Note: PRIMary medications may be set in drug library to prohibit SECondary infusions.A message will appear indicating SECondary has been disabled for the drug.
SECondary meds, which are administered intermittently, will most frequently be set upfor Dose over Time. SECondary meds set up as continuous are programmed as abovefor PRIMary programming.
• Enter total dose and confirm with k.
• Enter total time and confirm with k.
Note: The pump calculates the rate and VTBI.
• Presssf key, note message reminder to check bag height and unclamp secondary.
• Presssf again to confirm message and start SECondary.
Chapter 1
OPERATION

30
Note: The SECondary bag must be hung at least 8 inches above the PRIMary. The 8 inch interval is measured from the bottom of the SECondary bag to the top of fluid level in the PRIMary.
Chapter 1
OPERATION

31
Note: When running a SECondary infusion at rates greater than 300ml/hr clamp offthe PRIMary infusion to prevent concurrent flow.
Dose over Time run screen will indicate drug name and count down remaining time.
Note: During SECondary administration, the PRIMary may be resumed at any time bypressing the sf key to stop the SECondary infusion, scrolling to and selecting "resumePRIMary", selecting it with l or k switches back to the primary infusion. Pressingsf leads to an acknowledging prompt to clamp or remove SECondary, then pressingsf key to infuse PRIM. To resume SECondary, stop PRIM and scroll to and select "resume SECondary". The menu item "resume SECondary" will not appear if the SECondary dose/volume was completed.
• To stop and clear a current SECondary infusion prior to completion of dose/ volume, press sf key, then press c key, then press u arrow to answer yes to "Clear SECinfusion". SECondary drug will remain in the list of previous SECondary infusions.
The Space Infusomat stores up to 5 of the previously administered SECondary medications for easier programming of repetitive SECondary medications. The previous SECondary medications are cleared when the Care Unit changes, the pump ispowered off or answering “yes” to New Patient when bar coding.
Note: When a SECondary medication with the same name but different concentrationor dose is programmed, the prior medication with that name is deleted from the list.SECondary infusions which are cleared prior to completion will remain in the list ofprevious SECondary medications.
• Stop PRIMary by pressing sf key.
• Scroll to SECondary menu and select by pressing l arrow or k key.
• Select "Use a Previous SECondary" by pressing l arrow or k key.
Chapter 1
OPERATION

32
• Scroll to desired drug, press l arrow or k to select.
• Confirm previous values by scrolling to each parameter. When all are checked press k to confirm and then press sf to begin infusion.
Note: Reminder to check bag height and unclamp SEConday will appear, press sfagain to begin SECondary infusion.
1.5 Programming an intermittent Dose Over Time Infusion
Dose Over Time is used to administer a specific dose of a medication in a specific time.Dose Over Time can only be used within the drug library in either the PRIMary or SECondary mode. Limits can be set around both total dose and total time in the drug library. The rate and VTBI are calculated based on the drug concentration, dose andtime. The rate may not be edited.
Note: Changing the VTBI will result in a change to the dose and the rate.
The symbol appears next to the mode symbol on the pump display when a medication is set up as Dose over Time.
To Program a Dose over Time infusion:
• Selected drug must be set for dose over time in the drug library.
• Choose drug per steps above in Section 1.3.
• Enter weight or weight and height as prompted based on dose settings in drug library.
• Enter total dose and press k to confirm.
Chapter 1
OPERATION

33
• Enter Total time and press k to confirm.
Note: When default values have been set in the Drug Library there will not be a promptto enter values. Values may be edited by scrolling to the parameter and pressing thel arrow key.
Note: The KVO and Bolus functions are disabled during Dose Over Time.
1.6 Programming a Loading Dose in Drug Library
The Infusomat® Space allows for the delivery of a loading dose for medications thathave been set up in the drug library for loading dose. Loading doses may have soft andhard limits set in the Drug Library. The pump will prompt and allow the user to pro-ceed with a loading dose or go right to the continuous infusion. Once "No" has beenselected to "Program Loading Dose?" it is not possible to recall it on the pump withoutexiting and clearing the infusion by pressing the c key and re-programming thedrug from the beginning.
To Program a loading dose:
• Press u arrow to answer yes to loading dose prompt.
• Enter loading dose amount using q arrow keys, confirm with k.
• Enter loading dose time using q arrow keys, confirm with k.
Chapter 1
OPERATION

34
Note: Soft and Hard limit alerts will be generated based on drug library settings.
• Press l arrow key to access doserate/rate editor to set continuous infusion.
• Enter doserate or rate for continuous infusion and confirm with k.
• Enter VTBI or Time.
Note: "LD dose and Start" alternate in upper right corner of screen.
• Press sf to begin infusion.
Note: The word LOAD is super-imposed on the run arrows.
Note: The loading dose may be stopped at any time by pressing the sf key. Press sfkey to deliver remaining loading dose. There will be nothing infusing until Load Dose isresumed or cancelled and continuous infusion started.
• When pump is stopped intentionally or by an alarm state, the pump will display the amount that has been delivered of the total amount programmed. Press k to confirm.
• Upon pressing sf , the pump will prompt to deliver remaining loading dose. Press u arrow for yes, d arrow for no.
Chapter 1
OPERATION

35
Note: Once "No" is selected it is no longer possible to recall the loading dose.
1.7 Programming a Bolus with Dose and Time in the Drug Library
The Infusomat® Space allows for delivery of a programmed bolus for drugs which havebeen set up in the drug library for bolus dosing.
• Press yellow nb key.
• Select Program bolus dose and time.
Note: Drugs which do not have manual bolus enabled will skip this step.
• Select dosing unit and confirm with k key.
Note: Pump defaults to bolus units set in the drug library. If the bolus ordered is in different units, press the u or d arrow key to change units. The pump will performall necessary calculations and apply dosing limits set in the drug library.
• Enter Bolus amount and confirm with k.
• Enter Bolus time and confirm with k.
• Review and confirm bolus parameters and press nb to begin bolus.
Chapter 1
OPERATION

36
OPERATION
Chapter 1
Note: The word Bolus superimposed over the run arrows is displayed on the screen.
Note: Failure to press BOL to start bolus will result in reminder alarm.
• The pump will automatically convert back to the continuous infusion when the bolus is complete.
Note: The bolus may be stopped at any time by pressing the c key, the continuous will then run. Press nb key to deliver remaining bolus.
• Press sf to stop the infusion entirely.
• When bolus is stopped intentionally by pressing c key,or pump is stopped by an alarm state, the pump will display the amount that has been delivered of the total amount programmed. Press k to confirm.
• If pump was not running, as after an operating alarm, press sf to begin the infusionand respond to prompt to deliver remaining bolus per above.
The last bolus dose is recorded in the status menu, refer to ch. 2.3.
1.8 Manual Bolus
The Infusomat® Space allows for the delivery of a manual bolus when the drug is setup in the drug library for a manual bolus. A manual bolus requires the user to continually hold the bolus button to deliver the bolus.
Note: Drug library limits do not apply to manual boluses.

37
To deliver a manual bolus:
• While an infusion is running, press nb key.
• Select “Use Manual Bolus feature”.
• Press and hold nb key.
• Bolus amount will count up on pump display.
Manual bolus is limited to 10 seconds.
The pump may be set to emit an audible tone every 1ml of solution delivered.
Bolus amount will be displayed when 10 seconds is complete or nb key is released.
The pump converts to the continuous infusion when the nb key is released or 10 seconds is completed.
1.9 Changing Care Unit
The Infusomat® Space allows the Care Unit to be changed when patients are transfer-red. All drug library limits for the new Care Unit are immediately applied and a limitalert appears if soft limits are exceeded in the new Care Unit. If a hard limit is exceededthe pump reverts back to the previous Care Unit. The pump does not allow a Care Unitchange in the following circumstances: during SECondary infusions, if the drug or concentration are not available in the new Care Unit and if hard limit is exceeded.
To change a Care Unit:
• While infusion is running press the c key to get to home screen.
• Scroll to “Change Care Unit”, select with l arrow or k key.
• Scroll to desired Care Unit and select with left l or k key.
• Pump will display confirmation of new Care Unit.
Chapter 1
OPERATION

38
OPERATION
The doserate, dose or time editor will appear and required confirmation if parameterexceeds the soft limit in the new Care Unit. The soft limit warning will be shown requiring an over ride or new programming to proceed as in Section 1.2. Pump will display message if Care Unit was not changed because drug or drug concentration isnot available in new Care Unit or hard limits are exceeded.
1.10 Changing display while pump is running
• While pump is running, press d arrow to choose preferred value to display on bottom left corner of display.
Values displayed will vary with type of therapy and may include drug long name, con-centration, volume totals, remaining time, care area, etc. Displayed value will remainuntil changed by user.
1.11 Basic Infusion (programming the pump outside of the drug library)
The Infusomat® Space allows programming outside the drug library, referred to as a Basic infusion. To program a Basic infusion, select “Basic Infusion” from the Care Unit,Patient Profile, Drug Category or Drug selection screens.
Note: Basic infusion may be selected in the SECondary menu.
• The pump provides a prompt that programming outside the drug library has no safety limits, press k.
Chapter 1

39
Chapter 1
OPERATION
• A second prompt requires responding yes with u to "Continue without limits".
• Respond “yes” or “no” to "Use dose rate calc?" (if configured). See Section 2.2.4.
Note: While under Basic Infusion, the pump is not using any drug library safety limits.
• The pump requires user to enter 2 out of 3 of the following parameters: rate, VTBI or time. When 2 are entered, the pump calculates the 3rd parameter.
SECondary, programmed bolus and manual bolus are also available in Basic mode, SeeSection 1.4, 1.7, 1.8. The target symbol appears next to the programmed value,other than rate, that was first set by the user. When a rate titration is made the valuewith the is not changed, rather the 3rd calculated value is adjusted for the newrate. As an example if a rate of 10ml/hr and time of 20hrs is programmed the VTBI iscalculated, when rate is titrated the VTBI is changed not the time. If the rate and VTBIare initally programmed the time would change with a change in rate. The parameterwith the target symbol does not change during titration of either of the other 2 para-meters.
1.) Enter VTBI and time: The infusion rate will be calculated and displayed on the bottom of the display.
• Select VTBI with t and open withl.
• Enter VTBI with qand confirm with k.
• Select time with t and open withl.
• Enter time with q and confirm with k.
Rate titration will result in adjustment of time. Alternatively:
2.) Enter rate and VTBI: The infusion time will be calculated and displayed on the bottom of the display. Rate titration will result in re-calculation of time.

40
Chapter 1
OPERATION
3.) Enter rate and time: The infusion volume will be calculated and displayed on the bottom of the display. Rate titration will result in re-calculation of VTBI.
1.12 IV Line Change and New Therapy Start
Note: Always close roller clamp and disconnect the line from the patient before changing a line to avoid inadvertent free flow.
• Presssf to stop the delivery. The green LED goes out. Close the roller clamp and disconnect line from the patient.
• Press x and open the pump door with u. Once door finishes opening automatically, pull down on door to fully open. Expect some resistance. Press down the green opening lever completely until it locks in place, releasing the pump based safety free flow clamp, and yellow light flashes, then remove the IV line from right to left and insert a new IV line, note that green anti-free flow clip occludes the IV line when removed.
Note: In the unlikely event the pump door cannot be opened remove the allen keyfrom the inside of the battery compartment cover. Use this key to remove the emergency aperture cover of the pump. Place the crank in the aperture and turn itclockwise until the pump door opens.
Push cover opening with pen.
Remove crank from inside of batterycover.

41
Chapter 1
OPERATION
• Insert new lV line per Chapter 1.1. Close the pump door and open the roller clamp.
• If prompted, prime the pump with u. Then press d to proceed when priming is complete.
• Connect IV line to patient and check the parameters with t.
• Start the infusion by pressingsf.
Note: A new infusion can be started at any time during a stopped infusion. Press cand respond yes to prompt "Exit and clear infusion". Note prompt will indicate ifPRIM, SEC or both will be cleared depending on current pump mode and infusion status. B. Braun landing page will be displayed.
1.13 End of Infusion
• Presssf to stop the infusion. The green LED goes out. Close the roller clamp and disconnect the line from the patient.
Remove emergency aperture cover.
Turn crank inside aperture to open thedoor.
Turn crank to remove emergencyaperture cover.

42
Chapter 1
• Press x and open the pump door with u and remove IV line per above in Section 1.12.
• Close door and press o for 3 sec to power off the pump.
Note: When pump is powered up user will be prompted to continue last infusion,answering No returns to B. Braun landing page.
Note: Pump cannot be powered off with IV line inserted.
1.14 Standby Mode
The pump may be placed in standby rather than powering off so that re-starting an infusion is quicker.
• Presssf to stop the infusion, leave IV line inserted in pump. Then press and hold o for 3 sec.
• The pump is now in Standby.
While the pump is in the standby mode, the display shows infusion mode, drug nameand the remaining time for standby mode. Change remaining time by pressing l,standby may be set from 1 min to 24 hours. Exit standby by pressing c. The pumpwill alarm when the standby time expires.
• Press c to cancel standby.
OPERATION

43
Chapter 2
PUMP MENUS
Menus are accessed from the Home screen using the q arrow keys. Press c keywhile pump is running to access home menu. All menus may be accessed while thepump is running except the SECondary menu. Features displayed in the menus are determined by your facility and set in the service program. All features listed belowmay not be available.
• To edit a menu item, select the desired menu item in the Home screen and press L. Then select desired function with t and follow the directional arrow prompts.
2.1 Infusion Totals
• Infusion totals may be cleared by scrolling to “Infusion Totals” while in Home screen. Select with l. Primary, Secondary and Total of both are displayed. Scroll and select desired value, respond to prompt to zero the value.
Note: Infusion totals are cleared when cleared by user, when No is selected to “Continue Last Infusion” on power up or “Yes” is selected to New Patient during barcoding.
PUMP MENUS

44
2.2 Options
2.2.1 Downstream Occlusion Pressure
The higher the pressure level is set, the higher the pressure level must rise before trig-gering an occlusion pressure alarm.
• Enter "pressure" in Options Menu by pressing l to set downstream pressure limit.
• Choose between nine pressure levels (1=lowest level; 9=highest level) by pressing lor r and confirm entry with k. Pressure levels and equivalent mmHg are displayed when left arrow is pressed while in pressure menu.
Note: The pressure will remain at set level until changed by user unless the drug selected had a pressure level set in the drug library. When pump is powered off pressure level returns to default value set in service program when powered back onunless drug selected has a different pressure level set in the drug library.
2.2.2 Upstream Occlusion Pressure
The device is equipped with an upstream pressure sensor that detects an occlusion (e.g. closed roller clamp, kinked line) between the container and thepump. The higher the pressure level is set, the lower the pressure level mustdrop before triggering an upstream occlusion pressure alarm.
• Access upstream pressure in Options Menu by pressing l.
• Choose between nine pressure levels (1=lowest level; 9=highest level) by pressing l or r and confirm entry with k.
2.2.3 Alarm Volume
Chose between 9 different alarm volume levels.
• Open alarm volume in Options Menu with l.
• Set volume with l or r and confirm entry with k.
2.2.4 Dose Rate Calculator
The Dose Rate Calculator may be used to calculate a doserate for a medicationthat is not in the drug library. While the pump will calculate the rate, it is
PUMP MENUS
Chapter 2

45
Chapter 2
PUMP MENUS
important to realize there are no dose limits.
• To access the Dose Rate Calculator go to the Home screen and scroll to Options.
Note: Pump may be set up in service program to prompt “Use Dose RateCalculator?” when a basic infusion is selected.
• Press k to prompt to select concentration units.
• Scroll to and select units for concentration (units of drug in bag) using q arrow keys, confirm with k.
• Press k to prompt for entering amount of drug in bag.
• Enter the amount of drug using q arrow keys and confirm with k.
• Press k to prompt for entering the volume of the bag.
• Enter the volume of the bag using q arrow keys and confirm with k.

46
• Select patient parameter, if any, for dosing calculation. Choices are weight, BSA, or none.
• Select the doserate units.
• Enter doserate using q arrow keys and confirm with k.Confirm and start infusion.
• *Enter VTBI or Time.
• To exit Dose Rate Calculation: the pump must be stopped. Press the c Keyfrom Home screen and answer “yes” to “Exit and clear infusion?”
Assigning a basic or doserate calculation infusion to Drug Library:
An infusion started without using the drug library, either a basic or doseratecalculation, may be assigned to the drug library without stopping the infusion.
• Access the Home screen by pressing the c key.• Scroll to and select Options.• Scroll to and select “Assign to Drug Library”.
• Program for the Drug Library following the same steps covered in Chapter 1.3 to program within the drug library, beginning with selecting the Care Unit.
PUMP MENUS
Chapter 2

47
Chapter 2
PUMP MENUS
2.2.5 Data Lock
The pump offers 2 levels of security to prevent unauthorized access which maybe set in this menu. A third level may be set in the drug library by drug. A fourdigit code (default setting “9119”) must be entered within 20 seconds to preventa data lock alarm. The code can be changed via the service program for Level 1and Level 2.
Level 1:All keys except X door open and sf are locked and require entry of data lockcode. The IV line may be changed.
Level 2:Functions the same as level 1 and in addition does not allow the door to beopened and requires code to start infusion.
Note: Once code has been entered changes may be made for 20 seconds untilthe pump locks again and requires re-entry of the code.
Level 3:Functions the same as level 2 but has a custom code set in the Drug Library. Inaddition the pump display may have a custom message.
Activation of the function:
• Open data lock in Options Menu with l.
• Select between level 1 or 2 with l and r and confirm with k.
• Enter code with q and press k in order to activate data lock.
EventChange IV line
Level 1 Level 2 Level 3
Change parameters
��
Stop infusion � % ��Powering off pump / Standby %�Displays customized message whenrunning
�= possible | = requires code | %= followed by data lock alarm
NA �NA
Start infusion
� with code for level 2/3

48
• Note that upon activation of data lock the y symbol appears on the run screen to the right of the rate/dose indicating changes are only possible after entering the code. If the wrong code is entered four times the pump will go into an audible alarm, the yellow LED will light, and the pump display indicates invalid code.
• To deactivate data lock, select “Off” in the data lock menu, press k.
2.2.6 KVO-Mode
The pump can continue the infusion with a preset KVO rate after an infusion time orVTBI has ended. The rate and duration of the KVO delivery is set in the service program.When KVO feature is activated in the service program, the pump will automatically gointo KVO unless it has been turned off in the Options menu.
• Open the KVO mode in the Options menu with l.
• Answer the Yes/No question with u to activate the KVO mode.
Note: KVO function is disabled in Dose over Time.
2.2.7 Contrast / Display Light / Keypad Light
Contrast as well as display and keypad light can be adjusted individually according tothe lighting conditions.
• Open contrast/display light/keypad light in Options Menu by pressing l.
• Choose between 9 contrast and display light levels with l or r and confirm with k.
Chapter 2
PUMP MENUS

49
2.2.8 Bolus Rate
The pump has a default bolus rate which is set in the service program. This rate is usedfor manual bolusing. For a programmed bolus, this rate will be converted to a time inthe time editor screen if no default bolus rate has been set in the drug library and maybe changed by adjusting the time.
• Open bolus rate in Options Menu with l.
• Change bolus rate with q and confirm setting with k.
2.2.9 Date / Time
• Open date/time in the Options Menu with l.
• Modify date and time with q and confirm the setting with k.
2.2.10 Macro Mode
The infusion rate appears much larger and the drug name much smaller on the displaywhen the macro mode is activated and the pump is infusing.
• Open macro mode in Options Menu with l.
• Answer Yes/No question by pressing u to activate the macro mode.
Note: For quick activation and deactivation of macro mode: Press and hold rwhilethe pump is infusing until the font size changes.
2.2.11 Wireless Activation
Allows wireless to set for active or inactive.
2.3 Status Menu
The status menu is accessed from the Home screen. In the status menu it is pos-sible to review the following:
• Battery time remaining at current infusion rate• Last bolus amount, date and time• Drug info which includes Care Unit, drug file creation date, current drug selection, patient profile and clinical advisory (if any).• Pump software version• Wireless status • IV line
Chapter 2
PUMP MENUS

50
Chapter 2
PUMP MENUS

51
Chapter 3
ALARMS
ALARMSThe Infusomat® Space is equipped with an audible and optical alarm signal.
3.1 Device Alarms
When a device alarm occurs the infusion is immediately stopped and display indicates"device alarm" with a code. The audible alarm is unique. Press o to switch off the device. Then switch the device on again. In the case of a repeated device alarm thepump must be sent for service.
3.2 Pre-Alarms and Operating Alarms
Pre-alarms:Pre-alarms are set in the service program. Pre-alarms occur a few minutes (specifictime set in service settings) prior to operating alarms. During pre-alarms an audibletone sounds, the yellow LED is constantly on and a staff call is activated (optional). Thedisplay message varies depending on the reason for the alarm. The signal tone and thestaff call are turned off with k. Display and LED stay in pre-alarm until condition causing the pre-alarm results in an operating alarm. Pre-alarms do not stop the infusion.
Display message Pre-alarm reason
“VTBI near end“ The programmed volume is almost infused.
“Time near end“ The programmed time is almost over.
“Battery nearly empty“ The battery is almost discharged.
“KVO mode“ VTBI or time are complete and the pump converted to the KVO rate.
Alarm-typeDeviceAlarm
yes flashes off device alarmand alarmcode
yes Follow the instruc-tion on the displayto press k.
Opera-tingAlarm
yes flashes off alarm type yes
Pre-Alarm
yes off constanton
alarm type (de-)activatevia serviceprogram
Press k to acknow-ledge and cancelalarm
ReminderAlarm
yes off constanton
alarm type yes Press k to acknow-ledge and cancelalarm
AlarmHint
no off off alarm type no Message disappearswithout confirmation.
Audiblesignal Red LED
Optical signalYellow LED Text
Staff call User confirmation
Press k toacknowledge andcancel alarm

52
A stopwatch on the display counts down the remaining time (depending on theservice program, between 3-30 min). After that, the pump goes into an opera-ting alarm.
Operating alarms:Operating alarms immediately stop the infusion. An audible tone sounds, the redLED flashes and a staff call is activated (optional). The display states “Alarm“and the reason for the operating alarm. The alarm tone and message as well asthe staff call are turned off with K. Correcting the alarm state depends on thecause of the alarm.
Display message Alarm reason
“VTBI infused “ The programmed volume was infused. Hang new bag and/or reset VTBI
“Time expired“ The programmed time has ended. Hang new bag and/or reset time.
“Battery empty“ The battery is discharged. The battery alarm will be on for 3 min. Then the pump will automatically turn off. Plug pump in immediately to re-charge battery.
"Downstream occlusion" The set downstream pressure level was exceeded. Post occlusion bolus reduction is automatically initiated by the pump. Check tubing for kinks , closed stopcocks, filter patency, and IV site. Increase occlusion pressure if necessary per your institutional policy.
“KVO time finished“ The KVO time has ended. Program new settings.
“Battery cover removed“ The battery cover is not properly engaged on the battery compartment. Reposition cover, listening for click when battery cover is locked in place.
“Standby time expired“ The set standby time has ended. Set new standby time or initiate infusion.
“No battery inserted“ It is not possible to use the pump without a battery. Turn off pump and insert battery according to directions in “Overview Infusomat® Space“.
“Drive blocked“ Excess pressure in system or motor failure. Remove tubing and re-insert, if persists pump must be sent for service.
“Calibrate device“ Return to service for calibration.
Chapter 3
ALARMS

53
Display message Alarm reason
“Upstream occlusion - above pump" The upstream pressure between the bag and the pump is high. Check if roller clamp is closed, or infusion line is kinked.
“Air bubble alarm"/"Accumulated air exceeds limit“ Air detector limits are set in the service program. The air bubble size can be set between 0.02 - 0.3ml in increments of 0.01. The accumulated air value may be set between 0.5 - 3.8ml/hr in increments of 0.1ml. The display will indicate air bubble or accumulated air as the cause of the alarm. When an air alarm is cleared (disconnect line from patient and follow display prompts to prime the air bubble out or follow hospital protocol) the system resets to zero.
“Pump set back to default settings” Pump settings could not be restored. Enter infusion parameters again.
"Infusion values were cleared” Infusion data could not be restored. Enter infusion parameters again.
“Data lock" An attempt was made to access the pump without entering the code. Enter the correct code.
Danger of FreeFlow - Clamp IV line Anti-free flow clip not properly inserted. Close roller clamp, open door and re-insert IV line.
The red LED extinguishes with the acknowledgement of the operating alarm.
3.3 Reminder Alarms
Reminder alarms occur in 2 different scenarios.
1. A line is inserted, the pump is not infusing, programming is incomplete, and there has been no interaction with the pump for two minutes. An acoustic tone sounds, the yellow LED is constantly on and a staff call is activated (optional).
a) The display states “Reminder alarm” and reason for alarm.
b) The display states “Programming not done”
Confirm alarm with K and continue to program.
ALARMS
Chapter 3

54
2. An editor screen was open for programming but no values were confirmed or values were entered but no line is inserted in pump. An acoustic tone sounds in 20 seconds, the display states “Value not confirmed“, the yellow LED is constantly on and a staff call is activated (optional). Confirm alarm with K and continue to program infusion.
Sample reminder alarms include:
Display message Alarm reason
“Bolus NOT running“ BOL was not pressed after programming bolus dose and time.
“Order still pending” Autoprogramming order was sent to pump but not confirmed.
3.4 Alarm Prompts
A prompt provides direction to assist in properly operating the pump. (e.g. “Bolus func-tion disabled”, “Download failed”, or “The parameter can not be modified”).
ALARMS
Chapter 3

55
Chapter 4
WIRELESS DRUG LIBRARY UPLOAD
WIRELESS DRUG L IBRARY UPLOAD
The pump has the ability to accept new drug library files wirelessly. A file symbol will flash alternately with the wireless antenna symbol on the top of thepump display when a new file is available. The wireless antenna symbol is seenon run screen, standby screen and when pump is powered off and plugged in.
• Press Start/Stop key sf to stop infusion when patient condition allows.
• Close roller clamp, disconnect IV line from patient, press x and remove IV line from right to left per Section 1.12 and 1.13.
• Power pump off.
• Wait 10 seconds, progress bar appears on pump, do not power pump back on until Drug Upload is complete as indicated by progress bar.
• Display will indicate DL update is successful when complete, on power up display indicates new Drug Library is activated on pump.
Note: Cancelling the Drug library update will remove all drug library files fromthe pump. A small drug library may load very quickly and not be able to becancelled.

56
• Press power key o to re-start pump, respond to 2 prompts that all values are cleared and new Drug Library has been loaded.
• Confirm prompt that previous programming values have been cleared.
New drug library has been activated on pump.
Chapter 4
WIRELESS DRUG LIBRARY UPLOAD

57
AUTOPROGRAMMING
Note: All normal pump functions remain in place when orders are received viaautoprogramming.
The pump can accept drug orders wirelessly from the EHR system. The workflowto accept an order wirelessly will vary depending on your EHR vendor.
• Using the hand held device or lap top, review the order and follow your hospital protocol for scanning the bag, pump, patient and nurse (optional).
• Once order is confirmed on the hand held or laptop, prompt EHR to send order directly to pump. The order will arrive and appear on the pump within 10 seconds.
• Ensure pump is on B Braun landing page (press c key to return to landing page).
• New Order message will appear with drug name and mode.
• Press k to accept or c key to cancel order and respond to prompt.
• Select Care Unit and Patient Profile as in Drug Library programming in Chapter 1.
• Pump will search for Drug Library match.
Note: If no drug library match, which may be due to no matching name, concentra-tion or dosing units, pump displays reason for no match and depending on your hospitals configuration either allows manual programming outside the drug library perChapter 1 Section 1.11 or rejects order completely. An order that is confirmed outsidethe drug library will have a triangle with an exclamation point on display to indicatethere are no drug library settings.
• Scroll to each value to confirm using q arrow keys.
Note: Order may be cancelled prior to confirming order.
Chapter 5
AUTOPROGRAMMING AND BARCODING

58
• Once all values are confirmed the Home screen is displayed.
Note: Soft Limit alert will be issued if value exceeds any soft limits set in druglibrary, soft limit may be overridden or value re-programmed per institutionalpolicy. Order will be rejected if hard limit is exceeded. (except in circumstancewhere pump service program is not set to perform drug library match for auto-programming).
For PRIMary Orders:
Note: The first order sent is always considered the PRIMary infusion, subsequentorders will be considered SECondary.
• Press Start/Stop key sf to start infusion.
Updates to Current Primary Infusion
Updates may be received for PRIMary infusions while pump is running or stopped andwhile in PRIMary or SECondary.
While in PRIMary:
• Update icon will appear on display, follow on screen prompts to accept or cancel the order. Confirmation screen will indicate both OLD and NEW value for parameter(s) that changed.
While in SECondary:
• Message will appear on top of display indicating update is available for PRIMary.
• Press M key to view order.
• Follow prompt, pressing sf to accept order or c key to cancel and hold order for later.
Chapter 5
AUTOPROGRAMMING AND BARCODING

59
Chapter 5
AUTOPROGRAMMING AND BARCODING
New Primary Infusion:
• To accept a new PRIMary order, stop infusion and clear current PRIMary infusion by pressing c key and responding “yes” to clear current infusion.
SECondary Orders:
Orders received after PRIMary has been set will be for SECondary infusions, follow prompts on screen to stop the PRIMary to accept the SECondary order.
• Confirm order values as above for PRIMary orders.
• Respond to prompts to check bag height and clamps prior to starting SECondary.
New SECondary order while SECondary is Infusing:
• Follow display prompts to stop current infusion.
Note: A SECondary order may be held for later by pressing c key to cancelorder and answering yes to “hold for later”.
Note: Changing values on any incoming order may only be done after confirm-ing all values. Once all values are confirmed you may scroll to any value andopen editor with l to change value. Alternately, order may be cancelled andrequest made for revised order to be sent.
Note: If pump is placed in standby while order is pending new order will flashon top of stand by display, press M key to accept order (pump will come out ofstandby).

60
BARCODING
Please contact your local B. Braun sales representative for barcoding information.
Chapter 5
AUTOPROGRAMMING AND BARCODING

61
Chapter 6
BATTERY OPERATION AND MAINTENANCE
INTENDED USE
The battery module of Space guaranties operation independent of AC power whentransporting patients within the facility. The wireless battery module contains a wireless transceiver module to allow data transmission during these transports orwhen connected to AC power.
6.1 General
The Infusomat® Space is equipped with the latest Li-Ion battery. The device is equipped with protection against overcharge and deep depletion.The battery pack is charged by the pump when connected to AC power. Whendisconnected from power or in case of power failure, the pump automatically switchesto battery power.
Note: Prior to a prolonged storage of the pump (> 5 months) the battery pack must becompletely charged and then removed from the pump.
If the battery symbol on the display is blinking while connected to AC power, the battery is either discharged or has a reduced capacity and pump must remain pluggedin while in use. When the battery symbol blinks permanently (>1h), the battery mustbe checked by a technician and replaced if necessary.
Directions for optimal battery use:
The actual battery life may vary due to • ambient temperature • varying load (e.g. frequent boluses).
The optimal lifetime of a battery pack will only be reached if it's completelydischarged from time to time. A maintenance mode which conducts this batterymaintenance is built in. This function should be activated once a month. Furthermore:
• If possible, only charge the battery if it has been completely discharged. • If a battery, which is not completely discharged, is charged several times, its capacity can be reduced. Its original capacity can be reached again if the battery is completely discharged and then recharged. • Under normal temperature conditions a battery can be charged and discharged approximately 500 times before its lifetime decreases. • When the pump is not connected to AC power the battery discharges itself slowly. This can occur even when the pump is not operating. The original capacity will only be reached after several cycles of charging and discharging. • The battery operating time can be realized if the pump operates continuously with a fully charged battery at room temperature. The display of the battery operating time on the pump is an approximate value based on the current delivery rate. If the battery is aged it may differ from the actual achievable operating time. The wireless is only available when using a battery module with a wireless transceiver (article code 8713182U) and the wireless function is activated via

62
Chapter 6
BATTERY OPERATION AND MAINTENANCE
the service program (HiBaSeD) or within the Options menu of the pump. The wireless operation mode supports 802.11 a/b/g/n with static IP-address setting or DHCP in ad-hoc mode or within an infrastructure.
Caution: Exposure considerations require that a 20 cm (8 inch) separation distance between users and the installed antenna location shall be maintained at all times when the module is energized. OEM installers must consider suitable module and antenna installation locations in order to assure this in 20 cm (8 inch) separation, and end users be also be advised of the requirement.
6.2 Safety Instructions
Safety Instruction for B.Braun Battery-Pack SP (Li-Ion)Battery pack is suitable only for use with B.Braun Space Infusion devices.Please follow local ordinance and/or regulations for disposal. Fire or chemical burn hazard if battery is mishandled. To avoid possible injury.
■ Do not open or expose to heat above 80°C (176°F).
■ Do not use damaged Battery-Packs.
■ Do not attempt to disable it.
■ Do not short circuit it.
■ Do not expose it to water or rain.
Caution: If this equipment is modified, appropriate inspection and testing must be conducted to ensure continued safe use of the equipment.
This device/firmware contains components that are licensed under the GNU General Public License version 2 (see chapter 9).
To receive the source code of these components as required by that license, please get in contact with your local distributor.
Caution: The recommandations of the IEC 80001 should be observed.
6.3 Battery with WiFi
Handling the Battery Pack SP with WiFi:
The Battery Pack SP can be exchanged by any user. No special qualification is required. Replace Battery Pack SP model 8713182U with corresponding models only. Replace battery pack for Space with battery packs releasedby B. Braun. Other batteries may cause injury, fire or explosion.

63
Caution: The pump must be switched off before opening the battery compartment.
Open the cover of the battery compartment (see ch. 1.12), unlock the battery bysliding the green hook and pull out the battery using the metal handle.Replace the Battery Pack SP in the battery compartment, lock it with the greenhook and test the proper placement by pulling the metal handle. Close the battery compartment again.
Note: In case of ESD, Pump may need to be plugged into wall outlet to re-startthe battery.
The battery is charged by the pump during connection to A/C power. When disconnected from A/C or in case of power failure, the pump automatically switches to battery power.
Connection to A/C power is displayed by the symbol in the main menu ofthe pump. Recharging of WiFi battery while connected to A/C power and activeWiFi is ensured as long as environmental temperature outside Infusion pump is 35 °C (95°F).
Attention: If the battery module is stored for long periods of time outside the pump, itis recommended to fully charge the battery and store it at room temperature.
Caution: Batteries may explode or leak if they are opened or incinerated. Consider disposal directions!
The status of the wireless connection is displayed in the run screen. When the wireless transmitter is switched off, no symbol is shown in the status of the run screen.
If the wireless is activated, the status of the connection is shown.
Wireless operation mode is switched on but no connection to the network.
Note: An “X” through the wireless antenna indicates wireless connection has been lost,contact your bio-medical engineering or IT department to determine cause.
Wireless operation mode is switched on on and connection to the network isestablished.
Further status information regarding thestatus of the wireless connection can beviewed in the Status menu.
BATTERY OPERATION AND MAINTENANCE
Chapter 6

64
SSID: The Service Set Identifier, is a the service tool HiBaSeD.wireless LAN. The SSID can be up to 32 characters long and can only be set with
IP-Address shows the assigned IP address of the infusion pump.
Signal strength: The signal strength shows the quality of the connection.
Baud rate is the maximum communication speed in mega bits per second (Mbps). Themaximum baud rate strongly depends on the wireless standard (802.11 a/b/g/n).
Status code displays the current status of the wireless connection. If there is a problemwith the wireless connection an error code is displayed. Error codes can be:
10 to 12: internal malfunction 13: wireless interface does not find any network 14: wireless interface is trying to connect to a network 15: the interface is being configured 16: the interface is waiting for authentication 17: DHCP request is sent out 19: internal failure
Available Networks opens a sub menu showing the available wireless networks (SSID)and their signal strength. It is not possible to change to another network. The Spacepump always connects to the network with the highest signal strength.
Within the Options menu the wireless mode can be switched on or off.
6.4 Battery maintenance
To accurately balance the battery capacity a cyclical battery maintenance isnecessary. The pump asks the user to perform a battery maintenance every 30days when the feature is enabled in the service program. The battery mainte-nance mode detects a possible capacity loss (e.g. through aging of the batterypack) and then the capacity/running time will be recalculated. After a longer
BATTERY OPERATION AND MAINTENANCE
Chapter 6

65
BATTERY OPERATION AND MAINTENANCE
Chapter 6
storage time or a longer operation without battery maintenance the batterypre-alarm time may no longer be maintained. In this case it is necessary to per-form a battery maintenance.
To initiate the discharge process the message “Battery maintenance“ and the k keywill be displayed after switching the pump off. By pressing k and u the dischargeprocess will start. The process is interrupted by switching the pump on again. If thebattery maintenance is to be continued a new activation is necessary. After completelydischarging the battery it will be completely charged again. The total duration of thebattery maintenance process takes approximately twelve hours.
Caution: When the battery maintenance has not been completed there is a possibility of a reduced battery operating time.

66
Chapter 7
START UP GRAPHS AND TRUMPET CURVES
The graphs show the accuracy/uniformity of flow in relation to time.The delivery behaviour or delivery precision is influenced by the type of thedisposable used. Deviations from the technical data of the pump cannot beexcluded if lines (disposables) other than B.Braun approved sets are used.
START UP GRAPHS AND TRUMPET CURVES
Trumpet CurvesMeasured values for second hour in each case.Measurement interval ∆t = 0.5 minObservation interval p x ∆t [min]
Start Up GraphsMeasurement interval ∆t = 0.5 minMeasurement duration T = 120 minFlow Q
i (ml/h)
Start Up Graphs Trumpet Curves

67
TECHNICAL DATA
Type of unit Volumetric infusion pump
Classification (acc. to IEC/EN 60601-1) defibrillator-proof; CF equipment Protective Class II; Protective Class I in combination with SpaceStation
Class (acc. to Directive 93/42 EEC) IIb
Classification acc. to 21 CFR 880.5725 Class II (Product code FRN and FPA)
Moisture protection IP 22 (drip protected for horizontal usage)
External power supply: •Rated voltage Via B. Braun SpaceStation or optional AC adaptor (rated voltage 100 … 240 V AC~, 50/60 Hz) for stand alone operation • External low voltage 11 – 16 V DC via Connection Lead SP 12 V or via SpaceStation
Staff call Max. 24 V / 0,5 A / 24 VA
EMC IEC/EN 60601-1-2 / 60601-2-24
Time of operation 100 % (continuous operation)
Operating conditions: •Relative humidity 30 % – 90 % (without condensation) • Temperature +60 – + 105° F •Atmospheric pressure 500 – 1060 mbar
Storage conditions: •Relative humidity 20 % – 90 % (without condensation) • Temperature -4 – +131° F •Atmospheric pressure 500 – 1060 mbar
Type of battery pack (rechargeable) Li-Ion NiMH
Operating time of rechargeable battery Li-Ion wireless active Infusomat at 100ml/h 4.0 hours wireless active Infusomat at 1200ml/h 2.5 hours wireless inactive Infusomat at 100ml/h 12.0 hours wireless inactive Infusomat at 1200ml/h 5.0 hoursNiMH at 100 ml/h 13 hours at 1200 ml/h 5 hours
Recharging time Approximately 6 hours
Weight Approximately 1.4 kg
Dimensions (W x H x D) 214 x 68 x 124 mm = 8.4 x 2.6 x 4.8 inches
TECHNICAL DATA
Chapter 8

68
Volume increments 0.1 - 99.99 ml in increments of 0.01 ml 100.0 – 999.0 ml in increments 0.1 ml 1000 – 9999 ml in increments 1 ml
Time selection 00:01 – 99:59 h
Accuracy of set delivery rate ± 5 % according to IEC/EN 60601-2-24
Administration Set Change Interval Pumping accuracy is maintained for a minimum of 96 hours.
Max. Volume in case of single fault For incorrect dosages of 1.4 ml due to condition malfunctions of the device the pump will automatically shut off
Technical inspection (safety check) Every 2 years
Rate increments 0.1 - 99.99 ml/h in increments of 0.01 ml/h 100.0 - 999.9 ml/h in increments of 0.1 ml/h 1000.0 - 1200 ml/h in increments of 1 ml/h
Multiple lines connected to one patient port Connecting multiple infusion lines with different flow rates may affect the rate for all infusions past the point of connection.
Accuracy of bolus infusion typically ± 5 % for a bolus volume > 1 ml
KVO rate Delivery rate 10 ml/h: KVO rate 3 ml/h Delivery rate < 10 ml/h: KVO rate 1 ml/h Delivery rate < 1 ml/h: KVO rate = programmed rate (default setting 0.1 ml/h)
Computer connection USB connection in combination withfor Service Program B. Braun interface lead CAN SP (8713230) including electrical insulation. Please pay attention to safety notices.Air detector The Infusomat® Space Volumetric Infusion pump includes an ultrasonic air detection sensor that is used to detect air in the disposable set. Per the requirements of the IEC 60601-2-24 (2nd Ed. 51.104 and 3rd Ed. 201.12.4.4.107) the software uses this sensor to detect the accumulation of air not to exceed 1 ml/15 minutes of any air bubbles greater than or equal to 0.01 ml (10 uL). The air accumulating
TECHNICAL DATA
Chapter 8

69
value may be set between 0.5 – 3.8 ml/hr in increments of 0.1 ml/hr during configuration. In addition, the pump also has a configurable single bubble alarm that can be set between 0.02 – 0.3 ml in increments of 0.01 ml. The pump display indicates if the alarm is a Single bubble alarm or an Accumulated Air alarm and stops the infusion thus requiring intervention from the user to address the alarm.
“Upstream sensor” 9 levels from -90 mmHg to -160 mmHg (pressure reduction)Occlusion alarm pressures (downstream pressure) 9 levels from 225mmHg to 900 mmHg
Alarm volume 9 levels from 1 (59dBA) to 9 (74dBA)Mechanical occlusion pressure limit Occlusion alarm pressure max. 1575 mmHgunder fault conditions (210 kPa). Maximum posts occlusion bolus volume 2ml.Pump log Logs are accessed via the service program. Pump logs include history log of 1000 past entires, alarm log, key stroke and notes log. Refer to HiBaSed IFU for more information.
Caution: If a wrench is displayed and/or the yellow, red and blueLEDs blink, then the pump is in the service mode and cannot be used on apatient. The pump must then be checked by a service technician.
Note: The technical data stated in this Instructions for Use manual weredetermined with the Infusomat® Space line (870 0036 SP). These technical datacan change when using different set configurations.
• Use only pressure proof and compatible disposable items (min. 2 bar/ 1500 mm Hg) to avoid influencing performance data - which would result in impairing patient safety.
Level 1Level 5Level 9
[mmHg]Time to occlusion alarm [min] at rate Max bolusOcclusion pressure
[1 mL/h]typ. 226 09:07typ. 563typ. 900
25:5346:50
[25 mL/h]00:3301:1402:06
[100 mL/h]00:0700:1500:24
[mL]0.03470.09870.1787
Chapter 8
TECHNICAL DATA

70
• Use only compatible combinations of equipment, accessories, working parts and disposables with luer lock connectors.
• The Infusomat Space System is unsafe to use in proximity to magnetic resonance imaging (MRI) equipment.
• Only use combined with approved devices/accessories by the manufacturer, otherwise this may lead to higher emission or reduced immunity.
Essential Performance for Infusion pumps
• Infusion of liquids without variation of infusion rate • Pressure limitation as protection from the bursting of the infusion line • Protection from air-infusion • Protection against unintended bolus volumes and occlusion (added by IEC 60601-2-24) • Alarm signal of high priority (added by IEC 60601-2-24)
Dosing families
Drug and rate units and the abbreviation for each as they appear on the pumpare the following:
gram = g milli gram = mg micro gram = mcg nano gram = ng unit = U milli unit = mU kilo unit = kU million unit = MU milli equivalent = mEq milli mole = mmol kilo calorie = kcal milli liter = ml kilo gram = kg meters squared = m2
body surface area = BSA minutes = min hour = h seconds = sec
The following table shows the drug/rate units and options available for administrationof medications using dosing/rate units in combination with patient metrics and timeunits. Dosing units are derived by selecting any one unit from each column in anycombination (except where noted otherwise). The dosing units may be pre-set in theDrub Library (refer to Chapter 1.2 ) or selected when using the Dose Rate Calculator(refer to Chapter 2.2.4).
Chapter 8
TECHNICAL DATA

71
The table below shows the conversion for the dosing units of the gram and units families :
The following formula is used to calculate flow rate:
Infusion rate (ml/hr) = Dose/concentration x (patient weight or BSA)
Gram family 106 ng 103 mcg 1 mg 10-3 g
Unit family 103 mU 1 U 10-3 kU 10-6 MU
Drug Units Patient Units Time Units
g (none) min
h
24h
sec (bolus only)
per hour only
per hour only
kg
m2
(none)
kg
mg
mEq
mmol
U
milli U
kU*
MU*
kcal**
Rate Units
ml
ml
* no m2 or per minute dosing
** no m2, per minute, or per hour dosing
Chapter 8
TECHNICAL DATA

72
Guidance and manufacturer’s declarartion on electromagnetic compatibility
Emissions test
Guidance and manufacturer’s declaration – electromagnetic emission
The Space System is intended for use in the electromagnetic environment specified below. Thecustomer or the user of the Space System or any component should assure that it is used in suchan environment.
RF emissions CISPR 11
Compliance
Group 1
Electromagnetic environment guidance
The Space System uses RF energy only for its internalfunction. Therefore, its RF emissions are very low andare not likely to cause any interference in nearby electronic equipment.If WLAN-Module is installed within Battery module(8713182U) or WLAN USB Stick for SpaceCom(8713185) is used RF energy is transmitted by theSpace System.Refer to technical data of Battery-Pack SP with WifiIUF and/or SpaceStation and SpaceCom for details.
RF emissions
CISPR 11
Harmonic emissions IEC 61000-3-2
Class B (Note 2)
applicable only forSpaceStation
Class A
Voltage fluctuations /flicker emissions
IEC 61000-3-3
Note 1: Maximum emissions are measured with a complete system (SpaceStation and components).
Note 2: If Class A equipment is attached to the Space System, the Space System will become ClassA too. This equipment/system may cause radio interference or may disrupt the operation of nearbyequipment. It may be necessary to take mitigation measures, such as re-orienting or relocating theSpace System or shielding the location.
Complies
The Space System or any component is suitable foruse in all establishments, including domestic establishments and those directly connected to thepublic low-voltage power supply network that supplies buildings used for domestic purposes.
Chapter 8
TECHNICAL DATA

73
Chapter 8
TECHNICAL DATA
Note: Different test values of IEC 60601-2-24 are marked in the table. At the test values no dangerous disturbances occurred at the lower test values of IEC 60601-1-2.
Immunity test
Guidance and manufacturer’s declaration – electromagnetic immunity
The Space System is intended for use in the electromagnetic environment specified below. The customer or the user of the Space System or any component should assure that it is used in suchan environment.
Electrostaticdischarge (ESD)according IEC60601-4-2
contactIEC 60601-1-2:±6KVIEC 60601-2-24:±8KV
airIEC 60601-1-2:±8KV IEC 60601-2-24: ±15KV
±6KV no disturbances
±8KV stop with alarm possible
±8KV no disturbances
±15KV stop with alarmpossible
Floors should be wood, concrete or ceramic tile. If floors are covered withsynthetic material, the relativehumidity should be at least 30 %.
Electrostatic transient / burstaccording IEC61000-4-4
± 2 kV for powersupply lines
± 1 kV for input/output lines
±2KV
±1KV
A/C power quality should bethat of a typical commercial orhospital environment.
Surge according IEC61000-4-5
differential mode±1KV
common mode ±2KV
±1KV
±2KV
A/C power quality should bethat of a typical commercial orhospital environment.
Power frequency(50/60 Hz)magnetic fieldaccording IEC61000-4-8
3 A/m 400 A/m Power frequency magneticfields should be at levels characteristic of a typical location in a typical commercial or hospital environment.
Voltage dips, shortinterruptions andvoltage variationson power supplyinput linesaccording IEC61000-4-11
< 5 % UT (>95 % dip in UT )for 0,5 cycle
40 % UT (60 % dip in UT )for 5 cycles
70 % UT (30 % dip in UT )for 25 cycles
< 5 % UT (>95 % dip in UT )for 5 sec
<5% UTfor 5 s(>95% dip)
complies by use of internal battery
A/C power quality should bethat of a typical commercial orhospital environment. If theuser of the Space Systemrequires continued operationduring long time A/C powerinterruptions, it is recommended that the SpaceSystem or component be powered from an uninterruptible power supply ora battery.
test level IEC 60601-1-2IEC 60601-2-24
Compliance level Electromagnetic environment – guidance

74
radiated electromagneticRF fields according IEC 61000-4-6
radiated electromagneticRF fields according IEC 61000-4-3
IEC 60601-1-2: 3 Veff normal and10Veff in ISM frequency band
IEC 60601-2-24:10 Veff150KHz to 80MHz
10 V/m80 MHz to 2,5 GHz
10Veff150KHz to 80MHz
10 V/m80 MHz to 3 GHz
Portable and mobile RF communications equipment shouldbe used no closer to any part of theSpace System or it’s components,including cables, than the recommended separation distancecalculated from the equation applicable to the frequency of thetransmitter.
Recommended separation distance
d = 1,2 PField strengths should be less then10V/m
d = 1,2 P80 MHz to 800 MHz
d = 2,3 P 800 MHz to 2,5GHz
where p is the maximum outputpower rating of the transmitter inwatts (W) according to the transmit-ter manufacturer and d isthe rec-ommended separationdistance in meters (m).
Field strengths from fixed RF transmitters, as determined by anelectromagnetic site survey, shouldbe less than the compliance level ineach frequency range.
Interference may occur in the vicinity of equipment marked withthe following symbol:
Immunity test
Guidance and manufacturer’s declaration – electromagnetic immunity
The Space System is intended for use in the electromagnetic environment specified below. The customer or the user of the Space System or any component should assure that it is used in suchan environment.
test level IEC 60601-1-2 IEC 60601-2-24
Compliance level
Electromagnetic environment - guidance
NOTE 1: At 80 MHz and 800 MHz, the higher frequency range applies.
NOTE 2: These guidelines may not apply in all situations. Electromagnetic propagation is affected byabsorption and reflection from structures, objects and people.
NOTE 3: See next page.
Chapter 8
TECHNICAL DATA

75
TECHNICAL DATA
Chapter 8
NOTE 3: Different test values of IEC 60601-2-24 are marked in the table. At these test values nodangerous disturbances are allowed while at the lower test values of IEC 60601-1-2. Field strengthsfrom fixed transmitters, such as base stations for radio (cellular/cordless) telephones and land mobileradios, amateur radio, AM and FM radio broadcast and TV broadcast cannot be predicted theoreticallywith accuracy. To assess the electromagnetic environment due to fixed RF transmitters, an electro-magnetic site survey should be considered. If the measured field strength in the location in which theSpaceSystem is used exceeds the applicable RF compliance level above, the Space System should beobserved to verify normal operation. If abnormal performance is observed, additional measures may benecessary, such as re-orienting or relocating the Space System.
rated power of theratio transmitter
W
Separation distance according to frequency of transmitter
m
The Space System is intended for use in an electromagnetic environment in which radiated RF disturbances are controlled. The customer or the user of the Space System or component can helpprevent electromagnetic interference by maintaining a minimum distance between portable andmobile RF communications equipment (transmitters) and the Space System as recommended below,according to the maxi-mum output power of the communications equipment
150 kHz bis 80 MHz 1,2 P
80 MHz bis 800 MHz 1,2 P
800 MHz bis 2,5 GHz 2,3 P
NOTE 1: For transmitters rated at a maximum power output not listed above, the recommended separation distance (d) in meters (m) can be determined using the equation applicable to the frequen-cy of the transmitter, where (P) is the maximum output power rating of the transmit-ter in watts (W)according to the transmitter manufacturer.
NOTE 2: An additional factor of 10/3 is used in calculating the recommended separation distance fortransmitters in the frequency range 0.15 MHz to 2.5 GHz to decrease the likelihood that mobile/portable communications equipment could cause interference if it is inadvertently brought into patient areas.
NOTE 3: These guidelines may not apply in all situations. Electromagnetic propagation is affected byabsorption and reflection from structures, objects and people.
0,01 0,12 0,23
0,1 0,38 0,73
1 1,2 2,3
10 3,8 7,27
100 12
0,12
0,38
1,2
3,8
12 23

76
WARRANTY / TRAINING / TSC* / SERVICE / DISINFECTING / DISPOSAL
Chapter 9
WARRANTY / TRAINING / TSC* / SERVICE /DISINFECTING / DISPOSAL
B. Braun is the legal manufacturer:
The manufacturer, assembler, installer or importer is responsible for the effectson safety, reliability and performance of the equipment only if:
• assembly operations, extensions, re-adjustments, modifications or repairs are carried out by authorized personnel, • the electrical installation of the relevant room complies with the appropriate requirements (e.g. IEC 60364 "Electrical installations of buildings and/or the IEC-publications resp. national requirements), • the equipment is used in accordance with the Instructions for Use and • the Technical Safety Checks are carried out regularly.
Warranty
B. Braun provides 12 months warranty, from the date of delivery, for everyInfusomat® Space pump and for every Battery-Pack SP. This covers repair orreplacement of parts damaged as a result of design/manufacturing errors ormaterial defects. Modifications or repairs to the unit undertaken by theuser/operator or by third parties invalidate the warranty.
The warranty does not cover the following: Elimination of faults attributable to incorrect/unauthorized handling, or tonormal wear and tear.
Defective rechargeable battery packs can be returned to B. Braun for disposal.
Training
B. Braun offers a training for version X86U. Please ask your local representativefor further details.
Technical Safety Check* / Service
The Technical Safety Check is recommended to be carried out every 2 years andshould be documented. Servicing work must be carried out by B. Braun trainedpersonnel.
The CE mark confirms that thismedical productcomplies with the“Council Directiveon Medical Devices93/42/EEC” dated14th Junde 1993.
B. Braun Melsungen AG

77
Cleaning and Disinfecting
Caution: Before cleaning and disinfecting the pump, always disconnectthe pump from the patient, switch off the device and disconnect pump from A/Cpower outlet and other devices (e.g. staff call).
Clean all external surfaces using a clean, soft, lint-free cloth dampened with amild cleaning solution of soapy water. Make sure to remove any visible residuefrom all surfaces prior to disinfecting. The housing of Infusomat Space , the lineguide cover and the IV line guiding areas may be disinfected with EPA registeredhospital disinfectants containing 1-propanol, isopropyl alcohol, ethanol ordidecyl dimethyl ammonium chloride. Do not spray disinfectants directly on thepump, use a soft, low lint cloth dampened but not saturated with product. Aftercleaning and disinfecting allow device to dry for at least 20 minutes prior touse.
Note: To clean and disinfect the peristaltic fingers and membrane, the line guidecover can be removed using a pointed object (ballpoint pen) inserted in thelower right corner. Clean cover and peristaltic fingers and membrane using aclean, soft, lint-free cloth dampened with a mild cleaning solution of soapywater. The line guide cover may be cleaned under running water after it isremoved from the pump. Disinfect line guide cover, peristaltic fingers andmembrame following same procedure as stated above.
Caution: Do not touch the peristaltic fingers and membrane area ofpump with sharp object.
When reinserting the line guide cover, make sure that it is not damaged andthat it audibly locks in place.
Note: Do not use chloride disinfectant products (bleach).
line guide cover
Chapter 9
WARRANTY / TRAINING / TSC* / SERVICE / DISINFECTING / DISPOSAL

78
Note: Keep instrument upright and do not allow any part of instrument to become saturated with or submersed in fluid during cleaning operation.
Do not allow moisture or detergents to come into contact with the electricalconnections of the device (P2 or P3 connectors) or any device openings. To reduce the likelihood of moisture ingress into the electrical connectors, the P2connector of a power supply or combi cable may be used to cover the connections during cleaning operations. Ensure that any connectors used tocover are not connected to a wall outlet or other electrical source. Once thecleaning has been completed, remove the connector and inspect all connectorsfor residual moisture and evidence of damage or breakdown to the plating onthe connectors. Allow any residual moisture to evaporate before plugging thedevice into a wall outlet. Replace any connectors which exhibit damage or evi-dence of plating breakdown prior to returning the device to service. Utilize electrical contact cleaner that does not react with plastics toremove any deposits of material which may be present inside the electricalconnectors as required.
Caution: Do not allow liquids to enter into or come into contact with any openings or electrical connections on the pump or power supply. Fluid exposure in these areas may result in the risk of short circuit, corrosion or breakdown of sensitive electrical components, and/or electrical shock. If fluid exposure occurs, the device should be swapped out with another device in a manner that presents minimal interruption to patient care. The device should remain unplugged until it can be inspected by a trained technician for any evidence of damage and/or residual moisture which may impair the function of the device.
Caution: Do not touch line guide cover or peristalitic pumping area of pump with sharp object.
When reinserting the line guide cover, make sure that it is not damaged andthat it audibly locks in place.
Note: The use of unappoved cleaners and failure to follow the disinfection pro-cedures and the manufacturer's recommended dilutions can result in an instru-ment malfunction or product damage and could void the warranty.
peristaltic fingers and membrane
Chapter 9
WARRANTY / TRAINING / TSC* / SERVICE / DISINFECTING / DISPOSAL

79
Disposal
The pumps as well as battery packs can be returned to B. Braun for disposal. Separate disposal is required for electrical and electronic equipment (2002/96/EC)
Inspection on Delivery
Despite careful packaging, the risk of damage during transport cannot beentirely prevented. Upon delivery, please check that all items are present. Do notuse a damaged device. Contact B. Braun customer service or your local representative service.The device should be tested for proper functioning before initial use.
Included in Delivery
Infusomat® Space, Battery-Pack SP (with or without Wifi) and Instructions forUse.
Chapter 9
WARRANTY / TRAINING / TSC* / SERVICE / DISINFECTING / DISPOSAL

80
Chapter 10
OPTIONAL SPACE ACCESSORIES
OPTIONAL SPACE ACCESSORIES
SpaceStation (8713140U)
Station that can hold for up to four B. Braun Space pumps. Refer toSpaceStation user manual for operating instructions. For further informationcontact your B. Braun Representative or call B. Braun Customer Service at 1-800-627-7867.
SpaceStation with SpaceCom (8713142U)
SpaceStation with data communication capabilities. Refer to SpaceStation usermanual for operating instructions.
SpaceCover Comfort (8713145U)
The SpaceCover Comfort, which attaches to the top of the SpaceStation,includes a handle, central alarm management and alarm LEDs.
PoleClamp SP (8713130)
A maximum of three B. Braun Space pumps can be stacked together when usedwith the PoleClamp SP. For detailed instructions on secure fixation of thePoleClamp SP please refer to "Overview Infusomat® Space" and "Patient Safety".
Space Pole Clamp (speed clamp) (8713131)
Incorporates "speed clamp" for faster attaching/removing from IV Pole. A maximum of three B. Braun Space pumps can be stacked together when usedwith the Space Pole Clamp. For detailed instructions please refer to the"Overview Infusomat® Space" and "Patient Safety."
Power Supply SP (8713112D)
The Power Supply SP can supply power for a single pump.
1.) Connect P2 plug of Power Supply SP with P2 socket on back of pump (ensure that plug “clicks”).
2.) Push power plug into wall outlet.
Note: To disconnect plug from pump, firmly grasp the connector and pullstraight out. Do not twist or bend the cord or connector.

81
Chapter 10
OPTIONAL SPACE ACCESSORIES
Caution: Do not pull on cord to remove connector.
A maximum of three plugs can be stacked upon each other in P2 socket.
Technical Data: 100 – 240V AC~, 50/60 Hz, 0,4-0,2A
Combi Lead SP 12 V (8713133)
The Combi Lead SP can connect up to three pumps. All pumps can then beoperated by one Power Supply SP.
1.) Connect P2 plug of the Combi Lead SP 12 V with the P2 socket on the back of the pump. 2.) Connect P2 plug of Power Supply SP with Combi Lead SP. 3.) Push plug of Power Supply SP into the wall outlet.
Note: A maximum of three plugs can be stacked upon each other in P2 socket.
Connection Lead SP (12 V) (8713231)
Install the Connection Lead SP (12 V) in the following way:
1.) Connect plug to socket P2 on back of pump or F3 on SpaceStation.
2.) Put the connection lead into the car socket.
3.) If necessary, remove red adaptor of motor vehicle connector by slightly turning and simultanously pulling.
The green LED of the electronic box shows the operating voltage.
Caution: Plug into vehicle charger and connect to pump. Do not connect pump to patient if vehicle battery/generator is powering on.
Short Stand SP (8713135)
The Short Stand SP may be used to hang an infusion container above the pumpin place of a standing IV pole.
1.) Push the PoleClamp on the pump.
2.) Plug the short stand into the aperture on the PoleClamp; make sure that it audibly locks in.
3.) To remove the short stand press the button where stand attaches to pole clamp.
Note: Use only one infusion bag with max. 1000ml on the short stand.

82
Note: Insure pump is properly secured before attaching fluid bag to short standand connecting to patient to assure pump cannot fall and harm patient.
Battery-Pack SP with Wireless (Li-Ion) (8713182U)
For further information on the Battery Pack with wireless (Li-Ion), see chapter6.3 "Battery Pack SP with WiFi".
Battery-Pack SP without Wireless (NiMH) (8713180A)
For further information on the Battery Pack without wireless (NiMH), see chap-ter 6.1 "Battery Maintenance".
Interface Lead CAN SP (8713230)
Interface Lead CAN SP is needed in order to set up a connection between theSpaceStation and /or pump and the computer to use the service program(HiBaSed).
1.) Push plug into socket F3 on the SpaceStation or P2 on the pump and connect with the CAN/USB converter.
2.) Connect CAN/USB converter to computer USB port as described in the HiBaSed Instructions for Use manual.
Caution: The Interface Lead CAN SP is only to be used by the service department; never use while patient is connected.
Note: A maximum of three plugs can be stacked upon each other in socket P2.
Connection Lead for Staff Call SP (8713232)
To connect the Infusomat® Space to a staff call system, use the ConnectionLead for Staff Call SP.
Note: Test staff call signalling each time new pump connection is established.
The Infusomat® Space offers three different staff call operating modes. They aredisplayed in the signalling scheme below. Consider the functioning of the staffcall in the hospital when choosing an operating mode. Choose the operatingmode via the service program.
Chapter 10
OPTIONAL SPACE ACCESSORIES

83
Caution: The user should respond to the local pump alarms as well.
Note: A maximum of three plugs can be stacked upon each other in P2 socket.
Chapter 10
OPTIONAL SPACE ACCESSORIES
turned off
Alarm
Operation
Alarm
Operation
Alarm
Operation
turned on
1 sec
1 sec 1 sec
turned off
staticwithoutOff-Alarm*)
dynamicwithoutOff–Alarm
dynamicwithOff-Alarm
Operating Alarm
*) in the static mode without Off-Alarm, the staff call can be surpressed with k
Technical Data
Polarity of connection is arbitrary:max. 24 V / 0.5 A / 12 VA
AlarmOperation
white and greenConnecting Wire
white and browndisconnected connectedconnected disconnected

ORDERING
Art. No.
B. Braun Infusomat® Space (100 - 240 V) + Battery-Pack SP with Wifi (Li-Ion) ................. .........................................8713051U
B. Braun Infusomat® Space (100 - 240 V) + Battery-Pack SP without Wifi (NiMH) ....................................................8713052U
Recommended accessories for the B. Braun Infusomat® Space:SpaceStation........................................................................................................8713140USpaceStation with SpaceCom .......................................................................8713142USpaceCover Comfort..........................................................................................8713145U Pole Clamp SP......................................................................................................8713130Space Pole Clamp (speed clamp).... ...............................................................8713131Power Supply SP (US Plug) ............................................................................8713112DCombi Lead SP 12 V..........................................................................................8713133Short Stand SP....................................................................................................8713135Battery-Pack SP without Wifi (NiMH)... ......................................................8713180ABattery-Pack SP with Wifi (Li-Ion)..................................................... ..........8713182UInterface Lead CAN SP .................................................................................... 8713230Connection Lead for Staff Call SP.................................................................8713232Connection Lead SP (12 V)..............................................................................8713231Interface Lead RS232 SP..................................................................................8713234
Infusomat® Space Lines/Sets – Product families:• 15 Drop Set• 60 Drop Set• Blood Set• Epidural Set• Filtered Set
84

85
Technical Support
If the pump fails to respond to the operating or troubleshooting procedures listed inthis manual and the cause cannot be determined, discontinue use and forward it to anauthorized B. Braun Service Center.
Should it be necessary to return the pump for repair, contact Technical Support atB. Braun Customer Service at (800) 627-PUMP. A Returned Materials Authorizationnumber will be provided. Carefully pack the pump (preferably in the originalpacking), and ship it prepaid to the address below. B. Braun cannot assume anyresponsibility for loss or damage to returned instruments while they are in transit.
Service and product performance information, operation training, service training, andservice manuals may be obtained from the manufacturer by contacting:
B. Braun Medical Inc. 1601 Wallace Drive, Suite 150 Carrollton, TX 75006 Attn: Service Manager or call (800) 627-PUMP
Product complaints may be sent to the Quality Assurance Manager at the aboveaddress. With each complaint, please include:
• the pump’s serial number and software revision, • a description of the difficulty experienced, • the pressure limit setting, • the rate/dose setting, • the initial volume(s) to be infused (VTBI), • the type of fluid(s), • the amount of time between the start of the infusion and the time the difficulty was noticed, • the message displayed at the time the difficulty occurred, • the catalog and lot number of the set(s) in use, • the diagnostic code (if applicable), and • any other information which might aid in the investigation of the complaint.
Authorization to return products must be received from B. Braun prior to shipment.Please contact Customer Service at the above phone number for a Returned Materials Authorization Number.
Clinical SupportThe customer may speak with a Registered Nurse for clarification of operating instructions or clinical applications for the Space pump, etc. A (Clinical Support Specialist) Nurse Consultant may be reached at (800) 854-6851.

38911910 • I00457002010815
Distributed byB. Braun Medical Inc.824 12th Avenue Bethlehem, PA 18018-3524 USAwww.bbraunusa.comClinical and technical support for USA:1-800-854-6851
Manufactured byB. Braun Melsungen AG34209 MelsungenGermanyTel +49 (0) 56 61 71-0