3doodler classroom basics: part 2
TRANSCRIPT

3Doodler Classroom Basics: Part 2 From Two Dimensions to Three
Suitable Ages: Suitable for ages 14+
Skill Level: Basic
Materials Required: • 3Doodler 2.0: 1 for each student (recommended; can also deploy one for every two students) • 3Doodler ABS strands: 1 strand per 3Doodler • Masking tape
Duration: ~35 minutes
Page of 1 10
3Doodler EDU

Contents Objective 3
Warm-up 3
Activity 3
Sequence & Pacing 5
Striving Students 5
Accelerated Students 5
Evaluation Strategies 5
Evaluation Rubric 6
Recommended Doodling Surfaces 7
Terms & Methods 7
Pyramid Stencil 8
Exit Reflection 9
Additional Resources 10
Tutorial Videos 10
Additional Inspiration 10
3Doodler/EDU 10
Page of 2 10

Objective Following this activity, students will be able to identify proper materials and surfaces to 3Doodle on, use the 3Doodler to trace a stencil, and weld the pieces together to transform a two-dimensional piece into a three-dimensional model.
Students will also use the 3Doodler to create a three-dimensional model using the freehand technique by starting on paper and drawing up into the air to create a free-standing structure.
Warm-up Students will follow along as suitable surface materials for Doodling are outlined, as well as key terms and methods associated with this lesson. The instructor will provide a demonstration of what is expected of the students.
Activity Each student will receive one strand of ABS plastic and a stencil. Students will trace four of the smaller triangles on the stencil using the 3Doodler and the Welding Stencil on page 8.
Page of 3 10
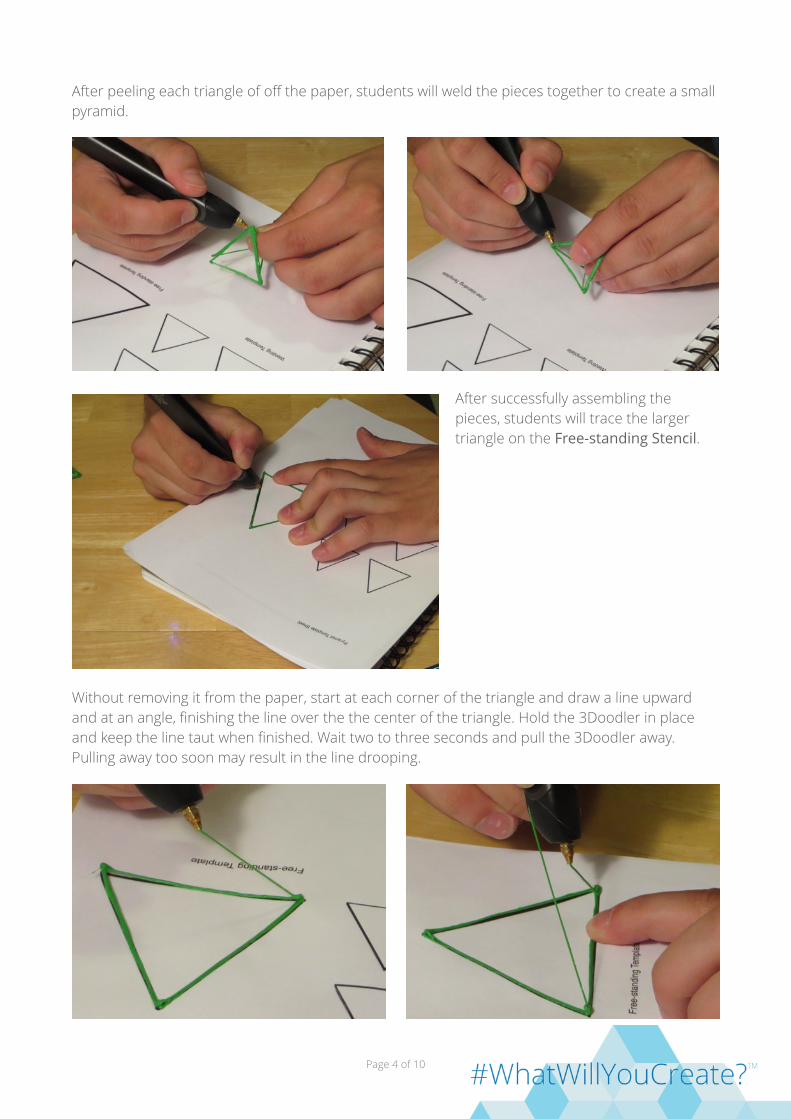
After peeling each triangle of off the paper, students will weld the pieces together to create a small pyramid.
After successfully assembling the pieces, students will trace the larger triangle on the Free-standing Stencil.
Without removing it from the paper, start at each corner of the triangle and draw a line upward and at an angle, finishing the line over the the center of the triangle. Hold the 3Doodler in place and keep the line taut when finished. Wait two to three seconds and pull the 3Doodler away. Pulling away too soon may result in the line drooping.
Page of 4 10
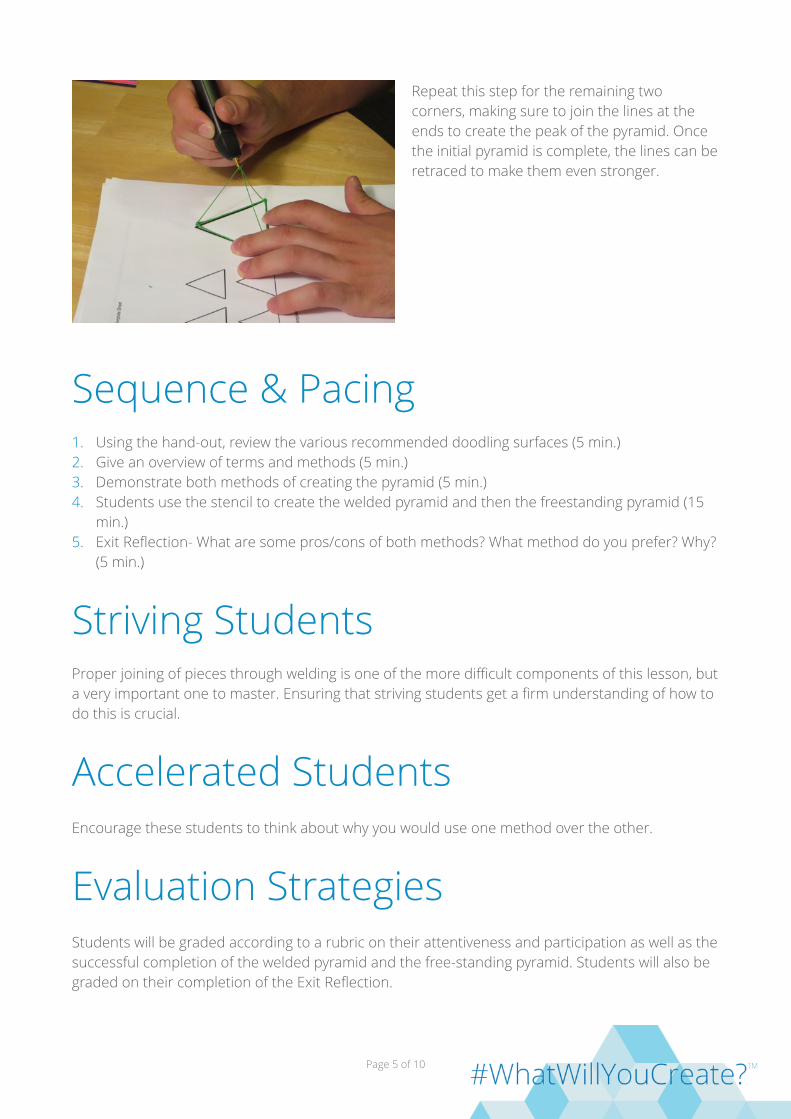
Repeat this step for the remaining two corners, making sure to join the lines at the ends to create the peak of the pyramid. Once the initial pyramid is complete, the lines can be retraced to make them even stronger.
Sequence & Pacing 1. Using the hand-out, review the various recommended doodling surfaces (5 min.) 2. Give an overview of terms and methods (5 min.) 3. Demonstrate both methods of creating the pyramid (5 min.) 4. Students use the stencil to create the welded pyramid and then the freestanding pyramid (15
min.) 5. Exit Reflection- What are some pros/cons of both methods? What method do you prefer? Why?
(5 min.)
Striving Students Proper joining of pieces through welding is one of the more difficult components of this lesson, but a very important one to master. Ensuring that striving students get a firm understanding of how to do this is crucial.
Accelerated Students Encourage these students to think about why you would use one method over the other.
Evaluation Strategies Students will be graded according to a rubric on their attentiveness and participation as well as the successful completion of the welded pyramid and the free-standing pyramid. Students will also be graded on their completion of the Exit Reflection.
Page of 5 10

Evaluation Rubric 4 3 2 1
Participation Students raise their hands to ask and answer pertinent questions. Follow directions. Stay on task.
Students raise their hands to ask and answer pertinent questions. Follow directions.
Students answer when called upon. Follow directions.
Students fail to engage in classroom discussion. Failure to follow directions/stay on task.
Attentiveness Students are following along and paying close attention at all times.
Students are following along with the lesson.
Students need to be reminded of instruction due to lack of attention.
Students are not following along/paying attention.
Completion of both methods of pyramid construction
All connection points of both pyramids are strong and secure.
Both pyramids are complete.
One pyramid is complete.
Failure to complete the pyramids.
Exit Reflection 2 pros, 2 cons, preferred method, why.
1 pro, 1 con, preferred method, why.
1 pro, 1 con, preferred method
Failure to provide pro/con, preferred method.
Page of 6 10

Recommended Doodling Surfaces One of the best materials to 3Doodle on — just like doodling with an ink pen — is paper! Standard computer or photocopy paper provides a great base to Doodle on as well as a means of creating great stencils. ABS works great on paper, it sticks where you want it to and peels off easily, usually without damaging the paper at all. PLA bonds more readily with other materials, so it will rip the paper when you try to remove it. This is why a little bit of masking tape laid down on the paper is great for 3Doodling; it provides a good surface to stick to, but also won’t rip when you peel your creation off the page.
Experimenting on different materials and surfaces is great, but don’t just go putting your 3Doodler on anything! The extreme heat from the tip is enough to damage many materials, so always be sure to protect anything you don’t want getting melted or burned. A few sheets of paper on top of each other or a sketchbook are good for protecting the table or surface underneath.
Terms & Methods Stencil: A stencil is a guide that you can draw or print on regular paper and then trace over the lines with the 3Doodler. Stencils can be of simple shapes or very intricate and detailed. Stencils are useful for making more than one of the same shape. Check out the3Doodler.com/community/ for an ever-growing list of free stencils.
Anchor Point: When beginning a Doodle it is important to establish an anchor point before moving in any direction. This can be done by gently pushing into the surface you're working on and allowing a bead of plastic to build up to establish a good starting connection. From here you can either stay pressed to the paper (as when following a stencil), or move right up and off the page and into the air.
Welding (also: joining, connecting, bonding, gluing): Freshly extruded plastic can be used to weld two already finished pieces. The hotter the plastic used to weld two pieces, the stronger the bond. Touching the hot nozzle to the two pieces being joined just before beginning to extrude can remelt the pieces and help create an even stronger connection.
Free-standing: This term refers to the 3Doodler’s unique ability to draw into the air. When directions call for a structure to be free-standing it usually means you'll be drawing up into the air.
Retracing: The fine and delicate lines created with the 3Doodler are great, but sometimes you want your creation to be a little stronger or you didn’t get it exactly right the first time. Retracing is exactly what it sounds like. You simply extrude back over the lines you've already created to make welded sections stronger or reinforce thinner areas, or just make some minor adjustments.
Page of 7 10

Pyramid Stencil
Welding Stencil Free-standing Stencil
Page of 8 10

Exit Reflection What are some of the advantages and disadvantages of using two-dimensional pieces to build three-dimensional objects versus 3Doodling in three dimensions using the freehand method? Which method do you prefer? Why?
Page of 9 10

Additional Resources Tutorial Videos Please visit the3Doodler.com/videos/#started to find videos demonstrating the skills required for this activity. Individual videos that will be useful include:
• Inserting Plastic: • YouTube: https://www.youtube.com/watch?v=ZSmdhZEnMDE • Dropbox: https://www.dropbox.com/s/3jnmafuve2saqu4/Inserting%20Plastic.mp4?dl=0
• The Buttons: • YouTube: https://www.youtube.com/watch?v=mos2SBukObo • Dropbox: https://www.dropbox.com/s/cqkozrmhktr3u38/Buttons.mp4?dl=0
• Reversing Plastic: • YouTube: https://www.youtube.com/watch?v=aD84E55mgac • Dropbox: https://www.dropbox.com/s/mpzxcrky9f5aq41/Reversing%20Plastic.mp4?dl=0
Additional Inspiration For additional inspiration and ideas about other simple projects that can be accomplished at this level, check out the following links: • Stencils and Projects: the3Doodler.com/community/ • Doodles by You: the3Doodler.com/doodles/ • Videos: the3Doodler.com/videos/
• Getting Started: the3Doodler.com/videos/#started • Tips & Tricks: the3Doodler.com/videos/#tips
3Doodler/EDU More curricular materials are available at the3Doodler.com/education/.
If you have additional ideas for classroom activities or lessons, feel free to reach out to us at [email protected]!
Page of 10 10