4 5 6 7 8 9 10 11 - riso
TRANSCRIPT

Please contact the following for supplies and service:
2016/6 059-36006
About This Machine
Basic Operations
Functions for Master Making
Functions for Printing
Useful Functions
Setting the Operation Conditions
RISO Console
Replacing Consumables
Maintenance
Troubleshooting
Appendix
1
2
3
4
5
6
7
8
9
10
11

For SF5450U, SF5430U and SF5130UDuplicator Model: SF5450U, SF5430U and SF5130URFID System Model: 050-34901Contains FCC ID: RPARFR6This device complies with Part 15 of the FCC Rules. Operation is subject to the following two conditions: (1) this device may not cause harmful interference, and (2) this device must accept any interference received, including interference that may cause undesired operation.The user is cautioned that unauthorized changes or modifications not approved could void the user's authority to operate the equipment.NOTE: This equipment has been tested and found to comply with the limits for a Class B digital device, pursuant to part 15 of the FCC Rules. These limits are designed to provide reasonable protection against harmful interference in a residential installation. This equipment generates, uses and can radiate radio frequency energy and, if not installed and used in accordance with the instructions, may cause harmful interference to radio communications. However, there is no guarantee that interference will not occur in a particular installation. If this equipment does cause harmful interference to radio or television reception, which can be determined by turning the equipment off and on, the user is encouraged to try to correct the interference by one or more of the following measures:- Reorient or relocate the receiving antenna.- Increase the separation between the equipment and receiver.- Connect the equipment into an outlet on a circuit different from that to which the receiver is connected.- Consult the dealer or an experienced radio/TV technician for help.
Contains IC: 4819A-RFR6Operation is subject to the following two conditions: (1) this device may not cause interference, and (2) this device must accept any interference, including interference that may cause undesired operation of the device.CAN ICES-3(B)/NMB-3(B)
Perchlorate Material-special handling may apply, See www.dtsc.ca.gov/hazardouswaste/perchlorateThis product may contain certain substances which are restricted when disposed.Therefore, be sure to consult your contracted service dealer.
For SF5350A, SF5250A, SF5330A, SF5230A, SF5130A and SF5030AWarningThis is a Class A product. In a domestic environment this product may cause radio interference in which case the user may be required to take adequate measures.
For SF5350E, SF5050E, SF5230E and SF5030EThis product contains RFID (Radio Frequency Identification) System.
RE directive Class1 device
As an ENERGY STAR® Partner, RISO KAGAKU CORP. has determined that this product meets the ENERGY STAR® guidelines for energy efficiency.
Nur SF5350E, SF5050E, SF5230E und SF5030EMASCHINENLÄRMINFORMATIONMaschinenlärminformations-Verordnung 3. GSGV:Der höchste Schalldruckpegel beträgt 70 dB(A) oder weniger gemäß EN ISO 7779.
Hinweis:Das Gerät ist nicht für die Benutzung am Bildschirmarbeitsplatz gemäss BildscharbV vorgesehen.
RISO KAGAKU CORPORATION LONDON OFFICE610 Centennial Park, Centennial Avenue, Elstree, Herts, WD6 3TJ U.K.

1
Preface
Thank you for your purchase of this printing machine.This machine is a digital duplicator that enables clear printing by using simple operations as if you are operating a copying machine.You can print multiple sheets quickly at a low cost.This machine is equipped with many useful functions that only duplicators can provide.
■ Descriptive contents in this guide• The reproduction of this guide in whole or in part is strictly prohibited without the permission of
RISO KAGAKU CORPORATION.• The contents of this guide are subject to change in the future without prior notice for improve-
ment of the product.• Please note that we do not assume any responsibility for the effect of outcomes resulting from
the use of this guide and the operation of this machine.
■ Trademarks• , and are trademarks or registered trademarks of RISO
KAGAKU CORPORATION in the United States and other countries.• Microsoft and Windows are either registered trademarks or trademarks of Microsoft Corpora-
tion in the United States and/or other countries.• Other corporate names and/or trademarks are either registered trademarks or trademarks of
each company, respectively.
This machine is certified for being manufactured in consideration of Color Universal Design, which improves visibility for more people regardless of individual differences in color perception, by the Color Universal Design Organization (CUDO).
© Copyright 2016 RISO KAGAKU CORPORATION

2
About the User’s Guides
User's guides provided for this machineThis machine comes with the following user’s guides.Thoroughly read these user’s guides before using this machine.In addition, read them whenever necessary in case there is anything unclear during the use of this machine. We hope that you will continuously use these guides together with this machine.
■ RISO SF Series User’s Guide (this guide)This user’s guide explains the basic operation procedures of this machine and also explains how to use advanced printing functions and other useful functions.It also explains precautions for use, how to handle and replace consumables, and troubleshooting procedures for cases in which a problem occurs.
■ RISO Printer Driver User’s GuideThis user’s guide is included as a PDF file on the attached DVD-ROM.It explains the operation procedures for printing on this machine from a computer and various settings.
■ RISO Utility Software User’s GuideThis user’s guide is included as a PDF file on the attached CD-ROM.It explains how to use the RISO COPY COUNT VIEWER and RISO USB PRINT MANAGER.
About symbols
About screens and illustrationsThe screens and illustrations provided in this guide may vary depending on usage environment factors such as the model and installation conditions of optional parts.
Warnings or precautions for ensuring safety.
Important matters that require special attention. Read carefully and follow the instructions.
Supplemental explanation that provides useful information.
A Indicates reference pages.
3
ContentsPreface ............................................................................................................................................................. 1
About the User’s Guides ................................................................................................................................ 2User's guides provided for this machine ..............................................................................................................2About symbols .....................................................................................................................................................2About screens and illustrations............................................................................................................................2
Contents........................................................................................................................................................... 3
Safety Precautions.......................................................................................................................................... 7Warning indications .............................................................................................................................................7Installation location ..............................................................................................................................................7Power connection ................................................................................................................................................7Ground connection ..............................................................................................................................................7Machine handling.................................................................................................................................................8Ink ........................................................................................................................................................................8Locations of caution labels ..................................................................................................................................9
Before Starting Use......................................................................................................................................... 9Precautions for installation...................................................................................................................................9Precautions for use............................................................................................................................................10Consumables.....................................................................................................................................................10Printing of original data ......................................................................................................................................11Software.............................................................................................................................................................11Originals.............................................................................................................................................................12Printing papers...................................................................................................................................................12Printing area ......................................................................................................................................................14Materials not to be printed .................................................................................................................................14
Chapter 1 About This Machine
Name and Function of Each Part................................................................................................................. 16Paper feeding side.............................................................................................................................................16Paper receiving side ..........................................................................................................................................17Option ................................................................................................................................................................18Control panel .....................................................................................................................................................19
Liquid Crystal Panel Displays...................................................................................................................... 21Master making basic screen ..............................................................................................................................21Print basic screen ..............................................................................................................................................21
Printing Flow ................................................................................................................................................. 22“Master making process” and “Printing process” ...............................................................................................22What is [Auto Process]? ....................................................................................................................................22
Chapter 2 Basic Operations
Preparation before Printing.......................................................................................................................... 24Setting up the paper feed tray and the paper ....................................................................................................24Setting up the paper receiving tray ....................................................................................................................25
Placement of Originals ................................................................................................................................. 28When using the glass platen..............................................................................................................................28When using the auto document feeder..............................................................................................................28
4
Printing of Paper Originals........................................................................................................................... 29If the authentication screen is displayed............................................................................................................30
Printing from Computer................................................................................................................................ 31When [Auto Process] is set to other than [ON] ..................................................................................................32
Printing by Using the USB Flash Drive ....................................................................................................... 33
Chapter 3 Functions for Master Making
Functions for Master Making ....................................................................................................................... 36
Image Processing That Is Suitable for the Original [LINE/PHOTO] [PENCIL] ......................................... 36[LINE/PHOTO] ...................................................................................................................................................36[PENCIL]............................................................................................................................................................37
Selecting a Method to Process the Gradation of Photos [Dot Process].................................................. 37
Adjusting the Scanning Level of the Original [SCANNING LEVEL] ......................................................... 38
Using a Book Type Original [BOOK] ........................................................................................................... 38
Saving Ink [INK SAVING].............................................................................................................................. 39
Enlarging or Reducing the Size of the Original [Size] ............................................................................... 39[Standard ratio] ..................................................................................................................................................39[Zoom]................................................................................................................................................................40
Laying Out Two Copies of Originals on a Single Sheet of Paper [2-UP] ................................................. 40
Chapter 4 Functions for Printing
Functions for Printing................................................................................................................................... 44
Adjusting the Print Speed [SPEED]............................................................................................................. 44
Adjusting the Print Density [DENSITY] ....................................................................................................... 45
Adjusting the Print Position [PRINT POSITION] ........................................................................................ 46Adjusting the position in the horizontal direction................................................................................................46Adjusting the position in the vertical direction....................................................................................................46
Chapter 5 Useful Functions
Useful Functions........................................................................................................................................... 50
Printing the Sorted Originals [Program] ..................................................................................................... 50Setting [Single Page Mode] ...............................................................................................................................51Setting [Multi-Page Mode] .................................................................................................................................51Canceling [Program] ..........................................................................................................................................52Registering [Program]........................................................................................................................................52Retrieving [Program]..........................................................................................................................................52Changing the settings of [Program] ...................................................................................................................53Erasing [Program]..............................................................................................................................................53
Preventing Blurring of Ink [IDLING] ............................................................................................................ 54
Preventing Copying of Confidential Documents [CONFIDENTIAL] ......................................................... 54

5
Chapter 6 Setting the Operation Conditions
Setting the Operation Conditions [Custom Setting Mode] ....................................................................... 56Basic operation of [Custom Setting Mode] ........................................................................................................56List of setting items ............................................................................................................................................57
Connecting to the Network .......................................................................................................................... 65When connecting to the IPv4 network ...............................................................................................................65When connecting to the IPv6 network ...............................................................................................................66
Using the Authentication Function ............................................................................................................. 67[User Registration] .............................................................................................................................................67[Disable] .............................................................................................................................................................69[Limit T/C] [Limit M/C] ........................................................................................................................................69[Clear T/C] [Clear M/C] ......................................................................................................................................70[Reset Counter]..................................................................................................................................................70[Set Date]...........................................................................................................................................................71[Clear Count Error].............................................................................................................................................71[Count Report Output]........................................................................................................................................71[Setting of Count Report] ...................................................................................................................................72[Clear Authentication Setting] ............................................................................................................................73
Displaying the Accumulated Counts [Meter Display]................................................................................ 74
Adjusting Paper Feeding and Receiving Conditions [Special Paper Control]........................................ 75Paper feeding adjustment for special paper [Paper Quality] .............................................................................75Paper receiving adjustment for special paper [Separation Fan] [Suction Fan] ..................................................75
Chapter 7 RISO Console
RISO Console ................................................................................................................................................ 78Accessing RISO Console ..................................................................................................................................78Logging in ..........................................................................................................................................................78Logging out ........................................................................................................................................................78
[Monitoring] Menu......................................................................................................................................... 79[General] tab screen ..........................................................................................................................................79[System] tab screen ...........................................................................................................................................79[User] tab screen ...............................................................................................................................................79
[Printer] Menu................................................................................................................................................ 80
[Network] Menu ............................................................................................................................................. 81[Network setting] screen ....................................................................................................................................81[SNMP Setting] screen ......................................................................................................................................81[SMTP Setting] screen.......................................................................................................................................81
6
Chapter 8 Replacing Consumables
Setting the Master Roll ................................................................................................................................. 84
Replacing the Ink Cartridge ......................................................................................................................... 86
Emptying the Master Disposal Box............................................................................................................. 88
Replacing the Print Drum (Cylinder) ........................................................................................................... 89Removing the print drum (cylinder)....................................................................................................................89Installing the print drum (cylinder)......................................................................................................................90
Collecting and Disposing of Depleted Consumables................................................................................ 91Ink cartridge .......................................................................................................................................................91Master core........................................................................................................................................................91Used master ......................................................................................................................................................91
Chapter 9 Maintenance
Maintenance .................................................................................................................................................. 94Thermal print head.............................................................................................................................................94Exterior ..............................................................................................................................................................94Glass platen and platen cover pad ....................................................................................................................95Optional Auto Document Feeder .......................................................................................................................95Pressure roller ...................................................................................................................................................96
Chapter 10 Troubleshooting
When a Message Is Displayed ..................................................................................................................... 98How to view the message..................................................................................................................................98Message ............................................................................................................................................................99When the [I] indicator blinks and [H] is displayed in the numeric display......................................................106When the [I] indicator goes off and an error code is displayed in the numeric display .................................107
Troubleshooting.......................................................................................................................................... 108
Chapter 11 Appendix
Optional Accessories ................................................................................................................................. 118
Specifications.............................................................................................................................................. 119
Index............................................................................................................................................................. 125

7
Safety Precautions
Warning indicationsThe following warning indications are used to ensure proper operation of this machine and also to prevent hazards to the human body and damage to property.
Example of pictorial indication
Installation location
● Do not place this machine on an unstable location, such as a wobbly base or tilted surface. If this machine falls down or falls over, the situation may result in injury.
● Keep this machine away from humid and dusty environments. Failure to do so may result in fire or electric shock.
Power connection
● Use this machine in accordance with the rated volt-age value. Also, use this machine by connecting it to an electrical outlet with a capacity larger than the rated current value. For the rated voltage and rated current values, check the item “Power Source” in the table of specifications at the end of this guide.
● Do not use a branching outlet or multiple outlet extension plug. It may result in fire or electric shock.
● Do not scratch, damage, or process the power cord. Do not damage the power cord by placing heavy objects on it or pulling or forcibly bending it. It may result in fire or electric shock.
● The provided power cord is dedicated for this machine. Do not use it for other electrical products. It may result in fire or electric shock.
● Do not plug or unplug the power cord with wet hands. It may result in electric shock.
● When unplugging, do not pull the power cord (be sure to hold the plug). It could damage the cord, and this may result in fire or electric shock.
● If this machine is not used for a long time due to consecutive holidays, etc., be sure to unplug the power cord to ensure safety.
● Unplug the power cord at least once a year and clean the prongs of the plug and their surroundings. Dust collected on these areas may result in fire.
Ground connection
● Be sure to connect the ground wire before plugging in the power cord. Be sure to unplug the power cord before dis-connecting the ground wire. If you fail to connect the ground wire and an electric leakage occurs, it may result in fire or electric shock. If the ground wire cannot be connected, consult your dealer or authorized service representative.
This section describes the information that you need to be aware of before using this machine. Read this section before operating this machine.
Indicates that incorrect han-dling by ignoring this symbol may cause death or serious human injury.
Indicates that incorrect han-dling by ignoring this symbol may cause human injury or damage to properties.
The symbol indicates prohibited actions. The specific actions that are prohibited are indicated within the pic-tograph or in an adjacent area. The pictograph shown on the left indicates prohibition of disassembly.
The symbol indicates mandatory actions or instructions. The specific instructions are indicated within the pictograph. The pictograph shown on the left asks you to unplug the power cord.
Warning
Caution
Caution
Warning
Caution
Warning
8
Machine handling
● Do not place a container that is filled with water or metallic objects on this machine. If the water spills or the water or metallic objects fall into this machine, it may result in fire or electric shock.
● Do not use combustible spray and flammable sol-vent near this machine. If the sprayed gas or flam-mable solvent contacts the electrical parts inside the mechanical system, it may result in fire or elec-tric shock.
● Do not insert or drop foreign matter, such as metal-lic parts or highly combustible matter, into this machine through any opening. It may result in fire or electric shock.
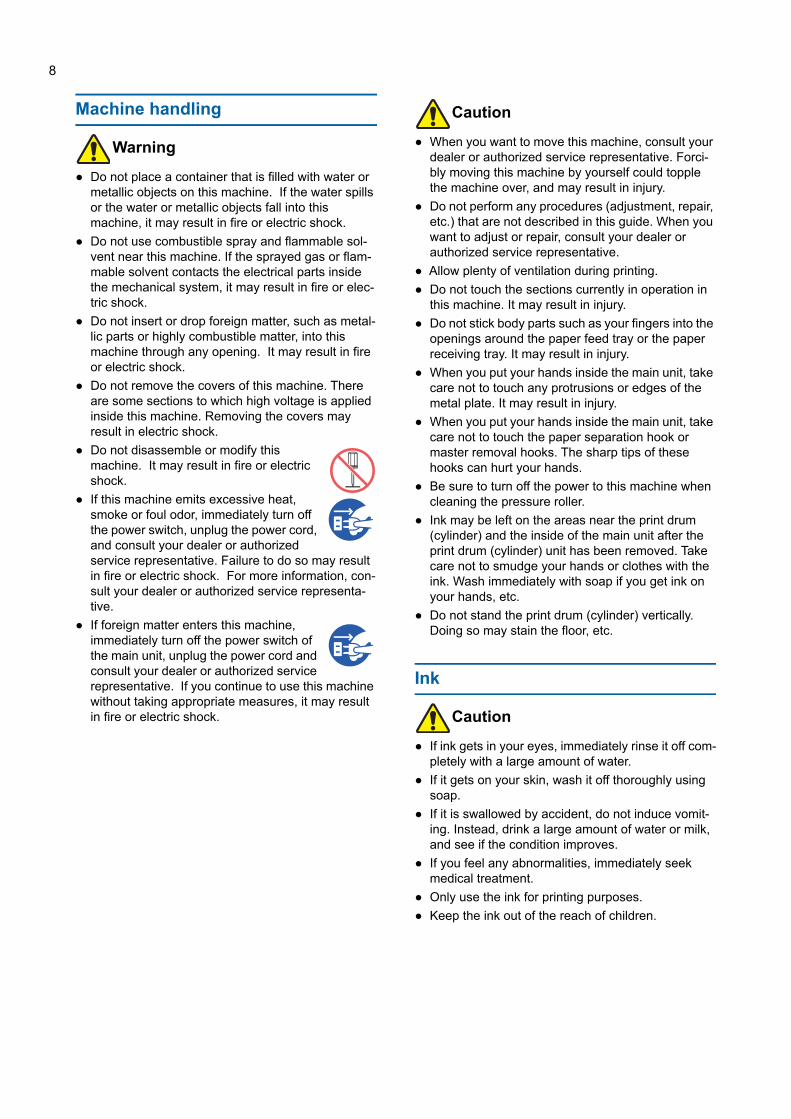
● Do not remove the covers of this machine. There are some sections to which high voltage is applied inside this machine. Removing the covers may result in electric shock.
● Do not disassemble or modify this machine. It may result in fire or electric shock.
● If this machine emits excessive heat, smoke or foul odor, immediately turn off the power switch, unplug the power cord, and consult your dealer or authorized service representative. Failure to do so may result in fire or electric shock. For more information, con-sult your dealer or authorized service representa-tive.
● If foreign matter enters this machine, immediately turn off the power switch of the main unit, unplug the power cord and consult your dealer or authorized service representative. If you continue to use this machine without taking appropriate measures, it may result in fire or electric shock.
● When you want to move this machine, consult your dealer or authorized service representative. Forci-bly moving this machine by yourself could topple the machine over, and may result in injury.
● Do not perform any procedures (adjustment, repair, etc.) that are not described in this guide. When you want to adjust or repair, consult your dealer or authorized service representative.
● Allow plenty of ventilation during printing.● Do not touch the sections currently in operation in
this machine. It may result in injury.● Do not stick body parts such as your fingers into the
openings around the paper feed tray or the paper receiving tray. It may result in injury.
● When you put your hands inside the main unit, take care not to touch any protrusions or edges of the metal plate. It may result in injury.
● When you put your hands inside the main unit, take care not to touch the paper separation hook or master removal hooks. The sharp tips of these hooks can hurt your hands.
● Be sure to turn off the power to this machine when cleaning the pressure roller.
● Ink may be left on the areas near the print drum (cylinder) and the inside of the main unit after the print drum (cylinder) unit has been removed. Take care not to smudge your hands or clothes with the ink. Wash immediately with soap if you get ink on your hands, etc.
● Do not stand the print drum (cylinder) vertically. Doing so may stain the floor, etc.
Ink
● If ink gets in your eyes, immediately rinse it off com-pletely with a large amount of water.
● If it gets on your skin, wash it off thoroughly using soap.
● If it is swallowed by accident, do not induce vomit-ing. Instead, drink a large amount of water or milk, and see if the condition improves.
● If you feel any abnormalities, immediately seek medical treatment.
● Only use the ink for printing purposes.● Keep the ink out of the reach of children.
Warning
Caution
Caution
9
Locations of caution labelsThis machine has some caution labels to ensure safe operation. Follow the indications of those labels and use this machine safely.
Before Starting Use
Precautions for installation
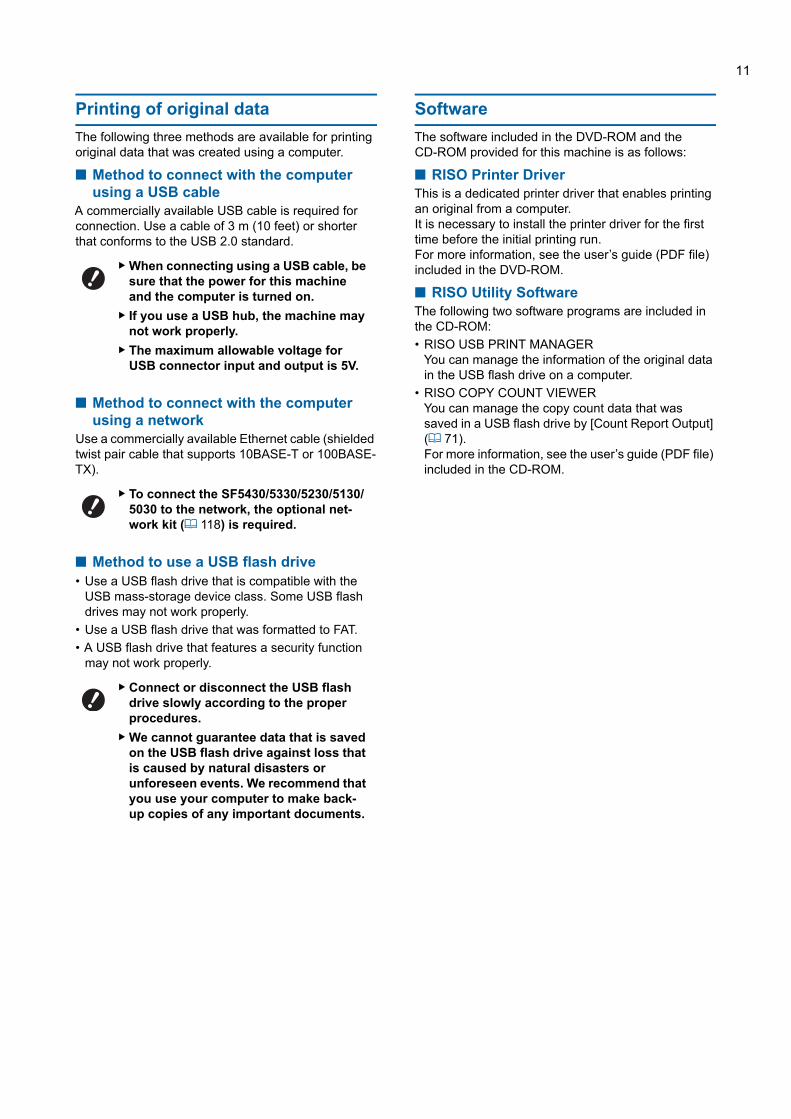
■ Required spaceThis machine requires the following space.
When the optional auto document feeder is installed, the values of (A) to (C) in the figure above are as fol-lows.(A) 1440 mm (56 11/16 inches)(B) 1100 mm (43 5/16 inches)(C) 705 mm (27 3/4 inches)* The depth of the main unit includes the dedicated rack
(RISO Stand D Type III) and stabilizers.
This section describes the precautions to be observed and the information that you need to be aware of before using this machine.
1515mm(59 21/32 inches) (A)
675mm *(27 9/16 inches)
670mm(26 3/8inches) (C)
1065mm(41 15/16inches) (B)

10
Top view• When in use
• When in storage
■ Installation location• The installation location of this machine will be
determined in consultation with you during delivery.• The installation location of the machine should be
fixed.When you want to move this machine, consult your dealer or authorized service representative.
• Do not install this machine in the locations listed below. Failure to observe this precaution may result in malfunction, failure, or accident.– Locations with exposure to direct sunlight
and locations close to windows(cover the windows with curtains if neces-sary)
– Locations that are subject to sudden changes in temperature
– Extremely hot and humid locations or cold and dry loca-tions
– Locations exposed to fire or heat, direct cold air (e.g., air conditioner), direct hot air (e.g., heater), or where heat is transmitted
– Locations with poor permeability and ventilation• Choose a location where this machine is
level when it is installed. (Levelness for installation: 10 mm [25/64 inches] or less both lengthwise and widthwise)
• The appropriate environment conditions are as follows.Temperature range: 15°C to 30°C (59°F to 86°F)Humidity range: 40% to 70% (no conden-sation)
Precautions for use
■ Power connection• Be sure to plug in the power cord securely
to prevent poor contact in the power plug section.
• Locate this machine near the electric out-let.
■ Operations• Do not turn off the power or unplug the power cord
during operation.• Do not open covers or move this machine during
operation.• Open and close covers gently.• Do not put any heavy objects on this machine.• Avoid excessive impact on this machine.• This machine contains precision parts and drive
mechanisms. Perform only the procedures described in this guide.
Consumables• For the ink and master rolls, it is recommended to
use the products specified by RISO.• Genuine RISO inks and master rolls are engineered
for maximum performance and maximum life, and RISO equipment is designed to give excellent per-formance when used with genuine RISO consum-ables. However, all consumables can and do deteriorate over time. We recommend that you use ink and master rolls as soon as possible after purchase, and within 24 months of the date of manufacturing. You can find the date of manufacturing on the ink cartridge or the inside of master core. RISO genuine consumables transmit information regarding the age of the consumables that allows the machine to make adjustment based on the age of the consumables, e.g., time remaining until the Use By date.
• Store the paper, master rolls, and ink cartridges properly according to the instructions indicated on each container.
• Do not store those parts in the locations listed below.– Locations with exposure to direct sunlight
and locations close to windows(cover the windows with curtains if neces-sary)
– Locations that are subject to sudden changes in temperature
– Extremely hot and humid locations or cold and dry loca-tions
1240mm(48 13/16inches)
1215mm(47 27/32inches)
1415mm(55 23/32 inches)
780mm(30 23/32 inches)
11
Printing of original dataThe following three methods are available for printing original data that was created using a computer.
■ Method to connect with the computer using a USB cable
A commercially available USB cable is required for connection. Use a cable of 3 m (10 feet) or shorter that conforms to the USB 2.0 standard.
■ Method to connect with the computer using a network
Use a commercially available Ethernet cable (shielded twist pair cable that supports 10BASE-T or 100BASE-TX).
■ Method to use a USB flash drive• Use a USB flash drive that is compatible with the
USB mass-storage device class. Some USB flash drives may not work properly.
• Use a USB flash drive that was formatted to FAT.• A USB flash drive that features a security function
may not work properly.
SoftwareThe software included in the DVD-ROM and the CD-ROM provided for this machine is as follows:
■ RISO Printer DriverThis is a dedicated printer driver that enables printing an original from a computer.It is necessary to install the printer driver for the first time before the initial printing run.For more information, see the user’s guide (PDF file) included in the DVD-ROM.
■ RISO Utility SoftwareThe following two software programs are included in the CD-ROM:• RISO USB PRINT MANAGER
You can manage the information of the original data in the USB flash drive on a computer.
• RISO COPY COUNT VIEWERYou can manage the copy count data that was saved in a USB flash drive by [Count Report Output] (A 71).For more information, see the user’s guide (PDF file) included in the CD-ROM.
BWhen connecting using a USB cable, be sure that the power for this machine and the computer is turned on.
BIf you use a USB hub, the machine may not work properly.
BThe maximum allowable voltage for USB connector input and output is 5V.
BTo connect the SF5430/5330/5230/5130/5030 to the network, the optional net-work kit (A 118) is required.
BConnect or disconnect the USB flash drive slowly according to the proper procedures.
BWe cannot guarantee data that is saved on the USB flash drive against loss that is caused by natural disasters or unforeseen events. We recommend that you use your computer to make back-up copies of any important documents.

12
Originals
■ Size and weightThe following sizes and weights of originals are usable:
When using the glass platen
When using the optional auto document feeder
• Do not mix originals of different sizes for the auto document feeder.
• You can place up to approximately 50 sheets of orig-inals (when using originals of 80 g/m2 [21-lb bond] or less) in the auto document feeder at the same time.
• If an original is excessively wrinkled, curled, or creased, flatten it thoroughly so that the entire origi-nal is securely placed on the glass platen. Areas that come off from the glass platen may be printed in black.
• If ink or correction fluid is used on an original, thor-oughly dry it before placement. Failure to do so may contaminate the glass platen, and this impairs proper printing.
■ Direction of originalEach direction of an original is referred to as follows in this guide:• When placing an original on the glass platen:
The side that faces the reference position (H sym-bol) is referred to as the “top”.
• When placing an original on the optional auto docu-ment feeder:The leading edge in the feeding direction is referred to as the “top”.
Printing papers
■ Size and weightThe following sizes and weights of paper are usable:
• This machine detects the following papers as stan-dard size paper.
Type: mm
Size 50 mm × 90 mm to 310 mm × 432 mm (1 31/32 inches × 3 17/32 inches to 12 7/32 inches × 17 inches)
Weight 10 kg (22 lb) at maximum
Size 100 mm × 148 mm to 300 mm × 432 mm (3 15/16 inches × 5 13/16 inches to 11 13/16 inches × 17 inches)
Weight 50 g/m2 to 128 g/m2 (13-lb bond to 34-lb bond)
BThe following originals cannot be used in the auto document feeder. Place the origi-nal on the glass platen.CPatched originalCExcessively wrinkled, curled, or creased
originalCOriginal with sticky areas or holesCTorn original or deckle-edged originalCChemically treated original (such as
thermal or carbon paper)CTransparent original (such as OHP films
or tracing paper)COriginal with correction fluid or glueCExtremely thin original (less than 50 g/
m2 [13-lb bond])CExtremely thick original (greater than
128 g/m2 [34-lb bond])COriginal with slippery surface (such as
art or coated paper)COriginal with staples or clips
Size 100 mm × 148 mm to 310 mm × 432 mm (3 15/16 inches × 5 13/16 inches to 12 7/32 inches × 17 inches)
Weight SF5450/5350/5250/5050: 46 g/m2 to 210 g/m2 (12-lb bond to 116-lb index)SF5430/5330/5230/5130/5030: 46 g/m2 to 157 g/m2 (12-lb bond to 42-lb index)
A3h 297 mm × 420 mm (11 11/16 inches × 16 17/32)
A4h 210 mm × 297 mm (8 1/4 inches × 11 11/16 inches)
A4W 297 mm × 210 mm (11 11/16 inches × 8 1/4 inches)
B4h 257 mm × 364 mm (10 1/8 inches × 14 11/32 inches)
B5h 182 mm × 257 mm (7 5/32 inches × 10 1/8 inches)
B5W 257 mm × 182 mm (10 1/8 inches × 7 5/32 inches)
Foolscaph
215.9 mm × 330.2 mm (8 1/2 inches × 13 inches)

13
Type: inch
• If you use papers outside the specifications of this machine, RISO does not assure the paper feeding and printing performance with these papers.
■ To prevent paper jams and paper feeding failures
• Place the paper so that its grain (flow of the grain) is aligned with the paper feeding direction.If the paper grain is set perpendicularly to the paper feeding direction, the resilience of the paper will decrease, and it may result in a paper jam.
You can check the paper grain by tearing the paper.The direction in which the paper tears straight is the paper grain.
• When using poorly cut paper or coarse surfaced paper (drawing paper, etc.), separate the paper before use.
• Depending on the type of paper to be used, paper dust may be generated during use of this machine. Please clean and ventilate the area adequately.
• When using thick paper (drawing paper, etc.) or paper with a slippery surface, adjust the following parts:• For SF5450/5350/5250/5050
–The paper feed setting lever–The paper arrangers for the paper receiving tray–The adjustment dial for the paper jumping wings
• For SF5430/5330/5230/5130/5030–The paper feed setting lever–The corrugators for the paper receiving tray(A 24 “Preparation before Printing”)
• Use flat paper. If it is unavoidable to use curled paper, place the printing paper so that the inner curled part faces up.
• If the margin at the top of the printed paper (leading edge in the paper output direction) is too small or if a highly dense image is located at the top of the printed paper, the paper may adhere to the print drum (cylinder). In this case, lower the print position to allow a larger margin at the top or rotate the top-and-bottom direction of the original, and then make a master again.
■ Paper storageStore paper in a dry area. Paper containing moisture can result in paper jams or poor print quality.
■ Inappropriate paper for printingDo not use the types of paper listed below, as it can result in a paper jam.• Extremely thin paper (less than 46 g/m2 [12-lb
bond])• Extremely thick paper (greater than 210 g/m2 [116-lb
index])• Chemically treated paper (such as thermal or carbon
paper)• Excessively wrinkled, curled, creased, or torn paper• Paper coated on one side or both sides• Deckle-edged paper• Art paper• Paper with sticky areas or holes
■ Direction of paperThe leading edge in the paper feeding direction is referred to as the “Top” in this guide.
Ledgerh 11 inches × 17 inches
Legalh 8 1/2 inches × 14 inches
Letterh 8 1/2 inches × 11 inches
LetterW 11 inches × 8 1/2 inches
Statementh
5 1/2 inches × 8 1/2 inches
BPlease note that even with paper of a size and weight that conforms to the specifications of this machine, this machine may not feed the paper depending on the paper type, environ-mental conditions, and storage condi-tions. For more information, consult your dealer or authorized service repre-sentative.
The paper tears straight if you tear it along the paper grain.
The paper does not tear straight if you tear it perpendicularly to the paper grain.
RIGHT WRONG
Paper grainPaper grain
(Top)

14
Printing area
■ Maximum Printing AreaThe maximum printing area of this machine is as fol-lows:
■ Master making areaThe master making area is determined according to the paper size placed on the paper feed tray. The master making area is an area that equals the paper size excluding the margin shown in the illustration below.
* These values are for cases when using standard size paper. When using custom size paper, these values are 5 mm (3/16 inches).
When creating originals, take above margins into con-sideration.The same master making area is applied when print-ing by sending original data from a computer.
Materials not to be printedDo not use this machine in any manner which violates the laws or infringes on established copyrights, even when making copies for personal use. Consult your local authorities for further details. In general, use dis-cretion and common sense.Model Allowable printing range
SF5450/5430 291 mm × 425 mm (11 15/32 inches × 16 23/32 inches)
SF5350/5330 291 mm × 413 mm (11 15/32 inches × 16 1/4 inches)
SF5250/5230 251 mm × 357 mm (9 7/8 inches × 14 1/16 inches)
SF5130 210 mm × 357 mm (8 1/4 inches × 14 1/16 inches)
SF5050/5030 210 mm × 290 mm (8 1/4 inches × 11 13/32 inches)
BThe master making area does not exceed the maximum printing area even when you set large paper.
BWhen printing an original with little margin around the original, it is useful to reduce the original by setting the magnification rate (A 39).
Paper feeding direction
Master making area
3mm *
(1/8 inches)
3mm * (1/8 inches)
2mm (3/32 inches) 5mm (3/16 inches)

Chapter1
15
1
About This Machine

Chapter 1 About This Machine16
Name and Function of Each Part
Paper feeding side
1 Master disposal box (A 88)Collects masters that are disposed of.
2 Feed tray ascent / descent button (A 24)Raises or lowers the paper feed tray when you replace or add the paper.
3 Paper feed setting lever (A 24)Adjusts the paper-feed pressure according to the paper type.
4 Feed-tray paper guides (A 24)Slide these guides to fit the paper width to prevent misalignment of the paper.
5 Paper feed tray (A 24)Place the paper on this tray.
6 Vertical print position adjustment dial (A 46)Adjusts the printing position in the vertical direction.
7 Platen cover (A 28)Open / close this cover when placing an original.
8 Platen cover pad (A 95)9 Glass platen (A 28)
Place the original facing down.
0 Control panel (A 19)Perform the required operations.
a USB connector (A 11)Plug in a USB cable to connect this machine with a computer.
b LAN connector (A 11)Plug in an Ethernet cable to connect this machine to the network.Depending on the model, the optional network kit (A 118) is required.
4
6
a
b 0
7
8
9
5
3
2
1

Chapter 1 About This Machine 17
1
Paper receiving side
1 Master making unit cover (A 84)2 Master guide flap (A 85)3 Thermal print head (A 94)4 Master roll holder (A 85)
Secures a master roll that is set.
5 Master roll (A 84)6 Master making unit (A 84)
See numbers 1 to 5.
7 Front door (A 84)8 Print drum (cylinder) (A 89)9 Ink cartridge (A 86)0 Print drum (cylinder) handle (A 89)
Grip this handle to pull out the print drum (cylinder).
a Master making unit handle (A 84)Grip this handle to pull out the master making unit.
b Print Drum (Cylinder) Release Button (A 89)You can pull out the print drum (cylinder) while this button is lit.When the button is not lit, press the button to light it up and then pull out the print drum (cylinder).
c Master Making Unit Release Button (A 84)You can pull out the master making unit while this button is lit.When the button is not lit, press the button to light it up and then pull out the master making unit.
d Stabilizere Power switch (A 29)
Turn on/off the power supply.
f Paper receiving tray (A 25)The printed paper is output to this tray.
g Paper stopper (A 25)Slide this stopper to fit the paper size.
h Receiving-tray paper guides (A 25)Slide these guides to fit the paper size.
i Paper arranger knob (A 25) (Only for SF5450/5350/5250/5050)Press this knob to open the paper arranger.The paper arranger helps improve the arrangement state of the printed paper.
j Voltage switch (Only for SF5430/5330/5230/5130/5030)Do not touch the switch on the upper part of the AC inlet (power cord connection). Switching the voltage by mistake may result in malfunctions.
k Adjustment dial for the paper jumping wings (A 26) (Only for SF5450/5350/5250/5050)
l Paper jumping wing (A 26)m USB slot (A 33)
Insert a USB flash drive for printing.
6
7
8
g
h
0
d
9
ba c
i
3
k
m
l
f
1
2 4
5
j
e

Chapter 1 About This Machine18
Option
■ Auto Document Feeder
1 ADF cover (A 105)Open this cover when a paper jam occurs to remove the original.
2 ADF original guides (A 28)Slide these guides to fit the original width to prevent misalignment of the original.
3 ADF original receiving trayThe original that has been scanned is output to this tray.
1 2
3

Chapter 1 About This Machine 19
1
Control panel
■ Main panel
1 Error location indicator (A 99)Shows the location where an error is occurring.
2 Display (A 21)3 [I] indicator (A 99)
The color of the [I] indicator shows the status of this machine.
4 Numeric displayShows the number of prints and the entered values for various settings.
5 [SPEED] keys (A 44)Press these keys to adjust the print speed. The lamp above these keys shows the current speed.
6 [DENSITY] keys (A 45)Press these keys to adjust the print density. The lamp above these keys shows the current print density.
7 [PRINT POSITION] keys (A 46)Press these keys to adjust the print position in the horizontal direction after master making.
8 [U] keyPress this key to register the [Program] (A 50) set-tings or open the [Program] screen.
9 Numeric keysPress these keys to enter the number of prints and the values for various settings.
0 [C] keyPress this key to clear the entered characters and numbers.
a [P] key (A 50)Press this key to open the [Program] screen. When [Program] is turned on, the key lamp is lit.
b [+] keyPress this key to operate [Program] (A 50) or [Cus-tom Setting Mode] (A 56).
c [X] keyPress this key to operate [Program] (A 50) or [Cus-tom Setting Mode] (A 56).
d [MASTER MAKING] key (A 29)Press this key to display the master making basic screen.
e [PRINT] keyPress this key to display the printing process basic screen.
f [AUTO PROCESS] key (A 22)Press this key to turn on / off [AUTO PROCESS].When [AUTO PROCESS] is turned on, the lamp above the key is lit.
g [WAKE-UP] key• When this machine is in the sleep (power saving)
status, the key lamp is lit. Press this key to activate this machine.
• When the authentication function (A 67) is enabled, the key lamp is lit while the user is authenticated. Press this key to cancel the authen-tication.
h [PROOF] key (A 29)Press this key to output a proof copy.
i [START] keyPress this key to start the master making process and the printing process as well as to start various operations.The key lamp is lit when the operation is available and not lit when the operation is not available.
j [STOP] keyPress this key to stop the operation in progress.If this key is pressed while master making is in prog-ress, the operation stops after the master making process is complete.
k [RESET] keyPress this key to reset the current setting to its default value or clear error displays after trouble-shooting.
1
5 6 7 8 0 b i jc h ka9
2 3 4 d e f g

Chapter 1 About This Machine20
■ Sub panel
1 Reproduction size selection area (A 39)You can set the magnification rate.
2 Scanning level adjustment area (A 38)You can adjust the scanning level of the original.
3 [BOOK] key (A 38)4 [INTERFACE] key (A 31)
Press this key before receiving the original data from the computer. When this key is turned on, the lamp above the key is lit.
5 [CUSTOM] key (A 56)Press this key to change the default setting, etc. Dur-ing setting, the lamp above the key is lit.
6 [2-UP] key (A 40)Press this key to lay out two copies of originals side by side on a single sheet of paper. When this key is turned on, the lamp above the key is lit.
7 [INK SAVING] key (A 39)Press this key to reduce the amount of ink consump-tion.
8 [IDLING] key (A 54)You can reduce blurring of ink at the beginning of printing, for example, when the print drum (cylinder) has not been used for a long time. When this key is turned on, the lamp above the key is lit.
9 [PENCIL] key (A 37)You can apply image processing that is suitable for originals that are pale in color such as an original written in pencil or stamped in red seal-ink. When this key is turned on, the lamp above the key is lit.
0 [CONFIDENTIAL] key (A 54)Press this key to discard the used master. When this key is turned on, the lamp above the key is lit.
a [COARSE/FINE] key (A 37)You can select the processing method to express the gradation of a photo. The lamp above the key is lit depending on the processing method that you selected.
b [LINE/PHOTO] key (A 36)You can select the image processing that is suitable for the type of original. The lamp above the key is lit depending on the image processing that you selected.
76
1
3
4
5
2
b
a
0
9
8

Chapter 1 About This Machine 21
1
Liquid Crystal Panel Displays
Master making basic screen
1 Message areaYou can check the description of the operation and the status of this machine.
2 Original data displayWhen this machine receives the original data from the computer or USB flash drive, [Received file] is dis-played.The display remains blank when this machine does not receive any original data.
3 Information about consumablesYou can check the remaining amount of ink or master roll.
: Remaining amount of ink
: Remaining amount of master roll
4 Ink colorYou can check the ink color of the print drum (cylin-der) that is set in this machine.
Print basic screen
1 Print position (horizontal direction)You can check whether the print position (A 46) is moved toward the top or bottom of the printed paper.
This section describes typical screen displays.
BIf the remaining amount is 10% or less, the remaining amount icon ( ) blinks.
2
3
4
1
Display Print position
Moved to the bottom
Standard position
Moved to the top
BIf the information cannot be acquired from the ink cartridge and master roll, the infor-mation is displayed as follows.C / : Remaining amount is not dis-
played and the icon blinks.CColor of ink: Either [Black] or [Color] is
displayed.
1

Chapter 1 About This Machine22
Printing Flow
“Master making process” and “Printing process”This machine is a digital duplicator that uses the screen printing method. The screen printing method first forms minute holes on a master (plate), which is the base of the printing process. Then, ink is applied through these holes to transfer images onto paper.In the screen printing method, “master making process” refers to the steps to create a master, and “printing pro-cess” refers to the steps in which the ink goes through the created master and the image is transferred onto paper. In this guide, “master making process” and “printing process” are together called “printing”.
What is [Auto Process]?[Auto Process] refers to continuous operation of the master making process and the printing process.You can turn on / off the [Auto Process] setting by pressing the [AUTO PROCESS] key (A 19).
■ When [Auto Process] is onAfter the master making process, the printing process starts.After the printing process is complete, if there is a next original on the optional auto document feeder, master mak-ing for it starts.If the original is placed on the glass platen, the operation stops after the completion of the printing process.Use this setting when you do not need to check the proof copy or change the printing conditions and the master making conditions.
■ When [Auto Process] is offOperation stops after each process: master-making and printing.Use this setting when you need to change the printing conditions after checking the proof copies or when you need to replace the paper.
PrintingMaster making process Printing process
Scanning an original
Paper original
Original data
Receiving the original data
The created master is loaded on the print drum (cylinder).
A sheet of proof copy is output.
The print drum (cylinder) rotates for printing.
Master making Proof copy Printing
Master making process Printing process
Master making process Printing processStop Stop

23
2Chapter2Basic Operations

Chapter 2 Basic Operations24
Preparation before Printing
Setting up the paper feed tray and the paper
1 Open the paper feed tray.While holding the paper feed tray with your hand, open it until it stops.
2 Place the paper on the paper feed tray.Place the paper with the printing side facing up. Use the same orientation as that of the original.(A 28 “Placement of Originals”)
3 Adjust the feed-tray paper guides.Raise the lock levers on both sides of the feed-tray paper guides so that you can slide the feed-tray paper guides by hand.Tightly fit the feed-tray paper guides to the paper, and then push down the lock levers on both sides to lock the guides.
4 Adjust the paper feed pressure.Select the position of the paper-feed setting lever according to the paper type.
■ Adding and replacing the paperWhen adding or replacing the paper during the print-ing process, press the feed tray ascent / descent but-ton (A 16). The paper feed tray lowers so that you can remove and place the paper easily.
■ How to close the paper feed tray
1 Remove all of the paper.After removing the paper, check that the paper feed tray is lowered to the bottom.
BDo not use inappropriate paper or mix paper of different sizes. It may cause a paper jam or dam-age your printer.(A 12 “Printing papers”)
BThis machine identifies the paper size according to the position of the feed-tray paper guides. If the feed-tray paper guides do not fit tightly to the paper, the paper size cannot be identified correctly.
Lever Paper type
U (NORMAL) Newsprint paperFine paper
Z (CARD) Smooth cardstockThick paper such as drawing paper
BAfter replacing the paper with that of a different type, reposition the paper-feed setting lever.
BAfter replacing the paper with that of a different size, also adjust the receiving-tray paper guides and the paper stop-per.
BWhen the paper runs out or all of the paper is removed, the paper feed tray lowers to the bottom automatically.
Chapter 2 Basic Operations 25
2
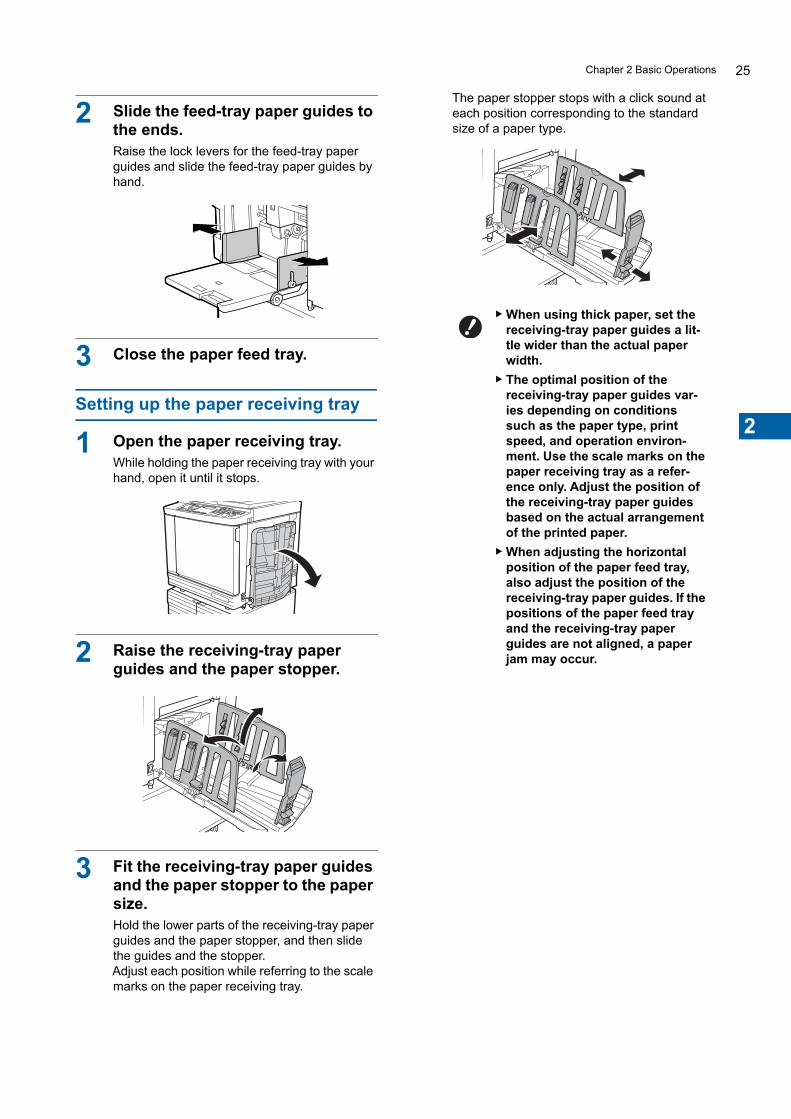
2 Slide the feed-tray paper guides to the ends.Raise the lock levers for the feed-tray paper guides and slide the feed-tray paper guides by hand.
3 Close the paper feed tray.
Setting up the paper receiving tray
1 Open the paper receiving tray.While holding the paper receiving tray with your hand, open it until it stops.
2 Raise the receiving-tray paper guides and the paper stopper.
3 Fit the receiving-tray paper guides and the paper stopper to the paper size.Hold the lower parts of the receiving-tray paper guides and the paper stopper, and then slide the guides and the stopper.Adjust each position while referring to the scale marks on the paper receiving tray.
The paper stopper stops with a click sound at each position corresponding to the standard size of a paper type.
BWhen using thick paper, set the receiving-tray paper guides a lit-tle wider than the actual paper width.
BThe optimal position of the receiving-tray paper guides var-ies depending on conditions such as the paper type, print speed, and operation environ-ment. Use the scale marks on the paper receiving tray as a refer-ence only. Adjust the position of the receiving-tray paper guides based on the actual arrangement of the printed paper.
BWhen adjusting the horizontal position of the paper feed tray, also adjust the position of the receiving-tray paper guides. If the positions of the paper feed tray and the receiving-tray paper guides are not aligned, a paper jam may occur.

Chapter 2 Basic Operations26
4 Adjust the paper arrangers. (Only for SF5450/5350/5250/5050)Adjust the paper arrangers so that printed paper is aligned.• To open a paper arranger, press down the
paper arranger knob.• To close a paper arranger, pull up the paper
arranger knob.
■ For normal paperOpen all four of the paper arrangers.
■ When a printed area is concen-trated on one side of the page
Open the paper arrangers on the side with more printed ink.
■ For thick paperOpen only the paper arrangers that are close to the machine.
5 Adjust the paper jumping wings. (Only for SF5450/5350/5250/5050)Turn the adjustment dial for the paper jumping wings to the position that is relevant to the paper type or size.
Paper type
Paper size Dial
NORMAL B4 or larger
Smaller than B4
CARD Any size

Chapter 2 Basic Operations 27
2
6 Set the corrugators. (Only for SF5430/5330/5230/5130/5030)Lower the corrugators to the inside of the paper guides.
■ How to close the paper receiving tray
1 Remove all of the printed paper.
2 Slide the receiving-tray paper guides and paper stopper to the ends.
3 Close all of the paper arrangers. (Only for SF5450/5350/5250/5050)
4 Raise the corrugators. (Only for SF5430/5330/5230/5130/5030)
5 Fold the paper stopper inward.
6 Fold the receiving-tray paper guides inward.
7 Close the paper receiving tray.
BUsually the corrugators should be lowered. When using thick paper, you do not need to lower the corru-gators.

Chapter 2 Basic Operations28
Placement of Originals
■ Relation of original and paper orienta-tions
Make sure that the orientations of the original and the paper are as shown below.Short edge paper feed
Long edge paper feed
When using the glass platen
1 Open the platen cover.
2 Place an original on the glass platen.Place the original with the scanning side facing down and align the center of the original with the [H] mark.
3 Close the platen cover.
When using the auto document feeder
1 Place originals on the auto docu-ment feeder.Place the originals with the scanning side fac-ing up.
2 Adjust the ADF original guides to the width of the original.
Originals can be scanned by using the glass platen or the optional auto document feeder.
BWhen [2-UP] (A 40) is set, the orientation of the original is different from the orienta-tion of the paper.
Orientation of paperOrientation of original
Orientation of paper Orientation of original
BClose the platen cover gently.Forcefully closing the platen cover will cause damage to the glass platen or original scanning errors.
BFor the auto document feeder, the type and the number of originals to be placed are limited.(A 12 “Originals”)
BIf the size of an original is smaller than the size that is allowed on the auto document feeder, place the original on the glass platen.

Chapter 2 Basic Operations 29
2
Printing of Paper Originals
1 Check that the power switch of this machine is on.Press the [X] side of the power switch.
2 Check the paper.(A 24 “Setting up the paper feed tray and the paper”)
3 Check the paper receiving tray.(A 25 “Setting up the paper receiving tray”)
4 Place the original.(A 28 “Placement of Originals”)
5 Check that the master making basic screen is displayed.If a screen other than the master making basic screen is displayed, press the [MASTER MAK-ING] key (A 19).
6 Check the [Auto Process] setting.(A 22 “What is [Auto Process]?”)
7 Set the master making conditions.(A 36 “Functions for Master Making”)(A 50 “Useful Functions”)
8 Enter the number of copies to be printed using the numeric keys.
9 Press the [START] key.Master making starts and a proof copy is out-put.• When the [Auto Process] setting is on, go to
step 12.• When the [Auto Process] setting is off, go to
step 10.
10 Set the printing conditions.Check the printing position and density on the proof copy.(A 44 “Functions for Printing”)
11 Press the [START] key.The printing process starts.
This section describes the procedure to scan and print paper originals.
BIf [ECO Mode] is displayed when you switch on this machine, [ECO Mode] (A 61) is set.
BIf the authentication screen (A 30) is displayed, perform the authentica-tion operation.
BAn idling action (to ensure the ink usability and stability) may be auto-matically executed. You can change the setting in [Auto Idling Time] under [Custom Setting Mode] (A 58).
BPress the [PROOF] key to check the output using another proof copy.
BIf the machine has not been used for an extended period of time, the ink on the print drum (cylinder) dries and colors in the printed output may be faint or faded. If you find the case mentioned above, output several proof copies to ensure the usability and stability of the ink. You can out-put proof copies consecutively by continuously pressing the [PROOF] key.
BTo stop the printing process, press the [STOP] key.

Chapter 2 Basic Operations30
12 Remove the printed copies.Fold the receiving-tray paper guides outward to easily remove the printed paper.
If the authentication screen is displayedIf the following screen is displayed, perform the authentication operation.
The following two methods are available for the authentication operation.
• Entering a PIN code• Using the optional IC Card Reader
Using either method is set with [Authentication Method] (A 67) in [Custom Setting Mode].
■ Entering a PIN code
1 Using the numeric keys, enter the PIN code.The entered code is displayed as “j”.
2 Press the [START] key.
■ Using the optional IC Card Reader
1 Touch the registered IC card to the IC Card Reader.
BTo print more copies, enter the num-ber of copies and press the [START] key.
BTo start master making for the next original, repeat the procedure from step 4.
BWhen you place originals on the optional auto document feeder and the [ADF Semi-Auto] setting (A 59) is turned on, master making for the next original starts automatically. Repeat the procedure from step 10 for each original.
BTo cancel the authentication status, press the [WAKE-UP] key. The authentication status is also can-celled when the time that is set in [Auto Sleep Setting] (A 58) or “Auto Clear Time” (A 58) elapses.
BIf the entered PIN code is incorrect, the buzzer sounds. Re-enter the PIN code.
BIf you do not know the PIN code, please contact your administrator.
BIf a user who is set to [Disable] (A 69) performs an authentication operation, the buzzer sounds and an error code (F39) is displayed. Pressing the [RESET] key clears the error.
BIf the IC card is not read correctly, the buzzer sounds. Touch the IC card again.
BTo register an IC card to this machine, please contact your administrator.
BIf a user who is set to [Disable] (A 69) performs an authentication operation, the buzzer sounds and an error code (F39) is displayed. Pressing the [RESET] key clears the error.
PIN Code: IC Card:
Chapter 2 Basic Operations 31
2
Printing from Computer
1 Turn on the power to this machine.Press the [X] side of the power switch.
2 Check the paper.(A 24 “Setting up the paper feed tray and the paper”)
3 Check the paper receiving tray.(A 25 “Setting up the paper receiving tray”)
4 Turn on [INTERFACE].If the [INTERFACE] lamp is off, press the [INTERFACE] key to light up.
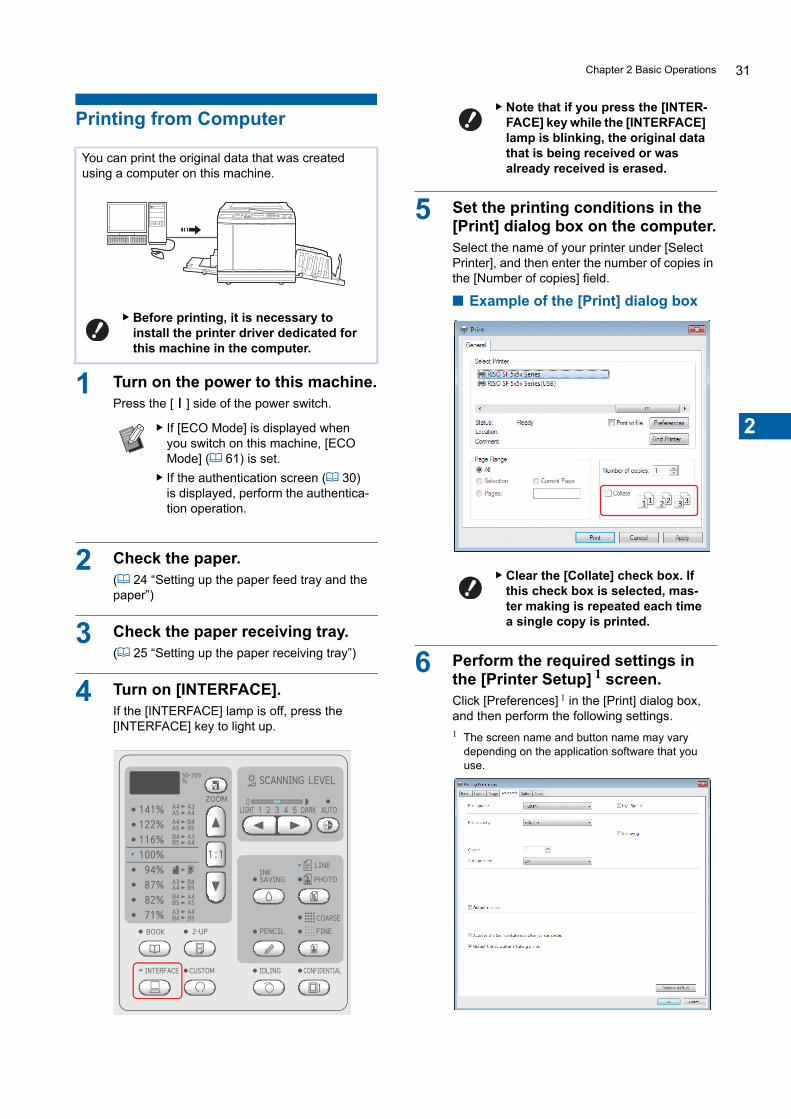
5 Set the printing conditions in the [Print] dialog box on the computer.Select the name of your printer under [Select Printer], and then enter the number of copies in the [Number of copies] field.
■ Example of the [Print] dialog box
6 Perform the required settings in the [Printer Setup] 1 screen.Click [Preferences] 1 in the [Print] dialog box, and then perform the following settings.1 The screen name and button name may vary
depending on the application software that you use.
You can print the original data that was created using a computer on this machine.
BBefore printing, it is necessary to install the printer driver dedicated for this machine in the computer.
BIf [ECO Mode] is displayed when you switch on this machine, [ECO Mode] (A 61) is set.
BIf the authentication screen (A 30) is displayed, perform the authentica-tion operation.
BNote that if you press the [INTER-FACE] key while the [INTERFACE] lamp is blinking, the original data that is being received or was already received is erased.
BClear the [Collate] check box. If this check box is selected, mas-ter making is repeated each time a single copy is printed.

Chapter 2 Basic Operations32
■ [Advanced] tab screen[Auto Process]: Before master making and the printing process, you can temporarily stop the operation to check the proof copy, perform various settings, replace the paper, or do other necessary work.
■ Other printing settingsFor more information, see the “RISO Printer Driver User’s Guide” (DVD-ROM).
7 Click [OK].The [Print] dialog box is displayed.
8 Click [Print]. 2
The original data is printed according to the printer driver settings.2 The button name may vary depending on the
application software that you use.
• When [Auto Process] is [ON]: Master making is followed by the printing pro-cess.
• When [Auto Process] is set to other than [ON]: Perform the necessary operation according to the settings.(A 32 “When [Auto Process] is set to other than [ON]”)
When [Auto Process] is set to other than [ON]The operation varies depending on the [Auto Process] setting that is selected in the printer driver.
■ When [Pause before "Master-making"] is selected
The operation pauses before master making of each page. After master making, the printing process is per-formed automatically.
1 Check that “Received file” is dis-played in the master making basic screen.If a screen other than the master making basic screen is displayed, press the [MASTER MAK-ING] key (A 19).
2 Press the [START] key.After master making, the printing process starts. Operation does not pause after a proof copy has been output.After the printing process is complete, the opera-tion pauses and then master making of the next page starts. Repeat steps 1 to 2 for each page.
■ When [Pause before "Print"] is selectedAfter master making of each page is performed auto-matically, a proof copy is output, and then the opera-tion pauses.
1 Check the printing conditions.Check the printing position and density on the proof copy. Perform the required settings as necessary.
2 Press the [START] key.The printing process starts. After the printing process is complete, master making of the next page starts. After outputting a proof copy, the operation pauses. Repeat steps 1 to 2 for each page.
■ When [OFF] is selectedBefore the master making process and before the printing process of each page, the operation pauses.
1 Check that “Received file” is dis-played in the master making basic screen.If a screen other than the master making basic screen is displayed, press the [MASTER MAK-ING] key (A 19).
2 Press the [START] key.Master making starts. After master making is complete, a proof copy is output and then the operation pauses.
3 Check the printing conditions.Check the printing position and density on the proof copy. Perform the required settings as necessary.
4 Press the [START] key.The printing process starts. After the printing process is complete, the operation pauses and then master making of the next page starts.Repeat steps 1 to 4 for each page.
BAn idling action (to ensure the ink usability and stability) may be auto-matically executed. You can change the setting in [Auto Idling Time] under [Custom Setting Mode] (A 58).

Chapter 2 Basic Operations 33
2
Printing by Using the USB Flash Drive
1 Connect the USB flash drive to the computer.
2 Set the printing conditions in the [Print] dialog box on the computer.In [Select Printer], select the printer driver that is dedicated for the USB flash drive. (“(USB)” is added to the name of your printer.)
■ Example of the [Print] dialog box
3 Perform the required settings in the [Printer Setup] 1 screen.Click [Preferences] 1 in the [Print] dialog box, and then perform the following settings.1 The screen name and button name may vary
depending on the application software that you use.
■ [Advanced] tab screen[Auto Process]: Before master making and the printing process, you can temporarily stop the operation to check the proof copy, perform various settings, replace the paper, or do other necessary work.
■ Other printing settingsFor more information, see the “RISO Printer Driver User’s Guide” (DVD-ROM).
4 Click [OK].The [Print] dialog box is displayed.
5 Click [Print]. 2
2 The button name may vary depending on the application software that you use.
6 Remove the USB flash drive.While this computer is saving the original data, a printer icon is displayed on the Windows task-bar.After the printer icon on the taskbar goes off, remove the USB flash drive from the computer.
7 Turn on the power to this machine.Press the [X] side of the power switch.
By using the printer driver, you can print the original data that is saved in a USB flash drive with this machine.
BBefore printing, it is necessary to install the printer driver that is dedi-cated for the USB flash drive in the computer.
BYou cannot print any original data (PDF file, etc.) that is saved in a method other than steps 1 to 6 below.
BClear the [Collate] check box. If this check box is selected, mas-ter making is repeated each time a single copy is printed.
BSet [Copies] in the operation panel of this machine. Even if you set [Copies] in the dialog box, the set-ting is not applied to printing.
BDo not remove the USB flash drive during the saving process-ing. It may cause data loss or damage the USB flash drive.
BIt may take several minutes until the processing is completed.
BIf [ECO Mode] is displayed when you switch on this machine, [ECO Mode] (A 61) is set.
BIf the authentication screen (A 30) is displayed, perform the authentica-tion operation.

Chapter 2 Basic Operations34
8 Check the paper.(A 24 “Setting up the paper feed tray and the paper”)
9 Check the paper receiving tray.(A 25 “Setting up the paper receiving tray”)
10 Insert the USB flash drive that con-tains the original data into the USB slot.
• When [Auto Process] is [ON]: Master making is followed by the printing pro-cess.
• When [Auto Process] is set to other than [ON]: Perform the necessary operation according to the settings.(A 32 “When [Auto Process] is set to other than [ON]”)
11 Remove the USB flash drive.Check that [USB Accessing…] is not displayed, and then remove the USB flash drive.
BWhile this machine is processing the original data, [USB Access-ing…] is displayed on the screen. Do not remove the USB flash drive while this message is dis-played. It may cause data loss or damage the USB flash drive.
BOriginal data in the USB flash drive will be erased automatically after master making.
35
3Chapter3
Functions for Master Making

Chapter 3 Functions for Master Making36
Functions for Master Making
■ Functions related to image processing
■ Functions related to layout
Image Processing That Is Suitable for the Original [LINE/PHOTO] [PENCIL]
[LINE/PHOTO]Select the processing that is suitable for the ratio of characters and photos that are included in the original.
1 Press the [LINE/PHOTO] key.
Each press of the [LINE/PHOTO] key changes the setting.
■ [cLINE]Select this function for originals that do not con-tain photos.
■ [dPHOTO]Select this function when clearness of photos is important.
For the details and setting procedure of each func-tion, see the pages that are specified as a refer-ence.
[LINE/PHOTO] [PENCIL] (A 36)You can set the processing that is suitable for the type of original.
[Dot Process] (A 37)You can set the processing method to express the gradation of a photo.
[SCANNING LEVEL] (A 38)You can adjust the scanning level according to the paper color and the tint of the original.
[BOOK] (A 38)You can erase the shadow in the binding section of books.
[INK SAVING] (A 39)You can reduce the amount of ink consumption.
[Size] (A 39)You can enlarge or reduce the size of the original.
[2-UP] (A 40)You can lay out two copies of originals side by side on a single sheet of paper.
You can obtain clearer images by selecting pro-cessing that is suitable for the type of original.Set either [LINE/PHOTO] or [PENCIL].
BYou can change the default setting in [Original Scanning Mode Default Setting] (A 57) under [Custom Setting Mode].
BYou cannot use this function with [Dot Process] (A 37).
BYou cannot use this function with [AUTO] under [SCANNING LEVEL] (A 38).
BYou can change the processing method to express the gradation of a photo in [Dot Process] (A 37).

Chapter 3 Functions for Master Making 37
3
■ [cdDUO]Both [cLINE] and [dPHOTO] light up.Select this function when you want clearness of both characters and photos.
[PENCIL]Select this function for originals that are pale in color such as an original written in pencil or stamped in red seal-ink.
1 Press the [PENCIL] key.
Press the [LINE/PHOTO] key to turn off [PEN-CIL].
Selecting a Method to Process the Gradation of Photos [Dot Process]
1 Press the [COARSE/FINE] key.
Each press of the [COARSE/FINE] key changes the setting.
■ [OFF]Gradation of photos is processed by an error diffusion method.The gradation is expressed by changing the density of dots that are irregularly arranged.
■ [eCOARSE] / [fFINE]Gradation of photos is processed by a dot pro-cess method.The gradation is expressed by changing the size of dots that are regularly arranged.[e COARSE]: Equivalent to 53 lines[f FINE]: Equivalent to 106 lines
BYou can change the image quality in [Duo Mode Setting] (A 61) under [Custom Setting Mode].
BYou cannot use this function with [AUTO] under [SCANNING LEVEL] (A 38).
BYou can change the processing method to express the gradation of a photo in [Dot Process] (A 37).
BYou can change the image quality in [Pencil Mode Setting] under [Cus-tom Setting Mode] (A 61).
BYou cannot use this function with the following functions.C[Dot Process] (A 37)C[AUTO] under [SCANNING
LEVEL] (A 38)
You can set the processing method to express the gradation of a photo.
B[Dot Process] can be selected only when [PHOTO] or [DUO] has been set for [LINE/PHOTO] (A 36).

Chapter 3 Functions for Master Making38
Adjusting the Scanning Level of the Original [SCANNING LEVEL]
1 Press the scanning level adjust-ment keys.
• Each press of the [AUTO] key turns on / off the [AUTO] setting.
• Each press of the [O] key decreases the scanning density by one level.
• Each press of the [N] key increases the scanning density by one level.
■ [AUTO]You can select this button only when [LINE] is selected in [LINE/PHOTO] (A 36).When you select [AUTO], the scanning level is adjusted optimally according to the paper color of the original.
■ [1] to [5]You can adjust the scanning density in five lev-els.Select [1] for the lowest density.Select [5] for the highest density.
Using a Book Type Original [BOOK]
1 Press the [BOOK] key.
You can adjust the contrast according to the condi-tions such as the paper color and the tint of the orig-inal.
BYou can change the default setting in [Scanning Level] (A 57) under [Custom Setting Mode].
BYou cannot change the [SCANNING LEVEL] setting when [INK SAVING] (A 39) is turned on.
When you scan an original that is bound at the cen-ter, such as a book, you can erase the shadow of the binding section.
BBe sure to align the original to the cen-ter along the left side of the glass platen and place the original in the direction shown below.
BWhen scanning a thick book, raise the hinges of the platen cover so that you can press the book evenly using the cover.
BIn [Original Book Size] (A 57) under [Cus-tom Setting Mode], you can change the size of the original that is to be scanned.
BIn [Book Gutter Shadow Width] (A 57) under [Custom Setting Mode], you can change the range that is to be erased.
BYou cannot use this function with the fol-lowing functions.C[2-UP] (A 40)C[Quick Master Making] (A 60)
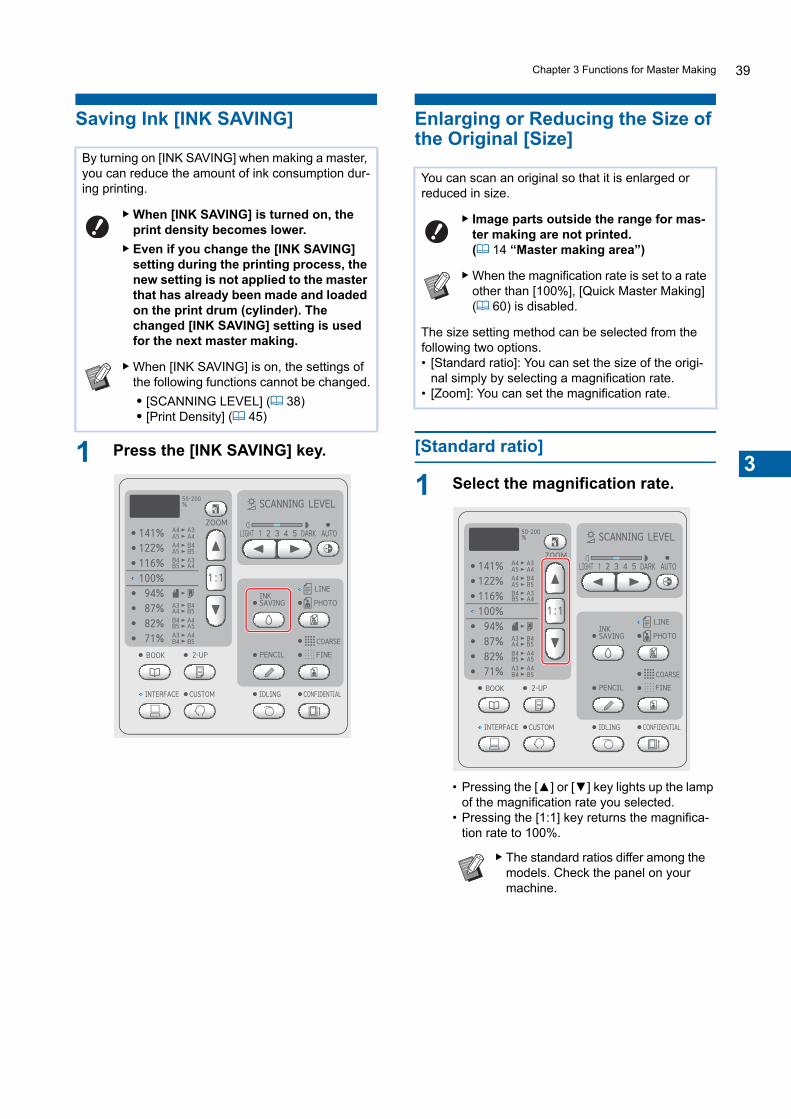
Chapter 3 Functions for Master Making 39
3
Saving Ink [INK SAVING]
1 Press the [INK SAVING] key.
Enlarging or Reducing the Size of the Original [Size]
[Standard ratio]
1 Select the magnification rate.
• Pressing the [▲] or [▼] key lights up the lamp of the magnification rate you selected.
• Pressing the [1:1] key returns the magnifica-tion rate to 100%.
By turning on [INK SAVING] when making a master, you can reduce the amount of ink consumption dur-ing printing.
BWhen [INK SAVING] is turned on, the print density becomes lower.
BEven if you change the [INK SAVING] setting during the printing process, the new setting is not applied to the master that has already been made and loaded on the print drum (cylinder). The changed [INK SAVING] setting is used for the next master making.
BWhen [INK SAVING] is on, the settings of the following functions cannot be changed.C[SCANNING LEVEL] (A 38)C[Print Density] (A 45)
You can scan an original so that it is enlarged or reduced in size.
BImage parts outside the range for mas-ter making are not printed.(A 14 “Master making area”)
BWhen the magnification rate is set to a rate other than [100%], [Quick Master Making] (A 60) is disabled.
The size setting method can be selected from the following two options.• [Standard ratio]: You can set the size of the origi-
nal simply by selecting a magnification rate.• [Zoom]: You can set the magnification rate.
BThe standard ratios differ among the models. Check the panel on your machine.
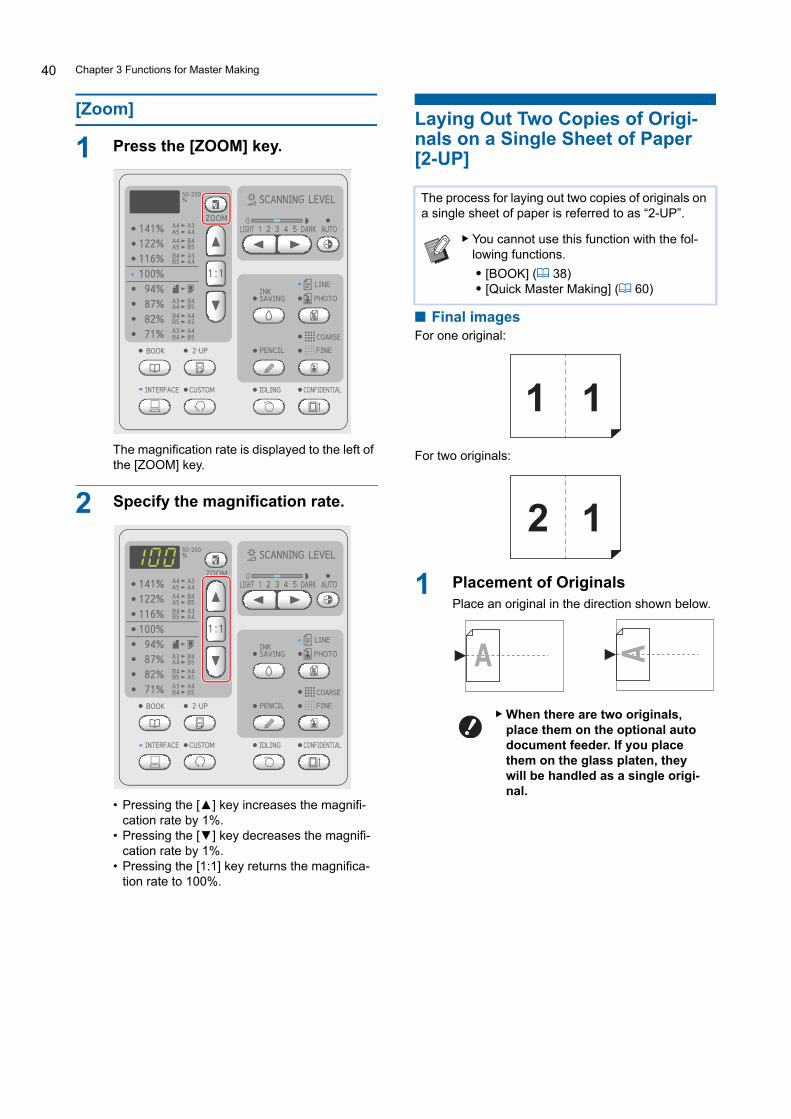
Chapter 3 Functions for Master Making40
[Zoom]
1 Press the [ZOOM] key.
The magnification rate is displayed to the left of the [ZOOM] key.
2 Specify the magnification rate.
• Pressing the [▲] key increases the magnifi-cation rate by 1%.
• Pressing the [▼] key decreases the magnifi-cation rate by 1%.
• Pressing the [1:1] key returns the magnifica-tion rate to 100%.
Laying Out Two Copies of Origi-nals on a Single Sheet of Paper [2-UP]
■ Final imagesFor one original:
For two originals:
1 Placement of OriginalsPlace an original in the direction shown below.
The process for laying out two copies of originals on a single sheet of paper is referred to as “2-UP”.
BYou cannot use this function with the fol-lowing functions.C[BOOK] (A 38)C[Quick Master Making] (A 60)
BWhen there are two originals, place them on the optional auto document feeder. If you place them on the glass platen, they will be handled as a single origi-nal.
1 1
2 1

Chapter 3 Functions for Master Making 41
3
2 Place the paper.Place the paper in the direction of a short edge paper feed.
3 Set the paper receiving tray.(A 25 “Setting up the paper receiving tray”)
4 Check that the master making basic screen is displayed.If a screen other than the master making basic screen is displayed, press the [MASTER MAK-ING] key (A 19).
5 Press the [2-UP] key.
6 Set the other required master mak-ing conditions.(A 36 “Functions for Master Making”)(A 50 “Useful Functions”)
7 Press the [START] key.Scanning of the original starts.The rest of the procedure is the same as the normal printing operation of paper originals.(A 29 “Printing of Paper Originals”)
If the original is placed on the glass platen, a buzzer sounds to notify the waiting time. While the buzzer is sounding, place the original that is to be scanned next, and then press the [START] key.
BThe reduction and enlargement rates are different from the standard magnification rates. Specify a mag-nification rate that is shown in the table below.
Original
A4 B5 A5 B6
Printing P
aper
A3 100% 116% 141% 163%
B4 87% 100% 122% 141%
A4 71% 82% 100% 116%
B5 61% 71% 87% 100%
Paper feeding direction
Short side
Long side
Original
A6 B7 A7 B8
Printing P
aper
A3 200% --- --- ---
B4 173% 200% --- ---
A4 138% 163% 200% ---
B5 122% 141% 173% 200%
OriginalLetter Statement
Printing P
aperLedger 100% 127%
Legal 77% 100%
Letter 66% 100%State-ment 50% 66%
BIf a certain amount of time has elapsed without the next original being placed, master making starts automatically. The range that has not been scanned is output as a blank space.This certain amount of time is referred to as [2-Up Mode Scan Waiting Time]. The factory default is 15 seconds. You can change the setting in [2-Up Mode Scan Waiting Time] (A 58) under [Custom Setting Mode].

Chapter 3 Functions for Master Making42

43
4
Chapter4Functions for Printing

Chapter 4 Functions for Printing44
Functions for Printing Adjusting the Print Speed [SPEED]
1 Press the [SPEED] key ([O] or [N]).
• Each press of the [O] key decreases the print speed by one level.
• Each press of the [N] key increases the print speed by one level.
The table below shows the relation between the print speed lamp status and the print speed.
* Only for SF5450/5350/5250/5050
For the details and setting procedure of each func-tion, see the pages that are specified as a refer-ence.
[SPEED] (A 44)You can adjust the print speed.
[DENSITY] (A 45)You can adjust the print density.
[PRINT POSITION] (A 46)You can adjust the print position.
You can adjust the print speed.It is possible to adjust the print speed not only before but also during the printing process.
BYou can change the default setting in [Print Speed] (A 57) under [Custom Setting Mode].
Lamp Print speed (sheets / minute)
Approximately 60
Approximately 80
Approximately 100
Approximately 120
Approximately 130
Approximately 150([High Speed]) *

Chapter 4 Functions for Printing 45
4
Adjusting the Print Density [DENSITY]
1 Press the [DENSITY] key ([O] or [N]).
• Each press of the [O] key decreases the print density by one level.
• Each press of the [N] key increases the print density by one level.
The print density lamp shows the current print density level.
B[High Speed] is not available when the temperature in the print drum (cylinder) is less than 15°C (59°F).
BSome types of paper may cause a paper jam easily. When using such paper, print at a lower speed.
You can adjust the print density.It is possible to adjust the print density not only before but also during the printing process.
BYou can change the default setting in [Print Density] (A 57) under [Custom Setting Mode].
BYou cannot change the print density when [INK SAVING] (A 39) is turned on.

Chapter 4 Functions for Printing46
Adjusting the Print Position [PRINT POSITION]
Adjusting the position in the horizontal directionYou can adjust the print position in the horizontal direction using the [PRINT POSITION] keys on the control panel.It is possible to adjust the print position not only before but also during the printing process.
1 Press the [PRINT POSITION] key ([O] or [N]).Each press of the [O] or [N] key moves the printed image by 0.5 mm (1/64 inches).
Adjusting the position in the vertical directionYou can adjust the print position using the vertical print position adjustment dial on the paper feed tray.
1 Lower the paper feed tray.Press the feed tray ascent / descent button to lower the paper feed tray until the paper feed roller separates from the paper.
2 Turn the vertical print position adjustment dial.Adjust the vertical print position while checking the scale for the shifted length.The [M] symbol on the scale indicates the stan-dard print position.
■ Moving the printed image upward on the paper
Turn the dial clockwise.
You can adjust the print position.The adjustment method differs between the hori-zontal direction and vertical direction.
BPress the [P] key to return the printed image to the standard posi-tion.
BTo return the printed image to the standard position during the printing process, press and hold the [P] key.
BAfter the adjustment, press the [PROOF] key to check the printed paper.
BIf the following operations are performed, the print position in the horizontal direction is returned to the standard position.CPress the [RESET] key.CTurn off the power.
Vertical direction
Horizontal direction
BThe scale is only a reference. After the adjustment, press the [PROOF] key to check the printed paper.
Paper feed tray Printed image
Upward

Chapter 4 Functions for Printing 47
4
As the paper feed tray moves to the front of this machine, the printed image is shifted upward relatively on the paper.
■ Moving the printed image down-ward on the paper
Turn the dial counterclockwise.
As the paper feed tray moves to the back of this machine, the printed image is shifted down-ward relatively on the paper.
3 Adjusting the position of the receiving-tray paper guidesAdjust the position of the receiving-tray paper guides according to the shifted length of the paper feed tray. If the positions of the paper feed tray and the receiving-tray paper guides are not aligned, a paper jam may occur.(A 25 “Setting up the paper receiving tray”)
Paper feed tray Printed image
Downward
BAfter the printing process is com-plete, return the positions of the paper feed tray and the receiving-tray paper guides to their stan-dard positions. To return the paper feed tray to the standard position, turn the dial until the edge of the paper feed tray aligns with the [M] symbol on the scale.

Chapter 4 Functions for Printing48
49
5
Chapter5Useful Functions

Chapter 5 Useful Functions50
Useful Functions Printing the Sorted Originals [Program]
■ Types of [Program][Single Page Mode]:You can set the number of copies to be printed from a single original for each “set”.The “sets” can be organized into a “group”.It is possible to set up to 9999 copies × 99 sets × 50 groups.
For the details and setting procedure of each func-tion, see the pages that are specified as a refer-ence.
[Program] (A 50)You can separate and sort the printed paper by a specified number of sheets.
[IDLING] (A 54)When the print drum (cylinder) has not been used for a long time, you can reduce blurring of ink at the beginning of printing.
[CONFIDENTIAL] (A 54)You can discard the master that has already been used.
You can separate the number of copies to be printed for each set or each original.As the printing process stops for a few seconds after printing the specified number of copies (for each set or each original), you can sort the printed paper.
BThis function is useful when it is used with [Job Separation] (A 59) because printed paper is sorted according to each speci-fied separation with a tape.The optional Job Separator is required to use [Job Separation].When the Job Separator is not installed, we recommend that you remove the printed paper from the paper receiving tray or insert an interleaf manually, during the pause of printing for each separation.
Group 1
Up to 50 groups
20 copies
30 copies
40 copies
50 copies
20 copies
2 sets
1 set
40 copies
2 sets
1 setUp to 99 sets
Group 2
Group 3
Group 4
Original
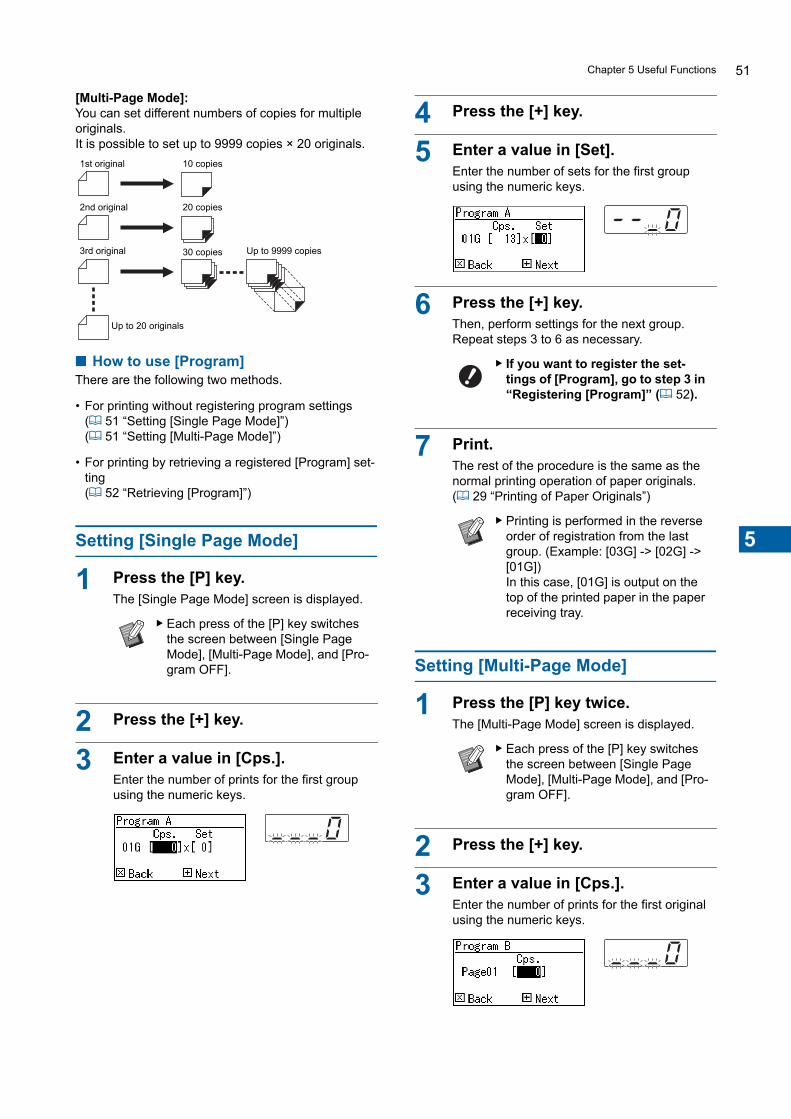
Chapter 5 Useful Functions 51
5
[Multi-Page Mode]:You can set different numbers of copies for multiple originals.It is possible to set up to 9999 copies × 20 originals.
■ How to use [Program]There are the following two methods.
• For printing without registering program settings(A 51 “Setting [Single Page Mode]”)(A 51 “Setting [Multi-Page Mode]”)
• For printing by retrieving a registered [Program] set-ting(A 52 “Retrieving [Program]”)
Setting [Single Page Mode]
1 Press the [P] key.The [Single Page Mode] screen is displayed.
2 Press the [+] key.
3 Enter a value in [Cps.].Enter the number of prints for the first group using the numeric keys.
4 Press the [+] key.
5 Enter a value in [Set].Enter the number of sets for the first group using the numeric keys.
6 Press the [+] key.Then, perform settings for the next group.Repeat steps 3 to 6 as necessary.
7 Print.The rest of the procedure is the same as the normal printing operation of paper originals.(A 29 “Printing of Paper Originals”)
Setting [Multi-Page Mode]
1 Press the [P] key twice.The [Multi-Page Mode] screen is displayed.
2 Press the [+] key.
3 Enter a value in [Cps.].Enter the number of prints for the first original using the numeric keys.
BEach press of the [P] key switches the screen between [Single Page Mode], [Multi-Page Mode], and [Pro-gram OFF].
1st original 10 copies
20 copies
30 copies Up to 9999 copies
2nd original
3rd original
Up to 20 originals
BIf you want to register the set-tings of [Program], go to step 3 in “Registering [Program]” (A 52).
BPrinting is performed in the reverse order of registration from the last group. (Example: [03G] -> [02G] -> [01G])In this case, [01G] is output on the top of the printed paper in the paper receiving tray.
BEach press of the [P] key switches the screen between [Single Page Mode], [Multi-Page Mode], and [Pro-gram OFF].

Chapter 5 Useful Functions52
4 Press the [+] key.Then, perform settings for the next original.Repeat steps 3 and 4 as necessary.
5 Print.The rest of the procedure is the same as the normal printing operation of paper originals.(A 29 “Printing of Paper Originals”)
Canceling [Program]
1 Press the [P] key.The [P] key lamp goes off and [Program] is turned off.
Registering [Program]It is useful if you register a program that is used fre-quently.You can register a total of 6 [Single Page Mode] and [Multi-Page Mode] programs.
1 Set a program.Perform either of the following settings.
• Steps 1 to 6 in “Setting [Single Page Mode]” (A 51).
• Steps 1 to 4 in “Setting [Multi-Page Mode]” (A 51).
2 Press the [U] key.
3 Enter the program number.Enter the program number that you want to reg-ister using the numeric keys.
• If you enter a program number that is already registered, either [a] (Single Page Mode) or [b] (Multi-Page Mode) is displayed in the numeric display.
• If you enter a program number that is not reg-istered, neither [a] nor [b] is displayed.
4 Press the [U] key.The settings of [Program] are registered. The number and type of the registered programs (either [a] or [b]) are displayed in the numeric display.• When you press the [START] key, printing
can be performed according to the [Program] settings that you registered.
• Pressing the [P] key turns off [Program].
Retrieving [Program]
1 Press the [P] key.The [P] key lamp lights up.
2 Press the [U] key.
3 Enter the program number.Enter the program number that you want to retrieve using the numeric keys.
4 Press the [+] key.The settings that you registered are retrieved.
BIf you want to register the set-tings of [Program], go to step 3 in “Registering [Program]” (A 52).
BPrinting is performed in the reverse order of registration from the last original. (Example: [Page 03] -> [Page 02] -> [Page 01])In this case, [Page 01] is output on the top of the printed paper in the paper receiving tray.
BEach press of the [P] key switches the screen between [Single Page Mode], [Multi-Page Mode], and [Pro-gram OFF].
BIf you enter a program number that is already registered, the set-ting is overwritten. Check to make sure there is no problem if the settings are overwritten.

Chapter 5 Useful Functions 53
5
• When you press the [START] key, printing can be performed according to the [Program] settings that you retrieved.
• Pressing the [P] key turns off [Program].
Changing the settings of [Program]
1 Retrieve a program.Perform steps 1 to 4 in “Retrieving [Program]”.
2 Press the [+] key.You can now change the settings.
3 Change the settings of the pro-gram.Change the number of copies and the number of sets.• Pressing the [C] key clears the values that
were set, and you can input a new entry using the numeric keys.
• Pressing the [+] key goes to the next input target.
• Pressing the [×] key goes back to the previ-ous input target.
4 Press the [U] key.For the rest of the procedure, register the changes by performing steps 3 and 4 in “Regis-tering [Program]”.
Erasing [Program]
1 Press the [P] key.The [P] key lamp lights up.
2 Press the [U] key.
3 Enter the program number.Using the numeric keys, enter the program number that you want to erase.
4 Press the [C] key.
5 Press the [START] key.[Program] that you specified is erased.
6 Press the [P] key.[Program] is turned off.
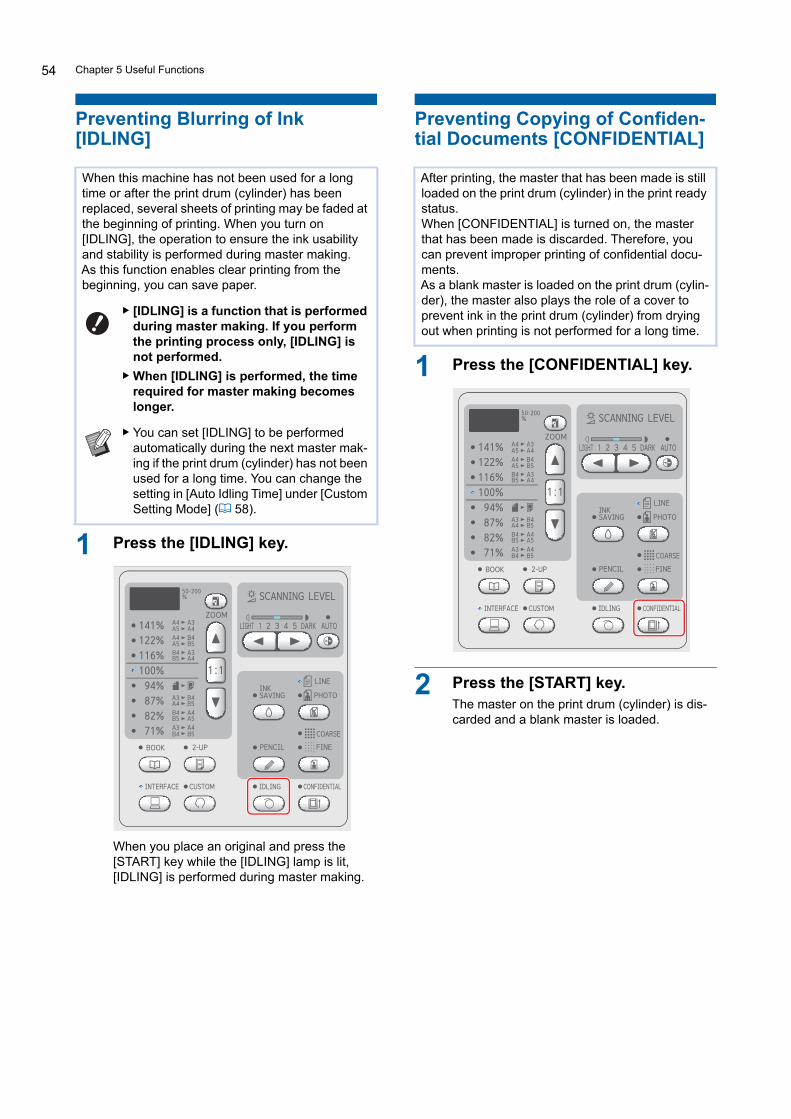
Chapter 5 Useful Functions54
Preventing Blurring of Ink [IDLING]
1 Press the [IDLING] key.
When you place an original and press the [START] key while the [IDLING] lamp is lit, [IDLING] is performed during master making.
Preventing Copying of Confiden-tial Documents [CONFIDENTIAL]
1 Press the [CONFIDENTIAL] key.
2 Press the [START] key.The master on the print drum (cylinder) is dis-carded and a blank master is loaded.
When this machine has not been used for a long time or after the print drum (cylinder) has been replaced, several sheets of printing may be faded at the beginning of printing. When you turn on [IDLING], the operation to ensure the ink usability and stability is performed during master making.As this function enables clear printing from the beginning, you can save paper.
B[IDLING] is a function that is performed during master making. If you perform the printing process only, [IDLING] is not performed.
BWhen [IDLING] is performed, the time required for master making becomes longer.
BYou can set [IDLING] to be performed automatically during the next master mak-ing if the print drum (cylinder) has not been used for a long time. You can change the setting in [Auto Idling Time] under [Custom Setting Mode] (A 58).
After printing, the master that has been made is still loaded on the print drum (cylinder) in the print ready status.When [CONFIDENTIAL] is turned on, the master that has been made is discarded. Therefore, you can prevent improper printing of confidential docu-ments.As a blank master is loaded on the print drum (cylin-der), the master also plays the role of a cover to prevent ink in the print drum (cylinder) from drying out when printing is not performed for a long time.
55
6
Chapter6Setting the Operation Conditions

Chapter 6 Setting the Operation Conditions56
Setting the Operation Conditions [Custom Setting Mode]
Basic operation of [Custom Setting Mode]
1 Press the [CUSTOM] key.
The [Custom Setting Mode] menu screen is displayed.
2 Enter the item number.Using the numeric keys, enter the item number that you want to set.
The number that you entered is displayed in the numeric display.You can change the menu that is to be dis-played on the screen, using the [×] key and the [+] key.
3 Press the [START] key.
4 Enter the number of the setting value.
5 Press the [START] key.The setting is complete and the [Custom Set-ting Mode] menu screen is displayed.If you want to change multiple setting items, repeat steps 2 to 5.
6 Press the [START] key or the [CUSTOM] key.A confirmation screen is displayed.
7 Press the [START] key.
The settings that you changed are applied and the mode returns to normal.
You can change the default values and set the sys-tem control-related settings in order to make this machine more convenient for use.
BIf you want to cancel the change, press the [STOP] key instead of the [START] key.
BIf you want to cancel all the changes that were made in [Custom Setting Mode], press the [STOP] key instead.
BIf you want to return to the [Custom Setting Mode] menu screen, press the [STOP] key instead of the [START] key.

Chapter 6 Setting the Operation Conditions 57
6
List of setting items• The factory default settings are underlined in the following list.• The items marked with an asterisk (*) are displayed only when an optional accessory is installed.• When [Authentication Setting] (A 67) is set to [ON], users except the administrator cannot browse or change the
items that are marked with “g”.
Item num-ber
Setting item Description
0 1 2 3 4 5
1g
[Print Speed]You can change the default setting of the print speed (A 44).
Level 1 Level 2 Level 3 Level 4 Level 5
BWhen [ECO Mode] (A 61) is set to [ON], [Print Speed] is fixed to [2] (Level 3).
2g
[Print Density] You can change the default setting of the print density (A 45).
Level 1 Level 2 Level 3 Level 4 Level 5
BWhen [ECO Mode] (A 61) is set to [ON], [Print Den-sity] is fixed to [0] (Level 1).
3g
[Auto Process]You can change the default setting of [Auto Process] (A 22).
OFF ON
4g
[Scanning Level]You can change the default setting of scanning level (A 38).
Level 1 Level 2 Level 3 Level 4 Level 5 Auto
5g
[Original Scanning Mode Default Setting]You can change the default settings of [LINE/PHOTO] and [PENCIL](A 36).
Line Photo Duo Pencil
6 [Original Book Size]You can change the size of the original that is to be scanned in [BOOK] (A 38).When [Paper] is set, the original is scanned with the same size as the paper that is set on the paper feed tray.
Type: mm
Paper A3 B4 A4 B5
Type: inch
Paper Ledger Legal Letter
7 [Book Gutter Shadow Width]You can change the range that is to be erased in [BOOK] (A 38).
Type: mm
20mm 30mm 40mm 50mm 80mm
Type: inch
13/16" 1 3/16" 1 8/16" 1 31/32" 3 1/8"
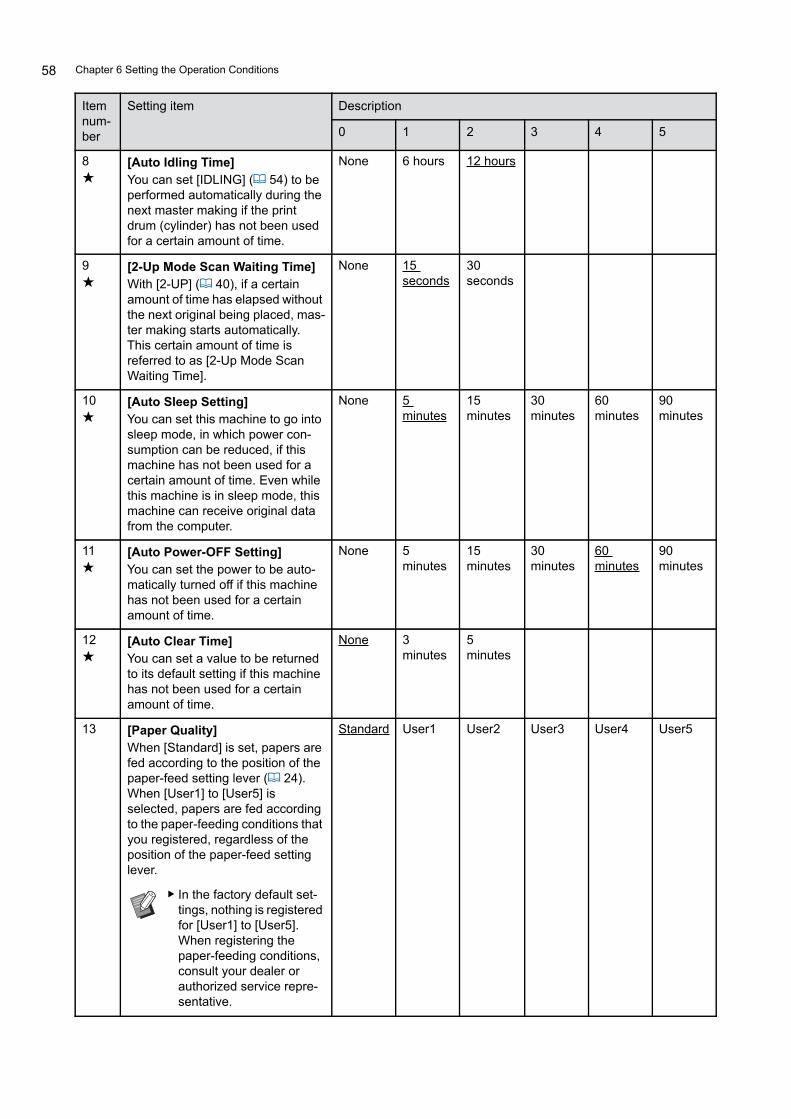
Chapter 6 Setting the Operation Conditions58
8g
[Auto Idling Time]You can set [IDLING] (A 54) to be performed automatically during the next master making if the print drum (cylinder) has not been used for a certain amount of time.
None 6 hours 12 hours
9g
[2-Up Mode Scan Waiting Time]With [2-UP] (A 40), if a certain amount of time has elapsed without the next original being placed, mas-ter making starts automatically. This certain amount of time is referred to as [2-Up Mode Scan Waiting Time].
None 15 seconds
30 seconds
10g
[Auto Sleep Setting]You can set this machine to go into sleep mode, in which power con-sumption can be reduced, if this machine has not been used for a certain amount of time. Even while this machine is in sleep mode, this machine can receive original data from the computer.
None 5 minutes
15 minutes
30 minutes
60 minutes
90 minutes
11g
[Auto Power-OFF Setting]You can set the power to be auto-matically turned off if this machine has not been used for a certain amount of time.
None 5 minutes
15 minutes
30 minutes
60 minutes
90 minutes
12g
[Auto Clear Time]You can set a value to be returned to its default setting if this machine has not been used for a certain amount of time.
None 3 minutes
5 minutes
13 [Paper Quality]When [Standard] is set, papers are fed according to the position of the paper-feed setting lever (A 24).When [User1] to [User5] is selected, papers are fed according to the paper-feeding conditions that you registered, regardless of the position of the paper-feed setting lever.
Standard User1 User2 User3 User4 User5
BIn the factory default set-tings, nothing is registered for [User1] to [User5]. When registering the paper-feeding conditions, consult your dealer or authorized service repre-sentative.
Item num-ber
Setting item Description
0 1 2 3 4 5
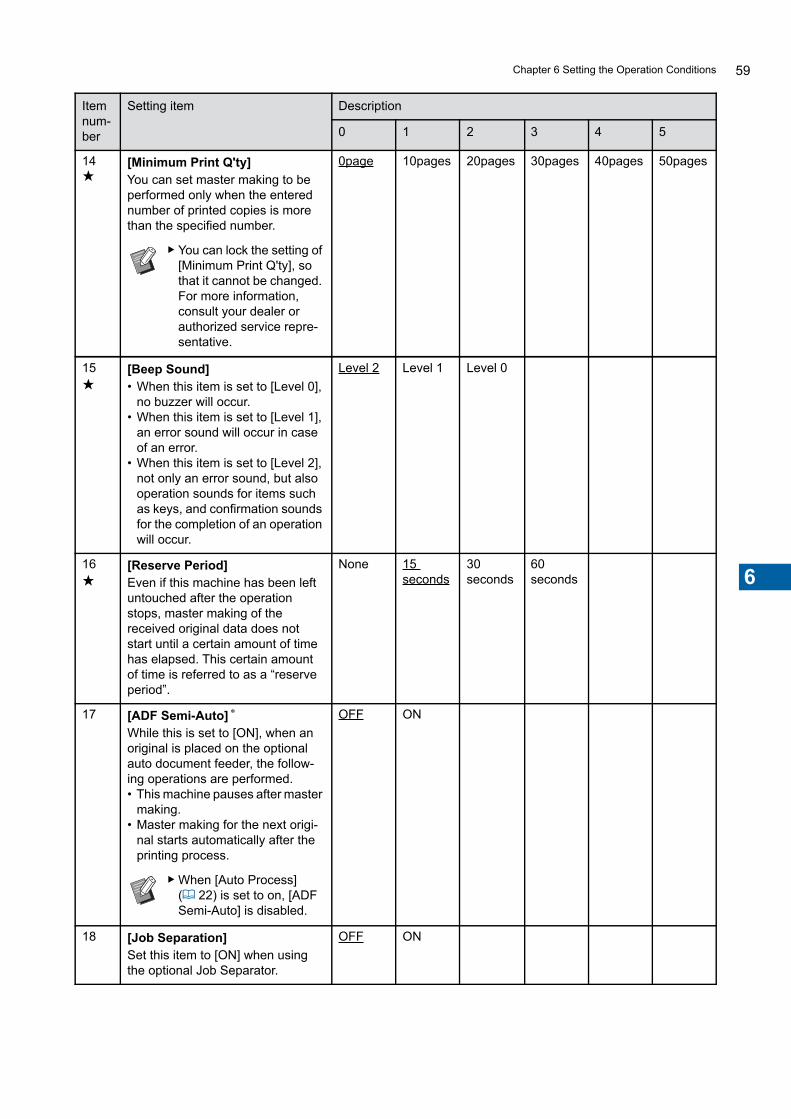
Chapter 6 Setting the Operation Conditions 59
6
14g
[Minimum Print Q'ty]You can set master making to be performed only when the entered number of printed copies is more than the specified number.
0page 10pages 20pages 30pages 40pages 50pages
BYou can lock the setting of [Minimum Print Q'ty], so that it cannot be changed. For more information, consult your dealer or authorized service repre-sentative.
15g
[Beep Sound]• When this item is set to [Level 0],
no buzzer will occur.• When this item is set to [Level 1],
an error sound will occur in case of an error.
• When this item is set to [Level 2], not only an error sound, but also operation sounds for items such as keys, and confirmation sounds for the completion of an operation will occur.
Level 2 Level 1 Level 0
16g
[Reserve Period]Even if this machine has been left untouched after the operation stops, master making of the received original data does not start until a certain amount of time has elapsed. This certain amount of time is referred to as a “reserve period”.
None 15 seconds
30 seconds
60 seconds
17 [ADF Semi-Auto] *
While this is set to [ON], when an original is placed on the optional auto document feeder, the follow-ing operations are performed.• This machine pauses after master
making.• Master making for the next origi-
nal starts automatically after the printing process.
OFF ON
BWhen [Auto Process] (A 22) is set to on, [ADF Semi-Auto] is disabled.
18 [Job Separation]Set this item to [ON] when using the optional Job Separator.
OFF ON
Item num-ber
Setting item Description
0 1 2 3 4 5

Chapter 6 Setting the Operation Conditions60
19 [Quick Master Making]When this item is set to [ON], you can shorten the time required for master making.The icon that is displayed in the master making basic screen changes according to the [OFF] and [ON] settings.• [OFF]:• [ON]:
OFF ON
BWhen master making is performed with this item set to [ON], images are printed at a lower reso-lution.
BWhen you set the follow-ing functions, [Quick Mas-ter Making] is disabled.C[Size] (A 39)C[2-UP] (A 40)C[BOOK] (A 38)
20 [Print Count Hold Setting]• When this item is set to [Return],
the numeric display returns to the set number of sheets after print-ing is complete. (Example: When printing with the number of prints set to “100”, the numeric display returns to “100”.)
• When this item is set to [Do Not Return], the numeric display remains “0” after printing is com-plete.
Do Not Return
Return
21 [2-Up Print Hold Setting]• When this item is set to [Return],
[2-UP] remains on after master making or printing by [2-UP] is complete.
• When this item is set to [Do Not Return], [2-UP] turns off after master making or printing by [2-UP] is complete.
Do Not Return
Return
22 [Separation Fan]Adjust this item if unevenness or blurring occurs in printed images, depending on the image conditions of the original or the type of paper.
OFF Level 1(Low)
Level 2 Level 3 Level 4(High)
BFor appropriate adjust-ment values, consult your dealer or authorized ser-vice representative.
Item num-ber
Setting item Description
0 1 2 3 4 5

Chapter 6 Setting the Operation Conditions 61
6
23 [Suction Fan]Adjust this item if unevenness or blurring occurs in printed images, depending on the image conditions of the original or the type of paper.
Level 1(Low)
Level 2 Level 3 Level 4(High)
BFor appropriate adjust-ment values, consult your dealer or authorized ser-vice representative.
24 [Duo Mode Setting]You can change the image pro-cessing of [Duo] (A 37).[Standard]
Select this option when you want to reproduce characters and pho-tos with good balance. This option is also suitable for colored originals.
[Line]Select this option to emphasize the clearness of characters. This is also suitable when the original contains a photo with clear con-trast, such as buildings and gloss on metallic surfaces.
[Photo]Select this option when the origi-nal contains a photo in which smoothness of gradation is important, such as food and por-trait photos.
[ON/OFF]Select [ON] to clear the back-ground color of the dark-colored originals, such as newspapers.
Standard/OFF
Standard/ON
Line/OFF
Line/ON
Photo/OFF
Photo/ON
25 [Pencil Mode Setting]You can change the image pro-cessing of [PENCIL] (A 37). Select [Lighter] when the shadows in a cut-and-paste original are included in the master.
Darker Lighter
28g
[ECO Mode]You can print with reduced power consumption at a lower printing pressure than normal printing.When this item is set to [ON], nei-ther [Print Speed] nor [Print Den-sity] under [Custom Setting Mode] (A 57) can be changed any more.
OFF ON
Item num-ber
Setting item Description
0 1 2 3 4 5

Chapter 6 Setting the Operation Conditions62
29g
[Display Language]You can change the language to be displayed on the screen.
0 and on
A number is assigned to each language.You can change the displayed language by selecting the number of the language that you want to display.BWhen changing the set-
ting, consult your dealer or authorized service representative.
31 [Display Density]You can adjust the density of the screen display.
Level 1 to Level 5 to Level 9
32 [LCD Brightness]You can adjust the brightness of the screen display.
Level 1 Level 2 Level 3 Level 4 Level 5
50 [Count:A4/Letter and Smaller]Shows the accumulated number of copies that was printed on papers smaller than A4 in this machine.The value does not include proof copies that were output during master making.
A 74 “Displaying the Accumulated Counts [Meter Display]”
51 [Count:Larger than A4/Letter]Shows the accumulated number of copies that was printed on papers larger than A4 in this machine.The value does not include proof copies that were output during master making.
52 [Total Print Count Display]Shows the accumulated number of copies that have been printed on this machine.The value does not include proof copies that were output during master making.
53 [Total Master Count Display]Shows the accumulated count of master making processes that have been performed on this machine.The value includes the count of [IDLING] and [CONFIDENTIAL] that have been performed.
Item num-ber
Setting item Description
0 1 2 3 4 5
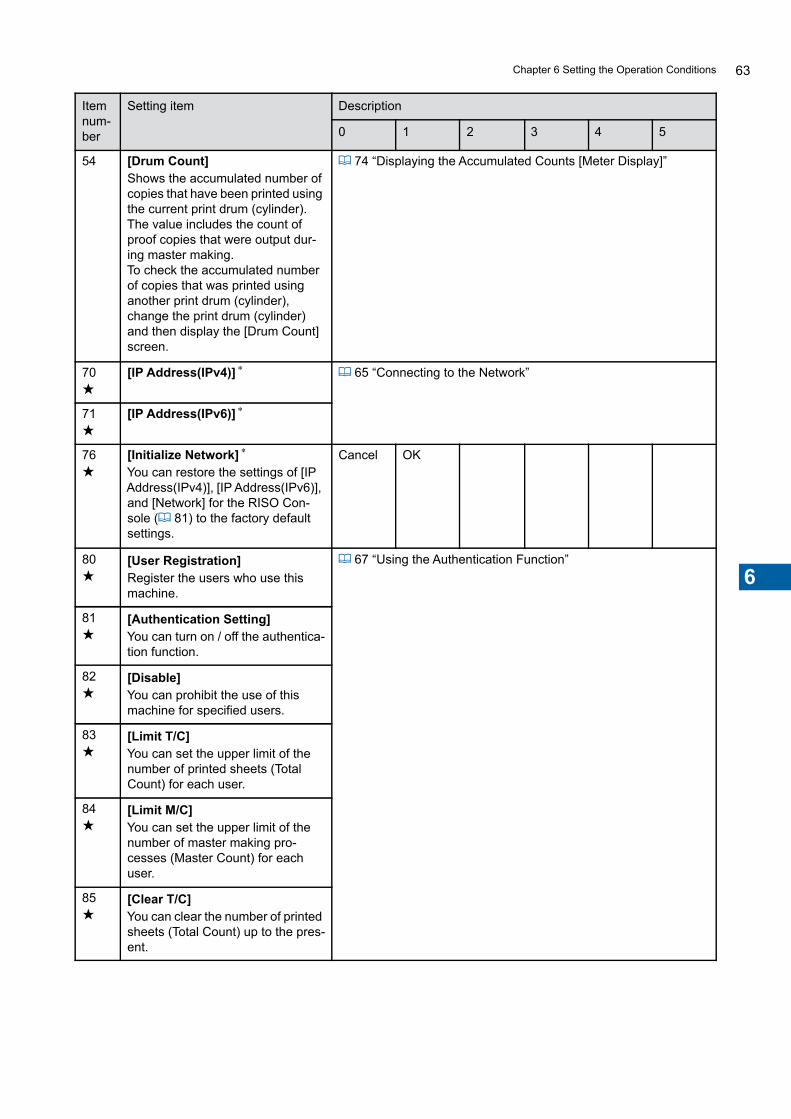
Chapter 6 Setting the Operation Conditions 63
6
54 [Drum Count]Shows the accumulated number of copies that have been printed using the current print drum (cylinder).The value includes the count of proof copies that were output dur-ing master making.To check the accumulated number of copies that was printed using another print drum (cylinder), change the print drum (cylinder) and then display the [Drum Count] screen.
A 74 “Displaying the Accumulated Counts [Meter Display]”
70g
[IP Address(IPv4)] * A 65 “Connecting to the Network”
71g
[IP Address(IPv6)] *
76g
[Initialize Network] *
You can restore the settings of [IP Address(IPv4)], [IP Address(IPv6)], and [Network] for the RISO Con-sole (A 81) to the factory default settings.
Cancel OK
80g
[User Registration]Register the users who use this machine.
A 67 “Using the Authentication Function”
81g
[Authentication Setting]You can turn on / off the authentica-tion function.
82g
[Disable]You can prohibit the use of this machine for specified users.
83g
[Limit T/C]You can set the upper limit of the number of printed sheets (Total Count) for each user.
84g
[Limit M/C]You can set the upper limit of the number of master making pro-cesses (Master Count) for each user.
85g
[Clear T/C]You can clear the number of printed sheets (Total Count) up to the pres-ent.
Item num-ber
Setting item Description
0 1 2 3 4 5

Chapter 6 Setting the Operation Conditions64
86g
[Clear M/C]You can clear the number of master making processes (Master Count) up to the present.
A 67 “Using the Authentication Function”
87g
[Reset Counter]You can clear the number of printed sheets and the number of master making processes for all users col-lectively.
88g
[Set Date]You can display the report screen for [Count Report Output] on the specified date of every month.
89g
[Clear Count Error]You can hide the report screen for [Count Report Output] of the month.
90g
[Count Report Output]You can output the total results for the number of printed sheets and the number of master making pro-cesses for all users. Select the out-put method in advance with [Setting of Count Report].
91g
[Setting of Count Report]Set the output method of [Count Report Output].
92g
[Authentication Method] *
This setting item is displayed when the optional IC Card Reader is installed.Select the method of authentication operation.
95g
[Clear Authentication Setting]You can restore all the settings for item numbers 80 to 92, which are related to the authentication func-tion, to the factory default settings.
99g
[Reset to Default Setting]You can restore all the settings of [Custom Setting Mode] to the fac-tory default settings.
Cancel OK
Item num-ber
Setting item Description
0 1 2 3 4 5
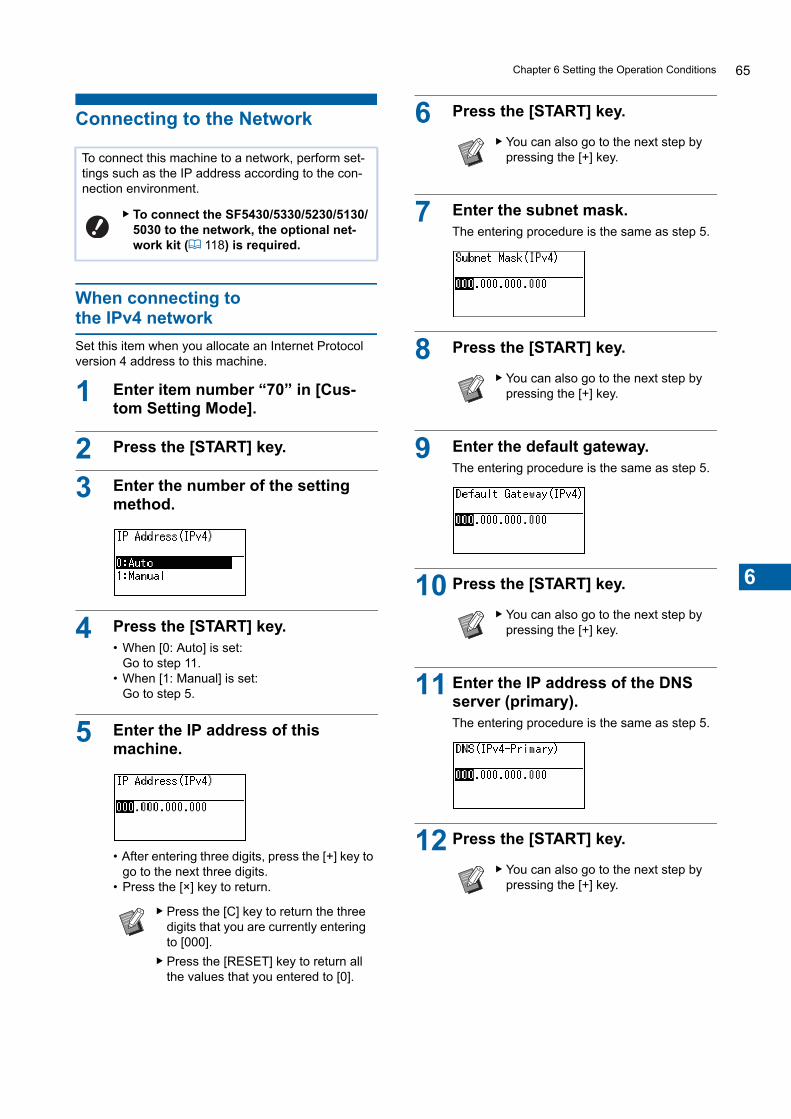
Chapter 6 Setting the Operation Conditions 65
6
Connecting to the Network
When connecting to the IPv4 networkSet this item when you allocate an Internet Protocol version 4 address to this machine.
1 Enter item number “70” in [Cus-tom Setting Mode].
2 Press the [START] key.
3 Enter the number of the setting method.
4 Press the [START] key.• When [0: Auto] is set:
Go to step 11.• When [1: Manual] is set:
Go to step 5.
5 Enter the IP address of this machine.
• After entering three digits, press the [+] key to go to the next three digits.
• Press the [×] key to return.
6 Press the [START] key.
7 Enter the subnet mask.The entering procedure is the same as step 5.
8 Press the [START] key.
9 Enter the default gateway.The entering procedure is the same as step 5.
10 Press the [START] key.
11 Enter the IP address of the DNS server (primary).The entering procedure is the same as step 5.
12 Press the [START] key.
To connect this machine to a network, perform set-tings such as the IP address according to the con-nection environment.
BTo connect the SF5430/5330/5230/5130/5030 to the network, the optional net-work kit (A 118) is required.
BPress the [C] key to return the three digits that you are currently entering to [000].
BPress the [RESET] key to return all the values that you entered to [0].
BYou can also go to the next step by pressing the [+] key.
BYou can also go to the next step by pressing the [+] key.
BYou can also go to the next step by pressing the [+] key.
BYou can also go to the next step by pressing the [+] key.

Chapter 6 Setting the Operation Conditions66
13 Enter the IP address of the DNS server (secondary).The entering procedure is the same as step 5.
14 Press the [START] key.The setting is complete and the menu screen is displayed.
When connecting to the IPv6 networkSet this item when you allocate an Internet Protocol version 6 address to this machine.
1 Enter item number “71” in [Cus-tom Setting Mode].
2 Press the [START] key.
3 Enter the number of the setting method.
4 Press the [START] key.• When [0: Manual] is set:
Go to step 5.• When either [1: Stateless] or [2: Stateful] is
set:Go to step 11.
5 Enter the IP address of this machine.
1 Press the [O] and [N] keys for the print position adjustment to select the value (alphabet and numeric values) to be entered from the field at the bottom of the screen.
2 Press the [P] key for the print position adjustment to confirm the value that you entered. (You can also enter numeric values by using the numeric keys.)
3 After entering four digits, press the [+] key to go to the next four digits.
6 Press the [START] key.
7 Enter the prefix length.
8 Press the [START] key.
BPress the [N] key for the print speed adjustment to move the entry destination to the next digit.
BPress the [O] key for the print speed adjustment to return the entry destination to the previous digit.
BPress the [C] key to return the four digits that you are currently entering to [0000].
BPress the [RESET] key to return all the values that you entered to [0].
BYou can also go to the next step by pressing the [+] key.
BYou can also go to the next step by pressing the [+] key.

Chapter 6 Setting the Operation Conditions 67
6
9 Enter the IP address of the default gateway.The entering procedure is the same as step 5.
10 Press the [START] key.
11 Enter the IP address of the DNS server (primary).The entering procedure is the same as step 5.
12 Press the [START] key.
13 Enter the IP address of the DNS server (secondary).The entering procedure is the same as step 5.
14 Press the [START] key.The setting is complete and the menu screen is displayed.
Using the Authentication Func-tion
■ Setting items that are required for using the authentication function
Perform the following settings in [Custom Setting Mode].
[User Registration]Register the users who use this machine.The number of users that can be registered varies depending on the [Authentication Method].
Those users are categorized into “general user” and “administrator”.
■ What is “general user”?“Authentication registration numbers” are assigned to the users who have been registered in this machine. The users who have been registered for any numbers from authentication registration number 1 are called “general users”. General users cannot browse or change some of the items in [Custom Setting Mode].
BYou can also go to the next step by pressing the [+] key.
BYou can also go to the next step by pressing the [+] key.
“Authentication” means to identify the user of this machine by using the PIN code and IC card that are assigned to each user.User identification enables individual user manage-ment and enhanced security.
Item number
Setting item
81 [Authentication Setting]You can turn on / off the authentication function.When this item is set to [1: ON], authentication operation is required when this machine is started up.
92 [Authentication Method]This setting item is displayed when the optional IC Card Reader is installed.Select the method of authentication operation from “0: PIN Code” and “1: IC Card”.
80 [User Registration]Register the users who use this machine.For the registration procedure, see the description below.
[Authentication Method] Available "Authentication registration numbers"
[0:PIN Code] No.0 to 99
[1:IC Card] No.0 to 499

Chapter 6 Setting the Operation Conditions68
■ What is “administrator”?The user who has been registered for authentication registration number 0 is called “administrator”.
The administrator can perform the following opera-tions in [Custom Setting Mode]. 1 Enter item number “80” in [Cus-
tom Setting Mode].
2 Press the [START] key.The [User Registration] screen is displayed.
3 Press the [+] key.
4 Enter the authentication registra-tion number of the user that you want to register or change.If the administrator (authentication registration number: 0) is not registered, it is necessary to register it first.
5 Press the [+] key.Go to step 6.If [Authentication Method] (A 67) is set to [1: IC Card], go to step 8.
6 Enter a new PIN code.You can enter up to four digits.The entered code is displayed as “j”.
7 Press the [+] key.Go to step 9.
8 Touch the IC card to the IC Card Reader.When the IC card is read correctly, the [Enter the Group No.] screen is displayed.
BFor the items that general users cannot browse or change, see “List of setting items” for [Custom Setting Mode] (A 57). The item numbers are marked with “g”.
Item number
Setting item
82 [Disable] (A 69)You can prohibit the use of this machine for specified users.
83 [Limit T/C] (A 69)You can set the upper limit of the num-ber of printed sheets for each user.
84 [Limit M/C] (A 69)You can set the upper limit of the num-ber of master making processes for each user.
85 [Clear T/C] (A 70)You can clear the number of printed sheets up to the present.
86 [Clear M/C] (A 70)You can clear the number of master making processes up to the present.
87 [Reset Counter] (A 70)You can clear the number of printed sheets and the number of master mak-ing processes for all users collectively.
88 [Set Date] (A 71)You can display the report screen for [Count Report Output] on the specified date of every month.
89 [Clear Count Error] (A 71)You can hide the report screen for [Count Report Output] of the month.
90 [Count Report Output] (A 71)You can output the total results for the number of printed sheets and the num-ber of master making processes for all users.
91 [Setting of Count Report](A 72)Set the output method of [Count Report Output].
95 [Clear Authentication Setting] (A 73)You can restore all the settings for item numbers 80 to 92, which are related to the authentication function, to the fac-tory default settings.
Item number
Setting item

Chapter 6 Setting the Operation Conditions 69
6
9 Enter the group number.You can set the group (department, etc.) to which the user belongs. Once a group is set, the total count for each group is displayed in the total results output with [Count Report Out-put] (A 71).
You can set numbers 1 to 32.If no group is to be set, enter “0”.
10 Press the [+] key.The user is registered.To continue setting other users, repeat steps 4 to 10.
11 Press the [START] key.The setting is complete and the menu screen is displayed.
[Disable]You can prohibit the use of this machine for specified users. To cancel the disabled state, switch this item to [0:OFF] using the same steps.
1 Enter item number “82” in [Cus-tom Setting Mode].
2 Press the [START] key.The [Disable] screen is displayed.
3 Press the [+] key.
4 Enter the authentication registra-tion number of the target user.
5 Press the [+] key.
6 Enter the number of the setting.0:OFF (Able)1:ON (Disable)
7 Press the [+] key.The settings that you changed are confirmed.To continue setting other users, repeat steps 4 to 7.
8 Press the [START] key.The setting is complete and the menu screen is displayed.
[Limit T/C] [Limit M/C]You can set the upper limit of the number of printed sheets and the number of master making processes for each user.
1 Enter the item number in [Custom Setting Mode].Enter either of the following item numbers.
The setting procedures of [Limit T/C] and [Limit M/C] are the same. The following example describes the procedure for setting [Limit T/C].
2 Press the [START] key.
3 Press the [+] key.
4 Enter the authentication registra-tion number of the target user.
BAdministrator usage of this machine can-not be disabled.
Item number
Setting item
83 [Limit T/C]You can set the upper limit of the number of printed sheets."T/C" is an abbreviation for "Total Count".
84 [Limit M/C]You can set the upper limit of the number of master making pro-cesses."M/C" is an abbreviation for "Mas-ter Count".

Chapter 6 Setting the Operation Conditions70
5 Press the [+] key.
6 Enter the upper limit of the number of printed sheets you want to set.When “0” is set, “no limit” is applied.
7 Press the [+] key.The settings that you changed are confirmed.To continue setting other users, repeat steps 4 to 7.
8 Press the [START] key.The setting is complete and the menu screen is displayed.
[Clear T/C] [Clear M/C]You can clear the number of printed sheets or the number of master making processes up to the pres-ent. You can designate each user or all users as the target for clearing.
1 Enter the item number in [Custom Setting Mode].Enter either of the following item numbers.
The setting procedures of [Clear T/C] and [Clear M/C] are the same. The following exam-ple describes the procedure for setting [Clear T/C].
2 Press the [START] key.
3 Press the [+] key.
4 Enter the authentication registra-tion number of the target user.To designate all users as a target for clearing, enter “00”.
5 Press the [+] key.The preset upper limit of the number of printed sheets is displayed.
6 Press the [+] key.The number of printed sheets up to the present is displayed.
7 Press the [C] key.The displayed number of printed sheets is cleared.
8 Press the [+] key.Clearing of the number of printed sheets is con-firmed.To continue clearing the number of printed sheets for other users, repeat steps 4 to 8.
9 Press the [START] key.The menu screen is displayed.
[Reset Counter]You can clear the number of printed sheets and num-ber of master making processes for all users collec-tively.
1 Enter item number “87” in [Cus-tom Setting Mode].
2 Press the [START] key.
B[Reset Counter] (A 70) is useful when you want to clear the number of printed sheets and number of master making processes for all users collectively.
Item number
Setting item
85 [Clear T/C]You can clear the number of printed sheets up to the present."T/C" is an abbreviation for "Total Count".
86 [Clear M/C]You can clear the number of master making processes up to the pres-ent."M/C" is an abbreviation for "Master Count".
BOnce clearing is executed, it is not pos-sible to return to the status before clear-ing.

Chapter 6 Setting the Operation Conditions 71
6
3 Enter [1].
4 Press the [START] key.Clearing is executed.Once clearing is complete, the menu screen is displayed.
[Set Date]You can display the report screen (A 104) for [90: Count Report Output] on the specified date of every month.
1 Enter item number “88” in [Cus-tom Setting Mode].
2 Press the [START] key.
3 Enter the notification day.
4 Press the [START] key.The menu screen is displayed.
[Clear Count Error]Once you specify a date for [88: Set Date], a warning screen is displayed each time the power is turned on until [90: Count Report Output] is executed. If you do not want to perform [90: Count Report Output] for the current month, perform [89: Clear Count Error]. The warning screen is not displayed until the notification day of the next month.
1 Enter item number “89” in [Cus-tom Setting Mode].
2 Press the [START] key.
3 Enter [1].
4 Press the [START] key.Clearing is executed.Once clearing is complete, the menu screen is displayed.
[Count Report Output]You can output the total results for the number of printed sheets and the number of master making pro-cesses for all users.
■ To print
1 Check the paper.To execute [Count Report Output], a paper larger than A4 size is required.(A 24 “Setting up the paper feed tray and the paper”)
2 Enter item number “90” in [Cus-tom Setting Mode].
3 Press the [START] key.
4 Enter [1].
5 Press the [START] key.The total results are printed.Once printing is complete, the menu screen is displayed.
BWhen this item is set to [0], the report screen is not displayed.
BWhen you set any date from [29] to [31], the report screen is displayed on the last day of the month if the specified date does not exist in the month, for example, Febru-ary.
BRegister the “administrator” in [80: User Registration] (A 67) in advance.
BSelect the output method in [91: Setting of Count Report] (A 72) in advance.

Chapter 6 Setting the Operation Conditions72
■ To save in a USB flash drive
1 Insert the USB flash drive into the USB slot.
2 Enter item number “90” in [Cus-tom Setting Mode].
3 Press the [START] key.
4 Enter [1].
5 Press the [START] key.The total results are saved in the USB flash drive as a CSV file.Once saving is complete, the menu screen is displayed.
6 Remove the USB flash drive.
■ To send by e-mail
1 Enter item number “90” in [Cus-tom Setting Mode].
2 Press the [START] key.
3 Enter [1].
4 Press the [START] key.The total results are saved as a CSV file and attached to an e-mail.The e-mail is sent to e-mail addresses that have been specified in advance.Once sending the e-mail is complete, the menu screen is displayed.
[Setting of Count Report]Select from the following for the output method of [90: Count Report Output] (A 71).• Printing with this machine• Saving in a USB flash drive as a CSV file• Sending a CSV file by e-mail
1 Enter item number “91” in [Cus-tom Setting Mode].
2 Press the [START] key.
3 Enter the number of the setting.0: Print1: USB Flash Drive2: Mail
4 Press the [START] key.The setting is complete and the menu screen is displayed.
■ Presetting for [2:Mail]
1 Access the RISO Console from the computer.(A 78 “Accessing RISO Console”)
2 Log in to the RISO Console.(A 78 “Logging in”)
3 Click [Network].(A 81 “[Network] Menu”)
4 Click [SMTP Setting].
BRegister the “administrator” in [80: User Registration] (A 67) in advance.
BThe included “RISO COPY COUNT VIEWER” is useful for managing saved CSV files.
BIf [2:Mail] is not displayed, special set-tings are required. For more informa-tion, consult your dealer or authorized service representative.
BTo send an e-mail, perform the proce-dure “Presetting for [2:Mail]” in advance.
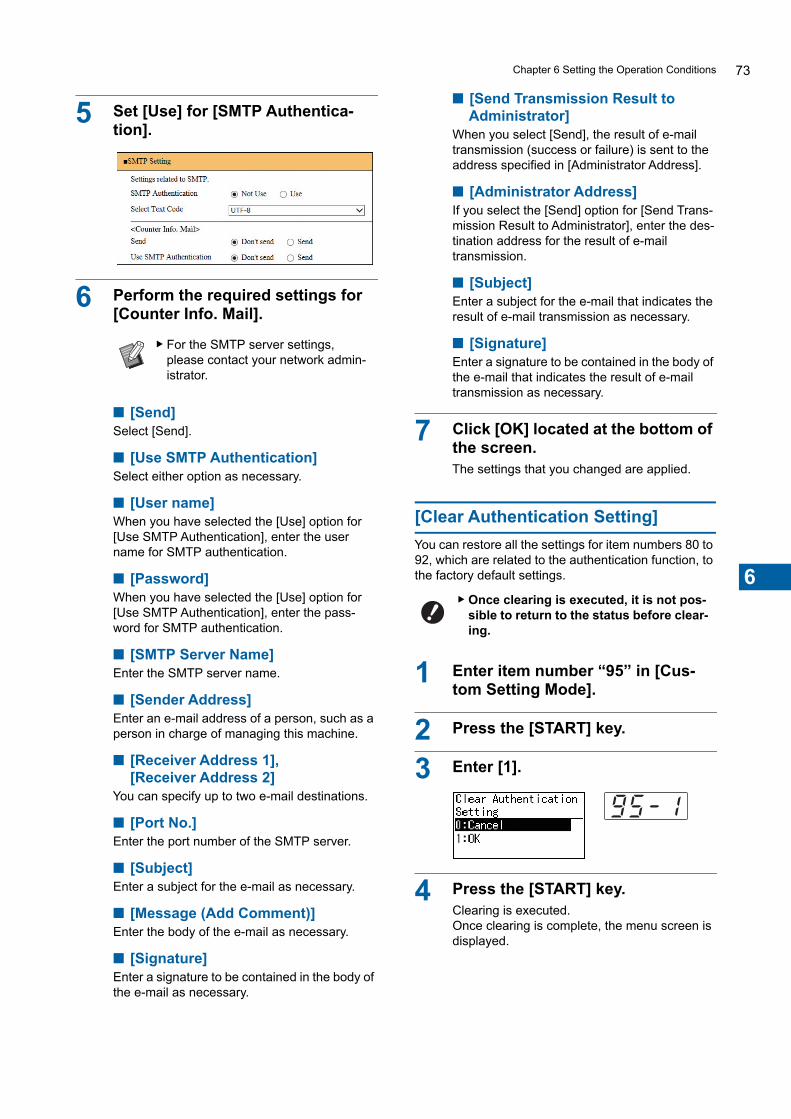
Chapter 6 Setting the Operation Conditions 73
6
5 Set [Use] for [SMTP Authentica-tion].
6 Perform the required settings for [Counter Info. Mail].
■ [Send]Select [Send].
■ [Use SMTP Authentication]Select either option as necessary.
■ [User name]When you have selected the [Use] option for [Use SMTP Authentication], enter the user name for SMTP authentication.
■ [Password]When you have selected the [Use] option for [Use SMTP Authentication], enter the pass-word for SMTP authentication.
■ [SMTP Server Name]Enter the SMTP server name.
■ [Sender Address]Enter an e-mail address of a person, such as a person in charge of managing this machine.
■ [Receiver Address 1], [Receiver Address 2]
You can specify up to two e-mail destinations.
■ [Port No.]Enter the port number of the SMTP server.
■ [Subject]Enter a subject for the e-mail as necessary.
■ [Message (Add Comment)]Enter the body of the e-mail as necessary.
■ [Signature]Enter a signature to be contained in the body of the e-mail as necessary.
■ [Send Transmission Result to Administrator]
When you select [Send], the result of e-mail transmission (success or failure) is sent to the address specified in [Administrator Address].
■ [Administrator Address]If you select the [Send] option for [Send Trans-mission Result to Administrator], enter the des-tination address for the result of e-mail transmission.
■ [Subject]Enter a subject for the e-mail that indicates the result of e-mail transmission as necessary.
■ [Signature]Enter a signature to be contained in the body of the e-mail that indicates the result of e-mail transmission as necessary.
7 Click [OK] located at the bottom of the screen.The settings that you changed are applied.
[Clear Authentication Setting]You can restore all the settings for item numbers 80 to 92, which are related to the authentication function, to the factory default settings.
1 Enter item number “95” in [Cus-tom Setting Mode].
2 Press the [START] key.
3 Enter [1].
4 Press the [START] key.Clearing is executed.Once clearing is complete, the menu screen is displayed.
BFor the SMTP server settings, please contact your network admin-istrator.
BOnce clearing is executed, it is not pos-sible to return to the status before clear-ing.

Chapter 6 Setting the Operation Conditions74
Displaying the Accumulated Counts [Meter Display]
1 Press the number of the item that you want to check in [Custom Set-ting Mode].
2 Press the [START] key.
3 Check the contents in the display.
4 Press the [START] key or the [STOP] key.The menu screen is displayed.
You can check the accumulated results for the count of master making processes and the number of printed sheets.
Item number
Setting item
50 [Count:A4/Letter and Smaller]Shows the accumulated number of copies that was printed on papers smaller than A4 in this machine.The value does not include proof copies that were output during master making.
51 [Count:Larger than A4/Letter]Shows the accumulated number of copies that was printed on papers larger than A4 in this machine.The value does not include proof copies that were output during master making.
52 [Total Print Count Display]Shows the accumulated number of copies that have been printed on this machine.The value does not include proof copies that were output during master making.
53 [Total Master Count Display]Shows the accumulated count of master making processes that have been performed on this machine.The value includes the count of [IDLING] and [CONFIDENTIAL] that have been performed.
54 [Drum Count]Shows the accumulated number of copies that have been printed using the current print drum (cyl-inder).The value includes the count of proof copies that were output dur-ing master making.To check the accumulated num-ber of copies that was printed using another print drum (cylin-der), change the print drum (cylin-der) and then display the [Drum Count] screen.
Item number
Setting item

Chapter 6 Setting the Operation Conditions 75
6
Adjusting Paper Feeding and Receiving Conditions [Special Paper Control]
Paper feeding adjustment for special paper [Paper Quality]When [Standard] is set in [13: Paper Quality] (A 58), papers are fed according to the position of the paper-feed setting lever (A 24).When [User1] to [User5] is selected, papers are fed according to the paper-feeding conditions that you registered, regardless of the position of the paper-feed setting lever.
1 Press item number “13” in [Cus-tom Setting Mode].
2 Press the [START] key.
3 Enter the number of the setting value.Enter [1] (User1) to [5] (User5).
4 Press the [START] key.The setting is completed and the [Custom Set-ting Mode] menu screen is displayed.
Paper receiving adjustment for spe-cial paper [Separation Fan] [Suction Fan]You can adjust the paper receiving conditions depend-ing on the characteristics of the printed image and the paper.
1 Enter the item number in [Custom Setting Mode].Enter either of the following item numbers.
2 Press the [START] key.
3 Enter the number of the setting value.Refer to the following page for details.• [22: Separation Fan] (A 60)• [23: Suction Fan] (A 61)
4 Press the [START] key.The setting is completed and the [Custom Set-ting Mode] menu screen is displayed.
You can adjust the paper feeding and paper receiv-ing conditions when using special paper or when unevenness and blurring occur in printed images.
BIn the factory default settings, nothing is registered for [User1] to [User5]. When registering the paper-feeding conditions, consult your dealer or authorized service representative.
BFor appropriate adjustment values, consult your dealer or authorized service representative.
Item number
Setting item
22 [Separation Fan]
23 [Suction Fan]
BFor appropriate adjustment values, consult your dealer or authorized service representative.
BYou can also adjust the paper receiving conditions by the following items.CPaper arrangers (A 26)CJumping wings (A 26)CCorrugators (A 27)

Chapter 6 Setting the Operation Conditions76

77
7
Chapter7RISO Console

Chapter 7 RISO Console78
RISO Console
■ Compatible Web browser
Accessing RISO Console
1 Start up a Web browser.
2 Enter the IP address of this machine.Entry example:
3 Press the [Enter] key.The [Monitoring] menu screen for the RISO Console is displayed.
Logging inIn order to perform the following operations, it is nec-essary to log in to the RISO Console.
• Browsing the [Printer] menu screen• Changing the settings on the [Network] menu screen
(login is not necessary for browsing)
1 Click [Login].
2 Enter [User name] and [Password].
■ [User name]Enter “admin” (lower-case, single-byte charac-ters).You cannot change the user name.
■ [Password]This is the password that has been set in the [User] tab screen (A 79) on the RISO Console.The password that was set by default at the time of factory shipment is “admin” (lower-case, single-byte characters).
3 Click [OK].
Logging out
1 Click [Logout].
When you log out, the user name display goes off and [Login] is displayed.
“RISO Console” is a function for remotely operating this machine using a Web browser.You can check the status of this machine and change the settings from a computer that is con-nected via a network.
BTo connect the SF5430/5330/5230/5130/5030 to the network, the optional net-work kit (A 118) is required.
OS Web browser
Windows Internet Explorer 9Internet Explorer 11Microsoft Edge
OS X Safari 6Safari 7Safari 8Safari 9
BFor the IP address of this machine, contact your administrator.

Chapter 7 RISO Console 79
7
[Monitoring] Menu
[General] tab screenYou can check the status of this machine.
■ Status of this machineShows a message such as [Ready to print.] or [Sleep-ing.]. If an error occurs in this machine, an error mes-sage is displayed.
■ Consumables Amount[Standard tray]Shows [Paper size] and [Paper finish] of papers on the paper feed tray.[Master]Shows the remaining amount of masters that are set in this machine.If the remaining amount is low, the remaining amount indicator blinks.[Ink]Shows the remaining amount of ink that is set in this machine.If the remaining amount is low, the remaining amount indicator blinks.
■ Disposal Box SpaceShows the remaining amount of space in the master disposal box.If the amount of space is low, the remaining amount indicator blinks.
■ Drum InformationShows the size and color of the print drum (cylinder) that is set in this machine.
[System] tab screenYou can check the system information of this machine.
[User] tab screenYou can change the password for logging in to the RISO Console.
1 Click [Change password].
2 Enter a new password.
3 Click [OK].The [Done] screen is displayed.
You can check the status of this machine and sys-tem information, and also change the login pass-word.

Chapter 7 RISO Console80
4 Click [OK]. [Printer] Menu
• Clicking the heading line ([Job name] [Owner] [Received]) changes the sorting order.
• You can select the number of items to be listed from [Show 50 items] and [Show 100 items].
You can check a list of the original data that is cur-rently being processed in this machine.

Chapter 7 RISO Console 81
7
[Network] Menu
[Network setting] screenThis screen is used for the connection settings of this machine to the network.
Clicking [OK] updates the changes.
[SNMP Setting] screenThis screen is used for the SNMP (Simple Network Management Protocol) settings. Set in accordance with the network environment.
Clicking [OK] updates the changes.
[SMTP Setting] screenThis screen is used for the SMTP (Simple Mail Trans-fer Protocol) settings.Perform the settings when using [2:Mail] for [Setting of Count Report] (A 72).
Clicking [OK] updates the changes.
You can check and change the settings that are related to the network connection of this machine.
When you click an item, the setting screen for the relevant item is displayed.
BThis screen may not be displayed depending on your system configuration. For more information, consult your dealer or authorized service representative.

Chapter 7 RISO Console82
83
8
Chapter8Replacing Consumables

Chapter 8 Replacing Consumables84
Setting the Master Roll
1 Open the front door.
2 Check that the [Master Making Unit Release Button] lamp is lit.If the lamp is off, press [Master Making Unit Release Button] to light it up.
3 Pull out the master making unit.1 Grasp the master making unit handle and
pull it to the front.
2 Pull out the master making unit slowly as far as it will go.
4 Open the master making unit cover.While grasping the handle, open the master making unit cover.
5 Open the master roll holder.
6 Remove the depleted master core.
• Dispose of the depleted master core accord-ing to the disposal regulations of your local community.(A 91 “Collecting and Disposing of Depleted Consumables”)
If a master roll is depleted, a message is displayed and this machine stops. Set a new master roll in place.
BIt is recommended to use products specified by RISO when replacing the master roll.
BKeep the power on while replacing the master roll.
BWhen the print drum (cylinder) is pulled out, you cannot pull out the master making unit. Return the print drum (cylinder) to its original posi-tion, and then press [Master Making Unit Release Button].
Master Making Unit Release Button
Master making unit handle

Chapter 8 Replacing Consumables 85
8
• Clean the thermal print head.(A 94 “Maintenance”)
7 Set a new master roll.Remove the package (transparent film) of the master roll. Set the master roll so that the [I] symbol is located on the left.
8 Close the master roll holder.1 Close the master roll holder.2 Remove the tape.
9 Insert the leading edge of the mas-ter roll under the master guide flap.1 Insert the leading edge of the master roll
under the master guide flap and advance it as far as it will go.
2 If the master roll is loose, turn the flange on the right toward the rear and rewind it.
■ If you cannot insert the master rollInsert the master roll using the following steps.1 Turn the dial at the edge of the master guide
flap toward the rear and raise the master guide flap.
2 Align the leading edge of the master roll to the line indicated by the arrow.
3 Return the master guide flap to its original position.
10 Close the master making unit cover.
BTake care not to scratch the [I] section. If the [I] section is bent or cut at a perforation, the master roll will become unusable.
BDo not remove the tape yet.
Leave the tape as it is.
BWhen closing the master making unit cover, do not grasp the holder of the master making unit cover.
Master guide flap
Flange
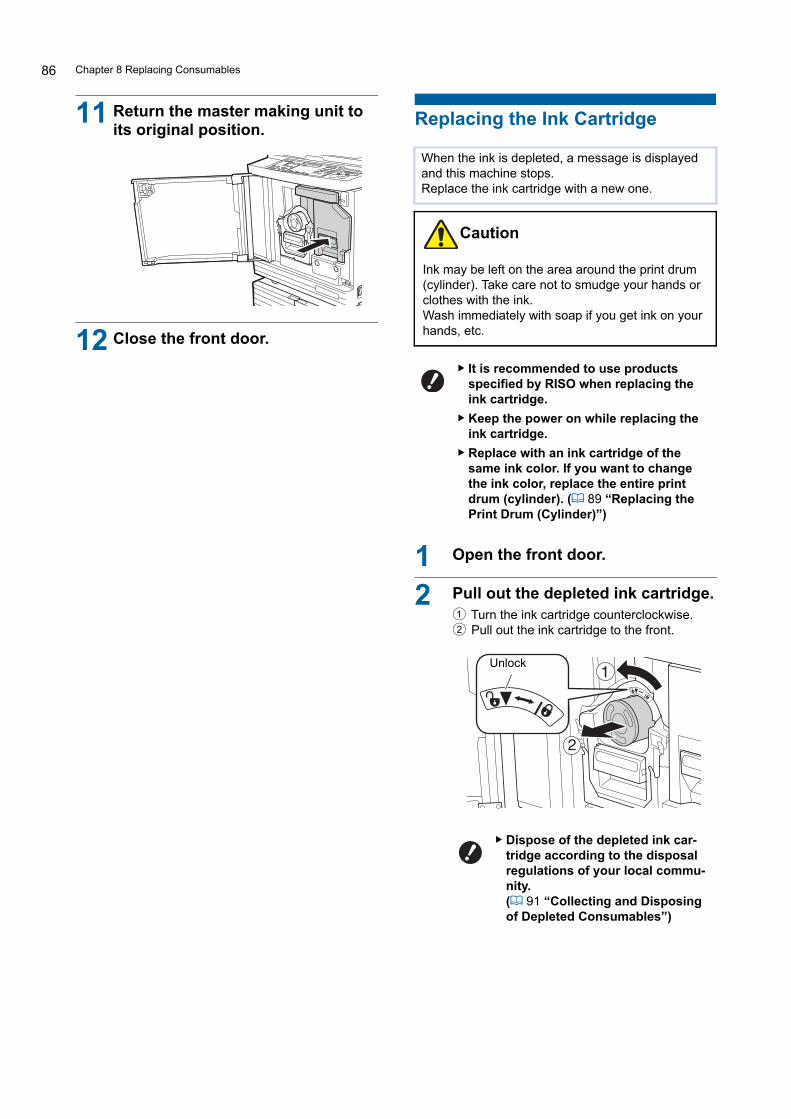
Chapter 8 Replacing Consumables86
11 Return the master making unit to its original position.
12 Close the front door.
Replacing the Ink Cartridge
1 Open the front door.
2 Pull out the depleted ink cartridge.1 Turn the ink cartridge counterclockwise.2 Pull out the ink cartridge to the front.
When the ink is depleted, a message is displayed and this machine stops. Replace the ink cartridge with a new one.
Ink may be left on the area around the print drum (cylinder). Take care not to smudge your hands or clothes with the ink.Wash immediately with soap if you get ink on your hands, etc.
BIt is recommended to use products specified by RISO when replacing the ink cartridge.
BKeep the power on while replacing the ink cartridge.
BReplace with an ink cartridge of the same ink color. If you want to change the ink color, replace the entire print drum (cylinder). (A 89 “Replacing the Print Drum (Cylinder)”)
BDispose of the depleted ink car-tridge according to the disposal regulations of your local commu-nity.(A 91 “Collecting and Disposing of Depleted Consumables”)
Caution
Unlock
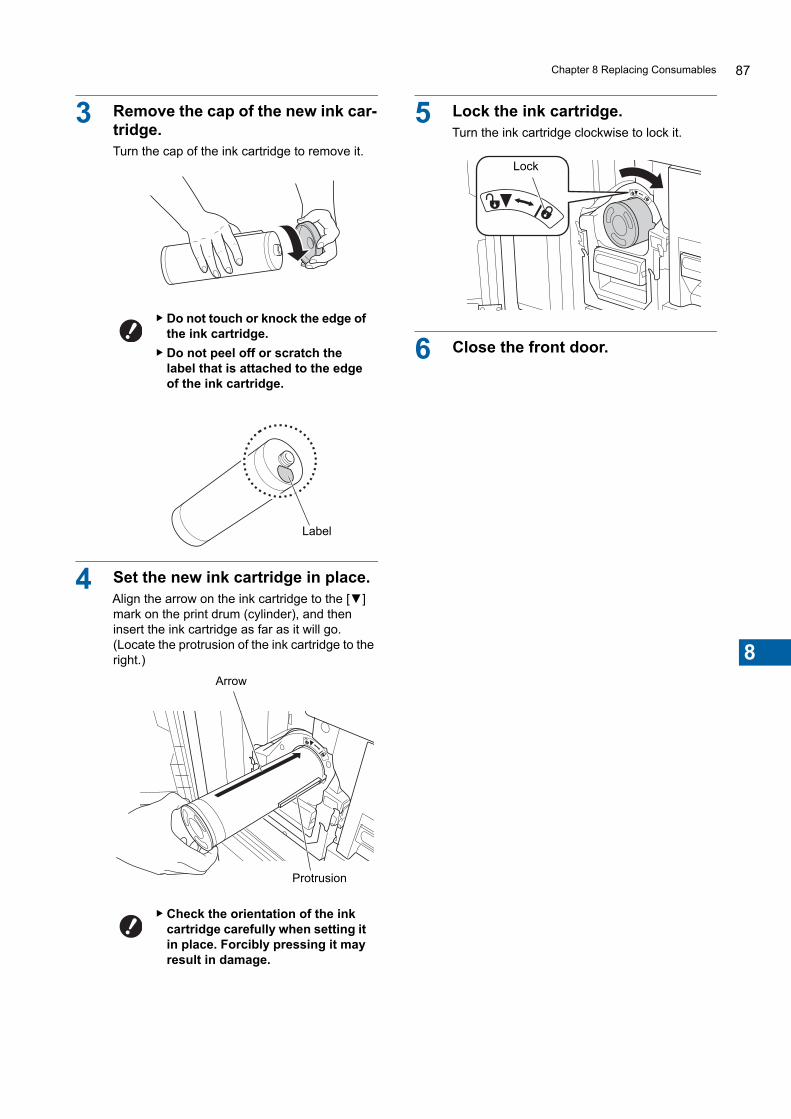
Chapter 8 Replacing Consumables 87
8
3 Remove the cap of the new ink car-tridge.Turn the cap of the ink cartridge to remove it.
4 Set the new ink cartridge in place.Align the arrow on the ink cartridge to the [▼] mark on the print drum (cylinder), and then insert the ink cartridge as far as it will go.(Locate the protrusion of the ink cartridge to the right.)
5 Lock the ink cartridge.Turn the ink cartridge clockwise to lock it.
6 Close the front door.
BDo not touch or knock the edge of the ink cartridge.
BDo not peel off or scratch the label that is attached to the edge of the ink cartridge.
BCheck the orientation of the ink cartridge carefully when setting it in place. Forcibly pressing it may result in damage.
Label
Arrow
Protrusion
Lock
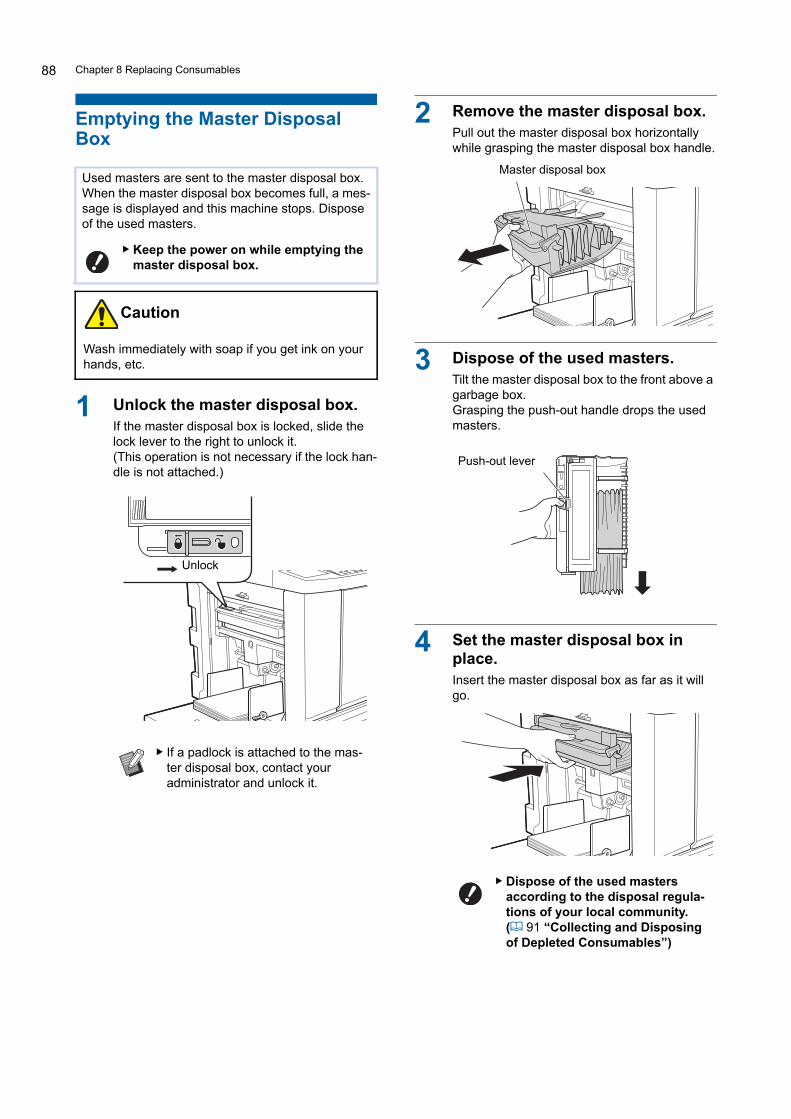
Chapter 8 Replacing Consumables88
Emptying the Master Disposal Box
1 Unlock the master disposal box.If the master disposal box is locked, slide the lock lever to the right to unlock it.(This operation is not necessary if the lock han-dle is not attached.)
2 Remove the master disposal box.Pull out the master disposal box horizontally while grasping the master disposal box handle.
3 Dispose of the used masters.Tilt the master disposal box to the front above a garbage box.Grasping the push-out handle drops the used masters.
4 Set the master disposal box in place.Insert the master disposal box as far as it will go.
Used masters are sent to the master disposal box. When the master disposal box becomes full, a mes-sage is displayed and this machine stops. Dispose of the used masters.
BKeep the power on while emptying the master disposal box.
Wash immediately with soap if you get ink on your hands, etc.
BIf a padlock is attached to the mas-ter disposal box, contact your administrator and unlock it.
Caution
Unlock
BDispose of the used masters according to the disposal regula-tions of your local community.(A 91 “Collecting and Disposing of Depleted Consumables”)
Master disposal box
Push-out lever
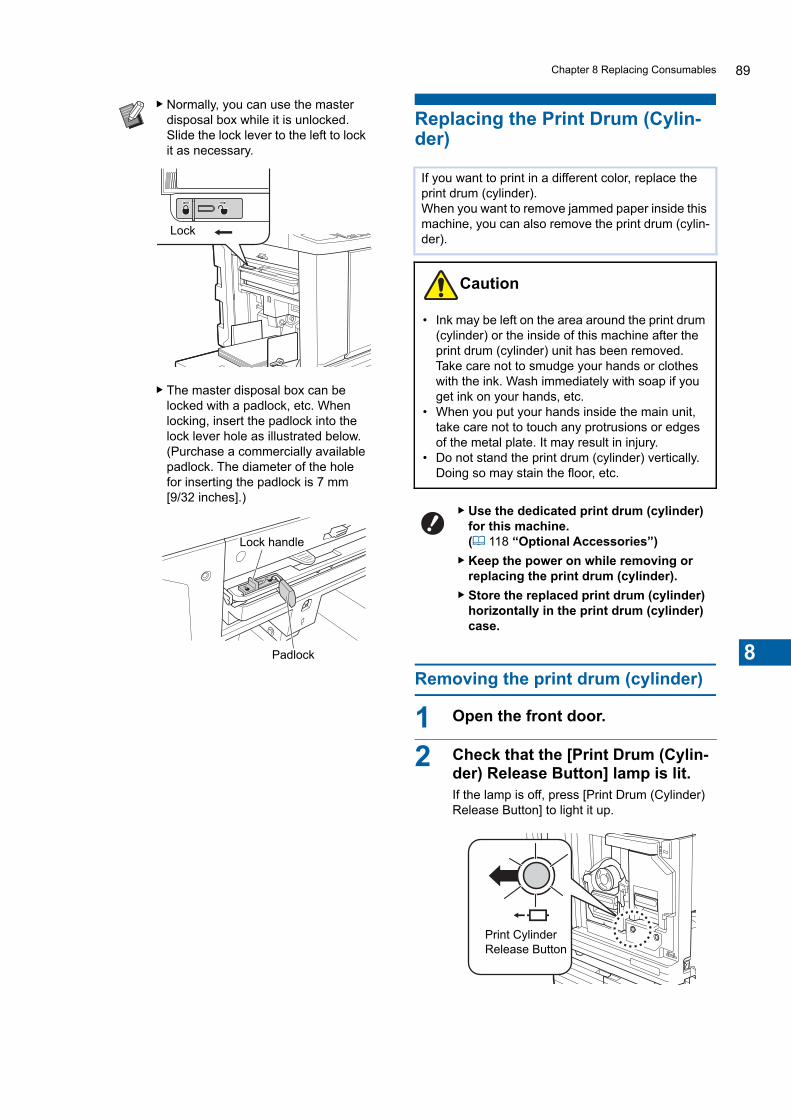
Chapter 8 Replacing Consumables 89
8
Replacing the Print Drum (Cylin-der)
Removing the print drum (cylinder)
1 Open the front door.
2 Check that the [Print Drum (Cylin-der) Release Button] lamp is lit.If the lamp is off, press [Print Drum (Cylinder) Release Button] to light it up.
BNormally, you can use the master disposal box while it is unlocked. Slide the lock lever to the left to lock it as necessary.
BThe master disposal box can be locked with a padlock, etc. When locking, insert the padlock into the lock lever hole as illustrated below. (Purchase a commercially available padlock. The diameter of the hole for inserting the padlock is 7 mm [9/32 inches].)
Lock
Lock handle
Padlock
If you want to print in a different color, replace the print drum (cylinder).When you want to remove jammed paper inside this machine, you can also remove the print drum (cylin-der).
• Ink may be left on the area around the print drum (cylinder) or the inside of this machine after the print drum (cylinder) unit has been removed. Take care not to smudge your hands or clothes with the ink. Wash immediately with soap if you get ink on your hands, etc.
• When you put your hands inside the main unit, take care not to touch any protrusions or edges of the metal plate. It may result in injury.
• Do not stand the print drum (cylinder) vertically. Doing so may stain the floor, etc.
BUse the dedicated print drum (cylinder) for this machine.(A 118 “Optional Accessories”)
BKeep the power on while removing or replacing the print drum (cylinder).
BStore the replaced print drum (cylinder) horizontally in the print drum (cylinder) case.
Caution
Print Cylinder Release Button

Chapter 8 Replacing Consumables90
3 Pull out the print drum (cylinder).Pull out the print drum (cylinder) slowly as far as it will go while grasping the print drum (cylin-der) handle.
4 Remove the print drum (cylinder).Use both hands to lift the print drum (cylinder) straight up and remove it from the rail. Firmly grasp the blue handle section.
Installing the print drum (cylinder)
1 Place the print drum (cylinder) on the rail.Align the ▼ mark on the print drum (cylinder) with the M mark on the rail. Place the print drum (cylinder) on the rail horizontally.
2 Return the print drum (cylinder) to this machine.Push in the print drum (cylinder) slowly as far as it will go.
3 Close the front door.
BWhen the master making unit is pulled out, you cannot pull out the print drum (cylinder). Return the master making unit to its original position, and then press [Print Drum (Cylinder) Release Button].
BDo not touch the connector on the print drum (cylinder). Neglect-ing this may result in a malfunc-tion of the print drum (cylinder) because of static electricity or other factors.
Print drum (cylinder) handle
BIf the print drum (cylinder) was manually rotated, be sure to return it so that the ▼ and M marks align after the procedure is complete.
BWhen pushing in the print drum (cylinder), do not grasp the print drum (cylinder) handle.

Chapter 8 Replacing Consumables 91
8
Collecting and Disposing of Depleted Consumables
Ink cartridge• Dispose of the depleted ink cartridges according to
the disposal regulations of your local community. If required, separate the specific components using the following procedures as a reference.
• Remove the label at the edge of the ink cartridge by peeling it off from the section indicated with the arrow in the illustration below, and then dispose of it separately.
Master core• Dispose of the depleted master core according to
the disposal regulations of your local community. If required, separate the specific components using the following procedures as a reference.
• A label that includes a metallic component is attached to the rear side of the section that is stamped with the [I] mark. Tear along the perfora-tion and dispose of it separately.
Used master• Dispose of the used masters according to the dis-
posal regulations of your local community. If required, separate the specific components using the following procedures as a reference.
Parts Materials
Ink cartridge and cap
Plastic (polypropylene or polyeth-ylene)
Label Plastic (metal included)
Ink Plant oil, petroleum hydrocar-bons, water, pigments
Ink may be left on the area around the edge of the ink cartridge. Take care not to smudge your hands or clothes with the ink. Wash immediately with soap if you get ink on your hands, etc.
Caution
Parts Materials
Core Paper
Master roll Plastic, Japanese paper
Cutout section marked with [I]
Plastic (metal included), paper
Parts Materials
Master roll Plastic, Japanese paper
Ink Plant oil, petroleum hydrocar-bons, water, pigments
BThe master is made of carbon and hydro-gen compounds. If it is fully combusted, it will turn into water and carbon dioxide.

Chapter 8 Replacing Consumables92
93
9
Chapter9Maintenance

Chapter 9 Maintenance94
Maintenance
Thermal print headThe thermal print head is a component that produces heat during master making and forms minute holes on the master. Clean it whenever the master roll is replaced.Open the master making unit cover, and then gently wipe the thermal print head in the back of the unit sev-eral times with a soft cloth, etc.
ExteriorUse a soft cloth to gently wipe the entire exterior peri-odically in order to protect the machine exterior from dust.
Normally, gently wipe off dirt on the display with a dry cloth. If ink adheres to the touch panel, dampen a cloth with a small amount of cleaner and gently wipe it off.
The finish of prints may be stained or blurred if the thermal print head of the master making unit, parts such as the scanner glass and white sheet of the optional auto document feeder, or other parts are contaminated with dust, dirt, white-out, etc. We rec-ommend that you perform maintenance periodically.
Do not perform any procedures (adjustment, repair, etc.) that are not described in this guide. When you want to adjust or repair, consult your dealer or authorized service representative.
BThe thermal print head is extremely del-icate. Avoid creating excessive impacts or scratches with a hard object.
BThe thermal print head is susceptible to static electricity. Be sure to remove the static electricity charge that is accumu-lated in your body before cleaning.
Caution
BPlastic is used for the machine exterior. Do not use alcohol or solvent for clean-ing.
BDo not coat or spray the cleaner solu-tion directly onto the display. Doing so may result in malfunctions.

Chapter 9 Maintenance 95
9
Glass platen and platen cover padIf the glass platen or platen cover pad is stained, gen-tly wipe it off several times with a soft cloth or tissue paper.
Optional Auto Document FeederGently wipe any stains off the scanner glass and white sheet with a soft cloth or tissue paper.
BThe glass platen is extremely delicate. Avoid creating excessive impacts or scratches with a hard object.
Glass platen
Platen cover pad
BThe scanner glass is extremely delicate. Avoid creating excessive impacts or scratches with a hard object.
Scanner glass
White sheet
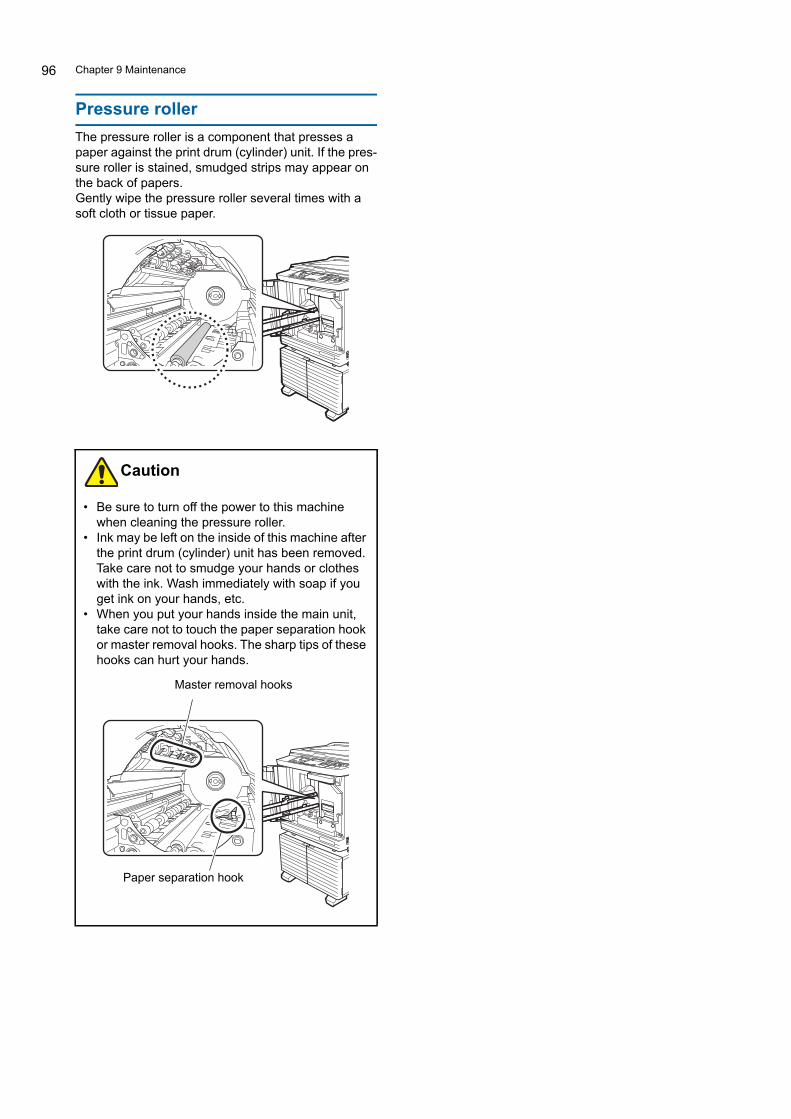
Chapter 9 Maintenance96
Pressure rollerThe pressure roller is a component that presses a paper against the print drum (cylinder) unit. If the pres-sure roller is stained, smudged strips may appear on the back of papers.Gently wipe the pressure roller several times with a soft cloth or tissue paper.
• Be sure to turn off the power to this machine when cleaning the pressure roller.
• Ink may be left on the inside of this machine after the print drum (cylinder) unit has been removed. Take care not to smudge your hands or clothes with the ink. Wash immediately with soap if you get ink on your hands, etc.
• When you put your hands inside the main unit, take care not to touch the paper separation hook or master removal hooks. The sharp tips of these hooks can hurt your hands.
Caution
Master removal hooks
Paper separation hook
97
10
Chapter10Troubleshooting
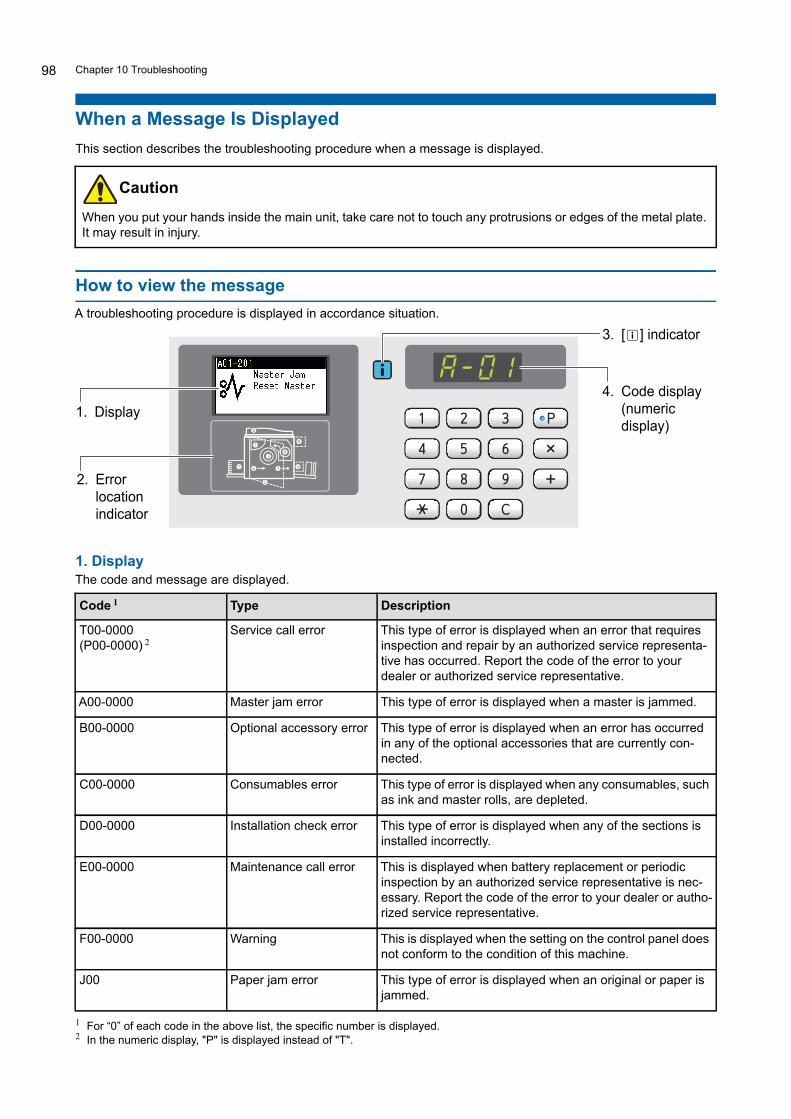
Chapter 10 Troubleshooting98
When a Message Is DisplayedThis section describes the troubleshooting procedure when a message is displayed.
How to view the messageA troubleshooting procedure is displayed in accordance situation.
1. DisplayThe code and message are displayed.
1 For “0” of each code in the above list, the specific number is displayed.2 In the numeric display, "P" is displayed instead of "T".
When you put your hands inside the main unit, take care not to touch any protrusions or edges of the metal plate. It may result in injury.
Code 1 Type Description
T00-0000(P00-0000) 2
Service call error This type of error is displayed when an error that requires inspection and repair by an authorized service representa-tive has occurred. Report the code of the error to your dealer or authorized service representative.
A00-0000 Master jam error This type of error is displayed when a master is jammed.
B00-0000 Optional accessory error This type of error is displayed when an error has occurred in any of the optional accessories that are currently con-nected.
C00-0000 Consumables error This type of error is displayed when any consumables, such as ink and master rolls, are depleted.
D00-0000 Installation check error This type of error is displayed when any of the sections is installed incorrectly.
E00-0000 Maintenance call error This is displayed when battery replacement or periodic inspection by an authorized service representative is nec-essary. Report the code of the error to your dealer or autho-rized service representative.
F00-0000 Warning This is displayed when the setting on the control panel does not conform to the condition of this machine.
J00 Paper jam error This type of error is displayed when an original or paper is jammed.
Caution
1. Display
2. Error location indicator
3. [I] indicator
4. Code display(numeric display)
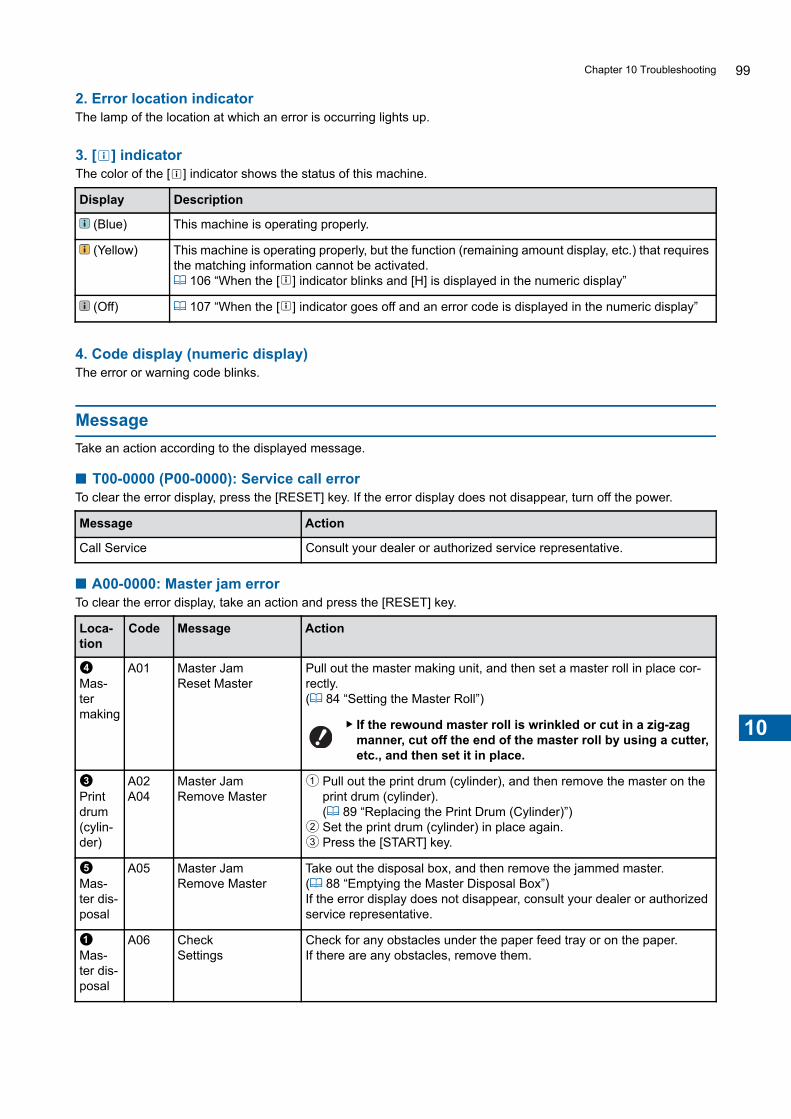
Chapter 10 Troubleshooting 99
10
2. Error location indicatorThe lamp of the location at which an error is occurring lights up.
3. [I] indicatorThe color of the [I] indicator shows the status of this machine.
4. Code display (numeric display)The error or warning code blinks.
MessageTake an action according to the displayed message.
■ T00-0000 (P00-0000): Service call errorTo clear the error display, press the [RESET] key. If the error display does not disappear, turn off the power.
■ A00-0000: Master jam errorTo clear the error display, take an action and press the [RESET] key.
Display Description
(Blue) This machine is operating properly.
(Yellow) This machine is operating properly, but the function (remaining amount display, etc.) that requires the matching information cannot be activated.A 106 “When the [I] indicator blinks and [H] is displayed in the numeric display”
(Off) A 107 “When the [I] indicator goes off and an error code is displayed in the numeric display”
Message Action
Call Service Consult your dealer or authorized service representative.
Loca-tion
Code Message Action
4Mas-ter making
A01 Master JamReset Master
Pull out the master making unit, and then set a master roll in place cor-rectly.(A 84 “Setting the Master Roll”)
BIf the rewound master roll is wrinkled or cut in a zig-zag manner, cut off the end of the master roll by using a cutter, etc., and then set it in place.
3Print drum (cylin-der)
A02A04
Master JamRemove Master
1 Pull out the print drum (cylinder), and then remove the master on the print drum (cylinder).(A 89 “Replacing the Print Drum (Cylinder)”)
2 Set the print drum (cylinder) in place again.3 Press the [START] key.
5Mas-ter dis-posal
A05 Master JamRemove Master
Take out the disposal box, and then remove the jammed master.(A 88 “Emptying the Master Disposal Box”)If the error display does not disappear, consult your dealer or authorized service representative.
1Mas-ter dis-posal
A06 CheckSettings
Check for any obstacles under the paper feed tray or on the paper.If there are any obstacles, remove them.
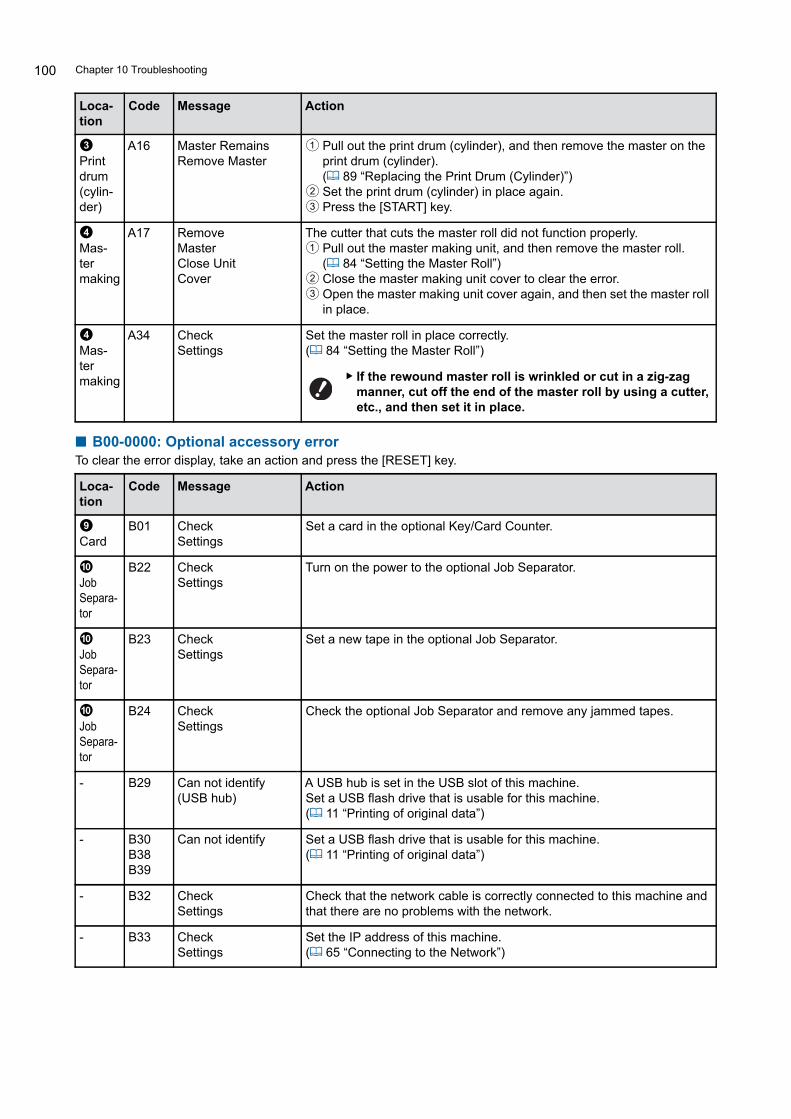
Chapter 10 Troubleshooting100
■ B00-0000: Optional accessory errorTo clear the error display, take an action and press the [RESET] key.
3Print drum (cylin-der)
A16 Master RemainsRemove Master
1 Pull out the print drum (cylinder), and then remove the master on the print drum (cylinder).(A 89 “Replacing the Print Drum (Cylinder)”)
2 Set the print drum (cylinder) in place again.3 Press the [START] key.
4Mas-ter making
A17 RemoveMasterClose UnitCover
The cutter that cuts the master roll did not function properly.1 Pull out the master making unit, and then remove the master roll.
(A 84 “Setting the Master Roll”)2 Close the master making unit cover to clear the error.3 Open the master making unit cover again, and then set the master roll
in place.
4Mas-ter making
A34 CheckSettings
Set the master roll in place correctly.(A 84 “Setting the Master Roll”)
BIf the rewound master roll is wrinkled or cut in a zig-zag manner, cut off the end of the master roll by using a cutter, etc., and then set it in place.
Loca-tion
Code Message Action
9Card
B01 CheckSettings
Set a card in the optional Key/Card Counter.
0Job Separa-tor
B22 CheckSettings
Turn on the power to the optional Job Separator.
0Job Separa-tor
B23 CheckSettings
Set a new tape in the optional Job Separator.
0Job Separa-tor
B24 CheckSettings
Check the optional Job Separator and remove any jammed tapes.
- B29 Can not identify (USB hub)
A USB hub is set in the USB slot of this machine.Set a USB flash drive that is usable for this machine.(A 11 “Printing of original data”)
- B30B38B39
Can not identify Set a USB flash drive that is usable for this machine.(A 11 “Printing of original data”)
- B32 CheckSettings
Check that the network cable is correctly connected to this machine and that there are no problems with the network.
- B33 CheckSettings
Set the IP address of this machine.(A 65 “Connecting to the Network”)
Loca-tion
Code Message Action

Chapter 10 Troubleshooting 101
10
■ C00-0000: Consumables errorTo clear the error display, take an action and press the [RESET] key.
■ D00-0000: Installation errorTo clear the error display, take an action and press the [RESET] key.
Loca-tion
Code Message Action
3Print drum (cylin-der)
C01 ReplaceInk Cartridge
Replace the ink cartridge with a new one.(A 86 “Replacing the Ink Cartridge”)
4Mas-ter making
C02 ReplaceMaster Roll
Remove the master core from the master making unit, and then set a new master roll in place.(A 84 “Setting the Master Roll”)
5Mas-ter dis-posal
C03 EmptyDisposal Box
Dispose of the masters in the master disposal box.(A 88 “Emptying the Master Disposal Box”)
1Paper feed-ing
C04 CheckSettings
Set paper on the paper feed tray.(A 24 “Setting up the paper feed tray and the paper”)
3Print drum (cylin-der)
C11 ExpiredInkReplaceInk Cartridge
Replace the ink cartridge with a new one.(A 86 “Replacing the Ink Cartridge”)
4Mas-ter making
C12 ExpiredMasterReplaceMaster Roll
Replace the master roll with a new one.(A 84 “Setting the Master Roll”)
3Print drum (Cylin-der)4Mas-ter making
C13 ExpiredInk & MasterReplace them
Replace the ink cartridge and the master roll with new ones.(A 86 “Replacing the Ink Cartridge”)(A 84 “Setting the Master Roll”)
Loca-tion
Code Message Action
3Print drum (cylin-der)
D01 CheckSettings
The print drum (cylinder) is not set in place or not set correctly. Set the print drum (cylinder) in place correctly.(A 89 “Replacing the Print Drum (Cylinder)”)
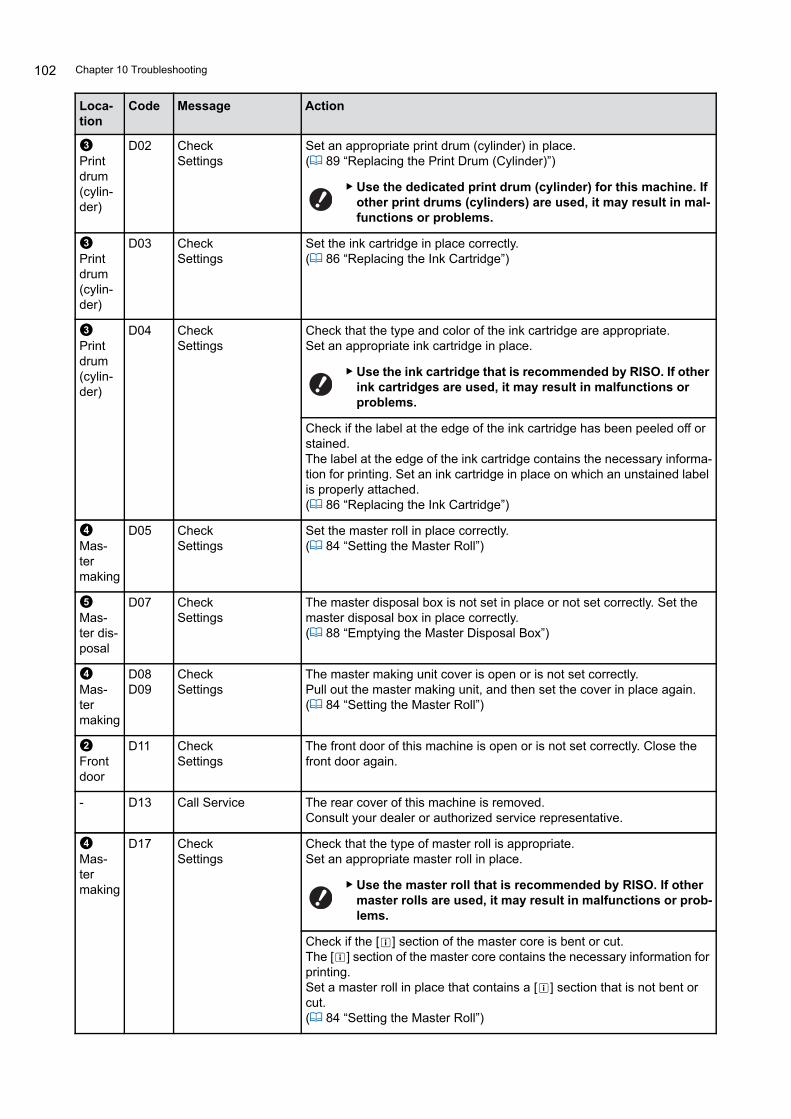
Chapter 10 Troubleshooting102
3Print drum (cylin-der)
D02 CheckSettings
Set an appropriate print drum (cylinder) in place.(A 89 “Replacing the Print Drum (Cylinder)”)
BUse the dedicated print drum (cylinder) for this machine. If other print drums (cylinders) are used, it may result in mal-functions or problems.
3Print drum (cylin-der)
D03 CheckSettings
Set the ink cartridge in place correctly.(A 86 “Replacing the Ink Cartridge”)
3Print drum (cylin-der)
D04 CheckSettings
Check that the type and color of the ink cartridge are appropriate.Set an appropriate ink cartridge in place.
BUse the ink cartridge that is recommended by RISO. If other ink cartridges are used, it may result in malfunctions or problems.
Check if the label at the edge of the ink cartridge has been peeled off or stained.The label at the edge of the ink cartridge contains the necessary informa-tion for printing. Set an ink cartridge in place on which an unstained label is properly attached.(A 86 “Replacing the Ink Cartridge”)
4Mas-ter making
D05 CheckSettings
Set the master roll in place correctly.(A 84 “Setting the Master Roll”)
5Mas-ter dis-posal
D07 CheckSettings
The master disposal box is not set in place or not set correctly. Set the master disposal box in place correctly.(A 88 “Emptying the Master Disposal Box”)
4Mas-ter making
D08D09
CheckSettings
The master making unit cover is open or is not set correctly.Pull out the master making unit, and then set the cover in place again.(A 84 “Setting the Master Roll”)
2Front door
D11 CheckSettings
The front door of this machine is open or is not set correctly. Close the front door again.
- D13 Call Service The rear cover of this machine is removed.Consult your dealer or authorized service representative.
4Mas-ter making
D17 CheckSettings
Check that the type of master roll is appropriate.Set an appropriate master roll in place.
BUse the master roll that is recommended by RISO. If other master rolls are used, it may result in malfunctions or prob-lems.
Check if the [I] section of the master core is bent or cut.The [I] section of the master core contains the necessary information for printing.Set a master roll in place that contains a [I] section that is not bent or cut.(A 84 “Setting the Master Roll”)
Loca-tion
Code Message Action

Chapter 10 Troubleshooting 103
10
■ E00-0000: Maintenance call errorTo clear the error display, press the [RESET] key.
■ F00-0000: WarningTo clear the error display, press the [RESET] key.
2Front door
D18 Print Drum has been Unlocked
The print drum (cylinder) can be pulled out.Pull out the print drum (cylinder).
2Front door
D19 Master Making Unit has been Unlocked
The master making unit can be pulled out.Pull out the master making unit.
3Print drum (cylin-der)
D22 CheckSettings
The print drum (cylinder) is not set as far as it can go.1 Press [Print Drum (Cylinder) Release Button] and wait until it lights up.2 Pull out the print drum (cylinder), and then set it in place again.
8Scan-ning
D23 CheckSettings
Close the ADF cover of the optional auto document feeder.
Loca-tion
Code Message Action
- E01 MaintenanceCall
The internal battery of this machine is almost depleted.Consult your dealer or authorized service representative for battery replacement.
- E02 MaintenanceCall
Consult your dealer or authorized service representative for periodic inspection.
Loca-tion
Code Message Action
3Print drum (cylin-der)
F01 CheckSettings
No master is attached to the print drum (cylinder). Perform master mak-ing.
BIf you leave the print drum (cylinder) with no master attached, the print drum (cylinder) will dry, and this situa-tion may result in malfunctions. Be sure to perform master making or [Confidential] (A 54) and load a master on to the print drum (cylinder).
1Paper feed-ing
F03 CheckSettings
Set a standard size of paper on the paper feed tray.
- F04 Reached to the limit countPlease Contact the administrator
The count has reached the upper limit of the preset number of master making processes or number of printed copies. Please contact your administrator.(A 69 “[Limit T/C] [Limit M/C]”)
- F05 Enter Print QuantityOver [nn]
Enter a value that is larger than the displayed value, and then press the [START] key.You can change the setting in [Minimum Print Q'ty] under [Custom Set-ting Mode] (A 59).
Loca-tion
Code Message Action
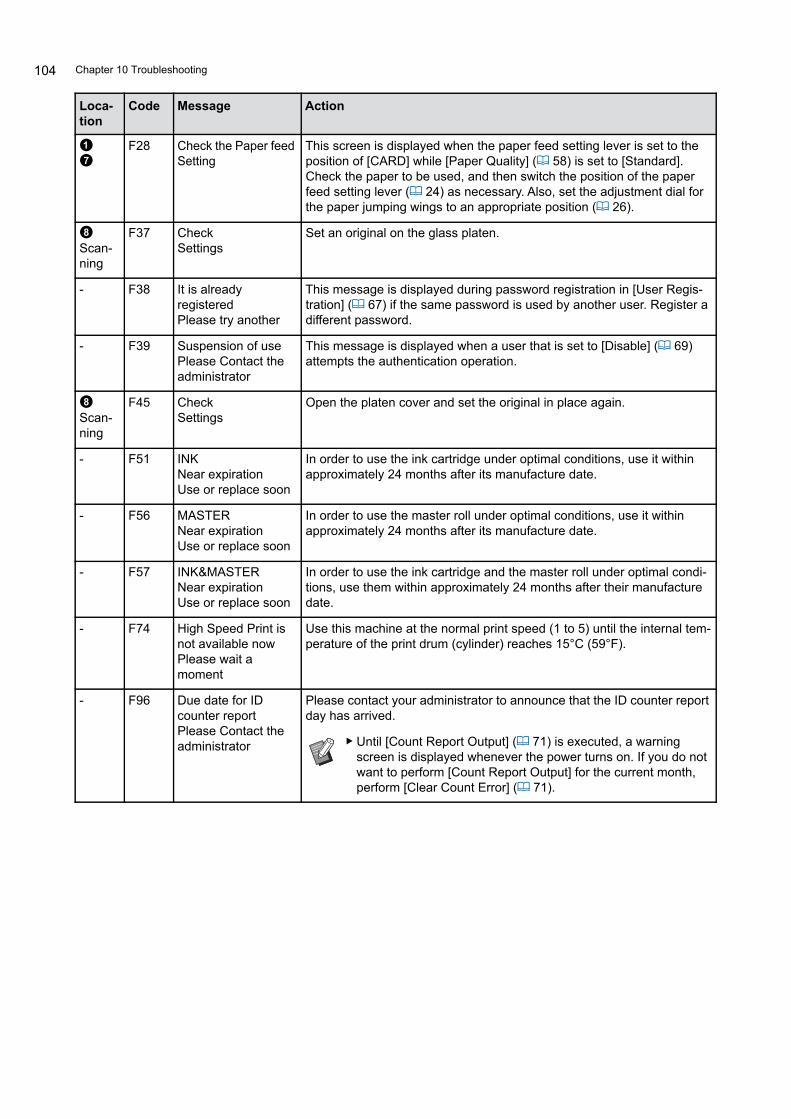
Chapter 10 Troubleshooting104
17
F28 Check the Paper feed Setting
This screen is displayed when the paper feed setting lever is set to the position of [CARD] while [Paper Quality] (A 58) is set to [Standard].Check the paper to be used, and then switch the position of the paper feed setting lever (A 24) as necessary. Also, set the adjustment dial for the paper jumping wings to an appropriate position (A 26).
8Scan-ning
F37 CheckSettings
Set an original on the glass platen.
- F38 It is already registeredPlease try another
This message is displayed during password registration in [User Regis-tration] (A 67) if the same password is used by another user. Register a different password.
- F39 Suspension of usePlease Contact the administrator
This message is displayed when a user that is set to [Disable] (A 69) attempts the authentication operation.
8Scan-ning
F45 CheckSettings
Open the platen cover and set the original in place again.
- F51 INKNear expirationUse or replace soon
In order to use the ink cartridge under optimal conditions, use it within approximately 24 months after its manufacture date.
- F56 MASTERNear expirationUse or replace soon
In order to use the master roll under optimal conditions, use it within approximately 24 months after its manufacture date.
- F57 INK&MASTERNear expirationUse or replace soon
In order to use the ink cartridge and the master roll under optimal condi-tions, use them within approximately 24 months after their manufacture date.
- F74 High Speed Print is not available nowPlease wait a moment
Use this machine at the normal print speed (1 to 5) until the internal tem-perature of the print drum (cylinder) reaches 15°C (59°F).
- F96 Due date for IDcounter reportPlease Contact theadministrator
Please contact your administrator to announce that the ID counter report day has arrived.
BUntil [Count Report Output] (A 71) is executed, a warning screen is displayed whenever the power turns on. If you do not want to perform [Count Report Output] for the current month, perform [Clear Count Error] (A 71).
Loca-tion
Code Message Action

Chapter 10 Troubleshooting 105
10
■ J00: Paper jam errorThe error location indicator where an original or paper is jammed blinks.
BIn order to prevent a paper jam, use appropriate papers for printing.(A 12 “Printing papers”)
BWhen placing originals on the optional auto document feeder, use an appropriate original.(A 12 “Originals”)
Location Action
6Paper feeding side Check the paper feeding side and lower the paper feed tray, and then remove any jammed papers.If the error display does not disappear, press the [RESET] key.
BOccasionally, switching the paper feed setting lever can prevent a paper jam.(A 24 “Setting up the paper feed tray and the paper”)
8Optional Auto Document Feeder
Open the ADF cover, and then remove any jammed originals.Depending on the location of the jammed original, you can also remove it from the bottom of the auto document feeder by raising the platen cover.
3Around the print drum (cylin-der)
Pull out the print drum (cylinder), and then remove any jammed papers.(A 89 “Replacing the Print Drum (Cylinder)”)
• Ink may be left on the area around the print drum (cylinder) or the inside of this machine after the print drum (cylinder) unit has been removed. Take care not to smudge your hands or clothes with the ink. Wash immediately with soap if you get ink on your hands, etc.
• When you put your hands inside the main unit, take care not to touch the paper separation hook or master removal hooks. The sharp tips of these hooks can hurt your hands.
7Paper receiving side Check the paper receiving side and remove any jammed papers.
Caution
Master removal hooks
Paper separation hook

Chapter 10 Troubleshooting106
When the [I] indicator blinks and [H] is displayed in the numeric displayIn order to maintain the optimum printing conditions, this machine obtains information from the consumables. If the information cannot be obtained, a code that starts with [H] is displayed in the numeric display.Enter an appropriate value.
■ [Ink Information Input]Set the items according to the following table.
BWe assume no responsibility or liability for cases in which you use any consumables other than the con-sumables recommended by RISO. We are also unable to provide appropriate values for setting. If appro-priate values for setting are unknown, we recommend that you adjust by changing values from [1] and on, while checking the print results at the same time.
BIf the following operations are performed, the values entered will be erased. In this case, it is necessary to re-enter those values.CThe power switch is turned off and then on again.CThe [WAKE-UP] key is pressed while this machine is in sleep mode.
No. Screen display Description of setting Value
H1 Ink Color Setting1: Black2: Color
Select the same color as the color of the print drum (cylinder) that is currently used.Pressing the [START] key goes to the next step.
1: Black2: Color
H2 Print Density FineAdjustment1 (Light)5 (Dark)
Enter the setting value to obtain the appropri-ate print density according to the ink.Pressing the [START] key goes to the next step.
1 (Light) to 5 (Dark)
H3 First Print DensityAdjustment1 (Light)5 (Dark)
Enter the setting value to obtain the appropri-ate print density for the first print according to the ink.Pressing the [START] key goes to the next step.
1 (Light) to 5 (Dark)
HE Enter two digits ofmonth
Enter the month during which the warning [F51] (A 104) will be displayed.Pressing the [START] key goes to the next step.
01 to 12
HY Enter last twodigits of year
Enter the year during which the warning [F51] (A 104) will be displayed.Pressing the [START] key completes the entry of the ink information.
01 to 99

Chapter 10 Troubleshooting 107
10
■ [Master Information Input]Set the items according to the following table.
When the [I] indicator goes off and an error code is displayed in the numeric displayRefer to the following pages and take action according to the code.
No. Screen display Description of setting Value
H4 Master-makingDensity Setting1 (Light)10 (Dark)
Enter the setting value to obtain the appropri-ate master making density according to the master.Pressing the [START] key goes to the next step.
1 (Light) to 10 (Dark)
H5 Print Density FineAdjustment1 (Light)5 (Dark)
Enter the setting value to obtain the appropri-ate print density according to the master.Pressing the [START] key goes to the next step.
1 (Light) to 5 (Dark)
H6 First Print DensityAdjustment1 (Light)5 (Dark)
Enter the setting value to obtain the appropri-ate print density for the first print according to the master.Pressing the [START] key goes to the next step.
1 (Light) to 5 (Dark)
HE Enter two digits ofmonth
Enter the month during which the warning [F56] (A 104) will be displayed.Pressing the [START] key goes to the next step.
01 to 12
HY Enter last twodigits of year
Enter the year during which the warning [F56] (A 104) will be displayed.Pressing the [START] key completes the entry of the master information.
01 to 99
Code Reference page
C01 A 101
C02 A 101
D04 A 102
D17 A 102
Other D error A 101 to A 103
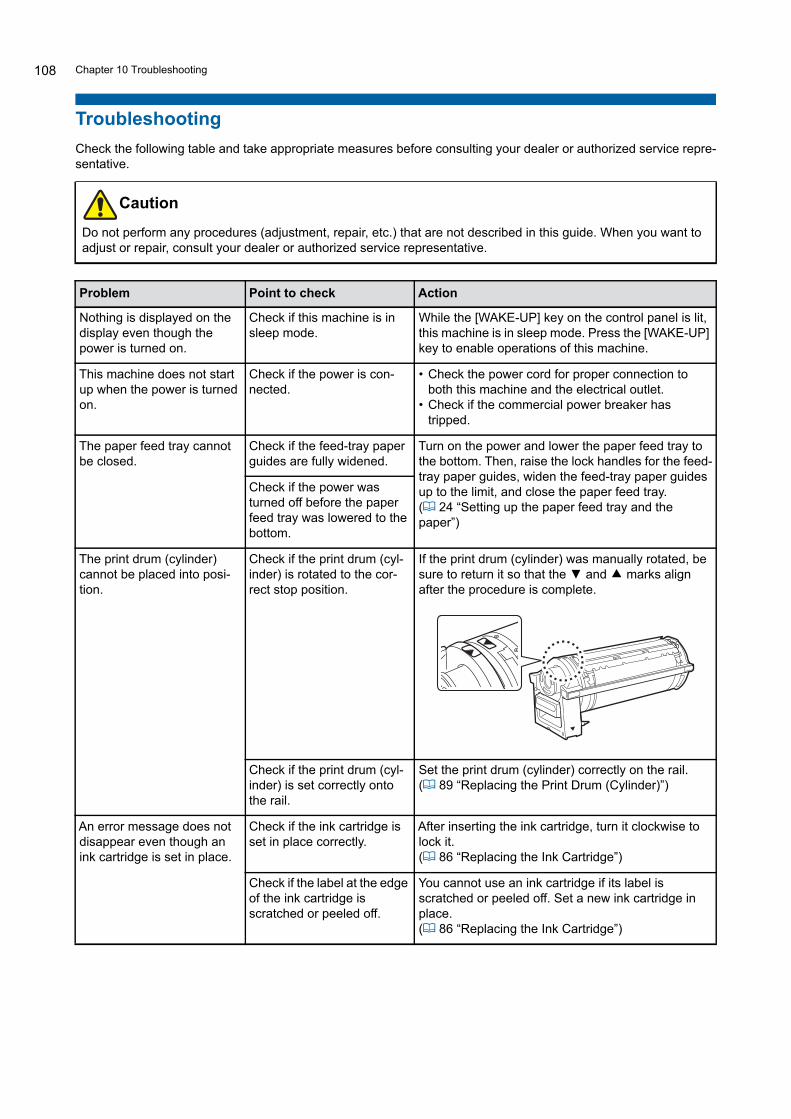
Chapter 10 Troubleshooting108
TroubleshootingCheck the following table and take appropriate measures before consulting your dealer or authorized service repre-sentative.
Do not perform any procedures (adjustment, repair, etc.) that are not described in this guide. When you want to adjust or repair, consult your dealer or authorized service representative.
Problem Point to check Action
Nothing is displayed on the display even though the power is turned on.
Check if this machine is in sleep mode.
While the [WAKE-UP] key on the control panel is lit, this machine is in sleep mode. Press the [WAKE-UP] key to enable operations of this machine.
This machine does not start up when the power is turned on.
Check if the power is con-nected.
• Check the power cord for proper connection to both this machine and the electrical outlet.
• Check if the commercial power breaker has tripped.
The paper feed tray cannot be closed.
Check if the feed-tray paper guides are fully widened.
Turn on the power and lower the paper feed tray to the bottom. Then, raise the lock handles for the feed-tray paper guides, widen the feed-tray paper guides up to the limit, and close the paper feed tray.(A 24 “Setting up the paper feed tray and the paper”)
Check if the power was turned off before the paper feed tray was lowered to the bottom.
The print drum (cylinder) cannot be placed into posi-tion.
Check if the print drum (cyl-inder) is rotated to the cor-rect stop position.
If the print drum (cylinder) was manually rotated, be sure to return it so that the ▼ and M marks align after the procedure is complete.
Check if the print drum (cyl-inder) is set correctly onto the rail.
Set the print drum (cylinder) correctly on the rail.(A 89 “Replacing the Print Drum (Cylinder)”)
An error message does not disappear even though an ink cartridge is set in place.
Check if the ink cartridge is set in place correctly.
After inserting the ink cartridge, turn it clockwise to lock it.(A 86 “Replacing the Ink Cartridge”)
Check if the label at the edge of the ink cartridge is scratched or peeled off.
You cannot use an ink cartridge if its label is scratched or peeled off. Set a new ink cartridge in place.(A 86 “Replacing the Ink Cartridge”)
Caution

Chapter 10 Troubleshooting 109
10
An error message does not disappear even though a master roll is set in place.
Check if the master roll is set in place correctly.
Set the master roll so that the side of the master core with the [I] mark is located on the left.(A 84 “Setting the Master Roll”)
Check if the [I] section inside the master core is bent or cut.
You cannot use the master roll if its [I] section is bent or cut. Set a new master roll in place.(A 84 “Setting the Master Roll”)
The master disposal box cannot be set in place.
Check if the lock lever of the master disposal box is locked.
Slide the lock lever (A 88) of the master disposal box to the right to unlock it. Then, set the master dis-posal box in place.
There is no image on copies. Check if the original is placed so that it faces up.
Place the original so that it faces down.(A 28 “Placement of Originals”)
Closing the platen cover without setting an original automatically switches print-ing mode to master making mode.
Check if you forcefully closed the platen cover.
If an original is set and detected when the platen cover is closed in printing mode, this machine auto-matically switches to master making mode. How-ever, forcefully closing the platen cover may cause this machine to incorrectly detect that an original is set even when there is no original.Close the platen cover gently.
A portion of the image is missing on printed papers.
Check if the glass platen is stained.
Wipe the glass platen with a soft cloth, etc.(A 94 “Maintenance”)
Check if any foreign objects are adhered to the master.
Pull out the print drum (cylinder) and check if any for-eign object adheres to the master. If there is a for-eign object, remove it.If a foreign object exists between the master and the print drum (cylinder), remove the master, and elimi-nate the foreign object. Then, set the print drum (cyl-inder) in place and perform the master making process again.
Check if the paper size that was placed on the paper feed tray for master making is smaller than the size of the original.
The size of the master to be made is determined according to the size of the paper that is placed on the paper feed tray.Set the same size of paper on the paper feed tray as the original, and then perform the master making process.
Blank lines are found on printed papers.
Check if the thermal print head of the master making unit or the scanner glass of the optional auto document feeder is stained.
Wipe the thermal print head or scanner glass with a soft cloth, etc.(A 94 “Maintenance”)
Lines are found on printed papers.
Check if the scanner glass of the optional auto document feeder is stained.
Wipe the scanner glass with a soft cloth, etc.(A 94 “Maintenance”)
Problem Point to check Action

Chapter 10 Troubleshooting110
The overall background of the printed papers is stained.
Check if colored paper, such as newspaper, is used as the original.
Lighten the contrast in [SCANNING LEVEL] (A 38) and perform master making again.
Check if the glass platen is stained.
Wipe the glass platen with a soft cloth, etc.(A 94 “Maintenance”)
The edges of printed papers are smudged with ink.
Check if the size of the paper that was placed on the paper feed tray for master making is larger than the size of the original.
Set the same size of paper on the paper feed tray as the original, and then perform the master making process.The size of the master to be made is determined according to the size of the paper (the width of the feed-tray paper guides and the length of the paper) that is placed on the paper feed tray.If the size of the paper placed on the paper feed tray for master making is larger than the size of the origi-nal, the outside of the original is also included in master making.For this reason, if the platen cover is not securely closed, the edges of the original may be processed as shadows.
Check if the feed-tray paper guides are fitted to the width of the paper during master making.
Check if a corner of a thick paper, such as a postcard, scratches the master when it is being printed.
Perform master making again.Use papers that are suitable for this machine.(A 12 “Printing papers”)
Check if a considerable time elapsed for the master roll that was used after the previ-ous master making.
Perform master making again.
Problem Point to check Action

Chapter 10 Troubleshooting 111
10
The back of the printed paper is smudged with ink.
Check if the pressure roller is smudged with ink.
Remove the print drum (cylinder), and then wipe the pressure roller with a soft cloth, etc.(A 94 “Maintenance”)If the print position deviates from the paper, this may cause the pressure roller to be stained with ink. Adjust the print position within the size of the paper.
Check if the feed-tray paper guides are fitted to the width of the paper during master making.
When performing master making, align the feed-tray paper guides with the width of the paper.(A 24 “Setting up the paper feed tray and the paper”)If the feed-tray paper guides are not aligned with the width of the paper, a master is made in a wider area than the paper size. As a result, ink adheres to the pressure roller outside the paper, and this may cause the ink to be printed on papers.
Check if a paper that does not efficiently absorb ink is used.
As the next paper is fed before the ink dries, ink adheres to the back of papers.Take the following measures.• Use papers that efficiently absorb ink.• Reduce the print speed.
[SPEED] (A 44)• Decrease the ink density.
[DENSITY] (A 45)[SCANNING LEVEL] (A 38)[INK SAVING] (A 39)
Printed images are faint.Printed text is blurred.
Check if printing was per-formed after the print drum (cylinder) was not used for an extended period of time.
If the print drum (cylinder) is not used for an extended period of time, ink on the surface of the print drum (cylinder) may dry. Printing in such a state may result in faint printing for the first few papers just after the printing has started.Press the [PROOF] key and print several papers before starting actual printing.By executing [IDLING] (A 54), high print quality may be instantly achieved from the beginning of printing. This can reduce paper waste.
Check if the original itself is faint.
Darken the contrast in [SCANNING LEVEL] (A 38) and make a master again.For originals written with a pencil, set [PENCIL](A 37).
Check if the temperature is low (below 15°C [59°F]) in the place where this machine is installed or ink cartridges are stored.
Use this machine in a location where the tempera-ture is 15°C (59°F) or higher.For ink cartridges that have been stored in a location at low temperature, keep them in a location at a tem-perature of 15°C (59°F) or higher before using them.(A 7 “Installation location”)
Check if [INK SAVING] is set to on.
If a master is made while [INK SAVING] is set to on (A 39), the ink on printed papers is lighter than usual.
Problem Point to check Action
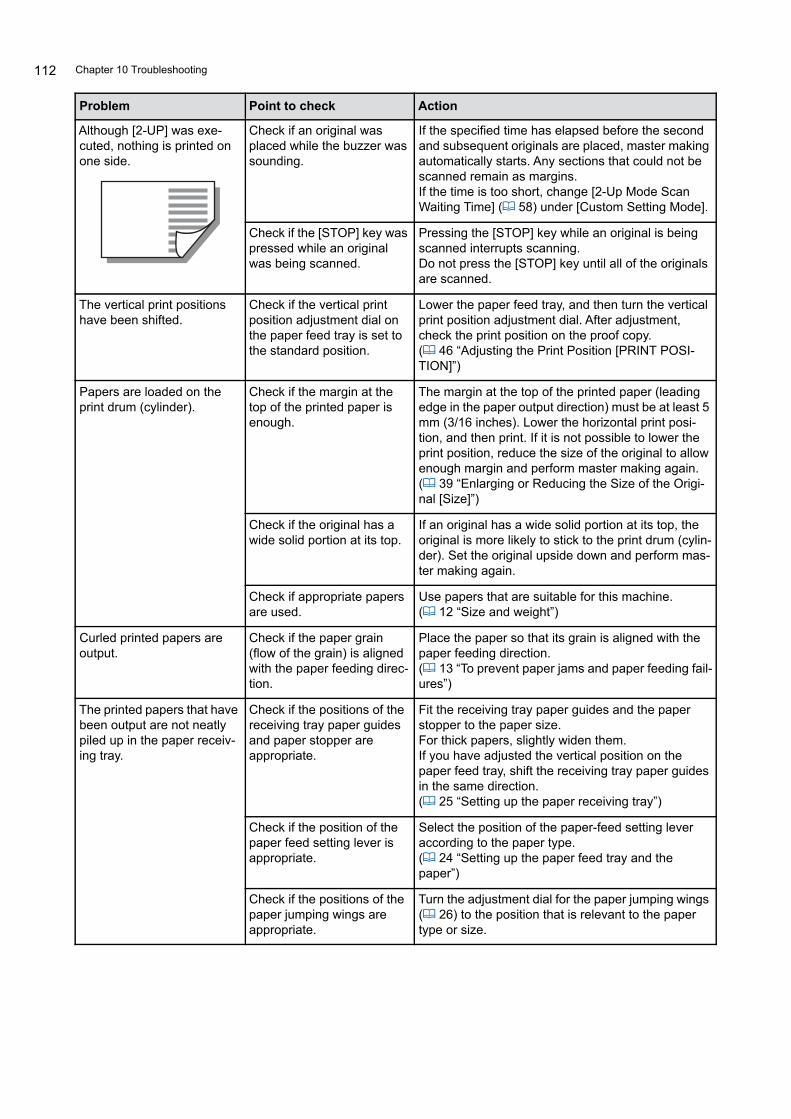
Chapter 10 Troubleshooting112
Although [2-UP] was exe-cuted, nothing is printed on one side.
Check if an original was placed while the buzzer was sounding.
If the specified time has elapsed before the second and subsequent originals are placed, master making automatically starts. Any sections that could not be scanned remain as margins.If the time is too short, change [2-Up Mode Scan Waiting Time] (A 58) under [Custom Setting Mode].
Check if the [STOP] key was pressed while an original was being scanned.
Pressing the [STOP] key while an original is being scanned interrupts scanning.Do not press the [STOP] key until all of the originals are scanned.
The vertical print positions have been shifted.
Check if the vertical print position adjustment dial on the paper feed tray is set to the standard position.
Lower the paper feed tray, and then turn the vertical print position adjustment dial. After adjustment, check the print position on the proof copy.(A 46 “Adjusting the Print Position [PRINT POSI-TION]”)
Papers are loaded on the print drum (cylinder).
Check if the margin at the top of the printed paper is enough.
The margin at the top of the printed paper (leading edge in the paper output direction) must be at least 5 mm (3/16 inches). Lower the horizontal print posi-tion, and then print. If it is not possible to lower the print position, reduce the size of the original to allow enough margin and perform master making again.(A 39 “Enlarging or Reducing the Size of the Origi-nal [Size]”)
Check if the original has a wide solid portion at its top.
If an original has a wide solid portion at its top, the original is more likely to stick to the print drum (cylin-der). Set the original upside down and perform mas-ter making again.
Check if appropriate papers are used.
Use papers that are suitable for this machine.(A 12 “Size and weight”)
Curled printed papers are output.
Check if the paper grain (flow of the grain) is aligned with the paper feeding direc-tion.
Place the paper so that its grain is aligned with the paper feeding direction.(A 13 “To prevent paper jams and paper feeding fail-ures”)
The printed papers that have been output are not neatly piled up in the paper receiv-ing tray.
Check if the positions of the receiving tray paper guides and paper stopper are appropriate.
Fit the receiving tray paper guides and the paper stopper to the paper size.For thick papers, slightly widen them.If you have adjusted the vertical position on the paper feed tray, shift the receiving tray paper guides in the same direction.(A 25 “Setting up the paper receiving tray”)
Check if the position of the paper feed setting lever is appropriate.
Select the position of the paper-feed setting lever according to the paper type.(A 24 “Setting up the paper feed tray and the paper”)
Check if the positions of the paper jumping wings are appropriate.
Turn the adjustment dial for the paper jumping wings (A 26) to the position that is relevant to the paper type or size.
Problem Point to check Action

Chapter 10 Troubleshooting 113
10
Printed papers go over the paper stopper of the paper receiving tray.
- Level the paper receiving tray using the following steps.1 Fold the receiving tray paper guides and the
paper stopper.2 Lift up the sides of the paper receiving tray with
both hands, and then move the paper receiving tray shaft to position B of the bearing.
Problem Point to check Action
A: Normal positionB: When papers go over the stopper
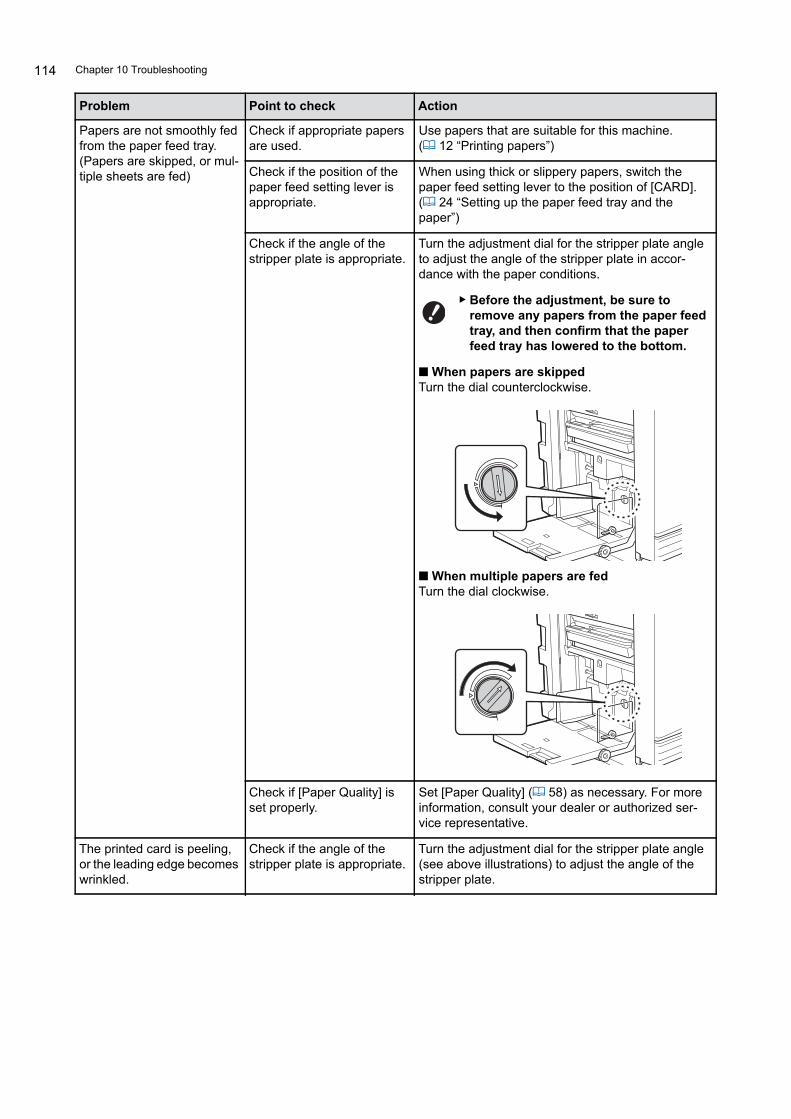
Chapter 10 Troubleshooting114
Papers are not smoothly fed from the paper feed tray. (Papers are skipped, or mul-tiple sheets are fed)
Check if appropriate papers are used.
Use papers that are suitable for this machine.(A 12 “Printing papers”)
Check if the position of the paper feed setting lever is appropriate.
When using thick or slippery papers, switch the paper feed setting lever to the position of [CARD].(A 24 “Setting up the paper feed tray and the paper”)
Check if the angle of the stripper plate is appropriate.
Turn the adjustment dial for the stripper plate angle to adjust the angle of the stripper plate in accor-dance with the paper conditions.
BBefore the adjustment, be sure to remove any papers from the paper feed tray, and then confirm that the paper feed tray has lowered to the bottom.
■ When papers are skippedTurn the dial counterclockwise.
■ When multiple papers are fedTurn the dial clockwise.
Check if [Paper Quality] is set properly.
Set [Paper Quality] (A 58) as necessary. For more information, consult your dealer or authorized ser-vice representative.
The printed card is peeling, or the leading edge becomes wrinkled.
Check if the angle of the stripper plate is appropriate.
Turn the adjustment dial for the stripper plate angle (see above illustrations) to adjust the angle of the stripper plate.
Problem Point to check Action

Chapter 10 Troubleshooting 115
10
An error message is dis-played even though there is no paper jam.
Check if a lifted paper has been output.
The margin at the top of the printed paper (leading edge in the paper output direction) must be at least 5 mm (3/16 inches). Lower the horizontal print posi-tion, and then print. If it is not possible to lower the print position, reduce the size of the original to allow enough margin and perform master making again.(A 39 “Enlarging or Reducing the Size of the Origi-nal [Size]”)
Check if this machine is exposed to direct sunlight.
The sensor may malfunction if this machine is exposed to direct sunlight.Shield the light using curtains, etc., in order to pro-tect this machine from direct sunlight.
The print speed cannot be set to [High Speed].
Check if printing is per-formed in a cold location.
If the temperature of the inside of the print drum (cyl-inder) is less than 15°C (59°F), [High Speed] does not work.The [High Speed] function can be used only for the SF5450/5350/5250/5050.
[Quick Master Making] can-not be used.
Check if a function that can-not be used concurrently with [Quick Master Making] is set.
If you set a function that cannot be used concurrently with [Quick Master Making], [Quick Master Making] (A 60) is disabled.
Original data with multiple pages have been sent from a computer. Even though mul-tiple copies are set for print-ing, this machine repeats master making one page at a time.
Check if the [Collate] option is selected in the printing dialog box on a computer.
Temporarily delete the original data that this machine has received. To delete the original data, press the [INTERFACE] key (A 31).Deselect [Collate] in the printing dialog box on the computer, and then resend the original data to this machine.(A 31 “Printing from Computer”)
Even though the computer has sent the original data, this machine cannot receive it.
Check if the [INTERFACE] lamp is off on the operation panel.
Press the [INTERFACE] key (A 31) to light up the lamp.
The [START] key is blinking. Check if the received original data is waiting for output.
Press the [START] key to print them.
Even though the IP address of this machine is set with [1: Manual], it changes to [2: Auto] after restarting.
Check if the entered IP address is the same as that of another device on the net-work.
Set a unique IP address.
Problem Point to check Action

Chapter 10 Troubleshooting116
117
11
Chapter11Appendix

Chapter 11 Appendix118
Optional Accessories
■ Auto Document Feeder AF-VIIFeeds up to approximately 50 pages of originals auto-matically.
■ Color Print Drum (Cylinder)Enables the print colors to be changed easily simply by replacing a print drum (cylinder). (Dedicated case included)
■ Wide Stacking TrayA paper receiving tray that is equipped with paper arrangers.
■ Key/Card Counter IV;NUseful for cost management as it enables recording and viewing of the number of master making pro-cesses and the number of printed copies. The record-ing and viewing can be performed within a given period of time or for each key card individually.- Enables printing a report of recorded data: “Printer
usage volume” and “Average number of copies per master”.However, printing a report of the “Limit count applied against usage volume” and “Lock-out mode status” is not included.
- Enables printing of the report by operating in [Cus-tom Setting Mode] of the printer, but printing the report by operating the Key/Card Counter is not included.
■ IC Card Reader Activation kit RGEnables individual user management and enhanced security with the use of IC cards.To use IC card, [Authentication Setting] (A 67) must be configured in [Custom Setting Mode].
■ Job Separator IV;NII / NIIIEnables easy separation of printed papers simply by inserting tape strips when using [Job Separation] func-tion (A 59).
■ RISO Network Kit S10Required for connecting the following models to the network.SF5430/5330/5230/5130/5030
■ Card Feed KitA unit for feeding postcards, etc.
■ Envelope Feed KitA unit for feeding envelopes.
■ RISO Printer Driver for MacintoshA printer driver to use this machine on Mac OS X.
A variety of optional accessories are available to enhance the capabilities of this machine.To purchase the optional accessories, consult your dealer or authorized service representative.

Chapter 11 Appendix 119
11
Specifications■ SF5450/5350/5250/5050
Model SF5450 SF5350 SF5250 SF5050
Master Making Methods
High-speed digital master-making
Master Making-Time 1(When [Quick Master Making] is OFF)
Approx. 19 seconds (Letter paper, short edge feed)
Approx. 20 seconds (A4 paper, short edge feed)
Approx. 20 seconds (A4 paper, short edge feed)
Approx. 22 seconds (A4 paper, short edge feed)
Master Making-Time 1(When [Quick Master Making] is ON)
Approx. 17 seconds (Letter paper, short edge feed)
Approx. 18 seconds (A4 paper, short edge feed)
Approx. 18 seconds (A4 paper, short edge feed)
Approx. 20 seconds (A4 paper, short edge feed)
Printing Method Fully automatic printing
Scanning Resolu-tion
600 dpi × 600 dpi
Printing Resolu-tion
300 dpi × 600 dpi (perforation on the master 2: 600 dpi × 600 dpi)When [Quick Master Making] is set: 300 dpi × 400 dpi (perforation on the master 2: 600 dpi × 400 dpi)
Original Type Book (10 kg [22 lb] or less) or sheet
Original Paper Weight
When auto document feeder is used: 50 g/m2 to 128 g/m2 (13-lb bond to 34-lb bond) (normal paper)
Original Size When glass platen is used: 50 mm × 90 mm to 310 mm × 432 mm (1 31/32 inches × 3 17/32 inches to 12 7/32 inches × 17 inches)When auto document feeder is used: 100 mm × 148 mm to 300 mm × 432 mm (3 15/16 inches × 5 13/16 inches to 11 13/16 inches × 17 inches)
Maximum Scan-ning Area
297 mm × 432 mm (11 11/16 inches × 17 inches)
Print Paper Weight
46 g/m2 to 210 g/m2 (12-lb bond to 116-lb index)
Print Paper Size 100 mm × 148 mm to 310 mm × 432 mm (3 15/16 inches × 5 13/16 inches to 12 7/32 inches × 17 inches)
Maximum Print-ing Area
291 mm × 425 mm (11 15/32 inches × 16 23/32 inches)
291 mm × 413 mm (11 15/32 inches × 16 1/4 inches)
251 mm × 357 mm (9 7/8 inches × 14 1/16 inches)
210 mm × 290 mm (8 1/4 inches × 11 13/32 inches)
Paper Feed Tray Stacking Capacity
1000 sheets 3 (stacking height of 110 mm [4 11/32 inches] or lower)
Paper Receiving Tray Stacking Capacity
1000 sheets 3 (stacking height of 110 mm [4 11/32 inches] or lower)
Print Speed 6 levels: 60, 80, 100, 120, 130, and 150 (High Speed 4) sheets per minute
Print Position Adjustment
Horizontal: ±15 mm (±19/32 inches) Vertical: ±10 mm (±13/32 inches)
Image Process-ing Mode
Line, Photo, Duo, Pencil
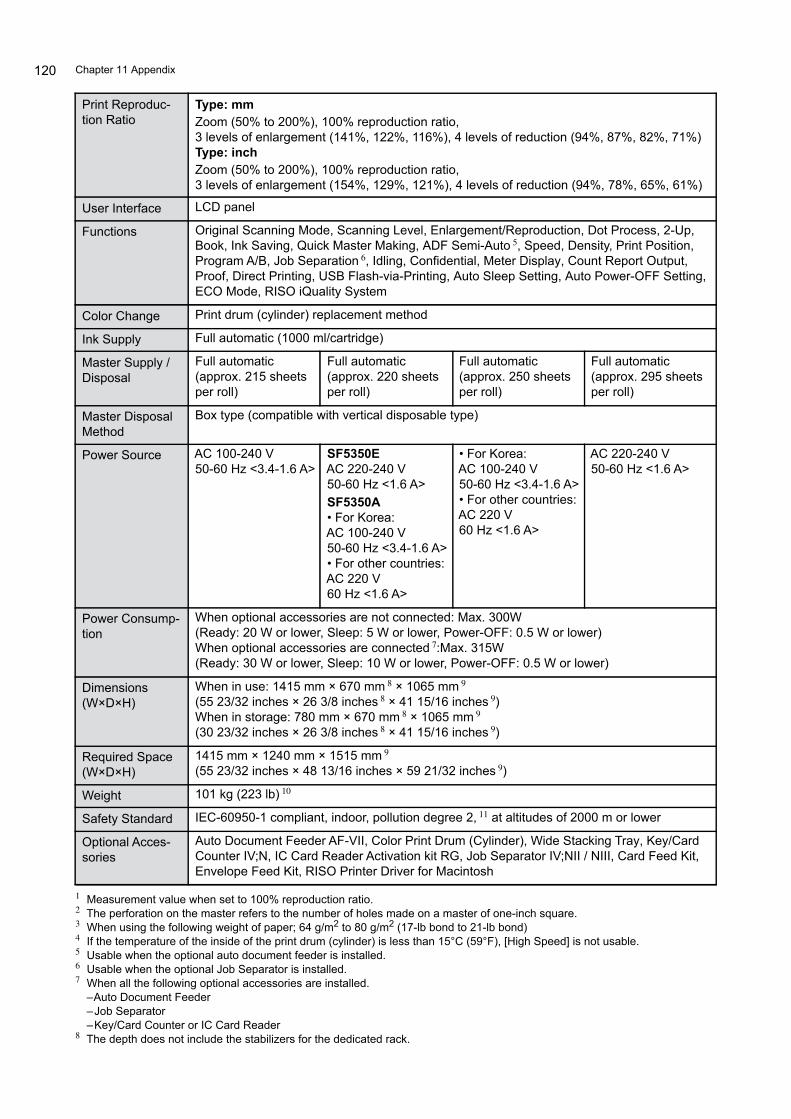
Chapter 11 Appendix120
1 Measurement value when set to 100% reproduction ratio.2 The perforation on the master refers to the number of holes made on a master of one-inch square.3 When using the following weight of paper; 64 g/m2 to 80 g/m2 (17-lb bond to 21-lb bond)4 If the temperature of the inside of the print drum (cylinder) is less than 15°C (59°F), [High Speed] is not usable.5 Usable when the optional auto document feeder is installed.6 Usable when the optional Job Separator is installed.7 When all the following optional accessories are installed.
–Auto Document Feeder–Job Separator–Key/Card Counter or IC Card Reader
8 The depth does not include the stabilizers for the dedicated rack.
Print Reproduc-tion Ratio
Type: mmZoom (50% to 200%), 100% reproduction ratio, 3 levels of enlargement (141%, 122%, 116%), 4 levels of reduction (94%, 87%, 82%, 71%)Type: inchZoom (50% to 200%), 100% reproduction ratio, 3 levels of enlargement (154%, 129%, 121%), 4 levels of reduction (94%, 78%, 65%, 61%)
User Interface LCD panel
Functions Original Scanning Mode, Scanning Level, Enlargement/Reproduction, Dot Process, 2-Up, Book, Ink Saving, Quick Master Making, ADF Semi-Auto 5, Speed, Density, Print Position, Program A/B, Job Separation 6, Idling, Confidential, Meter Display, Count Report Output, Proof, Direct Printing, USB Flash-via-Printing, Auto Sleep Setting, Auto Power-OFF Setting, ECO Mode, RISO iQuality System
Color Change Print drum (cylinder) replacement method
Ink Supply Full automatic (1000 ml/cartridge)
Master Supply / Disposal
Full automatic(approx. 215 sheets per roll)
Full automatic(approx. 220 sheets per roll)
Full automatic(approx. 250 sheets per roll)
Full automatic(approx. 295 sheets per roll)
Master Disposal Method
Box type (compatible with vertical disposable type)
Power Source AC 100-240 V 50-60 Hz <3.4-1.6 A>
SF5350EAC 220-240 V 50-60 Hz <1.6 A>SF5350A• For Korea:AC 100-240 V 50-60 Hz <3.4-1.6 A>• For other countries:AC 220 V 60 Hz <1.6 A>
• For Korea:AC 100-240 V50-60 Hz <3.4-1.6 A>• For other countries:AC 220 V60 Hz <1.6 A>
AC 220-240 V 50-60 Hz <1.6 A>
Power Consump-tion
When optional accessories are not connected: Max. 300W(Ready: 20 W or lower, Sleep: 5 W or lower, Power-OFF: 0.5 W or lower)When optional accessories are connected 7:Max. 315W(Ready: 30 W or lower, Sleep: 10 W or lower, Power-OFF: 0.5 W or lower)
Dimensions (W×D×H)
When in use: 1415 mm × 670 mm 8 × 1065 mm 9
(55 23/32 inches × 26 3/8 inches 8 × 41 15/16 inches 9)When in storage: 780 mm × 670 mm 8 × 1065 mm 9
(30 23/32 inches × 26 3/8 inches 8 × 41 15/16 inches 9)
Required Space (W×D×H)
1415 mm × 1240 mm × 1515 mm 9
(55 23/32 inches × 48 13/16 inches × 59 21/32 inches 9)
Weight 101 kg (223 lb) 10
Safety Standard IEC-60950-1 compliant, indoor, pollution degree 2, 11 at altitudes of 2000 m or lower
Optional Acces-sories
Auto Document Feeder AF-VII, Color Print Drum (Cylinder), Wide Stacking Tray, Key/Card Counter IV;N, IC Card Reader Activation kit RG, Job Separator IV;NII / NIII, Card Feed Kit, Envelope Feed Kit, RISO Printer Driver for Macintosh

Chapter 11 Appendix 121
11
9 The height includes the dedicated rack.10 The weight does not include the ink, master roll, and rack.11 The pollution degree of the usage environment due to dirt and dust in the air. Degree “2” corresponds to a general indoor envi-
ronment.
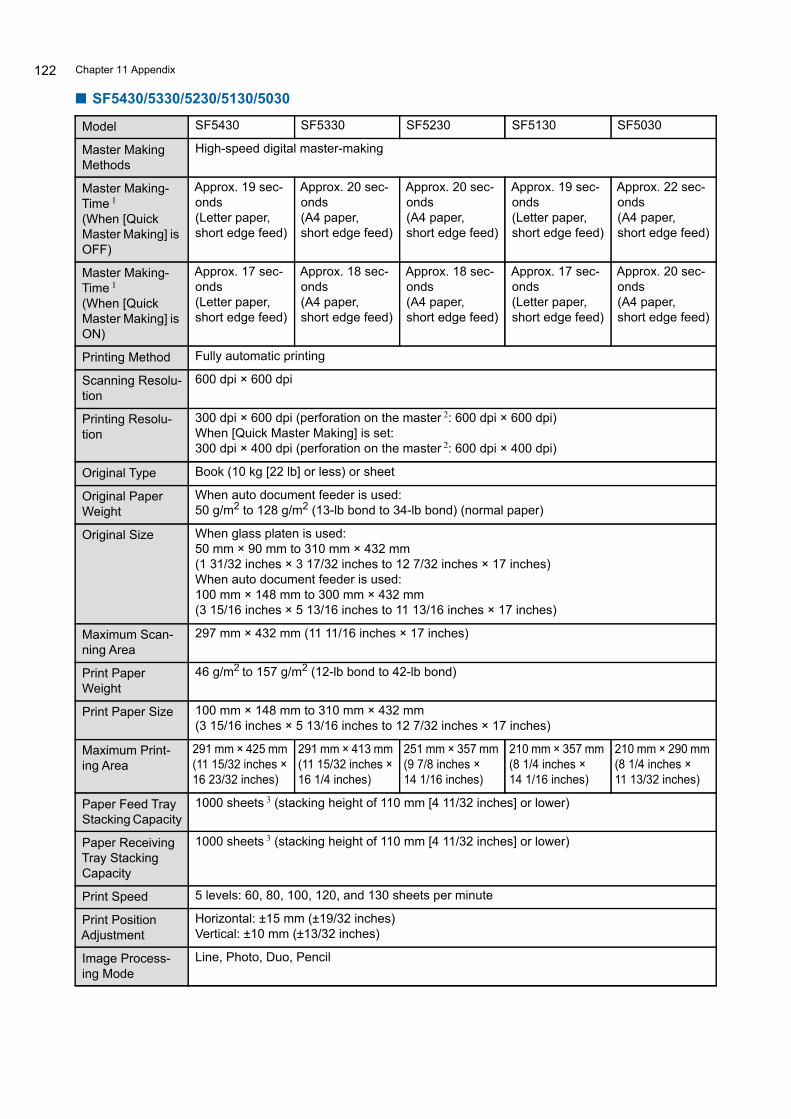
Chapter 11 Appendix122
■ SF5430/5330/5230/5130/5030
Model SF5430 SF5330 SF5230 SF5130 SF5030
Master Making Methods
High-speed digital master-making
Master Making-Time 1
(When [Quick Master Making] is OFF)
Approx. 19 sec-onds(Letter paper, short edge feed)
Approx. 20 sec-onds(A4 paper, short edge feed)
Approx. 20 sec-onds(A4 paper, short edge feed)
Approx. 19 sec-onds(Letter paper, short edge feed)
Approx. 22 sec-onds(A4 paper, short edge feed)
Master Making-Time 1
(When [Quick Master Making] is ON)
Approx. 17 sec-onds(Letter paper, short edge feed)
Approx. 18 sec-onds(A4 paper, short edge feed)
Approx. 18 sec-onds(A4 paper, short edge feed)
Approx. 17 sec-onds(Letter paper, short edge feed)
Approx. 20 sec-onds(A4 paper, short edge feed)
Printing Method Fully automatic printing
Scanning Resolu-tion
600 dpi × 600 dpi
Printing Resolu-tion
300 dpi × 600 dpi (perforation on the master 2: 600 dpi × 600 dpi)When [Quick Master Making] is set: 300 dpi × 400 dpi (perforation on the master 2: 600 dpi × 400 dpi)
Original Type Book (10 kg [22 lb] or less) or sheet
Original Paper Weight
When auto document feeder is used: 50 g/m2 to 128 g/m2 (13-lb bond to 34-lb bond) (normal paper)
Original Size When glass platen is used: 50 mm × 90 mm to 310 mm × 432 mm (1 31/32 inches × 3 17/32 inches to 12 7/32 inches × 17 inches)When auto document feeder is used: 100 mm × 148 mm to 300 mm × 432 mm (3 15/16 inches × 5 13/16 inches to 11 13/16 inches × 17 inches)
Maximum Scan-ning Area
297 mm × 432 mm (11 11/16 inches × 17 inches)
Print Paper Weight
46 g/m2 to 157 g/m2 (12-lb bond to 42-lb bond)
Print Paper Size 100 mm × 148 mm to 310 mm × 432 mm (3 15/16 inches × 5 13/16 inches to 12 7/32 inches × 17 inches)
Maximum Print-ing Area
291 mm × 425 mm (11 15/32 inches × 16 23/32 inches)
291 mm × 413 mm (11 15/32 inches × 16 1/4 inches)
251 mm × 357 mm (9 7/8 inches × 14 1/16 inches)
210 mm × 357 mm (8 1/4 inches × 14 1/16 inches)
210 mm × 290 mm (8 1/4 inches ×11 13/32 inches)
Paper Feed Tray Stacking Capacity
1000 sheets 3 (stacking height of 110 mm [4 11/32 inches] or lower)
Paper Receiving Tray Stacking Capacity
1000 sheets 3 (stacking height of 110 mm [4 11/32 inches] or lower)
Print Speed 5 levels: 60, 80, 100, 120, and 130 sheets per minute
Print Position Adjustment
Horizontal: ±15 mm (±19/32 inches) Vertical: ±10 mm (±13/32 inches)
Image Process-ing Mode
Line, Photo, Duo, Pencil
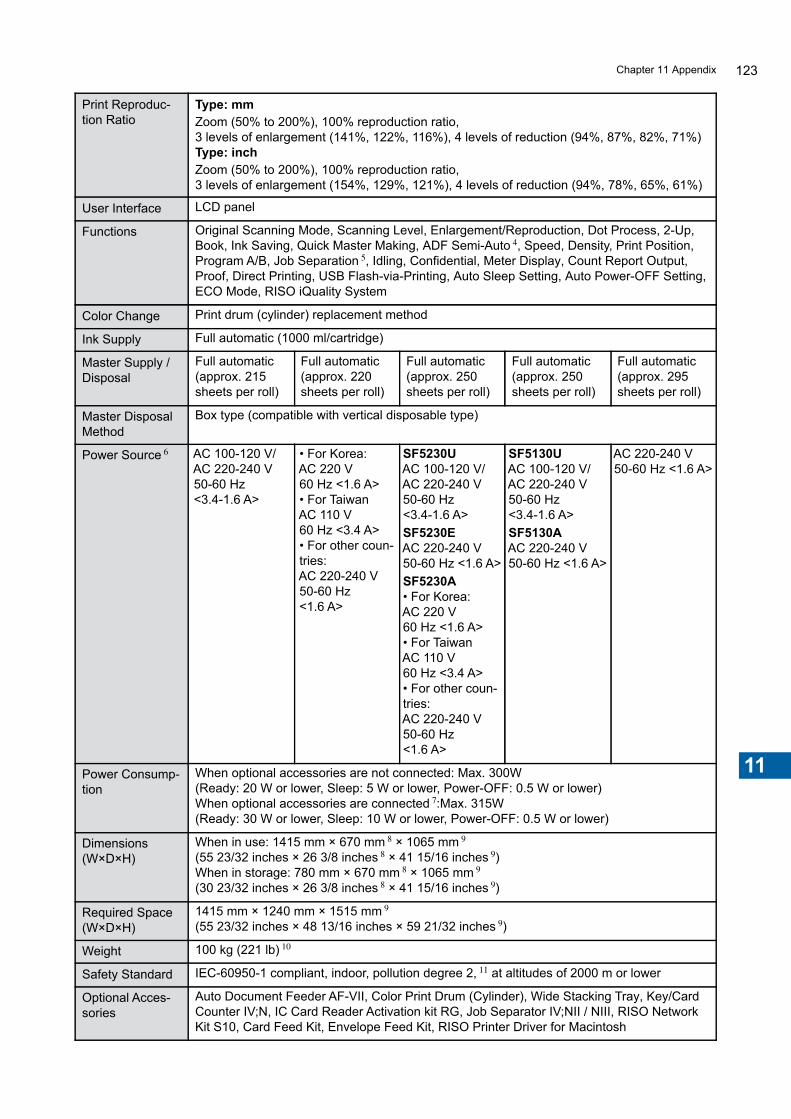
Chapter 11 Appendix 123
11
Print Reproduc-tion Ratio
Type: mmZoom (50% to 200%), 100% reproduction ratio, 3 levels of enlargement (141%, 122%, 116%), 4 levels of reduction (94%, 87%, 82%, 71%)Type: inchZoom (50% to 200%), 100% reproduction ratio, 3 levels of enlargement (154%, 129%, 121%), 4 levels of reduction (94%, 78%, 65%, 61%)
User Interface LCD panel
Functions Original Scanning Mode, Scanning Level, Enlargement/Reproduction, Dot Process, 2-Up, Book, Ink Saving, Quick Master Making, ADF Semi-Auto 4, Speed, Density, Print Position, Program A/B, Job Separation 5, Idling, Confidential, Meter Display, Count Report Output, Proof, Direct Printing, USB Flash-via-Printing, Auto Sleep Setting, Auto Power-OFF Setting, ECO Mode, RISO iQuality System
Color Change Print drum (cylinder) replacement method
Ink Supply Full automatic (1000 ml/cartridge)
Master Supply / Disposal
Full automatic(approx. 215 sheets per roll)
Full automatic(approx. 220 sheets per roll)
Full automatic(approx. 250 sheets per roll)
Full automatic(approx. 250 sheets per roll)
Full automatic(approx. 295 sheets per roll)
Master Disposal Method
Box type (compatible with vertical disposable type)
Power Source 6 AC 100-120 V/AC 220-240 V50-60 Hz <3.4-1.6 A>
• For Korea:AC 220 V60 Hz <1.6 A>• For TaiwanAC 110 V60 Hz <3.4 A>• For other coun-tries:AC 220-240 V50-60 Hz <1.6 A>
SF5230UAC 100-120 V/ AC 220-240 V50-60 Hz <3.4-1.6 A>SF5230EAC 220-240 V50-60 Hz <1.6 A>SF5230A• For Korea:AC 220 V60 Hz <1.6 A>• For TaiwanAC 110 V60 Hz <3.4 A>• For other coun-tries:AC 220-240 V50-60 Hz <1.6 A>
SF5130UAC 100-120 V/ AC 220-240 V50-60 Hz <3.4-1.6 A>SF5130AAC 220-240 V50-60 Hz <1.6 A>
AC 220-240 V50-60 Hz <1.6 A>
Power Consump-tion
When optional accessories are not connected: Max. 300W(Ready: 20 W or lower, Sleep: 5 W or lower, Power-OFF: 0.5 W or lower)When optional accessories are connected 7:Max. 315W(Ready: 30 W or lower, Sleep: 10 W or lower, Power-OFF: 0.5 W or lower)
Dimensions (W×D×H)
When in use: 1415 mm × 670 mm 8 × 1065 mm 9
(55 23/32 inches × 26 3/8 inches 8 × 41 15/16 inches 9)When in storage: 780 mm × 670 mm 8 × 1065 mm 9
(30 23/32 inches × 26 3/8 inches 8 × 41 15/16 inches 9)
Required Space (W×D×H)
1415 mm × 1240 mm × 1515 mm 9
(55 23/32 inches × 48 13/16 inches × 59 21/32 inches 9)
Weight 100 kg (221 lb) 10
Safety Standard IEC-60950-1 compliant, indoor, pollution degree 2, 11 at altitudes of 2000 m or lower
Optional Acces-sories
Auto Document Feeder AF-VII, Color Print Drum (Cylinder), Wide Stacking Tray, Key/Card Counter IV;N, IC Card Reader Activation kit RG, Job Separator IV;NII / NIII, RISO Network Kit S10, Card Feed Kit, Envelope Feed Kit, RISO Printer Driver for Macintosh
Chapter 11 Appendix124
1 Measurement value when set to 100% reproduction ratio.2 The perforation on the master refers to the number of holes made on a master of one-inch square.3 When using the following weight of paper; 64 g/m2 to 80 g/m2 (17-lb bond to 21-lb bond)4 Usable when the optional auto document feeder is installed.5 Usable when the optional Job Separator is installed.6 To switch between 100-120 V and 220-240 V, contact your dealer or authorized representative.7 When all the following optional accessories are installed.–Auto Document Feeder–Job Separator–Key/Card Counter or IC Card Reader
8 The depth does not include the stabilizers for the dedicated rack.9 The height includes the dedicated rack.10 The weight does not include the ink, master roll, and rack.11 The pollution degree of the usage environment due to dirt and dust in the air. Degree “2” corresponds to a general indoor envi-
ronment.
Notes• The specifications and type of the product are subject to change without prior notice.• Please note that due to improvements and changes to this machine, some images and explanations in this guide
may not correspond to your machine.

Chapter 11 Appendix 125
11
IndexNumerics[U] key..........................................................................19
[+] key ...........................................................................19
[X] key...........................................................................19
[I] indicator............................................................19, 99
[1:1].........................................................................39, 40
[1:1] key ..................................................................39, 40
2-UP..............................................................................40
[2-UP] key .....................................................................20
2-Up Mode Scan Waiting Time.....................................58
2-Up Print Hold Setting .................................................60
AADF cover.....................................................................18
ADF original guides ......................................................18
ADF original receiving tray............................................18
ADF Semi-Auto.............................................................59
Adjustment dial for the paper jumping wings ................26
Adjustment dial for the stripper plate angle ................114
Administrator.................................................................68
Authentication Function ................................................67
Authentication Method ..................................................67
Authentication operation ...............................................30
Authentication Setting...................................................67
Auto Clear Time............................................................58
Auto Document Feeder.................................................18
Auto Idling time .............................................................58
Auto Power-OFF...........................................................58
Auto process...............................................22, 29, 32, 57
[AUTO PROCESS] key.................................................19
Auto Sleep ....................................................................58
BBeep Sound ..................................................................59
BOOK ...........................................................................38
Book Gutter Shadow Width ..........................................57
[BOOK] key...................................................................20
C[C] key...........................................................................19
Clear Authentication Setting .........................................73
Clear Count Error..........................................................71
[Clear M/C]....................................................................70
[Clear T/C] ....................................................................70
[COARSE/FINE] key.....................................................20
[CONFIDENTIAL] key.............................................20, 54
Consumables................................................................10
Control panel ................................................................16
Corrugator.....................................................................27
Count Report Output.....................................................71
[CUSTOM] key..............................................................20
Custom Setting Mode ...................................................56
DDensity ..........................................................................45
[DENSITY] keys............................................................19
Disable..........................................................................69
Display ..........................................................................21
Display Density .............................................................62
Display Language .........................................................62
Displaying the Accumulated Counts .............................74
Dot Process ..................................................................37
Drum Count ..................................................................74
Duo ...............................................................................37
Duo Mode Setting .........................................................61
EECO mode ....................................................................61
Error diffusion method ..................................................37
Error location indicator ..................................................19
Error message ..............................................................98
FFeed tray ascent / descent button ................................16
Feed-tray paper guides.................................................16
Front door .....................................................................17
G[General] tab screen .....................................................79
General user .................................................................67
Glass platen..................................................................16

Chapter 11 Appendix126
Group number...............................................................69
HHigh Speed ...................................................................44
Horizontal direction .......................................................46
IIC Card Reader Activation kit RG ...............................118
[IDLING] key ...........................................................20, 54
Information about consumables....................................21
Initialize Network...........................................................63
Ink cartridge ..................................................................17
Ink color ........................................................................21
Ink Information Input ...................................................106
[INK SAVING] key...................................................20, 39
[INTERFACE] key.........................................................20
IP Address (IPv4)....................................................63, 65
IP Address (IPv6)....................................................63, 66
JJob Separation..............................................................59
LLAN connector ..............................................................16
LCD Brightness.............................................................62
Limit M/C.......................................................................69
Limit T/C .......................................................................69
LINE..............................................................................36
[LINE/PHOTO] ........................................................36, 57
[LINE/PHOTO] key .......................................................20
Logging in .....................................................................78
MMaster disposal box......................................................16
Master guide flap ..........................................................17
Master Information Input.............................................107
Master making area ......................................................14
Master making basic screen .........................................21
[MASTER MAKING] key ...............................................19
Master making process...........................................22, 36
Master making unit .......................................................17
Master making unit cover..............................................17
Master making unit handle............................................17
Master Making Unit Release Button .............................17
Master roll .....................................................................17
Master roll holder ..........................................................17
Maximum Printing Area ................................................14
Message area ...............................................................21
Meter.............................................................................74
Meter Display................................................................74
Minimum Print Q’ty .......................................................59
[Monitoring] Menu .........................................................79
Multi-Page Mode...........................................................51
N[Network] Menu.............................................................81
[Network setting] screen ...............................................81
Numeric display ............................................................19
Numeric keys ................................................................19
OOriginal Book Size ........................................................57
Original data display .....................................................21
Originals........................................................................12
P[P] key...........................................................................19
Padlock .........................................................................89
Paper arranger knob.....................................................17
Paper feed setting lever ................................................16
Paper feed tray .............................................................16
Paper grain ...................................................................13
Paper jumping wing ......................................................17
Paper Quality ................................................................58
Paper Receiving Tray ...................................................17
Paper stopper ...............................................................17
Password ......................................................................78
Pencil ............................................................................37
[PENCIL] key ................................................................20
Photo ............................................................................36
PIN code .......................................................................68
Platen cover..................................................................16
Platen cover pad...........................................................16
Power switch.................................................................17
Pressure roller ..............................................................96
Print basic screen .........................................................21

Chapter 11 Appendix 127
11
Print Count Hold Setting ...............................................60
Print density ............................................................45, 57
Print drum (cylinder) .....................................................17
Print drum (cylinder) handle..........................................17
Print Drum (Cylinder) Release Button ..........................17
[PRINT] key ..................................................................19
Print Position.................................................................46
[PRINT POSITION] keys ..............................................19
Print Speed .............................................................44, 57
[Printer] Menu ...............................................................80
Printing..........................................................................22
Printing area .................................................................14
Printing papers..............................................................12
Printing process ......................................................22, 44
Program ........................................................................50
Proof copy.....................................................................22
[PROOF] key ................................................................19
QQuick Master Making ....................................................60
RReceived file .................................................................21
Receiving-tray paper guides .........................................17
Reserve Period .............................................................59
Reset Counter...............................................................70
[RESET] key .................................................................19
Reset to Default Setting................................................64
RISO Console...............................................................78
RISO Printer Driver.......................................................11
RISO Utility Software ....................................................11
SScanning Level .......................................................38, 57
Screen printing method.................................................22
Separation Fan .............................................................60
Set Date........................................................................71
Single Page Mode ........................................................50
Size...............................................................................39
[SMTP Setting] screen..................................................81
[SNMP Setting] screen .................................................81
Special Paper Control ...................................................75
Speed ...........................................................................44
[SPEED] keys ...............................................................19
Stabilizer .......................................................................17
Standard ratio ...............................................................39
[START] key .................................................................19
[STOP] key ...................................................................19
Suction Fan...................................................................61
[System] tab screen ......................................................79
TThermal print head........................................................17
Top..........................................................................12, 13
Total Master Count Display ..........................................74
Total Print Count Display ..............................................74
UUSB connector..............................................................16
USB flash drive .......................................................11, 33
USB slot ........................................................................17
User name ....................................................................78
User Registration ..........................................................67
[User] tab screen ..........................................................79
VVertical direction ...........................................................46
Vertical print position adjustment dial .....................16, 46
W[WAKE-UP] key ............................................................19
ZZoom.............................................................................40

Chapter 11 Appendix128
059-36006-304

For SF5450U, SF5430U and SF5130UDuplicator Model: SF5450U, SF5430U and SF5130URFID System Model: 050-34901Contains FCC ID: RPARFR6This device complies with Part 15 of the FCC Rules. Operation is subject to the following two conditions: (1) this device may not cause harmful interference, and (2) this device must accept any interference received, including interference that may cause undesired operation.The user is cautioned that unauthorized changes or modifications not approved could void the user's authority to operate the equipment.NOTE: This equipment has been tested and found to comply with the limits for a Class B digital device, pursuant to part 15 of the FCC Rules. These limits are designed to provide reasonable protection against harmful interference in a residential installation. This equipment generates, uses and can radiate radio frequency energy and, if not installed and used in accordance with the instructions, may cause harmful interference to radio communications. However, there is no guarantee that interference will not occur in a particular installation. If this equipment does cause harmful interference to radio or television reception, which can be determined by turning the equipment off and on, the user is encouraged to try to correct the interference by one or more of the following measures:- Reorient or relocate the receiving antenna.- Increase the separation between the equipment and receiver.- Connect the equipment into an outlet on a circuit different from that to which the receiver is connected.- Consult the dealer or an experienced radio/TV technician for help.
Contains IC: 4819A-RFR6Operation is subject to the following two conditions: (1) this device may not cause interference, and (2) this device must accept any interference, including interference that may cause undesired operation of the device.CAN ICES-3(B)/NMB-3(B)
Perchlorate Material-special handling may apply, See www.dtsc.ca.gov/hazardouswaste/perchlorateThis product may contain certain substances which are restricted when disposed.Therefore, be sure to consult your contracted service dealer.
For SF5350A, SF5250A, SF5330A, SF5230A, SF5130A and SF5030AWarningThis is a Class A product. In a domestic environment this product may cause radio interference in which case the user may be required to take adequate measures.
For SF5350E, SF5050E, SF5230E and SF5030EThis product contains RFID (Radio Frequency Identification) System.
RE directive Class1 device
As an ENERGY STAR® Partner, RISO KAGAKU CORP. has determined that this product meets the ENERGY STAR® guidelines for energy efficiency.
Nur SF5350E, SF5050E, SF5230E und SF5030EMASCHINENLÄRMINFORMATIONMaschinenlärminformations-Verordnung 3. GSGV:Der höchste Schalldruckpegel beträgt 70 dB(A) oder weniger gemäß EN ISO 7779.
Hinweis:Das Gerät ist nicht für die Benutzung am Bildschirmarbeitsplatz gemäss BildscharbV vorgesehen.
RISO KAGAKU CORPORATION LONDON OFFICE610 Centennial Park, Centennial Avenue, Elstree, Herts, WD6 3TJ U.K.

Please contact the following for supplies and service:
2016/10 059-36006
About This Machine
Basic Operations
Functions for Master Making
Functions for Printing
Useful Functions
Setting the Operation Conditions
RISO Console
Replacing Consumables
Maintenance
Troubleshooting
Appendix
1
2
3
4
5
6
7
8
9
10
11