4-h working steer manual - university of new hampshire€¦ · · 2013-03-254-h working steer...
TRANSCRIPT

4-H Working Steer Manual
Visit our website at www.extension.unh.edu
UNH Cooperative Extension programs and policies are consistent with pertinent Federal and State laws and regulations on nondiscrimination regarding race, color, national origin, sex, sexual orientation, age, disability or veteran’s status.
The University of New Hampshire Cooperative Extension is an equal opportunity educator and employer. University of New Hampshire, U.S. Department of Agriculture and N.H. counties cooperating. 01/00 Reprinted May, 2007

Acknowledgments:This manual is dedicated to teamsters past and present who have the energy and drive, the pa-tience and skill, to help keep alive an all but forgotten tradition.
Author: Mackenzie Chauncey – UNH Self-designed Agriculture Journalism, SophomoreContributing Authors and Editors: Lisa Townson – Extension Specialist 4-H Jim Carrabba – Extension Educator 4-H Drew Conroy – Associate Professor, Applied Animal Sci-
ence, Thompson School, University of New Hampshire
Special thanks for the contributions and critiques of the New Hampshire 4-H Working Steer Cur-riculum Committee. The combined experience of this dedicated group has not only enhanced this manual, but enriches the experiences of 4-H Working Steer members across the state.
Cover illustrations and oxen line drawings are by Analesa Harvey. Photos are by Drew Conroy.

1
Working Steer Manual
Table of Contents
Selecting project animals .......................... 3Management .............................................. 6Feeds and feeding ..................................... 6Health ....................................................... 11Animal identification .............................. 18Behavior .................................................... 20Training .................................................... 22 Cart/Obstacle driving ............................ 26The course ................................................ 27Cart driving commands ......................... 28Drag/pulling ........................................... 29Fitting and showing ................................ 30Yoke making/fitting ............................... 37Teamster terminology ............................. 42Parts of a yoke ........................................ 43Parts of a steer ......................................... 44

2

3
Selecting Project AnimalsThe first step in purchasing a pair of steers is deciding what breed of cattle you want to train. Although availability of particular breeds is dependent on the region you live in, it is important to understand breed differences with respect to size, temperament and suitability for a Working Steer or Oxen project. Use the following guide to determine what breed would work best for you in terms of size, temperament and availability.
HolsteinThe Holstein breed originated in the Netherlands and continues as the distinctive black and white or red and white cattle popular in the United States today. Because of this, Holstein bull calves are abundant and can be found at dairy farms without a problem. Holsteins have an even temperament but they grow very fast. Often they can exceed the height of a young teamster, making them dif-ficult to control unless already well trained.
Getting a perfect match of spots on Holsteins is difficult, but can be done. Half- brothers can often be found on the same farm and may be better matched then trying to get calves from two different farms.
Despite their growth rate, Holsteins make fine oxen and a nice first year team.
JerseyThe Jersey breed, originally from the Isle of Jersey, is the most varied colored breed. They can range from a shade of fawn with or without white markings to almost black. This makes it difficult to exactly match a team, for they have been known to change a few shades as they grow. Jerseys are relatively easy to find at dairy farms and are inexpensive. Jerseys are the smallest dairy breed and do not grow too fast or too large. The breed is also known to be very aggressive and somewhat high-strung. The novice teamster would be well advised to keep a close eye on this team.
Milking Shorthorn (Durham)The Milking Shorthorn originated in northeastern England and also varies in color though not as widely as the Jersey. Shorthorns are generally red, white, red and white, or roan. (Roan is a mix of red and white, though neither color is exactly solid). Shorthorns tend to be even-tempered and mature at a relatively slow pace. The shorthorn can also be polled or horned, so when you make your choice, make sure your calves will have horns!
Shorthorns are typically less available and are generally more expensive then Holsteins or Jerseys. You may want to let several farms know you’re looking for bull calves and try to match a team for color and size between farms.
Beef-type Shorthorns may also be used for oxen teams.
Holstein breed
Jersey breed
Milking Shorthorn breed

4
American Milking DevonThe Devon breed, which originated in England is also a characteristically red breed. The American Milking Devon is a smaller breed. They are very fast, remark-ably smart and aggressive. The American Milking Devon is a strain unique to America and distinctively different from the beef-type Devon. The horns on Devon steers grow faster than their bodies. Devons are very difficult to find and tend to be expensive. Often breeders will have a waiting list of teamsters who want a team, but they are relatively easy to match.
Devons have a high resale value as they make excellent teams for working around the farm. Their intelligence may be used to the advantage of an experienced teamster, but they can be challenging to handle and not recommended for the novice teamster.
Brown SwissA less popular breed, Brown Swiss originated in Switzer-land. They are very docile animals and tend to move much slower than other breeds. For a dairy breed, they tend to have a heavier muscle covering with strong feet and legs. The breed is not as easy to find, and may affect the cost of a team. Brown Swiss are easy to match, as they generally stay in the light to dark gray range. These cattle have a slow maturing rate, but make excellent pullers and a good, strong team.
Other and CrossbreedsThere are many other purebred and crossbred cattle available. Examples include: Herefords, minor breeds (such as Linebacks or Dexters), Charolais, Chianina, Whitefaces (which are Hol-stein/Hereford crosses), Devon-Holstein, and Ayrshire.
These breeds may be more difficult to find and therefore more expensive, but have been known to make award winning teams. Consult someone who has a team or knows of the desired breed to decide which breed would be best for you.
Age of CattleMost young teamsters will want to purchase young calves which gives them the ability to handle the team easier. Purchasing a mature, trained team is not recommended for a younger teamster. Oxen can sense if the teamster is incapable of maintaining control and can become difficult to manage for an inexperienced teamster. In addition, a primary objective of the project is to learn to train a team of oxen. Unfortunately cattle don’t grow at the same rate as humans and calves will quickly out grow their handler. If a young member isn’t able to handle their team, it may be necessary to purchase new calves as the steers outgrow the child.
American Milking Devon breed
Brown Swiss breed

5
Recognizing an ideal team/Recognizing good conformation, abnormalities and faults
Once you have decided on a breed and have located a team, it is wise to go and see the calves for yourself. Buying a team sight unseen is not recommended.
First, look each calf over. The general appearance of the calf will give you some clues to the health and characteristics of the animal. The calf should stretch when you get him up. He should be alert and curious to what you are doing in his pen. Make sure the calf does not have any physical abnormalities such as an umbilical hernia or blindness. Inspect the coat for signs of lice, fleas or mites, as well as ringworm. Check for runny eyes or nose, diarrhea, and for signs of disease in the hooves. Ask the farmer if he dipped the navel of the calf after birth to prevent navel and joint ill. You may want to check to make sure the calf has two descended testicles, for easier castration. Also, be sure the team you are purchasing will have horns, as horns will be necessary when maneuvering a cart down hill.
A calf that will make a strong steer will have a straight back with squarely placed feet and strong pasterns. A wide chest floor between the front legs is also desirable.
After the calves have been physically examined, try to match a team. By matching a team, you look to find two calves as close in size, color patterns, and bone structure as possible. A mated team is a team placed together based solely on similar working capabilities. A mated team works well together, but does not necessarily have to be of the same color, nor the same breed. A 4-H member should strive to have a team that is well matched and mated.
Stand the calves next to each other. Pay attention to their markings. It is easy to match solid colored calves, who may only have a star on the forehead to match, but do the best you can with Holsteins and other varied colored breeds. Also, pay close attention to size and bone structure of the calves. A smaller calf can be given more grain to even out height differences, but a calf with smaller bone structure (small, delicate bones) will not be able to keep up with a heavier boned animal.
Once you have purchased your team, don’t think your work in keeping them matched is done. It is your responsibility to monitor the growth rates of your team. Make sure each steer gets ad-equate amounts of grain and hay. Separate your team at feeding if one steer is more aggressive in eating all the feed. If the horns on your cattle grow in different directions, you may correct them (ask your club leader for help if necessary).
They’re your team and your responsibility—the more work you put into your project now the more successful you will be over the course of your project.

6
Management
HousingThe housing for your team of working steers is generally dependent upon the amount of space you have readily avail-able. If you already live on a farm, then it will be easy to find a stall or pen for your team. If not, you may have to alter existing facilities.
Steers will do well in most any housing environment, as long as it is kept clean and dry to prevent disease. A barnyard or pasture for your team is acceptable, although not always feasible. Many teamsters prefer that the steers be kept in a solid-walled barn or shed with tie ups. This aids in the training of young steers and will ensure their readiness for the fairs, as they must be tied at such events. Some teams are kept in stan-chions and this is perfectly acceptable.
Tying a team is easy. If you don’t have a have a halter for each steer, you can make one out of a length of rope. Call your County Extension office for a fact sheet or information on making rope halters.
VentilationA barn with proper ventilation is essential to the health and well being of your team. Cattle kept in barns without windows and closed up tight against the cold winter winds may seem like a good idea, but it is a disaster waiting to happen. Instead, leave windows at least partially open to allow clean, fresh air in the barn at all times. To prevent respiratory disease, young calves should not be kept in a direct draft. During the summer months, it may be necessary to install a fan over your team to keep fresh air flowing around them. As long as your team is kept in a clean, dry, well ventilated area and always provided with fresh clean water and feed, they should remain healthy.
Feeds and FeedingCattle, like sheep, goats and deer, are ruminants, which means their digestive system includes a four-compartment stomach. This specialized system allows ruminants to utilize high fiber for-ages as a major portion of their nutrition needs.
Digestive SystemCattle don’t have top teeth (incisors), but have a tough layer of skin on the top of their mouth, where their teeth might have been. When grazing, ruminants cut the forage with their lower teeth and bite against the thick skin on the top of their mouth. Once chewed, food is swallowed and passes through the esophagus into the first compartment of the stomach.
The reticulum is sometimes called the honey comb chamber because the inside walls of the reticulum resemble a honey comb. The purpose of this compartment is to catch large food mate-rial. Calves have larger reticulums in relation to the rest of their stomach compartments. As they mature and begin to eat more forages, the second compartment (rumen) of their stomach devel-ops and becomes the largest portion of their stomach.
The rumen is a large fermentation vat where food is sorted, agitated and fermented. Millions of microbes (bacteria and protozoa) can be found in the rumen. These microbes attach themselves to feed particles and digest the feed, producing by-products in the form of volatile fatty acids (VFA’s). These VFA’s are in turn absorbed through the wall of the rumen to be used as energy for the animal.

7
Fats and sugars are digested in a similar manner, however most fats take longer to digest and are passed to the abomasum (fourth stomach compartment).
Feed is sorted in the rumen. Large stems and hay particles may spend up to 60 hours in the rumen. Ruminants will regurgitate and rechew these large particles to aid in digestion (chewing the cud). Smaller feed particles, such as some grains exit the rumen quickly and pass through to the third stomach compartment, the omasum.
The omasum is made up of many layers of tissue and feed particles move into it and fill up the spaces between these layers. Water and some mineral absorption takes place here.
The abomasum is the fourth compartment of the ruminant’s stomach and is really the “true” stomach. This compartment produces gastric enzymes and digests acid, similar to our own stom-ach. Starches, sugars and proteins are broken down here.
The small intestine is a long, coiled tube (up to 130 feet in a mature steer). Fat digestion begins here and absorption of all nutrients except water takes place across the lining of the small intes-tine. The last segment of the digestive system is the large intestine and it’s function is to absorb water. It’s shorter than the small intestine but larger in diameter. The large intestine ends at the rectum, where solid waste product is passed from the animal in the form of manure.
NutrientsThere are five major nutrients that are required by cattle. Each of these has a different role in growth and maintenance of the steer:
• Energy • Protein • Vitamins • Minerals • Water
■ EnergyEnergy nutrients provide “fuel” for your animal. Aside from water, energy makes up the largest portion of a steer’s diet. Once digested, energy nutrients are carried via the blood stream to dif-ferent parts of the body. Energy is required for muscle movement and produces heat to keep an animal warm.
Carbohydrates are the main group of energy nutrients. Grains, such as corn and oats, contain carbohydrates in the form of sugars and starches. These simple carbohydrates are fairly easy to digest. The cellulose found in hay, silage and pasture is a more complex carbohydrate and more difficult for most animals to digest. Ruminants are specifically designed to digest cellulose in the
8
largest compartment of their stomach, the rumen. Microorganisms (protozoa and bacteria) found in the rumen digest the cellulose, converting it to sugars, which are in turn digested easily.
Fat is another group of energy nutrients. Although the energy in fat is more concentrated, (2.25 times more than carbohydrates), it shouldn’t be used as a main energy source for cattle. In fact, mature steers probably don’t need any fat added to their diet at all. Too much fat or oils can make them sick.
■ ProteinProteins are important for growth. Amino acids are the building blocks of proteins. The number and arrangement of amino acids determine which type of protein is built. All tissues both inter-nal and external, including horn, skin, hair and hoof growth require proteins.
Calves and pregnant or lactating cows require more protein than mature steers. High protein feeds like alfalfa or soybean meal are generally more expensive and cattle will convert protein they don’t need into energy. Because of the higher cost of protein feeds, you will not want to feed more protein than necessary.
■ VitaminsVitamins are needed in relatively small amounts in a steer’s diet, but they are just as important as other nutrients. Each vitamin is chemically different and has a specific function in the body.
Vitamin A is needed for healthy tissue linings and the nasal passages, eyes and lungs. Carotene – green and yellow in grass in hay, supplies Vitamin A.
Vitamin D supports bone growth. It is called the “sunshine vitamin” because exposure to sun-light allows animals to convert a compound found in the body to Vitamin D.
Vitamin E works with the mineral Selenium, to develop muscle. Vitamin K is important for blood clotting. B-complex vitamins and Vitamin C are not typically supplemented in cattle rations as the rumen microbes will usually synthesize these vitamins.
■ MineralsLike vitamins, minerals are needed in very small amounts and are essential to the well-being of your steer. Calcium, phosphorus, magnesium, potassium, sulfur and sodium are macro minerals and are sometimes fed as supplements in the forms of dicalcium phosphate, magnesium oxide or calcium carbonate. Iron, manganese, copper, zinc, cobalt, iodine and selenium are trace minerals and are required in minute amounts. These minerals are typically fed through a purchased trace mineral salt mixture to provide the proper balance.
■ WaterWater is the single most important nutrient and often the one that’s taken for granted. In addition to regulating body temperature, water makes up the largest single part of a steer’s body and is required for many body functions.
Clean, fresh water should be available to your steers every day. New England weather is cold in the winter so be sure to change or thaw frozen water at least twice a day.
FeedsCattle feeds are typically divided into two types: roughages and concentrates. Roughages include hay, silage, straw, pasture, corn stalks and other crop residue. Roughages are high in fiber and typically lower in energy than concentrates. Concentrates include grains (corn, oats, etc.) and the by-products from processing other foods like wheat bran, distillers waste, etc. These feeds are high in energy and sometimes high in protein (soybean meal, cottonseed meal). Concentrates tend to be higher priced feeds than roughages.

9
When determining what and how much feed your steer will consume, feeds are often converted to a Dry Matter basis (DM). Dry Matter refers to the percent of dry feed left when all of the water is removed from a feed stuff.
A balanced diet for working steers depends on several things: age of animal, breed, size, body condition and feed availability. Cattle typically consume 2 to 2.5% of their body weight in DM feed. Calves less than 500 lbs. may eat up to 3% of their body weight.
Table 1: Suggested Feed Intake
Body Weight (lbs.)* Feed Intake (lbs.) As Fed Dry Matter
200 6-7 5-6 300 8-10 7.5-9 400 11-14 10-12 500 13-16 11.5-14 600 16-20 14 -17.5 700 18-22 16 – 19.5 800 20-23 17.5 - 20 900-1300 22-25 19-22
* Wyoming 4-H Beef Manual
Feeding the CalfAs a teamster, you most likely will be purchasing your teams of working steers from area farms, unless you live on a dairy or beef operation. Because of this, you most likely will not be present for the birth of your steers, nor be able to give them their first and most important meal – colostrum.
Colostrum is the first milk produced by a cow after she calves and it is loaded with proteins, vitamins, minerals and antibodies. These antibodies can be passed on to the calf in a form of passive immunity, which will help the calf survive. The antibodies can help the calf defend itself against diseases in the area, but they can only be absorbed and be effective in the first 6 hours of life, so you must rely on the farmer to administer this first and very important source of immunity.
After you bring your calves home, you may begin them on a strict diet of high quality milk replacer. Milk replacer can be purchased from your local grain store in powder form and mixed with warm water for maximum solubility. The highest quality milk replacer is powdered milk made from real milk for easier digestibility.
Feed your calves twice a day at scheduled feeding times according to the proportions recom-mended by the milk replacer manufacturer. Grain and hay should be offered free choice.
Weaning should occur at between 8 and 14 weeks of age. Weaning is the progressive decrease of amounts of milk replacer, and gradual increase of calf starter grain mix and free choice high qual-ity hay. Follow instructions per the milk replacer manufacturer on weaning schedule.
By three months of age, calves can be introduced to a mineral salt block for their mineral needs. High quality hay should be continued although excess hay can cause hay bellies, which are unde-sirable in steers.
Fresh, clean water should be made available at all times and is essential to the health of your team.
Newborn steer drinking colostrum.

10
Feeding growing steersFeeding a growing ration to steers will permit your animal to grow rather then fatten up. If your steers were being raised for beef, this would be a different ration. Growing steers will do quite well on a diet of good quality hay or pasture. However, if the hay or pasture doesn’t have a level of protein that is at least around 12-14%, you may have to feed a protein supplement in small amounts (.5 to 1.0 lb. per day). Alfalfa or any hay that contains a legume (clover, alfalfa, trefoil, etc.) is typically high enough in protein to feed a growing steer without supplement. It’s probably a good idea to have some of your hay analyzed for nutrient content if you are not sure.
Growing steers may be fed grain as well, but you shouldn’t feed too much grain, so that rumen function remains normal. Grains can be fed at around 4 lbs. per day and gradually increased (.5 to 1 lb. every other day) until you reach 40-45% (maximum) of the diet. If you were feeding for an aggressive growth (as in beef cattle rations), you might feed up to 60-70% concentrate, but this is typically cost prohibitive for working steers, not necessary, and may cause health problems.
When selecting hay for your team, make sure it’s free of mold and excessive dust. Break open a couple of bales when you are inspecting the hay and don’t buy hay that feels hot on the inside or smells musty or moldy. Good quality hay should have leaves attached to the stems but not many seed heads present. Seed heads and mature flowers in hay indicate a later harvest and that the nutrients aren’t as high as they might have been if harvested at peak time.
Feeding the mature teamFeeding mature steers can be as simple as watching growth and body condition and adjusting the diet accordingly. A lean or underweight older animal may require increased feed or a higher quality feed for short periods of time. Generally, older animals need less protein, less energy more fiber, and consumption of a lower percentage of their body weight each day (around 2%). Refer to Table 1 to determine how much feed your steer should be consuming. Once mature, your steers will do well being fed strictly hay or pasture. Fresh water and mineral salt blocks should be available free choice throughout the life of a team.
Monitor the weight of your steers by actually weighing if you have access to scales or estimating weight with a girth tape.
Length (inches) from pinbone to point of shoulder (A to B) x [2 x heart girth (C)] = estimated weight (lbs.)
300
By measuring and recording the weight of your animals periodically, you can adjust the amount of feed for one or the other to keep them close to the same size.

11
Health
Normal vs. Sick CattleAfter you have spent time with your team of working steers, you will come to know them quite well. You will be able to recognize their body language and temperament and make judgements on their health based on how they appear from day to day. The normal steer will exhibit the fol-lowing behavior and appearance:
• Alert and attentive eyes/ears • Eating/chewing cud • Drinking water • Healthy, shiny coat • Defecation (normal consistency) • Normal posture • Walks/moves easily • Is quiet
Unhealthy or diseases animals may exhibit some of the following:
• Disinterest in feed/water • Diarrhea/lack of feces • High temperature • Runny nose/eyes • Lethargic • Reluctance to stand • Loss of hair, lesions on the skin • Lame feet • Bloated/gaunt
With experience you will be able to determine what problems require veterinary assistance. Although not every health problem may require calling a veterinarian, you should always contact your 4-H leader or veterinarian if you aren’t sure of the appropriate treatment.
Taking a temperatureIf you suspect your steer may be running a fever (ears are especially hot), you will need to take the steers temperature before becoming alarmed. The normal body temperature of cattle runs around 101.5 F, but can range from 100.4-102.8 F. If you call a veterinarian, they will typically ask you for the temperature of the sick animal.
Temperatures exceeding 103.0 F should raise some concern and may require veterinary assistance.
A healthy calf
An unhealthy calf

12
Using a veterinary rectal thermometer, first shake down the mercury, then insert the thermometer, bulb first, about 2-3 inches into the rectum (be sure to leave enough thermometer to hang on to!) Do not force the thermometer, as this may cause breaking of glass or the rectal wall.
Keep the thermometer out of fecal matter or gas pockets to produce an accurate reading.
Hold the thermometer inside the rectum for three minutes before taking it out for a reading. For safety, have a string attached to the thermometer that hangs out of the rectum, preferably attached by a clip to the hair on the animal.
Always clean the thermometer with warm (not hot) water and soap and return it to the medicine cabinet for safe keeping. Call your veterinarian if necessary.
Common afflictionsOnce you have determined the steer’s temperature, you can look at the other symptoms he is exhibiting. There are many diseases and afflictions that occur with cattle. Listed here are a few common diseases that teamsters should be aware of:
■Foot RotFoot rot can ca use the tissues between the hooves to become inflamed, causing severe lameness. A bacterium (Fusobacterium necrophorum) is thought to cause this disease.
Signs and Symptoms: This disease occurs during all seasons but tends to be most prevalent during wet weather. However, foot rot can occur in dry weather, particularly when cattle have access to stagnant water. Once a break in the skin occurs, organisms in stagnant pools readily infect the wound. One or more feet may be affected at one time. The best form of prevention is to practice good hygiene.
Treatment: Systemic and local treatment with antibiotics and sulfonamides usually shortens the course of the disease. Other procedures that may speed recovery are cleaning the foot, applying a protective dressing and removing the necrotic (dead and decaying) mass.
Prevention: Keep animals in clean dry environment. Restrict access to high risk areas known to hold stagnant water.
■BloatBloat is a complex, metabolic disorder that develops when gas production in the rumen exceeds the animal’s ability to remove gas by eructation (belching). Because natural rates of gas formation in the rumen are very high, this imbalance can occur very rapidly. In both pasture and feedlot bloat, eructation is commonly inhibited by frothy or foamy rumen contents where much of the gas remains trapped and forms very small bubbles. These bubbles expand the rumen contents and interfere with nerves that control the opening into the esophagus. Approximately 10% of bloat cases are caused by “free gas” bloat in which gas production simply exceeds eructation.
When lush, young forage materials (pasture bloat) or finely processed grain are ingested, mi-crobes attack the cellulose and soluble carbohydrate immediately. Initial rate of energy release is very high. This rapid availability of feed energy stimulates a burst of microbial activity that gener-ates large amounts of gas. Gas is then trapped in rumen fluids to produce foam. Trapped gases elevate rumen contents, fill the rumen cavity and interfere with esophageal functions.
When viewed from the rear, animals will appear very full or puffed up on the left (rumen) side. As bloat progresses, both sides of the animal become distended and breathing becomes labored. Ultimately, death can occur.

13
Treatment: If your cattle exhibit bloat symptoms call a veterinarian immediately.
Prevention: Never change your cattle’s diet suddenly. If you are introducing your team to pasture for the first time in the spring or even to a new pasture with different forage species, do so gradually. Be sure to feed a combination of forages (pasture, hay or silage) and grain (corn, oats, barely) and not strictly a grain diet.
■ Hairy Heel WartsHairy heel warts is a disease affecting the feet of cattle. It has become increasingly more common among cattle attending fairs. The disease usually starts as an extremely painful, rough and raised area on the skin at the back of the feet, most often the rear feet. Cattle infected are often very sore and stand on their heels.
Treatment: Antibiotic sprays, like Terramycin, Lincomix and Oxytetracycline, sprayed di-rectly on the lesion has offered excellent control. This should be done in conjunction with your veterinarian.
Prevention: Cattle housed with or near dairy herds with this disease are most likely to become infected.
■ Hardware DiseaseHardware disease is caused when a steer ingests a relatively heavy and sharp object. The object falls to the floor of the rumen and is pushed forward into the reticulum.
Typical symptoms of this disease are pain and loss of appetite. The animal may stand with an arched back or be reluctant to walk. Often you can hear a “grunt” when the animal is forced to walk. Symptoms and seriousness varies depending on whether or where the item penetrates the wall of the reticulum.
Treatment: Since many other diseases can exhibit the same symptoms, it is difficult to be 100 per-cent sure of a diagnosis. X-rays and metal detectors may be used to diagnose, but these methods are not always effective either.
Prevention: Prevention of hardware disease in cattle revolves around managing animal feed and animal areas so they avoid ingestion of heavy sharp objects. Keep your pastures and any areas your steers are housed in free of dangerous objects. Barbed wire fencing, staples and roofing nails are often incriminated in hardware disease cases.
Another preventative practice is to place a magnet in the animal’s forestomach with the hope that it ends up in the reticulum. The bar magnet will attract metal objects to the bottom of the stomach, hopefully preventing the object from penetrating the reticular wall.

14
External Parasites
■ LiceTwo types of lice afflict cattle: biting and sucking. Either way, they are a nuisance and quite irritat-ing to the steers.
Sign and Symptoms: As lice feed on the blood of your steer, the animal will rub against poles, sides of the barn or you in order to relieve the itching. This can result in hair loss and open sores, which is not only unsightly, but also painful. Severe in-festations will produce bare patches of skin with a bluish color. Steers may go off feed and their growth may be stunted if not treated immedi-ately. Lice are spread from one animal to another by physical contact. Lice can occur year round, but are most common in winter months when animals are kept indoors in close quarters.
Treatment: There are several methods that may be used to help control lice infestations. Dustings are most common and inexpensive, but there are also drenches and injectable medications (such as Ivomec) available. Contact your veterinarian for more information.
Prevention: Sprays or delousing powders can also be used in preventative measures.
■MitesSigns and Symptoms: Mites produce many of the same symptoms as lice. However, while lice bite the surface of the skin, mites are a microscopic parasite that burrows into the skin. This is severely irritating to cattle and causes intense itching. Red, blistering skin may result, in addition to fierce scratching and hair loss. Mites are also spread through physical contact.
Treatment: Mites are best controlled by injectables such as Ivomec, drenches, and other forms of insecticides. Consult your veterinarian for more information.
Prevention: Sprays may be used as well as dips.
■FliesFlies are a fact of the barnyard. However, proper sanitation, manure handling and management will reduce fly numbers.
Signs and symptoms: Most flies associated with cattle are biting flies, and your steers will show agitation and discomfort when the flies bite them. Tail swishing and skin twitching are natural defenses that aid in the removal of flies from the skin.
Treatment: Severe fly problems can be pacified with sprays, pour-ons, or dusting.
Prevention: Sanitation is the first and most important step in any fly control program.
Insecticides will not be effective as long as breeding sites are available. Manure, wet straw and decaying feed are all attractive breeding grounds for most flies. By removing these items from the barn yard at least once a week, you will break up the breeding cycle of flies and reduce popula-tions considerably.
Delousing a steer

15
Fly spray is useful and sometimes necessary, especially when working your team of working steers. During fly season, you may want to protect your cattle by applying a coat of fly spray or wipe as needed. Pay special attention to sensitive areas such as the eyes and ears. For ears that are especially sensitive to bites, you may want to smear a coat of Vaseline petroleum jelly on the inside ear (do not push into eardrum). This prevents flies from reaching the skin.
■TicksTicks are becoming a nuisance in many areas around the United States. Your steers can pick up ticks in tall grasses when out on pasture.
Signs and Symptoms: Ticks will latch on to your animals’ skin with their mouth parts and suck blood continuously until full. When they have their fill, they will drop off. They can be felt under the skin as small lumps when filling with blood.
Treatment: Pulling ticks out of the skin must be done carefully. Pull slowly and downward so as to remove all of the ticks head and mouthparts. Any tick remaining in the skin could cause an infection.
Prevention: Before turning your steers out to pasture be sure to apply fly and tick spray or wipe to prevent ticks from being attracted to your steers.
ParasitesWhen eating, your steers may inadvertently ingest any number of internal parasites. Depending on the immunity of the steer, he may be able to ward off illness caused by the parasite, or he may become ill. The following are some internal parasites common to working steers.
■RoundwormsRoundworms live in the fourth stomach compartment (abomasum) and part of the small intes-tine. Adult worms suck blood through the gut lining, which may cause holes and fluid leakage into the gut. Eggs laid by adults are expelled in manure and once hatched, larvae climb on blades of grass. Cattle ingest the larvae when grazing, causing a never-ending cycle.
Signs and Symptoms: Infected animals may become dehydrated, have dramatic weight loss and loss of appetite and or develop a swelling of the jaw (called bottle jaw).
Treatment: Administration of drugs such as ivermectin, fenbendazole, albendazole or levamisole may be helpful in treating affected animals. Contact your veterinarian for more information.
Prevention: Use a deworming program appropriate for your area (usually deworming occurs in spring and fall for calves at 200 lbs.) Consult with other cattle owners in your area, your 4-H leader or veterinarian to develop a comprehensive worming program. Rotate your cattle to pas-ture where cattle have not grazed for at least a month to prevent re-infestation.
■FlatwormsTapeworms are the most common flatworm parasite in cattle. They are transmitted by grass mites that have fed on tapeworm eggs in cow feces. Tapeworms live in the small intestine and absorb nutrients that would otherwise benefit the steer. As tapeworms grow, segments of their body break off and can be observed in the feces as small white fragments (they look like wiggling grains of rice). Tapeworms are not often a disease-causing parasite, but may weaken the immune system to allow secondary diseases.

16
Treatment: Ivomec pour-on.
Prevention: Make sure feed is free of feces. Follow a deworming program. Rotate your cattle to pasture where cattle have not grazed for at least a month to prevent re-infestation.
■CoccidiosisCoccidiosis is a disease caused by one-celled protozoan parasites called coccidia. Calves are most susceptible to this disease, as older animals usually develop immunity.
Signs and Symptoms: Coccidia live in the small and large intestines and cause bloody diarrhea in the animal. Coccidiosis is more likely to occur when the animal is under some sort of stress (such as weaning, heat or overcrowding) and is easily spread animal to animal through ingested fecal matter.
Treatment: Although coccidiosis should be treated before signs of the disease are seen in the animal, measures should be taken to ensure the animal does not contract secondary diseases.
Prevention: Isolate infected animals to prevent spreading to other animals. Keep calf areas clean, dry and stress free.
■RingwormRingworm is a fungus that infects the skin.
Signs and Symptoms: Ringworm works it’s way into the hair follicles and causes the hair to fall out. This produces bare patches of skin, generally in circular (“ring”) formations, but can be of other shapes and many sizes. Ringworm often occurs on the face and neck, although any body part is susceptible.
Treatment: Use of an anti-fungal applied to the affected area may accelerate recovery, but usually, the course of the fungus is untreatable.
Prevention: Because ringworm can be passed through direct or indirect physical contact of steers and you (always wash your hands thoroughly after touching ringworm-infected cattle as humans can get ringworm). It may be helpful to isolate infected animals. Once your steers have had ringworm, they are not likely to get it again.
Ringworm is highly contagious so don’t share halters, brushes or other equipment with fellow teamsters. If your animals have ringworm, they must not be taken to a fair or show.

17
Other Diseases
■WartsWarts are a viral disease which cause unsightly bumps and masses on the surface of you steer’s skin.
Signs and Symptoms: Bumps and masses commonly found on the face and neck, but can occur anywhere on the body.
Treatment: Cutting off warts is a common practice, though this does not ensure the warts will not grow back. Most animals will have a few warts when they are young at some time, but once infected they are rarely re-infected.
Prevention: Isolate infected animals. Vaccinate for warts.
■Calf ScoursCalf scours, or enteritis, is a very infectious bacterial disease, commonly caused by Escherichia coli (E. coli), although it can also be caused by viruses such as the Rota viruses and Corona viruses.
Sign and Symptoms: Calves afflicted with calf scours exhibit diarrhea, loss of appetite, weight loss, and dehydration. Calves in this condition need treatment. Call your veterinarian immedi-ately if your calf does not respond to treatment.
Treatment: Electrolytes should be administered along with antibiotics. Water should be available at all times.
Prevention: Isolate infected calves. Ensure the calves you purchase have received adequate amounts of colostrum. It is a good idea to vaccinate your calves for E. coli, but this will not pre-vent all types of calf scours.
■Respiratory VirusesRespiratory ailments such as Bovine Virus Diarrhea (BVD), Infectious Bovine Rhinotracheitis (IBR), Bovine Respiratory Syncytial Virus (BRSV), and PI3, can cause severe problems for your steers.
Signs and Symptoms: Calves with respiratory diseases generally exhibit red and runny noses, fever, coughing, weight loss, and diarrhea.
Treatment: Consult your veterinarian for treatment.
Prevention: Vaccination with a killed virus for these diseases is cheap and effective. Also, provide your steers with a clean, dry and stress free environment. It is highly recommended to vaccinate steers before the fair season.
Ensure the safety of othersBefore you take your steers to a show or any place there are other cattle, make sure your animals are not ill or carrying infectious diseases. To prevent passing contagious diseases, do not share buckets with other animals at fairs. Check with state and fair health regulations to make sure your animals have all the vaccinations necessary for admission. Always remember that the supervi-sor or local attendant of the show has the authority to reject an animal that appears unhealthy or doesn’t have proper health certificates.

18
Management
CastrationAt one point or another, it will be necessary to castrate your team. Castration is necessary to ensure the safety of the teamster, as well as the animals, as bulls can become quite aggressive.
Castration is a relatively simple surgical procedure that removes the testicles or prevents them from functioning. After a bull (intact male) is castrated, it is called a steer.
Castration can be performed as young as one day old, but is usually done between six months and one year. This will give your team enough time to establish bullish characteristics (such as a wider head and stronger horns) before becoming aggressive.
One of three methods may be used for castration, but all should be performed with ample time to heal before any shows/fairs and preferably not during fly season.
A qualified veterinarian may use:
• Elastration – where a rubber band constricts the scrotal sac and causes the entire scrotum to be removed. However, this must be done between one and two months of age. It is also a slow process that is not entirely credible for actual castration.
• Crushing – where the cords are crushed to prevent maturing of sperm, but the testes are not removed. There is the possibility of missing a cord and resulting in an incomplete castration.
• Surgical Removal – where the testes are removed. This ensures complete castration.
Foot careProper hoof care can begin when calves are young. By picking up the hoof and leg of your calves, you can get them used to this sort of handling. This will make it easier for any hoof or leg care when the animals are larger.
To pick up a front hoof, stand facing your steer, bend down and squeeze the dew claws to-gether while cupping the front side of the hoof. Pull the leg up as the knee folds. Hold the hoof securely and be careful not to place the hoof on your own foot when you let him go. For back hooves, stand in the same position, but when you pull up on the hoof, do not try and pull the leg outward, as this may cause the steer to feel unsteady and fall. Instead, pull straight up and work from there.
Trimming hooves can be a difficult and challenging experience for the young teamster, and may not be necessary. Teamsters who exercise their steers daily may find that the hooves remain well worn on their own.
The ideal hoof has short toes and high heels, which causes the animal to walk properly on his toes and therefore keep them trim during regular workouts.
If you do need to trim hooves, do so to allow adequate time for your steers to adjust to their newly trimmed feet before pulling heavy loads or entering a show.
Unless you are a professional, it is unwise to use power tools and sanders when trimming hooves in order to ensure the safety of you and your team. Stick with nippers, a rasp and a pair of hoof knives.

19
Tie the animal so kicking will not be an option (this may require extra hands) and beginning by nipping off the end of the toe (cut #1). Nip off small sections at a time, stopping before you have reached the “quick.” The “quick” refers to the live tissue inside the hard surface of the hoof. You don’t want the hoof to bleed as this will cause lameness.
Next, remove excess hoof material from the bottom of the hoof (cut #2) being careful not to take off too much from the outside shell, as this is necessary for the support and protection of the hoof. Leave as much heel as possible, rasping from heel to toe.
Remember to check the hoof to make sure both toes are even with each other and will allow the steer to walk on his toes. This can be done by letting him put his foot down and seeing that he stands square on it, or by pressing a flat board on the bottom of the hoof and making sure it does not wobble.
Animal IdentificationYour team of working steers may have arrived with or without eartags; the eartag is a form of identification and may be removed or kept on. If you do use an eartag, make sure they are in the bottom part of the ear to avoid complications in growth and working. Generally, team-sters do not have so many steers in the barn that they need eartags to distinguish steer from steer, but they can be helpful. Some form of animal identification is required for all 4-H working steer animals.
Another form of identification popularly used by team-sters is tattooing. An animal’s name or a number can be tattooed inside the ear to ensure identification. This procedure should only be performed by a licensed veteri-narian or experienced individual.
A veterinarian administers small metal eartags when your steers receive their Tuberculosis (TB) test or they can use a tattoo if they test TB free. This is a form of permanent identification that may be required for traveling over state lines and entering shows. Check with your state rules and regulations for any requirements you need to follow.
Record keepingIt is helpful to keep records for your 4-H working steer project. It is important to keep information such as feed costs, health records, approval forms, training and show records. It is also reward-ing to track your progress over time. You can track how much time and money you have put into your team.
These records can be kept for your own knowledge and reference. They can also be submitted for judging at the county and state levels. For official record forms, contact your 4-H leader or local Extension Educator.
Normal hoof trimming (left) and ideal hoof angle in trimmed hoof (right)
Steer with small metal ear tag.
20
Approval FormsNew Hampshire 4-H programs require animal project members to submit approval forms every year they plan to participate in New Hampshire 4-H shows. Deadlines for submitting these forms may change from year to year, but are typically in the spring for working steers. The forms must be filled out, signed by yourself, your 4-H leader and county extension educator. The information included must be accurate, as any falsified forms will be disqualified, and you will be unable to show your project that year. If you have more than one team, it would be wise to sign up all teams just in case you decide to show one team over the other. Remember that, while approval forms are required to enter each show and you should have them and health records available at all times, they are NOT fair entry forms. You will need to contact fair administration in order to obtain entry forms for individual 4-H and open shows. Contact your 4-H leader or county extension educator for approval forms and/or information on entering county fair competitions.
BehaviorThe focus of the 4-H Working Steer project is training your animals to respond in a yoke without a halter. The use of a goad or whip and voice are the techniques used for animal control.
When starting a team, it is important to remember the five basic commands: Whoa, Giddup, Gee, Haw, and Back. These are words that the team will quickly associate with certain actions. It would be wise for the teamster to use these commands consistently and not try the change them. This will help in the resale value of your team, as teamsters will be more apt to purchase teams who already know the commands with which they are familiar.
For ease in training, you should purchase your team as young as possible. Although older ani-mals can be trained, it is easier to handle a younger, smaller animal. Imprinting is more likely to occur at this younger age. You will find that your steers will recognize your voice and shape as you come out to the barn to feed and work with them. You can use this recognition factor to your advantage.
Naming your teamNaming your team is very important, as you will use their names in conjunction with the com-mands. Keep the names to short one or two syllable words that do not rhyme like: Duke and Diamond, Bert and Ernie, or Ben and Jerry. The names shouldn’t rhyme with commands you use either (Bow rhymes with Whoa). Your steers will be able to recognize the sound or their name, but only if you keep it short enough so they can pay attention through it.
Cattle BehaviorIt is important you understand your team and their behavior. Cattle may not think like humans, but they can communicate to us in subtle ways. You must be in tune to what they are trying to tell you. Much of the behavior exhibited by cattle is learned. When working with cattle, we often take for granted their eyesight, hearing capabilities and response to stimuli.
■ EyesightYour steers have very good vision. With eyes on the side of their heads, your team can see what is happening in front of them, as well as what you’re doing beside them. This panoramic vision leads to a concept we call the “flight zone.”
The flight zone of a steer can be used to your advantage during training. When you stand in front of the steer, you pose a threat to him, and he will move around or backwards. This may be helpful at some point, but not if you want them to move forward.

21
When approaching a steer, move slowly and within the sight of the animal. He will know you mean him no harm and allow capture. Sudden movements may startle the steer into running. As long as you assure the steer of his safety, he will be much easier to handle.
■ HearingCattle have very keen hearing, and they will learn quickly to associate certain sounds with certain activities. The opening of the barn door and clank of buckets will immediately alert your steers it’s feeding time. Just as they associate these sounds with food, they will be able to associate the commands you give them with what you want them to do. Do not be fooled by a team who pretends not to hear you, just keep repeating the command in a calm fashion and soon they will understand.
When using voice commands, it is very important to be firm and persistent. A team is not going to learn the commands in one day, but as long as you continue training with positive re-inforcements, and force when necessary, they will eventually understand. You must be patient. Trying to teach your team too many commands at once will confuse them. Start by teaching “whoa”, the most important command. Then, after you think they have a grasp of the concept, add “giddup” and work from there.
Remember that your team watches every move you make. Even if you are being consistent in your voice commands, slight differences in your body language can confuse the animals.
■ TouchCattle are very aware of their surroundings. Regardless of their tough hide, you will find your steers will be able to feel a fly land on their coat. This fly will cause a flick of the tail or twitch of the skin to be rid of the annoyance. On the other hand, the area around the horns and head is not quite as sensitive, as the head is used when exhibiting aggressive behavior.
It is necessary to remember a steer can feel pain. The whip or goad should only be used as rein-forcement when voice commands are not enough, and even then, only slight taps are required. Excessive beating is abusive and will confuse the steer as to what he did wrong. If you hit your steers with brutal force while they are demonstrating the command you asked for, you will only regress in training. In addition, remember you are setting an example for animal agricul-ture to the general public who may be watching. Any excessive force may lead to questions about abuse and cruelty.
■ Creatures of HabitKeep in mind that cattle are creatures of habit, and will recognize patterns in training. They know when and from where feed will come, and how long a workout usually lasts. They will even recognize a common turning around point, and become excited for the walk home. Vari-ety is the spice of training. Mix things up and keep your team waiting for the next command. If an animal wants to avoid a certain area or place, they must be trained to overcome their fear and trust the teamster.
■ DominanceYou’ll notice that your team will nearly always be together, and where you find one, the other is sure to be close by. Cattle are very social and enjoy the company of others. They, along with any other cattle you may have, establish a herd, and each of your steers will have a place in this herd. Usually, a steer with larger horns and heavier body weight will maintain a status of dominant steer within your team. You must establish your dominance over both steers to assure easier handling.
As with a dominant steer, your team will respect and follow you if they realize you are indeed dominant. To establish your dominance in the herd, start when the animals are young. Let them know that you are capable of capturing and restraining them, as well as providing them

22
with clean, fresh feed and water and a sense of safety. Once your team recognizes you as their superior, training will be easier and much more enjoyable.
■ The rope halterTo learn how to make and use a rope halter, talk with your club leader or ask your Cooperative Extension Educator for a fact sheet describing this activity.
TrainingThe first step in training is to bond with your team. This is simple, but necessary, as imprinting will occur through daily chores.
Before you begin training, you must remember your team will listen to you and respond to your voice and body language at all times (even when you are not aware of it). Consistency is key in training, and will be rewarded with a well-trained team.
Do not try to teach all five commands to your team at once. This will only confuse the animal and frus-trate you. Start with “whoa”, then “giddup”. After you feel confident they recognize and attempt these commands, you can move on to “gee” and “haw”, giving a team at least a week to let each of the commands sink in. Reserve “back” for last, as it is an unnatural gait and may prove to be the most difficult command to teach. Remember to follow a command by the name of the steer so they can distinguish which team member you refer to once yoked.
Throughout training, use positive reinforcement to let your team know they are doing something right. Scratches under the chin and kind words can be used as positive reinforcement. Correct poor behavior or bad habits with a sharp tap of the goad stick and stern words.
Although you are teaching a team, do not immediately yoke up your animals and expect good results. Begin by halter training one steer at a time to allow time to get to know each other. Especially in these early stages, it is important to work with your steers daily. They will learn more quickly if the repetition of command is daily rather than further spaced apart. Be firm when training your team. They need to know what it is you want them to do, and they will only learn these commands if they can follow your actions without question.
You may begin halter training your calves as soon as they have become accustomed to their new home. This may take a day or two to allow time for stress levels to be reduced and make sure the team is well rested.
Before taking your steer out for the first time, make sure the halter you are using fits the animal’s head snugly and will not slip off if the steer balks.
The large loop of a halter should fit over the animal’s head, behind both horns (poll) and ears. The small loop should fit over the muzzle and rest between the eyes and nose. The end you hold should run under the steer’s chin to the left side of his face. This will allow you to pull tight, caus-ing an uncomfortable sensation if necessary to correct a command.
A steer’s first trip out of the barn can vary greatly. Some animals use the opportunity to run full speed ahead, while others refuse to move forward an inch. It is your responsibility to make sure their behavior is corrected immediately to assure efficient training.
Leading steer on halter

23
It is unnatural for a steer to walk next to you, but it is something they will learn to accept. When starting to halter train, always remain at the animals’ side, just at or behind their point of shoul-der. Because of a steer’s panoramic vision, you do not pose a threat to the path of forward motion by standing at the point of their shoulder.
The Five Basic CommandsThere are five basic commands to learn when training steers. They are:
• Giddup, Waheesh, Come up, etc. = To move forward • Gee = Turn right • Haw = Turn left • Back, Back up = back up • Whoa = StopMake sure you know and understand these commands before trying to teach them to your team. It can be very confusing to a team if you teach them a command, and don’t use the command consistently.
■ GiddupOne at a time, take you steers out of their pen/barn on a halter. When you move forward, say “giddup” and tug on the halter. If the animal moves with you, keep walking to an open area where you plan to continue the lesson.
If the steer does not move forward with you and instead assumes the drag-me-all-you-want-I’m-not-moving pose, you have a few options.
First, you can continue to tug on the halter while saying the command, then release to give the animal time to think. If he starts moving forward while you are tugging, immediately relax the pull to let him know it is more comfortable to walk than be pulled.
If tugging on the halter does not work, try standing at about mid-steer, while still holding the lead end of the halter. Take hold of the steers tail and pull it to the side. Do not pull up or too hard, as a broken tail will cause problems. By gently pulling the tail to the side, the steer will instinctively try to get away from the sensation, hence moving forward – don’t forget to say “giddup”!
Another approach used by teamsters is to introduce the goad stick. Never use this tool to hurt your animals. If you do, they will associate you and the goad stick with pain. This will make training much more difficult.
Use the goad stick to tap the steer on his rump while saying the command “giddup” and giving a quick tug on the halter. Allow a pause to give your steer time to think about the command before repeating the procedure.
If these possibilities still do not lead to a forward motion, it may be time to enlist the help of another person. Have someone stand behind the steer and pull the tail to one side as previously mentioned. As you say the command “giddup” and tug on the halter, have your helper push and pull the tail until the steer moves forward with you.
Another tactic commonly attacked with gusto by a steer is the “I’m-free-let’s-run” approach. Although this is moving forward, it will be undesirable once the steer is placed in a yoked team.
To correct running, allow a steer to run around before taking him out. A tired steer is more likely to listen and less likely to run off. But if running should occur, “whoa” may be the first command you teach.

24
■WhoaWhile an animal is walking (or running) with you and you want to stop, say “whoa”. Follow the voice command with a quick tug backwards on the rope halter. More importantly, if you want a steer to stop, you must stop moving when you say the command. Your team is going to want to go where you go, so if you say “whoa”, but continue walking, they will only be confused and keep walking with you. To stop with a steer when you say “whoa” shows the animal the action which accompanies the command, and they will learn much more quickly.
Once you believe your steers respond well to both “giddup” and “whoa”, you can begin teaching the commands to turn. This can be done in or out of the yoke.
Some teamsters begin yoking once the animals start and stop on a halter individually. After yoking your team, make sure the yoke fits the team properly. (See Fitting the Yoke.)
It will be helpful to place your slower steer who may not be as quick to respond to commands next to you (nigh) to allow for quick corrections or frequent encouragement.
Allow your team some time to adjust to the yoke. As it will be uncomfortable and unnatural at first. Once accustomed to the yoke, you can begin your daily training session.
You will now realize that you have to re-teach the command you thought your steers knew as individuals. Do not become frustrated – this is a normal occurrence. Even though your steers rec-ognize the commands, they are not used to another animal beside them, and it will take a while to learn how to work together.
At this point, you should not be using the halters from previous training. Although tempting, it can be cumbersome to handle the goad stick, two leads and keep track of your team; it also defeats the purpose of voice commands if you are constantly pulling on the halter ropes. Also, refrain from pushing/pulling on the yoke to teach any commands. Even though this may be ef-fective, the steers will learn to associate a command with the pull of the yoke rather than a word, which is undesirable.
■(Team) GiddupTo make your team move forward, follow the same guidelines as with a single steer. This time, say the command “giddup” (preceded or followed by both steers names) and move forward while tapping the team on the rump with the goad stick. You may need to tap one steer more than another depending on the team.
Remember now that your off steer may become confused. Up to this point, you have walked beside him, but now this other steer is in your place. You are sometimes out of his field of vision. Allow him time to adjust to his now position in respect to you.
■(Team) WhoaTo stop two steers at once may be difficult at first. It is the most important command and cannot be ignored. If you want to stop while the team is walking forward, say the command “whoa” while stopping and tapping both steers on the briskets at once. While tapping on the briskets is an odd maneuver, it is effective and will stop a team quickly. Use a sharp voice to show your team how quickly you want them to stop. Try not to hit your steers on the head or nose, as this will make them head shy and difficult to handle. The more you work with your team, the faster they will learn the command and stop on a dime.
25
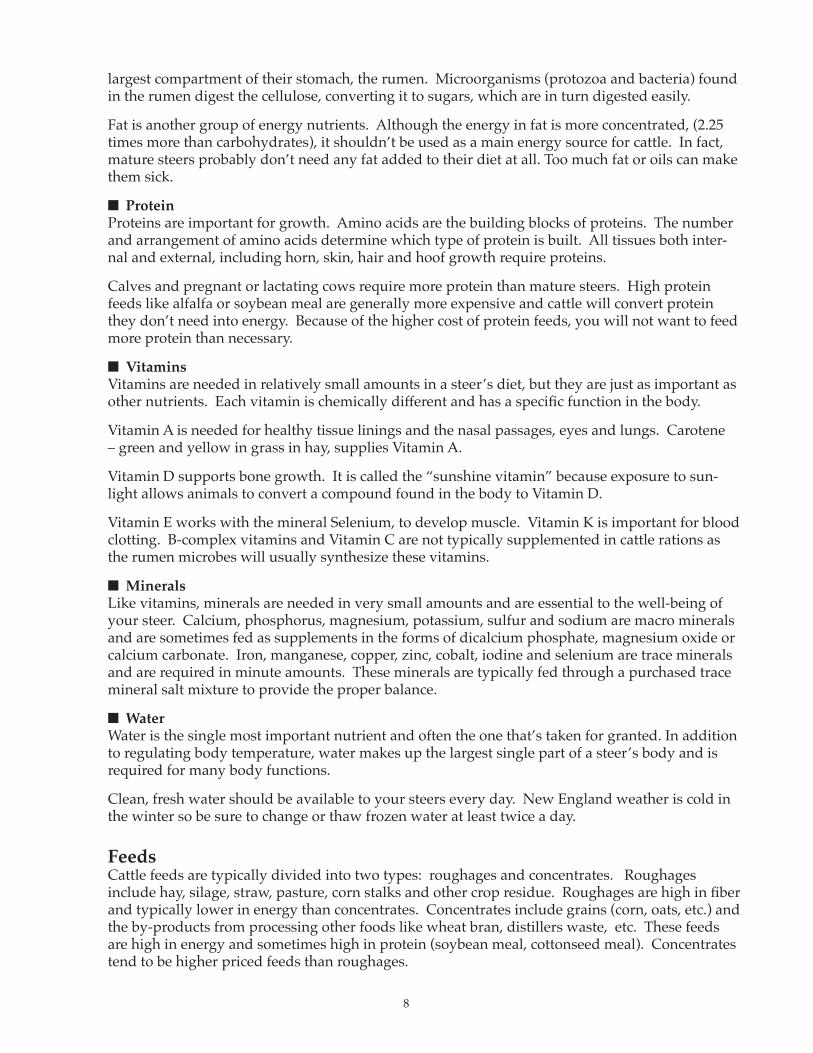
■GeeThe command to turn right can be accomplished easily. It may be helpful to begin teaching this command from a walking movement. Say the com-mand “gee” repeatedly until the turn in complete. Use your goad stick as a visual and physical aid. Move slightly in front of your nigh steer while tapping him on his outer flank with the goad stick. Wave the goad stick in front of your off steer’s face, or tap him on his outer ear. The object is to keep both steers moving, so don’t let the off steer stop while the nigh steer does all the work.
After completing a turn successfully, be sure to recognize the accomplishment with kind words and scratches under the chin.
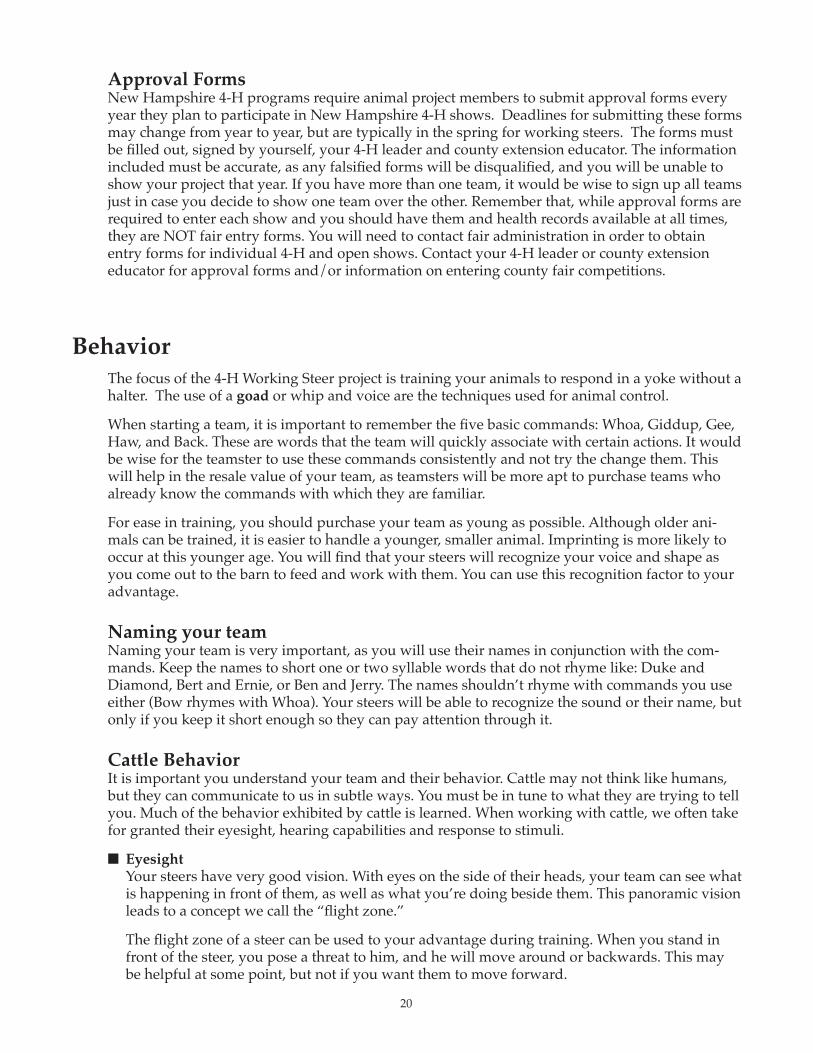
■HawTo move your team in a haw (left) turn, start from a moving motion. Say the command “haw” and step to about mid-nigh steer. From here, still saying the command, tap your nigh steer on his outer ear, and the off steer on his outer flank. This will be much more difficult to perform with larger animals, so it is important to teach while the animals are young and manageable. Again, the object is too keep both animals moving, so don’t let the nigh steer stop while the off steer does all the work.
■BackBacking up is a very unnatural gait for cattle. You will very rarely see an animal back away from something they fear for more than a few feet before turning and running. Your team must trust you in order to learn this command.
Hopefully, this trust will have been established while teaching the other commands.
The “back” command can be taught from two different positions. One is to stand in front of your team, the other is to stand beside your team, as has been procedure for the previous commands.
Say the command “back” repeatedly while tapping your team’s legs just above the knee. Try not to be forceful, as you must understand the difficulty of this gait.
When backing a team, you want the steers to remain parallel to one another. If they begin to split apart in a V-formation, immediately stop them and correct the problem.
It may be helpful to revert to one-steer training on a halter to teach this command. While on a halter, have your steer stand between you and a straight wall, preferably 20 feet or longer (the side of your barn would be perfect). Next, tap your steer above the knees while saying “back” and move with him. He will soon understand this command and be ready to try it as a team.
Training takes many hours of repetition and hard work. It may take months before your team shows signs of word recognition, but it will happen. As a seasoned teamster once said of his eight year old team, “They’re still learning.”
Gee turn
Haw turn

26
Always remember that it is frequent repetition that trains a team, not once a week lessons. Time, effort and patience are the only things standing between you and a well-trained team.
Working TeamsIn keeping alive the tradition of working animals today, teamsters train teams to pull a cart and work with a weighted drag, in much the same way as our ancestors did. Remember it takes patience to train a team. Don’t get discouraged, it will take time and repetition to train calves into a fine working team.
Your team should know the five basic commands before attempting the cart or drag.
Cart / Obstacle DrivingOnce your team understands and responds to the five basic commands, they are ready to be hitched to a cart.
Many teamsters prefer to begin cart training with a light two-wheeled cart. This can be made out of almost anything, as long as it has two wheels and a straight pole long enough to keep the ani-mals’ backends and legs free of the wheels and axle. A pin can be used to attach the pole between the animals to the ring of the yoke.
You can hitch your team in one of two ways: 1) walk the team over the pole so the pole lies on the ground between the two animals, or 2) back the team up to the pole and keep the team straight while back-ing over it until you can pick it up and hitch. In the show ring, it will be up to the judge which method he/she wants to see, but your team should be familiar with both techniques. Be sure to find out which method the judge would prefer to avoid points being taken off.
On your teams’ first hitch to a cart, they may be afraid of the noise of the wheels or the weight of the cart, and may bolt. Be ready to respond and help your team to understand the cart won’t hurt them.
Begin by going through the five basics with your team until they are well adjusted to the cart. Then you can set up a course.
A team hitched to a two-wheeled cart

27
The Obstacle Course (Performance Cart Class)Courses vary from judge to judge and show year to show year, but there are several obstacles commonly used in an obstacle course. You and your team should be prepared for them in any order and proximity. Obstacles may include:
• Barrels – or cones, sometimes with tennis balls balanced on top • A “bridge” – usually two planks spaced apart to allow the carts wheels passage, can be
raised or nailed to the ground • An “L” – usually planks (raised or nailed) in an “L” formation so team and teamster must
make a tight gee or haw turn while remaining inside the “L” • A “bump” – can be anything one wheel of the cart can roll over. The judge will sometimes
ask for the wheel to be stopped at the top of the bump • A pivot – can be a board or circle drawn on the ground for one wheel to be stopped in, and
the team must turn a full circle while keeping the wheel in the designated area • A “barn” – this is usually a three sided obstacle with planks (raised or nailed) on either side
and behind the cart so you may “park” when finished with the course.
Other obstacles may occur according to the judge, who sets up a course to mimic what a team of cattle may encounter while working in the woods or traveling to market. These maneuvers may include parallel parking, backing through a bridge or calling a team through a bridge.
This is an example of a basic obstacle course.

28
Cart Driving CommandsIn training with the cart for such courses, you may need to enlist the help of some new com-mands. This should be done only after the five basic commands have been mastered.
When hitching to the cart, your team may not be standing close enough to the pole, or maybe they are too close.
To correct this, use the commands “step in” and “step out” (may also use: “stand in and out” or “put in and out”; be sure to pick one and stick with it throughout your training). In teaching this command, tap the steer on the opposite side you want them to move towards and say the com-mand. For example, if you want your nigh steer to step towards the pole, tap him on the outside flank and say “step in”. If you want him to step away from the pole, tap him on the inside flank and say “step out”.
When hitching to a cart, you should never pull the cart to the yoke or push it away in order to make the hitch. This would not be possible if the cart was fully loaded with logs or other heavy items. Instead, make the cattle move forward or back a few steps with the command: “Come up step” (or “Giddup step”) or “Back up step”. In this, your are using the same procedure as giddup or backup, but letting your team know they only have to go one or two steps.
If your team becomes jumpy or nervous when hitching or pulling out a new cart, you can say “Easy” in a soothing voice to help calm them down. If your team becomes unruly or begins moving too fast, you can add a sharper tone to the command to let them know they are out of line and need to slow down.
ManeuveringManeuvering a two-wheeled cart through a course sounds easier than it actually is. It is easy to forget the extra length of the cart behind your team and miscalculate turns or stopping points. You must always remem-ber to know where you and your team is in respect to the cart and any obstacles in the way.
Many judges like to see tight turns around barrels and cones, but a simple “gee” or “haw” may not work to keep the cart as tight as you’d like it. You can use “step in” and “step out” again, to keep your team moving in a circular motion, but this may get cumber-some, as you need to say each command to the team many times over before completing a turn.
You may want to use another command that works in much the same way.
“Haw to” and “Gee off” can be used to make your team side step in the desired direction. Teach the commands in the same manner as “step in” and “step out”, but keep your team parallel with each other and soon they will respond quickly and smoothly.
In obstacle driving, it is very important to have a calm and steady voice. Do not get upset if your team does not respond to your expectations or you miscalculate, overturn, or hit an obstacle. Everyone makes a mistake at one time or another. You will gain more respect if you carry on and finish a course to the best of your ability than become so frustrated you cannot carry on. A judge wants to see smooth turns and quick response of the team to voice control. The judge also wants to see a teamster who is comfortable with the team he/she has trained.
Backing a cart through an obstacle course
29
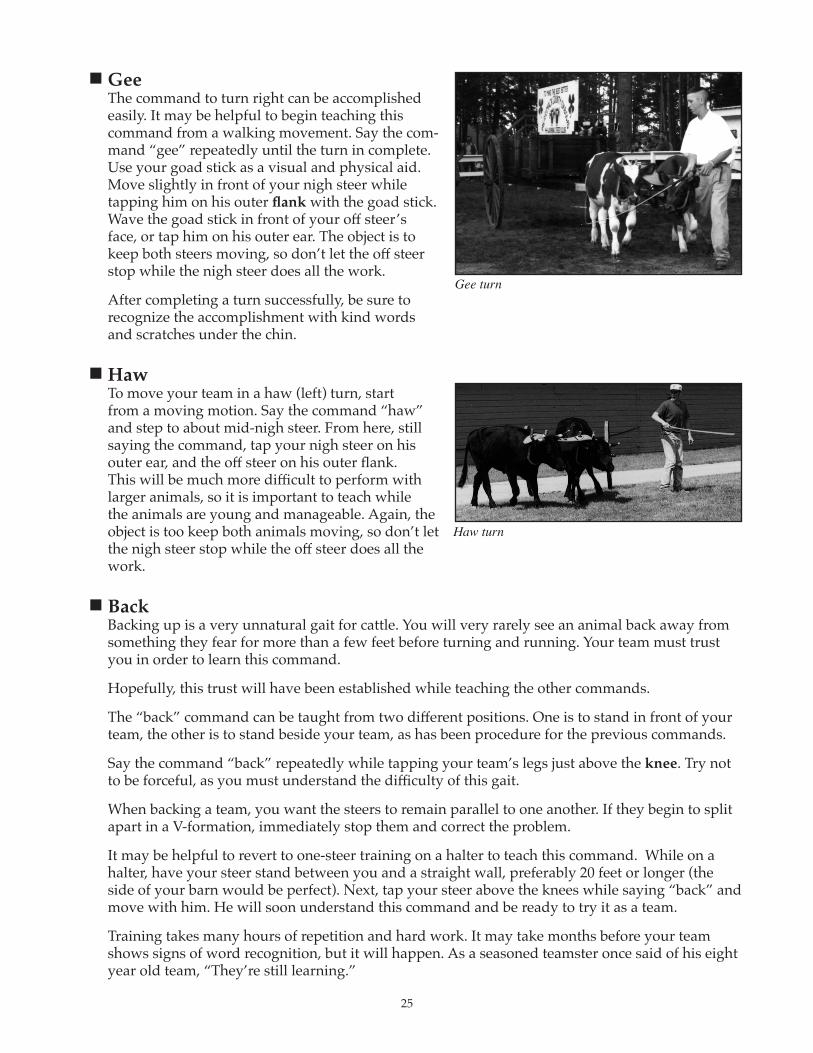
Drag / PullingAround the same time you introduce the two-wheeled cart to your team of working steers, you can introduce a drag. A drag is anything you can pull behind your team. Usually, a young team is started on a tire at-tached to the ring of the yoke by a straight pole to help prevent “backchaining”. Backchaining occurs when you use a chain instead of a pole. It happens when one of your steers steps over the chain with his back feet. He may go farther, and swing his whole body around the chain, or he may step on the drag itself. Either way, this is a bad habit and one that should be immediately cor-rected. Once you feel your steers are ready to move from the straight pole to a chain, you may do so. The chain may be covered with fire or irrigation hose to help prevent any sores that may result from rubbing against the hocks.
Adequate length between team and drag is not always easy to see, but is very important, especially when pull-ing a heavy load. To measure the length needed, pull one end of the chain through the ring of the yoke and hitch it at any link. The end, which will hook to the drag should be located where the stifle and rear flank meet when the chain is pulled tight against the side of the animal and wrapped around the back end of your longest steer. This should allow enough room so your animals do not hit the drag or are uncomfortable by too much draft (weight). By working with your team at home, you will be able to know what length of chain works best for your animals. When your longest steer has his back legs fully extended in pulling, he should clear the end of the stone boat by at least six inches. If your teams hind hooves do hit the drag, immediately stop and readjust the chain length – damaged hooves could mean the end to a good team.
4-H teams are generally required to pull half their weight on the day of a distance pull perfor-mance class. Most fairgrounds have their own set of scales and weigh times will be announced by the superintendent of shows. When you arrive at a show, your team should be able to pull the required weight without difficulty – this is not the time to “see if they can.” Teams that struggle, balk, back-chain or fall down while hitched may be marked down or disqualified.
After hitching to a load, you need to set your team up before saying the command to move for-ward. To set up a team to pull a load, step them over to the left or right to create a slight angle of the chain. This is called cutting the load and makes it easier to start pulling a load. Turn your drag the same way you turn a cart.
■ Three Point TurnMost judges have a 4-H team make two turns, a ‘gee’ and a ‘haw’, in a distance pull class. These can be around barrels, or at a designated end of the ring. Be sure you remember which end is ‘gee’, and which end is ‘haw’, to avoid being marked down by the judge.
A common turn is the three-point turn, where a teamster stops at the designated turning point and side steps his team in the correct direction, at a right angle to the drag, and pulling forward until the drag is straight again. This is called cutting the drag. Two more turns like this and the
Proper chain length
Pole sled training

30
drag is headed in the opposite direction in no time.
Remember when turning to keep the chain tight and legs and hocks away from the chain. If one of your steers steps over the chain, correct the problem immediately, and continue to your next turn.
It is proper to rest your team between each turn, even if they do not appear tired. This will let the judge know you care for your team, and would rest them if they were out in the woods doing real work. After stopping your team, remember to cut the load before starting again.
■ WeightA 4-H team should be able to pull half of their combined weight. If your team is too tired or having difficulty with the load on the day of the show, do not be afraid to ask the judge to remove some weight from the drag. You may be penalized for not being prepared, however, most judges will respect the fact that you do not want to ruin or discourage your team.
■ Timed ClassesMany judges put a time limit on the performance cart and distance pull classes. The time de-pends on the judge, but many run from three to five minutes. Usually older, more experienced teamsters will have a shorter time limit than novices.
Some judges will stop you if you have exceeded the time limit, especially if there are numerous teamsters in your class. Do not let this discourage you. Go out into a course and try the best you can to do a good job. If you hit something, try to correct it to the best of your ability. If you can’t, don’t waste your time, but move on.
Remember to remain calm and be patient with your team. It is helpful to watch teamsters before you and see where the hard spots in the course are. If you are first, good luck, and be proud to show others what your team can do.
Fitting and ShowingAlthough 4-H membership doesn’t require partici-pation in a show, many 4-H working steer members plan to enter their team in a local, county, or state show. At these shows, you will be representing not only your club, but also 4-H working steer projects from around your state. It will be necessary for you to understand and abide by the rules and expecta-tions provided to you by the show.
4-H Working Steer competitions are generally composed of (but are not limited to) three classes. They are:
• Fitting and Showmanship • Performance Cart • Distance Pull
In the Fitting and Showmanship class you will be judged on appearance of team and teamster, attentiveness towards the judge, ability to show the animals, and knowledge of the 4-H project.
Showing working steers
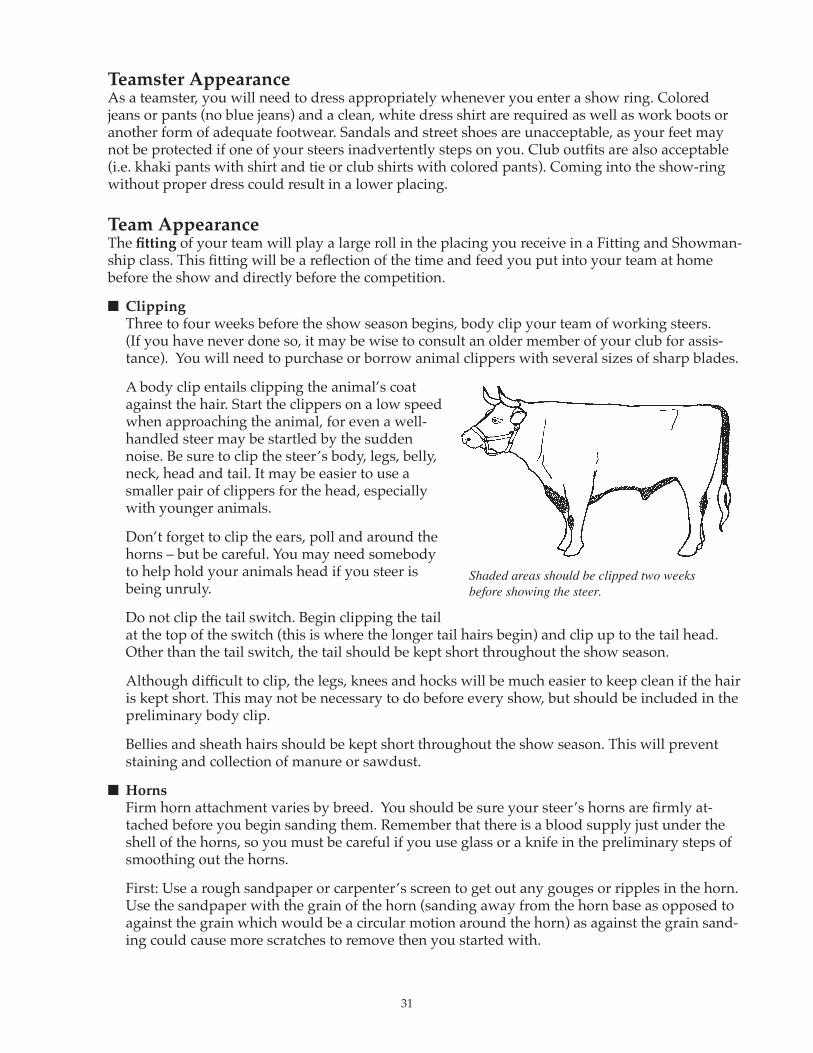
31
Teamster AppearanceAs a teamster, you will need to dress appropriately whenever you enter a show ring. Colored jeans or pants (no blue jeans) and a clean, white dress shirt are required as well as work boots or another form of adequate footwear. Sandals and street shoes are unacceptable, as your feet may not be protected if one of your steers inadvertently steps on you. Club outfits are also acceptable (i.e. khaki pants with shirt and tie or club shirts with colored pants). Coming into the show-ring without proper dress could result in a lower placing.
Team AppearanceThe fitting of your team will play a large roll in the placing you receive in a Fitting and Showman-ship class. This fitting will be a reflection of the time and feed you put into your team at home before the show and directly before the competition.
■ ClippingThree to four weeks before the show season begins, body clip your team of working steers. (If you have never done so, it may be wise to consult an older member of your club for assis-tance). You will need to purchase or borrow animal clippers with several sizes of sharp blades.
A body clip entails clipping the animal’s coat against the hair. Start the clippers on a low speed when approaching the animal, for even a well-handled steer may be startled by the sudden noise. Be sure to clip the steer’s body, legs, belly, neck, head and tail. It may be easier to use a smaller pair of clippers for the head, especially with younger animals.
Don’t forget to clip the ears, poll and around the horns – but be careful. You may need somebody to help hold your animals head if you steer is being unruly.
Do not clip the tail switch. Begin clipping the tail at the top of the switch (this is where the longer tail hairs begin) and clip up to the tail head. Other than the tail switch, the tail should be kept short throughout the show season.
Although difficult to clip, the legs, knees and hocks will be much easier to keep clean if the hair is kept short. This may not be necessary to do before every show, but should be included in the preliminary body clip.
Bellies and sheath hairs should be kept short throughout the show season. This will prevent staining and collection of manure or sawdust.
■ HornsFirm horn attachment varies by breed. You should be sure your steer’s horns are firmly at-tached before you begin sanding them. Remember that there is a blood supply just under the shell of the horns, so you must be careful if you use glass or a knife in the preliminary steps of smoothing out the horns.
First: Use a rough sandpaper or carpenter’s screen to get out any gouges or ripples in the horn. Use the sandpaper with the grain of the horn (sanding away from the horn base as opposed to against the grain which would be a circular motion around the horn) as against the grain sand-ing could cause more scratches to remove then you started with.
Shaded areas should be clipped two weeks before showing the steer.

32
Second: Use medium sandpaper, sanding with the grain until the horn is smooth and without ripples.
Third: Use a fine sandpaper against the grain of the horn to produce a very smooth horn.
■ BrushingAfter you clip your team, it would be wise to begin brushing them. Just a few minutes of brushing each day will help keep loose hair and dirt off the animal, as well as reduce dandruff, which will in turn produce a healthy, shiny coat.
For everyday brushing, use a hard or medium bristled brush with firm, brisk strokes. Begin the brush with bristles angled slightly upward on the steers coat, then move downward over a small portion of the coat, changing the angle so the bristles are pointed down at the end of a stroke. Quick flicks of the wrist should be used to lift dirt and hair off the coat and away from the animal. A soft brush can be used in longer strokes to smooth hair down and produce high shine.
Teams that are not brushed everyday will have dull coats with accumulated dandruff and dirt and will be difficult to prepare for a show.
Steers often enjoy a good brushing, as it is invigorating and stimulating. Often, teamsters will treat their team to a quick brush down before and/or after a workout. Brushing can be used as a form of positive reinforcement.
■ WashingAlthough brushing is helpful, it may not be enough to keep your team clean. Your team is likely to become dirty in any housing environment.
Washing a steer may not be as easy as it sounds. How-ever, if animals are introduced to the washing process early on, they will become accustomed to it. Washing is usually preformed just prior to leaving for a show, but can be done at any time.
Securely tie your steer where he will be washed. (At competitions, “wash-racks” or, common washing areas are provided, but you may need to provide your own.) Preferably, your wash-rack will be up against a build-ing or something your animal cannot jump through or over if frightened by the water. (Ani-mals unaccustomed to washing may be scared by sudden water temperature and pressure).
Begin by wetting the whole steer down with water. He may not enjoy this but should comply. Once your steer is thoroughly drenched, you can apply the soap. You can use any kind of soap you want, from livestock soaps on the market to laundry or dish detergents, to the shampoo out of your own bathroom.
Use a scrub brush (one with strong, hard bristles, but not one you will use for brushing a dry coat) to rub the soap into the coat to remove any dirt, dandruff or excess hair. Animals with white hair will require a little more elbow grease, as stains on knees, hocks, brisket and flanks are more apparent.
Make sure to scrub the belly, head and tail. It may be useful to have a bucket filled with soapy water to get places you might have missed.

33
Scrubbing the hooves is not always feasible to do before traveling to a show, as manure will re-collect during shipping, but it is helpful. Be careful to anticipate your steer’s movements so you do not get stepped on or kicked while scrubbing hooves.
After thoroughly scrubbing your steer, you may rinse him. You must make sure you have rinsed out ALL of the soap off the coat, as soap left to dry can cause dandruff or a dull appearance.
Once completely rinsed, put your steer in a clean, dry place and monitor to prevent unneces-sary staining.
■ Cleaning EquipmentThe best way to present a clean team to a judge is to have them in clean equipment. Your yoke is the major piece of this equipment. To have your yoke ready for a show, start by cleaning it after every use. After a work out with your team, wipe any dirt or manure that may have accumulated on the yoke neck, belly or bows with a damp cloth. In extreme cases, it may be necessary to sand down dirt and apply a new coat of polyurethane to the yoke or bows.
If your staple, ring and pins (see Parts of a Yoke diagram) are painted (usually black), it would be best to apply a fresh coat of paint to them. Be sure to cover the wood of the yoke with a cloth or newspaper and masking tape to prevent any discoloration.
Your goad stick is also a piece of equipment, and should be in presentable condition. The goad should be the appropriate length and width, as well as being fairly smooth and free of sharp ends. Many teamsters find that wrapping black electrical tape from the handle to almost the tip of the goad gives a presentable appearance.
Tack BoxYou will probably want to bring with you a box of cleaning supplies and equipment you may need at a show. This is called a tack box. Some things you may want to include in your box:
• Hard brush • Medium brush • Soft brush • Tail comb • Scrub brush • Soap • Water pail • Sandpaper • Towels • Hoof/Horn polish or oil
Be sure to put your farm name or initials on your equipment, as things are easily misplaced at a show. When packing for a show, don’t forget such necessities as your yoke, pins, goad stick, show clothes, grain and hay, and team. It is always helpful to make a list of what you need and check-off things as your pack them.
At the ShowAfter arriving at a show, check in with the superintendent. Find out where you can tie your steers and unload your equipment. Shortly after, take your team to the wash-rack.
Repeat all procedures for washing, this time taking extra time in removing stains from knees, hocks, briskets, and flanks, as well as manure from hooves.

34
Back at your team’s stall, you should tie them securely with enough rope to be comfortable, but not enough so they may turn around and fight with animals near them.
You must have halters and lead ropes to tie your team. Collars and chains are not advisable, as they do not hold a team from fighting with neighbors. Halters allow more control over the animal and help create a good public image. Provide your steers with ample bedding (straw or sawdust is usually provided by the show) so as to prevent your team from getting dirty again.
At this point, you will want to take care of all other details.
Clean each ear free of wax and dirt with a cloth dampened with water or rubbing alcohol. Q-tips are not recommended as movement of the steers head could cause you to push the Q-tip in too far, possibly damaging the ear drum and irritating the steer.
Make sure horns are smooth and no damage has occurred during shipping.
Directly before a fitting and showmanship class, make sure under the tail head is free of manure, eyes and nose are clean and free of discharge, and the coat is free of dandruff and loose hairs. If nothing else, it is advisable to brush, brush, brush, right up to the time you need to enter the show-ring.
■ Show TimeAlways know what time a show begins and arrive at the designated place early. Bring a brush and a clean cloth with you and do any last minute touch ups where you can hear your class announced. If there are other classes ahead of you, make sure to watch those classes. This will help you determine what the judge is looking for as well as give you ample time to yoke up and be ready for your class without guessing.
Once you have entered the ring (with your team and dressed in proper show clothes), you must pay close attention to the judge and your team.
■ Set UpIf the judge asks you to set up your team, you must find a spot that puts your steers in a posi-tion to show them off at their best. Such a position should allow your team enough room. Do not crowd another team. You want to show your team to the best of your ability.
If one steer in your team is slightly larger than the other, try to find a hill or rise in the show-ring to make your smaller steer appear larger. You may also want to set up your team heading slightly up hill (front feet on small rise) to make them appear more bullish.
Always make sure your team is attentive. Keep your team parallel to each other and the yoke straight.
Do not let your team wander off, eat grass, lie down, mount or fight with others while in the show ring.
■ Watch the JudgeIt is very important to keep an eye on the judge, even if you think he/she is not looking at you. A judge may place a class before giving his/her reasons, and if you aren’t paying attention, you may lose your place.
Do what the judge asks of you. If you do not follow instructions, you will not receive a high placing. Never turn your back to a judge. Always turn your body so you are facing him/her as well as keeping an eye on your team.
A judge may ask you questions to find out the extent of your knowledge on your 4-H project. Answer these to the best of your ability. Some questions which may be asked:

35
•What kind of wood is your yoke/bows made out of?•What do you feed your team?•What breed is your team?•How much does your team weigh?•What is the expected mature weight of your team?•Can you tell me what this part of the animal is called? (points to body part) or•Can you tell me where (body part) is?•How old is your team?
Keep your team’s attention. A team that responds quickly and correctly will help you receive a higher placing. Don’t give up. A judge’s placings aren’t final until the ribbons are handed out, so keep on smiling and showing to the best of your ability. If you have questions, ask the judge politely afterwards and he/she will be happy to speak with you.
ShowmanshipIn addition to the fitting of your team and knowledge of your project, you will also be judged on your showmanship abilities. However, showmanship is a quality that is beneficial in more than just the fitting and showmanship class. Your attitude and attentiveness will be continually checked by the judge and supervisors.
To be a good showperson, one must exhibit self-control in the ring. Even if your animals are acting out of control during a show, do not use brute force to get their attention. The ring is a place to show off what your team can do, not train them.
Offer encouragement to your fellow teamsters from the sidelines of cart and drag classes (if you are not in the ring with them). Congratulate your fellow teamsters on a job well done.
A showperson will remember that he or she is at a fair to present a team of working steers to the judge and also for the public. Teamsters should be on their best behavior at all times. No horse play around the barns or cattle. This will help to prevent scaring the cattle and will present work-ing steer 4-H members in a positive manner. Be friendly and offer to answer questions the gen-eral public may have about your team and your project.
Tricks of the TradeAs you gain experience and become an expert at washing, fitting and showing cattle, you will find there are a few tricks of the trade and helpful hints that will give you and your team an edge.
■ Common Problem:You will find after many months of training hard for a pulling class, the spot where the yoke rests on your teams’ neck is white and flaky. Especially noticeable on black animals, dandruff (accumulated dead skin cells), is an undesirable trait during the Fitting and Showmanship class. A judge will often pull back a yoke to see if you have attempted to hide a dandruff prob-lem. Other common dandruff areas are the back and end of the tail.
Trick (Solution):Some teamsters have found the skin on animals’ neck can be softened by baby or mineral oil. A small amount of oil can be worked into the skin of problem areas to soften and reduce dan-druff. But oil will also give your animals’ coat a greasy look, which will be frowned upon in the show ring. If you use oil, make sure you do it well ahead of a show so it will be worked out of the coat by show time.
Another approach to dandruff problems is with ordinary white vinegar. After washing and thoroughly rinsing your steer, pour ample amounts of vinegar over the problem areas and do not rinse.

36
Dandruff can be controlled by everyday brushing. Although these tricks may help, good ol’ elbow grease is your best bet.
■ Common Problem:After sanding your steers’ horns for hours on end, you may find they turn somewhat dull to look at. Judges like to see smooth horns and clean hooves, and some teamsters like to put a shine on their steers’ horns.
Trick (Solution):There are several ways to put a little spark to your team’s horns. Many teamsters use baby or mineral oil to give the horns and hooves a soft, clean and smooth appearance. Make sure you start with clean hooves and smooth horns. Dab a small amount of oil onto a clean cloth or paper towel. Rub moistened cloth onto horn and hoof, making sure not to get stepped on. Try not to get oil into the hair, as it will cause a greasy appearance. It is helpful to apply oil to hooves while animals are standing on dry, clean concrete or pavement and remain there until oil is dry and no dirt will stick to them. Before going into a show ring, make sure to remove any excess oil off horns. A judge may touch the horns and will not be pleased by greasy hands.
Other teamsters like to use polish, which is applied by a brush. Polish comes in clear and black and leaves hoof and horn with a shiny appearance. Horns should be clean and well-sanded before applying polish, as dirty, rough horns will stand out even more. Do not get any hair around the horns or hooves in the polish, as the hair will harden in the polish, too. It is not recommended to use black polish, as it is difficult to keep off white hair and can leave an un-natural appearance.
■ Common Problem:There will be times, no matter how much you brush, you just won’t seem to get any shine to your animals coat. This can be especially bothersome in white or red animals.
Trick (Solution): After washing your animals, it is possible to apply a conditioner to your teams’ coat, which can help to gain shine. There are many such conditioners on the market, but make sure to read the labels. Some conditioner must be rinsed or else dandruff will result while others may be left on for super shine.
For last minute shine, use a product like “Show Sheen” or “leave-in” conditioner and water in a spray bottle. After brushing away any and all loose hair and dirt, spray a light mist over each animal and brush the product in for a high shine that will be sure to attract a judge’s eye.
Make certain you do not use too much of the product, as sticky clumping of hair may occur.
■ Common Problem:Cattle generally don’t enjoy their ears being cleaned, but judges have been known to check ears with a napkin in the ring, so don’t forget about them.
Trick (Solution):For stubborn earwax, use baby wipes to clean out ears. You don’t need to clean farther than your fingers can reach, but make sure the wipe comes out clean before you’re done. Refrain from using Q-tips, as the sensitive eardrum may be damaged by sudden moves from the steer.
■ Common Problem:Diarrhea may be caused by traveling, which can be stressful to animals, as can the change of water from their usual source. Diarrhea can also be very messy, so it is helpful to limit stress as much as possible.
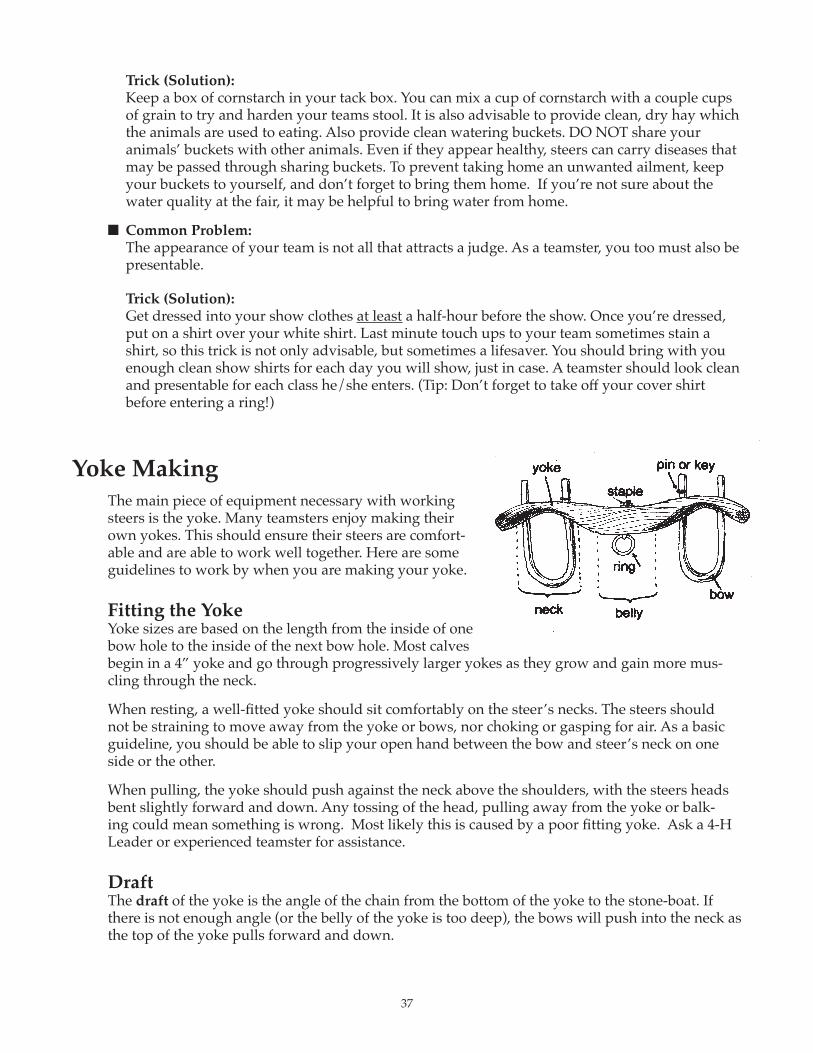
37
Trick (Solution):Keep a box of cornstarch in your tack box. You can mix a cup of cornstarch with a couple cups of grain to try and harden your teams stool. It is also advisable to provide clean, dry hay which the animals are used to eating. Also provide clean watering buckets. DO NOT share your animals’ buckets with other animals. Even if they appear healthy, steers can carry diseases that may be passed through sharing buckets. To prevent taking home an unwanted ailment, keep your buckets to yourself, and don’t forget to bring them home. If you’re not sure about the water quality at the fair, it may be helpful to bring water from home.
■ Common Problem:The appearance of your team is not all that attracts a judge. As a teamster, you too must also be presentable.
Trick (Solution): Get dressed into your show clothes at least a half-hour before the show. Once you’re dressed, put on a shirt over your white shirt. Last minute touch ups to your team sometimes stain a shirt, so this trick is not only advisable, but sometimes a lifesaver. You should bring with you enough clean show shirts for each day you will show, just in case. A teamster should look clean and presentable for each class he/she enters. (Tip: Don’t forget to take off your cover shirt before entering a ring!)
Yoke MakingThe main piece of equipment necessary with working steers is the yoke. Many teamsters enjoy making their own yokes. This should ensure their steers are comfort-able and are able to work well together. Here are some guidelines to work by when you are making your yoke.
Fitting the YokeYoke sizes are based on the length from the inside of one bow hole to the inside of the next bow hole. Most calves begin in a 4” yoke and go through progressively larger yokes as they grow and gain more mus-cling through the neck.
When resting, a well-fitted yoke should sit comfortably on the steer’s necks. The steers should not be straining to move away from the yoke or bows, nor choking or gasping for air. As a basic guideline, you should be able to slip your open hand between the bow and steer’s neck on one side or the other.
When pulling, the yoke should push against the neck above the shoulders, with the steers heads bent slightly forward and down. Any tossing of the head, pulling away from the yoke or balk-ing could mean something is wrong. Most likely this is caused by a poor fitting yoke. Ask a 4-H Leader or experienced teamster for assistance.
DraftThe draft of the yoke is the angle of the chain from the bottom of the yoke to the stone-boat. If there is not enough angle (or the belly of the yoke is too deep), the bows will push into the neck as the top of the yoke pulls forward and down.

38
If there is too much draft or too little belly, the yoke will ride high on the animals, pulling up, rather than allowing the bows to tuck into the shoulders. Draft can be changed with a wood block to lower the staple, cutting the belly of the yoke, or adjusting the ring position. Rings can be moved forward or backward in order to change draft.
StaplesThere are several different types of staples and rings to choose from. A simple eyebolt and ring is fine for small yokes, but is not recommended for any heavy pulling.
Some staples are adjustable. They have two slots in front of and behind the ring. This enables you to slide the ring from side to side towards the stronger steer, making it easier for the weaker steer to pull effectively. When using this staple, always make sure nuts are securely tightened to prevent slipping and pos-sible damage to steers.
Other staples allow the ring to be moved forward or backward to change draft when pulling. Again, make sure all bolts are securely tightened.
Smooth NecksAbove all else, a yoke must be comfortable for the steers. The neckpiece is in constant contact with your steers’ necks and therefore must be the smoothest part of the yoke. A good rule of thumb, so to speak, is too look at the curve of the bottom of your thumb. This shape is smooth and consis-tent, without any sharp edges or roughness. Make sure this area is well sanded and well rounded, to ensure comfort of you team and maximum working capabilities. Any cracks, high spots, or imperfections will irritate the steers.
Yoke MaterialFor a young pair of steers in a 4 or 5” yoke, a lighter type of wood like bass or poplar is helpful to use. This will allow the steers to become adjusted to the weight on their necks before moving to a larger yoke.
Yokes for larger animals and those who will be pulling heavy loads should be made with some type of hardwood. Red or sugar maple, black or yellow birch and oak all make strong and worthy yokes. Other hardwoods such as elm or cherry, although more difficult to find, make good yokes.
When choosing your wood, look for a piece that has a straight grain. The grain of a wood is the lines running the length of the piece. Any cracks or large knots in this line are considered defects. This is where the yoke will break if not properly constructed.
Knots can weaken the strength of your yoke. Knots are where a branch of the tree emerged from the trunk. They can be seen on the exterior of your piece, or may be hidden under the white wood.
Locate knots, as they most likely travel the width of the piece, and try to position them to be cut out.
Also, look for the heartwood of the piece. The heartwood is the dark circle of wood from the middle of the tree. Heartwood is not as strong as the white wood around it. It is helpful to find a piece where the heartwood is located towards one edge, as far from the center of the wood. This will allow you to cut most of the heartwood out with the neck.
The following chart may be used as a basic guideline when making a yoke. Modifications may be made to the preference of the teamster.
Parts of the staple

39
Chart 1: Yoke Dimensions Neckpiece End (b/n outside Approx. starting Length b/n thickness (b/n off top bow and end)Yoke Size Wood Size Bow Size bow holes top & neck) of belly of yok
4” 4x6’ 1” 16-18” 2” 1 1/2” 4-5” 5” 4x6’ 1 1/4” 16-18” 2” 1 1/2” 4-5” 6” 5x7’ 1 1/2” 20” 2 1/2” 1 1/2” 4-5” 7” 6x8’ or 7x9’ 2” 22” 3” 1 1/2” 6-8” 8” 7x9’ or 7x10’ 2” 24” 3 1/2” 2-2 1/2” 6-8” 9” 7x10’ 2” 24-26” 3 1/2” 2-2 1/2” 6-8” 10” 8x10’ 2” 24-26” 3 1/2” 2-2 1/2” 6-8” 11” 8X10’ 2” 26-28” 3 1/2” 2-2 1/2” 6-8” 12” 8X10’ 2” 26-28” 3 1/2” 2-2 1/2” 6-8”
General Yoke Making Steps:1. Find the heartwood and any knots. Try to position these towards the bottom of your yoke and
label the top, front and back.
2. Measure out the center of your piece and mark it on the top.
3. Measure the length between inside bow holes (for a 6” yoke, this would be 10” on each side of the center mark)
4. Measure the diameter for the inside bow hole (1 1/2” for the 6” yoke)
5. Measure the length between the bows (6” for the 6” yoke)
6. Measure the length from the outside bow holes (1 1/2” for the 6” yoke)
7. Measure the end pieces (4-5” for the 6” yoke)
8. Carry the lines from steps 1-7 to the front of the yoke.
9. Measure the width at the center of the piece and mark the middle. This is where your ring and staple will be.
10. On the front, find the center of the neckpiece. This will be the highest point of the neck.
11. Draw the curve of the neck as smooth as possible. Although compasses may be used, best results are found by stepping back, reviewing your work, and making adjustments. Remem-ber that the recommended thickness depends on the wood type, the shape will still need to be smooth and round.
12. Measure out at least 1 1/2” off the top of the yoke between inside bow holes to reduce the center of gravity riding on the steers necks.
13. Once all lines have been drawn, drill your bow and staple holes. Bow holes should be drilled with a bit slightly larger (approx. 1/8” ) then the bows themselves will be. This will allow for swelling of bows during hot, humid summer months. Important—drilling of holes must be exact. The holes must be straight, or the yoke will not be of any use to the team or teamster. Follow safe and proper drill operating instructions.
14. Measure the belly of the yoke. This will be important to draw and cut correctly to ensure your cattle will be able to pull well.

40
15. Now that the bow and staple holes have been drilled, it is time to saw out the basic shape of the yoke. Using safe and proper ban saw techniques, carefully follow the drawn lines to cut out the neckpieces, above the belly and ends. You can now sand your yoke.
16. Sanding of a yoke may begin with a power sander. Sand only enough to smooth out all rough and sharp edges following safe and proper power sanding instructions.
17. Once smooth, use fine sandpaper to finish out details. It may be helpful for the teamster who uses a yoke with a sliding ring to find the center of his yoke and mark it in order to give both steers equal weight.
18. Yokes may be stained, weatherproofed or painted to the fancy of the teamster. Most teamsters prefer polyurethane finishes.
19. Once sanded and finished, the staple and ring may be put in place (ring towards belly) and tightened.
20. Try your yoke and see how it works. Make modifications as needed.
21. When you stop work for the day, apply a 50/50 mixture of boiled linseed oil and mineral spirits generously. This will help prevent the wood from cracking overnight.
BowsBows are attached to the yoke. They wrap around the neck, and hold the yoke to the steer’s neck. Most bows are made out of hickory, white oak and ash, which is strong, but capable of bending while still holding its shape.
When choosing wood for bows, choose pieces that are straight grained, as imperfections will produce twisted and inferior bows. Starting lengths of bows can be as follows:
Chart 2: Bow Dimensions
Wood for bows should be from the outside (white) and lower part of the tree, as these are where the strongest fibers are located.
Start with a piece of wood 6”-8” around and quarter it until a desired, straight grained piece is produced. Then, use a knife or wood rasp to shave the bow into shape. Any bark will be located on the outside of the bow (the side that does not touch the steers neck). A shaving horse would be valuable for this step.
Next, sand the bows smooth once you have reached the desired shape and diameter.
Now your bows are ready for steaming. A wooden box with pipe steam running through can be used at this point.
Depending on how dry the wood of your bows are, will determine how long they will need to be steamed. For 4”-6” bows, this process generally takes 20 minutes, while larger bows will take longer.
Bend your bows in half, but place spacers between them for the size bow you desire. Spacers should be at the bottom of your bow and three quarters of the way up. Tie each bow to itself to prevent loosing its shape before drying. Bows should remain tied until dried and should be left in the yoke when not in use to prevent splaying and trying to revert to a straight position.
Starting Bow length of Size piece 4-6” 4 ft. 7-8” 5 ft. 8-12” 6 ft.
Top of a bow

41
Goad sticksMaking a goad stick follows the same principles of bow making. From a piece of quartered white oak, choose a straight grained piece of wood for your goad. Remember which end of the piece is which; the end located farther up the tree will be your handle while the end from closer to the stump will be the thin, limber, business end.
Do not use heartwood for a goad, as it is weak and capable of easily breaking. Shape your goad as you would the bows, with the handle being comfortable to hold and the tip slightly larger than the limber, smallest diameter of the middle goad.
As a general standard produced by the New England Ox Teamsters Association, a goad stick should be no longer than 4 ft. and must be able to have a 1/2” washer fit down the top half of the goad. Teamsters will find that they do not need this much goad for a small pair of steers, and may require a longer goad for larger pulling oxen.
At shows make sure you follow proper goad regulations.
Whips with lashes are optional, though regulations should be followed.
Front and top views of a yoke

42
Glossary of Terms
Teamster TerminologyBackchain – backchaining occurs when a steer backs over the chain or drag during a workout.
This is a bad habit, which should be corrected immediately.
Back-Gee – much like “Gee off”, but teamster moves in a circle with team. Team’s back feet remain in same place while moving front end to the right.
Back-Haw – much like “Haw to”, but teamster moves in a circle with team. Team’s back feet remain in same place while moving front end to the left.
Back up step – command used in conjuncture with steer name to back him up one step. Helpful in hitching/unhitching to cart or drag.
Bloated – animals’ belly swells up. May result from increased water intake or illness. Contact veterinarian if condition persists.
Castration - surgical procedure to remove or render useless the testicles of a male animal.
Come up step – command to make team move forward one step. Helpful unhitching/unhitching to cart of drag. (May be used instead of “giddup step”.)
Draft – many New England teamsters refer to draft as the angle of the chain from the bottom of a yoke to the stone boat.
Drag - anything that you can pull behind your team, typically attached to yoke with a chain.
Easy – command used to slow team from walking/pulling too fast. Used much like the “whoa” command, without actually stopping.
Fitting - term used to describe how a showperson has prepared animals for show. Fitting refers to condition (weight) of animal, cleanliness, properly trimmed hooves, clipping, etc.
Gaunt – thin appearance of animal resulting from decreased feed/water intake. May occur in new environments (such as fairs), but veterinarian should be contacted if condition persists.
Gee off – command where team sidesteps away from teamster. Helpful in working with cart or drag to reduce rubbing against pole or chain.
Goad Stick - wooden stick (less than 4’ long) used to gently tap/touch steer to encourage proper movement.
Haw to – command where team sidesteps towards teamster. Helpful in working with cart or drag to reduce rubbing against chain or pole.
Head up – command used to make steers pick their heads up if they are eating grass or otherwise. Tap the underside of their chin while saying the command.
Heartwood – usually a dark circle of wood from the middle of the tree, weaker than white wood and unsatisfactory for neckpiece wood.
Matched – a team that is of the same breed, color pattern, size and bone structure and also work well together.
Mated – a team placed together based on working capabilities. Do not have to be of the same breed or color, but should be relatively close in size and work well together.

43
Nigh – steer closest to teamster when yoked.
Off – steer farthest from teamster when yoked.
Polled – animals bred and born without horns. Do not make a desirable team.
Roan - body color that consists of a mix of white and other color hair, giving the steer a mottled color.
Step in – command preceding or following steer’s name, used to make steer step in closer to the pole or chain. Usually used before starting to pull a load to ensure the safety of team. (May also use “put in” or “stand in”).
Step out – command preceding or following steers’ name, used to make steer step away from pole or chain. Usually used while hitching or turning a load. (May also use “put out” or “stand out”).
Stone Boat – a small, flat sled developed for moving stones. Usually 3-3 1/2 feet wide and 6-8 feet long and made of 2-inch hardwood planks.
Umbilical Hernia – a muscle tear in the abdomen at the site of the umbilical cord, just under the skin, allowing part of the stomach or intestines to bulge out of the abdomen. A serious prob-lem that requires surgery.
Parts of a Yoke

44
Parts of the Steer
1. Thigh
2. Stifle
3. Hock
4. Dew Claw
5. Pastern
6. Flank
7. Sheath
8. Ribs
9. Hoof
10. Knee
11. Brisket
12. Point of Shoulder
13. Throat
14. Muzzle
15. Horn
16. Neck
17. Heart Girth
18. Chine
19. Loin
20. Rump
21. Back
22. Point of Jaw