44553078 step by step install guide openqrm data center management and cloud computing platform
TRANSCRIPT
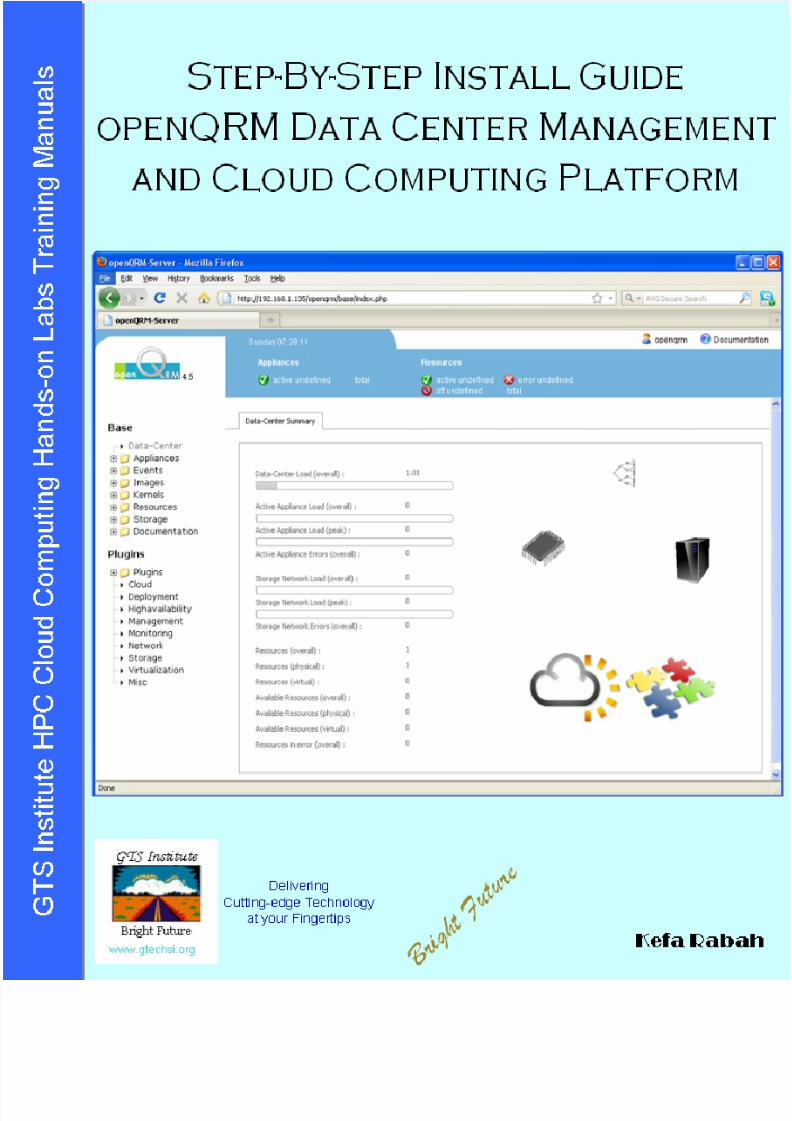
8/4/2019 44553078 Step by Step Install Guide OpenQRM Data Center Management and Cloud Computing Platform
http://slidepdf.com/reader/full/44553078-step-by-step-install-guide-openqrm-data-center-management-and-cloud 1/32
8/4/2019 44553078 Step by Step Install Guide OpenQRM Data Center Management and Cloud Computing Platform
http://slidepdf.com/reader/full/44553078-step-by-step-install-guide-openqrm-data-center-management-and-cloud 2/32
Global Open Versity, HPC Cloud Labs Install Guide openQRM Data Center Management on CentOS5 v.10
April 2007, Kefa Rabah, Global Open Versity, Vancouver Canada
www.globalopenversity.org HPC 201 – High Performance Computing Virtualization Technology
1
Global Open Versity
Cloud Computing Hands-on Labs Training Manual
Step-By-Step Install Guide openQRM Data Center Management
and Cloud Computing Platform
Kefa Rabah
Global Open Versity, Vancouver [email protected]
www.globalopenversity.org
Table of Contents Page No.
STEP-BY-STEP INSTALL GUIDE OPENQRM DATA CENTER MANAGEMENT AND CLOUD
COMPUTING PLATFORM 2
Introduction 2
Hands on Lab Session 2
Part 1: Install Prerequisites 2 Step 1: Install DAGC Repo 3 Step 2: Install Zabbex 4 Step 3: Install ASH 4
Part 2: openQRM can be installed using yum. 5 Step 1; Install openQRM-Server 5
Step 2: openQRM-Server Layout 8 Step 3: openQRM Plugins Layout 13 Step 4: Activate DHCP, TFTP, Storage Plugins 14
Part 3: Using openQRM Server 16
Part 4: Creating a New LVM (NF) Storage 19 Step 1: Create the LVM (Nfs) Storage 19 Step 2: Configure new storage from LVM Plugin 22 Step 3: Configure a New Cloud Image 26 Step 4: Download & Untar Ubuntu 10.10 LTS 28 Step 5: Creating Xen VM 29 Step 6: Configure Xen plugin 29 Step 7: Deploy our Cloud Image 29
Part 5: Need More Training on Linux: 30 Eucalyptus Cloud Training: 30
Part 6: Hands-on Labs Assignments 30
A GOV Open Access Technical Academic PublicationsEnhancing education & empowering people worldwide through eLearning in the 21st Century

8/4/2019 44553078 Step by Step Install Guide OpenQRM Data Center Management and Cloud Computing Platform
http://slidepdf.com/reader/full/44553078-step-by-step-install-guide-openqrm-data-center-management-and-cloud 3/32
Global Open Versity, HPC Cloud Labs Install Guide openQRM Data Center Management on CentOS5 v.10
April 2007, Kefa Rabah, Global Open Versity, Vancouver Canada
www.globalopenversity.org HPC 201 – High Performance Computing Virtualization Technology
2
Global Open Versity
Virtualization Computing Hands-on Labs Training Manual
Step-By-Step Install Guide openQRM Data Center Management and
Cloud Computing Platform
By Kefa Rabah, [email protected] Nov 28, 2010 GTS Institute
Introduction
OpenQRM is the next generation, open-source Data-center management platform. It’s fully pluggable
architecture focuses on automatic, rapid- and appliance-based deployment, monitoring, high-availability,
cloud computing and especially on supporting and conforming multiple virtualization technologies.
openQRM is a single-management console for the complete IT-infrastructure and provides a well defined
API which can be used to integrate third-party tools as additional plugins.
OpenQRM server is a pretty neat datacenter management tool. You can use it to provision and manage
servers and cloud computing solutions. For example, if you’re just starting out with Linux server
provisioning and high availability OpenQRM is amazing product and can do wonders when setup properly.
In this hands-on lab session you’re going to learn how to accomplish this in style.
While OpenQRM is not a tool for public clouds It is geared towards people delivering private virtual
clusters or cloud capabilities. openQRM is a single-management console for the complete IT infrastructure
and provides a well defined API which can be used to integrate third-party tools as additional plugins.
What’s really interesting about OpenQRM is that it can suck up physical installations, create an image,
write that image to a SAN and then run the virtual instances on demand. I think the opportunity for
OpenQRM is to be able to suck those images up and then spit them out to cloud computing resources like
EC2, RightScale or Rackspace Cloud.
Hands on Lab Session
In this Hands-on lab session you’ll learn how to openQRM-server on Linux CentOS-5.5. It’s assumed that
you know how to install, configure and upgrade CentOS-5 server and have a good knowledge working
with Linux distros. You’ll learn how to install and configure openQRM. Manage Plugins. Build and deploy
images using openQRM. How to upload and run cloud images. In this lab you’ll learn how to build bundle
and upload Tinylinux and Ubuntu 9.04 images. Upon completion of this lab session you should have
gained skills and expertise to enable you to build and deploy your private cloud with Eucalyptus 2.0system on Linux. The entire lab session was performed using VMware to deploy the servers.
Part 1: Install Prerequisites
However, from the start, it seems like the installation of OpenQRM is kind of confusing, especially if you
use the official guide, which does not inform you that there are many other pre-requisites that must be met
before you can use their provided instruction. One needs to add few Yum repositories that are required by
8/4/2019 44553078 Step by Step Install Guide OpenQRM Data Center Management and Cloud Computing Platform
http://slidepdf.com/reader/full/44553078-step-by-step-install-guide-openqrm-data-center-management-and-cloud 4/32
Global Open Versity, HPC Cloud Labs Install Guide openQRM Data Center Management on CentOS5 v.10
April 2007, Kefa Rabah, Global Open Versity, Vancouver Canada
www.globalopenversity.org HPC 201 – High Performance Computing Virtualization Technology
3
the dependencies before you can use the openQRM yum install instruction – so here is the instruction that
I used to install it on the Linux CentOS 5 server:
openQRM hosts own packages for many distributions, including pre-built binary packages (please notice
that installation from the pre-built packages require an empty mysql password. It is recommended to re-
configure this after the installation in the openqrm-server.conf file).
1. Note if you just run the yum install without installing the prerequisites, then you’ll get the following info:
[root@cluster01 ~]# yum install openqrm-server-entire* -y
Loaded plugins: fastestmirror
Loading mirror speeds from cached hostfile
* addons: archaea.its.sfu.ca
* base: archaea.its.sfu.ca
* extras: archaea.its.sfu.ca
* updates: archaea.its.sfu.ca
Setting up Install ProcessNo package openqrm-server-entire* available.
Nothing to do
[root@cluster01 ~]#
2. So now let’s begin to install all the prerequisites.
Step 1: Install DAGC Repo
1. DAG repo contains certain packages such as Nagios. According to:
http://dag.wieers.com/rpm/FAQ.php#B
http://apt.sw.be/redhat/el5/en/i386/rpmforge/RPMS/rpmforge-release-0.3.6-1.el5.rf.i386.rpm
2. This is how you should install the repo:
[root@cluster01 ~]# rpm -Uhv
http://apt.sw.be/redhat/el5/en/i386/rpmforge/RPMS/rpmforge-release-0.3.6-
1.el5.rf.i386.rpm
Retrieving http://apt.sw.be/redhat/el5/en/i386/rpmforge/RPMS/rpmforge-
release-0.3.6-1.el5.rf.i386.rpm
warning: /var/tmp/rpm-xfer.fyaFXf: Header V3 DSA signature: NOKEY, key ID
6b8d79e6
Preparing... ####################################### [100%]
1:rpmforge-release ####################################### [100%]
[root@cluster01 ~]#
Note 1: you can check the latest release from:
8/4/2019 44553078 Step by Step Install Guide OpenQRM Data Center Management and Cloud Computing Platform
http://slidepdf.com/reader/full/44553078-step-by-step-install-guide-openqrm-data-center-management-and-cloud 5/32
Global Open Versity, HPC Cloud Labs Install Guide openQRM Data Center Management on CentOS5 v.10
April 2007, Kefa Rabah, Global Open Versity, Vancouver Canada
www.globalopenversity.org HPC 201 – High Performance Computing Virtualization Technology
4
http://apt.sw.be/redhat/el5/en/i386/rpmforge/RPMS/
Note 2: Depending on your architecture, replace i386 architecture with x86_64.
3. You’re done with this section.
Step 2: Install Zabbex
4. OpenQRM will require Zabbex. The only place I found that has Zabbex RPMs is here:
http://fedoraproject.org/wiki/EPEL/FAQ#howtouse
http://download.fedora.redhat.com/pub/epel/5/i386/epel-release-5-4.noarch.rpm
5. And you can install the repo by:
[root@cluster01 ~]# rpm -Uvhhttp://download.fedora.redhat.com/pub/epel/5/i386/epel-release-5-
4.noarch.rpm
Retrieving http://download.fedora.redhat.com/pub/epel/5/i386/epel-release-
5-4.noarch.rpm
warning: /var/tmp/rpm-xfer.ipE6LL: Header V3 DSA signature: NOKEY, key ID
217521f6
Preparing... ##################################### [100%]
1:epel-release ##################################### [100%]
[root@cluster01 ~]#
Note 1: you can check the latest release from:
http://download.fedora.redhat.com/pub/epel/5/
Note 2: Depending on your architecture, replace i386 architecture with x86_64.
6. You’re done with this section.
Step 3: Install ASH
1. OpenQRM will require ASH to be installed. Unfortunately this package no longer comes with Linux
CentOS-5. You'll have to grab it from CentOS-4 package repository:
http://mirror.nexcess.net/CentOS/4/os/x86_64/CentOS/RPMS/
http://mirror.nexcess.net/CentOS/4/os/i386/CentOS/RPMS/ash-0.3.8-20.el4_7.1.i386.rpm

8/4/2019 44553078 Step by Step Install Guide OpenQRM Data Center Management and Cloud Computing Platform
http://slidepdf.com/reader/full/44553078-step-by-step-install-guide-openqrm-data-center-management-and-cloud 6/32
Global Open Versity, HPC Cloud Labs Install Guide openQRM Data Center Management on CentOS5 v.10
April 2007, Kefa Rabah, Global Open Versity, Vancouver Canada
www.globalopenversity.org HPC 201 – High Performance Computing Virtualization Technology
5
2. Or simply, run:
[root@cluster01 ~]# rpm -Uvh
http://mirror.nexcess.net/CentOS/4/os/i386/CentOS/RPMS/ash-0.3.8-
20.el4_7.1.i386.rpm
Retrieving http://mirror.nexcess.net/CentOS/4/os/i386/CentOS/RPMS/ash-0.3.8-20.el4_7.1.i386.rpm
warning: /var/tmp/rpm-xfer.LRvSW2: Header V3 DSA signature: NOKEY, key ID
443e1821
Preparing... ###################################### [100%]
1:ash ###################################### [100%]
[root@cluster01 ~]#
Note 1: you can check the latest release from:
http://mirror.nexcess.net/CentOS/4/os/
Note 2: Depending on your architecture, replace i386 architecture with x86_64.
3. You’re done with this section.
Part 2: openQRM can be installed using yum.
Step 1; Install openQRM-Server
Note that you will need the openqrm-package-repository enabled for this to work e.g. create
"/etc/yum.repos.d/openQRM.repo" as follows:
1. Install OpenQRM repo. This is where OpenQRM packages will be coming from:
vi /etc/yum.repos.d/openqrm.repo
2. and add the following:
[openqrm]
name = Red Hat Enterprise $releasever – openQRM
baseurl = http://packages.linuxfellaz.net/centos5
enabled = 1protect = 0
gpgcheck=0
3. Save and close.
4. Finally, now that everything is in place, run:
8/4/2019 44553078 Step by Step Install Guide OpenQRM Data Center Management and Cloud Computing Platform
http://slidepdf.com/reader/full/44553078-step-by-step-install-guide-openqrm-data-center-management-and-cloud 7/32
Global Open Versity, HPC Cloud Labs Install Guide openQRM Data Center Management on CentOS5 v.10
April 2007, Kefa Rabah, Global Open Versity, Vancouver Canada
www.globalopenversity.org HPC 201 – High Performance Computing Virtualization Technology
6
yum install openqrm-server
Note: it will install all the required dependencies and execute the configuration script.
4. Login to the server by visiting the following:
https://<ip address>/openqrm/
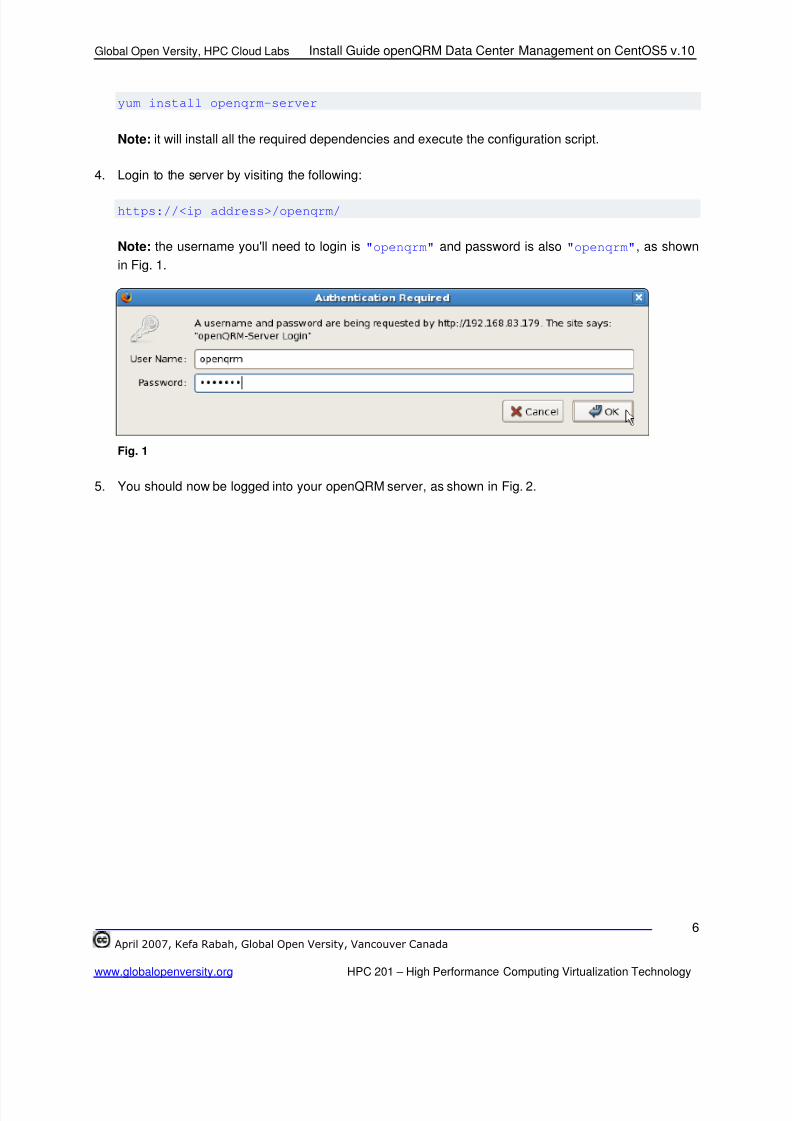
Note: the username you'll need to login is "openqrm" and password is also "openqrm", as shown
in Fig. 1.
Fig. 1
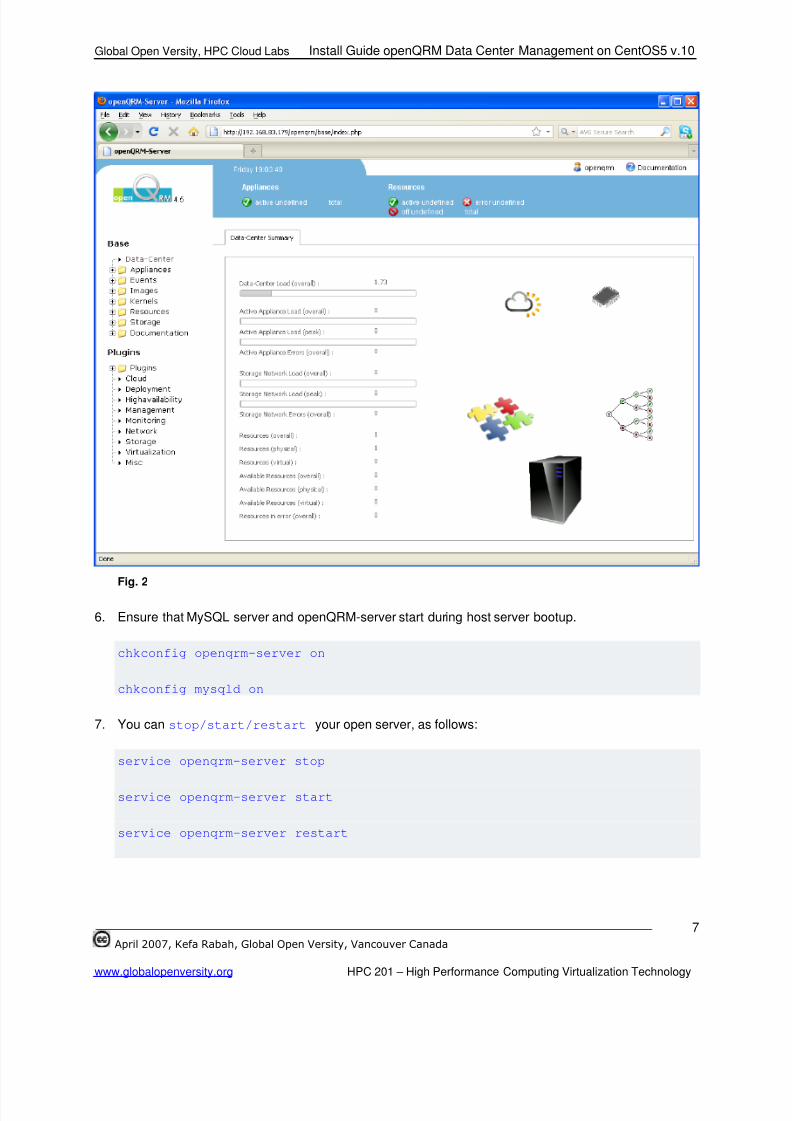
5. You should now be logged into your openQRM server, as shown in Fig. 2.
8/4/2019 44553078 Step by Step Install Guide OpenQRM Data Center Management and Cloud Computing Platform
http://slidepdf.com/reader/full/44553078-step-by-step-install-guide-openqrm-data-center-management-and-cloud 8/32
Global Open Versity, HPC Cloud Labs Install Guide openQRM Data Center Management on CentOS5 v.10
April 2007, Kefa Rabah, Global Open Versity, Vancouver Canada
www.globalopenversity.org HPC 201 – High Performance Computing Virtualization Technology
7
Fig. 2
6. Ensure that MySQL server and openQRM-server start during host server bootup.
chkconfig openqrm-server on
chkconfig mysqld on
7. You can stop/start/restart your open server, as follows:
service openqrm-server stop
service openqrm-server start
service openqrm-server restart
8/4/2019 44553078 Step by Step Install Guide OpenQRM Data Center Management and Cloud Computing Platform
http://slidepdf.com/reader/full/44553078-step-by-step-install-guide-openqrm-data-center-management-and-cloud 9/32
Global Open Versity, HPC Cloud Labs Install Guide openQRM Data Center Management on CentOS5 v.10
April 2007, Kefa Rabah, Global Open Versity, Vancouver Canada
www.globalopenversity.org HPC 201 – High Performance Computing Virtualization Technology
8
Fig. 3
Note: always do ensure that MySQL server is also running:
8. If everything went well up to this point, then you now have a working openQRM setup with no
resources and no virtual environments but at least one boot image
9. You’re done with this section
Step 2: openQRM-Server Layout
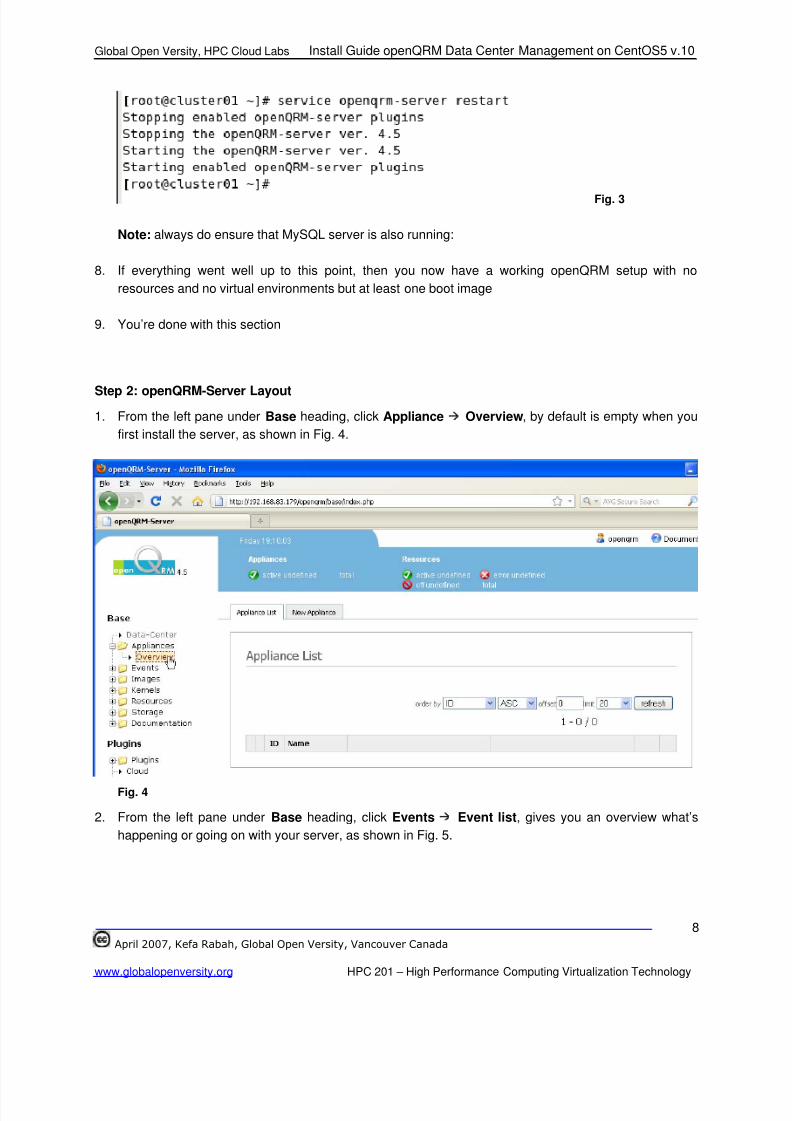
1. From the left pane under Base heading, click Appliance Overview, by default is empty when you
first install the server, as shown in Fig. 4.
Fig. 4
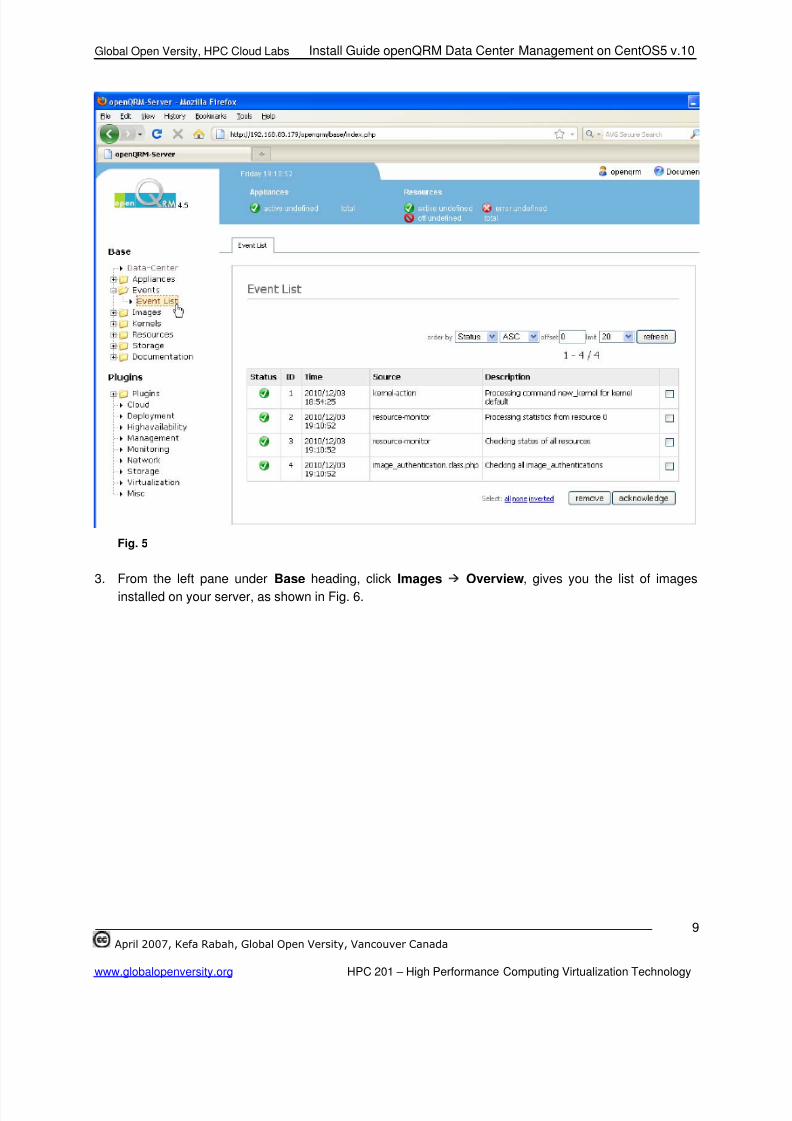
2. From the left pane under Base heading, click Events Event list, gives you an overview what’s
happening or going on with your server, as shown in Fig. 5.
8/4/2019 44553078 Step by Step Install Guide OpenQRM Data Center Management and Cloud Computing Platform
http://slidepdf.com/reader/full/44553078-step-by-step-install-guide-openqrm-data-center-management-and-cloud 10/32
Global Open Versity, HPC Cloud Labs Install Guide openQRM Data Center Management on CentOS5 v.10
April 2007, Kefa Rabah, Global Open Versity, Vancouver Canada
www.globalopenversity.org HPC 201 – High Performance Computing Virtualization Technology
9
Fig. 5
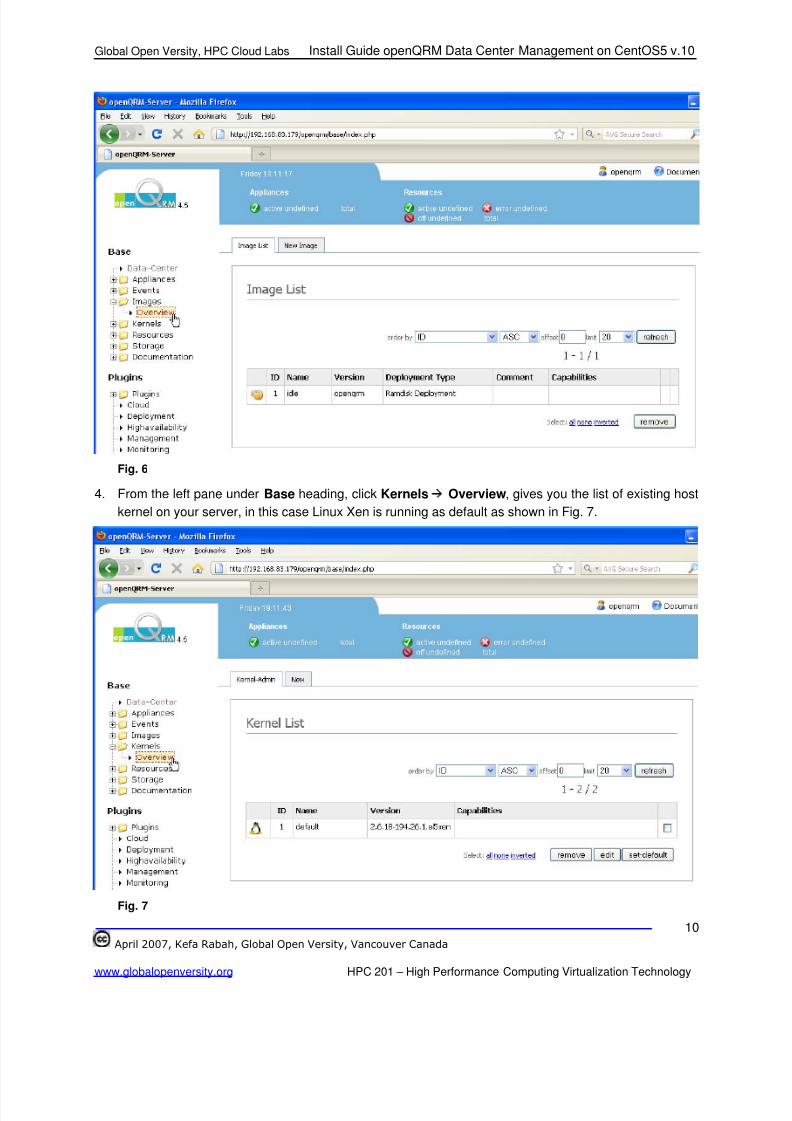
3. From the left pane under Base heading, click Images Overview, gives you the list of images
installed on your server, as shown in Fig. 6.
8/4/2019 44553078 Step by Step Install Guide OpenQRM Data Center Management and Cloud Computing Platform
http://slidepdf.com/reader/full/44553078-step-by-step-install-guide-openqrm-data-center-management-and-cloud 11/32
Global Open Versity, HPC Cloud Labs Install Guide openQRM Data Center Management on CentOS5 v.10
April 2007, Kefa Rabah, Global Open Versity, Vancouver Canada
www.globalopenversity.org HPC 201 – High Performance Computing Virtualization Technology
10
Fig. 6
4. From the left pane under Base heading, click Kernels Overview, gives you the list of existing host
kernel on your server, in this case Linux Xen is running as default as shown in Fig. 7.
Fig. 7
8/4/2019 44553078 Step by Step Install Guide OpenQRM Data Center Management and Cloud Computing Platform
http://slidepdf.com/reader/full/44553078-step-by-step-install-guide-openqrm-data-center-management-and-cloud 12/32
Global Open Versity, HPC Cloud Labs Install Guide openQRM Data Center Management on CentOS5 v.10
April 2007, Kefa Rabah, Global Open Versity, Vancouver Canada
www.globalopenversity.org HPC 201 – High Performance Computing Virtualization Technology
11
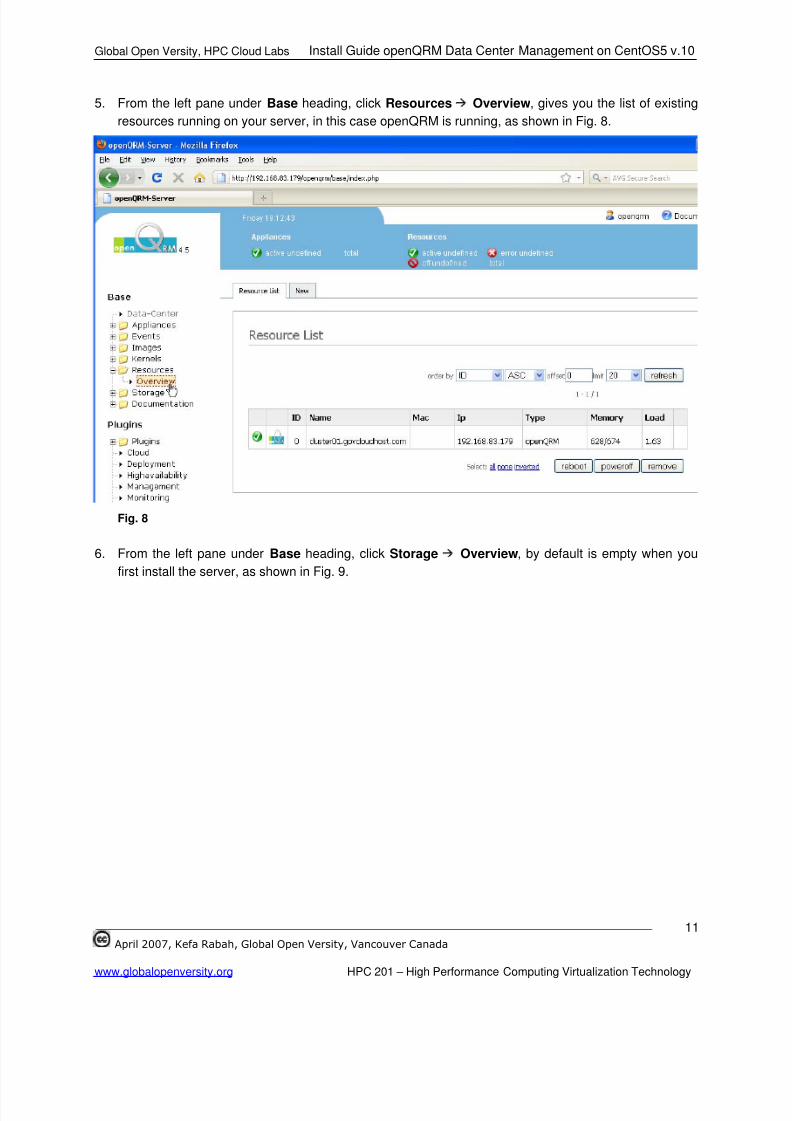
5. From the left pane under Base heading, click Resources Overview, gives you the list of existing
resources running on your server, in this case openQRM is running, as shown in Fig. 8.
Fig. 8
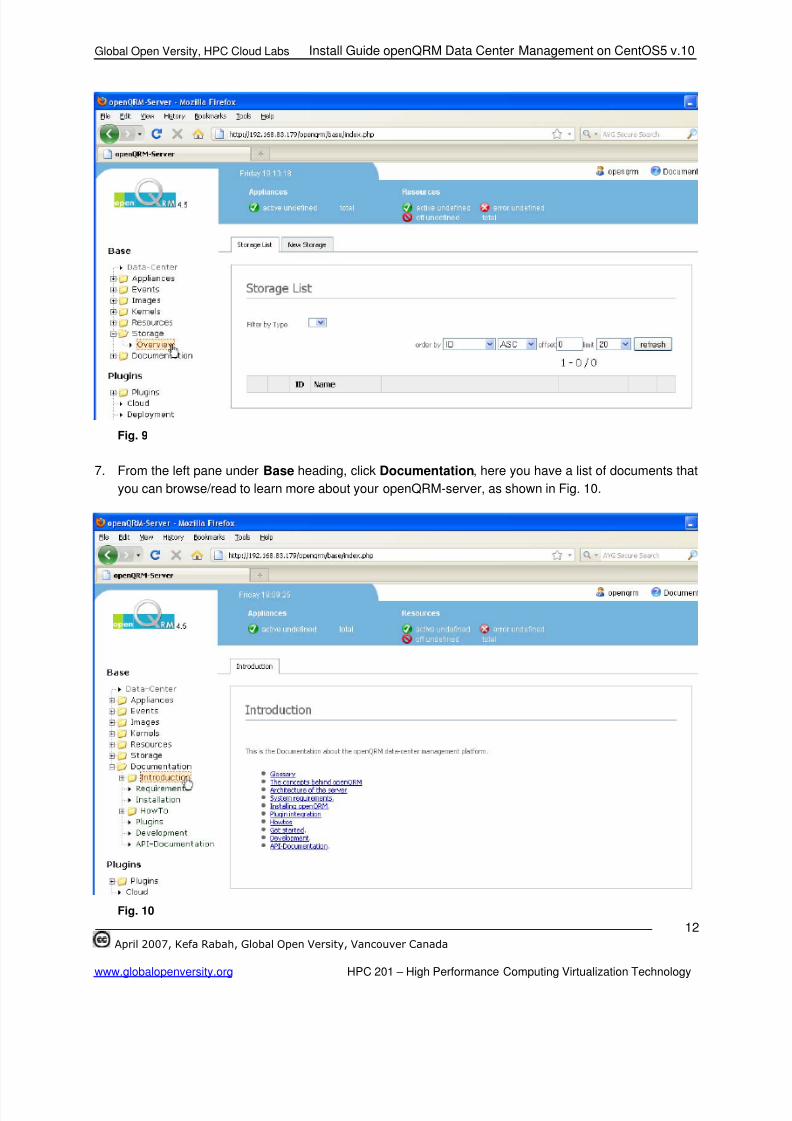
6. From the left pane under Base heading, click Storage Overview, by default is empty when you
first install the server, as shown in Fig. 9.
8/4/2019 44553078 Step by Step Install Guide OpenQRM Data Center Management and Cloud Computing Platform
http://slidepdf.com/reader/full/44553078-step-by-step-install-guide-openqrm-data-center-management-and-cloud 13/32
Global Open Versity, HPC Cloud Labs Install Guide openQRM Data Center Management on CentOS5 v.10
April 2007, Kefa Rabah, Global Open Versity, Vancouver Canada
www.globalopenversity.org HPC 201 – High Performance Computing Virtualization Technology
12
Fig. 9
7. From the left pane under Base heading, click Documentation, here you have a list of documents that
you can browse/read to learn more about your openQRM-server, as shown in Fig. 10.
Fig. 10
8/4/2019 44553078 Step by Step Install Guide OpenQRM Data Center Management and Cloud Computing Platform
http://slidepdf.com/reader/full/44553078-step-by-step-install-guide-openqrm-data-center-management-and-cloud 14/32
Global Open Versity, HPC Cloud Labs Install Guide openQRM Data Center Management on CentOS5 v.10
April 2007, Kefa Rabah, Global Open Versity, Vancouver Canada
www.globalopenversity.org HPC 201 – High Performance Computing Virtualization Technology
13
Step 3: openQRM Plugins Layout
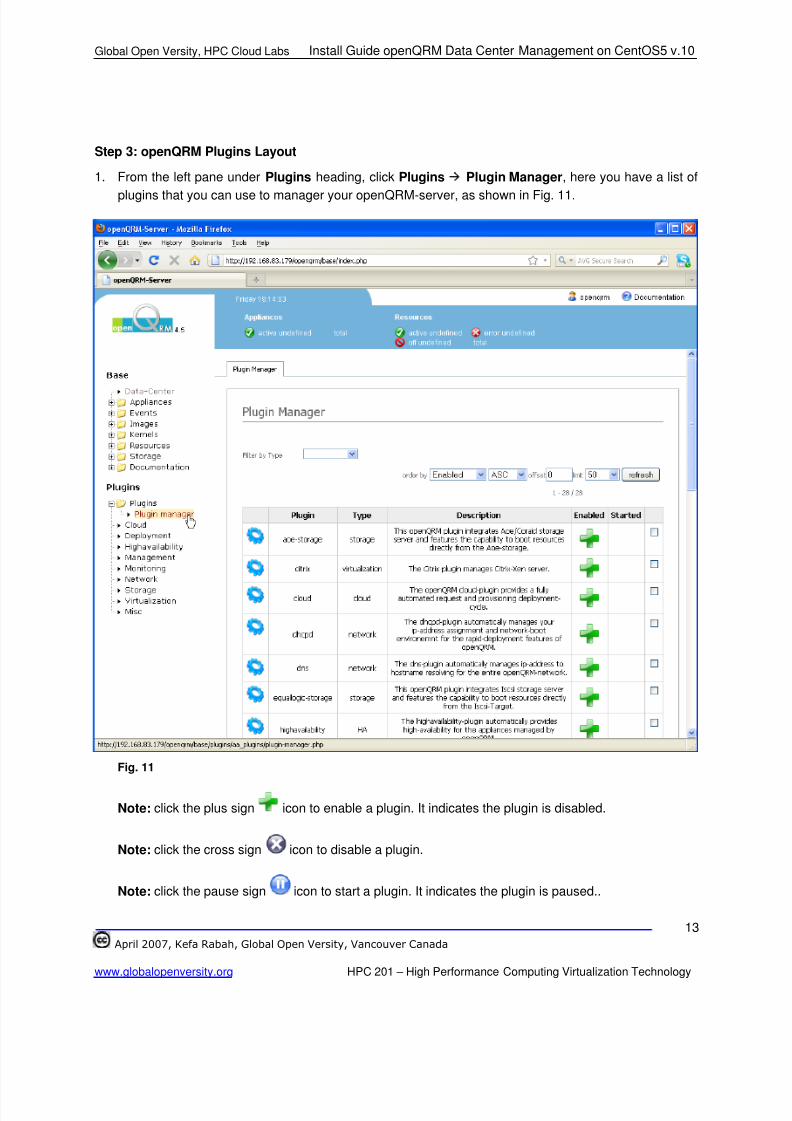
1. From the left pane under Plugins heading, click Plugins Plugin Manager, here you have a list of
plugins that you can use to manager your openQRM-server, as shown in Fig. 11.
Fig. 11
Note: click the plus sign icon to enable a plugin. It indicates the plugin is disabled.
Note: click the cross sign icon to disable a plugin.
Note: click the pause sign icon to start a plugin. It indicates the plugin is paused..
8/4/2019 44553078 Step by Step Install Guide OpenQRM Data Center Management and Cloud Computing Platform
http://slidepdf.com/reader/full/44553078-step-by-step-install-guide-openqrm-data-center-management-and-cloud 15/32
Global Open Versity, HPC Cloud Labs Install Guide openQRM Data Center Management on CentOS5 v.10
April 2007, Kefa Rabah, Global Open Versity, Vancouver Canada
www.globalopenversity.org HPC 201 – High Performance Computing Virtualization Technology
14
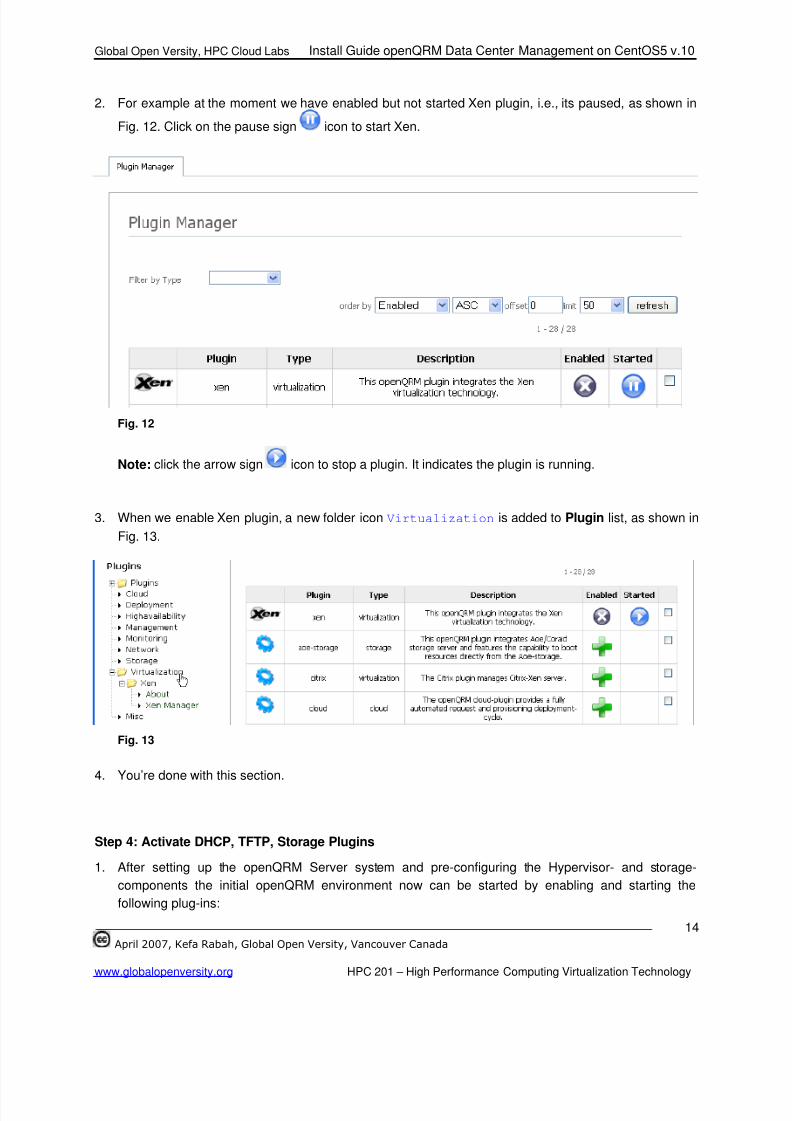
2. For example at the moment we have enabled but not started Xen plugin, i.e., its paused, as shown in
Fig. 12. Click on the pause sign icon to start Xen.
Fig. 12
Note: click the arrow sign icon to stop a plugin. It indicates the plugin is running.
3. When we enable Xen plugin, a new folder icon Virtualization is added to Plugin list, as shown in
Fig. 13.
Fig. 13
4. You’re done with this section.
Step 4: Activate DHCP, TFTP, Storage Plugins
1. After setting up the openQRM Server system and pre-configuring the Hypervisor- and storage-
components the initial openQRM environment now can be started by enabling and starting the
following plug-ins:
8/4/2019 44553078 Step by Step Install Guide OpenQRM Data Center Management and Cloud Computing Platform
http://slidepdf.com/reader/full/44553078-step-by-step-install-guide-openqrm-data-center-management-and-cloud 16/32
Global Open Versity, HPC Cloud Labs Install Guide openQRM Data Center Management on CentOS5 v.10
April 2007, Kefa Rabah, Global Open Versity, Vancouver Canada
www.globalopenversity.org HPC 201 – High Performance Computing Virtualization Technology
15
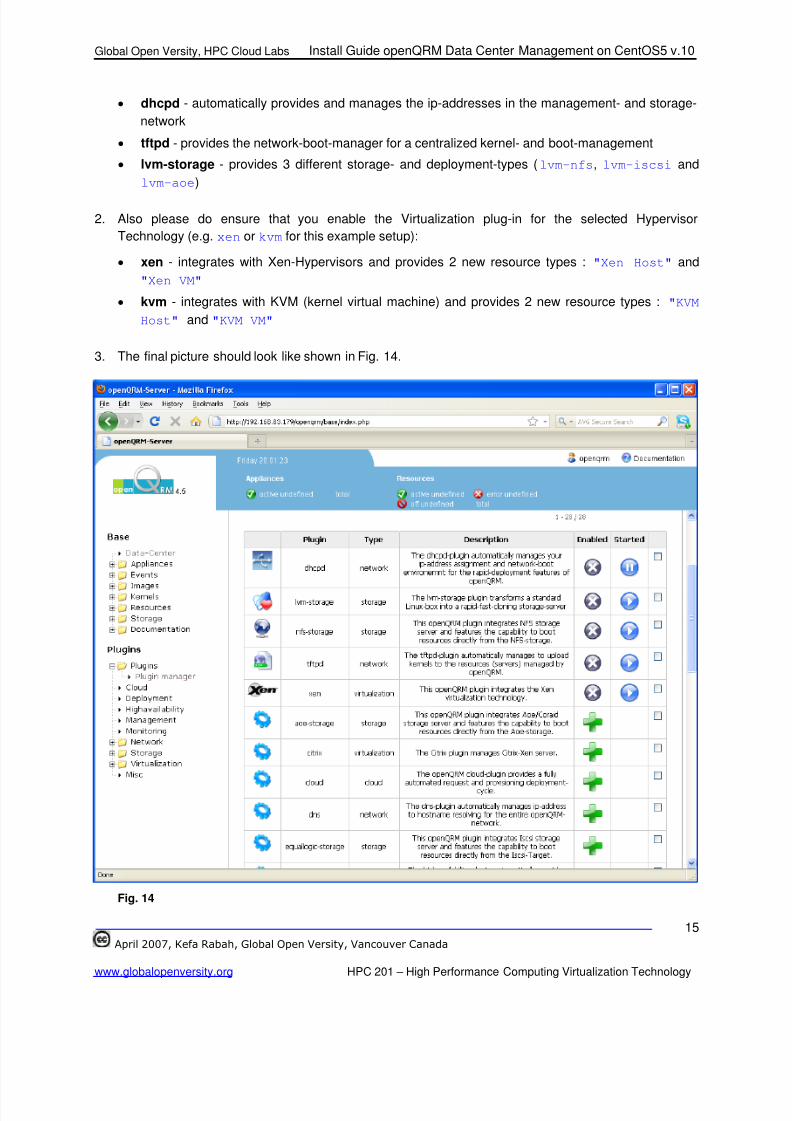
• dhcpd - automatically provides and manages the ip-addresses in the management- and storage-
network
• tftpd - provides the network-boot-manager for a centralized kernel- and boot-management
• lvm-storage - provides 3 different storage- and deployment-types (lvm-nfs, lvm-iscsi and
lvm-aoe)
2. Also please do ensure that you enable the Virtualization plug-in for the selected Hypervisor
Technology (e.g. xen or kvm for this example setup):
• xen - integrates with Xen-Hypervisors and provides 2 new resource types : "Xen Host" and
"Xen VM"
• kvm - integrates with KVM (kernel virtual machine) and provides 2 new resource types : "KVM
Host" and "KVM VM"
3. The final picture should look like shown in Fig. 14.
Fig. 14
8/4/2019 44553078 Step by Step Install Guide OpenQRM Data Center Management and Cloud Computing Platform
http://slidepdf.com/reader/full/44553078-step-by-step-install-guide-openqrm-data-center-management-and-cloud 17/32
Global Open Versity, HPC Cloud Labs Install Guide openQRM Data Center Management on CentOS5 v.10
April 2007, Kefa Rabah, Global Open Versity, Vancouver Canada
www.globalopenversity.org HPC 201 – High Performance Computing Virtualization Technology
16
4. You’re done with this section.
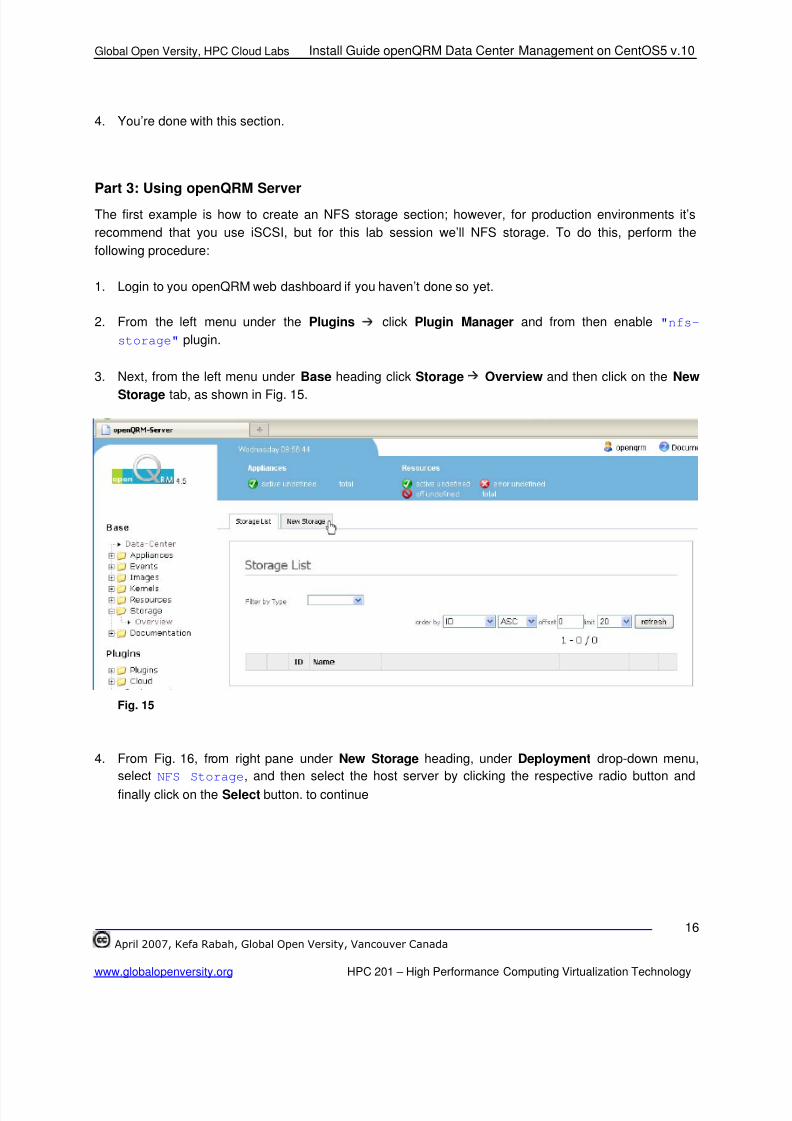
Part 3: Using openQRM Server
The first example is how to create an NFS storage section; however, for production environments it’s
recommend that you use iSCSI, but for this lab session we’ll NFS storage. To do this, perform the
following procedure:
1. Login to you openQRM web dashboard if you haven’t done so yet.
2. From the left menu under the Plugins click Plugin Manager and from then enable "nfs-
storage" plugin.
3. Next, from the left menu under Base heading click Storage Overview and then click on the New
Storage tab, as shown in Fig. 15.
Fig. 15
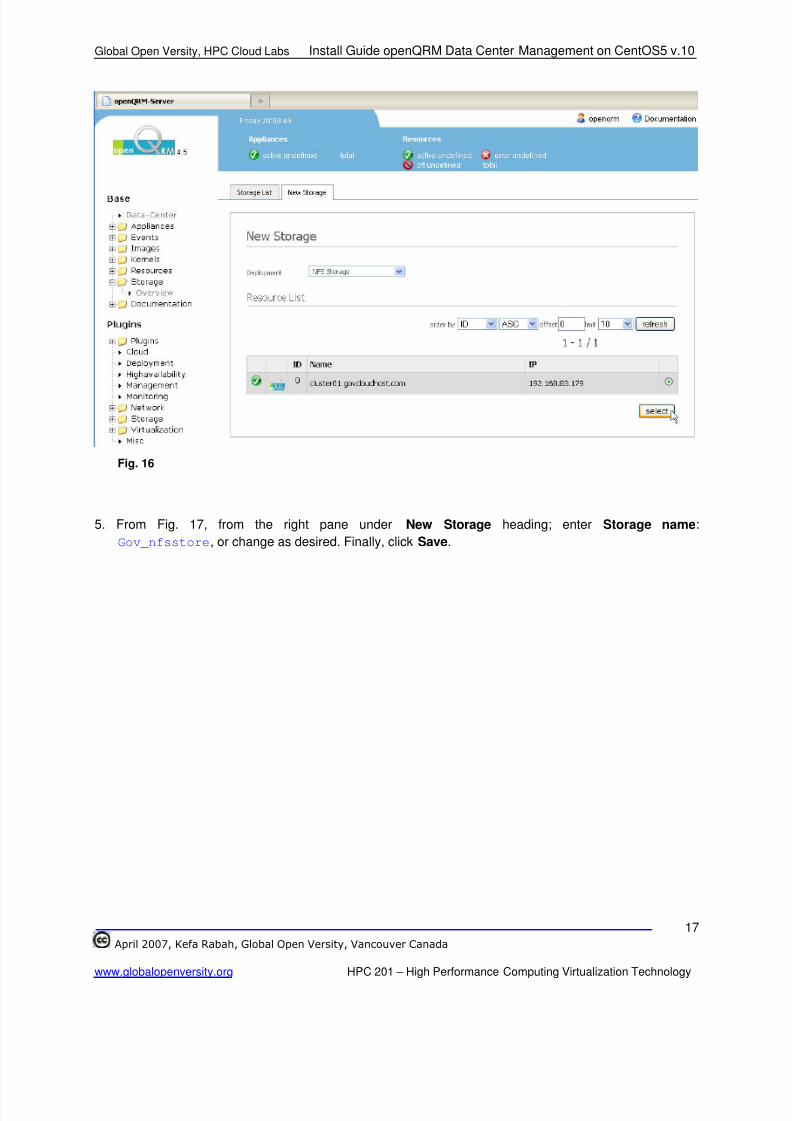
4. From Fig. 16, from right pane under New Storage heading, under Deployment drop-down menu,
select NFS Storage, and then select the host server by clicking the respective radio button and
finally click on the Select button. to continue
8/4/2019 44553078 Step by Step Install Guide OpenQRM Data Center Management and Cloud Computing Platform
http://slidepdf.com/reader/full/44553078-step-by-step-install-guide-openqrm-data-center-management-and-cloud 18/32
Global Open Versity, HPC Cloud Labs Install Guide openQRM Data Center Management on CentOS5 v.10
April 2007, Kefa Rabah, Global Open Versity, Vancouver Canada
www.globalopenversity.org HPC 201 – High Performance Computing Virtualization Technology
17
Fig. 16
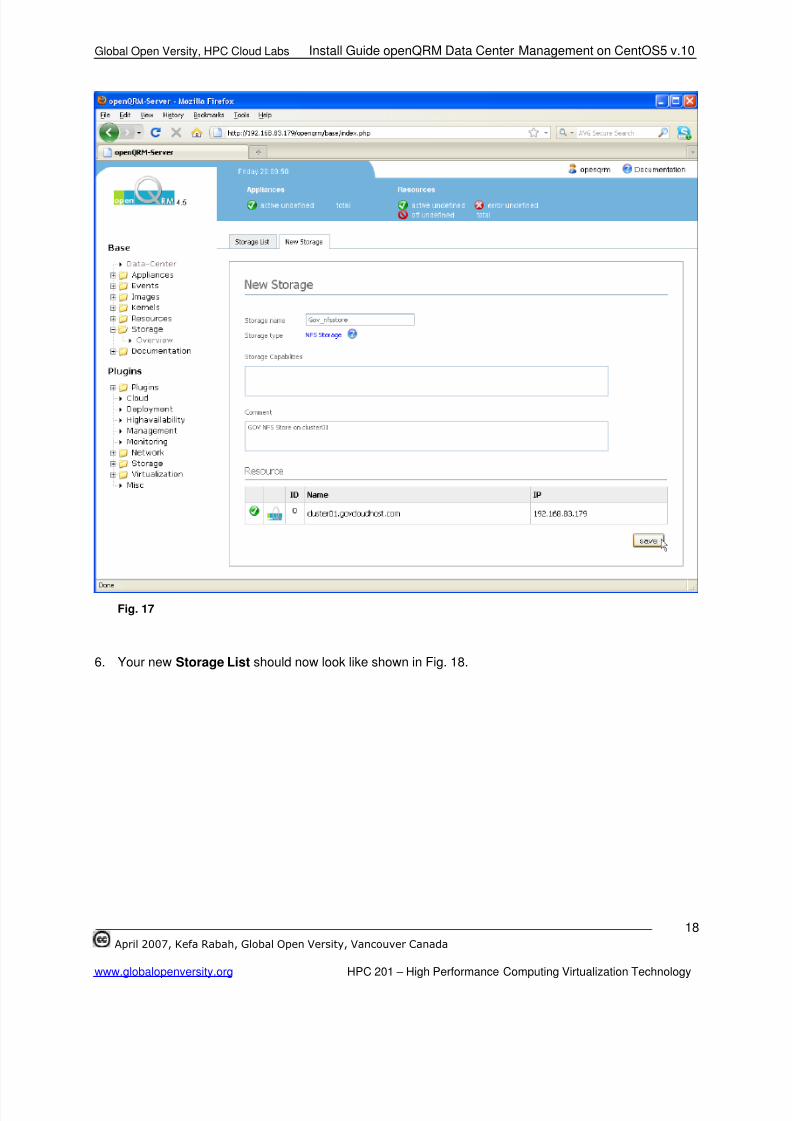
5. From Fig. 17, from the right pane under New Storage heading; enter Storage name:
Gov_nfsstore, or change as desired. Finally, click Save.
8/4/2019 44553078 Step by Step Install Guide OpenQRM Data Center Management and Cloud Computing Platform
http://slidepdf.com/reader/full/44553078-step-by-step-install-guide-openqrm-data-center-management-and-cloud 19/32
Global Open Versity, HPC Cloud Labs Install Guide openQRM Data Center Management on CentOS5 v.10
April 2007, Kefa Rabah, Global Open Versity, Vancouver Canada
www.globalopenversity.org HPC 201 – High Performance Computing Virtualization Technology
18
Fig. 17
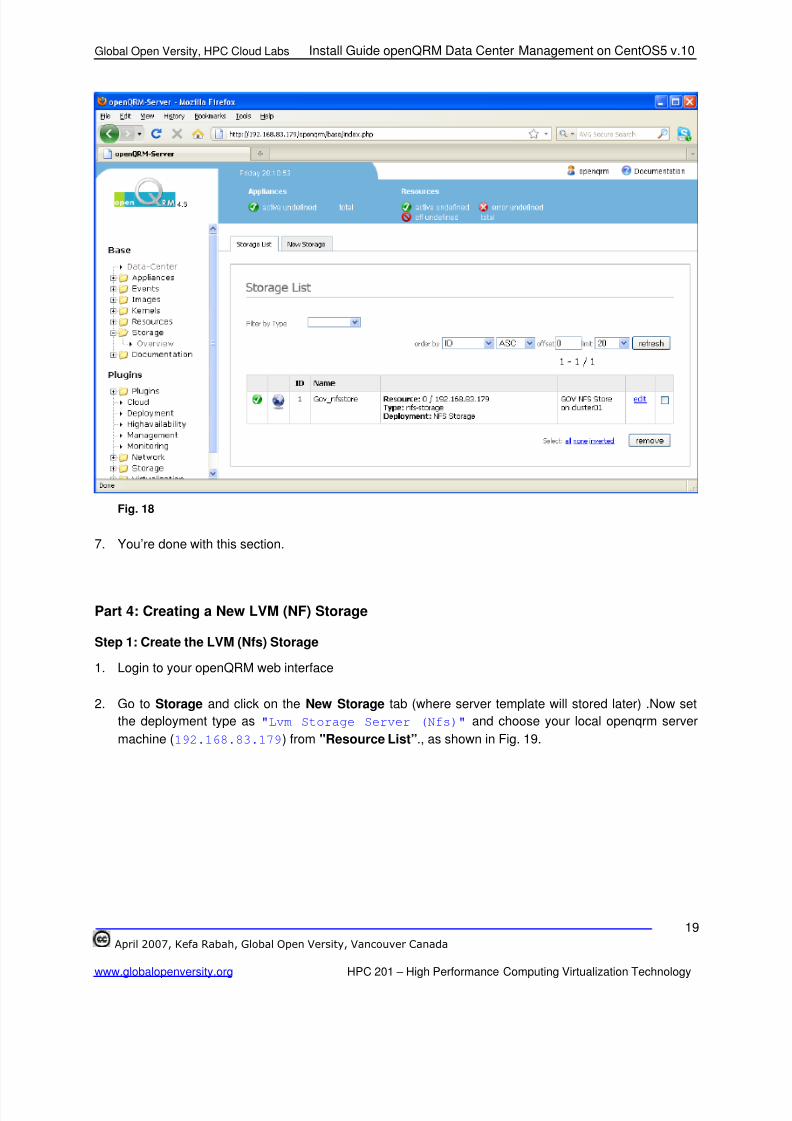
6. Your new Storage List should now look like shown in Fig. 18.
8/4/2019 44553078 Step by Step Install Guide OpenQRM Data Center Management and Cloud Computing Platform
http://slidepdf.com/reader/full/44553078-step-by-step-install-guide-openqrm-data-center-management-and-cloud 20/32
Global Open Versity, HPC Cloud Labs Install Guide openQRM Data Center Management on CentOS5 v.10
April 2007, Kefa Rabah, Global Open Versity, Vancouver Canada
www.globalopenversity.org HPC 201 – High Performance Computing Virtualization Technology
19
Fig. 18
7. You’re done with this section.
Part 4: Creating a New LVM (NF) Storage
Step 1: Create the LVM (Nfs) Storage
1. Login to your openQRM web interface
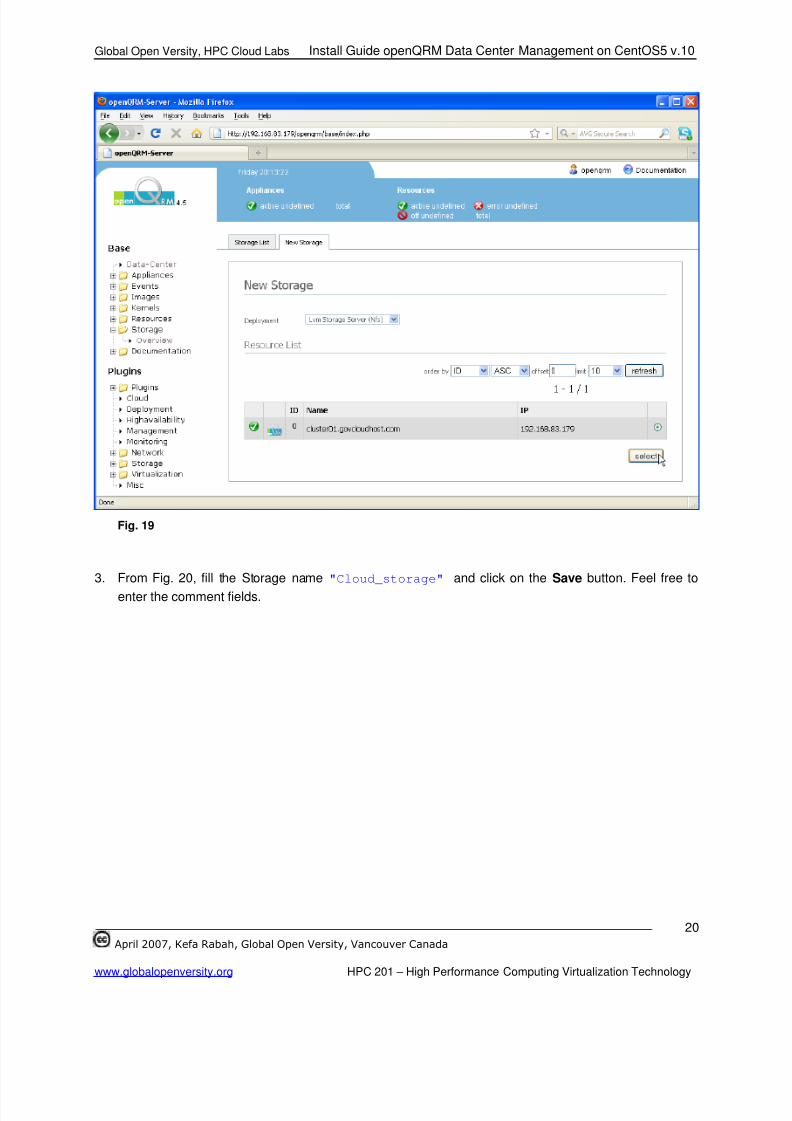
2. Go to Storage and click on the New Storage tab (where server template will stored later) .Now set
the deployment type as "Lvm Storage Server (Nfs)" and choose your local openqrm server
machine (192.168.83.179) from "Resource List”., as shown in Fig. 19.
8/4/2019 44553078 Step by Step Install Guide OpenQRM Data Center Management and Cloud Computing Platform
http://slidepdf.com/reader/full/44553078-step-by-step-install-guide-openqrm-data-center-management-and-cloud 21/32
Global Open Versity, HPC Cloud Labs Install Guide openQRM Data Center Management on CentOS5 v.10
April 2007, Kefa Rabah, Global Open Versity, Vancouver Canada
www.globalopenversity.org HPC 201 – High Performance Computing Virtualization Technology
20
Fig. 19
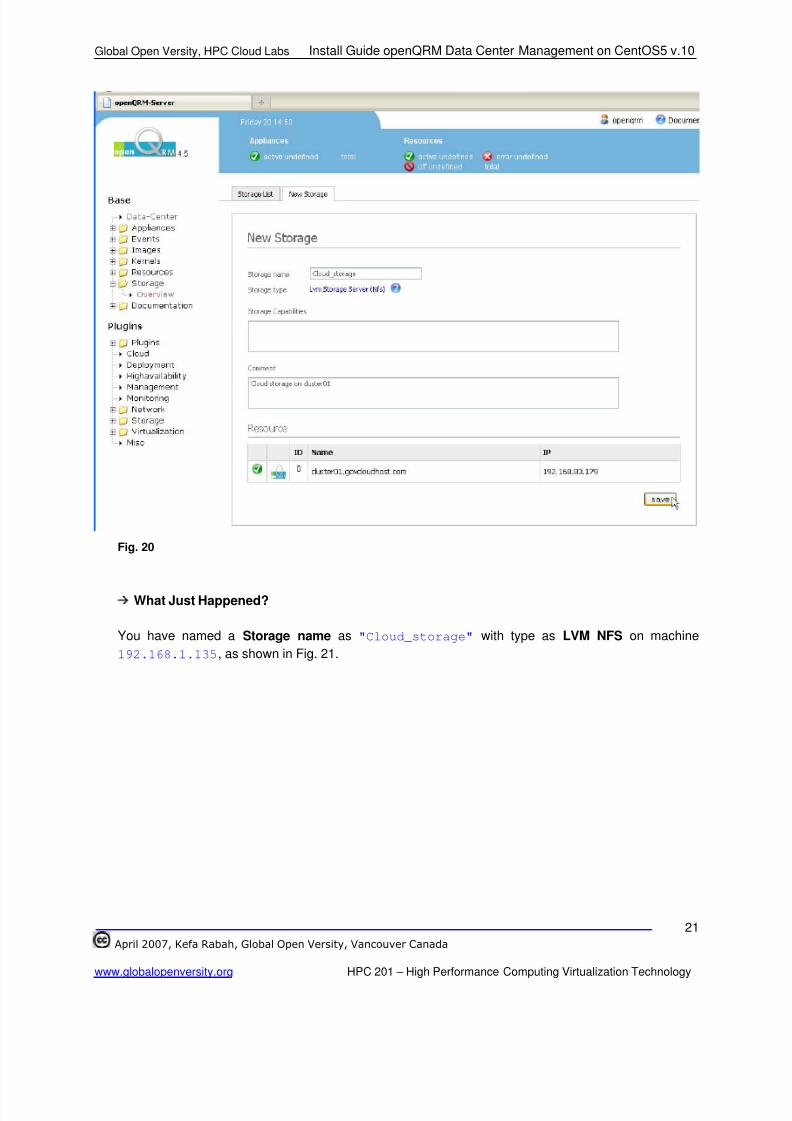
3. From Fig. 20, fill the Storage name "Cloud_storage" and click on the Save button. Feel free to
enter the comment fields.
8/4/2019 44553078 Step by Step Install Guide OpenQRM Data Center Management and Cloud Computing Platform
http://slidepdf.com/reader/full/44553078-step-by-step-install-guide-openqrm-data-center-management-and-cloud 22/32
Global Open Versity, HPC Cloud Labs Install Guide openQRM Data Center Management on CentOS5 v.10
April 2007, Kefa Rabah, Global Open Versity, Vancouver Canada
www.globalopenversity.org HPC 201 – High Performance Computing Virtualization Technology
21
Fig. 20
What Just Happened?
You have named a Storage name as "Cloud_storage" with type as LVM NFS on machine
192.168.1.135, as shown in Fig. 21.
8/4/2019 44553078 Step by Step Install Guide OpenQRM Data Center Management and Cloud Computing Platform
http://slidepdf.com/reader/full/44553078-step-by-step-install-guide-openqrm-data-center-management-and-cloud 23/32
Global Open Versity, HPC Cloud Labs Install Guide openQRM Data Center Management on CentOS5 v.10
April 2007, Kefa Rabah, Global Open Versity, Vancouver Canada
www.globalopenversity.org HPC 201 – High Performance Computing Virtualization Technology
22
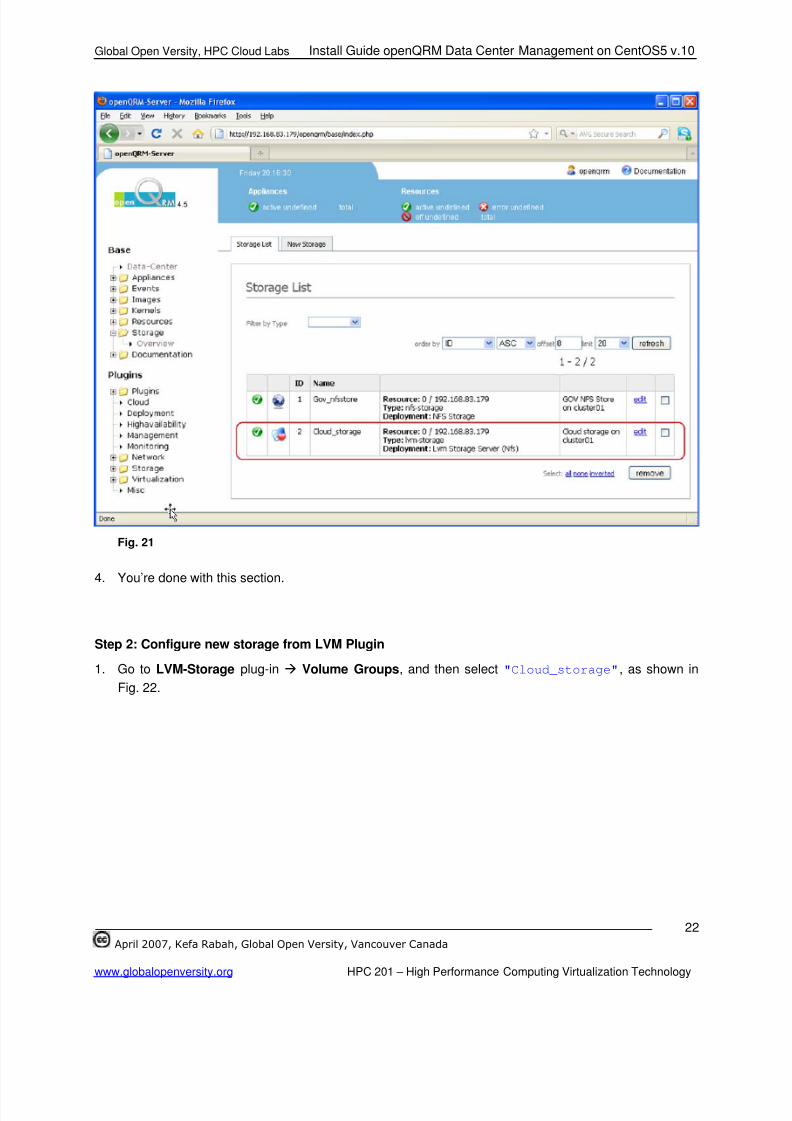
Fig. 21
4. You’re done with this section.
Step 2: Configure new storage from LVM Plugin
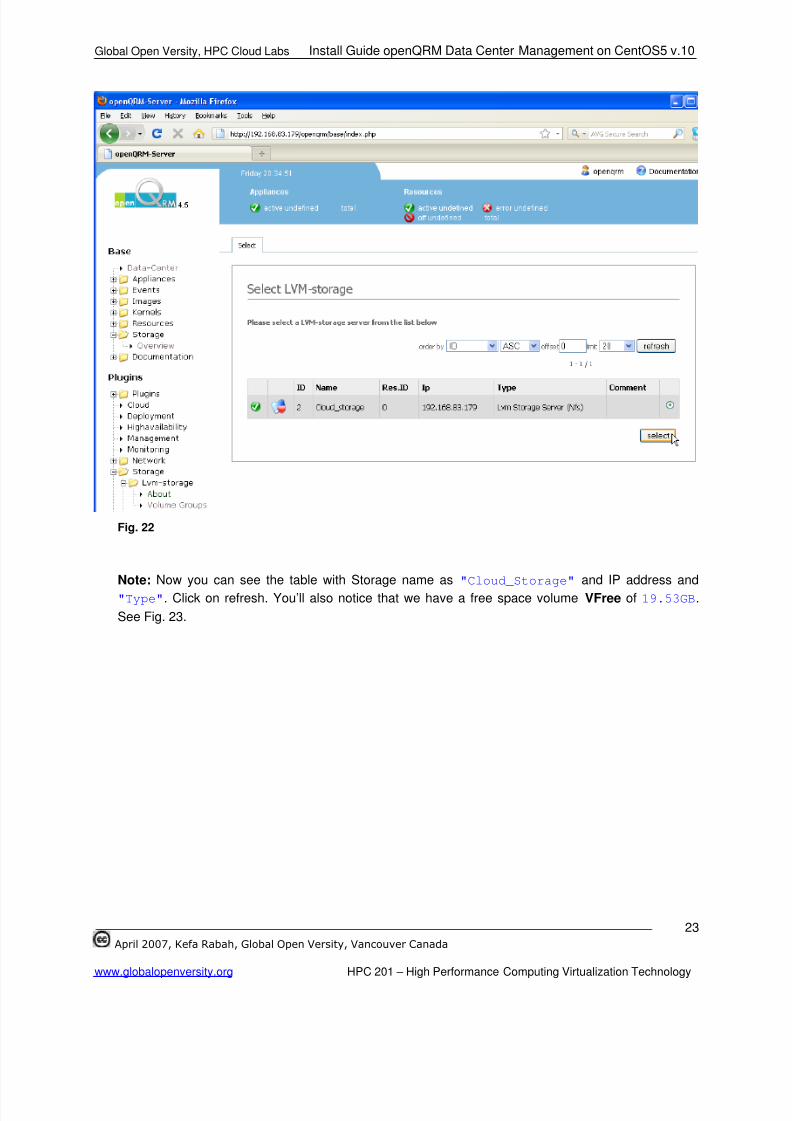
1. Go to LVM-Storage plug-in Volume Groups, and then select "Cloud_storage", as shown in
Fig. 22.
8/4/2019 44553078 Step by Step Install Guide OpenQRM Data Center Management and Cloud Computing Platform
http://slidepdf.com/reader/full/44553078-step-by-step-install-guide-openqrm-data-center-management-and-cloud 24/32
Global Open Versity, HPC Cloud Labs Install Guide openQRM Data Center Management on CentOS5 v.10
April 2007, Kefa Rabah, Global Open Versity, Vancouver Canada
www.globalopenversity.org HPC 201 – High Performance Computing Virtualization Technology
23
Fig. 22
Note: Now you can see the table with Storage name as "Cloud_Storage" and IP address and
"Type". Click on refresh. You’ll also notice that we have a free space volume VFree of 19.53GB.
See Fig. 23.
8/4/2019 44553078 Step by Step Install Guide OpenQRM Data Center Management and Cloud Computing Platform
http://slidepdf.com/reader/full/44553078-step-by-step-install-guide-openqrm-data-center-management-and-cloud 25/32
Global Open Versity, HPC Cloud Labs Install Guide openQRM Data Center Management on CentOS5 v.10
April 2007, Kefa Rabah, Global Open Versity, Vancouver Canada
www.globalopenversity.org HPC 201 – High Performance Computing Virtualization Technology
24
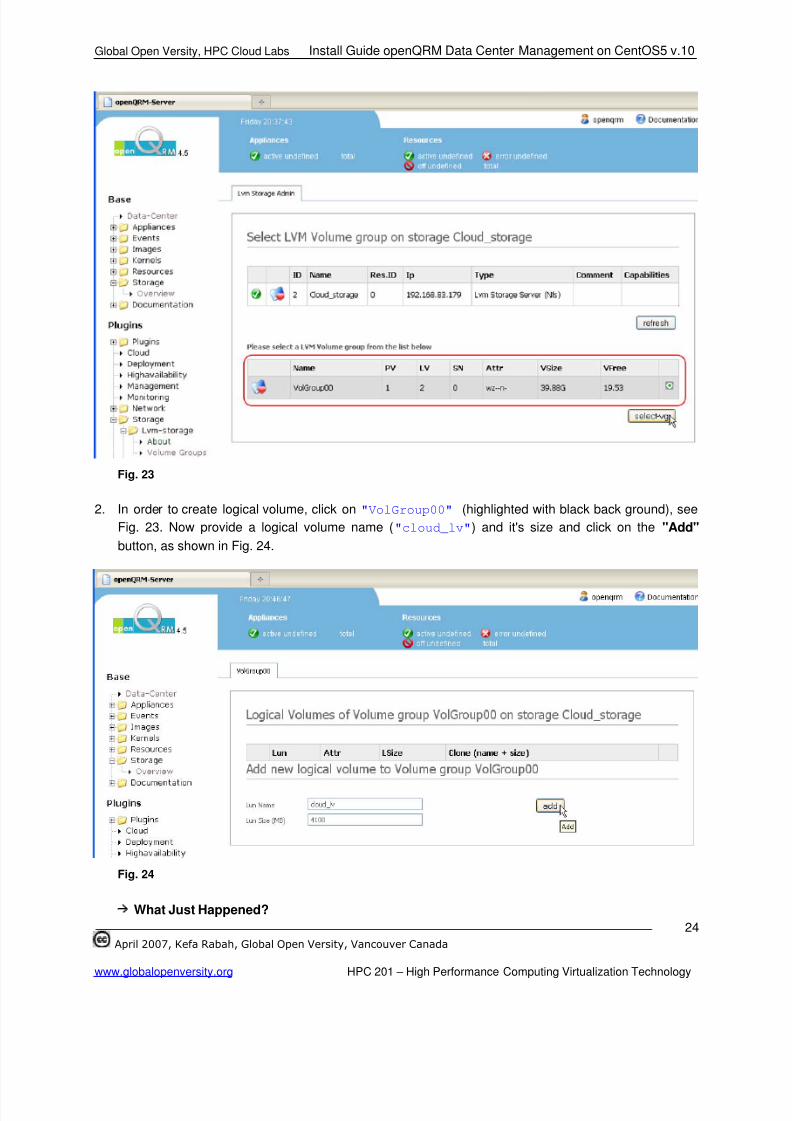
Fig. 23
2. In order to create logical volume, click on "VolGroup00" (highlighted with black back ground), see
Fig. 23. Now provide a logical volume name ("cloud_lv") and it's size and click on the "Add"
button, as shown in Fig. 24.
Fig. 24
What Just Happened?
8/4/2019 44553078 Step by Step Install Guide OpenQRM Data Center Management and Cloud Computing Platform
http://slidepdf.com/reader/full/44553078-step-by-step-install-guide-openqrm-data-center-management-and-cloud 26/32
Global Open Versity, HPC Cloud Labs Install Guide openQRM Data Center Management on CentOS5 v.10
April 2007, Kefa Rabah, Global Open Versity, Vancouver Canada
www.globalopenversity.org HPC 201 – High Performance Computing Virtualization Technology
25
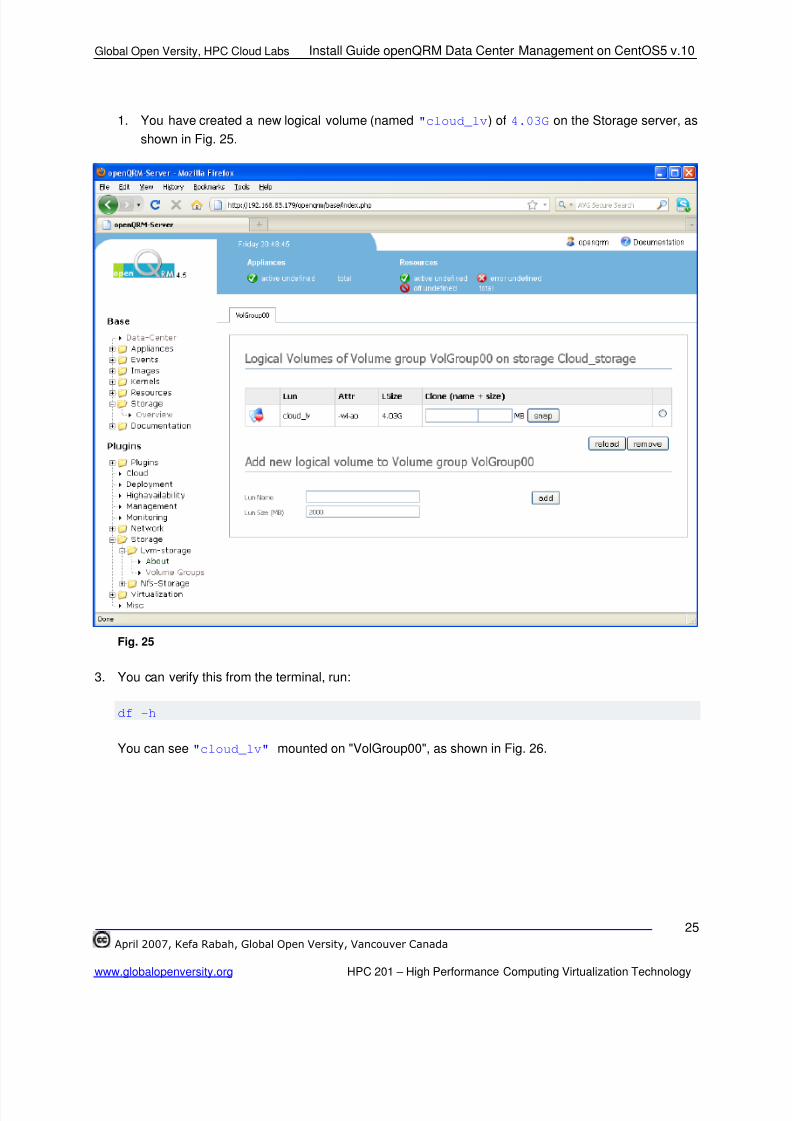
1. You have created a new logical volume (named "cloud_lv) of 4.03G on the Storage server, as
shown in Fig. 25.
Fig. 25
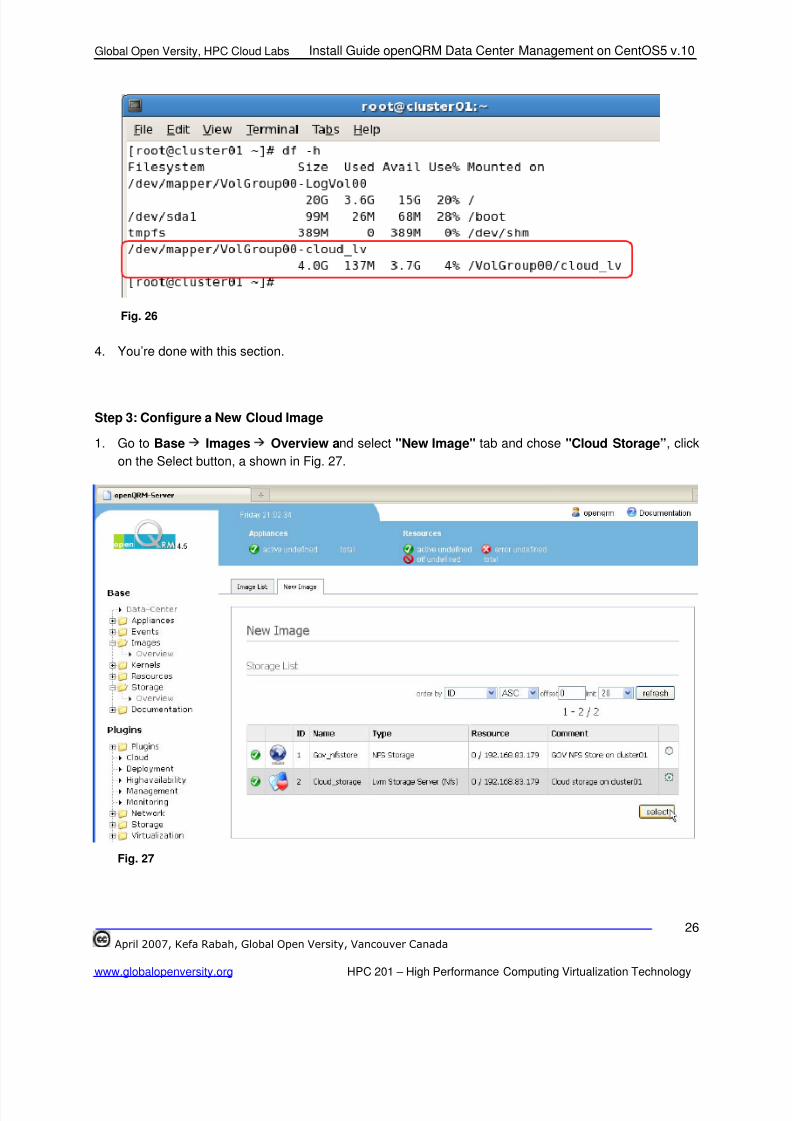
3. You can verify this from the terminal, run:
df -h
You can see "cloud_lv" mounted on "VolGroup00", as shown in Fig. 26.
8/4/2019 44553078 Step by Step Install Guide OpenQRM Data Center Management and Cloud Computing Platform
http://slidepdf.com/reader/full/44553078-step-by-step-install-guide-openqrm-data-center-management-and-cloud 27/32
Global Open Versity, HPC Cloud Labs Install Guide openQRM Data Center Management on CentOS5 v.10
April 2007, Kefa Rabah, Global Open Versity, Vancouver Canada
www.globalopenversity.org HPC 201 – High Performance Computing Virtualization Technology
26
Fig. 26
4. You’re done with this section.
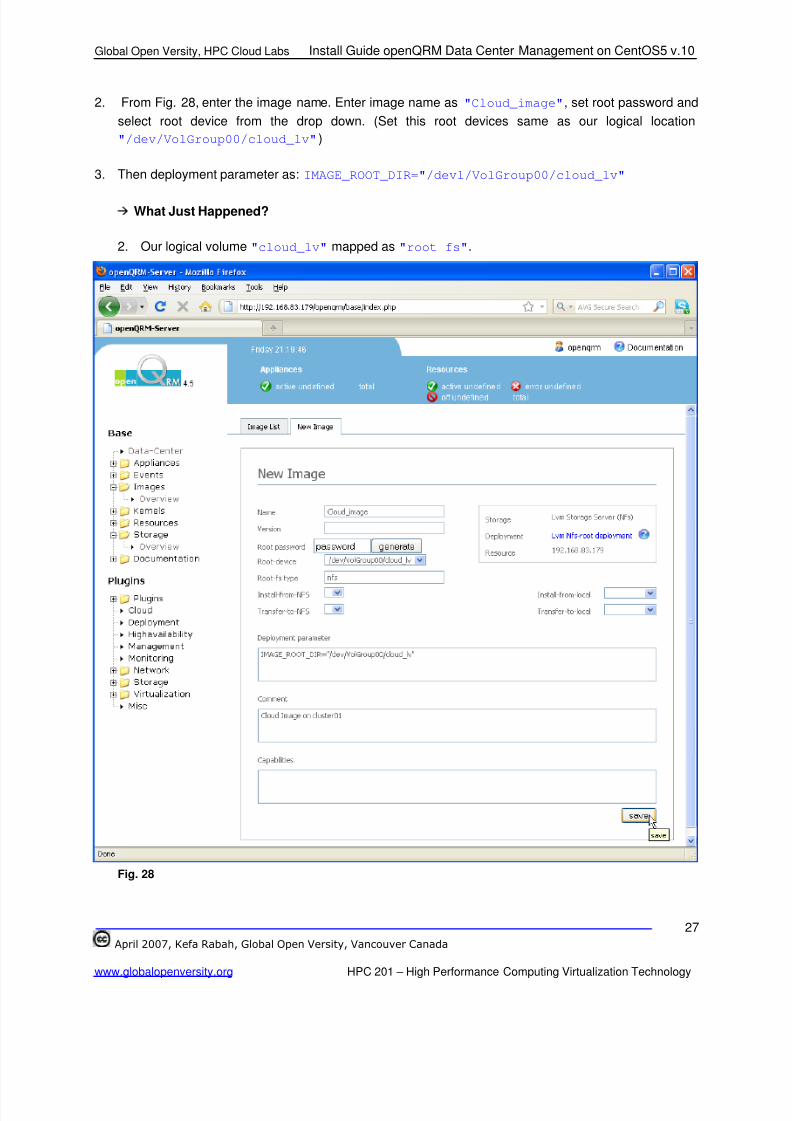
Step 3: Configure a New Cloud Image
1. Go to Base Images Overview and select "New Image" tab and chose "Cloud Storage”, click
on the Select button, a shown in Fig. 27.
Fig. 27
8/4/2019 44553078 Step by Step Install Guide OpenQRM Data Center Management and Cloud Computing Platform
http://slidepdf.com/reader/full/44553078-step-by-step-install-guide-openqrm-data-center-management-and-cloud 28/32
Global Open Versity, HPC Cloud Labs Install Guide openQRM Data Center Management on CentOS5 v.10
April 2007, Kefa Rabah, Global Open Versity, Vancouver Canada
www.globalopenversity.org HPC 201 – High Performance Computing Virtualization Technology
27
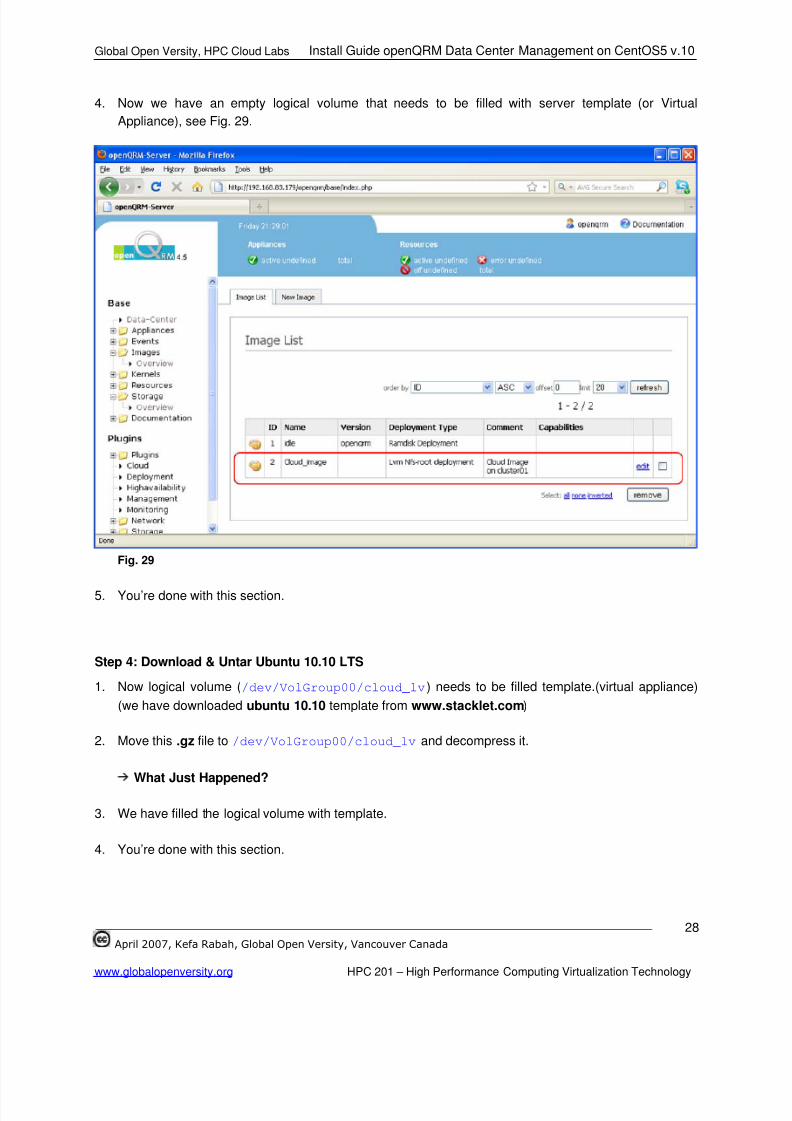
2. From Fig. 28, enter the image name. Enter image name as "Cloud_image", set root password and
select root device from the drop down. (Set this root devices same as our logical location
"/dev/VolGroup00/cloud_lv")
3. Then deployment parameter as: IMAGE_ROOT_DIR="/devl/VolGroup00/cloud_lv"
What Just Happened?
2. Our logical volume "cloud_lv" mapped as "root fs".
Fig. 28
8/4/2019 44553078 Step by Step Install Guide OpenQRM Data Center Management and Cloud Computing Platform
http://slidepdf.com/reader/full/44553078-step-by-step-install-guide-openqrm-data-center-management-and-cloud 29/32
Global Open Versity, HPC Cloud Labs Install Guide openQRM Data Center Management on CentOS5 v.10
April 2007, Kefa Rabah, Global Open Versity, Vancouver Canada
www.globalopenversity.org HPC 201 – High Performance Computing Virtualization Technology
28
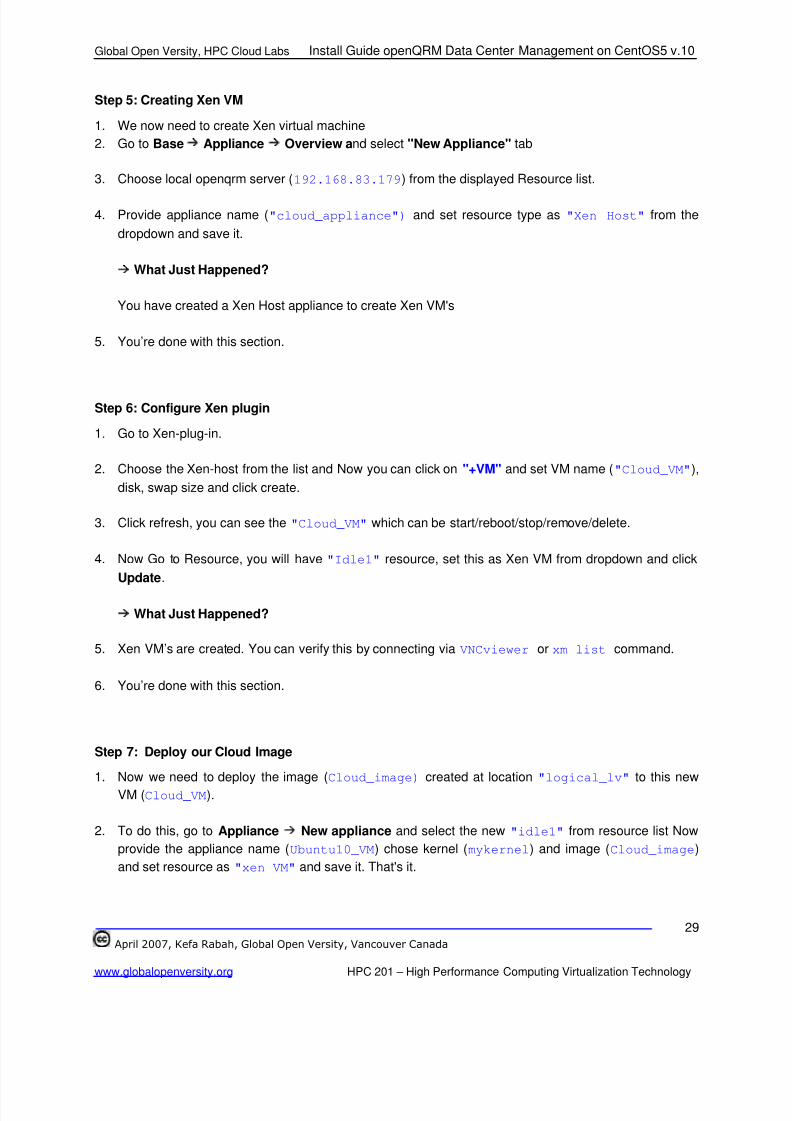
4. Now we have an empty logical volume that needs to be filled with server template (or Virtual
Appliance), see Fig. 29.
Fig. 29
5. You’re done with this section.
Step 4: Download & Untar Ubuntu 10.10 LTS
1. Now logical volume (/dev/VolGroup00/cloud_lv) needs to be filled template.(virtual appliance)
(we have downloaded ubuntu 10.10 template from www.stacklet.com)
2. Move this .gz file to /dev/VolGroup00/cloud_lv and decompress it.
What Just Happened?
3. We have filled the logical volume with template.
4. You’re done with this section.
8/4/2019 44553078 Step by Step Install Guide OpenQRM Data Center Management and Cloud Computing Platform
http://slidepdf.com/reader/full/44553078-step-by-step-install-guide-openqrm-data-center-management-and-cloud 30/32
Global Open Versity, HPC Cloud Labs Install Guide openQRM Data Center Management on CentOS5 v.10
April 2007, Kefa Rabah, Global Open Versity, Vancouver Canada
www.globalopenversity.org HPC 201 – High Performance Computing Virtualization Technology
29
Step 5: Creating Xen VM
1. We now need to create Xen virtual machine
2. Go to Base Appliance Overview and select "New Appliance" tab
3. Choose local openqrm server (192.168.83.179) from the displayed Resource list.
4. Provide appliance name ("cloud_appliance") and set resource type as "Xen Host" from the
dropdown and save it.
What Just Happened?
You have created a Xen Host appliance to create Xen VM's
5. You’re done with this section.
Step 6: Configure Xen plugin
1. Go to Xen-plug-in.
2. Choose the Xen-host from the list and Now you can click on "+VM" and set VM name ("Cloud_VM"),
disk, swap size and click create.
3. Click refresh, you can see the "Cloud_VM" which can be start/reboot/stop/remove/delete.
4. Now Go to Resource, you will have "Idle1" resource, set this as Xen VM from dropdown and click
Update.
What Just Happened?
5. Xen VM’s are created. You can verify this by connecting via VNCviewer or xm list command.
6. You’re done with this section.
Step 7: Deploy our Cloud Image
1. Now we need to deploy the image (Cloud_image) created at location "logical_lv" to this new
VM (Cloud_VM).
2. To do this, go to Appliance New appliance and select the new "idle1" from resource list Now
provide the appliance name (Ubuntu10_VM) chose kernel (mykernel) and image (Cloud_image)
and set resource as "xen VM" and save it. That's it.
8/4/2019 44553078 Step by Step Install Guide OpenQRM Data Center Management and Cloud Computing Platform
http://slidepdf.com/reader/full/44553078-step-by-step-install-guide-openqrm-data-center-management-and-cloud 31/32
Global Open Versity, HPC Cloud Labs Install Guide openQRM Data Center Management on CentOS5 v.10
April 2007, Kefa Rabah, Global Open Versity, Vancouver Canada
www.globalopenversity.org HPC 201 – High Performance Computing Virtualization Technology
30
3. Now go to "Resources", you can see new resource with its new IP address (xx.xx.xx.xx) of
Ubuntu10_VM.
4. Next, go to SSH-terminal plugin, you can login via, available terminal for new Ubuntu10_VM.
5. You’re done with this section.
6. Take a break – will continue later
Part 5: Need More Training on Linux:
Are you having trouble understanding or comprehending the working of Linux OS, if so, then check out
some of our introductory courses on Linux at: Global Technology Solutions Institute, Vancouver Canada.
Eucalyptus Cloud Training:
You can now register and take our superb Eucalyptus Cloud computing training course:
• HPC303 - Build and Running Private Eucalyptus Cloud Systems
Call us today:
Email: [email protected] .URL: www.gtechsi.org
Part 6: Hands-on Labs Assignments
1. Create bundle and upload CentOS 5 images and use it as your web server
2. Create bundle and upload 5 Ubuntu 10.04 LTS Server images and deploy LAMP, MySQL,
PostgreSQL, Apache Tomcat6 on it.
Other Related Articles & Hands-on Lab Manuals:
1. Build Private Clouds With Ubuntu 10.10 LTS Enterprise Cloud Platform
2. Step-By-Step Install Guide eyeOS Cloud Computing Operating System
3. Build your Own Private Cloud using Ubuntu 10.04 Eucalyptus Enterprise Cloud Computing
Platform
4. Build & Deploy a Private Cloud Using OpenNebula Cloud Computing v1.0
5. Using Webmin and Bind9 to Setup DNS Server on Linux
6. Using Samba 3 Client Technology and Kerberos for Win2k8 AD-based identity management
7. Step-By-Step Build and Deploy Xen Hypervisor Virtualization on Linux OpenSUSE 11.3 Server
8. Build and Deploy Enterprise sipXecs Integration with Openfire
9. Step-By-Step Install Guide Openfire Jabber Server on Linux v1.0
10. Build your own ISP Hosting using EHCP on Ubuntu 10.04 LTS Server
8/4/2019 44553078 Step by Step Install Guide OpenQRM Data Center Management and Cloud Computing Platform
http://slidepdf.com/reader/full/44553078-step-by-step-install-guide-openqrm-data-center-management-and-cloud 32/32
Global Open Versity, HPC Cloud Labs Install Guide openQRM Data Center Management on CentOS5 v.10
11. Step-By-Step Install Guide DTC on Linux CentOS5 Server v1.0
12. Install Guide Secure mail with Dovecot & Roundcube Webmail v1.0Send
13. Build your Own Private Data Center Backup Solutions using Ubuntu Powered RESTORE Backup
Server v1.0
14. Install Guide IPCop Firewall for Network Security with Spam and Virus Protection
15. Install & Setup Astaro Security Gateway to Protect Corporate Network v1.1
-----------------------------------------------Kefa Rabah is the Founder of Global Technology Solutions Institute. Kefa is knowledgeable in severalfields of Science & Technology, Information Security Compliance and Project Management, andRenewable Energy Systems. He is also the founder of Global Open Versity, a place to enhance youreducating and career goals using the latest innovations and technologies.
Fellow us on Twitter: Global Open Versity and Kefa Rabah
A GTSI Open Access Technical Academic PublicationsDelivering Cutting-edge Technology at your Fingertips in the 21st Century